

Page 1
WARNING:
CHOKING HAZARD
— Small parts.
Not for children under 3 years.
Page 2

About this Instruction Manual
Please read the safety instructions and the operating instructions carefully before
use. Keep these instructions for renewed use at a later date. When the device is
sold or given to someone else, the instruction manual must be provided to the new
owner/user of the product.
Read these safety instructions before using your device and store them for possible
future reference.
• Never settle the camera under direct sunlight, nor to direct the lens toward the sun.
Otherwise, the image sensor may be damaged.
• It is required to take care of the camera and prevent water or sand from dropping into it
when using the camera at a sandy beach or near water. The water, sand drop, dust or
salty component may damage the camera.
• Please put the camera far from the dust and chemical subject, and it is required to
put it in a cool, dry and well ventilated location. Never deposit it in a location of high
temperature, humidity or dust to prevent failure.
• It is required to operate camera regularly during long time storage. Please check
whether the camera operates normally or not before using the camera again.
• If dirt or stain is accumulated on the camera or lens, it is required to use a piece of
soft, clean and dry cloth to wipe it out lightly. If the camera or lens is stained with sand
grain, it is available to blow it away lightly. Never use cloth to wipe. Otherwise, it may
scrape the camera or lens surface.
• If it is required to clean the lens surface, blow away firstly the sand dust accumulated
on the surface, and then use dish cloth or paper towel suitable for the optical
equipment to wipe the lens lightly. If there is such requirement, please use the lens
cleaning compound. Never use organic solvent to clean the camera.
• Never touch the lens surface with finger.
• If it is the first time to use a memory card in the digital camera, please carry on
information backup for the card first. Then format the memory card once at the digital
camera.
2
Page 3

Battery, Charger, and Other Accessories
• If the charging cord is damaged, have it repaired by the manufacturer, its service or a
similarly qualified person in order to avoid any hazard.
• The power supply must be replaced by a new one in case of malfunction, because this
power supply is not repairable.
• The charging cord is not intended for use by persons (including children) with reduced
physical, sensory or mental capacity. Persons who have not read the manual,
unless they have received explanations by a person responsible for their safety and
supervision should not use this unit.
• Children should be monitored to ensure that they do not play with the charger.
• The charging cord should always be readily accessible.
• The device should not be exposed to dripping or splashing water.
• No objects filled with liquids such as vases shall be placed on the device.
• Always leave a minimum distance of 10 cm around the unit to ensure sufficient
ventilation.
• Open flame sources, such as candles, should not be placed on top of the device.
• The device is intended for use only in a temperate climate.
• CAUTION: Danger of explosion if battery is incorrectly replaced or not replaced by the
same type or equivalent.
• The battery should not be exposed to excessive heat such as sunshine, fire or similar.
• Different types of batteries, new and used batteries should not be mixed.
• The battery must be installed according to the polarity.
• If the battery is worn, it must be removed from the product.
• The battery must be disposed of safely. Always use the collection bins provided (check
with your dealer) to protect the environment.
3
Page 4

Intended Use
This product is intended only for private use. It was developed as an electronic medium
for the use of multimedia services.
General Warnings
• Risk of choking — Keep packaging material, like plastic bags and rubber bands, out of
the reach of children, as these materials pose a choking hazard. This product contains
small parts that could be swallowed by children.
• Leaking battery acid can lead to chemical burns. Avoid contact of battery acid with
skin, eyes and mucous membranes. In the event of contact, rinse the affected region
immediately with a plenty of water and seek medical attention.
• Risk of electric shock — Never bend, pinch or pull the power and connecting cables,
extensions and adapters. Protect the cables from sharp edges and heat. Before
operating, check the device, cables and connections for damage. Never use a damaged
unit or a unit with damaged power cables. Damaged parts must be exchanged
immediately by an authorised service centre.
• Risk of property damage! — Do not disassemble the device. In the event of a defect,
please contact your dealer. The dealer will contact the Service Center and can send the
device in to be repaired, if necessary.
• Do not expose the device to high temperatures. Use only the supplied power adapter.
Do not short-circuit the device or throw them into a fire. Excessive heat or improper
handling could trigger a short-circuit, a fire or an explosion.
• Do not interrupt an on-going data connection to a computer before all data has been
transferred. This could lead to data loss for which the manufacturer is not liable.
Warnings
1. It is a high-precision product, do not fall or crash.
2. Do not expose the unit to strong magnetic objects, such as magnet and electrical
motor. Avoid strong radio waves. Strong magnetic fields may cause the products
breakdown or images and sounds damage.
4
Page 5
3. Never leave the products exposed to high temperatures and direct sunlight.
4. Please choose branded Micro SD card. Neutral cards are not guaranteed to work
normally.
5. Do not place Micro SD card near strong magnetic objects to avoid data loss.
6. In case of overheating, smoke, or unpleasant smell in the process of charging, unplug
your device immediately to prevent fire hazard.
7. While it is charging, keep the product out of children reach. Power line may cause
children accidental suffocation or electric shock.
8. Keep the device in cool, dry and dust-proof places.
Notes on Cleaning
Turn off the camera.
microfibre cloth). To avoid scratching the lenses, use only gentle pressure with the cleaning
cloth. Only use a dry cloth to clean the exterior of the device. To avoid damaging the elec
tronics, do not use any cleaning fluid. Clean the protective case after each use with clear,
clean water and dry it thoroughly.
Disposal
Dispose of the packaging materials properly, according to their type, such as
paper or cardboard. Contact your local waste-disposal service or environmental
authority for information on the proper disposal.
The integrated battery must only be removed for disposal. Opening the device
housing can damage the unit. Drain the battery completely before disposal.
Remove all the screws in the housing and open the device housing. Remove the
connections to the battery and remove it. Cover the open contacts with tape and package
the battery in such a way that it cannot shift in the packaging.
Clean the eyepieces and/or lenses only with a soft, lint-free cloth, (e.g.
-
5
Page 6
PREFACE
6
Page 7

Whether you’re interested in demonstrating makeup techniques,
giving advice or showcasing your comedic talents, the best way to
reach the most people is by putting yourself out there. With Explore
One’s Full HD VLOG camera, you can take blogging to the next level by
documenting your sharable moments in HD video.
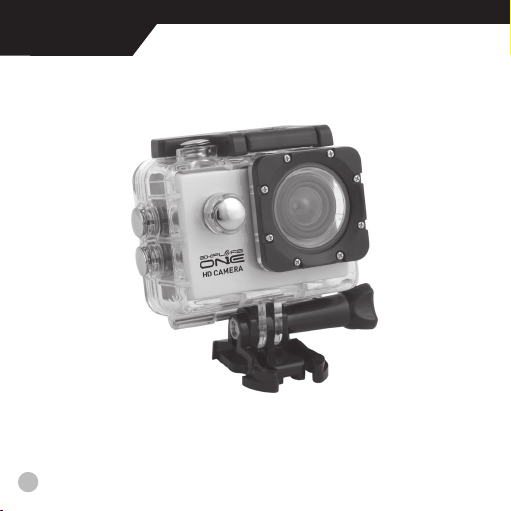
The camera comes with a flexible tripod so you can get the
perspective you want and has a wide 120° field of view. It comes with
a waterproof housing, mounting accessories and a USB cable so you
can easily upload your videos for editing and posting.
7
Page 8
CONTENTS
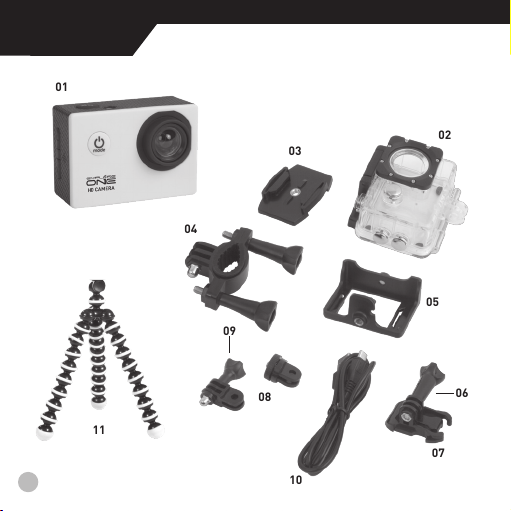
01
03
04
09
08
11
8
10
02
05
06
07
Page 9

HD Camera
01
Waterproof Case
02
Flat Adhesive Mount
03
Handle Bar/Pole Mount
04
Frame Housing Mount
05
Long Thumb Screw
06
Quick Release Buckle
07
Pivot Mounts
08
Short Thumb Screw
09
USB Cable
10
Tripod
11
9
Page 10
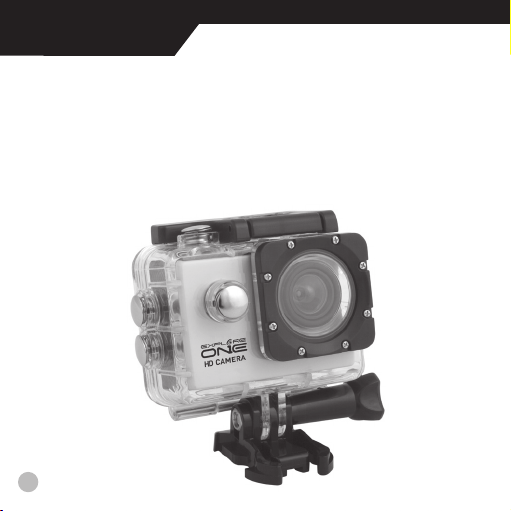
INSTRUCTIONS
Product Features
1. Water-resistant casing allows you to film water sports up to 30 meters under water
and use the camera in changing weather conditions.
2. High definition screen displays and replays videos recorded.
3. Detachable battery is easy to replace and prolongs your camera’s service life.
4. Supports storage cards up to 32GB maximum.
5. Supports Web camera.
6. Multiple video recording formats: 1080P/720P/480P.
7. 12 M (HD) wide-angle lens.
10
Page 11
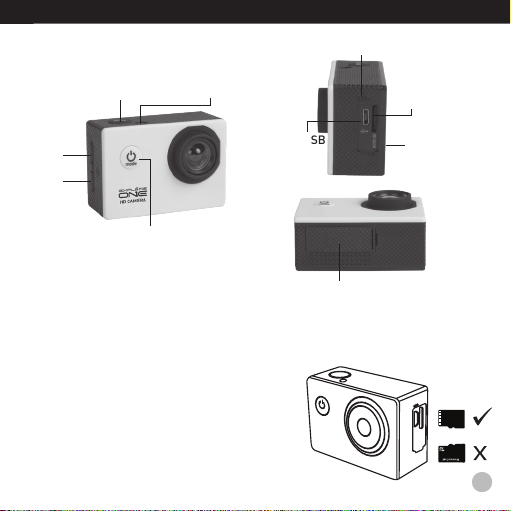
Microphone
Shutter/Select Button Status Light
Zoom
In/Up
Button
Zoom
Out/Down
Button
Power/Mode Button
Operating
1. Inserting Micro SD card
Note: For best performance, please choose a branded Micro SD card and format it on
your computer before use. Generic cards are not guaranteed to work flawlessly.
Insert a microSD card with the label facing the screen.
Use brand name memory cards that meet these
requirements:
a) microSD, microSDHC
b) Class 10 speed rating
c) capacity up to 32GB
Micro USB
Port
Battery Door
MicroSD
Slot
Charging
Status Light
11
Page 12
INSTRUCTIONS
2. Installing or removing the battery
A. Press on the battery cover to open it.
B. Correctly install the battery into the camera according to the polarity guides.
C. To remove the battery, simply open the battery cover and take it out.
3. Charging
A. Connect the camera to a computer or the power adapter via the USB cable for charging.
B. When charging, a blue indicator light will appear. When the blue light goes off, the device
is fully charged.
C. When charging, the blue indicator light long bright, fully charged, the blue light goes out.
4. Turning camera on and off
Press and hold the power switch for three to five seconds to turn the camera on or off.
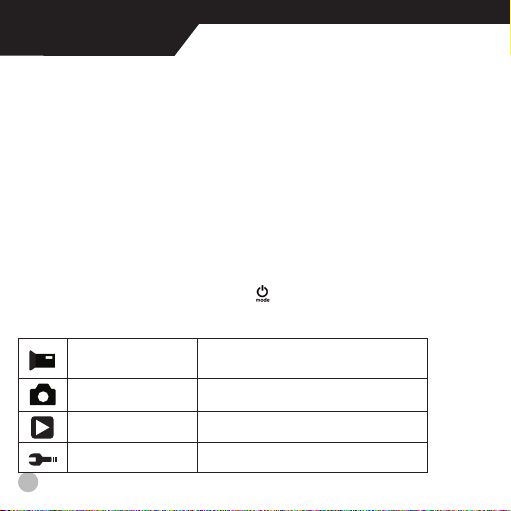
5. Mode Switching
A. Press the [Power On-Off / mode] button [
modes.
Camera mode
Video recording
mode
Photo shooting mode Time setting/Photo taken
Play back mode Cyclic Record/Fast view
Settings Adjust all camera settings
12
Description
Video recording/Motion detection
] repeatedly to cycle through the camera
Page 13
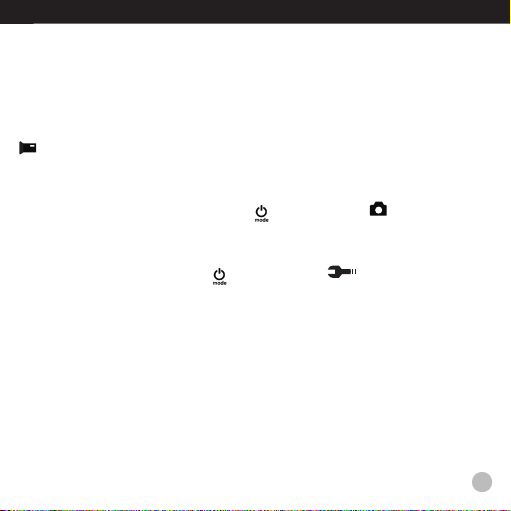
6. How to record videos and configure recording setting
6.1. Video Recording
Turn the camera on. You will start with the video recording mode. There will be an
icon in the upper left corner. Insert a SD card and start recording by pressing “OK”.
Press “OK” again if you want to stop the recording.
6.2. Photo shooting
Switch to photo shooting mode by pressing [
left corner. Press ”OK” to take photos.
]. There will be an icon in the upper
6.3. Setting
Switch to setting mode by pressing [
corner. Press “OK” , “UP”, or “DOWN” button to set.
6.4. File Storage & Play back
After you have finished recording use a USB cable to export the videos onto a computer
for play back. You can also take the Micro SD card out and access the image data with a
card reader.
]. There will be an icon in the upper left
13
Page 14
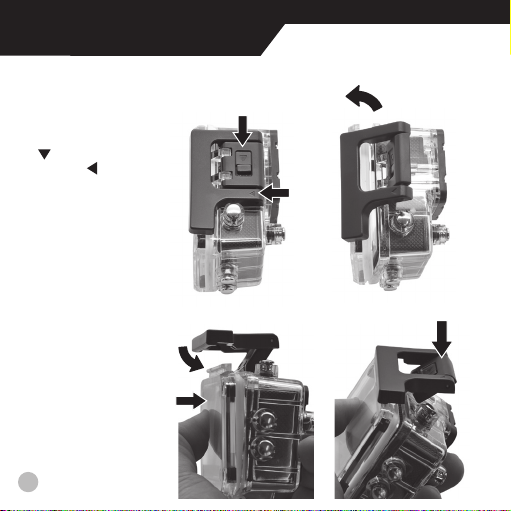
MOUNTING THE CAMERA
How to Open and Close the Waterproof Case
1
How to Open:
Press and hold down
switch (1) and
the
then use the
(2) to open the clamp
(3).
arrow
3
2
How to Close:
Press the case
door all the way
down (1) and then
snap the clamp to
the hinge (2).
Now, simply press
the clamp down
(3) to close.
14
3
2
1
Page 15
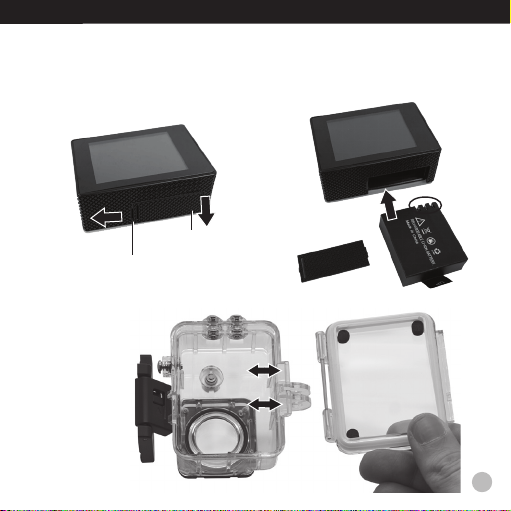
How To Replace The Battery
Battery cover
Battery cover lock
How to Swap the
Backdoor:
Align the backdoor
with the hinge and
press down until it
clicks into place.
15
Page 16
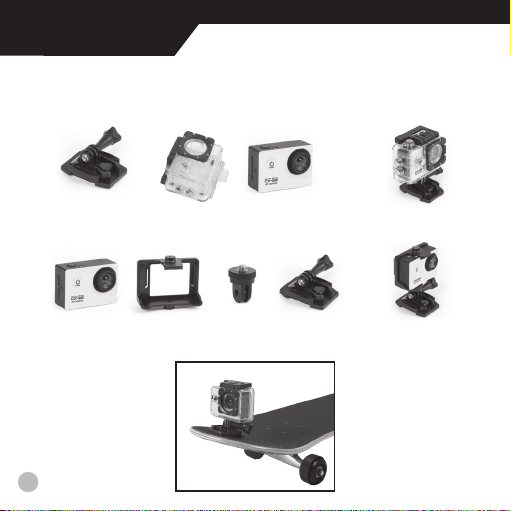
INSTRUCTIONS
Base Mount Example
01
=
02
=
16
Page 17
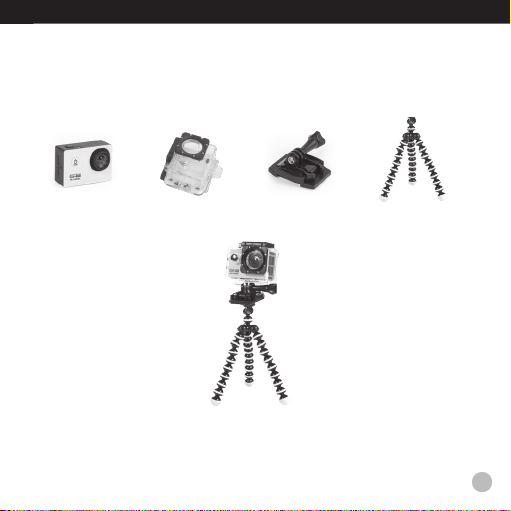
Tripod Mount Example
01
=
17
Page 18
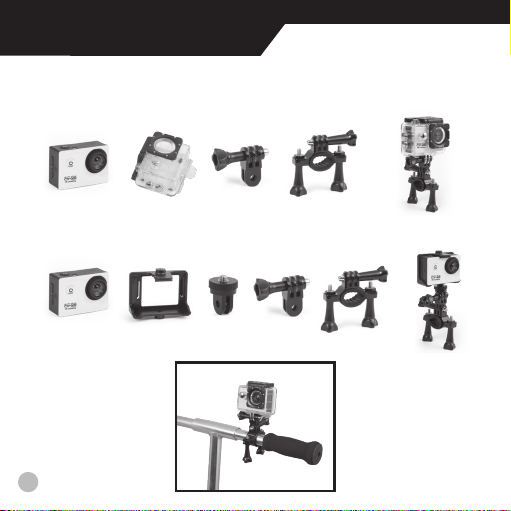
MOUNTING THE CAMERA
Pole/Bicycle Mount Example
01
02
18
=
=
Page 19
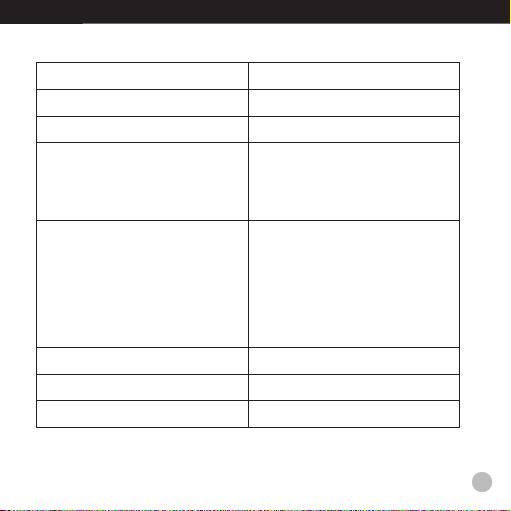
Technical Data
TFT Display 2.0 inch display
Lens 120° wide angle
Waterproof case Resistant up to 30 m. IP68
Language options English, French, Dutch,
Russian, Spanish, Italian,
Portuguese, German, Korean,
Turkish, Polish, Chinese
Resolution of photos 12 M
10 M
8 M
5 M
3 M
2 M
1 M
Resolution of videos 1080P, 720P, 480P
Video format AVI
Image format JPG
19
Page 20
INSTRUCTIONS
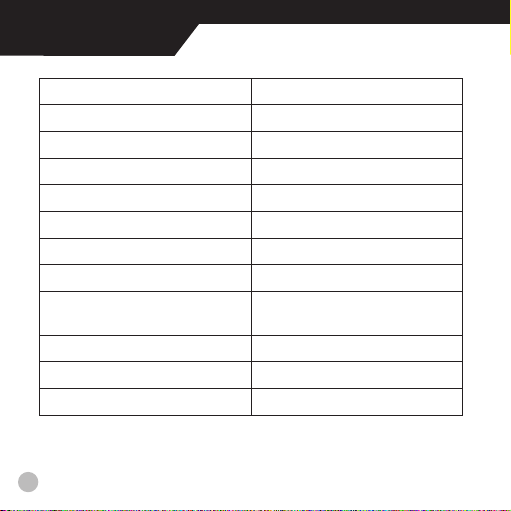
Storage Micro SD card up to 32 GB
Shooting mode Photo timer
Frequency of optical source 50Hz/60Hz
USB interface USB 2.0
Rated voltage DC 5V 1A
Battery capacity Removable Li-ion 900 mAh
Recording time About 75 minutes (at 1080p)
Charging time About 3 hours
Dimensions 2.33 x 1.62 x 0.97 in.
Weight 60 grams
External Adapter Not included in this product
WIFI/Bluetooth Function Non-applicable
Note: Specifications could be subject to change due to upgrading or updating.
Please regard the actual product as the standard.
20
( 59.3x41.1x24.6 mm )
Page 21

VLOG TIPS
The first step in starting a vlog is deciding what kind of content you would like to create.
There are many options to consider. When choosing, keep the following in mind:
• What are you passionate about?
• Who do you want to reach?
• Do you have enough ideas to make a series?
Some popular choices include product reviews, beauty/fashion tutorials, gaming walkthroughs and comedy skits. Your vlog can certainly be a mix of types, but be sure that
you have enough of a central focus to build an audience. Be sure that you are doing
something that you are actually interested in because your audience will be able to tell if
you’re not. Whatever you choose, always make content that you’re proud of!
After you decide what your focus will be, you’ll need to do some planning before you start
filming. The following are some tips to guide you through the planning stages.
Step 1: Who is your audience?
In the beginning you’ll want to have a clear idea of whom you are trying to reach with your
videos so that you can make relatable content.
Step 2: Where will you film?
When filming, be aware of what’s in the background of your videos so that you do not
reveal any personal information such as your address. Always get permission before
filming on private property, and do not include other people in your videos without their
clear permission. This is important to keep in mind when filming in a public place.
21
Page 22

VLOG TIPS
Step 3: How long will your episodes be?
How long your episodes are should depend largely on the type of vlog you are making.
If you are doing beauty tutorials or product reviews, it is probably best to keep each post
to less than 10 minutes because lengthy episodes might discourage viewership. For
these types of videos, audiences are looking for quick tips. If you are doing gaming walkthroughs, a lengthier episode is probably a good idea.
Step 4: How often do you want to post?
Think quality not quantity! It is better to put out a well-planned video weekly than a daily
video that doesn’t really have much to say. As you get more experienced at vlogging,
you may be able to up your frequency without sacrificing quality. No matter what you
decide, be consistent on when and how often your upload videos. You audience might lose
interest if they are never sure when you’re going to post.
Step 5: Before you begin recording, outline what you will be doing and practice! To make
sure that you cover everything and don’t leave key information out, you should create a
script or make easy-to-follow notes. Be sure to read through it several times so that you
don’t spend all of your camera time looking down at a piece of paper. The more prepared
you are, the less editing or reshooting you will have to do.
22
Page 23

Step 6: Check your equipment and make sure your battery is fully charged before you
start filming. Also, do a test run to check the lighting and sound. Natural or warm lighting
is usually best, but the only way to know what will work for you is to experiment.
As you film, look into the lens. You want to make eye contact with your viewer. If you are
moving around during your vlog, be sure to stay within the camera’s viewing range.
It takes time to build up an audience for your vlog posts, so it’s important to be patient
and not get discouraged! There are a few steps though that you can take to get your vlog
some attention.
Step 7: Promote your vlog on social media sites like Instagram or Twitter using hashtags
that are both relevant and popular.
Step 8: Find other vlogs that appeal to you and leave comments that include a link to
your own posts. Make sure that your comments are thoughtful, courteous and relevant.
Posting a link to your vlog with no other commentary will not encourage others to check
out your work, it will just look like spam so people will avoid it.
Step 9: Include a fun (but brief) description with your vlog post that will draw viewers to
click play. This description is a great place to put helpful links that relate to the content
of the post.
Step 10: Have Fun! Blogging and Vlogging should be fun. It’s a great way to spend time
with friends and make new ones. Enjoy what you do and it will be much easier.
23
Page 24

This device complies with Part 15 of the FCC Rules. Operation is subject to the following two conditions:
(1) this device may not cause harmful interference, and
(2) this device must accept any interference received, including interference that may cause undesired
operation.
Warning: Changes or modifications to this unit not expressly approved by the party responsible for
compliance could void the user authority to operate the equipment.
This Class [*] digital apparatus complies with Canadian ICES-003.
Cet appareil numérique de la classe [*] est conforme à la norme NMB-003 du Canada.
88-83003
©2018 Explore Scientific, LLC.
All rights reserved. explorescientificusa.com | exploreone.com | 866.252.3811
1010 S. 48th Street, Springdale AR 72762
Made in China
CONFORMS TO THE SAFETY REQUIREMENTS OF ASTM F963
24
 Loading...