

Page 1

IFU-1014 Rev 2
Project Katharine Instructions for use
ECO-4967
Release Date: 10/04/2019
Content
Slides 1-2 Cover Pages
Slides 3-60 Internal Pages
Page 2

TABLE OF CONTENTS
1. Overview 2
2. Getting Started 8
Flange Sizing Guide
Get the Right Bra
Boil Flange & Flextube
Wake Up Willow
3. Pumping 13
Turn on Pump
Assembly
Alignment
Initiate Latch
Phases of Willow
Secure Pump in Bra
Suction Levels
Realignment Tips
4. Ending Your Session 28
Pause Pump
Break Latch & Remove Pump
Flip to Finish
Remove Milk Bag
Charging Willow
5. Cleaning, Transfer & Storage 36
6. Troubleshooting 41
7. Technical Information 46
™
Page 3

1. OVERVIEW
SAFETY INFORMATION
Read all instructions prior to use.
Please follow guidelines below when using the Willow Wearable Breast Pump Generation 3.
WARNINGS:
1. Use product only for its intended use as described in this Instructions for Use pamphlet.
2. This is a personal care product for a single user and should not be shared
between users.
3. Only use Willow Breast Pump Generation 3 parts; do not substitute. Do not modify equipment.
4. Close supervision is necessary when product is used near children.
5. Do not operate where aerosol spray products are used or oxygen
is being administered.
6. Only wear Willow Generation 3 (latched) while pumping.
Do not wear Willow Generation 3 on Pause (latched) for an extended period of time.
7. Always break latch before removing Pump from breast.
8. Consult your healthcare practitioner to understand how long you should
pump in a pumping session. Willow Generation 3 turns o automatically after 25 minutes.
9. Pump is not provided sterile.
10. Do not wash or sanitize Pump. Wipe with clean, damp cloth only.
11. Do not immerse Pump in water.
12. Do not place Pump in refrigerator or freezer.
13. Boil Flange and Flextube™ prior to rst use.
14. After boiling, allow Flange to cool before touching metal parts.
15. Do not use harsh chemicals to clean Flange and Flextube.™
16. Do not store damp components.
17. Do not put Flange or Milk Bag in microwave or microwave sterilizer bags.
18. Milk Bag is intended for single use only. Do not re-use.
19. Do not place Milk Bag in refrigerator door to avoid temperature uctuations.
20. Do not microwave breast milk.
21. Do not use hot water to thaw breast milk.
22. Do not refreeze thawed breast milk.
23. If you are a mother who is infected with Hepatitis B, Hepatitis C or Human
Immunodeciency Virus (HIV), pumping breast milk will not reduce or
remove the risk of transmitting the virus to your baby through your breast milk.
24. Do not use Pump in an airplane.
25. Do not drop or insert any object into any openings on Pump.
26. Do not attempt to open or repair Pump or Charger. No modication
of this equipment is allowed.
27. Pump will not work when connected to Charger; always disconnect
Pump from Charger before using.
28. Only use Charger supplied with Willow Breast Pump Generation 3.
29. Plug Charger into an electrical outlet that is visible and easily accessible. To
remove line voltage (mains power), unplug the power supply from the wall.
30. Never operate product if cord or plug is damaged, it is not working properly,
it has been dropped, damaged or immersed in water.
31. Do not attempt to reset Pump during use.
PRECAUTIONS:
1. Ensure Flange, Flextube,
2. Ensure Flange, Flextube™ and Milk Bag are securely assembled and connected to Pump.
3. Visually inspect Pump, Flange and Flextube™ to ensure there are no tears
or indications of degraded performance.
4. If excessive discomfort or pain is felt during pumping, stop pumping, break latch,
then reposition Pump or cease session.
5. If package appears damaged or tampered with before use, do not use and contact Customer Care.
™
surface of Pump and Milk Bag are clean.
1
2
willowpump.com l text or call 1-888-WILLOW-3 Willow Wearable Breast Pump Generation 3 Instructions for Use
3
Page 4

INDICATIONS FOR USE
Who should use the Willow Wearable Breast Pump Generation 3?
The Willow Wearable Breast Pump Generation 3 is intended to express milk from
lactating women in order to collect breast milk from their breasts. The device is
intended for a single user.
CONTRAINDICATION
Do NOT use this Pump if you have an active implanted device that would be affected
by a magnetic field (e.g., pacemaker, implantable cardioverter defibrillator).
USAGE & OPERATING LIFE
Pump is reusable for a single user, and has an expected operating life of 12 months.
Reusable parts – Flange and Flextube™ – should be cleaned prior to use
(reference Section 2. GETTING STARTED - Boil Flange & Flextube™ ). These parts are
intended for use by a single user only, and should be replaced every 3 months.
Milk Bags are intended for single use only, disposable and should be
discarded after each use. Please recycle.
PRODUCT DESCRIPTION
The Willow Wearable Breast Pump Generation 3 contains the number of parts and
accessories listed here: Pump (2), Flange (2), Flextube
Charger (1), Accessories: Cleaning Brush (2), Carrying Bags (2). Parts Shown on page 5.
Additional Flange sizes and spare parts are available for purchase at www.willowpump.com.
™
(2), Milk Bag - 4oz. Disposable (24),
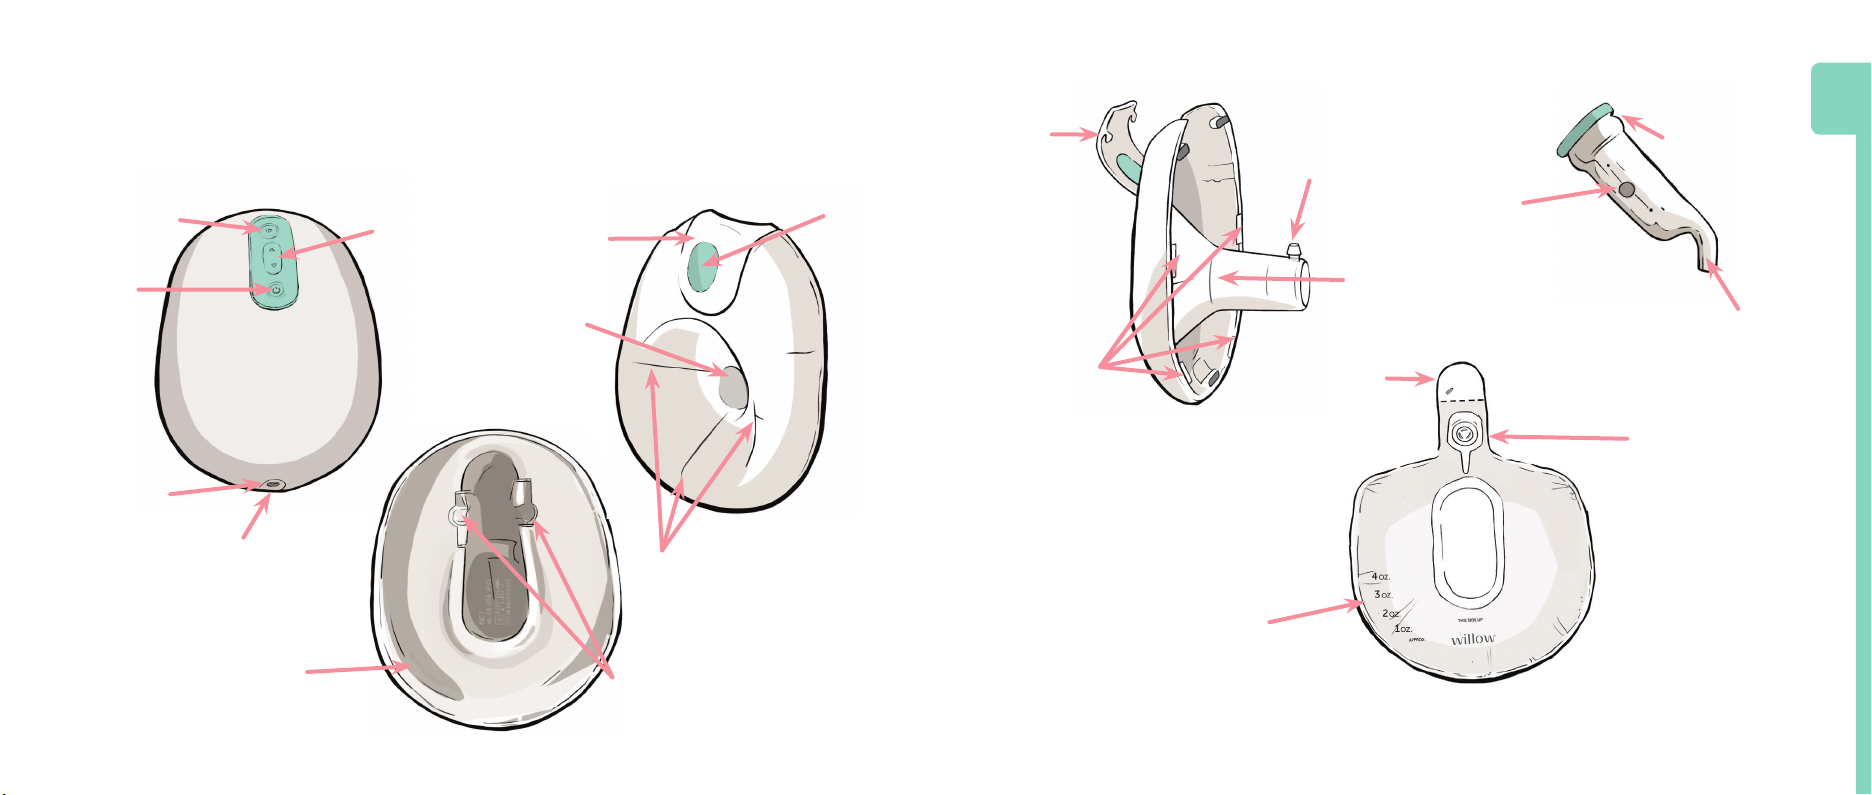
PRODUCT PARTS
Willow Pump
Generation 3
Milk Bag
Flange
Charger
Flextube
™
Cleaning Brushes
1
Milk Container, additional flange sizes, and spare parts are available for purchase at willowpump.com.
4
willowpump.com l text or call 1-888-WILLOW-3 Willow Wearable Breast Pump Generation 3 Instructions for Use
5
Page 5
The Willow Breast Pump Generation 3 is a personal use, cordless breast Pump for single
and double pumping. The product includes: re-chargeable Pump(s), Flange(s),
Flextube(s)™ and disposable Milk Bags.
Flange Exterior
Thumbpad
Pump/Pause
Pump Exterior
Suction Controls
Increase/Decrease
Door
Door
Flange Interior
Flange Spout
attaches to
Flextube™ Tip
Flextube™ Grips
slide into grooves
on Pump interior
Flextube
™
1
Flextube™ Collar
attaches to Milk Bag
On/Off
Power Port
Reset Button
6
Serial Number
Tunnel
Pump Interior
willowpump.com l text or call 1-888-WILLOW-3 Willow Wearable Breast Pump Generation 3 Instructions for Use
Alignment Guides
Grooves for
Flextube™ Grips
Alignment Guide
Flextube™ Tip
attaches to
Flange Spout
Tabs
to tuck
Milk Bag
Milk Bag
Label Area
space to mark
date and volume
One-way Valve
connects to
Flextube™ Collar
One-way Valve
lets milk in,
but prevents
leaks and spills.
No cap needed.
Volume
Indicators
approximate
Milk Container, additional flange sizes, and spare parts are available for purchase at willowpump.com.
7
Page 6
2. GETTING STARTED
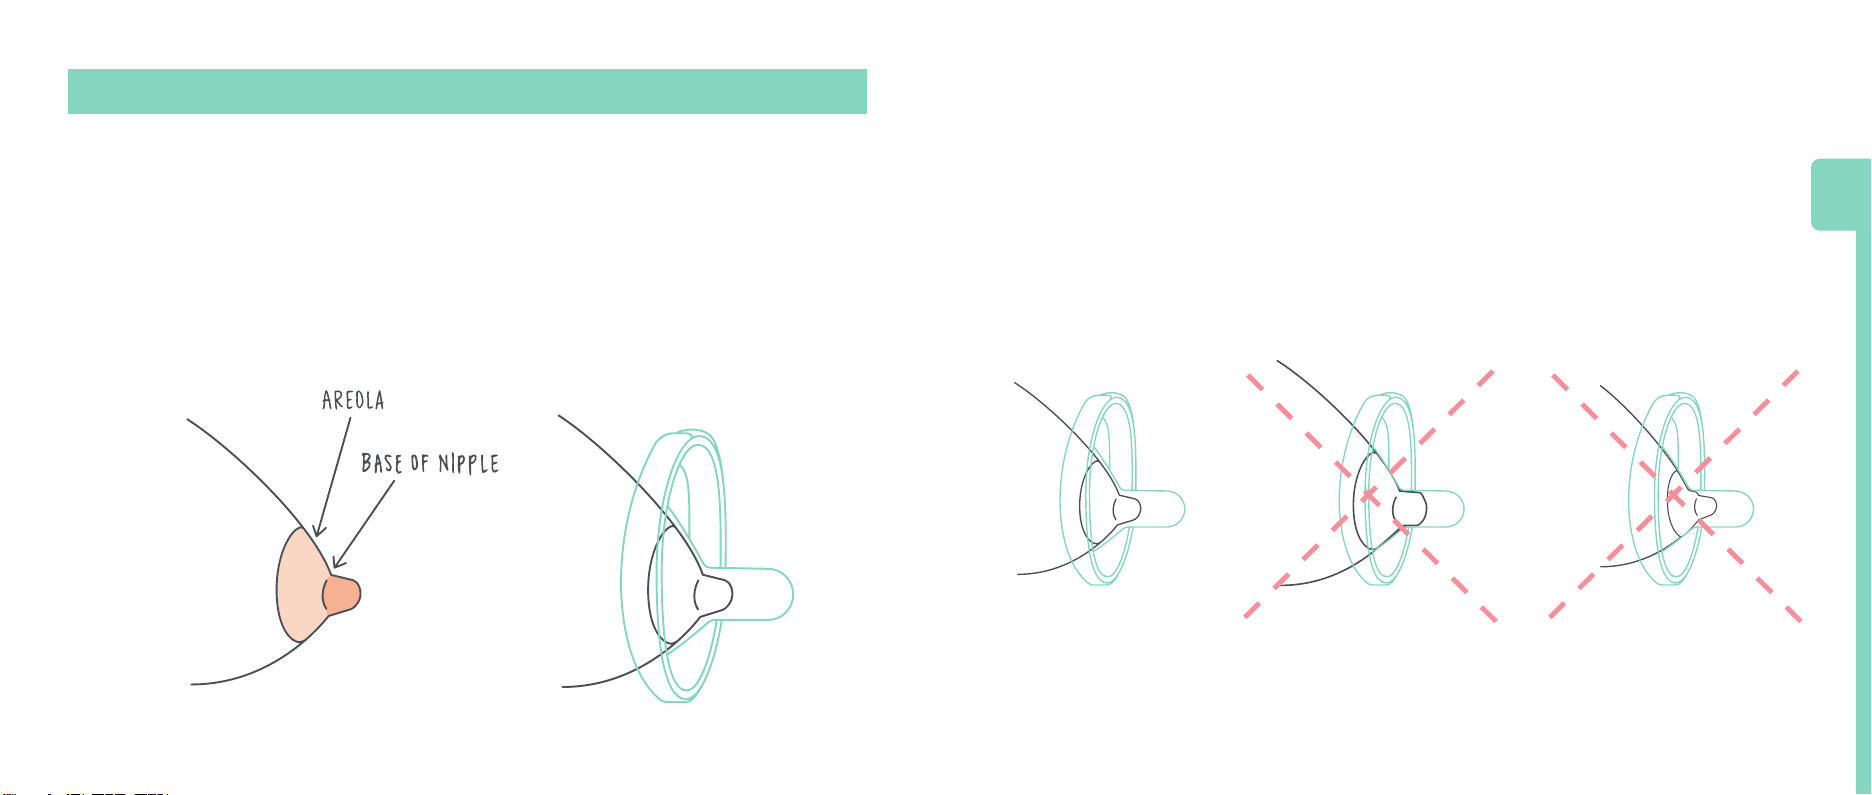
WILLOW FLANGE SIZE
CHECK YOUR FLANGE FIT
Choosing the right flange size is critical to successful pumping.
Make sure your Flange fits properly.
What’s your Willow size?
Your size for Willow might be different than the size you use for another pump!
Using the right size for your Flange or Milk Container can make all the difference
when it comes to comfort and the volume you get with Willow.
Visit willowpump.com/sizeme to check your size and see which
accessories are available
8
willowpump.com l text or call 1-888-WILLOW-3 Willow Wearable Breast Pump Generation 3 Instructions for Use
Good Fit: During pumping,
your nipple moves freely in the
flange tunnel. You see space
around the nipple, and little
to no areola is pulled into the
tunnel with the nipple.
Your flange size may fluctuate with birth, breastfeeding, and pumping.
We recommend you revisit your flange fit from time to time.
Too Small: During
pumping, some or
your entire nipple rubs
against the side of the
flange tunnel.
Too Large: During pumping,
more areola is drawn into
the flange with your nipple.
Your areola may rub against
the side of the breast flange
tunnel.
2
9
Page 7
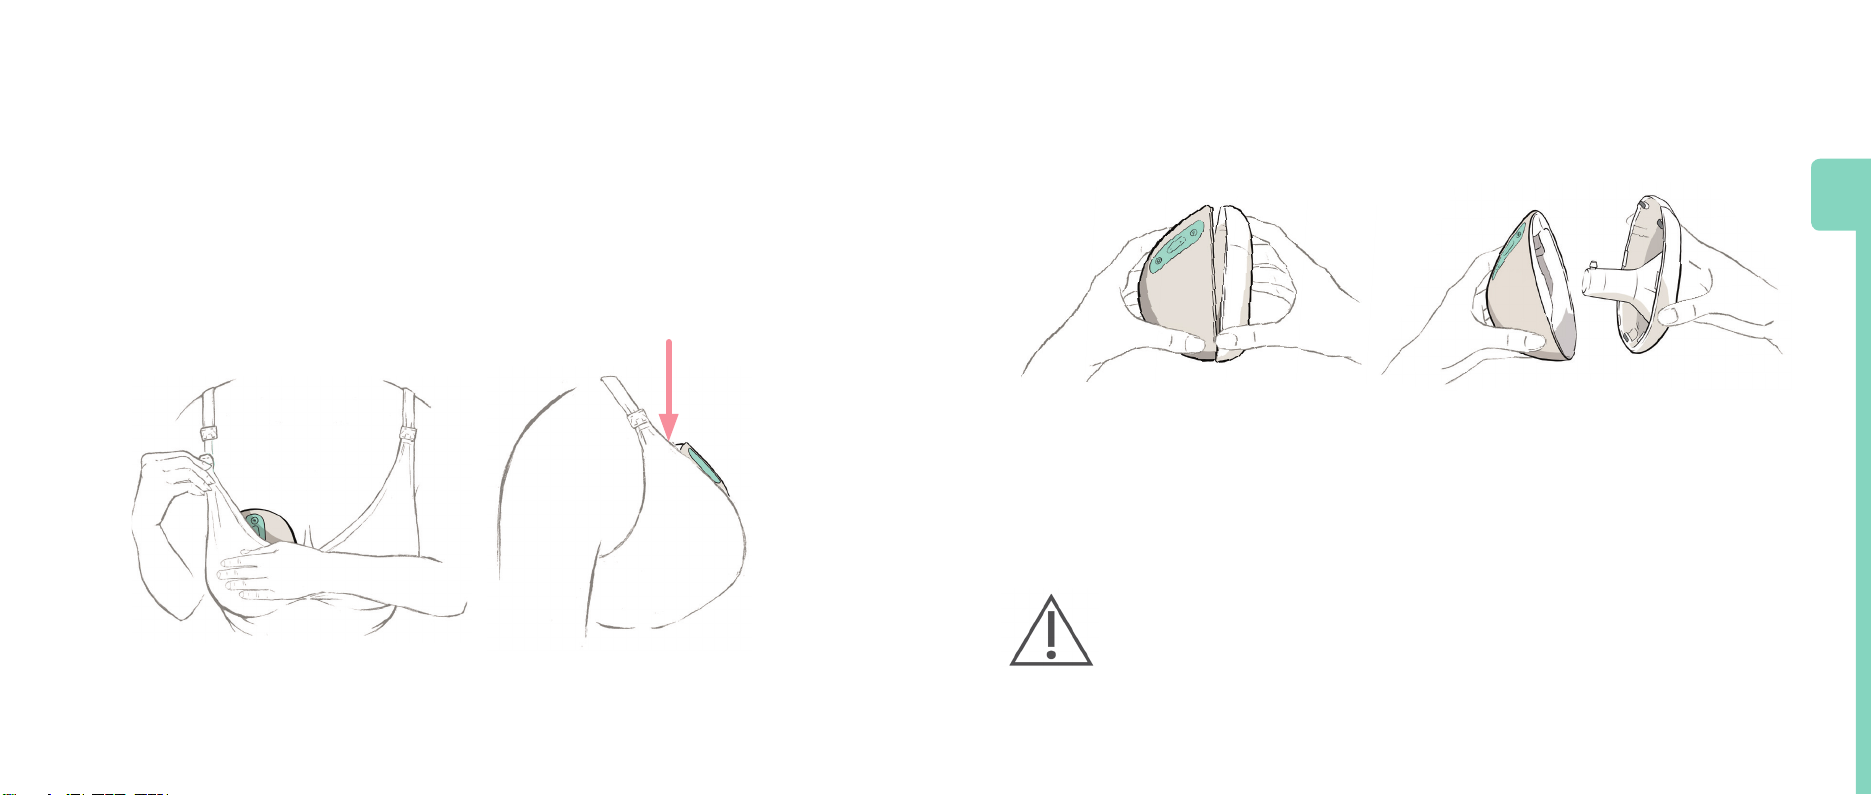
GET THE RIGHT BRA
BOIL FLANGE & FLEXTUBE™ - FOR FIRST USE ONLY
The bra you wear while pumping with Willow needs to keep the Pump
pressed firmly and securely against your breast.
Pick the right bra:
Full coverage
Has a flap
Made of stretchy fabric
No underwires or padding
No gaps!
The blue thumbpad on the
Flange should be rmly
pressed against your skin.
If it feels like Willow will shift when you move,
tighten the straps or pick a different bra.
a. Separate Flange from Pump
g 2a Pull Pump
away from Flange
to separate.
b. Remove lm between Pump and Flange.
c. Boil Flange and Flextube™ for 10 minutes and place on a clean surface to air dry.
MILK BAG - READY FOR USE
Single use only, please recycle
May be stored in refrigerator or freezer
WARNING:
DO NOT put Flange or Milk Bag in microwave or microwave sterilizer bags.
Milk Bag is disposable and NOT for reuse; discard after use.
After boiling, allow Flange to cool before touching metal parts.
2
10
willowpump.com l text or call 1-888-WILLOW-3 Willow Wearable Breast Pump Generation 3 Instructions for Use
11
Page 8

WAKE UP WILLOW
Pump comes partially charged, but needs to
wake up.
a. Plug Charger into outlet, then into Pump.
b. Wait until Pump lights up.
c. Unplug Charger from Pump.
GET THE APP
The app is an optional pumping
partner and can be downloaded
from the App Store (iPhone) or
Google Play Store (Android).
It can help you:
View your suction level
Track volume
See which phase you are in
3. PUMPING
Wear a nursing bra that keeps Pump rmly and securely in place. If it feels like
Willow will shift when you move, tighten the bra straps or pick a different bra.
Do not slide Pump directly into your bra; follow step-by-step instructions.
Disconnect from Charger before use.
Willow should only be worn (latched) while actively pumping.
You should break latch and remove Willow once you have nished pumping.
Consult your healthcare practitioner to understand for how long you
should pump. Willow turns o automatically after 25 minutes.
TURN ON PUMP
Press On/Off button until Pump lights up. Power button will display light to conrm Pump is on.
Color of light indicates battery status:
g 3a ON/OFF
Press On/Off
button until
Pump lights up.
Green Solid
Orange Solid
Enough charge for 2+ sessions
Enough charge for 1 session.
3
12
willowpump.com l text or call 1-888-WILLOW-3 Willow Wearable Breast Pump Generation 3 Instructions for Use
Red Solid
Low battery – inadequately
charged for session
13
Page 9
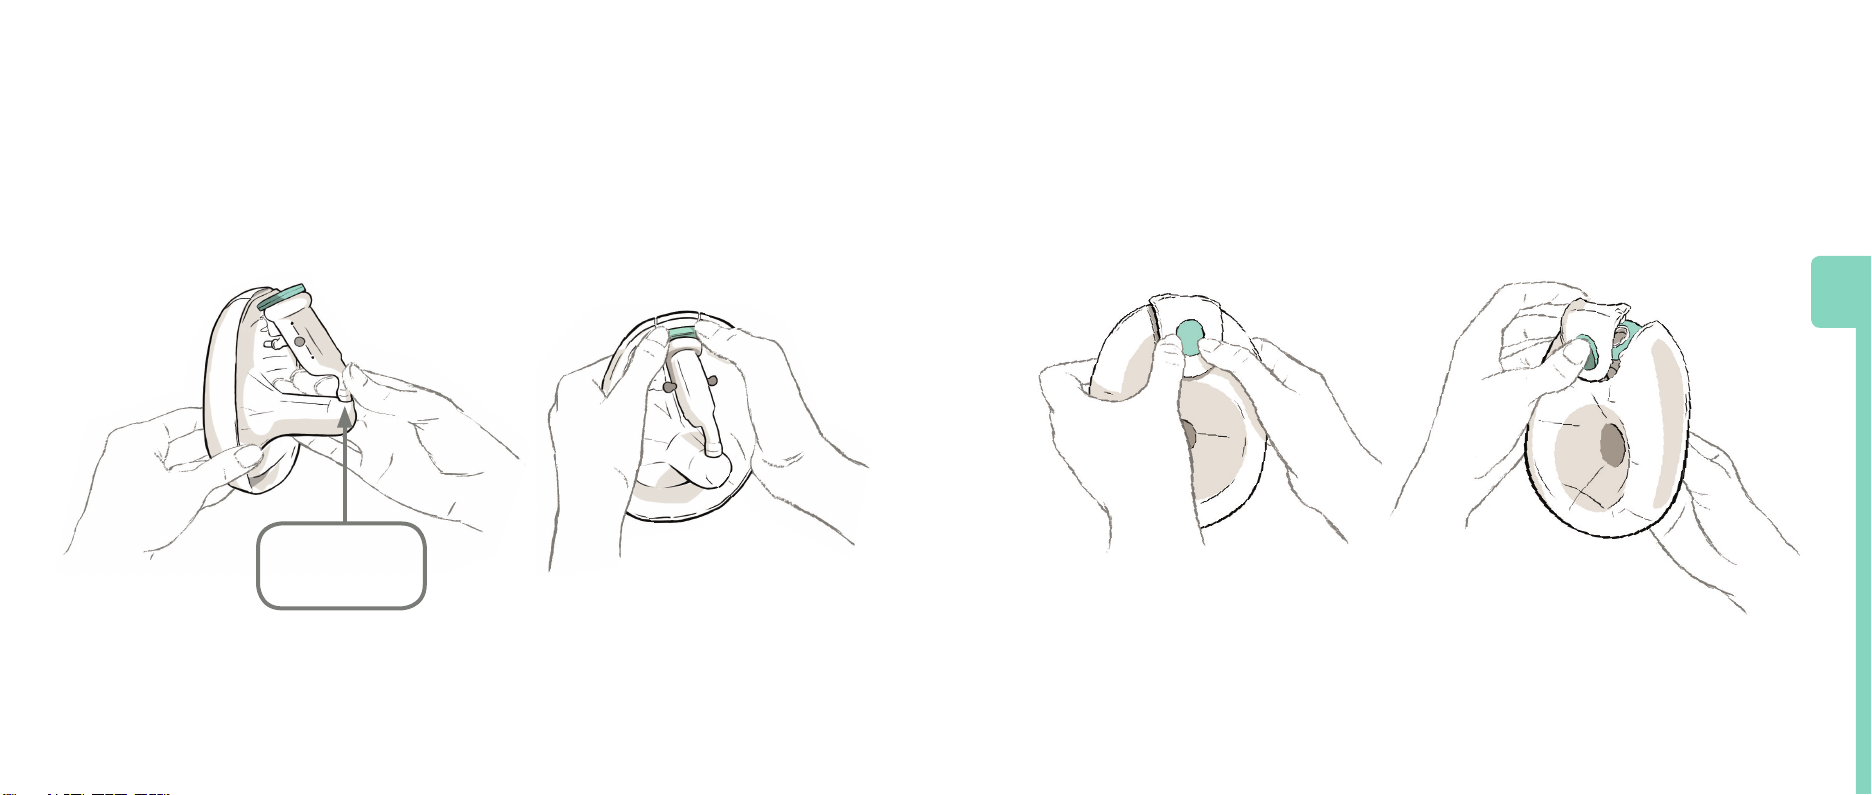
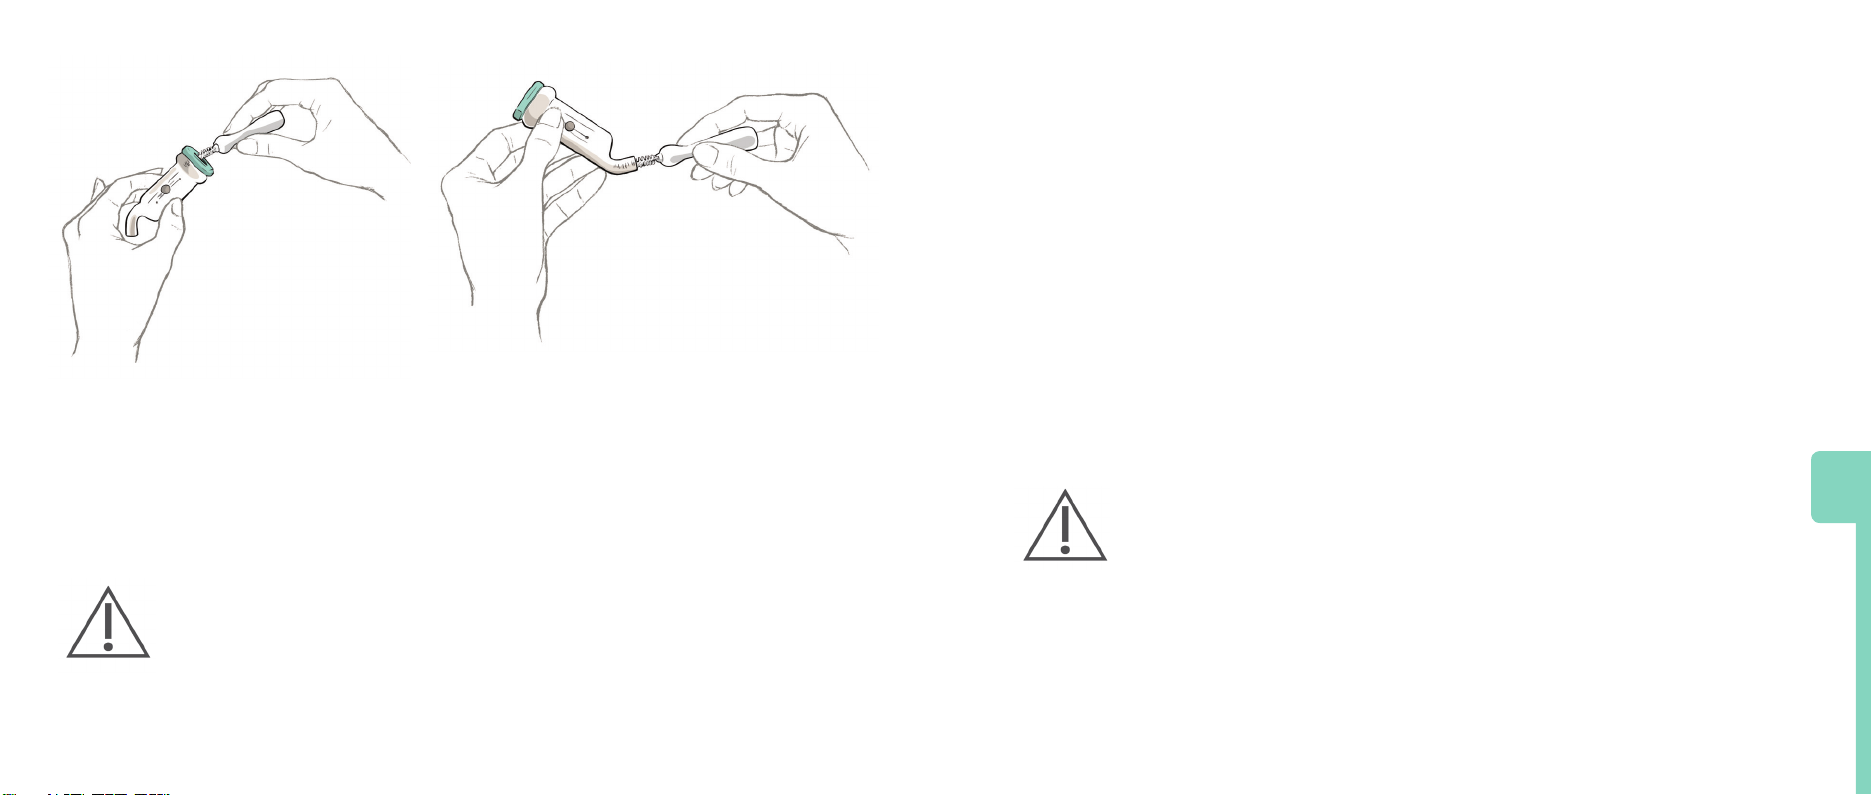
ASSEMBLY
BEFORE USING PUMP Examine Pump and accessories for any damage, cracks, chips or wear.
a. Connect Flextube™ to Flange
b. Attach Milk Bag
g 3b Push Flextube
Tip all the way down
onto Flange Spout.
™
g 3c Slide Flextube™
Collar into top of Flange.
Listen for Collar to ‘click’
into place.
click!
Make sure the
edges are flush.
TIP: Flextube™ must be pushed all the way down onto the Flange Spout.
14
willowpump.com l text or call 1-888-WILLOW-3 Willow Wearable Breast Pump Generation 3 Instructions for Use
g 3d Slide Flange Door
open by pushing the blue
thumb pad in and sliding up.
g 3e After sliding
Door up, pull open.
3
15
Page 10

g 3f Drape a new
Milk Bag over Flange
with writing “THIS
SIDE UP” facing away
from Flange.
g 3g Firmly press
Milk Bag’s Oneway Valve onto
Flextube™ collar.
Make sure Valve is
securely attached
to collar.
g 3h Close
Flange Door by
swinging closed
and sliding
down.
g 3i The Milk Bag
is bigger than the
Flange. To t it,
press center of bag
into deepest part
of Flange then
tuck edges.
3
g 3j Tuck bag
under tabs on
Flange. Make
sure the bag is
behind and not
touching the grips
on either side
of the Flextube.™
16
willowpump.com l text or call 1-888-WILLOW-3 Willow Wearable Breast Pump Generation 3 Instructions for Use
17
Page 11
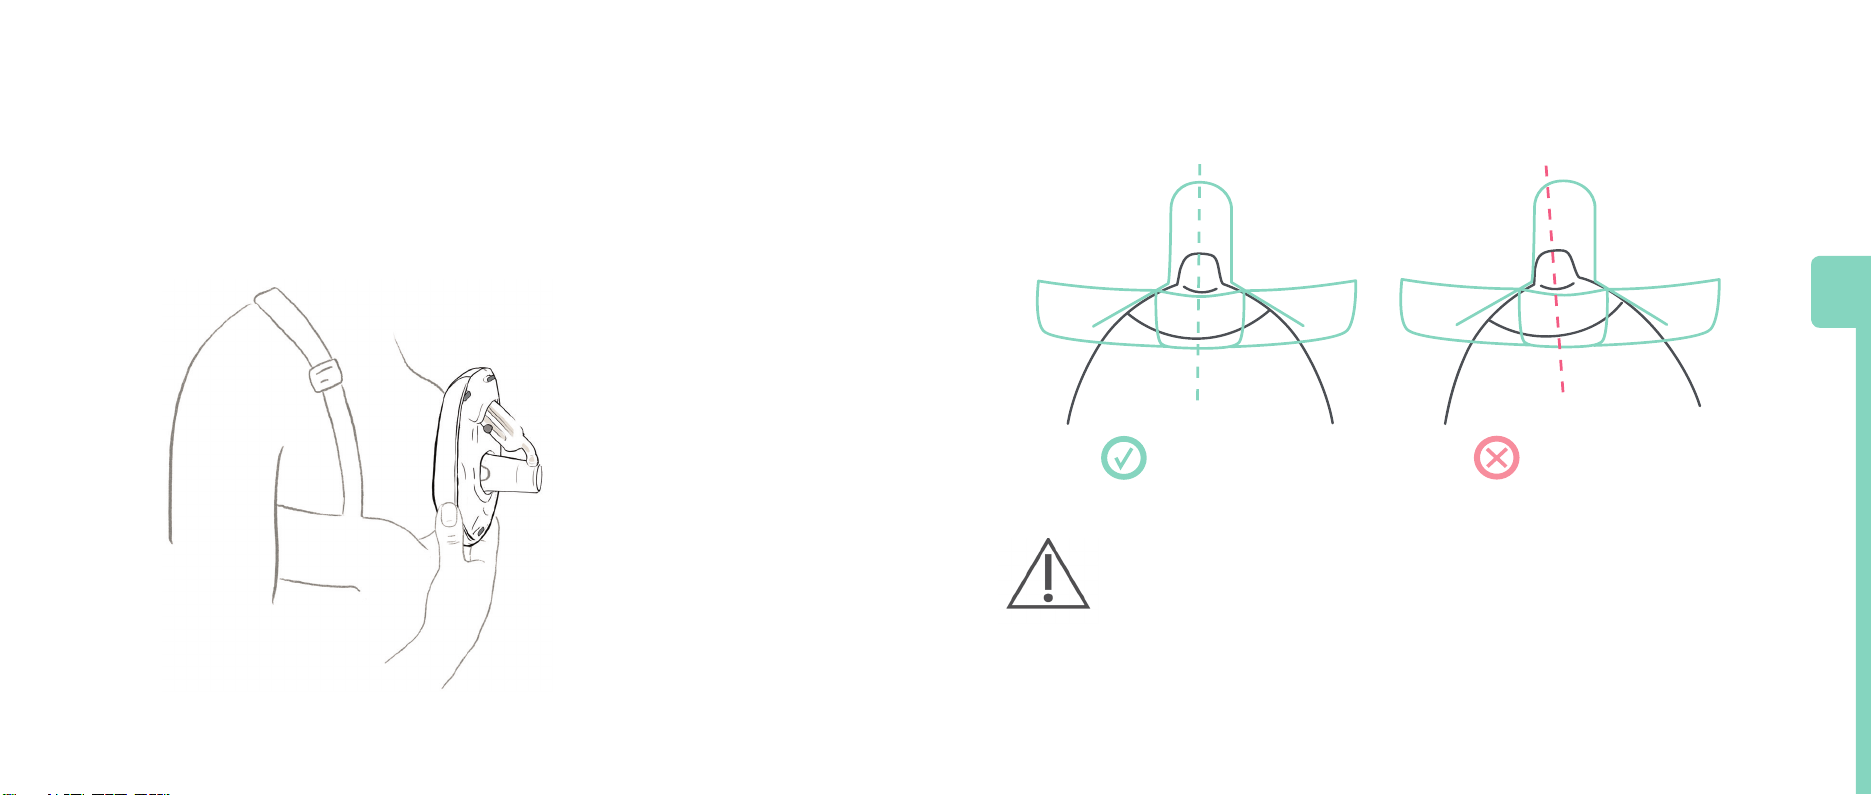
ALIGNMENT
To align, hold the Flange against your breast so you can see if your nipple
is centered in the Flange Tunnel. You may need to bend forward.
Aligning this way can help you confirm you’re aligned when you’re
learning how to use Willow.
g 3k Bring the Flange to
your breast, making sure
your nipple is centered
in the Flange Tunnel and
not touching the top,
bottom, or sides.
After you’ve aligned, look through the clear Flange to confirm your nipple is
centered before connecting the Pump. The tip of your nipple should
NOT touch the top, sides or bottom of the Flange Tunnel. If it does, try again.
3
18
Correct Alignment
Milk expression.
IMPORTANT: Correct nipple alignment is key to comfort
expression and performance.
› Nipple must be positioned correctly in Flange Tunnel
before pumping to avoid discomfort
› If you still experience discomfort even with proper
alignment, you may need a dierent Flange size (See
Section 2. GETTING STARTED - Willow Flange Size)
willowpump.com l text or call 1-888-WILLOW-3 Willow Wearable Breast Pump Generation 3 Instructions for Use
Incorrect Alignment
Try again.
19
Page 12

When you’ve confirmed your nipple is centered, connect the Pump to the Flange.
g 3m Using your other
hand, bring the Pump
straight on to the Flange
until they connect.
g 3n Firmly hold
Pump against your
breast and press Play
to initiate latch.
INITIATE LATCH
a. Hold Pump rmly against your breast.
b. Press Pump/Pause button to initiate latch and begin pumping.
C. Continue to hold Pump rmly against your breast until it is latched.
Wait until Pump reaches Stimulation.
Trouble Initiating Latch? See Section 6. TROUBLESHOOTING.
Once you’ve learned how to align Willow, you may assemble the Flange and Pump
before you align. To assemble, bring the Pump and Flange together until they
securely connect. Then, align Willow by bringing the Pump to your breast, ensuring
your nipple is centered in the Flange Tunnel.
20
willowpump.com l text or call 1-888-WILLOW-3 Willow Wearable Breast Pump Generation 3 Instructions for Use
3
IMPORTANT: Always break latch before removing Pump from breast.
21
Page 13

PHASES OF WILLOW
While pumping, you are going to hear several different sounds that indicate which phase
you are in. Many women transition to Expression within 2 minutes, but this can vary.
about 10 seconds
INITI AT E L ATC H
Louder, slower sounds
STIMULATION
Short, quick sounds
about 2 minutes
(transitions automatically)
EXPRESSION
Slow, quiet sounds
SECURE PUMP IN BRA
a. Once Willow is latched and in
Stimulation phase, secure Pump in
place by hooking nursing bra ap
over Pump, taking care to keep
Pump pressed rmly against breast.
If necessary, tighten bra strap to
keep Pump securely in place.
3
The Pump is establishing
suction. Remember
to hold Willow securely
against your breast.
If at any point you experience excessive discomfort, decrease suction or pause the
pump, then break latch and make sure you are aligned properly.
22
Pump cycles quickly to
encourage ‘let-down.’ Milk
will start to ow - check the
App to see your progress.
willowpump.com l text or call 1-888-WILLOW-3 Willow Wearable Breast Pump Generation 3 Instructions for Use
Pump has detected
let-down. Note: You
cannot go back to
Stimulation phase.
b. When double pumping, put the second
Pump on after the rst Pump is latched,
secured in your bra and in Stimulation.
23
Page 14

If you are still in Stimulation phase after about 2 minutes...
Make sure your bra is keeping Willow pressed securely against
your breast, especially at the top of the Pump.
Press Pump/Pause button, break latch and check alignment
(See Section 3. PUMPING - Alignment).
SUCTION LEVELS
›
Use the increase/decrease buttons
on the pump at any point during your
session to nd the suction level that’s
right for you.
›
Try the highest suction level that’s still
comfortable to help you get the most
from your session.
›
You’ll have access to the rst three
suction levels in Stimulation. Once
you’re in Expression and have pumped
about 0.5 oz. of milk, you’ll have access
to all seven suction levels.
›
The pump automatically increases your
suction by one level at this time, unless
you’re on the lowest setting (Level 1).
›
Check the app if you’d like to conrm
your suction level.
g 3o Adjust suction
level using increase/
decrease Suction
Controls on the
Pump.
3
24
IMPORTANT: Avoid setting suction at a level that causes discomfort.
If excessive discomfort or pain is felt during pumping, stop
pumping, break latch, then realign Pump or cease session.
willowpump.com l text or call 1-888-WILLOW-3 Willow Wearable Breast Pump Generation 3 Instructions for Use
25
Page 15

REALIGNMENT TIPS
Once you start pumping, you may need to realign if you...
Experience excessive discomfort or pain that is not alleviated by pressing Willow
rmly against your breast or adjusting suction level
Do not reach Expression phase within 2 minutes
› Experience lower than expected milk volume
TO REALIGN
Pause Pump and break latch
(reference Section 4. ENDING YOUR SESSION - Break Latch & Remove Pump).
Remove Pump from breast, keeping Flange side up to avoid spilling milk
not yet pumped into Milk Bag.
Realign Willow with the Pump and Flange assembled (reference Section 3. PUMPING
- Alignment). Bend over to avoid spilling milk and bring the Pump to your breast
in the direction your nipple points, centering your nipple in the Flange Tunnel.
g 3q Break latch
by placing a few
ngers between
Pump and breast.
g 3r Bend
forward and
bring the Pump
to your breast.
g 3s After you’ve
secured the Pump
and Flange, hold the
Pump rmly against
your breast, taking
care to prevent Pump
from shifting.
You may also separate the Pump from the Flange to realign. To do this, perform Flip to
Finish before realigning (reference Section 4. ENDING YOUR SESSION - Flip to Finish).
3
26
willowpump.com l text or call 1-888-WILLOW-3 Willow Wearable Breast Pump Generation 3 Instructions for Use
27
Page 16

4. ENDING YOUR SESSION
BREAK LATCH & REMOVE PUMP
PAUSE PUMP
To pause while pumping, press Pump/Pause button. Press it again to resume pumping.
Pump stopped automatically? This happens when:
White Pulsing Indicator – Auto-Pause:
After 25 minutes of continuous pumping, Pump will pause.
To continue pumping, press Pump/Pause button.
White Solid Indicator – Full Milk Bag:
When Milk Bag is full, Pump stops pumping. Break latch, remove Pump, perform Flip to Finish
reference Section 4. ENDING YOUR SESSION - Flip to Finish) and replace Milk Bag. To resume
pumping, attach a new Milk Bag and follow instructions starting with Section 3. PUMPING.
g 4a Pause Pump
by pressing
Pump/Pause button.
g 4b Unhook bra and
bend forward; support
bottom of Pump with
one hand.
TIP: There will be some milk in the Flange; the next step will help you capture it.
g 4c Break latch
by placing a few
ngers between
Pump and breast.
g 4d Tilt Pump
away from
breast, keeping
Flange side up.
4
28
willowpump.com l text or call 1-888-WILLOW-3 Willow Wearable Breast Pump Generation 3 Instructions for Use
29
Page 17

FLIP TO FINISH
Flip to Finish helps you capture the remaining milk in your Flange. Follow the steps
below to move the last bit of milk from the Flange Tunnel into the Milk Bag.
g 4e With Flange
side up, ROTATE
so blue thumb pad
is pointing
toward you.
g 4f TILT until pump
starts to gulp milk.
g 4g HOLD until milk
completely disappears and
you hear one loud slurp
(typically 3 to 4 gulps at
this point).
4
g 4h FLIP all the way
over with the Flange
opening facing the oor
and wait until gulps stop
(a total of 8 gulps).
TIP: You may notice, with a full Milk Bag, the Flange starts to separate from the Pump. This is
normal. Squeeze pump and Flange together during Flip to Finish.
30
willowpump.com l text or call 1-888-WILLOW-3 Willow Wearable Breast Pump Generation 3 Instructions for Use
31
Page 18

g 4i When nished ip Pump
back over so the Flange side is up.
g 4j Slowly pull the Flange away from
the Pump, keeping the Flange facing up
to avoid spills. Be careful not to tip the
Flange too far.
g 4k Look to see if any milk remains in
the Flextube.™ A few drops is normal.
g 4l If more than a few drops are present,
turn Pump back on, attach Flange, Press
Pump/Pause button and repeat Flip to Finish.
4
TIP: To easily separate Flange from Pump, hold near the bottom and pull apart.
32
willowpump.com l text or call 1-888-WILLOW-3 Willow Wearable Breast Pump Generation 3 Instructions for Use
TIP: A few drops left is completely normal. If you repeat Flip to Finish with only a few
drops left or multiple times, the Milk Bag may fill up with air.
33
Page 19

REMOVE MILK BAG
PUMP TURNS OFF AUTOMATICALLY WHEN FLANGE IS DETACHED FROM PUMP.
Pump may also be turned off manually by pressing On/Off button.
REMOVE MILK BAG
g 4m Slide Flange
Door open by pushing
blue thumb pad in
and sliding up.
g 4n Detach Milk
Bag’s One-way Valve
from Flextube™ Collar.
CLEAN Flange and Flextube™ as instructed
(reference Section 5 - CLEANING, TRANSFER & STORAGE).
g 4o Remove lled Milk Bag and
store in refrigerator or freezer. The
One-way Valve allows it to be laid
at without leaking.
CHARGING WILLOW
CHARGE Check battery level after each use by pressing On/Off button.
If the battery level is low, charge Pump with Charger provided.
1. Plug Charger into Pump’s Power Port.
2. Plug other end of Charger into any standard electrical outlet (120 V).
3. Once Pump is charged, remove Charger from Pump and unplug from electrical
outlet.
CHARGING TIMES
QUICK CHARGE Takes approximately 20 minutes to charge (1 session).
FULL CHARGE Takes approximately 2 hours and light indicator will
turn solid green when fully charged (approximately 5 sessions).
Color of light indicates battery status:
Enough charge for 2+ sessions
Red Solid
Enough charge for 1 session.
Low battery – inadequately
charged for session
Green Solid
Orange Solid
IMPORTANT: Pump will not operate while plugged into electrical
outlet. ONLY USE Charger supplied with the Willow Breast Pump.
4
34
willowpump.com l text or call 1-888-WILLOW-3 Willow Wearable Breast Pump Generation 3 Instructions for Use
35
Page 20

5. CLEANING, TRANSFER & STORAGE
CLEANING & MAINTENANCE
First Time Use After Each Use
Pump
Flange & Flextube
Wake up Pump by plugging in
for a few seconds.
™
Boil for 10 minutes.
Do not microwave Flange.
See detailed instructions in
Section 2. GETTING STARTED
- Boil Flange & Flextube.™
No cleaning required; wipe with
damp cloth as needed.
Do not immerse Pump in water.
Clean with mild dish washing soap
and brushes provided.
See detailed instructions in Section 5.
CLEANING, TRANSFER & STORAGE.
AFTER EVERY USE, FOLLOW THESE DIRECTIONS TO CLEAN FLANGE & FLEXTUBE™:
1. RINSE IMMEDIATELY Separate Flange from Pump, then separate Flextube™
from Flange, and rinse both parts with water to avoid buildup of breast
milk residue and prevent bacterial growth.
2. SOAK FOR 5 MINUTES Using mild dish washing soap, soak both parts in
very warm, soapy water for 5 minutes (minimum).
3. WASH + BRUSH THOROUGHLY Using the two Cleaning Brushes provided,
wash each part separately in soapy water for 60 seconds (minimum)
and brush for 30 seconds (minimum) as follows:
Milk Bag
Milk Bag is disposable and NOT for reuse.
Do not microwave Milk Bag.
Discard after each use and do not reuse.
TIP: FLANGE AND FLEXTUBE™ ARE DISHWASHER SAFE USING TOP RACK ONLY.
WARNINGS:
DO NOT wash or sanitize Pump.
Wipe with clean, damp cloth, if needed.
DO NOT use harsh chemicals to clean Flange and Flextube.™
Use mild dish washing soap.
36
willowpump.com l text or call 1-888-WILLOW-3 Willow Wearable Breast Pump Generation 3 Instructions for Use
g 5a Insert small
brush into
Spout and clean.
5
g 5b Use large brush to clean inside
top opening and body being
careful NOT to push brush all the
way through Tip at bottom.
37
Page 21
g 5c Use small
brush to clean inside
top opening and
area under Collar.
g 5d Insert small
brush into Tip at
bottom and clean.
4. RINSE FOR 20 SECONDS Rinse both parts thoroughly with hot water for 20
seconds (minimum). Visually inspect parts to ensure each is clean. If any signs
of residual milk, repeat cleaning process.
MILK STORAGE GUIDELINES
La Leche League International Storage Duration Guidelines For Breast Milk for use with
healthy full term babies.
WHERE TEMPERATURE TIME
Room Temperature 60 to 85°F (16 to 29°C) 4 hours (ideal) up to 6 hours (acceptable)*
Refrigerator <39°F (<4°C) 4 days (ideal) up to 5 days (acceptable)
Freezer 0°F (-18°C) 3-6 Months
Deep Freezer -4°F (-20°C) 6 months up to 12 months
Source: La Leche League International 2017
* The preference is to refrigerate or chill milk right after it is expressed.
5. AIR DRY + STORE Place both parts on clean paper towel or drying rack and
allow to air dry. For best results: avoid using cloth towels; store dry parts in
clean, cool place; do not store wet or damp parts. To maintain cleanliness, avoid
touching inside of parts.
IMPORTANT: Take care not to damage parts when cleaning. Replace
Flange, Flextube™ and/or Cleaning Brushes after signs of excessive wear.
Replace Flange and Flextube™ every 3 months.
38
willowpump.com l text or call 1-888-WILLOW-3 Willow Wearable Breast Pump Generation 3 Instructions for Use
WARNINGS:
DO NOT microwave breast milk.
DO NOT use hot water to thaw frozen breast milk.
DO NOT place filled Milk Bag in refrigerator door
to avoid temperature fluctuations.
5
39
Page 22

TO EMPTY MILK BAG
Use clean scissors to cut on dotted line below Label Area on Milk Bag.
g 5e Place spout
into bottle and
slowly tilt bag.
g 5f Pour milk into
bottle. To release as
much as possible,
squeeze bag.
Discard Milk Bag,
please recycle.
6. TROUBLESHOOTING
Use table to help solve any problems that may arise. If problem persists or to report
unexpected operation or events, contact Customer Care.
PUMP POWER LEVEL INDICATORS
Enough charge
for 2+ sessions.
Green
Pump is ready to pump.
• Pulses while charging.
• Solid when fully charged (approximately 5 sessions).
40
Enough charge
for 1 session.
Red
Low battery /
inadequately charged
for session.
Pump does
not wake up.
Orange
No Color
willowpump.com l text or call 1-888-WILLOW-3 Willow Wearable Breast Pump Generation 3 Instructions for Use
Pump is ready to pump. Recharge soon.
• Pulses while charging.
In order to pump for a full session, charge immediately.
• Single Session - Charge time approximately 20 minutes.
• Full Charge - Charge time approximately two hours. Light
turns solid green when fully charged.
To resolve issue:
• Press On/Off button until Pump lights up.
• Plug into Charger to ensure battery has enough charge.
6
41
Page 23

WHEN PUMP IS IN USE
Check assembly.
Orange Blinking
Check seal.
White Pulsing and
Orange Blinking
Milk Bag is full.
White Solid
White Pulsing
Pump paused and
waiting for next
command, or
Pumping time exceeded
25 minutes, so
automatically paused.
Separate Flange from Pump and check the 3 connections
(reference Section 3. PUMPING - Assembly):
1. Milk Bag One-way Valve to Flextube.™
2. Flextube™ to Flange Spout.
3. When closing pump, bring straight onto ange, not at angle.
If the issue persists, contact Customer Care.
Reposition Pump with special attention to these tips
(reference Section 3. PUMPING - Alignment):
1. Bra is not between Pump and breast.
2. Pump is pressed securely against breast while trying to latch.
If the issue persists, complete steps for orange blinking alert
(Milk Bag, Flextube™ or Flange not assembled correctly).
Remove full bag and store properly.
Change bag and continue pumping.
• To continue pumping, press Pump/Pause button.
• To end session, break latch and remove Pump.
OTHER
ISSUES
Pump does
not “pump.”
Milk does
not flow.
Need to
realign
Willow.
Discomfort
while
pumping.
TO RESOLVE ISSUE
• If this is your rst time using Willow, you may need to wake up Willow by plugging the charger
into an outlet and into Willow (reference Section 2. GETTING STARTED – Wake up Willow).
• Check that Pump is not plugged into Charger.
• Conrm that Pump is powered on by pressing the On/Off button until Pump lights up.
• Conrm battery level is orange or green. If red, recharge Pump.
• If let-down has not yet occurred, consider leaving Pump on breast for longer
period of time to observe for possible delayed let-down. Note: Initial milk let-down time is
unique for each person and varies by many factors.
• Check nipple alignment, pause pump, break latch, and remove from breast.
Realign Willow as described below.
• You may not have the correct Flange size for Willow
(reference Section 2. GETTING STARTED - Willow Flange Size).
• Pause Pump, break latch, and remove Pump from breast. Realign Willow fully assembled (reference
Section 3 - PUMPING - Realignment Tips).
• You may also separate the Pump from the Flange to realign. To do this, perform Flip to Finish before
realigning (reference Section 4. ENDING YOUR SESSION - Flip to Finish). Then, center your nipple in
the Flange Tunnel and bring the Pump to your breast (reference Section 3. PUMPING - Alignment).
If experiencing excessive discomfort try the following
(reference Section 3. PUMPING - Alignment):
• Make sure to press Willow rmly against breast during Stimulation phase.
• Tighten bra to make sure Willow is held rmly against breast.
• Decrease suction level.
• Realign Willow (see above).
• You may be pumping for too long. Willow shuts o automatically after 25 minutes.
• You may not have the correct Flange size
(reference Section 2. GETTING STARTED – Willow Flange Size).
• Stop and see medical professional or breastfeeding specialist.
6
42
willowpump.com l text or call 1-888-WILLOW-3 Willow Wearable Breast Pump Generation 3 Instructions for Use
43
Page 24

OTHER
ISSUES
TO RESOLVE ISSUE
OTHER
ISSUES
TO RESOLVE ISSUE
A lot of air
in Milk Bag
or bag full
indicator with
<4 oz. of milk
pumped.
Decreased
(low) Pump
suction.
Pump stops
pumping.
New users may experience air in the bag. The goal is to reduce the amount of air
in the bag over time using these tips:
• Evaluate the seal between Pump and breast.
1. Make sure bra is not in between Pump and breast.
2. Check to see if there is a gap between the Flange and your breast while pumping.
If you see a gap, press the Pump against your breast and tighten bra straps.
If the problem persists, try a dierent bra that holds Willow securely against your breast.
• Make sure Pump is paused before breaking latch.
• You may not have the correct Flange size
(reference Section 2. GETTING STARTED - Willow Flange Size).
• The Pump has seven suction settings; push up arrow to increase suction.
• Check your Flanges and Flextubes™ for signs of wear.
They should be replaced after three months of use.
• If that does not work, try the following:
Check connections between Flange, Flextube™ and Milk Bag to ensure all are secure.
1.
Visually inspect Flange, Flextube™ and Milk Bag and replace if damaged.
2.
Check that power is on and battery has sufficient charge.
3.
Press Pump securely against breast.
4.
• Pump stops automatically after 25 minutes -
Pump/Pause button pulses - press Pump/Pause to re-start Pump.
• Pump may have stopped because Milk Bag is full -
Pump/Pause button solid - check Milk Bag.
• Pump/Pause button may have been pressed -
Pump/Pause button pulses white - Press Pump/Pause button to continue pumping.
• Check to see if low battery - On/Off button light is solid red.
Pump does
not stop
pumping
Pump or
Charger gets
wet
(immersed
in water).
Pump is not
charging.
Device needs
to be reset.
• Press Pump/Pause button. Break latch and remove Pump.
• If issues persists, break latch and remove Pump. Then press On/Off button
to turn Pump off.
• Dry Pump o immediately. Prop Pump upright with charger port down and
blue suction controls up, and let dry overnight. Do not use Pump or Charger for 24 hrs.
• Contact Customer Care.
• Ensure Charger is fully plugged into Pump Power Port.
• Reset by gently inserting end of a small object, such as a paper clip or earring back,
into the reset Button beneath the Power Port.
The Willow Breast Pump Generation 3 is not a serviceable device.
6
44
willowpump.com l text or call 1-888-WILLOW-3 Willow Wearable Breast Pump Generation 3 Instructions for Use
45
Page 25

7. TECHNICAL INFORMATION
WARRANTY
Under our limited warranty, Willow * (“we,” “us,” “our”), warrants to the original consumer
purchaser (the “purchaser”) to be free from defects in material and workmanship for the period of
12 months from the date of the pump first use on the pump mechanism and the period of 90 days
from purchase on all other product components under normal use and conditions (the “Warranty
Period”). This limited warranty does not cover damage caused by accident, misuse, normal wear
and tear, improper use, unauthorized maintenance or repair, or failure to follow written instructions
for use. The pump can not be submerged in water, washed or sanitized, placed in the refrigerator
or freezer, used during takeoff or landing when traveling on an airplane, or used with any charger
that is not provided with the pump. The flange can not be placed in microwave or microwave
sterilizer bags. Doing so voids this limited warranty. Warranty coverage terminates if you sell or
otherwise transfer this product to another person. This warranty gives you specific legal rights and
you may also have other rights, which vary, by location.
WILLOW MAKES NO EXPRESS WARRANTY OF ANY KIND REGARDING THE PRODUCT OTHER
THAN THOSE WARRANTIES EXPLICITLY SET FORTH HEREIN. ANY IMPLIED WARRANTY,
INCLUDING ANY IMPLIED WARRANTY OF MERCHANTABILITY, NON-INFRINGEMENT, QUIET
ENJOYMENT, OR ANY IMPLIED WARRANTY OF FITNESS FOR A PARTICULAR PURPOSE, TO
THE EXTENT PERMITTED BY LAW, SHALL BE LIMITED IN DURATION TO A PERIOD OF 90 DAYS
FROM THE DATE OF PURCHASE BY THE ORIGINAL PURCHASER.
In the event the product is found by Willow to not meet the above limited warranty in the Warranty
Period, as purchaser’s sole and exclusive remedy Willow will repair or, at the option of Willow,
replace this product without charge for such replacement or parts or labor.NOTE: The purchaser
shall bear all expense for returning this product to Willow. This limited warranty does not apply to
any product that has been used commercially, subjected to misuse, abuse, or alteration.
Only Willow brand replacement parts are recommended for use with Willow breastfeeding
products. Improper or incorrectly performed maintenance or repair, or use of non-Willow brand
replacement parts may invalidate this limited warranty.
TO THE EXTENT PERMITTED BY LAW, Willow SHALL NOT BE LIABLE FOR ANY INDIRECT,
SPECIAL, PUNITIVE, EXEMPLARY INCIDENTAL OR CONSEQUENTIAL DAMAGES INCLUDING,
BUT NOT LIMITED TO, REPLACEMENT COSTS RESULTING FROM THE BREACH OF ANY
WRITTEN OR IMPLIED WARRANTY.
If you wish to make a claim under this limited warranty, you must return the product to Willow
prepaid, together with your dated bill of sale or other dated proof of purchase and a brief
statement of the problem, along with a Returned Goods Authorization number. You may obtain the
appropriate Authorization number and shipping address by calling the phone number or sending
an email to the email address provided. Items returned without an associated Returned Goods
Authorization Number will be returned to sender.
To obtain the address to return goods or a Returned Goods Authorization Number contact the
Customer Care Team.
We recommend recording your serial number here when you first open your pump for easy
reference when contacting Willow Customer Care Team. The serial number can be found on the
pump interior.
Record the Serial Number(s) here for easy reference:
Pump 1:
Pump 2:
*Note: Exploramed NC7, Inc. is d/b/a Willow.
7
46
willowpump.com l text or call 1-888-WILLOW-3 Willow Wearable Breast Pump Generation 3 Instructions for Use
47
Page 26

TECHNICAL SPECIFICATIONS
2016
2017
2018
2019
2020
2021
2022
2023
POWER REQUIREMENTS
Only use the Willow Breast Pump 1, 2, or 3 Charger
Manufacturer: Delta Electronics, Inc.
Part Number: MDS-030AAC05 ZB | Specications: 100 - 240 Vac, 50-60Hz, 0.5A-0.3A
Part Number: MEF-010A05B JA | Specications: 100 - 240 Vac, 50-60Hz, 0.4A-0.2A
SPECIFICATIONS
Pump Dimensions 141mm x 85mm x 112mm
Pump Weight 355 g
Vacuum Strength 35-245 mmHg
Cycle Speed 42-90 cycles/minute
Motor Life
Bluetooth Info Bluetooth v4.1 (Bluetooth Low Energy); Range up to 10 m
Security Encryption 128-bit AES (Advanced Encryption Standard)
Date of Manufacture: The date of
manufacture can be located within
the serial number of the pump. The
serial number is an 11 digit number
formatted as: xxxYM xxxxxx where
“Y” is the year and “M” is the month.
Use the tables to determine the year
and month of manufacture.
273 hours (Dened to be approximately three 15 minute
sessions per day for one year.)
Date of Manufacture:
Year Code
A B C D E F G H
Month Code
Jan Feb Mar Apr May Jun Jul Aug Sep Oct Nov Dec
1 2 3 4 5 6 7 8 9 A B C
Electromagnetic Compatibility Compliance Statement Information
The Willow Breast Pump Generation 3 may be used at home, office, or other general areas.
Special consideration should be given to use:
During Medical Procedures: Do not use the Willow pump during any medical
procedure or during imaging. For example, do not use
pump during RF ablation of a skin anomaly, x-ray, MRI, or ultrasound.
With other Equipment: Use of this equipment adjacent to or stacked with other
equipment should be avoided because it could result in improper
operation. If such use is necessary, the pump and the other equipment
should be observed to verify that they are operating normally.
In High Electrostatic Discharge Environments: If the air is very dry, use the pump
where oors are wood, concrete, or ceramic tile. If oors are covered with
synthetic material, the relative humidity should be at least 30%. If you notice
shocks when you touch things, as sometimes happens in very dry winter months,
be sure to touch a metal item such as a table before handling the Willow pump.
In Industrial Settings: Avoid using the pump near arc welding equipment,
radar installations, and similar industrial settings.
Near RF Emitters: Keep devices that use WiFi, Bluetooth, and other intentional
RF emitters at least 30 cm from the pump during operation. This includes
communications equipment peripherals such as antenna cables and external
antennas. Otherwise, degradation of the performance of the Willow pump
could result. If you know the power output the RF emitter, the table labeled
“Electromagnetic Compatibility Compliance Statement Information”
can be used for more precise information about separation distances.
7
48
willowpump.com l text or call 1-888-WILLOW-3 Willow Wearable Breast Pump Generation 3 Instructions for Use
49
Page 27

Warning: Use of accessories other than those specied by Exploramed NC7 may result in increased
emissions or decreased immunity of the Willow Breast Pump Generation 3.
The Willow Breast Pump Generation 3 has no essential performance; however, it was tested for
immunity to electromagnetic disturbances. The Willow Breast Pump Generation 3 passed with the
following acceptance criteria: pumping vacuum does not exceed a safe level and no components fail.
This equipment uses wireless communication:
Frequency (transmit and receive): 2400 – 2483.5 MHz
Modulation: frequency hopping with GFSK
Effective radiated power: 4 mW
This device complies with part 15 of the FCC Rules. Operation is subject to the following two
conditions: (1) This device may not cause harmful interference, and (2) this device must accept any
interference received, including interference that may cause undesired operation.
Note: This equipment has been tested and found to comply with the limits for a Class B digital
device, pursuant to part 15 of the FCC Rules. These limits are designed to provide reasonable
protection against harmful interference in a residential installation. This equipment generates,
uses and can radiate radio frequency energy and, if not installed and used in accordance with
the instructions, may cause harmful interference to radio communications. However, there is no
guarantee that interference will not occur in a particular installation. If this equipment does cause
harmful interference to radio or television reception, which can be determined by turning the
equipment off and on, the user is encouraged to try to correct the interference by one or more of
the following measures:
Reorient or relocate the receiving antenna.
Increase the separation between the equipment and receiver.
Connect the equipment into an outlet on a circuit different
from that to which the receiver is connected.
Consult the dealer or an experienced radio/TV technician for help.
ELECTROMAGNETIC COMPATIBILITY COMPLIANCE STATEMENT INFORMATION
Recommended separation distances between portable and mobile RF communications equipment
and the Willow Breast Pump Generation 3
Rated maximum output power
of transmitter
w
0.01 0.12 0.12 0.23
0.1 0.38 0.38 0.74
1 1.2 1.2 2.3
10 3.8 3.8 7. 3
100 12 12 23
For transmitters rated at a maximum output power not listed above, the recommended separation distance d in meters (m) can
be estimated using the equation applicable to the frequency of the transmitter, where P is the maximum output power rating of
the transmitter in watts (W) according to the transmitter manufacturer.
NOTE 1: At 80 MHz and 800 MHz, the separation distance for the higher frequency range applies.
NOTE 2: These guidelines may not apply in all situations. Electromagnetic propagation is affected
by absorption and reflection from structures, objects and people.
Separation distance according to frequency of transmitter (m)
150kHz to 80 MHz 80 MHz to 800 MHz 800 MHz to 2.7 GHz
7
50
willowpump.com l text or call 1-888-WILLOW-3 Willow Wearable Breast Pump Generation 3 Instructions for Use
51
Page 28

GUIDANCE AND MANUFACTURER’S DECLARATION – ELECTROMAGNETIC EMISSIONS
GUIDANCE AND MANUFACTURER’S DECLARATION – ELECTROMAGNETIC IMMUNITY
The Willow Breast Pump Generation 3 is intended for use in the electromagnetic environment specified below.
The customer or user of the Breast Pump should assure that it is used in such an environment.
Emissions Test Compliance Electromagnetic Environment – Guidance
RF emissions CISPR 11 Group 1 The Willow Breast Pump Generation 3 uses RF
energy only for its internal function. Therefore, its RF
emissions are very low and are not likely to cause any
interference in nearby electronic equipment.
RF emissions CISPR 11 Class B The Willow Breast Pump Generation 3 is suitable
for use in all establishments, including domestic
Harmonic emissions IEC 61000-3-2 Class A
Voltage fluctuations/flicker emissions IEC
61000-3-3
Complies
establishments and those directly connected to
the public low-voltage power supply network that
supplies buildings used for domestic purposes.
The Willow Breast Pump Generation 3 is intended for use in the electromagnetic environment specied below. The
customer or ser of the Breast Pump should assure that it is used in such an environment.
Immunity Test IEC 60601 Test Level Compliance Level Electromagnetic Environment – Guidance
Electrostatic discharge
(ESD) IEC 61000-4-2
Normal operation while
on battery power.
Electrostatic discharge
(ESD) IEC 61000-4-2
Battery Charge Mode
or Device Firmware
Update (DFU) Mode.
Electrical fast transient/
burst IEC 61000-4-4
Surge
IEC 61000-4-5
±8 kV contact
±15 kV air
±8 kV contact
±6 kV air
±8 kV and 15 kV air
±2 kV for power
supply lines
±1 kV line to line ±1 kV line to line The Willow Breast Pump Generation 3 is suitable
±8 kV contact
±15 kV air
±8 kV contact
±6 kV air
±8 kV and 15 kV air*
±2 kV for power
supply lines
Floors should be wood, concrete or ceramic tile. If
oors are covered with synthetic material, the relative
humidity should be at least 30%.
Floors should be wood, concrete or ceramic tile. If
oors are covered with synthetic material, the relative
humidity should be at least 30 %.
*NOTICE: If the Willow Breast Pump Generation 3 is
exposed to ESD air discharges at levels between 8kV
and 15 kV when in Battery Charge mode or Device
Firmware Update (DFU) Mode, it may become nonoperational.
The Willow Breast Pump 2.0 is suitable for use in all
establishments, including domestic establishments
and those directly connected to the public
low-voltage power supply network that supplies
buildings used for domestic purposes.
for use in all establishments, including domestic
establishments and those directly connected to
the public low-voltage power supply network that
supplies buildings used for domestic purposes.
7
52
willowpump.com l text or call 1-888-WILLOW-3 Willow Wearable Breast Pump Generation 3 Instructions for Use
53
Page 29

GUIDANCE AND MANUFACTURER’S DECLARATION – ELECTROMAGNETIC EMISSIONS
GUIDANCE AND MANUFACTURER’S DECLARATION – ELECTROMAGNETIC EMISSIONS
The Willow Breast Pump Generation 3 is intended for use in the electromagnetic environment specied below.
The customer or user of the Breast Pump should assure that it is used in such an environment.
Immunity Test IEC 60601 Test Level Compliance Level Electromagnetic Environment –Guidance
Voltage dips, short
interruptions and
voltage variations on
power supply input lines
IEC 61000-4-11
Power frequency (50/60
Hz) magnetic eld IEC
61000-4-8
NOTE UT is the a.c. mains voltage prior to application of the test level.
<5 % UT (>95 % dip
in UT) for 0.5 cycle
30% reduction,
25/30 periods at 0°
> 95% reduction, 0.5
period at 0°, 45°,
90°, 135°, 180°, 225°,
270° and 315°
> 95% reduction, 1
period at 0°
> 95% reduction,
250/300 periods
30 A/m 30 A/m The Willow Breast Pump Generation 3 is suitable
<5 % UT (>95 % dip
in UT) for 0.5 cycle
30% reduction,
25/30 periods at 0°
> 95% reduction, 0.5
period at 0°, 45°,
90°, 135°, 180°, 225°,
270° and 315°
> 95% reduction, 1
period at 0°
> 95% reduction,
250/300 periods
The Willow Breast Pump Generation 3 is suitable
for use in all establishments, including domestic
establishments and those directly connected to
the public low-voltage power supply network that
supplies buildings used for domestic purposes.
for use in all establishments, including domestic
establishments and those directly connected to
the public low-voltage power supply network that
supplies buildings used for domestic purposes.
The Willow Breast Pump Generation 3 is intended for use in the electromagnetic environment specied below. The customer or
user of the Breast Pump should assure that it is used in such an environment.
Immunity Test IEC 60601 Test Level Compliance Level Electromagnetic Environment –Guidance
Conducted RF
IEC 61000-4-6
Radiated RF IEC
61000-4-3
NOTE 1: At 80MHz and 800MHz, the higher frequency range applies.
NOTE 2: These guidelines may not apply in all situations. Electromagnetic propagation is affected by absorption and reection
from structures, objects and people.
3 V; 150 kHz
to 80 MHz
6 V; ISM and
amateur
radio bands
between
0.15 MHz and
80 MHz
10V/m
80 MHz to
2.7 GHz
3 V; 150 kHz
to 80 MHz
6 V; ISM and
amateur
radio bands
between
0.15 MHz and
80 MHz
10V/m
80 MHz to
2.7 GHz
Portable and mobile RF Communications equipment should be
used no closer to any part of the Willow Breast Pump, including
cables, than the recommended separation distance calculated
from the equation applicable to the frequency of the transmitter.
Recommended separation distance
d = 1.2√P
d = 1.2√P 80 MHz to 800 MHz
d = 2.3√P 800 MHz to 2.5 GHz
Where P is the maximum output power rating of the transmitter
in watts (W) according to the transmitter manufacturer and d is
the recommended separation distance in meters (m).
Field strengths from xed RF transmitters, as
determined by an electromagnetic site survey,
a. should be less than the compliance level
in each frequency range.
b. Interference may occur in the vicinity of
equipment marked with the following symbol:
7
54
willowpump.com l text or call 1-888-WILLOW-3 Willow Wearable Breast Pump Generation 3 Instructions for Use
55
Page 30

GUIDANCE AND MANUFACTURER’S DECLARATION – ELECTROMAGNETIC EMISSIONS
a. Field strengths from fixed transmitters, such as base stations for radio (cellular/cordless) telephones and landmobile radios, amateur radio, AM and FM radio broadcast and TV broadcast cannot be predicted theoretically
with accuracy. To assess the electromagnetic environment due to fixed RF transmitters, an electromagnetic site
survey should be considered. If the measured field strength in the location in
which the Willow Breast Pump is used exceeds the applicable RF compliance level above, the Willow Breast Pump
should be observed to verify normal operation. If abnormal performance is observed, additional measures may be
necessary, such as reorienting or relocating the Willow Breast Pump.
b. Over the frequency range 150 kHz to 80MHz, field strengths should be less than 3 V/m.
DISPOSAL INFORMATION
The breast pump contains a rechargeable lithium ion battery. Use your local return and
collection system for electrical waste and electronic equipment (including batteries).
Flange and Milk Bags can be disposed of in your home’s recycling container. Flextube™
should be disposed of in your home’s waste management container.
GLOSSARY & SYMBOLS
OPERATING CONDITIONS
OPERATING CONDITIONS
Operating Temperature 5 to 40 °C
Relative Humidity 15% - 90%; non-condensing
Pressure 700 hPa to 1060 hPa
TRANSPORT, STORAGE, DISPOSAL
TRANSPORT AND STORAGE
Temperature - 20 to 60 °C
Relative Humidity 0%-93%; non-condensing
Pressure 50 hPa to 1060 hPa
56
willowpump.com l text or call 1-888-WILLOW-3 Willow Wearable Breast Pump Generation 3 Instructions for Use
PUMP CONTROL BUTTONS
BUTTON FUNCTION
ON / OFF
PUMP / PAUSE
UP ARROW = INCREASE Suction Strength
DOWN ARROW = DECREASE Suction Strength
7
57
Page 31

SYMBOLS
SYMBOLS
SYMBOL DEFINITION SYMBOL DEFINITION
Manufacturer Keep away from heat
Date of Manufacture Temperature Limit
Lot Number Humidity Limitation
Catalog Number Atmospheric Limitation
Serial Number Consult Instructions For Use
Do not use if package is
damaged
Caution
SYMBOL DEFINITION SYMBOL DEFINITION
Keep dry Type BF Applied Part
Class II Equipment –
Device does not rely on
earth plug or power cord.
Indoor use only
Do not reuse. Radiation
Recycling
Ingress Protection
Do not throw in trash.
Send to a recycling center.
Product tested by Intertek
and found in compliance
with standards listed.
7
58
willowpump.com l text or call 1-888-WILLOW-3 Willow Wearable Breast Pump Generation 3 Instructions for Use
59
Page 32

Manufactured for:
Exploramed NC7, Inc. d/b/a Willow
1975 W. El Camino Real #306
Mountain View, CA 94040
United States
Contact Information:
Customer Care
phone: 1-888-WILLOW-3
email: care@willowpump.com
©2019 Willow. All rights reserved. Willow, Flextube and the stylized “W” are
trademarks or registered trademarks of Willow in the United States and other countries.
Patent: www.willowpump.com/patents/
CAREFULLY READ ALL INSTRUCTIONS PRIOR TO USE
Save instructions and sales receipt for future reference.
The Bluetooth® word mark and logos are registered trademarks owned by the
Bluetooth SIG, Inc. and any use of such marks by Willow is under
license. Other trademarks and trade names are those of their respective owners.
60
willowpump.com l text or call 1-888-WILLOW-3
 Loading...