

Page 1

A complimentary Copy from Mr & Mrs Vintage Typewriters
For More Visit www.MrMrsVintageTypewriters.com
Page 2

\
r—K,
gzxgazi‘iidat-s;ofrubber
hum
soiling
the
type:
ha
3.
Km”)
{ha
types
dean;
?'mwn
Hus
amidwl
gum
air
the
lam
page
.13
SM)
W51
Hug:
numbness
in
brackets
in
tin:
{ext
refer
to
*akctch
51:,
[ha
and
of
mm;
bcmkiem
in
r;}<.<;:u:h
1%,
Rd.
,,
..
V
7.4“
.U
_“
n
x.
3min?
.x.mmm
uplaamg
you;
g‘ikgé
A
clear
iezter
‘45
pleasant
m
mm:
:71:
m
Hf»;
Lt‘=i~‘f,3“'
r47
3J4
mum
aha
Cay‘nage
:25!
the
way
to
Sufi:
or
right
bc-fcr's:
i"i'$:k§="fi§;{
:1!*v“’f_/;
Page 3
Table
of
Contents
Page
HelprI
Hints
....
.....A..
Inside
cover
The
Ribbon
Preface
and
Preliminaries
Changing
the
Colour
8
Preface2Stencils
..8
Opening
the
Carrying
Case...........2/3
ChOICe
Of
Ribbon
:nd
Spools
8
Unblocking
the
Machine
............2
Reversing
the
Ribon'
Closing
the
Carrying
Case...,.......2/3
ChangIng
the
RIbbon
9
Making
the
Machine
Ready
for
Use
Unlocking
and
Locking
the
Carriage
.......3AUtomat'c
TabUIator
10/11
Inserting
the
Paper
...
...
.....
3
a)
Setting
the
Stops
_.
10
b)
Clearing
Individual
Stops
10
General
Rules
c)ClearingallStops.............10
Graduated
Paper
Side
Guide.4
Pro
ressive
Brake
10
Adjusting
PositionofPaper
.
.
4
g
‘
Hiding-rollers
Plate
(endofpage).4
Transparent
Card
Grips
and
Guide
Lines
.
S
_
.
Capital
Letters
(Shifting)
.5Ma'ntenance
and
CleanIng
Movement
Of
CerrIage
'
5
Do
not
take
Your
Machine
Apart
.
.....
..
12
Return
of
Carriage
S
__.
Space
Bar5MaIntenance
and
LubrIcatIon
.
12
Passage
from
one
Linetothe
Next.
5
CleanIng
the
Types
12
Location
of
Line
or
Letter
(Corrections,Additions)
6
Cleaning
the
Platen
-
12
Releasing
the
Platen
.
6
Cleaning
the
Machine
.
12
a)towrite
between
the
lines.6
b)towriteonruled
paper.
6
Intermediate
Table.6Serial
Numberofthe
Machine
12
Drawing
Lines
.
7
“
Lightning”Margins.7
Margin
Release
Key
(end
of
line)
and
Freeing
of
Operating
Parts
Jammed
Type
Bars..........
Touch
Regulator
7
Diagram
Inside
back
cover
Page 4
Preface
and
Preliminaries
Preface
Thisisthe
HERMES
2000,aprecision
typewriter
that
easily
accessible
from
the
front.
This
makes
the
HERMES
2000
very
easytouse.
carefully,
all
the
same.
incorporates
all
the
very
latest
improvements.
All
levers
are
VlSIble
and
But
read
the
instructions
for
its
use
and
maintenance
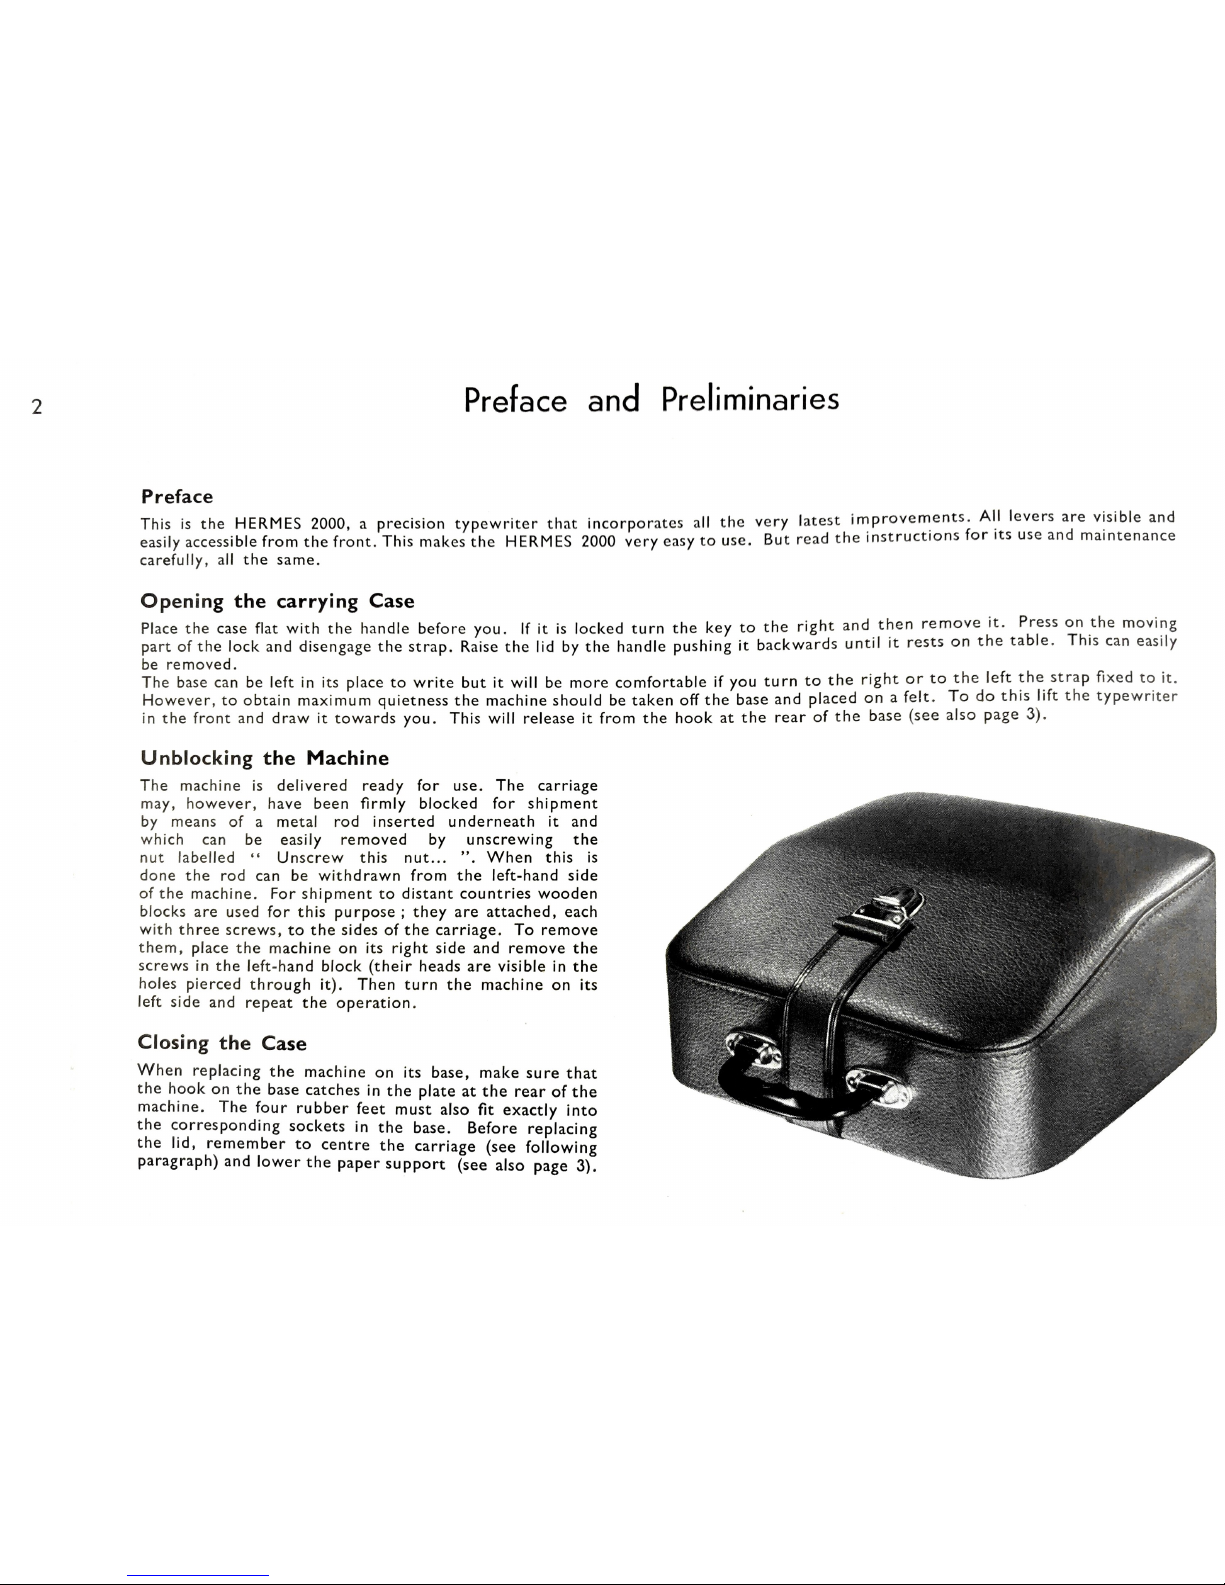
Opening
the
carrying
Case
Place
the
case
flat
with
the
handle
before
you.Ifitislocked
turn
the
keytothe
right
andthen
remove
It.
Pressonthe
movihg
partofthe
lock
and
disengage
the
strap.
Raise
the
lidbythe
handle
pushing
it
backwards
untilItrests
on
the
table.
This
can
eaSily
be
removed.
.
The
base
canbeleftinits
placetowrite
butitwillbemore
comfortable
if
you
turntothe
rightorto
the
left
the
strap
fixedtoit.
However,
to
obtain
maximum
quietness
the
machine
should
be
taken
off
the
base
and
placed
onafelt.
To
do
this
lift
the
typewriter
in
the
front
and
draw
it
towards
you.
This
will
release
it
from
the
hook
at
the
rear
of
the
base
(see
also
page
3).
Unblocking
the
Machine
The
machineisdelivered
ready
for
use.
The
carriage
may,
however,
have
been
firmly
blocked
for
shipment
by
means
ofametal
rod
inserted
underneath
it
and
which
can
be
easily
removed
by
unscrewing
the
nut
labelled
“
Unscrew
this
nut...
”.
When
this
is
done
the
rod
canbewithdrawn
from
the
left-hand
side
of
the
machine.
For
shipment
to
distant
countries
wooden
blocks
are
used
for
this
purpose;
they
are
attached,
each
with
three
screws,tothe
sidesofthe
carriage.
To
remove
them,
place
the
machine
on
its
right
side
and
remove
the
screws
in
the
left-hand
block
(their
heads
are
visible
in
the
holes
pierced
through
it).
Then
turn
the
machine
on
its
left
side
and
repeat
the
operation.
Closing
the
Case
When
replacing
the
machineonits
base,
make
sure
that
the
hook
on
the
base
catches
in
the
plateatthe
rearofthe
machine.
The
four
rubber
feet
must
also
fit
exactly
into
the
corresponding
sockets
in
the
base.
Before
replacing
the
lid,
remember
to
centre
the
carriage
(see
following
paragraph)
and
lower
the
paper
support
(see
also
page
3).
Page 5
Making
the
Machine
Ready
for
Use
3
Unlocking
and
Locking
(centering)
the
Carriage
a)Tounlock,
raise
Locking
Lever
(27)
and
move
Carriage
to
the
right
until
the
leverisreleased.
b)Tolockorcentre
the
Carriage,
raise
Locking
Lever
(27)
with
forefinger.
and
holditwhile
pressing
on
Carriage
Release
LeverAtthe
same
time
press
with
thumbonRight
Platen
Knob
(28)toslow
down
carriage
motion.
When
the
central
position
is
reached
the
carriage
will
lock
automatically.
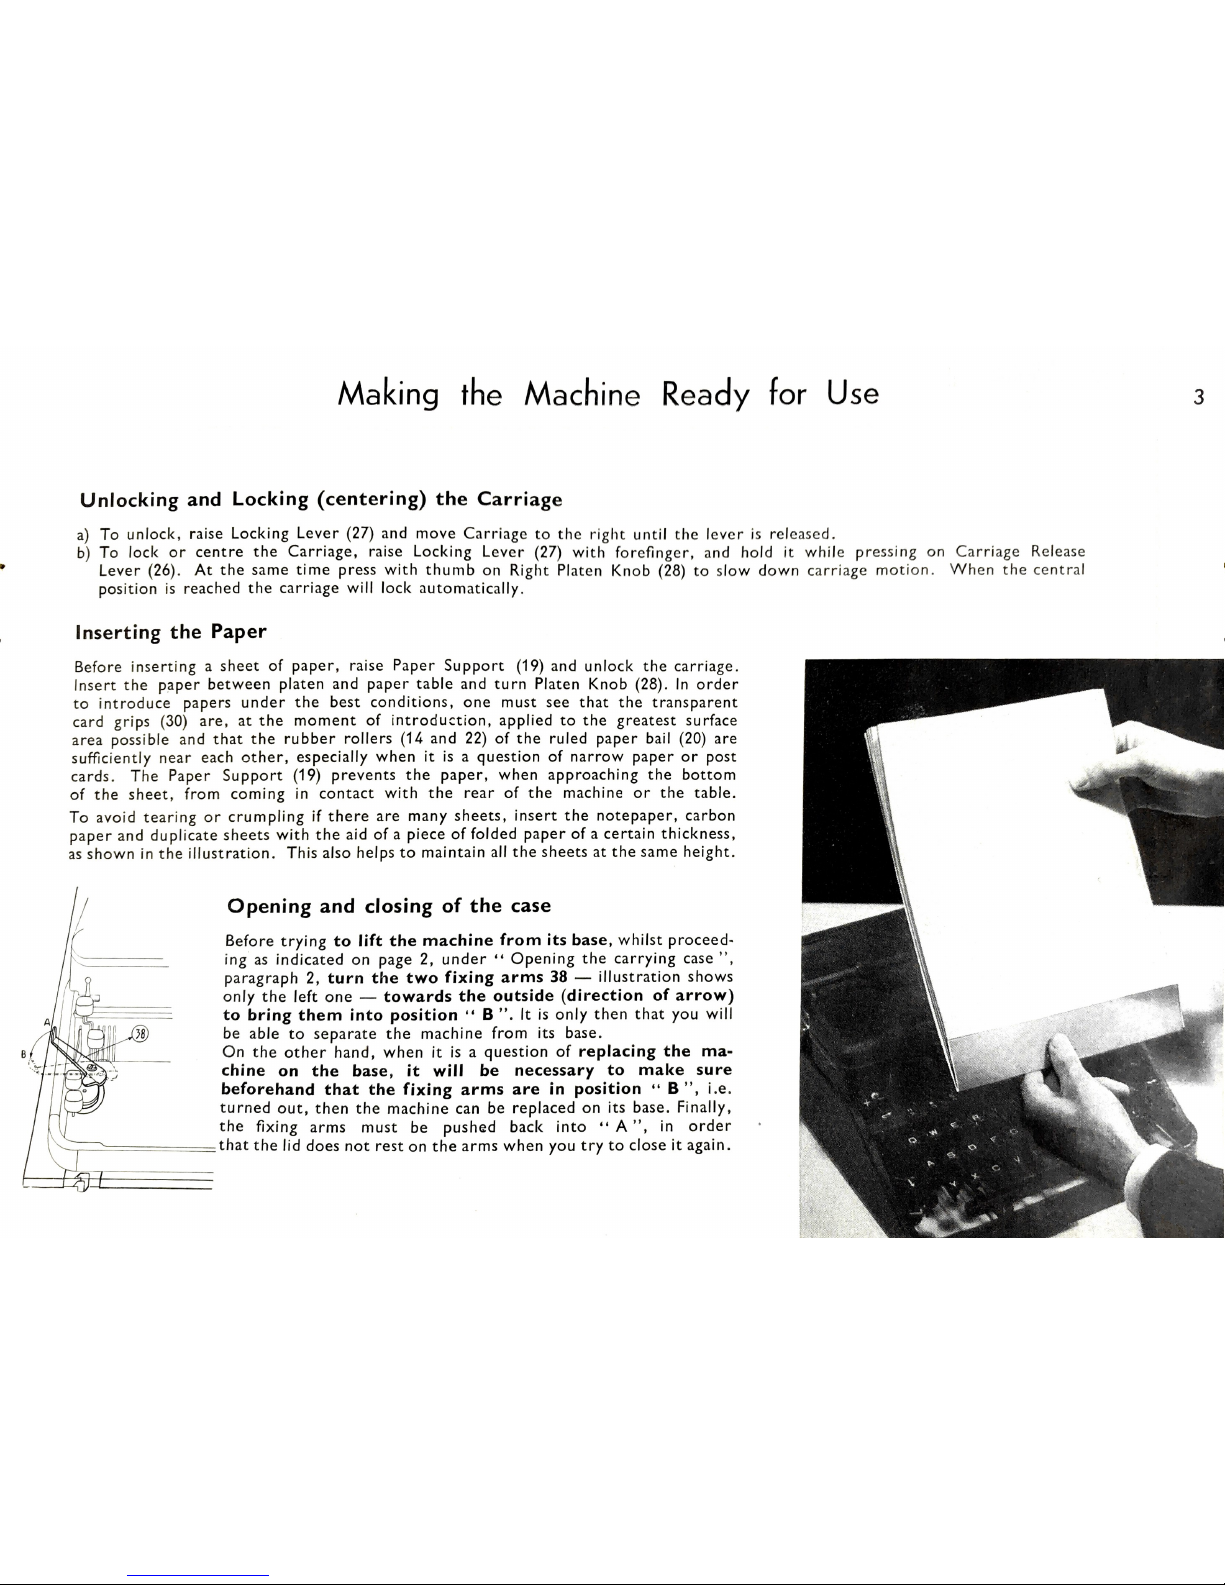
Inserting
the
Paper
Before
inserting
a
sheet
of
paper,
raise
Paper
Support
(19)
and
unlock
the
carriage.
insert
the
paper
between
platen
and
paper
table
and
turn
Platen
KnobInorder
to
introduce
papers
under
the
best
conditions,
one
must
see
that
the
transparent
card
grips
(30)
are,atthe
momentofintroduction,
appliedtothe
greatest
surface
area
possible
and
that
the
rubber
rollers
(14
and
22)ofthe
ruled
paper
bail
(20)
are
sufficiently
near
each
other,
especially
whenitisaquestion
of
narrow
paperorpost
cards.
The
Paper
Support
(19)
prevents
the
paper,
when
approaching
the
bottom
of
the
sheet,
from
comingincontact
with
the
rearofthe
machineorthe
table.
To
avoid
tearingorcrumpling
if
there
are
many
sheets,
insert
the
notepaper,
carbon
paper
and
duplicate
sheets
with
the
aidofa
pieceoffolded
paperofa
certain
thickness,
as
showninthe
illustration.
This
also
helpstomaintain
all
the
sheetsatthe
same
height.
Opening
and
closing
of
the
case
Before
trying
to
lift
the
machine
from
its
base,whilst
proceed-
ingasindicated
on
page2,under“Opening
the
carrying
case
”,
paragraph
2,
turn
the
two
fixing
arms
38—illustration
shows
only
the
left
one——towards
the
outside
(direction
of
arrow)
to
bring
them
into
position
“B”.
It is
only
then
that
you
will
be
able
to
separate
the
machine
from
its
base.
i‘V“AOnthe
other
hand,
whenitisaquestion
of
replacing
the
ma-
‘~
chineonthe
base,itwillbenecessarytomake
sure
beforehand
that
the
fixing
arms
are
in
position
“B",
Le.
turned
out,then
the
machine
canbereplaced
on
its
base.
Finally,
the
fixing
arms
must
be
pushed
back
into“A
”,
in
order
‘L~
Atthat
the
lid
does
not
restonthe
arms
when
you
trytocloseitagain.
\H
7
Flag!
\
,,_
L__L4‘J‘J_l—__
Page 6

General
Rules
Graduated
Paper
Side
Guide
On
the
left-hand
sideofthe
paper
tableisan
Adjustable
Paper
Side
Guide
the
outer
edgeofwhichisbenttoformastop.
Itismade
expressly
rather
stifftoprevent
it
from
shiftingofits
own
accord.
This
Side
Guide
enables
all
the
sheets
of
paper
to
be
inserted
in
the
same
way
and
ensuresauniform
margin
without
adjusting
marginortabulator
stops.Ifcareistaken
alwaystorest
the
paper
against
the
edgeofthis
device.
you
will
findnodifficulty
in
rc-inserting
a
sheet
for
the
purposeofmakingacorrection.
The
following
testiseasy
and
conclusive:
Insertasheetofpaper
perfectly
straight
and
taking
caretoplaceitagainst
Side
Guide
Place
Ribbon
Indicator
(32)on“
Red"
and
type
the
word
“
HERMES"severaltimes
on
differentlines,actioning
Line
Space
Lever
Remove
the
sheet
from
the
machine
and
re-insert
carefully.
Place
the
Ribbon
Indicator
on“Black
”,
action
the
Line
Space
Lever
until
the
first
word
“
HERMES"
written
in
red
appears,
then
type
this
word
in
black
over
the
red.
The
letter“H”will
strike
on
exactly
the
same
spot,
and
so
will
the
others
(see
illustration).
Adjusting
Position
of
Paper
Draw
Paper
Release
Lever
(25)
towards
you.
This
raises
the
paper
bail
(20)
and
releases
the
paper
from
the
Feed
Rollers.
The
paper
can
nowbeeasily
adjusted.
Return
Paper
Release
Lever
(25)toits
initial
position.
The
divisions
on
Paper
Bail
(20)
helptoset
margins
(see
p. 7)
and
automatic
tabulator
stops
(Seep.10).
Rubber
Rollers
(14&22)
canbeshiftedtoright
and
lefttosuit
sheetsofdifferent
width.
They
are
parti-
cularly
useful
for
writing
postcards
and
small
forms.
Hiding-rollers
plate
(end
of
page)
This
plate
has
two
openings
(7)
thankstowhich
one
can
control
the
advancement
of
the
paper
gradually
by
writing,
enabling
onetonote
soon
enough
the
end
of
the
page.
Page 7

General
Rules
Transparent
Card
Grips
and
Guide
Lines
Card
Grips
(30)
permit
writingatthe
extreme
upper
edgeofthe
paper
beforeitpasses
under
the
paper
bailaswellasto
the
very
bottomofthe
sheet.
They
also
serveasguide
lines(17),as
their
top
limitsofgraduation
indicate
the
levelofthe
written
line;
please
note
that
petrol
harms
the
transparence
of
the
Card
Grips.
Capital
Letters
(shifting)
To
write
capital
letters,
depress
one
or
other
of
Shift
Keys
(1&35).
For
continuous
writing
in
capitals,
press
down
completely
Shift
Lock
To
return
to
small
letters,
depress
Shift
Key
Movement
of
Carriage
The
normal
movement
of
the
carriage
to
the
leftiscaused
by
striking
the
keys
or
Space
Bar
It
can,
however,
be
moved
rapidly
from
lefttorightorvice
versabypressing
Platen
Knob(8or
28)
with
the
thumb
and
raising
Carriage
Release
Lever
(9or26)
with
the
forefinger.
Tabulator
Key
(33)
can
alsobeused
for
this
purpose,
if
tabulator
stops
are
previously
cleared,
and
permits
the
slowing
downofthe
movement
of
the
carriage.
Return
of
Carriage
To
move
carriage
back
one
spaceata
time,
use
Back
Space
Key
This
serves
for
makingacorrection
or
for
rewriting
a
badly
typed
character.
Do
not
strike
the
Back
Space
Key
but
pressitdown
completely.
Space
Bar
Space
Bar
(36)isusedtomove
the
carriage
from
righttoleft,toseparate
two
words,
ortoleave
blank
spaces.
Passage
from
one
Linetothe
Next
To
return
the
carriage
and
prepare
for
writing
on
the
next
line,
simply
push
Line
Space
Lever
(6)
with
left
forefinger.
This
moves
the
carriagetothe
right
and
spaces
the
papertothe
next
line
automatically
at
the
same
time.
There
are
three
line
spacings
on
the
HERMES
2000.
These
are
set
by
Line
Space
Regulator
A complimentary Copy from Mr & Mrs Vintage Typewriters
For More Visit www.MrMrsVintageTypewriters.com
Page 8

General
Rules
Location
of
LineorLetter
(corrections,
additions.
etc.)
Releasing
the
Platen
a)
for
writing
between
two
lines:
The
top
limitsofthe
graduation
on
the
guide
lines
thatisto
say.
the
horizontal
line.
gives
the
exact
height
of
the
writing
line.
Any
vertical
lineofthe
divisions
gives
the
place
of
printing
ofaletter.
as
the
middle
corresponds
exactly
with
the
middle
ofaletter
(see
illustration).
The
guide
lines
serve
to
replace
documents
justasthey
were
when
they
had
to
be
corrected
or
taken
outofthe
machine.
When
Line
Space
Indicator
(10)isplaced
in
position
0,
the
platenisreleased
from
line
space
ratchet
control
for
the
purpose
of
writing
between
the
lines.
When
the
indicator
is
returned
to
its
previous
position
the
platen
returnstothe
same
line
as
before.
Thisisvery
useful
for
making
an
addition
or
correction
between
the
lines.
b)
for
writing
on
ruled
paperorfilling
forms
in
contrast
to
the
foregoing,
the
platen
does
not
return
to
the
previous
line
if
Left
Platen
Knob
(8)
is
used
to
release
the
platen
from
all
spacing
control.
By
pulling
out
this
knob
the
platenisreleased;
by
pushing
it
in,
the
ratchet
is
again
engaged
and
the
new
line
spacing
startsatthis
point.
This
deviceisemployed
for
writing
on
forms
or
ruled
paper,
where
fixed
spacing
is
useless.
Do
not
forget
that
the
writing
line
cor-
responds
to
the
horizontal
lineofthe
guide
lines
Intermediate
Table
(24)
This
is
very
useful
when
one
wants
to
correct
many
copiesoraddafew
wordsbyhand,
without
taking
the
paper
from
the
machine.
stell‘idar’d
i
Page 9

General
Rules
Drawing
Lines
To
draw
lines
rapidly
for
tablesofall
kinds.
insert
the
pointofa
pencilinthe
holeinCard
Grip
(30)
(see
illustration).
By
moving
the
carriage
sidewaysahorizontal
lineisobtained.
To
drawavertical
line,
simply
turn
the
platen.
“
Lightning
”
Margins
For
setting
the
right
and
left
hand
marginsofa
page,
place
the
carriageinthe
position
for
writing
the
First
letterofa
line
and
depress
Left
Margin
Lever
This
sets
the
margin
stop
automaticallyatthe
place
required.
Repeat
the
operation
with
Right
Margin
Lever
(23)toset
the
right-hand
margin.
To
vary
left-hand
margin,
depress
Margin
Lever
(12)
and
holditin
this
position
while
moving
the
carriagetowhere
you
want
the
new
margin.
Release
lever
Resetting
of
right-hand
marginisdonebydepressing
Margin
Lever
(23)
andatthe
same
time
actioning
Carriage
Release
Lever
Allow
carriage
to
slidetothe
point
where
the
new
marginisrequired
and
release
both
levers.
Margin
Release
Key
(end
of
line)
and
freeing
of
jammed
type
bars
The
type
bars
are
automatically
blocked
afew
spaces
after
the
bell
rings.Towriteinthe
margin
press
Margin
Release
Key
this
will
permit
youtowritetothe
extreme
right-hand
endofthe
platen.
The
same
key
also
permits
writing
outside
the
left-hand
margin
without
shifting
Margin
Lever
Key
34
has
anotherfunction;
thatof“
freeing”.It
some-
times
happens
that
two
type
bars
are
locked
:
all
one
has
todoistopress
this
key
and
the
type
bars
fall
back
into
place.
Touch
Regulator
Adjust
the
touchofyour
HERMES
2000toyour
own
taste
by
means
of
Knob
(16)
placedatthe
rearofthe
machine.
Turn
towards
(+)tomake
touch
harder
and
towards
(—)
to
makeitsofter.
Page 10

The
Ribbon
Changing
the
Colour
of
the
Ribbon
The
three
coloured
dots
above
the
aperture
for
Ribbon
Indicator
(32)
show
in
what
colour
the
machine
will
write
without
having
to
makeatest.
The
blue
dot
indicates
that
the
upper
halfofthe
ribbonisin
use;the
red
dot
corresponds
to
the
lower
half.
When
Ribbon
Indicator
(32)isplacedinthe
middle
position
opposite
the
white
dot,
the
ribbonisdisengaged
for
stencil
work.
Stencils
For
cutting
stencils
disengage
the
ribbon
by
moving
Ribbon
Indicator
(32)
to
the
middle
position
opposite
the
white
dot.
Clean
the
types
well
with
a
brush
and
strike
the
keys
uniformly.
Choice
of
Ribbon
and
Spools
To
function
perfectly
on
the
HERMES
2000
a
ribbon
must
comply
with
the
following
requirements:
It
must
be
wound
onaHERMES
spool,
oratany
rate
onawell-centred
spool
having
the
same
slots
as
the
HERMES.
It
must
be
.1/2"
(13
mm.)
wide
and
have
an
eyelet
about
5”
(12
cm.)
from
each
end.
To
ensure
clear
writing
the
ribbon
must
be
strong
and
thin
at
the
same
time.
Reversing
the
Ribbon
Automatic
reverse:
If
the
ribbon
is
provided
with
an
eyelet,
it
will
wind
automatically
off
the
full
spool
on
to
the
empty
one.
Manual
reverse:
Should
itbenecessary
for
any
reason
whatsoever
to
change
the
direction
of
ribbon
travel.
just
push
one
of
Ribbon
Reverse
Levers
(5or29)
placedateither
sideofthe
machine.
If
Lever
(29)onthe
rightispushed,
the
ribbon
will
wind
up
on
right-hand
spool;
if
Lever
(S)onthe
leftispushed,
the
ribbon
will
traveltothe
left.
Page 11

The
Ribbon
Changing
the
Ribbon
.
Remove
Top
Plate
(37)bylifting
and
carefully
observe
how
the
ribbonisFitted.
.
Wind
the
ribbononto
oneofthe
spools.
.
Set
the
carriageinthe
position
for
writingincapitals
and
place
Ribbon
Indicator
(32)
opposite
the
red
dot.
.
Press
two
keysatcentreofkeyboard
simultaneouslysothat
the
type
bars
jam
(see
Fig.
A).
This
will
hold
Ribbon
Carrier
(31)
in
elevated
position
for
easy
removalofribbon,
first
from
Carrier
(31)
and
then
from
Lateral
Ribbon
Guides
(15
and
21).
.
Remove
the
two
spools
and
throw
away
the
worn
out
ribbon.
Hook
the
endofthe
new
ribbononthe
empty
spool
and
winditas
farasthe
eyelet.
.
Place
the
two
spoolsinposition
with
the
red
halfofthe
ribbon
downward.
Press
the
spools
firmly,sothat
the
pin
near
the
axle
enters
the
second
holeinthe
spool.
Take
care
that
the
eyeletatthe
endofthe
ribbonissituated
between
the
axle
and
the
lateral
ribbon
guide.
Slip
the
ribbon
between
the
platen
and
Ribbon
Carrier
then
insertitfrom
behindinthe
slotsinCarrier
The
ribbon
must
pass
behind
the
carrier,asshown
in
Fig.(B),
and
notinfront
(see
Fig.C“
wrong
”).
in
Fig.
D.
Thread
ribbon
through
Lateral
Ribbon
Guides
(15
and
21),asdemonstrated
®~+
(right)
B
(wrong)
C
Page 12

10
The
Automatic
Tabulator
The
Automatic
Tabulator
The
tabulator
isamechanism
for
displacing
the
carriage
automatically
from
one
column
to
the
next.
21)
Setting
the
stops.
The
graduations
on
Paper
Bail
(20)
correspond
to
as
many
tabulator
stops.
If
you
wish
the
carriage
to
stop,
for
instance,
at
the
30th
space,
move
ittothe
position
where
the
central
guide
(18)
coincides
with
the
figure
30
on
the
paper
bail.
Push
Tabulator
Set
Key
(4)tothe
left
To
set
further
stops,
repeat
the
operation.
Then
draw
the
carriage
completely
to
the
right.
Thereafter,
each
time
Tabulator
Key
(33)ispressed
the
carriage
will
stopatthe
selected
positions.
b)
Clearing
Individual
Stops.
To
clearacertain
stop
for
the
purpose
of
eliminating
a
column
for
which
you
have
no
further
use,
press
Tabulator
Key
(33)
to
bring
the
carriage
to
this
stop
and
push
Tabulator
Set
Key
(4)tothe
right
c)
Clearing
All
Stops.
Simply
raise
Stop
Clear
Key
(11)toclear
all
stopsatonce.
Progressive
Brake
The
tabulator
of
the
HERMES
2000isfitted
withadevice
for
slowing
down
the
movementofthe
carriage.
A
normal
pressure
on
Tabulator
Key
(33)
causes
the
carriage
to
slide
rapidly.
A
stronger
pressure
makesittravel
more
slowly
and
avoids
all
shock
when
it
comes
toastop.
The
advantage
ofaprogressive
brake
of
this
typeisobvious.
A complimentary Copy from Mr & Mrs Vintage Typewriters
For More Visit www.MrMrsVintageTypewriters.com
Page 13

The
Automatic
Tabulor
’1
KN
Fran
ais:Les
machinesaécrlre
"ELEMES"
sent
livrables
avec
les
écritures
suivantes:
English:The
"HERMES"
typewrlters
canbefitted
with
the
following
types:
Deutsch
:
Die
"HERMES"-Schreibmaschinen
kdnnen
mlt
fol—
genden
Schriftarten
geliefert
werden:
Es
a501:Lag
méquinas
"HERMES"
pueden
ser
entregadas
con
los
siguientes
tipos:
Automatic
Tabulator
Ecritures
—
Types
Espacement
a
Schriftarten
—
T1905
Spacing
Baby
Aedla
2000
Amb'
4a.
Setting
IndIVIdual
Stops.
.
__
Economlc
..
1,5
mm
-
-
—
EC
4b.
Clearing
lndIVIdual
Stops.
Diamant
(Di)
2,0
mm
-
Di
Di Di
K
Ellte
(El)
2,0
mm
El
El El
E1
.
Hermes
Special
2,5
mm
-
H5
H3
H5
11'Stop
Clear
ey
Pica
(PI)
..
2,5
mm
PI PI
PI
PI
Large
Pica
(LP)
2,5mm—LpLP
LP
33'
TabUIator
Key'
Medium
Roman
(Mr)
2,5
mm
—
Mr
Mr
:17:
A
..-
Colorls-Colour
Baby
Medla
2000
Amb.
nghtmng
Marglns
Fame
-cOlor
12
Left
Margin
Lever.5“'
grey'gran‘5‘15xxx‘
23.
Right
Margin
Lever.
Page 14

12
Maintenance
and
Cleaning
Do
not
Take
Your
Machine
Apart
The
carriage
spring
and
the
whole
mechanism
of
the
HERMES
2000
are
regulated
at
the
works
so
astogive
complete
satisfaction
to
the
most
expert
typist.Nofurther
adjustmentisnecessary.
We
advise
usersofthe
HERMES
2000
against
taking
their
machine
apart,
as
any
one
butaspecialist
would
be
absolutely
unable
to
make
any
improvements
and
would
risk
unintentionally
upsetting
some
part
of
the
delicate
mechanism.
Our
guarantee
does
not
cover
any
machine
that
has
been
tampered
with.
Maintenance
and
Lubrication
When
making
erasures
take
caretoshift
the
carriage
righttothe
sidetoprevent
particles
of
rubber
from
falling
into
the
machine.
They
might
mix
with
the
oil
and
cause
fouling.
The
machine
should
not
be
oiled
too
frequently,
to
avoid
dust
sticking
to
the
oiled
parts.
Never
oil
the
typebars
nor
the
slots
in
which
they
move.
Have
your
machine
cleaned
at
least
onceayear
byaHermes
agent.
Cleaning
the
Types
To
clean
the
types
brush
them
with
the
brush
fitted
inside
the
case.Ifa
typeisfullofhardened
ink,
remove
this
with
the
brush
oracloth
soaked
with
benzine.
Do
not
use
alcohol
asitmight
cause
rust.
Cleaning
the
Platen
Only
alcohol
may
be
used
for
cleaning
the
rubber
platen.
Never
use
petroleum
or
benzine,asthey
are
solvents
for
rubber.
Cleaning
the
Machine
There
isaspecial
brush
for
this
purpose
fitted
inside
the
case.
Brush
lightlyinorder
not
to
cause
breakage
of
springs
or
deforma-
tion
of
delicate
parts.
The
space
bar
and
platen
knobs
must
not
be
cleaned
with
an
organic
solvent
(petrol,
paraffin,
turpentine,
trichlorethylene,
alcohol,
etc.),
but
withacloth
soaked
with
soapy
water.
Serial
Number
of
the
Machine
Every
HERMES
2000ismarked
withaserial
number
engraved
at
the
reartothe
right.
This
number
should
be
mentioned
in
all
correspondence
dealing
with
your
typewriter.
‘
Page 15

Page 16

Specification
of
N
UMERICAL
Shift
Key,
left
(See
p.
5).
Shift
Lock
(See
pp.
5,
9).
Back
Space
Key
(See
p.
5).
Tabulator
Key,
for
setting
and
clearing
individual
stops
(Seep.10).
Ribbon
Reverse
Lever,
left
(See
p.
8).
Line
Space
Lever
(See
pp.
4,
5).
Roller-hiding
Plate
(Seep.4).
Platen
Knob,
left
(See
pp.5,6).
Carriage
Release
Lever,
left
(Seep.5).
Line
Space
Regulator
(See
pp.
5,
6).
Stop
Clear
Key
(Seep.10).
Margin
Lever,
left
(Seep.7).
Adjustable
Side
Guide
(Seep.4).
Rubber
Roller,
left,
on
paper
bail
(See
pp.
3,
4).
Lateral
Ribbon
Guide,
left
(Seep.9).
Touch
Regulator
(See
p.
7).
Aligning
Scale
(See
pp.5.6).
Central
Guide
(Seep.10).
Paper
Support
(Seep.3).
INDEX
Paper
Bail
(See
pp.
3,4,S,
10).
Lateral
Ribbon
Guide,
right
(See
p.
9).
Rubber
Roller,
right,
on
paper
bail
(See
pp.3,4).
Margin
Lever,
right
(Seep.7).
Intermediate
Table
(See
p.
6).
Paper
Release
Lever
(Seep.4).
Carriage
Release
Lever
(See
pp.3,S,
7).
Carriage
Locking
Lever
(Seep.3).
Platen
Knob,
right:
(See
pp.
3,
5).
Ribbon
Reverse
Lever,
right
(See
p.
8).
Transparent
Card
Grips
(See
pp.3,5,
7).
Ribbon
Carrier
(See
p.
9).
Ribbon
Indicator
(See
pp.
4,8,9).
Tabulator
Key
and
Progressive
Brake
(See
pp.
5,
10).
Margin
Release
Key
and
freeing
of
jammed
type
bars
(Seep.7).
Shift
Key,
right
(Seep.5).
Space
Bar
(Seep.5).
Top
Plate
(Seep.9).
 Loading...