


Expert Sleepers
Augustus Loop
v2.3.0
User Manual

Copyright © 2009-2010 Expert Sleepers. All rights reserved.
This manual, as well as the software described in it, is furnished under licence and may be
used or copied only in accordance with the terms of such licence. The content of this manual is furnished for informational use only, is subject to change without notice, and should
not be construed as a commitment by Expert Sleepers. Expert Sleepers assumes no responsibility or liability for any errors or inaccuracies that may appear in this document.
THE SOFTWARE IS PROVIDED "AS IS", WITHOUT WARRANTY OF ANY KIND, EXPRESS OR IMPLIED, INCLUDING BUT NOT LIMITED TO THE WARRANTIES OF
MERCHANTABILITY, FITNESS FOR A PARTICULAR PURPOSE AND NONINFRINGEMENT. IN NO EVENT SHALL THE AUTHORS OR COPYRIGHT HOLDERS BE LIABLE
FOR ANY CLAIM, DAMAGES OR OTHER LIABILITY, WHETHER IN AN ACTION OF
CONTRACT, TORT OR OTHERWISE, ARISING FROM, OUT OF OR IN CONNECTION
WITH THE SOFTWARE OR THE USE OR OTHER DEALINGS IN THE SOFTWARE.

Contents
Introduction! 12
Installation! 14
Mac OS X, Audio Unit (AU)! 14
Mac OS X, VST! 14
Windows (VST)! 14
System Requirements! 14
Mac OS X! 14
Windows! 14
Registration! 15
What’s New in Version 2! 16
Quality Improvements! 16
Freeze Loop! 16
Sync Groups! 16
Tape Sim! 16
Skinnable and Scriptable GUI! 16
OSC! 17
MIDI & OSC Scripting! 17
Waveform Display! 17
Record O"set! 17
Tape Read Mode! 17
Quickstart! 18
Using Augustus Loop! 19
Using the controls! 19
Knobs! 19

Sliders! 19
Dropdown menus! 19
Value edit boxes! 19
Name/value display! 19
Overview! 20
Delay Time! 21
Max Delay! 21
Delay Time! 21
Min! 21
Max! 21
Current delay time! 21
Delay Slider! 21
Delay Taps! 22
Delay Time! 22
Delay Level! 22
Master! 22
Pitch! 23
Pitch! 23
Pitch Slider! 23
'Piano Keys'! 23
Reverse! 23
Stop! 24
LFO Speed! 24
LFO Depth! 24
Filter! 25
Cutoff! 25
Q! 25
Typ e! 25
LFO Speed! 25
LFO Depth! 25
Saturate! 25
Saturation! 25
Shape! 26
Tape Sim! 26
Drive! 26
Crunch! 26
Gain! 26
Lo Freq/Lo Amnt! 26

Hi Freq/Hi Amnt! 26
Sync! 27
Host Tempo! 27
Beat Divisor & Triplet! 27
Beats! 27
Using Beats with Tap Record! 27
Sync Groups! 27
Clock Out! 28
Ping-Pong/Read Mode! 28
Mono-ize & Init Pan! 28
Tape Read Mode! 28
Levels! 29
Dry! 29
Effect! 29
Input! 29
PISIL and POSIL! 29
Loop! 30
Tap Rec! 30
Hold Rec! 30
Tap Length & Hold Length! 30
Freeze Loop! 30
Freeze Loop Mode! 30
Clear Loop! 31
Misc! 31
Fix Delay! 31
Trigger Arm! 31
Fade! 31
Punch In/Out! 32
Punch In Quantize (menu)! 32
Punch Out Quantize (menus)! 32
Inertia! 33
Pitch Inertia! 33
Delay Inertia! 33
Digital Mode! 33

Record O"set! 34
Waveform Display! 35
Augustus Loop Fx Loop! 36
Introduction! 36
Using the Fx Loops! 36
Setting up your DAW for Fx Loops! 37
Ableton Live! 37
Current Limitations! 37
Preferences! 38
MIDI In! 38
Skin! 38
OSC Base Port! 39
MIDI output! 39
Rounded tempos (for Live)! 39
Legacy filter behaviour! 39
Ignore AudioUnitReset! 40
Skins! 41
Preamble! 41
Learn by example! 41
Share your Skins!! 41
Anatomy of a Skin! 42
Mac OS X! 42
Windows! 42
Bundle structure! 42
Image requirements! 42
The Skin Script! 42
getWindowSize()! 42

getFont()! 43
getLabelFont()! 43
getTextFieldFont()! 43
createUI()! 43
Functions callable from createUI()! 44
setBannerPosition( y [, showVersion ] )! 44
setGroupActiveColour( r, g, b, a ), setGroupInactiveColour( r, g, b, a )! 44
texture( filename )! 44
setBackgroundTexture( texture )! 44
setBackgroundColour( r, g, b )! 44
sliderRenderer( texture )! 44
buttonRenderer( texture )! 45
knobRenderer( texture, u, v, size )! 45
group( name )! 45
group:add( control )! 45
group:width()! 45
group:height()! 45
group:bounds()! 46
group:setPosition( x, y )! 46
group:setVisible( v )! 46
group:isVisible()! 46
add( control )! 46
knob( param, label, x, y, size )! 46
paramButton( param, x, y, w, h, u, v [, hold ] )! 46
slider( param, x, y, w, h, orient, u, v, du, dv )! 47
button( id, label, x, y, w, h, u, v )! 47
luaButton( function, label, tooltip, type, x, y, w, h, u, v )! 47
textField( param, label, x, y, w, h [, format ] )! 48
dropDown( param, x, y, w, h )! 48
indicator( id, x, y, w, h, u, v )! 48
delaySlider( x, y, w, h, orient, u, v, du, dv )! 49
control:setVisible( v )! 49
control:isVisible()! 49
control:setState( v )! 49
control:getState()! 49
valueDisplay()! 49
valueDisplay:setColour( r, g, b, a )! 49
valueDisplay:setPosition( id, x, y, w, h )! 49
levelMeters( texture, u, v, w, h )! 49
levelMeters:add( id, x, y )! 50
waveformDisplay( x, y, w, h )! 50
waveformDisplay:setMoving( v )! 50
waveformDisplay:isMoving()! 50

getParameterID( param )! 50
Functions callable from luaButton functions! 51
getParameter( param )! 51
setParameter( param, value )! 51
setOthersParameter( id, param, value )! 51
getOthersParameter( id, param )! 51
sendOSC( address, path [, format ] [, values ] )! 52
control:setVisible() / control:isVisible()! 52
control:setState() / control:getState()! 52
redrawLabels()! 52
Pre-defined Global Values! 53
Debugging! 53
Mac OS X! 53
Windows! 53
MIDI control! 54
CC messages! 54
NRPN messages! 54
OSC Control! 55
Received OSC Commands! 55
/ping s:returnUrl s:returnPath! 55
/set i:param f:value! 55
/get i:param s:returnUrl s:returnPath! 55
/getAll s:returnUrl s:returnPath! 56
/getNumParameters s:returnUrl s:returnPath! 56
/getInfo i:param s:returnUrl s:returnPath! 56
/registerUpdate i:param s:returnUrl s:returnPath! 56
/unregisterUpdate i:param s:returnUrl s:returnPath! 56
/getAllRegistered! 56
/exec s:func ...! 56
/call s:func s:returnUrl s:returnPath ...! 57
MIDI & OSC Scripting! 58
Preamble! 58
Learn by example! 58
Share your scripts!! 58

Script locations! 59
Mac OS X! 59
Windows! 59
Overriding the default script! 59
MIDI & OSC Script Functions! 59
getParameterID( param )! 59
getParameter( param )! 59
setParameter( param, value )! 60
getParameterMinMax( param )! 60
setOthersParameter( id, param, value )! 60
getOthersParameter( id, param )! 60
sendOSC( address, path [, format ] [, values ] )! 60
requestAllNoteOn( function )! 61
requestAllNoteOff( function )! 61
requestAllCC( function )! 61
requestAllNRPN( function )! 61
requestAllProgramChange( function )! 61
requestAllPolyPressure( function )! 62
requestNoteOn( note, function )! 62
requestNoteOff( note, function )! 62
requestCC( cc, function )! 62
requestNRPN( nrpn, function )! 62
requestProgramChange( pc, function )! 62
requestPolyPressure( key, function )! 63
requestPitchWheel( function )! 63
requestChannelPressure( function )! 63
time()! 63
requestTimedCallback( interval, function )! 63
requestPeriodicCallback( interval, function )! 64
cancelTimer( timer )! 64
setGUIBoolValue( id, value )! 64
getGUIBoolValue( id )! 64
setOthersGUIBoolValue( other, id, value )! 64
getOthersGUIBoolValue( other, id )! 64
registerOSCPathForParameter( path, param )! 64
registerOSCPathForParameterNormalized( path, param )! 65
Pre-defined Global Values! 65
Debugging! 65
Mac OS X! 65
Windows! 66

Version History! 67
v2.3.0 5th August 2010! 67
v2.2.2 28th June 2010! 67
v2.2.1 24th February 2010! 67
v2.2.0 9th February 2010! 67
v2.1.1 24th August 2009! 67
v2.1.0 8th May 2009! 67
v2.0.4 17th April 2009! 67
v2.0.3 19th March 2009! 68
v2.0.2 3rd March 2009! 68
v2.0.1 11th January 2009! 68
v2.0.0 23rd October 2008! 68
v1.8.2 (unreleased)! 68
v1.8.1 19th July 2008! 69
v1.8.0 5th June 2008! 69
v1.7.3, 24th March 2008! 69
v1.7.2, 18th March 2008! 69
v1.7.1, 17th March 2008! 69
v1.7.0, 14th March 2008! 69
v1.6.5, 30th September 2007! 69
v1.6.3, 31st October 2006! 70
v1.6.2, 2nd July 2006! 70
v1.6.1, 20th March 2006! 70
v1.6.0, 9th January 2006! 70
v1.5.1, 5th October 2005! 70
v1.5.0, 29th August 2005! 70
v1.4.3, 13th July 2005! 70
v1.4.2, 11th June 2005! 70
v1.4.1, 13th March 2005! 70
v1.4.0, 27th February 2005! 70
v1.2.0, 3rd January 2005! 71
v1.1.0, 30th August 2004! 71
v1.0, 5th June 2004! 71
Release Notes! 72
Issues with keyboard input! 72
Contact! 73
Acknowledgements! 74
Lua! 74

oscpack! 74
glew! 75
FreeType! 76
FTGL! 76
libpng! 76
zlib! 76
Introduction
Augustus Loop is an emulation of a tape-based delay effect, with some extra features to
facilitate its use as a looping device. (If you're unfamiliar with the concept/genre of looping, pay a visit to www.loopers-delight.com).
The key features of Augustus Loop that make it more than just a big delay effect are:
•
Really long maximum delay (3600 seconds - that's one hour).
•
Tap length/tap record. You can set the loop time while recording your first phrase.
•
Virtual tape. The delay simulates an old-style tape delay, meaning you can
•
! change the tape speed (i.e. pitch up and down)
•
! reverse the tape direction
•
! stop the tape
•
! smoothly change the delay time (as if changing the head gap on a tape delay).
•
Multimode filter and saturation in the feedback loop.
•
‘Tape Sim’ section to emulate the signal degradation of vintage tape echo machines.
•
Four feedback taps (left to left, left to right, right to left and right to right) with independent delay time and feedback settings, for ping-pong effects, stereo delays etc.
•
Pitch and filter LFOs.
•
‘Freeze Loop’ feature lets you freeze the audio into a perfect loop, no matter what
other settings are in effect.
•
Loop length can be set in terms of the host's tempo setting.
•
Output of MIDI clock messages to synchronise other applications to the plug-in.

•
Ability to sync multiple instances of the plug-in running at once.
•
Automatic fades up and down to allow smooth transitions in your playing. It can
even automatically clear the loop for you once it’s faded out.
•
Host transport-sync’d punch in and out when recording.
•
‘Inertia free’ mode suppresses the tape-like behaviour when changing delay times to
allow seamless transitions between loop lengths. (This is also the route to the popular
‘multiply’ and ‘divide’ features found on some popular looping devices.)
•
The ‘Fx Loop’ plug-in configuration allows you to route audio through other plug-ins
either side of the ‘virtual tape’, allowing you to insert your own effects in the delay
loop. So you can just substitute your own filtering/saturation for Augustus Loop’s
own, or get really creative by inserting any plug-in you like in the delay.
•
‘Record Offset’ feature to solve the problem of latency in digital audio systems.
•
Fully scriptable and skinnable GUI.
•
Fully scriptable control via MIDI and OSC.
•
Scripts can control other instances of the plug-in, allowing you to build complex
multi-plug-in setups controlled from a single source (e.g. a MIDI pedalboard).

Installation
Mac OS X, Audio Unit (AU)
One file (ExSlAugustusLoop.component) contains all variants of the plug-in.
Simply copy the file to the folder:
Library/Audio/Plug-Ins/Components
Mac OS X, VST
There is one file per plug-in configuration, named ExSlAugustusLoop.vst and
ExSlAugustusLoopFxLoop.vst.
Simply copy the files to the folder:
Library/Audio/Plug-Ins/VST
Windows (VST)
There is one file per plug-in configuration, named augustusloop.dll and
augustusloop_fxloop.dll.
Simply copy the files to your VST plug-ins folder.
System Requirements
Mac OS X
Augustus Loop v2.2.0 and above require at least Mac OS X version 10.5.8 and are usable
on Intel Macs only. Older versions of Augustus Loop also work on PowerPC Macs and
OS"X versions back to 10.2.8.
The Audio Unit version will work in any Audio Unit host.
The VST version requires a “VST 2.4” compatible host.
1
Windows
Augustus Loop has been developed and tested with Windows XP SP2. It may work with
other versions of Windows (Vista included) but this is by no means guaranteed.
The plug-in requires a “VST 2.4” compatible host.
1
VST is a trademark of Steinberg Media Technologies GmbH.

Registration
The downloadable version of Augustus Loop stops working after 15 minutes every time
you use it. To stop this happening, you need to buy a registration.
You can buy a registration key online using a credit card or PayPal from the Expert Sleepers Licence Manager application. See here for more information. Note that you need at
least version 1.0.12 of the Licence Manager.
The e-commerce side of things is handled by eSellerate. If you have any security concerns,
have a look at their website which is pretty informative.
Your registration key allows you to install Augustus Loop on up to 3 different computers
(useful if for example you have a desktop computer in the studio and a laptop for live
use).
You need an internet connection to activate the software, though not necessarily on the
computer on which you want to use it.

What’s New in Version 2
This section summarises the new features of Augustus Loop version 2. It is aimed at users
who are already familiar with the previous versions of the plug-in. If you’re new to
Augustus Loop, please skip ahead to the Quickstart section.
For a complete list of changes, please refer to the version history.
Quality Improvements
Great attention has been paid to removing the niggling little clicks and pops that used to
occur if you used some features and were unlucky with your timing. Specifically, using the
following should now never result in an unpleasant audio artefact:
•
Clear Loop
•
Changing the Input Level (which includes using the Punch In/Out Set Input Level
features)
•
Tap Record
Freeze Loop
While Freeze Loop is essentially the same feature as has always been found in Augustus
Loop, the new implementation in version 2 transforms this function into something altogether more powerful. Whereas in previous versions frozen loops were prone to clicking
and popping unless the audio and plug-in settings were just right, version 2’s Freeze Loop
is totally bomb proof and will loop anything. Read more.
Sync Groups
It is now possible to synchronise multiple copies of Augustus Loop that are running
within one host application. You can therefore use Augustus Loop to build complex, multichannel, multi-loop systems. Read more.
Tape Sim
A new audio processing section has been added to further expand the range of sounds you
can get out of Augustus Loop, consisting of a new tape-style saturation effect and a new
filter section. Read more.
Skinnable and Scriptable GUI
In version 2 it’s possible to completely replace the Augustus Loop user interface. This goes
far beyond other ‘skinning’ systems where you can only change the superficial appearance

of the interface. With Augustus Loop you can move user interface elements around, remove things you don’t use, add new buttons to drive your own new functionality. A general purpose scripting language lies behind all this, so your new buttons aren’t just limited
to setting plug-in parameters - you can build complex systems limited only by your
imagination (and programming skill!).
See the Skins section below for details.
OSC
Augustus Loop can now be remotely controlled via the Open Sound Control protocol.
See the OSC section below for details.
MIDI & OSC Scripting
Augustus Loop’s response to MIDI and OSC control can now be completely redefined by
scripts written by users. This goes far beyond simply redefining which MIDI CC controls
which parameter - you can build elaborate, state-based control systems, driving many copies of Augustus Loop from a single control source.
See the MIDI & OSC Scripting section below for details.
Waveform Display
A new element has been added to the GUI that enables you to visualise the audio that’s
recorded onto Augustus Loop’s virtual tape. Apart from looking swish, this is a useful tool
that helps you understand exactly what the plug-in is doing at any particular time, especially when some of the more complex functions are enabled. Read more.
Record O"set
This new feature makes it easy to sync your looping to other performers, even when your
computer-based setup is introducing a lot of latency into your audio stream. Read more.
Tape Read Mode
Although Augustus Loop remains a fundamentally stereo device, the new Tape Read
Mode setting lets you simulate a mono tape echo from days of old. Read more.
Quickstart
Augustus Loop is designed to be used as an insert effect, but you can use it as a send effect
if you wish.
By default, the effect produces a straightforward one second delay, with fairly high feedback. Play a note through it - you should hear it echo once a second for quite some time.
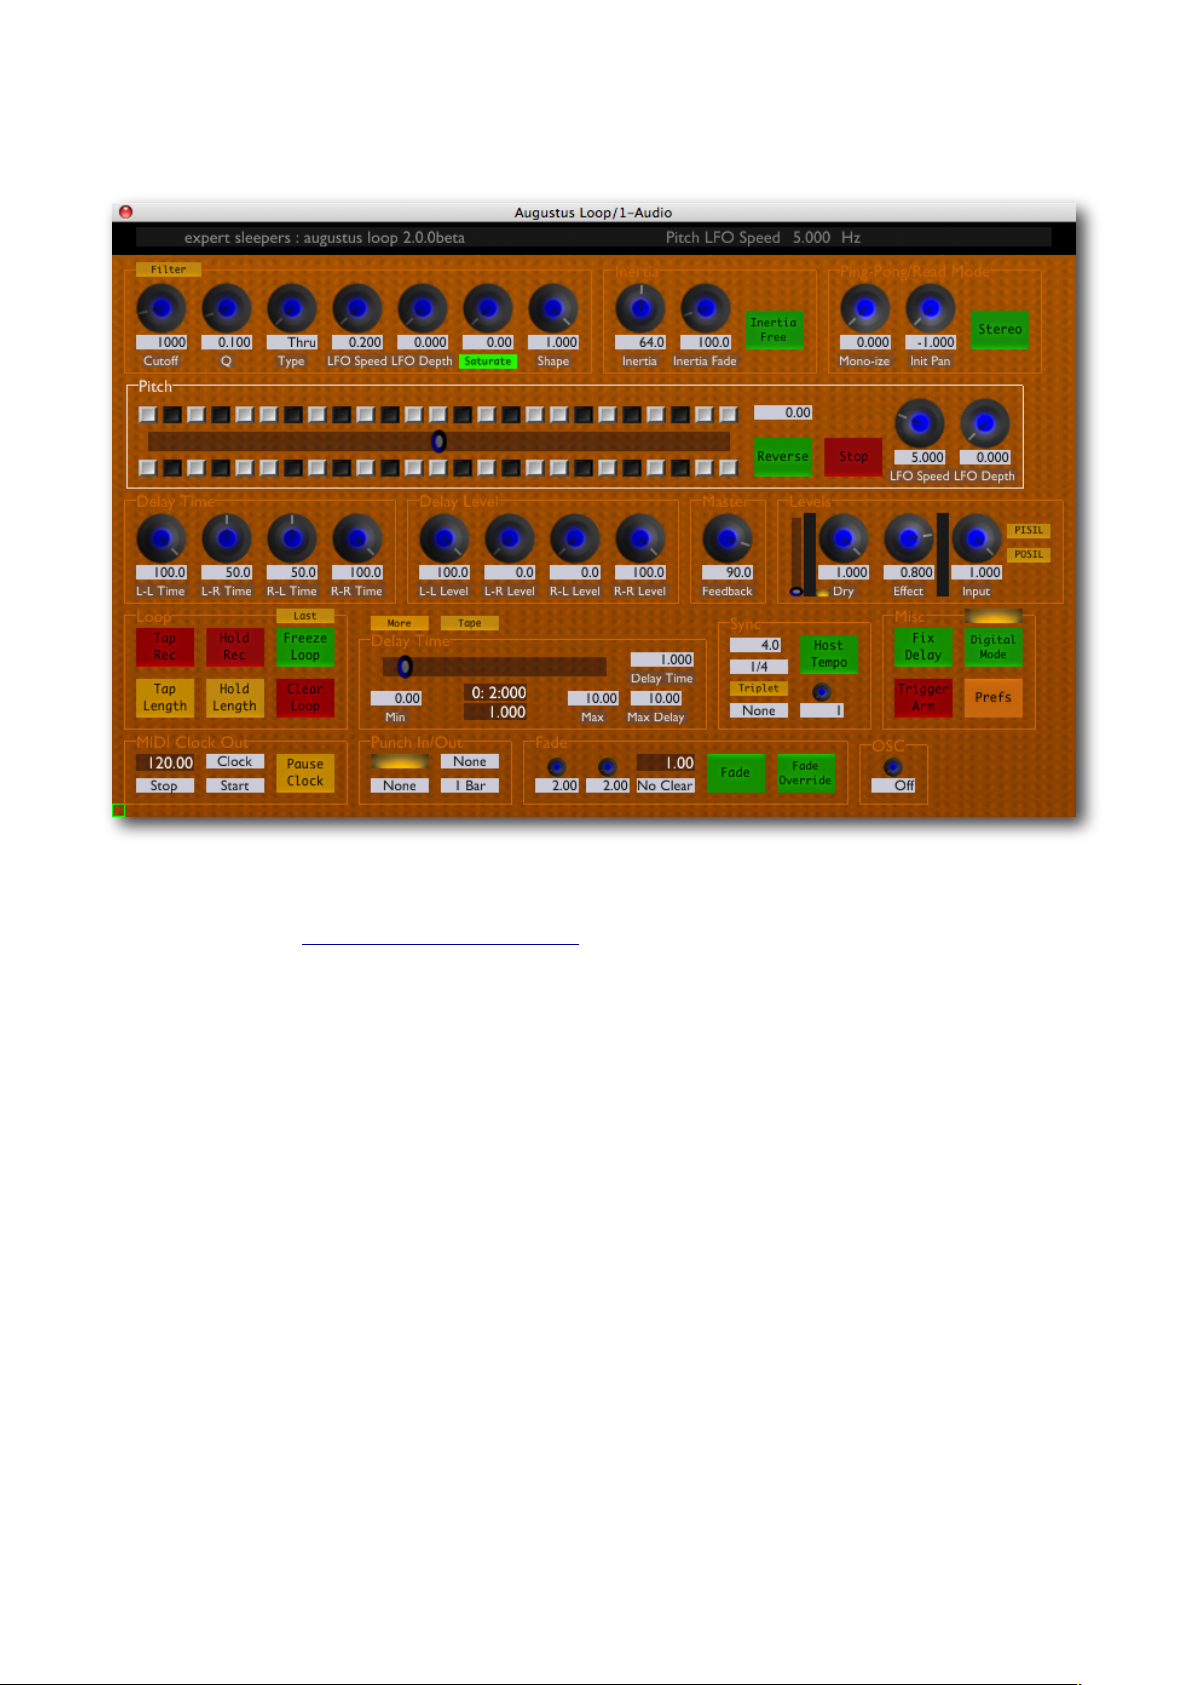
The GUI consists of two sliders, a number of knobs and a smaller number of buttons.
The shorter of the two sliders
and the cluster of edit boxes
around it control the delay time.
By default the slider lets you adjust the delay time between zero
and ten seconds. Try dragging
the slider and see what happens.
The longer slider controls the speed of the virtual tape, or equivalently the pitch of the delayed material. Try playing some notes into the delay, and then adjusting the slider. You
should hear the notes you played at a higher or lower pitch.
Four of the buttons let you set up a delay time
without having to know what you want as a number of seconds. Try clicking on 'Tap Length', waiting
a moment, and then clicking on it again. The delay
time will change to the length of time between your
two clicks. If you use 'Tap Rec' (short for 'Tap Record') the delayed material will be cleared out on
the first click. This is useful when starting afresh on
a new loop.
Other than that, just have a play with the controls, and then dig into the detailed reference
section, below.
Using Augustus Loop
Using the controls
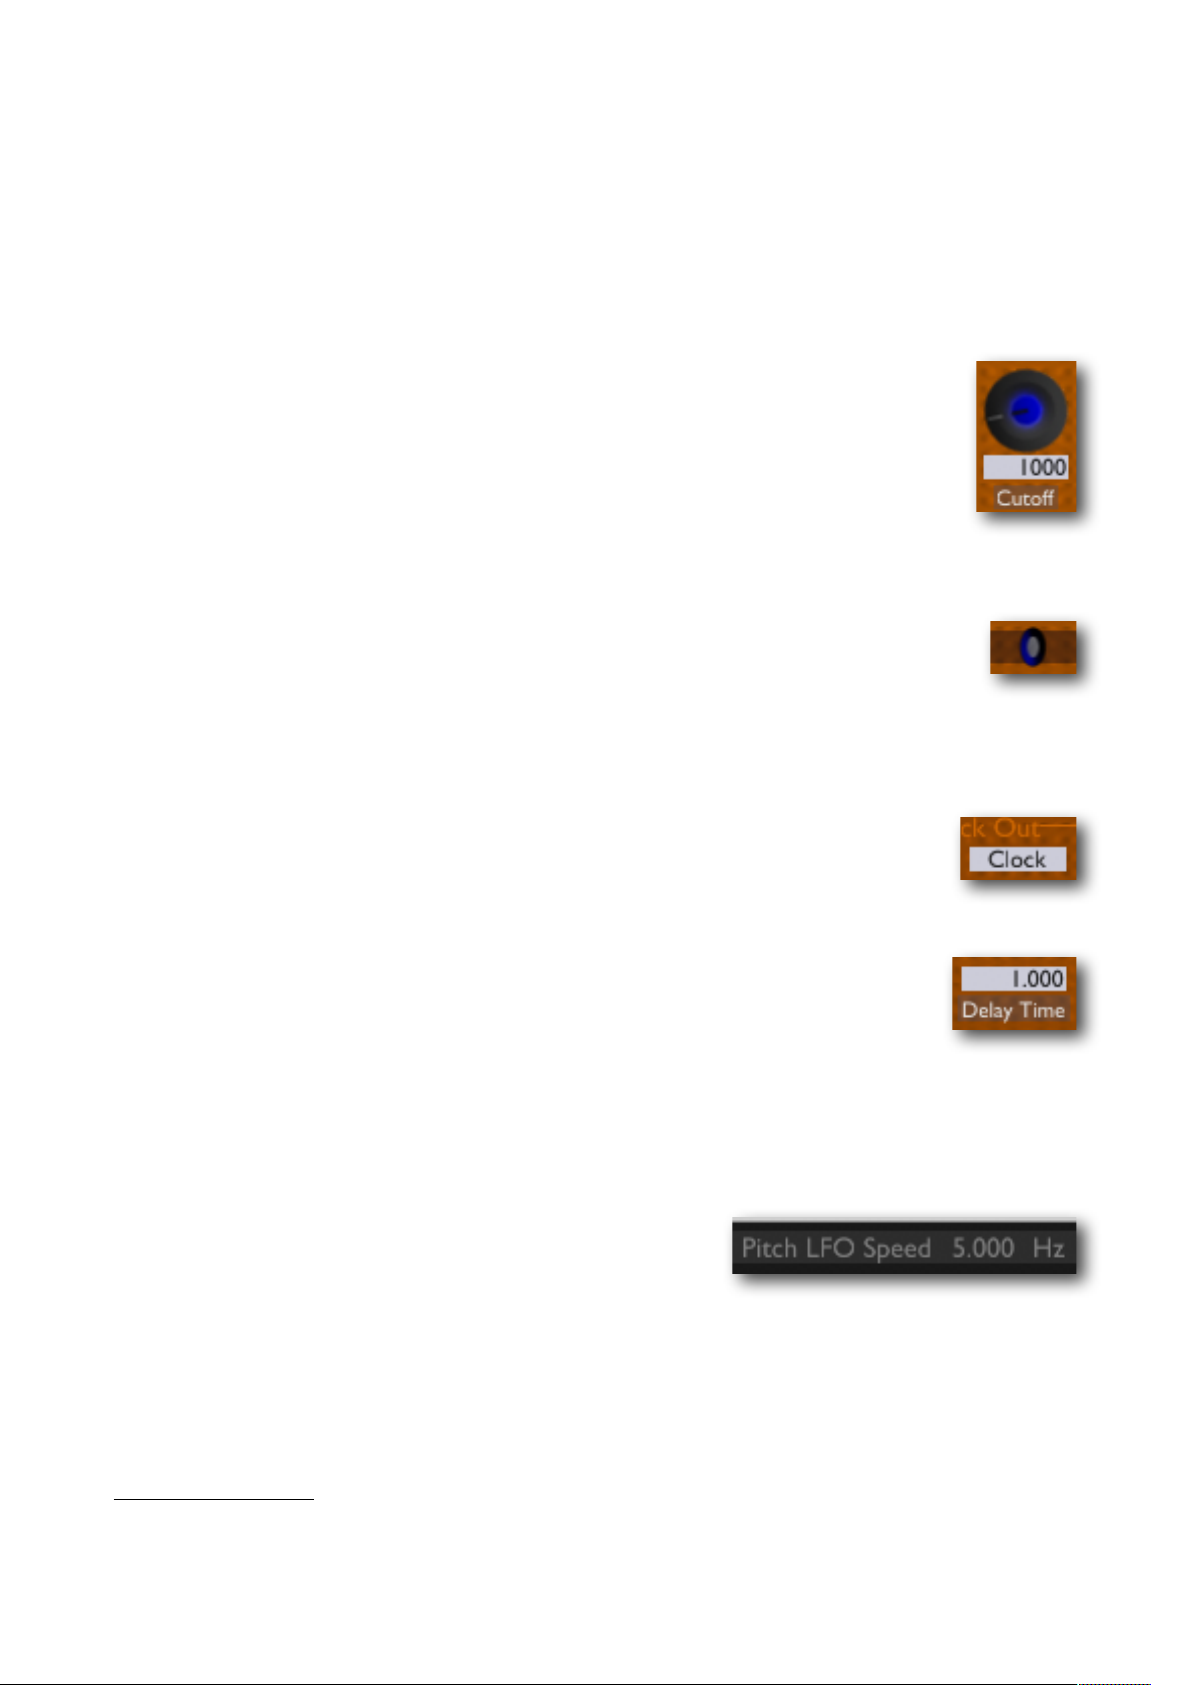
Knobs
Basic use of the knobs is to click on them and drag the mouse up and down.
However you can obtain different results by holding keys as follows:
•
Shift : Values change more slowly as you move the mouse.
•
Command1 (Mac OS X)/Alt (Windows) : The knob assumes its default
position.
Sliders
Sliders behave similarly.
•
Shift : Values change more slowly as you move the mouse.
•
Command : The slider assumes its default position.
Dropdown menus
Clicking on the menu displays the list of options. Move the mouse over the
desired option and release the mouse to select it.
Value edit boxes
These boxes let you enter parameter values directly. Clicking on the value
highlights it in green - you can then type the desired value using the keyboard. Press enter to finish and accept the new value.
While you’re typing the value, the box goes red to indicate that the value you
see has not yet been accepted.
Name/value display
As you move the mouse around the interface, the name
and current value of the control currently under the
mouse is displayed in the top right of the window. This
area also provides tooltips for buttons.
1
The ‘Command’ key is also known as the ‘Apple’ key - the one next to the spacebar.
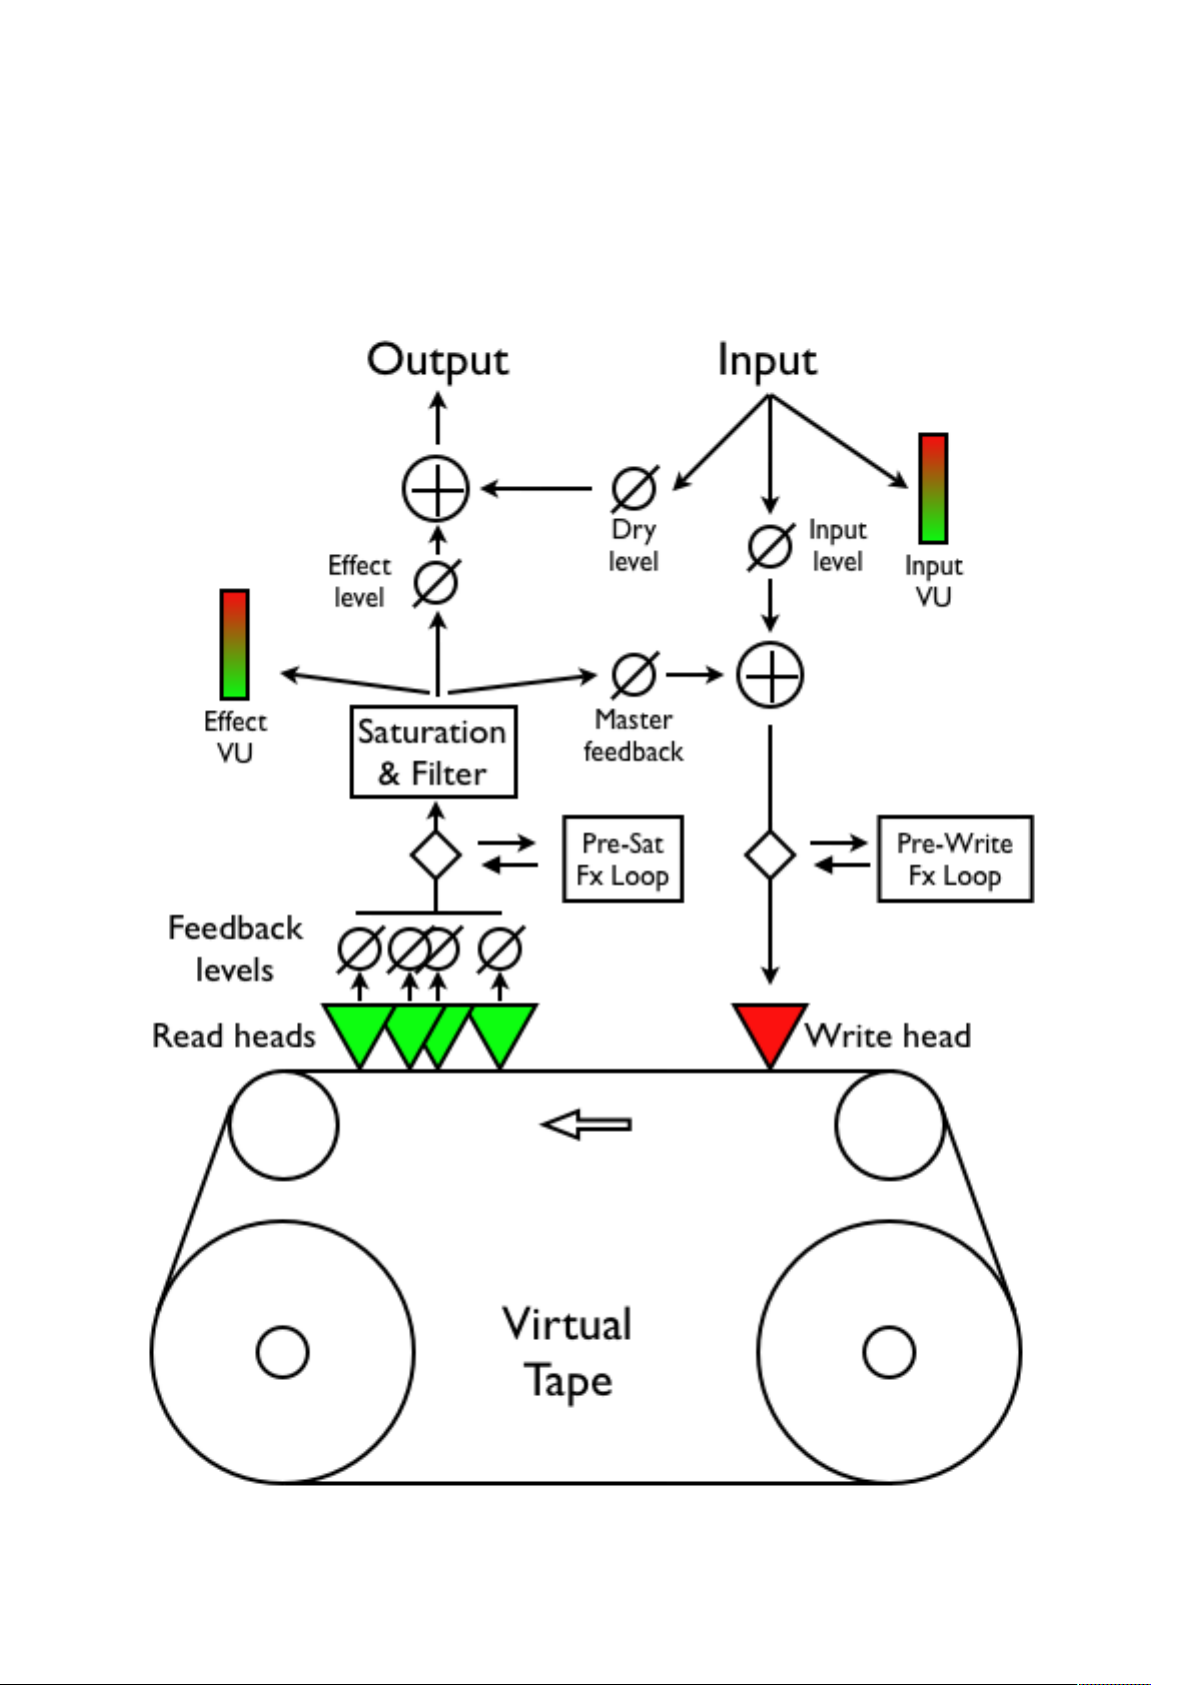
Overview
Here's a block diagram of the 'circuitry' of Augustus Loop. It can help to visualise this
when understanding the effect of some settings, particularly the delay time settings.

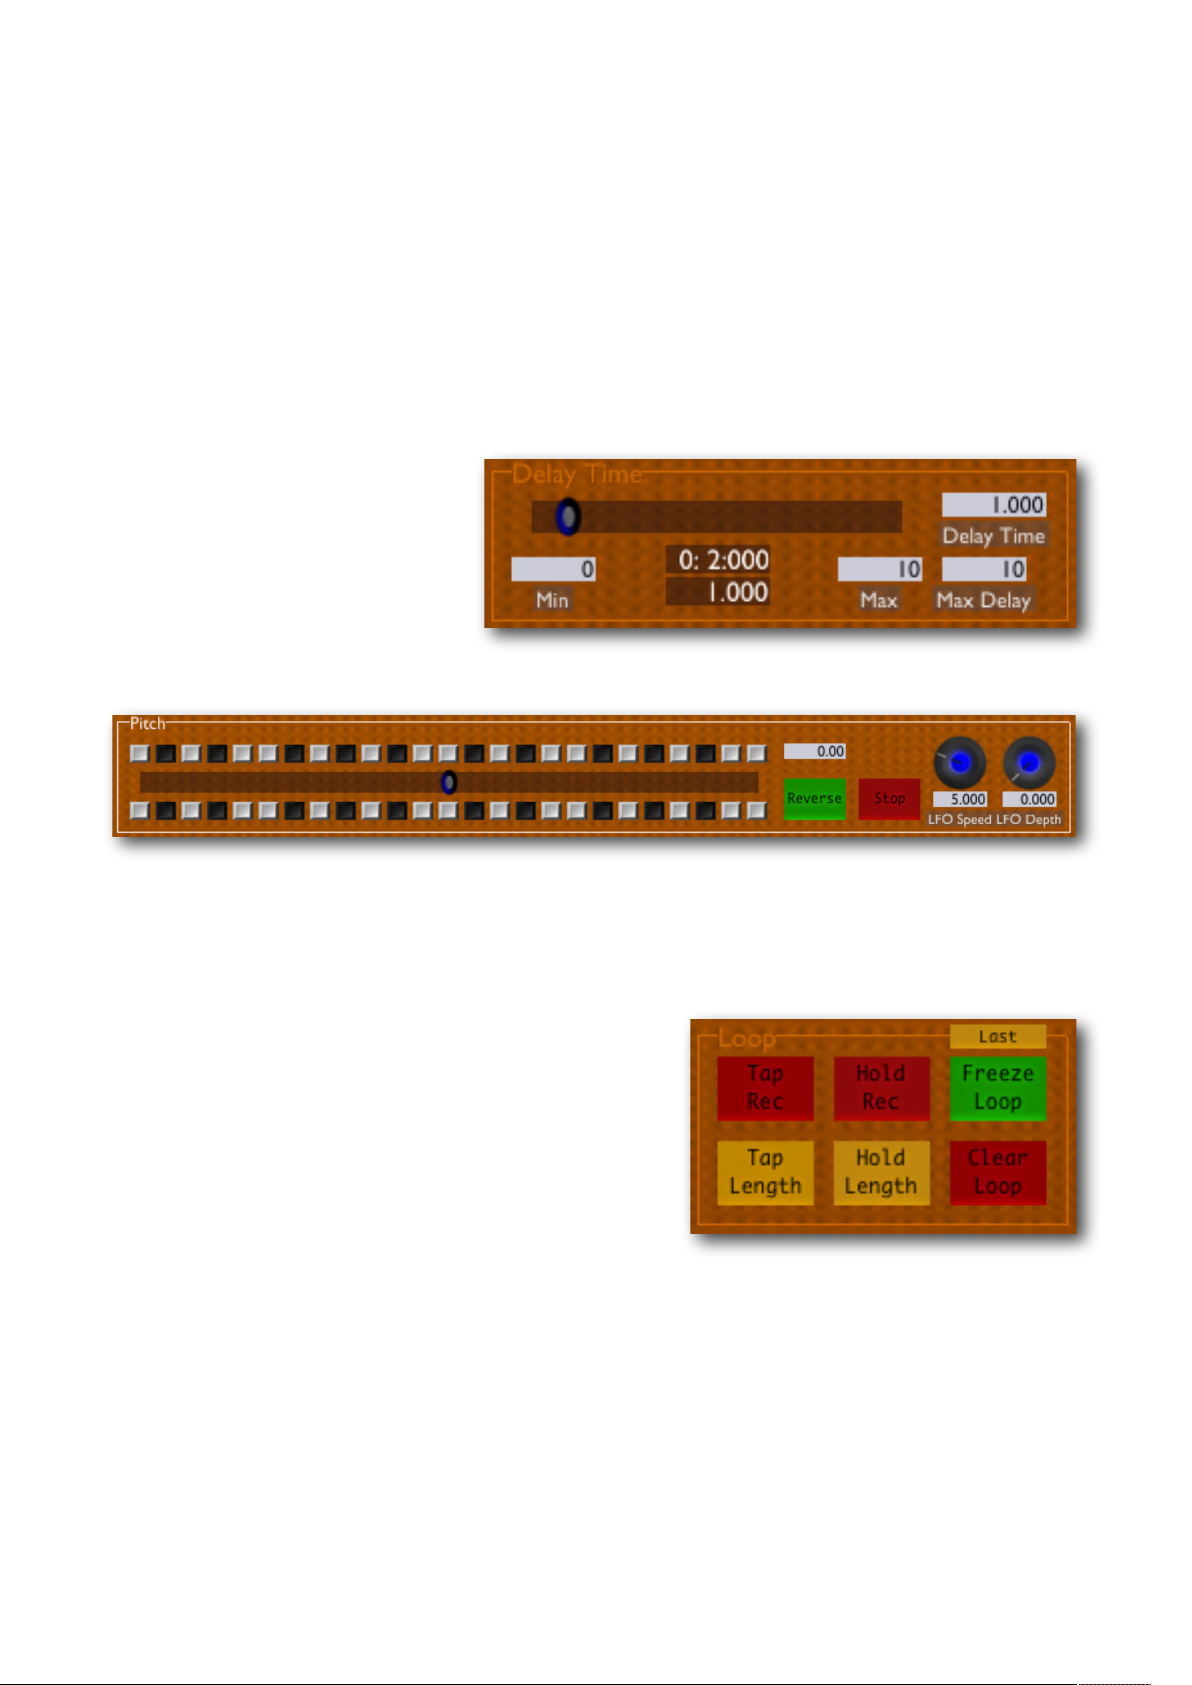
Delay Time
The delay time controls consist
of a slider and four text boxes.
Max Delay
This field sets the maximum delay time the plug-in is capable of
using. The highest value that
you can enter here is '3600', which is an hour (60 minutes times 60 seconds).
NB Changing this value causes the plug-in to reallocate its delay buffers. This can be a
slow operation, especially if the value entered is large. So don't do it when there's actually
audio flowing through the plug-in, as you'll most likely get an ugly stutter or momentary
silence.
Also NB You'll want a lot of RAM to use high values for the delay time! At 44.1kHz, you'll
need about 20MB per minute. If you ask for the maximum 3600 seconds, that's about
1.2GB of RAM you're asking the plug-in to use.
Delay Time
This field reflects the current delay time, in seconds. You can enter a value here directly, or
use the delay slider or tap buttons to set it indirectly.
Min
This field sets the value corresponding to the leftmost position of the delay slider.
Max
This field sets the value corresponding to the rightmost position of the delay slider.
Current delay time
This field (immediately below the delay slider) shows one of the following:
•
The current delay time in use, as set by the delay slider/text box.
•
The current delay time in use, as set by the host tempo settings, if 'host tempo' is active.
•
The time since tap recording began, during tap recording.
The time is shown in seconds and in bars/beats/480ths (if the host application supports
the concept of bars/beats etc.).
Delay Slider
This slider lets you adjust the delay time between the two values set in 'Min' and 'Max'.
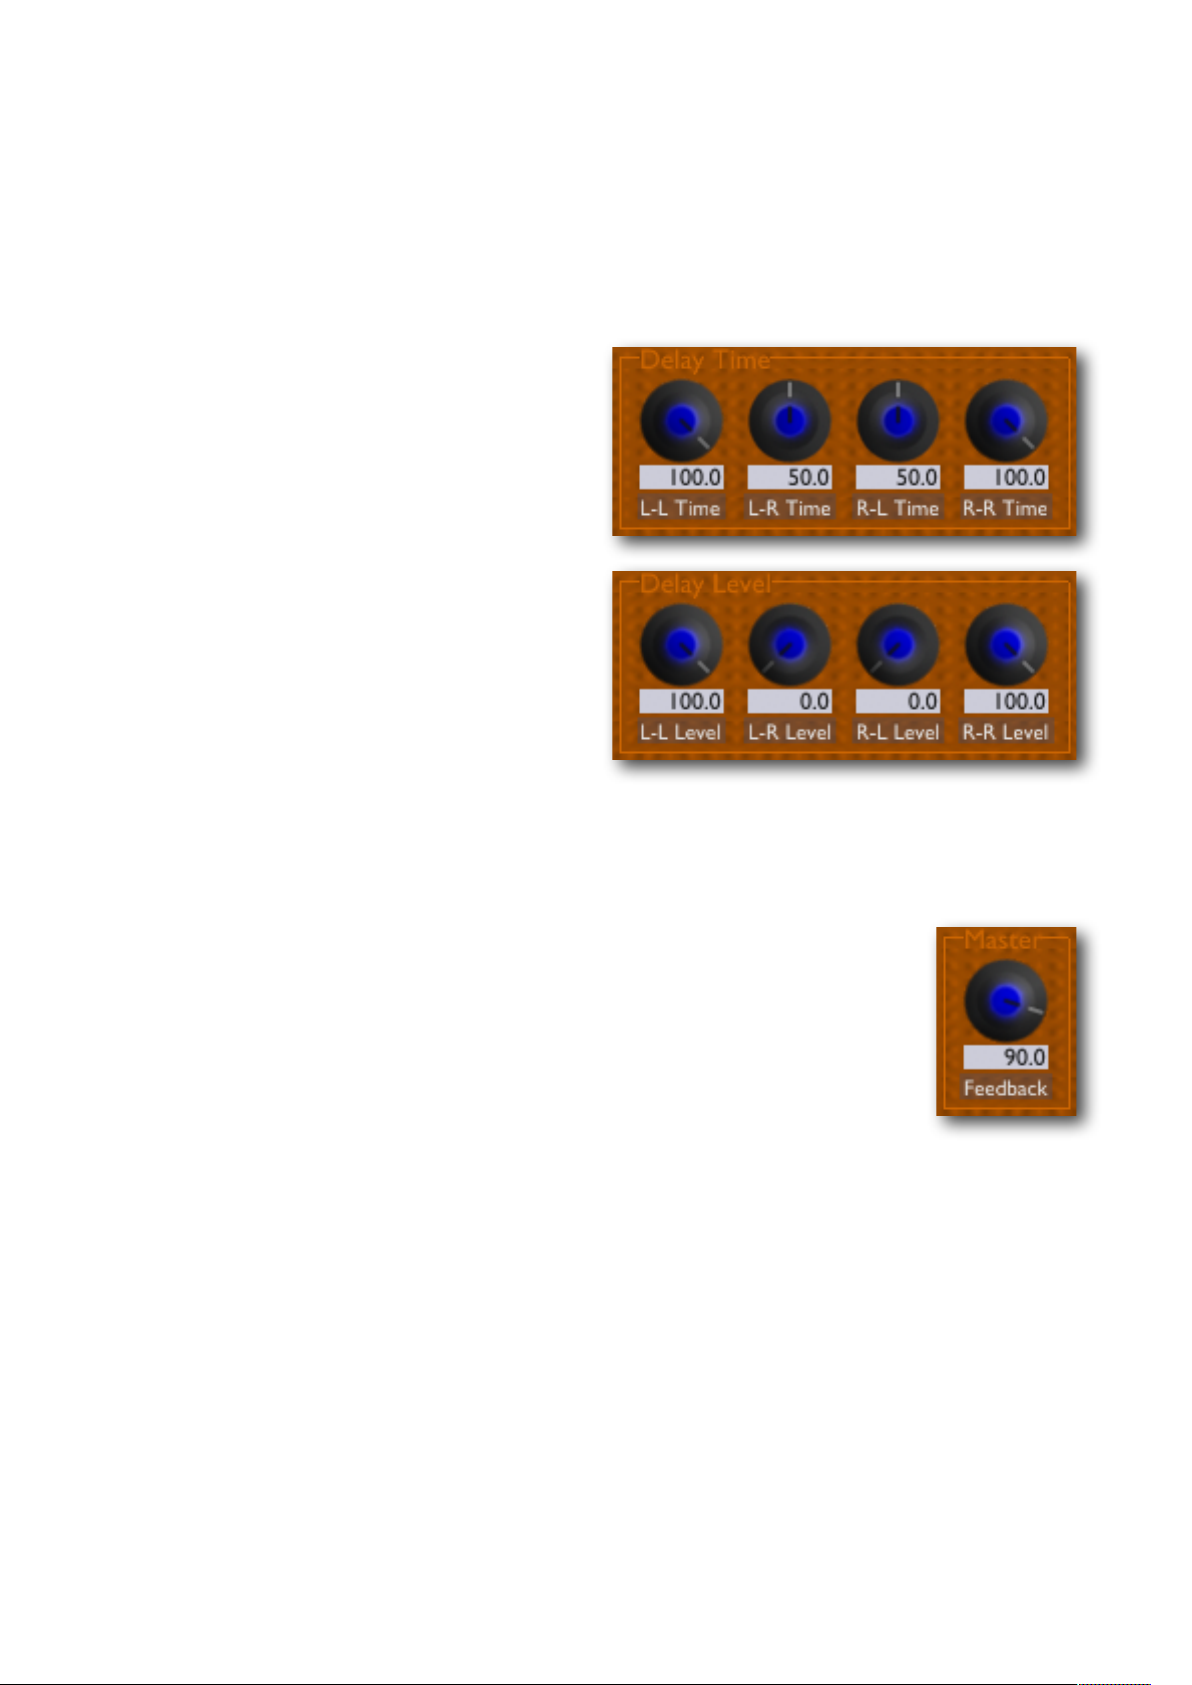
Delay Taps
A total of nine knobs make up this section.
Eight of these are in pairs, giving you control of delay time and feedback level for each of
the four taps.
Delay Time
Sets the delay time for the tap, expressed as
a percentage of the master delay time set in
the delay time section.
Delay Level
Sets the feedback level for the tap. This is
the same as the actual output level of the tap
in our architecture.
The four taps let you feedback sound between the two stereo channels. The left-toleft and right-to-right taps give you a normal
stereo delay. The left-to-right and right-to-left taps allow you create ping-pong style delays. By mixing all four, you can get some spacious stereo spread effects.
Master
The last control in this group, 'Feedback', sets the overall feedback level.
Effectively it scales the four tap level controls.
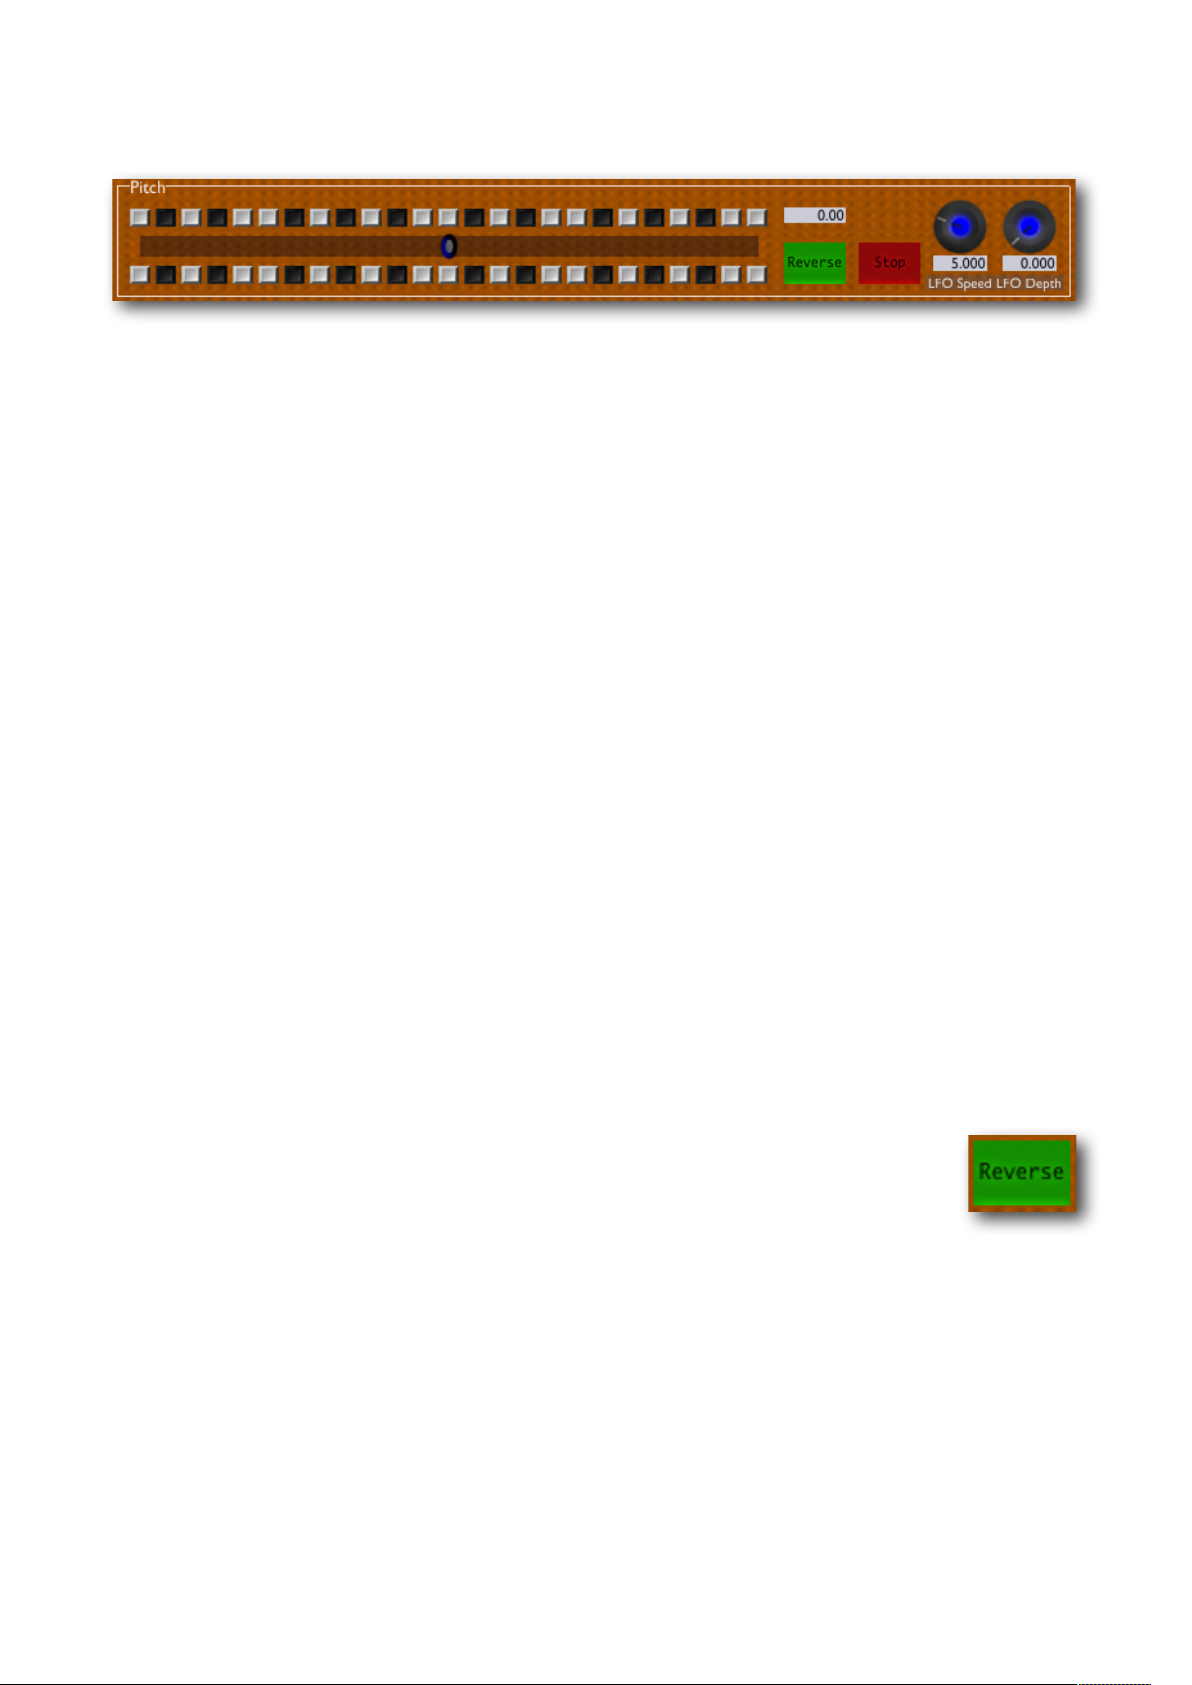
Pitch
Pitch
This text field simply reflects the current pitch value. You can type numbers directly in
here. The values represent semitones (12 semitones is an octave).
Pitch Slider
The slider controls the speed of the virtual tape, over a range of two octaves i.e. you can go
from half-speed up to double-speed.
If you hold the Option (Mac OS X)/Ctrl (Windows) key while dragging the slider, it will
only move to whole number values.
If you hold the Command (Mac OS X)/Alt (Windows) key and click on the slider, it will
return to zero.
'Piano Keys'
The many small buttons above and below the pitch slider are laid out in a black and white
pattern like a piano keyboard. These buttons let you set the pitch slider directly to whole
semitone values.
The upper set of buttons just change the pitch. The lower set of buttons also reverses the
tape direction. NB This means that if the tape is already reversed, they will change the direction to forwards.
Reverse
Reverses the direction of the virtual tape.
Of itself, this is fairly straightforward. However it has a slightly non-intuitive
relationship with the tap delay times. In order that changing the tape direction does not
produce any nasty artefacts, the position of the tap tape heads has to remain constant. This
means that their order is reversed.
For example, say in the simplest case you have the L-L and R-R taps set to 100% time and
level, and the other taps set to 0% level, with the master delay time set to 1s. In this scenario, reversing the tape gives you the same result, that is a delay of 1s.

In a more complex example, say the tap times are set to 100%, 75%, 50% and 25%. When
the tape is reversed, the tap times become 100%, 125%, 150% and 175%. Note that the display of the tap times values does not change, only their internal interpretation.
Because in reverse delay times can reach 200%, you should try to make sure that the
maximum (allocated) delay time is set to at least twice the actual delay time.
Note that the speed at which the tape reverses is controlled by the inertia setting (below).
Stop
Stops the virtual tape.
Note that the speed at which the tape stops, and starts, is controlled by the inertia setting (below).
LFO Speed
Controls the speed of the pitch LFO (in Hz).
LFO Depth
Controls the depth of the pitch LFO.

Filter
Cutoff
Controls the filter cut-off frequency (in Hz).
Q
Controls the filter resonance.
Type
Allows you to smoothly change between the following filter types:
•
Thru - no filtering
•
Low - lowpass filter
•
Band - bandpass filter
•
High - highpass filter
LFO Speed
Controls the speed of the filter LFO (in Hz), which modulates the cutoff frequency.
LFO Depth
Controls the depth of the filter LFO. The value is a number of octaves to sweep the cutoff
frequency by.
Saturate
The button below the 'Saturation' control (where the knob’s label would normally be)
turns the saturation effect on and off. NB when this is turned off, the signal in the loop can
reach very high levels which may cause problems further down the line.
Saturation
Controls the level of saturation (overdrive) applied to the signal (before being fed into the
filter).

Shape
Controls the shape of the saturation. At '1.0' the effect is that of soft saturation and clipping. At '0.0' the effect is of hard digital clipping. Note that at shape settings other than
'0.0', some alteration is applied to the signal even if the Saturation level is zero.
Tape Sim
The Tape Sim controls are displayed by clicking on the ‘Filter’ button at the top left of the
filter controls.
The audio processing controlled by this section is applied before the filter/saturation
processing described above.
Drive
Applies a fairly smooth saturation distortion kind of effect. The range of the control is
large, for extreme effects, but for a nice ‘tape-ish’ sounding effect, try settings in the lower
range, around 12db or so.
Crunch
Applies a quite extreme, non-linear, mangling to the audio. You will typically need to
wind the Drive control up a little if you apply any Crunch.
Gain
Applies a simple level boost to the audio. This is typically useful when you apply some
low and high cut (see below) to bring the level of the audio back up so you can still get
long-lasting delay echoes.
Lo Freq/Lo Amnt
Applies a low frequency cut to the audio, rolling off some of the bottom end.
Hi Freq/Hi Amnt
Applies a high frequency cut to the audio, rolling off some of the top end.

Sync
The controls in the Sync group (to the right of the delay slider)
allow you to sync the delay time to the tempo of the host application, or to another instance of Augustus Loop. (NB not all
plug-in hosts provide tempo information.)
Host Tempo
This button activates the host tempo mode.
Beat Divisor & Triplet
The 'Beat Divisor' drop-down menu lets you set the units in which you want to control the
loop length. '1/4' corresponds to quarter notes, '1/8' to eighth notes etc. The 'Triplet' button turns the selected value to triplets.
Beats
This is where you set the number of beats you want for the loop length. NB this can be a
non-integer value e.g. if the beat divisor is '1/8' then setting 'Beats' to 1.5 will give you a
dotted eighth note loop length.
Using Beats with Tap Record
When a loop has been recorded using the Tap Rec feature, the length of the loop and the
beats controls define a tempo (see Clock Out, below). Once this has been done, you can
change the beats controls to change the loop length in a rhythmically meaningful way.
E.g. suppose the Beats control is set to 4, and that you use Tap Rec to record a loop of 1.2
seconds. Changing the Beats control to 2 would change the loop length to 0.6 seconds;
changing the Beats control to 8 would change the loop length to 2.4 seconds.
Sync Groups
The bottom two controls in this section - the Sync Group Mode dropdown menu and the
Sync Group Number knob/textfield - allow you to sync up multiple copies of Augustus
Loop which are running at the same time within one host application.
There are 16 sync groups; which group an Augustus Loop is in is defined by its Sync
Group Numbers setting. How the plug-in interacts with its sync group is defined by the
Sync Group Mode setting. There are four options, as follows:
•
None - the plug-in is not affected by any other in its sync group, nor does it affect any
other plug-in.
•
Master - the plug-in is the group ‘master’. Its loop length and tempo information is
made available to other plug-ins in the group. NB if you set two plug-ins to both be
the master of the same group, the result is undefined (and probably not useful).

•
Tempo - the plug-in takes its tempo information from the group master, instead of
from the host application. If you enable ‘Host Tempo’ as above, the loop length will
be based on the master’s tempo, not the host tempo.
This is typically useful if you want the loop times of two Augustus Loops to be
rhythmically connected, but not actually the same.
•
Time - the plug-in takes its delay time directly from the delay time of the group master.
Clock Out
These controls set how the plug-in generates MIDI
clock out. NB these controls have no effect if the
MIDI output has been disabled in the 'Prefs' dialogue.
The tempo of the clock signal produced is set by the
loop length and the beats settings in the host tempo section. The tempo is displayed in the
top left corner of this control group.
In this version of the plug-in this functionality is tied to the 'Tap Record' feature. Essentially the clock is started and stopped by the end and beginning respectively of the recording. However using the three drop-down menus you can control exactly what MIDI messages are sent.
The 'Pause Clock' button lets you manually stop and resume the MIDI clock once it's running.
Ping-Pong/Read Mode
Mono-ize & Init Pan
These controls let you convert a stereo input signal
into a mono one, which is useful when you have the
delay taps configured as a ping-pong effect. 'Monoize' controls the degree to which the signal is converted to mono (from 0.0 meaning no conversion to
1.0 meaning fully mono). 'Init Pan' controls the position in the stereo field of the mono signal.
Tape Read Mode
Usually the signal from the four tape read heads forms a stereo signal, allowing you to either loop a stereo input or to create ping-pong type effects. Changing the ‘Tape Read
Mode’ to Mono converts the signal from the tape heads to mono - effectively turning
Augustus Loop into a classic old-style mono tape delay, with four delay ‘taps’.

Levels
Dry
Controls the amount of the input signal
that is fed directly to the plug-in's output.
The level meter to the left of the ‘Dry’
knob shows the level of the signal entering the plug-in.
The slider to the left of the meter sets the trigger level (see below). The small button at the
bottom right of the meter increases the meter sensitivity, which can be useful when setting
the trigger level on signals with a low noise floor.
Effect
Controls the amount of the effect signal that is output from the plug-in.
The level meter to the right of the ‘Effect’ knob shows the level of the signal after the filter
section, but before the effect level has been applied (see the overview diagram).
Input
Controls the amount of the input signal that is fed into the delay loop.
PISIL and POSIL
The two buttons to the right of the Levels group are rather cryptically labelled PISIL and
POSIL, which stand for “Punch In Set Input Level” and “Punch Out Set Input Level” respectively. The names are historical - the functions used to be linked to the punch in/out
controls (below).
These buttons allow the loop input level (the 'Input' knob) to be automatically set by the
beginning and end of tap recording. The input level is set to 1.0 at the start of recording if
PISIL is activated; it is set to 0.0 at the end of recording if POSIL is activated.
POSIL is useful to emulate the behaviour of certain other looping devices, where ‘closing’
the loop puts you into a mode where what you just recorded forms the loop and what you
continue to play is not overdubbed, until you explicitly ‘re-open’ the loop i.e. set the input
level back to 1. Without POSIL enabled, Augustus Loop’s default behaviour is, in the parlance of these other loopers, to immediately enter overdub mode after recording a loop.

Loop
Tap R ec
When first clicked,
•
silences the effect output
•
sets the pitch to 0.0
•
turns off the 'reverse' feature
When clicked again, sets the delay time to the interval between the two clicks, and immediately begins playback of the signal recorded in that time.
Hold Rec
Same as 'Tap Rec', except the delay time is set by the length of time the button is held
down.
Tap Length & Hold Length
Similar to 'Tap Rec' and 'Hold Rec' except that the only effect is to change the delay time.
Freeze Loop
Similar in effect to setting the 'Input' control to zero (so no input signal is passed into the
loop) and setting the feedback to 100% (so the loop doesn't decay). In fact though the behaviour is different because the loop is completely locked down so e.g. the filter is not applied in the feedback loop.
While the loop is locked you can still change the pitch, and the filter is applied to the loop
output. The audio on the virtual tape remains unchanged however until the freeze is released.
To understand the exact behaviour of freeze loop, it can be helpful to enable the waveform
display and observe the behaviour of the tape head write/read positions.
To avoid unpleasant clicks and pops due to imperfect loops, a crossfade is applied when
the audio loops in Freeze Loop mode. The length of this crossfade is controlled by the Inertia Fade time - see below.
Freeze Loop Mode
The default Freeze Loop Mode is ‘Last’. In this mode the tape write position jumps back
by one loop length immediately the Freeze Loop button is pressed, so the audio on the
tape is immediately locked down. The alternative Freeze Loop Mode is ‘Current’ - in this
mode, when Freeze Loop is pressed, audio continues to be recorded onto the tape for one
loop length before the write head jumps back.

Clear Loop
Wipes the virtual 'tape'. Because this can be a lengthy operation (especially when the max
delay time is large) you should not expect to press this button and immediately be able to
begin recording again. During the clear operation, the Clear Loop button remains lit, and
the output level meters show a decreasing level to indicate progress.
Misc
Fix Delay
Normally when you change the pitch the delay time is changed as well. E.g. if
you change the pitch an octave up, the delay time effectively halves. If you
turn on 'Fix Delay', the delay time is changed automatically as the pitch
changes, so the effective delay time remains the same as the pitch is altered.
Trigger Arm
Arms the auto-record trigger.
In this mode the plug-in will watch for an input signal, and when it detects
one it will effectively press 'Tap Rec' on your behalf.
You can adjust the trigger level using the small slider to the left of the input level meter.
The small button below and to the right of the input level meter controls the sensitivity of
the meter. When pressed, the range of the trigger level slider matches that of the meter.
Fade
The auto-fade controls allow you to
smoothly and automatically fade
the loop in and out, effectively turning the 'Effect' level control for you.
The 'Fade' button activates the fade
operation. Press to fade out; press again to fade back in.
The 'Fade Override' button quickly completes the fade operation, in either direction.
The 'Fade In' and 'Fade Out' knobs set the corresponding fade times, in seconds (up to
30s).
The indicator to the left of the 'Fade' button shows the current level of the fade envelope
(0.0 being fully faded out, 1.0 being fully faded in).

The menu below the indicator allows you to automatically clear the loop (i.e. as if you
pressed the 'Clear Loop' button) when the fade out is complete. There are two settings
(plus 'No Clear'):
•
AutoClear - simply activates loop clearing after a fade out.
•
AutoClr2 - activates loop clearing after a fade out, then does an instant fade-in after
the loop is clear.
Punch In/Out
These controls are used in conjunction with Tap Record, and
affect the exact time that the start and end of recording take
place. This can be useful when creating loops in sync with
other material playing in the host application.
Note that most of these features rely on the host application's
concept of tempo and meter. Some hosts may support none or only some of these features.
The indicator at the top left of the group turns red when a punch in or out is pending.
Punch In Quantize (menu)
When set to 'None', tap recording starts immediately you press the 'Tap Rec' button. Otherwise, the start of recording is delayed until a time quantized by the setting of this menu.
E.g. if set to '1/4' the recording will not start until the next full beat (quarter note) arrives.
Punch Out Quantize (menus)
When set to 'None', tap recording ends immediately you press the 'Tap Rec' button. Otherwise the settings have the following meaning:
•
Length - recording ends automatically once the loop has reached the length it had
before you started recording.
•
LengthQ - recording ends at a time quantized such that the loop has a length that is a
multiple of the value selected. E.g. if you select a quantization of '1 Bar', when you
press Tap Rec to stop recording, recording will continue until the loop length is a
whole number of bars long.
•
PositionQ - similar to Punch In Quantize, in that the time of the end of recording is
quantized. Please note the difference between quantizing the time of the beginning
and end of recording and quantizing the length of the recording.

Inertia
Pitch Inertia
The ‘Inertia’ knob controls how long the tape speed
takes to react to changes in pitch (including reversing
and stopping the tape). Low inertia settings cause the
pitch to change more quickly.
Delay Inertia
The 'Inertia Free' button controls how Augustus Loop behaves when a delay time is
changed. (This includes a change to the overall delay time setting, or to one or more of the
delay tap times.)
When the button is turned off, the behaviour is most like a tape delay, in that the play
heads slide along the tape to their new positions. This will inevitably produce some odd
sounds if the tape is not empty (which may of course be exactly what you want).
With the button on, the play heads move instantly, which is not how a physical tape delay
works, but allows you to change the delay time without the unusual sounds.
In fact, it is a little more complex than just described - the play heads don't move instantly.
Rather, new play heads are created at the new positions and the sound from these is faded
in as the sounds from the old heads are faded out. The duration of this crossfade is controlled by the 'Inertia Fade' knob (set in milliseconds).
Digital Mode
'Digital Mode' is activated using the button so labelled (in the Misc group).
In this mode, some of the tape simulation processing is disabled, allowing for
perfectly clean, 'digital' looping, with no colouration/degradation of the
sound as it loops.
Even with the digital mode button pressed, other settings have to be right for the mode to
actually be active. The indicator above the button will turn green when digital mode is in
fact active. These settings are as follows:
•
The pitch control must be at zero (i.e. centred).
•
The pitch LFO depth must be zero.
If delay inertia is active, digital mode will also be inactive for a while around delay time
changes, while the delay times settle down.
It's worth noting that CPU load is fairly dramatically reduced in digital mode.

Also note that if you want a totally clean loop, you should also set the filter to 'Thru' and
turn off the saturation. NB setting the saturation knob to zero is not the same as turning it
off (by pressing the button). Likewise all the Tape Sim controls (Crunch, Drive and Hi and
Lo Amnt) should be zeroed.
Record O"set
Record Offset is a feature designed to help with latency issues when using Augustus Loop as a looper in
live situations.
Specifically, the problem that this solves arises in the
following combination of circumstances:
•
When using a tempo-synced delay time.
•
When the source material has obvious rhythmic qualities (e.g. feeding drums into the
plug-in).
•
When your audio hardware, or other plug-ins in the processing chain, are introducing significant latency.
What you may hear then is that, while the time between delay repeats is correct, they appear to be late relative to the song.
What record offset does is to record the initial audio into the delay loop slightly ahead of
where it should be, so that when it starts repeating it will be in the right place.
The record offset controls are hidden by default - they’re exposed
by clicking on the little ‘More’ button just above the Delay Time
controls.
The ‘Enable’ button turns the whole feature on and off. The remaining two controls control how much of an offset is applied.
The menu to the right of the Enable button offers three choices for
the offset amount:
•
Auto: The plug-in uses a latency figure guessed from information supplied by the
host app.
•
Off: No offset is applied.
•
Manual: You can specify exactly the offset you want via the ‘Offset’ knob.

Waveform Display
The waveform, or ‘tape’, display is shown and hidden by the small
button marked ‘Tape’ just above the Delay Time controls.
Showing the waveform display hides the entire top half of the GUI the Filter, Inertia, Ping-Pong and Pitch groups.
The displays shows the stereo waveform on Augustus Loop’s virtual tape - the left channel is on the top.
Five lines are overlaid on the waveforms. The red line shows the write position, at which
audio is recorded onto the tape. The four white lines show the read positions of the four
read heads; from top to bottom these are the L-L head, the L-R head, the R-L head and the
R-R head.
The ‘Moving’ button at the lower left of the waveform display allows you to toggle between two display modes. In the first, the waveform scrolls while the head position lines
remain stationary. In the second, the waveform remains stationary while the head positions scroll.

Augustus Loop Fx Loop
Introduction
The normal Augustus Loop configuration is a stereo or mono-to-stereo plug-in. As of version 1.8.0, another configuration is also available; known as Augustus Loop Fx Loop, it’s a
6-in 6-out plug-in.
The 6 inputs and output are arranged as 3 stereo pairs. (At this point it may help to refer to
the overview diagram earlier in this manual.)
The first stereo pairs (inputs 1&2 and outputs 1&2) are the regular inputs and outputs that
the stereo plug-in configuration has. The remaining pairs are “effects loops” (aka fx loops).
Inputs/outputs 3&4 are the “Pre-Write Fx Loop”. This lets you process the audio just before it’s written to the tape.
Inputs/outputs 5&6 are the “Pre-Sat Fx Loop”. This lets you process the audio after it’s
been played back from the tape, just before it enters the saturation and filtering section.
Using the Fx Loops
The fx loops are disabled by default. To access the controls to enable them, click on the little ‘More’ button just above the Delay
Time controls.
This hides the central Delay Time and Delay Level sections and
replaces them with controls for the fx loops.
There are two identical sets of controls,
one for each fx loop.
The ‘Enable’ button
enables the fx loop i.e. audio will be
sent out to and received from the relevant inputs and outputs only when this button is pressed.
The remaining two controls relate to the compensation for the fx loop latency in the loop
delay time. When the audio is routed through the fx loops it usually encounters a slight
delay, simply because of how digital audio applications work. This therefore affects the
time between when a signal enters the plug-in, and when it (after coming off the tape)

leaves it - i.e. it affects the delay time. The compensation controls allow you to make up
for this, so the delay time you specify is the one you actually get.
Note this is not the same as the latency usually meant by “plug-in latency” in DAWs,
which refers to the internal latency introduced by a given plug-in. In the case of Augustus
Loop’s fx loops, the latency is introduced by the host’s buffering of plug-in inputs and
outputs. This latency will typically be small, and is not worth worrying about overly unless you need exact tempo-synced delay times. Often it is an amount that you can specify
in your DAW - e.g. in Ableton Live, the setting is under the CPU section of the Preferences.
The menu to the right of the Enable button offers three choices for the latency compensation:
•
Auto: The plug-in uses a latency figure guessed from information supplied by the
host app.
•
Off: No latency compensation is applied.
•
Manual: You can specify exactly the compensation you want via the ‘Latency’ knob.
Setting up your DAW for Fx Loops
Ableton Live
The image to the right shows how to configure the routing in Ableton Live to use
Augustus Loop’s fx loops.
The track named ‘Augustus’ is the track on
which the plug-in is inserted. The regular
inputs and outputs (1&2) operate on this
track.
The other two tracks are the fx loop tracks.
By inserting plug-ins onto these tracks, you
can apply processing to the audio within
Augustus Loop.
Current Limitations
Unfortunately using the fx loops with the following features will most likely result in
audio glitches, unless the input to the plug-in is silence:
•
Reverse
•
Tap Record
These issues may be resolvable in a future update. As ever, the more people we hear from
who say this is important to them, the higher priority will be assigned to it.

Preferences
Pressing the ‘Prefs’ button brings up a dialogue where various preferences
are set. These global settings are shared by all instances of Augustus Loop,
and are not stored with presets.
The top section shows the product version. The Windows version also shows which SSE
variant has been detected (there are optimised versions of the core processing routines for
systems with SSE2).
The central section will show your serial number once you’ve bought a registration.
MIDI In
This menu controls how the plug-in responds to incoming MIDI CC messages (see below).
Skin
This menu lets you select a ‘skin’ for the GUI - see the section on skins. Depending on your
host application, the new skin will be applied either when you next open the plug-in GUI,
or when you next load the plug-in itself.

OSC Base Port
Sets the base port number for OSC. See the section on OSC, below.
MIDI output
This checkbox enables or disables the output of MIDI clock messages (see above).
The Windows version also has a drop-down menu for choosing which MIDI output port
to send the MIDI clock on.
Rounded tempos (for Live)
Note - the following applies to version 7.0.10 of Ableton Live and earlier versions. Version 7.0.12
changed the behaviour of the application in this area, but it also introduced other issues. At the time
of writing, if you want to use Live synced to Augustus Loop via MIDI you’re recommended to use
version 7.0.10.
Essentially this is a workaround for a limitation in Ableton Live, in that Live reports
rounded tempo values to hosted plug-ins when externally synced by MIDI clock. For example, if Live receives clocks at a tempo of 114.6bpm, it will tell its hosted plug-ins that the
tempo is 115bpm. Why it does this remains something of a mystery.
This is a problem if you are using multiple instances of Augustus Loop in a Live song,
with one AL set to generate MIDI clock, Live synced to that clock, and the other ALs set to
'Host Tempo' mode. When you use Tap Record to record your loop in the master AL, the
other ALs will be given a slightly wrong tempo by Live and the loops will be out of sync.
Turning on 'rounded tempo' in AL solves this problem by only ever generating MIDI clock
at rounded values. The downside is that the loop length will not be quite what you
wanted, but it may be good enough, depending largely on your musical style and whether
you record the first loop 'silent' simply to set the tempo.
With this mode turned on, when you use Tap Record the loop end will be slightly later
than when you tap to close the loop. E.g. if you record a loop that would have a tempo of
122.3bpm, AL actually keeps recording until the loop length matches a tempo of 122bpm.
Legacy filter behaviour
This checkbox causes the filter to revert to its behaviour in versions of the plug-in before
1.7.0 (see the version history).

Ignore AudioUnitReset
This setting applies to the Audio Unit version of the plug-in only. Audio Unit plug-ins
usually have the ability to be ‘reset’ by the host application, which usually occurs when
the transport is started or stopped (e.g. Logic resets AUs on transport start, Ableton Live
resets AUs on transport stop), and is intended to clear any delay or reverb tails which
might be undesirable when re-starting playback at a new position. However, sometimes
this is itself undesirable - for example when using the plug-in in a live context, you might
very well want to stop and start playback without wiping whatever loop you had running
in Augustus Loop. Therefore this setting tells the plug-in to ignore the reset messages.
Note that the behaviour of the VST versions of the plug-in is the same as the AU version
when this setting is on, since there is no equivalent reset mechanism for VSTs.

Skins
Preamble
From Augustus Loop v2.0.0 onwards it is possible to completely redefine the plug-in’s
GUI. Typical uses for this would be to simplify the GUI to show only the parameters you
need to access when playing live, or to add new buttons which perform actions specific to
your needs. Or maybe you just don’t like the default colour scheme.
The skin GUIs are defined by a script file, and by any graphical resources the script uses
(e.g. images for the buttons and knobs). The default GUI is defined in exactly the same
way, so you can copy the default script and images and use those as a starting point for
your customisations.
The language used for the GUI scripts is Lua. You will find a complete description of the
language, and some useful tutorials, at the Lua website: www.lua.org
All the standard language features of Lua are available in the GUI scripts, plus some extra
functions (documented below) specific to the Expert Sleepers GUI system.
Learn by example
The best way to learn about scripting the GUI is to look at the existing examples, particularly the default GUI script that ships with the plug-in. Just open up the plug-in bundle
and find the gui.lua file within. (Windows users should download the Mac OS X version
of the plug-in and get the script from there, since in the Windows version the script is
munged into the plug-in as a Windows resource.)
Most of the example snippets in the documentation below are taken directly from the default GUI script.
You should be able to find more skins on the Expert Sleepers website.
Share your Skins!
You are encouraged to share your GUI skins with other users. For example, you could post
them on the Expert Sleepers forum (linked from the website). Alternatively, email them to
us, and we’ll make the best of the bunch downloadable directly from the Expert Sleepers
site.

Anatomy of a Skin
Skins use the standard Mac OS X bundle system. Since this is essentially just a folder hierarchy with a special structure, this works just fine on Windows as well.
Augustus Loop looks for skins in standard locations:
Mac OS X
Augustus Loop looks for skins in
Library/Application Support/Expert Sleepers/Augustus Loop/Skins
Windows
Augustus Loop looks for skins in
C:\Documents and Settings\<username>\Application Data\Expert
Sleepers\Augustus Loop\Skins
Bundle structure
Inside the bundle’s folder, there is a Contents
folder, and inside that, a Resources folder. The Resources folder must contain the script file, which
must be called gui.lua, and may contain image
files.
The Contents folder may also contain an
‘Info.plist’ file. This is a convention for Mac OS X
bundles but is not required by the skin system.
Image requirements
Images used in skins should be in PNG format, and must be power-of-two sized in both
width and height (e.g. 32x32, 128x16, 64x256).
The Skin Script
The script file gui.lua must define five functions which are called by the system at the
appropriate times. (The script may also define any other functions it requires for its own
purposes.)
getWindowSize()
This function should simply return two numbers, which are the width and height of the
GUI. E.g.
function getWindowSize()

!return 773, 491
end
getFont()
This function should return a list of fonts that the GUI should attempt to use as the general
purpose font for e.g. group labels. The first font in the list that the system can successfully
find and load will be used. Each entry in the list is a Lua table, defining the file name and
point size of the font. All the standard locations are searched for the font file - on Mac OS
X, that’s Library/Fonts in the user, local and system domains; on Windows, it’s $WINDIR
\Fonts.
E.g.
function getFont()
!if isMac then
!!return { { name="GillSans.dfont", size=14 }, { name="Monaco.dfont", size=12 } }
!else
!!return { { name="tahoma.ttf", size=14 }, { name="arial.ttf", size=12 } }
!end
end
getLabelFont()
As getFont(), but returns the font to be used for knob labels.
getTextFieldFont()
As getFont(), but return the font to be used for editable text fields.
createUI()
This function defines the guts of the script. It’s where all the GUI elements are created and
laid out. Things you’ll want to do in this function include:
•
Load images into textures, for use as buttons, or the GUI background.
•
Set the position of the banner (the plug-in name and version information, and the parameter value display)
•
Create the ‘renderers’ that handle actually drawing knobs, buttons etc.
•
Create groups, knobs, buttons etc.
•
Lay out the groups and other elements.

Functions callable from createUI()
The following functions are defined by the skin system, and may be called from your
createUI() function.
setBannerPosition( y [, showVersion ] )
Sets the vertical position of the banner, which is where the plug-in displays its version information, and the name and value of the parameter currently being edited. An optional
second parameter lets you disable the version information and only show the parameter
information, which is useful for small skins. Examples:
setBannerPosition( 471.0 )
setBannerPosition( 80.0, false )
setGroupActiveColour( r, g, b, a ), setGroupInactiveColour( r, g, b, a )
These two functions set the colours used to draw the boxes that surround groups of controls. ‘Active’ refers to when the mouse is within the group. E.g.:
setGroupActiveColour( 0.95, 0.9, 0.9, 1.0 )
setGroupInactiveColour( 0.8, 0.4, 0.01, 1.0 )
texture( filename )
Loads the named image file and creates a texture object from it. E.g.
background = texture( "bgtile.png" )
setBackgroundTexture( texture )
Sets the background texture for the GUI window. The texture parameter should have previously been created with the texture() function. E.g.
setBackgroundTexture( background )
setBackgroundColour( r, g, b )
Sets the background colour for the GUI window, used if no background texture is set. E.g.
setBackgroundColour( 0.2, 0.2, 0.3 )
sliderRenderer( texture )
Creates a renderer for the sliders in the GUI. A renderer is a object that manages the drawing of all its associated objects. The texture parameter should have previously been created
with the texture() function, and defines the image to be used to draw the sliders that use
this renderer. (Note that this texture may be shared by multiple renderers.)

You can create multiple renderers, but there is a concept of a ‘current’ renderer. When a
new slider is created, it automatically associates itself with the current renderer. The current renderer is the one named ‘theSliderRenderer’.
E.g.:
atlas = texture( "buttons.png" )
theSliderRenderer = sliderRenderer( atlas )
buttonRenderer( texture )
As sliderRenderer(), but for buttons. The current button renderer is named
‘theButtonRenderer’.
knobRenderer( texture, u, v, size )
As sliderRenderer() and buttonRenderer() but for knobs. The current knob renderer
is named ‘theKnobRenderer’.
The extra parameters (u, v, size) define the area of the texture that will be used to draw the
knobs.
group( name )
Creates a group, which is one of the labelled boxes you see in the default GUI. Groups
have several purposes:
•
They let you visually group controls, to make it clear which have similar functions.
•
They let you show and hide groups of controls.
•
In script building, they make it easier to move controls around as a group, since controls are positioned relative to their enclosing group.
E.g.:
miscButtonsGroup = group( "Misc" )
group:add( control )
Adds a control to a group. Invoked as a member function on the group e.g.
miscButtonsGroup = group( "Misc" )
miscButtonsGroup:add( paramButton( ... ) )
group:width()
Returns the width of the group. E.g.
x = x + miscButtonsGroup:width()
group:height()
Returns the height of the group. E.g.

y = y + miscButtonsGroup:height()
group:bounds()
Returns the extremities of the group. E.g.
local minx, miny, maxx, maxy = delayTimeGroup:bounds()
group:setPosition( x, y )
Sets the position of the group within the GUI. E.g.
miscButtonsGroup:setPosition( x, y )
group:setVisible( v )
Sets the visibility of the group. The parameter ‘v’ should be a boolean value (i.e. true or
false). E.g.
recordOffsetGroup:setVisible( false )
group:isVisible()
Returns whether the group is visible or not. E.g.
local v = not delayTimeGroup:isVisible()
add( control )
Similar to group:add(), but adds a control directly to the GUI, without it being in a group.
E.g.
add( paramButton( "Saturation On/Off", ... ) )
knob( param, label, x, y, size )
Creates a knob (using the current knob renderer).
The ‘param’ parameter should be the name of the plug-in parameter that the knob will
control. The names are the same as are displayed in the banner line.
If no label is required, pass “” for the label.
E.g.:
group:add( knob( “Filter Cutoff”, “Cutoff”, 10, 10, 30 ) )
paramButton( param, x, y, w, h, u, v [, hold ] )
Creates a button to control the named plug-in parameter.
x, y, w, h specify the position, width and height of the button.

u, v specify the location in the renderer’s image of the sub-image to be used to draw the
button.
The optional ‘hold’ parameter lets you create a button that sets the parameter value to 1.0
while the button is held down; without this option, the button toggles the parameter value
each time it’s pressed.
E.g.:
loopButtonsGroup:add( paramButton( "Tap Tempo",!! 0*kButtonSpaceH, 0*kButtonSpaceV,
!!!!!!!!!kButtonW, kButtonH, 3*kButtonW, 2*kButtonH ) )
loopButtonsGroup:add( paramButton( "Tap Tempo", ! 1*kButtonSpaceH, 0*kButtonSpaceV,
!!!!!!!!!kButtonW, kButtonH, 5*kButtonW, 0*kButtonH, true ) );
slider( param, x, y, w, h, orient, u, v, du, dv )
Creates a slider to control the named parameter.
x, y, w, h specify the position, width and height of the slider.
‘orient’ specifies the slider orientation. It should be one of "horizontal" or "vertical".
u, v, du, dv specify the position and size of the sub-image within the renderer’s image to
be used to draw the slider’s handle.
E.g.:
pitchSliderGroup:add( slider( "Pitch", px, kPitchButtonH+5, pitchSliderW, kPitchSliderH,
!!!!!!!!!!"horizontal",
!!!!!!!!!!2*kPitchButtonW+1, 4*kButtonH+2*12+1, 14, 20 ) )
button( id, label, x, y, w, h, u, v )
Creates a button which activates a pre-defined system function when pressed. The function is specified via the ‘id’ parameter. Currently, there is only one option: “Prefs”, which
brings up the Preferences dialog.
x, y, w, h specify the position, width and height of the button.
u, v specify the position of the sub-image within the renderer’s image to be used to draw
the button.
E.g.:
miscButtonsGroup:add( button( "Prefs", "Prefs",
!!1*kButtonSpaceH, 0*kButtonSpaceV, kButtonW, kButtonH, 0*kButtonW, 0*kButtonH ) )
luaButton( function, label, tooltip, type, x, y, w, h, u, v )
Creates a button which calls a Lua function (defined in the script) when pressed.
‘type’ should be either “toggle” or “push”.

x, y, w, h specify the position, width and height of the button.
u, v specify the position of the sub-image within the renderer’s image to be used to draw
the button.
E.g.:
function toggleFxLoops()
!-- do stuff here
end
add( luaButton( toggleFxLoops, "More", "Show/Hide More Controls", "toggle",
!!!!!x, y + loopButtonsGroup:height() - 10 - 12 - pad, 48, 12,
!!!!!6*kButtonW, 4*kButtonH ) )
textField( param, label, x, y, w, h [, format ] )
Creates an editable text field, showing and allowing editing of a plug-in parameter.
The optional ‘format’ parameter allows you to specify an exact format for the numeric
value displayed. The format string is the standard C language printf format.
E.g.:
delayGroup:add( textField( "Max Delay Time", "Max Delay", ! x, y, w, h ) )
delayGroup:add( textField( "Delay Time", "Delay Time", ! ! x, y, w, h, "%.3f" ) )
dropDown( param, x, y, w, h )
Creates a drop-down menu to control a plug-in parameter. The parameter must be of the
appropriate type i.e. one which has a number of discrete options, rather than a continuous
range of values. E.g.
syncGroup:add( dropDown( "Beat Divisor",!0, 8, 48, 12 ) )
indicator( id, x, y, w, h, u, v )
Creates a non-pressable button, used to display the state of an internal value. Internally
this really is a button, and so it uses the current button renderer.
The ‘id’ parameter should be either
•
“PendingPunch” or “DigitalModeActive”, or
•
a number from 0 to 7, indicating a scriptable value (see the MIDI script method set-
GUIBoolValue()).
E.g.:
punchGroup:add( indicator( "PendingPunch", 1*58, kSmallIndicatorSpace, 48, 12,
!!!!!!!!!!!!!!3*kButtonW, 4*kButtonH ) )

delaySlider( x, y, w, h, orient, u, v, du, dv )
Creates Augustus Loop’s slider that controls the delay time. The parameters correspond to
those of the ‘slider’ function.
control:setVisible( v )
Sets the visibility of the control (where ‘control’ is a knob, button, slider etc.). The parameter ‘v’ should be a boolean value (i.e. true or false). E.g.
theWaveformDisplay:setVisible( false )
control:isVisible()
Returns whether the control is visible or not. E.g.
local v = theWaveformDisplay:isVisible()
control:setState( v )
Sets the state of the control (where ‘control’ is a knob, button, slider etc.). Not all controls
define a state; for these controls the function is ignored. The parameter ‘v’ should be a boolean value (i.e. true or false). E.g.
toggleWaveformButton:setState( false )
control:getState()
Returns the state of the control. E.g.
local v = toggleWaveformButton:getState()
valueDisplay()
Creates a GUI object that displays certain values (see below).
valueDisplay:setColour( r, g, b, a )
Sets the colour used by a valueDisplay object to draw its values. E.g.
local theValueDisplay = valueDisplay()
theValueDisplay:setColour( 1, 1, 1, 1 )
valueDisplay:setPosition( id, x, y, w, h )
Sets the position of one of the valueDisplay’s values. ‘id’ should be one of "Tempo",
"DelayTime", "DelayBeats" and "EnvLevel". E.g.
theValueDisplay:setPosition( "Tempo", x, y+kSmallIndicatorSpace, 48, 12 )
levelMeters( texture, u, v, w, h )
Creates a GUI object that draws level meters, using the provided texture.

u, v specify the position of the sub-image within the texture image to be used to draw the
meter. w, h specify the meter’s width and height.
levelMeters:add( id, x, y )
Adds a level meter to be drawn by the levelMeter object. ‘id’ should be one of
"InputRmsLeft", "InputRmsRight", "FxRmsLeft" and "FxRmsRight". E.g.
meters = levelMeters( atlas, 512-5, 0, kMeterW, kMeterH )
meters:add( "InputRmsLeft", x, y )
waveformDisplay( x, y, w, h )
Creates a graphical representation of the plug-in’s virtual tape. E.g.
theWaveformDisplay = waveformDisplay( 10, 100, 600, 200 )
add( theWaveformDisplay )
waveformDisplay:setMoving( v )
Sets whether the waveform display shows a scrolling waveform (with static read/write
indicators) or a static waveform (with moving read/write indicators). E.g.
theWaveformDisplay:setMoving( false )
waveformDisplay:isMoving()
Returns whether the waveform display is set to ‘moving’ mode or not. E.g.
local v = theWaveformDisplay:isMoving()
getParameterID( param )
Returns the parameter ID of the named parameter. Use with setParameter()/
getParameter() (see below). E.g.
paramID_Pitch = getParameterID( "Pitch" )

Functions callable from luaButton functions
These functions should not be called from your createUI() function, but can be used within
functions invoked by any luaButton (see above) that you create.
getParameter( param )
Returns the value of the plug-in parameter. ‘param’ can either be the parameter name (as
used in all the control creation functions above) or the parameter ID (as returned from
getParameterID()). Using the ID is more efficient. Typically you would obtain the ID in the
createUI() function (which is only performed once) and then use it in the button function
(which can be called many times). E.g.
pitch = getParameter( “Pitch” )
pitch = getParameter( paramID_Pitch )
setParameter( param, value )
Sets the value of the plug-in parameter. See the description of getParameter() for the meaning of ‘param’. E.g.
setParameter( “Pitch”, 12.0 )
setParameter( paramID_Pitch, 12.0 )
setOthersParameter( id, param, value )
As setParameter(), but sets the parameter on another instance of the plug-in, not necessarily the one running the script. This allows you to control several instances of the plug-in
from a single GUI.
The ‘id’ is matched against the OSC Port Offset of the plug-ins. Any plug-in that matches
the id will have its parameter set.
Note that all the plug-ins must be loaded by the same host application. For controlling instances of the plug-in loaded by other hosts, or running on other computers, use the
‘sendOSC’ command (below).
E.g.
setOthersParameter( 2, paramID_Pitch, 12.0 )
getOthersParameter( id, param )
As getParameter(), but gets the parameter from another instance of the plug-in. See
setOthersParameter() for a fuller explanation. E.g.
pitch = getOthersParameter( 2, paramID_Pitch )

sendOSC( address, path [, format ] [, values ] )
Sends an OSC message. ‘values’ is an optional array of data items to be sent with the message. If ‘values’ is used, then ‘format’ is an optional string that indicates how the items in
the values array should be interpreted. This is required because Lua treats all numbers as
being of the same type, whereas OSC differentiates between integers and floating point
values. The number of characters in ‘format’ should be the same as the number of values.
Each character may be one of ‘i’ (integer), ‘f’ (float) or ‘s’ (string).
E.g.
sendOSC( "osc.udp://localhost:7001", "/foo" )
sendOSC( "osc.udp://localhost:7001", "/foo", { 3, 5.2, "hello" } )
sendOSC( "osc.udp://localhost:7001", "/foo", "ifs", { 3, 5.2, "hello" } )
Note that the second example sends two floats and a string; the third sends an integer, a
float and a string.
group:setVisible() / group:isVisible()
control:setVisible() / control:isVisible()
control:setState() / control:getState()
These functions described above can also be called from luaButton functions.
redrawLabels()
This function should be called after you’ve changed the visibility of any groups. E.g.
recordOffsetGroup:setVisible( v )
redrawLabels()

Pre-defined Global Values
The system defines some values before calling your script, which you can use to make the
script’s behaviour dependent on, for example, what kind of computer you’re using. These
values (which are pretty self-explanatory) are:
•
isMac
•
isWin
•
isVST
•
isAU
•
isFxLoopVersion
•
majorVersion
•
minorVersion
•
dotVersion
•
version
The plug-in’s version number is of the form x.y.z (e.g. 2.1.4) where x is the major version
number, y is the minor version number, and z is the dot version. The ‘version’ global variable contains a single value combining all three e.g. for version 2.1.4, ‘version’ is 20104.
This is useful for making your scripts backwardly compatible - by testing for the version
number and not trying to use features that were not present in a version of the plug-in
older than the version you’re testing for.
Debugging
You can use Lua’s ‘print’ function to write out information to help you track what’s going
on (or what’s not going on) in your script. Also any run-time errors, or errors in loading
the script in the first place, are reported. In both cases, the output goes to:
Mac OS X
The system console.log. Use the standard Console utility (located in Applications/
Utilities) to view it.
Windows
The system OutputDebugString API. Use an application like Sysinternal’s DebugView to
view it.

MIDI control
Most of Augustus Loop's controls can be controlled via MIDI.
There is a preference setting in the 'Prefs' dialog that controls whether Augustus Loop responds to MIDI events on all channels, or just on channels 1&2.
In the latter case, the plug-in responds to MIDI controller messages on channel 1 (see table
below) and to note on messages (to alter the pitch setting) on channel 2. This can make it
more convenient to play a soft-synth and control Augustus Loop from the same keyboard.
Some parameters are controlled by NRPN messages rather than CC messages because
they require the extra (14 bit) resolution. NB the 'Delay Slider' has both a CC and NRPN
assigned to it.
CC messages
5 Master Feedback
12 Delay Slider
14 Mono-ize Input
15 Initial Pan
18 Pitch
19 Pitch Inertia
20 Dry Level
21 Effect Level
22 Input Level
23 L-L Time
24 L-R Time
25 R-L Time
26 R-R Time
27 Filter LFO Speed
28 Filter LFO Depth
29 Pitch LFO Depth
31 Host Tempo
32 Triplet
33 Beats
34 Beat Divisor
70 R-L Feedback
71 Filter Q
72 R-R Feedback
73 L-L Feedback
74 Filter Cutoff
75 L-R Feedback
76 Pitch LFO Speed
78 Trigger Arm
79 Saturation
80 Saturation Shape
81 Saturation On/Off
85 Filter Type
86 Freeze Loop
87 Tap Length
88 Pause Clock
89 Tape Reverse
92 Tap Record
96 Fade In Time
97 Fade Out Time
100 Clear Loop
101 Punch In Quantize
102 Punch Out Quantize
103 Punch Out Type
104 Punch In Set Input Level
105 Punch Out Set Input Level
106 Auto Clear After Fade
107 Fade
108 Fade Override
109 Delay Inertia Mode
110 Delay Inertia Fade Time
111 Digital Mode
112 Tape Stop
114 Tape Read Mode
115 Sync Group Mode
116 Sync Group Number
117 Freeze Mode
118 Low Cut Freq
119 Low Cut Amount
120 High Cut Freq
121 High Cut Amount
122 Crunch
123 Drive
124 Post Gain
NRPN messages
128 Delay Slider Min
129 Delay Slider Max
130 Master Delay Time
131 Delay Slider

OSC Control
From version 2.0.0 Augustus Loop can be controlled via the Open Sound Control (OSC)
protocol.
If you’re new to OSC, start by visiting opensoundcontrol.org.
Two settings control what port Augustus Loop uses to listen on for OSC
commands. One is the base OSC port, set in the preferences. The second is
the OSC Port Offset control. If the port offset is set to something other than
‘Off’, then the two numbers are added together and the result used as the
port number. E.g. if the base port is 6000 and the port offset is 1, then
Augustus Loop will listen on port 6001.
Received OSC Commands
In the documentation below, OSC parameters are prefixed with a string to indicate their
type, as follows:
•
s - string
•
i - integer
•
f - float
All the examples assume that Augustus Loop is listening at address 10.0.0.1:6001.
/ping s:returnUrl s:returnPath
Responds by sending a message back to the returnUrl and returnPath with the parameters
s:hosturl s:version
E.g.
/ping osc.udp://10.0.0.2:7000 “/foo”
replies to 10.0.0.2:7000 with
/foo osc.udp://10.0.0.1:6001 “Augustus Loop 2.0.0”
/set i:param f:value
Sets the value of parameter ‘param’ to ‘value’.
/get i:param s:returnUrl s:returnPath
Responds by sending a message back to the returnUrl and returnPath with the parameters
i:param f:value
where ‘value’ is the value of parameter ‘param’. E.g.
/get 14 osc.udp://10.0.0.2:7000 “/foo”

replies to 10.0.0.2:7000 with (assuming parameter 14 has the value 64.0)
/foo 14 64.0
/getAll s:returnUrl s:returnPath
Behaves exactly as if a /get message was received for every parameter.
/getNumParameters s:returnUrl s:returnPath
Responds by sending a message back to the returnUrl and returnPath with the parameters
i:numParameters
where ‘numParameters’ is the total number of parameters defined by the plug-in. E.g.
/getNumParameters osc.udp://10.0.0.2:7000 “/foo”
replies to 10.0.0.2:7000 with (assuming the plug-in has 84 parameters)
/foo 84
/getInfo i:param s:returnUrl s:returnPath
Responds by sending a message back to the returnUrl and returnPath with the parameters
i:param f:minValue f:maxValue f:defaultValue s:name i:unit
where ‘minValue’ and ‘maxValue’ are the minimum and maximum values that parameter
‘param’ can take, ‘defaultValue’ is the default value of the parameter, ‘name’ is the name of
the parameter, and ‘unit’ is a value that indicates the unit of the parameter (e.g. Hz, db,
seconds). The unit is one of the values defined by Apple’s Audio Unit specification.
/registerUpdate i:param s:returnUrl s:returnPath
Requests that when the parameter ‘param’ changes, a message is sent back to the returnUrl and returnPath with the parameters
i:param f:value
where the returned parameters have the same meaning as for the /get command (above).
/unregisterUpdate i:param s:returnUrl s:returnPath
Cancels a request made via /registerUpdate (above).
/getAllRegistered
Behaves exactly as if every parameter registered for updates with /registerUpdate had
changed. A message will be sent for every such parameter.
/exec s:func ...
Executes the Lua function ‘func’, which is assumed to be defined by the MIDI & OSC
scripting system (see below). OSC parameters following ‘func’ are passed through to the
Lua function, as can best be managed given the varying limitations of the two. Specifically,
the following table describes the mapping from OSC types to Lua types:
OSC
Lua
bool
bool
float
number
double
number
int32
number
int64
number
string
string
nil
nil
/call s:func s:returnUrl s:returnPath ...
As /exec, but also responds to the returnUrl and returnPath with the results of the Lua
function call. The following table describes the mapping from Lua return values to OSC
types:
Lua
OSC
number
float
string
string
Lua types not in the above table are not handled.

MIDI & OSC Scripting
Preamble
From Augustus Loop v2.0.0 onwards it is possible to extend the plug-in’s MIDI & OSC
functionality via user-writeable scripts. Indeed, the standard MIDI functionality described
above has been re-implemented using such a script, which you can use as reference for
your customisations.
The language used for the MIDI scripts is Lua. You will find a complete description of the
language, and some useful tutorials, at the Lua website: www.lua.org
All the standard language features of Lua are available in the GUI scripts, plus some extra
functions (documented below) specific to the Expert Sleepers system.
Learn by example
The best way to learn about scripting the MIDI & OSC functionality is to look at the existing examples, particularly the default script that ships with the plug-in. Just open up the
plug-in bundle and find the midi.lua file within. (Windows users should download the
Mac OS X version of the plug-in and get the script from there, since in the Windows version the script is munged into the plug-in as a Windows resource.)
Most of the example snippets in the documentation below are taken directly from the default midi script.
You should be able to find more scripts on the Expert Sleepers website.
Share your scripts!
You are encouraged to share your scripts with other users. For example, you could post
them on the Expert Sleepers forum (linked from the website). Alternatively, email them to
us, and we’ll make the best of the bunch downloadable directly from the Expert Sleepers
site.

Script locations
Augustus Loop looks for MIDI & OSC scripts in standard locations. Scripts must have the
filename extension “.lua”.
Mac OS X
Augustus Loop looks for scripts in
Library/Application Support/Expert Sleepers/Augustus Loop/Scripts
Windows
Augustus Loop looks for scripts in
C:\Documents and Settings\<username>\Application Data\Expert
Sleepers\Augustus Loop\Scripts
Overriding the default script
Normally any scripts that the plug-in finds are run in addition to (and after) the default
script (‘midi.lua’) that comes with the plug-in itself.
However, if you name your own script ‘midi.lua’, then the default script is not run. This
lets you completely replace the plug-in’s default MIDI behaviour (as described previ-
ously), rather than simply extend it.
MIDI & OSC Script Functions
The scripts are simply loaded and executed. You do not need to define any particular functions for the system to call.
The following functions are available for you to call to define your script behaviour.
getParameterID( param )
Returns the parameter ID of the named parameter. Use with setParameter()/
getParameter() (see below). E.g.
paramID_Pitch = getParameterID( "Pitch" )
getParameter( param )
Returns the value of the plug-in parameter. ‘param’ can either be the parameter name or
the parameter ID (as returned from getParameterID()). Using the ID is more efficient.
Typically you would obtain the ID in the main script body (which is only executed once)
and then use it in a handler function (which can be called many times). E.g.

pitch = getParameter( “Pitch” )
pitch = getParameter( paramID_Pitch )
setParameter( param, value )
Sets the value of the plug-in parameter. See the description of getParameter() for the meaning of ‘param’. E.g.
setParameter( “Pitch”, 12.0 )
setParameter( paramID_Pitch, 12.0 )
getParameterMinMax( param )
Returns the minimum and maximum values allowable for a plug-in parameter. See the description of getParameter() for the meaning of ‘param’. E.g.
local minv, maxv = getParameterMinMax( paramID_Pitch )
setOthersParameter( id, param, value )
As setParameter(), but sets the parameter on another instance of the plug-in, not necessarily the one running the script. This allows you to control several instances of the plug-in
from a single script.
The ‘id’ is matched against the OSC Port Offset of the plug-ins. Any plug-in that matches
the id will have its parameter set.
Note that all the plug-ins must be loaded by the same host application. For controlling instances of the plug-in loaded by other hosts, or running on other computers, use the
‘sendOSC’ command (below).
E.g.
setOthersParameter( 2, paramID_Pitch, 12.0 )
getOthersParameter( id, param )
As getParameter(), but gets the parameter from another instance of the plug-in. See
setOthersParameter() for a fuller explanation. E.g.
pitch = getOthersParameter( 2, paramID_Pitch )
sendOSC( address, path [, format ] [, values ] )
Sends an OSC message. ‘values’ is an optional array of data items to be sent with the message. If ‘values’ is used, then ‘format’ is an optional string that indicates how the items in
the values array should be interpreted. This is required because Lua treats all numbers as
being of the same type, whereas OSC differentiates between integers and floating point
values. The number of characters in ‘format’ should be the same as the number of values.
Each character may be one of ‘i’ (integer), ‘f’ (float) or ‘s’ (string).

E.g.
sendOSC( "osc.udp://localhost:7001", "/foo" )
sendOSC( "osc.udp://localhost:7001", "/foo", { 3, 5.2, "hello" } )
sendOSC( "osc.udp://localhost:7001", "/foo", "ifs", { 3, 5.2, "hello" } )
Note that the second example sends two floats and a string; the third sends an integer, a
float and a string.
requestAllNoteOn( function )
Request that the given function be called in response to any MIDI note on event. E.g.
local function handleNoteOn( channel, noteNumber, velocity )
!-- do stuff
end
requestAllNoteOn( handleNoteOn )
requestAllNoteOff( function )
Request that the given function be called in response to any MIDI note off event. E.g.
local function handleNoteOff( channel, noteNumber, velocity )
!-- do stuff
end
requestAllNoteOff( handleNoteOff )
requestAllCC( function )
Request that the given function be called in response to any MIDI continuous controller
(CC) event. E.g.
local function handleCC( channel, cc, value )
!-- do stuff
end
requestAllCC( handleCC )
requestAllNRPN( function )
Request that the given function be called in response to any MIDI non-registered parameter number (NRPN) event. E.g.
local function handleNRPN( channel, nrpn, value )
!-- do stuff
end
requestAllNRPN( handleNRPN )
requestAllProgramChange( function )
Request that the given function be called in response to any MIDI program change event.
E.g.
local function handlePC( channel, value )
!-- do stuff
end
requestAllProgramChange( handlePC )

requestAllPolyPressure( function )
Request that the given function be called in response to any MIDI poly pressure (polyphonic aftertouch) event. E.g.
local function handlePolyPressure( channel, key, value )
!-- do stuff
end
requestAllPolyPressure( handlePolyPressure )
requestNoteOn( note, function )
Request that the given function be called in response to a MIDI note on event matching the
given note number. E.g.
local function handleNoteOn( channel, noteNumber, velocity )
!-- do stuff
end
requestNoteOn( 60, handleNoteOn )
requestNoteOff( note, function )
Request that the given function be called in response to a MIDI note off event matching
the given note number. E.g.
local function handleNoteOff( channel, noteNumber, velocity )
!-- do stuff
end
requestNoteOff( 60, handleNoteOff )
requestCC( cc, function )
Request that the given function be called in response to the given MIDI continuous controller (CC) event. E.g.
local function handleCC( channel, cc, value )
!-- do stuff
end
requestCC( 20, handleCC )
requestNRPN( nrpn, function )
Request that the given function be called in response to the given MIDI non-registered parameter number (NRPN) event. E.g.
local function handleNRPN( channel, nrpn, value )
!-- do stuff
end
requestNRPN( 1000, handleNRPN )
requestProgramChange( pc, function )
Request that the given function be called in response to the given MIDI program change
event. E.g.

local function handlePC( channel, value )
!-- do stuff
end
requestProgramChange( 2, handlePC )
requestPolyPressure( key, function )
Request that the given function be called in response to a MIDI poly pressure (polyphonic
aftertouch) event on the given key. E.g.
local function handlePolyPressure( channel, key, value )
!-- do stuff
end
requestPolyPressure( 60, handlePolyPressure )
requestPitchWheel( function )
Request that the given function be called in response to a MIDI pitch wheel event. NB the
value passed to the handler function is the raw 14 bit MIDI value, not e.g. a normalised
±1.0 value. E.g.
local function handlePitchWheel( channel, value )
!-- do stuff
end
requestPitchWheel( handlePitchWheel )
requestChannelPressure( function )
Request that the given function be called in response to a MIDI channel pressure (aftertouch) event. E.g.
local function handleChannelPressure( channel, value )
!-- do stuff
end
requestChannelPressure( handleChannelPressure )
time()
Returns a value in seconds. The value itself is not particularly meaningful, but if you call it
twice and subtract the two values you will have the time interval between the two calls.
E.g.
time1 = time()
!-- do stuff
time2 = time()
print( "elapsed time", time2-time1 )
requestTimedCallback( interval, function )
Requests that the given function should be called after interval seconds. Returns a timer
object that can be passed to cancelTimer() (see below). E.g.
local function timerTimeOut()
!print( "it is now 2 seconds later" )

end
requestTimedCallback( 2.0, timerTimeOut )
requestPeriodicCallback( interval, function )
Requests that the given function should be called every interval seconds. Returns a timer
object that can be passed to cancelTimer() (see below). E.g.
local function timerCallback()
!print( "tick" )
end
requestPeriodicCallback( 1.0, timerCallback )
cancelTimer( timer )
Cancels a timer that was created with requestTimedCallback() or requestPeriodicCallback(). After this call the timer object is no longer valid and should not be used. E.g.
timer = requestPeriodicCallback( 1.0, timerCallback )
!-- timer is now firing every second
cancelTimer( timer )
timer = nil
setGUIBoolValue( id, value )
Sets a value that can be picked up by GUI objects. ‘id’ is a number between 0 and 7. ‘value’
is interpreted as a boolean value (true or false). See the GUI script method indicator() for a
typical usage.
getGUIBoolValue( id )
Gets one of the values that can be set with setGUIBoolValue(). ‘id’ is a number between 0
and 7.
setOthersGUIBoolValue( other, id, value )
As setGUIBoolValue() but sets the value on other instances of the plug-in - see
setOthersParameter() above.
getOthersGUIBoolValue( other, id )
As getGUIBoolValue() but gets the value from another instance of the plug-in - see
getOthersParameter() above.
registerOSCPathForParameter( path, param )
Registers the OSC path ‘path’ as controlling the parameter ‘param’ (which is a parameter
name or ID, as for e.g. setParameter()).

The OSC packet should include a float value after the path, which will be the value for the
parameter. E.g.
registerOSCPathForParameter( "/1/fader1", "Env 1 Scale" )
registerOSCPathForParameterNormalized( path, param )
As registerOSCPathForParameter() except that incoming OSC values in the range 0-1 are
renormalized to control the full parameter range between its minimum and maximum
values.
Pre-defined Global Values
The system defines some values before calling your script, which you can use to make the
script’s behaviour dependent on, for example, what kind of computer you’re using. These
values (which are pretty self-explanatory) are:
•
isMac
•
isWin
•
isVST
•
isAU
•
majorVersion
•
minorVersion
•
dotVersion
•
version
The plug-in’s version number is of the form x.y.z (e.g. 2.1.4) where x is the major version
number, y is the minor version number, and z is the dot version. The ‘version’ global variable contains a single value combining all three e.g. for version 2.1.4, ‘version’ is 20104.
This is useful for making your scripts backwardly compatible - by testing for the version
number and not trying to use features that were not present in a version of the plug-in
older than the version you’re testing for.
Debugging
You can use Lua’s ‘print’ function to write out information to help you track what’s going
on (or what’s not going on) in your script. Also any run-time errors, or errors in loading
the script in the first place, are reported. In both cases, the output goes to:
Mac OS X
The system console.log. Use the standard Console utility (located in Applications/
Utilities) to view it.

Windows
The system OutputDebugString API. Use an application like Sysinternal’s DebugView to
view it.

Version History
v2.3.0 5th August 2010
•
First 64 bit Mac OS X VST release.
•
Improved handling of mouse events (dragging knobs would temporarily freeze the
host UI on some platforms).
•
Improved accuracy of MIDI event handling.
v2.2.2 28th June 2010
•
Fixed GUI issue in Reaper on Windows.
•
Added new OSC command (registerOSCPathForFunction).
•
Fixed a keypress issue in certain VST hosts (plug-in would respond to numeric input
but not to pressing Return).
v2.2.1 24th February 2010
•
(AU version only updated)
•
Fixed compatibility with OS X 10.5.
•
Worked around a bug in Digital Performer 7.1 which would cause a crash when the
plug-in prefs dialog was used.
•
Generally improved stability of the Cocoa UI.
v2.2.0 9th February 2010
•
First 64 bit AU release.
•
32 bit AU now uses a Cocoa UI if the host supports it.
v2.1.1 24th August 2009
•
Added new OSC commands (registerOSCPathForParameter() and registerOSCPathForParameterNormalized()), primarily for compatibility with TouchOSC.
v2.1.0 8th May 2009
•
Added timing and timed callback methods for MIDI/Lua scripts.
•
Added set/getGUIBoolValue() methods and corresponding form of the indicator()
method.
v2.0.4 17th April 2009
•
(AU version only updated) Addressed an issue where no audio would reach the fx
loop outputs with certain combinations of parameter settings.

v2.0.3 19th March 2009
•
(AU version only updated) Further improved the behaviour of parameter automation in Logic - specifically:
•
the pitch buttons now cause automation to be recorded.
•
the four delay time parameters (delay slider min/max, max delay and delay
time) now use 'high resolution' mode automation.
v2.0.2 3rd March 2009
•
(AU version only updated) Fixed recording of parameter automation in Logic.
v2.0.1 11th January 2009
•
The default MIDI/OSC script (midi.lua) can now be completely overridden.
•
Added ‘Ignore AudioUnitReset’ preference.
v2.0.0 23rd October 2008
•
Augustus Loop’s GUI is now fully skinnable and scriptable.
•
MIDI behaviour is now scriptable.
•
VST version now receives MIDI.
•
Added Record Offset feature.
•
Added waveform display.
•
The ‘Max Delay Time’ parameter now has a smaller minimum value (1.0 seconds)
and is not rounded to the nearest 10 seconds.
•
Added Tape Read Mode parameter.
•
The Freeze Loop function is much improved.
•
A small crossfade is now applied when activating Clear Loop, and when Clear Loop
ends.
•
The Input Level parameter is now protected against sudden changes, which previously could result in audio artefacts. In particular this makes the Punch In/Out features more usable.
•
A small crossfade is now applied when activating Tap Record.
•
Added a new mode for the Freeze Loop function, “Freeze Current”.
•
Added OSC support.
•
Added ‘Sync Group’ feature.
•
Added new ‘Tape Sim’ section.
•
Added factory presets.
•
Fixed a bug that could cause Digital Mode to not engage correctly.
v1.8.2 (unreleased)
•
Fixed parameter automation in VST versions (host would not record automation
when adjusting controls in Augustus Loop GUI).

v1.8.1 19th July 2008
•
Fixed a problem where Augustus Loop's GUI would stop Logic's Key Commands
from working.
•
Fixed an issue which could cause Apple’s AU validation tool (as used by Logic) to
run very slowly when validating Augustus Loop.
v1.8.0 5th June 2008
•
New 6-in 6-out configuration of the plug-in, allowing audio to be routed through external processing either side of the virtual tape.
•
Fixed an issue that could cause a crash in Logic 8 when opening a song containing
multiple instances of Augustus Loop with their GUIs open.
v1.7.3, 24th March 2008
•
(Windows version only updated) Plug-in no longer requires SSE2, though it is still
optimised for systems that have it.
v1.7.2, 18th March 2008
•
Mac OS X versions only updated.
•
Fixed a problem where the VST version would crash if the AU version were not also
installed.
•
Further enhanced the plug-ins’ resilience to font installation issues.
v1.7.1, 17th March 2008
•
(Mac OS X versions only) Fixed a possible crash if a system font is not installed in the
expected location.
v1.7.0, 14th March 2008
•
First Windows version.
•
First Mac OS X VST version.
•
New GUI.
•
Fixed various filter problems. In particular, the filter cutoff was being limited to
about 2kHz - now the full range up to 8kHz is usable. Therefore, this version may
sound different to previous versions at the same settings. A preferences setting is
provided to revert to the previous behaviour, which may be useful if you have to revisit an old mix after upgrading.
•
Added ‘Tape Stop’ feature.
v1.6.5, 30th September 2007
•
Now responds properly to AudioUnitReset(), so in e.g. Logic the delay buffer will be
cleared when song playback is started etc.

v1.6.3, 31st October 2006
•
Added rounded tempos option.
v1.6.2, 2nd July 2006
•
Fixed a GUI issue with certain hosts (notably Plogue Bidule on Intel).
v1.6.1, 20th March 2006
•
First 'Universal Binary' version for Intel and PowerPC Macs.
v1.6.0, 9th January 2006
•
Added 'digital mode'.
•
Fixed bug which could result in orphaned threads being created.
v1.5.1, 5th October 2005
•
Added wider range of values for punch in/out drop-down menus.
v1.5.0, 29th August 2005
•
Added new 'delay intertia-free' mode.
v1.4.3, 13th July 2005
•
Tempo is calculated and displayed even if MIDI clock output is disabled.
•
MIDI clock generation is completely rewritten internally, and is generally more compatible with host apps.
•
Once tap recording has been performed, changing the beats/beat divisor/triplet controls changes the delay time accordingly to maintain the tempo calculated at the end
of tap recording.
v1.4.2, 11th June 2005
•
Fixed some potential issues with Logic's AU validation.
v1.4.1, 13th March 2005
•
Added MIDI control of delay time.
v1.4.0, 27th February 2005
•
Added 'clear loop' function to wipe the tape.
•
Added auto fade-in/out envelope, with override and optional auto-clear of loop on
fade-out completion.
•
Current loop length now displayed in host's bar/beat units as well as seconds.
•
Added auto punch in/out, quantized to loop length (seconds or host units) or host
transport position.

•
Loop input level can be controlled by punch in/out.
•
Extensive CPU efficiency improvements.
•
Now correctly reports silent output to downstream processing, resulting in further
efficiency improvements in hosts that support this feature.
•
Fixed potential crash when using Freeze Loop and Host Tempo.
•
Improved behaviour of Freeze Loop in conjunction with Reverse.
•
Maximum delay time is now limited according to installed system RAM.
v1.2.0, 3rd January 2005
•
MIDI output ports now uniquely named.
•
Added option to disable MIDI output ports.
•
Added option for MIDI receive channel.
•
Added display of current loop length (when sync'd) and while using 'tap record'.
•
Added saturation shape control.
•
CPU efficiency improvements.
v1.1.0, 30th August 2004
•
Added host tempo mode.
•
Added ability to output MIDI clock messages.
•
Added audio triggered recording.
•
'Tap tempo' renamed 'Tap length'.
•
Fixed issue with 48kHz operation.
•
Fixed behaviour of MIDI remote control of pitch parameter.
•
Fixed problem with Freeze Loop button staying on after tap record.
•
Rebuilt with Core Audio SDK 1.3.1.
v1.0, 5th June 2004
•
First release.
!

Release Notes
Issues with keyboard input
There are known issues with some hosts, in particular Ableton Live, and all plug-ins that
require keyboard input. (Augustus Loop is such a plug-in.) Ableton have done something
to address this issue in Live 7.0.2.
See
•
http://www.ableton.com/forum/viewtopic.php?t=84434
•
http://www.ableton.com/pages/faq/options_text
Basically you can enable keyboard presses in plug-ins by creating or editing a file called
Options.txt
which lives here:
C:\Documents and Settings\<username>\Application Data\Ableton\Live
7.0.2\Preferences
The file needs to contain the line:
-_EnsureKeyMessagesForPlugins

Contact
The Expert Sleepers website is here:
http://www.expert-sleepers.co.uk/
Or you can email
info@expertsleepers.co.uk
Or you can use the forum, which is here:
http://www.kvraudio.com/forum/viewforum.php?f=85

Acknowledgements
The software described in this manual makes use of the following open source projects.
The author is greatly indebted to them for their efforts and generosity.
Below are reproduced the various copyright notices and disclaimers that accompany these
software projects, in accordance with their terms of use.
Lua
Copyright (C) 1994-2008 Lua.org, PUC-Rio.
Permission is hereby granted, free of charge, to any person obtaining a copy of this
software and associated documentation files (the "Software"), to deal in the Software
without restriction, including without limitation the rights to use, copy, modify,
merge, publish, distribute, sublicense, and/or sell copies of the Software, and to permit persons to whom the Software is furnished to do so, subject to the following conditions:
The above copyright notice and this permission notice shall be included in all copies
or substantial portions of the Software.
THE SOFTWARE IS PROVIDED "AS IS", WITHOUT WARRANTY OF ANY KIND,
EXPRESS OR IMPLIED, INCLUDING BUT NOT LIMITED TO THE WARRANTIES
OF MERCHANTABILITY, FITNESS FOR A PARTICULAR PURPOSE AND NONINFRINGEMENT. IN NO EVENT
SHALL THE AUTHORS OR COPYRIGHT HOLDERS BE LIABLE FOR ANY CLAIM, DAMAGES OR OTHER LIABILITY, WHETHER IN AN ACTION OF CONTRACT, TORT OR OTHERWISE, ARISING FROM, OUT OF OR IN CONNECTION WITH THE SOFTWARE OR THE USE OR OTHER DEALINGS IN THE SOFTWARE.
oscpack
oscpack -- Open Sound Control packet manipulation library
http://www.audiomulch.com/~rossb/code/oscpack
Copyright (c) 2004 Ross Bencina <rossb@audiomulch.com>
Permission is hereby granted, free of charge, to any person obtaining a copy of this software and associated documentation files (the "Software"), to deal in the Software without restriction, including without limitation the rights to use, copy,
modify, merge, publish, distribute, sublicense, and/or sell copies of the Software, and to permit persons to whom the
Software is furnished to do so, subject to the following conditions:
The above copyright notice and this permission notice shall be included in all copies or substantial portions of the Software.
Any person wishing to distribute modifications to the Software is requested to send the modifications to the original
developer so that they can be incorporated into the canonical version.
THE SOFTWARE IS PROVIDED "AS IS", WITHOUT WARRANTY OF ANY KIND, EXPRESS OR IMPLIED, INCLUDING BUT NOT LIMITED TO THE WARRANTIES OF MERCHANTABILITY, FITNESS FOR A PARTICULAR PURPOSE
AND NONINFRINGEMENT. IN NO EVENT SHALL THE AUTHORS OR COPYRIGHT HOLDERS BE LIABLE FOR
ANY CLAIM, DAMAGES OR OTHER LIABILITY, WHETHER IN AN ACTION OF CONTRACT, TORT OR OTHERWISE, ARISING FROM, OUT OF OR IN CONNECTION WITH THE SOFTWARE OR THE USE OR OTHER DEALINGS
IN THE SOFTWARE.

glew
The OpenGL Extension Wrangler Library
Copyright (C) 2002-2007, Milan Ikits <milan ikits[]ieee org>
Copyright (C) 2002-2007, Marcelo E. Magallon <mmagallo[]debian org>
Copyright (C) 2002, Lev Povalahev
All rights reserved.
Redistribution and use in source and binary forms, with or without modification, are permitted provided that the following conditions are met:
* Redistributions of source code must retain the above copyright notice, this list of conditions and the following disclaimer.
* Redistributions in binary form must reproduce the above copyright notice, this list of conditions and the following disclaimer in the documentation and/or other materials provided with the distribution.
* The name of the author may be used to endorse or promote products derived from this software without specific prior
written permission.
THIS SOFTWARE IS PROVIDED BY THE COPYRIGHT HOLDERS AND CONTRIBUTORS "AS IS" AND ANY EXPRESS
OR IMPLIED WARRANTIES, INCLUDING, BUT NOT LIMITED TO, THE IMPLIED WARRANTIES OF MERCHANTABILITY AND FITNESS FOR A PARTICULAR PURPOSE ARE DISCLAIMED. IN NO EVENT SHALL THE COPYRIGHT OWNER OR CONTRIBUTORS BE LIABLE FOR ANY DIRECT, INDIRECT, INCIDENTAL, SPECIAL, EXEMPLARY, OR CONSEQUENTIAL DAMAGES (INCLUDING, BUT NOT LIMITED TO, PROCUREMENT OF SUBSTITUTE
GOODS OR SERVICES; LOSS OF USE, DATA, OR PROFITS; OR BUSINESS INTERRUPTION) HOWEVER CAUSED
AND ON ANY THEORY OF LIABILITY, WHETHER IN CONTRACT, STRICT LIABILITY, OR TORT (INCLUDING
NEGLIGENCE OR OTHERWISE) ARISING IN ANY WAY OUT OF THE USE OF THIS SOFTWARE, EVEN IF ADVISED
OF THE POSSIBILITY OF SUCH DAMAGE.
Mesa 3-D graphics library
Version: 7.0
Copyright (C) 1999-2007 Brian Paul All Rights Reserved.
Permission is hereby granted, free of charge, to any person obtaining a copy of this software and associated documentation files (the "Software"), to deal in the Software without restriction, including without limitation the rights to use, copy,
modify, merge, publish, distribute, sublicense, and/or sell copies of the Software, and to permit persons to whom the
Software is furnished to do so, subject to the following conditions:
The above copyright notice and this permission notice shall be included in all copies or substantial portions of the Software.
THE SOFTWARE IS PROVIDED "AS IS", WITHOUT WARRANTY OF ANY KIND, EXPRESS OR IMPLIED, INCLUDING BUT NOT LIMITED TO THE WARRANTIES OF MERCHANTABILITY, FITNESS FOR A PARTICULAR PURPOSE
AND NONINFRINGEMENT. IN NO EVENT SHALL BRIAN PAUL BE LIABLE FOR ANY CLAIM, DAMAGES OR
OTHER LIABILITY, WHETHER IN AN ACTION OF CONTRACT, TORT OR OTHERWISE, ARISING FROM, OUT OF
OR IN CONNECTION WITH THE SOFTWARE OR THE USE OR OTHER DEALINGS IN THE SOFTWARE.
Copyright (c) 2007 The Khronos Group Inc.
Permission is hereby granted, free of charge, to any person obtaining a copy of this software and/or associated documentation files (the "Materials"), to deal in the Materials without restriction, including without limitation the rights to
use, copy, modify, merge, publish, distribute, sublicense, and/or sell copies of the Materials, and to permit persons to
whom the Materials are furnished to do so, subject to the following conditions:
The above copyright notice and this permission notice shall be included in all copies or substantial portions of the Materials.
THE MATERIALS ARE PROVIDED "AS IS", WITHOUT WARRANTY OF ANY KIND, EXPRESS OR IMPLIED, INCLUDING BUT NOT LIMITED TO THE WARRANTIES OF MERCHANTABILITY, FITNESS FOR A PARTICULAR

PURPOSE AND NONINFRINGEMENT. IN NO EVENT SHALL THE AUTHORS OR COPYRIGHT HOLDERS BE LIABLE FOR ANY CLAIM, DAMAGES OR OTHER LIABILITY, WHETHER IN AN ACTION OF CONTRACT, TORT OR
OTHERWISE, ARISING FROM, OUT OF OR IN CONNECTION WITH THE MATERIALS OR THE USE OR OTHER
DEALINGS IN THE MATERIALS.
FreeType
The FreeType Project is copyright (C) 1996-2000 by David Turner, Robert Wilhelm, and Werner Lemberg.
THE FREETYPE PROJECT IS PROVIDED `AS IS' WITHOUT WARRANTY OF ANY KIND, EITHER EXPRESS OR IMPLIED, INCLUDING, BUT NOT LIMITED TO, WARRANTIES OF MERCHANTABILITY AND FITNESS FOR A
PARTICULAR PURPOSE. IN NO EVENT WILL ANY OF THE AUTHORS OR COPYRIGHT HOLDERS BE LIABLE
FOR ANY DAMAGES CAUSED BY THE USE OR THE INABILITY TO USE, OF THE FREETYPE PROJECT.
FTGL
Copyright (C) 2001-3 Henry Maddocks
Permission is hereby granted, free of charge, to any person obtaining a copy of this software and associated documentation files (the "Software"), to deal in the Software without restriction, including without limitation the rights to use, copy,
modify, merge, publish, distribute, sublicense, and/or sell copies of the Software, and to permit persons to whom the
Software is furnished to do so, subject to the following conditions:
The above copyright notice and this permission notice shall be included in all copies or substantial portions of the Software.
THE SOFTWARE IS PROVIDED "AS IS", WITHOUT WARRANTY OF ANY KIND, EXPRESS OR IMPLIED, INCLUDING BUT NOT LIMITED TO THE WARRANTIES OF MERCHANTABILITY, FITNESS FOR A PARTICULAR PURPOSE
AND NONINFRINGEMENT. IN NO EVENT SHALL THE AUTHORS OR COPYRIGHT HOLDERS BE LIABLE FOR
ANY CLAIM, DAMAGES OR OTHER LIABILITY, WHETHER IN AN ACTION OF CONTRACT, TORT OR OTHERWISE, ARISING FROM, OUT OF OR IN CONNECTION WITH THE SOFTWARE OR THE USE OR OTHER DEALINGS
IN THE SOFTWARE.
libpng
http://www.libpng.org/pub/png/libpng.html
zlib
http://www.zlib.net/
 Loading...