

Page 1

Application Note
Wireless HotSync of the Handspring Visor
2002/6/24
Trademark(s) . and Registered Trademark(s) ®
WIDCOMM, the WIDCOMM logo, BlueConnect, BlueShare and BTW are trademarks
of WIDCOMM, Inc.
The Bluetooth trademarks are owned by Telefonaktiebolaget L M Ericsson, Sweden and
used by WIDCOMM under license.
Handspring, Visor, Springboard, and HotSync are trademarks/registered trademarks of
Handspring, Inc.
Palm OS is a registered trademarks of Palm, Inc.
Other brand and product names may be registered trademarks or trademarks of their
respective holders.
1 Introduction
As a technology leader in the wireless networking market, WIDCOMM’s vision is to enable
consumers to easily, conveniently and securely access information and services from their
Bluetooth devices anytime and anywhere – from homes, offices and public places.
BlueShare™ is a Bluetooth USB radio module for your desktop or laptop computer that
is fully interoperable with the WIDCOMM BlueConnect™ module.
BTW™ is a set of software drivers and utilities that seamlessly integrate Bluetooth
technology into your desktop or laptop computer.
BlueConnect™ is a Bluetooth Springboard™-compatible radio module for the
Handspring™ Visor™ that is fully interoperable with the WIDCOMM BlueShare™
family of Bluetooth devices.
This document describes the procedure for demonstrating the use of the Serial Port Profile
(SPP) to wirelessly HotSync® applications onto a Handspring Visor. Doing so requires a
BlueConnect module on the Handspring Visor and a BlueShare dongle on a Microsoft Windows
Laptop or Desktop computer. This document was tested using the following configuration:
A desktop or laptop computer with an available USB interface and running the
Microsoft Windows 2000 operating system.
BTW version 1.0.0.
A standard version of the Handspring Visor (running the Palm OS version 3.1) with a
BlueConnect card running the WIDCOMM version 2.2G software.
NOTE: This procedure was tested under Windows 2000 only. On a computer
running other
versions of the Microsoft Windows operating system, this procedure may be slightly
different.
NOTE: This procedure was on a Visor running the PalmOS version 3.1 only. On a
computer
running other versions of the Palm operating system, this procedure may be slightly
different.
2 A Quick Overview of the Procedure
The basic procedure for running this demonstration is fairly simple. On the Visor side, HotSync
operates as if it was using a serial port connection. Instead of a physical serial cable connecting
the two computers, a Bluetooth wireless link is used to simulate a serial link. On the
BTW/Windows side, the HotSync uses a Windows Virtual COMM port instead of a physical
Page 2

serial port. Here is a quick overview of the process:
1) Install BTW and BlueShare on your Windows Computer (98SE, 2000, or Me version)
2) Install the Handspring organizer software on your Windows Computer (98SE, 2000, or
Me version) if necessary.
3) Insert the BlueConnect card into your Visor
4) Use the Visor to inquire for the BlueShare device
5) Use the Visor to discover the “Generic Serial” service on the BTW system. Select this
service so that the first attempt to utilize a serial link will automatically create a
Bluetooth connection to the BTW system.
6) Using the BTW dialogs, determine what Virtual COMM (VCOMM) port will be
assigned to the BTW side of the SPP link
7) Configure the HotSync manager on the PC to use the VCOMM port that you uncovered
in step 6.
8) Select some files to HotSync on your PC. Use the Handpring organizer software to
queue them up for HotSync.
9) Initiate a HotSync from the Visor side.
10) When the HotSync is finished, terminate the SPP link by shutting down the
BlueConnect card on the Visor.
3. Setup
3.1 BLUESHARE/BTW SETUP
3.1.1 Connect BlueShare to your PC or Laptop
Installing the BlueShare is quick and painless. Regardless of which Development Kit that you
buy, a BlueShare device will always be accompanied by a Universal Serial Bus (USB) cable for
connecting your PC or laptop computer to
Page 3
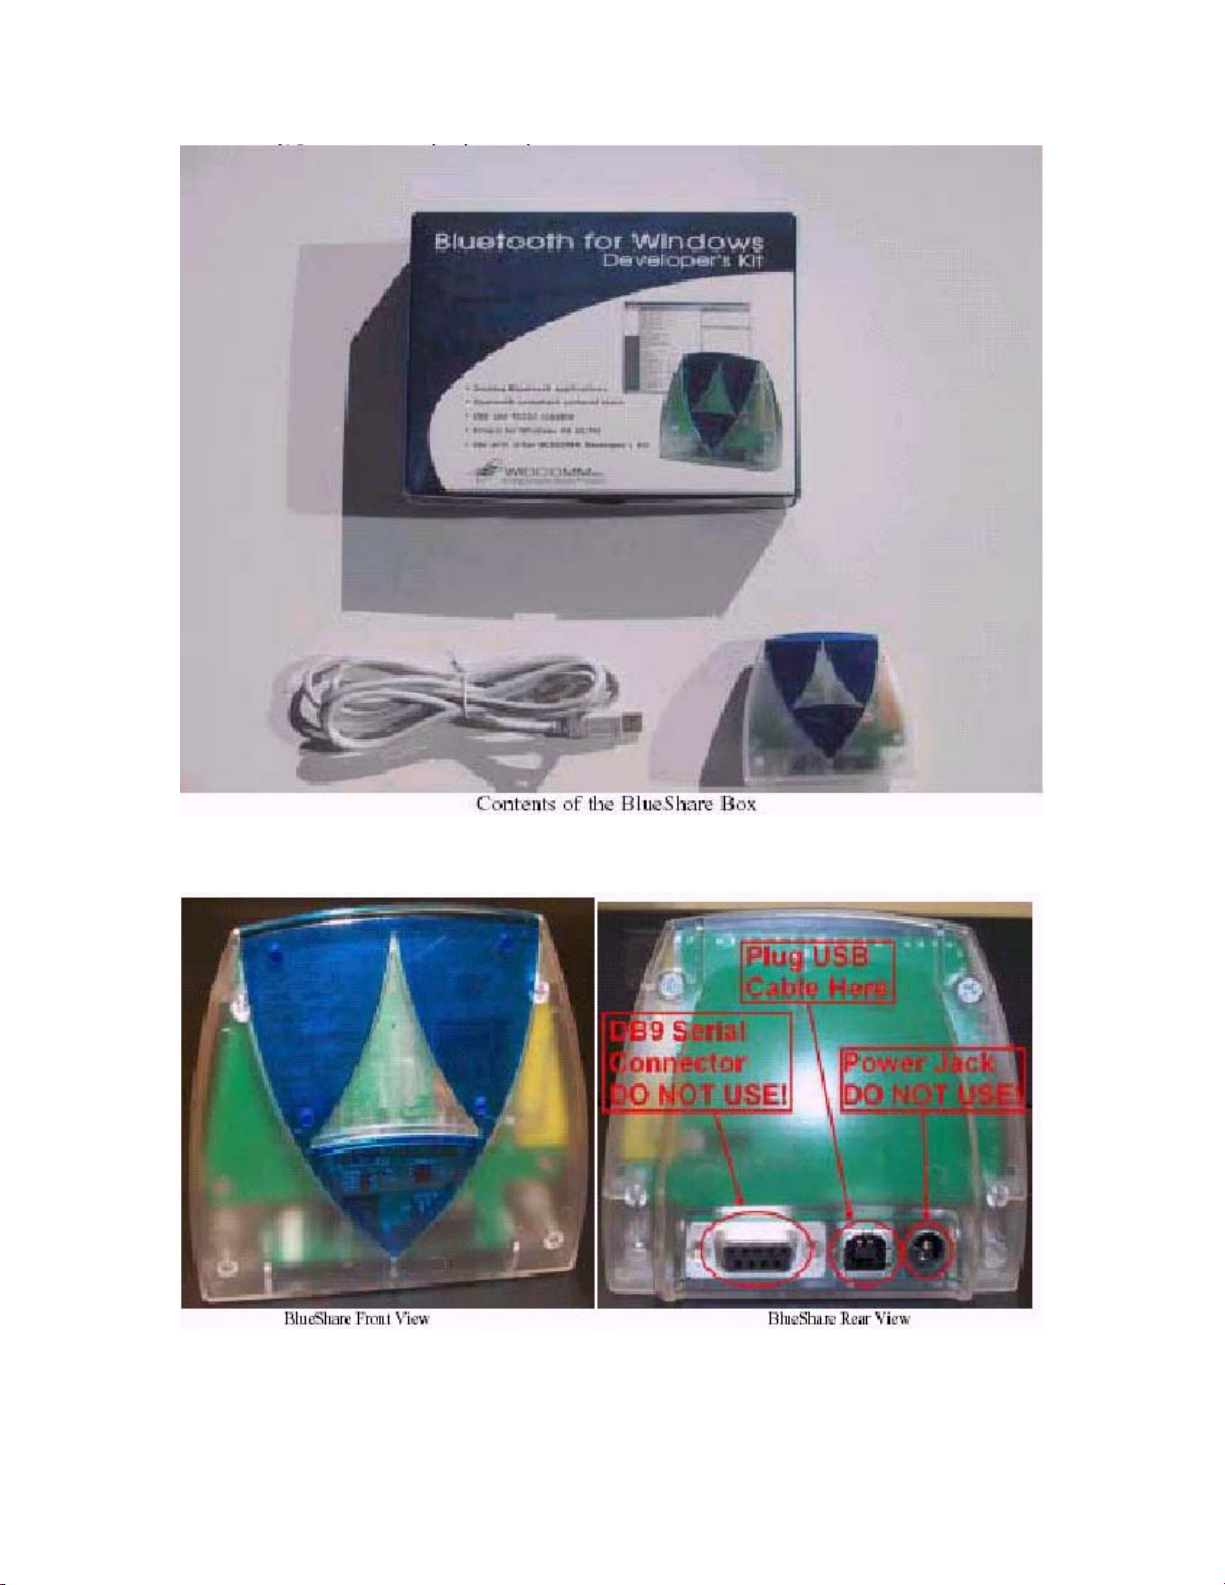
NOTE: This picture shows the BlueShare hardware only. The BTW software is
supplied on a separate CD [not shown].
Page 4

Connect the USB cable to the jack shown above and to the matching USB connector on your
PC, laptop computer, or USB hub. This concludes the physical installation of the BlueShare
device.
NOTE: The DB9 serial connector and the optional power connector located on the
rear of the
BlueShare are exclusively for the use of WIDCOMM technicians. Do not attempt to
use
either one of these connectors.
3.1.2 Install the BTW Software
The BTW software is installed from a CDROM using an InstallShield executable. For detailed
instruction on how to install the software, see the BTW Installation and Uninstallation
Instructions, WIDCOMM doc # S0003-0024. This document will be supplied with your BTW
CD and has the file name readme.doc or readme.pdf.
3.1.3 Install the Palm Desktop Software
Insure that the Palm desktop software is installed on your desktop or laptop computer. The
software resides on a CD-ROM that was supplied with your Visor. For instructions on how to
install this software, consult the Handspring documentation.
3.1.4 Update HotSync if Necessary [Seldom Required]
Some early Prism/Platinum Visors (ROM version 3.5.2H) had a problem that prevented modem
HotSync from working. There is a fix that you can download from Handspring at:
http://www.handspring.com/support/ts_updater11_readme.jhtml
"HS
Extensions 3.5.2 v. 1.2". In most cases, this is not required.
3.1.5 Set Explorer to View→Details
On your Windows PC, start the Windows Explorer and click on the “Bluetooth Neighborhood”
entry in the folder view. For additional status information, it is always a good idea to use the
View → Details option as shown below.
. This will install the
Page 5
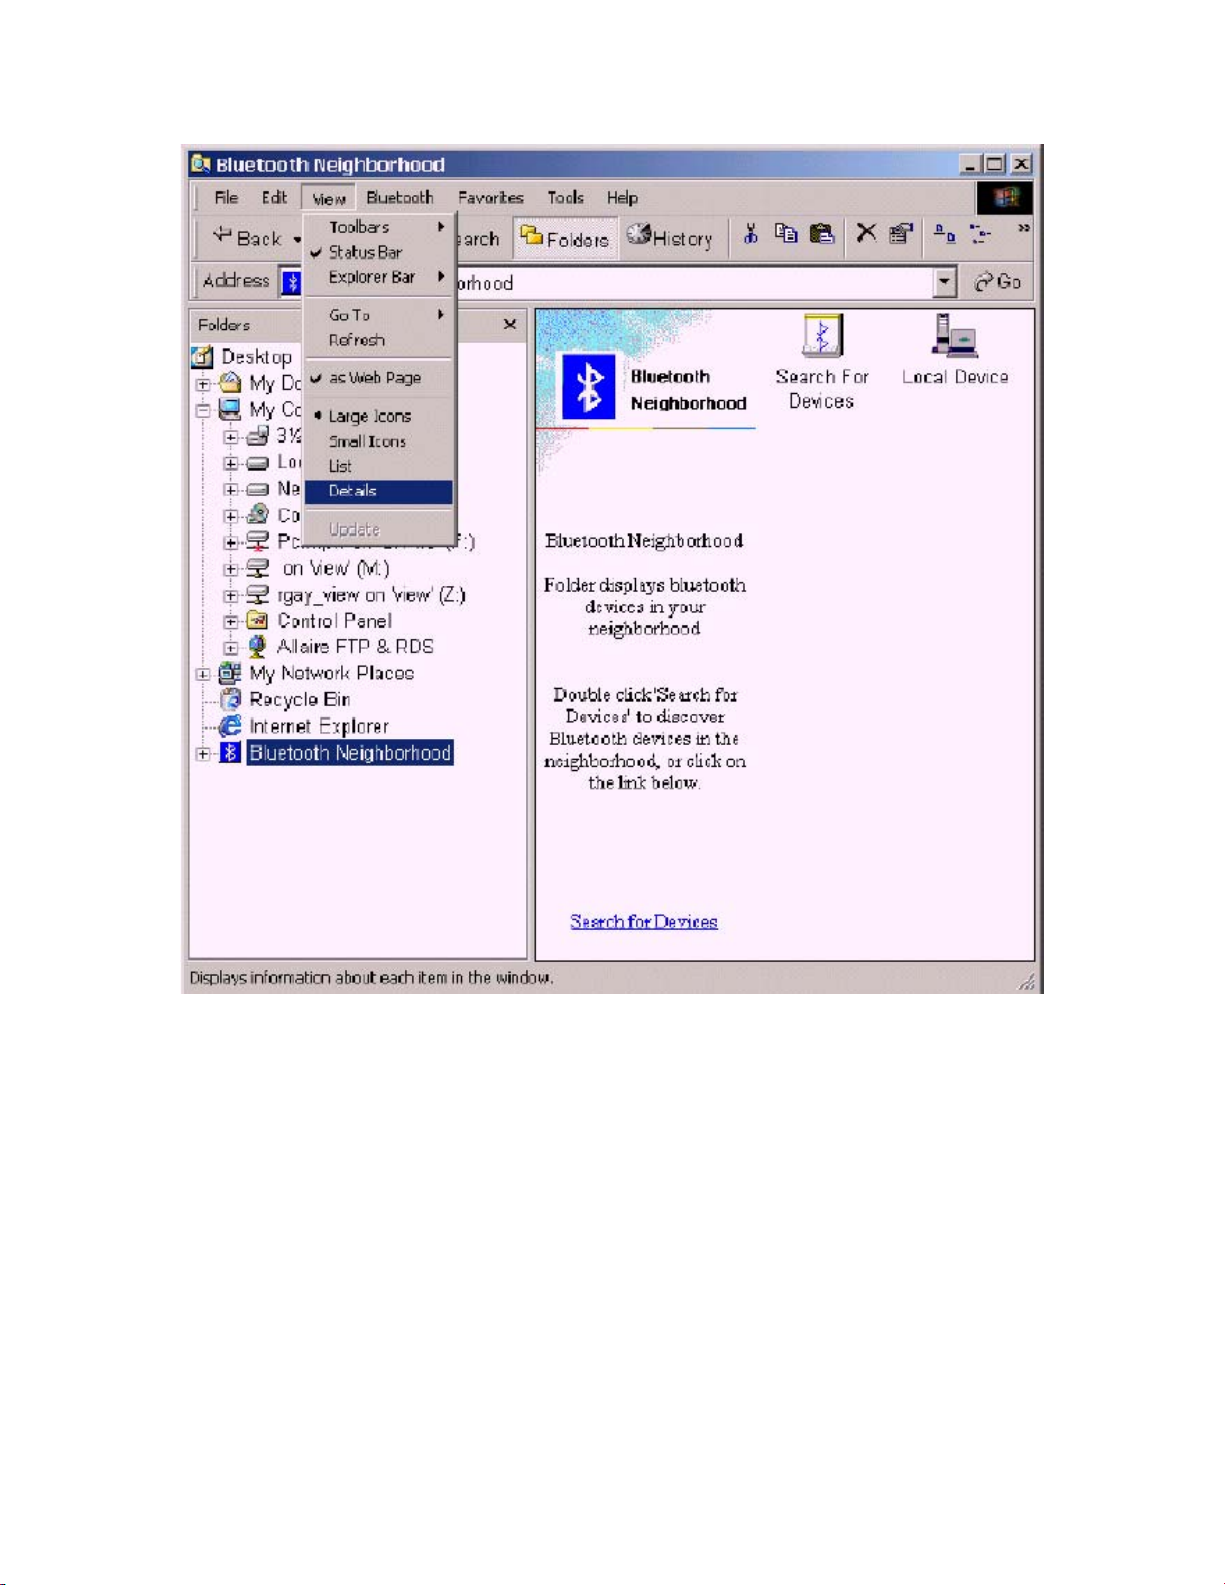
NOTE: It is important later in the process to use the View
→ Details option. This
setting will
allow you to view the details of your SPP connection in the .Local Devices. display.
3.1.6 Configure BlueShare to Act as an SPP Server
No action is necessary on your part. A service entitled “Generic Serial” will be automatically
started on your Windows PC or laptop. This service will handle all incoming requests which
attempt to utilize the Serial Port Profile.
3.1.7 What VCOMM Port to Use?
By clicking on the “Local Devices” icon in your Bluetooth Neighborhood, you will see the
following display (with no connection active):
Page 6

Examine the “Generic Serial” service under the “Status” column. You will notice that the
service is started and that COM4 will be the next virtual COMM port that will be assigned to an
incoming Bluetooth connection.
NOTE: If you look at this display, you will see a service called .OBEX IrMC Sync..
Do not be
confused. This service is used for syncing the BTW system with other computers and
has nothing to do with HotSync on the Visor.
3.1.8 Configure HotSync on the PC
1) Right click on the HotSync Manager in your system tray and make sure only the “Local
Serial” is
2) Right click again and select “Setup…”.
3) Under the “Local” tab, select the VCOMM port that you discovered in the previous
section (in this case: “COM4”) and click on the “OK” button.
Page 7

NOTE: The version of the Palm desktop software that was used in the
demonstration (desktop
software for the Palm OS 3.1) only allows COM port selection up to COM4. Since
COM4
is the normal default for the SPP service under Windows 2000, this is not a problem.
If
COM4 is used by another application or is unavailable for some reason, BTW may
set the
default port for the SPP service to a value greater than COM4. In that case, consult
the
BTW and Handspring documentation on how to proceed. A detailed configuration
of
these services is beyond the scope of this document.
3.2 B
LUECONNECT SETUP
3.2.1 Power Considerations and Battery Drain
Whenever the Bluetooth stack is running, the BlueConnect card remains fully powered up and
operational. Even when the Handspring Visor auto-off timer expires and the screen blanks,
power is still applied to the BlueConnect card. If the screen blank button is pushed, power is
still applied to the BlueConnect card. This can cause the battery to drain at a high rate. For this
reason, the Discover application should always be run in order to power down the card when the
Bluetooth features are no longer being used. This can be done by tapping the “Setup” button at
the initial Discover screen followed by the “Shutdown”
Page 8

3.2.2 Configure the Visor for Local HotSync
There are many ways to HotSync a Visor. In order to do so over Bluetooth, you must have your
HotSync preferences configured correctly.
1) To access the HotSync preferences, tap on the icon on the main Visor menu.
2) Tap on the icon and select “LANSync Prefs” from the drop-down menu.
3) Make sure that the “Local HoySync” choice is selected as shown
4) If you had to change the setting, tap on “OK” to register your choice.
3.2.3 Configuring BlueConnect as an SPP Client
SPP connectivity requires a remote device with a SPP server running the Bluetooth Serial Port
Profile. The name of the SPP service running under BTW is “Generic Serial”.
Page 9

1. On the Visor, run the “Discover” application by tapping on the icon to start up
the Bluetooth stack. The application will start by displaying all local devices that are
stored in its database. Tap the “Setup” button to confirm that the Visor is in the
“Client” mode. If not, tap the “Client” selector to change the unit to client mode and
tap “OK” on the “Connection Mode” dialog that appears are a
2. Perform a device inquiry by tapping “Inquire” in order to locate the BlueShare device.
3. Select the device by tapping on its BD address. Perform service discovery on this unit
by tapping the “Discover” button. Verify that the target SPP server is shown and
supports the Serial Port
Page 10

4. Tap the “Generic Serial” service in order to select it.
5.
Return to the application launch screen by tapping the icon.
IMPORTANT NOTE: At this point do not use the .Shutdown. button to exit
the .Discover.
application. This will power down the BlueConnect card and shut down the
Bluetooth
stack.
4. Perform the HotSync
4.1 S
ELECT SOME FILES TO SYNC ON THE PC
Palm OS executable files typically have the *.prc extension. Once your Handspring organizer
software has been installed, you can queue any number of files up by double-clicking on them.
In the following example, we double-clicked on a Handspring executable entitled Blazer.prc.
1) The Handspring install tool first prompts you for a user name. You would typically
select the one that you specified when you installed your Handspring Organizer
software. Then click on “OK” to
2) The install tool will then display a list of all files that are queued up for HotSync. Click
on “Done” to confirm the list.
Page 11

3) Finally, the install tool will confirm that these files will be installed on your Visor.
Click on “OK” to
4.2 INITIATE THE HOTSYNC ON THE VISOR
1) Tap the icon.
2) Make sure that “Local HotSync” is checked as shown below:
Page 12

3) Return to the main menu by tapping the icon.
4) Tap on the icon. You should see the following display:
Page 13

5) Tap on the icon. This will initiate the HotSync.
4.3 W
HAT YOU SHOULD SEE ON THE VISOR
As the HotSync progresses, you should see a dialog displaying the following distinctive
messages:
1. “Connecting with the desktop”
2. “Identifying user”
3. “Synchronizing <Item>”
Where #3 will repeat as each item is transferred to the Visor. Once the HotSync is
complete, you will see the following display:
Page 14

4.4 W
HAT YOU SHOULD SEE ON THE PC
As the HotSync operation proceeds, the two computers will connect using the “Generic Serial”
service. The “Local Device” display on the PC will change to the following:
Notice the “Status” column under the “Generic Serial” service. As expected, COM4 is
assigned to the Bluetooth connection. For this particular example, if this was not the case, then
the HotSync operation would have failed. Notice that the friendly name and the Bluetooth
Page 15

Device Address of the BlueShare unit is displayed for this connection.
In addition, the progress of the HotSync will be reported in a “HotSync Progress” dialog box
similar to the one shown below:
4.5 HOW LONG DOES IT TAKE?
A Bluetooth HotSync can take much longer than a HotSync using the Visor USB cradle. The
amount of time depends upon the number and size of the files that are queued up for HotSync.
Be patient. Do not cancel the HotSync operation unless at least 10 minutes have elapsed with
no appreciable activity on either the Visor or the PC.
5. Terminate the Connection and Power Down BlueConnect
Even though the Bluetooth connection has been terminated at this point, your BlueConnect card
remains powered up and will drain your Visor batteries at an accelerated rate. To power down
your BlueConnect card, run the Discover application on your Visor and tap the “Setup” button
at the initial Discover screen followed by the “Shutdown”
Page 16

6. For Troubleshooting or Further Information
For additional technical information or troubleshooting advice, see the following WIDCOMM
documents:
BlueConnect Version 2.2G Release Notes, WIDCOMM doc # BCDK-RN2.2G-020201-
1200.
BlueConnect User.s Guide, WIDCOMM doc # BCDK-UG-012401-1200.
BlueConnect Development Kit Quick Start Guide, WIDCOMM doc # BCDK-QS-
12401-1620.
BTW Installation and Uninstallation Instructions, WIDCOMM doc # S0003-0024.
This document is supplied with your BTW CD and has the file name readme.doc or
readme.pdf.
BTW Windows 2000 Release Notes, WIDCOMM doc # RN0001-0002.
BTW User Interface User.s Guide and Reference, WIDCOMM doc # T0002-0016.
If you still cannot succeed using the steps outlined in the document, contact WIDCOMM
technical support. The preferred method of doing this is to use the on-line forms for either
BTW or BlueConnect. In order to access these forms, you will need the user name and
password that was supplied along with your WIDCOMM product. You can access these forms
from http://www.widcomm.com/Support/index.asp or send an email to support@widcomm.com
 Loading...