

Page 1

Revision 1.3
06-97
ThinFax 1414-LX/LXM with MiniFax
For
HP 100/200LX
Page 2

INTRODUCTION
Features
INSTALLATION
System Requirement
Hardware Installation
Software Installation
Testing the Modem
Accessing the Flash (F:) drive
Formatting the Flash (F:) drive
TABLE OF CONTENTS
2
TABLE OF CONTENTS (Cont.)
4
1
OPERATION
Sending a Fax
Send Fax Entry
Cover Page
Phone book
Receiving Fax
View Fax
MiniFax Utility
Printing Fax
Log
Configuring MiniFax
Manual Dial
Upgrading the MiniFax
5
USING THE THINFAX AS A DATA MODEM IN THE HP 100/200LX
GETTING STARTED
Starting MiniFax Under System=s Icons View and List View
Send fax with Cover Page
Receive a Fax
3
Operating consideration
Operating Mode
Flow Control
6
USING THE THINFAX AS A DATA MODEM IN PC CARD COMPATIBLE
COMPUTER
Hardware Installation
Software Installation Guide
COM Port Configuration
Using the ThinFax LXM as a FLASH card in PC Card Compatible
Computer
Install EXP FLASH card device driver
Page 3

TABLE OF CONTENTS (Cont.)
APPENDIX A
Basic Data Modem >AT= Commands
Data Mode Error Detection and Data Compression
APPENDIX B
Download Upgrade Program Procedures
Upgrade the MiniFax
Upgrade the FLASH (F:) drive file
Question & Answer
APPENDIX C
ERROR MESSAGE
Page 4

1
INTRODUCTION
Thank you and welcome to our next generation of the ThinFax modem card for
HP 100/200LX. This User's Manual explains in detail how to install, and how to
operate the ThinFax modem cards. The following products are covered in this manual:
ThinFax 1414LX (Modem + MiniFax)
ThinFax 1414LXM (Modem + MiniFax +
2, 4 or 8 MB FLASH memory)
Both ThinFax cards come with MiniFax, an onboard fax program with the same user
interface of the HP 100/200LX palmtop computer. The MiniFax is a full function fax
program, which user can send, receive, view and print fax documents.
The ThinFax 1414LXM (Modem + Memory Combo card) has all the functions and
features of the ThinFax 1414LX plus 2, 4 or 8 MB Flash Memory within the card setup
as the F: drive. (typical)
CCITT V.32bis, V.32, V.22bis, V.22, and V.21
Bell 103 and 212A
‘ Error correction: V.42, MNP 2-4
‘ Data compression: V.42bis, MNP5
‘ Send and receive Fax speed up to 14,400 bps.
‘‘ Fax mode protocols:
CCITT V.17, V.29, V.27ter, and V.21 Ch. 2
EIA/TIA 578 Class 1
Fax Group III compatible.
‘‘ Automatic power save mode
‘‘ MiniFax:
Resides in the card.
Log of Send/Receive fax
Previewing a fax on the screen before sending.
Viewing received faxes.
Fax Telephone Directory via the HP 100/200LX Phone Book application
User-friendly interface
Fax cover page
Multiple printer support
ThinFax 1414-LX/LXM can be used as Fax/Data modem on any PC Card
(PCMCIA 2.10) compatible computers as well. Users must install a PC Card
(PCMCIA 2.10) device driver(s) with a DOS-Based or WINDOWS-Based software to
utilize Fax/Data function.
FEATURES
‘‘ Low power consumption
‘‘ 2 MB, 4MB or 8 MB low power (5V) FLASH memory
(ThinFax 1414LXM Only)
‘‘ PC Card (PCMCIA 2.10) Type II Card size, 54.0 mm x 85.6 mm x 5.0
mm
‘‘ Data speed up to 14,400 bps.
‘‘ Data mode protocols:
Page 5
SYSTEM REQUIREMENT
Preparing the HP 100/200LX
2
INSTALLATION
This section contains information that you need to prepare the HP 100/200LX
for ThinFax 1414-LX/LXM, including how to insert and remove the card and how to
test the modem's installation with DataComm.
Note1: To prolong the HP 100/200LX's battery life, Hewlett-Packard
recommends the following procedure should be observed:
If possible use an AC Adapter whenever the ThinFax modem card is
plugged into the HP 100/200LX.
Note2: A reminder for ThinFax LXM user, the FLASH memory portion of the
card will consume power from the palmtop when the card is inserted and
the power switch is set to ON.
Keystrokes Convention
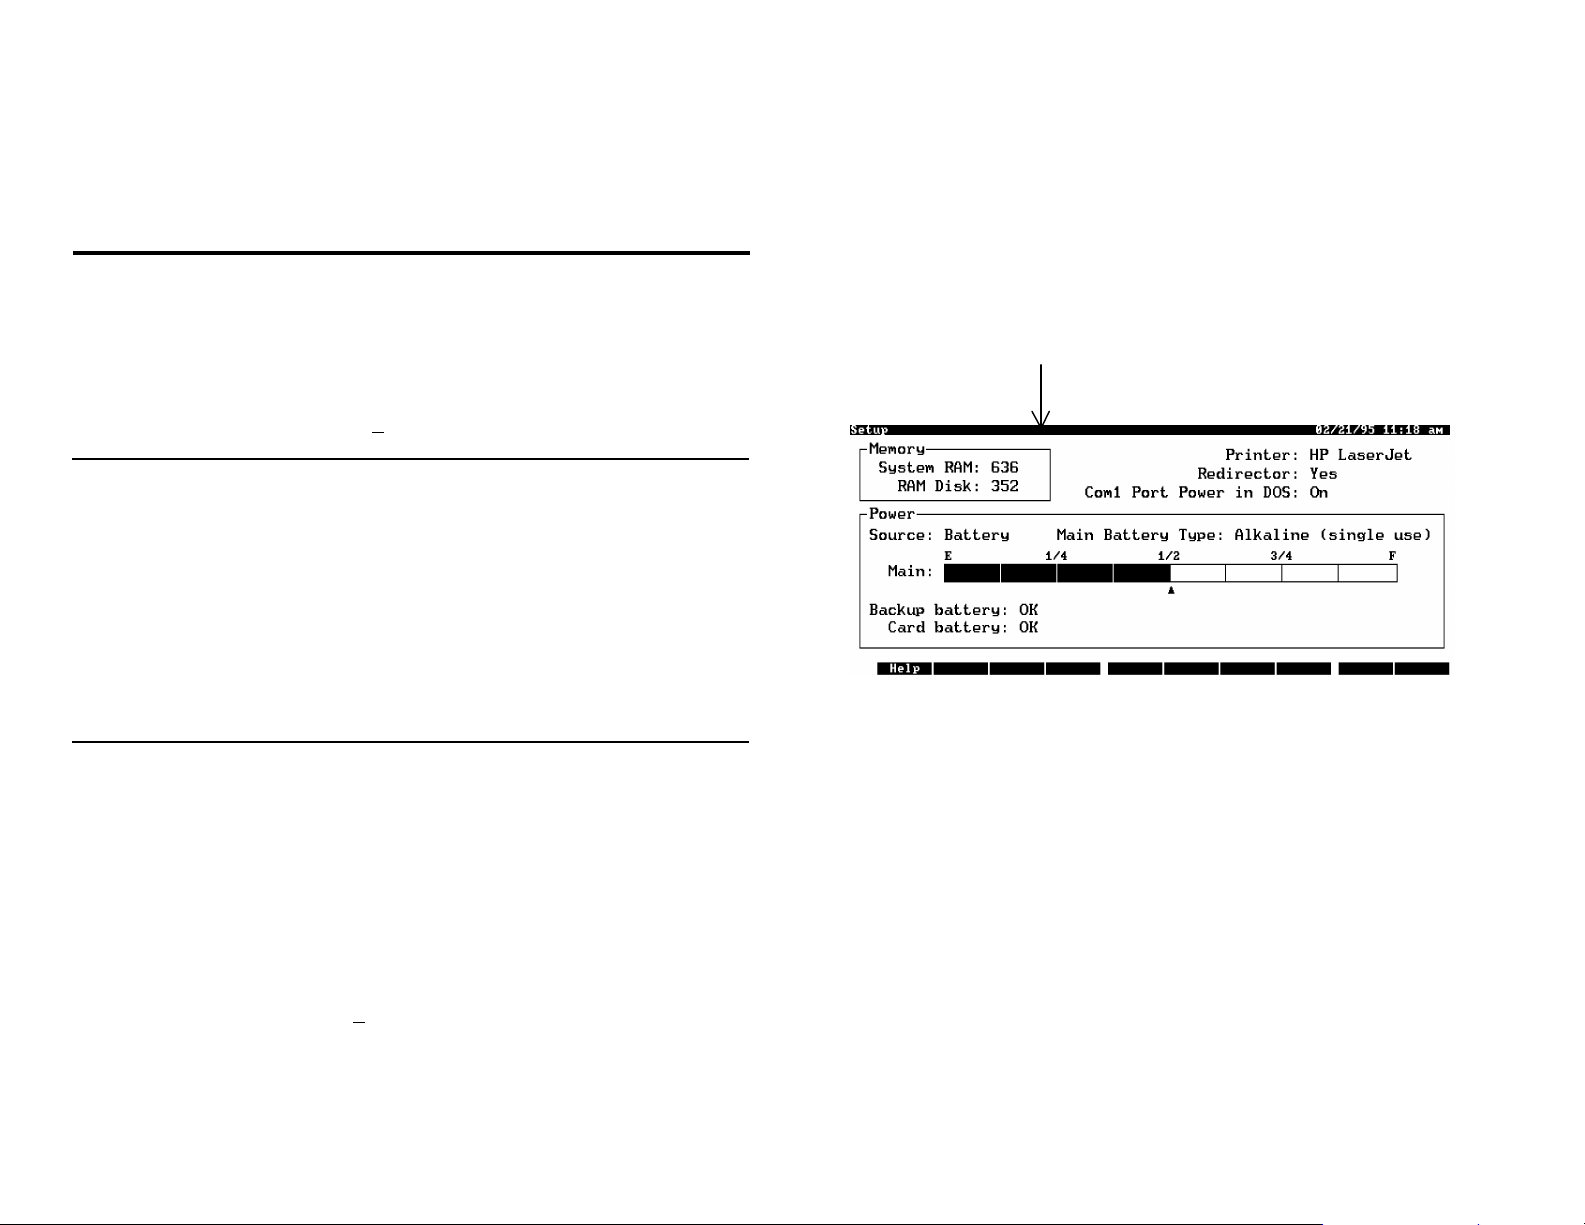
Memory: You should reserve at least 400 KB of system memory for the MiniFax
(70KB) and the HP System Manager. If you plan to use other built-in
applications, consider increasing the size of the system memory
accordingly. Press the &… and S key to start Setup.
System RAM Memory
Need at least 400K
Hardware Installation
Sometimes you may need to press the keyboard in series or combination
keystrokes. The following are the keystrokes convention used in this guide:
Sequential key: MENU, F, S Press the keys shown in sequence.
(without , )
Hot-key: Alt + F2 Press and hold down the key(s) shown then
tap the last key. The last key can be any underline letter
(DataComm) displayed on the screen or a Function key.
Note: HP does not recommend performing the insertion/removal of the
PCMCIA card into/from the HP 100/200LX when its power is on. Turn
the power to the computer OFF before attempting the following
operation. This card is also sensitive to static electricity.
Page 6

Hardware Installation (Cont.)
Software Installation
Inserting the Card
Hold the card with the EXP logo on the top. Slide the card into the slot located at the
left side of the HP 100/200LX. Push the card in until the end of the card is flush with
the case. (See Below)
Removing the card
Slide the ejection button to the left until the end of the card clears the case.
To install the ThinFax card:
C Press the &… , MENU, A, L key. To close all applications.
C Press &… , D to display DOS prompt C:\.
C Type A: and press Enter, Change to drive A: in the ThinFax 1414-
LX/LXM card.
C Type INSTALL and then press Enter.
The installation program will check the existence of the c:\config.sys and
c:\autoexec.bat file. If the files are not present, the install program will copy them
from the D: drive to C: drive and/or activate the TSR program by erase the word
>REM= from the c:\autoexec.bat (HP 100LX only) line:
REM d:\bin\cic100 /gen1
If you have ThinFax 1414-LXM, beside performing the above procedures, the
install program also sets up the FLASH memory as the F: drive (typical) in your
HP 100/200LX palmtop computer by adding a statement into the C:\config.sys
file:
Device=c:\tflxm\lxmdrv.sys
Along with the driver, a format utility is also included. These two files will be
installed in the C:\tflxm directory:
lxmdrv.sys (device driver for HP Palmtop)
lxmfmt.exe (format utility)
The screen should display the following lines:
<< EXP ThinFax LX, LXM card installer v1.2* >>
Processing AUTOEXEC.BAT...
Create C:\TFLXM
Processing CONFIG.SYS.........
Press any key to reboot....
The card is now ready to use.
*
The actual version may be different.
The Flash size displayed depends on your card type.
Page 7
NOTICE:
User type in these lines
Modem’s responses
What type of your telephone line ANALOG OR DIGITAL?
Check your telephone line, the Fax/Data can be connected to an ANALOG Line
ONLY ! (normal house hold line)
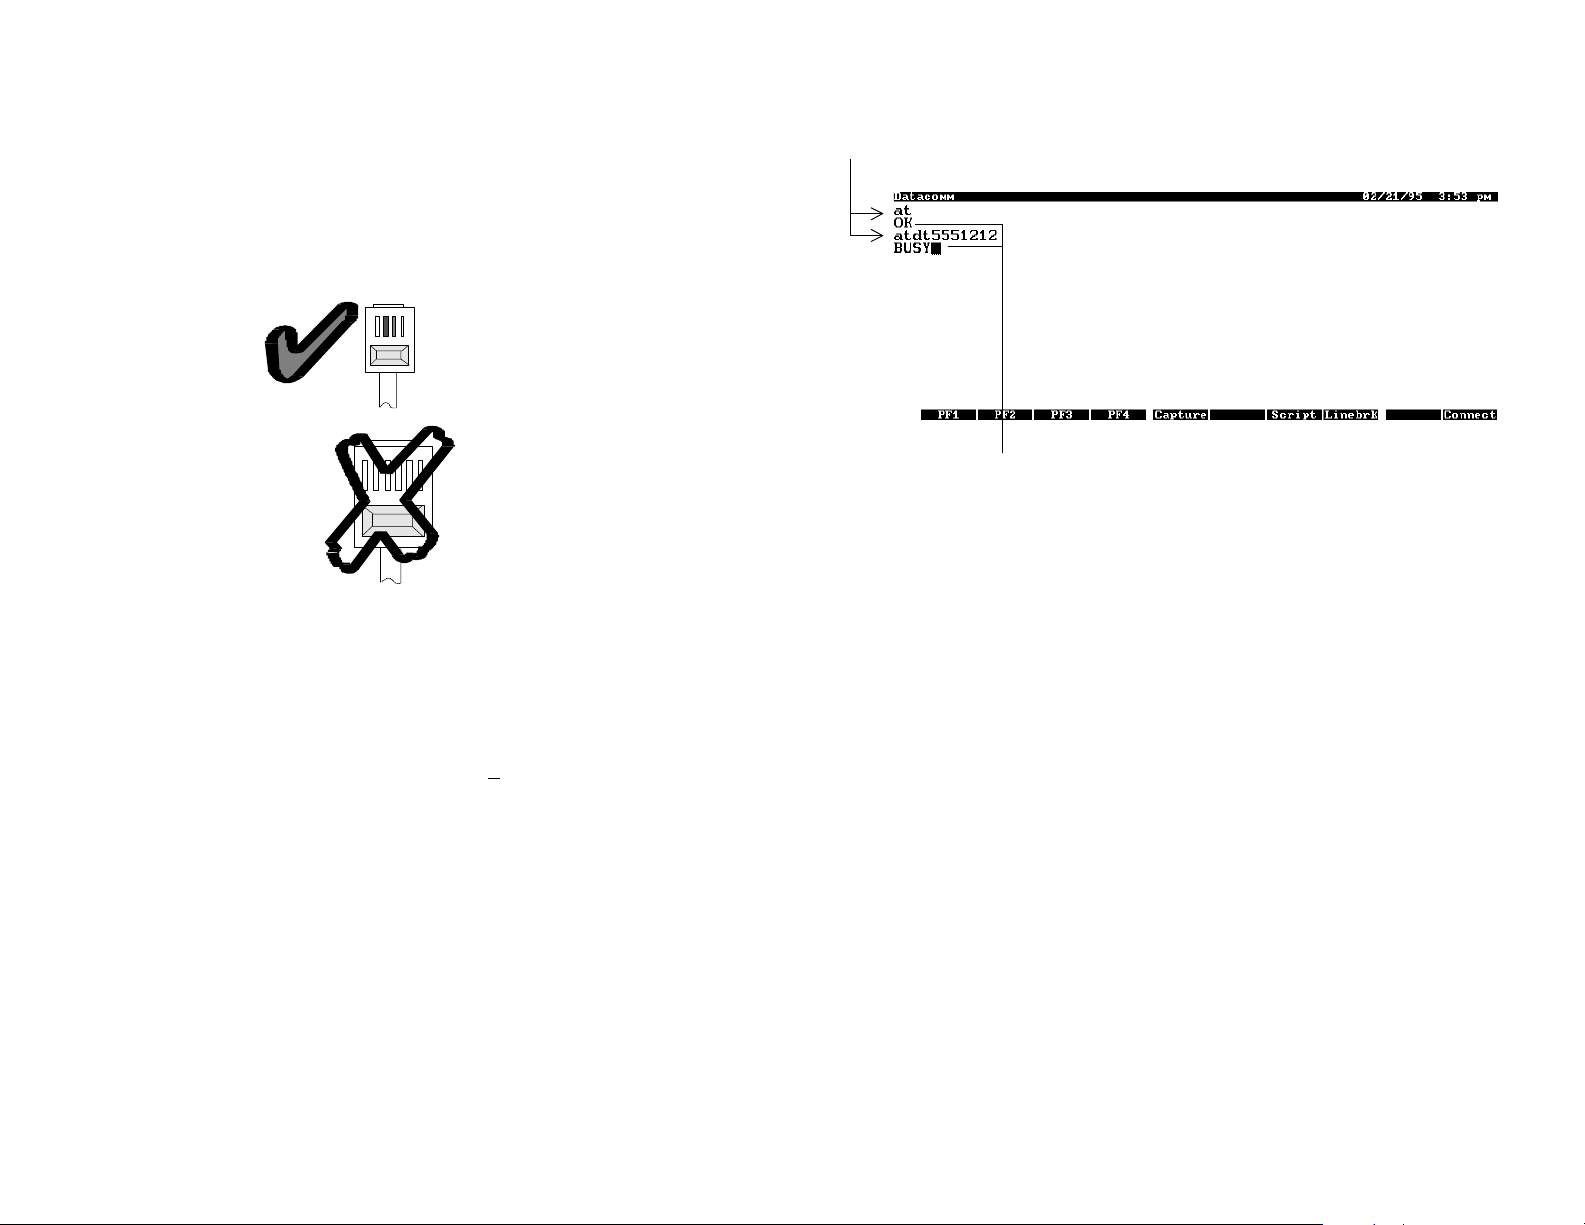
Testing the Modem
5. Type ATDT nnn nnnn then press ENTER, where nnn nnnn is
your telephone number. The modem will attempt to dial and
later it should display BUSY result code.
After you have finished the above procedures, this is proof that the modem is installed
properly and functioning well.
To verify that the modem has been installed and functions properly, please follow
these steps:
1. Press &… , C to start the DataComm program.
2. Press MENU, C, S to select the COM port setting in the
Interface field for COM 2.
Press TAB to move the highlight to OK and press ENTER to
accept the information entered.
3. Type AT then press ENTER.
The ThinFax modem should respond with an OK.
If the modem does not respond, please verify that the COM port
is set for COM 2 and redo the installation procedure.
4. Connect the slim connector to the modem card with the
RJ-11 end to a working telephone jack.
Page 8
Accessing the Flash (F:) drive
ThinFax 1414-LXM user can access the Flash F:(typical) drive just like other
DOS drives after the software installation is completed. All file operations such as
Copy, Delete, Move are supported both within DOS prompt and any HP built-in
application. The Flash F: drive is pre-formatted at our factory. (No fdisk or format
procedures is required)
Note: If there are any other FLASH card installed in your HP palmtop prier to
the ThinFax 1414 LXM card, the drive letter may change to G:. Also
review to config.sys file and make sure the EXP=s FLASH driver
(lxmdrv.sys) load after the other FLASH card=s driver.
3
Getting Started
This section describes how to use the MiniFax program to send and receive a fax.
Starting MiniFax under System's Icons View and List View
Format the F: drive
In case user needs to reformat the FLASH drive, EXP includes the format utility
file Alxmfmt.exe@. To format follow the steps below:
1. Press &…, D to start the DOS Prompt program.
2. At the prompt type c:\tflxm\lxmfmt Press ENTER.
3. The screen will display:
<< EXP ThinFax-LXM format utility V1.5* >>
Insert ThinFax LXM card
and press ENTER when ready
Checking card type .........
4M* flash present
Verifying the card ...
Writing 00 to card ......
................................................
Read back and check ...
Writing FF to card ......
................................................
Number of bad pages = 0000
Writing BOOT area ......
Prepare FAT table .......
OK! Format complete
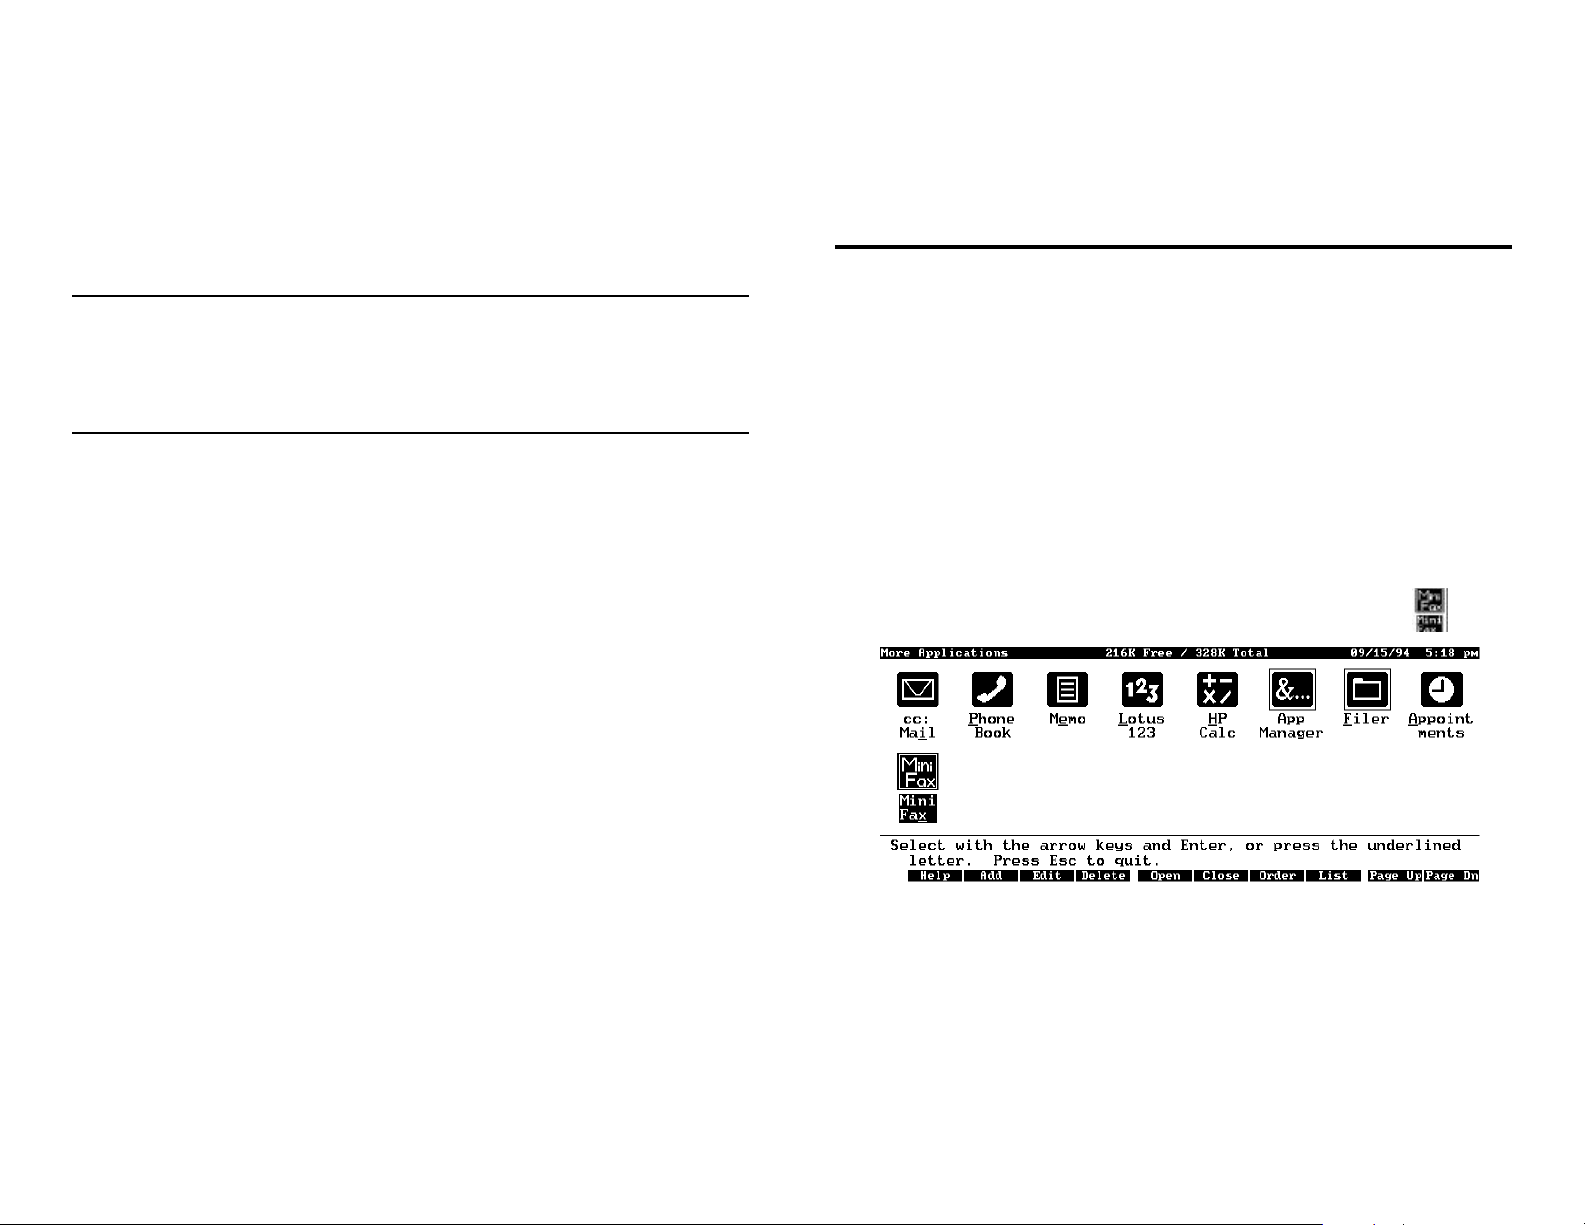
During the installation, the System Manager will install the MiniFax icon into your
HP100/200LX. You may start the MiniFax software as all the other built-in
applications.
# Press the blue &… to display the More Application screen.
# From the Icon View press the Down Arrow key Or Pdn to
locate the MiniFax icon.
Use Arrow key to highlight the MiniFax Icon or press X key or you may use the
hot-key (Alt + F2 by default) to start MiniFax.
# From List View, highlight MiniFax and press ENTER, or use the hot-key Alt +
F2
*
The actual version may be different.
The Flash size displayed depends on your card type.
Page 9
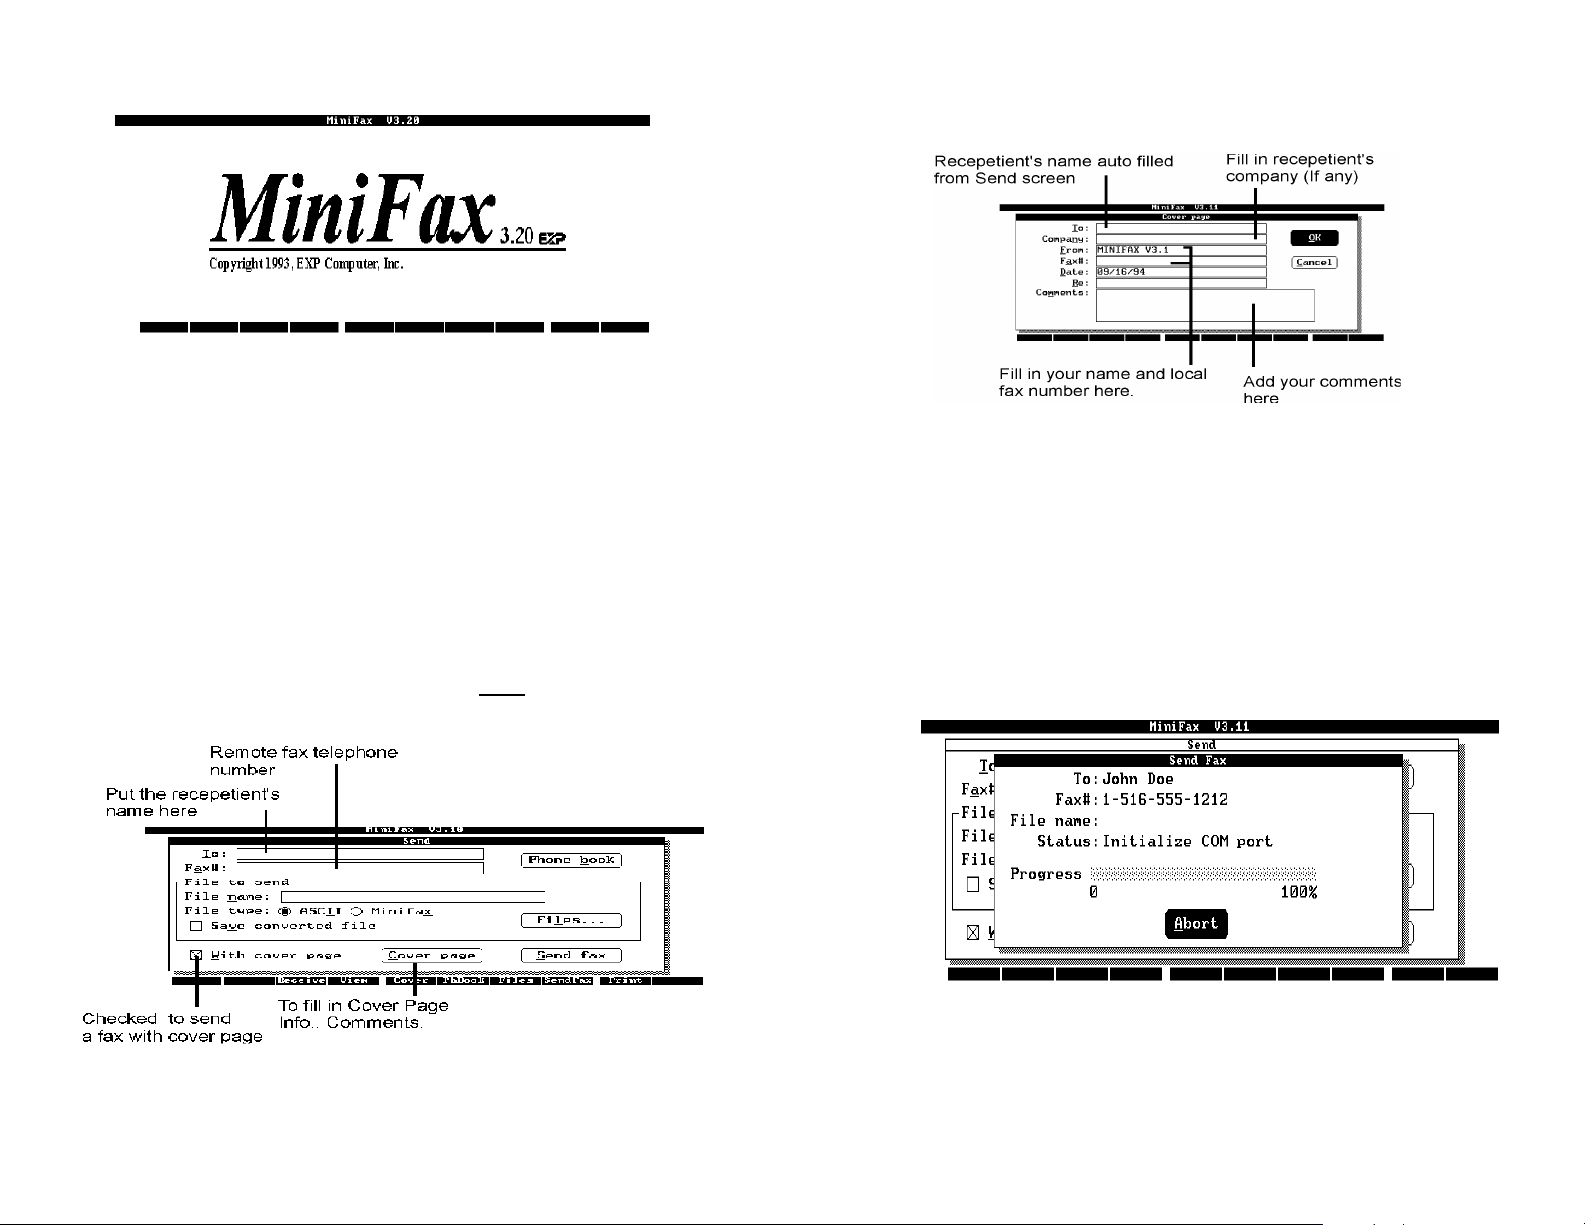
The initial screen after running MiniFax will be:
The screen will then change to the Send Menu after several seconds, or you may press
any key to access the Send screen immediately.
5. To edit a Cover page, press TAB to highlight the Cover Page box and press
ENTER, or press F6.
Send fax with Cover Page
1. Connect the modem to a working telephone line.
2. At the sending screen fill in To: fax’s recipient, Fax#: remote fax’s telephone
3. File name: Enter the file name that you wish to send. (Leave blank if you
wish to send a cover page only) You may highlight Files… and press
ENTER or press F7 to display the Files screen and select a file. If you
choose the MEMO=s file, it can be in either Memo=s format or ASCII format.
For all others built-in applications the file must be saved in ASCII format
only. The File Type: ASCII=s button is filled in.
4. Make sure that the X is in the box "With cover page." If not, Press TAB to
move the highlight to it, use Space bar or press ENTER to toggle it.
6. Fill in; Company: of the fax recipient (if any), From: Your name goes in
here, Fax# for your local fax number. You may add the reference subject to
the Re: field and any additional notes to the Comment: field. The comments
field is limited to approximately 16 lines or 500 characters.
7. Press TAB to move the highlight to OK and press ENTER, or Alt + O to
accept the information entered. To discard all the information press to move
the highlight to Cancel and press ENTER , or Alt + C. In both cases,
MiniFax will return to Send screen.
8. To start sending fax, at the Send screen press TAB to move the highlight to
Send fax and press ENTER, or Alt + S or press F8.
9. In the Send fax screen, the Status: field display current MiniFax's operation
such as:
Converting cover page... => initialize COM port =>... Dialing.
Page 10
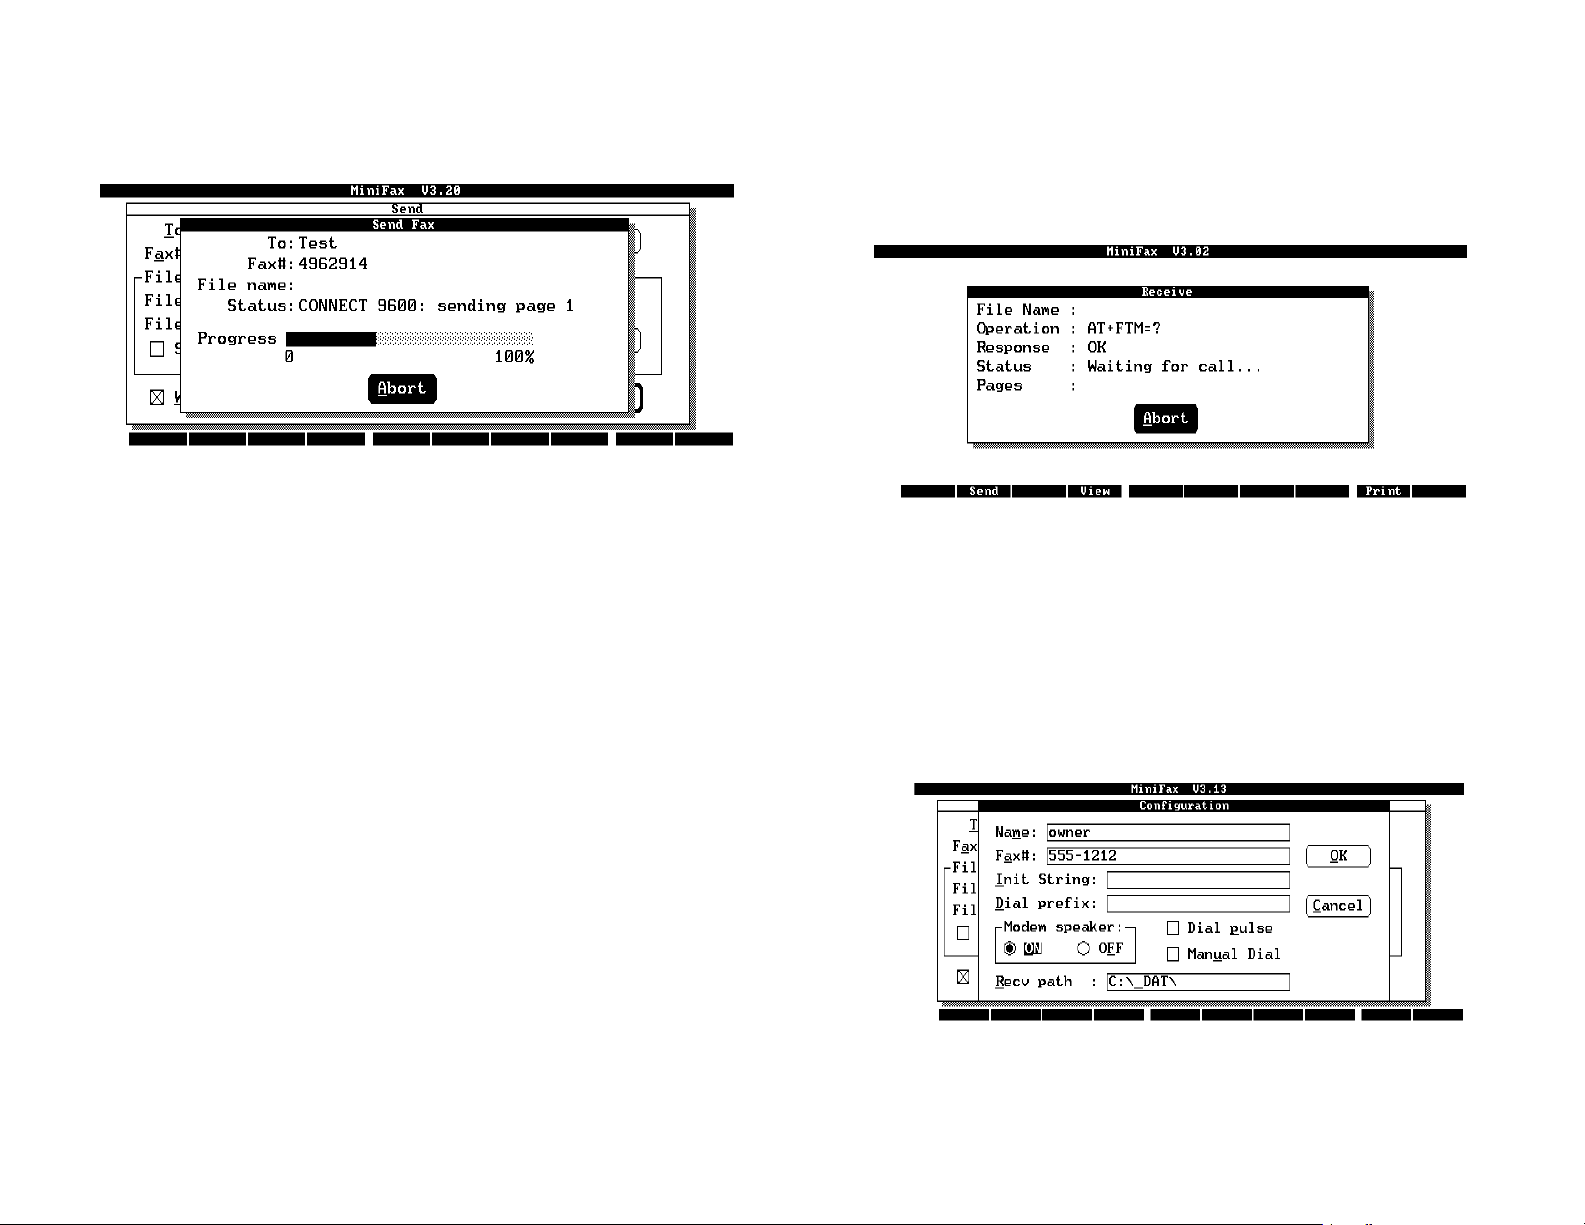
10. The MiniFax will attempt to make a connection with the remote fax machine,
the progress graph starts incrementing until it reaches 100%.
Receiving a Fax
Connect the ThinFax modem to a working telephone line and then to start
MiniFax, After MiniFax is started, press MENU, F, R or F3 from any of the
other MiniFax menu to display the following screen
If there is any error, please consult APPENDIX C for more detail and possible cause of
the error.
1. Observe the Operation: (Command sending to the modem) and Response:
(modem answering to MiniFax commands) during the initial setting of the
ThinFax 1414-LX/LXM. The ThinFax should always respond with OK.
2. At the end of setting up the ThinFax for fax reception, the status will display
'Waiting For call...' You are now ready to receive a fax.
3. The receiving fax will be stored at C:\_DAT (Default path), to change the path
user must use the MiniFax=s Configuration utility.
To access the Configuration screen press MENU, U, C.
Change the >>Recv path:== field to your choice. Including the FLASH drive if you
have the ThinFax 1414-LXM card. (i.g. F:\faxrecv)
Receiving fax=s file name format consists of the current month, date, hour and minute
setting in the palmtop.
02220937.mfx (mmddhhmm)
Page 11

page and highlight Cover page then press ENTER or use Hot-key. Fill in the
text boxes such as number of pages, reference and comments. If the file name is
omitted from the File name field then only the cover page will be sent.
4. Highlight Send Fax and press ENTER or press F8 to start sending fax.
Send Fax Entry
4
SENDING A FAX
This section contains all the detailed explanations of the MiniFax functions including
the entries in each main function.
NOTE: During SEND, a temporary disk's space of approximately 35KB per page
will be needed for file conversion.
## Press MENU, F, S or F2 from another MiniFax menu to display the following
screen.
## To: This entry is for a fax recipient=s name.
## Fax #: The fax recipient=s telephone number.
## File name: Type the file name that you wish to send. You may highlight Files…
and press ENTER or press F7 to display the Files screen and select a file.
## File Type: Select ASCII for text file. (Including MEMO =s file format) It will be
converted to the fax format automatically before sending. Check the X Save
converted file box to save the file converted (with .mfx extension). Select MiniFax
for a previously converted fax format file (.mfx). This type of file can be sent
without further conversion.
## With cover page: Check this box to send the cover page along with any file or just
the cover page only, if the file name is omitted from the File name: text box.
## File: From the Send screen highlight Files… and press ENTER, or press F7 to
display Files screen.
To Send a Fax
1. Fill in the fax recipients name in the To: field and the fax number in the Fax #:
field. You can highlight the Phone book and press ENTER or Hot-key to
select previously entered fax recipient's names and numbers from the Phonebook
screen.
2. Fill in File to send text box. File name: Enter file name you wish to send. The
user may highlight the Files… button and press ENTER or use Hot-key and
then select a file to send from the Files screen.
3. If you need to send the cover page, please check the box with a X With cover
This screen operates as a file manager. The user can select a file from this Files
screen. The file selected will be filled into the File name: text box in the Send
screen. You can select Drives, or Directories as well. Press TAB to move the
highlight among the field, button or List boxes. Use Up arrow or Down arrow key
to move within a List box and press ENTER to accept the highlighted selection.
# Cover page: From the Send screen highlight Cover page and press ENTER, or
press F5 to edit the Cover page.
Page 12

Fill in the following information:
Company: The company name for the fax recipient if any.
# of pages: Number of pages including the cover page.
Re: Subject or reference matter.
Comments: You may add any notes or comments here.
Date: The default is the date on the HP 100LX.
To: Fax recipient name; it is automatically filled in from the Send screen
Fax #: If you enter your local telephone number in the Configuration screen the
fax number will be filled in automatically. Otherwise, enter your local telephone
number here.
From: The default is the name of the sender entered on the Configuration
Screen.
Highlight OK button and press ENTER, or ALT + O to accept the information
entered.
Highlight button and press ENTER, or ALT + C to discard the information
entered.
In both cases, you will be returned to the Send screen.
Press TAB to move the highlight among the field, button or List boxes. Use Up
arrow or Down arrow to move within the Name and Fax# List box and then press
ENTER to accept the highlighted selection. The name and fax number will be
copied automatically to the fax recipient's To: and Fax #: field in the Send screen.
The telephone directory and the Phone book entry on this screen are identical to
the entry from the built-in HP 100/200LX Phone Book.
Any modification of the Phone book records must be made through the Phone Book
application program.
Search: The search criteria of MiniFax are the same as the last one used by Phone
Book. If your last criteria of search in the Phone Book is by last name so will
MiniFax.
Note: MiniFax can NOT access the phone.pdb that have a password protection. If
you set a password in the Phone Book database file, you will need to undo it.
# Send fax: From the Send screen highlight Send fax button and press ENTER, or
ALT + S or F8 to start sending a fax and to display the Send Fax status.
# Phone book: From the Send screen highlight Phone book and press ENTER, or
ALT + b to display the Phone book screen.
Send Fax Entry
## Status: Shows any action or commands sending from MiniFax to modem.
## Progress: Displays the sending operation via bar-graph indicating percentage of
completion.
Page 13

RECEIVING FAXES
This section explains in detail the steps required to receive faxes.
NOTE: The MiniFax requires space in the C: drive to store the received fax.
Depending on the received fax's resolution, approximately 35KB
(standard mode, 200 x 100/200 dpi) or as high as 95KB (fine mode 200 x
200 dpi) of the disk's space will be needed for a one page (letter size) fax.
## Press MENU, F, R or F3 or from any other MiniFax menu to display the
Receive Fax Entry
## File Name: This entry is the file name of the receiving fax. The file name will be
created by MiniFax when a fax is received.
## Operation: This entry shows various commands or activity being sent to the
ThinFax 1414-LXM/LX.
## Response: This entry is for the response from ThinFax 1414-LXM/LX
## Status: The status shows the state of the receiving function.
## Pages: This entry shows number of page(s) received.
following screen
To receive fax
1. Observe the Operation:, and Response: during the initial setting of the ThinFax.
The ThinFax should always respond with OK.
2. At the end of setting up the ThinFax for reception, the status will display
'Waiting For call...' You are now ready to receive a fax.
3. The receiving fax will be stored at C:\_DAT (Default path). To change the path
of the received fax, user must use the MiniFax=s Configuration utility.
Press MENU, U, C, to access the configuration screen.
Change the Recv path to your choice.
Receiving fax=s file name format consists of the current month, date, hour and
minute setting in the palmtop. 02220937.mfx (mmddhhmm)
Page 14

VIEW FAX
## Press MENU, F, V or press F4 from within MiniFax operation.
View Contents
## Select a file and press ENTER, or ALT+ O from the Select View File to display
the following View Contents screen.
Function key
To View Fax
Type in a file name or use TAB to move the highlight bar to Files: List box. Use
Up arrow or Down arrow to move within the Files: box. Press ENTER or use
the Hot-key to accept the highlighted selection.
Note: The View Fax function displays fax file format (.mfx extension) which are
pre-converted or received file. All other files will be treated as ASCII
files. The user can preview these files but the View Fax function will not
convert them into a fax format.
2. The file's contents will be displayed once you are in the View contents screen.
Press F6 for zoom and F7 or F8 to move among the pages.
Select View Files Entry
## File name: Enter file name to view
## Directory: Current directory.
## Files: The file List box, displays all files in the current directory. Press Up arrow
or Down arrow to move within the box. Press ENTER to accept the highlighted
selection.
## Directories: In the Directory List box, you can select directory or drive from this
box. Press Up arrow or Down arrow to move within the box. Press ENTER to
accept the highlighted selection.
## Press F6 to zoom-in (X 2), Press F6 again for normal display.
## Press F7 or F8 to move the display screen to the first ten lines of the Previous Page
or Next Page, since the HP 100/200-LX can only display ten lines per screen.
# Press Fn + or Fn + to display subsequent ten lines in both directions
within a page.
## Use Up arrow or Down arrow to move the display only one line at a time.
Page 15

MINIFAX UTILITY
## Press MENU, U or press F4 from any other MiniFax menu to display the following
screen.
Switching Operations in Utility
# To Print a fax: Press MENU, U, P
# To display Sending and Receiving Log: Press MENU, U, L
# To Configure MiniFax: Press MENU, U, C
# To display information About MiniFax: Press MENU, U, A
## File name: Enter file name to print.
## Directory: Current directory.
## Files: The file List box, displays all files in current directory. Press Up arrow or
Down arrow to move within the box. Press ENTER to accept the highlighted
selection.
## Directories: In the Directory List box, you can select the directory or drive you want
from this box. Press Up arrow or Down arrow to move within the box. Press ENTER
to accept the highlighted selection.
Printing Fax Screen
## Select a file and press ENTER, or ALT + O from the Select Print File option to
display the following Print Fax screen.
Printing Fax
# Press MENU, U, P to display the Select Print File screen.
Printing a Fax file
1. Type file name in the File Name: field or select a file from the File: List box. File
extension must be .mfx. (fax file format)
2. Press ENTER , or ALT + P to accept the highlighted selection and start the
printing operation.
Selecting Print File Entry
Print Fax Entry
## File name: Name of the file being printed.
## Printer Type: Type of the printer attached to the HP 100LX.
## Status: Shows any action or commands being sent from MiniFax software to the
modem.
## Progress: Displays the printing operation via a bar-graph indicating percentage of
completion.
Page 16

Log
Configuring MiniFax
# Press MENU, U, L to display the Log screen.
Switching Operation in Log
## Press Arrow up or Arrow down key to move the highlighted bar to select a
record.
## Press F4 to View a fax file. (Received Fax only)
## Press F5 to Delete a highlighted record.
## Press F6 to Delete All records in the log.
## Press F8 to Resend a highlighted file.
# Press F9 to Print a highlighted file.
Fax Log Entry
# Send/Receive: Indicates the type of activity in the log file.
# Status: Indicates the following Fax indication:
OK Fax operation complete.
Abort User has aborted the fax operation.
Error Fax operation encounters error(s).
Busy The remote fax is busy.
NoAns The remote fax is not answering the call.
# Date and Time: Date and time stamp when starting the fax operation.
# Pages: Number of page(s) sent or received.
# To/From: Name of the fax recipient or sender.
The configuration menu allows you to do the following operations: registers your name,
local Fax number, changes modem characteristics (via Init String field), or for the credit
card caller you can add ID number (via Dial Prefix field), Modem speaker control,
Pulse and Manual dial selection.
# Press MENU, U, C to display the Configuration screen.
To configure the MiniFax
1. Fill in the Name: and Fax#: of the MiniFax user.
2. Select the Modem speaker: Set the modem's sound ON or OFF .
3. Init String: This entry is for advance users who need to change modem's
operation parameter(s). For example, to set the CTS/RTS flow control and
sensing the Carrier Detect (CD) the entry in this field would be 'AT\Q3&C1'. To
disable the Dial tone detection this entry would be 'ATX3'. (You may need this
feature when the dial tone pitch is different from North American dial tone.)
Normally you should leave this entry blank.
4. Dial prefix: This field is for users who need to add prefix number to the
telephone number. For example, to access the outside line from a hotel and in
some areas user need to dial 1 before an Area Code: This entry would be 8,1
5. Dial pulse: If you are using pulse (rotary) phone line, check this box to enable
pulse dialing. Leave the box unchecked if you use touch-tone line.
Page 17

6. Manual Dial: If checked, the user will be prompted at the send fax screen.
Status: Hit Enter after fax tone.
At This point user needs to pick up the handset and dial the number. After hearing the
fax's high pitch tone, press ENTER, to start the fax sending, then place your handset on
its cradle.
About
## To display information about the MiniFax programs itself such as revision, and
copyright information.
Upgrade the MiniFax
From time to time EXP will release a maintenance upgrade MiniFax for additional
features. The new revision file will be posted on our
BBS (516) 496-3753. The file name convention are:
For ThinFax 1414-LX
Basic-XX.exe. where XX (e.g., 01)= revision number.
For ThinFax 1414-LXM
LXM-XX.exe. where XX (e.g., 01)= revision number.
Note: For Manual Dial operation user will need the one line to two line (Not Included)
or the 'Y' connector (Male-Female-Female.) in order to connect both the modem
and telephone set to the same telephone line.
7. Highlight the OK button and press ENTER, or ALT + O to accept the information
entered.
Highlighted button and press Cancel, or ALT + C to discard the information
entered.
In both cases, you will be returned to the Utility screen.
Your current revision number is displayed on the top of MiniFax's screens. As an
owner of EXP's modem product you are invited to log-on our BBS and check for any
new revision.
See APPENDIX B for detail on how to download and install the upgrade file from the
BBS.
Page 18

5
Using the ThinFax as a Data modem in the HP
100/200LX
This section assumes that you had completed the steps required to prepare the HP
100/200 LX for the card modem in the Section 2.
The ThinFax 1414-LX/LXM also functions as a data modem with speed up to
14,400 bps. User of the built-in application such as DataComm or CC:Mail or any data
communication program should follow the setup procedures for each individual
program. For the ThinFax 1414-LXM owner. You can download files or E-mail and
store those data right on the ThinFax card. Just set the receiving path to the F: drive.
The following parameters are recommended for the ThinFax 1414-LX/LXM:
1. Com 2: The Interface parameter of the application MUST be set to COM2.
2. Flow: The Flow control parameter of the application should be set to
RTS-CTS or Hardware.
3. Baud: The Baud parameter may be set at 57600 for maximum speed.
Operating Consideration for ThinFax as a Data Modem
Operating Mode
Five operating modes can be chosen by the \Nn command, are supported to allow the
HP 100/200LX to communicate with remote modems that may or may not support error
correction and data compression. The five operating modes are Normal, Direct, MNP
Reliable, V.42 Auto-reliable and V.42 Reliable. Speed buffering, which is used for all
operating modes except \N1, allows the HP 100/200LX -to-modem data rate to be
different from the modem-to-modem data rate. This is accomplished by using
transmitter and receiver buffers in the modem. Thus, the HP 100/200LX -to-modem
data rate can be set for 2400 bps when the modem-to-modem data rate is 300 bps,
without causing any data errors. In all data modes except direct mode (\N1), the HP
100/200LX -to-modem data rate can be set for any valid speed between 300 bps to
57,600 bps. In direct mode, the HP 100/200LX -to-modem data rate can only be set to
300, 1200, 2400, 4800, 7200, 9600, 12000, and 14400 bps. Each operating mode is
explained in more detail below.
Normal Mode (\N0) - No error correction/data compression, but
speed buffering is supported.
Direct Mode (\N1) % No error correction/data compression or
speed buffering.
MNP Reliable Mode (\N2) % MNP 2-5 connection only. The modem
hangs up if an MNP connection cannot be
established.
V.42 Auto-Reliable Mode (\N3) % V.42/V.42 bis with fallback to MNP 2-5
or normal mode.
V.42 Reliable Mode (\N4) % V.42, V.42 bis or MNP 2-5 only
connection. The modem hangs up if a
V.42/V.42 bis/MNP 2-5 connection
cannot be established.
The interface must be set tot COM 2
For more information on specific application, please consult the 'HP 100LX User's
Guide'.
NOTES: 1) MNP 5 requires that the modem be configured for %C1.
2) V.42 bis requires that the modem be configured for "H3.
3) Refer to \Cn and %A commands for more information about autoreliable mode.
Page 19
Operating Mode (Cont)
To alter modem’s operating mode
The list of commands needed to enter a specific error correction or data compression
mode are provided below:
Direct mode only: &F \N1 or \N1
V.42 bis with fallback to MNP 5, &F \N3 or \N3 "H3 %C1
MNP 2-4 or V.42:
V.42 bis with fallback &F \N4 %C0 or \N4 %C0 "H3 -J1
to V.42/MNP 2-4:
V.42 bis only: &F \N4 -J0 or \N4 -J0 "H3
V.42 only: &F \N4 -J0 "H0 or \N4 -J0 "H0
MNP 5 with fallback to MNP 2-4: &F \N2 or \N2 %C1
MNP 2-4 only: &F \N2 %C0 or \N2 %C0
6
Using the ThinFax as a Data modem in PC Card
Compatible Computers
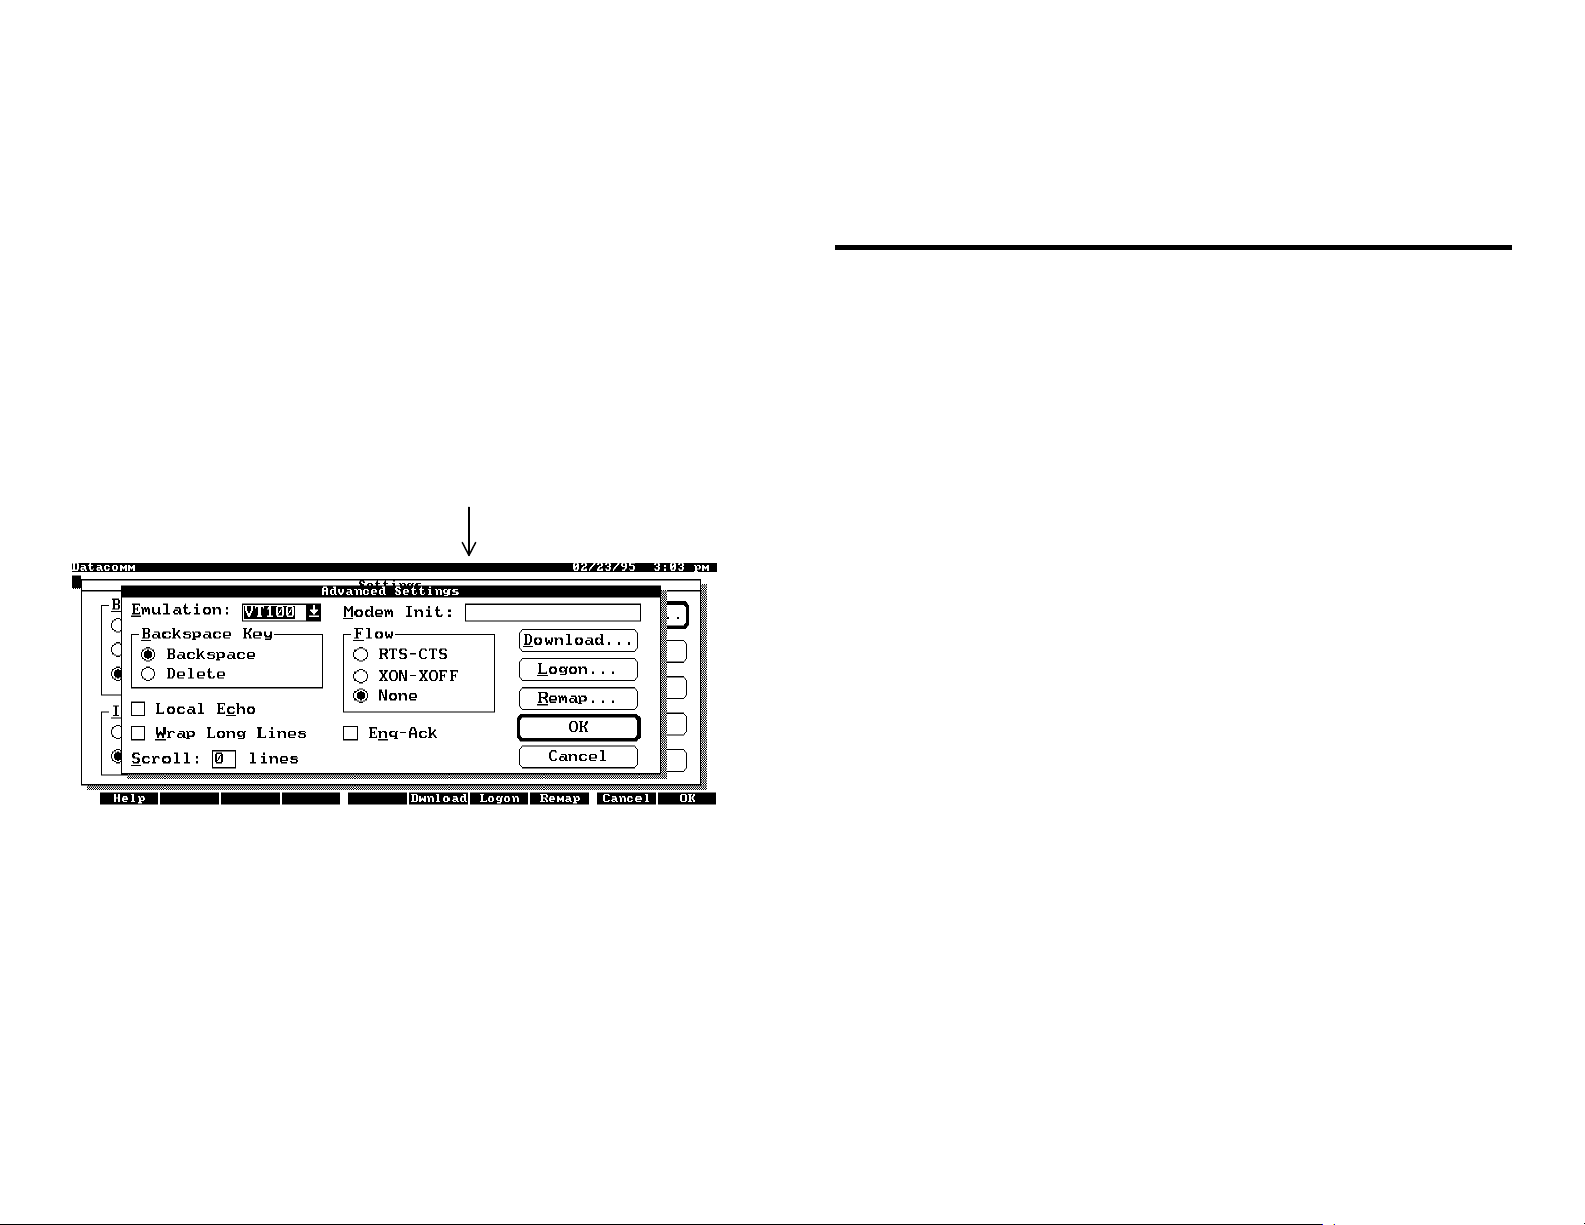
The above operation modes may be set in the DataComm's Advanced Settings
To display the following screen:
Press MENU, C, S and then ALT + V
Flow Control
Usually, your computer can transmit data to the modem with a higher speed than the
modem's maximum speed of connection. Setting the flow control between the computer
and the modem can prevent data overrun during transmission. There are two common
ways of setting the flow control. First is XON/XOFF or sometimes
being referred as Software Flow control. The other one is CTS/RTS or also known as
Hardware Flow Control.
Examples of setting the flow control:
AT&K3 enables RTS/CTS flow control
AT&K4 enables XON/XOFF flow control
SYSTEM REQUIREMENT
PC Card (PCMCIA 2.10) Device Driver:
Most of the notebook computer manufacturers supply their own device driver
program to operate the PC Card (PCMCIA) slot on their computers. If your
computer comes with the device driver to support PC Card (PCMCIA) slot
(i.e., Socket Service, Card Service, Card Installation Client, CardID, Cardtalk
etc.), you should always use the default device driver. However, if the default
device driver cannot operate the ThinFax LX/LXM card, or if the computer
did not come with any device driver, you can then install the EXP's device
driver.
Note: The EXP's PC Card (PCMCIA) device driver is NOT included with your
package. Please follow the instructions in the Appendix B to download the
device driver from our bulletin board system (BBS) or our Internet address
http://www.expnet.com
PC Card Type II or Type III slot(s)
The ThinFax LX/LXM is a Type II card (5 mm thickness). Check your
computer PC Card slots.
Page 20

Hardware Installation
1. Locate the PC Card (PCMCIA) slot, which is usually on one side of
the computer. Some PC Card (PCMCIA) systems allow "hot
insertion" (inserting the card while PC power still on).
Consult your computer User's manual for details.
If you are in doubt, turn the power off.
2. Align the modem card with the arrow sign pointing toward the
computer's slot. (Please note that the card is keyed to guide the
proper installation.)
3. Slowly insert the modem card into the slot and press firmly until
the modem =s connector is seated.
5. Connect RJ-11 connector to a working telephone line. ( If you are not
planing to use the modem at this time. You may skip this step.)
6. You are now ready to install either the computer manufacturer's
Device Driver (If they are Not pre-loaded from the factory) or the
EXP's ThinFax Device Driver. Please follow the Software
Installation Guide procedures.
Software Installation Guide
Installing the device driver for DOS and Windows 3.X
4. Insert the modem =s cable into the card.
Hardware Installation (Cont)
The EXP Device Driver Installation programs are designed to help you install
the device driver into the computer with ease. The programs present you with choices
of specific manufacturers and models of the computers. EXP also has a generic driver
available in case your specific computer is not on this list.
1. Insert the device driver diskette into the floppy drive.
2. Change the working directory to the floppy drive containing the device
driver diskette by typing a: or b:, then the Enter key.
3. At the DOS prompt (A:\> or B:\>), type INSTALL followed by the Enter
key. Press Enter again.
A selection menu will appear.
Page 21

(Check the system configuration program or your computer User's manual
for details on how to disable a COM Port)
5. After completing all of the selection, use the TAB key to advance the
highlight bar to the INSTALL button. Press the Enter key to complete the
installation process. You must reboot your computer for the new device
driver to take effect.
4. You can use either a mouse or the TAB key to switch between different
fields of the menu. Use the mouse or the arrow keys to move the highlight
bar to select among the items in each field.
Installing EXP's Device Driver on an unlisted Host PC
If the make and/or model of your computer is not listed in the list of the
Host PC field, EXP also provides you with a GENERIC device driver:
INTEL 82365SL PC Card Interface
The device driver is used on a trial and error basis.
For computers that only come with one PCMCIA slot, choose slot 1.
Otherwise, select the slot that you installed your ThinFax Modem
COM Port Configuration
Your ThinFax Modem can be configured to be COM1, COM2, COM3, or
COM4. Some notebook computers may reserve a COM Port address for
serial devices, e.g., Trackball, and on-board COM Port. Unless the COM
port address is already occupied, we recommend you always configure
your ThinFax Card to either COM2 or COM4. This will reduce the
chance of IRQ(Interrupt Request) conflicting with other devices. In some
cases you may need to disable one of the existing COM Ports and then
configure the ThinFax to use that COM Port.
NOTE For Windows User, The COM Ports I/O Address and IRQ of your choice should be set to the
actual address; NOT the 'Default'.
Click on:
Main Group Y Control Panel Y Ports Y COM X Y Setting
Y Advanced (X = Com Ports 1 -4) to verify its setting.
WINDOWS 95 INSTALLATION FOR MODEM
The PCMCIA modem is a windows 95 compatible product. It is installed as Plug-NPlay peripheral. The device driver for the modem is not required.
INSTALL THE MODEM CARD
1. Start Windows 95 and insert the modem into PC Card (PCMCIA) slot. Check your
computer User s manual for the slot location.
2. The Windows 95 should respond with “New Hardware Found” window.
3. Windows 95 will install the modem’s driver automatically. The system will beep
when finishing installation procedures.
Page 22
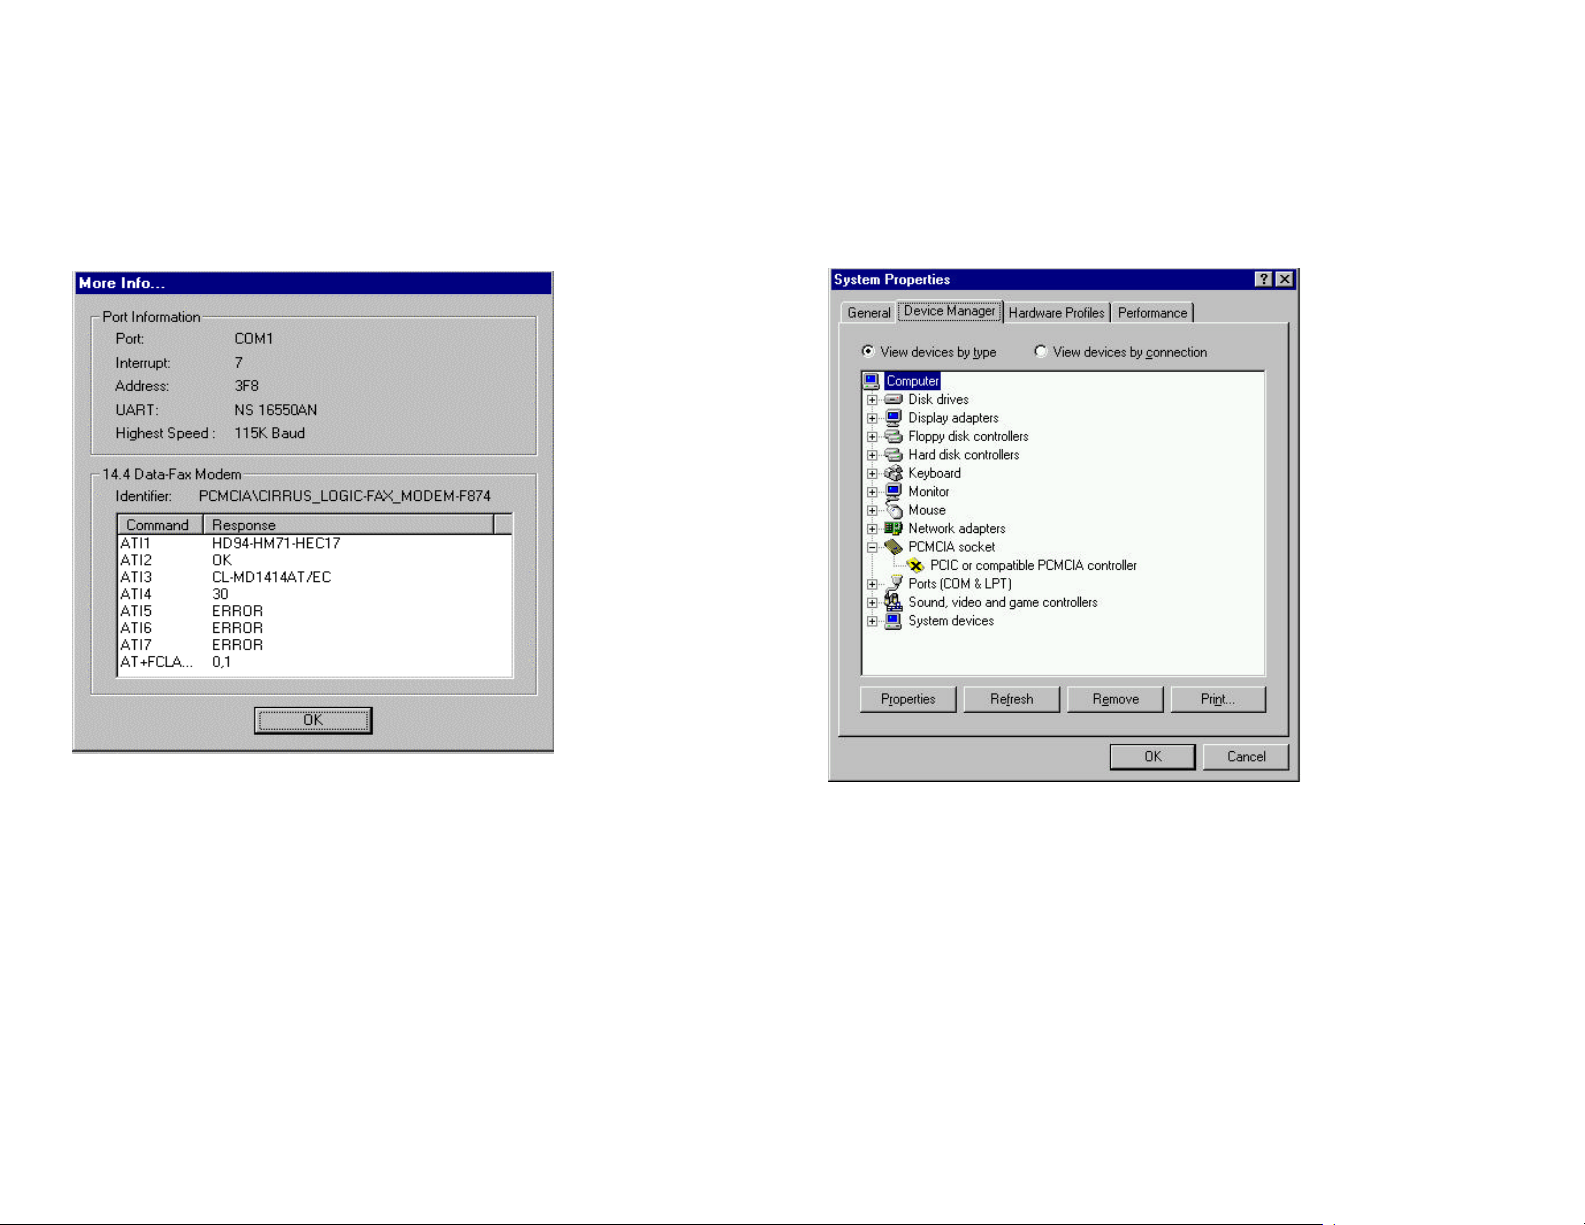
CHECKING YOUR MODEM INSTALLATION
After installation, you may wish to check if the computer recognized the
modem and the assigned COM port.
Click on Start => Settings => Control Panel => Modem => Diagnostics tab.
Locate the modem’ s COM port then highlight it. Click on ‘More Info... button.
ENABLING 32-BIT CARD SUPPORT OF WINDOWS 95
Your system should be ready for PCMCIA socket support prior to operating the
ThinFax Modem. To check whether your computer is PCMCIA Socket supported, first,
double-click on the “System” icon from “Control Panel” folder (you can select the
“Control Panel” under “Settings” from the “Start” menu to open the “Control Panel”
folder).
The Windows 95 will try to communicate with the modem. The More Info... window
appear with all the modem identification information.
The modem is now installed properly and ready. If you have a program that required
modem, please check your COM port setting. Match the COM port and the IRQ
(Interrupt Request) setting for the modem in the ‘More Info.. window.
IF SOMETHING GOES WRONG
In case of difficulty such as after you inserted the card and there is NO “New
Hardware Found” window pop-up or there is no information about the modem. Please
check the PCMCIA Socket support, the 32-Bit Card support may not enable or working
properly. Follow the instruction for enabling the Socket support.
Click on the Device Manager Tab. If “PCMCIA Socket” is found with a cross (X) sign
next to the PCMCIA Controller as show above, it means the PCMCIA device driver is
not using 32-Bit Card Support. The socket(s) is not function properly. There should be
only one such a line displayed.
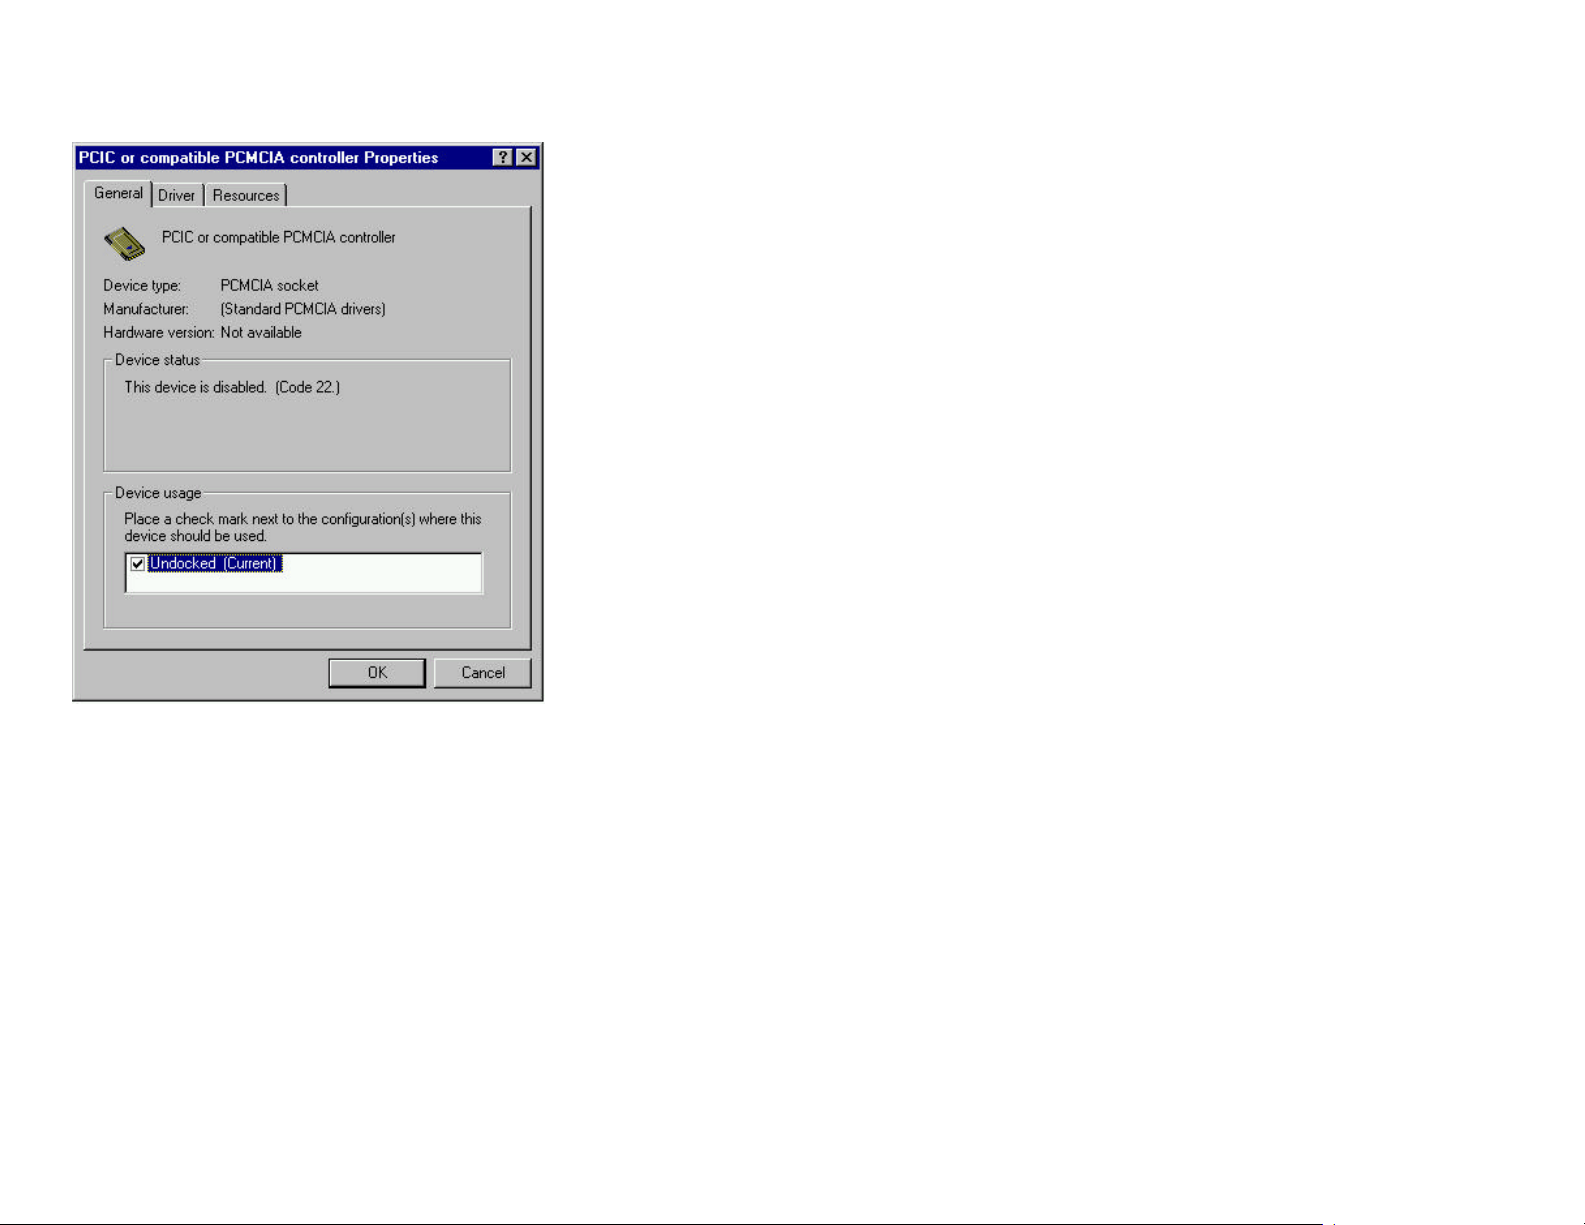
In this case, double click on the PCMCIA Controller, and a dialog box will be displayed
as below. Please place a check mark next to the current configuration of Device usage
box, then select OK.
After the PCMCIA 32-Bit Card support is installed, Windows will ask you to reboot
your computer. Then you should repeat the install procedures.
If the PCMCIA Socket is not found, then you must add a PCMCIA socket to your
system. Please click on the “Add New Hardware” icon in the Control Panel folder and
Page 23
select “PCMCIA socket”. Select the appropriate type of PCMCIA Controller that
matches with yours and follow the on-screen instructions.
Using the ThinFax 1414-LXM as a FLASH card in PC Card Compatible
Computer.
SYSTEM REQUIREMENT
PC Card (PCMCIA 2.10) Device Driver:
Most of the notebook computer manufacturers supply their own device driver
program to operate the PC Card (PCMCIA) slot on their computers. If your
computer comes with the device driver to support PC Card (PCMCIA) slot
(i.e., Socket service, Card Service, Card Installation Client, CardID, Cardtalk
etc.), you should always use the default device driver.
EXP FLASH Card Device Driver
The EXP's PC Card (PCMCIA) device driver is NOT included with your
package. Please follow the instructions in the Appendix B to download the
device driver from our bulletin board system (BBS). The file name is:
LXMCSx.EXE (where X is a revision number)
PC Card Type II or Type III slot(s)
The ThinFax LX/LXM is a Type II card (5 mm thickness). Check your
computer=s PC Card slot.
INSTALLING THE EXP FLASH CARD DEVICE DRIVER
The EXP FLASH card device driver is compliance with PC Card
specification. This mean the Socket Service and Card Service must be loaded
prior to load the EXP FLASH card driver. Using any text editor Notepad or
DOS Edit program to manually add an entry line after the PC Card Device
Driver entries in the CONFIG.SYS file. For example:
Device=C:\cardsoft\sscirrus.exe
Device=C:\cardsoft\cs.exe
Device=C:\cardsoft\csalloc.exe C:\cardsoft\csalloc.ini
Device=C:\cardsoft\cardid.exe
Device=C:\cardsoft\lxmcs1.exe <= Add by user
Save the Config.sys file and reboot the computer. There should be additional
drive in your computer when the ThinFax LXM card is inserted.
Page 24

APPENDIX A
Basic Data Modem 'AT' Commands
Command Default Function
A/ ** none Repeat last command
A none Answer
Bn * 1 Select CCITT or Bell
Cn 1 Carrier control option
D none Dial command
En * 1 Command echo
Fn 1 On-line echo
Hn 0 Switch hook control
In 0 Identification/checksum
Kn none SRAM buffer control
Ln * 2 Speaker volume control
Mn * 1 Speaker control
Nn * 1 Connection data rate control
On 0 Go on line
P * none Select pulse dialing
Qn * 0 Result code display control
Sn none Select an S-register
Sn=x none Write to an S-register
Sn? none Read from an S-register
? none Read last accessed S-register
T * none Select DTMF dialing
Vn * 1 Result code form
Xn * 4 Result code type
Yn * 0 Long space disconnect
Zn 0 Recall stored profile
&Cn * 1 DCD option
&Dn * 2 DTR option
&F none Load factory defaults
&Gn * 0 Guard tone option
&Jn * 0 Auxiliary relay control
&M0 * 0 Communication mode option
&Pn * 0 Dial pulse ratio
&Q0 * 0 Communication mode option
&Sn * 0 DSR option
&Tn 0 Self test commands
&Vn 0 View active and stored configuration
&Un * 0 Disable Trellis coding
&Wn 0 Stored active profile
&Yn * 0 Select stored profile on power up
&Zn=x none Store telephone number
%En * 1 Auto-retrain control
%G0 * 0 Rate Renegotiation
%Q none Line signal quality
-Cn * 0 Generate data modem calling tone
* Value saved in NVRAM.
** Command not preceded by an 'AT'. _ Patent pending.
Data Mode Error Detection and Data Compression
The EXP ThinFax LX/LXM supports two types of error correction (MNP 2-4 and
V.42) and data compression (MNP 5 and V.42 bis). V.42 error correction uses LAPM
as the primary error- control protocol, and uses MNP 2-4 as an alternative. V.42 bis
data compression requires V.42 (LAPM only). MNP 5 requires MNP 2-4. The
supported V.42/MNP 'AT' command set is listed below
V.42, MNP 'AT' Commands
Command Default Function
%An* 13 Set auto-reliable fallback character
%Cn* 1 MNP 5 data compression control
\An* 3 MNP block size
\Bn* none Transmit break
\Cn* 0 Set auto-reliable buffer
\Gn* 0 Set modem port flow control
\Jn* 0 Bps rate adjust control
\Kn* 5 Set break control
\Nn* 3 Set operating mode
\O* none Originate reliable link
\Q* 3 Set serial port flow control
\T* 0 Set inactivity timer
\U* none Accept reliable link
\V* 2 Modify result code form
\Xn* 0 Set XON/XOFF pass-through
\Y none Switch to reliable mode
\Z none Switch to normal mode
-Jn* 1 Set V.42 detect phase
"Hn* 3 V.42 bis compression control
Page 25

"On 16 V.42 bis string length
* Value saved in NVRAM.
APPENDIX B
UPGRADE
Full description of the above >AT= commands is available for downloads on
EXP Bulletin Board System.
This appendix contains the procedures to download the maintenance upgrade for the
MiniFax, the PC Card (PCMCIA 2.01) device driver and the FLASH memory device
driver with format utility program from EXP's Bulletin Board System (BBS).
EXP constantly works on perfecting the ThinFax LX/LXM products line. The new
revision of MiniFax program and device drivers is available to existing customers for
free upgrade. User have to download an upgrade program from the EXP Computer
Inc.'s Bulletin Board System (BBS). Then use the install program to store the new
MiniFax and/or device driver into appropriate drive or directory in the ThinFax 1414LX/LXM card. The files name convention as the following:
For ThinFax 1414-LX
BASIC-XX.EXE (where XX=revision number)
This self-extract file contain MiniFax program and its support files. It also
include the installation utility program.
For ThinFax 1414-LXM
LXM-XX.EXE (where XX=revision number)
This self-extract file contain MiniFax program and its support files. The file
also include the FLASH memory device driver (lxmdrv.sys), the FLASH memory
format utility (lxmfmt.exe) and the installation utility program.
Page 26

Download the Upgrade Program using HP 100/200LX Palmtop
By using the Palmtop's built-in application DataComm with the ThinFax 1414LX/LXM, you can download the upgrade program from the EXP Computer Inc.'s BBS
at 516-496-3753.
1. Press MENU, F To use filer to view C:\_DAT directory. If there is any file
named MINIFnnn.EXE, where nnn are any numerical characters, delete those
files from the directory, or at least rename them to a different name. This is to
ensure no conflicts with the program to be downloaded and extracted later.
2. Quit the filer program by press MENU, Q
3. With the ThinFax 1414-LX/LXM card in the palmtop, Press &…, C to
enter the DataComm Application.
4. Press MENU, C, S to set the following parameters to the ThinFax 1414-
LX/LXM for later data transmission:
Baud Rate 57600
Data Bit 8
No Parity
Stop Bit 1
Com Port 2
Flow Control CTS/RTS
Highlight the OK button and press ENTER, or ALT + O, or press F10 to accept
all the settings.
5. Press MENU, F, P to set the protocol to ZMODEM.
The interface must be set tot COM 2
Highlight the OK button and press ENTER, or ALT + O, or press F10 to
accept the setting.
6. Connect a phone line to the ThinFax 1414-LX/LXM. In the DataComm, type
in "ATDT15164963753", then press ENTER to dial up to the EXP's BBS.
If you are dialing from a foreign country, please insert the country code for
the United State into the proper position (before the Area Code e.g. 516) in
the "ATDT..." line.
7. After the connection is established, the message displayed will prompt you to
enter some information to log in as a new user. Set up your own password.
Please answer all of the questions. If you have logged in previously, you may
only need to enter your name and your password.
8. At the Main Menu, select the File menu by pressing F and then press
ENTER. Select List file contents in the "Files for MiniFax" directory. When
the file is listed on your display, you may flag the file(s) for later download by
pressing F then type in the file(s) name LXM-nn.EXE. (where nn are any
numerical characters) This self-extract file may have associate document(s)
you can also type in the file name in this menu.
9. When returned to the Main menu, press D to download the selected file(s).
Choose Zmodem as the protocol to download the program selected. The
screen then will display a progress bar.
10. Start the receiving process on you palmtop by pressing MENU, F, R It may
takes several minutes to receive the upgrade program.
At the Main Menu, press G to logout.
Quit the DataComm by pressing MENU, Q .
For more detail about using the DataComm Application, refer to your HP 100LX User's
Manual under DataComm.
Page 27

Upgrade the MiniFax
Download ThinFax==s PC Card (PCMCIA 2.10) Device driver.
The upgrade program must be executed from DOS.
1. Press the &… to access More Applications screen. Press MENU, A, L key to
close all applications. Press &…, D key to enter DOS environment.
2. After the screen displays the DOS prompt C:\_DAT>,(default path) type
INSTALL then Press ENTER to start the program. Follow the prompt
message to complete the upgrade process.
3. Upon the completion of the upgrade procedures, you can delete the OLD
MINIFnnn.EXE program to free more space for the C: drive.
Restart your palmtop and the new MiniFax is now ready.
Upgrade the FLASH (F:) driver file.
Follow the >Download the upgrade program using HP 100/200 Palmtop. procedure.
The name of the Flash driver upgrade is LXM-XX.exe where XX is the version number
of the upgrade program. The upgrade program must be executed from DOS.
1. Press the &… to access More Applications screen. Press MENU, A, L key to
close all applications. Press &…, D to enter DOS environment.
You do not need this driver if the your notebook already has a PC Card (PCMCIA
2.10) device driver installed in your notebook computer. (Consult the User=s manual
or call the notebook manufacturer to confirm.)
The EXP=s install program will check for the PC Card (PCMCIA 2.10)
Socket Service, Card Service and Clint drivers, if these drivers are loaded in your
notebook computer the install program will not install the ThinFax driver and attempt to
identify the COM port for the ThinFax 1414-LX/LXM. If they are NOT loaded the
ThinFax driver will function as a Direct Enabler support PCIC ( Intel 82365SL
compatible) controller chip.
Follow the same download procedures and change the file name in Step # 8, to
TFDDXX.zip (XX=Version number i.e., 20). Download the file along with its
document file (tfddxx.doc)
SYSTEM PREPARATION:
Transfer the downloaded device driver file to a notebook computer and
decompress it. You may run the installation program directly from the hard disk or
copy these files to floppy disk then follow the instruction in Section 6. >Software
Installation Guide=
2. After the screen displays the DOS prompt C:\_DAT>,(default path) type
INSTALL the upgrade program you just received from the BBS. Press to
start the program.
Page 28

Questions & Answers
4) Should I have the power hooked up when I use the modem?
The Technical Support staff of EXP are available to help you with any problem in
regarding installation ThinFax-LX/LXM and operation of the MiniFax. For all other
operations, it is requested that you refer to appropriate HP 100/200LX user=s manual or
the communication program user manual. Please read the following Question &
Answer. You may find the answer here in this section before contacting Technical
Support for help.
Technical Support
EXP Computer Inc.
141 Eileen Way
Syosset, NY 11791
(516-496-7629) Fax (516) 496-2914
Hours: 9 A.M. to 9.00 P.M., Eastern Time Monday through Friday
INTERNET:www.expnet.com
1) Can I send faxes in fine mode?
No, you can only send in standard mode, but you can receive in either mode.
2) How much space does a fax page take up on the AAC@@ drive?
Standard mode requires approximate 35KB per page to send. Fine mode
requires 70KB to 95KB per page to receive. Adding a cover page takes another
~15KB. ( The more graphics on a page, the higher the space requirements will
be. )
Yes, it is recommended that you use the AC adapter to power the HP 100/200LX
while the modem card is inserted.
5) Can I insert or take out the modem with the power on?
HP does not recommend or support hot swaps on the HP 100/200LX.
6) I see the MiniFax Icon, but I don==t seem to be able to use the modem. What
can be wrong?
There are a number of possibilities:
a) Config.sys is missing or incorrect,
b) CIC100 not loaded by autoexec.bat, (100LX)
c) Modem is not in the slot,
d) Modem defective.
Refer to your HP 100/200LX user=s manual on AConnecting to Card Modems@ for
more information or INSTALLATION Chapter in this manual.
7) Can I use the ThinFax 1414-LX/LXM in other computers?
You can use the 1414-LX/LXM in any computer that has a PC Card (PCMCIA
2.0) standard slot. The device drivers for the PC Card slot will be needed to
access the modem.
NOTE:The MiniFax functions will NOT be available. It is designed for HP
Palmtop only.
3) What printers can I use with MiniFax and how does the HP 100LX output
to the printer?
There are three printer types supported by the HP 100/200LX. They are:
a) Epson FX80,
b) HP LaserJet,
c) IBM Proprinter.
Your printer should either be one of these or emulate the functions. COM 1 is the
printer port for which a special cable is used to connect to the printer. This is a
serial connection which requires the baud rate to be set so that the printer and
COM port are at the same rate.
8) How would I dial out from my hotel room?
Use the access number, 9 (or any number the hotel requires to get an
outside line), plus a @W@ to wait for the second dial tone, then the number in the
fax number field. i.e. 9W5551212 or
Press MENU, U, C To access configuration menu and then press TAB key
highlight Dial Prefix filed type in 9W.
Press TAB to highlight OK box and press ENTER or Alt to except the data.
9) What do I do when my palmtop locks up and I can==t even turn it off?
Page 29

Use the key combination, CTRL + SHIFT + ON, to re-initialize the system. Do
not initialize the RAM disk or you will lose everything in your AC@ drive.
AT&F &C1 &D2
For more advanced modem operation see Section 5 >Operating Mode=
10) How much space does the MiniFax software take up on my AAC @@ drive?
None, it does not require any space on the AC@ drive. It requires ~64KB of
system memory.
11) How do I connect to a BBS?
Use DataComm to dial out to the BBS. Make sure it is set to COM 2, because
that is where the modem is. At the screen type AATDT5551212@, where
A5551212@ is your BBS number. Parity, data bits and stop bits are to match the
settings of the BBS that you are calling. The most common settings are N,8,1.
12) Can I leave the modem card in the HP 100LX when not in use?
Yes you can. It will use up your battery faster though.
13) Can I use the other ThinFax e.g. 14,400/14,400 with my HP 100LX?
You can use it for data only. There is no fax software on the card. It may cause
the HP 100LX to lock up if DataComm is started with the modem inserted. Just
start DataComm first then turn off the HP 100LX and insert the modem. It
should then be fine when you turn it back on to use DataComm. Remember to
have the AC adapter power your HP 100LX.
17) I have a FLASH card from another manufacturer. How do I install the
ThinFax LXM card?
You need to load EXP FLASH card device driver ( lxmdrv.sys ) after the other
FLASH card=s device driver.
14) An ERROR AACannot find application to open@@
Make sure the ThinFax card is inserted.
MiniFax program reside in the A: drive. If you use any FLASH card, check its
device driver is in the config.sys or autoexec.bat file and make sure that the
FLASH card does not assign it to the A: drive.
15) I don==t like the fonts on Cover Page. Can I change it?
No, not at the current production of the ThinFax card.
16) ThinFax is not on the list of supported modem. What is the initialize
string?
Page 30

APPENDIX C
ERROR MESSAGE
V01, V04: File is not found!
Resolution: Check for the location of file. Match the path of the file to the
location.
V02, V03, V05: Memory overflow!
Resolution: Check to see if you have any other applications open and
close them. Make sure you have at least 400K of System
RAM.
M01, M4: EXP ThinFax card not found!
Resolution: Check to see if the card is securely seated into the slot. Make
sure the TSR, AD:\BIN\CIC100 /GEN 1@, is being loaded by
the autoexec.bat.
M02: Log file is old. Delete it? Y/N
Resolution: Older version of MiniFax log may be incompatible with newer
version of MiniFax.
M03: File is not found!
Resolution: Check for the location of file. Match the path of the file
location.
M05: Missing fax# or file name!
Resolution: Put in the fax number or file name.
M07, M08: Memory overflow!
Resolution: Check to see if you have any other applications open and
close them. Make sure you have at least 400K of System
RAM.
document.mfx.
M13: No resend for receives log!
M14: No view for send log!
M15: No print for send log!
Resolution: NONE. Function are not supported
M17: File Lock or Missing!
Resolution: Phone.pdb may have a password setting. Phone book
application may not have saved the file correctly. Go to
Phone book application undo the password and open and
save Phone book.
C03: C drive is full!
Resolution: MiniFax requires about 35K per page of free disk space on
your AC@ drive in order to send a non converted file or to
receive a fax.
C06: File is not in f
ax format !
Resolution: Check file name extension. Its should be .mfx
C08: ASCII file with .MFX extension!
Resolution: The extension is a MiniFax graphics file format. It is REAL
ASCII file.
C09: MiniFax file with .MIX extension!
Resolution: Wrong extension for MiniFax. The file is MiniFax format.
C11: Font file not found!
Resolution: File named f16x17.dat can not be found.
C13: Can not create .MFX file!
Resolution: Check to see if you have enough space in your AC@ drive.
M09 : Printer error !
M10: Printer port is not responding!
Resolution: Check if the printer is power on and the printer=s cable is
connected properly.
M11: File is not in fax format!
Resolution: The file should have a Amfx@ extension to the file name, i.e.
C16: Disk may be full. Can not write!
Resolution: Disk write error during conversion. Check to see if you have
enough space in your AC@ drive.
E05 : No dial tone !
Resolution: Make sure that your modem is hooked up to an analog
telephone line.
Page 31

E06 : Line busy !
Resolution: Try the number again later or a different number.
E07 : No answer !
Resolution: Remote machine not on or connected. Try the number again.
E08 : Protocol exchange error !
E09 : Line condition may be bad !
Resolution: Protocol/ Speed negotiation error, line is noisy
Move to different location and try again.
E11 : COM port is not responding !
Resolution: Check COM port with DataComm. Reset the palmtop.
Restart MiniFax.
E12 : Memory overflow !
Resolution: Check to see if System RAM is 400K or more.
E13 : Long fax number without commas !
Resolution: Use commas in between phone, credit card, and access
numbers.
E16 : Failed to connect after answer !
Resolution: May not have been a fax call.
E17 : Error receiving page !
Resolution: Line noise or not a fax call.
E19 : Receive path is invalid !
Resolution: Check Amenu@ >Autility@ > Aconfig@ for valid
 Loading...