

Page 1

- i -
ThinCom PCMCIA
Ethernet - Modem
Adapter
User==s Manual
Page 2

Copyright 1996
Revision 1.0
September 6, 1996
ALL trademarks and registered trademark are of their respective companies.
No part of this publication may be reproduced, stored in a retrieval or transmitted in any form or by any means, mechanically, photocopying, or recording.
The information in this publication has been carefully checked and is believed to be accurate as of its publication date. EXP will not be held reponsible for any inadvertent.
All information is subject to change without notice.
- ii -
Page 3

TABLE OF CONTENTS
INTRODUCTION
Features and Compatibility.............................................................. 1
REQUIREMENTS
Notebook computer with PC Card slot............................................2
PC Card device driver......................................................................2
Upper Memory Block Region........................................................... 2
Analog Telephone line.....................................................................2
INSTALLATION
Hardware Installation ...................................................................... 5
Software Installation......................................................................... 7
Diagnose the need for PC Card (PCMCIA 2.10) software .............................support.7
Installing the Point Enabler Device Driver............................... 9
Installing the Point Enabler Device Driver on an unlisted ................ Host PC. 10
Installation Verification................................................................... 11..............Windows 95 Installation for Modem 12
Enabling 32-bit card support of Windows 95................................ 13
Modem Selection ........................................................................... 15
DATA COMMUNICATION.......................................................................... 15
Operating Mode.............................................................................. 17
CELLULAR OPERATION.......................................................................... 19
FAX OPERATION....................................................................................... 20
DIAGNOSTIC FUNCTION......................................................................... 21
TROUBLE SHOOTING.............................................................................. 23
APPENDIX A
AT Commands for 28,800............................................................. 24
AT Command for 1414CL ............................................................. 31
TABLE OF CONTENTS (Cont.)
- iii -
Page 4

AT Command for 2400, 96,00 and 33,600/14,400....................... 37
APPENDIX B
S Register Summary ......................................................41
FCC Compliance Statements.................................................................... 45
FCC Part 68................................................................................................ 45
FCC Part 15................................................................................................ 46
Canadian Department of Communication Compliance Statement.......... 47
- iv -
Page 5

INTRODUCTIONINTRODUCTION
INTRODUCTION
Congratulation on your purchase of the ThinCom PC Card. It is among the finest card in today's market. We develop this innovative product to meet or exceed the computer manufacturers' specifications as
well as your communication needs.
The ThinCom has dual functions in one card, the Fax/Data Modem portion allows you to use data communication such as connecting to an on-line service or the Internet, or send and receive fax. Ethernet
Local Area Network portion give you the connection to your LAN server. These two functions can be performed simultaneously. For example down load a file from a remote location to a network drive.
Features
! Dual functions Data/Fax modem and Ethernet in a Type II PC Card
! Simultaneous modem and Ethernet Local Area Network operation.
! Compatible with standard Socket Services and Card Services (PCMCIA 2.1) and Windows 95.
! 3 years warranty
Fax/Data Modem
! Support industrial standard Hayes "AT" command set
! Adaptive Dialing
! Call progress monitoring
! Data Mode communication speed: 33,600, 28,800, 14,400, 9600 or 2400 bps
! Compatible protocol: ITU (CCITT) V.34, V.FC, V.32bis, V.32, V.23, V.22bis, V.22, V22.A/B, V.21, Bell 103 and 212A.
! Fax Mode: Group III Compatible
Class I and/or Class II commands on send and receive up to 14,400 bps
ITU (CCITT) V.17, V.29, V.27ter, V.21 Ch.2
! Built-in Error correction: V.42, MNP 2-4
! Built-in Data Compression: V.42 bis and MNP 5
! Automatic Power Save in sleep mode
! Auto Retrain
! Support Diagnostics modes
! Cellular ready using MNP 10 Cellular Enhancement protocol
Ethernet
! Support IEEE 802.3 (ANSI 8802-3) and Ethernet Standard.
! Direct 10 Base T (twisted pair) connection using RJ-45
! Driver support for most Network Operating System
SYSTEM REQUIREMENT
The following list contains all elements needed for the ThinCom PC Card to function as a fax/data modem and Ethernet card.
1. A notebook or desktop computer with a PC Card (PCMCIA ) slot.
- 1 -
Page 6

INTRODUCTION
The system should have at least one Type II or Type III (5.0 mm or 10.0 mm thickness) slot.
2. DOS version 5.0 or higher
Or
Windows 95
3. Socket Service and Card Service compliant with PCMCIA 2.10 to operate the
PC Card (PCMCIA ) slot.
Normally, the device driver is pre-installed on the computer from the factory.
4. Network operating system software compatible with NDIS or ODI drivers.
5. A RJ-45 (10 Base-T) jack connect to a network server or a computer.
6. A working analog telephone line
- 2 -
Page 7

INSTALLATIONINSTALLATION
INSTALLATION
Before you begin the installation procedure, check and verify content of the ThinCom package. If you are missing any of the items listed below, please contact your dealer.
! ThinCom PC Card
! Device driver and Diagnostics diskette
! This User's Manual
! Diskette and manual for data and fax communications software
! Telephone line interface cable with RJ-11 modular plug
! Ethernet 10 Base T interface cable with RJ-45 modular plug for network opration
Before You Begin
CAUTION! The electronic components and IC chips installed on the ThinCom card are very sensitive to damage from static electricity. Before touching the card, touch a grounded
metal surface.
- Inspect the ThinCom card for any damage which may have occurred during shipping. If any damage is found, please notify your dealer immediately for prompt replacement.
- Turn off the computer
HARDWARE INSTALLATION GUIDE
This section provides you with general information on how to install the PC Card into the majority of notebook computers available on the market today.
1. Locate the PCMCIA slot, which is usually on one side of the computer. Some PCMCIA system allows "hot insertion" (inserting the card while PC power still on). Consult your computer User's
manual for detail. If you are in doubt, turn the power off.
2. Align the ThinCom card with the arrow sign pointing to the computer's slot. (Please note that the card is keyed to guide for proper installation.)
Hardware Installation Guide (Cont.)
3. Slowly insert card into a slot and press firmly until the ThinCom card connector is seated.
4. Insert the telephone line interface cable with RJ-11 connector into the Fax/Data modem port (Black connector). Push in the connector firmly.
- 3 -
Page 8

INSTALLATION
Make sure to match the cable connector=s color with the connector on the card. The Modem connector is keyed, and it can not be inserted to the Ethernet connector accidently.
5. Insert the LAN interface cable with RJ-45 connector into the LAN port (White connector). Push in the connector firmly.
Make sure to match the cable connector=s color with the connector on the card. The Ethernet connector is keyed, and it can not be inserted to the Modem connector accidently.
6. You are now ready to install the ThinCom=s Ethernet and Modem device driver.
Please follow the Software Installation Guide procedures.
SOFTWARE INSTALLATION GUIDE for DOS/Windows 3.XX
Install the ThinCom==s driver with PC Card device driver
C Most of the notebook computer manufacturers supply the device driver program to operate the PC Card slot on their computers. The ThinCom=s driver work with the PC Card (Socket Service and Card
Service) device driver compliant to the PCMCIA 2.1 or later specification. Check the table on the APPENDIX A for the name of some widely used device drivers.
C A minimum of 8K block of memory in the UMB (Upper Memory Block) should be available. In order to initialize and access the ThinCom card such a memory block exclusion is requied. In most case the
PC Card device driver installation program will set the option in the EMM386.exe of the C:\config.sys file. The statement may look like this: (The actul setting for your computer may be different)
- 4 -
Page 9

INSTALLATIONINSTALLATION
DEVICE=C:\DOS\EMM386.EXE NOEMS X=D000-DFFF
C Depending on the network environment, you need to choose whether you want to use ODI, NDIS2 or NDIS3 drivers. (These files are included with your installation diskette.) Use the following table as a
guide:
Network Environment Driver selection
Netware from DOS
Netware from DOS and/or Windows 3.1x
MS Windows Network from windows 3.1 x
Netware and MS Windows Network Windows 3.1 x
Lan Manager
Windows 95
C Insert the diskette into the floppy drive, at the DOS prompt type in >A:\install=, or from File Manager double click on >install.exe=. At the greeting screen press >Enter= to continue. A selection menu will display
as the following:
EXP ThinCom PCMCIA Modem/Net card - Installation Program
[ X ] Full installation
[ ] Enabler ( No Card Service )
[ ] ODI
[ ] NDIS
[Space] to toggle. [F2] or [Enter] to continue. [Esc] to quit.
Full installation: This option install modem and Ethernet card device driver including Novell ODI and Microsoft NDIS network driver.
Enabler:
ODI: Choose this option to install the Novell=s network device driver only.
NDIS: Choose this option to install the Microsoft=s network device driver only.
Use the Up/Down Arrow key to move the cursor and the Space key to select the drivers to be installed. When ready to install, press Enter key to continue.
C The next screen prompt you to enter the location to install the device driver, please enter the target directory name, or press Enter key to accept the default directory.
C After the device drivers are copied in to the directory, screen will prompt to change the AUTOEXEC.BAT and CONFIG.SYS so the driver can take effect on the next system boot up. Please select Yes so
the program can modify those files.
C The README.TXT file contain any recent change of the device driver, press the Enter key after the modification to the AUTOEXEC.BAT and CONFIG.SYS files. Or you may press the Esc key to exit the
installation.
ODI
ODI
NDIS (ODI also possible)
ODI
NDIS2
NDIS3 Miniport
NOTE: Remember to reboot the system so the newly installed device driver will take effect.
INSTALLATION VERIFICATION
MODEM
- 5 -
Page 10

INSTALLATION
PC Card (PCMCIA) device driver
Most PC Card software will have a utility program to display the socket status,
card type, card manufacturer name and system resource used by the PC Card inserted. These programs have a name such as >PCMINFO.EXE , CARDINFO.EXE, CARDVIEW or PCCARD.EXE
etc..
If the ThinCom card is recognized and configured successfully, the screen message will show socket(s) information, card type as modem together with the COM port and interupt request number
assigned to the modem.
NOTE: For DOS communication program user, make sure the Interupt Request number match the assigned number from PC Card device drivers.
For Windows 3.xx, you need to set the COM port Interupt Request( Control Panel => Port => COM x => Advance => Setting) to match the assigned number from PC Card device drivers
- 6 -
Page 11

INSTALLATIONINSTALLATION
TESTING THE MODEM
This section contains steps to verify the installation of the ThinCom Modem portion by using a communication software.
1. Install and start a data communication software. (for Microsoft Windows users Click on Accessories Group => Terminal) Select terminal mode.
2. In setup modem, set COM port to match COM Port previously set by the PC Card device driver
3. Set Baud Rate, Data bits, Parity, Flow Control and Stop bit parameters to your normally use.
4. Enter the terminal mode. This will allow you to issue the 'AT' command directly to the modem.
5. Type 'AT' or 'at' then press ENTER key. (Note: the modem will not recognize mixed case such as 'At' or 'aT') The modem should respond with 'OK' on the screen. The modem=s active parameters
may be reviewed by using the AT&V command.
TESTING THE NETWORK
On the next system reboot the EXPNET.BAT file will start and attempt to log in to a network.
The THINCOM.EXE PC Card network adapter driver
- 7 -
Page 12
INSTALLATION
WINDOWS 95 INSTALLATION
The ThinCom card is a Windows 95 compatible product. It is installed as Plug-N-Play peripheral. Your system >32-Bit PC Card (PCMCIA) support= should be enabled prior to operating the ThinCom card.
(See >Enable the 32-Bit card support in Windows 95' next page) Be sure to have your ThinCom= s device driver diskette and the Windows 95 CD-ROM or diskette handy.
INSTALL THE THINCOM CARD
1. Start Windows 95 and insert the modem into PC Card (PCMCIA) slot. Check your computer User*s manual for the slot location.
2. The Windows 95 will sense the new hardware upon a card insertion and ask you for the software driver diskette.
3. Depending on the previous software and hardware installed in your system, it may attempt to copy other files from the Windows 95 install source (CD-ROM or diskette).
NOTE: If you are reinstalling the card in a system where there is a previous version of the drivers for this card you must competely remove old entries from Control Panel => System => Device Manager =>
Multi-Function Adapter.
IF SOMETHING GOES WRONG
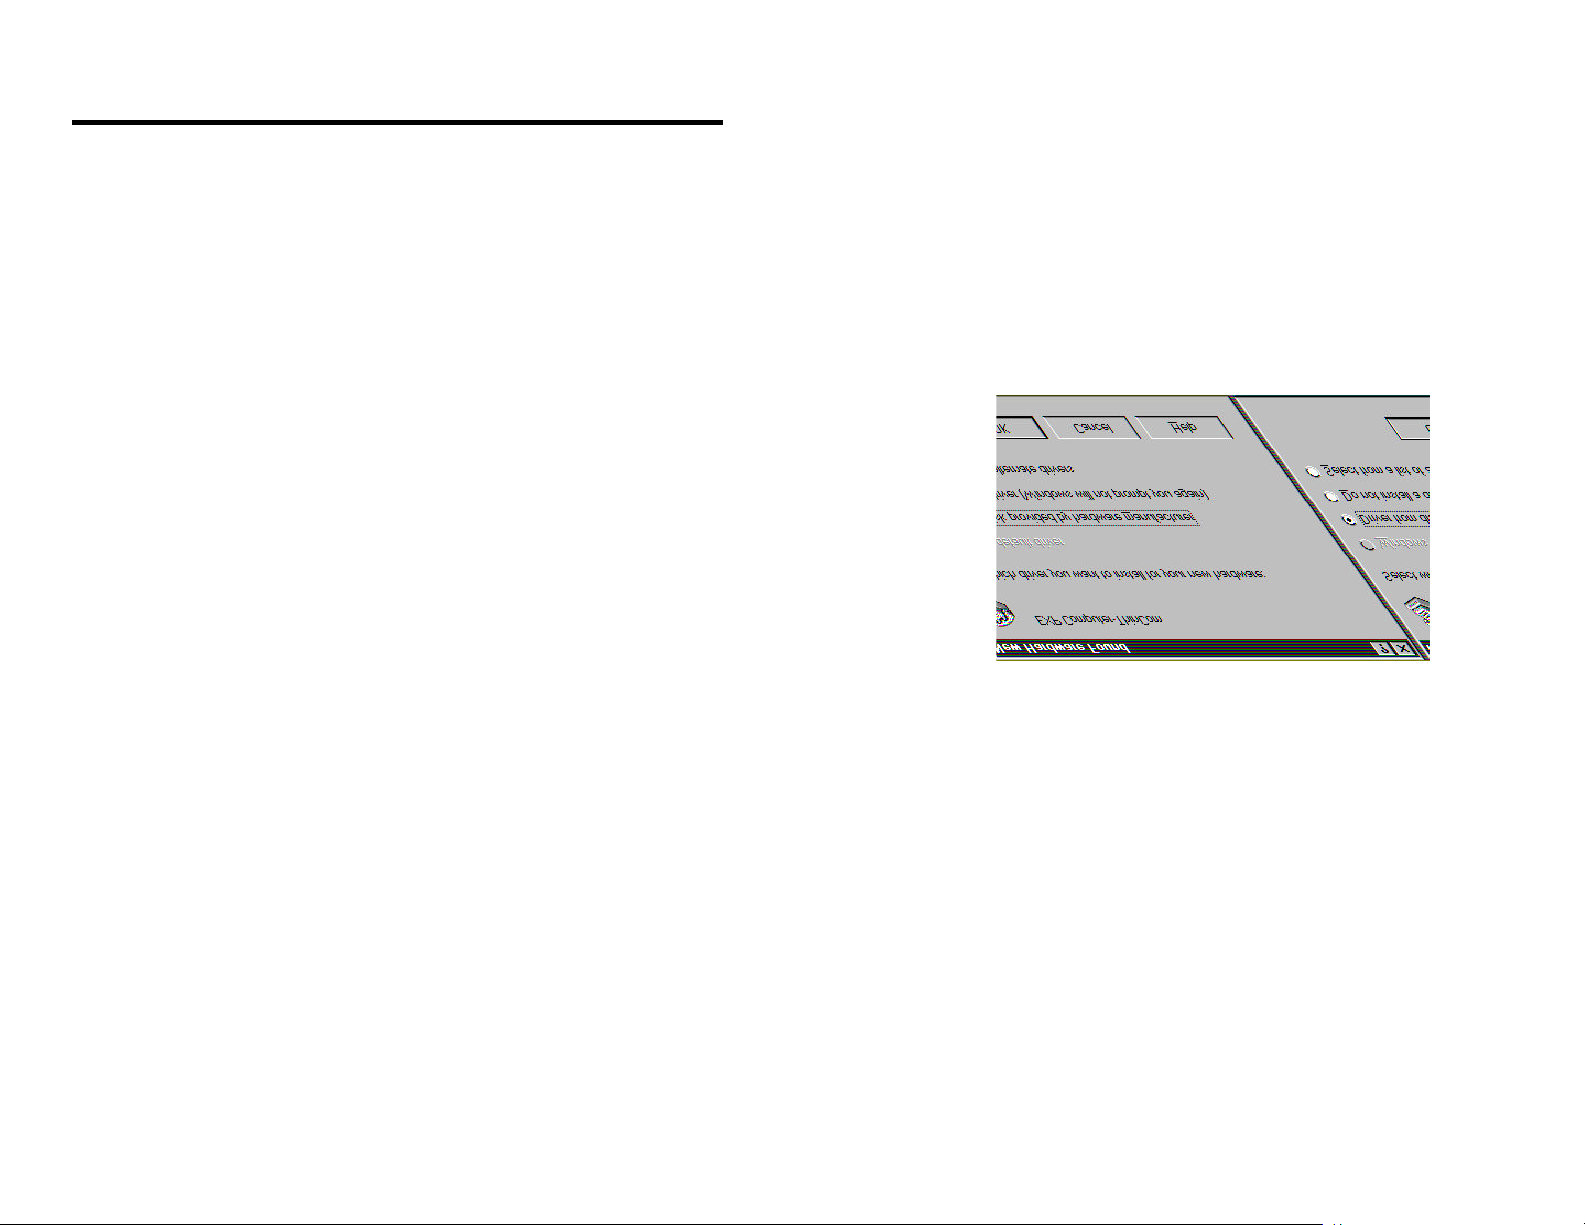
support, the 32-Bit Card support may not enable or working properly. Follow the instruction to enabling the Socket support.
In case of difficulty such as after you inserted the card and there is NO ANew Hardware Found@ window pop-up or there is no information about the modem. Please check the PCMCIA Socket
- 8 -
Page 13
INSTALLATIONINSTALLATION
ENABLING 32-BIT CARD SUPPORT IN WINDOWS 95
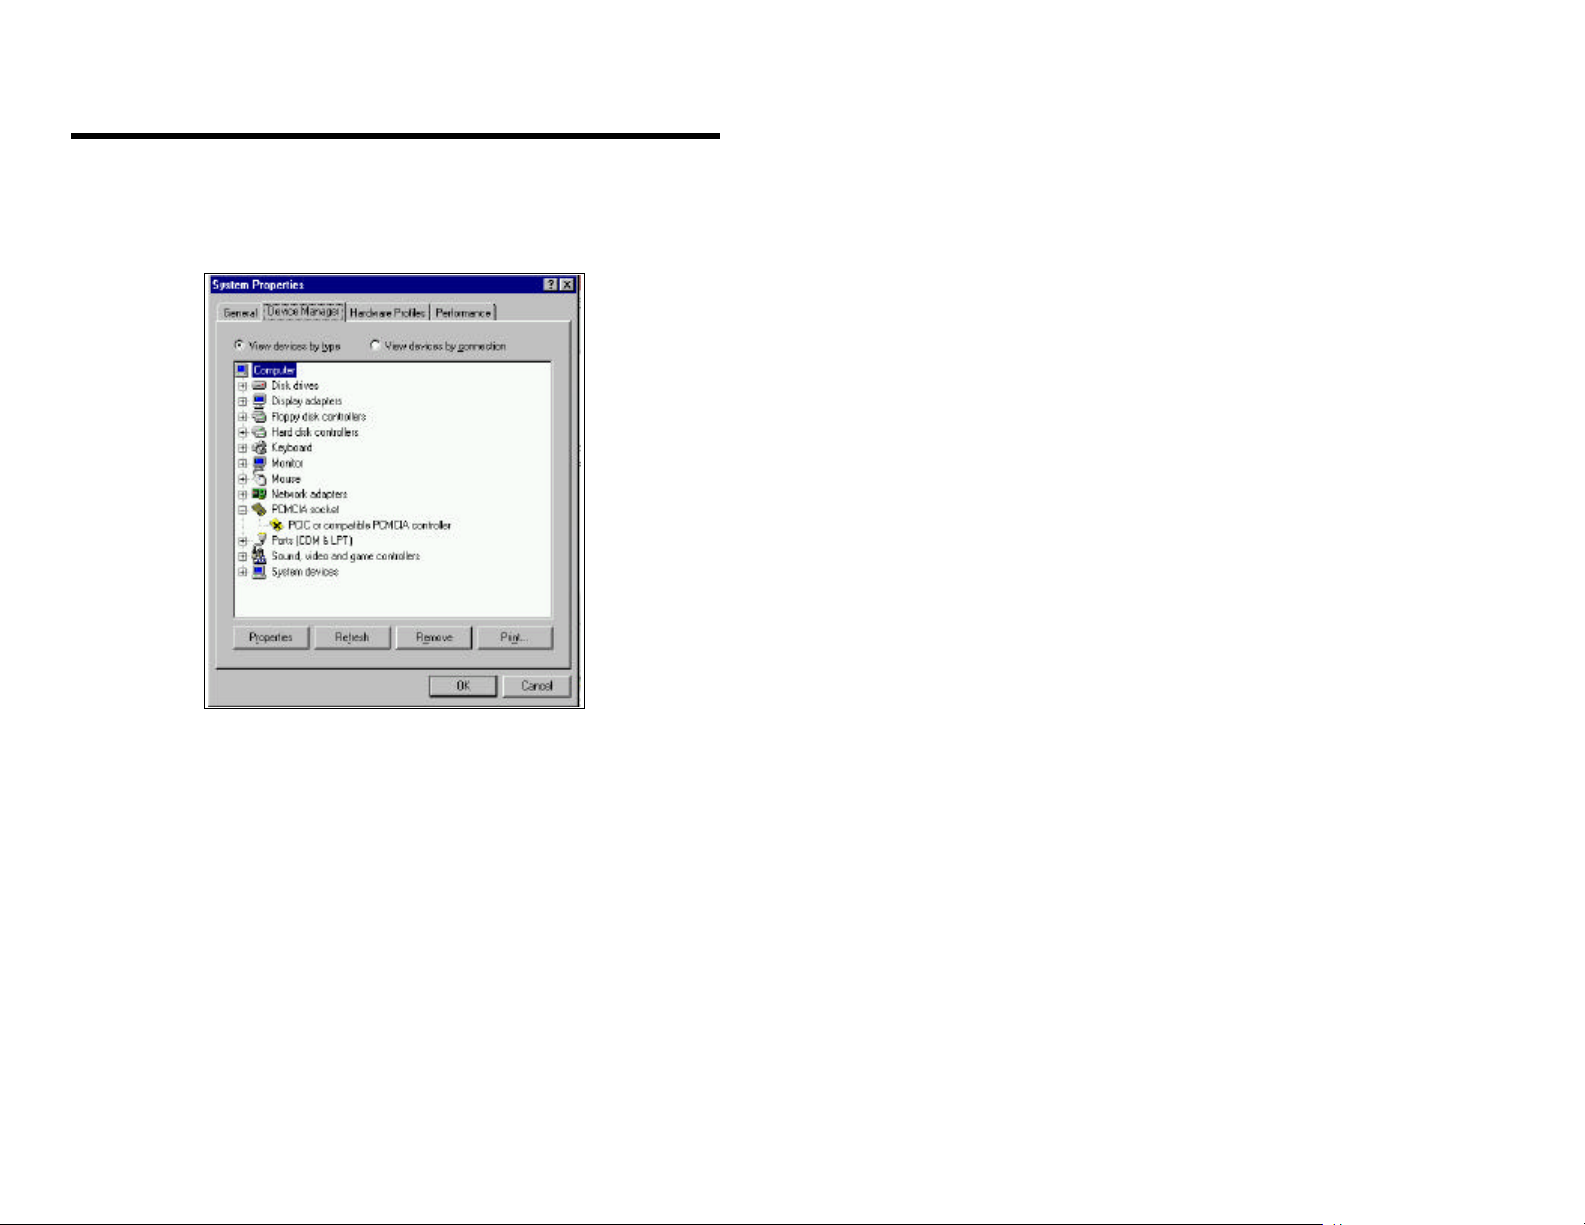
To check whether your computer is PCMCIA Socket supported, first, double-click on the ASystem@ icon from AControl Panel@ folder (you can select the AControl Panel@ under ASettings@ from the AStart@ menu
to open the AControl Panel@ folder).
Click on the Device Manager Tab. If APCMCIA Socket@ has a cross (X) sign next to the PCMCIA Controller as show above, it means the PCMCIA device driver is not using 32-Bit Card Support. The socket(s)
is not enabled at this time and there should be only one such a line displayed. In this case, double click on the PCMCIA Controller, and a dialog box will be displayed as below. Please place a check mark next
to the current configuration of Device usage box, then select OK.
After the PCMCIA 32-Bit Card support is installed, Windows will ask you to reboot your computer. Then you should repeat the install procedures.
If the PCMCIA Socket is not found, then you must add a PCMCIA socket to your system. Please click on the AAdd New Hardware@ icon in the Control Panel folder and select APCMCIA socket@. Select the
appropriate type of PCMCIA Controller that matches with yours system and follow the on-screen instructions.
- 9 -
Page 14
INSTALLATION
INSTALLATION VERIFICATION Cont.
MODEM
Windows 95
After installation, you may wish to check if the computer recognized the modem and the assigned COM port.
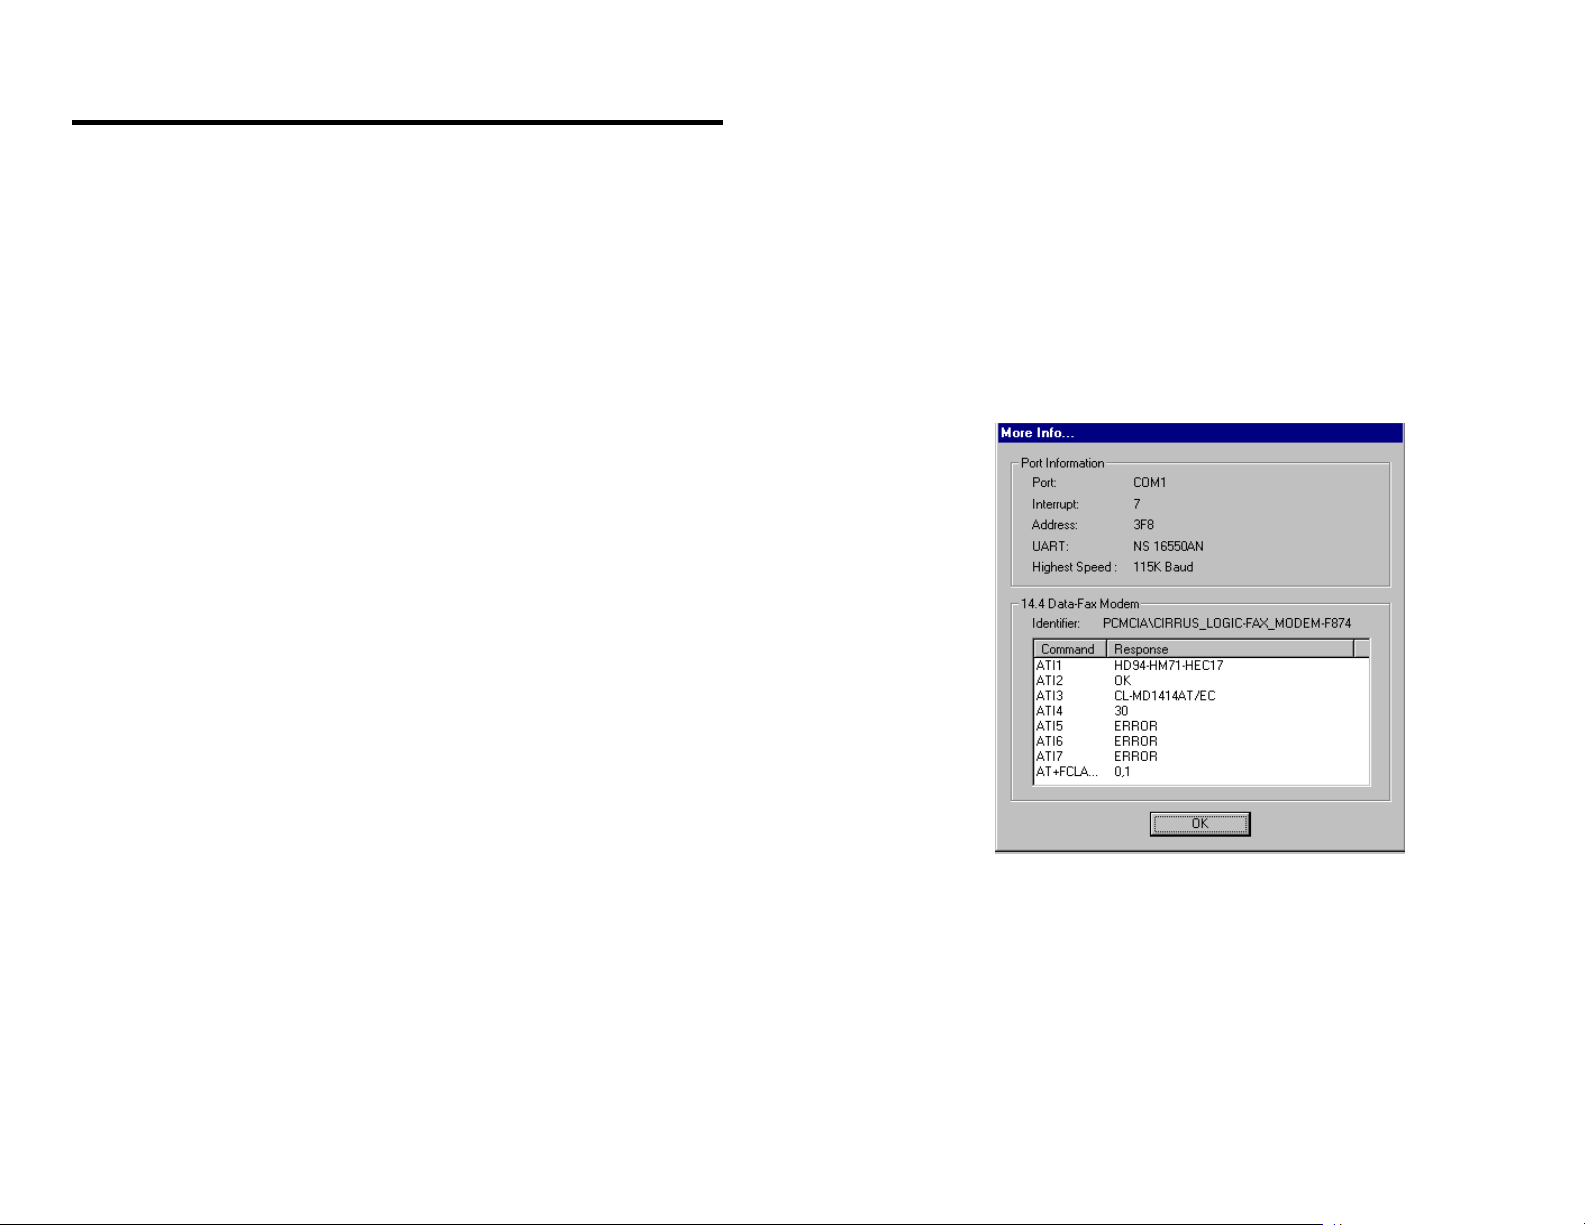
1. Click on Start => Settings => Control Panel => Modem => Diagnostics tab.
2. Locate the modem*s COM port then highlight it. Click on >More Info...* button.
3. The Windows 95 will try to communicate with the modem. The More Info... window appear with all the modem identification information. (Your actual display may be different)
The ThinCom modem portion is installed properly and ready to use.
- 10 -
Page 15

NETWORK
Go to > Control Panel= => Network and then install the nescessery network driver for the Windows 95. Also in here all the protocal driver are listed in here.
Upon next restart of the notebook. The system will prompt for a network login.
INSTALLATIONINSTALLATION
- 11 -
Page 16

INSTALLATION
During the installation of the communication software you may be asked to select a model from a list of the support modem. Use the table below to help you with your selection.
Modem speed (Data/Fax) Choose Or using the following
Initialization string
2400/9600 Hayes Smart Modem AT&F &C1 &D2
9600/9600 Hayes V Series AT&F &C1 &D2 &K3 S48=7
14,400/14,400 Hayes Optima 14,400 + Fax AT&F W1 F0 &C1 &D2
14,400/14,400CL Hayes Ultra 14,400 AT&F &C1 &D2
28,800/14,400 Hayes Optima 28,800 + Fax AT&F W1 F0 &C1 &D2
&K3 S48=7
&K3 S48=7
- 12 -
Page 17

DATA COMMUNICATION OPERATION
following parameters are the basic settings needed for a successful connection:
The Fax/Data Modem may be used to connect to an On-Line service, local BBS (Bulletin Board System) or the Internet. This connection may require different communication parameters. The
1. Data Bit 8 Data bit is the most common setting.
7 Data bit some for On-Line service and mostly Main frame connection.
2. Stop Bit 1 Stop bit is widely use.
3. Parity There are three setting: ODD, EVEN or NONE depends on the system you are trying to connect.
4. Baud Rate The speed that the data traveling between the modem and your computer. The setting should be four times of your modem speed. For example:
5. Flow Control Set the flow control between the computer and the modem can prevent data over run during transmission. There are two common ways of setting the flow control.
Software Flow control or XON/XOFF
Hardware Flow Control or CTS/RTS
Modem Speed Baud Rate selection
2400 bps 9600 bps
9600 bps 38,400 bps
14,400 bps 57,600 bps
28,800 bps 115,200 bps
Most of the data communication software has the option for setting the above parameters. In order to let the modem communicate flawlessly, these settings must be identical between the two modems except
Baud Rate and Flow Control.
- 13 -
Page 18

OPERATING MODEOPERATING MODE
OPERATING MODEOPERATING MODE
OPERATING MODE
The Fax/Data Modem operating modes, which is selectable by the \Nn command, these commands allow the DCE (modem) to communicate with remote modems that may or may not support error
correction and data compression. The operating modes are Normal, Direct, Reliable link, Auto-reliable, V.42 Reliable Mode, and MNP Reliable Mode. Speed buffering, which is used for all operating modes
except \N1, allows the DTE(computer)-to-modem data rate to be different from the modem-to-modem data rate. This is accomplished by using transmitting and receiving buffers in the modem as speed buffer.
Thus, the DTE-to-modem data rate can be set for 38,400 bps when the modem-to-modem data rate is 9,600 bps, without causing any data errors. In all data modes except direct mode (\N1), the DTE-tomodem data rate can be set for any valid speed between 300 bps and 57,600 bps. (In direct mode, the DTE-to-modem data rate can only be set to 300, 1200, 2400, 4800, 7200, 9600, 12000, and 14400
bps.)
Each operating mode is explained as the following:
Normal Mode % No error correction/data compression, but speed
buffering is supported.
Direct Mode % No error correction/data compression and speed buffering.
Reliable Mode % V.42, V.42 bis or MNP 2-5 only connection. The modem hangs up if a V.42/V.42 bis/MNP 2-5
connection cannot be established.
Auto-Reliable Mode % V.42/V.42 bis with fall back to MNP 2-5 or normal mode.
V.42 Reliable Mode - V.42/V.42 bis connection only. The modem hangs up if an V.42/V.42 bis connection cannot be established.
MNP Reliable Mode % MNP 2-5 connection only. The modem hangs up if an MNP connection cannot be established.
If you have difficulty connecting to a remote modem, try using the Normal mode or Direct mode.
The table below shows the \Nn and other commands needed to setup a desired operating mode.
Operating Mode
Data/Fax Modem Speed
All of these commands have a prefix AT&F
2400 9600 14.4/14.4 14.4/14.4CL 28.8/14. 4
- 14 -
Page 19

Normal \N0 \N0 \N0 \N0 \N0
Direct \N1 \N1 \N1 \N1 \N1
Reliable \N2 \N2 \N2 \N4 \N2
DATA COMMUNICATIONDATA COMMUNICATION
Auto-Reliable \N3 \N3 \N3 \N3 \N3 with
V.42 Only \N4 \N4 \N4 \N4 -J0 AH0 \N4
MNP Only \N5 \N5 \N5 \N2 \N5
File Transferring
To transfer files between two computers user will need to choose a file transfer protocol once the two modems are connected. There are many different types of file transfer protocol. Each has
advantage and disadvantage on their own. The following are some guide - line in file transferring:
C After log in to a remote computer check, the protocol its using. Make sure your protocol matches the remote computers. Here are, some names of the popular protocols: COMPUSERVE B,
Kermit, XMODEM, YMODEM, ZMODEM.
C The remote computer will wait for a user to start the file transfer sequence. The user must tell the communication software to start sending or receiving the selected files.
Remote Access
The best source of the information for setting up a remote access software is its User=s manual. A user needs to fill in which type of modem to use (consult the modem choice section) and the flow
control selection.
If you are having some difficulty connecting to a remote computer, change the init string for the modem to use Normal or Direct Mode. Some of the remote access programs have an error correction
and/or data compression built-in to the software. Disabling Fax/Data Modem=s errorcorrection and/or data compression may be required for this operation.
CELLULAR OPERATION
For the >Cellular ready= modem owner, you will need to obtain a proper cellular interface cable kit that matches the make and model your cellular phone.(see the Notice: below)
Please follow these suggestions:
MNP10
C Verify if the modem is installed and recoqnized by the system. Using PCMCIA sockets driver utility such as Cardinfo or PCMWIN etc.
C Check the modem operation with the land line using any communication program for DOS or Windows.
C You need to run an installation program to activate the cellular function included with the cellular interface kit. For more details consult the User=s manual and the README file in the driver
diskette.
For the >None - Cellular ready= Fax/Data Modem, you will need a cellular interface adapter. This adapter provide Dial Tone for the modem and cellular cable kit matching your cellular phone make and model.
Operating consideration:
- 15 -
Page 20

FAX OPERATIONFAX OPERATION
C Because of the cellular phone environment, modem=s connection speed may be slower than the actual rated. (9600 bps is the fastest)
C The MNP 10 protocol (cellular enhancement) is included with the 28,800 and all the cellular-ready modem.
Notice: For the Cellular Ready Modem only
This product contains inactivated SPECTRUM CONNECTED cellular data
communication technology which can be activated for data communication over a cellular
net work when a license is obtained from SPECTRUM and the product is combined with
an appropriate cellular telephone driver and corresponding cable compatible with popular
brands of cellular telephones. To obtain a license and to determine the availability of an
appropriate driver and cable for cellular telephone, contact Spectrum Information
Technologies, Inc. by calling 800-233-2119
This product is licensed under one or more of the following United Stats patents:
RE 34 034; 4,9972,457; 5,127,041; and 5,249,218 of Spectrum Information
Technologies, Inc. Other patent pending
FAX OPERATION
The Fax/Data Modems support Group III Class 1(EIA/TIA 578) or Class 2 commands, which are part of the AT command set. The fax software included with your modem will automatically handle the fax
operation for you. Please refer to the manual of your fax software on how to send and receive faxes from your computer with the Fax/Data modems. If you are using fax software other than the one included,
the installation of the software may ask you to specify the type of fax modem. You may select either Class 1 or Class 2 type fax. Consult the list below for your specific modem speed.
Your modem speed Select Fax Class
2400, 9600, 14,400 Class 1, Class 2 or Hayes V series (14,400 use Hayes Optima 14,400 + Fax)
14,400CL Class 1 or Hayes Optima 14,400 + Fax
28,800 Class 1, Class 2 or Hayes Optima
Flow Control CTS/RTS or Hardware is recommended
The Fax/Data Modems with the UART 16550 ( 2400, 9600 and 14,400/14,400) emulation may have problems sending faxes under the Microsoft Windows. The following lines additions and/or changes in the
SYSTEM.INI file will correct the problem.
SYSTEM.INI
- 16 -
Page 21

;changes in this section of file
[386 Enh]
COMxFIFO=2
COMxTXFIFO=1
COMxBOOSTTIME=30
COMxPROTOCOL=XOFF
COMxBUFFER=4096
COMxAUTOASSIGN=2
COMxTXSIZE=16
COMxRXSIZE=8
The "x" is the number of the COM port. You must be sure to be running in the enhanced mode. You can force windows to go into enhanced mode by starting Windows with the command win /3.
The above entries work with:
1) UART 16550 emulation
2) normal version of COMM.DRV
Otherwise the entries will be ignored.
- 17 -
Page 22

DIAGNOSTICDIAGNOSTIC
DIAGNOSTIC FUNCTION
Setting up for the diagnostic operation: Start the data communication software, then enter the >Terminal Mode= or >Connect Mode=. Set the COM port to match the number use by the modem type >at= then press
ENTER key to check the modem installation.
The Fax/Data Modem supports diagnostic functions defined by ITU (CCITT) V.54 to assist identifying problems of the modem. Basically, these functions loop signals on the local and remote modems to
simulate data communication activities.
These diagnostic functions must be performed under asynchronous operation in non-error-correction mode(normal or direct mode). In command mode, use AT\N1 to enter direct asynchronous mode. To stop
any diagnostic functions in progress, use the escape (+++) sequence to go to command mode, and type AT&T0 .
Local Analog Loopback
the computer will be transmitted to the modem and then return to the computer to be displayed on the screen.
Local Analog Loopback with Self-test
of the test, it returns the number of detected errors to the computer. Register S16 bit 6 will be set when the test is in progress.
Remote Digital Loopback
phone connection to a remote modem. The remote modem then retransmit the data through the same connection back to the local modem, then to the local computer. Before the test, you must establish a
connection with a remote modem. If no connection is made, ERROR message will be returned. The CONNECT XXXX message will be displayed upon the start of the test. After the connection, all characters
you typed on computer will be remote loopbacked and redisplayed on your screen.
Remote Digital Loopback with Self-test
duration is determined by the contents of S18. Upon the termination of the test, it returns the number of detected errors to the computer. Register S16 bit 5 will be set when the test is in progress.
Local Digital Loopback
characters typed on the remote computer will be routed from the remote modem to the local modem through the connection. The local modem will then return the data to the remote modem, and then
redisplayed on the screen of the remote computer. Register S16 bit 4 will be set when the test is in progress.
This test will loop data from computer to the modem. Use AT&T1 to start the test. CONNECT XXXXX message will be displayed upon the start of the test. After the connection, characters typed on
Use AT&T8 to initialize this test. The modem will generate a test pattern and looped back and checked by the modem itself. The testing duration is set by the contents of S18. Upon the termination
Use AT&T6 to initialize this test. The test is to check the connection fault between a local modem and a remote modem. Data is routed from local computer to the local modem, then through the
Use AT&T7 to initiate the test, and a test pattern will be looped back and checked by the modem. If no connection is made before the start of the test, ERROR message will be returned. The test
Before the start of the test, a connection to a remote modem must be established. If no connection, ERROR message will be displayed. Use AT&T3 to start the test. After the start of the test,
- 18 -
Page 23

TROUBLESHOOTING
This section lists the common problems and possible causes and/or solutions. You may find the answer to your problem here.
Problem Solution
NO DIAL TONE ! Check the phone connection on both sides of the cable.
! Ensure the telephone is an Analog line not Digital line.
! Check the telephone line by connecting a standard telephone,
listen to the normal house hold dial tone.
! Bypass Dial tone detection, add >X3' to the init string.
TROUBLESHOOTINGTROUBLESHOOTING
Cannot hear
modem speaker
The selected COM
port is either not
supported or is
being used by
other devices.
Cannot type >>AT==
in terminal mode.
Failed to connect ! Check your modem choice.
Modem doesn==t fit ! Make sure the computer has Type II or Type III slot.
Can==t Send or
Receive fax
Unreadable
character on the
screen
! Check the computer volume setting.
! In Terminal Mode send >ATL3M1' command to the modem, this
will enable modem sound until its connection to a remote
modem with the highest volume.
! Disable Auto-receive in the FAX program.
! Check the COM Port I/O address and IRQ setting.
Click on: Main Group => Control Panel => Ports => COM x
(x=com port 1-4)
! Ensure that only one program is using the modem.
! Check the IRQ setting in your application program, make sure
that it matches the setting from the device driver.
! Some program may not support IRQ higher than 7.
! Try adding the \N1 as the last command to the init string.
! Check the User=s manual for the PC Card=s slot location.
! Ensure you select the right fax Class for the modem
or try selecting fax Class 1 with CTS/RTS (Hardware) flow
control.
! Check and make sure the communication parameters match the
remote location, i.g., Data Bit, Parity, Stop Bit
Cannot find
modem
! Use PC Card driver utility >Cardinfo= or >PCMinfo= to make sure
modem is configured.
! Using MSD to verify that you have an additional COM port after
- 19 -
Page 24

TROUBLESHOOTINGTROUBLESHOOTING
modem is inserted.
! Redo the installation procedures.
APPENDIX A
What is PC Card (PCMCIA) device driver?
A PC Card device driver contains several components: Socket services, Card services, Resource Initialization Utility and Card Installation Utility. The remaining of this section will explain the four components
and list the names of the device driver for some major PC Card software vendors.
Socket Services provides the interface between a system*s BIOS and the host controller chips (such as the Intel 82365SL PCIC and the DataBook TCIC-2/N). Socket Services includes functions such as
configuring a socket for an I/O or memory interface and controlling socket power voltages. The Socket Services driver operates the host controller chip of your computer.
Card Services provides the interface between the PC Card card and the Sockets Service driver. To make sure Card Services operate flawlessly regardless of the system, some PC Card device driver provide
their own resource initialization utility, which will check all of the I/O ports, IRQs, and memory addresses used by the computer and report that information to Card Services.
The Card Installation Utility detects the insertion and removal of a PC Card, and determines the card type upon insertion, then the card and socket will be configured properly.
These components are loaded into the system during boot-up via the statements in the C:\CONFIG.SYS file. Along with the four components you may find other types of device drivers for various types of PC
Card like SRAM card, FLASH memory card, and ATA/IDE hard drive card.
- 20 -
Page 25

The name of device drivers for the major PC Card software vendors are listed below:
TROUBLESHOOTINGTROUBLESHOOTING
Software/Device
Driver
Socket Services SS365SL.EX
Card Services CS.EXE PCMCS.
Resource
Initialization
Utility
IDE/ATA Driver S_IDE.EXE
SRAM Card
Driver
Flash Card
Support
Memory Card
Driver
Card Installation
Utility
SystemSoft
CardSoft
E,
SS365LP.EX
E,
SSCIRRUS.
EXE,
SSDBOOK.E
XE,
SVADEM.EX
E,
SSVLSI.EXE
CSALLOC.E
XE
or
ATADRV.EX
E
SRAMDRV.E
XE or
MTSRAM.EX
E
MTAA.EXE,
MTAB.EXE,
MTI1,EXE
MTI2P.EXE
SCARD29.E
XE or
MEMDRV.E
XE
CIC.EXE or
CARDID.EX
E
Phoenix Databook
PCMSS.
EXE
EXE
PCMRM
AN.SYS
PCMATA
.SYS
PCMSC
D.EXE
Cardtalk
SNOTEP
V2.SYS
CTALKCS
.EXE
CARDTAL
K.SYS
- 21 -
Page 26

Card Services
Power
Management
Basic >>AT== command for 28,800 Modem
Command Function
A/ Re-execute command.
A Go off-hook and attempt to answer a call.
B0 Select V.22 connection at 1200 bps.
B1 Select Bell 212A connection at 1200 bps.
C1 Return OK message.
Dn Dial modifier.
E0 Turn off command echo.
E1 Turn on command echo.
H0 Initiate a hang-up sequence.
H1 If on-hook, go off-hook and enter command mode.
I0 Report product code.
I1 Report pre-computed checksum.
I2 Report OK.
I3 Report firmware revision, model, and interface type.
I4 Report response programmed by an OEM.
I5 Report the country code parameter.
I6 Report modem data pump model and code revision.
I7 Reports the DAA code (W-class models only).
L0 Set low speaker volume.
L1 Set low speaker volume.
L2 Set medium speaker volume.
L3 Set high speaker volume.
M0 Turn speaker off.
M1 Turn speaker on during handshaking and turn speaker off while receiving carrier.
M2 Turn speaker on during handshaking and while receiving carrier.
M3 Turn speaker off during dialing and receiving carrier and turn speaker on during answering.
N0 Turn off automode detection.
CS_APM.EX
E
- 22 -
Page 27

APPENDIX AAPPENDIX A
N1 Turn on automode detection.
O0 Go on-line.
O1 Go on-line and initiate a retrain sequence.
P Force pulse dialing.
Q0 Allow result codes to DTE.
Q1 Inhibit result codes to DTE.
Sn Select S-Register as default.
Sn? Return the value of S-Register n.
=v Set default S-Register to value v.
? Return the value of default S-Register.
T Force DTMF dialing.
V0 Report short form (terse) result codes.
V1 Report long form (verbose) result codes.
W0 Report DTE speed in EC mode.
W1 Report line speed, EC protocol and DTE speed.
W2 Report DCE speed in EC mode.
X0 Report basic call progress result codes, i.e., OK, CONNECT, RING, NO CARRIER (also, for busy, if enabled, and dial tone not detected), NO ANSWER and ERROR.
X1 Report basic call progress result codes and connections speeds (OK, CONNECT, RING, NO CARRIER (also, for busy, if enabled, and dial tone not detected), NO ANSWER,
CONNECT XXXX, and ERROR.
X2 Report basic call progress result codes and connections speeds, i.e., OK, CONNECT, RING, NO CARRIER (also, for busy, if enabled, and dial tone not detected), NO
ANSWER, CONNECT XXXX, and ERROR.
X3 Report basic call progress result codes and connection rate, i.e., OK, CONNECT, RING, NO CARRIER, NO ANSWER, CONNECT XXXX, BUSY, and ERROR.
X4 Report all call progress result codes and connection rate, i.e., OK, CONNECT, RING, NO CARRIER, NO ANSWER, CONNECT XXXX, BUSY, NO DIAL TONE and ERROR.
Y0 Disable long space disconnect before on-hook.
Y1 Enable long space disconnect before on-hook.
Z0 Restore stored profile 0 after warm reset.
Z1 Restore stored profile 1 after warm reset.
&C0 Force RLSD active regardless of the carrier state.
&C1 Allow RLSD to follow the carrier state.
&D0 Interpret DTR ON-to-OFF transition per &Qn:
&Q0, &Q5, &Q6 The modem ignors DTR.
&Q1, &Q4 The modem hangs up.
&Q2, &Q3 The modem hangs up.
&D1 Interpret DTR ON-to-OFF transition per &Qn:
&Q0, &Q1, &Q4,.
- 23 -
Page 28

APPENDIX AAPPENDIX A
&D2 Interpret DTR ON-to-OFF transition per &Qn:
&D3 Interpret DTR ON-to-OFF transition per &Qn:.
&F0 Restore factory configuration 0.
&F1 Restore factory configuration1.
&G0 Disable guard tone.
&G1 Disable guard tone.
&G2 Enable 1800 Hz guard tone.
&J0 Set S-Register response only for compatibility.
&J1 Set S-Register response only for compatibility.
&K0 Disable DTE/DCE flow control.
&K3 Enable RTS/CTS DTE/DCE flow control.
&K4 Enable XON/XOFF DTE/DCE flow control.
&K5 Enable transparent XON/XOFF flow control.
&K6 Enable both RTS/CTS and XON/XOFF flow control.
&L0 Select dial up line operation.
&L1 Select leased line operation.
&M0 Select direct asynchronous mode.
&M1 Select sync connect with async off-line command mode.*
&M2 Select sync connect with async off-line command mode and enable DTR dialing of directory zero.*
&M3 Select sync connect with async off-line command mode and enable DTR to act as Talk/Data switch.*
&P0 Set 10 pps pulse dial with 39%/61% make/break.
&P1 Set 10 pps pulse dial with 33%/67% make/break.
&P2 Set 20 pps pulse dial with 39%/61% make/break.
&P3 Set 20 pps pulse dial with 33%/67% make/break.
&Q0 Select direct asynchronous mode.
&Q1 Select sync connect with async off-line command mode.*
&Q2 Select sync connect with async off-line command mode and enable DTR dialing of directory zero.*
&Q3 Select sync connect with async off-line command mode and enable DTR to act as Talk/Data switch.*
&Q4 Select Hayes AutoSync mode.
&Q5, &Q6 Asynchronous escape.
&Q2, &Q3 The modem hangs up.
&Q0 thru &Q6 The modem hangs up.
&Q0, &Q1, &Q4,.
&Q5, &Q6 The modem performs soft reset.
&Q2, &Q3 The modem hangs up.
- 24 -
Page 29

&Q5 Modem negotiates an error corrected link.
&Q6 Select asynchronous operation in normal mode.
&R0 CTS tracks RTS (async) or acts per V.25 (sync).
&R1 CTS is always active.
&S0 DSR is always active.
&S1 DSR acts per V.25.
&T0 Terminate any test in progress.
&T1 Initiate local analog loopback.
&T2 Returns ERROR result code.
&T3 Initiate local digital loopback.
&T4 Allow remote digital loopback.
&T5 Disallow remote digital loopback request.
&T6 Request an RDL without self-test.
&T7 Request an RDL with self-test.
&T8 Initiate local analog loop with self-test.
&V Display current configurations.
&W0 Store the active profile in NVRAM profile 0.
&W1 Store the active profile in NVRAM profile 1.
&X0 Select internal timing for the transmit clock.
&X1 Select external timing for the transmit clock.
&X2 Select slave receive timing for the transmit clock.
&Y0 Recall stored profile 0 upon power up.
&Y1 Recall stored profile 1 upon power up.
&Zn=x Store dial string x (to 35) to location n (0 to 3).
%E0 Disable line quality monitor and auto retrain.
%E1 Enable line quality monitor and auto retrain.
%E2 Enable line quality monitor and fallback/fall forward.
%L Return received line signal level.
%Q Report the line signal quality.
%TTn PTT certification test signals.
\G0 Disable modem to modem flow control.
\G1 Enable modem to modem flow control.
\Kn Controls break handling during three states:
When modem receives a break from the DTE:
\K0,2,4 Enter on-line command mode, no break sent to the remote modem.
\K1 Clear buffers and send break to remote modem.
APPENDIX A
- 25 -
Page 30

APPENDIX AAPPENDIX A
\K3 Send break to remote modem immediately.
\K5 Send break to remote modem in sequence with transmitted data. When modem receives \B in on-line command state:
\K0,1 Clear buffers and send break to remote modem.
\K2,3 Send break to remote modem immediately.
\K4,5 Send break to remote modem in sequence with transmitted data.When modem receives break from the remote modem:
\K0,1 Clear data buffers and send break to DTE.
\K2,3 Send a break immediately to DTE.
\K4,5 Send a break with received data to the DTE.
\N0 Select normal speed buffered mode.
\N1 Select direct mode.
\N2 Select reliable link mode.
\N3 Select auto reliable mode.
\N4 Force LAPM mode.
\N5 Force MNP mode.
+MS Select modulation
ECC COMANDS
%C0 Disable data compression.
%C1 Enable MNP 5 data compression.
%C2 Enable V.42 bis data compression.
%C3 Enable both V.42 bis and MNP 5 compression.
\A0 Set maximum block size in MNP to 64.
\A1 Set maximum block size in MNP to 128.
\A2 Set maximum block size in MNP to 192.
\A3 Set maximum block size in MNP to 256.
\Bn Send break of n x 100 ms.
MNP 10 COMMANDS
)M0 Disable MNP 10 link negotiation power adjustment.
)M1 Enable MNP 10 link negotiation power adjustment.
*H0 Select MNP 10 link negotiation at highest rate.
*H1 Select MNP 10 link negotiation at 1200 bps.
*H2 Select MNP 10 link negotiation at 4800 bps.
- 26 -
Page 31

-K0 Disable MNP 10 extended services.
-K1 Enable MNP 10 extended services.
-K2 Enable MNP 10 extended services detection only.
-Q0 Disable MNP 10 fallback to 2400 bps (V.22 bis)/1200 bps (V.22).
-Q1 Enable MNP 10 fallback to 2400 bps (V.22 bis)/1200 bps (V.22).
@M0 Select initial transmit level of -26 dBm.
@M1 Select initial transmit level of -30 dBm.
@M2 Select initial transmit level of -10 dBm.
@M3 - @M10 Select initial transmit level of -10 dBm.
@M11 Select initial transmit level of -11 dBm.
@M12 -Select initial transmit level of -12 dBm.
.
.
.
@M30 Select initial transmit level of -30 dBm.
@M31 Select initial transmit level of -31 dBm.
:E0 Disable the compromise equalizer.
:E1 Enable the compromise equalizer.
CALLER ID COMMANDS
#CID=0 Disable Caller ID.
#CID=1 Enable Caller ID with formatted presentation.
#CID=2 Enable Caller ID with unformatted presentation.
APPENDIX A
- 27 -
Page 32

APPENDIX AAPPENDIX A
CELLULAR COMMANDS
^C2 Download cellular phone driver.
^I Identify cellular phone driver.
^T6 Indicate status of cellular phone.
- 28 -
Page 33

APPENDIX A
Basic >>AT== command for 1414 CL
Command Default Function
A/ none Repeat last command
A none Answer
B0 Select ITU connection
B1 * Select Bell connectionor
C0 Disable Carrier control
C1 * Enable Carrier control
D none Dial command
E0 Disable Command echo
E1 * Enable Command echo
F0 Disable On-line echo
F1 * Enable On-line echo
H0 * Start Hang-up sequence
H1 If On-hook, go off-hook and enter command mode
I0 * Report ID code
I1 Report checksum I2 Report OK
I3 Report firmmware revision,model
I4 Report Manufacturer ID code
K0 * SRAM buffer control
L0 Set low speaker volume control
L1 Set low speaker volume control
L2 * Set medium speaker volume control
L3 Set high speaker volume control
M0 Turn speaker off
M1 Turn speaker on during handshaking and turn speaker off while receiving carrier.
M2 * Turn speaker on during handshaking and while receiving carrier.
M3 Turn speaker off during dailing, receiving carrier and turn speaker on during answering.
N0 Disable connection data rate control
N1 * Enable connection data rate control
On 0 Go on line
P none Select pulse dialing
Q0 * Enable result code display
Q1 Disable result code display
Sn none Select an S-register
Sn=x none Write to an S-register
Sn? none Read from an S-register
? none Read last accessed S-register
T * Select DTMF dialing
V0 Report result code short form
V1 Report result code long (verbose) form
X0 Report basic call progress i.e., OK, CONNECT, RING, NO CARRIER
X1 Report basic call progress and connection speed i.e., OK, CONNECT, RING, NO CARRIER CONNECT XXXX and ERROR (no Dial tone detection)
X2 Report basic call progress and connection rate i.e., OK, CONNECT, RING, NO CARRIER CONNECT XXXX and ERROR (no Dial tone detection)
X3 Report basic call progress and connection rate i.e., OK, CONNECT, RING, NO CARRIER CONNECT XXXX NO ANSWER and ERROR (no Dial tone detection)
X4 * Report basic call progress and connection rate i.e., OK, CONNECT, RING, NO CARRIER, RING CONNECT XXXX NO ANSWER, BUSY NO DIAL TONE and
ERROR
- 29 -
Page 34

APPENDIX AAPPENDIX A
Y0 * Disable long space disconnect
Y1 Enable long space disconnect Z0 * Recall stored profile 0
Z1 Recall stored profile 1
&C0 Force DCD active
&C1 * Allow DCD to follow carrier state
&D0 0 In asynchronous mode (&Q0), the modem ignores DTR.In asynchronous mode (&Q0), the modem ignores DTR.
&F none Load factory defaults
&G 0* Guard tone disabled
&J 0 Auxiliary relay is never operate
&Pn 0* Make = 39%; Break = 61% for use in the United States. *Make = 39%; Break = 61% for use in the United States. *
&Sn 0* Force DSR alway active
&Tn 0* Terminates test in progressTerminates test in progress 11 Local analog Local analog loopbackloopback
&Un 0*0* Enabled (Trellis modulation with QAM modulation as a fallback)Enabled (Trellis modulation with QAM modulation as a fallback)
&Vn 0* View active and stored configuration 0
11 The modem switches from data mode to command mode when an on-to-off transition of DTR occurs.The modem switches from data mode to command mode when an on-to-off transition of DTR occurs.
2*2* An on-to-off transition of DTR causes the modem An on-to-off transition of DTR causes the modem to go on-hook (hang-up) and disable auto-answer mode. Auto-answer mode (S0 is not equal to zero)to go on-hook (hang-up) and disable auto-answer mode. Auto-answer mode (S0 is not equal to zero)
is enabled when DTR is turned on. *is enabled when DTR is turned on. *
33 An on-to-off transition of DTR re-initializes the modem. The re-initialize procedure performs a power-up reset, except that the UART registers are not re-An on-to-off transition of DTR re-initializes the modem. The re-initialize procedure performs a power-up reset, except that the UART registers are not re-
configured.configured. DTR option
11 550-Hz guard tone enabled.550-Hz guard tone enabled.
22 1800-Hz guard tone enabled.1800-Hz guard tone enabled.
1 A lead is connected to the A1 lead the modem is off-hook
11 Make = 33%; Break = 67% for use in the United Kingdom and Hong Kong.Make = 33%; Break = 67% for use in the United Kingdom and Hong Kong.
1 DSR circuit is on during handshaking, off in test or idle modes. DSR is on when carrier is lost.DSR circuit is on during handshaking, off in test or idle modes. DSR is on when carrier is lost.
33 Local digital Local digital loopbackloopback
44 Grants RDL request from remote modemGrants RDL request from remote modem
55 Denies RDL request from remote modemDenies RDL request from remote modem
66 Remote digital Remote digital loopbackloopback
77 Remote digital Remote digital loopback with self-testloopback with self-test
88 Local analog Local analog loopback with self-testloopback with self-test
11 Disabled (QAM modulation only)Disabled (QAM modulation only)
1 View active and stored configuration 1
AT&V1AT&V1
Active Profile:Active Profile:
+FCLASS=0 #VCL=0 #VLN=25+FCLASS=0 #VCL=0 #VLN=25
B1 E1 L2 M1 N1 P Q0 V1 X4 Y0 &C1 &D2 &G0 &J0 &P0 &Q0 &S0 &Y0 -C0 %E1 %G0B1 E1 L2 M1 N1 P Q0 V1 X4 Y0 &C1 &D2 &G0 &J0 &P0 &Q0 &S0 &Y0 -C0 %E1 %G0
\A3 \C0 \G0 \J0 \K5 \N3 \T00 \V2 \X0 %A013 %C1 -J1 "H3 "O016\A3 \C0 \G0 \J0 \K5 \N3 \T00 \V2 \X0 %A013 %C1 -J1 "H3 "O016
S00:000 S01:000 S02:043 S03:013 S04:010 S05:008 S06:002 S07: 060 S08:002S00:000 S01:000 S02:043 S03:013 S04:010 S05:008 S06:002 S07: 060 S08:002
S09:006 S10:014 S11:095 S12:050 S14:170 S16:000 S18:000 S21:048 S22:118S09:006 S10:014 S11:095 S12:050 S14:170 S16:000 S18:000 S21:048 S22:118
S23:021 S25:005 S26:001 S27:064 S30:010 S37:000 S90:000 S108:002 S109:062S23:021 S25:005 S26:001 S27:064 S30:010 S37:000 S90:000 S108:002 S109:062
Stored Profile 1:Stored Profile 1:
B1 E1 L2 M1 N1 P Q0 V1 X4 Y0 &C1 &D2 &G0 &J0 &P0 &Q0 &R0 &S0 &X0B1 E1 L2 M1 N1 P Q0 V1 X4 Y0 &C1 &D2 &G0 &J0 &P0 &Q0 &R0 &S0 &X0
\A3 \C0 \G0 \J0 \K5 \N3 \T00 \V2 \X0 %A013 %C1 -J1 "H3 "O016\A3 \C0 \G0 \J0 \K5 \N3 \T00 \V2 \X0 %A013 %C1 -J1 "H3 "O016
S00:000 S06:002 S07: 060 S08:002 S09:006 S10:014 S11:095 S12:050 S14:170S00:000 S06:002 S07: 060 S08:002 S09:006 S10:014 S11:095 S12:050 S14:170
S16:000 S18:000 S21:048 S22:118 S23:021 S25:005 S26:001 S27:064 S30:010S16:000 S18:000 S21:048 S22:118 S23:021 S25:005 S26:001 S27:064 S30:010
- 30 -
Page 35

S37:000 S90:000 S108:002 S109:062S37:000 S90:000 S108:002 S109:062
Telephone Numbers:Telephone Numbers:
&Z0 12345&Z0 12345
&Z1 T4444444&Z1 T4444444
&Z2 T12345&Z2 T12345
&Z3 T 1 (123) 456-7890&Z3 T 1 (123) 456-7890
APPENDIX A
&W 00 Store active profile in user profile 0Store active profile in user profile 0
&Y 0* Select stored profile 0 on power up
&Zn=x none Store telephone number
%E 0 Disable Auto-retrain ( V.32 and V.32bis Only)
%G0 0 * Disable Auto Fallforward/fallback Rate Renegotiation
%Q none Line signal quality
-Cn 0* Diable data modem calling tone
* Value saved in NVRAM.
V.42, MNP 'AT' Commands
Command Default Function
%A 13 Set auto-reliable fallback character
%C 0 No data compression
\A 00 MNP block size Maximum 64 characters Maximum 64 characters
\Bn none Transmit break (n=0-9 Break lenght in 100 msec)
\C 0* Does not buffer data
\G 0 * Disable modem port flow control
\Jn 0 * Disable Bps rate adjusting
11 Store in Store in active profile user profile 1 user profile 1
1 Select stored profile 1 on power up
To dial the stored telephone, use theTo dial the stored telephone, use the
ATDS=n command.ATDS=n command.
x = 0, 9, A, B, C, D, #, *, T, P, R, W, @, ,,!,;x = 0, 9, A, B, C, D, #, *, T, P, R, W, @, ,,!,;
n = 0-3n = 0-3
1 * Enable Auto-retrain
1 Enable Auto Fallforward/fallback Rate Renegotiation
Range: 0-255Range: 0-255
0 - 7 No Retrain0 - 7 No Retrain 8 - 255 Modem performs a Retrain (i.e., if configured for %E1)8 - 255 Modem performs a Retrain (i.e., if configured for %E1)
1 Enable data modem calling tone
1* MNP 5 data compression control
11 MNP block size Maximum 128 characters Maximum 128 characters
22 MNP block size Maximum 192 characters Maximum 192 characters
3*3* MNP block size Maximum 256 characters Maximum 256 characters
11 Buffers data for four seconds until 200 characters have been buffered or SYN character is detected, then switches to reliable mode. If the buffer fills,Buffers data for four seconds until 200 characters have been buffered or SYN character is detected, then switches to reliable mode. If the buffer fills,
data is passed to the serial port.data is passed to the serial port.
22 Does not buffer data. Switches to normal mode upon receipt of auto-reliable fallback character and passes it to serial port. This feature is used toDoes not buffer data. Switches to normal mode upon receipt of auto-reliable fallback character and passes it to serial port. This feature is used to
allow non-V.42 modems to connect immediately to a V.42 modem without data loss.allow non-V.42 modems to connect immediately to a V.42 modem without data loss. Set auto-reliable buffer
1 Set port flow control to XON/XOFF
- 31 -
Page 36

APPENDIX AAPPENDIX A
\Kn 5 Set break control
\Nn Set Operating Mode: Determines the type of Set Operating Mode: Determines the type of connection attempted by the modem.connection attempted by the modem.
NOTE: 300 NOTE: 300 bps does not support synchronous operation. The mode will automatically fall back to MNP asynchronous operation.bps does not support synchronous operation. The mode will automatically fall back to MNP asynchronous operation.
1 Enable Bps rate adjusting
In Connect State, if reliable mode then transmit break to remote:
n = 0,2,4 Enter command state, but do not send a break.
n = 1 Destructive/expedited
n = 3 Non-destructive/expedited
n = 5 Non-destructive/non-expedited
In Command State, if reliable mode then transmit break to remote:
n = 0,1 Destructive/expedited
n = 2,3 Non-destructive/expedited
n = 4,5 Non-destructive/non-expedited
In Connect State, if direct mode then receive break at serial port:
n = 0,2,4 Immediately send break and enter command state.
n = 1,3,5 Immediately send break through
In Connect State, receive break at modem port, send to serial port:
n = 0,1 Destructive/expedited
n = 2,3 Non-destructive/expedited
n = 4,5 Non-destructive/non-expedited
n = 0n = 0 Normal Mode-No data compression or error correction, but uses speed buffering.Normal Mode-No data compression or error correction, but uses speed buffering.
n = 1n = 1 Direct Mode- No data compression, error correction, or speed buffering.Direct Mode- No data compression, error correction, or speed buffering.
n = 2 n = 2 MNP Reliable Mode-The modem attempts to negotiate an MNP error-correction 'reliable' link, hanging up if it fails.MNP Reliable Mode-The modem attempts to negotiate an MNP error-correction 'reliable' link, hanging up if it fails.
n = 3n = 3 V.42 Auto-reliable Mode * If V.42 detection is enabled (-V.42 Auto-reliable Mode * If V.42 detection is enabled (-Jn), a LAPM or MNP link can be detected and negotiated, otherwise only LAPM will beJn), a LAPM or MNP link can be detected and negotiated, otherwise only LAPM will be
attempted. If configured for -J0 and a protocol connection is not made, the modem will hang up. If configured for -J1 and a protocolattempted. If configured for -J0 and a protocol connection is not made, the modem will hang up. If configured for -J1 and a protocol
connection is not made, the modem will fall back to speed buffering mode.connection is not made, the modem will fall back to speed buffering mode.
n = 4n = 4 V.42 Reliable - The modem attempts to negotiate LAPM error correction, hanging up if it fails.V.42 Reliable - The modem attempts to negotiate LAPM error correction, hanging up if it fails.
\O none Originate reliable link
\Qn 0 Disables flow control
1 XON/XOFF software flow control
2 Unidirectional hardware flow control
3* Bidirectional hardware flow control
\T 0* Disable inactivity timer
0-90 Lenth in minutes
\U none Accept reliable link
\Vn 0 Enables codes defined by ATV command
1 Enables modified MNP codes
2* Enables extended V.42 codes
\X 0* Processes flow control characters *
1 Processes flow control characters and passes them through to the local or remote so they can process the characters.
\Y none Switch to reliable mode
\Z none Switch to normal mode
-Jn 0 Disable the V.42 detect phase
(\N3,\N4 operating mode)
1* Enable the V.42 detect phase
- 32 -
Page 37

APPENDIX A
"Hn 00 Disables V.42 Disables V.42 bisbis
11 Enables V.42 Enables V.42 bis only when transmitting databis only when transmitting data
22 Enables V.42 Enables V.42 bis only when receiving databis only when receiving data
3*3* Enables V.42 Enables V.42 bis for both transmitting and receiving databis for both transmitting and receiving data
"On 16 V.42 bis string length (range 6-250 Number of charecters)
* Value saved in NVRAM.
Dial Modifiers
Command Function
0 to 9 Dialing digits
A,B,C, Tone dial characters
D, *, #
P Pulse dial
R Reverse originate mode
S=n Dial NVRAM telephone number
T Tone dial
W Wait for dial tone
, Pause
! Flash hook
@ Wait for quiet answer
; Return to idle state
- ( ) Ignored by modem
(\N3,\N4 operating mode)
- 33 -
Page 38

APPENDIX A
Basic AT command for 2400, 9600 and 14,400 modem.
Command Function
A/ Re-execute command.
A Go off-hook and attempt to answer a call.
B0 Select V.22 connection at 1200 bps.
B1 Select Bell 212A connection at 1200 bps.
C1 Return OK message.
Dn Dial modifier.
E0 Turn off command echo.
E1 Turn on command echo.
F0 Select auto-detect mode (equivalent to N1).
F1 Select V.21 or Bell 103.
F2 Reserved.
F3 Select V.23 line modulation.
F4 Select V.22 or Bell 212A 1200 bps line speed.
F5 Select V.22 bis line modulation.
F6 Select V.32 bis or V.32 4800 line modulation.
F7 Select V.32 bis 7200 line modulation.
F8 Select V.32 bis or V.32 9600 line modulation.
F9 Select V.32 bis 12000 line modulation.
F10 Select V.32 bis 14400 line modulation.
H0 Initiate a hang-up sequence.
H1 If on-hook, go off-hook and enter command mode.
I0 Report product code.
I1 Report pre-computed checksum from ROM.
I2 Compute checksum and report status.
I3 Report firmware revision, model, and interface type.
I4 Report response programmed by an OEM.
I5 Report the country code number.
I6 Report modem data pump model.
L0 Set low speaker volume.
L1 Set low speaker volume.
L2 Set medium speaker volume.
L3 Set high speaker volume.
M0 Turn speaker off.
M1 Turn speaker on during handshaking and turn speaker off while receiving carrier.
M2 Turn speaker on during handshaking and while receiving carrier.
M3 Turn speaker off during dialing and receiving carrier speaker on during answering.
N0 Turn off automode detection.
N1 Turn on automode detection.
O0 Go on-line.
O1 Go on-line and initiate a retrain sequence.
P Force pulse dialing.
Q0 Allow result codes to DTE.
Q1 Inhibit result codes to DTE.
Sn Select S register as default.
Sn? Return the value of S register n.
=v Set default S register to value v.
- 34 -
Page 39

APPENDIX A
? Return the value of default S register.
T Force DTMF dialing.
V0 Report short form (terse) result codes.
V1 Report long form (verbose) result codes.
W0 Report DTE speed in EC mode.
W1 Report line speed, EC protocol and DTE speed.
W2 Report DCE speed in EC mode.
X0 Report basic call progress result codes, i.e., OK, CONNECT, RING, NO CARRIER (also, for busy, if enabled, and dial tone not detected), NO ANSWER and ERROR.
X1 Report basic call progress result codes and connections speeds (OK, CONNECT, RING, NO CARRIER (also, for busy, if enabled, and dial tone not detected), NO ANSWER,
X2 Report basic call progress result codes and connections speeds, i.e., OK, CONNECT, RING, NO CARRIER (also, for busy, if enabled, and dial tone not detected), NO
X3 Report basic call progress result codes and connection rate, i.e., OK, CONNECT, RING, NO CARRIER, NO ANSWER, CONNECT XXXX, BUSY, and ERROR.
X4 Report all call progress result codes and connection rate, i.e., OK, CONNECT, RING, NO CARRIER, NO ANSWER, CONNECT XXXX, BUSY, NO DIAL TONE and ERROR.
Y0 Disable long space disconnect before on-hook.
Y1 Enable long space disconnect before on-hook.
Z0 Restore stored profile 0 after warm reset.
Z1 Restore stored profile 1 after warm reset.
&C0 Force RLSD active regardless of the carrier state.
&C1 Allow RLSD to follow the carrier state.
&D0 Interpret DTR ON-to-OFF transition per &Qn.
&D1 Interpret DTR ON-to-OFF transition per &Qn.
&D2 Interpret DTR ON-to-OFF transition per &Qn.
&D3 Interpret DTR ON-to-OFF transition per &Qn.
&F Recall (restore) factory profile.
&G0 Disable guard tone.
&G1 Disable guard tone.
&G2 Enable 1800 Hz guard tone.
&J0 Set S register response only for compatibility.
&J1 Set S register response only for compatibility.
&K0 Disable DTE/DCE flow control.
&K3 Enable RTS/CTS DTE/DCE flow control.
&K4 Enable XON/XOFF DTE/DCE flow control.
&L0 Select dial up line operation.
&L1 Select leased line operation.
&M0 Select direct asynchronous mode.
&M1 Select sync connect with async off-line command mode.
&M2 Select sync connect with async off-line command mode and enable DTR dialing of directory zero.
&M3 Select sync connect with async off-line command mode and enable DTR to act as Talk/Data switch.
&P0 Set 10 pps pulse dial with 39%/61% make/break.
&P1 Set 10 pps pulse dial with 33%/67% make/break.
&P2 Set 20 pps pulse dial with 39%/61% make/break.
&P3 Set 20 pps pulse dial with 33%/67% make/break.
&Q0 Select direct asynchronous mode.
&Q1 Select sync connect with async off-line command mode.
&Q2 Select sync connect with async off-line command mode and enable DTR dialing of directory zero.
&Q3 Select sync connect with async off-line command mode and enable DTR to act as Talk/Data switch.
&Q4 Select Hayes AutoSync mode.
&Q5 Modem negotiates an error corrected link.
&Q6 Select asynchronous operation in normal mode.
CONNECT XXXX, and ERROR.
ANSWER, CONNECT XXXX, and ERROR.
- 35 -
Page 40

APPENDIX A
&R0 CTS tracks RTS (async) or acts per V.25 (sync).
&R1 CTS is always active.
&S0 DSR is always active.
&S1 DSR acts per V.25.
&T0 Terminate any test in progress.
&T1 Initiate local analog loopback.
&T2 Returns ERROR result code.
&T3 Initiate local digital loopback.
&T4 Allow remote digital loopback.
&T5 Disallow remote digital loopback request.
&T6 Request an RDL without self-test.
&T7 Request an RDL with self-test.
&T8 Initiate local analog loop with self-test.
&V Display current configurations.
&W0 Store the active profile in NVRAM profile 0.
&W1 Store the active profile in NVRAM profile 1.
&X0 Select internal timing for the transmit clock.
&X1 Select external timing for the transmit clock.
&X2 Select slave receive timing for the transmit clock.
&Y0 Recall stored profile 0 upon power up.
&Y1 Recall stored profile 1 upon power up.
&Zn=x Store dial string x (to 40) to location n (0 to 19).
%E0 Disable line quality monitor and auto retrain.
%E1 Enable line quality monitor and auto retrain.
%E2 Enable line quality monitor and fallback/fall forward.
%L Return received line signal level.
%Q Report the line signal quality.
%TTn PTT certification test signals.
\G0 Disable modem to modem flow control.
\G1 Enable modem to modem flow control.
\Kn Controls break handling during three states.
\N0 Select normal speed buffered mode.
\N1 Select direct mode.
\N2 Select reliable link mode.
\N3 Select auto reliable mode.
\N4 Force LAPM mode.
\N5 Force MNP mode.
ECC COMMANDS
%C0 Disable data compression.
%C1 Enable MNP 5 data compression.
%C2 Enable V.42 bis data compression.
%C3 Enable both V.42 bis and MNP 5 compression.
\A0 Set maximum block size in MNP to 64.
\A1 Set maximum block size in MNP to 128.
\A2 Set maximum block size in MNP to 192.
\A3 Set maximum block size in MNP to 256.
\Bn Send break of n x 100 ms.
\L0 Use stream mode for MNP.
\L1 Use block mode for MNP.
- 36 -
Page 41

EXP Fax/Data Modem OPERATING CONSIDERATION
MNP 10 COMMANDS (14.400 modem only)
)M0 Disable MNP 10 link negotiation power adjustment.
)M1 Enable MNP 10 link negotiation power adjustment.
*H0 Select MNP 10 link negotiation at highest rate.
*H1 Select MNP 10 link negotiation at 1200 bps.
*H2 Select MNP 10 link negotiation at 4800 bps.
-K0 Disable MNP 10 extended services.
-K1 Enable MNP 10 extended services.
-K2 Enable MNP 10 extended services detection only.
-Q0 Disable MNP 10 fallback to 2400 bps (V.22 bis)/1200 bps (V.22).
-Q1 Enable MNP 10 fallback to 2400 bps (V.22 bis)/1200 bps (V.22).
@M0 Select initial transmit level of -26 dBm.
@M1 Select initial transmit level of -30 dBm.
@M2 Select initial transmit level of -10 dBm.
@M3 - @M10 Select initial transmit level of -10 dBm.
@M11 Select initial transmit level of -11 dBm.
@M12 Select initial transmit level of -12 dBm.
.
.
.
@M30 Select initial transmit level of -30 dBm.
@M31 Select initial transmit level of -31 dBm.
:E0 Disable the compromise equalizer.
:E1 Enable the compromise equalizer.
- 37 -
Page 42

APPENDIX B
S REGISTERS
The S registers are summarized in table along with their default values. Registers denoted with an '*' in the table may be stored in one of the two user profiles by entering the &Wn command. One of these
profiles may be loaded at any time by using the Zn command. Registers or register fields quoted as "reserved" are reserved for current or future use by the firmware, or are permanently overridden by PTT
limitations.
All bit-mapped registers are read-only. The appropriate AT command which controls the relevant bits in the S-register should be used to change the value.
FACTORY DEFAULTS
The factory default values are stored in ROM and are loaded into the active configuration at power up or by the AT&F command. In addition, the designated default profile is subsequently loaded, and may
change some of the factory default values. The designated default profile can be changed by entering the &Yn command where n is one of the two possible user profiles.
The defaults shown are those used in factory profile. All of the factory default values may be loaded at any time by entering the &F command.
S Register Summary.
Register Function Range Units Save Default
S0 Rings to Auto-Answer 0-255 rings * 0
S1 Ring Counter 0-255 rings 0
S2 Escape Character 0-255 ASCII * 43
S3 Carriage Return Character 0-127 ASCII 13
S4 Line Feed Character 0-127 ASCII 10
APPENDIX B
S5 Backspace Character 0-255 ASCII 8
S6 Wait Time for Dial Tone 2-255 s * 4
S7 Wait Time for Carrier 1-255 s * 50
S8 Pause Time for Dial Delay
Modifier
S9 Carrier Detect Response Time 1-255 0.1s * 6
S10 Carrier Loss Disconnect Time 1-255 0.1s * 14
S11 DTMF Tone Duration 50-255 0.001 s * 95
Register Function Range Units Save Default
S12 Escape Code Guard Time 0-255 0.02 s * 50
0-255 s * 2
- 38 -
Page 43

APPENDIX B
S13 Reserved - - S14 General Bit Mapped Options - - * 138 (8Ah)
S15 Reserved - - - S16 Test Mode Bit Mapped
Options(&T)
S17 Reserved - - S18 Test Timer 0-225 s * 0
S19 AutoSync Bit-Mapped Options - - - S20 HDLC address or BSC sync
character
S21 V.24/General Bit Mapped
Options
S22 Speaker/Results Bit Mapped
Options
S23 General Bit Mapped Options - * 55(37h)
S24 Sleep Inactivity Timer 0-255 s 0
S25 Delay to DTR Off 0-255 s or
S26 RTS-to-CTS Delay 0-255 0.01s 1
S27 General Bit Mapped Option - - * 73(49h) w/ ECC
- - 0
0-255 ASCII - -
- - - 4(04h)
- - * 117(75h)
5
0.01s
74(4Ah)w/o ECC
S28 General Bit-Mapped Options - - * 0
S29 Flash Dial Modifier Time 0-255 10 ms 0
S30 Disconnect Inactivity Timer 0-255 10s 0
S31 General Bit-Mapped Options - - * 2
S32 XON Character 0-255 ASCII 17 (11h)
Register Function Range Units Save Default
- 39 -
Page 44

APPENDIX B
S33 XOFF Character 0-255 ASCII 19 (13h)
S34-S35 Reserved - - -
S36 LAPM Failure Control - - - 7
S37 Line Connection Speed - - * 0
S38 Delay Before Forced Hang-up 0-255 s 20
S39 Flow Control - - * 3
S40 General Bit-Mapped Options - - * 107(6Bh)
S41 General Bit-Mapped Options - - * 3
S42-S45 Reserved - - -
S46 Data Compression Control - - * 13
S48 V.42 Negotiation Control - - * 7
S80 Soft-Switch Functions - - - 0
S82 LAPM Break Control - - 128(40h)
S86 Call Failure Reason Code 0-255 - S91 PSTN Transmit Attenuation
Level
S92 Fax Transmit Attenuation Level 0-15 dBm 10
S95 Result Code Messages Control - - * 0
S99 Leased Line Transmit Level 0-15 -dBm 10
S201 Cellular Transmit Level *
S202 Remote Access Escape
* Register value may be stored in one of two user profiles with the &W command.
0-15 dBm 10
0-255 ASCII * 170
C
h
a
r
a
c
t
e
r
- 40 -
Page 45

APPENDIX B
- 41 -
Page 46

Page 47

FCC
FCC COMPLIANCE STATEMENTS
FCC Part 68
This equipment complies with Part 68 of FCC rules. On the Fax/Data modem there is a label that contains, among other information, the FCC registration number and Ringer Equivalence Number(REN) for
the equipment. If requested, please provide this information to your telephone company.
The REN is useful to determine the maximum number of devices may be able to ring when your number is called. In most, but not all areas, the sum of the RENs of all devices should not exceed five(5.0). To
be certain of the number of the devices you may connect to your line, please call your local telephone company.
If your Fax/Data Modem is seemed to cause harm to the telephone network, your telephone company may discontinue your service temporarily. If possible, they will notify you in advance. But if advance notice
isn't practical, you will be notified as soon as possible. You will be advised of your right to file a complaint with the FCC.
Your telephone company may make changes in its facilities, equipment, operation, or procedures that could affect the proper operation of your equipment. If they do, you will be given advance notice so as to give
you an opportunity to maintain uninterrupted service.
If you experience trouble with the Fax/Data Modem, please contact your dealer for repair/warranty information. The telephone company may ask you to disconnect this equipment from the network until the
problem has been corrected or you are sure that the equipment is not malfunctioning. There are no repaired that can be made by the customer to the Fax/Data Modem. All repairs need to be made by Modem
manufacture.
This equipment may not used on coin service provided by the telephone company. Connection to party lines is subject to state tariffs. (Contact you state public utility commission or corporation commission for
information).
- 43 -
Page 48

FCC
FCC Part 15
This equipment has been tested and found to comply with the limits for a Class B digital device, pursuant to Part 15 of the FCC Rules. These limits are designed to provide reasonable protection against
harmful interference in a residential installation. This equipment generates, uses and can radiate radio frequency energy and, if not installed and used in accordance with the instructions, may cause harmful
interference to radio communications. However, there is no guarantee that interference will not occur in a particular installation. If this equipment does cause harmful interference to radio or television reception,
which can be determined by turning the equipment off and on, the user is encouraged to try to correct the interference by one or more of the following measures:
Reorient or relocate the receiving antenna.
Increase the distance between the equipment and receiver.
Connect the equipment into an outlet on a circuit different from that to which the receiver is connected.
Consult the dealer or an experienced radio/TV technician for help.
CAUTION: CHANGE OR MODIFICATIONS NOT EXPRESSLY APPROVED BY PARTY RESPONSIBLE FOR COMPLIANCE COULD VOID THE USER'S AUTHORITY TO OPERATE THE EQUIPMENT.
- 44 -
Page 49

FCC
CONSUMER INFORMATION AND FCC REQUIREMENTS
The Telephone Consumer Protection Act of 1991 makes it unlawful for any person to use a computer or other electronic device to send any message via a telephone fax machine unless such message clearly
contains in a margin at the top or bottom of each transmitted page or on the first page of the transmission, the date and time it is sent and an identification of the business or other entity, or other individual
sending the message and the telephone number of the sending machine or such business, other entity, or individual.
In order to program this information into your fax machine, you should complete the following steps:
A. If you modem is ThinFax 1414LX or ThinFax 1414 LXM, and is using MiniFax as your fax software, please use the following procedure. Otherwise skip to (B):
B. If your modem is ThinFax 288i, ThinFax 288c ThinFax 1414i, ThinFax 1414c, ThinFax 1414CL, ThinFax 1414LX , ThinFax 1414LXM, or the modem portion of the ThinCom and is using QuickLink II Fax
software
(1) Under your System Manager Menu, select Setup, Option then Date to enter the date and time information.
(2) In your MiniFax Software, go to the Configuration Menu and enter all the information into the menu, then click the OK button.
The MiniFax software will generate the required headers on the fax page.
(1) Under your Windows environment, go through Main-Control Panel-Date/Time to enter the date and time information.
(2) Go to the Cover Page Setup section of your QuickLink II Fax software, enter information about you and your company for the fax page headers and click the OK button when all of the information
are completed.
The QuickLink II Fax software will generate the required headers on the fax page according to the information entered in the Cover Page Setup. If you need to know more detail about how to use the
setup, please consult the Cover Page Setup section of your QuickLink II Fax software Users Guide.
- 45 -
Page 50

FCC
Canadian Department of Communications compliance statements
This digital apparatus does not exceed the Class B limits for radio noise emissions from digital apparatus set out in the Radio Interference Regulation of the Canadian Department of Communications.
NOTICE: The Canadian Department of Communication label identifies certified equipment. This certification means that the equipment meets certain telecommunication network protective, operational, and
safety requirements. The Department does not guarantee the equipment will operate to the user's satisfaction.
Before installing this equipment, users should ensure that it is permissible to be connected to the facilities of the local telecommunications company. The equipment must also be installed using acceptable
method of connection. In some cases, the company's inside wiring associated with a single line individual service may be extended by means of a certified connector assembly (telephone extension cord). The
customer should be aware that compliance with the above conditions may not prevent degradation of service in some situations.
Repairs to certified equipment should be made by an authorized Canadian maintenance facility designated by the supplier. Any repairs or alterations made by the user to this equipment malfunctions, may give
the telecommunications company cause to request the user to disconnect the equipment.
Users should ensure, for their own protection, that the electrical ground connections of the power utility, telephone lines, and internal metallic water pipe system, if present, are connected together. This
precaution may be particularly important in rural areas.
Caution: Users should not attempt to make such connections themselves, but should contact the appropriate electric inspection authority, or electrician, as appropriate.
The "Load Number" (LN) assigned to each terminal device denotes the percentage of the total load to be connected to a telephone loop which is used by the device, to prevent overloading. The termination on
the loop may consist of any combination of devices subject only to the requirement that the total of the Load Numbers of all device does not exceed 100.
- 46 -
Page 51

Page 52

Page 53

 Loading...