

Page 1

BluetoothAccess Point Application Note
Surfing the Web from Your Laptop Computer
6/29/2002
1. Introduction
As a technology leader in the wireless networking market, WIDCOMM’s vision is to enable
consumers to easily, conveniently and securely access information and services from their
Bluetooth devices anytime and anywhere – from homes, offices and public places.
WIDCOMM has introduced products that allow you to surf the Web from your laptop
computer.
• BTW™ is a set of software drivers and utilities that seamlessly integrate Bluetooth
technology into your desktop or laptop computer.
• BlueGate™ is the first available server-independent Bluetooth wireless access point in
the world to support extended receiver range capabilities. Acting as a gateway for
shared Internet access, BlueGate creates local “hot spots” of high-speed wireless
connectivity that link as many as seven Bluetooth-enabled devices simultaneously and
connects them to a standard Ethernet network.
This document describes the procedure for using BTW to surf the Web through a BlueGate
2500 Network Access Point. This document was tested using the following configuration:
• A desktop or laptop computer with an available USB interface and running Microsoft
Windows 98 SE, Me, 2000, or XP. The Windows Dial-Up Networking component
must be installed.
• BTW version 1.2.1.14 with an attached Psion USB dongle.
BTW
AS A
LAP C
LIENT
-010710-
• A BlueGate 2500 Network Access Point
2 Browsing the Web using BlueGate and BTW
2.1 B
Setting up the BlueGate 2500 is straightforward. Depending on your Local Area Network
(LAN) configuration, the device is usually configured properly at the factory. Just plug it in and
go. For additional details on how to set up the BlueGate or troubleshoot the device, see one or
both of the following documents:
• The BlueGate 2500 Quick Start Guide, WIDCOMM doc # BG2500-PROJ-UM
0608
• The BlueGate 2500 Administrator’s Guide, WIDCOMM doc # BG2500-PROJ-UM-
011023-1800
2.2 I
The BTW software is installed from a CDROM using an InstallShield executable. For detailed
instruction on how to install the software and USB dongle, see the BTW Installation and
Uninstallation Instructions. This document is supplied as a readme file on your BTW release
CD.
2.3 P
The term “LAP” refers to the Bluetooth LAN Access Profile. This profile allows one computer
(the client) to request a Bluetooth connection with another (the server). The client can then use
the server to access a LAN.
In order for BTW to operate correctly, you must install the Windows Dial-Up Networking
LUEGATE SETUP
NSTALLING THE
REREQUISITES FOR USING
BTW S
OFTWARE
Page 2

component. (Refer to the Windows help system for assistance: Start →Help →Index →Dial-Up
Networking.)
2.4 S
ET EXPLORER TO VIEW DETAILS
Start by opening Windows Explorer and click on the My Bluetooth Places entry in the folder
view. For additional status information, it is always a good idea to use the View _ Details
option as shown below.
2.5 I
There is more than one way to perform a device inquiry under BTW. One of the easiest ways is
to double-click on the Entire Bluetooth Neighborhood icon.
NOTE: Depending on the BTW settings, the system may perform a device inquiry for y ou.
If you see that other Bluetooth devices have already been identified, you may want to skip
this step.
It may take up to 30 seconds for the inquiry to complete. You should then see a display similar
to the one shown below:
NQUIRE FOR THE BLUEGATE DEVICE UNDER
BTW
Page 3

2.6 D
ISCOVER THE
“LAN A
In order to initiate a connection to your LAN, you must discover the service which controls LAN
access on your BlueGate. In Bluetooth parlance, this process is called Service Discovery.
You can do this by right-clicking on the BlueGate device name (“BG227” in the example shown
below) and choosing Explore or Discover Available Services from the drop-down menu.
CCESS
” S
ERVICE
For a BlueGate 2500, this will result in a display similar to the one shown below.
Page 4

NOTE: The name of the service that is running on the BlueGate is configurable by the
BlueGate administrator. “LAN Access” is the default service name, but it may not match
the name shown above.
2.7 C
You can use several methods to initiate a LAN Access Profile (LAP) connection. On the BTW
client, you can double-click on the LAN Access
established. Another method is to right-click on the
Access Point from the drop-down menu as shown below:
REATE THE CONNECTION
service
to which the connection is to be
service
and select Connect to Network
BTW will respond by activating the Microsoft Windows Dialup Networking dialog. The dialog
will be slightly different depending on which version of the Windows Operating System that
you are using. If you are running your BlueGate in its factory default configuration then the
user name and password are irrelevant. Feel free to leave these fields blank if you wish. Click
on Connect in order to initiate the connection.
Page 5

A set of dialogs will inform you of the progress of the connection. Once more, these differ
slightly depending on the version of Microsoft Windows that you are using.
If your BTW client is also connected to the LAN through an internal network card, you may see
a dialog similar to the one shown below. Although this is a situation that is normally to be
avoided, it does not interfere with this demonstration. Click on “OK” in order to continue.
Under Windows 2000, another dialog may be displayed in order to inform you that the
connection has been successfully established. Click on “OK” in order to continue.
You will then see the display shown below. Notice that the status of the “LAN Access” service
is “Connected.”
Page 6

2.8 S
If the BlueGate is connected to a network that has access to the Internet, open a browser on the
BTW system and connect to the World Wide Web.
URF THE WEB
2.9 V
If you are having problems with your connection, one simple debugging tool is to right-click on
the connected service and choose Status from the pull-down menu. The resulting status dialog
is shown below:
IEW THE STATUS OF THE CONNECTION
Page 7
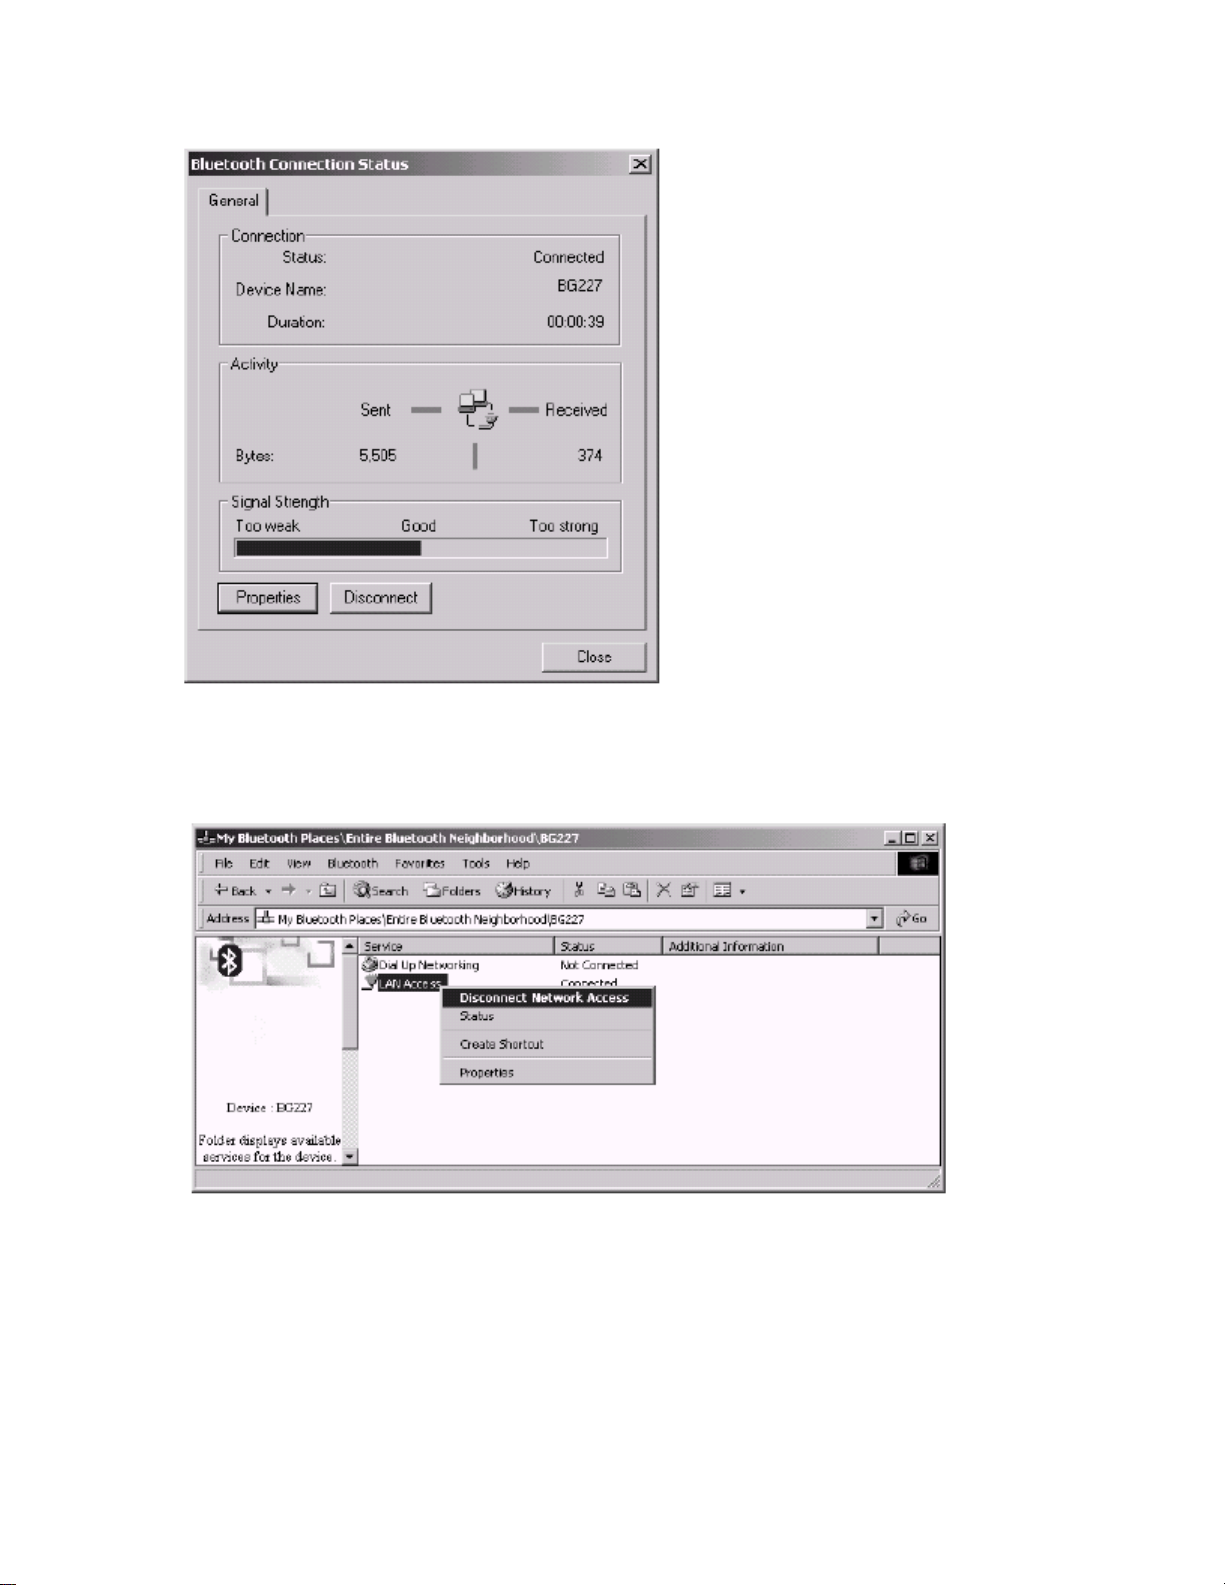
Check the Signal Strength indicator. If the signal strength is too weak, you may want to
reposition your BlueGate unit.
2.10 T
ERMINATE THE CONNECTION
Once you are finished surfing the Web, terminate the connection by right-clicking on the
connected
service and selecting Disconnect Network Access from the drop-down menu.
BTW will ask you to confirm. Click on “Yes” to disconnect.
Page 8
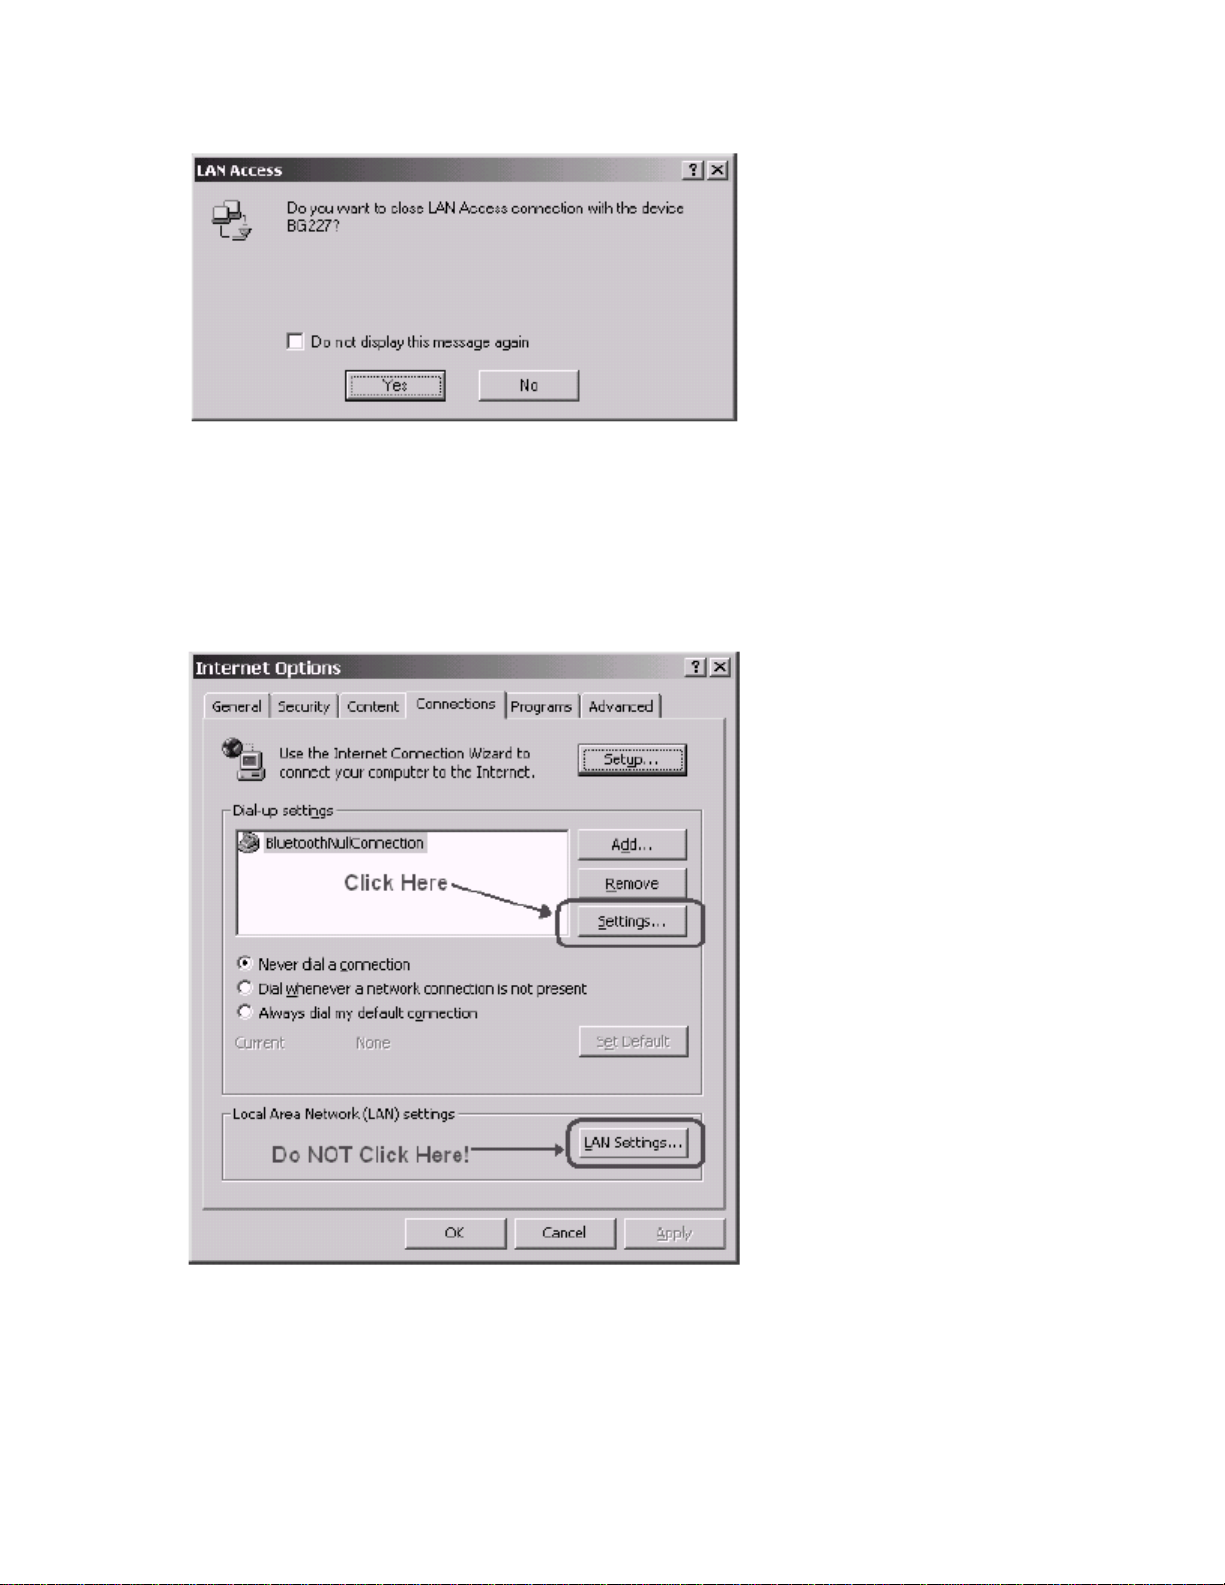
3 Support for Proxy Servers in Internet Explorer
If your pipeline to the Internet uses a proxy server, you can enable this support in your browser
software. For Microsoft Internet Explorer 5.0, use the following procedure:
1) Bring up Internet Explorer
2) Click on the Tools menu
3) Select Internet Options…
4) Click on the Connections tab. Make sure that BluetoothNullConnection is selected.
You will see a dialog similar to the following:
5) Click on Settings…
NOTE: Do NOT click on LAN Settings… The proxy settings in the LAN Settings… dialog will
not enable the correct proxy server support.
Page 9

6) Check the Use a proxy server box and fill in the address and Port information. You
may have to consult your local Network Administrator to obtain the correct values.
7) When you are finished, click on OK to activate the new settings.
NOTE: If you are using a different version of Internet Explorer or a web browser from a
different manufacturer, this procedure will differ. If you have problems, consult your local
Network Administrator or IT Service Technician.
4. For Troubleshooting or Further Information
For additional technical information or troubleshooting advice, see the following WIDCOMM
documents:
• The BlueGate 2500 Quick Start Guide, WIDCOMM doc # BG2500-PROJ-UM
0608.
• The BlueGate 2500 Administrator’s Guide, WIDCOMM doc # BG2500-PROJ-UM-
011023-1800.
• BTW Configuration Guide, WIDCOMM doc # BTW-DOCS-010620-1220.
• Bluetooth Neighborhood User’s Guide, WIDCOMM doc # BTW-DOCS-011100-1700.
If you still cannot succeed using the steps outlined in the document, contact WIDCOMM
technical support. The preferred method of doing this is to use the on-line forms for either
BTW or BlueGate. In order to access these forms, you will need the user name and password
that was supplied along with your WIDCOMM product. You can access these forms from
http://www.widcomm.com/Support/index.asp or send an email to support@widcomm.com.
-010710-
 Loading...