

Page 1

Application Note
Demonstrating the Serial Port Profile (SPP)
Between BTW
2002/6/29
1. Introduction
As a technology leader in the wireless networking market, WIDCOMM’s vision is to enable
consumers to easily, conveniently and securely access information and services from their
Bluetooth devices anytime and anywhere – from homes, offices and public places.
• BTW™ is a set of software drivers and utilities that seamlessly integrate Bluetooth
technology into your desktop or laptop computer.
• BlueConnect™ is a Bluetooth Springboard™-compatible radio module for the
Handspring™ Visor™. This document describes the procedure for demonstrating the use of the
Serial Port Profile (SPP) to chat between a BlueConnect module on a Handspring Visor and a
Bluetooth USB dongle on a Microsoft Windows laptop or desktop computer. This document
was tested using the following configuration:
• A desktop or laptop computer with an available USB interface and running the
Microsoft Windows 2000 operating system.
• BTW version 1.2.1.14 or later.
• A Psion USB dongle running firmware version 114.
• A standard version of the Handspring Visor (running Palm OS 3.1) with a Bluetooth CF
card running the WIDCOMM version 3.0 software. The procedure is slightly different
under the Palm OS version 3.5.
• A terminal emulator under Windows 2000. Hyperterminal will work although it is not
recommended. This example utilizes an enhanced version of Hyperterminal which is
available for download from the Web.
NOTE: The procedure on a computer running other versions of the Microsoft Windows
operating system may be slightly different.
2. A Quick Overview of the Procedure
The basic procedure for running this demonstration is not complicated. On the Visor side,
WidChat acts like a simple terminal emulator that connects to another computer through a Serial
Port Profile (SPP) connection. Instead of a physical serial cable connecting the two computers,
a Bluetooth wireless link is used to simulate a serial connection. On the BTW/Windows side,
you can use any terminal emulator which runs under Windows and supports the Windows
Virtual COMM (VCOMM) port standard. Here is a quick overview of the process:
1) Install BTW 1.2 and a Psion dongle on your Windows Computer (98SE, 2000, Me, or
XP version)
2) Install Hyperterminal Private Edition or some other compatible terminal emulator on
your BTW system
3) Insert the BlueConnect 3.0 card into your Visor
4) Use the Visor to inquire for the BTW device
5) Use the Visor to discover the “Bluetooth Serial Port” service on the BTW system
6) Use the Visor to establish a connection to the “Bluetooth Serial Port” service on the
BTW system. You do this by starting WidChat on the Visor and using it to initiate a
connection.
7) Using the BTW dialogs, determine what Virtual COMM (VCOMM) port has been
assigned to the BTW side of the SPP link
Page 2

8) Configure your Windows terminal emulator to use the VCOMM port that you
uncovered in step 7. Configure the terminal emulator to echo local input to the screen
(Local Echo ON).
9) Start the terminal emulator on the BTW system.
10) At this point you may chat freely back and forth.
11) When you are finished, terminate the applications (WidChat and your Windows
terminal emulator).
12) Terminate the SPP link by shutting down your BlueConnect card on the Visor.
3. The Differences between the Old and New WidChat
WidChat has changed somewhat between the BlueConnect 2.2G and 3.0 releases. Under 2.2G,
you would simply discover the SPP service on a remote server and run WidChat in order to
establish a connection. WidChat would automatically attempt to connect to the SPP service on
the remote device. It was limited to only using a service which advertised itself as a legacy
serial port profile. Since WidChat had no user options whatsoever, there was no possibility of
confusion. Since then, WidChat has been enhanced. The new WidChat will allow you to connect
to a custom RFCOMM service that was created specifically to support the WidChat application.
This allows WidChat to communicate with another WidChat that is running on a different
Visor. To support the new functionality, there are now various menu options on WidChat.
Some of these options can be confusing to people who are used to the old version of WidChat.
For best results, we recommend that you exactly follow the instructions outlined in this
document.
4. Setup
ETUP
_ Details option as shown
4.1 BTW S
4.1.1 Connecting the USB Dongle to your Desktop or Laptop Computer
Installing the USB Bluetooth Adapter is quick and painless. Connect the USB cable to the
matching USB connector on your PC, laptop computer, or USB hub.
4.1.2 Installing the BTW Software
The BTW software is installed from a CDROM using an InstallShield executable. For detailed
instruction on how to install the software, see the BTW Installation and Uninstallation
Instructions. This document will be supplied with your BTW CD and has the file name
readme.pdf.
4.1.3 Set Explorer to View Details
On your Windows PC, start the Windows Explorer and click on the My Bluetooth Places entry
in the folder view. For additional status information, use the View
below.
Page 3

NOTE: It is important later in the process to use the View Details option. This setting will
allow you to view the details of your SPP connection in the My Device display.
4.1.4 Configuring BTW to Act as an SPP Server
No action is necessary on your part. A service entitled “Bluetooth Serial Port” will be
automatically started on your Windows desktop or laptop computer. This service will handle all
incoming requests which attempt to utilize the Serial Port Profile.
4.2 B
LUECONNECT SETUP
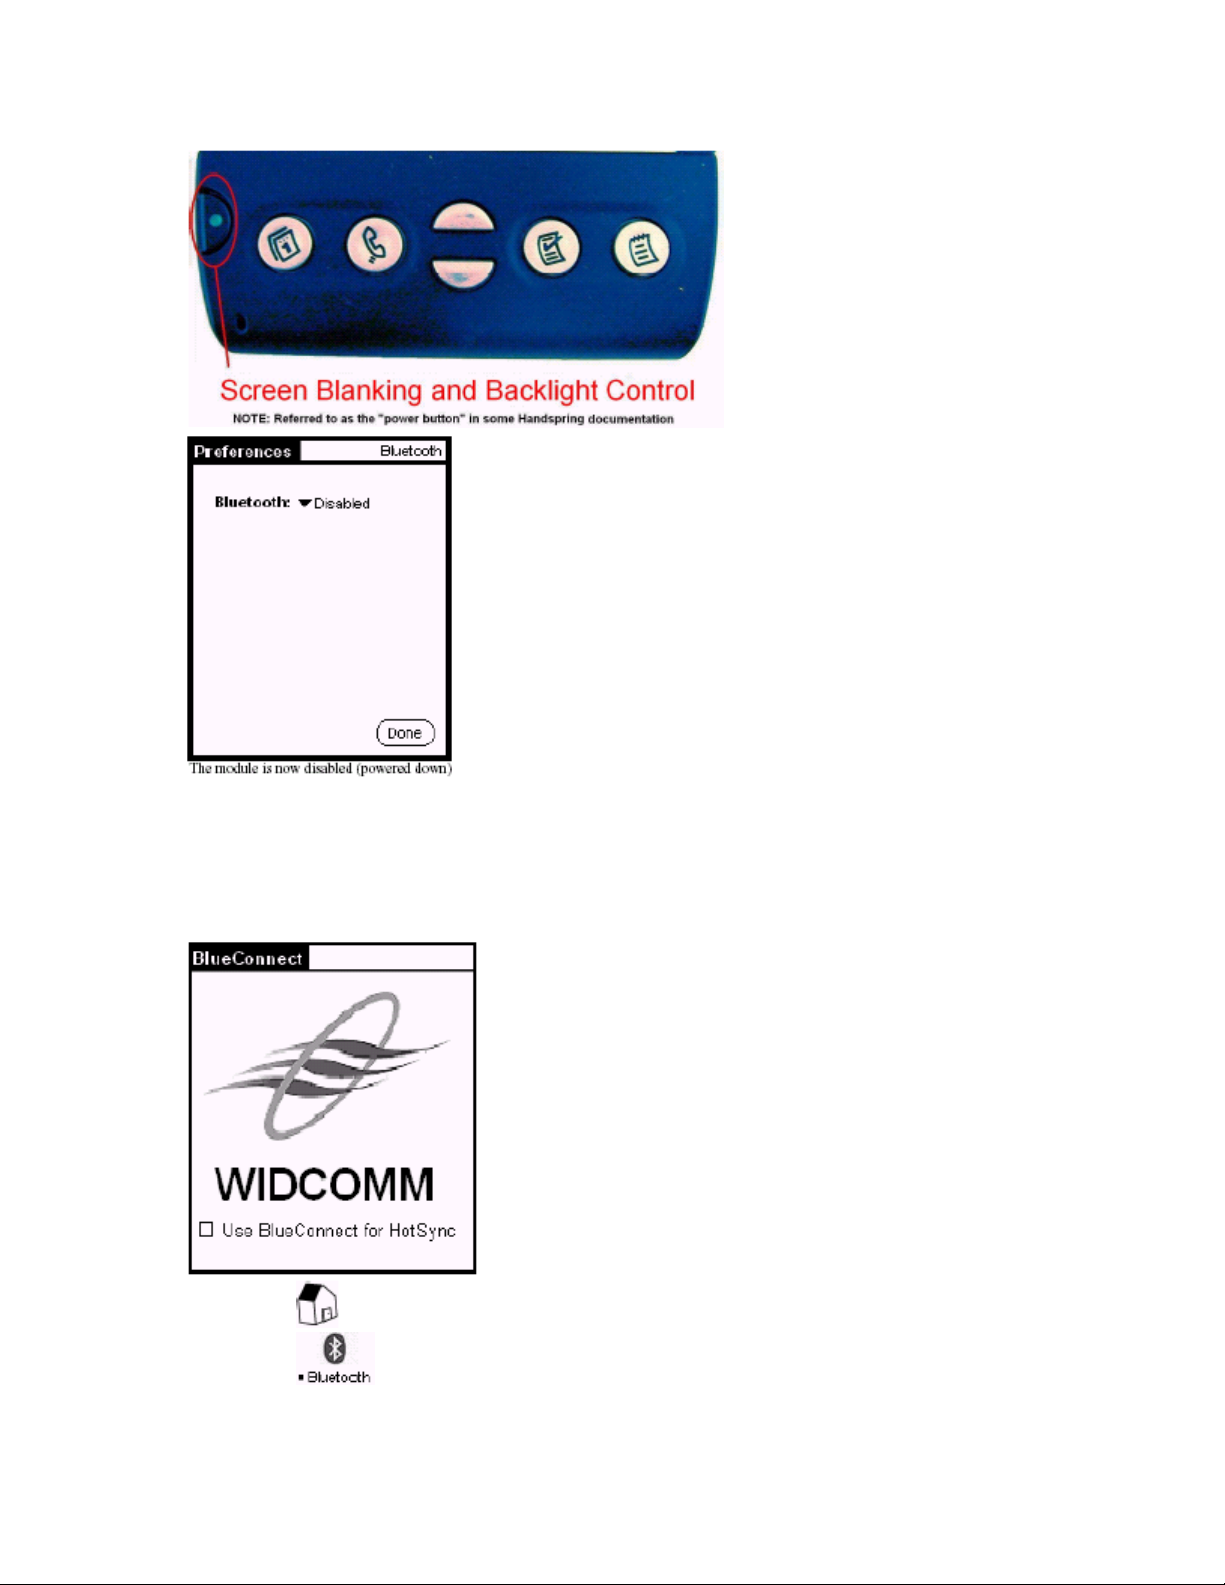
4.2.1 Power Considerations and Battery Drain
Whenever the Bluetooth Stack is running, the BlueConnect card remains fully powered up and
operational. Even when the Handspring Visor auto-off timer expires and the screen blanks,
power is still applied to the BlueConnect card. If the screen blank button is pushed, power is
still applied to the BlueConnect card. This can cause the battery to drain at a high rate. For
this
reason, you should always power down the card when the Bluetooth features are no longer
being used. This can be done by using the “Bluetooth” pull-down selector and choosing
“Disabled” at the main Bluetooth preferences screen.
Page 4
4.2.2 Configuring BlueConnect as an SPP Client
SPP connectivity requires a remote device with a SPP server running the Bluetooth Serial Port
Profile. The name of the SPP service running under BTW 1.2 is “Bluetooth Serial Port”.
1. Insert the BlueConnect module into your Visor. You should see the BlueConnect 3.0
welcome
screen:
2. Tap the icon.
3. Tap the
4. The devices displayed are drawn from the discovery database and may not be up-to-date.
icon. Make sure that Bluetooth is enabled.
Page 5

Follow the procedure shown below to do a fresh device inquiry.
5. Once device inquiry has completed, verify that the SPP server shows up in the device list,
then
tap on the device icon in order to perform a service discovery. Tap the Bluetooth Serial Port
service in order to select it.
NOTE: The SPP service name is configurable and may vary from device to device.
6. Tap on “Done” to confirm your selection.
Return to the application launch screen by tapping the “Home” silkscreen icon:
7.
5. Run WidChat on the Visor/BlueConnect
WidChat is a sample chat application that was designed to demonstrate the ability of two
BlueConnect devices to communicate. This application is permanently burned into the ROM of
your BlueConnect card. In order to run the WidChat side of this example, you will need the
following:
• A Handspring Visor
• A BlueConnect 3.0 card
5.1 L
Tap to launch the WidChat application on the client Visor.
AUNCH WIDCHAT
Page 6

Tap the button. This should activate a menu bar across the top of your Visor screen.
Tap on “Connection” followed by “Join Session.”
WidChat will respond by confirming the device that you wish to connect to. Tap on Connect.
There will be a delay of a few seconds while the unit attempts to connect with the service that is
running on your BTW system. A tone will sound to announce that the connection has been
established.
NOTE: This screen and the accompanying Bluetooth connection will never time out. It
will persist for as long as it takes to bring up a matching terminal emulator on your
Windows system.
6. Install and Run HyperTerminal Private Edition
6.1 D
On the desktop or laptop computer that you are using as a Bluetooth server, click on the Local
Devices icon in My Bluetooth Places. You will see the following display if you have no active
Bluetooth connections:
ISCOVERING THE
VCOMM P
ORT
Page 7

Examine the Status column under the Bluetooth Serial Port service. Notice that the service is
started and that COM4 will be the VCOMM port that will be assigned to an incoming SPP
connection.
Once you have connected to the Bluetooth Serial Port service using BlueConnect, this display
will change to the following:
Once again, examine the Status column under the Bluetooth Serial Port service. Notice that the
service is started and the COM4 is assigned to the Bluetooth connection. Also notice that the
friendly name and Bluetooth Device Address of the BTW unit is displayed for this connection.
From the above example, you can see that COM4 is the appropriate port to use on the BTW side
of the connection. You must set your terminal emulator to this com port in order to
communicate with WidChat on your BlueConnect.
6.2 O
BTAINING AND INSTALLING HYPERTERMINAL PRIVATE EDITION
Although you can use the Hyperterminal application that is supplied along with your Windows
operating system to perform this demonstration, it is not recommended. Hyperterminal does not
support a local echo mode. Text that you type in at the Hyperterminal screen will show up on
BlueConnect/Widchat, but will not echo on the Hyperterminal display.
You can obtain a free upgrade of Hyperterminal that will support local echo. It can be obtained
at: http://www.zdnet.com/downloads/stories/info/0,,16536,.html
Page 8

Once you reach this page, download the file called htpe63.zip. Inside the zip file, double-click
on htpe6.exe in order to install the software. To run the new version of Hyperterminal, use the
following sequence:
Page 9

6.3 H
YPERTERMINAL SETTINGS
The first time that you run Hyperterminal, you will be prompted to create a new connection. In
the following example, we will create a connection called BlueConnect. Enter the name and
click on OK to continue.
The next dialog will have a header entitled Connect To. Set the Connect using setting to use the
COM port that you discovered in Section 6.1: 6.1Discovering the VCOMM Port. Click on OK
to continue.
The next dialog will have a header entitled “COM[X] Properties”. You can set the “Bits per
second” to any value. A baud rate of 38400 will work quite well. Set “Flow Control” to None.
Then click on OK to immediately connect to the specified COM port.
Page 10

NOTE: The connection is still not properly set up at this point. Continue to finish the
configuration.
Use the File menu to set the properties of the current session using the method shown below:
Click on the Settings tab followed by the ASCII Setup… button. Checkmark the Send line ends
with line feeds and Echo types characters locally boxes as shown below.
Page 11

7. Chatting
7.1 WIDC
On the Visor, set your WidChat screen name by tapping in the Screen Name field and using the
Palm OS text entry feature. Tap in the Chat field to set the text that you want to send to
HyperTerminal. Tap the Send key to send your text to the opposing unit.
HAT TO HYPERTERMINAL
WidChat may be terminated at any time by tapping the icon. The Bluetooth connection
will persist after the application has ended and must be shut down by tapping the Discover icon
and then tapping the Shutdown button. If you do not shut down the connection, the
BlueConnect card will remain powered up – this may result in excessive drain on the batteries
in your Visor.
7.2 H
You are now ready to begin chatting. To send text from HyperTerminal to WidChat, just type it
YPERTERMINAL TO WIDCHAT
Page 12

in at the HyperTerminal window. Text that you enter onto the HyperTerminal screen will echo
on the WidChat and vice versa.
8. Disconnect the Applications
When you are finished chatting, disconnect both applications as shown below.
8.1 E
You might think that the best way to terminate your Bluetooth connection is to return to the
XIT WIDCHAT
application launch screen by tapping the
between the two devices will still be active (although there are no applications on either side to
make use of it). Your BTW system will still be prevented from servicing other connections
(since the current version is point-to-point) and your BlueConnect card will remain powered up
and will drain your Visor batteries at an accelerated rate.
When you are finished using WidChat, the best way to terminate the connection is by tapping
the
the application launch screen by tapping the
8.2 E
At this point the connection should already be terminated. Exit HyperTerminal as you would
any other Windows application.
8.3 S
Your Bluetooth card will still be powered up at this point. See Section 4.2.1: Power
Considerations and Battery Drain for information on how to shut down the card and prevent
battery drain.
button and choosing Disconnect from the pull-down menu. You can then return to
XIT HYPERTERMINAL
HUT DOWN THE BLUECONNECT CARD
button. This is not true. The SPP connection
button.
9. For Troubleshooting or Further Information
For additional technical information or troubleshooting advice, see the following WIDCOMM
documents:
BTP-PROJ-UM-011005-
• BlueConnect Version 3.0 Release Notes, WIDCOMM doc #
1230.
Page 13

• BlueConnect User’s Guide, WIDCOMM doc # BTP-PROJ-UM-010627-1723.
• BlueConnect Development Kit Quick Start Guide, WIDCOMM doc # BTP-PROJ-UM-
010725-0623.
• BTW Installation and Uninstallation Instructions. These are supplied with your BTW
CD as readme.doc or readme.pdf.
• BTW Windows 2000 Release Notes.
• BTW Configuration and User’s Guide.
If you still cannot succeed using the steps outlined in the document, contact WIDCOMM
technical support. The preferred method of doing this is to use the on-line forms for either
BTW or BlueConnect. In order to access these forms, you will need the user name and
password that was supplied along with your WIDCOMM product. You can access these forms
from http://www.widcomm.com/Support/index.asp or send an email to support@widcomm.com
10. A Freeware Alternative to WidChat
A freeware terminal emulator called Pilot Term can be used in place of WidChat and is just as
effective at demonstrating the SPP profile. You can obtain it at:
http://www.handango.com/PlatformProductDetail.jsp?siteId=1&homePath=HANDANGO&platfor
mId=1&productType=2&productId=549§ionId=122&catalog=1
 Loading...