

Page 1
POWERVIEW VIDEO ENHANCER QUICK GUIDE
Congratulatio ns on purchasing the P owerView Video Enhanc er! Designed to
improve the output of your video display, the Video Enhancer delivers a sharper
image and more vibrant colors, while at the same time reducing eyestrain
considerably. The PowerView Video Enhancer is compatible with most systems and
can be installed on your PC in minutes!
Your Video Enhancer offe rs the following benefits:
1. Increased sharpness and brightness
2. Easy to install
3. Hot key toggles Enhanced mode on/off
4. No software or driver required.
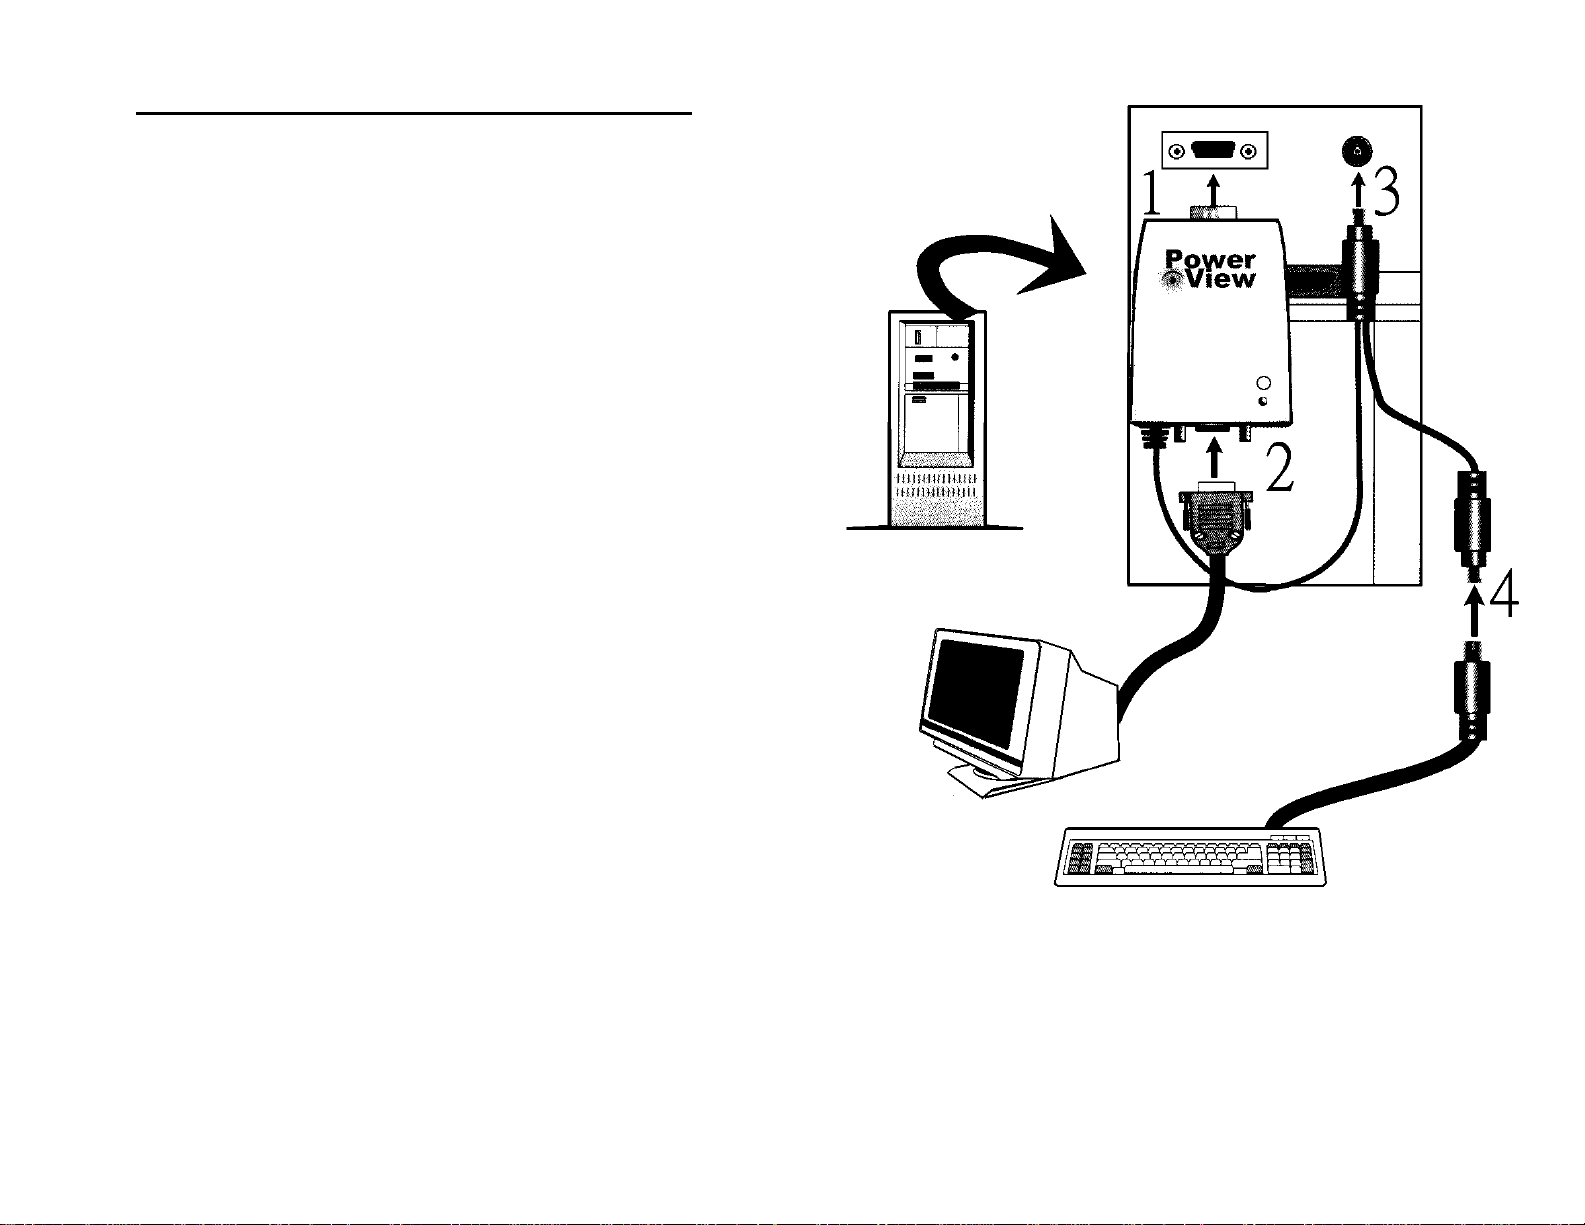
Connecting the Video Enhancer
As a precaution, before you begin the following procedure, power off your PC and
disconnect the power. Locate the VGA port on the rear of your PC and disconnect
the signal cable. Then, disconnect the keyboard from the PS/2 port. Refer to Fig. 1
and follow the directions below to connect the Video Enhancer to you PC:
1. Connect the Video Enhancer’s VGA connector to the VGA port of your
PC. Tighten the securing screws.
2. Connect the monitor’s 15-pin mini D-sub plug t o the Video Enhancer’s
VGA port. Again, tighten the securing screws.
3. Connect the Video Enhancer’s PS/2 connector to the PS/2 port of your PC.
4. Connect the keyboard to the Video Enhancer’s PS/2 port.
Operation
The Video Enhancer requires no software to operate; once you have connected the
Video Enhancer to your PC, you a re ready to get started. To begin, power on your
PC. When the operating system loads, you won’t notice any difference in your
display output. This is because your monitor is still displaying in original mode. To
switch to Enhanced mode press the
Video Enhancer will light.
[Pause]
key. The Enhanced mode LED on t he
Hit the
[PAUSE]
-Fig.1-
key to switch
.
Page 2
Getting the Most From Your Video Enhancer
Your monitor can be set to Video Enhancer mode for all media; however, it’s when
used with graphic-rich media and applications that the benefits are most evident.
In the following table, a check indicates the media recommended for use with the
Video Enhancer.
Media Enhanced Mode Contrast Brightness
(max.)
CAD X 100% 50-80%
Digital Camera
Scanner
Fax/Modem X 100% 50-80%
Photo Disk
Game Disk
Design Software
PC/TV
VCD
CCD
Video-Phone
CDI
MPEG
Internet Animation
DVD
3D Game
NOTE:
can be adjusted to its highest level.
These are recommended settings. 100% means the Contrast or Brightness
√
√
√
√
√
√
√
√
√
√
√
√
√
√
75-100% 50%
75-100% 50%
75-100% 50%
75-100% 50%
75-100% 50%
90-100% 30-50%
90-100% 50%
90-100% 50%
90-100% 50%
90-100% 50%
90-100% 50%
80-100% 50%
80-100% 30-50%
80-100& 30-50%
Troubleshooting
If the tips in this brief troubleshooting section do not help you to solve your
problem, please contact your dealer.
PROBLEM SOLUTION
The screen is blank. Make sure that all connectors are
securely connected. Confirm that the
Status LED is lit. If it is not lit then the
Video Enhancer is not receiving power.
Color is off or the image looks unstable. Make sure the securing screws on the
connectors are tightened well.
Color and image look no different than
usual.
Enhanced mode may be off. Press the
[Pause]
mode on.
hot key to toggle Enhanced
Specifications
Maximum dpi: 1800x1440 true color
Video bandwidth: 120MHz
Input signal: 0.7p-p/75 ohm, positive pole
Output resistance: 75 ohm
I/O connector: 15-pin mini D-sub plug
Display colors: Unlimited
Power supply: DC 12V/100mA
Power consumption: 1.2 Watt. (Maximum)
Control interface:
Status LED: Green Enhanced mode
PC compatibility: All NEC, MAC and IBM monitors
Dimensions: 80x60x20 mm
Recommended
Ambience: Operation: 0~80 °C
[Pause]
Storage: -20~60 °C
Humidity: 20~90%
hot key (on keyboard0
 Loading...