

Page 1

PCMCIA
Portable HARD DISK
Installation Manual
HD Traveler
Page 2

EXP COMPUTER, INC.
EXP MEMORY PRODUCTS.
NON-TRANSFERABLE LIMITED WARRANTY
EXP COMPUTER INC., AND EXP MEMORY PRODUCTS("EXP") warrants that the Disk Traveler
(“products”) manufactured or distributed by EXP to be free from failures due to defects in materials
or workmanship for a full one year from the date of purchase of the products.
This warranty is void if the product is damaged by abnormal or improper use or by accident, abuse
or if any attempt to repair or modify the product without authorization from EXP. Your sales receipt or
invoice, showing the date of purchase and the name of the authorized reseller, is your proof of the
date of purchase. During the warranty period, EXP will at its option, replace or repair, at no charge,
the product which in its opinion is defective.
Before you return the failed products, contact EXP. You must obtain a Return Merchandise
Authorization (RMA) number by calling the Technical Support Dept. of EXP Computer Inc. At (516)
496-7629. The RMA number should be displayed on the outside of the returned package and on
the accompanying packing list. EXP cannot be held responsible for any package returned without
the RMA number. You are responsible for packaging, providing proof of the date of purchase and
the shipping cost of the failed product to EXP Computer, Inc. You are responsible for mailing the
warranty registration card. The warranty claims may not be honored if there is no corresponding
registration card on file at EXP.
IN NO EVENT WILL EXP BE LIABLE FOR ANY DIRECT, INDIRECT, SPECIAL, INCIDENTAL
OR CONSEQUENTIAL DAMAGE, INCLUDING LOSS OF PROFIT, LOSS OF SAVINGS; OR
ANY OTHER DAMAGES CAUSED BY PRODUCT OR FAILURE OF THE PRODUCT TO
PERFORM.
FCC COMPLIANCE STATEMENTS
This equipment has been tested and found to comply with the limits for a
Class B digital device, pursuant to Part 15 of the FCC Rules. These limits
are designed to provide reasonable protection against harmful interference
in a residential installation. This equipment generates, uses and can radiate
radio frequency energy and, if not installed and used in accordance with the
instructions, may cause harmful interference to radio communications.
However, there is no guarantee that interference will not occur in a particular
installation. If this equipment does cause harmful interference to radio or
television reception, which can be determined by turning the equipment off
and on, the user is encouraged to try to correct the interference by one or
more of the following measures:
Reorient or relocate the receiving antenna.
Increase the Distance between the equipment and receiver.
Connect the equipment into an outlet on a circuit different from that to which
the receiver is connected.
Consult the dealer or an experienced radio/TV technician for help.
THIS LIMITATION OF LIABILITY APPLIES EVEN IF EXP HAS BEEN ADVISED OF THE
POSSIBILITY OF SUCH DAMAGES. SOME SATES DO NOT ALLOW THE EXCLUSION OR
LIMITATION IN INCIDENTAL OR CONSEQUENTIAL DAMAGES, SO THE ABOVE EXCLUSION
OR LIMITATION MAY NOT APPLY TO YOU.
CAUTION
CHANGE OR MODIFICATIONS NOT EXPRESSLY APPROVED BY
PARTY RESPONSIBLE FOR COMPLIANCE COULD VOID THE
USER’S AUTHORITY TO OPERATE THE EQUIPMENT.
Page 3

Table of Content
INTRODUCTION
INTRODUCTION 1
SYSTEM REQUIREMENTS
FEATURES
PART NAME AND FUNCTIONS
HARDWARE INSTALLATION 3
SOFTWARE INSTALLATION FOR DOS/WINDOWS 3.1 4
AUTOMATIC INSTALLATION
MANUAL INSTALLATION
SOFTWARE INSTALLATION FOR WINDOWS 95 8
USING THE HD TRAVELER UNDER WINDOWS 95
REMOVING OR REINSTALL THE DRIVER
ENABLING 32-BIT CARD SUPPORT OF WINDOWS 95
CHANGING A DRIVER LETTER ASSIGNED TO HD TRAVELER 13
SOFTWARE INSTALLATION FOR WINDOWS NT 14
GAME PORT CALIBRATION 15
PCMCIA SOFTWARE INFORMATION 16
POWER SAVING 17
APPENDIX A 21
APPENDIX B 22
The HD Traveler is a portable compact hard disk drive, which consists of a
low-power hard disk drive, a Game Port, and a PCMCIA interface card. It is
compatible with most computer equipped with a PCMCIA 2.1 Type I or II
slot. The HD Traveler comes equipped with an 5V, DC external power jack
in case your notebook’s PCMCIA slot cannot supply enough power needed
by the HD Traveler. The HD Traveler provides a fast and easy way to add
more storage space to your notebook computer.
SYSTEM REQUIREMENTS
1. Notebook or desktop computer with a PCMCIA 2.1 Type I or II slot.
2. PC Card (PCMCIA/JEIDA ) Card service and Socket device driver
compliant preferred (If the drivers are not present, the Point Enabler for
Intel 82365SL Personal Computer Interface Controller PCIC or
compatible will be installed.
3. DOS 6.0 or later, Windows 3.x, Windows 95, Windows NT
4. Your system’s I/O address 200 to 207 must be available for the Game
Port I/O function to operate
FEATURES
§ Complies with PCMCIA 2.1
§ Windows 95 Ready
§ Hard disc size from 1.0GB, 1.4GB, 2.1 GB, to 3.2GB
§ IBM PC compatible Game Port I/O included
§ Easy-to-install device driver software
§ Can be powered by most notebooks’ power, however, an external 5V DC
power jack can be used for those which do not supply enough power to
the PCMCIA slot
§ Single 5V operation, Low power consumption; 250 mA (Standby), 800
mA (Peak value accessing)
§ Ultra slim PCMCIA Card
85.6 x 54.0 x 3.3 mm (Type I)
Page 4
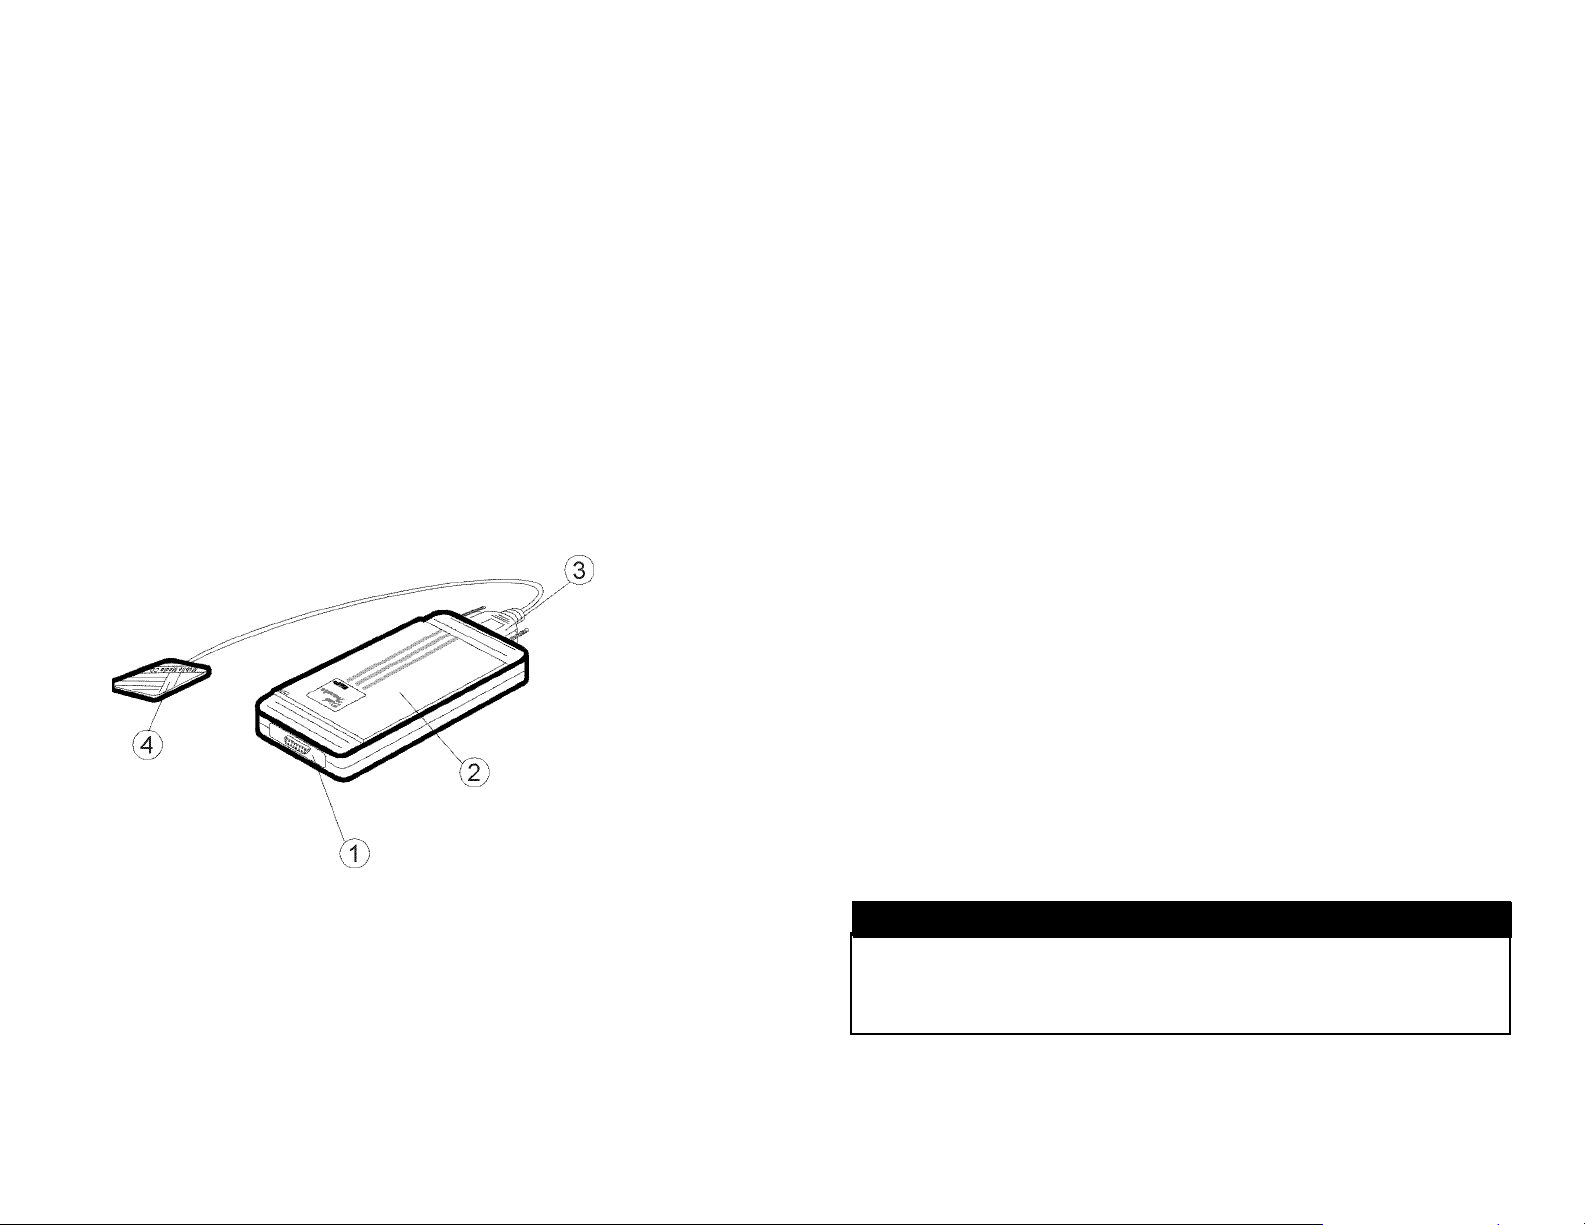
PART NAMES AND FUNCTIONS
1. Game Port
15-pin game port connector for joystick or game-pad
HARDWARE INSTALLATION
Before you begin, make sure you turn OFF all power to your system before
connecting the HD TRAVELER to your computer.
1. Connect the PCMCIA interface card to the HARD DISK drive.
Press firmly until the HARD DISK connector is seated, and then
tighten the two screws on the cable connector.
2. Hard Disk
hard disk with the power indicator and the 5V DC input jack
3. Interface Connector
26-pin male connector connects to PCMCIA card’s female adapter
4. PCMCIA Card
Type 1 PCMCIA card connects to notebook’s PCMCIA slot
2. Place the HARD DISK drive in the horizontal position,
(recommended)
3. Consult your computer’s documentation to locate the PCMCIA
slot.
4. Align the PCMCIA interface card with the arrow sign pointing to
the computer’s slot. (Please note that the card is keyed to guide
for proper orientation.)
5. Slowly insert the PCMCIA interface card into the slot and press
firmly until the connector is seated.
6. You are now ready to install the HD TRAVELER device driver.
Please follow the Software Installation procedures to follow.
CAUTION
You should connect the PCMCICA interface card to HARD DISK drive first
before inserting the PCMCIA interface card into your computer. DO NOT
connect/disconnect the HARD DISK PCMCIA interface card to/from the
PCMCIA interface card when the system is in power-on state.
Page 5
SOFTWARE INSTALLATION FOR DOS/WINDOWS 3.1
AUTOMATIC INSTALLATION
The device driver installation programs provide a simple INSTALL program
to help you to install the device driver into the computer with ease. Please
follow the instructions below to proceed automatic installation.
1. Insert the device driver diskette into a floppy disk drive on your
computer.
2. Change the working directory to the floppy drive containing the
device driver diskette by typing “A:” or “B:” then press ENTER.
3. At the DOS prompt (A:\> or B:\>), type “INSTALL” followed by
the ENTER key.
4. Choose the right configuration you need - “Hard Disk Only” or
“Hard Disk with Game” to continue. If you just need the Hard disk
function only, then choose “Hard Disk Only”, or you can choose
“Hard Disk with Game” to install the game port I/O function.
However, you can always change it later by running the INSTALL
program again.
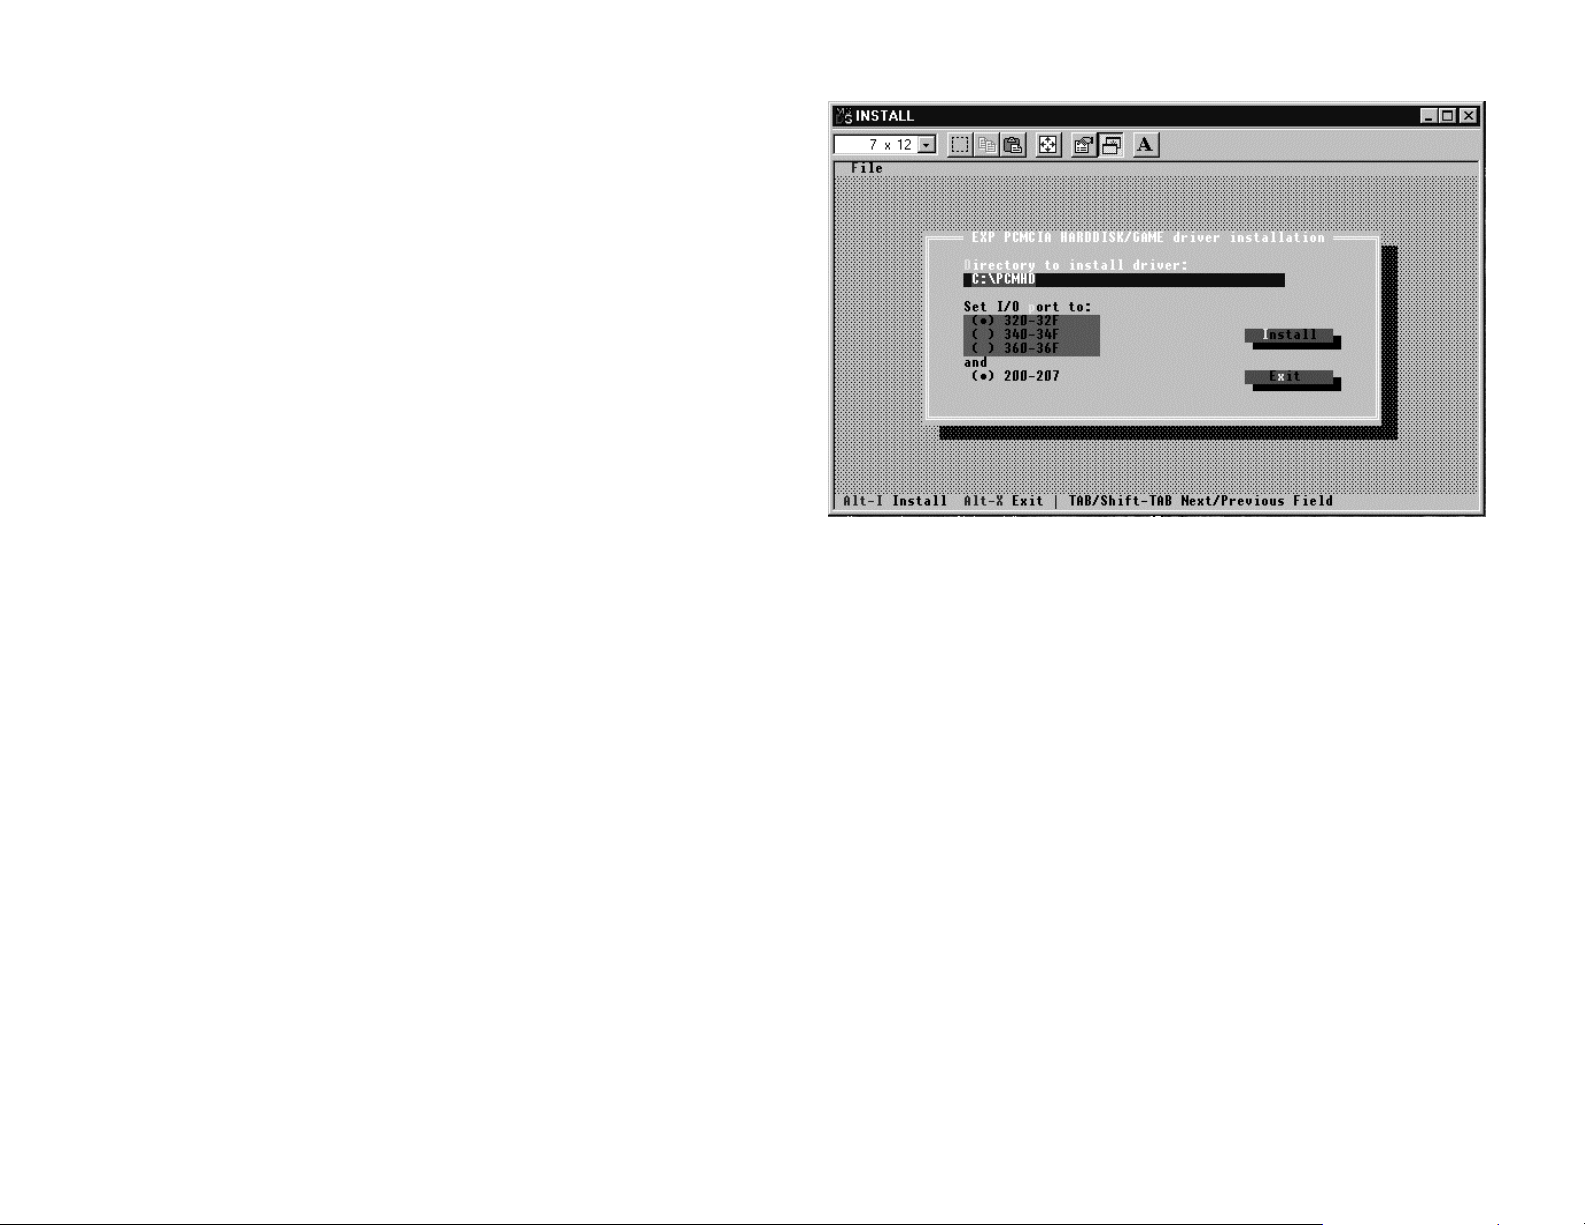
5. Press ENTER or click on the OK button to continue when the
opening screen appears. A dialog box will be displayed for you to
type in the directory to place the device driver to and to select
the I/O ports used for PCMCIA interface card. Enter the directory
you select to install the driver and press the TAB key to move to
next field to indicate the DOS Directory. Press the TAB key
again to set the I/O port. The default setting of the I/O address is
320-32F. The Game I/O is always 200-207, without any other
choice. After completing this selection, click on the Install button
to continue.
NOTE:
INSTALL.EXE is only for MS-DOS mode. Do not use it under Windows 95,
unless you want to use this device under pure MS-DOS mode. Please see
APPENDIX B for detail.
Page 6

MANUAL INSTALLATION
You may manually install the HD TRAVELER device driver if the default
setting conflicts with your system. Try the following procedure to complete
the manual installation.
1) Copy the file named EXPHDG.EXE to a directory on your main hard
disk. ( i.e. C:\PCMHD).
2) Edit the config.sys add the following line at the end of the file.
DEVICE=[drive] [path] EXPHDG.EXE /P:320 [/G]
/P is used to set the I/O ports, and the valid numbers are 320, 340 and
360. Each number represents the I/O port address - 320-32F, 34034F, and 360-36F respectively.
The default setting is /P:320
/G Add this to the end of the line, if you want to enable game port
The config.sys file example
LASTDRIVE=Z
DEVICE=C:\DOS\HIMEM.SYS
DEVICE=C:\DOS\EMM386.EXE NOEMS X=D000-D3FF
FILES=40
BUFFERS=20
STACKS=9,256
DEVICE=C:\PCMHD\EXPHDG.EXE /P:320 /G
NOTE:
The EXPHDG.EXE also has a command line parameter:
/I - Initialize a hard disk
All the information on the hard disk will be deleted.
EXAMPLE: EXPHDG /I
If you use the memory manager just like the example above (EMM386.exe).
You need to exclude the memory range for the hard disk card and X=D000D3FF is recommended.
3.) Reboot the system so the new driver will take effect.
Page 7
SOFTWARE INSTALLATION FOR WINDOWS 95
USING THE HD TRAVELER UNDER WINDOWS 95
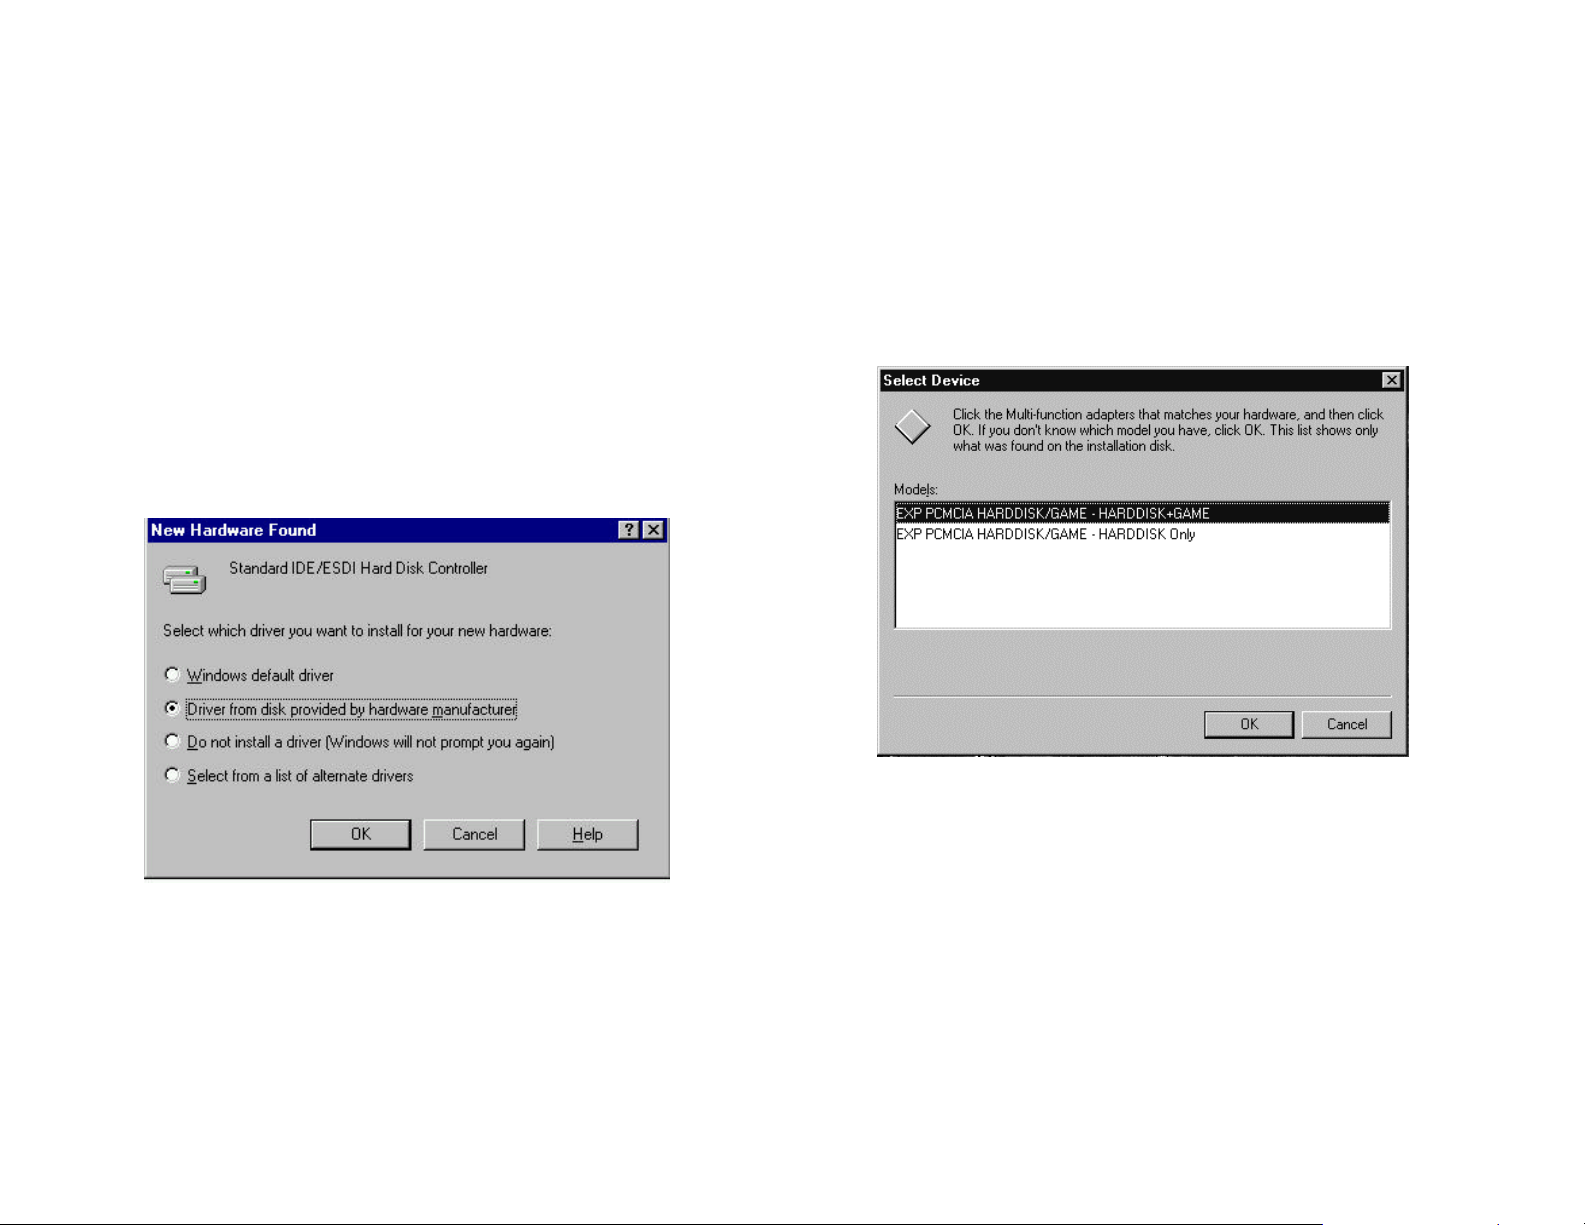
The following dialog box will appear when you use the HD TRAVELER under
Windows 95 for the very first time.
When the following dialog box appear, select the configuration you need and
click on the OK bottom.
Follow the on-screen instruction to continue. After finishing, look in “My
Computer” and you should have additional hard disk icon.
If the dialog box does not appear and the additional hard disk folder can not
be found in My Computer, please refer to the section titled “Enabling 32-Bit
Card Support”.
Select “Driver from disk provided by hardware manufacturer” and click on
the OK button, Windows 95 will then prompt you to insert the manufacturer’s
installation disk. Insert the HD TRAVELER device driver disk into your
floppy drive. Specify the directory as A:\ (or B:\ whichever contains the
diskette) and select OK.
Note that it is not necessary to connect the HD TRAVELER every time you
reboot your computer, just plug it in when you need to use it.
Page 8

REMOVING OR RE-INSTALLING THE DRIVER
ENABLING 32-BIT CARD SUPPORT OF WINDOWS 95
You can always change the configuration by removing the driver and
reinstalling again. To remove the driver -
A.) If previous installed as “ Hard Disk Only”:
With the HD Traveler connected, go to the Control Panel, click on System,
then choose “Device Manager”, and under “hard disk controllers” click the
“+” sign to expand this list and then highlight “EXP PCMCIA HD”. Then
click the “Remove” button.
B.) If previous installed as “Hard Disk + Game”:
With the HD Traveler connected, go to the Control Panel, click on System.
Then choose “Device Manager, under “Multifunction adapters” click at the
“+” sign to expand this list and then highlight “EXP PCMCIA
HRDDISK+GAME”, then click the “Remove” button.
Your system should be ready for PCMCIA socket support prior to operating
the HD TRAVELER. To check whether your computer is PCMCIA Socket
supported, first, double-click on the “System” icon from the “Control Panel”
folder (you can select the “Control Panel” under “Settings” from the “Start”
menu to open the “Control Panel” folder).
Click on the Device Manager Tab. If “PCMCIA Socket” is found with a cross
(x) sign next to the PCMCIA Controller as the Figure shows below, it means
the PCMCIA device driver is not using 32-Bit Card Support.
Page 9

In this case, double click the PCMCIA Controller and a dialog box will be
displayed as below. Please place a check mark next to the current
configuration of the Device usage box, and then select OK.
CHANGING A DRIVE LETTER ASSIGNED TO HD TRAVELER
In some case user need to change a drive letter for the HD Traveler, for
example, from “D” drive to “E” drive, please follow the instructions below.
Open "Control Panel", then "System", select "Device Manager" tab,
double click "Disk Drives", select "Generic IDE Disk Type 80" (or "Generic
IDE Disk Type 00") then click "Properties" button.
After the PCMCIA 32-Bit Card support is installed, Windows will ask you to
reboot your computer. Then you should refer to the first section in the
manual, “Using The HARD DISK Under Windows 95” to configure the HD
TRAVELER.
If the PCMCIA Socket is not found, then you must add a PCMCIA socket to
your system. Please click on the “Add New Hardware” icon in the Control
Panel folder and select “PCMCIA socket”. Select the appropriate type of
PCMCIA Controller that matches yours and follow the on-screen instruction.
Select "Settings" tab, check the "Removable" under options, then change
the "Start drive letter" and the "End drive letter" to the letter you wish to
choose.
Page 10

INSTALL THE WINDOWS NT 4.0 DEVICE DRIVER
Currently there is no Plug and Play support for the Windows NT 4.0, User
need to insert the HD PC Card while the power is off. Restart the computer
and click on My Computer , then Control Panel, choose SCSI Adapters.
Choose Drivers tab and the click on Add.. From the Install Driver click
Have Disk
GAME PORT CALIBRATION
The game port on the HD Traveler requires I/O address 200 to 207. Not all
the notebooks have this I/O available, please check APPENDIX A for the
incompatible list of notebooks. If your notebook is compatible with the game
port and you already installed the necessary driver for the game port, you
will need to calibrate your joystick (or game-pad) before you use it. To check
if the game port is functioning correctly, first make sure you connected the
joystick or game-pad) to the game port firmly and then do the following
steps-
Calibration Under DOS Mode
Most of the game programs offer a calibration utility allow you to calibrate
your joystick.
Joystick Calibration Under Windows 95
Select “Control Panel” from “My Computer”, and then select “Joystick”. Click
on calibrate and follow the on-screen instructions to finish the joystick
calibration. You can test the calibration result by clicking the “Test” button
and running the testing procedure.
Install from disk will prompt for a diskette to install the driver, using Browse
button or type in the path A:\winnt finishing the installation then you need to
restart the computer.
After computer boot up go to My Computer icon you should have an addition
hard disk icon.
Page 11

PCMCIA SOFTWARE (DOS/WINDOWS3.X) INFORMATION
If you have installed the PCMCIA software, such as SystemSoft’s CardSoft
or Databook’s Cardtalk, then EXPHDG.EXE will call these PCMCIA software
to enable the card. If you don’t have one, EXPHDG.EXE still can directly
access your hardware to enable the card. In this case, your computer should
have an Intel 82365SL Personal Computer Interface Controller (PCIC) or
another compatible controller.
PCMCIA software contains several components: Socket services, Card
services, Resource Initialization Utility and Card Installation Utility. The
remainder of this section will explain the four components and list the device
driver names for the major PCMCIA software.
Socket Services provide the interface between a system’s BIOS and the
host controller chips (such as the Intel 82365SL PCIC, Vadem 468, etc )
Socket Services includes functions such as configuring a socket for an I/O or
memory interface and controlling socket power voltages. The Socket
Services driver you have varies with the host computer chip of your
computer.
Card Services provides the interface between the PC Card and the PCMCIA
sockets. Card Services must be aware of the I/O, IRQ, and memory
resources already used by the system so it can accurately assign unused
resources to the PC Cards.
To ensure Card Services will operate reliably regardless of the system it is
installed on, some PCMCIA software provides its own resource initialization
utility, which will check I/O ports, IRQs, and memory addresses and then
report that information to Card Services.
The Card Installation Utility detects the insertion and removal of PC cards,
and automatically determines the card type upon insertion so the card and
socket will be configured properly.
The device driver names of the major PCMCIA software are listed below:
Software/Device
Driver
Socket Services SS365SL.EXE,
Card Services CS.EXE PCMCS.EXE PCCS.EXE IBMDOSCS.SYS
Resource
Initialization Utility
IDE/ATA Driver ATADRV.EXE PCMATA.SYS
SRAM Card Driver MTSRAM.EXE
Flash Card Support MTAA.EXE,
Memory Card
Driver
Card Installation
Utility
Card Services Power
Management
SystemSoft
CardSoft
SS365LP.EXE,
SSCIRRUS.EXE,
SSDBOOK.EXE,
SVADEM.EXE,
SSVLSI.EXE
CSALLOC.EXE PCMRMAN.SYS PCRM.EXE DICRMU02.SYS
MTAB.EXE,
MTI1,EXE
MTI2P.EXE
MEMDRV.EXE
CARDID.EXE PCMSCD.EXE PCENABLE.EXE AUTODRV.SYS
CS_APM.EXE $ICPMDOS.SYS
Phoenix Award
Cardware
PCMSS.EXE SSPCIC.EXE IBMDSS02.SYS
IBM
ThinkPad
If you are not sure which PCMCIA software you are using, you may check it
by typing TYPE CONFIG.SYS at the DOS prompt followed by the ENTER key.
The file should come up and look like one of the following examples.
Page 12

SYSTEMSOFT PCMCIA SOFTWARE SAMPLE CONFIG.SYS FILE
LASTDRIVE=Z
DEVICE=C:\DOS\HIMEM.SYS
DEVICE=C:\DOS\EMM386.EXE NOEMS X=D000-D3FF
FILES=40
BUFFERS=20
STACKS=9,256
DEVICEHIGH=C:\CARSOFT\SS36SSL.EXE
DEVICEHIGH=C:\CARDSOFT\CS.EXE
DEVICEHIGH=C:\CARDSOFT\CSALLOC.EXE
REM** The REM’s should be removed from the follwing
REM** lines to enable memory and hard drive card support
REM** DEVICEHIGH=C:\CARDSOFT\ATADRV.EXE
REM** DEVICEHIGH=C:\CARDSOFT\MTSRAM.EXE
REM** DEVICEHIGH=C:\CARDSOFT\MTDDRV.EXE
DEVICEHIGH=C:\CARDSOFT\CARDID.EXE
REM HD TRAVELER I/O 320-32F, GAME ENABLE
DEVICE=C:\PCMHD\EXPHDG.EXE /P:320 /G
PHOENIX PCMCIA SOFTWARE SAMPLE CONFIG.SYS FILE
LASTDRIVE=Z
DEVICE=C:\DOS\HIMEN.SYS
DEVICE=C:\DOS\EMM386.EXE NOEMS X=D000-D3FF
DOS=HIGH, UMB
STACKS=9,256
DEVICE=c:\PCMPLUS3\CNFIGNAME.EXE/DEFAULT
DEVICE=C:\PCMPLUS3\PCMSS.EXE
DEVICE=C:\PCMPLUS3\PCMCS.EXE
DEVICE=C:\PCMPLUS3\PCMRMAN.EXE
DEVICE=C:\PCMPLUS3\PCMSCD.EXE
REM HD TRAVELER I/O 340-34F, GAME DISABLE
DEVICE=C:\PCMHD\EXPHDG.EXE /P:340
FILES=40
STACKS=9,256
DOS=HIGH
DEVICEHIGH=C:\THINKPAD\IBMDSS02.SYS /S0=2
DEVICEHIGH=C:\THINKPAD\IBMDOSCS.SYS
DEVICEHIGH=C:THINKPAD\DICRMU02.SYS /MA=D000-DFFF
DEVICEHIGH=C:\THINKPAD\$ICPMDOS.SYS
DEVICE=C:\THINKPAD\AUTODRV.SYS C:\THINKPAD\AUTODRV.INI
REM HD TRAVELER I/O 320-32F, GAME ENABLE
DEVICE=C:\PCMHD\EXPHDG.EXE /P:320 /G
AWARD PCMCIA SOFTWARE SAMPLE CONFIG.SYS FILE
LASTDRIVE=Z
DEVICE=C:\DOS\HIMEN.SYS
DEVICE=C:\DOS\EMM386.EXE NOEMS X=D000-D3FF
FILES=40
BUFFERS:20
STACKS=9,256
DEVICE=C:\CARDWARE\SSPCIC.EXE
DEVICE=C:\CARDWARE\PCCS.EXE
DEVICE=C:\CARDWARE\PCRM.EXE/AUTODETECT
DEVICE=C:\CARDWARE\PCENABLE.EXE
REM HD TRAVELER I/O 320-32F, GAME DISABLE
DEVICE=C:\PCMHD\EXPHDG.EXE /P:320
IBM PCMCIA SOFTWARE SAMPLE CONFIG.SYS FILE
LASTDRIVE=Z
DEVICEHIGH=C:\DOS\HIMEN.SYS/TESTMEM:OFF /MACHINE:2
DEVICEHIGH=C:\DOS\EMM386.EXE NOEMS X=D000-DFFF
BUFFERS=40
Page 13

POWER SAVING
APPENDIX A
The HD TRAVELER drive will automatically enter the sleep mode (spindle
off) when it has not been accessed for about 4 minutes.
The “Hot insert/remove” feature of a PCMCIA card helps to save power. If
PCMCIA software that is Exchangeable Card Architecture (ExCA) compliant
has been loaded on to your computer, then you can remove the HD
TRAVELER interface card from your system after being booted, and insert it
again when you need to use the HARD DISK device. For notebook computer
users, removing the card will preserve power and prolong battery life.
GAME PORT INCOMPATIBLE LIST
The following notebooks have been tested and have been confirmed
as incompatible with the Game Port on the HD Traveler:
Canon Innova Book 490CDT
Compaq Armada 4120T
Compaq Armada 4130T
Dell Latitude LM series
Dell Latitude LX series
Fujitsu Lifebook 535T, 535TX, 555T
Fujitsu Melan
Gateway 2000 Solo 2200
HP Omnibook 800CT
IBM Thinkpad 365CS, 365XD, 365X
IBM Thinkpad 701 series
IBM Thinkpad 760CD, 760EL, 760E
IBM Thinkpad 560 series
Micron Millennia series
NEC Versa 2405
NEC Versa 6050
TI Travelmate 4000M
Winbook LM
If your notebook already has a built-in game port, due to the I/O conflict, you
will NOT be able to use the Game Port adapter.
For the latest update, please check our Web site at www.expnet.com
Page 14
APPENDIX B
WINDOWS 95’s MS-DOS Mode for the HD Traveler
This procedure will allow you to use the HD Traveler in a pure MS-DOS
environment for those applications that will not run in Windows 95.
An MS-DOS mode icon is set up with a separate config.sys and
autoexec.bat will be run when the icon is used.
The requirements are that your system’s PCMCIA controller has to be INTEL
(PCIC) and compatible or the DOS PCMCIA socket drivers (contact your
notebook manufacturer) be loaded before the EXP device DOS drivers. If
the above requirements are met, please proceed with the following:
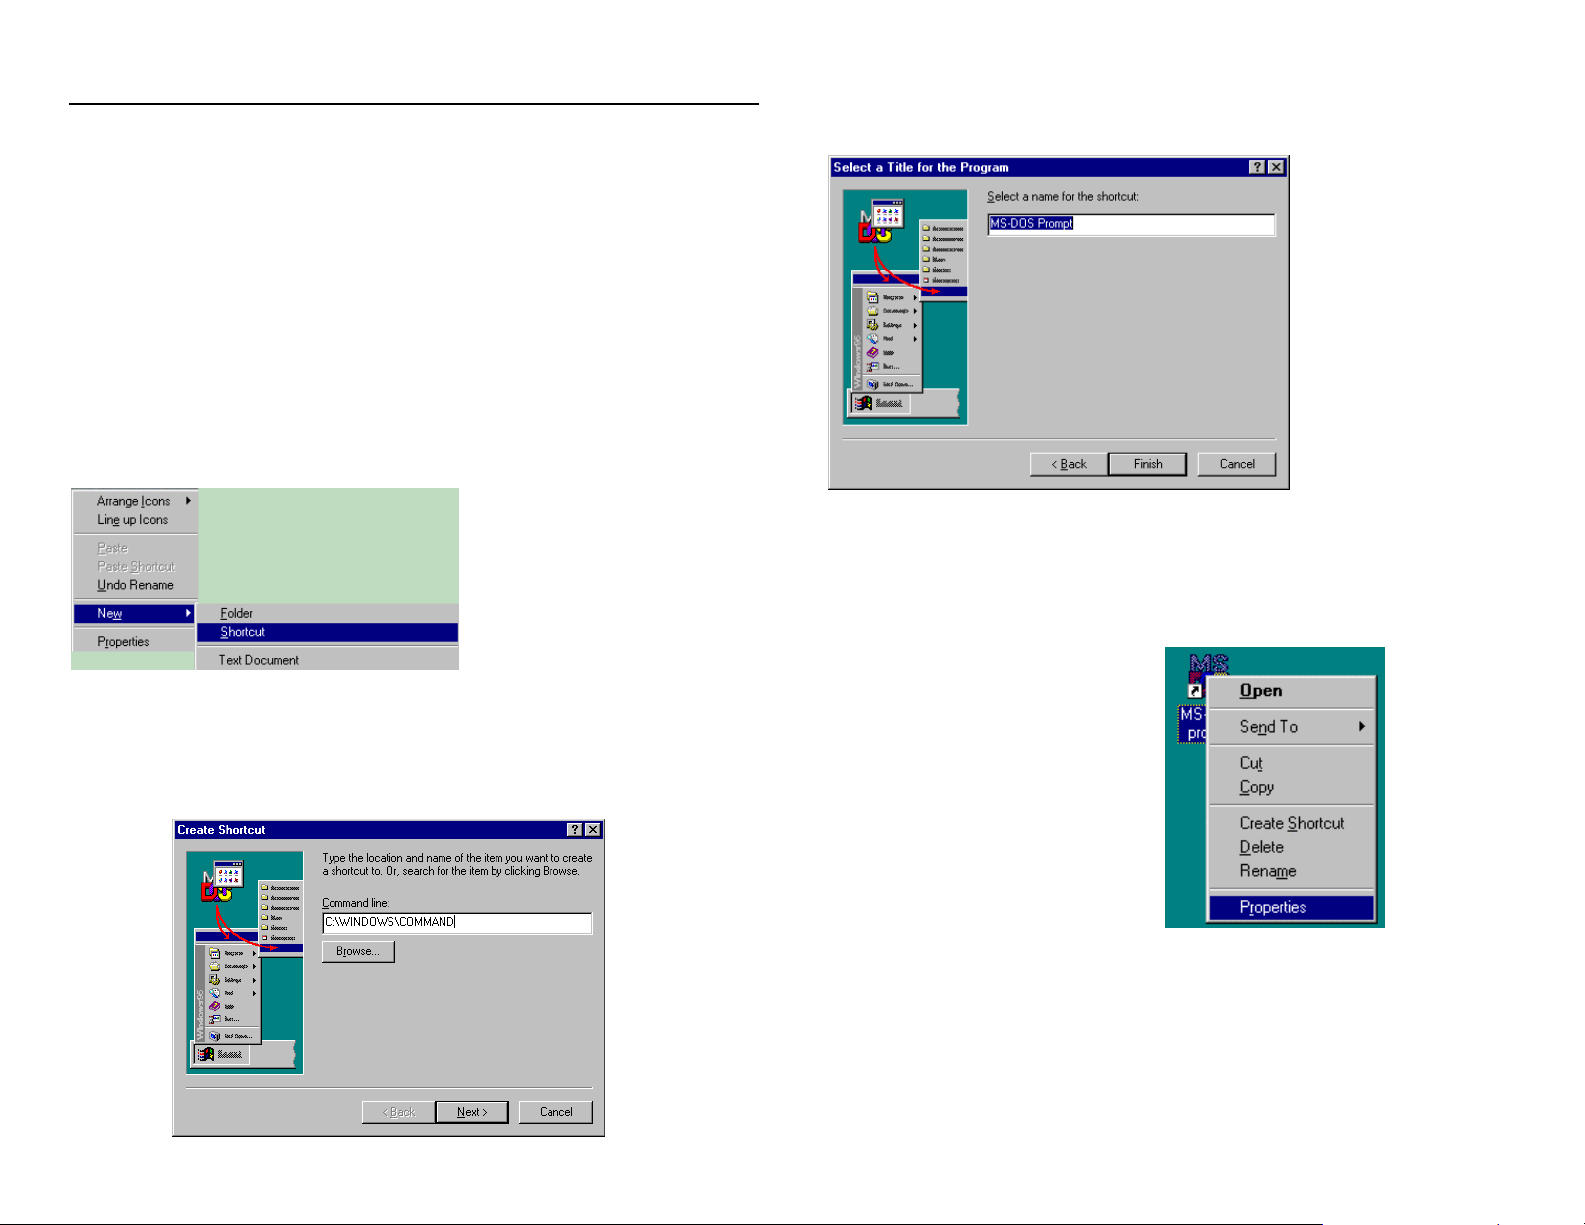
• click mouse right button
onto the desktop’s empty
area
• Go to “New”, then choose
“Shortcut”
• Type in at the Command line - “C:\WINDOWS\COMMAND”
• Click on “Next”
• Click on “Finish”
• Click the mouse right button on the new MS-DOS icon
• Go to “Properties”
• Go to “Program”
Page 15
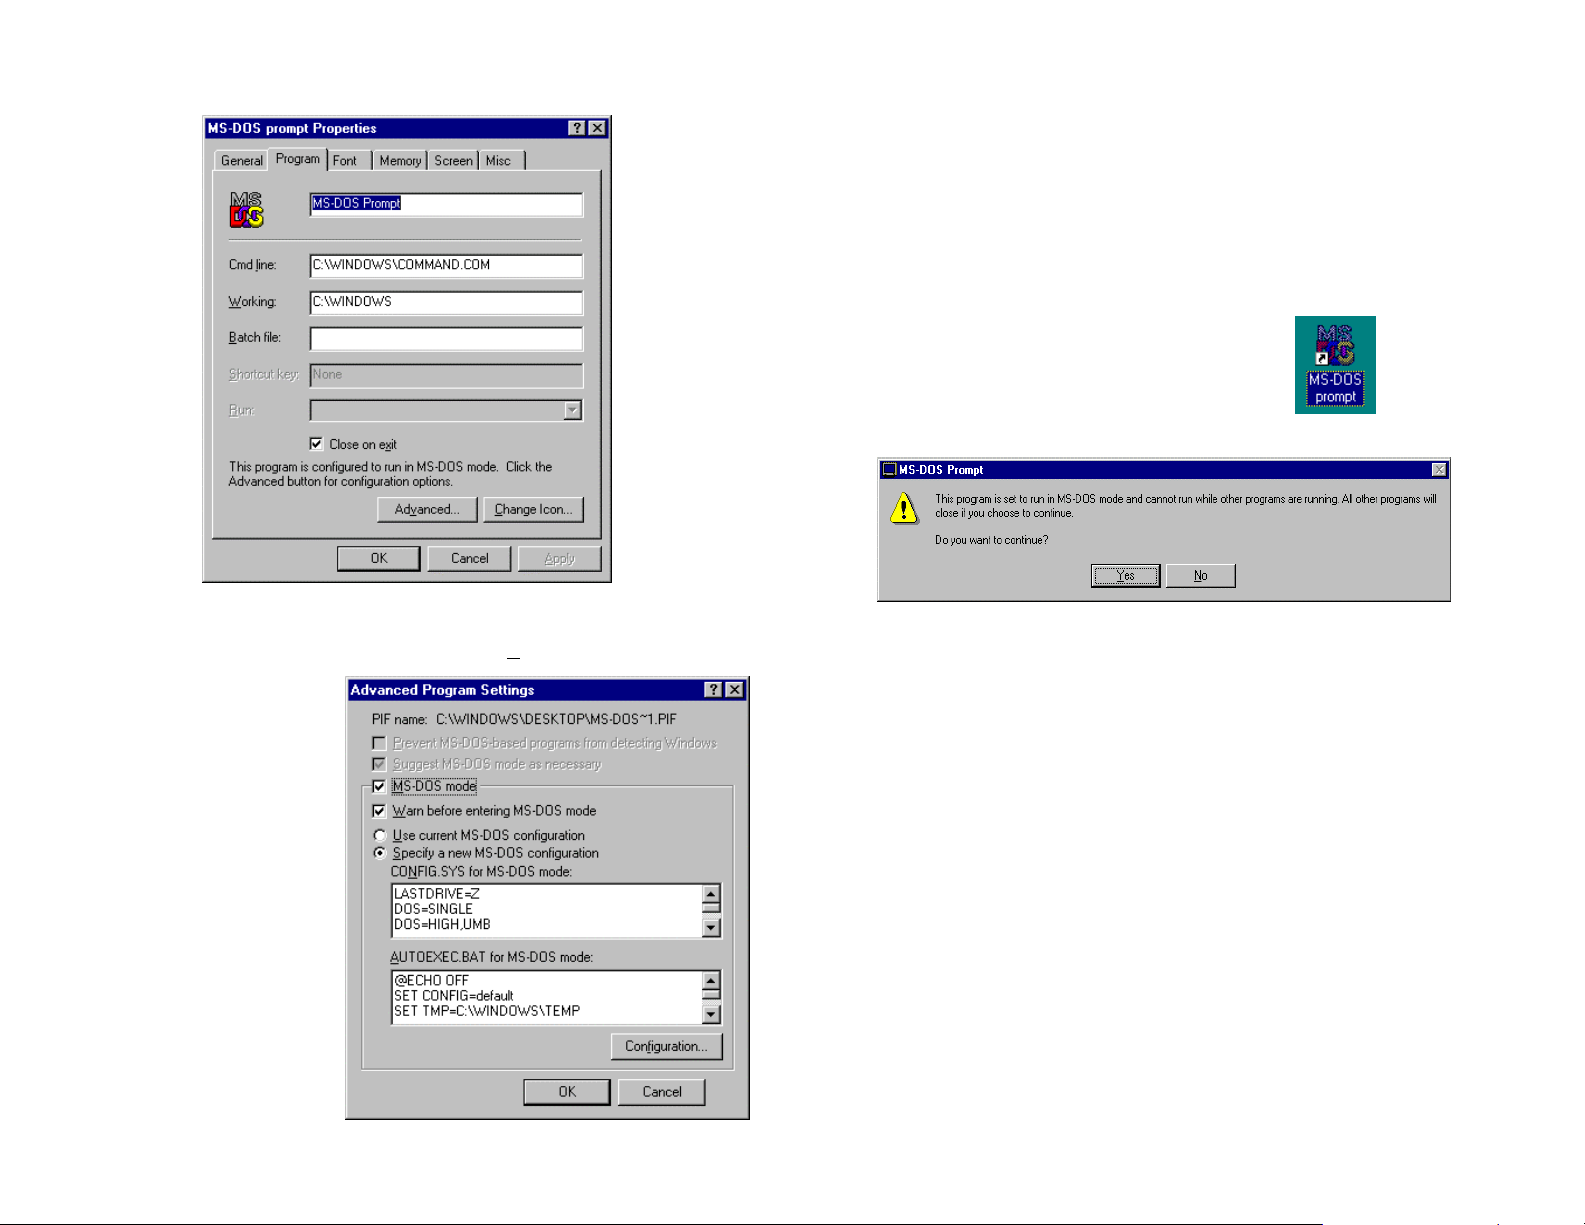
Click on the “Advanced”
• Click the “MS-DOS mode” Click on “Specify a new MS-DOS
configuration”
• Click on “OK”. Then
click on “OK”. This is
the end of the DOS
mode icon setup.
• The Next step is to configure the DOS mode session for the DOS drivers
that are needed to run the Hard disk/game card.
• If you have a config.dos and autoexec.dos file on the “C” drive. Just put
the lines that are missing in the corresponding boxes. If you do not have
these files just continue without it. This just means that certain devices
may not function without first loading the DOS drivers for this DOS
mode session.
• Double click on the new icon.
• Click on “YES
• Once the computer is started in this mode, you can then install the DOS
HD Traveler drivers.
• Run the Installation program for the DOS drivers from EXP’s disk.
• More detailed instructions on “SOFTWARE INSTALLATION FOR
DOS/WINDOWS 3.1” can be found under ‘Automatic installation’
• To restart Windows 95 normally, type in EXIT at the command prompt
and press “Enter”.
 Loading...