

Page 1
Dual Ports Serial PC Card Installation Guide
DOC. NO: LD-5118
SOFTWARE INSTALLATION
For Windows 95
Insert the Serial PC Card into the PCMCIA socket of your notebook computer.
Once the Serial PC Card is inserted properly, Windows 95 will detect the new device
automatically and prompt you a screen to begin the software installation.
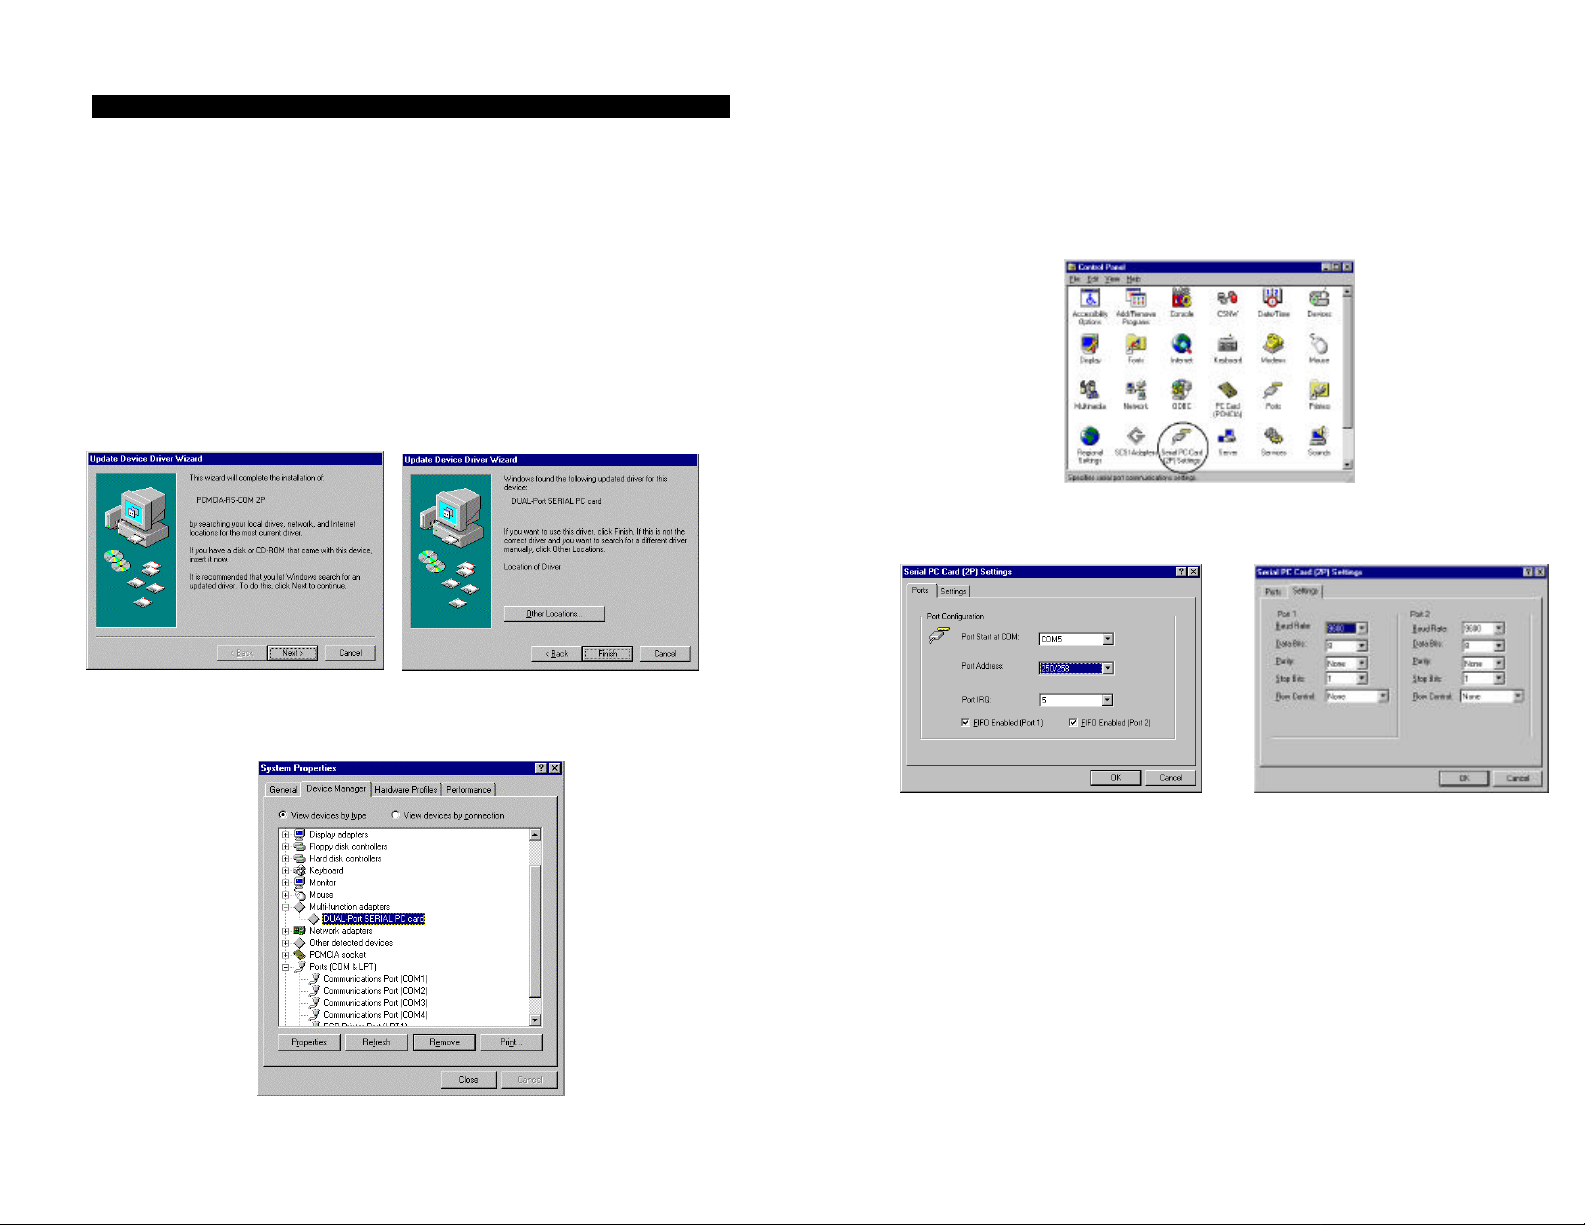
Insert the Serial PC Card device driver diskette into your floppy disk drive. Click
“Next” button to continue.
Press ENTER or click Finish to continue. If the working directory is not drive A, click
Other Locations for manually searching for a driver. The installation will proceed
automatically.
For Windows NT
1. Insert the Serial PC Card device driver to your floppy disk drive.
2. In the Start menu, click Run.
3. A dialog box will appear. Type in A:\WINNT\SETUP.EXE.
4. From the main group menu, you may go to Control Panel to check if the device
driver is installed as the following screen displays the icon.
5. Double click the Serial PC Card (2P) Settings icon, the following dialog box
will appear to display the properties. Click OK to use the default settings or
you may change the settings if there is any conflicts.
You may go to the Device Manager to check if the device driver is installed properly
or to make changes to the configurations as the following figure illustrates. (Go to My
computer. Click mouse right button, click Property. Select Device Manage.)
6. Remember to reboot your computer for the first time installation or if you are
making any changes to the configuration.
Page 2

FOR DOS/WINDOWS 3.1.
Dual Ports:
Automatic Installation
1. Insert the Serial PC Card device driver diskette into your floppy disk drive.
2. Change the working directory to the floppy drive containing the device driver
diskette and type “A:\” (depending on your port number), and press ENTER.
3. At the DOS prompt, type “INSTALL” followed by the ENTER key.
4. Press ENTER or click on the OK button when the opening screen appears. A
warning screen will be displayed to remind you this installation program is for
DOS/Windows 3.1 rather than for Window 95. Press “Y” or ENTER to
continue, otherwise, press “N” to exit.
5. If you select to continue the installation, a dialog box will then appear for
specifying 1) the directory to install the device driver; 2) the COM port or I/O
port address; 3) the IRQ number. Enter the directory you select to install the
driver and press TAB to forward to next field to set the I/O port and the IRQ
after completing the selection, click on the Install button to continue. The rest of
the installation will proceed automatically.
6. After completing, remember to REBOOT your system.
Manual installation
You may also manually install the device driver by performing the following steps.
1. Copy the files ARICOM.EXE (OR ARICOM2.EXE if your Serial PC Card is a
dual ports model) from the Serial PC Card device driver diskette to your hard
disk.
DEVICE = driver:\path\ARICOM2.EXE /Px /Iy
where x is used to select COM ports, the valid ports options are 1 (3E8H/2E8H),
2 (250H/258H) or 3 (260H/268H).
where y is used to select IRQ number, the valid numbers are
3,4,5,7,9,10,11,12,15.
Example:
DEVICE= driver:\path\ARICOM2.EXE /P1 /I10 ;
3E8H~3EFH for port1, 2E8H~2EFH for port2,IRQ=10
If your computer has been loaded with ExCA compliant PCMCIA software, then you
are allowed to hot insert/remove the Serial PC Card, which means you can
connect/remove the Serial PC Card all the time without rebooting your system. If
your system doesn’t have the software, however, each time you remove the card and
need to use it again, you have to type ARICOM.EXE /Cx /Iy or
ARICOM2.EXE /Px /Iy at DOS prompt to enable the Serial PC Card.
Note:
1. For IRQ sharing feature is not supported in DOS and Windows 3.1, you can not
use 2 ports at the same time unless your “Interrupt Service Routing” is able to
identify which port is driving the IRQ line; Otherwise, your system will hang on
by the IRQ conflicts.
2. For IRQ sharing feature is supported in Windows 95, the above problem won’t
occur under Windows 95 environment.
2. According to your port number, add the following lines to the BOTTOM of your
CONFIG.SYS file :
Single Port:
DEVICE = driver:\path\ARICOM.EXE /Cx /Iy
where x is used to select COM port, the valid ports are 1,2,3,4.
where y is used to select IRQ number, the valid numbers are
3,4,5,7,9,10,11,12,15.
Example:
DEVICE= driver:\path\ARICOM.EXE /C3 /I10 ;
select COM3(3E8H-3EFH), IRQ=10
FCC COMPLIANCE STATEMENTS
This equipment has been tested and found to comply with the limits for a Class B digital device,
pursuant to Part 15 of the FCC Rules. These limits are designed to provide reasonable protection
against harmful interference in a residential installation. This equipment generates, uses and can
radiate radio frequency energy and, if not installed and used in accordance with the instructions, may
cause harmful interference to radio communications. However, there is no guarantee that interference
will not occur in a particular installation. If this equipment does cause harmful interference to radio
or television reception, which can be determined by turning the equipment off and on, the user is
encouraged to try to correct the interference by one or more of the following measures:
Reorient or relocate the receiving antenna.
Increase the Distance between the equipment and receiver.
Connect the equipment into an outlet on a circuit different from that to which the receiver is
connected.
Consult the dealer or an experienced radio/TV technician for help.
 Loading...