

Page 1

R
Adaptec Easy CD Creator
Standard Edition
User’s Guide
Page 2

Copyright
©
1998 Adaptec, Inc. All rights reserved. No part of this publication may be reproduced, stored
in a retrieval syste m, or transmitted in an y fo r m or by any means, electronic, mechanical, pho tocopying, recording or otherwise, without the prior written consent of Adaptec, Inc., 691 South
Milpitas Blvd., Milpitas, CA 95035.
Trademarks
Adaptec, the Adap tec l ogo , Ea sy CD Cr eato r, and CD Spin Doc tor are tr ade mark s o f Adap tec,
Inc. which may be registered in some jurisdictions.
Windows and Windows 95 are registered trademarks and Windows NT is a trademark of
Microsoft Corporation in t he U.S. and othe r countries used under license.
All other trademarks are owned by their respective owners.
Changes
The material in this document is for information only and is subject to change without notice.
While reasonable efforts have been made in the preparation of this docume nt to assure its accuracy, Adaptec, Inc. assumes no liability resulting from errors or omissions in this document,
or from the use of the information contained herein.
Adaptec reserves the right to make changes in the product design without reservation and without notification to its users.
Adaptec Software License Agreement
In return for acquiring a license to use the software ("Softw ar e") a nd related documentatio n,
you agree to the following terms and conditions:
License. This Agreement grants you, the Licensee, a license to: (a) use the Software on a
1
single computer system or, in the case of a multiuser or networked system which permits
access to the Software by more than one user at the same time, at a single working location; and (b) make one copy of the Software in machine readable form solely for back-up
purposes provided you reproduce Adaptec’s copyrig ht no ti ce and any proprietary
legends.
Restrictions. You may no t di stribute copies of the Software to others or el ectronically
2
transfer the Software from one computer to another over a network. You may not use the
Software from multiple lo ca ti ons of a multiuser or networked system at any time . T he
Software contains tra de secrets and in order to protect the m yo u ma y not decompile, reverse engineer, disassem bl e, or otherwise reduce the Sof tware to a human-perceivable
form. YOU MAY NOT MODIFY, ADAPT, TRANSLATE, RENT, LEASE, LOAN, RESELL FOR PROFIT, DISTRIBUTE, NETWORK OR CREATE DERIVATIVE
WORKS BASED UPON THE SOFTWARE OR ANY PART THEREOF.
Ownership of Software. As Licensee, you own the media upon whi ch the software is re-
3
corded or fixed, but Adaptec retains title and ownership of the Software recorded on the
original media and all subsequent copies of the Software, regardless of the form or media
in which or on which the original and other copies may exist. This license is not a sale of
the Software or any copy.
ii
Page 3

Confidentiality . You agree to maintain the Softwar e in conf idence and to not disc lose the
4
Software to any third par ty with out the express written consen t of Adaptec. You further
agree to take all re asonab le prec auti ons to pr eclud e access o f unaut hori zed per sons to the
Software.
Term. This license is effective until January 1, 2045, un less terminated ear lier. You may
5
terminate the license at any time by destroying the Softwar e (i ncluding the related documentation) together with all copies or modifications in any form. Adaptec will have the
right to terminate your license immediately if you fail to comply with any term or condition of this Agreement. Upon any termination, including termination by you, you must destroy the Software (including the related documentation) together with all copies or
modifications in any form.
Limited Warranty. Adaptec warrants only that the media upon which the Software is fur-
6
nished will be free from defects in material or workmanship under normal use and service
for a period of thirty (30) days from the date of delivery to you. ADAPTEC DOES NOT
AND CANNOT WARRANT THE PERFORMANCE OR RESULTS YOU MAY OBTAIN BY USING THE SOFTWARE OR DOCUMENTATION. THE FOREGOING
STATES THE SOLE AND EXCLUSIVE REMEDIES ADAPTEC WILL PROVIDE
FOR BREACH OF WARRANTY. EXCEPT FOR THE FORE GOING LIMITED WAR RANTY, ADAPTEC MAKES NO WARRANTIES, EXPRESS OR IMPLIED, AS TO
NONINFRINGEMENT OF THIRD PARTY RIGHTS, MERCHANTABILITY OR FITNESS FOR A PARTICULAR PURPOSE. Some states do not allow the exclusion of implied warranties or limitations on how long an implied warranty may last, so the above
limitations may not apply to you. This warranty gives you specific leg al rig hts a nd you
may also have other rights whic h va ry from state to state.
Limitation of Liability. IN NO EVENT WILL ADAPTEC BE LIABLE TO YOU FOR
7
ANY SPECIAL DAMAGES, INCLUDING ANY LOST PROFITS, LOST SAVINGS
OR OTHER INCIDENTAL OR CONSEQUENTIAL DAMAGES, EVEN IF ADAPTEC
HAS BEEN ADVISED OF THE POSSIBILITY OF SUCH DAMAGES, OR FOR ANY
CLAIM BY ANY OTHER PARTY. Some states do not allow the exclusion or limitation
of special, incidental, or consequential damages, so the above limitation or exclusion may
not apply to you.
Limitation of Rem edies. Adapt ec’s enti re liabili ty and yo ur exclus ive remedy sh all be: (a)
8
the replacement of any media not meet ing Adaptec’s limited warranty which is returned
to Adaptec; or (b) if Adaptec or it s dist ri but or is unable to deliver replacement media
which is free of defects in materials or workmanship, you may terminate this Agreement
by returning the Softwa re a nd your money will be refunded.
Export. You acknowle dge that the laws and regulati ons of t he Un it ed States restrict the
9
export and re-export of the Software. You agree that you will not export or re-export the
Software or media in any form without the appropriate United States and foreign government approval.
Government Restricted Rights Legend for Units of the DoD. Us e, duplication or disclo-
10
sure by the Government is subject to restrictions as set forth in subparagraph (c)(1)(ii) of
the Rights in Technica l Data and Computer Software clause at 252.227-7013. Adaptec,
Inc., 691 South Milpitas Boul evard, Milpitas, California 9503 5.
iii
Page 4

Government Restricted Rights Legend for Civilian Agencies. Use, reproduction or disclo-
11
sure is subject to restrictions set forth in subparagraphs (a) through (d) of the Commercial
Computer Software - Restricte d Rights clause at 52.227-19 and the limitat io ns set fort h
in Adaptec, Inc. is standard commercial agreement for this software. Unpublished - rights
reserved under the co pyright laws of the United States.
General. You acknowledge that you have read this Agreement, understand it, and that by
12
using the software you agree to be bound by its terms and conditions. You furt he r agre e
that it is the co mplete and e xclusive s tatemen t of the a greement be tween Ada ptec and y ou
which supersedes any proposal or prior agreement, oral or written, and any other communication between Ada pte c and you relating to the subject matte r of th is A greement. No
variation of the terms of this Agreement or any different terms will be enforceable against
Adaptec unle s s A d aptec gives its expre s s consent, including an express waiver of the
terms of this Agreement, in a writing signed by an officer of Adaptec. You assume full
responsibility for the use of the Software and agree to use the Software legally and responsibly. This Agreement shall be governed by California law except as to copyright matters
which are covered by Federal law. This Agree m ent is deemed entered into at Milpitas,
California by both parties. Should any provision of this Agreem ent be declared unenforceable in any jurisdi ct ion, then such provision shall be deem ed to be severable from
this Agreement and shall not affe ct the remainder hereof. All right s in the Soft ware not
specifically granted in this Agreement are reserved by Adaptec.
Should you have any questions concerning this Agreement, you may contact Adaptec by
13
writing to: Adaptec, Inc., Leg al D epart ment, 691 South Milpitas Boulevard, Milpitas,
California 95035.
iv
Page 5

Contents
1 Introduction
Make CDs Right on Your Desktop 1-1
Deluxe Edition Features 1-2
System Requirements 1-2
Supported Formats 1-3
File System Options 1-4
About CD-Recordable and CD-ReWritable Technology 1-5
CD-R Advantages 1-5
CD-RW Advantages 1-5
Getting Help 1-6
2 Getting Started
Installing Easy CD Creator 2-1
Opening Easy CD Creator 2-2
Using the Wizard to Make a CD 2-2
About the Easy CD Creator Window 2-4
Direct Access to Windows Explorer 2-4
Obtaining Blank CDs 2-5
Care and Handling of Recordable CDs 2-5
3 Making an Audio CD
How to Make an Audio CD 3-1
Recording Audio Tracks from an Existing Music CD 3-2
Recording Wave Files Stored on Your Hard Drive 3-4
Pre-recording Audio Tracks to Wave Files 3-5
Combining Both Audio Tracks and Wave Files 3-6
Modifying Your CD Layout 3-7
Changing the Order of Your Songs 3-7
Removing Songs from Your CD Layout 3-7
Renaming Songs in Your CD Layout 3-7
v
Page 6

Adaptec Easy CD Creator Standard Edition
Merging (Composite) Tracks 3-8
Splitting Composite Tracks 3-8
Saving a CD Layout 3-8
Opening an Existing CD Layout 3-9
Closing an Audio CD 3-9
Playing an Audio CD 3-9
CD-DA Recording Tips 3-10
Using Easy CD Creator Wizard 3-10
Using CD Copier 3-10
Minutes on a CD 3-10
Recording Time 3-10
Recording from a CD-ROM Drive 3-10
Eliminating the Two-Second Gap Between Tracks 3-11
Using a Disc Image to Record Your CD 3-11
Leaving the Session Open 3-11
4 Making a Data CD
How to Make a Data CD 4-2
Adding Files and Folders to Your CD Layout 4-2
Defining CD Layout Properties (Optional) 4-3
Creating the CD 4-5
Modifying Your CD Layout 4-5
Creating New Folders 4-5
Changing the Order of Files and Folders 4-5
Removing Files and Folders 4-6
Renaming Files and Folders 4-6
Finding Files 4-6
Saving a CD Layout 4-7
Opening an Existing CD Layout 4-7
Advanced Options 4-7
Using File Ordering Priorities 4-7
CD-ROM Writing Tips 4-11
Using Easy CD Creator Wizard 4-11
CD-ROM Formats 4-11
Using a Disc Image to Make Your CD-ROM Disc 4-12
Using CD Copier Deluxe 4-12
vi
Page 7

Contents
Making a Bootable CD 4-12
5 Making a Multisession CD
How to Make a Multisession CD 5-2
Importing Previous Sessions 5-3
Importing a Specific Session 5-3
Multisession CD Writing Tips 5-4
Deciding Which Format to Use: CD-ROM or CD-ROM
XA 5-4
Testing Your Multisession CD 5-5
Importing Sessions 5-5
Accessing Different Sessions 5-5
6 Making a Bootable CD
How to Make a Bootable CD 6-2
Tips for Making a Bootable CD 6-3
7 Combining Data And Audio on a CD
What is a Mixed-Mode CD? 7-1
What is a CD Extra Disc? 7-1
How to Make a Mixed-Mode CD 7-2
How to Make a CD Extra Disc 7-3
CD Extra Disc Properties General Tab 7-4
Mixed-Mode and CD Extra Writing Tips 7-4
When to Use Mixed-Mode 7-4
When to Use CD Extra 7-5
Differences Between the Two Methods 7-5
Multimedia CDs 7-6
Using a Multimedia Authoring Program 7-6
8 Making a CD from a Disc Image
How to Make a Disc Image 8-2
Creating the Disc Image 8-2
Creating the CD from a Disc Image 8-2
Disc Image Writing Tips 8-3
vii
Page 8

Adaptec Easy CD Creator Standard Edition
9 Making a Copy of a CD
What Kinds of CDs Can I Copy? 9-2
Opening CD Copier Deluxe 9-3
How to Make a Copy of a CD 9-3
CD Copier Advanced Tab Settings 9-5
CD Copier Tips 9-5
Testing Your CD Copier Setup 9-5
Source CD-ROM Drives for CD-to-CD Copying 9-5
Using the CD Recorder for CD-to-CD Copying 9-6
Copying Audio and Mixed-Mode 9-6
Making Multiple Copies 9-6
10 Making a Custom Jewel Case Insert
How to Make a Jewel Case Insert 15-2
Editing Inserts 15-2
Adding Text and Graphics 15-5
Arranging Track Titles 15-11
Printing Jewel Case Inserts 15-12
Setting Insert Layout Options 15-13
Margins Tab 15-14
Units Tab 15-14
Fonts Tab 15-14
11 Troubleshooting
Testing Your System Configuration 16-1
When to Test 16-1
How to Run the System Tests 16-2
Resolving Common Problems 16-3
Problems Reading Recordable CDs 16-3
Problems Reading Multisession CDs 16-3
CD-ROM Drive Incompatibility with Recordable CDs 16-4
Finding Error Message Descriptions 16-4
Using the Online Help 16-4
Getting Technical Support 16-5
Electronic Support 16-5
viii
Page 9

A Command Reference
The Easy CD Creator Main Toolbar A-1
Additional Audio CD Layout Toolbar Icons A-3
Additional Jewel Case Layout Toolbar Icons A-3
The File Menu A-5
The Edit Menu A-6
The View Menu A-7
The Disc Menu A-8
The Tools Menu A-8
The Help Menu A-8
The Track Menu A-9
The Effects Menu A-9
The Layout Menu A-10
The Text Menu A-10
The Arrange Menu A-11
The Page Menu A-11
B Setting Options and Properties
CD Creation Setup Settings B-1
CD Creation Setup General Tab B-2
CD Creation Setup Advanced Tab B-3
CD Creation Setup Summary Tab B-4
CD Layout Properties B-5
CD Layout Properties General Tab B-5
Data Settings B-6
Audio Settings B-7
File Types B-7
File System Properties B-8
Setting General Options B-9
Contents
ix
Page 10

Page 11

1
Introduction
Make CDs Right on Your Desktop
Using Easy CD Creator®, you can copy files from your computer to
a recordable compact disc (CD). Using a special write-once media,
Easy CD Creator allows you to permanently store data in a format
that is readable on virtually all CD-Recordable (CD-R) and Compact
Disc-Read Only Memory (CD-ROM) drives. In addition, the audio
CDs you create with your CD recorder are readable in your home or
car CD player. If you are using a CD-ReWritable (CD-RW) drive, you
can also use a special erasable media that allows you to rewrite
information on a CD (see
Te c h n o l og y
■
on page 1-5). You can use Easy CD Creator to:
Compile CDs of your favorite music
About CD-Recordable and CD-ReWritable
Archive data
■
Back up your hard drive
■
Disseminate information to field offices
■
Distribute databases
■
Create a test copy of a multimedia CD
■
Make a master CD for disc duplication
■
Duplicate a CD
■
Erase and rewrite the contents on a CD
■
Make a custom jewel case insert
■
1-1
Page 12

Adaptec Easy CD Creator Standard Edition
Deluxe Edition Features
You are using Easy CD Creator Standard Edition. If you want to
upgrade to the Deluxe Edition, you can purchase it from a retail
store (see http://www.adaptec.com to locate a retailer near you) or
directly from Adaptec.
Easy CD Creator Deluxe Edition comes with advanced applications
that expand your CD-R capabilities. These advanced features
include the following:
■ CD Spin Doctor™—allows you to make audio CDs from tradi-
tional music sources including LPs and cassette tapes and to
clean up the sound quality before recording songs to CD.
■ Picture CD Creator—allows you to make CDs containing your
favorite photographs.
■ Video CD Creator—allows you to make CDs containing videos
or still images.
■ Sound Editor—allows you to make changes to sound files on
your hard drive before recording them to CD.
■ Session Selector—allows you to view any previous session of a
multisession CD, not just the last session.
System Requirements
The following is a list of the Easy CD Creator system requirements:
■ Personal Computer (PC) running Windows 95
Windows NT™ v.4.0
■ CD Recorder
1-2
®
or
Page 13

Introduction
Supported Formats
Easy CD Creator supports the following CD-R formats which are
used to make data and audio CDs:
■ CD-ROM
Data CDs
■ CD-ROM XA
Data CDs
■ CD-DA
Audio CDs
■ CD Extra
Audio and Data CDs
■ Mixed-Mode
Data and Audio CDs
This is the standard for recording
data CDs.
XA stands for Extended Architecture.
CD-ROM XA is based on CD-ROM
but adds better audio and video capabilities so CD-ROMs can more easily
be used for multimedia applications.
Compact Disc-Digital Audio. This is
the original compact disc standard
and is used to record music CDs.
This format allows you to combine
audio and data on a CD. The audio
tracks are recorded in the first session
and one CD-ROM XA data track is
recorded in the second session to
make a multisession CD. The audio
tracks on CD Extra discs can be
played on home or car CD players.
This format allows you to combine
data and audio on a CD. Mixed-Mode
differs from CD Extra in that the data
is recorded in the first track followed
by one or more audio tracks, and both
the data and audio tracks are combined in a single session.
Mixed-Mode CDs should be used on
CD-ROM or CD-R drives only.
1-3
Page 14

Adaptec Easy CD Creator Standard Edition
File System Options
Easy CD Creator allows you to select different file system options
depending on how you plan to use your CD. They include:
■ ISO 9660—An international standard that specifies how data is
physically recorded onto the CD (sector-by-sector) into a directory tree (up to eight levels of directories). CD-ROMs made
according to the ISO 9660 Level 1 specifications can be read on
multiple operating systems such as Macintosh, DOS,
Windows 3.x, Windows 95, and Windows NT.
■ Joliet—A standard developed by Microsoft for Windows 95
that allows CDs to be recorded using long filenames. Joliet
allows you to use file names up to 64 characters in length,
including spaces, and also allows you to use Unicode characters for better international support. Joliet records the associated DOS standard filename (8 + 3 characters) for each file so
that the CD can be read on DOS systems or earlier versions of
Windows.
1-4
Page 15

Introduction
About CD-Recordable and CD-ReWritable Technology
If you have a CD-RW drive, you can use two types of discs to make
your own CDs:
■ CD-Recordable (CD-R) discs
■ CD-ReWritable (CD-RW) discs
CD-RW is a new technology and like CD-R, it allows you to record
information to a CD. What is new is that with CD-RW you can also
erase the contents of a CD and rewrite new information to it.
Depending on how you want to use your CD, each disc type offers
unique advantages.
CD-R Advantages
■ Good for permanent data storage
■ Less expensive per CD than CD-RW discs
■ Readable on virtually all CD-ROM and CD-R drives
CD-RW Advantages
■ Allows you to erase the data and rewrite new information (for
example, updating files)
■ Allows you to make a practice CD or to test the contents of a
CD before making a permanent one
■ More cost effective for near-line data storage requirements
than CD-R
Note:
Only CD-RW drives can read and write data to
CD-RW discs.
1-5
Page 16

Adaptec Easy CD Creator Standard Edition
Getting Help
Read this user’s guide for background information about CD-R
technology and instructions for recording CDs using Easy CD Creator. In this user’s guide, the term CD-Recordable includes both
CD-Recordable and CD-ReWritable technology. Technical terms are
defined in a Glossary in the back of this user’s guide.
Additional information is available online:
■ Select Help Topics from the Help menu
■ Use context-sensitive help in the active window
Refer to Chapter 11, Troubleshooting, for technical support and sug-
gestions for resolving problems.
❒
1-6
Page 17

2
Getting Started
The following sections explain how to install and open Easy CD Creator, explain how to use the Wizard to make an audio or data CD,
describe the Easy CD Creator main window, and explain how to
directly access Windows Explorer.
Installing Easy CD Creator
To install Easy CD Creator, follow these steps:
Insert the Adaptec Easy CD Creator CD into your CD-R,
1
CD-RW, or CD-ROM drive.
The Easy CD Creator installation window appears.
Select from one of the following:
2
– Easy CD Creator—to install the Easy CD Creator Standard
Edition software on your computer.
– MGI PhotoSuite (if the MGI software is included)—to
install MGI PhotoSuite so you can view picture CD images.
– CD Catalog—to install an electronic catalog of CD record-
able related products.
If the main menu does not appear automatically, click on the
button on the task bar, select
Start
D: is your CD drive’s letter), then click on OK.
Follow the on-screen installation instructions.
3
Run
, type
D:\SETUP
(where
2-1
Page 18
Adaptec Easy CD Creator Standard Edition
Opening Easy CD Creator
To open Easy CD Creator so you can begin creating your own CDs,
follow these steps:
In Windows 95, click the Start button located on the left side of
1
the taskbar.
Select Programs, point to Adaptec Easy CD Creator, and select
2
Easy CD Creator.
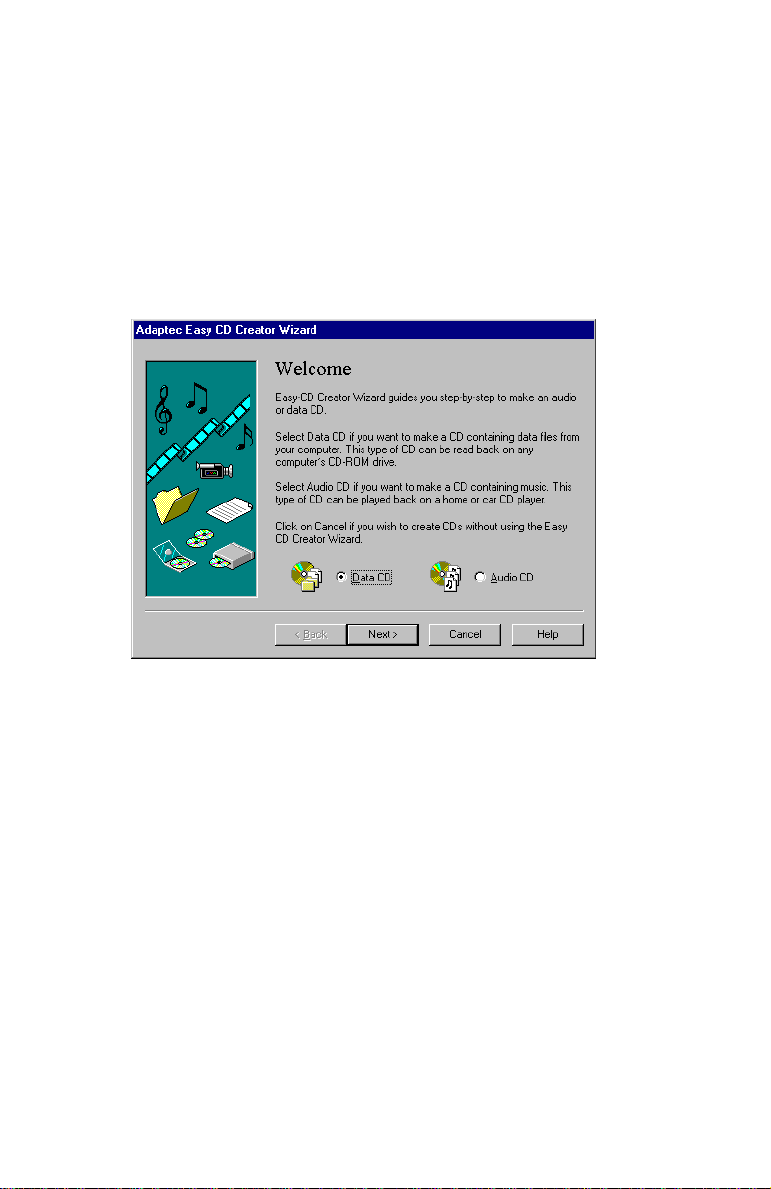
The Adaptec Easy CD Creator Wizard Screen appears.
Using the Wizard to Ma ke a C D
The easiest way to make a CD is to use the Easy CD Creator Wizard.
The Wizard guides you step-by-step to make a simple audio or data
CD. If you are new to CD-R technology, the Wizard is an excellent
way to become familiar with the CD recording process and make an
audio or data CD.
If you want to use advanced features (such as making a CD Extra
disc), refer to the appropriate chapters in this user’s guide.
To use the Wizard, follow these steps:
Select the type of CD you want to make: Data CD or Audio
1
CD.
Follow the on-screen instructions in the Wizard windows.
2
2-2
Page 19

Getting S tarted
To see a list of the files and folders or audio tracks you are adding to
your CD, move the Adaptec Easy CD Creator Wizard screen to view
the main Easy CD Creator window.
To move the Wizard window:
1
Click the Adaptec Easy CD Creator Wizard title bar.
2
Drag the Wizard window to the right side until you see the
Untitled - Easy CD Creator window.
A list of the folders you selected is displayed below the icon.
For a description of the window, see About the Easy CD Creator Win-
dow on page 2-4.
If you need help, click Help to open the Online Help, or refer to the
Audio or Data chapters in this user’s guide.
If you want to make a CD without using the Wizard:
■ Click Cancel in the Easy CD Creator Wizard Welcome window
and follow the instructions in the following chapters for the
type of CD you want to make.
2-3
Page 20
Adaptec Easy CD Creator Standard Edition
About the Easy CD Creator Window
The Easy CD Creator window appears when you click Cancel in the
Wizard or when you disable the Wizard option (see Setting General
Options on page B-9). The following graphic shows the different
parts of the Easy CD Creator window:
Easy CD Creator Tabs Windows Explorer Data CD Layout Window
Direct Access to Windows Explorer
Easy CD Creator includes direct access to Windows Explorer so you
can display Windows Explorer while using Easy CD Creator instead
of switching back and forth between the two applications. This feature allows you to easily select and arrange files and folders you
want to record. You can also use standard Windows Explorer commands to move files and folders around. Refer to the Microsoft
Windows 95 Online Help for information about how to work with
files and folders.
To hide Windows Explorer in the Easy CD Creator window:
■ Select Hide Windows Explorer from the View menu.
2-4
Page 21

Getting S tarted
Obtaining Blank CDs
You can obtain blank CDs where you purchased your CD-R or
CD-RW drive or at local computer retailers. Refer to your CD
recorder’s manufacturer for recommended CD brands.
Also, if you are planning to use CD-RW discs, please see About CD-
Recordable and CD-ReWritable Technology on page 1-5 for information
about CD-RW discs.
Care and Handling of Recordable CDs
Follow these general guidelines when handling CD-Recordable and
CD-ReWritable discs:
■ Do not expose CDs to sun or other strong light for long periods.
Also try to avoid high heat and humidity.
■ Handle CDs carefully to avoid scratching them, especially on
the top (label) side which has only a thin layer of lacquer protecting the writing surface.
■ Do not use alcohol-based pens to write on CDs—the ink may
eventually eat through the top lacquer-surface and damage
your data.
■ Do not use ball point pens to write on CDs— you may scratch
through the lacquer and damage your data.
■ Use felt-tip pens to write on CDs
■ Use only CD labels that are expressly designed for recordable
CDs.
■ Store and ship CDs in their jewel cases or other protective
containers.
■ Do not stack CDs together—they may stick to each other, caus-
ing parts of the reflective surface to peel off.
❒
2-5
Page 22

Page 23

3
Making an Audio CD
An audio CD is a compact disc (CD) containing digital audio tracks
recorded in the Compact Disc-Digital Audio (CD-DA) format.
Audio CDs can store up to 74 minutes of music and may contain up
to 99 tracks, each usually representing a separate piece of music.
Audio CDs can be played back from a home or car CD player or
from a CD-ROM drive through speakers or headphones attached to
the drive’s output jack.
Using Easy CD Creator, you can:
Compile audio CDs of your favorite music
■
Make CDs from Wave files on your hard drive
■
How to Make an Audio CD
To make an audio CD, you can record songs from:
■ Tracks
■ Wave
■
on an existing CD
files stored on your hard drive (*.wav, a standard
Windows format for sound files.)
A combination of Wave files and tracks
3-1
Page 24

Adaptec Easy CD Creator Standard Edition
Note:
Easy CD Creator is designed to assist you in reproducing material in which you own the copyright or have
obtained permission to copy from the copyright owner.
Unless you own the copyright or have permission to copy
from the copyright owner, you may be violating copyright
law and be subject to payment of damages and other remedies. If you are uncertain about your rights, contact your
legal advisor.
The following sections explain how to add songs to a CD layout so
you can record them to a blank CD using the menu bar. If you want
the help of the Wizard, see Using the Wizard to Make a CD on page
2-2.
For helpful pointers when recording music CDs, see CD-DA Record-
ing Tips on page 3-10.
Recording Audio Tr acks from an Existing Music CD
To record songs (audio tracks) from an existing music CD, you need
to first create a CD layout— a file that contains the list of songs and
the order in which they will be recorded—then record the layout to a
blank CD. To do so, follow these steps:
Select New CD Layout from the File menu or open an existing
1
CD layout.
3-2
Page 25
Making an Audio CD
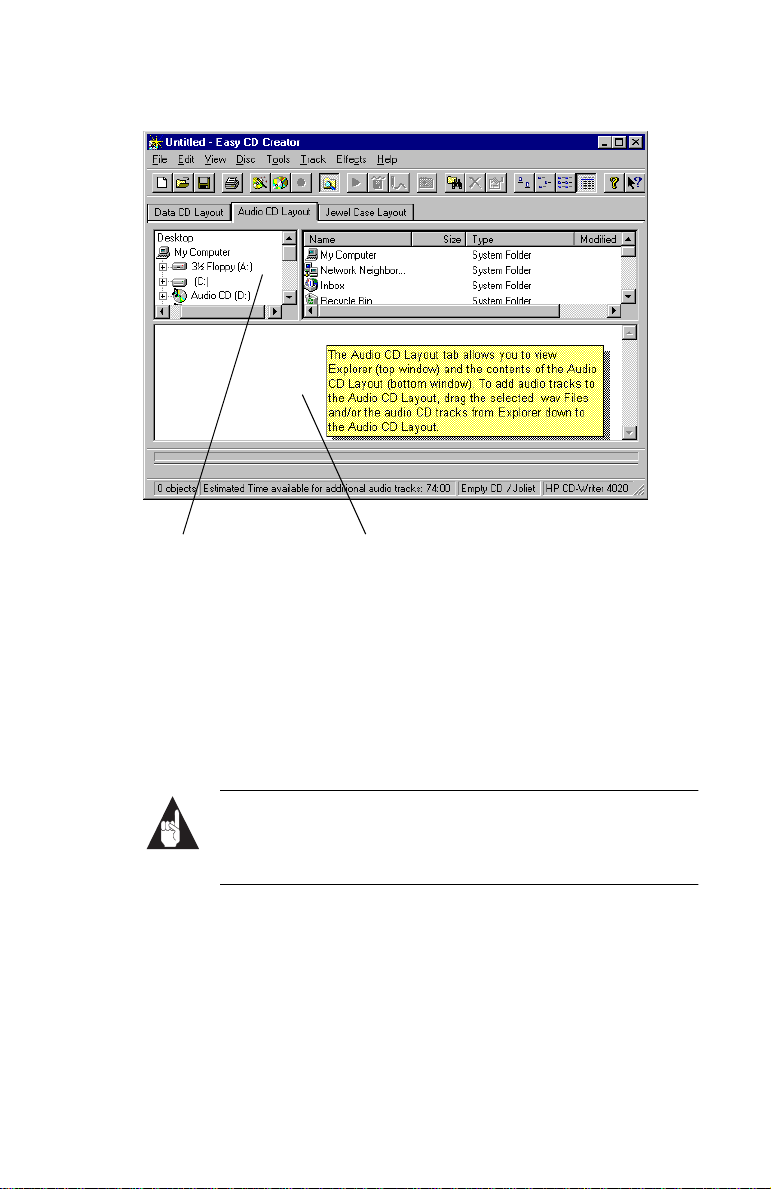
2
Click the Audio CD Layout tab.
Windows Explorer Audio CD Layout Window
The top part of the window is Windows Explorer, where you
can select the songs you want to record. The bottom part is the
Audio CD Layout window, which allows you to view the contents of the CD layout. To make changes to the list of tracks in
the Audio CD Layout tab, see Changing the Order of Your Songs
on page 3-7.
3
Insert the source CD, which contains the songs you want to
record, into your CD recorder.
Note:
You can record directly from a CD-ROM drive
only if it supports digital audio extraction. See Record-
ing from a CD-ROM Drive on page 3-10.
4
In the Explorer section of the window, select the drive where
the source CD is located to view the list of songs on the CD.
5
Drag the songs that you want to record from Explorer to the
Audio CD Layout window.
To change the name of a song, see Renaming Songs in Your CD
Layout on page 3-7.
3-3
Page 26

Adaptec Easy CD Creator Standard Edition
6
Repeat steps 3-5 for each existing music CD from which you
want to record songs.
7
Select Create CD from the File menu when you have placed all
of the songs that you want to record into the Audio CD Layout
window.
The CD Creation Setup box appears.
8
Make changes, if any, to the CD Creation Setup settings (see
CD Creation Setup Settings on page B-1 for descriptions) and
click OK.
Easy CD Creator begins recording your CD layout to a blank CD.
Insert a blank CD when prompted.
When the CD is finished, a final message box appears notifying you
that the recording is complete.
Note:
To make a sleeve that lists the artist, CD title, and
songs, see Chapter 10, Making a Custom Jewel Case Insert.
Recording Wave Files Stored on Your Hard Drive
To record an audio CD using Wave files (*.
be stored on your hard drive at 11, 22, 44.1 KHz, 8- or 16-bit, mono
or stereo. To make a Wave file from an existing CD, see Pre-recording
Audio Tracks to Wave Files on page 3-5.
To record Wave files stored on your hard drive to a blank CD, follow
these steps:
1
Insert a blank CD into your CD recorder.
2
Select New CD Layout from the File menu or open an existing
layout.
3
Click the Audio CD Layout tab.
4
Select the Wave files you want to record from Explorer and
drag them to the Audio CD Layout window.
To change the name of the song(s) see Renaming Songs in Your
CD Layout on page 3-7.
3-4
wav
), the Wave files must
Page 27

Making an Audio CD
5
Select Create CD from the File menu when you have finished
adding all of the songs you want to record to your CD layout.
The CD Creation Setup box appears.
6
Make changes, if any, to the CD Creation Setup settings (see
CD Creation Setup Settings on page B-1 for descriptions) and
click OK.
Easy CD Creator begins recording your CD layout to a blank CD.
When the CD is finished, a final message box appears notifying you
that the recording is complete.
.
Note:
To make a sleeve that lists the artist, CD title, and
songs, see Chapter 10, Making a Custom Jewel Case Insert.
Pre-recording Audio Tracks to Wave Files
Pre-recording audio tracks to Wave files on your hard drive is a way
to:
■ Minimize swapping CDs in and out of your drive if you want
to make more than one copy
■ Improve the sound quality if your CD recording system is less
than optimal
You can pre-record one Wave file at a time. To pre-record a Wave file
from an existing CD, follow these steps:
1
Insert the source CD, which contains the song you want to prerecord to your hard drive, into your CD recorder.
2
Click the Audio CD Layout tab.
3
Select the audio track you want to pre-record from Explorer
and drag it into the Audio CD Layout window.
4
Highlight the audio track in the Audio CD Layout window.
5
Select Pre-record to WAV file from the Track menu.
Pre-recording audio tracks to Wave files requires approximately 10MB of space on your hard drive for one minute of
music.
3-5
Page 28
Adaptec Easy CD Creator Standard Edition
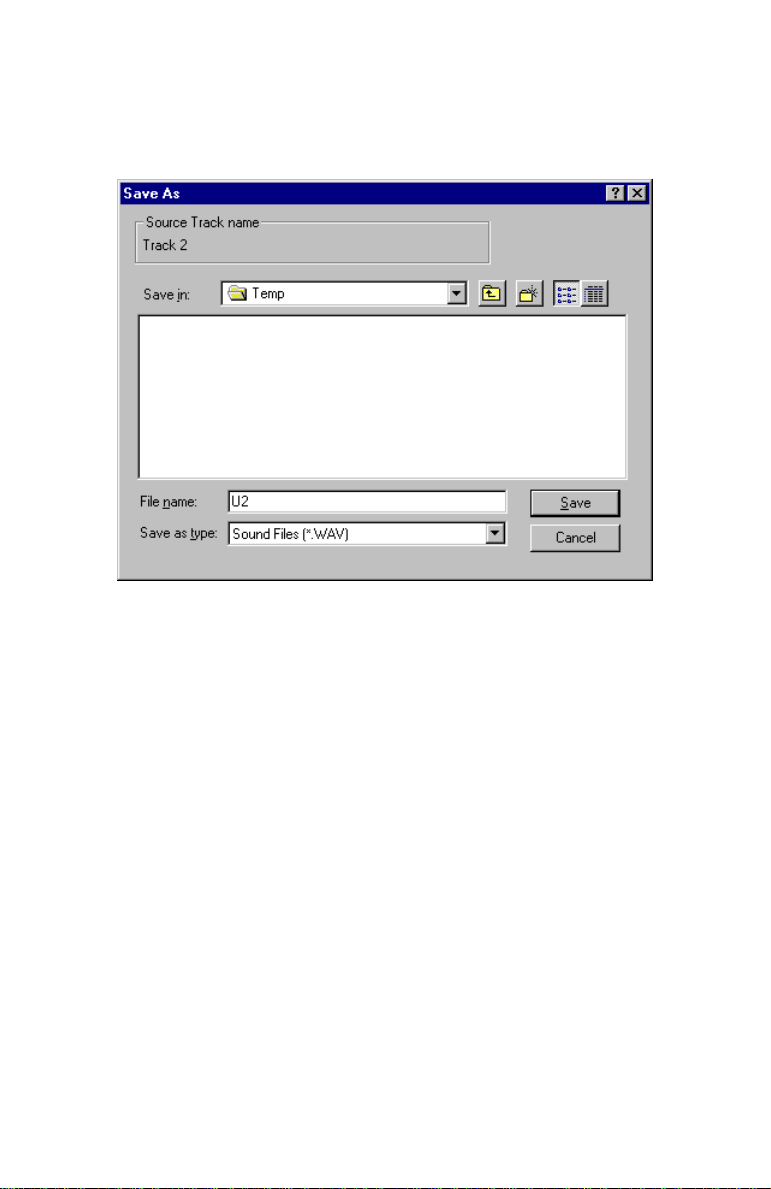
6
Type in a file name for the Wave file and choose a different
location on your hard drive if you do not want to record your
Wave file to your Temp directory.
7
Click Save.
Easy CD Creator pre-records your Wave file to your hard drive. A
final message box notifies you when the recording is complete.
Combining Both Audio Tracks and Wave Files
You can make a music CD that contains songs both from prerecorded Wave files stored on your hard drive and from audio tracks
on an existing music CD. To do so, follow the steps outlined in
Recording Audio Tracks from an Existing Music CD on page 3-2 and
Recording Wave Files Stored on Your Hard Drive on page 3-4, depend-
ing on the type of songs you want to record. Once you have added
all of the audio tracks and Wave files you want to record to your CD
layout, select Create CD from the File menu.
3-6
Page 29

Making an Audio CD
Modifying Your CD Layout
The following sections describe how to make changes to your CD
layout.
Changing the Order of Your Songs
Once you have added more than one song to your CD layout, you
can change the order of the songs at any time before creating the CD.
For example, you can move the track that is listed as the third song
in the Audio CD Layout window to the top of the list.
To change the order of the songs, follow these steps:
Select the song whose order you want to change in the CD
1
layout.
Drag it to the position you want it to appear in the Audio CD
2
Layout window.
Removing Songs from Your CD Layout
You can remove any song you have added to a CD layout at any
time before you create a CD. To remove a song from your CD layout,
follow these steps:
Select the song you want to remove in the Audio CD Layout
1
window.
Select Cut from the Edit menu.
2
Renaming Songs in Your CD Layout
To rename a song listed in your CD Layout, follow these steps:
Select the song you want to rename in the Audio CD Layout
1
window.
Select Rename in the Track menu.
2
Type in the new name in the text box.
3
3-7
Page 30

Adaptec Easy CD Creator Standard Edition
Merging (Composite) Tracks
Easy CD Creator features an option that allows you to make a composite track, a single track that is made up of two or more separate
tracks. Composite tracks are useful when you want to make a single
song from several Wave files.
To make a composite track, follow these steps:
Select two or more songs you want to merge into a single track.
1
Select Merge Tracks from the Effects menu.
2
The tracks appear as a single track in the Audio CD Layout window.
Note:
Merged tracks are treated as a single song when
played in a CD player.
Splitting Composite Tracks
To separate a composite track—a single track that is made up of two
or more separate tracks, follow these steps:
Select the composite track you want to separate.
1
Select Split Tracks from the Effects menu.
2
The composite track appears as multiple tracks in the Audio CD
Layout window.
Only tracks that have been merged can be split.
Saving a CD Layout
You can create a CD layout, save it, then use it to record a CD later.
To save a CD layout, follow these steps:
Select Save As from the File menu.
1
Type in the File name.
2
Select the location where you want to store the file.
3
3-8
Page 31

Making an Audio CD
Opening an Existing CD Layout
To open a CD layout you have previously saved:
■ Select Open CD Layout from the File menu.
Easy CD Creator displays the contents of the layout.
Closing an Audio CD
By default, Easy CD Creator closes the session so you can listen to
your audio CD on a home or car stereo. However, if you selected
Leave Session Open in the Advanced tab (see CD Creation Setup
Advanced Tab on page B-3) and you have added all the songs you
want to record, you must close the session before you can listen to
the CD on a home or car CD player. To close the session, follow these
steps:
Select Disc Information from the Disc menu.
1
The Disc Information tab appears.
Click Close Session.
2
Click OK.
3
Easy CD Creator closes the session.
Note:
You can add more sessions to the CD, but only the first
session on an audio CD can be played back on home or car
CD players, as long as it is closed.
Playing an Audio CD
Use the Windows 95 CD player to listen to the audio CD.
3-9
Page 32

Adaptec Easy CD Creator Standard Edition
CD-DA Recording Tips
Read the following section for useful information when recording
audio CDs.
Using Easy CD Creator Wizard
The easiest way to make an audio CD is with the help of the Easy
CD Creator Wizard. The Wizard appears when you first open Easy
CD Creator and guides you step-by-step in the creation of a simple
data or audio CD.
To make an audio CD with the assistance of the Wizard, see Using
the Wizard to Make a CD on page 2-2.
Using CD Copier
If you want to copy an entire audio CD from start to finish, use the
Easy CD Creator CD Copier feature. See Chapter 9, Making a Copy of
a CD for instructions.
Minutes on a CD
ACD's capacity is measured in minutes. Recordable CDs are available in 21-, 63-, and 74-minute sizes. See Obtaining Blank CDs on
page 2-5.
Recording Ti m e
Recording times vary based on the read and write speeds of your
CD recorder and whether you are recording tracks from existing
music CDs or Wave files.
Recording from a CD-ROM Drive
If you have a CD-ROM drive that can read (not just play) audio CDs
digitally—meaning that it supports digital audio extraction—you
can use it as your source drive to record songs from an existing CD.
This means that you would not have to swap CDs in and out for
each song you want to record from a single music CD. Not all CDROM drives support digital audio extraction. To determine if your
CD-ROM does, see Testing Your System Configuration on page 11-1.
3-10
Page 33

Making an Audio CD
Eliminating the Two-Second Gap Between Tracks
To prevent a two-second gap from occurring between audio tracks,
you can record Wave files stored on your hard drive to a blank CD
using the Disc-at-Once option. See Disc-at-Once, under the CD Cre-
ation Setup Advanced Tab on page B-3.
Using a Disc Image to Record Your CD
If your CD-R system is less than optimal and you have enough space
on your hard drive, you can create an audio CD from a disc image to
increase your chances for a successful recording. Using a disc image
is also useful when you are creating multiple copies of the same CD.
See Chapter 8, Making a CD from a Disc Image.
Leaving the Session Open
If you want to record a few tracks at a time, you can choose to Leave
the Session Open (see CD Creation Setup Settings on page B-1). When
you have recorded all the tracks you want on the CD, you can then
close the session to listen to the CD on a home or car CD player. See
Closing an Audio CD on page 3-9.
❒
3-11
Page 34

Page 35

4
Making a Data CD
A data CD (also known as a CD-ROM), is a compact disc used to
store computer data. Data is written on the CD in a continuous spiral running from the center of the CD to its outside rim. All the bits
in a file are written one after the other from beginning to end, then
the next file is written, and so on.
A logical format (or file system) structures the raw bits on the CD in
a virtual
humans and computers to use the information. ISO 9660 is a worldwide standard specifying the logical format for files and directories
on a CD-ROM.
Typical uses for CD-ROMs include:
Archiving data
■
of directories and files, which makes it easier for both
tree
Backing up a hard drive or other media
■
Creating a test copy of a CD before having it factory-
■
duplicated
Disseminating information to field offices
■
4-1
Page 36

Adaptec Easy CD Creator Standard Edition
How to Make a Data CD
For helpful pointers when creating data CDs, see CD-ROM Writing
Tips on page 4-11.
To make a data CD, there are three overall procedures:
■ Add files and folders to a CD layout—a file that contains the list
of files and folders and the order in which they will be
written
■ Define the CD Layout Properties which specify your file sys-
tem preference (optional)
■ Create the CD
The following sections explain how to define the CD layout properties, add files and folders to your CD layout, and create the CD.
Adding Files and Folders to Your CD Layout
To add files and folders to your CD layout, follow these steps:
Select New CD Layout from the File menu or open an existing
1
layout.
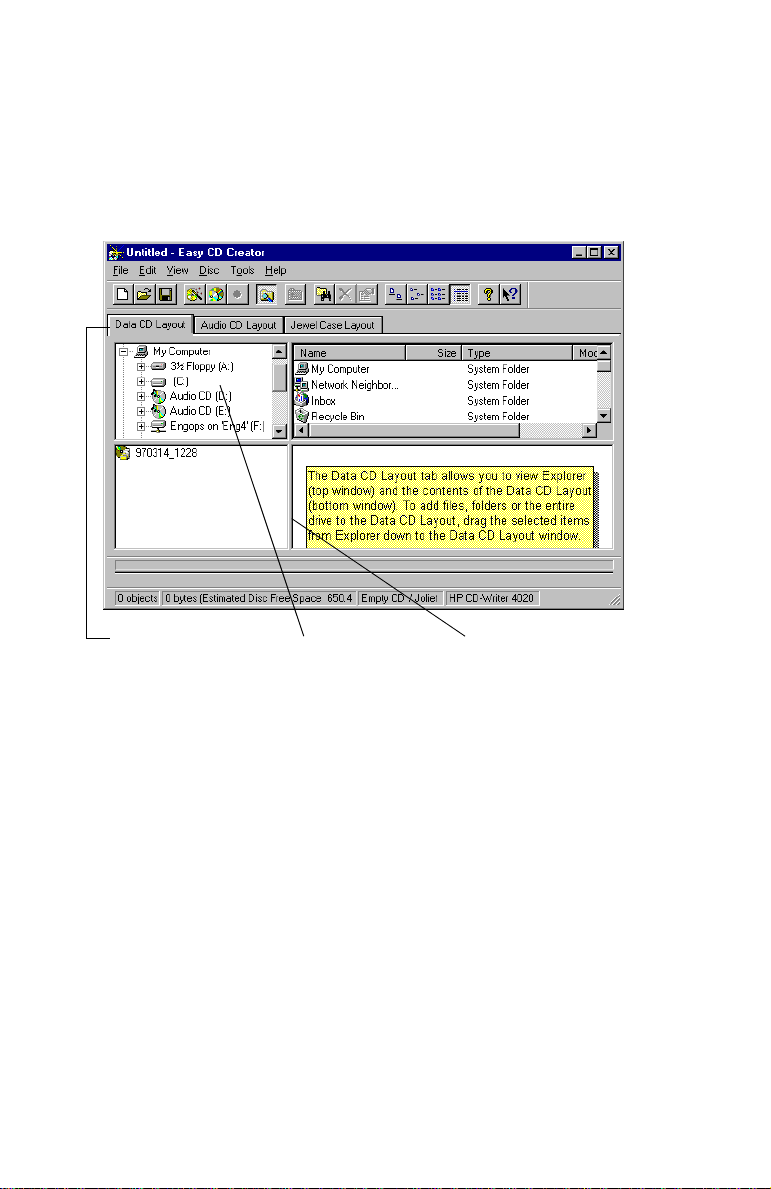
Click the Data CD Layout tab.
2
Windows Explorer Data CD Layout Window
4-2
Page 37

Making a Data CD
The top part of the window is Windows Explorer where you
can select the files and folders you want to write to CD. The
bottom part is the Data CD Layout window which allows you
to view the contents of your CD layout.
3
Select the files and folders you want to add to your CD from
Explorer and drag them into the Data CD Layout window.
To make changes to the list of files and folders in the Data CD
Layout tab, see Modifying Your CD Layout on page 4-5.
WARNING:
cally-named folders from two different sources (such as
from two different hard drives), the two folders are merged
on the CD. If there are identically-named files in the two different folders, the files that are added to the Data CD Layout
window last are the ones that are recorded to the CD. To
avoid this problem, rename one of the folders. See Renaming
Files and Folders on page 4-6.
If the Data CD Layout window includes identi-
Defining CD Layout Properties (Optional)
Easy CD Creator allows you to specify the CD layout properties for
your CD—meaning that you can customize your CD depending on
how you want to use it. You do not need to define the CD layout
properties if you want to make a CD using the default Joliet file system setting. See CD Layout Properties on page B-5.
If you do want to change the file system option to the ISO 9960 format, you must define the disc properties before adding files and
folders to your CD layout. To do so, follow these steps:
1
Select CD Layout Properties from the File menu.
2
Click the Data Settings tab.
4-3
Page 38

Adaptec Easy CD Creator Standard Edition
3
Select one of the two File System options depending on how
you want to use your CD:
■ ISO 9600 Select this option if you want to be able to read the
CD on different platforms including DOS, Macintosh, OS/2, Windows, and UNIX. Files and directories recorded to CD based on the ISO 9660 Level
One standard must meet the following (8+3)
requirements:
— A file name may not contain more than eight
alphanumeric characters and the underscore
symbol [_].
— A file name extension may not contain more
than three alphanumeric characters.
— A directory name may not contain more than
eight alphanumeric characters and the underscore symbol [_].
See File System Properties on page B-8 for information about the ISO 9660 file system properties
settings.
■ Joliet Select this option to use long file names. Joliet
allows you to use file names of up to 64 characters
in length, including spaces. Joliet also records the
associated DOS-standard name (8+3 characters) for
each file so that the CD may be read on DOS systems or earlier versions of Windows.
See File System Properties on page B-8 for information about the Joliet file system properties settings.
4
Click the File System Properties button and type in any volume descriptors information in the General tab (see File System
Properties on page B-8 for descriptions).
5
Click OK to return to the Data Settings tab.
6
Make changes, if any, to the CD Layout Properties settings (see
page B-5 for descriptions) and click OK.
4-4
Page 39

Making a Data CD
Creating the CD
Insert a blank CD into your CD recorder.
1
Select Create CD from the File menu or click the icon.
2
Make changes, if any, to the CD Creation Setup settings (see
3
CD Creation Setup Settings on page B-1) and click OK.
Easy CD Creator begins writing the files and folders listed in your
CD layout to a blank CD. A final message box notifies you when the
recording is complete.
Note:
To make a sleeve that lists the CD title and files, see
Chapter 10, Making a Custom Jewel Case Insert.
Modifying Your CD Layout
The followings sections describe how to make changes to the files
and folders listed in your CD layout.
Creating New Folders
You can create a new folder in your CD layout and then add files
and folders to that new folder.
To create a new folder:
■ Select New Folder from the Edit menu.
Changing the Order of Files and Folders
You can change the order of the files and folders to your CD layout
at any time before you create the CD. For example, you can move a
folder that appears at the end of the Data CD Layout window to the
top of the list.
Note:
Changing the order of the files and folders in your CD
layout affects only their physical position on the CD. Moving files and folders in the CD layout does not change their
original location on your computer.
4-5
Page 40

Adaptec Easy CD Creator Standard Edition
To change the order of the files and folders, follow these steps:
1
Select the file or folder you want to move in the Data CD Layout window.
2
Drag it to the position you want it to appear in the Data CD
Layout window.
Removing Files and Folders
You can remove files and folders (including everything within the
folder) at any time before you create the CD. Removing a file or
folder from your CD layout does not affect the original items on
your hard drive.
To remove a file or folder from your CD layout, follow these steps:
1
Select the file and/or folder that you want to remove in the
Data CD Layout window.
2
Select Remove from the Edit menu.
Renaming Files and Folders
You can change the name of files and folders listed in the Data CD
Layout window at any time before you create the CD. Renaming a
file or folder in the Data CD Layout window does not change the
original name of the file or folder on your hard drive.
To rename a file or folder, follow these steps:
1
Select the file or folder you want to rename in the Data CD
Layout window.
2
Select Rename from the Edit menu.
3
Type in the new name you want to call the file or folder.
Finding Files
To find a file in your CD layout, follow these steps.
1
Make sure the CD layout is the active window.
2
Select Find from the Tools menu.
3
Type in the name of the file you are looking for.
4-6
Page 41

Making a Data CD
Saving a CD Layout
You can create a CD layout, save it, then use it at a later time to add
more files and create your CD.
To save a CD layout, follow these steps:
Select Save As from the File menu.
1
Type in a file name for the CD layout.
2
Select the location where you want to store the CD layout and
3
click Save.
Opening an Existing CD Layout
To open a CD layout you have previously saved:
■ Select Open CD Layout from the File menu.
Easy CD Creator displays the contents of the CD layout. You can
make further modifications to the CD layout, or create the CD from
the layout. See Defining CD Layout Properties (Optional) on page 4-3.
Advanced Options
The following sections describe the advanced options available in
Easy CD Creator.
Using File Ordering Priorities
Easy CD Creator allows you to specify the file ordering priorities—the
order in which files are physically written to the CD. To optimize CD
access, you may want to specify that some files be written to the CD
before other files. This does not affect the logical directory structure,
but may improve the access time when reading the CD.
The three different default file ordering options are:
■ Normal—files are recorded in the order in which they appear
in the CD layout (this is the default setting)
■ Faster Access—specifies that files are written to CD before files
that are assigned a Normal priority
■ Fastest Access—specifies that files are written to CD first,
before Normal and Faster Access files, to optimize CD access
4-7
Page 42

Adaptec Easy CD Creator Standard Edition
You can also create your own file ordering priorities. See Adding New
Priorities on page 4-9.
Note:
A file’s priority is relative to other files on the CD. For
example, if you assign a high priority to all of the files in the
CD layout, Easy CD Creator records the files in the same
order as if they were left in the Normal priority.
Viewing File Ordering Priorities
To view the file ordering priorities, follow these steps:
Select Options from the Tools menu.
1
Select Show File Ordering Tab in the View options and click
2
OK.
Click the File Ordering tab.
3
4-8
File Ordering Priorities List of Files in the Priority
Page 43

Making a Data CD
Assigning File Ordering Priorities
Easy CD Creator assigns all files to the Normal priority. To change
the priority of a file(s) from Normal to a higher value such as Faster
Access or Fastest Access, follow these steps:
Select the file(s) in the right side of the File Ordering window.
1
Drag the file(s) to a different file ordering priority listed in the
2
left side of the File Ordering window.
Easy CD Creator changes the file ordering priority level for the
file(s) accordingly.
Adding New Priorities
You can create file ordering priorities above and below the Normal
priorities, and you can specify the order of the files within a given
priority. There is no limit to the number of priorities you can create;
however, no more than two or three priorities should be required.
To add file priorities, follow these steps:
Select New Priority from the Edit menu.
1
Type a name in the Name text box.
2
Select a color to identify the priority in the Color drop-down
3
list box.
Click the Move Up or Move Down buttons to position the pri-
4
ority in the list.
Click OK.
5
The new priority appears in the left side of the File Ordering
window.
Deleting Priorities
To delete a priority, follow these steps:
Select the priority you want to delete in the File Ordering
1
window.
Select Delete Priority from the Edit menu.
2
Easy CD Creator removes the priority from the list.
4-9
Page 44

Adaptec Easy CD Creator Standard Edition
Changing the Order of Files Within Priorities
There are two ways to determine the order in which files within a
given priority are written to CD:
Note:
You can only change the order of files within a priority
if you have selected Preserve normal file ordering under the
Optimization settings. See Data Settings on page B-6.
Manually
■ Select and drag the file(s) to the desired location in the files list.
Using File Proprieties
Select the files in right side of the File Ordering window.
1
Select Re-order Files from the Edit menu.
2
The Re-order files dialog box appears.
Select the option for which you want to re-order the files and
3
click OK.
4-10
Page 45

Making a Data CD
Finding Files Within File Ordering Priorities
To search for files that are grouped in a given priority, follow these
steps:
Select Find Files from the Edit menu.
1
Type the name of the file in the Named text box.
2
Select the Priority you want to search in the Look in drop-
3
down list box and click Find Now.
Displaying Priority Properties
To view and make changes to the properties of a given priority, follow these steps:
Right-click on the priority.
1
Select Properties.
2
Make changes, if any, in the Edit Priority window and click
3
OK.
CD-ROM Writing Tips
Read the following sections for useful information when writing
data CDs.
Using Easy CD Creator Wizard
The easiest way to make a data CD is with the help of the Easy CD
Creator Wizard. The Wizard appears when you first open Easy CD
Creator and guides you step-by-step in the creation of a data or
audio CD.
To make a data CD using the Wizard, see Using the Wizard to Make a
CD on page 2-2.
CD-ROM Form ats
CDs used for data storage can be written in one of two physical
formats:
■ CD-ROM (Mode 1)
■ CD-ROM XA (Mode 2)
4-11
Page 46

Adaptec Easy CD Creator Standard Edition
Easy CD Creator uses CD-ROM XA as the default format, but you
can choose to use CD-ROM. See Deciding Which Format to Use: CD-
ROM or CD-ROM XA on page 5-4
Using a Disc Image to Make Your CD-ROM Disc
If you have enough space on your hard drive, you can create a data
CD from a disc image—a file that contains all of the information necessary to record the CD. Using a disc image to create a CD offers
unique advantages over writing a CD layout directly to a disc. To
learn more about using a disc image, see Chapter 8, Making a CD
from a Disc Image.
Using CD Copier Deluxe
To make a backup copy of an entire CD from start to finish, use CD
Copier Deluxe. See Chapter 9, Making a Copy of a CD for instructions.
Making a Bootable CD
To make a data CD from which you can boot your system, see Chapter 6, Making a Bootable CD.
❒
4-12
Page 47

5
Making a Multisession CD
A multisession CD is an ISO 9660 CD (see
added incrementally in more than one session, allowing you to periodically add and update files and folders to your CD.
Uses for multisession CDs include periodically:
Backing up large quantities of data
■
Distributing data updates
■
Most CD-ROM drives can read multisession CDs.
Glossary
) to which data is
5-1
Page 48

Adaptec Easy CD Creator Standard Edition
How to Make a Multisession CD
For helpful pointers when creating multisession CDs, see Multisession CD Writing Tips on page 5-4.
Making a multisession CD involves essentially the same steps as
making a data CD. See How to Make a Data CD on page 4-2 for specific instructions on making a data CD.
To make a multisession CD, follow these steps:
To write the first session, add the files and folders to a CD
1
layout.
Select CD Layout Properties from the File menu.
2
Click the Data Settings tab and select one of the two File Sys-
3
tem options depending on how you want to use your CD: ISO
9660 or Joliet. See Data Settings on page B-6.
Click the Properties button and select either Mode 1:
4
CD-ROM or Mode 2: CD-ROM XA in the General tab. See
Deciding Which Format to Use: CD-ROM or CD-ROM XA on
page 5-4.
Insert a blank CD into your CD recorder and select Create CD
5
from the File menu.
To add another session, insert your data CD into your CD
6
recorder.
Follow steps 1-4 above. Be sure to select the same file system
7
properties used in the previous session on the CD.
Easy CD Creator automatically imports the previous session
8
on the CD to the new session (This is the default setting. See
Importing Previous Sessions on page 5-3). If you want to import a
different session, follow the instructions in Importing a Specific
Session on page 5-3.
Select Create CD from the File menu.
9
The CD now contains two sessions on the CD. You can continue to
add more sessions to the CD until the CD is full. Just be sure to
import previous sessions (the default setting) so you can read all of
the data on the CD.
5-2
Page 49

Making a Multisession CD
Importing Previous Sessions
With multisession CDs, you must import information written in a
previous session to the new session you are adding to the CD. Otherwise, you can view only the files in the most recent session.
Importing a session means the most recent session contains the new
information you are adding as well the file system information that
points to the files written in the previous session on the CD.
To import the previous session to the new session you are adding,
follow these steps:
Follow steps 1-4 in How to Make a Multisession CD on page 5-2.
1
In the Data Settings tab of the CD Layout Properties, select
2
Automatically import previous session (default setting).
Click OK and continue creating your CD.
3
If you do not import previous sessions to a multisession CD and you
want to access files written in previous sessions, see Chapter 14,
Using the Session Selector.
Importing a Specific Session
To import a specific session on the CD, not necessarily the previous
session written, follow these steps:
Follow steps 1-4 in How to Make a Multisession CD on page 5-2.
1
Select Import Session from the Disc menu.
2
The Import Session dialog box appears and lists all of the sessions on the CD.
Select the session you want to import and click Import to con-
3
tinue creating your CD.
5-3
Page 50

Adaptec Easy CD Creator Standard Edition
Multisession CD Writing Tips
Read the following sections for useful information related to making
multisession CDs.
Deciding Which Format to Use: CD-ROM or CD-ROM XA
You can turn a single-session CD into a multisession CD at any time
by adding another session. However, it’s best to decide in advance
whether or not your CD will be multisession, so that you can decide
whether to record the first session in CD-ROM format (also known
as Mode 1; see Glossary) or CD-ROM XA format (also known as
Mode 2). Regardless of which format you use, the second session
must be the same format as the first session.
If you see only the first session when you attempt to read back the
second or subsequent session on a multisession CD it may be
because:
The CD-ROM drive you are using does not read multisession
1
at all (this is most likely the case if the drive is very old).
The CD-ROM drive you are using recognizes a CD as multises-
2
sion only if it is written in the CD-ROM XA format. This problem is less likely with the newest generation of CD-ROM
drives, but is common with some older models.
Multisession CDs are recorded according to the Orange Book Part II
standard (see Glossary). Under this standard, when any CD is
inserted in a multisession CD-ROM drive, the drive by default looks
at the last session on the CD, no matter what format the CD is
recorded in.
However, inconsistencies in the application of the standard may
result in a multisession CD being read as if it were a single-session
CD and you see only the data in the first session.
To ensure the best possible multisession compatibility, record multisession CDs in the CD-ROM XA Mode 2 format.
Note:
Do not combine CD-ROM and CD-ROM XA formats
on the same multisession CD.
5-4
Page 51

Making a Multisession CD
Testing Your Multisession CD
If you need to distribute data on multisession CDs—for example,
you send CDs out to clients or colleagues, they send them back to be
updated, and then you send them out again—you should test your
multisession CD to make sure all the interested parties can read the
data. A simple test is to make a multisession CD (as described in
How to Make a Multisession CD on page 5-2) with directories named
A through M in the first session and directories N through Z in a second session. Send that CD to whoever needs to read your data; if
they can see all the directories from A to Z, then they can read your
multisession CD.
Importing Sessions
Easy CD Creator allows you to import either the previous session or
a specific session on the CD to the new session you are writing. Only
by importing a session to the new session you are adding to the CD
can you view the contents written during a previous session. To see
all of the sessions written on the CD, use the Automatically Import
Previous Session option (see Importing Previous Sessions on page 5-3)
for each session you write. This ensures that all previously written
sessions are continually imported to the most recent session on the
CD. For example, if you are writing session 2, automatically link it to
session 1 to view the contents of sessions 1 and 2. When you are
writing session 3, import session 2 to view the contents of sessions 2
and 1, and so on.
Accessing Different Sessions
If the multisession CD was not linked to previous sessions (see
Importing Previous Sessions and Importing a Specific Session on page
5-3), you can use the Session Selector to access more than just the last
session written. See Chapter 14, Using the Session Selector.
❒
5-5
Page 52

Page 53

Making a Bootable CD
6
A bootable CD is a disc that contains a
file that is an exact representation of a floppy or hard drive from
which you can boot your system.
Easy CD Creator implements the El Torito standard which was
developed by Phoenix Technologies and IBM and specifies a bootable CD-ROM format.
Bootable CDs are useful for making a backup copy of your customized system configuration and using that CD to re-create your system if necessary.
bootable image
—an ISO 9660
6-1
Page 54

Adaptec Easy CD Creator Standard Edition
How to Make a Bootable CD
For helpful pointers when creating bootable CDs, see Tips for Making
a Bootable CD on page 6-3.
To make a bootable CD, follow these steps:
Insert the source bootable floppy diskette into your floppy dis-
1
kette drive.
Select CD Layout Properties from the File menu.
2
Click the Data Settings tab.
3
Select the ISO 9660 File System option. See Data Settings on
4
page B-6.
Select Bootable and click OK.
5
6-2
Page 55

Making a Bootable CD
6
Follow the steps in How to Make a Data CD on page 4-2.
When Easy CD Creator begins writing files and folders to your
blank CD, two files are written to the root directory of your CD
layout:
bootcat.cin
Note:
Chapter 10, Making a Custom Jewel Case Insert.
and
bootimg.bim
To make a sleeve that lists the CD title and files, see
.
Tips for Making a Bootable CD
You create a bootable CD the same way as you create a bootable
floppy diskette for your working environment. Easy CD Creator
reads boot information from a floppy diskette and writes that information to a
the following floppy diskette formats:
■ 1.2 MB
■ 1.44 MB
■ 2.88 MB
bootimg.bin
file on the CD. Easy CD Creator supports
❒
6-3
Page 56

Page 57

7
Combining Data And Audio on a CD
There are many reasons to combine data and audio on a CD. These
include the ability to:
Make an audio CD and add Word files of the songs’ lyrics or
■
custom graphics for the jewel case insert
Use the CD to store data files and later add songs to the same
■
CD
Make a multimedia CD (see
■
You can combine both audio and data on a single CD using MixedMode or CD Extra. The difference between the two methods is the
way in which data and audio are recorded.
Multimedia CDs
on page 7-6)
What is a Mixe d-Mode CD?
A Mixed-Mode disc is a CD that includes both data and audio tracks
in a
single session
format in the first track on the CD followed by one or more audio
tracks in CD-DA format.
. The data is written in CD-ROM or CD-ROM XA
What is a CD Ex tra Disc?
A CD Extra disc (also known as CD Plus or Enhanced CD) is a
session CD
CD-DA format followed by a second session that contains data
tracks written in CD-ROM XA format.
. The first session contains one or more audio tracks in
multi-
7-1
Page 58

Adaptec Easy CD Creator Standard Edition
How to Make a Mixed-Mode CD
For helpful pointers when creating Mixed-Mode CDs, see MixedMode and CD Extra Writing Tips on page 7-4.
To write a Mixed-Mode CD, follow these steps:
Prepare the data portion of your CD. See How to Make a Data
1
CD on page 4-2 or use an authoring software application outside of Easy CD Creator to make a multimedia CD.
Insert a blank CD into your CD recorder.
2
Select New CD Layout from the File menu.
3
Click the Data CD Layout tab.
4
Select the data files you want to add listed in Explorer and
5
drag them into the Data Files window.
Click the Audio CD Layout tab.
6
Select the songs you want to record listed in Explorer and drag
7
them into the Audio CD Layout window.
Select Create CD from the File menu.
8
The CD Creation Setup box appears.
Make changes, if any, to the CD Creation Setup settings (see
9
CD Creation Setup Settings on page B-1) and click OK.
Easy CD Creator begins creating your Mixed-Mode CD. It records
the files listed in the Data Files tab in the first track, then records the
songs listed in the Audio Tracks tab in the following tracks. All
tracks (data and audio) are recorded in a single session.
A final message box notifies you when the recording is complete.
Note:
To make a sleeve that lists the CD title and files, see
Chapter 10, Making a Custom Jewel Case Insert.
7-2
Page 59

Combining Data And Audio on a CD
How to Make a CD Extra Disc
For helpful pointers when creating CD Extra discs, see Mixed-Mode
and CD Extra Writing Tips on page 7-4.
To write a CD Extra disc, follow these steps:
Follow steps 1-7 in How to Make a Mixed-Mode CD on page 7-2
1
to add your audio tracks and data files to your CD layout.
Select CD Layout Properties from the File menu.
2
Click the Data Settings tab.
3
Select CD EXTRA.
4
When you select the CD EXTRA option, Easy CD Creator
records the audio tracks listed in your layout in the first session
and the data files in the second session.
Click the Properties button next to the CD Extra option.
5
Type in the information in the General tab (See CD Extra Disc
6
Properties General Tab on page 7-4) and click OK.
Click OK again to return to the Data CD Layout tab.
7
Select Create CD from the File menu.
8
The CD Creation Setup box appears.
Make changes, if any, to the CD Creation Setup settings and
9
click OK. See CD Creation Setup Settings on page B-1
Easy CD Creator begins creating your CD Extra disc. A final message box notifies you when the recording is complete.
Note:
To make a sleeve that lists the CD title and files, see
Chapter 10, Making a Custom Jewel Case Insert.
7-3
Page 60

Adaptec Easy CD Creator Standard Edition
CD Extra Disc Properties General Tab
The following table lists the settings in the CD Extra Disc Properties
General tab and describes the kind of information to type in each
field:
Setting Description
Album Title The name of the CD.
Artist Name The name of the artist for this CD.
Publisher The publisher of this CD.
Copyright The applicable copyright date for this CD.
UPC The UPC number assigned to this CD.
ISBN The ISBN number assigned to this CD.
Creation Date The date this CD was created.
Publishing Date The date this CD will be published.
Mixed-Mode and CD Extra Writing Tips
When combining data and audio on a single CD, consider the system on which the CD will be played to determine which method to
use. The following sections describe when to use each method, and
when to select one instead of the other when combining both audio
and data on a single CD.
When to Use Mixed-Mode
Mixed-Mode CDs can be read back on any standard CD-ROM drive,
including older CD-ROM drives that cannot read multisession CDs.
Because the audio and data are both recorded in a single session,
you do not need a multisession CD-ROM drive.
WARNING:
back the data tracks of a Mixed-Mode CD with disastrous
results —the data is played as a very loud and grating noise
that can damage speakers. Some newer CD players detect a
data track and either skip or mute it, but older ones do not.
7-4
Home and car CD players may attempt to play
Page 61

Combining Data And Audio on a CD
When to Use CD Extra
Unlike Mixed-Mode, a CD Extra disc contains two sessions in which
the first session contains audio and the second data. Home or car CD
players play the tracks in the first session (the audio), but will never
read beyond the first session, so the data track is never played.
Also, most current generation CD-ROM drives support multisession—meaning that they read the last session on a CD first, so it
finds the data track. The application can then be used to play back
the audio that is in the first session.
Some additional features of CD Extra are defined under the Blue
Book standard (see Glossary). However, these features are not necessary to create a CD that performs as described above on multisession CD-ROM drives.
Note:
Only multisession CD-ROM drives can read the data
portion of CD Extra discs.
Differences Between the Two Methods
The following table summarizes the major differences between the
two methods for combining data and audio on a single CD.
Method Data Audio
Mixed-Mode First track;
CD-ROM or
CD-ROM XA
format
CD Extra Second
session;
CD-ROM XA
format
Second and
subsequent
tracks
One or more
tracks in the
first session
Number of
Sessions Limitations
One Not recommended
for home or car CD
players.
Two
(multisession)
Multisession
CD-ROM drive
required to read the
data track.
7-5
Page 62

Adaptec Easy CD Creator Standard Edition
Multimedia CDs
One reason for combining data and audio is to create multimedia
CDs. Multimedia means the combination of text, graphics, and sound
in an interactive application. Typical uses for multimedia CDs
include:
■ Informational—such as multimedia presentations or product
brochures
■ Educational—such as interactive software learning
applications
■ Entertainment—such as computer software games
One feature of combining audio and data is that you can create an
application to run on a computer using a standard CD-ROM drive,
and to ensure that everyone can hear the audio, record it to CD in
the standard CD-DA format (the same one used for audio CDs). You
do not need to install and configure a sound card in the computer;
you can use headphones or external speakers to listen to the sound.
Because the audio tracks are recorded in CD-DA format, they can be
played back on home or car stereos, independent of the application
they are associated with.
There are many ways to make a multimedia CD. Easy CD Creator
provides two methods for creating a multimedia CD depending on
the system on which you want to play back the CD. See When to Use
Mixed-Mode on page 7-4 and When to Use CD Extra on page 7-5 to
help you decide which method to use.
Using a Multimedia Authoring Program
To make a multimedia CD, you need an authoring program, such as
Macromedia Director™ to combine text, graphics, and sound into a
multimedia application. When the authoring process is finished,
you should have a set of executable and data files to put into your
CD layout, and one or more Wave files to be recorded as CD-DA
tracks.
❒
7-6
Page 63

8
Making a CD from a Disc Image
A
disc image
file. It is a single large file that is a representation of the whole set of
data and programs as it will appear on a CD. A disc image refers to
both content and logical format.
You can use disc images to:
■
■
■
■
is also known as an image, CD-ROM image, or image
Write the disc image to hard drive once, then record it multiple
times to different CDs to save processing time.
Add audio tracks to your CD using the Mixed-Mode or CD
Extra option.
Create a disc image file to be written to CD on another system.
Write your data to the hard drive first then record it to CD for
maximum security to avoid a buffer underrun.
8-1
Page 64

Adaptec Easy CD Creator Standard Edition
How to Make a Disc Image
For helpful pointers when creating disc images, see Disc Image Writing Tips on page 8-3.
To make a CD from a disc image, there are two overall procedures:
■ Create the disc image
■ Create the CD from the disc image
Creating the Disc Image
To make a disc image, follow these steps:
Add your data and/or audio files to a CD layout (see the spe-
1
cific chapters in this user’s guide for the type of CD you want
to make).
Select Create Disc Image from the File menu.
2
Select the location on your hard drive where you want to save
3
the disc image.
Note:
You will need enough space on your hard drive
to store the image file.
Type in the name of the file and click Save.
4
Easy CD Creator saves your disc image file to your hard drive.
Creating the CD from a Disc Image
When creating a CD from a disc image, you must use a blank CD or
a multisession CD. Otherwise, previous sessions recorded to the CD
would become inaccessible because the TOC is not updated to
include previous sessions when writing from a disc image.
To create a CD using a previously prepared disc image, follow these
steps:
Select Create CD from Disc Image from the File menu.
1
Select the image file (*.
2
click OK.
The CD Creation Setup dialog box appears.
8-2
cif
) you want to make into a CD and
Page 65

Making a CD from a Disc Image
3
Make changes, if any, to the CD Creation Setup settings (see
CD Creation Setup Settings on page B-1) and click OK.
Easy CD Creator begins creating your CD from the disc image.
When the CD is finished, a final message box appears notifying you
that the recording is complete.
Note:
To make a sleeve that lists the CD title and files or
songs, see Chapter 10, Making a Custom Jewel Case Insert.
Disc Image Writing Tips
When making a disc image, make sure you have enough space on
your hard drive to store the image file. A blank CD can hold up to
650 MB of data.
❒
8-3
Page 66

Page 67

9
Making a Copy of a CD
The most common use for making a copy of a CD is to create a working copy of a CD and archive the original in a safe place.
Easy CD Creator is designed to assist you in reproduc-
Note:
ing material in which you own the copyright or have
obtained permission to copy from the copyright owner.
Unless you own the copyright or have permission to copy
from the copyright owner, you may be violating copyright
law and be subject to payment of damages and other remedies. If you are uncertain about your rights, contact your
legal advisor.
9-1
Page 68

Adaptec Easy CD Creator Standard Edition
What Kinds of CDs Can I Copy?
Using the CD Copier Deluxe, you can make backup copies of almost
any type of CD. The following table lists the types of CDs that can be
copied and some notes about making backup copies:
Type of CD Notes
Audio If you are using a drive other than CD-R or CD-RW
drive, a source CD-ROM drive capable of reading
audio digitally is required. Not all drives support
digital audio extraction. See Testing Your System
Configuration on page 11-1. (Easy CD Creator tests
your drive to determine its capabilities when the
source CD is inserted.)
Mixed-Mode Mixed results. Some CDs copy perfectly; others do
not, possibly because the CD is formatted to circumvent copying or because there are many variations of the standard and some CDs do not follow
the specifications properly.
CD Extra Some audio may be lost if there is less than a
two-second gap on the source CD.
DirectCD
Discs
Photo CD Requires a source CD-ROM drive capable of read-
Video CD Requires a source CD-ROM drive capable of read-
Some CD-ROM drives may not be able to read a
DirectCD disc. If you have a CD-ROM drive that is
multiread capable, there should be no problems.
ing CD-ROM XA. Most current CD-ROM drives
support this.
ing CD-ROM XA. Most current drives support this.
9-2
Page 69

Making a Copy of a CD
Opening CD Copier Deluxe
You can access CD Copier from the Easy CD Creator Tool menu or
from the Start button in the Windows 95 taskbar. To access CD
Copier from the taskbar follow these steps:
In Windows 95, click the Start button located on the left side of
1
the taskbar.
Select Programs, point to Adaptec Easy CD Creator, and select
2
CD Copier Deluxe.
The CD Copier Source and Destination tab appears.
How to Make a Copy of a CD
For helpful pointers when creating a backup copy of a CD, see CD
Copier Tips on page 9-5.
To make a backup copy of a CD, follow these steps:
Select the source drive from which you want to copy the CD.
1
This can be your CD-R, CD-RW, or CD-ROM drive. See Source
CD-ROM Drives for CD-to-CD Copying on page 9-5 to copy
directly from a CD-ROM drive.
To make a copy of a CD from a disc image, select Source,
image file from the Control menu. See CD Copier Advanced Tab
Settings on page 9-5 for information about making disc copies
from image files.
9-3
Page 70

Adaptec Easy CD Creator Standard Edition
2
Select the destination drive that contains the blank CD. This is
your CD-R or CD-RW drive.
3
Make changes, if any, in the Advanced tab settings. See CD
Copier Advanced Tab Settings on page 9-5.
4
Select one of the following options:
– Test—Select this option to perform a test in which the files
to be recorded are passed to the CD recorder. No information is recorded to the CD. Use this option if you have
made any changes to your CD recorder setup.
– Test & Copy—Select this option to perform a test in which
the files to be recorded are passed to the CD recorder.
Recording begins after a successful test.
– Copy—Select this option when you do not want to perform
the test. Use this option if you have successfully recorded a
number of similar CDs and you have not made any
changes to your CD recorder setup.
5
Select the number of copies you want to make.
6
Click Copy to begin recording a copy of your CD.
7
Follow the on-screen instructions and insert a blank CD when
prompted.
CD Copier begins copying the files and folders from your
source to a blank CD. A final message box notifies you when
the copying is complete.
Note:
To make a sleeve that lists the CD title and files, see
Chapter 10, Making a Custom Jewel Case Insert.
9-4
Page 71

Making a Copy of a CD
CD Copier Advanced Tab Settings
Setting Description
Current CD
Recorder Speed
Disc Copy Select this option to copy the source CD to your hard drive first
Select Location To make a disc copy, type in a different location to store the
Select the speed at which you want to create the backup copy of
the CD. For greater certainty, record at 1x.
to speed up the recording process if you are making more than
one copy of a CD. Once the source has been copied to your
hard drive, CD Copier records the disc copy to the CD.
image file if you do not want to use the Temp directory.
CD Copier Tips
The following sections provide useful information related to making
backup copies of CDs using CD Copier.
Testing Your CD Copier Setup
Due to technical limitations of CD-ROM, CD-R, and CD-RW drives,
not every kind of CD can be copied perfectly. Problems can arise
from both the source CD-ROM drive and the source CD.
We recommend that you always select Te st & Co py (in the Source
and Destination tab) when copying CDs; however it is possible to
make an unusable copy of a CD without getting any error messages.
This might happen, for instance, if your source CD had data
between the tracks or other copy protection features.
Source CD-ROM Drives for CD-to-CD Copying
To copy directly from a source CD in a CD-ROM drive to a blank CD
in your CD recorder, you must have either a supported SCSI 2
CD-ROM drive (see the drive’s guide for information) or a supported ATAPI drive to use as your source.
However, not all CD-ROM drives are equal. When you insert a CD
into your source drive and select the drive in the Source and Destination tab, Easy CD Creator tests both the drive and the CD. The
tests determine whether the selected drive can successfully read the
selected CD. If not, an error message is displayed.
9-5
Page 72

Adaptec Easy CD Creator Standard Edition
Using the CD Recorder for CD-to-CD Copying
If you are using only your CD recorder to copy a CD and you have
enough space on your hard drive, you can speed up the recording
process by making a disc copy of the CD. See CD Copier Advanced Tab
Settings on page 9-5 for information on how to make a disc copy.
Making a disc copy eliminates the need to swap the source and
blank CD in and out of your CD recorder.
Copying Audio and Mixed-Mode
Although most CD-ROM drives can play back music from an audio
CD, not all are capable of reading and copying audio tracks in digital format. If you are not sure whether your drive supports digital
audio extraction, see Testing Your System Configuration on page 11-1.
Making Multiple Copies
If you want to make more than one copy of a CD and you have
enough space on your hard drive, you can speed up the recording
process by making a disc copy of the CD. See CD Copier Advanced Tab
Settings on page 9-5 for information on how to make a disc copy.
❒
9-6
Page 73

10
Making a Custom Jewel Case Insert
A jewel case insert is a cover you can print and insert in the CD’s
jewel case
and contents of your CD.
The cover is printed on one side of a sheet of paper and then folded.
One side lists the files or tracks and the other side shows the title
and may also contain graphics.
—the plastic case that holds the CD—to indicate the title
Easy CD Creator allows you to customize your own jewel case
insert. Once you have edited the jewel case insert, you can preview
it, print it, cut it to size, and insert it in the case.
You can also design and print a label for the top of the CD. You can
use a standard printer if you use special paper designed for disc
labels.
10-1
Page 74

Adaptec Easy CD Creator Standard Edition
How to Make a Jewel Case Inse rt
When you make a CD, Easy CD Creator uses the CD layout information to create a basic jewel case insert, including the CD title, artist
name, and list of files or songs. You can then click the Jewel Case
Layout tab to modify and customize that information, such as
changing font styles and adding graphics.
Creating custom jewel case inserts involves three basic
procedures:
■ Editing inserts
■ Adding text and graphics
■ Printing
The following sections explain how to view and edit inserts, add
text and graphics, and print jewel case inserts.
Editing Inserts
The following sections describe the different ways you can view and
edit jewel case inserts before printing them.
Viewing Inserts
To view the different parts (pages) of the jewel case insert, follow
these steps:
Click the Jewel Case Layout tab.
1
From the Page menu, select the part of the insert you want to
2
view:
– Jewel Front—to view the Inside Jacket and Front Cover
– Jewel Back—to view the Back Cover
– Disc Printer—to view the Compact Disc label
Easy CD Creator displays the view.
10-2
Page 75

Making a Custom Jewel Case Insert
Zooming
To view a section of an insert page in greater detail, you can magnify
the view. To change the magnification of the page, follow these
steps:
Select Zoom from the Page menu.
1
Select the zoom level you want to apply.
2
Click OK.
3
Easy CD Creator changes the magnification level.
Using Rulers and Grids
You can use rulers and grids to position text and graphics on your
jewel case insert. See Setting Insert Layout Options on page 10-13 to
define your preferences.
The following sections describe how to use rulers and grids.
Using Rulers
Rulers are displayed along the perimeter of the Jewel Case Layout
window and help you to measure the insert and its objects.
To display or hide the rulers, do the following:
■ Select the Ruler option from the View menu to view rulers.
■ Deselect the Ruler option from the View menu to hide rulers.
10-3
Page 76

Adaptec Easy CD Creator Standard Edition
Using Grids
Grids help you to more precisely position objects on the insert with
respect to other objects and the physical page.
To snap objects to a grid—meaning the objects are automatically
moved to the grid line—do the following:
1
Select Grid from the Layout menu.
2
Select Snap to Grid from the Layout menu.
The objects snap to the nearest grid marker when you move them
around on the page.
To display or hide the grids, do the following:
■ Select the Grid option from the Layout menu to view grids.
■ Deselect the Grid option from the Layout menu to hide grids.
Positioning Inserts
You can position the insert at any location on the physical page. For
an approximate position, use the box at the intersection of the two
rulers.
To position the insert , follow these steps:
■ Drag the box at the intersection of the ruler to the position on
the page where you want the upper left corner of the insert to
be located.
For more precise control over the position of the insert, use the Origin settings in the preferences. See Setting Insert Layout Options on
page 10-13.
Note:
To avoid cutting off the insert when it is printed, do not
move the insert off of the physical page.
10-4
Page 77

Making a Custom Jewel Case Insert
Adding Text and Graphics
The following sections describe how to add and edit text and graphics in your jewel case insert.
Adding Text
You can add as much text as you like to the jewel case insert. When
you add text, you can define some attributes, such as font style,
color, and background fill color.
To add text, follow these steps:
Select Insert Text from the Edit menu.
1
Type the text in the Text box.
2
10-5
Page 78

Adaptec Easy CD Creator Standard Edition
3
Select the text attributes you want to use:
Attribute Description
Fill Color Select the color you want surrounding the text.
Note: When text is marked Transparent—meaning that you
can see the background behind the text— you can not define
a fill color
Text Color Select the color of the text.
Font Select the font, style, and size of the text.
4
Click OK.
The text is added where the cursor is located on the Jewel Case
Layout window.
.
Editing Text Objects
To change the attributes of any text object in the jewel case layout,
follow these steps:
1
Double-click the text object you want to edit.
2
Select the text attributes you want to change. See Adding Text
on page 10-5.
3
Click OK.
Adding Graphics
The graphics used in Easy CD Creator are called OLE objects. OLE is
a Windows feature that maintains associations with objects across
different applications. For example, if you add OLE objects to
inserts, you can double-click the object to open the associated application so you can edit the object.
Creating and Inserting OLE Objects
To create and insert an OLE object, follow these steps:
1
Select Insert New Object from the Edit menu.
2
Select the Create New option.
3
Select the application in which you want to create the object in
the Object Type drop-down list box.
4
Click OK.
10-6
Page 79

Making a Custom Jewel Case Insert
The graphic appears in the Jewel Case Layout window.
Inserting Existing OLE Objects
To insert an existing OLE object, follow these steps:
1
Select Insert New Object from the Edit menu.
2
Select the Create from File option.
3
Select the location where the file is stored.
4
Click OK.
The graphic appears in the Jewel Case Layout window.
Editing OLE Objects
For objects added to the jewel case layout from OLE-compliant
applications, you can open the application from within Easy CD
Creator. The application automatically displays the selected object,
and you can make changes to it.
To edit OLE objects, follow these steps:
1
Double-click the object you want to edit.
2
Make the changes you want to apply to the object.
3
Click outside the object.
The revised object appears in the Jewel Case Layout window.
Removing Objects
You can delete objects from the insert by removing them.
To remove objects, follow these steps:
1
Select the object(s) you want to remove.
2
Select Remove from the Edit menu.
The object(s) is removed from the jewel case layout.
Unremoving Objects
Unremoving objects is similar to using an undo command for
objects that you have removed from the jewel case layout.
To unremove objects, follow these steps:
■ Select Unremove from the Edit menu.
The last object removed appears in the Jewel Case Layout window.
10-7
Page 80

Adaptec Easy CD Creator Standard Edition
Resizing Objects
You can change the size of an object using the resize handles of the
bounding box.
To resize an object, follow these steps:
Select the object(s) you want to resize.
1
Select the resize handles of the bounding box.
2
Move the resize handles until the object is the size you want.
3
If you select more than one object, one bounding box encloses all the
selected objects. While you are resizing the bounding box, the cursor
changes to a double-headed arrow.
Moving Objects
To move objects to different locations on the insert, follow these
steps:
Select the object(s) you want to move.
1
Drag the object(s) to the desired location on the layout.
2
While moving the object(s), the cursor (or pointer) changes to a
cross.
Cutting, Copying, and Pasting Objects
You can cut and copy objects to the clipboard. When you cut or copy
other objects, they replace the current contents of the clipboard. You
can:
■ Paste the contents of the clipboard into the current jewel case
layout or into another jewel case layout
■ Copy objects from another application and paste them into a
jewel case layout
■ Paste objects from the clipboard as many times as you like
■ Use standard Microsoft Windows commands to select multiple
objects
To cut, copy, and paste objects:
Select the object(s) you want to cut, copy, or paste.
1
Select Cut, Copy, or Paste from the Edit menu.
2
10-8
Page 81

Making a Custom Jewel Case Insert
If you cut or copy objects from an OLE-compliant application and
then paste the objects into a jewel case layout, an association with
the source application is maintained. Similarly, if you copy or cut
OLE objects in a jewel case layout and then paste the objects into
another layout, the objects in the second jewel case layout are also
associated with the source application.
Aligning Objects
You can vertically and horizontally align two or more objects relative to each other. For example, you can select three objects and align
them horizontally with the left-most selected object.
To align objects, follow these steps:
Select two or more objects you want to align.
1
Select Align from the Arrange menu.
2
Select the align option you want to use:
3
Click OK.
4
10-9
Page 82

Adaptec Easy CD Creator Standard Edition
Justifyi ng Objec ts
You can left, center, or right justify one or more objects on the jewel
case layout. For example, if you left justify all the tracks and names
on the inside jacket, these objects are moved to the left border of the
page. If you justify objects on different pages, the select objects move
to the left, center, or right on their respective pages.
To justify objects, follow these steps:
Select one or more objects you want to justify.
1
From the Arrange menu, select the justify option you want to
2
use: Left, Center, or Right.
Note:
Select the text and resize the borders and nodes that
surround the text to eliminate any extra space.
Changing the Order of Objects
You can create layered effects using two or more objects on the layout. For example, you can stack objects and then move individual
elements of the stack forward and backward.
To change the order of objects, follow these steps:
Select the object you want to move up or down the stack.
1
Select Order from the Arrange menu.
2
Select the order option you want to use:
3
– To Front—to move the selected object to the top of the
stack.
– To Bac k—to move the selected object to the bottom of the
stack.
– Forward One—to move the selected object up one in the
stack.
– Backward One—to move the selected object back one in
the stack.
10-10
Page 83

Making a Custom Jewel Case Insert
Arranging Track Titles
Information about tracks listed in the Audio CD Layout is automatically added to the Jewel Case Layout window. If you delete, merge,
or split tracks while making an audio CD, the associated information is automatically updated in the Jewel Case Layout tab.
Deleting and merging tracks while making an audio CD may cause
blank rows to appear in the tracks list of the Jewel Case Layout tab.
Therefore, if you make changes to the track list that affect the position of the tracks on the Jewel Case Layout window, Easy CD Creator asks if you want the tracks automatically repositioned.
The Jewel Case Layout tab provides some commands that are only
available when you are making an audio CD. These commands let
you create columns of track information, display the length and
number of each track, and automatically position tracks on the layout for better positioning.
The following sections describe different ways you can arrange the
tracks in the jewel case layout.
Creating Track Column Lists
You can arrange the track information boxes:
■ Randomly by dragging them to new positions in the Jewel
Case Layout window, or
■ In a linear list with one or two columns.
To create a track list:
■ Select One Column or Two C olumn from the Text menu.
Displaying Track Numbers and Duration Times
Easy CD Creator includes the track number and duration time for
each audio track. The track number indicates the order in which the
audio tracks are recorded. The duration time is shown in minutes
and seconds.
To display the track numbers:
■ Select Display Track Number from the Text menu.
To display track duration times:
■ Select Display Track Time from the Text menu.
10-11
Page 84

Adaptec Easy CD Creator Standard Edition
Fitting Tracks on a Page
Fitting tracks means all the track information is centered on each
page and aligned along the first character of each track.
You can move track titles from the inside jacket and the back cover
to the front cover. However, Best Fit will move tracks back to their
original location.
To fit the tracks on the page as described above:
■ Select Best Fit from the Arrange menu.
Printing Jewel Case Inserts
You can print a jewel case insert while the Jewel Case Layout tab is
open. The commands/options viable for printing depend on the
type of printer that is connected to your computer. For information
about these options, see your printer’s guide.
To print a jewel case insert or a disc label, follow these steps:
Select Print from the File menu.
1
Click OK.
2
To preview an insert before printing it:
Select Print Preview from the File menu.
1
Click OK.
2
10-12
Page 85

Making a Custom Jewel Case Insert
Setting Insert Layout Options
You can set different options to customize the layout of the jewel
case insert. To do so, follow these steps:
Select Options from the Layout menu.
1
The Jewel Case Preferences tabs appear.
Make your selections based on the information in the follow-
2
ing tables.
Click OK.
3
10-13
Page 86

Adaptec Easy CD Creator Standard Edition
Margins Tab
You can set the margins for each page of the insert.
Setting Description
Page Selection Select the page view for which you want to set the margins.
Origin Select the X- and Y-Margins to determine the orientation of the
Color Select the color of the selected page.
Disc Radius
selected page in the insert.
: This option applies to the Disc Printer page only.
Note
Select from the drop-down list box the numbers to define the inner
and outer radiuses of the disc label:
—Outer radius is half the width of the entire CD, measured at the
widest point.
—Inner radius is half the width of the circle inside the CD, mea-
sured at the widest point.
Units Tab
The Units tab determines the units of measurement used throughout
the jewel case layout for rulers, margin settings, and so on.
Setting Description
Units Select the units of measurement to use from the drop-down list box.
Grid Frequency Select the horizontal and vertical intervals of the dots that appear in
Show Grid Select this option to display the grids.
Snap to Grid Select this option if you want the objects in the jewel case layout to
the grid.
automatically move to the nearest grid line.
Fonts Tab
You can change the default fonts used for the artist, disc, track
names, and the box edge text.
Setting Description
Artists Font This is the font used for the name of the artist.
Title Font This is the font used for the title of the CD.
Track Font This is the font used for the track titles.
Edge Font This is the font used around the edge of the insert.
❒
10-14
Page 87

11
Troubleshooting
This chapter provides the information on the following topics:
Testing Your System Configuration
■
Resolving Common Problems
■
Finding Error Message Descriptions
■
Using the Online Help
■
Getting Technical Support
■
Testing Your System Configuration
Easy CD Creator comes with a variety of system tests that check different parts of your system for compatibility with Easy CD Creator.
This helps to make sure your system is configured for optimal performance with Easy CD Creator and improves the likelihood of successfully making a CD.
When to Test
You should perform the system tests:
Before making your first CD
■
After making changes to any of the following:
■
– Location of your temporary files
– Selected devices (such as using a different CD recorder)
– Adding devices (such as hard drives, zip drives, CD-ROM
drives and so on)
– Configuration settings
11-1
Page 88

Adaptec Easy CD Creator Standard Edition
How to Run the System Tests
To run the Systems Test, do the following:
Select System Tests from the Tools menu.
1
The Systems Test screen appears
Select from one of the following options:
2
– Transfer rate—determines the best writing speed to use on
your system when recording CDs.
– Audio Extraction—checks to make sure the necessary soft-
ware drivers are installed on your system and also checks if
your CD-ROM drive supports digital audio extraction.
– Recorder—checks to make sure that a CD recorder can be
seen on your system and that all of the necessary software
is installed and available.
Click Do Test to perform the test.
3
11-2
Page 89

T roubleshooting
Resolving Common Prob lems
The following sections describes common problems you may
encounter, along with some suggestions for resolving them. If you
need further assistance, see Getting Technical Support on page 11-5.
Problems Reading Recordable CDs
If you have successfully written a CD but have problems reading it,
there are a number of possible reasons:
■ If the CD can be read on the CD-R or CD-RW drive but not on a
standard CD-ROM drive, check in Disc Info and Tools to make
sure that the session containing the data you just wrote is
closed. CD-ROM drives cannot read data from a session that is
not closed. If the CD session is not closed, go ahead and do so.
■ If your CD is ejected, you receive an error message, or you
have random problems accessing files from the CD, your
CD-ROM drive may not be well-calibrated to read recordable
CDs.
Problems Reading Multisession CDs
If you can see only data recorded in the first session but not in subsequent sessions, it may be that:
■ You recorded the CD in CD-ROM (Mode 1) format, while your
multisession CD-ROM drive recognizes only CD-ROM XA
(Mode 2) multisession CDs. See Chapter 5, Making a Multises-
sion CD.
or,
■ Your CD-ROM drive does not support multisession at all.
If you can see only data recorded in the last session, you may have
forgotten to link your new data with data previously recorded on
the CD. Make sure to link your new session to an existing session
before recording. See How to Make a Multisession CD on page 5-2.
11-3
Page 90

Adaptec Easy CD Creator Standard Edition
CD-ROM Drive Incompatibility with Recordable CDs
Sometimes, it appears that you wrote a CD without trouble and can
read it on your CD recorder; however, when you put it in a standard
CD-ROM drive, one of the following happens:
■ The CD is ejected
■ You get error messages such as no CD-ROM or not ready
reading
■ You have random problems accessing some files or directories.
The problems may vanish completely when you use the disc on different CD-ROM drive.
The lasers of some CD-ROM drives, especially older ones, are not
calibrated to read recordable CDs because their surface is different
from that of factory-pressed CDs. If your CD-ROM drive reads
mass-produced (silver) CDs but not recordable CDs, check with the
CD-ROM drive manufacturer to determine if this is the problem. In
some cases, an upgrade may be available to resolve the problem.
The combination of CD brand and CD recorder can make a difference. See the manufacturer’s documentation for recommended CD
brands.
Finding Error Message Descriptions
See the Online Help for a list of common error messages, along with
descriptions and suggestions for resolving them. To access the
Online Help.
■ Select Help Topics from the Help menu.
Using the Online Help
You will find most of the information you need to use Easy CD Creator in the Windows 95 online help. To access,
■ Select Help Topics from the Help menu.
11-4
Page 91

T roubleshooting
Getting Technical Support
Technical support for Easy CD Creator Standard Edition is provided
by the manufacturer of the CD recorder from which you bought the
drive. Please contact the manufacturer for assistance. Contact information for many CD recorder manufacturers can be found on
Adaptec’s World Wide Web (WWW) site at
Electronic Support
Technical information, including product literature, answers to commonly asked questions, information on software upgrades and other
topics is available electronically through the following:
■ Adaptec World Wide Web (WWW) site at
http://www.adaptec.com/cdrec.
■ The Adaptec CDR internet mailing list is a moderated forum
where users of Adaptec CD-R software help each other with
technical and general CD-R questions. For details about the list
and how to subscribe, see
http://www.adaptec.com/support/cdrlist/policies.html.
http://www.adaptec.com.
❒
11-5
Page 92

Page 93

A
Command Reference
The Easy CD Creator Main Toolbar
The Toolbar offers shortcuts for Easy CD Creator’s most important
functions. The following table provides descriptions on the commands found in the main Easy CD Creator window. Additional buttons are displayed when the Audio CD and Jewel Case Layout
windows are active. See
and
Additional Jewel Case Layout Toolbar Icons
Button Command Description
New
Additional Audio CD Layout Toolbar Icons
on page A-3.
Start a new CD layout without the
Wizard.
Open
Save
Print
Wizard
Create CD
Open an existing CD layout. Easy CD
Creator displays the Open dialog box
in which you can locate and open the
desired file.
Save the current CD layout with its
current name. If you have not named
the CD layout, Easy CD Creator displays the Save As dialog box.
Print the contents of a CD Layout or
Jewel Case Layout.
Easy CD Creator opens the Wizard
which guides you step-by-step in the
creation of a data or audio CD.
Record the CD layout to a CD.
A-1
Page 94

Adaptec Easy CD Creator Standard Edition
Button Command Description
Hide/Show Windows
Explorer
Up One Level Move up one directory level.
Find Files Use this command to find a file or
Remove Remo ve selected items from the list.
Use this command to hide or show
Windows Explorer directly in Easy CD
Creator.
folder on the CD.
Properties Display the properties of a selected
Large Icons Display the large icons representing
Small Icons Display the small icons representing
List Display the names of the files and
Details Display the details of the files and fold-
Help Topics Open the Easy CD Creator online help
Context Help Activate context-sensitive help. Click
item.
the contents of the CD layout.
the contents of the CD layout.
folders listed in the CD layout.
ers listed in the CD layout, including
file size and the date last modified.
topics.
on this button, then click on the item
you have a question about.
A-2
Page 95

Command Reference
Additional Audio CD Layout Toolbar Icons
Additional buttons are found on the Toolbar when the Audio CD
Layout window is active. They include:.
Button Command Description
Play
Listen to an audio track listed in the
audio CD layout.
Pre-record
Edit Audio
Pre-record an audio track listed in the
audio CD layout to a Wave file stored
on your hard drive.
Edit a Wave file in the audio CD
layout.
Additional Jewel Case Layout Toolbar Icons
Additional buttons are found on the Toolbar when the Jewel Case
Layout window is active. They include:.
Button Command Description
Cut
Copy
Paste
Front Cover
Remove the selected object and place
it on the Clipboard.
Make a copy of the selected object(s)
and place it on the Clipboard.
Place an object that is on the Clipboard and place it in the jewel case
layout.
View the front cover of the jewel case
layout.
Back Cover
Disc Printer
View the back cover of the jewel case
layout.
View the disc printer section of the
jewel case layout.
A-3
Page 96

Adaptec Easy CD Creator Standard Edition
Button Command Description
Align Align to or more objects. You can verti-
To Front Change the order of layered objects
To Back Change the order of layered objects
Left Left justify one or more objects on the
cally and horizontally align two or
more objects relative to each other.
For example, you can choose three
objects and align them horizontally
with the left most select object.
by moving the selected object to the
top of the stack
by moving the selected object to the
back of the stack
jewel case layout.
Center Center justify one or more objects on
Right Right justify one or more objects on
One Column Arrange the track information boxes in
Two Columns Arrange the track information boxes in
Zoom View a section of an insert page in
Grid View grids in the layout. Grids help
the jewel case layout.
the jewel case layout.
a single column.
two columns.
greater detail.
you to more precisely position objects
on the insert with respect to other
objects and the physical page.
A-4
Page 97

Command Reference
The File Menu
The following table lists the commands under the File menu.
Command Description
New CD Layout
Open CD Layout
Save
Save As
Wizard
Properties
CD Layout
Properties
Create CD
Create Disc Image
Create CD from
Disc Image
Print
Print Preview
Create a new CD layout in the main window. You can open an
existing CD layout with the Open command. If you are preparing
a CD layout and use the New command without having saved it,
a dialog box will appear prompting you to do so.
A CD layout includes all the settings you have made for this
recording session, as well as all the files listed under the Data or
Audio CD Layout tabs and all of their settings. When you reopen a CD layout, you will find everything set up exactly as it
was before.
Open an existing CD layout. If you already have one open and
have modified it since it was opened, you will be asked if you
want to save it before opening a new one. If you answer NO, all
changes will be lost. You can create a new CD layout with the
New command.
In the dialog box, type or select the project filename you want to
open. This box lists only files with the extension .
not open any other type of file using this command.
Save the opened CD layout with its current name and location.
When you save a CD layout f or the first time, the Save As dialog
box appears so you can name the file. If you want to save an
existing project under a different name or location, use
Save the open CD layout under a different name or location. To
save a CD layout with its existing name, use the Save
command
Easy CD Creator opens the Wizard which guides you step-bystep in the creation of a data or audio CD.
Displays property settings and options about volume descriptors, data and audio settings, as well as file types.
Displays property settings and options about volume descriptors, data and audio settings, as well as file types.
Write the items listed in the CD layout to CD.
Write the items listed in the CD layout to a file on the hard drive.
Write the items contained in a file on the hard drive to CD.
Print the items listed in the jewel case layout.
Preview the jewel case insert for your CD before printing.
cl3
; you can-
.
Save As.
A-5
Page 98

Adaptec Easy CD Creator Standard Edition
Command Description
Print Setup
Recent CD Layout
Exit
Preview the printer setup options before printing the jewel case
layout.
Open the most recent CD layout.
Use this command to end your Easy CD Creator session. You
can also use the Close command on the application Control
menu. Easy CD Creator prompts you to save CD layouts with
unsaved changes.
The Edit Menu
The following table lists the commands under the Edit menu.
Command Description
New Folde r
Cut
Copy
Paste
Paste Special
Rename
Remove
Unremove
Change Priority
Select All
Select
Insert Text
Insert New Object
Object
Create a new folder.
Remove the selected item and place it on the Clipboard.
Make a copy of the selected item(s) and place it on the
Clipboard.
You can use the Copy command in the Windows Explorer or a
desktop window to select one or more items to paste to the Clipboard. Then use Paste in Easy CD Creator to insert the items
into the Data or Audio Tracks list.
Jewel case layout only. You can paste a link to an object in
another document. See Microsoft Windows 95 Online Help for
information about linking information between documents.
Change the name of a file, folder, or audio track.
Remove selected file, folder, or audio track from the CD layout.
Jewel case layout only. You can undo a remove command to
place a previously removed object back into the jewel case
layout.
Change the file ordering priority of a file or folder.
Select all of the items in the layout.
Jewel case layout only. Select items listed in the jewel case lay-
out. Options include: All, All Tracks, All Disc Info, and All Objects.
Jewel case layout only. Insert text to the jewel ca se layout.
Jewel case layout only. Insert a new object to the Jewel Case
Layout.
Jewel Case Insert Only. If there is an object in the jewel case
layout, you can Edit, Open, or Convert the object to a different
format.
A-6
Page 99

Command Reference
The View Menu
The following table lists the commands under the View menu.
Command Description
Data CD Layout
File Ordering
Audio CD Layout
Jewel Case Layout
Toolbar
Status Bar
Disc Info Bar
Ruler
Large Icons
Small Icons
List
Details
Arrange Icons
Hide/Show Windows Explorer
Split
Refresh
Display the Data CD Layout window.
Display the File Ordering window.
Display the Audio CD Layout window.
Display the Jewel Case Layout window.
Display or hide the Toolbar, which includes buttons for some of
them most common commands in Easy CD Creator, such as
Open. A check mark appears next to the menu item when the
Toolbar is displayed.
Display or hide the Status Bar. The Status Bar displays information about the CD layout and is located on the bottom of the
Easy CD Creator window.
Display the amount of space written on the current CD and the
amount of free space available. The Disc Info Bar appears at the
bottom of the Easy CD Creator window.
Jewel case layout only. Display or hide the ruler on the top part
of the Jewel Case Insert window.
View the large icons representing the contents of the CD layout.
View the small icons representing the contents of the CD
layout.
View the names of the files and folders listed in the CD layout.
View the details of the files and folders listed in the CD layout,
including file size and the date last modified.
Sort the icons listed in the CD layout in the order that you
specify.
Hide or show Windows Explorer directly in Easy CD Creator.
Separate the Easy CD Creator layout windows to left-right or
up-down orientation.
Update the contents of the current window.
A-7
Page 100

Adaptec Easy CD Creator Standard Edition
The Disc Menu
The following table lists the commands under the Disc menu.
Command Description
Eject/Tra y
Erase Disc
Import Session
Disc Information
Click to open or close the CD recorder’s tray/caddy.
Use this command to erase the contents of a CD-RW disc.
: You must use a CD-RW disc in a CD-RW drive to erase
Note
the contents of a CD.
Use this command to import a specific session of a multisession
CD to the current session you are writing.
Use this command to display information about the CD, includ-
ing the type of CD, the number of sessions, and the number of
tracks on the CD. Also, use this command to close a session or
close the disc (which write protects the CD).
The Tools Menu
The following table lists the commands under the Tools menu.
Command Description
Find
System Tests
CD-Recorder
Properties
Options
Find a file or folder on the CD.
Opens the Easy CD Creator Systems Tests so you can choose
the type of test you want to run on your system.
Displays information about the CD recorder connected to your
computer.
Select the View and Temporary Files options you want to use.
The Help Menu
The following table lists the commands under the Help menu.
Command Description
Help Topics
About Easy CD
Creator
A-8
Opens help for Easy CD Creator.
Opens the About dialog box for Easy CD Creator.
 Loading...