

Page 1

DVD STATION
INSTALLATION MANUAL
Page 2

CONTENTS
INTRODUCTION..............................................................
Specification................................... 6
Package Contents................................ 7
Caution......................................... 7
PART NAMES AND FUNCTIONS
Front Panel..................................... 8
Rear Panel...................................... 8
POWER SOURCE
........................................................................9
HARDWARE INSTALLATION
SOFTWARE INSTALLATION
SOFTWARE INSTALLATION FOR WINDOWS 95/98.....................11
Windows 98......................................................................................11
Windows 95 (B)................................................................................12
Windows 95 (Older Versions)
.........................................................
ENABLING 32-bit CARD SUPPORT
...........................................8
................................................10
.................................................11
13
……………….……..…14
6
Software Installation for Windows NT...........................................16
Installing the PCMCIA DVD-ROM under Windows NT.................16
PLAYING A MOVIE...................................................... 18
Using the PCMCIA Card and PowerDVD Program.......................18
System Requirements.....................................................................18
Installing and Using PowerDVD.....................................................19
About the Video Playback Setup ...................................................20
PLAYING AN AUDIO CD...............................................
Using the CD Player Utility in Windows 95/98 21
Hot-Insert/Remove Feature of the PCMCIA DVD-ROM................21
- 3 -
21
Page 3

PROBLEM SOLVING………………………………….….23
If You Cannot Access a Disc in the Drive………………………....23
If the Tray Does Not Slide Out...................................................... 23
If You Cannot Access a Particular CD......................................... 23
- 4 -
Page 4

EXP Computer, Inc.
EXP Memory Products.
Non-transferable Limited Warranty
EXP Computer Inc., and EXP Memory Products ("EXP") warrants
that the Disk Traveler (“products”) manufactured or distributed by
EXP are free from failures due to defects in materials or
workmanship for a full one year from the date of purchase of the
products.
This warranty is void if the product is damaged by abnormal or
improper use or by accident, abuse or if any attempt to repair or
modify the product without authorization from EXP. Your sales rec eipt
or invoice, showing the date of purchase and the name of the
authorized reseller, is your proof of the date of purchase. During the
warranty period, EXP will at its option, replace or repair, at no charge,
the product that in its opinion is defective.
Before you return the failed products, contact EXP. You will need to
obtain a Return Merchandise Authorization (RMA) num ber by calling
EXP’s Technical Support Departm ent at (516) 496-7629. The RMA
number should be displayed on the outside of the returning package
and on the accompanying packing list. EXP cannot be held
responsible for any package returned without the RMA number . You
are responsible for packaging, providing proof of the date of purchase
and the shipping cost of the failed product to EXP Computer, Inc.
You are responsible for mailing the warr anty registration card. The
warranty claims may not be honored if there is no corresponding
registration card on file at EXP.
IN NO EVENT WILL EXP BE LIABLE FOR ANY DIRECT,
INDIRECT, SPECIAL, INCIDENTAL OR CONSEQUENTIAL
DAMAGE, INCLUDING LOSS OF PROFIT, LO SS OF SAVINGS; OR
ANY OTHER DAMAGES CAUSED BY PRODUCT OR FAILURE OF
THE PRODUCT TO PERFORM.
This limitation of liability applies even if EXP has been advised of the
possibility of such damages. Som e sates do not allow the exclusion
or limitation in incidental or consequential damages, so the above
exclusion or limitation may not apply to you.
How to contact us:
EXP WEB SITE: WWW.EXPNET.COM
TECHNICAL SUPPORT: 516-496-7629
TECHNICAL SUPPORT E-MAIL: support@expcomputer.com
- 5 -
Page 5

INTRODUCTION
The DVD Station is an external DVD-ROM drive with the latest 32bit
Cardbus technology high-speed PC Card. The DVD Station allows you to
watch DVD movies* on a laptop computer in conjunction with the bundled
MPEG2 decoding program. The drive can also red other CD-ROM
standards as well (e.g. CD-R, CD-RW, etc.).
SPECIFICATION
External Drive Dimensions: 9.6" x 6.4" x 1.9" (L x W x H)
Weight: 3 lb. 3 oz.
Interface: PC Card (Cardbus)
MPEG2 Decoding: Cyberlink PowerDVD (Windows 95/98 only)
DVD-ROM Reading: Windows 95, 98, and Windows NT 4.0
Power required: 12V DC 1Amp.
Data Transfer Rate:
Sustained Mode 1350-2700 max KB/sec
(DVD) 1035-2400 KB/sec (CD-ROM)
Burst (ATAPI) 16.7 MB/sec
Buffer Cache Size: 128K
Access Time:
Average Random Seek (DVD) 110 ms
Average Random Seek (CD 16x) 110 ms
Average Random Access (DVD) 180 ms
Average Random Access (CD 16x) 120 ms
Full Stroke 250 ms (Both)
Media Capacity:
Single Side - Single Layer 4.7 GB
Single Side - Double Layer 8.5 GB
Double Side - Single Layer 9.4 GB
Double Side - Double Layer 17.1 GB
Compatible Format Standards:
DVD-ROM, DVD Video, CD-ROM XA, CD-I BRIDGE (Photo CD,
Video CD), CD-I READY, CD-DA CD-G, Multi-session (Photo-
CD), CD EXTRA, CD-RW and CD-R
* System Requirements for DVD movies -
Windows 95 or Windows 98 Only
Pentium 266MHZ or higher or system with MPEG2 decoding capability built-in
- 6 -
Page 6
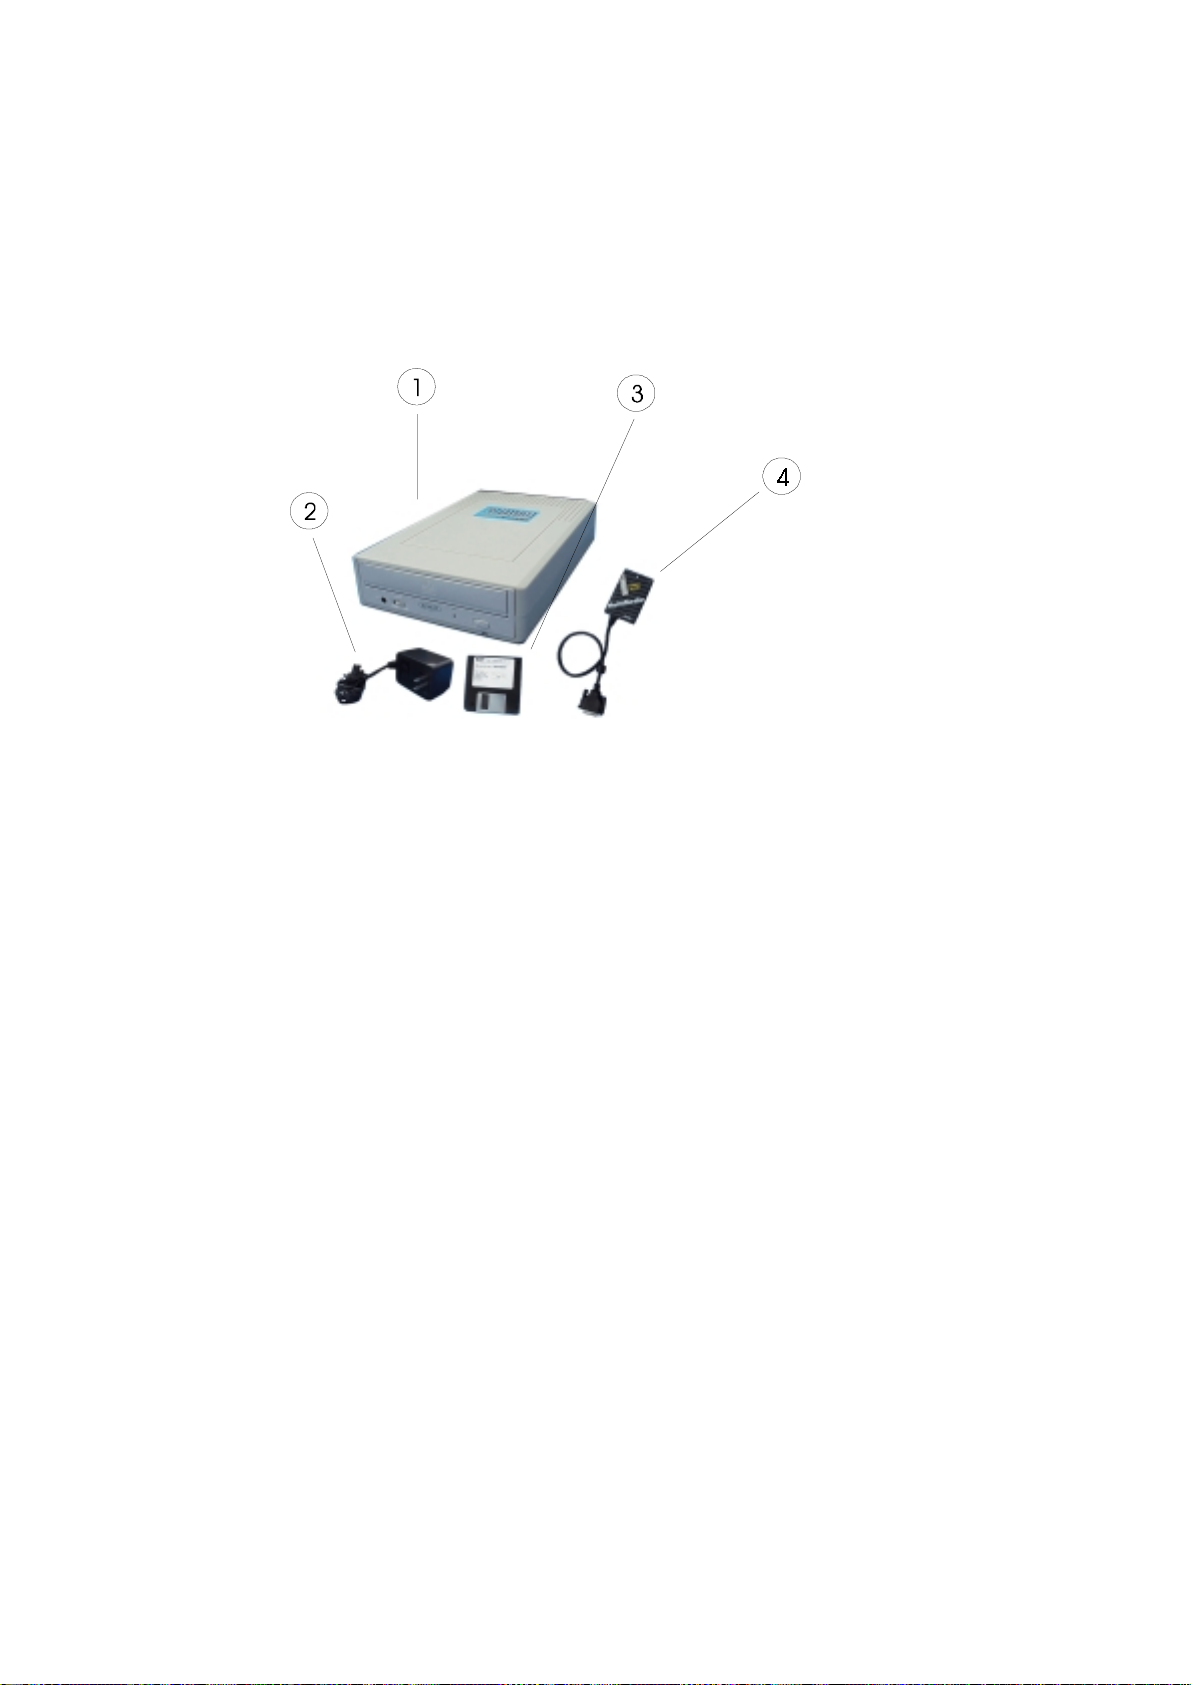
Package contents
The items shown below are included in the CD-Station package.
1. CD-ROM drive
2. AC Adapter Input: 120 VAC Output: 12 VDC 1 Amp.
3. Device Driver diskette
PC Card
4.
CAUTION
• Condensation can form on the lens if the DVD-ROM drive is moved
from a cold temperature to a warmer environment. This can result in
the lens’s inability to properly read the disc. If this occurs, remove the
disc and leave the power on. After one hour, reinsert the disc and try
again.
• Do not expose the disc to the direct sunlight. Do not store the disc in a
room with high temperature or high humidity.
• Always store the disc in its case to avoid dust, scratches, bending, etc.
• Use a soft and dry cloth to wipe the disc in a circular motion. Do not
use benzine, record cleaner, static electricity prevention fluid, or any
other liquid as it may damage the disc.
- 7 -
Page 7
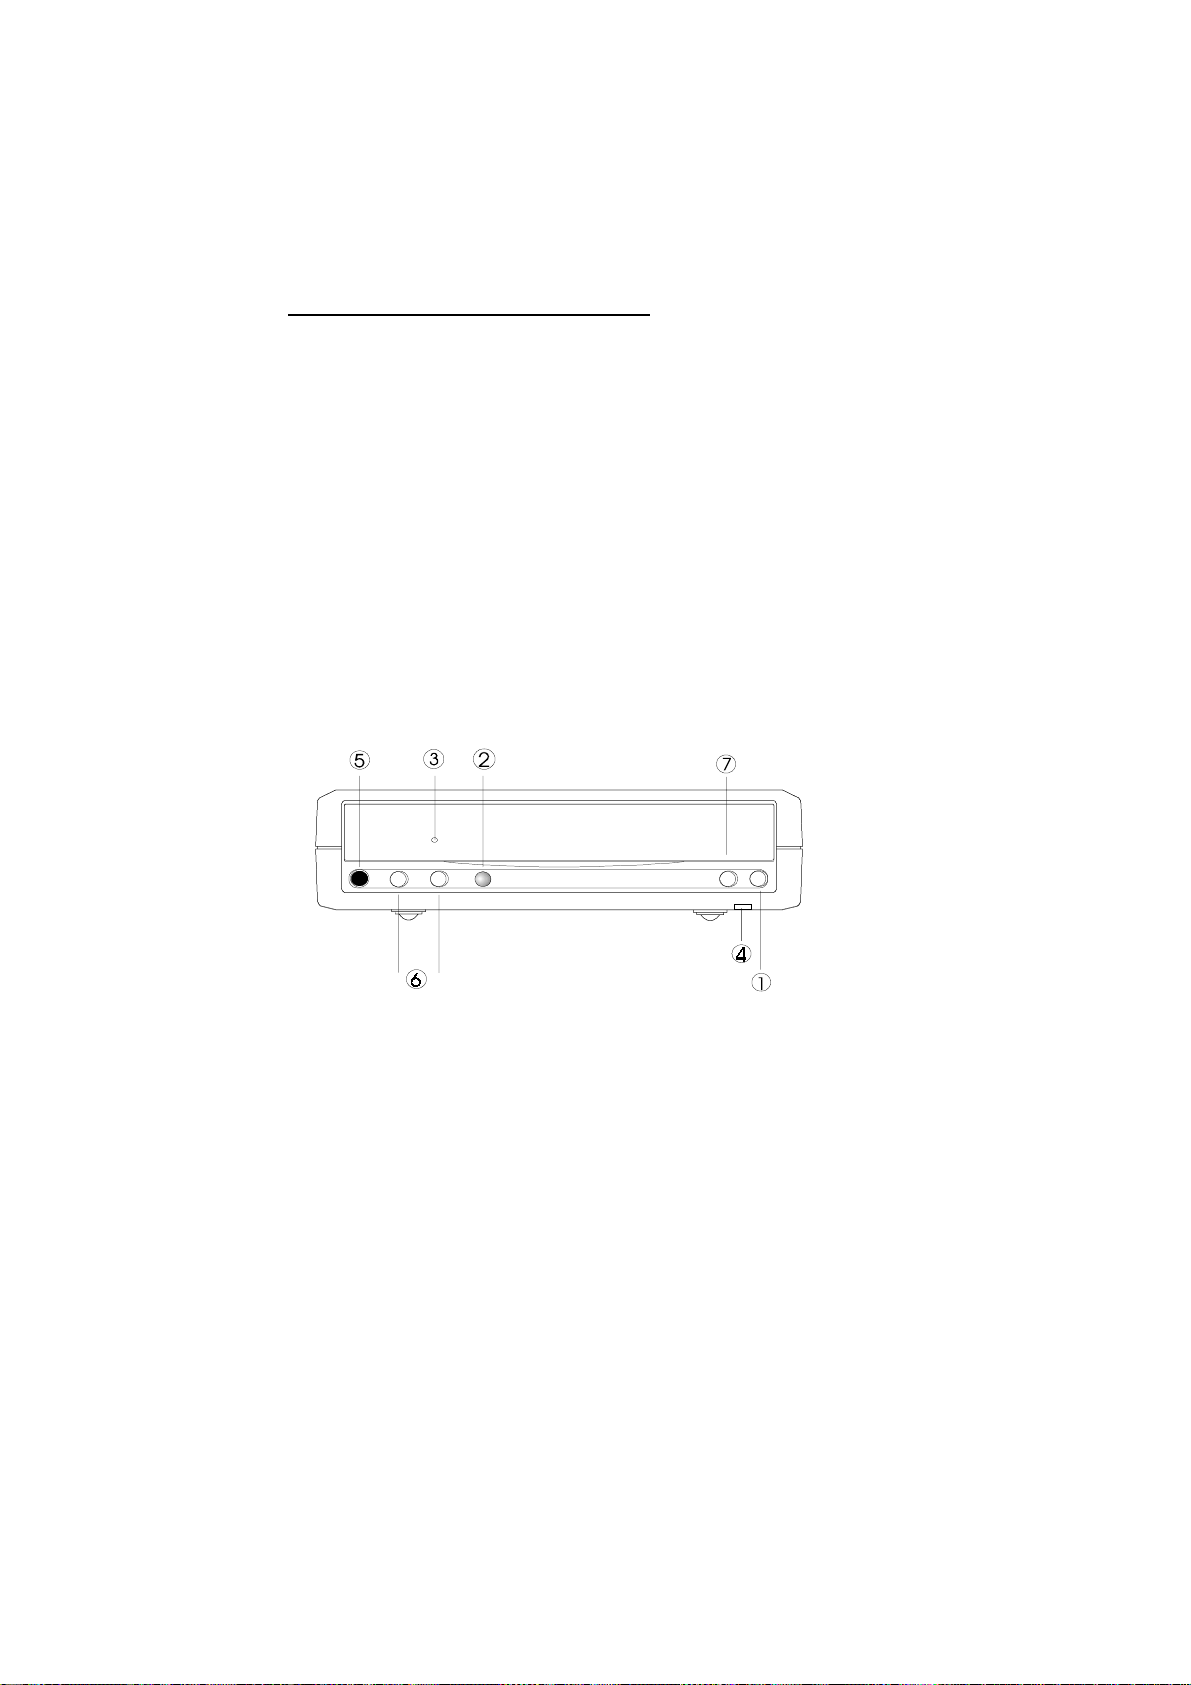
PART NAMES AND FUNCTIONS
FRONT PANEL
The front panel of your DVD-ROM drive may look slightly different from
the figure shown below. T he impo rta nt pa rts and functio ns; ho wever, ar e the
same regardless of their location on the drive.
1. Eject button:
Press this button to eject the tray.
2. Access LED:
This LED will blink when the drive is accessing the disc.
3. Emergency Hole:
Manually insert a pin shaped item to eject the tray during a power off.
4. Power LED:
This LED will light when the power is on.
Figure 1
- 8 -
Page 8

REAR PANEL
1. Power Button:
Press the button to manually power on/off the drive when the AC adapter
powers it.
2. DC in Jack:
Connect the AC adapter here.
3. PCMCIA Interface Connector:
Connect the drive to the PCMCIA interface card.
4. Audio Line-Out Jack:
Sends an audio signal to an external amplifier.
Figure 2
POWER SOURCE
An AC adapter powers the DVD-ROM drive. The POWER LED indicates
the power status, which will always light up when the power supply is in the
normal condition.
1. Connect the AC adapter into the DC IN jack at the rear panel of the
DVD-ROM drive.
2. Plug the AC adapter into the AC power outlet.
3. Insert the PCMCIA card. Now the DVD-ROM drive is ready to go.
CAUTION
Use only the AC adapter that is provided with this unit. Using a different
AC adapter may cause serious and permanent damage to the DVD-ROM
drive.
- 9 -
Page 9

HARDWARE INSTALLATION
Power off your system before connecting the PCMCIA DVD-ROM to your
computer.
1. Plug the AC adapter into the DC in Jack (rear panel), and then connect
the PCMCIA interface card to the DVD-ROM drive. Press firmly until
the connector is seated, and tighten the two screws on the cable
connector.
2. Place the drive in a horizontal position. The drive is designed to operate
only in a horizontal position. Operating the drive in any other position is
not recommended.
3. Make sure that the cable of the PCMCIA interface card is firmly
connected to the interface connector at the back panel of the DVD-ROM
drive.
4. Locate the PCMCIA slot of
your computer or consult
your computer user’s
manual for its location.
5. Align the PCMCIA
interface card with the
arrow sign facing upward
and pointing toward the
computer’s slot. (Please note that the card is keyed to guide for proper
insertion.)
6. Slowly insert the PCMCIA interface card into the slot and press firmly
until the connector is seated.
7. Turn the system ON to install the PCMCIA DVD-ROM device driver.
Please follow the Software Installation procedures in the next section.
CAUTION
You should connect the PCMCIA interface card to the DVD-ROM drive
before inserting the PCMCIA interface card into your computer. DO NOT
connect/disconnect the PCMCIA interface card to/from the DVD-ROM
drive when the system is in the power-on state.
- 10 -
Page 10

SOFTWARE INSTALLATION
SOFTWARE INSTALLATION FOR WINDOWS 95/98
If you are inserting the PCMCIA DVD-ROM into your computer for the
very first time, use Windows 95/98. Listed below are all the screen displays
for reference. (Your PC Card name may be different)
Windows 98
Add New Hardware Wizard will be displayed.
Click Next twice to display the screen below. Windows will search for a
driver, make sure the Floppy disk drive and Specify a location items are
checked and that A:\win95 is displayed in the drop box. Click Next and
then Finish to complete the installation.
- 11 -
Page 11

Windows 95 (B)
If the Update Device Driver Wizard dialog box appears as below, it means
your Windows 95 is version 4.00.950B, i.e. OSR 2.
In this case, perform the following steps for installing the PCMCIA DVDROM under Windows 95. Otherwise, ignore this section and skip to the next
section for installing the PCMCIA DVD-ROM for Windows 95 (Older
Versions).
1. Insert the PCMCIA DVD-ROM device driver disk into the floppy drive.
2. Click the Next button.
3. Click the Finish button. All the remaining installation procedures will
then finish automatically.
Note: It is not necessary to connect the PCMCIA DVD-ROM every time you
reboot your computer; connect it only when you need to use it.
- 12 -
Page 12

Windows 95 (Older Versions)
The following dialog will appear if you are using the PCMCIA DVD-ROM
under Windows 95 for the very first time and your Windows 95 is version
4.00.950 or 4.00.950a.
(If the dialog box does not appear and the DVD-ROM folder cannot be
found in My Computer, please refer to the section entitled, “Enabling 32-
bit Card Support.”)
Referring to the display above, select Driver from disk provided by
hardware manufacturer and click the OK button. Windows 95 will then
prompt you to insert the manufacture’s installation disk. Insert the PCMCIA
DVD-ROM device driver disk into your floppy drive. Specify the directory
as A:\ (or A:\ win95) and select OK. All the remaining installation
procedures will then finish automatically.
Note: It is not necessary to connect the PCMICA DVD-ROM every time
you reboot your computer; connect only when you need to use it.
- 13 -
Page 13

ENABLING 32-bit CARD SUPPORT
Note: The following procedures apply to the notebook that have installed or
re-installed the original release of the Windows 95 version 4.00.950
or 4.00.950a.
Your system should be ready for PCMCIA socket support prior to operating
the PCMCIA DVD-ROM. To check whether your computer has the
PCMCIA Socket supported, double-click on the System icon from the
Control Panel folder (You can find the Control Panel folder b y going to
the Start menu. Pull up the Start menu, select Settings and then click on
the Control Panel folder.)
Click on the Device Manager tab. If an “x” appears next to the PCIC or
compatible PCMCIA Controller item, as shown above, it means the
PCMCIA device driver is not using 32-bit Card Support.
Double-click on the PCIC or compatible PCMCIA Controller item, and a
dialog box will be displayed, as shown on the next page. Place a check mark
next to the current configuration o f the Device usage box, then select OK.
- 14 -
Page 14

After the PCMCIA 32-bit Card Support is installed, Windows will ask you
to reboot your computer. You should now refer to the previous section for
installing the PCMCIA DVD-ROM device driver.
If the PCMCIA Socket is not found, you must add a PCMCIA socket to
your system. Please click on the Adding New Hardware icon in the
Control Panel folder and select PCMCIA socket. Select the appr opriate
type of PCMCIA Controller that matches yours and follow the on-screen
instructions.
- 15 -
Page 15

SOFTWARE INSTALLATION FOR WINDOWS NT
Make sure of the following before you begin:
♦
Windows NT must be version 3.51 or higher.
♦
Since Windows NT does not support the “Hot Insert/Remove” feature,
the PCMCIA DVD-ROM should be connected with your computer
prior to sta rting Wi ndows NT. Likewise, do not remove the PCMCIA
DVD-ROM before you shut down Windows NT.
♦
In Windows NT, the I/O and IRQ settings of PCMCIA DVD-ROM
cannot be changed. Therefore, if the settings conflict with other devices
you are using, change the I/O or IRQ of other device to avoid conflicts.
♦ Currently, there is no DVD software decoder for Windows NT. The
DVD-ROM will read data that is DVD-ROM or CD-ROM.
Installing the PCMCIA DVD-ROM under Windows NT
In Windows NT 4.0, go to the Start menu and select Settings. Then click
on the Control Panel folder. Once the Control Panel appears, double-click
on the SCSI Adapter icon.
Click the Drivers tab, and the figure illustrated below will be displayed.
- 16 -
Page 16

Click the Add button, and then click the “Have Disk...” button (as shown on
the previous page). Windows NT will then prompt you to insert the
manufacturer installation disk. Insert the device driver disk into your floppy
drive. Specify the directory as A:\WINNT or B:\WINNT (whichever
contains the diskette) and click OK. When the following dialog box appears,
select the PCMCIA DVD-ROM/CD-R/CD-RW/DVD-ROM and then
click the OK button.
Follow the on-screen instructions to continue. After finishing, Windows NT
will prompt you to restart your computer to activate the new device driver
for Windows NT.
- 17 -
Page 17

PLAYING A MOVIE
USING THE PCMCIA DVD-ROM CARD AND POWERDVD PROGRAM.
System requirements:
• Windows 95 OSR2 or Windows 98 operating system ONLY
• Pentium II 266 Mhz is the minimum requirement
• 32 MB DRAM (Synchronized DRAM recommended)
• CardBus Controller with DMA support
To check if your PCMCIA controller is a CardBus controller and also
has DMA support, pull up the Start menu; select Settings and click on
the Control Panel folder. Then double-click on the System icon.
When the window below appears, select the Device Manager tab and
the screen below will be displayed.
Double-click on PCMCIA Socket to verify if your PCMCIA Socket is
Texas Instruments P CI-xxx Card Bus Co ntro ller (exce pt fo r T I PCI -1221). If
so, the PCMCIA controller has CardBus with DMA. The PCMCIA DVDROM works best with the TI controller and DMA. If your system is not
using the TI controller, we recommend that you use the PCMCIA DVDROM with an MPEG-2 decoder card for better performance.
- 18 -
Page 18

Installing and using PowerDVD
PowerDVD is a playback program for DVD titles or MPEG-2 files.
To install and use PowerDVD, follow the instructions below.
1. Prior to installing PowerDVD, the PCMCIA DVD-ROM should be
installed beforehand. Refer to the PCMCIA DVD-ROM installation
procedure in this manual for details.
2. Verify if the notebook has an additional CD-ROM drive icon in My
Computer. You may have to restart the computer after the installation
is completed to activate the DVD-ROM.
3. Insert the PowerDVD CD into your PCMCIA DVD-ROM. The
installation will proceed automatically. Follow the on-screen
instructions. During the installation, PowerDVD will prompt you to
input the CD-Key, printed on the sticker of the CD jacket.
4. After the installation is completed, you may start the playback of DVD
titles or MPEG-2 files.
There is a demo file named democlip on PowerDVD CD for you to try.
Follow the steps below:
Go to Start => Program => Cyberlink => PowerDVD. Click
PowerDVD. The panel shown below will appear. Make sure
appears, and click . Alternatively, if you want to playback DVD
titles, click on
to toggle to , and click .
You may move the mouse to any button and a hint will appear accordingly to
indicate its function. You may also click on
for the On-line help manual.
About Resolution:
For notebooks using TFT display technology: The display resolution for this
type of notebook is fixed; therefore, if a dialog box prompts you to change
the resolution, we recommend that you select Cancel to maintain the current
resolution.
- 19 -
Page 19

About the Video Play back Setup
The PowerDVD employs three video modes:
1. Auto-Select (Default)
2. Force Bob
3. Force Weave
Click on
to change the system configuration.
For a notebook with slower CPU than Pentium II 266MHz we recommend
that you select the Force Bob mode to get a better playback result. We also
recommended that you check the option Auto-Select, and PowerDVD will
automatically determine the best video mode for you.
- 20 -
Page 20

PLAYING AN AUDIO CD
USING THE CD PLAYER UTILITY IN WINDOWS 95/98
1. Connect the 3.5mm stereo audio cable from the Line-Out Jack of your
DVD-ROM to your notebook’s Line-In Jack, or to a self-amplified
speaker.
2. Make sure the CD
Player utility has been installed in your Windows 95/98. If not, go to
your Desktop and double-click the My Computer icon, then on the
Control Panel folder. Now double-click on the Add/Remove
Programs icon and select the Window Setup tab. Then select the
Multimedia item in order to add the CD Player.
3. Place an Audio CD in your DVD-ROM tray.
4. After closing the tray, the CD Player will automatically play the audio
CD.
Hot-Insert/Remove feature of the PCMCIA DVD-ROM
The PCMCIA DVD-ROM, being a storage device itself, cannot be hotinserted/removed (which means to insert/remove the card from your system
without rebooting or turning off your system) when it is accessing data. To
avoid system failure, read the following instructions carefully before using
the hot-removing fea ture.
For Windows 95 hot-swapping is allowable, but with more limits. To avoid
system failure, always follow the steps below to hot-remove the PCMCIA
DVD-ROM in Windows 95,
1. Click the PC card indicator on the task bar at the bottom right of the
screen.
2. Click the command to stop the card you want to remove.
3. When the screen prompts, read the instruction carefully. If the system
prompts you not to remove the card, DO NOT remove the card. You
should exit the present application and return to step 1.
Be sure you are removing the card by the procedures described above;
otherwise, the following dialog will be displayed:
- 21 -
Page 21

To display the PC card indicator on the task bar, perform the following
steps:
1. Double-click the PC Card (PCMCIA) icon on the Control Panel.
2. Make sure the box showing the control on the task bar is checked. If the
PC Card (PCMCIA) wizard appears when you click the button in step 1,
follow the instructions. Restart your computer, then double-click the PC
Card (PCMCIA) icon in the Control Panel, and check the box to view
the status indicator on the task bar.
- 22 -
Page 22

PROBLEM SOLVING
The following are solutions for some problems you may encounter while
using the PCMCIA DVD-ROM.
IF YOU CANNOT ACCESS A DISC IN THE DRIVE
Solutions:
! Make sure the AC adapter is securely connected to the drive and to the
outlet.
! Make sure the tray has been closed properly. Press gently and firmly
until it clicks into place.
! Eject the tray and remove the disc to make sure the tray is clean. Any
dirt may interfere with the laser beam.
! Examine the disc to see whether it is dirty. If necessary, wipe it with a
clean tissue.
! Replace the disc in the tray. Make sure the disc is lying flat with the
label side up. Push to close the tray completely.
IF THE TRAY DOES NOT SLIDE OUT
Solutions:
! Check the power LED to make sure the drive is powered on.
! There is an emergency hole on the front panel next to the eject button.
Insert a pin-shaped item (e.g. paper clip) to manually eject the tray.
Make sure there is no power to the drive.
IF YOU CANNNOT ACCESS A PARTICULAR CD
Solutions:
! Check the type of the CD you are using. The drive supports ISO 9660,
Audio CD, Video CD.
!
The color of the materials used to make the CD can also affect its
reliability. Silver colored CDs are the most reliable, followed by goldcolored CDs. Green-colored CDs are the least reliable.
- 23 -
 Loading...