

Page 1
User’s Manual
Page 2

Page 3

FCC COMPLIANCE STATEMENTS
This equipment has been tested and found to comply with the limits for a Class B digital device,
pursuant to Part 15 of the FCC Rules. Th ese l imits are designed to provide reasonable protection
against harmful interference in a residential installation. This equipment generates, uses and can
radiate radio frequency energy and, if not installed and used in accordance with the instructions, may
cause harmful interference to radio communications. However, there is no guarantee that interference
will not occur in a particular installation. If this equipment does cause harmful interference to radio or
television receptio n, which can be determined by turni ng the equipment off and on, th e user i s
encouraged to try to correct the interference by one or more of the foll owing measures:
Reorient or relocate the receiving antenna.
Increase the Distance between the equipment and receiver.
Connect the equipment into an outlet on a circuit different from that to which the receiver is connected.
Consult the dealer or an experienced radio/TV technician for help.
CAUTION
CHANGE OR MODIFICATIONS NOT EXPRESSLY APPROVED BY
PARTY RESPONSIBLE FOR COMPLIANCE COULD VOID THE USER
AUTHORITY TO OPERATE THE EQUIPMENT.
Page 4

TRADEMARKS
MS-DOS, Windows, Windows 95/98/Me/2000/XP are trademarks of Microsoft Corporation.
Macintosh is trademark of Appl e Computer Inc.
*All of the third-party brands and names are the property of their respective owners.
Page 5

CONTENTS
INTRODUCTION ............................................................................................................. 1
SYSTEM REQUIREMENTS ............................................................................................ 2
PART NAMES AND FUNCTIONS.................................................................................. 4
FRONT PANEL OF THE CD-RW DRIVE ................................................................ 4
REAR PANEL OF THE CD-RW DRIVE .................................................................. 6
HARDWARE INSTALLATION....................................................................................... 8
SOFTWARE INSTALLATION FOR WINDOWS 98SE ................................................ 10
SOFTWARE INSTALLATION FOR WINDOWS Me .................................................... 13
SOFTWARE INSTALLATION FOR WINDOWS 2000 ................................................. 16
HOW TO UPDATE THE DEVICE DRIVER ............................................................ 18
SOFTWARE INSTALLATION FOR WINDOWS XP .................................................... 20
USING CD-RW WITH USB INTERFACE ..................................................................... 22
CD-R/CD-RW MEDIA...................................................................................................... 24
Page 6

Page 7

INTRODUCTION
The external CD-RW is a high performance external CD Recordable/ReWritable drive, it makes
writing CDs easier, faster and more affordable than ever before. The features are:
♦ It can attach with the USB (Universal Seri al Bus) interface, the specification of these interfaces
must me e t :
USB 1.1 (Data Transfer Rate = up to 12Mbits/sec) or
USB 2.0 (Data Transfer Rate = up to 480Mbits/sec) standard.
♦ As for USB CD-RW, moreover, you can use it ju st like a high capacity, durable floppy; you can
write, update, and rewrite your files thousands of times on a single CD-RW disc.
♦ The external CD-RW can be easily con nected to computer via USB interface, and can even be
disconnected and re-conn ected while the computer is running.
This user’s manual is intended to describe how to install the external CD-RW on the computer. To use
the CD recording software, please consult the related user’s manual for each software package.
- 1 -
Page 8

SYSTEM REQUIREMENTS
USB 2.0 function USB 1.1 function
! Notebook or desktop computer with USB2.0
port.
! Windows 98SE/Me/2000 or Windows XP.
(Make sure the USB2.0 device driver h as
been installed and i s available).
! Backwards compatible with USB1.1
standard.
! Fast hard disk (ATA-3 or SCSI-2 or above) when using recording function.
NOTE:
♦ Although the external C D-RW supp orts U SB2.0 functi on, the ac tual tr ansfer spee d is de pen din g
on what USB port it is connected to. If the USB port supports USB2.0, the external CD-RW
works with USB2.0 function (up to 480Mbits/sec); if the USB port only supports USB1.1, the
external CD-RW can only works with USB1.1 function (up to 12Mbits/sec).
♦ Under Win95 and Win98, the USB device is not stable to work, we recommend using this
external CD-RW with Windows 98SE (Second Edition) and the newer version of Windows
operating systems.
! Notebook or desktop computer with USB1.1
port.
! Windows 98SE/Me/2000 or Windows XP.
(Make sure the USB device driver h as been
installed and is available).
- 2 -
Page 9

- 3 -
Page 10

PART NAMES AND FUNCTIONS
Your external CD-RW may differ slightly from the f igures shown, how ev er the controls w ill operate as
described below.
Front Panel Of The CD-RW Drive
1. Eject Button:
Press this button to open the disc tray. To close the disc tray, press this button again (external type
of drive), or gently push the front of the tray (Ultra-slim type of drive).
2. Disc Tray:
This disc tray is used to insert the CD media.
3. Disc Ready/Read/Write LED:
This LED is used to indicate the disc access status.
4. Emergency Eject:
In case you cannot s up ply power to the drive but want to r e move a disc from the tray, push a small
rod (paperclip) about 5cm long, through the Emergency Eject hole to disengage the gears inside.
Then pull the tray out manually. After removing the disc, gently push the tray back to its original
position. This proce dure is only to be used in t he c ase of an em e rgency a nd is not m ea nt for norm al
operation.
5. Headphone Volume Control:
Turn the wheel to adjust the audio volume of your head phones.
6. Headphone Jack:
Connect your headphones to this 3.5mm jack to listen to audio CDs.
- 4 -
Page 11
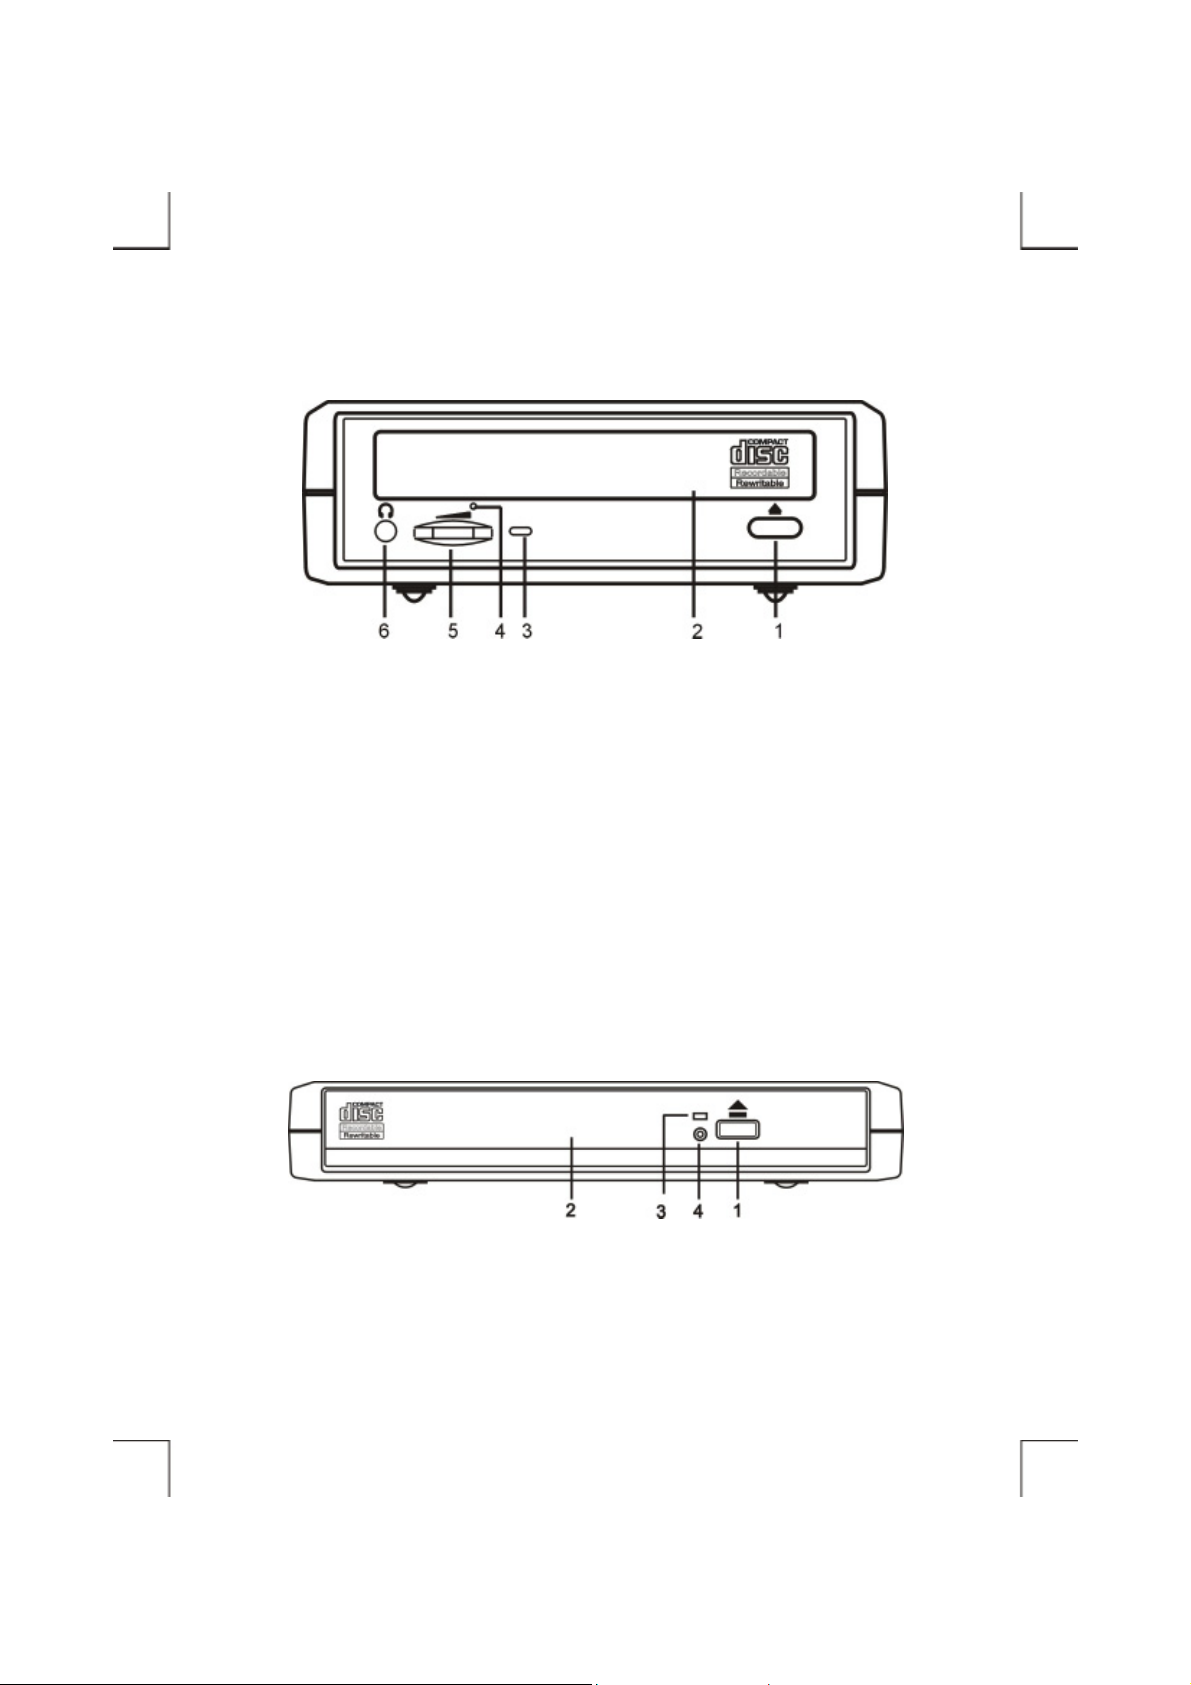
External Type
Ultra-Slim Type
- 5 -
Page 12

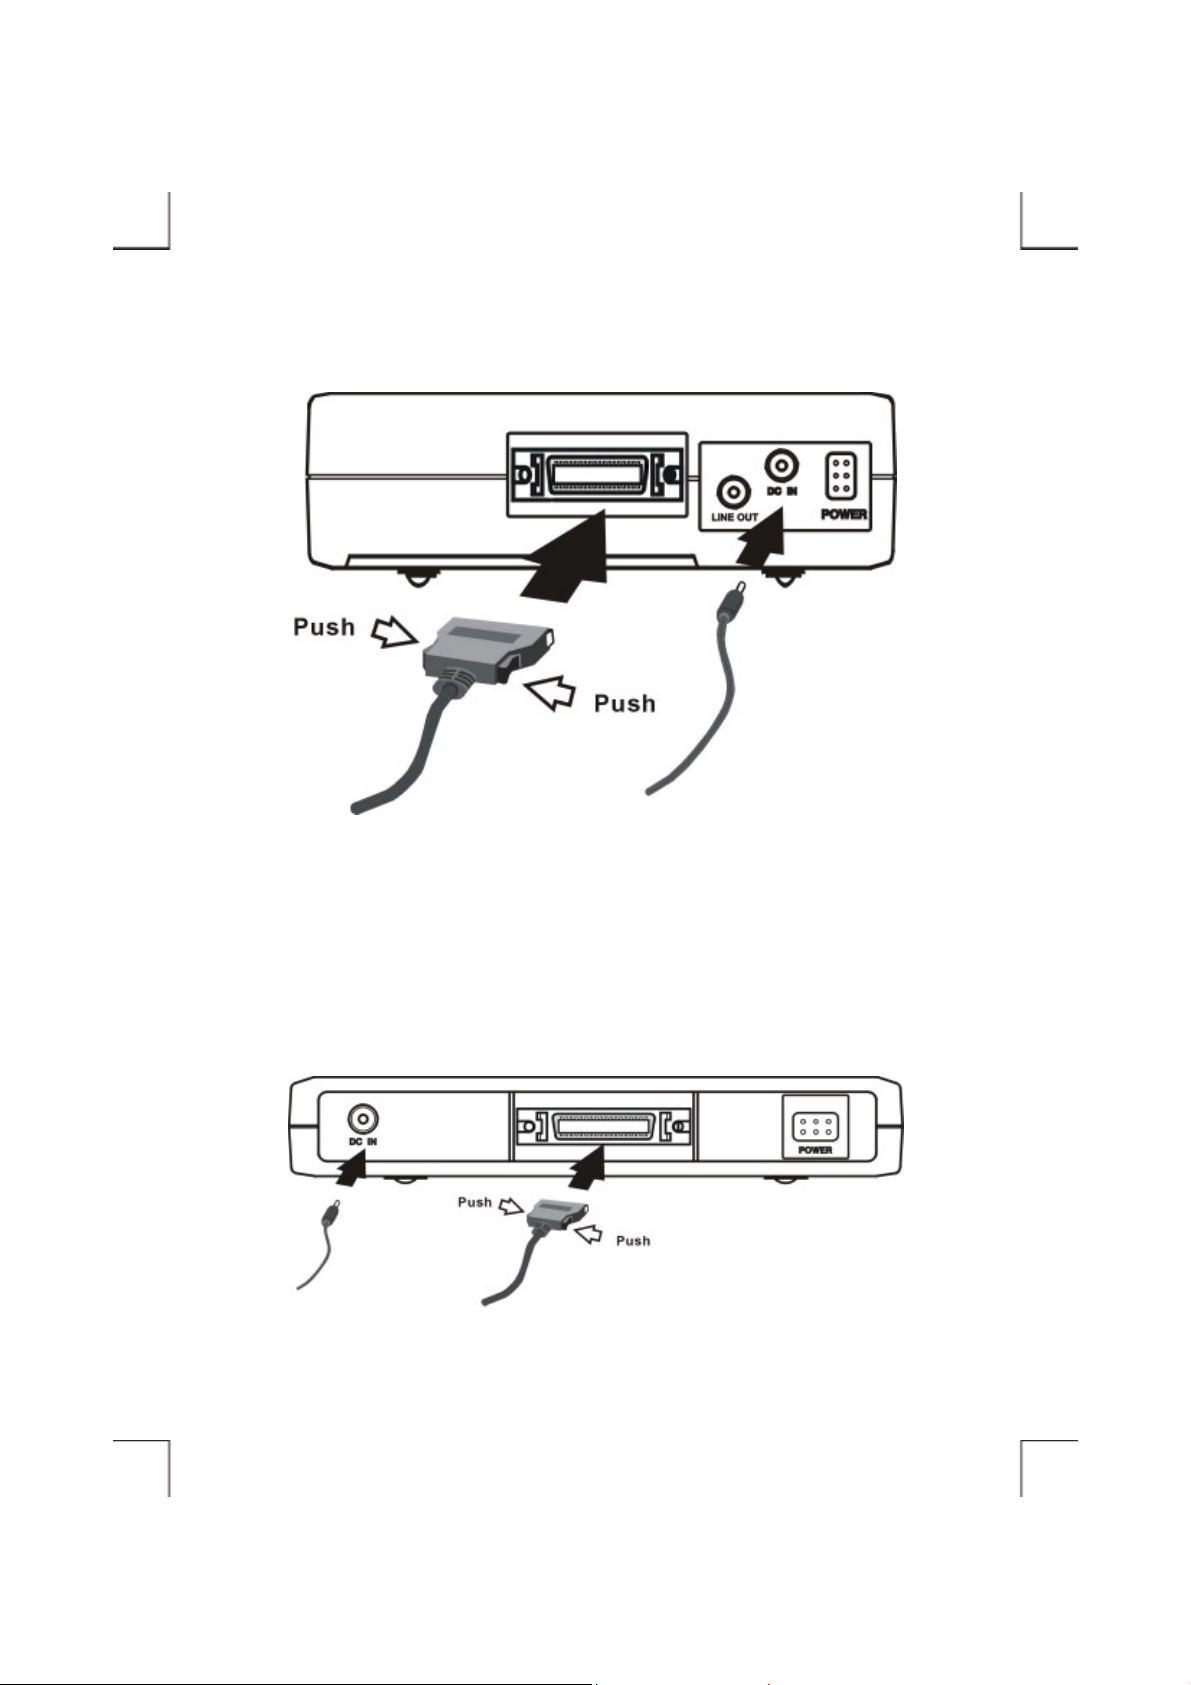
Rear Panel Of The CD-RW Drive
1. Power Button:
Press this button to manually power on/off the CD-RW drive.
2. Power Jack (DC IN):
Connect the AC adapter lead here.
3. Line Out Jack:
This jack provides audio signal output to your amplifier.
4. Interface Connector:
Connect the USB interface cable here.
- 6 -
Page 13

External Type
Ultra-Slim Type
- 7 -
Page 14

HARDWARE INSTALLATION
Note: This external CD-RW should only be powered by the AC adapter provided by manufacturer,
using an incorrect AC adapter can result in permanent and unpredictable damage to the drive.
1. Insert the plug of the USB cable into the Interface Connector of drive. Press firmly until the
Interface Connector is seated co rrectly.
2. Place the CD-RW drive in the horizontal position. The drive i s designed to operate only in the
horizontal position. Operating the CD-RW drive in any abnormal position is not recommended.
3. Connect the AC adapter lead to the Power Jack (DC IN) at th e rear panel of the drive.
4. Attach the AC adapter to the AC power outlet.
5. You are now ready to install the device drivers, please follow the related software installation guide
to install the device driver.
- 8 -
Page 15
External Type
Ultra-Slim Type
- 9 -
Page 16
E
H
SOFTWARE INSTALLATION FOR WINDOWS 98SE
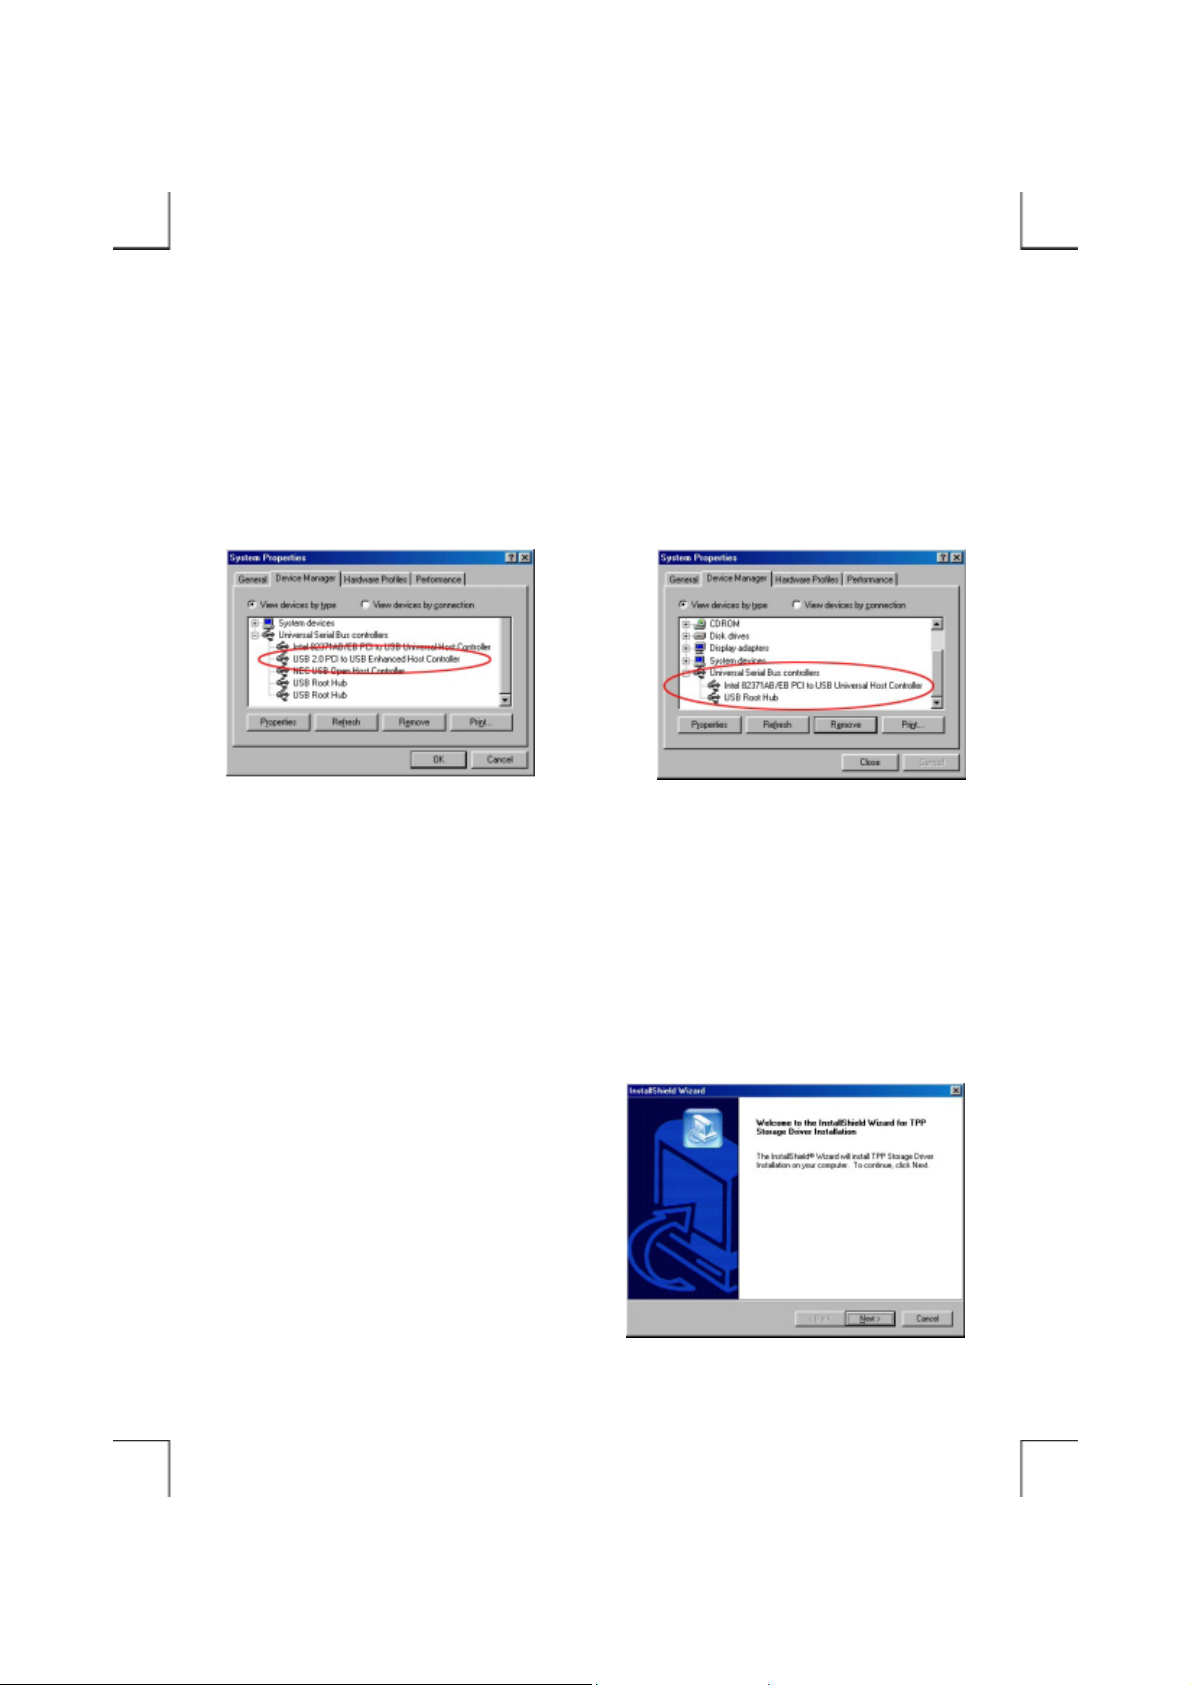
1. Boot-up your computer into Windows 98SE, making sure the USB port device driver has been
installed and is available. To check this, right-click ‘My Computer’, click ‘Properties’ and then
‘Device Manager’ to open the ‘Device Manager’ window. Refer to the figures shown below to see
if the USB Controller is installed without error.
The above figure indicates this system supports
both USB1.1 and USB2.0 function (the USB2.0
nhanced Host Controller has been installed).
The above figure indicates this system supports
only USB1.1 function (no USB2.0 Enhanced
ost Controller installed).
2. Before connect the external CD-RW into computer, please run the pre-install program first.
Insert the USB CD- RW dev ice dri ver dis kette into your floppy drive. D ouble clic k ‘My Com puter’,
double click ‘Floppy drive’, and then double click ‘TPPINST’ to run the pre-install program.
3. On the first screen, click Next.
- 10 -
Page 17
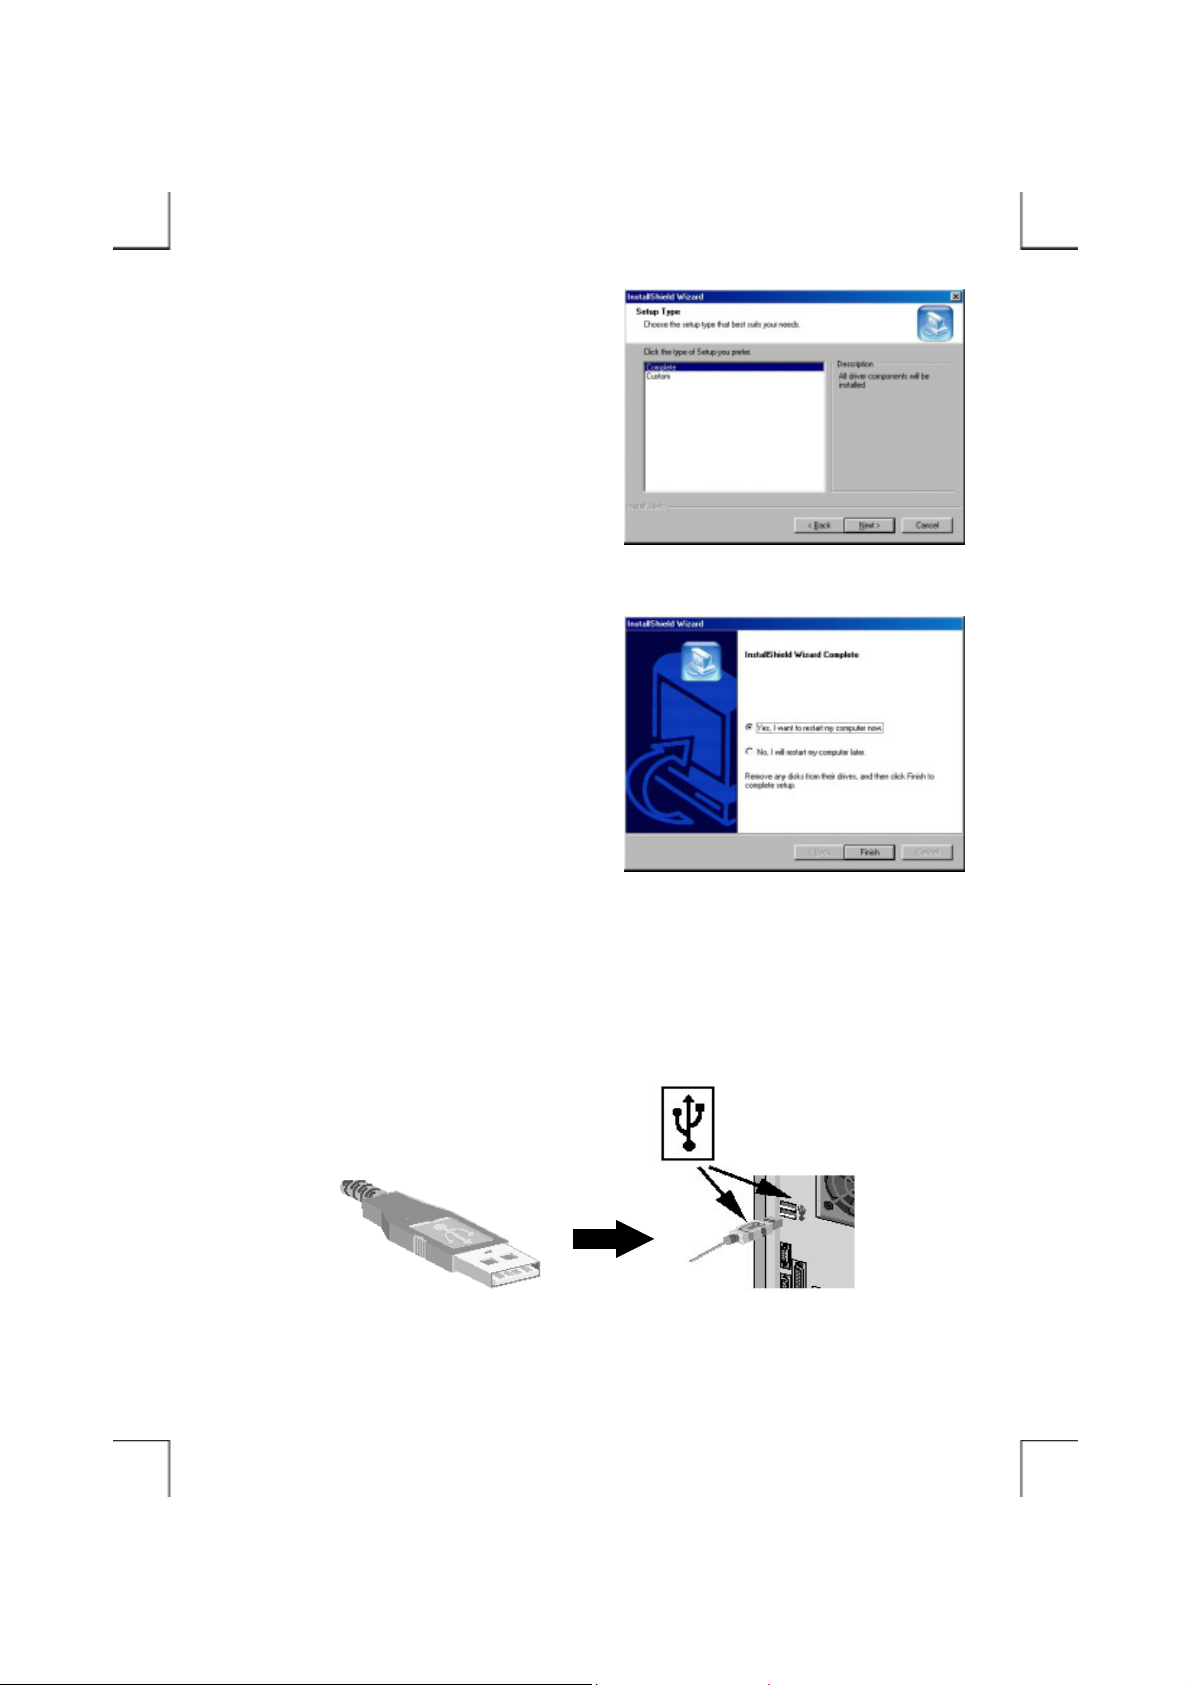
P
4. On the following screen, select ‘ C omplete’, and
then click Next.
5. After the necessary files are copied int o your
internal hard disk, a screen will appear as the
figure, click Finish to restart computer.
6. After the computer is restart and boot into Windows system, you can connect the external CD-RW
to the computer. Ensure the USB interface cab le and then the AC adapter connecti on s are made as
described in Hardware Installation. Insert the port connector of the USB interface cable into the
USB port of your computer.
ort connector of the USB cable
- 11 -
USB port of computer
Page 18
f
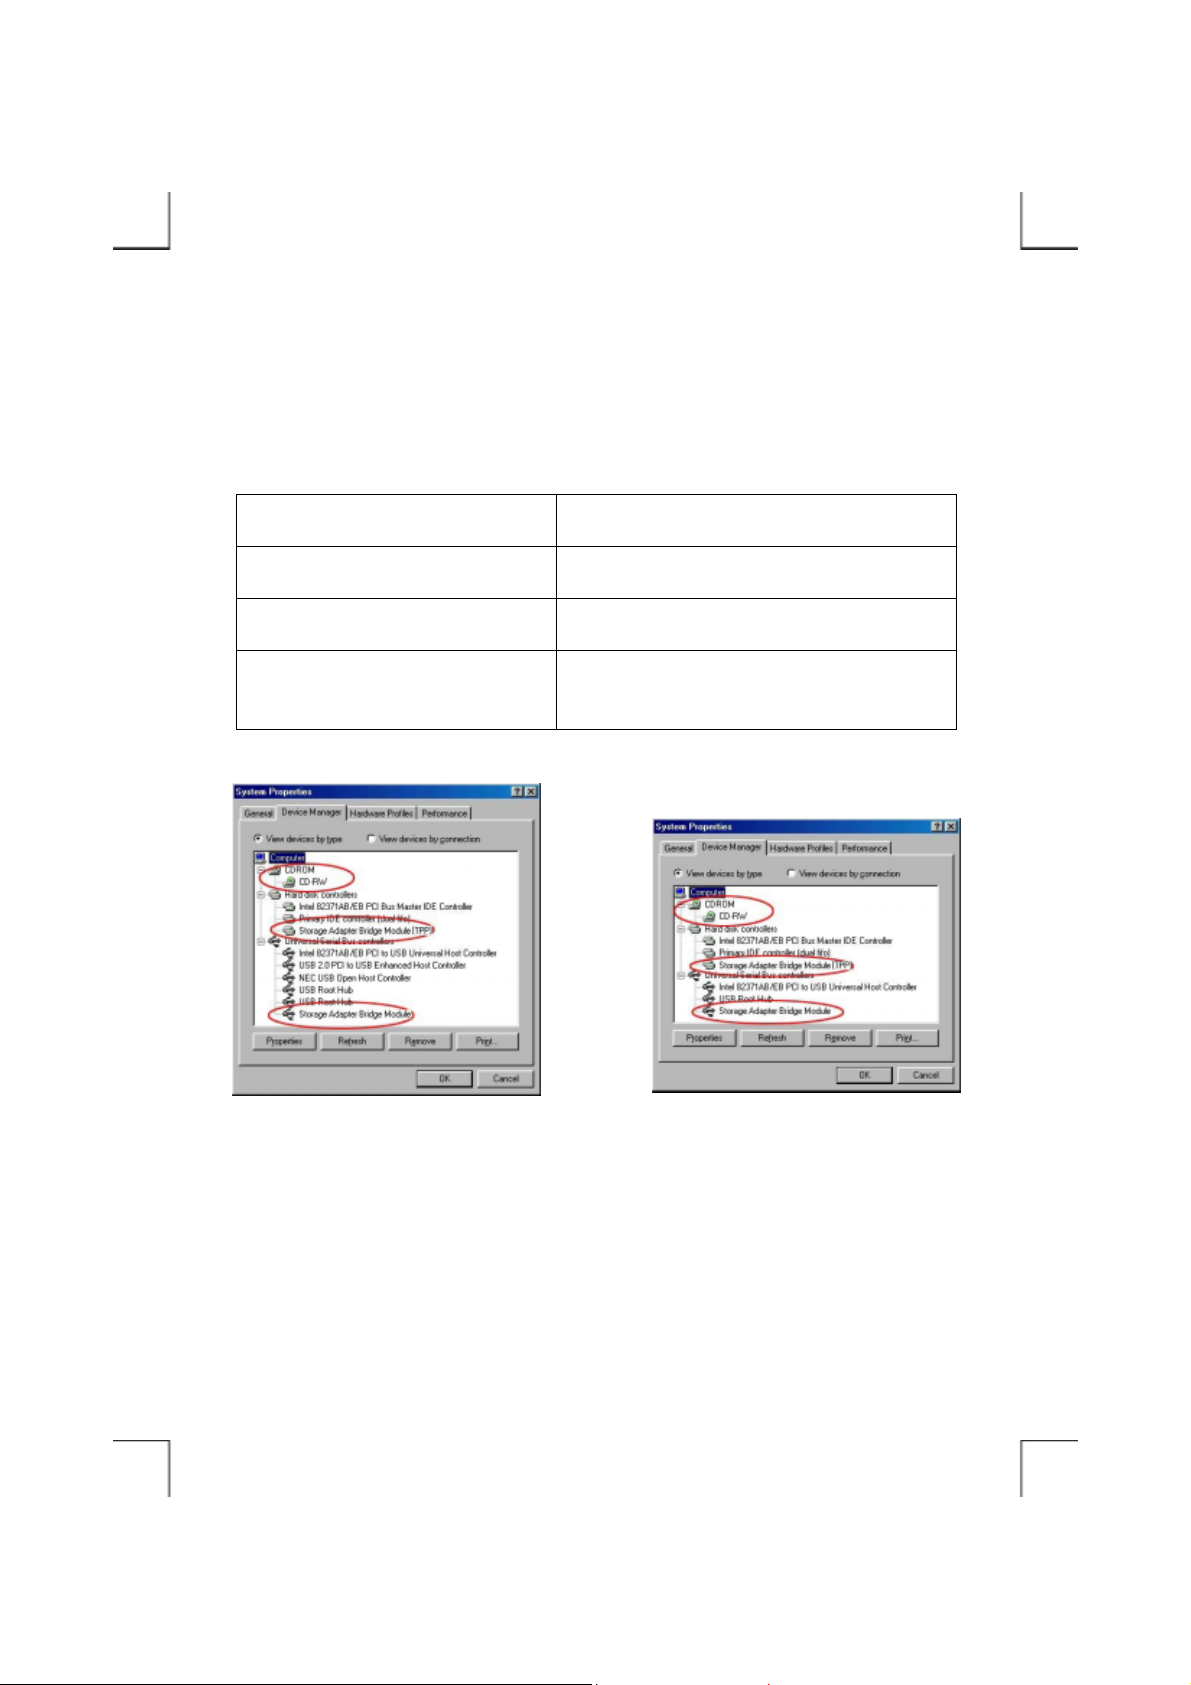
7. Windows will detect the external CD-RW and install the device driver automatically. After the
installation, you will find a new drive letter has been assigned for the drive in ‘My Computer’.
8. If the external CD-RW doesn’t appear in ‘My Computer’ or doesn’t work properly, please go into
‘Device Manager’ to check whether the devices are installed as the table and figure.
Installed Device Drivers Location
Storage Adapter Bridge Module Installed under ‘Universal Serial Bus Controllers’.
Storage Adapter Bridge Module (TPP) Installed under ‘Hard Disk Controllers’.
The real name of the CD-RW drive
Installed under ‘CDROM’ (the name list in the figure
may differ from your CD-RW drive).
The above figure indicates the drivers have been
installed into the system that supports both USB1.1
and USB2.0 function.
The above figure indicates the drivers have been
installed into the system that supports only USB1.1
unction.
- 12 -
Page 19

E
H
SOFTWARE INSTALLATION FOR WINDOWS Me
1. Boot-up your computer into Windows Me, making sure the USB port device driver has been
installed and is available. To check this, right-click ‘My Computer’, click ‘Properties’ and then
‘Device Manager’ to open the ‘Device Manager’ window. Refer to the figures shown below to see
if the USB Controller is installed without error.
The above figure indicates this system supports
both USB1.1 and USB2.0 function (the USB2.0
nhanced Host Controller has been installed).
The above figure indicates this system supports
only USB1.1 function (no USB2.0 Enhanced
ost Controller installed).
2. Before connect the external CD-RW into computer, please run the pre-install program first.
Insert the USB CD- RW dev ice dri ver dis kette into your floppy drive. D ouble clic k ‘My Com puter’,
double click ‘Floppy drive’, and then double click ‘TPPINST’ to run the pre-install program.
3. On the first screen, click Next.
- 13 -
Page 20

P
4. On the following screen, select ‘ C omplete’, and
then click Next.
5. After the necessary files are copied int o your
internal hard disk, a screen will appear as the
figure, click Finish to restart computer.
6. After the computer is restart and boot into Windows system, you can connect the external CD-RW
to the computer. Ensure the USB interface cab le and then the AC adapter connecti on s are made as
described in Hardware Installation . Insert the port connector of the USB interface cabl e i nto the
USB port of your computer.
ort connector of the USB cable
- 14 -
USB port of computer
Page 21

f
7. Windows will detect the external CD-RW and install the device driver automatically. After the
installation, you will find a new drive letter has been assigned for the drive in ‘My Computer’.
8. If the external CD-RW doesn’t appear in ‘My Computer’ or doesn’t work properly, please go into
‘Device Manager’ to check whether the devices are installed as the table and figure.
Installed Device Drivers Location
Storage Adapter Bridge Module Installed under ‘Universal Serial Bus Controllers’.
Storage Adapter Bridge Module (TPP) Installed under ‘Hard Disk Controllers’.
The real name of the CD-RW drive
Installed under ‘CDROM’ (the name list in the figure
may differ from your CD-RW drive).
The above figure indicates the drivers have been
installed into the system that supports both USB1.1
and USB2.0 function.
The above figure indicates the drivers have been
installed into the system that supports only USB1.1
unction.
- 15 -
Page 22

P
E
H
SOFTWARE INSTALLATION FOR WINDOWS 2000
1. Boot-up your computer into Windows 2000, making sure the USB port device driver has been
installed and is available. To check this, right-click ‘My Computer’, click ‘Properties’ then
‘Hardware’ a nd then ‘Dev ice Mana ger’ to open the ‘De vice Manager’ window . Refe r to the f igures
shown below to see if the USB Controller is installed without error.
The above figure indicates this system supports
both USB1.1 and USB2.0 function (the USB2.0
nhanced Host Controller has been installed).
The above figure indicates this system supports
only USB1.1 function (no USB2.0 Enhanced
ost Controller installed).
2. Ensure the USB interface cable and th en the AC adapter connections are made as described i n
Hardware Installation. Insert the por t conn ector of the USB interface cable into the USB port of
your computer. The LED on the drive should be light.
ort connector of the USB cable
USB port of computer
- 16 -
Page 23

f
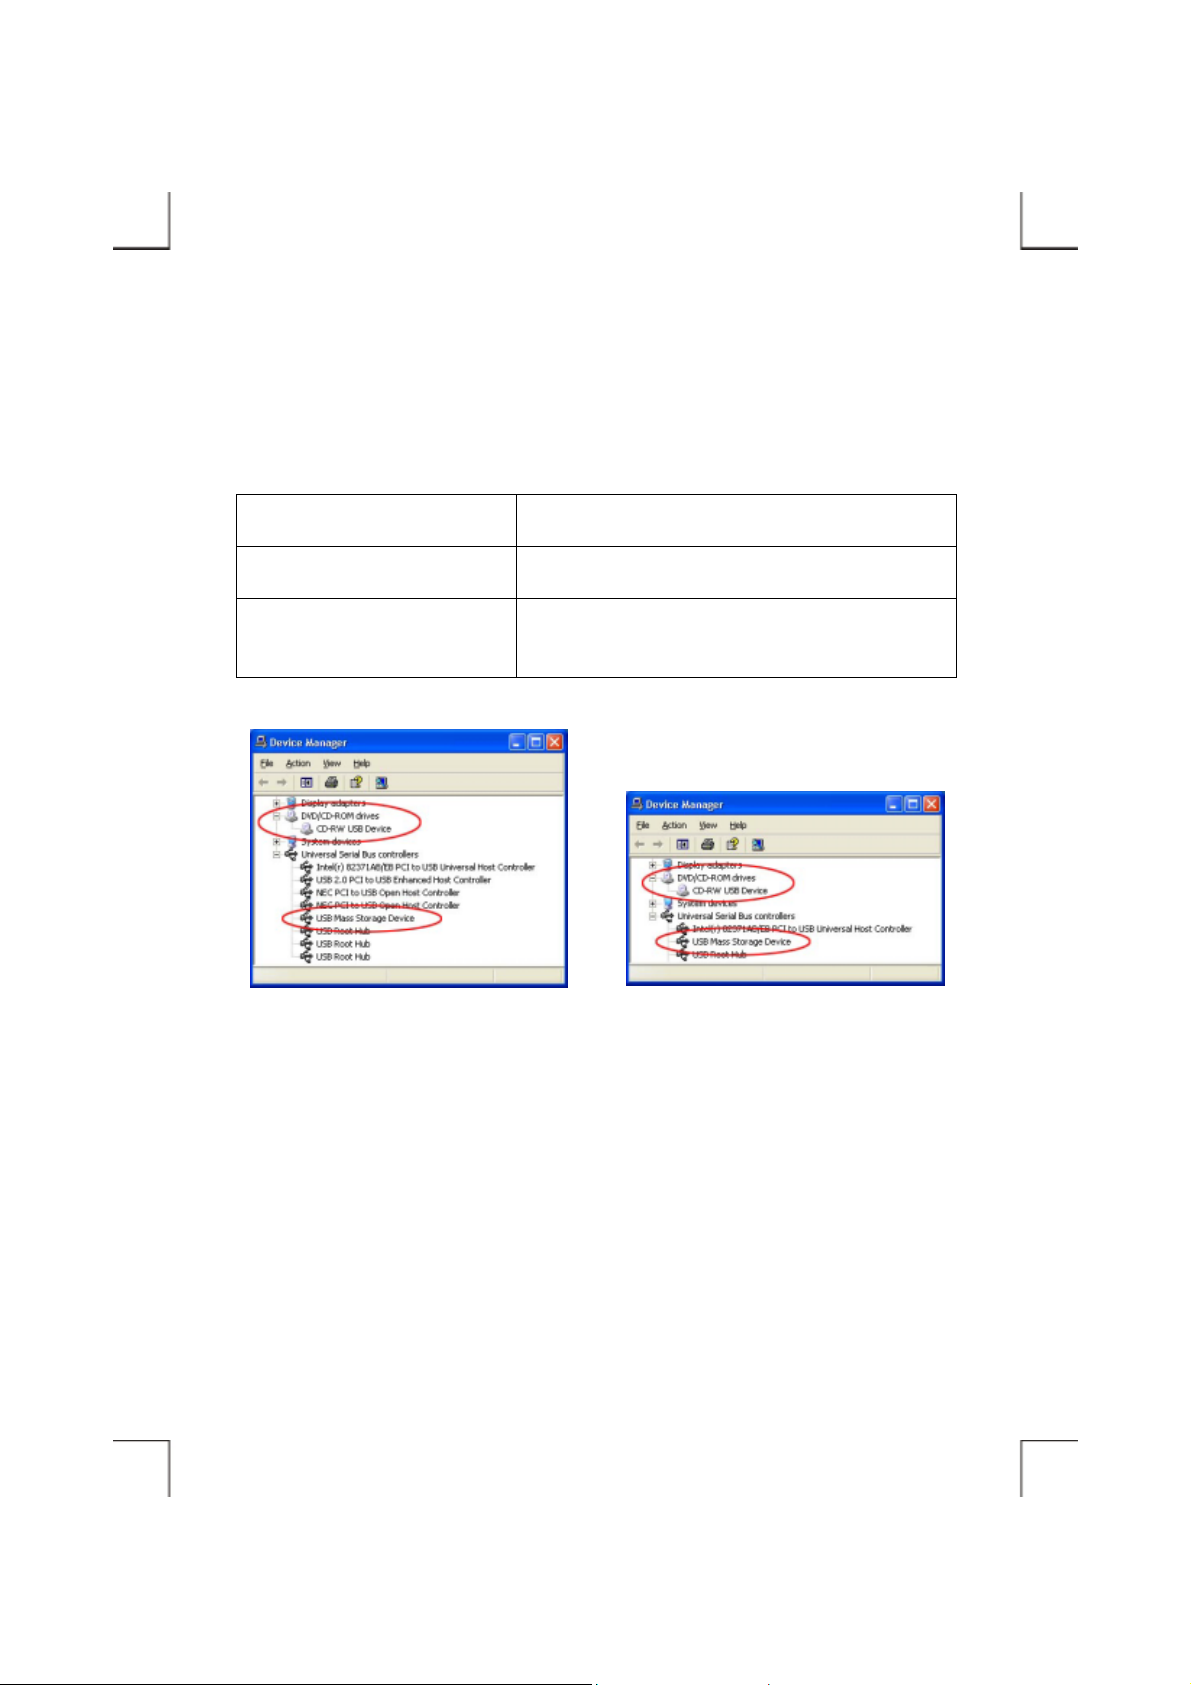
3. Windows 2000 will install its resident device driver (USB Mass Storage Device) automatically.
After the installation, this external CD-RW drive will appear under a new drive letter in ‘My
Computer’.
4. If the external CD-RW doesn’t appear in ‘My Computer’ or doesn’t work properly, please go into
‘Device Manager’ to check whether the devices are installed as the table and figure.
Installed Device Drivers Location
USB Mass Storage Device Installed under ‘Universal Serial Bus Controllers’.
The real name of the CD-RW drive
Installed under ‘DVD/CD-ROM drives’ (the name list in
the figure may differ from your CD-RW drive).
The above figure indicates the drivers have been
installed into the system that supports both USB1.1
and USB2.0 function.
The above figure indicates the drivers have been
installed into the system that supports only USB1.1
unction.
- 17 -
Page 24

How To Update The Device Driver
The Windows 2000 resident driver – ‘USB Mass Storage Device’ will work properly with the external
CD-RW, you don’t need to update it to the vendor’s driver. If the resident driver has problem or you
want to update the driver to newer version, the following is the procedure:
1. Do not connect the external CD-RW to computer.
2. Insert the USB CD-RW devic e driv er disk ette into y our f loppy dr ive. Do uble click ‘My Computer ’,
double click ‘Floppy drive’, and then double click ‘TPPINST’ to run the pre-install program.
3. On the first screen, click Next.
4. On the following screen, select ‘ C omplete’, and
then click Next.
5. Click Yes on the ‘Digital Signature Not Found’ screen.
- 18 -
Page 25

f
6. After the necessary files are copied int o your
internal hard disk, a screen will appear as the
figure, click Finish to restart computer.
7. Now the drivers have been updated. After the computer is restart and boot into Windows system,
you can connect the external CD-RW to the computer. Check ‘Device Manager’, t he new drivers
should be installed as the table and figure.
Installed Device Drivers Location
Storage Adapter Bridge Module Installed under ‘Universal Serial Bus Controllers’.
The real name of the CD-RW drive
The above figure indicates the drivers have been
installed into the system that supports both USB1.1
and USB2.0 function.
Installed under ‘DVD/CD-ROM drives’ (the name
list in the figure may diff er from your CD-RW driv e).
The above figure indicates the drivers have been
installed into the system that supports only USB1.1
unction.
- 19 -
Page 26
P
E
H
SOFTWARE INSTALLATION FOR WINDOWS XP
1. Boot-up your computer into Windows XP, making sure the USB port device driver has been
installed and is available. To check this, right-click ‘My Computer’, click ‘Properties’ then
‘Hardware’ a nd then ‘Dev ice Mana ger’ to open the ‘De vice Manager’ window . Refe r to the f igures
shown below to see if the USB Controller is installed without error.
The above figure indicates this system supports
both USB1.1 and USB2.0 function (the USB2.0
nhanced Host Controller has been installed).
The above figure indicates this system supports
only USB1.1 function (no USB2.0 Enhanced
ost Controller installed).
2. Ensure the USB interface cable and th en the AC adapter connections are made as described i n
Hardware Installation. Insert the por t conn ector of the USB interface cable into the USB port of
your computer. The LED on the drive should be light.
ort connector of the USB cable
USB port of computer
- 20 -
Page 27
f
3. Windows XP will insta ll its res ident device driv er (USB Mass Storage Devic e) automatic ally. Af ter
the installation, this externa l CD-RW drive will appear under a new drive letter in ‘My Compute r’.
4. If the external CD-RW doesn’t appear in ‘My Computer’ or doesn’t work properly, please go into
‘Device Manager’ to check whether the devices are installed as the table and figure.
Installed Device Drivers Location
USB Mass Storage Device Installed under ‘Universal Serial Bus Controllers’.
The real name of the CD-RW drive
The above figure indicates the drivers have been
installed into the system that supports both USB1.1
and USB2.0 function.
Installed under ‘DVD/CD-ROM drives’ (the name list in
the figure may differ from your CD-RW drive).
The above figure indicates the drivers have been
installed into the system that supports only USB1.1
unction.
- 21 -
Page 28

USING CD-RW WITH USB INTERFACE
To Connect The USB CD-RW To Your Computer
♦ Windows 98SE/Me/200 0/XP:
1. Insert the plug of the USB cable into the Interface Connector of your drive.
2. Connect the AC adapter lead to the Power Jack (DC IN) at the rear panel of the drive. And then
attach the AC adapter to the AC po wer outlet.
3. Insert the port connector of the USB cable into the USB port of your computer. The LED on the
drive should be light and your CD-RW drive is now ready for use.
To Disconnect The USB CD-RW From Your Computer
♦ Windows 98SE:
1. Click on the icon
2. Click ‘Safely Remove 12x10x40 CD-RW – Drive (D:)’ (The name may differ from yours,
depending on what model of CD-RW drive you are using) in the dialog box.
3. Wait for few seconds un til the s ystem prompts ‘The 12x10x40 CD-RW s tora ge device can now be
safely removed from the system’. Click OK, and then remove the USB cable from computer.
♦ Windows Me:
1. Click on the icon
2. Click ‘Safely Remove 12x10x40 CD-RW – Drive (D:)’ (The name may differ from yours,
depending on what model of CD-RW drive you are using) in the dialog box.
3. Wait for few seconds un til the s ystem prompts ‘The 12x10x40 CD-RW s tora ge device can now be
safely removed from the system’. Click OK, and then remove the USB cable from computer.
on system tray, a dialog box appears beside this icon.
on system tray and a dialog box appears beside this icon.
- 22 -
Page 29

♦ Windows 2000:
When this external drive has been inst alled as ‘USB Mass Storage Device’:
1. Double-click on the icon on system tray and the ‘Unplug or Eject Hardware’ dialog box
appears.
2. Highlight ‘USB Mass Storage Device’ in the dialog box and click Stop. At the next screen, click
OK.
3. Wait for few seconds until the system prompts ‘The USB Mass Storage Device can now be safely
removed from the system’. Click OK, and then remove the USB cable from computer.
When this external drive has been instal led with the pre-install program:
1. Click on the icon
2. Click ‘Safely Remove 12x10x40 CD-RW – Drive (D:)’ (The name may differ from yours,
depending on what model of CD-RW drive you are using) in the dialog box.
3. Wait for few seconds un til the s ystem prompts ‘The 12x10x40 CD-RW s tora ge device can now be
safely removed from the system’. Click OK, and then remove the USB cable from computer.
♦ Windows XP:
1. Click on the icon
on system tray and a dialog box appears beside this icon.
on system tray and a dialog box appears beside this icon.
2. Click ‘Safely remove USB Mass Storage Device – Drive (D:)’ (The drive letter may differ from
yours) in the dialog box.
3. Wait for few seconds until the system prompts ‘The USB Mass Storage Device can now be safely
removed from the system’, remove the USB cable from computer.
- 23 -
Page 30

CD-R/CD-RW MEDIA
When using the external CD-RW to record your own CDs, you can use both CD-R disc and CD-RW
discs. The CD-R/CD-RW discs must comply with the Orange Book Part II standard.
Media Compatibility
CD-R discs are readable by CD-ROM, CD-R and CD-RW drives. CD-RW di scs are only readable by
Multi-Read CD-ROM drives, CD-RW drives, and some CD-R drives. The readability of data discs on
various systems will also be affected by the filenames/file system selec ted, and the operating system(s)
under which the disc is written and read.
Care Of Discs
For best result of recording and also the care of the CD Discs, read the follo win g notes cautiously
before using the external CD-RW.
♦ When loading a disc, allow time for the door to open and then gently insert the disc.
♦ Handle discs only by the outer and inner edges.
♦ Never write on either side of a dis c with a ballpoi nt pen or pe ncil. To label CD -R/CD-RW discs, use
only markers or label specifically d esi gned for CD-R/CD-RW media.
♦ Do not store a disc in places with high temperature and humidity. Do not place the disc under direct
sunlight. Store discs in their cases to prevent dust contamination, scratches, bending and other
damage.
♦ When a disc becomes dirty, clean it with a cleaning cloth. Wipe the disc from the center out. Do not
use solvents such as benzine, thinner, commercially available cleaners, or anti-static fluids. Using
fluids of these types may damage the disc.
♦ Blank discs are separately available through your dealer.
♦ Unloading a disc after recordi ng might take some time, because th e drive has to update the TOC
before the disc can be ejected.
- 24 -
Page 31

Page 32

P/N: 7450350-02
Printed in Taiwan
 Loading...