

Page 1
User’s Manual
Page 2

Page 3

FCC COMPLIANCE STATEMENTS
This equipment has been tested and found to comply with the limits for a Class B digital device,
pursuant to Part 15 of the FCC Rules. Th ese l imits are designed to provide reasonable protection
against harmful interference in a residential installation. This equipment generates, uses and can
radiate radio frequency energy and, if not installed and used in accordance with the instructions, may
cause harmful interference to radio communications. However, there is no guarantee that interference
will not occur in a particular installation. If this equipment does cause harmful interference to radio or
television receptio n, which can be determined by turni ng the equipment off and on, th e user i s
encouraged to try to correct the interference by one or more of the foll owing measures:
Reorient or relocate the receiving antenna.
Increase the Distance between the equipment and receiver.
Connect the equipment into an outlet on a circuit different from that to which the receiver is connected.
Consult the dealer or an experienced radio/TV technician for help.
CAUTION
CHANGE OR MODIFICATIONS NOT EXPRESSLY APPROVED BY
PARTY RESPONSIBLE FOR COMPLIANCE COULD VOID THE USER
AUTHORITY TO OPERATE THE EQUIPMENT.
Page 4

TRADEMARKS
PCMCIA are the trademarks of Personal Compu t er Memory Card International Association.
MS-DOS, Windows, Windows 95/98/Me/2000/XP/NT and MSCDEX are trademarks of Microsoft
Corporation.
OS/2 WARP is a trademark of International Business Machines Corporation.
*All of the third-party brands and names are the property of their respective owners.
Page 5

CONTENTS
INTRODUCTION ........................................................................................................... 1
SYSTEM REQUIREMENTS .......................................................................................... 1
PART NAMES AND FUNCTIONS................................................................................ 2
FRONT PANEL OF THE CD-RW DRIVE .............................................................. 2
REAR PANEL OF THE CD-RW DRIVE ................................................................ 4
HARDWARE INSTALLATION..................................................................................... 6
SOFTWARE INSTALLATION FOR WINDOWS 95/98............................................... 8
SOFTWARE INSTALLATION FOR WINDOWS Me .................................................. 11
SOFTWARE INSTALLATION FOR WINDOWS 2000/XP ......................................... 13
SOFTWARE INSTALLATION FOR WINDOWS NT .................................................. 14
SOFTWARE INSTALLATION FOR DOS/WINDOWS 3.1 ......................................... 16
SOFTWARE INSTALLATION FOR OS/2 WARP ....................................................... 21
USING CD-RW WITH PCMCIA INTERFACE ............................................................ 24
Page 6

Page 7

INTRODUCTION
The external CD-RW is a high performance external CD Recordable/ReWritable drive, it can be easily
connected to computer by using PCMCIA interface, and can even be disconnected and re-connected
while the computer is running. It is a complete CD-Recording solution, which makes writing CDs
easier, faster and more affordable than ever before.
As for PCMCIA CD-RW, moreover, you can u se it just like a high capacity, durable floppy; you can
write, update, and rewrite your files thousands of times on a single CD-RW disc.
This user’s manual is intended to describe how to install the external CD-RW on the computer. To use
the CD recording software, please consult the related user’s manual for each software package.
SYSTEM REQUIREMENTS
♦ Notebook or desktop computer with PCMCIA 2.1 Type II or III socket.
♦ Windows 95/98/Me/2000 or Windows XP (The Hot Insert/Remove function is reachable with
these OS).
♦ Windows NT, DOS/Windows 3.1 or OS/2 WARP (These OS don’t support Hot Insert/Remove
function).
♦ Fast hard disk (ATA-3 or SCSI-2 or above) when using recording function.
- 1 -
Page 8

PART NAMES AND FUNCTIONS
Your external CD-RW may differ slightly from the f igures shown, how ev er the controls w ill operate as
described below.
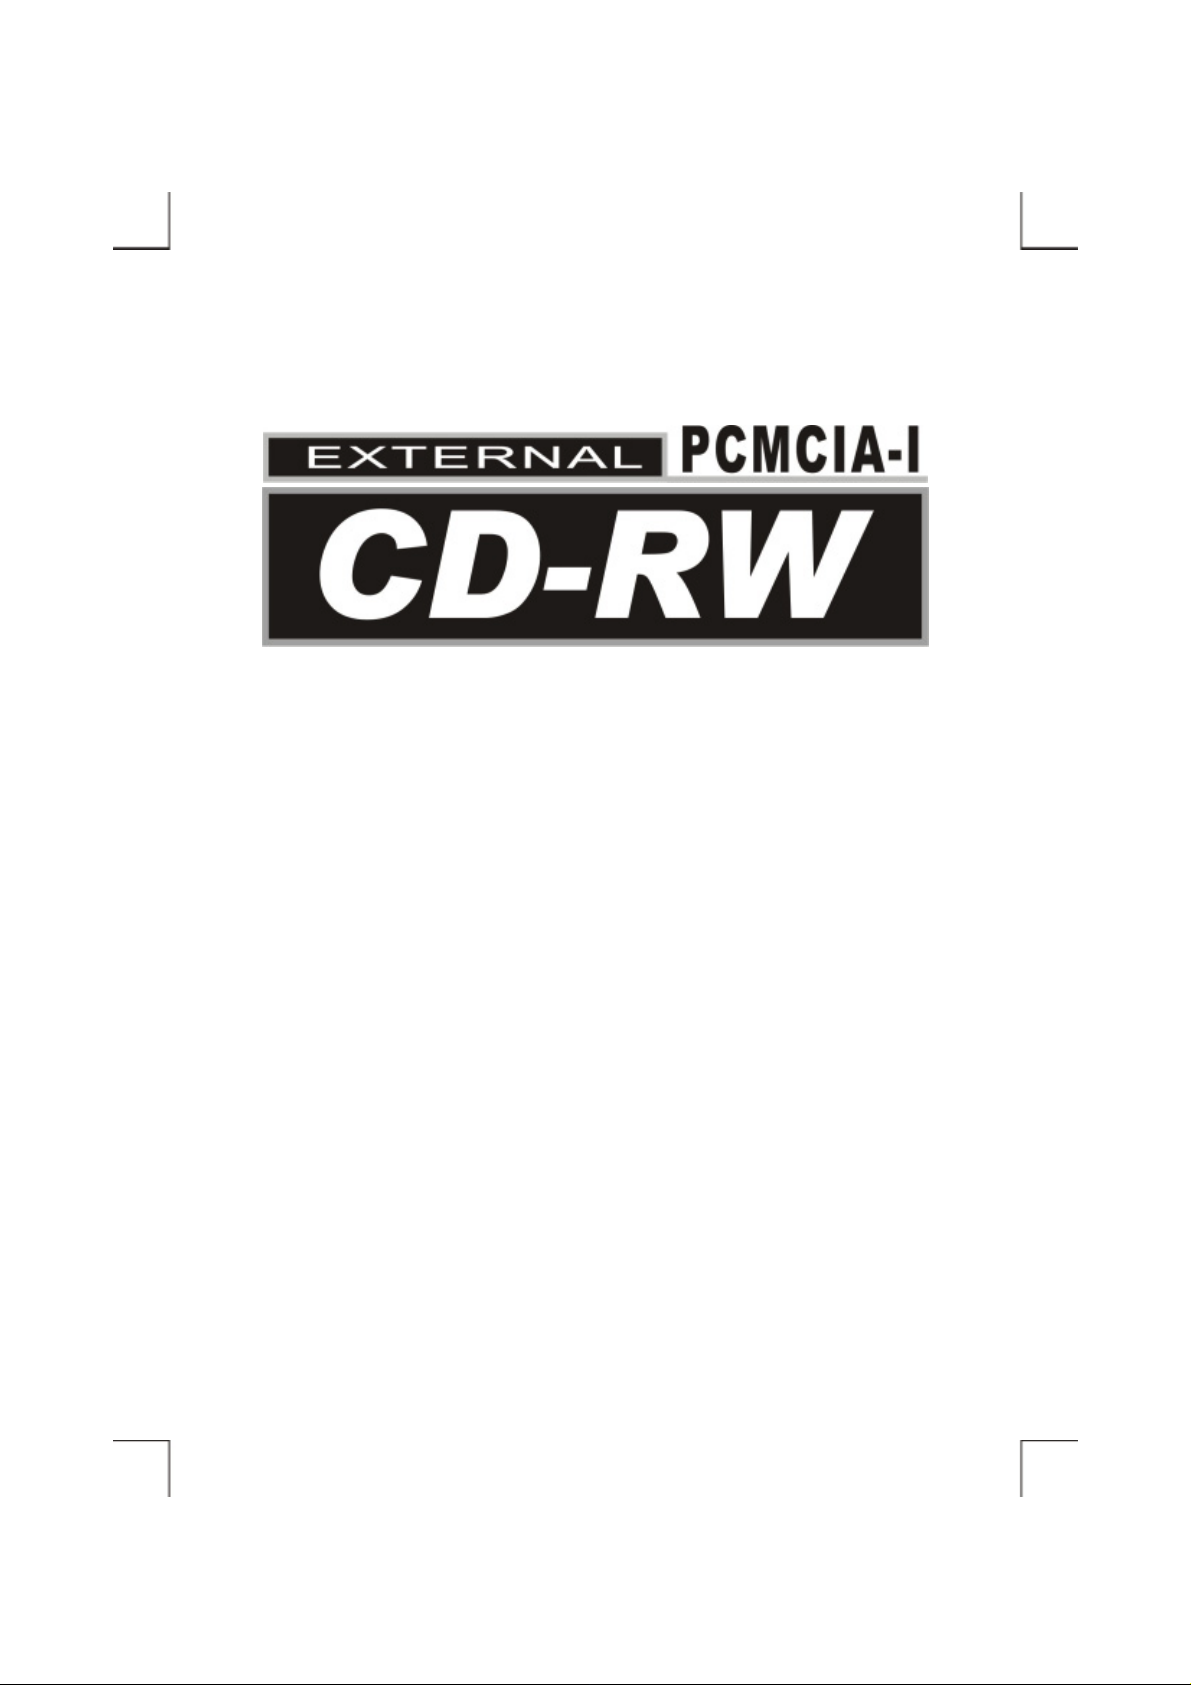
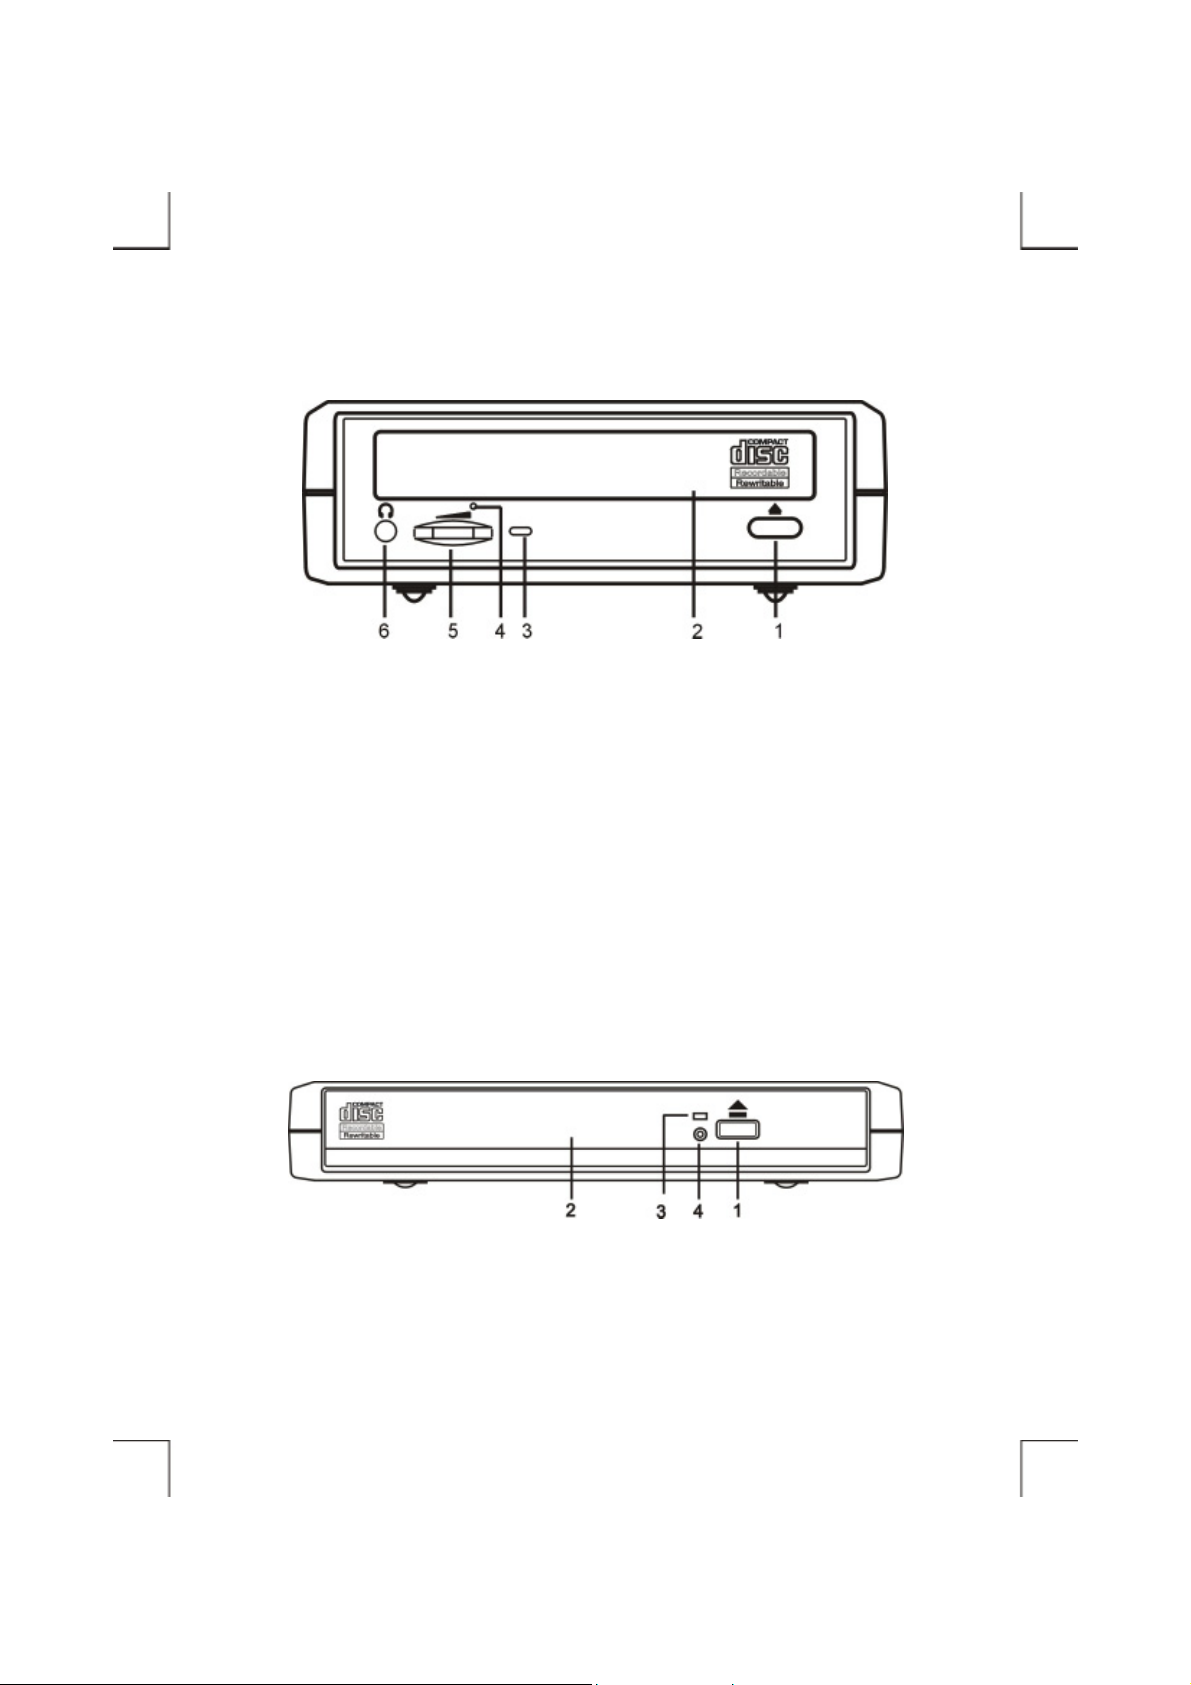
Front Panel Of The CD-RW Drive
1. Eject Button:
Press this button to open the disc tray. To close the disc tray, press this button again (external type
of drive), or gently push the front of the tray (Ultra-slim type of drive).
2. Disc Tray:
This disc tray is used to insert the CD media.
3. Disc Ready/Read/Write LED:
This LED is used to indicate the disc access status.
4. Emergency Eject:
In case you cannot s up ply power to the drive but want to r e move a disc from the tray, push a small
rod (paperclip) about 5cm lon g, through the Emergency Eject h ole to disengage the gears insi de.
Then pull the tray out manually. After removing the disc, gently push the tray back to its original
position. This proce dure is only to be used in t he c ase of an em e rgency a nd is not m ea nt for norm al
operation.
5. Headphone Volume Control:
Turn the wheel to adjust the audio volume of your head phones.
6. Headphone Jack:
Connect your headphones to this 3.5mm jack to listen to audio CDs.
- 2 -
Page 9
External Type
Ultra-Slim Type
- 3 -
Page 10

Rear Panel Of The CD-RW Drive
1. Power Button:
Press this button to manually power on/off the CD-RW drive.
2. Power Jack (DC IN):
Connect the AC adapter lead here.
3. Line Out Jack:
This jack provides audio signal output to your amplifier.
4. Interface Connector:
Connect the PCMCIA interface cable here.
- 4 -
Page 11

External Type
Ultra-Slim Type
- 5 -
Page 12

HARDWARE INSTALLATION
Note:
♦ This external CD-RW should only be powered by the AC adapter provided by manufacturer,
using an incorrect AC adapter can result in permanent and unpredictable damage to the drive.
♦ This external CD-RW supports Hot Insert/Remove function only under Windows
95/98/Me/2000/XP, with the other operating systems, please insert the PC Card of interfa ce
cable before power-on com puter, and remove this card after power-off computer.
1. Insert the plug of the PCMCIA interface cable into th e Int erface Connector of drive. Press firmly
until the interface connector is seated correctly.
2. Connect the AC adapter lead to the Power Jack (DC IN) at the rear panel of the drive. Attach the
AC adapter to the AC power outlet.
3. Place the CD-RW drive in the horizontal position. This dri ve i s desi gned to operate only in the
horizontal position. Operating the CD-RW drive in any abnormal position is not recommended.
4. You are now ready to install the device drivers, please follow the related software installation guide
to install the device driver.
- 6 -
Page 13

External Type
Ultra-Slim Type
- 7 -
Page 14

SOFTWARE INSTALLATION FOR WINDOWS 95/98
The following installation procedures are extracted from the Windows 98SE installation. The
installation for Windows 95 is almost same.
1. Boot-up your computer into Windows 98SE, making
sure the device driver for ‘PCMCIA Socket’ has been
installed and is available. To check this, right-click
‘My Computer’, click ‘Properties’ and then ‘Device
Manager’ to open the ‘Device Manager’ window.
Refer to the figure shown alongside to see if the
PCMCIA Controller is installed without error.
2. Ensure the PCMCIA interface cable and then the AC adapter connections are made as described in
Hardware Installation. Slowly insert the PC Card of interface cable into the P CMCIA socket of
computer and press firmly until the connector is seated (Please note that the PC Card is keyed to
guide for proper insertion).
3. If this is the very f irst tim e y ou a re c onnec ting t he
drive to computer, the ‘Add New Hardware
Wizard’ dialog box appears as shown.
4. Click Next, then select ‘Search for the best driver for your d evi ce’ box, and click Next.
- 8 -
Page 15

5. Select ‘Floppy disk drives’ box and insert the device driver diskette into floppy drive. Click Next.
6. Select ‘The updated driver (Recommended) –
PCMCIA CD-ROM/CD-R/CD-RW/DVD-ROM
(I3)’, and click Next.
7. Wait for few seconds, Windows will find a driver
from the floppy diskette, make sure the file that
Windows found is ‘A:\ PCMCDI.INF’. Click
Next.
8. After the necessary files are copied int o your
internal hard disk, a screen will appear as the
figure, click Finish.
- 9 -
Page 16

9. Windows will then detect the CD-RW drive, you will find a new drive letter has been assigned for
the drive in ‘My Computer’.
10. If the external CD-RW doesn’t appear in ‘My
Computer’ or doesn’t work properly, please go into
‘Device Manager’ to check whether the devices are
installed as the table and figure.
Installed Device Drivers Location
PCMCIA CD-ROM/CD-R/CD-RW/DVD-ROM (I3) Installed under ‘Hard Disk Controllers’.
Installed under ‘CDROM’ (the name list
The real name of the CD-RW drive
in the figure may differ from your
CD-RW drive).
- 10 -
Page 17

SOFTWARE INSTALLATION FOR WINDOWS Me
Windows Me will install the external CD-RW with its resident driver, please do not insert the device
driver diskette into floppy drive during the installation.
1. Boot-up your computer into Windows Me, making
sure the device driver for ‘PCMCIA Socket’ has been
installed and is available. To check this, right-click
‘My Computer’, click ‘Properties’ and then ‘Device
Manager’ to open the ‘Device Manager’ window.
Refer to the figure shown alongside to see if the
PCMCIA Controller is installed without error.
2. Ensure the PCMCIA interface cable and then the AC adapter connections are made as described in
Hardware Installation. Slowly insert the PC Card of interface cable into the P CMCIA socket of
computer and press firmly until the connector is seated (Please note that the PC Card is keyed to
guide for proper insertion).
3. If this is the very f irst tim e y ou a re c onnec ting t he
drive to computer, the ‘Add New Hardware
Wizard’ dialog box appears as shown. Select
‘Automatic search for a better driver
(Recommended), do not insert the device driver
diskette, click Next to continue.
- 11 -
Page 18

4. Windows will install its resident driver –
‘Standard IDE/ESDI Hard Disk Controller’ for
the external CD-RW. After the necessary files are
copied into your internal hard disk, a screen will
appear as the figure, click Finish.
5. Windows will then detect the CD-RW drive, you will find a new drive letter has been assigned for
the drive in ‘My Computer’.
6. If the external CD-RW doesn’t appear in ‘My
Computer’ or doesn’t work properly, please go into
‘Device Manager’ to check whether the devices are
installed as the table and figure.
Installed Device Drivers Location
Standard IDE/ESDI Hard Disk Controller Installed under ‘Hard Disk Controllers’.
The real name of the CD-RW drive
Installed under ‘CDROM’ (the name list in the
figure may differ from your CD-RW drive).
- 12 -
Page 19

SOFTWARE INSTALLATION FOR WINDOWS 2000/XP
1. Boot-up your computer into Windows, making sure
the device driver for ‘PCMCIA Adapters’ has b een
installed and is available. To check this, right-click
‘My Computer’, click ‘Properties’ then ‘Hardware’
and then ‘Device Manager’ to open the ‘Device
Manager’ window. Refer to the figure shown
alongside to see if the PCMCIA Controller is installed without error.
2. Ensure the PCMCIA interface cable and then the AC adapter connections are made as described in
Hardware Installation. Slowly insert the PC Card of interface cable into the P CMCIA socket of
computer and press firmly until the connector is seated (Please note that the PC Card is keyed to
guide for proper insertion).
3. Windows will detect the external CD-RW and install its resident driver automatically. After the
installation, you will find a new drive letter has been assigned for the drive in ‘My Computer’.
4. If the external CD-RW doesn’t appear in ‘My Computer’ or
doesn’t work properly, please go into ‘Device Manager’ to
check whether the devices are i nstalled as the table and
figure.
Installed Device Drivers Location
PCMCIA IDE/ATAPI Controller Installed under ‘IDE ATA/ATAPI Controllers’.
The real name of the CD-RW drive
Installed under ‘DVD/CD-ROM Drives’ (the name list
in the figure may differ from your CD-RW drive).
- 13 -
Page 20

SOFTWARE INSTALLATION FOR WINDOWS NT
Note:
♦ Make sure the Windows NT system is version 3.51 or higher.
♦ Since Windows NT does not support ‘Hot Insert/Remove’ feature, this external CD-RW should
be connected to computer prior to starting Windows NT. Likewise, d o not remove this drive
before you shut down the computer.
♦ In Windows NT, the I/O and IRQ settings of PCMCIA IDE device cannot be changed.
Therefore, if the setting of this CD-RW conflicts with other device, change the I/O or IRQ of
other device to avoid conflicts.
♦ We recommend you install a Card Service program, e.g. SystemSoft’s CardWizard for Windows
NT. This kind of program will help Windows NT to assign resource for PCMCIA device
properly, and reduce the conflict situation.
1. Do not connect the external CD-RW to computer, just power-on the computer and boot into
Windows.
2. Click on Start ! Settings ! Control Panel !
SCSI Adapter. The ‘SCSI Adapter’ dialog box
appears.
3. Click Drivers tab, and then click Add button.
- 14 -
Page 21

4. Click Have Disk button to continue. Window s NT will then prom pt you to insert the manufac turer’s
driver diskette. Insert th e device driver diskette into floppy dri ve. Specify the directory as
A:\WINNT (or B:\WINNT whichever contains the diskette) and click OK.
5. Select ‘PCMCIA CD-ROM/CD-R/
CD-RW/DVD-ROM’ and then click OK.
6. Follow the on-screen instruction to continue. After the installation is complete, Windows will
prompt you to restart to activate the new device driver. Restart and power-off the computer.
7. Ensure the PCMCIA interface cable and then the AC adapter connections are made as described in
Hardware Installation. Slowly insert the PC Card of interface cable into the P CMCIA socket of
computer and press firmly until the connector is seated (Please note that the PC Card is keyed to
guide for proper insertion).
8. Power-on the computer, after boot into Windows, the external CD-RW will be assigned a drive
letter in ‘My Computer’, the drive is ready for use.
- 15 -
Page 22

SOFTWARE INSTALLATION FOR DOS/WINDOWS 3.1
Automatic Installation
Follow the instructions below to proceed with automatic installation.
1. Insert the device driver diskette into a floppy disk drive on your computer.
2. Change the working dir ectory to the floppy driv e containing the dev ice driv er diske tte by ty ping A:
then press ENTER.
3. At the DOS prompt (A:\>), type INSTALL followed by the ENTER key.
4. Press ENTER or click OK button to continue. The screen will display as the following:
1) Directory to install driver: Type the
directory that you want the driver files
are copied to, and then press t he TAB
key to forward to the next field.
2) DOS directory: To specify the
directory containing the file
MSCDEX.EXE. Type the directory,
then press the TAB key to forward to the next field.
3) Set I/O port to: The default setting is (170-177, 376-377). Set to (168-16F, 36E-36F) is
recommended. Press the TAB key to forward to the next field.
4) Set IRQ to: The default setting is 15. Set to 9, 10, or 11 is recommended.
5. After completing the selection, press TAB key to the Install butto n, a nd press ENTER to continue.
- 16 -
Page 23

6. The rest of the installation sho uld proceed automatically, the CONFIG.SYS and
AUTOEXEC.BAT files on your computer will be updated automatically.
7. Reboot your computer and the CD-RW drive will be defined as the next available drive letter. For
example, if the last hard drive of the computer is drive C, the CD-RW drive will be assigned to
drive D.
Manual Installation
You may also manually install the external CD-RW device driver if the default setting conflicts with
your system. Perform the following procedures to complete the manual installation.
Note: The filename of the DOS device driver is different with the different version of driver package,
it could be ARICDI.EXE or NVICDI.EXE. However, you can find this driver in the root folder
of the diskette, the filename will be present as xxxCDI.EXE. The following example is
assumed the filename is ARICDI.EXE, replace the filename if you get the different driver file .
1. Copy the file ARICDI.EXE from the device driver diskette to your hard disk.
2. Add the following line to the TOP of your CONFIG.SYS file. If there is already a LASTDRIVE
line with a letter other than Z, change it to Z.
LASTDRIVE=Z
3. Add the following line to the BOTTOM of your CONFIG.SYS file:
DEVICE=drive:\path\ARICDI.EXE /P:3 /I:9 /D:MSCD001
Where drive:\path specifies the directory containing ARICDI.EXE.
Note: If your CONFIG.SYS file is already loaded with PCMCIA software, such as Cardsoft of
SystemSoft or Cardtalk of Databook, it is necessary to add the above line after the
PCMCIA software. Otherwise, the PCMCIA interface card will not be initialized
properly.
- 17 -
Page 24

ARICDI.EXE is the device driver for the PCMCIA CD-RW. The parameters of ARICDI.EXE
are described below:
/P is used to set the I/O ports, and the valid numbers are 1, 2, and 3. Each number represents
the I/O port pairs of (170-177, 376-377), (1E8-1EF, 3EE-3EF), and (168-16F, 36E-36F)
respectively. The default setting is /P:1.
/I is used to set the IRQ number. The valid IRQs are 3, 4, 5, 7, 9, 10, 11, 12 and 15, and the
default setting is /I:15.
/D is used to set t he devi ce nam e. It c an be a ny na me up t o 8 cha racte rs. This name must be t he
same as the name specified in t he MSCDEX.EXE option /D:name in the next step.
4. Add the following line at the TOP of your AUTOEXEC.BAT:
drive:\path\MSCDEX.EXE /D:MSCD001 /M:4
Where drive:\path specifies the DOS directory or the directo r y con taining the file
MSCDEX.EXE.
Note: If your AUTOEXEC.BAT file loads a menu pr ogram suc h as DOS SH ELL or W indows, y ou
have to add the above line in front of your menu program. Otherwise, MSCDEX will not
have a chance to load before your menu program begins.
The example above shows the default setting. The /D: switch indicates the device name. It
MUST be the same name specified by the /D: switch of ARICDI.EXE in your CONFIG.SYS file.
The /M: switch indicates how much memory to allocate for caching information on the CD-RW.
The default /M:4 caches 8KB.
For more information abo ut the sw itches of MSCDEX, please type ‘help MSCDEX’ at the DOS
prompt.
5. Now, reboot your computer to activate the external CD-RW drive.
Explanation Of The Error Messages
This section explains the most common error messages that DOS/Windows 3.1 users may encounter.
- 18 -
Page 25

After rebooting your computer, the following messages will be displayed on your screen, which are
generated by ARICDI.EXE and MSCDEX.EXE.
Configure card to:
I/O Port: 170-177, 376-377
IRQ number: 15
Device Name: MSCD001
PCMCIA CD-ROM card is present in socket 1
:
Drive D: = Driver MSCD001 unit 0
If any errors occur or the external CD-RW does not work, you should reboot your computer again.
When the system displays ‘Starting MS-DOS...’, press the F8 key to execute CONFIG.SYS and
AUTOEXEC.BAT step by step. You can consistently press the Y key to see each command’s message.
Error Messages Generated By ARICDI.EXE:
♦ Error: PCMCIA CD-ROM card is not present!
If the above message appears, it means ARICDI can’t find the PCMCIA interface card in your
PCMCIA sockets. Make sure the PCMCIA interface card is inserted firmly.
♦ Error: Illegal arguments! For help, type “aricdi /?”
The above error message means that there are invalid arguments in the ARICDI line of
CONFIG.SYS. Please refer to the section titled ‘Manual Installation’ for the usage of
ARICDI.EXE.
♦ Error: I/O port and IRQ number must be specifi ed!
The above message means you have not specified the I/O port and IRQ number argument in the
ARICDI line of CONFIG.SYS.
♦ Error: Illegal I/O port!
The above message means invali d I/O ports in the ARICDI line of CONFIG.SYS have been
selected. The legal I/O port numbers are: 1, 2, and 3.
- 19 -
Page 26

♦ Error: Illegal IRQ number!
The above message means invalid IRQ number in the ARICDI line of CONFIG.SYS have been
selected. The legal IR Q numbers are: 3, 4, 5, 7, 9, 10, 11, 12 and 15.
♦ Error: There is no available 4K memory for mapping!
The above message means ARIC DI can’t find available 4K memory between C000:0 to EFFF:0.
This error can be corrected by changing the EMM386 line of CONFIG.SYS to exclude at least 4K
memory for mapping. For example,
DEVICE=C:\DOS\EMM386.EXE ... X=D000-D3FF
♦ Error: The INTEL 82365SL PCMCIA controller is not detected in your system. You should
contact your dealer to get PCMCIA support software.
The above message means the PCMCIA controller of your computer is not INTEL 82365SL
compatible. In this case, you should install PCMCIA support software that should be supplied by
the notebook manufacturer.
♦ CD-ROM Drive is not found!
The above message means ARICDI. EXE can’t find the external CD-RW drive. Please make sure
the CD-RW drive is properly connected to the PCMCIA interface card cable, and if use AC
adapter, ensure it is connected properly, and the Power Source Switch must at ‘DC’ position.
Error Messages Generated By MSCDEX.EXE:
♦ Device driver not found: 'MSCD001'
This means that A RICDI .EXE is not installe d pr operly or you ha ve entered a diff erent /D: sw itch in
the MSCDEX line of AUTOEXEC.BAT. The device name specified by the /D: switch must be the
same as the /D: switch in the ARICDI.EXE line of CONFIG.SYS.
- 20 -
Page 27

SOFTWARE INSTALLATION FOR OS/2 WARP
Before installing the external CD-RW device driver for OS/2 WARP, make sure your computer is
PCMCIA supported. If you are not sure about this, please refer to the last part of this chapter for
‘Adding PCMCIA Support’ .
Automatic Installation
1. Insert the device driver diskette into floppy drive on your computer.
2. Open ‘OS/2 WARP’, and then open ‘Drives’.
3. Select Drive A or B depending on which floppy drive contains the device driver diskette.
4. Open ‘OS2WARP’ folder. Then double-click on ‘INSTALL2.EXE’.
5. A dialog box will be displayed for you to specify the
OS/2 directory, the I/O address for the CD-RW and the
IRQ number. After specifying the OS/2 directory, press
TAB to set the I/O port and then the IRQ. The default
setting of the I/O ports is (170-177, 376-377), and the
default IRQ is 15. After completing the selection, press
TAB to the Install button and press ENTER to continue.
6. The rest of the installation will proceed automatically. At the end, the on-screen instruction will
prompt you to restart your computer to act ivate the external drive for OS/2 Warp.
- 21 -
Page 28

Manual Installation
You may also manually install the external CD-RW OS/2 device driver if the default setting conflicts
with your system. Perform the following procedures to complete the manual installation.
1. Copy the ARICD2.FLT file from A:\OS2WARP to the BOOT subdirectory of the OS/2 directory
(for example: C:\OS2\BOOT.)
2. Add the following line to the BOTTOM of your CONFIG.SYS file:
BASEDEV=ARICD2.FLT /P:3 /I:11
The parameters of ARICD2.FLT are described below:
/P is used to set the I/O ports. The valid ports are 1, 2, and 3. Each number represents the I/O
ports group of (170-177, 376-377), (1E8-1EF, 3EE-3EF), and (168-16F, 36E-36F)
respectively. The default setting is /P:1. Set to /P:3 is recommended.
/I is used to set the IRQ number, the valid IRQs are 3, 4, 5, 7, 9, 10, 11, 12 and 15, and the
default setting is /I:11.
/V verbose mode, displays the initialization message. The default is quiet mode.
3. Meanwhile, check if the following lines exist in CONFIG.SYS, if not, add the following lines:
DEVICE=C:\OS2\BOOT\OS2CDROM.DMD /Q
IFS=C:\OS2\BOOT\CDFS.IF S /Q
DEVICE=C:\OS2\MDOS\VCDROM.SYS
Adding PCMCIA Support
PCMCIA Support can be automatically installed during OS/2 installation or it can be installed through
Selective Install after OS/2 installation.
To check or install PCMCIA support, perform the following steps:
- 22 -
Page 29

1. Open OS/2 System ! Open System Setup ! Open Selective Install.
2. Check if PCMCIA Support has been installed
in the System Configuration window, if yes,
you may exit now, otherwise, perform the
following steps to continue.
3. Select the check box to the left of PCMCIA
Support to display the Select PCMCIA system
window.
4. Select the appropria te sy stem (this shoul d either be a
direct match with your target install system or a
known compatible system).
5. Select OK ! Select Install, then, follow the on-screen instructions to finish the installation
- 23 -
Page 30

USING CD-RW WITH PCMCIA INTERFACE
To Connect The PCMCIA CD-RW To Your Computer
♦ Windows 95/98/Me/2000, and WindowsXP:
1. Boot into the Windows system.
2. Insert the plug of the PCMCIA interface cable into the Interface Connector of drive .
3. Connect the AC adapter lead to the Power Jack (DC IN) at the rear panel of the drive. And then
attach the AC adapter to the AC po wer outlet.
4. Slowly insert the PC Card of interface cable into the PCMCIA socket of computer and press firmly
until the connector is seated. Your PCMCIA CD-RW is now ready for use in few seconds.
♦ Windows NT, DOS/Windows 3.1 and OS2 WARP:
1. Power-off the computer.
2. Insert the plug of the PCMCIA interface cable into the Interface Connector of drive .
3. Connect the AC adapter lead to the Power Jack (DC IN) at the rear panel of the drive. And then
attach the AC adapter to the AC po wer outlet.
4. Slowly insert the PC Card of interface cable into the PCMCIA socket of computer and press firmly
until the connector is seated.
5. Power-on computer, the PCMCIA CD-RW will ready for use after boot into the operating system.
To Disconnect The PCMCIA CD-RW From Your Computer
♦ Windows 95/98, and Windo ws Me:
1. Click on the icon
2. Click ‘Stop PCMCIA CD-ROM/CD-R/CD-RW/DVD-ROM (I3)’ (or ‘Stop Standard IDE/ESDI
Hard Disk Controller ‘) in the dialog box.
(or ) on system tray and a dialog box appears beside this icon.
- 24 -
Page 31

3. Wait for few seconds until the system prompts ‘The device can now be safely removed from the
system’. Click OK, and then remove the PC Card of the cable from computer.
♦ Windows 2000 and Windows XP:
1. Click on the icon
2. Click ‘Stop PCMCIA IDE/ATAPI Controller’ in the dialog box.
3. Wait for few seconds until the system prompts ‘The PCMCIA IDE/ATAPI Controller can now be
safely removed from the system’. Click OK, and then remove the PC Card of the cable from
computer.
♦ Windows NT, DOS/Windows 3.1 and OS2 WARP:
1. Power-off the computer.
2. Remove the PC Card of the cable from computer.
(or ) on system tray and a dialog box appears beside this icon.
- 25 -
Page 32

P/N: 7450317-01
 Loading...