

Page 1

CD STATION
USER’S MANUAL
EXP
www.expnet.com
Page 2

EXP
Non-transferable Limited Warranty
EXP, (EXP Computer Inc. and EXP Memory Products),
provides a full one year warranty, from the date of
purchase, against any defects in the material and
workmanship.
This warranty shall not apply if the product is in
any way damaged by any abnormal or improper use, or
if there is any attempt to repair or modify the
product without the proper authorization from EXP.
Your proof of purchase needs to be a receipt or
invoice, showing the date of purchase and an
authorized resellers name. During the warranty
period, EXP reserves the right to either replace or
repair the defective product, at no extra charge.
In order to return the product, the customer will
need to obtain a RMA (Return Merchandise
Authorization) number before returning the
defective product. The customer can do this by
calling EXP’s Technical Support Department at (516)
496-7629. The RMA number needs to be displayed on
the outside of the returned package and on the
accompanying packing list. The customer is
responsible for the following:
Packaging the returned product
•
Providing proof of purchase
•
Mailing the warranty card registration card
•
(directly after purchase.)
NOTE: Warranty claims may not be honored if the
warranty registration card is not sent to EXP
(directly after purchase).
IN NO EVENT WILL EXP BE LIABLE FOR ANY DIRECT,
INDIRECT, SPECIAL, INCIDENTAL OR CONSEQUENTIAL
DAMAGE; INCLUDING LOSS OF PROFIT, LOSS OF SAVINGS;
OR ANY OTHER DAMAGES CAUSED BY PRODUCT OR FAILURE
OF THE PRODUCT TO PERFORM.
This limitation of liability applies even if EXP
has been advised of the possibility of such
damages. Some sales do not allow the exclusion or
limitation of incidental or consequential damages,
- 3 -
Page 3

so the above exclusion or limitation may not apply
to you.
How to contact us:
EXP WEB SITE: www.expnet.com
TECHNICAL SUPPORT: 516-496-7629
TECHNICAL SUPPORT E-MAIL: support@expcomputer.com
- 4 -
Page 4

CONTENTS
INTRODUCTION
SYSTEM REQUIREMENTS................................................................7
Features..............................................................................................7
Package contents
Caution
........................................................................................................8
PART NAMES AND FUNCTIONS
FRONT PANEL.............................................................................................9
REAR PANEL.............................................................................................10
POWER SOURCE
HARDWARE INSTALLATION (PC CARD)
SOFTWARE INSTALLATION (PC CARD)
.............................................................. 7
.....................................................................................8
..................................... 9
............................................................ 10
.................... 11
.................... 12
SOFTWARE INSTALLATION FOR WINDOWS 95/98........................12
Windows 98.............................................................................................12
Windows 95 (B)......................................................................................13
Windows 95 (Older Versions).................................................................14
SOFTWARE INSTALLATION FOR WINDOWS NT...............................17
Installing the PCMCIA CD-ROM driver................................................. 17
Software installation for Linux (Red hat distribution) .................19
HARDWARE INSTALLATION (OPTIONAL PARALLEL
PORT)
........................................................................... 20
- 5 -
Page 5

SOFTWARE INSTALLATION (OPTIONAL PARALLEL
PORT)
........................................................................... 21
Windows 95/98........................................................................................21
Windows NT 4.0 .....................................................................................23
Linux (Red hat distribution) ....................................................................25
PLAYING AN AUDIO CD
Using cd player utility in windows 95/98....................26
Hot-Insert/Remove feature of the PCMCIA CD-ROM ...........................26
............................................. 26
- 6 -
Page 6

INTRODUCTION
The CD Station is a portable external CD-ROM drive, equipped a highspeed PC Card (PCM CIA). The CD station is co nnected to a PC through a
PC Card Type I slot, Type II slot or a Parallel po rt (parallel cable sold
separately). An AC adapter is included to supply the necessary external
power to the drive. The drive can read CD-ROM standards such as, CD-R
and CD-RW. Dual connection gives users the flexibility to add more
storage space or transfer data between your notebook and/or your desktop
computer.
SYSTEM REQUIREMENTS
A notebook or desktop computer with a Parallel port (EPP or bi-
1.
directional). If using the PC Card interface, the notebook must have a
lease one PC Card Type I or Type II slot.
Windows 95/98, Windows NT 3.51/4.0
2.
FEATURES
Complies with PC Card (PCMCIA/JEIDA) standard
•
MSCDEX Compatible
•
Easy-to-install device driver software for
•
DOS/WIN
ULTRA Slim PC Card 85.6 x 54.0 x 3.3 (Type I)
•
CD-RW disc playback
•
Windows 95, 98 and Windows NT Ready
•
O/S 2 Warp and Linux Ready
•
Optional Parallel connectivity kit
•
CD-ROM drive physical characteristics:
Dimension: 9.6" x 6.4" x 1.9" (L x W x H)
•
Weight: 3 lbs 3 oz
•
Data capacity: 553 MB (Mode 1), 635 MB (Mode
•
2)
Motorized front tray loading
•
PCMCIA power consumption: +5V/300mA
•
(Standby), +5V/500mA (max)
Power source: AC 12V 1 A
•
Supports CD-Audio, CD-ROM mode 1 and 2, CD-
•
XA, Multi-session Photo CD, VCD, Enhanced CD,
and CD-RW
Audio function: headphone output jack with
•
volume control, audio line-out jack
- 7 -
Page 7
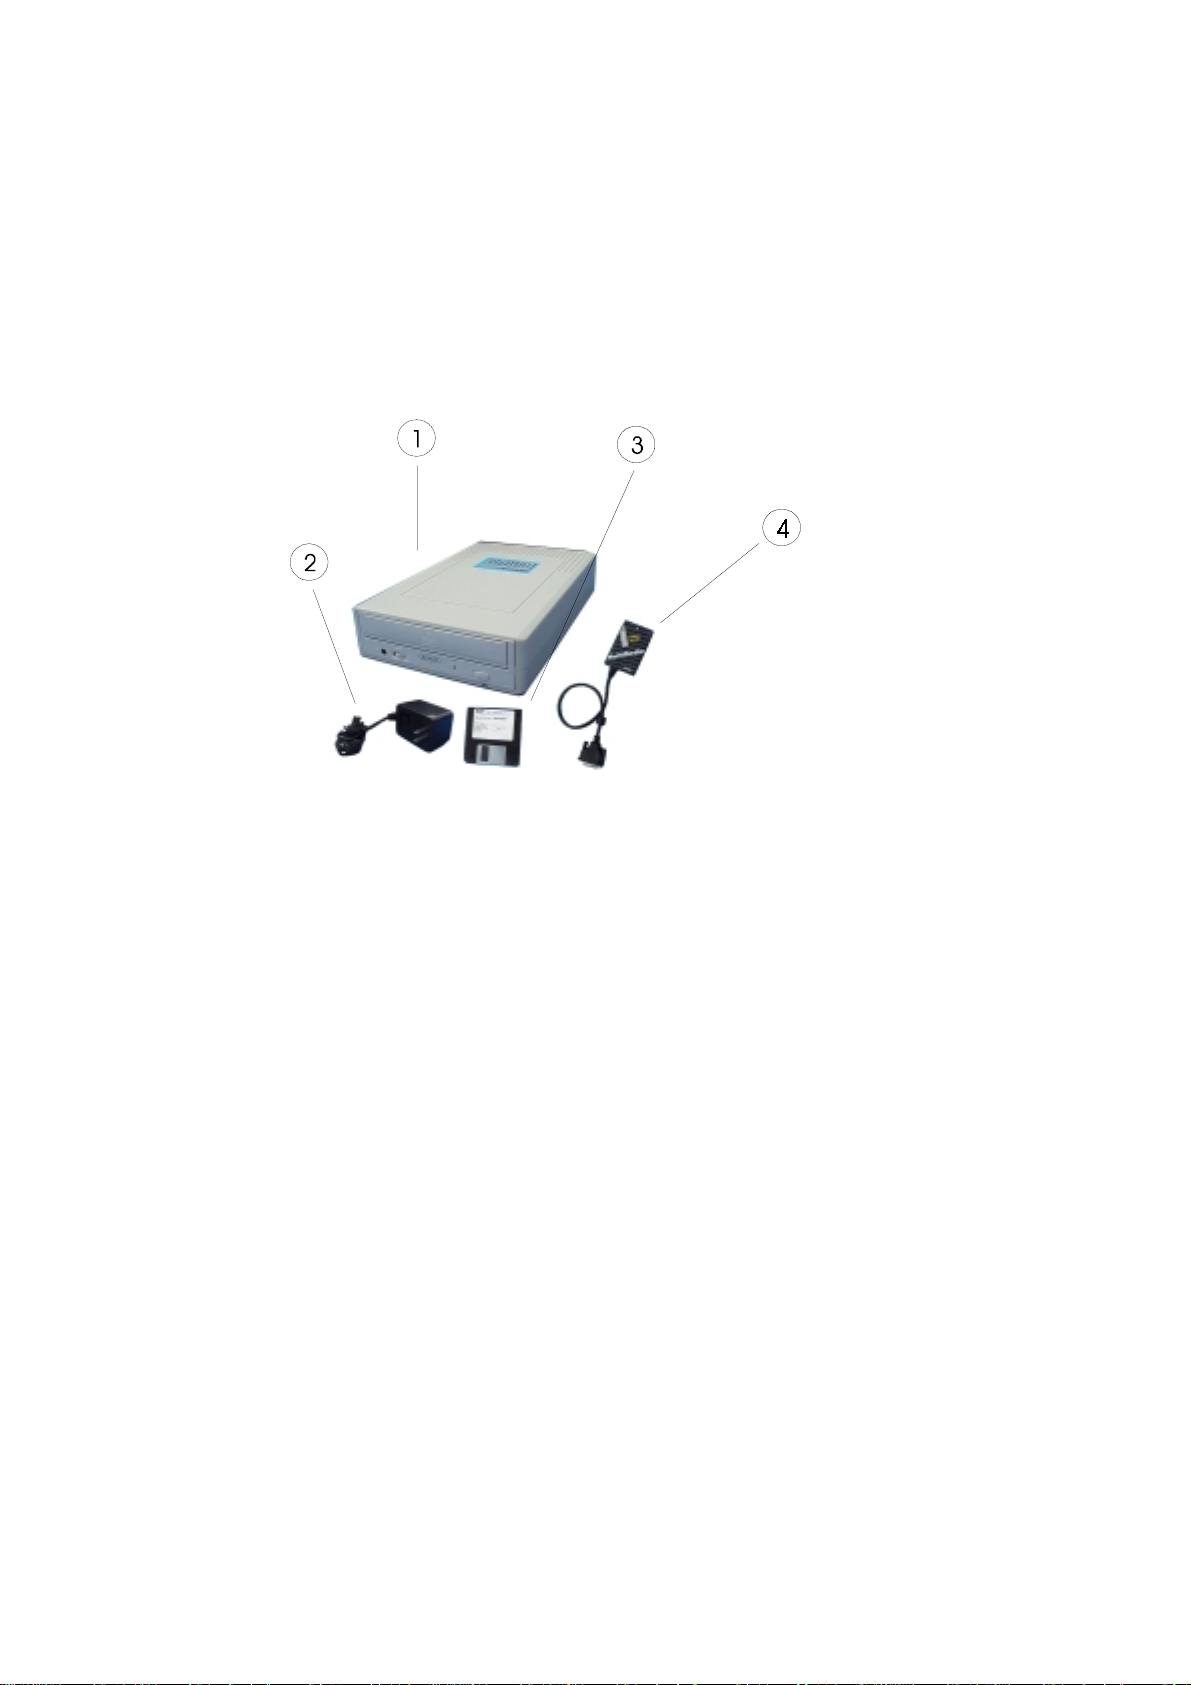
PACKAGE CONTENTS
The items shown below are included in the CD-Station package.
1. CD-ROM drive
2. AC Adapter Input: 120 VAC Output: 12 VDC 1 Amp.
3. Device Driver diskette
PC Card
4.
CAUTION
• Condensation can form on the lens if the CD-ROM drive is moved from
a cold temperature to a warmer environment. This can hinder the lens’s
ability to properly read the disc. If this does occur, remove the disc, but
leave the power on. After one hour, reinsert the disc and try again.
• Do not expose the disc to direct sunlight. Do not store the disc in a
room with high temperature or high humidity.
• Always store the disc in its case to avoid dust, scratches, bending, etc.
•Το clean the disc, use a soft, dry cloth to wipe the disc in a circular
motion. Do not use benzine, record cleaner, static electricity prevention
fluid, or any other liquid because it may damage the disc.
- 8 -
Page 8
PART NAMES AND FUNCTIONS
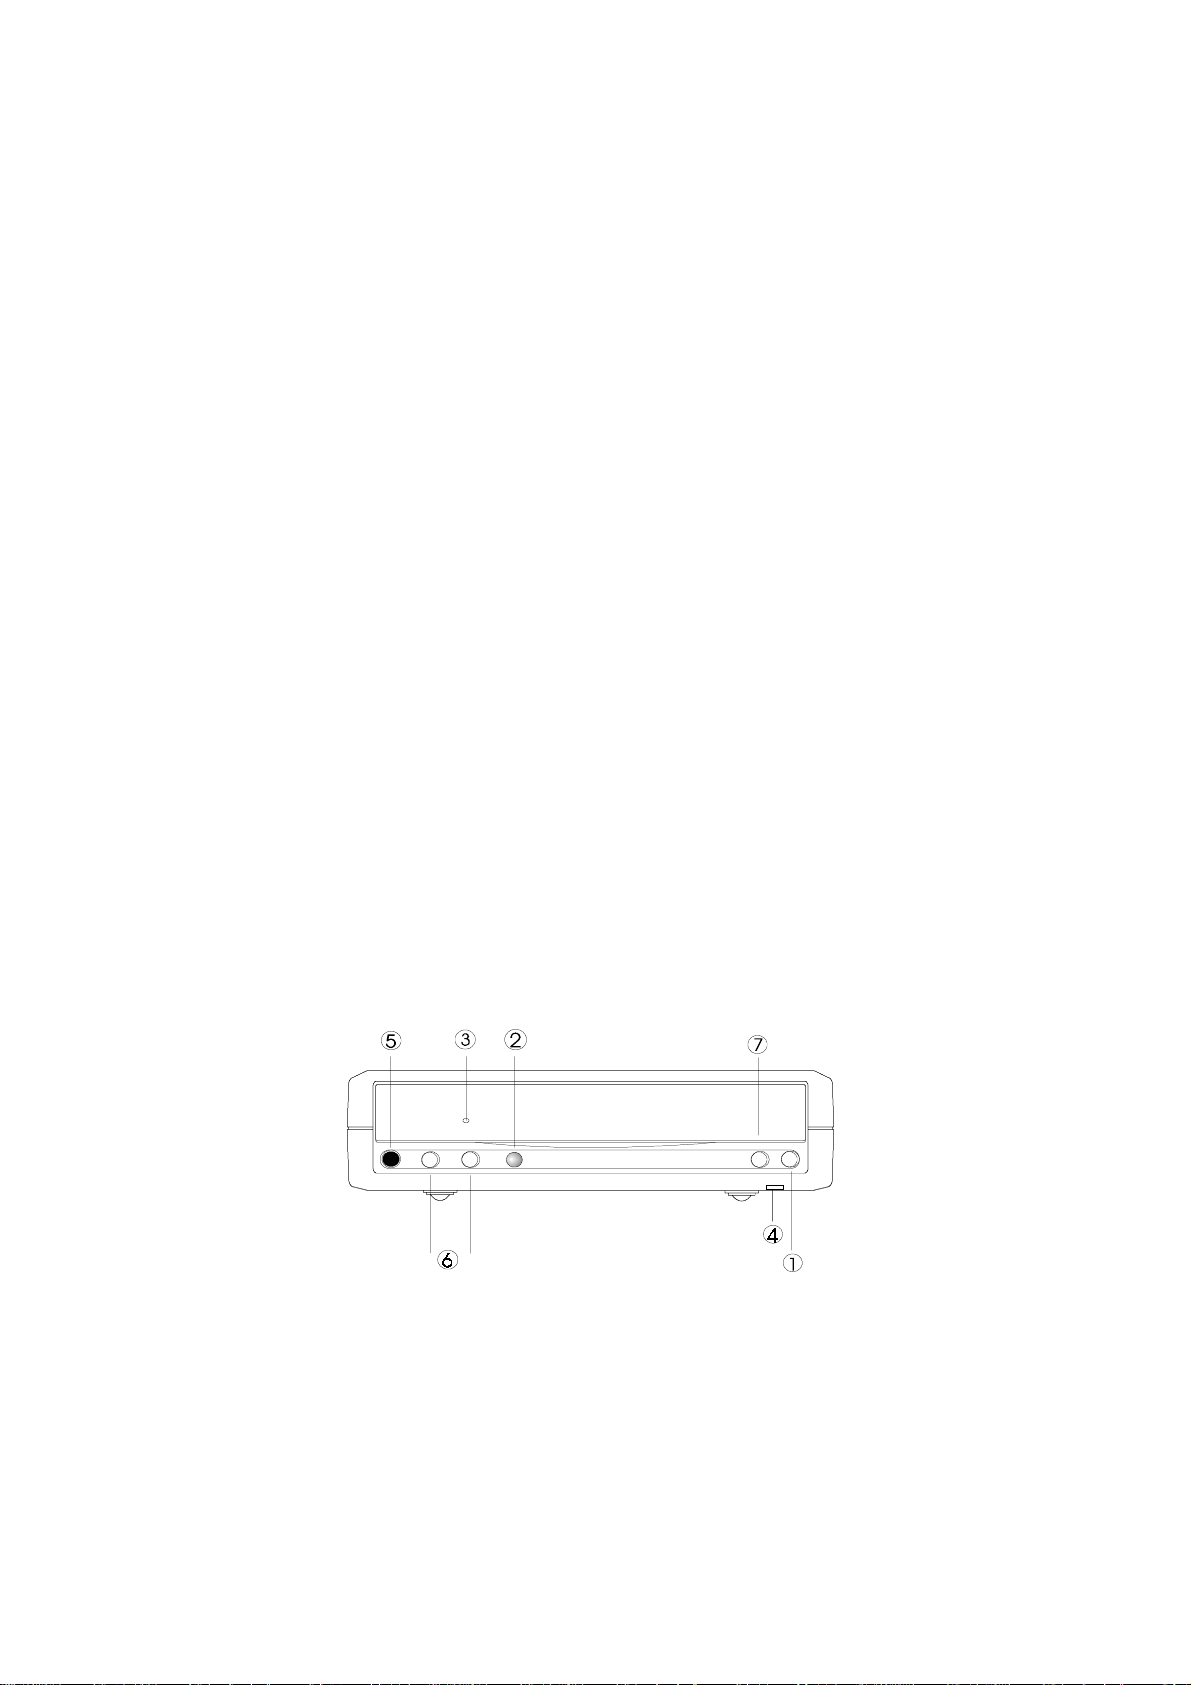
FRONT PANEL
The front panel of your CD-ROM may look slightly different from the figure
shown below. However, the following parts and functions are the same
regardless of their location on the drive.
1. Eject button:
Press this button to eject the tray.
2. Access LED:
This LED will blink when the drive is accessing the disc.
3. Emergency Hole:
Insert a pin shaped item to manually eject the tray when the power is
OFF.
4. Power LED:
This LED will light when the power is on.
5. Headphone jack:
You can connect headphones or an external speaker here to access the
CD-Audio output.
6. Volume Control:
Press these buttons to adjust the CD-Audio volume.
7. Track selector:
Press the button to select the next track.
Figure 1
- 9 -
Page 9
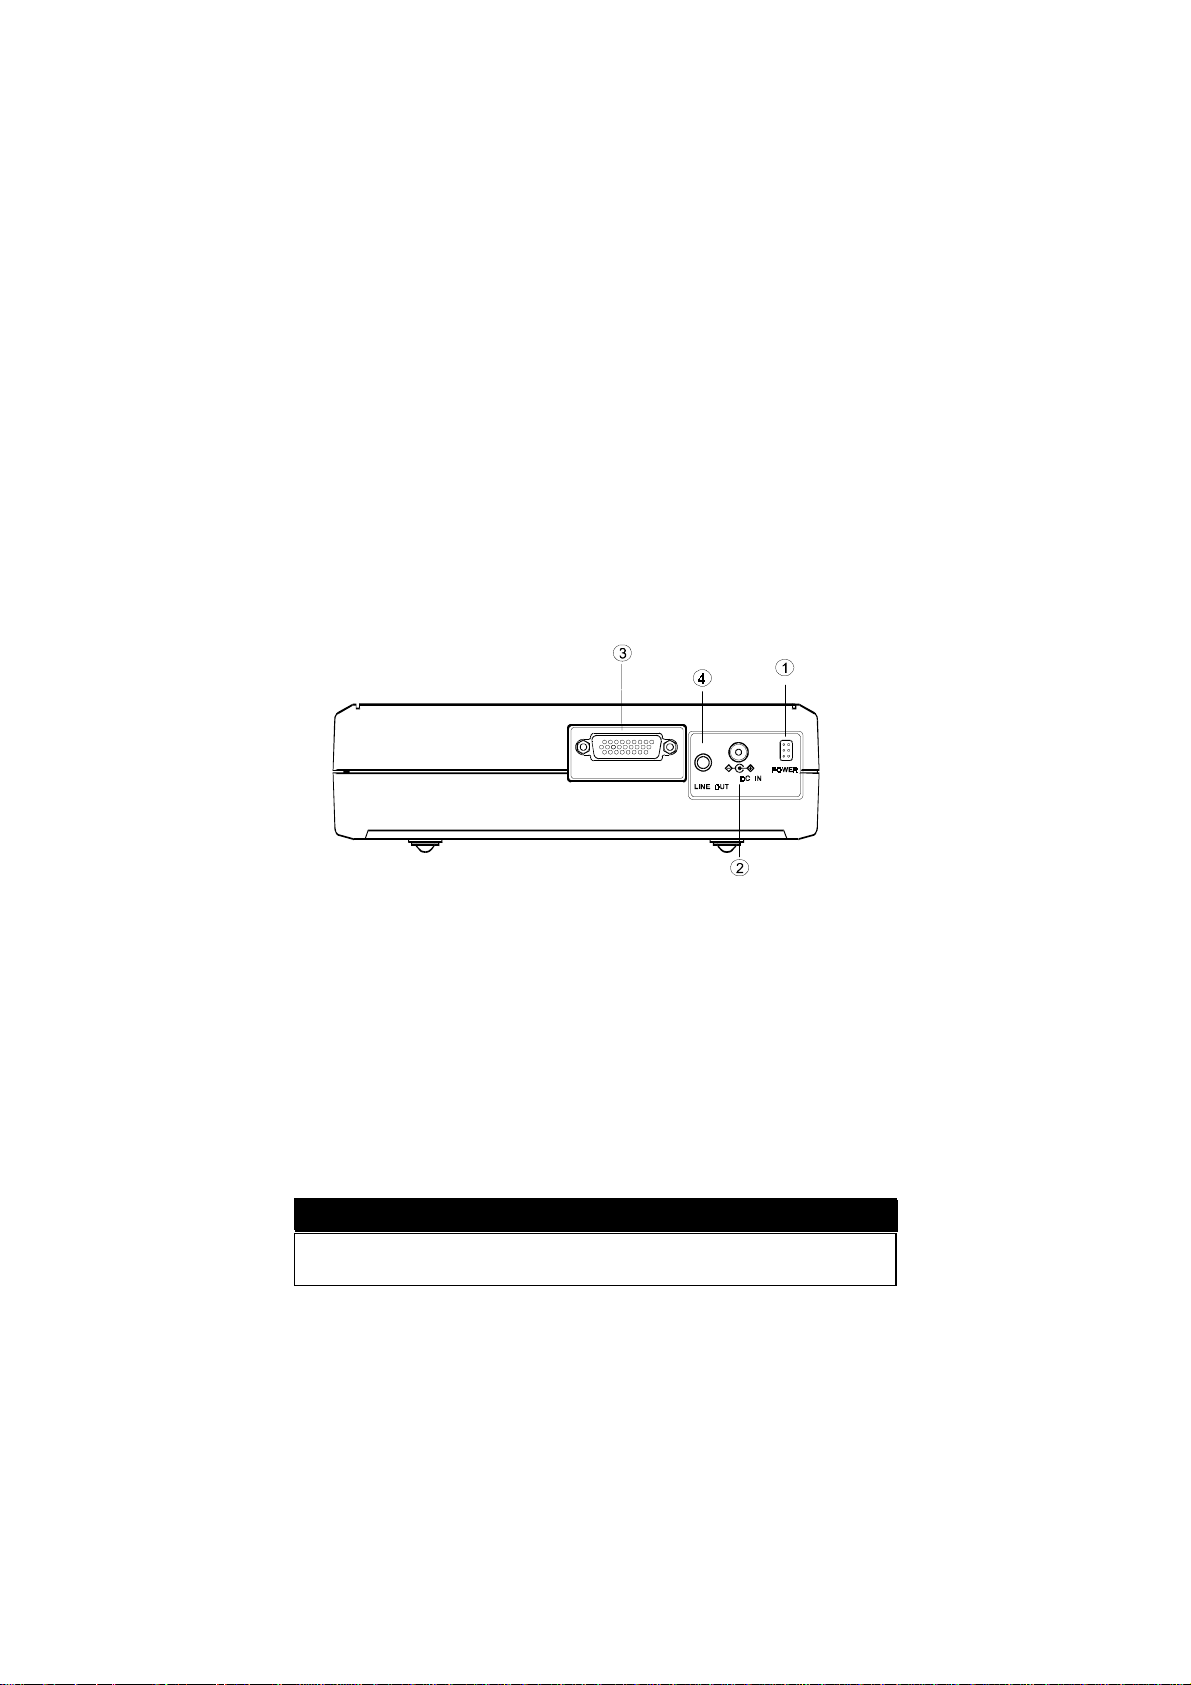
REAR PANEL
1. Power Button: (Optional in some models)
Press the button to manually power on/off the drive when it is powered
by an AC adapter.
2. DC in Jack:
Connect AC adapter into here.
3. Interface Connector:
Connect the PCMCIA interface card or Parallel Port cable into here.
4. Audio Line-Out Jack:
Sends audio signal to an external amplifier.
Figure 2
POWER SOURCE
An AC adapter powers the CD-ROM DRIVE. The POWER LED (on the
front panel) indicates the power status. It always lights up when the power
supply is in working mode.
1. Connect the AC adapter into the DC IN jack, on the rear panel of the
CD-ROM drive.
2. Plug the AC adapter into the AC power outlet.
3. Insert the PCMCIA card. Now the CD-ROM unit is ready.
CAUTION
Only use the AC adapter that is provided with this unit. Using a different
AC adapter may cause serious and permanent damage to the CD-ROM.
- 10 -
Page 10

HARDWARE INSTALLATION (PC CARD)
Turn OFF your system before connecting the PCMCIA CD-ROM to your
computer.
1. Connect the PCMCIA interface card to the CD-ROM drive. Press firmly
until the connector is seated, and tighten the two screws on the cable
connector.
2. Place the drive in a horizontal position. The drive is designed to operate
only in a horizontal position. Operating the drive in any other position is
not recommended.
3. Make sure that the cable of the PCMCIA interface card is firmly
connected to the interface connector on the back panel of the CD-ROM
drive.
4. Locate the PCMCIA slot of
your computer or consult
your computer user’s
manual for its location.
5. Align the PCMCIA
interface card with the
arrow sign facing upward
and pointing toward the
computer’s slot. (Please note that the card is keyed to guide for proper
insertion.)
6. Slowly insert the PCMCIA interface card into the slot and press firmly
until the connector is seated.
7. Turn the system ON to install the PCMCIA CD-ROM device driver.
Please follow the Software Installation procedures on the next page.
CAUTION
You should connect the PCMCIA interface card to the CD-ROM drive
before inserting the PCMCIA interface card into your computer. DO NOT
connect/disconnect the PCMCIA interface card to/from the CD-ROM drive
when the system is ON.
- 11 -
Page 11

SOFTWARE INSTALLATION (PC CARD)
SOFTWARE INSTALLATION FOR WINDOWS 95/98
If you are inserting the PCMCIA CD-ROM into your computer for the very
first time, depend on version of Windows 95/98. Listed below are the
screen displays to use for reference. (Your PC Card name may be different)
Windows 98
The Add New Hardware Wizard window will be displayed
Click Next twice in order to diplay the screen below. In this window make
sure that Floppy disk drive and Specify a location are checked and that
A:\win95 is displayed in the drop-box. Click Next and then Finish to
complete installation.
- 12 -
Page 12

Windows 95 (B)
If the Update Device Driver Wizard dialog box appears, as below, it
means your Windows 95 is version 4.00.950B, i.e. OSR 2.
In this case, perform the following steps for installing the PCMCIA CDROM under Windows 95. Otherwise, ignore this section and skip to the next
page for installing the PCMCIA CD-ROM for Windows 95 (Older
versions).
1. Insert the PCMCIA CD-ROM device driver disk into the floppy drive.
2. Click the Next button.
3. Click the Finish button. All the remaining installations will finish
automatically.
Please note that it is not necessary to connect the PCMCIA CD-ROM every
time you reboot your computer; connect it only when you need to use it.
- 13 -
Page 13

Windows 95 (Older Versions)
The following dialog will appear. If you are using the PCMCIA CD-ROM
under Windows 95 for the very first time and your Windows 95 is version
4.00.950 or 4.00.950a.
(If this dialog box does not appear and the CD-ROM folder cannot be found
in My Computer, please refer to the section titled “Installing 32-bit Card
Support”.)
Select Driver fro m disk provided by hardware manufacturer and then
click the OK button. Windows 95 will then prompt you to insert the
manufacture’s installation disk. Insert the PCMCIA CD-ROM device driver
disk into your floppy drive. Specify the directory as A:\ (or A:\ win95) and
click OK. All the remaining installations will then finish automatically.
Please note that it is not necessary to connect the PCMCIA CD-ROM every
time you reboot your computer; connect it only when you need to use it.
- 14 -
Page 14

Installing 32-bit Card Support
Note: The following procedures apply to the notebook that has install or re-
install the original release of the Windows 95 version 4.00.950 or
4.00.950a.
Your system should be ready for the PCMCIA socket support prior to
operating the PCMCIA CD-ROM. To check whether your computer has the
PCMCIA Socket supported, double-click on the System icon from the
Control Panel folder. (You can find the Control Panel folder by going to
the Start menu. Under the Start menu, select Settings. Under Settings you
can select the Control Panel folder).
Click on the Device Manager tab. If an “x” appears next to PCIC or
compatible PCMCIA Controller item, as shown above, it means the
PCMCIA device driver is not using 32-bit Card Support.
Double-click on the PCIC or compatible PCMCIA Controller item, and a
dialog box will be displayed, as shown on the next page. Place a check mark
next to the current configuration in the Device usage box, then select OK.
- 15 -
Page 15

After the PCMCIA 32-bit Card Support is installed, Windows will ask you
to reboot your computer. You should now refer to the previous section for
installing the PCMCIA CD-ROM device driver.
If the PCMCIA Socket is not found, then you must add a PCMCIA socket to
your system. Click on the Adding New Hardware icon in the Control Panel
folder and select PCMCIA socket. Select the appropriate type of PCMCIA
Controller that matches yours, and then follow the on-screen instructions.
- 16 -
Page 16

SOFTWARE INSTALLATION FOR WINDOWS NT
Make sure of the following before you begin:
♦
Windows NT must be version 3.51 or higher.
♦
Since Windows NT does not support the “Hot Insert/Remove” feature,
the PCMCIA CD-ROM should be connected with your computer prior
to starting Wind ows NT. Likewise, do not remove the PCMCIA CDROM before you shut down Windows NT.
♦
In Windows NT, the I/O and IRQ settings of PCMCIA CD-ROM
cannot be changed. Therefore, if the settings conflict with other devices
you are using, change the I/O or IRQ of other device to avoid conflicts.
Installing the PCMCIA CD-ROM driver
To open the Control Panel folder, in Windows NT 4.0, go to the Start menu
and select Settings. Then, click on the Control Panel item. Once the
Control Panel window appears, double click the SCSI Adapter icon.
Click the Drivers tab and the illustrated figure below will be displayed.
- 17 -
Page 17

Click the Add button, and then click the Have Disk... button. Windows NT
will then prompt you to insert the manufacturer installation disk. Insert the
device driver disk into your floppy drive. Specify the directory as
A:\WINNT (or B:\WINNT whichever contains the diskette) and select OK.
When the below dialog box appears, select PCMCIA CD-ROM/CD-
R/CD-RW/DVD-ROM and click the OK button.
Follow the on-screen instructions to continue. After finishing, Windows NT
will prompt you to restart your computer in order to activate the new device
driver for Windows NT.
- 18 -
Page 18

SOFTWARE INSTALLATION FOR LINUX
(RED HAT DISTRIBUTION)
In order to install the PCMCIA CD-ROM, the computer or notebook must
have a PCMCIA package install first. The PCMCIA package consists of
base kernel modules and card specific modules. The PCMCIA CD-ROM
card requires an ATA/IDE card module.
To Install Linux from the PCMCIA CD-ROM (PC Card interface)
1. To start the Linux installation program, boot the computer from the Red
Hat boot disk.
2. The installation program will auto-detect the existence of a PCMCIA
controller chip (Intel 82365SL or Compatible, Databook TCIC-2 and
for CardBus 16 bit mode is currently supported), then ask user if one
want to install the PCMCIA support. (Required supplement disk- see
Note 1)
3. After loading the PCMCIA support from supplement disk, choose
install from CD-ROM. Answer NO for the SCSI CD-ROM. The
installation program will start reading from the external PCMCIA CDROM.
To Install the PCMCIA CD-ROM onto a notebook which already has Linux
Installing from the Red Hat Package Manager.
1. A user can install the PCMCIA RPMS package using the command,
rpm –ivh kernel-pcmcia-cs xx.xx.xx.rpm (xx = version number)
2. Using glint, the X-based graphical Linux installation tool. This userfriendly program can start from command in X-terminal program or
from Control Panel click on Package Management icon.
3. Select Available Package > Daemons > kernel-pcmcia-cs xx.xx.xx.
Then select Install.
4. Use lsmod to verify if the module has been installed.
5. Insert the PCMCIA CD-ROM card; notice two high tone beeps that
indicate the card is configured properly.
Accessing the CD-ROM
1. Make sure there is a CD disk inside the CD-ROM drive.
2. Mount the CD-ROM with the command,
mount /dev/hdc /mnt/cdrom iso9660 (your /dev/x may be different).
Or go to Disk Management, if X windows is running, and then mount
the CD.
3. Go to /mnt/cdrom to accessing the CD-ROM
Note1: User needs to build a supplement from Red Hat CD-ROM. The disk image file is
located at /imgaes. If you are using a MS-DOS, see
information.
- 19 -
/dosutils/readme,
for more
Page 19

HARDWARE INSTALLATION (OPTIONAL PARALLEL PORT)
Before you begin, make sure you turn OFF all power to your system before
connecting the CD Drive to your computer.
CAUTION
The CD and electronic components installed on the CD drive are very sensitive
to damage from static electricity. Before handling the unit, touch a grounded
metal surface. DO NOT connect/disconnect the CD drive unit to/from the
parallel cable when the system is ON.
PARALLEL PORT ADAPTER CABLE:
Connect Parallel port interface to a computer (25 pin) parallel port.
!!!!
(Printer port)
""""
Connect CD-ROM drive interface to the back of CD-ROM drive.
(26 pin)
Figure 3
1. Plug-in the AC adapter to a working AC outlet.
2. Connect the DC Input adapter cable to the DC IN outlet on the CD-ROM
drive.
3. Connect one end of the Parallel cable to the CD-ROM (26 pin small
connector), and connect the other end to computer parallel port.
(Standard 25 connector)
4. Check the parallel port mode setting. The driver prefers the following
modes: EPP, Bi-directional and Normal mode.
5. You are now ready to install the software.
- 20 -
Page 20

SOFTWARE INSTALLATION (OPTIONAL PARALLEL PORT)
For Windows 95/98
Check all the connection as states in the “Hardware Installation” section.
From the Desktop click the My Computer icon. Next click the Control
Panel icon, and then click the Add New Hardware icon. You should now
see the window Add New Hardware Wizard.
1. Click the Next> button to begin.
2. When asked to search for your new hardware,
Select NO. Then click the Next> button.
3. Open SCSI controllers. Click Have Disk....
- 21 -
Page 21

4. Insert Installation Diskette into the drive selected,
Then click OK. If you're installing from a director y containing
downloaded installation files, specify the full path of the directory and
click OK.
5. Select PHT Parallel-Port PHT-Series Win95/98 Driver,
And click Next>.
6. Click the Finish button to complete installation.
7. Remove Installation diskette.
8. Restart system, when prompted to do so.
VERIFY YOUR INSTALLATION
Go to your Desktop and click on the My Computer icon. There should be
an additional CD-ROM drive icon displayed.
- 22 -
Page 22

Windows NT 4.0
1. Click on My Computer > Control Panel > SCSI Adapters.
2. Choose Drivers tab and the click on Add. From the Install Driver click
the Have Disk button.
3. The Install From Disk dialog box will prompt for device driver diskette.
4. Click the Browse button or type in the path A:\winnt. Click OK to
finish the installation.
- 23 -
Page 23

5. Select PHT Parallel-Port PHT-Series NT Driver. Click OK
6. Restart the computer when prompted to do so.
VERIFY YOUR INSTALLATION
Once your computer has booted up, and your
Desk Top appears, click on the My Computer
icon. You should now see an additional CDROM icon in My Computer.
- 24 -
Page 24

Linux (Red hat distribution)
The parallel port CD-ROM IDE modules consist of three parts:
4. There is a base paride module required to access the parallel ports.
(Support EPP and Bi-Direct, NOT ECP mode)
5. The second module (to load) is the manufacturer specific protocol
driver. EXP using the following drivers.
fit2 Fidelity Intl.
fit3 Fidelity Intl. TD-3000
6. The third module is a CD-ROM driver
pcd for ATAPI CD-ROM
7. Use modprobe -l to locate the three modules. On the RedHat 5.2:
paride.o /lib/modules/preferred/block
fit2.o, fit3.o /lib/modules/preferred/misc
pcd.o at /lib/modules/preferred/misc
8. Use insmod to load these drivers in the following order:
paride.o, fit2.o, fit3.o and pcd.o
Note: one may use just the fit3.o only.
9. To access the CD-ROM, make sure there is a CD disk inside the CDROM drive.
10. User need to mount the CD-ROM the command is
mount /dev/pcd0 /mnt/cdrom iso9660
or if X windows is running: Go to Disk Management then mount CD.
11. Go to the /mnt/cdrom to access the CD-ROM
- 25 -
Page 25

PLAYING AN AUDIO CD
USING THE CD PLAYER UTILITY IN WINDOWS 95/98.
1. Connect the 3.5 mm stereo audio cable from the Line-Out Jack of your
CD-ROM to your notebook’s Line-In Jack, or to a self-amplified
speaker.
2. Make sure the CD Player utility has been installed in your Windows
95/98. If not, please go to My Computer > Control Panel >
Add/Remove Programs. Click the Windows Setup tab, and then
select Multimedia to add the CD Player utility.
3. P lace an Audio CD in your CD-ROM.
4. The CD Player will then automatically play the audio CD.
Hot-Insert/Remove feature of the PCMCIA CD-ROM
Ideally, you would be able to hot-insert/remove the PCMCIA interface card.
This means you could insert, remove or exchange the card from your system
at any time, without rebooting or turning off your system. However, the
PCMCIA CD-ROM, being a storage device itself, cannot be hot-removed
when it is accessing the data. To avoid system failure, read the following
instructions carefully before using the hot-removing feature.
For Windows 95, hot swapping is allowable with more limits. To avoid
system failure, always follow the steps below to hot-remove the PCMCIA
CD-ROM in Windows 95,
1. Click the PC card indicator on the task bar at the bottom right of the
screen.
2. Click the command to stop the card you want to remove.
3. When the screen prompts, read the instruction carefully. If the system
advises you not to remove the card, DO NOT remove the card. You
should exit the present application and return to step 1.
Be sure you are removing the card by the procedures described above;
otherwise, the dialog box, on the next page, will be displayed.
- 26 -
Page 26

To display the PC card indicator on the task bar, perform the following
steps:
1. Double-click the PC Card (PCMCIA) icon on the Control Panel.
2. Make sure the box showing the control on the task bar is checked.
If the PC Card (PCMCIA) wizard appears when you click the button in step
one, restart you computer and repeat the above steps.
- 27 -
Page 27

HELPFUL HINTS
The following are solutions to some problems that you may encounter while
using the PCMCIA CD-ROM.
IF YOU CANNOT ACCESS A CD-ROM
Solutions:
#
Make sure there is power to your drive. If you are using power directly
from the PCMCIA socke t, be sure that your system has e nough power.
Otherwise, you will need an AC adapter to power the drive.
#
Make sure the tray has been closed properly. Press gently and firmly
until it clicks into place.
#
Make sure that the tray is clean. Any dirt may interfere with the laser
beam.
#
Examine the disc to see whether it is dirty. If necessary, wipe it with a
clean tissue.
#
Replace the disc in the tray. Make sure the disc is lying flat, with the
label side up. Close the tray completely.
#
Check computer’s parallel port setting
IF THE TRAY DOES NOT SLIDE OUT
Solutions:
#
Check the power LED to make sure the drive is powered ON.
#
There is an emergency hole on the front panel next to the eject button.
Insert a pin-shaped item such as a paper clip to manually eject the tray
Make sure there is no power to the drive.
IF YOUR CD DOES NOT RUN CORRECTLY
Solutions:
#
Check the type of the CD you are using. The drive supports ISO 9660,
Audio CD, Video CD.
#
The color of the materials used to make the CD can also affect its
reliability. Silver colored CDs are the most reliable, followed by goldcolored CDs. Green-colored CDs are the least reliable.
#
If the CD-ROM drive power selector switch is set to PC, shutdown the
computer. Try to set the switch to DC and connect the AC adapter.
- 28 -
 Loading...