

Page 1

PC Card
CD ReWritable
Installation Manual
CRW-740
Page 2

EXP COMPUTER, INC.
EXP MEMORY PRODUCTS.
TABLE OF CONTENTS
NON-TRANSFERABLE LIMITED WARRANTY
EXP COMPUTER INC., AND EXP MEMORY PRODUCTS ("EXP") warrants that the Disk Traveler
(“products”) manufactured or distributed by EXP to be free from failures due to defects in materials
or workmanship for a full one year from the date of purchase of the products.
This warranty is void if the product is damaged by abnormal or improper use or by accident, abuse
or if any attempt to repair or modify the product without authorization from EXP. Your sales receipt or
invoice, showing the date of purchase and the name of the authorized reseller, is your proof of the
date of purchase. During the warranty period, EXP will at its option, replace or repair, at no charge,
the product that in its opinion is defective.
Before you return the failed products, contact EXP. You will need to obtain a Return Merchandise
Authorization (RMA) number by calling EXP’s Technical Support Department at (516) 496-7629.
The RMA number should be displayed on the outside of the returning package and on the
accompanying packing list. EXP cannot be held responsible for any package returned without the
RMA number. You are responsible for packaging, providing proof of the date of purchase and
the shipping cost of the failed product to EXP Computer, Inc. You are responsible for mailing the
warranty registration card. The warranty claims may not be honored if there is no corresponding
registration card on file at EXP.
IN NO EVENT WILL EXP BE LIABLE FOR ANY DIRECT, INDIRECT, SPECIAL, INCIDENTAL
OR CONSEQUENTIAL DAMAGE, INCLUDING LOSS OF PROFIT, LOSS OF SAVINGS; OR
ANY OTHER DAMAGES CAUSED BY PRODUCT OR FAILURE OF THE PRODUCT TO
PERFORM.
INTRODUCTION 1
• SYSTEM REQUIREMENT
• FEATURES
• PACKAGE CONTENTS
• PART NAME AND FUNCTIONS
INTSTALLATION 5
INSTALLATION FOR PARALLEL PORT INTERFACE
• SOFTWARE INSTALLATION FOR WINDOWS 95 AND 98
• SOFTWARE INSTALLATION FOR WINDOWS NT
INSTALLATION FOR PC CARD INTERFACE
• SOFTWARE INSTALLATION FOR WINDOWS 95 AND 98
• SOFTWARE INSTALLATION FOR WINDOWS NT
TROUBLE SHOOTING 17
• PARALLEL PORT INTERFACE
• PC CARD INTERFACE
THIS LIMITATION OF LIABILITY APPLIES EVEN IF EXP HAS BEEN ADVISED OF THE
POSSIBILITY OF SUCH DAMAGES. SOME SATES DO NOT ALLOW THE EXCLUSION OR
LIMITATION IN INCIDENTAL OR CONSEQUENTIAL DAMAGES, SO THE ABOVE EXCLUSION
OR LIMITATION MAY NOT APPLY TO YOU.
EXP WEB SITE: www.expnet.com
TECHNICAL SUPPORT: 516-496-7629
TECHNICAL SUPPORT E-MAIL: support@expcomputer.com
REMOVE AND RE-INSTALL THE DRIVER 23
• PC CARD INTERFACE
• PARALLEL PORT INTERFACE
APPENDIX 25
• FCC COMPLIANCE STATEMENTS
• MEDIA CONSIDERATION 26
• TIPS
27
Page 3
INTRODUCTION
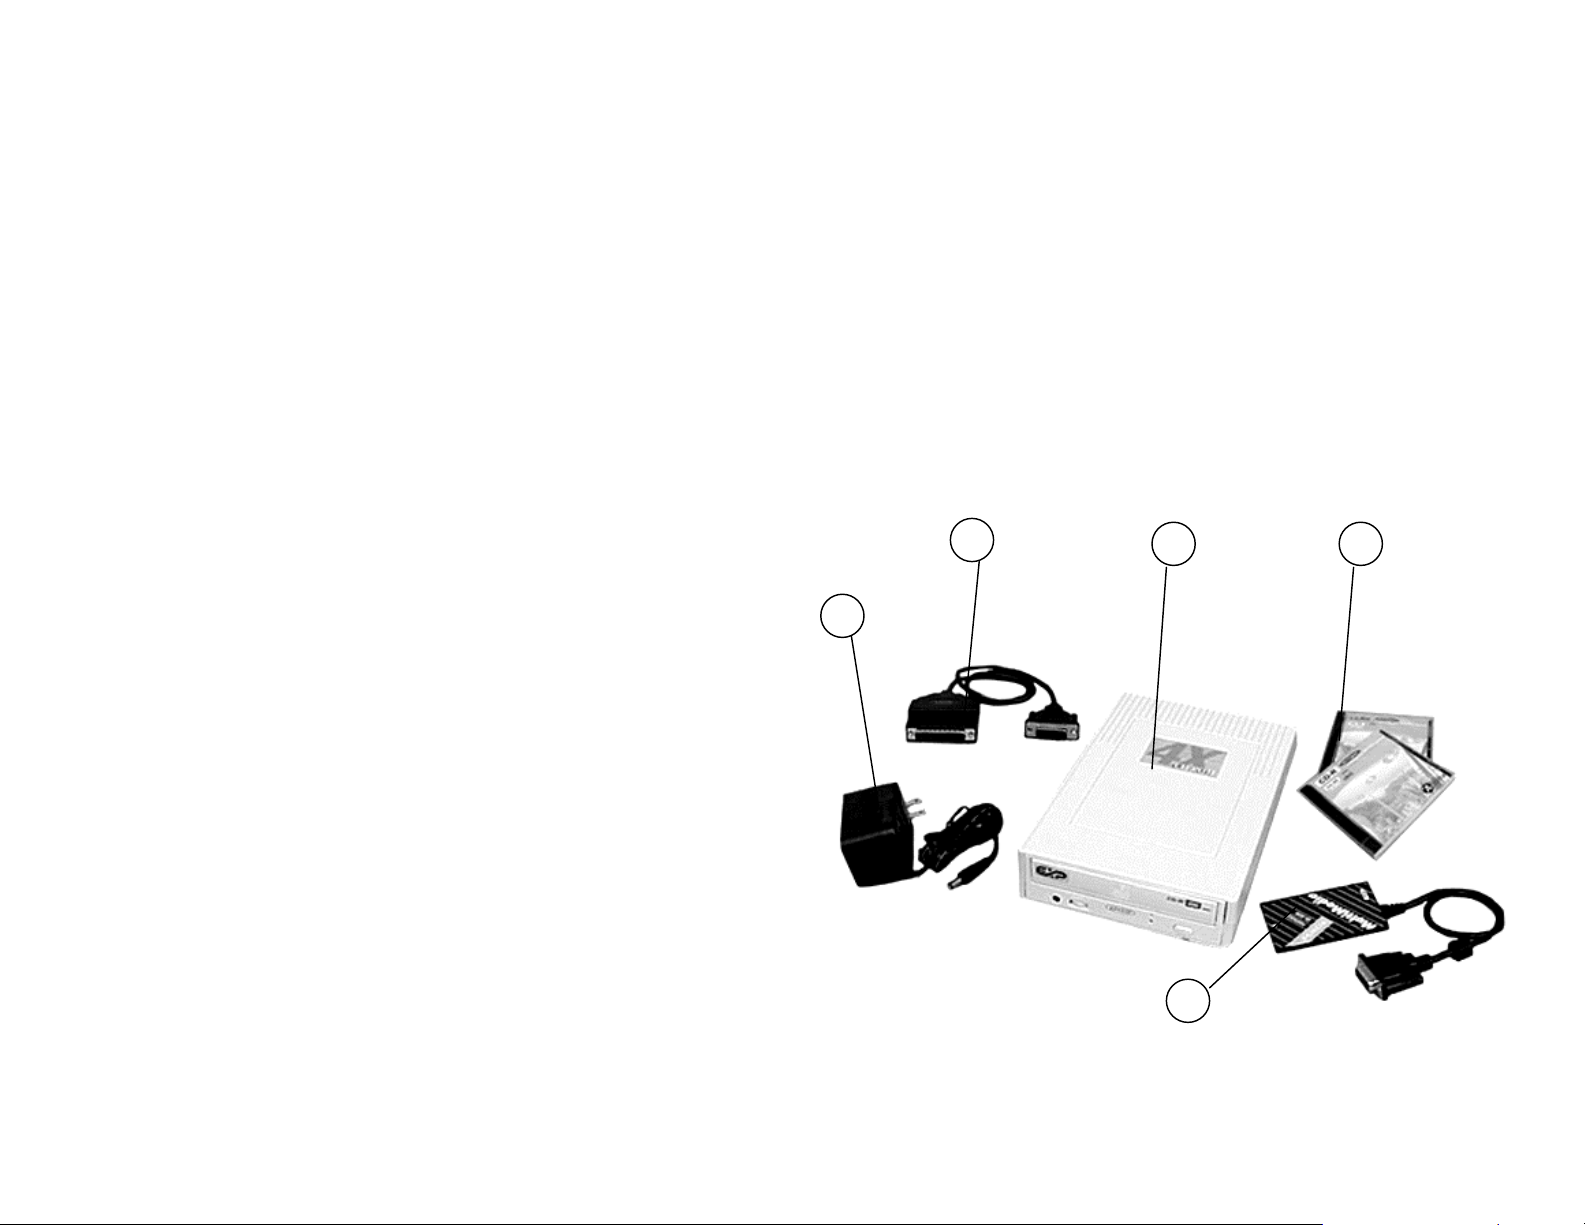
PACKAGE CONTENTS
The CD ReWriter is a portable CD-ROM drive, which consists of a lowpower CD rewritable drive, a small 26 pin universal connector, a cable for
Parallel port (printer port),. It is compatible with either computer’s Parallel
Port or PC CARD (PCMCIA) 2.1 Type II or I slot. The CD Rewriter can write
to CD-R (write-once) or CD-RW (rewritable) disk and read other variety of
CD formats. The drive required an external power supply adapter (included).
CD ReWriter dual connection gives user flexibility to add more storage
space or transfer data between your notebook and/or your desktop
computer.
SYSTEM REQUIREMENTS
• Notebook or desktop computer with Pentium 133 Mhz or higher
• 32 MB RAM
• 75 MB free HD space
• A Parallel port (EPP or bi-directional) or If using the PC Card interface,
the computer should have at least one PC Card (PCMCIA) 2.1 slot.
• Windows 95/98, Windows NT 4.0
§ Suitable for the following disk standard: CD R/RW, CD- DA, CD-ROM,
CD-I, C—ROM XA, CD-Bridge, Photo CD, Video CD, CD Extra
§ Power source: AC Adapter
Input: 120-240 VAC 50-60 Hz 0.4 A.
Output: 12 VDC 1000 mA.
§ CD-RW and CD-R disc and application software included.
1. Parallel Port interface cable
Standard 25 pin Parallel port connector and 26 pin small connector.
2. CD drive assembly
CD drive with the power indicator, a DC input jack
3. AC Adapter
Input: 100-240 VAC, 50-60 Hz. 0.4A.
Output: +12 VDC/1000mA.
4. Blank CD-RW and CD-R disk
5. PC Card
Page 4
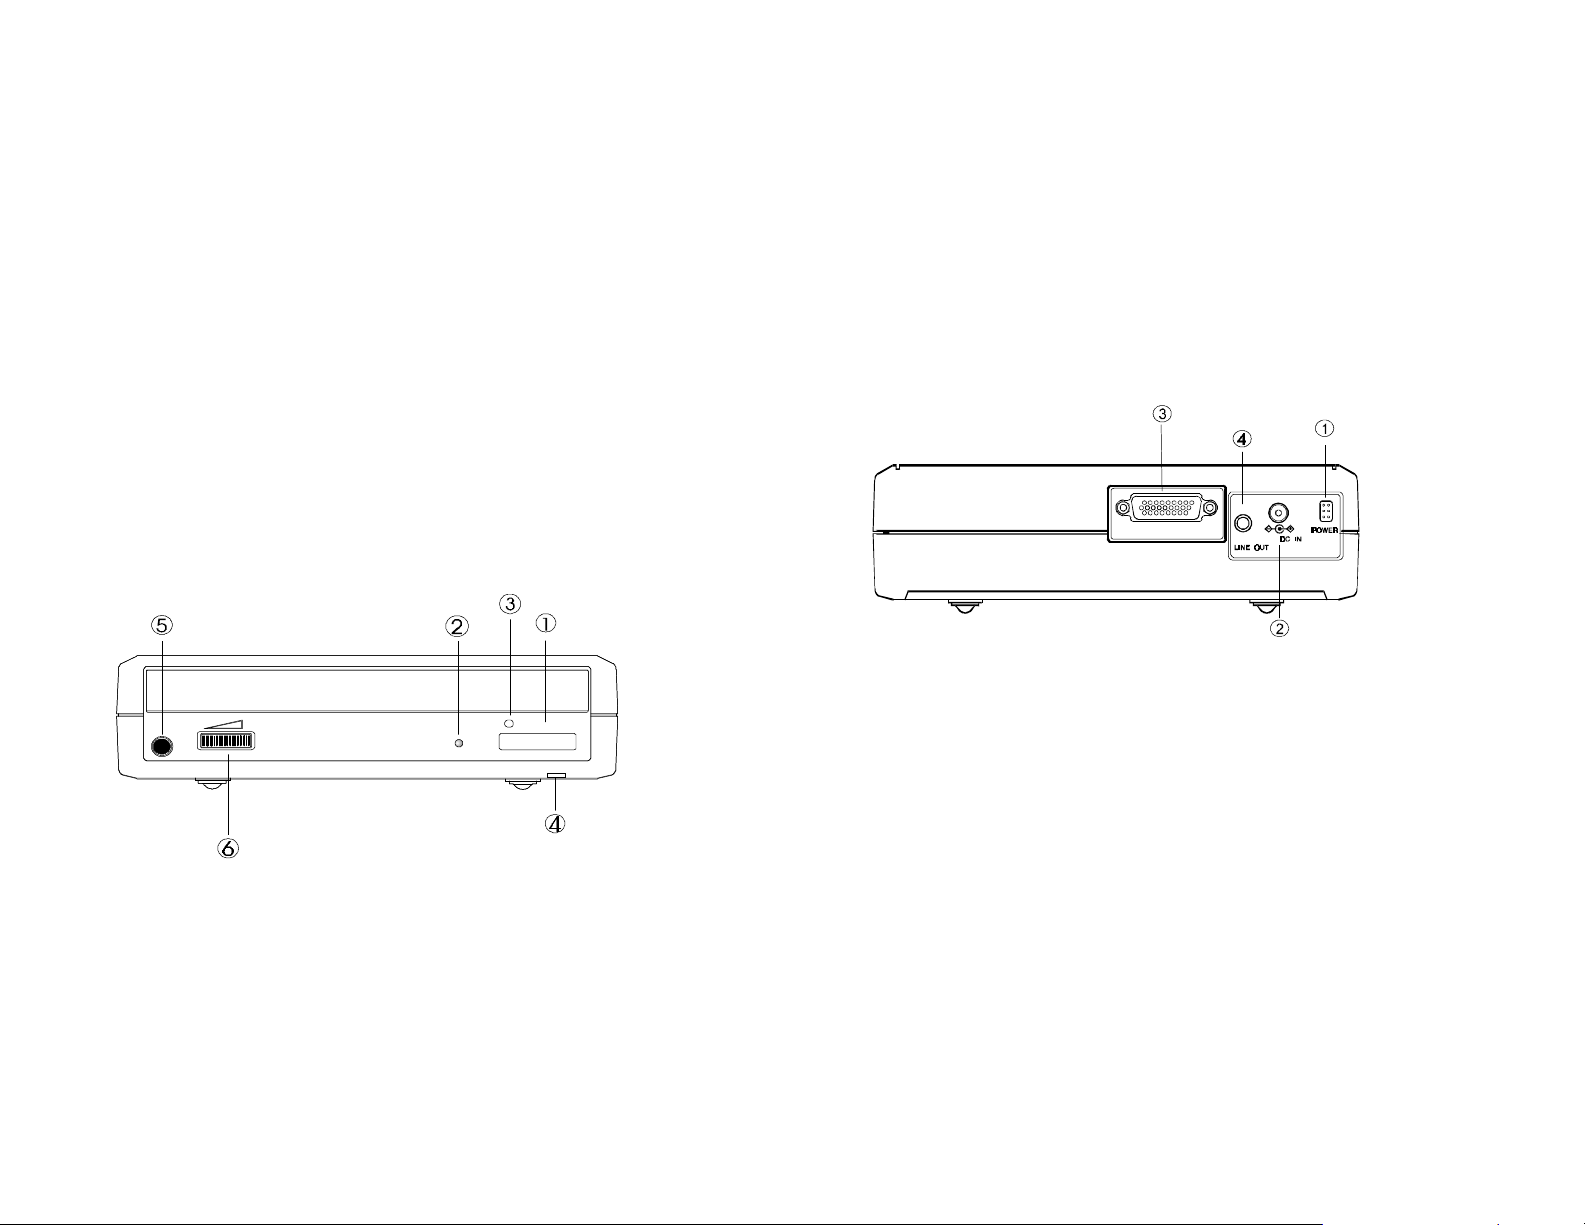
PART NAMES AND FUNCTIONS
FRONT PANEL
The front panel of your CD Rewriter may look slightly different from the
figure shown below. The important parts and functions, however, are the same
regardless their locations.
1. Eject button:
Press this button to eject the tray.
2. Access LED:
This LED will blink when the drive is accessing the disc.
3. Emergency Hole:
Insert a pin shaped item to manually eject the tray while power-off.
4. Power LED:
This LED will light when power is on.
5. Head Phone jack:
The CD-Audio sound output. Connect a headphone or external speaker here.
6. Volume Control:
CD-Audio volume control.
REAR PANEL
1. Power Button:
Press the button to manually power on/off the drive.
2. DC in Jack:
This jack connects to the AC adapter.
3. Interface Connector:
Connect the drive to the Parallel port cable or PCMCIA interface card.
4. Audio Line-Out Jack:
Send audio signal to an external amplifier.
Figure 1
Figure 2
POWER SOURCE
The CD Rewriter Drive powered by an AC adapter. The POWER LED indicates the
power status. It always light up when the power supply is in the normal condition.
1. Connect the AC adapter plugs to the DC IN jack at the rear panel of the drive.
2. Attach the AC adapter to the AC power outlet.
Page 5
INSTALLATION
The installation procedures have two sections for each type of interface.
1. Parallel Port interface
2. PC Card (PCMCIA) interface
The procedure includes hardware and software installation. Just follow along
the interface of your choice.
INSTALLATION FOR PARALLEL PORT INTERFACE
HARDWARE INSTALLATION
Before you begin, make sure you turn OFF all power to your system before
connecting the CD ReWriter to your computer.
1. Connect the DC Input adapter cable to the EXP CD drive assembly.
2. Connect one end
of the Parallel
cable to EXP CD
(26 pin small
connector), and
connect the other
end to computer
parallel port.
(standard 25
connector)
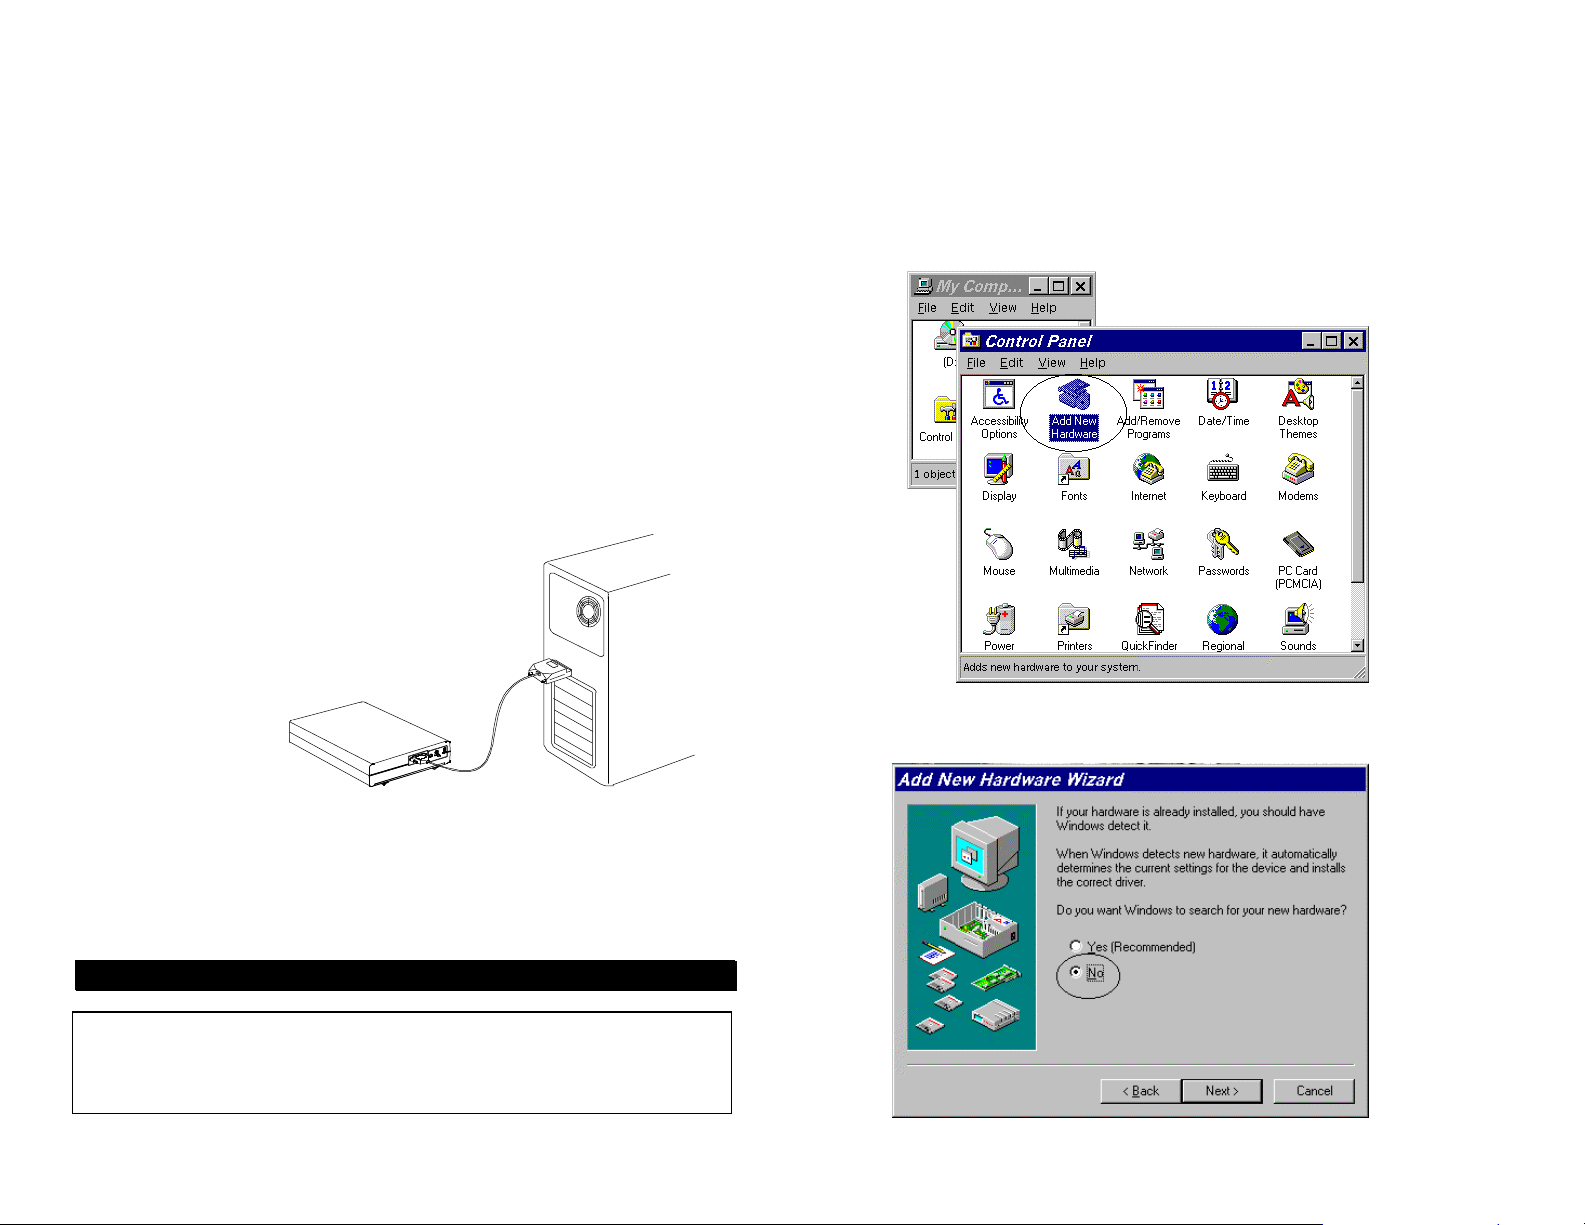
SOFTWARE INSTALLATION FOR WINDOWS 95/98
Check all the connection as states in the “Hardware Installation” section.
From the Desktop Click ‘My Computer’ icon, ‘Control Panel’ and then ‘Add
New Hardware’
1. Click "Next>" to begin.
2. When prompted whether to search for your new hardware,
Select "No" and click "Next>".
3. Plug-in the AC adapter to a working AC receptacle.
4. Press power button.
You are now ready to install the software.
CAUTION
The CD and electronic components installed on the CD ReWriter are very
sensitive to damage from static electricity. Before handling the unit, touch a
grounded metal surface. DO NOT connect/disconnect the CD ReWriter unit
to/from the parallel cable when the system is in power-on state.
Page 6
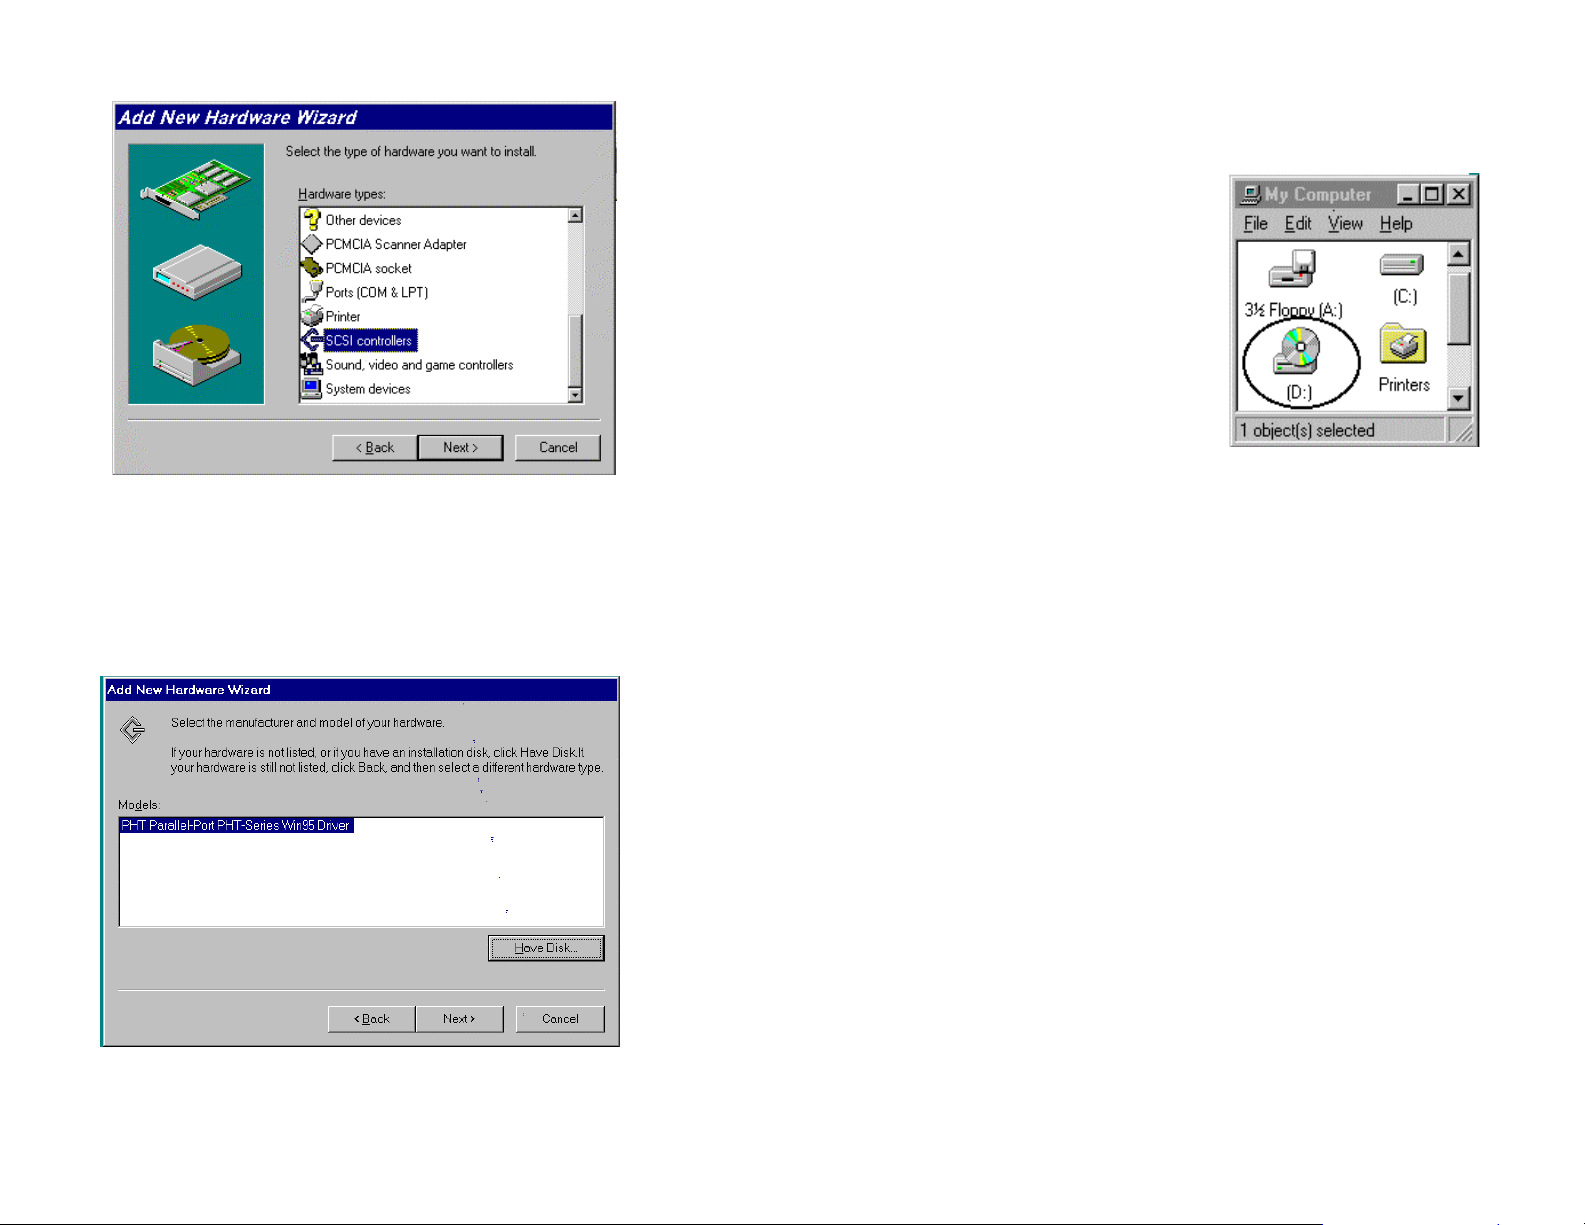
3. Open "SCSI controllers". Click "Have Disk...".
4. Insert Installation Diskette into the drive selected,
then click "OK". If you're installing from a directory
containing downloaded installation files, specify the full
path of the directory and click "OK".
5. Select "P.H.T. Parallel-Port Trans-Series Win95/98 Driver",
and click "Next>".
VERIFY YOUR INSTALLATION
From “desk top” click on “my computer”
icon. There should be addition CD-ROM
drive’s icon displayed.
6. Click "Finish" to complete installation.
7. Remove Installation diskette.
8. Restart system, when prompted.
Page 7

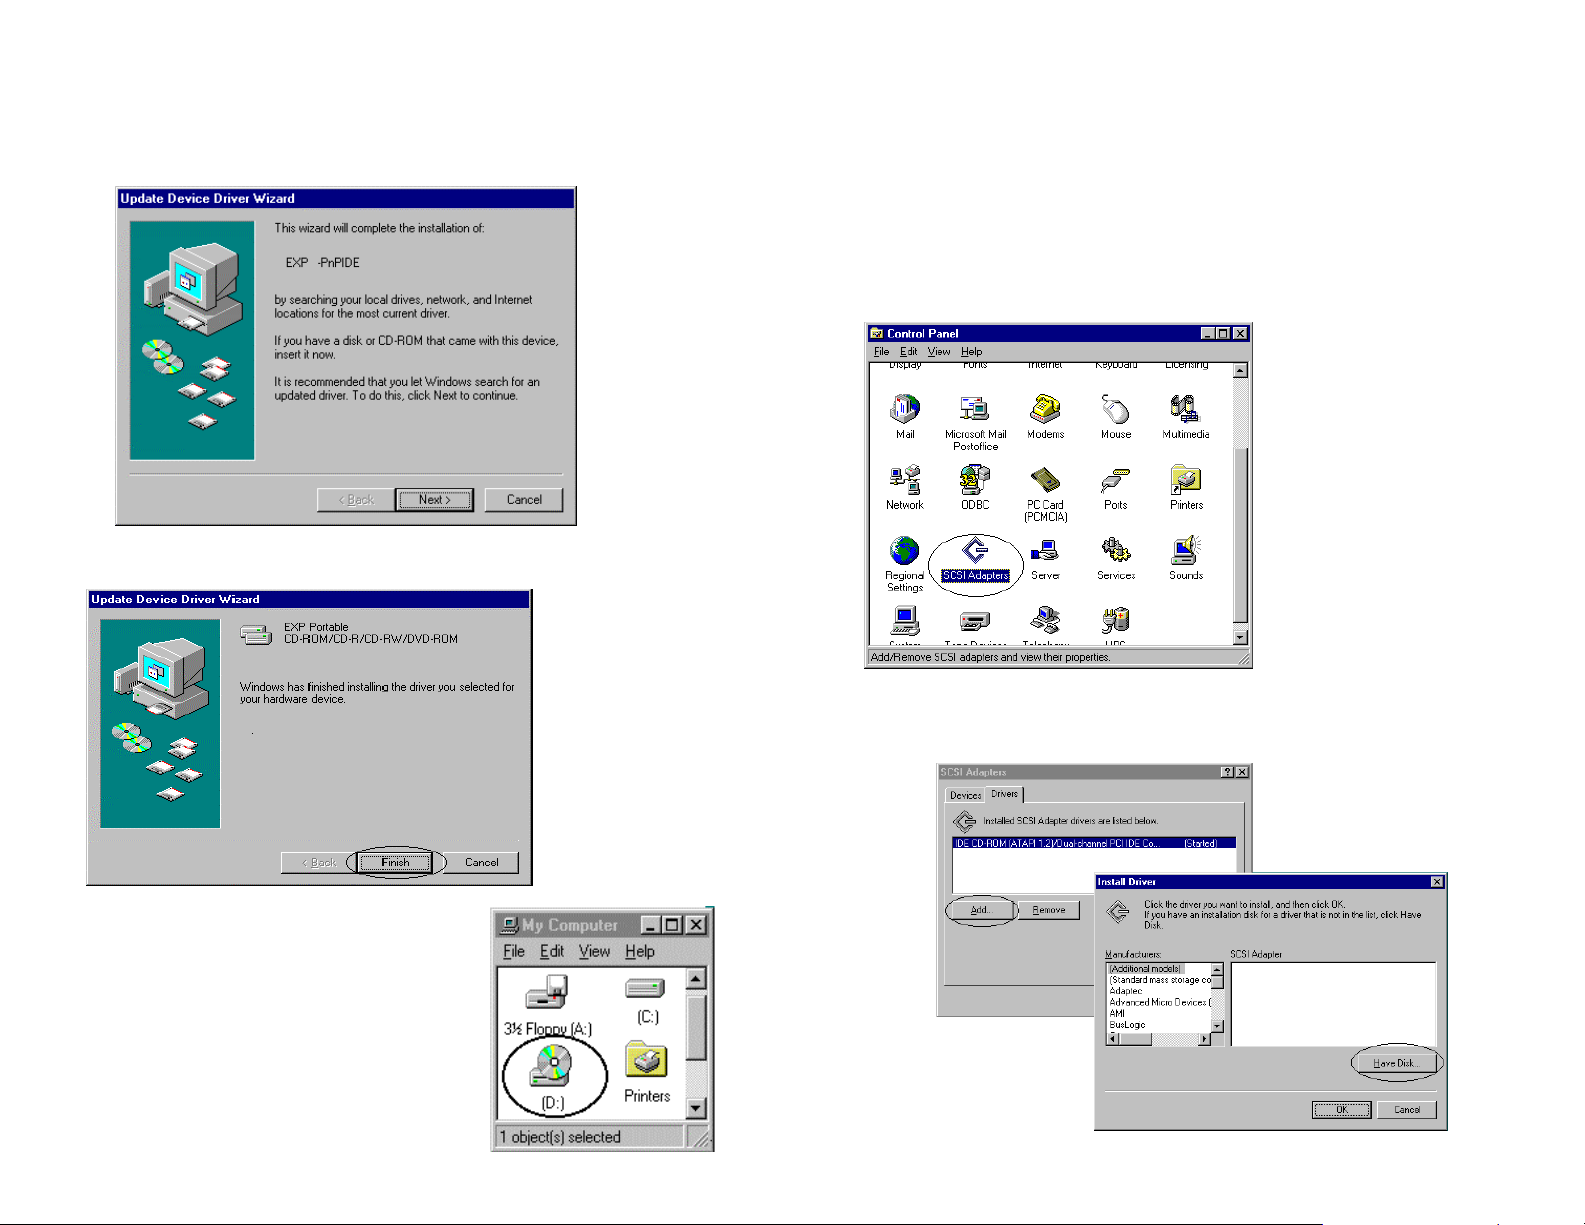
SOFTWARE INSTALLATION FOR WINDOWS NT 4.0
In Windows NT 4.0, you may select “Control Panel” under “Settings” from
the “Start” menu to open the “Control Panel” folder, double click the “SCSI
Adapter” icon)
Click “Drivers” tab, and a figure illustrated as below will be displayed.
On the ‘SCSI Adapter’ column shows “PHT Parallel-Port PHT-Serial NT
Drivers”
Click OK to select the driver.
Follow the on-screen instruction to continue. After finishing, Windows NT will
prompt you to restart your computer to activate the new device driver for
Windows NT.
Click “Add” button, and click “Have Disk...” button.
Windows NT will then prompt you to insert the manufacturer installation disk.
Insert the device driver disk into your floppy drive. Specify the directory as
A:\ (or A:\WINNT if the directory exist) and select OK.
Page 8

INSTALLATION FOR PCMCIA INTERFACE
HARDWARE INSTALLATION
If install on a NT station, make sure you turn OFF all power to your system
before connecting the CD ReWriter to your computer. However, you are
allowed to install the CD with power while using Windows 95/98, because
OS support plug-and-play.
1. Connect the PCMCIA interface card to the CD ReWriter drive. Push
firmly until the CD-RW connector is seated, and then tighten the two
screws on the cable connector.
2. Place the CD drive in the horizontal position
3. Consult your computer’s documentation to locate the PCMCIA slot.
4. Align the PCMCIA
interface card with the
arrow sign pointing to the
computer’s slot. (Please
note that the card is
keyed to guide for proper
orientation.)
SOFTWARE INSTALLATION FOR WINDOWS 95/98
The “New Hardware Found” dialog box* will appear when you insert the CD
ReWriter card under Windows 95 for the very first time.
Select “Driver from disk provided by hardware manufacturer” and click on
the OK button. Insert the CD ReWriter device driver disk into your floppy
drive. (If the dialog box does not appear, please refer to the “Trouble Shooting” section.)
5. Slowly insert the PCMCIA interface card into the slot and press firmly
until the card is seated.
6. You are now ready to install the CD ReWriter device driver.
CAUTION
The CD drive and electronic components installed on the CD ReWriter are
very sensitive to damage from static electricity. Before handling the unit,
touch a grounded metal surface. DO NOT connect/disconnect the CD
ReWriter unit to/from the parallel cable when the system is in power-on state.
If a dialog box come up select the CD-ROM , then click OK.
* Your dialog box may be different from the one shown depending on your Windows 95 version
Page 9
For user with a newer revision of Windows 95 od Windows 98, “Update
Device Driver Wizard” box * will appear. Click on “Next” button, let
Windows 95 search for driver. Make sure to insert the CD device driver
diskette into your floppy drive.
(If the dialog box does not appear, please refer to the “Trouble Shooting” section.)
Click on the “Finish” button.
SOFTWARE INSTALLATION FOR WINDOWS NT 4.0
PC CARD Interface
Currently there is no Plug and Play support for PC Card (PCMCIA) on the
Windows NT 4.0. User can install the device driver without the PC Card,
however after you finishing the installation you should insert the PC Card
before restart the computer.
Follow the instructions to install the device driver:
Click on My Computer > Control Panel > SCSI Adapters.
VERIFY YOUR INSTALLATION
From “Desk Top” click on “My Computer”
icon. There should be addition CD-ROM
drive’s icon displayed.
Choose Drivers tab and the click on “Add”. From the Install Driver click
“Have Disk” button.
Page 10

Install from disk dialog box will prompt for device driver diskette.
Either using “Browse” button or type in the path A:\winnt the click OK to
finishing the installation.
Make sure to insert the CD PC Card into the PC Card slot before restart the
computer.
VERIFY YOUR INSTALLATION
After computer boot up from “Desk Top” click
on “My Computer” icon. You should have an
addition CD-ROM icon.
INSTALLING THE APPLICATION SOFTWARE
From “Start” go to “Setting”, “ Control Panel” then “Add/Remove Program”
Click on “Install” button. The installation program will search for ‘Setup.exe’
program from the CD-ROM. Usually the application will start automatically.
If not click “Browse” button then open the sub-folder contain the setup
program.
Follow the program instructions to create your own CD. Most of the CD
related program would allow you create both CD-Audio and data CD.
WARNING
If you are using the CD Rewriter or software supply by EXP Computer Inc. to
reproduce copyright data, you must obtain permission from the copyright
owner. Consult your legal adviser before you proceed. You may be violate the
copyright law if you do not own the copyright data or have the permission
Page 11

TROUBLE SHOOTING
PARALLEL PORT INTERFACE
Symptom: The EXP CD starts to become excessively slow or does not
work at all.
Symptom: No additional drive icon in “My Computer”. The EXP CD driver
installed without any incident.
Solution:
1. Check your cable connection, along with the AC adapter at the
wall receptacle make sure there is no lose connection. The
green LED on the front of EXP CD assembly should lit up.
2. Check your computer CMOS or BIOS setup. Some computer
allows user to set printer type to be: Standard, EPP Only or Bidirectional. A setting to “EPP Only” is preferred for a better
performance.
3. Check if other hardware devices are connected to the same
parallel port. Daisy-chaining with other hardware devices is
NOT recommended. Other devices include but not limited to
the following: security device (key, lock), audio port, parallel-to
SCSI device, tape backup device, network device, A/B switch,
printer-sharing device.
4. If you connect the equipment in daisy-chain fashion, always
turn on the device farthest away from the computer first (in this
case the EXP CD), then turn on the device next on the chain.
Turn the computer last.
Solution: The parallel port on your machine may be able to a number of
different modes, standard, Bi-directional, EPP or ECP. These
different setting can effect performance of the EXP CD. In
some cases, the standard setting will even shut off signals the
EXP CD needs, while if the same port is set to Bi-directional or
EPP produce an excellent performance.
Symptom: The EXP CD starts to become excessively slow or behave
differently on a battery-powered notebook computer.
Solution: If you are using a notebook or laptop computer, without the AC
adapter. The performance of the parallel port may become
sluggish and unreliable if the battery runs low. Try reconnecting
the AC adapter to your computer or recharging the battery.
Page 12

PCMCIA INTERFACE
Symptom: No “New Hardware Found” dialog box display.
Solution: 1. The EXP card is NOT fully inserted.
The card status will show empty if Windows PCMCIA driver
did not detect any card. Some time, there is other dialog box
displayed, and the PC Card Properties still show empty. You
may need to disable such a program (i.e. CardWork,
CardWiz) consult your notebook User Manual.
2. The 32-bit card support is NOT enabled.
If you see the screen below, it means the PCMCIA device driver
is not using 32-Bit Card Support. Follow on screen instructions
by except all the default setting. At the end of the installation,
you will be asked to restart the computer.
After the computer restart, you can insert the EXP CD card, at
this time the “New Hardware Found” or “Update Device Driver
Wizard” dialog box will be displayed.
To enable the 32-bit support, click on “Start”, “Settings”,
“Control Panel” from the “Control Panel” folder Click on PC
Card (PCMCIA)
3. No PC Card (PCMCIA) icon in Control Panel
If the PCMCIA Socket is not found, then you must add a
PCMCIA socket to your system. Please click on the “Add New
Hardware” icon in the Control Panel folder and select “PCMCIA
socket”. Select the appropriate type of PCMCIA Controller that
matches yours (call your notebook manufacturer for detail) and
follow the on-screen instruction.
Page 13

Symptom: No additional drive icon in “My Computer”.
The EXP CD driver installed without any incident.
Solution: 1. System resources for the EXP CD are not available.
Click on “Start”, “Settings”, “Control Panel” from the “Control
Panel” folder Click on “System” then “Device Manager”
The EXP entry may
have a yellow circle
with an exclamation
point.
This is an indication
that the EXP CD did
not working properly.
Double click on EXP entry line and then select “Resources” You
can make some change to the following entry:
‘Basic Configuration
xxxx’, I/O Range,
and Interrupt
request.
In some computer, the I/O Range XXX, Interrupt Request 15
may be use by a built-in secondary IDE controller. Try changing
the interrupt to 9,10 or 11. You can also try different I/O
addresses.
3. The EXP entry may have a yellow circle with an exclamation
point. Device Manager shows resource for the EXP CD is
available and there is no conflicting device.
Check all connection to the EXP CD drive assembly, such as AC
Adapter. Your notebook PC Card sockets may not have enough
power for the EXP CD. If you already connect the AC adapter,
make sure to secure all connectors and the adapter plug into a
good AC out let.
4. The EXP CD and the ‘Standard IDE/ESDI Hard Disk Controller’
entry have a yellow circle with an exclamation point.
During resources
changing, observe
the “Conflicting
Device List”. You
should select the
resource(s), which
the “Conflicting
device list” shows
“No Conflict ”
2. Device Manager shows resource for the EXP CD is available
and there is no conflicting device.
Your notebook may have been infected with some kind of
computer virus. The virus disabled Windows 95 32-bit device
driver for the hard disk. The EXP CD requires the driver for its
operation. Check the “Performance” tab to confirm the
symptom.
You need to run an anti-virus program first, once the 32-bit
driver is running the EXP CD will be installed.
Page 14

REMOVING OR RE-INSTALLING THE DRIVER
PCMCIA INTERFACE
PARALLEL PORT INTERFACE
Go to “My Computer” icon, “Control Panel”, “System”,“ Device Manager”
Click on “SCSI Controller ”. The EXP CD should be listed
If you need to remove or reinstalling the driver, make sure the EXP
CD-ROM disk card is inserted.
• Go to “My Computer” icon, “Control Panel”, “System”,“ Device
Manager” Click on “Hard Disk Controller”. The EXP CD should be
listed
To remove EXP CD-ROM.
• Click on the EXP entry line (P.H.T. …) then click “Remove” button.
You may need to restart the computer to complete the task.
To reinstall EXP CD-ROM.
• Click on “Refresh” button, either the “New Hardware Found”or
“Update Device Driver Wizard” will be displayed.
Follow the instruction on Installation for “Parallel Port Interface” section.
To remove EXP CD-ROM.
• Click on the EXP entry line then click “Remove” button. You may
need to restart the computer to complete the task.
To reinstall EXP CD-ROM.
• Click on “Refresh” button, either the “New Hardware Found”
or “Update Device Driver Wizard” will be displayed.
Follow the instruction on “Installation for PCMCIA Interface” section.
Page 15

APPENDIX A
FCC COMPLIANCE STATEMENTS
This equipment has been tested and found to comply with the limits for a
Class B digital device, pursuant to Part 15 of the FCC Rules. These limits
are designed to provide reasonable protection against harmful interference
in a residential installation. This equipment generates, uses and can radiate
radio frequency energy and, if not installed and used in accordance with the
instructions, may cause harmful interference to radio communications.
However, there is no guarantee that interference will not occur in a particular
installation. If this equipment does cause harmful interference to radio or
television reception, which can be determined by turning the equipment off
and on, the user is encouraged to try to correct the interference by one or
more of the following measures:
Reorient or relocate the receiving antenna.
Increase the Distance between the equipment and receiver.
Connect the equipment into an outlet on a circuit different from that to which
the receiver is connected.
Consult the dealer or an experienced radio/TV technician for help.
CAUTION
APPENDIX B
Media consideration
The media for the CDRW is important. CDRW disk that is made for a 2x
rewrite will not work in this drive. This means that you cannot create a
CDRW disk that is made for a 2x rewriter. A 2x CDRW can be read, but it
cannot be written to. The CDRW disk must be of a 4x rewrite type in order
to be able to write to the CRW disk in this drive.
CHANGE OR MODIFICATIONS NOT EXPRESSLY APPROVED BY
PARTY RESPONSIBLE FOR COMPLIANCE COULD VOID THE
USER’S AUTHORITY TO OPERATE THE EQUIPMENT.
Page 16

APPENDIX C
Tips
1. What does "buffer underrun" mean?
The CD writing process can't be interrupted in mid-session. To prevent this from happening, the
makers of CD recorders put a write buffer in the drive, usually 512K or 1MB. Data read from the
hard drive, tape, or another CD is stored in the buffer, and pulled out as needed by the recorder.
Most Win95-based recording software recommend turning off Auto Insert Notification. Having this
on can interfere with closing sessions or even just inserting discs into the drive. You can disable it by
opening the "System" icon in the Control Panel, and selecting "Device Manager". For each item
under CD-ROM, select the device, click on the "Settings" tab, and make sure the "Auto Insert
Notification" checkbox is unchecked. (Some programs requires that the auto insertion be turned on.)
If you're using WinNT, you can turn it off with the "TweakUI" program available in PowerToys, or by
modifying a registry key with
If the recorder requests data from the write buffer, but there's none there, it's called a buffer
underrun. The disc is still spinning, but
there's no data to write, so the recording process aborts.
2. How to prevent " buffer underrun"?
A brief summary:
• Use a fast hard drive.
• Record at a slow speed - it takes longer to empty the buffer when recording at 1x.
• Don't do anything else with the computer while recording. Don't record from a file server.
• Defragment your HD, especially if you're doing on-the-fly recording.
• Record from an ISO image file rather than on-the-fly.
• Depending on your setup, putting the recorder and your hard drive on separate SCSI
controllers may be necessary.
• Keep your CD-R cool. Sometimes the drives fail when they overheat.
• Keep CD-Rewiter read/write head cleaning.
• Also watch out for things like anti-virus programs that wake up, virtual memory settings that
cause swapping, screen savers that activate during the CD creation process, unusual network
activity, and background downloads of data or faxes.
• Stabilize Your System for CD-R.
• Shut Down Other Applications.
• Test before writing.
• Another important tip for Win95 is to limit the size of the file cache, which by default is
unrestricted. The procedure is simple:
1. Open the file SYSTEM.INI with a text editor. This file is usually C:\WINDOWS\SYSTEM.INI.
2. Find the section labeled "[vcache]".
3. Add the following lines *after* the "[vcache]" line:
MinFileCache = 512
MaxFileCache = 4096
4. Save the changes to the file, and reboot.
3. Should I turn off Auto Insert Notificaton ?
Regedit32
(0=disabled, 1=enabled):
HKEY_LOCAL_MACHINE \ SYSTEM \ CurrentControlSet \ Services \
Cdrom \ Autorun
The trouble with Auto Insert Notification is that it periodically attempts to find a valid disc in the CD
recorder. A blank disc isn't very interesting to Windows, so nothing happens. When the table of
contents is written to the disc, it suddenly becomes interesting, and enough activity is generated by
Windows' attempts to read the disc that the write fails.
4. I can't read the multi-session CD I just made
One possible cause of this problem is writing a multisession disc in MODE-1 format. Some older
CD-ROM drives incorrectly assume that a MODE-1 disc can't be multi-session, so they don't look
for additional sessions unless it's written in MODE-2 (CD-ROM) format.
Also, if the final session on the CD isn't closed, standard CD players may become confused. This
doesn't mean that the *disc* must be closed, just that the *session* must be closed.
5. Write process keeps failing N minutes in
There's a couple of possibilities. One is that your data source can't keep up with the CD-R; try using
disc-at-once writing from an ISO image with the speed set to 1x. If it seems to be getting worse over
time, you may just need to defragment your hard drive.
If that fails, a number of people have discovered that the problem is a faulty CD-R unit, which have
different mechanisms. You should try 1x writing from a fast source and with different sets of data.
Be sure that there aren't environmental factors creating difficulties. CD-R units are usually built to
handle small shocks, but having a set of speakers playing loud music on the same table as a CD-R
may cause it to skip, resulting in a failed write. Sonic booms, heavy construction equipment, and
nuclear detonations may have similar effects.
Page 17

It's also possible that you simply have a bad batch of media. Try a different type and brand of disc.
Some distributors (e.g. dataDisc) will exchange media that's provably defective.
Be careful with Advanced Power Management functions on some PCs. If the keyboard and IDE
devices are completely idle, the system may decide that nothing is going on and switch to a lowpower mode. Ditto for screen savers that kick in after the system has been idle for a certain period.
6. Why did my CD-R eject between the "test" and "write" passes?
CD rewriter needs to clear their memory between the "test" pass and the "write" pass. For CD
rewriter, the only command that does this is "eject". If the recorder has a tray it just goes out and
back in, but if it uses a caddy manual intervention is needed.
7. Why CD-ROM drive doesn't like *any* CD-R discs
A very simple test is to take a CD that DOES work, copy it, and try both (this ensures that your
problems aren't being caused by, for example, a drive that doesn't support multi-session CDs).
Sometimes the firmware can be at issue.
If it fails with different kinds of media, the CD-ROM drive either doesn't like discs written with your
recorder, or doesn't like CD-R media at all.
In one case, returning the CD-ROM for an identical unit resolved the
problems.
8. I keep getting timeout errors
Basically, check your cabling, turn off features you don't need,
and make sure Auto Insert Notification is off.
There are a few of possibilities, some software and some hardware.
It may be that the system is looking at the disc, not finding a TOC (table of contents), and ejecting it
as useless. One way to tell the difference between the operating system rejecting the CD and the
drive rejecting the CD is to unplug the IDE cable from the back of the CD recorder before inserting
the disc.
If the problem is the operating system, you probably need to disable
certain features. Under Win95, disable auto insertion for all CD-ROM
devices. One user found that reinstalling Win95 helped.
If that doesn't work, make sure the CD-R drive is perfectly level.
Apparently some units are sensitive to being tilted at an angle. Some users have had trouble when a
CD-R has been on for a while and has overheated, so if you only have trouble when the machine has
been powered on for a while, try putting a small fan above the unit to blow air over it.
11. I can't see all the files on the CD-R
There's a couple of possibilities: either they aren't there, or they're there but you can't see them.
Looking at the disc from different machines should give you some idea.
Out-of-date versions of MSCDEX have been known to "forget" certain files when browsing a disc. If
you're using DOS or are using the "real mode" drivers from within Win95, make sure you're using
the most recent version of MSCDEX.
12. My multi-session disc only has data from the last session
A common mistake when burning a multisession CD is to forget to link the files from the previous
session into the current one. This results in a CD where you can see the new files but none of the
old, unless you have a program that lets you choose which session you look at.
If you're using Easy-CD Pro for Win31, CD Creator, or Adaptec Easy CD
Creator 3, you can load the contents of all the previous sessions, and burn a new session that has
all the files you want. This feature isn't available in Easy-CD Pro 95, which only allows you to link to
one previous session.
9. Getting errors reading the first (data) track on mixed-mode CD
There's a 150-sector postgap at the end of the data track. Some programs deal with this
automatically, some don't. If you're getting errors, try subtracting 150 from the total number of
sectors to read for that track. (How to do that?)
10. My CD-R ejects blank discs immediately
The files themselves aren't lost forever though: most packages will allow you to extract a track as an
ISO-9660 image, and you can use WinImage to pull individual files out of it. If all else fails, CD-R
Diagnostic claims to be able to recover data from "lost" sessions.
One caution: without something like Adaptec's Session Selector, you may not see the last session
on the disc anyway. Some CD-ROM drives stop looking for sessions after a certain point.
Page 18

13. Why doesn't the copy of an audio CD sound the same?
There are actually two questions here, so I've split them into separate
sections. The most common problem is that the audio extracted to the hard drive doesn't quite match
the original.
14. Why doesn't the audio data on the copy match the
original?
Most problems are due to poor digital audio extraction from the source
media. Some CD-ROM drives will return slightly different data every time an audio track is read.
The most fundamental problem is that, if the CD is dirty, the error
correction may not be able to correct all of the errors. Some drives will interpolate the missing
samples, some won't.
15. The audio data matches exactly, why do they sound different?
Suppose you extract the audio track from the copy, and it's an exact binary match of the track you
wrote from your hard drive, but the CDs don't sound quite the same. What then?
Most people don't notice any difference between originals and duplicates.
Some people notice subtle differences, some people notice huge differences.
Some say CD-R is better, some say worse. While it's true that "bits are
bits", there *are* reasons why CD-Rs may sound different even when the data matches exactly.
The manual for the CDD-2000 reportedly states that the drive uses 4x oversampling when playing
back pressed CDs, but switches to 1x for CD-R. This affects the quality of the D/A conversion, and
can make an audible
difference.
It has been suggested that the D/A conversion process in the CD player is more susceptible to
"jitter" when reading CD-Rs, because the clocking of the bits isn't as precise. A quality CD player
will compensate for this automatically.
16. I can't play extracted audio files by double-clicking in Win95
The default audio player in Win95 tries to load the entire file into
memory. When an extracted track is 40 or 50MB, and you don't have that much RAM, Win95's
virtual memory system starts writing pieces out to disk. The disk thrashes, and you get nowhere.
There are several ways around this. If you right-click on the file and select "properties", you will see a
"preview" tab. This will play it directly from disk. Another way is to use a different program. One
possibility is the Media Player, which is optionally installed with Win95. You can make it the default
WAV file player by selecting View/Options from Win95 explorer, clicking on the "File Types" tab,
and choosing "Wave Sound". Double-click on Play and change the program name from
"sndrec32.exe" to "mplayer.exe", leaving the "/play" and "/close" flags intact.
You can also use a program like CoolEdit, which will let you preview WAV files from the Open File
dialog.
17. Having trouble playing an audio CD in a home or car player
There are a few possibilities. First and foremost is media compatibility. Not all players get along with
all brands of CD-R media. You need to find a combination of recorder, media, and player that get
along.
Another common problem is failing to close the disc at the end of writing. You can't play an audio CD
on a common CD player until the session has been closed. You may be able to play it back with the
CD recorder though. Also, don't forget that you have to write all of the audio data into the first
session of a multisession CD. CD players don't know how to find the later sessions, so tracks
written there won't get played.
Sometimes the CD player will have no problem playing the tracks, but will have a great deal of
difficulty seeking between tracks or moving fast-forward. Using a different brand of media or a
different CD player may produce better results.
Some media works better at 1x, 2x, or 4x than it does at other speeds. You may find that slowing
down or speeding up the recorder helps.
Finally, remember that you have to write the disc in CD-DA format! If you just write a bunch of WAV
files to a CD-ROM, it's not going to work in your home stereo.
Others have asserted that *any* two CDs, pressed or otherwise, will sound slightly different.
Some people believe that audio CDs should be recorded at 1x, while others have asserted that, for
various technical reasons, 2x is better. Certain kinds of media may work best at specific speeds.
18. Having trouble using a CD-ROM on somebody else's machine
As with audio CDs, discussed in the previous section, there are several possibilities. The media
compatibility issues mentioned above apply to CD-ROM as well.
Page 19

If you're using CD-RW media rather than CD-R media, you have to be sure that the CD-ROM drive
in question is MultiRead compliant. Some older drives are able to read CD-RW media, but most are
not.
If the disc was written using a packet writing application like DirectCD, some CD-ROMs will stumble
on packet boundaries. Refer to section (4-21) for information and a possible workaround.
19. I can't copy a VideoCD
If you put a VideoCD (White Book) into your CD-ROM drive, you will see a bunch of files and
directories like you would on any other CD-ROM. In fact, with the appropriate software installed, on
some platforms you can double-click on a file to play the video.
In practice, however, the video files are stored on separate tracks, using CD-ROM/XA MODE-2
FORM-2. This allows more data to be stored on a VideoCD, at the price of less error correction. If
the video is short enough, you may be able to copy the disc as a collection of files, but some players
may be unable to play back selections if the original disc had more than one track.
You need to use a program like Adaptec's CD Copier to copy the disc track-by-track, preserving the
mode of the original.
If you let your drive to make a track-at-once recording, you may have trouble copying VideoCDs
because the starting address gets shifted when the drive writes a gap between tracks.
BUT: there's another problem: after you do a full erase and shut down the program you erase with
it's possible that the DirectCD program won't recognize the disc as valid media, and you still won't be
able to format it, until you restart the computer.
Unfortunately this means that if you want to start using a previously recorded CD-RW for packet
writing, you'll have to wait a total time of at least an hour and a half for the erase and format to
complete..."
22. I can't write CD-Rs after installing Windows 98
There are people successfully writing discs with Windows 98, so it *can* be done.
With Easy CD Creator 3, try uninstalling ECDC, rebooting, and reinstalling it. This seems to fix the
problems for the people reporting them. Doing the same for other software may have similar
beneficial effects.
20. The test write succeeds, but the actual write fails
Most often this is a problem with auto-insert notification being enabled when it shouldn't be.
One person supposedly fixed a similar problem by replacing the power supply in their computer.
Apparently the 200W supply wasn't enough to handle everything that was connected to it.
21. Trouble formatting CD-RW discs with DirectCD for Windows
"When Adaptec DirectCD refuses to format a CD-RW for packet-writing, it's possible that the disc is
not completely blank. This may happen because you chose the "quick" option when you last erased
it. The quick-erase option only erases the lead-in area to make the hardware and software think the
disc is empty. This is fine if you're going to use the disc for "normal" writing as a CD-ROM, audio
disc or whatever.
The packet-writing formatter in DirectCD 2.0a however (apparently) requires the disc to be totally
empty, so you really have to do a full erase if the disc contained data previously.
 Loading...