

Page 1

CD TRAVELER USER’S MANUAL
CD TRAVELER WITH
PORTABLE CD-ROM CARD
Page 2

CONTENTS
PRECAUTIONS .......................................................................................... 1
CD-ROM DRIVE ...................................................................................... 1
CD .......................................................................................... 1
PART NAMES AND FUNCTIONS................................................................... 2
TOP PANEL OF THE CD-ROM DRIVE.................................................... 2
REAR PANEL OF THE CD-ROM DRIVE................................................. 3
BOTTOM PANEL OF THE CD-ROM DRIVE............................................ 4
CD-ROM POWER .......................................................................................... 5
SELECT THE POWER SOURCE............................................................. 5
CONNECT THE AC ADAPTER................................................................ 6
INSTALL THE BATTERIES...................................................................... 6
POWER SWITCH .................................................................................... 7
NOTICE .......................................................................................... 8
HARDWARE INSTALLATION ........................................................................ 9
SOFTWARE INSTALLATION ........................................................................ 10
SOFTWARE INSTALLATION FOR WINDOWS 95.................................. 11
SOFTWARE INSTALLATION FOR WINDOWS NT 4.0........................... 14
SOFTWARE INSTALLATION FOR DOS/WINDOWS.............................. 17
SOFTWARE INSTALLATION FOR OS/2 WARP..................................... 20
BASIC OPERATING PROCEDURES............................................................. 23
USE THE PCMCIA CD-ROM AS A CD-AUDIO PLAYER......................... 24
USE THE PCMCIA CD-ROM WITH A COMPUTER................................. 25
NOTICE .......................................................................................... 28
PCMCIA SOFTWARE INFORMATION ABOUT DOS/WIN 3.1....................... 29
POWER SAVING .......................................................................................... 33
TROUBLE SHOOTING............................................................................. 34
DOS/WINDOWS 3.1................................................................................ 34
WINDOWS 95.......................................................................................... 36
Page 3

PRECAUTIONS
Read this section carefully before start using the
portable PCMCIA CD-ROM.
CD-ROM DRIVE
• Do not place heavy objects on the CD-ROM drive.
• Do not shake or subject to intense vibration.
• Keep disc cover closed to protect from dust.
• Do not disassemble the player.
• Do not spill liquid.
• Do not touch the lens.
• Clean the outside of the player with a soft, dry cloth.
• Clean the lens with a dry cotton swab or a lens blower.
• Do not expose the player to direct sunlight or heat. Especially do not leave it in
a hot automobile.
• Condensation may form on the lens if the CD-ROM is suddenly removed from a
cold temperature setting and placed in a much warmer environment. This may
result in the lens’ inability to properly read the disc. If this occurs, remove the
disc and leave the power on. After one hour, reinsert the disc and play again.
CD
• Handle the disc by the edges as mush as possible. Do not touch the surface of
the disc.
• Do not scratch or smudge the surface of the disc. Do not attach a label to the
disc.
• Do not bend the disc.
• Do not expose the disc to the direct sunlight. Do not store the disc in a room
with high temperature or high humidity.
• To avoid dust, scratches, bending, etc., always store the disc in its case.
• For best results, wipe the disc with a soft, dry cloth in a circular direction. Do
not use benzine, record cleaner, static electricity prevention fluid, or other liquid
as it may damage the disc.
- -
1
Page 4
CD-ROM PART NAMES AND FUNCTIONS
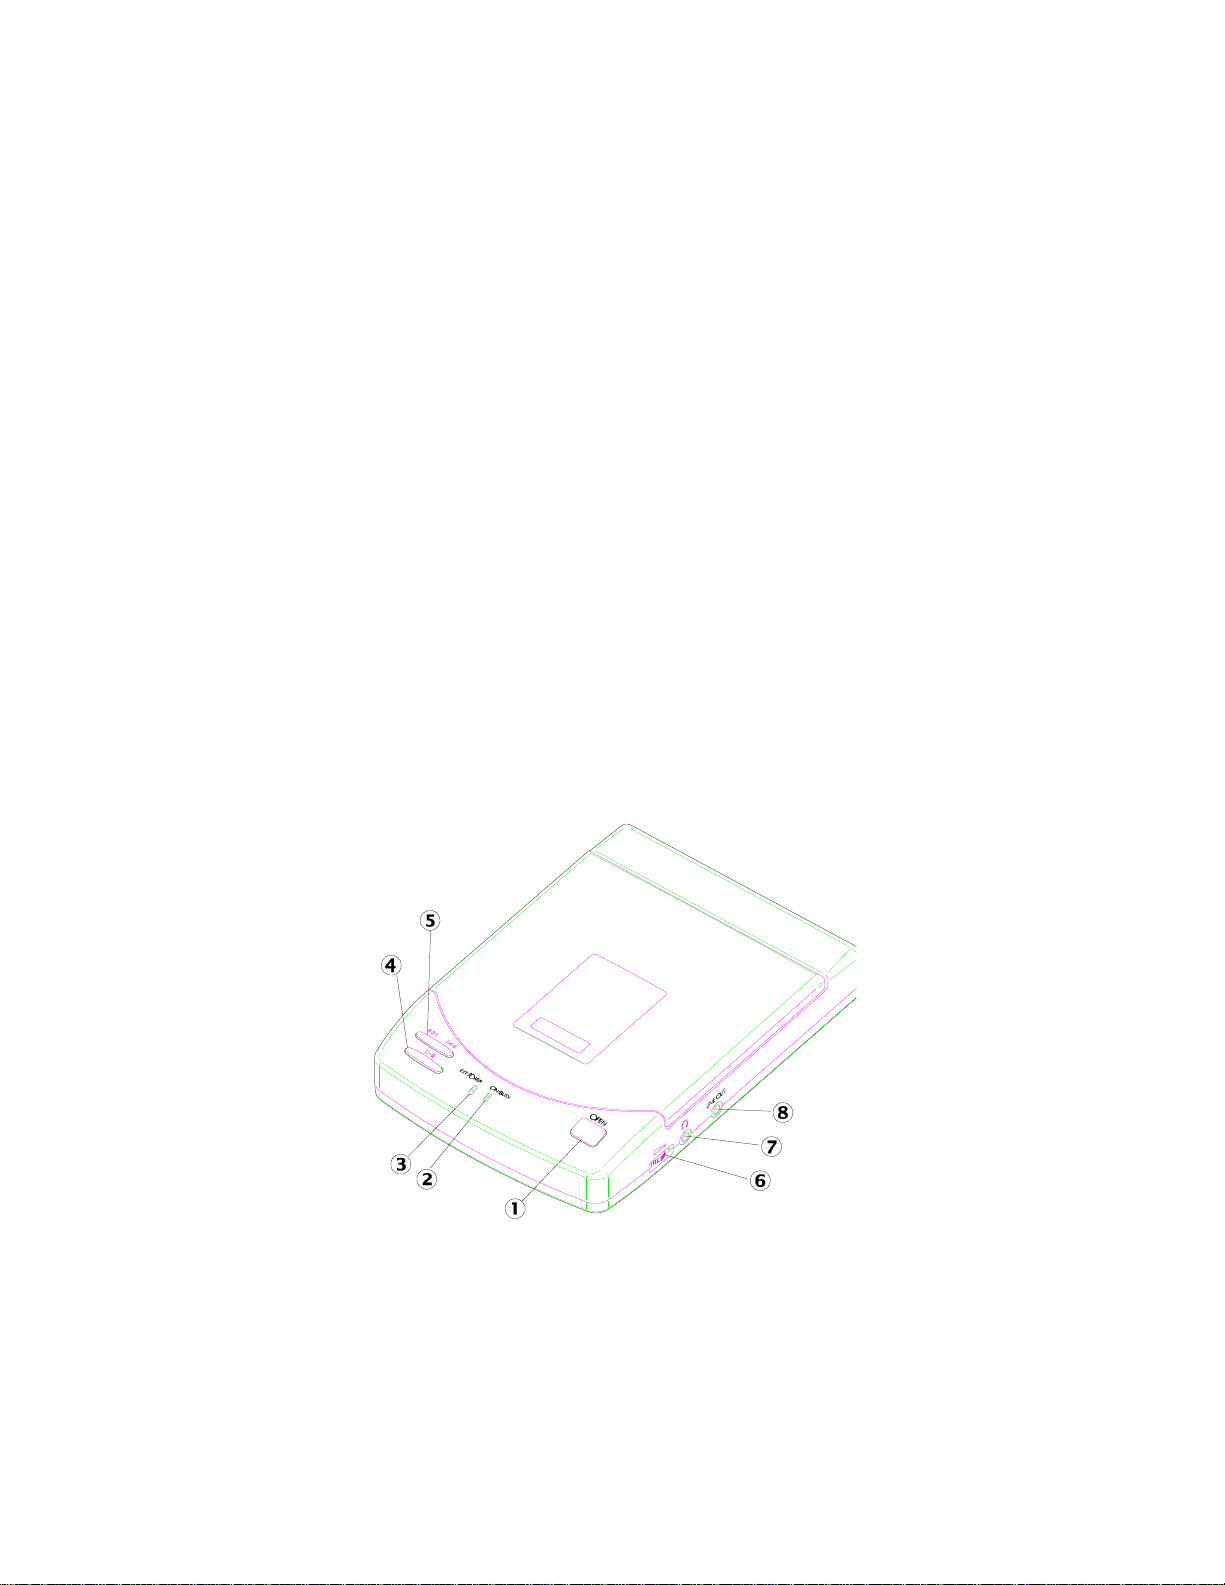
TOP PANEL OF THE CD-ROM DRIVE:
•• Open button:
Press this button to open the disc cover.
‚‚ On/Busy led:
• This indicator will light dimly with a green LED when the power is on.
• This LED will light brightly when the drive is ready.
• This LED will blink when the drive is accessing the disc.
• This LED will blink every 2 seconds when the disc cover is opened.
ƒƒ External Power led:
• This LED will light when AC adapter or battery is used.
• This LED will blink when input power is low.
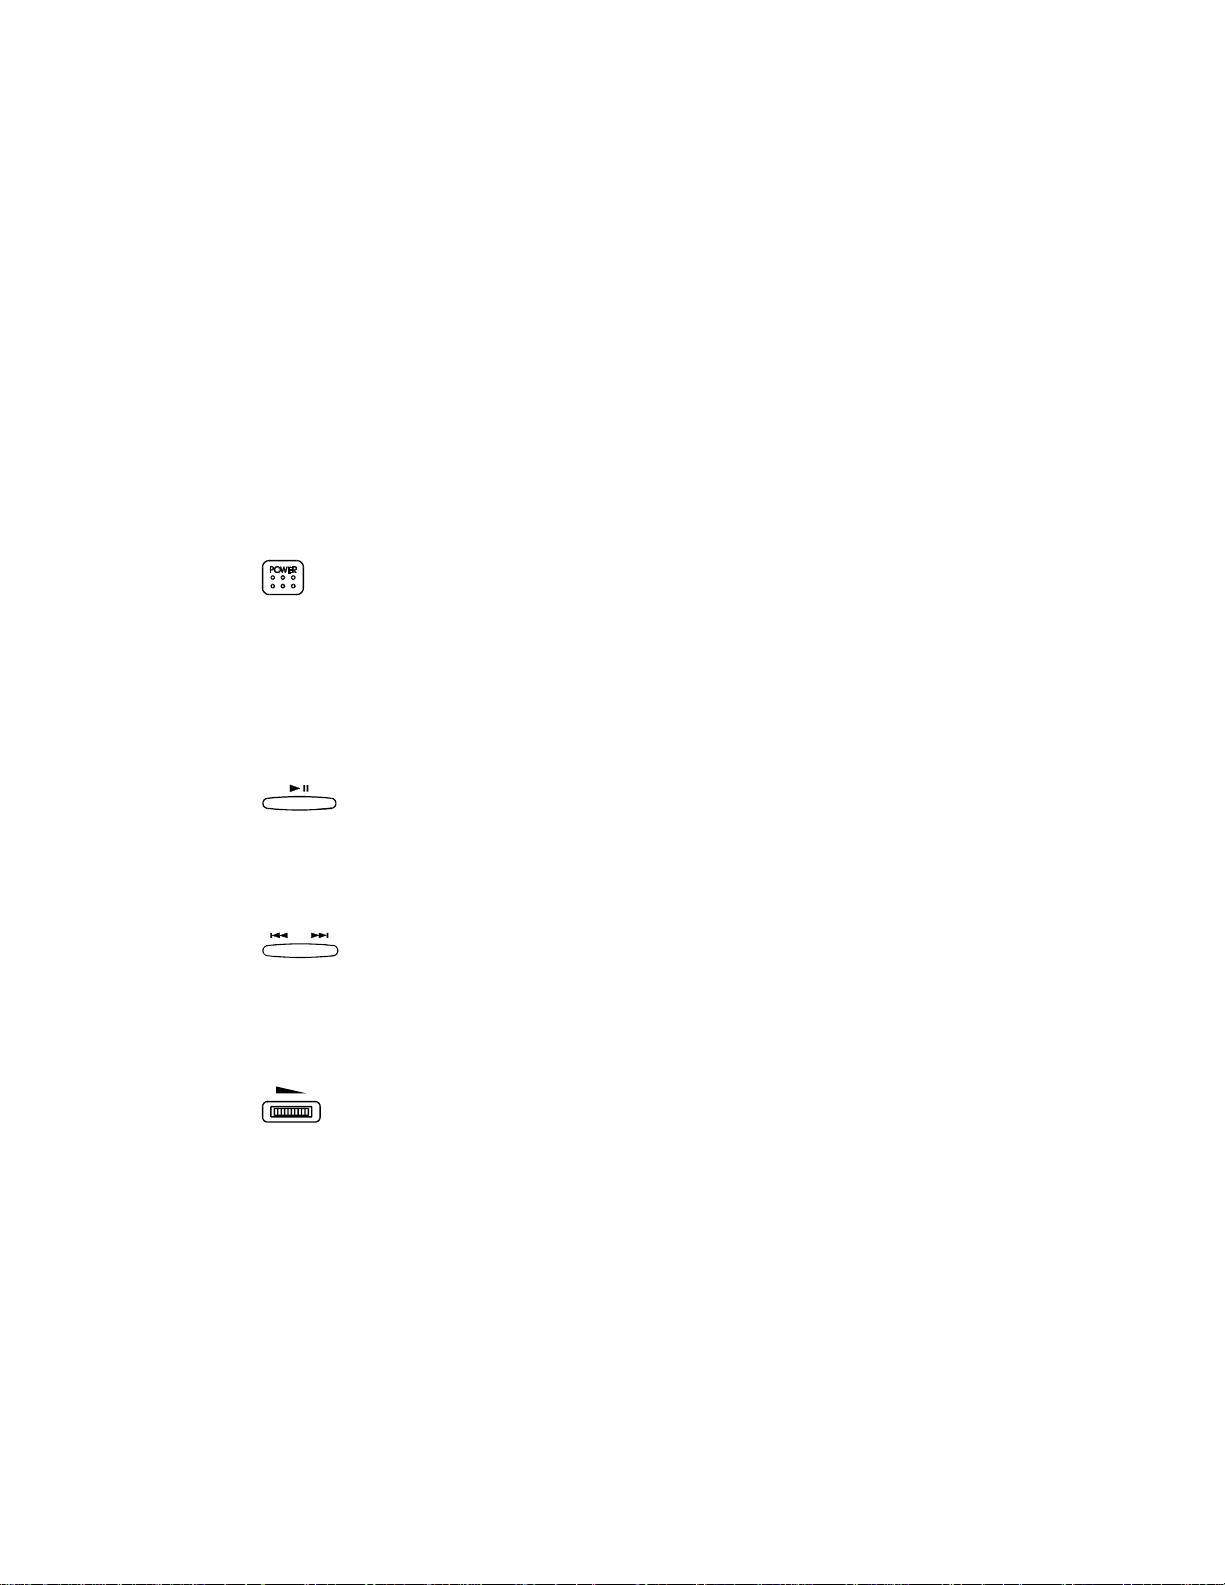
„„ Play/Pause button: (for CD audio operation only)
• When the drive is in stop state, pressing this button will activate the drive to
start playing.
• When the drive is in play state, pressing this button will make it pause.
Figure 1
…… Next/Previous button: (for CD audio operation only)
- -
2
Page 5
• When the drive is in play state, pressing the right edge of the button will skip
to the next track.
• When the drive is in play state, pressing the left edge of the button will skip to
the previous track.
†† Headphone Volume Control knob:
Turn this rotary knob to adjust the headphone volume.
‡‡ Headphone jack:
This is a 3.5mm audio headphone jack.
ˆˆ Line-out jack:
Audio outputs signal to an amplifier.
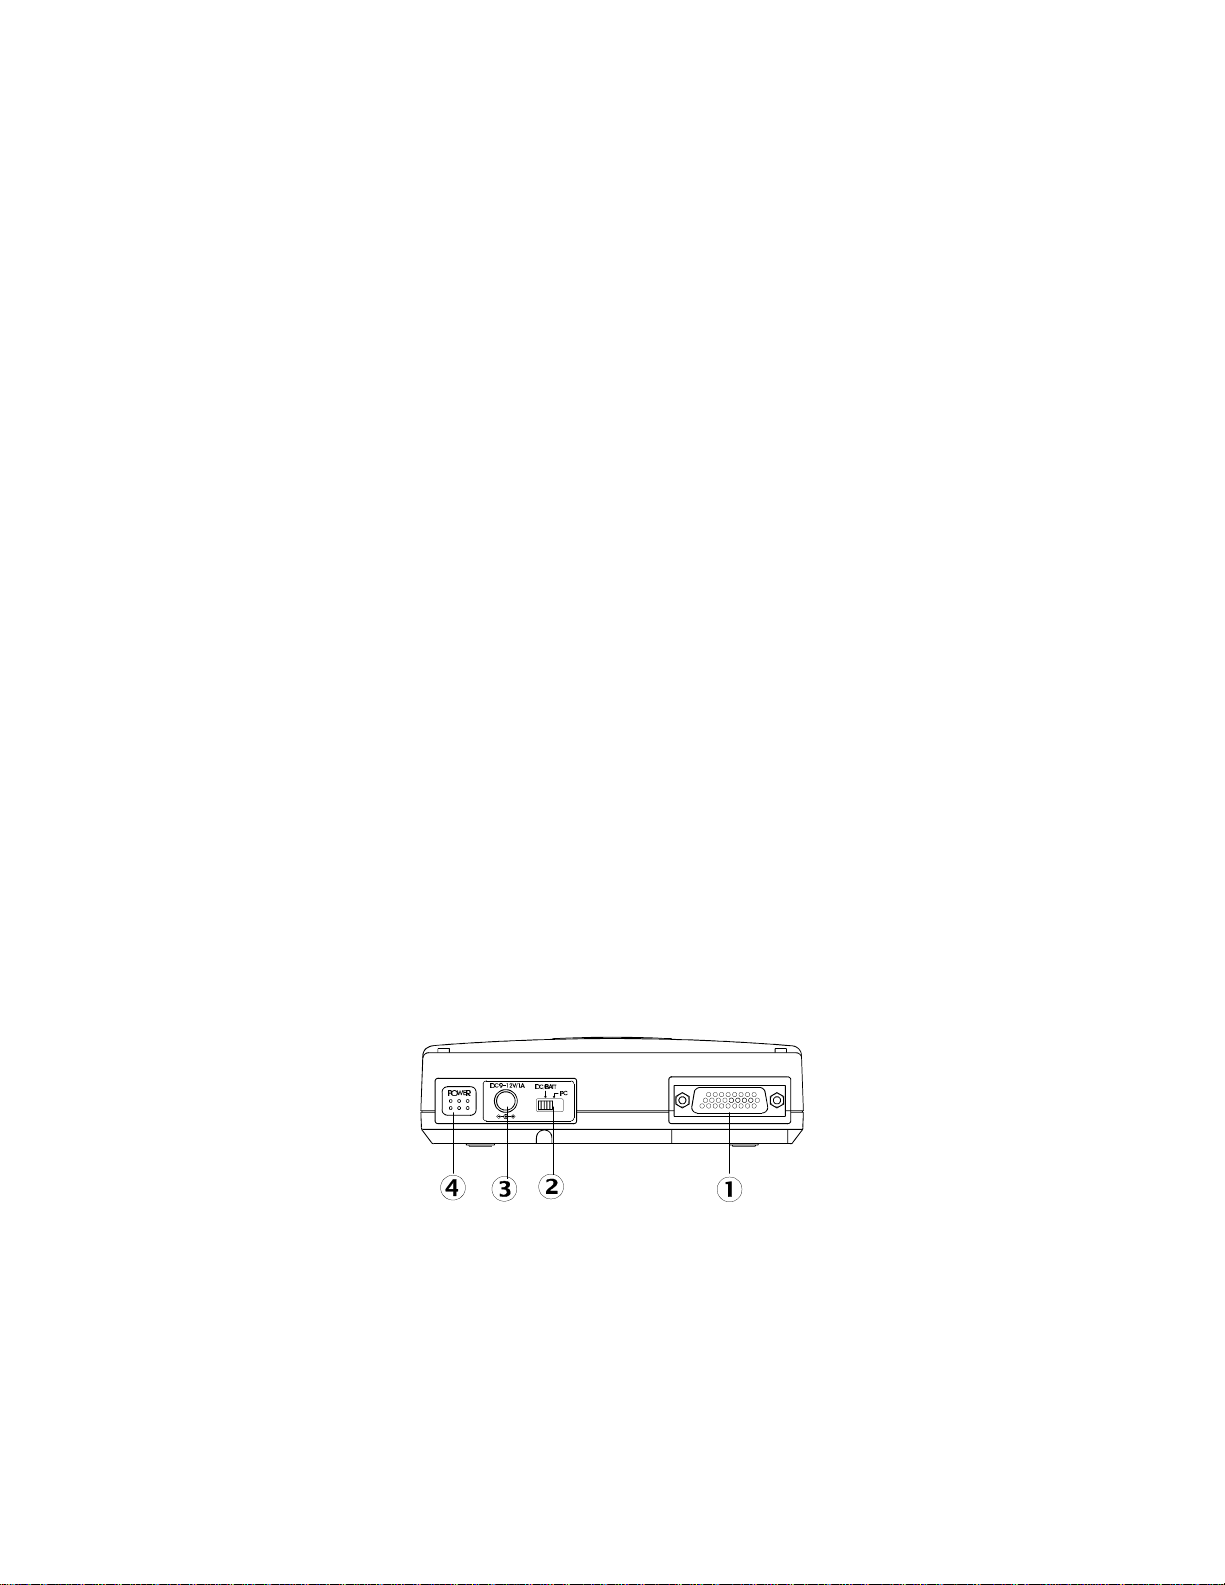
REAR PANEL OF THE CD-ROM DRIVE:
•• PCMCIA Interface connector:
This connector connects to the PCMCIA interface card.
‚‚ Power Source switch:
• Set the switch to “PC” to select the power source from PCMCIA socket.
• Set the switch to “DC/BATT” to select the power source from AC adapter or
batteries.
Please refer to next section titled “CD-ROM POWER SOURCE” for details.
ƒƒ DC-IN jack:
This jack connects to an AC adapter.
„„ Power button: ( for stand-alone CD player operation only)
Press this button to power on/off the drive when it is used stand-alone as an
audio CD player.
Figure 2
- -
3
Page 6

BOTTOM OF THE CD-ROM DRIVE:
•• PCMCIA Interface Card Holder:
Pack the PCMCIA interface card when not used.
‚‚ Battery Lid:
Slide and lift up the lid to install or remove the batteries.
Figure 3
- -
4
Page 7
CD-ROM POWER
There are three power source options to use with the portable PCMCIA CD-ROM:
1. PCMCIA socket power direct
2. AC adapter
3. Battery.
However, you can use only AC adapter or batteries when the CD-ROM is used as a
stand-alone CD player.
SELECT THE POWER SOURCE
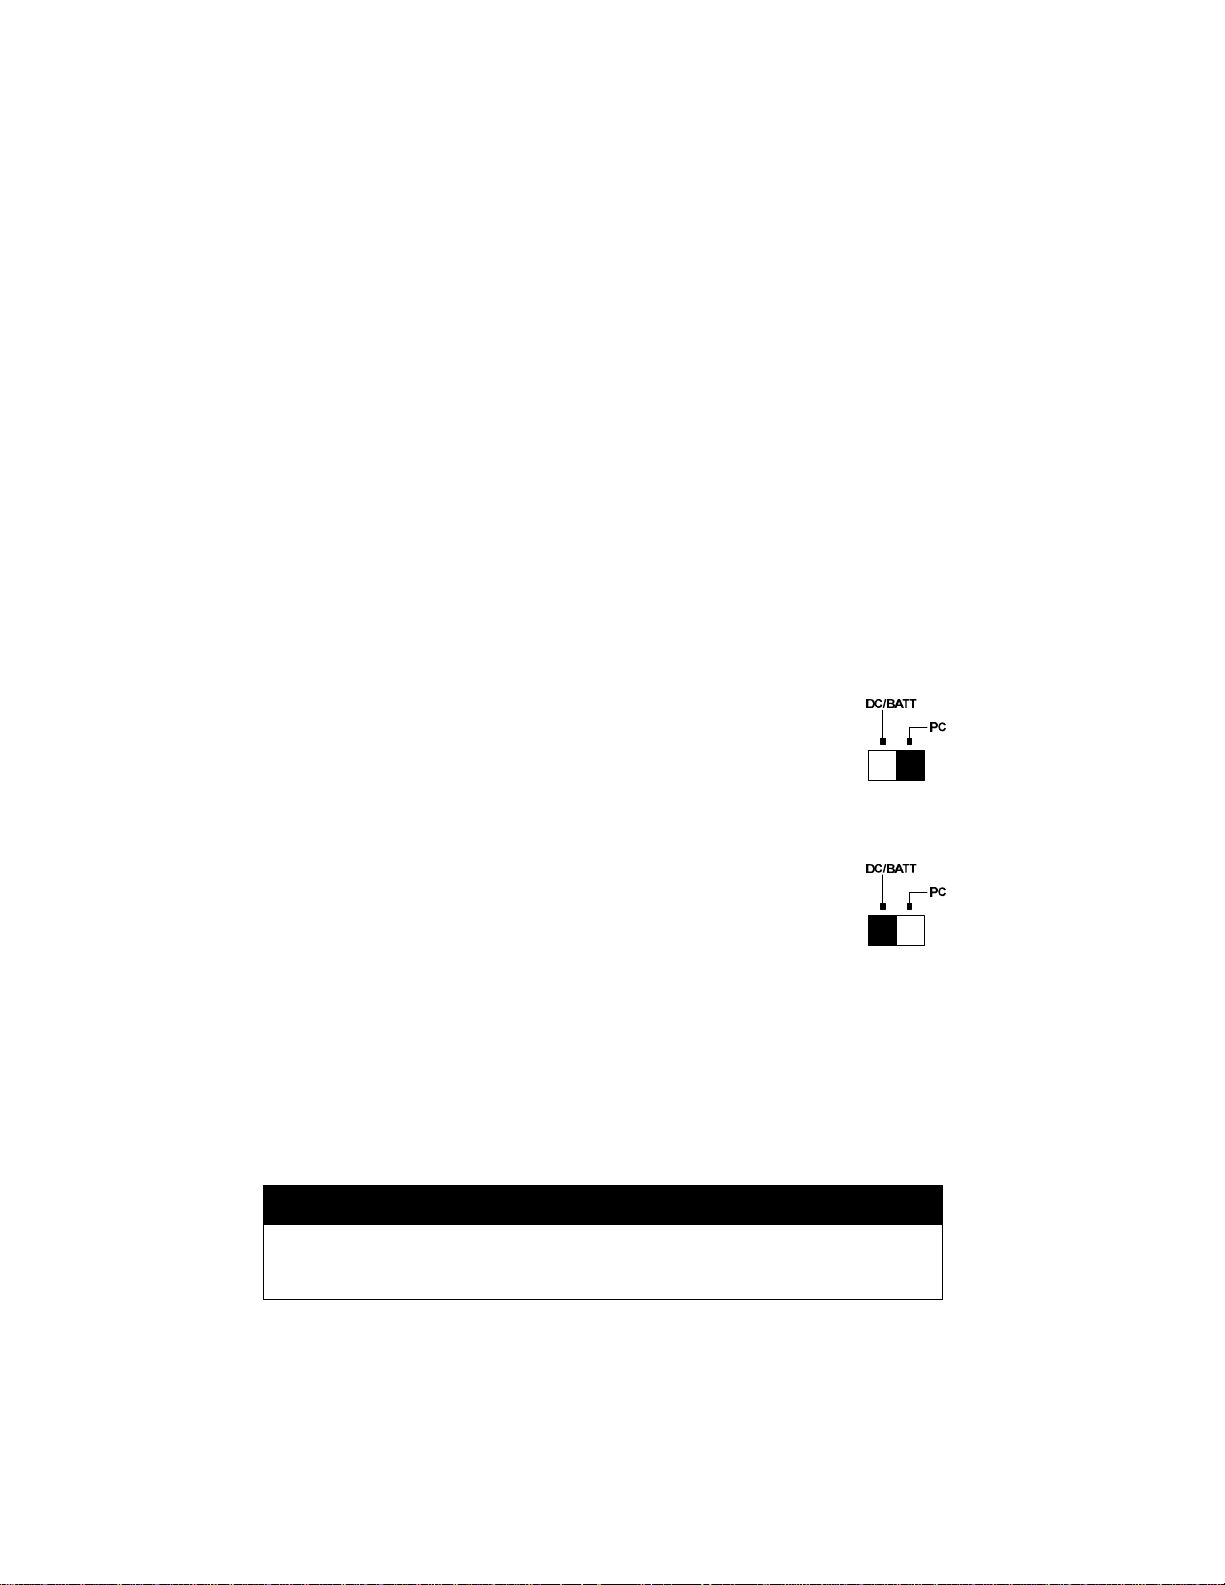
The POWER SOURCE SWITCH (as shown in ‚ of Figure 2) is for selecting which
power source to use.
POWER SOURCE SWITCH is set to “PC” (Figure 4.a)
The PCMCIA power direct is selected. Thus CD-ROM will obtain
power from PCMCIA socket of your computer, there for no external
power (AC or batteries) will be required. In case that your computer can
not supply enough power to operate the PCMCIA CD-ROM drive, then
you have to use external power as described below. Fig. 4.a
POWER SOURCE SWITCH is set to “DC/BATT” (Figure 4.b)
The external power source is selected. In this condition, you must apply
AC adapter or batteries to CD-ROM drive. Please note that the AC
adapter has a priority over the battery in powering the CD-ROM drive.
In other words, if you connect the AC adapter, the CD-ROM drive will
draw power from the adapter regardless if the batteries are installed. Fig.4.b
NOTE: If you choose to use external power, remember to apply external power
before enabling the PCMCIA interface card (booting the computer or hotinserting the card). If you failed to apply the external power first, the drive
status will remain NOT READY even though the external power is applied
later; it may also result in CD-ROM drive abnormal condition. In this case,
reboot your computer again to enable the PCMCIA CD-ROM drive.
CAUTION
Do not shift the POWER SOURCE SWITCH when the PCMCIA CDROM is powered on.
- -
5
Page 8
CONNECT THE AC ADAPTER
1. Remove the PCMCIA interface card from your computer.
2. Connect the AC adapter plug to the DC-IN jack at the CD-ROM rear panel.
3. Attach the AC adapter to the AC outlet.
CAUTION
Use only the AC adapter provided with this unit or refer to the rear panel
of the drive for the correct AC adapter. Using the incorrect AC adapter
will cause permanent and unpredictable damage to the CD-ROM.
INSTALL THE BATTERIES
The CD-ROM requires six AA size batteries (not included) for operation. The
Alkaline batteries may last longer than other batteries. You may also use Ni-Cad
rechargeable batteries which have a shorter service life. Neither the rechargeable
battery nor the charger are provided with this package.
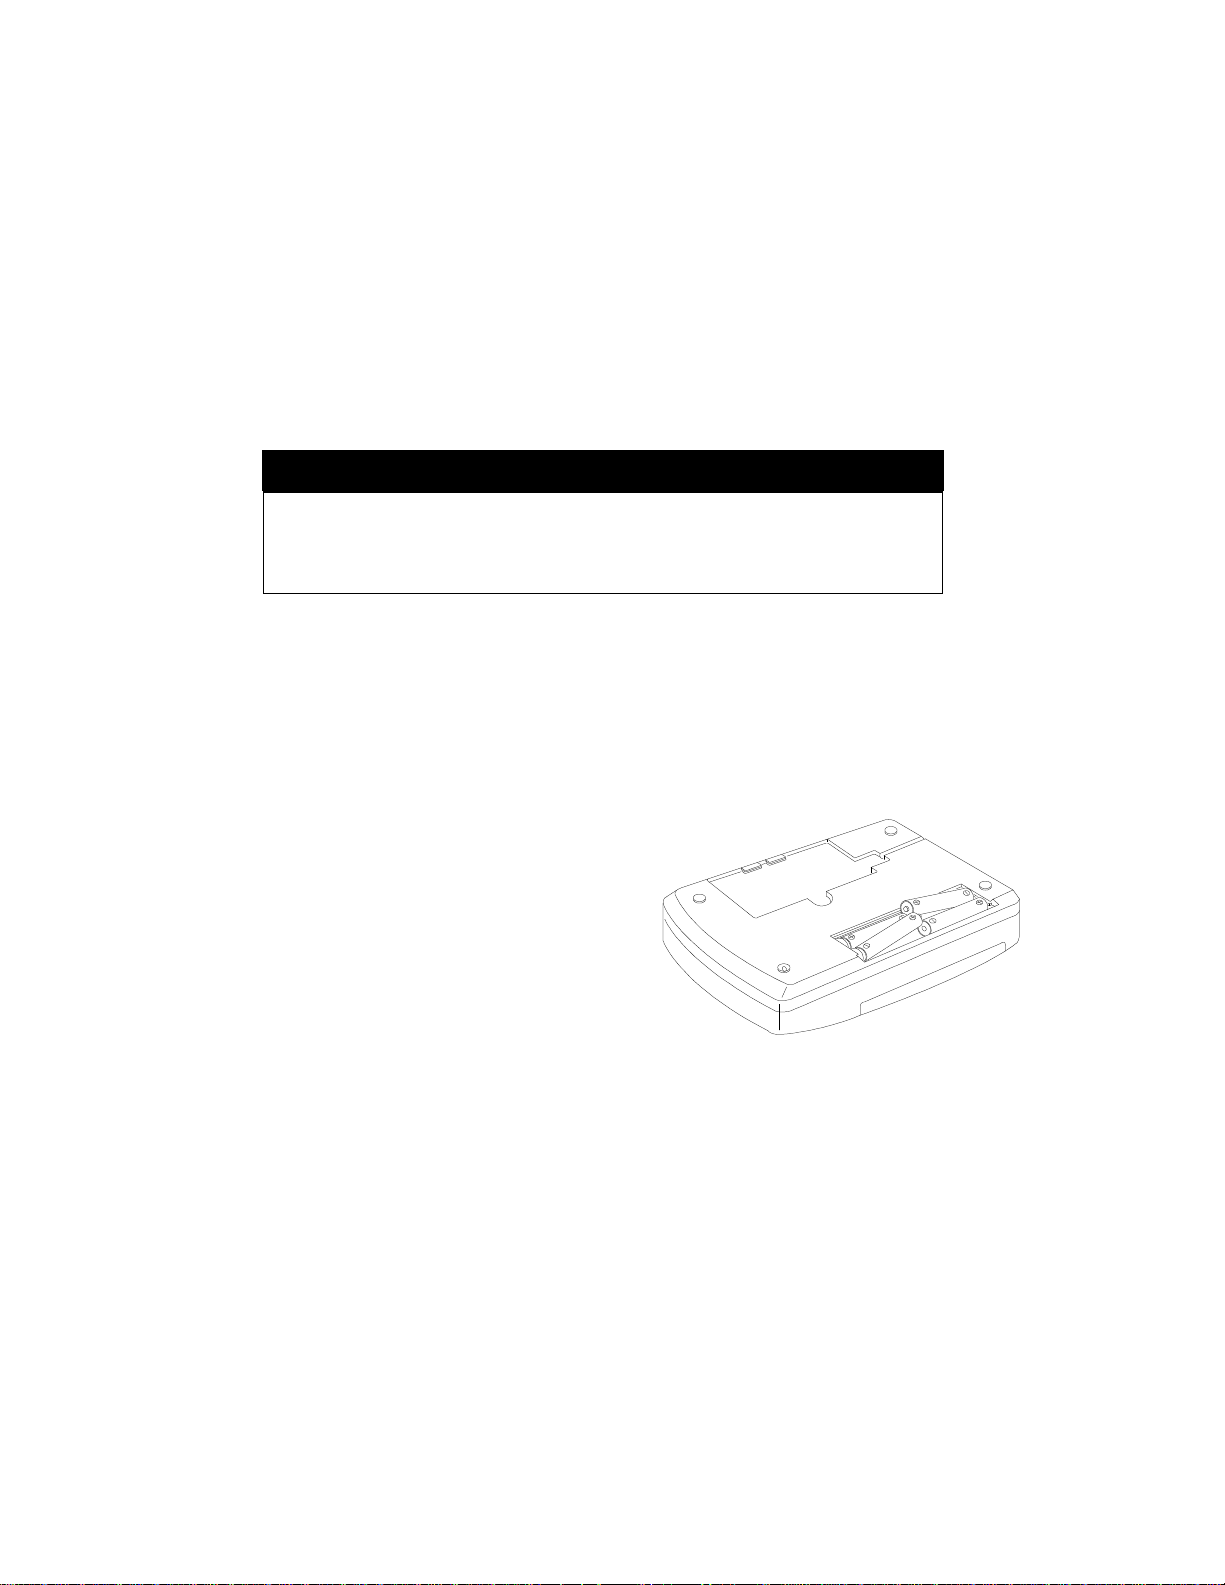
Follow the instruction below to install the batteries,
1. Remove the disc from the CD-ROM.
2. Disconnect the PCMCIA interface card
from your computer, and disconnect the AC
adapter from the “DC-IN” jack.
3. Turn over the CD-ROM drive and place it
horizontally.
4. Press and slide the battery lid in the
direction of the arrow to remove it.
5. Install six fresh AA batteries (as shown in
Figure 5), and make sure the polarities
match the diagram.
6. Replace the battery lid.
Figure 5
- -
6
Page 9

POWER SWITCH
Stand-alone CD player
Pressing the POWER button (as shown in „ of Figure 2) will switch the CD drive
power ‘on’ or ‘off’. The drive also has an inactivity timer which automatically
powered off if it has been idle more than 40 seconds.
CD-ROM operation
The POWER button will not function because the drive power is controlled by the
computer.
ON/BUSY LED (as shown in ‚ of Figure 1)
The LED indicate four status of the CD-Drive:
1. Power On: The LED will light dimly
2. Ready State: The LED will light brightly.
3. Accessing: The LED will blink when the drive is accessing the disc.
4. Cover Open: The LED will blink every 2 seconds.
EXT POWER LED (as shown in ƒ of Figure 1)
The LED indicates the external power state:
1. ON : The power supply is in the normal condition.
2. OFF: If you choose to use PCMCIA power direct.
3. BLINKING: External power is in use but power is low.
Low power may be caused by a malfunctioning AC adapter or when the batteries
are reaching the end of their service life. Check your AC adapter to see if it is
defective or improperly connected, or replace the old batteries with new ones.
- -
7
Page 10

NOTICE
• Use only the AC adapter provided with this unit or refer to the rear panel of the
drive for correct AC adapter specification.
• If you will not use the unit with the AC adapter for a long period of time,
disconnect it from the AC power outlet.
• Do not mix old and new batteries, or different type of batteries (Ni-Cad and
alkaline, etc.)
• Always remove old, weak or worn-out batteries promptly and dispose of them
properly.
• If you will not use this unit for a long period of time, remove the batteries to
avoid the possible battery leakage.
• Thoroughly clean the battery compartment before inserting new batteries.
- -
8
Page 11

HARDWARE INSTALLATION
Before you begin, make sure you turn OFF all power to your system before
connecting the PCMCIA CD-ROM to your computer.
1. Turn over the CD-ROM drive, locate the
PCMCIA interface card at the back of the CDROM drive. Lift and take out the card from the
holder as shown in Figure 6.
2. Place the CD-ROM drive upright in the
horizontal position.
3. Make sure that the PCMCIA interface cable is
firmly connected to the interface connector at
the back panel of the CD-ROM drive.
4. Refer to the computer user’s manual to locate
your computer’s PCMCIA slot.
5. Align the PCMCIA interface card with the arrow
sign pointing towards the computer’s slot. (Please
note that the card is keyed to guide for proper
insertion.)
6. Slowly insert the PCMCIA interface card into the
slot and press firmly until the connector is seated.
7. Check the power source switch set it according to
power source.
PCMCIA Socket => PC
AC adapter or Battery => DC/BATT
Make sure the AC adapter is properly connected or the batteries are installed)
8. Turn the system ON to install the PCMCIA CD-ROM device driver.
Figure 6
Figure 7
WARNING
Connect the PCMCIA interface cable to CD-ROM drive before inserting
the PCMCIA interface card into your computer. DO NOT
connect/disconnect the PCMCIA interface cable to/from the CD-ROM
drive while the card is inserted and the system is in the power-on state.
- -
9
Page 12
SOFTWARE INSTALLATION
SOFTWARE INSTALLATION FOR WINDOWS 95
DO NOT RUN “INSTALL” FROM THE DRIVER DISKETTE.
If your computer does not have Windows 95 installed yet, please refer to the section
titled “Using PCMCIA CD-ROM to Install Windows 95”.
Use the PCMCIA CD-ROM with Windows 95
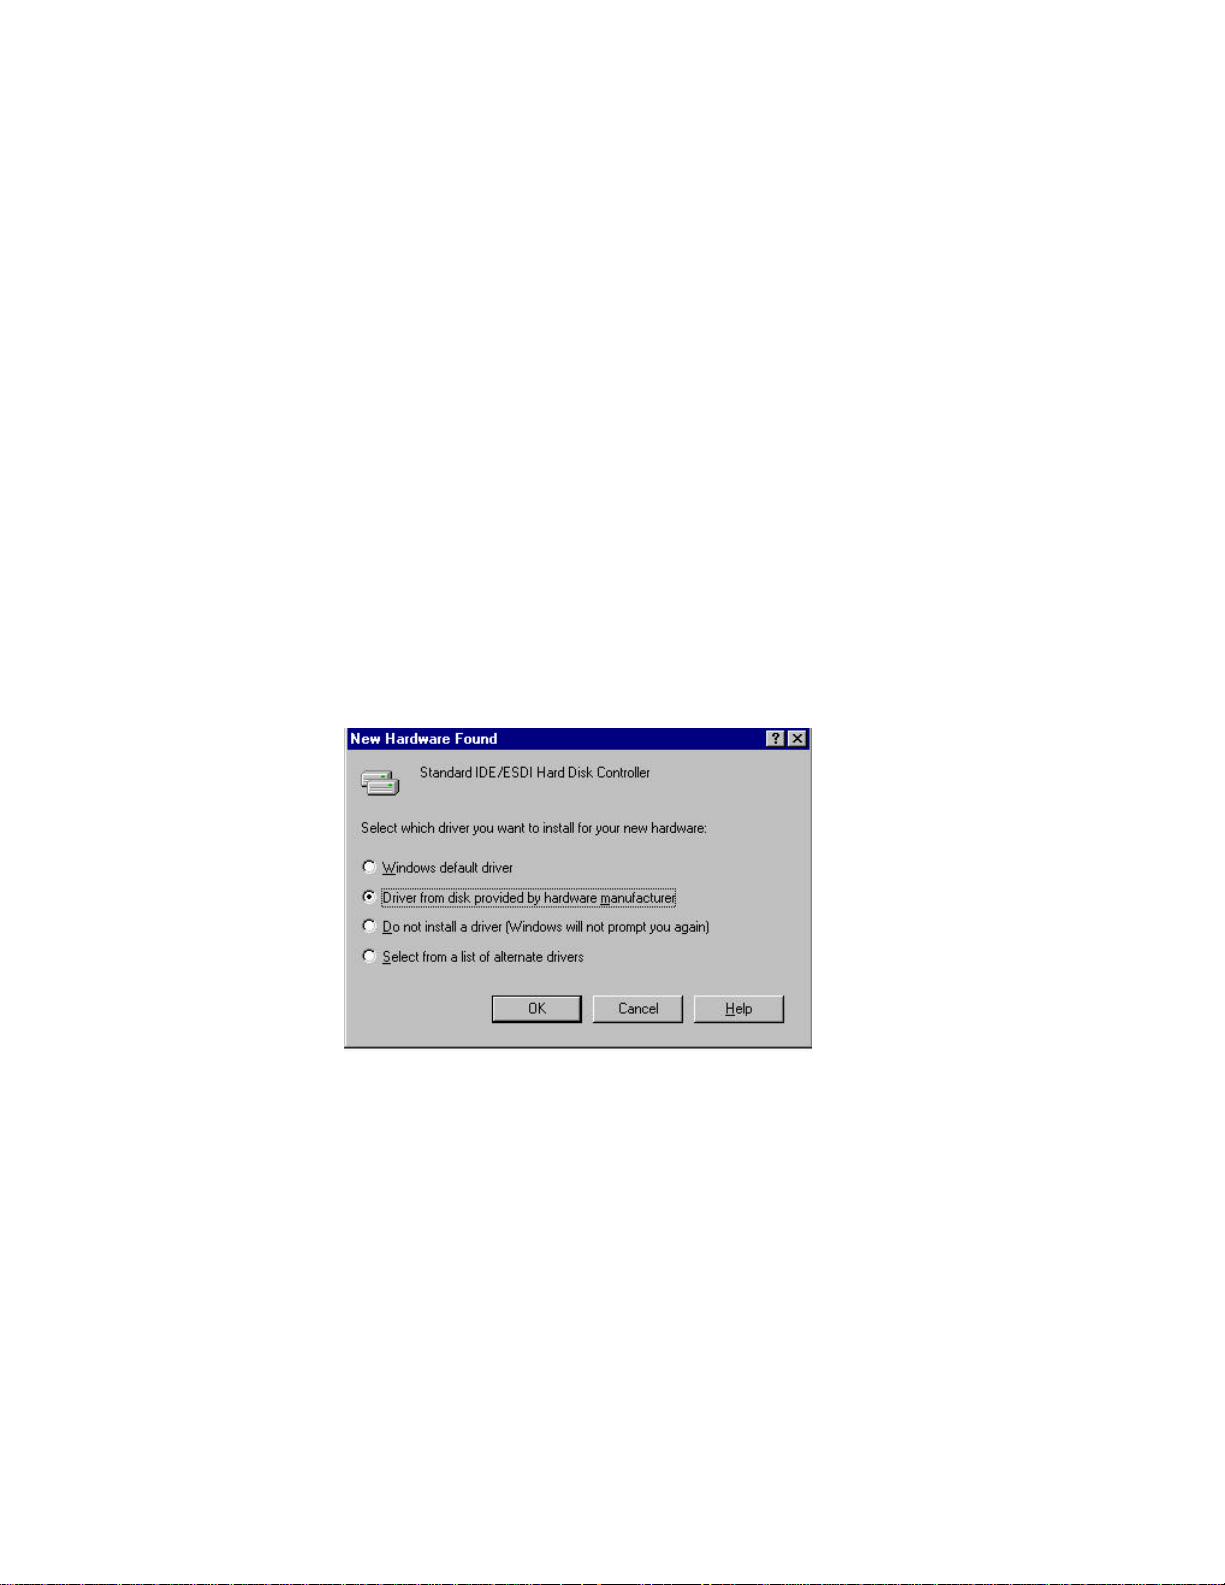
Due to the Plug-N-Play feature in Windows 95. The following dialog box will appear
when the PCMCIA CD-ROM is inserted into the PCMCIA slot for the very first
time.
If the dialog box does not appear and the CD-ROM folder can not be found in My
Computer, please refer to the section titled “Enabling 32-Bit Card Support”.
Figure 8
Select “Driver from disk provided by hardware manufacturer” and click on OK
button, Windows 95 will then prompt you to insert the manufacturer’s installation
disk. Insert the PCMCIA CD-ROM device driver disk into your floppy drive.
Specify the directory as A:\ (or B:\ whichever containing the diskette) and select OK.
- -
10
Page 13
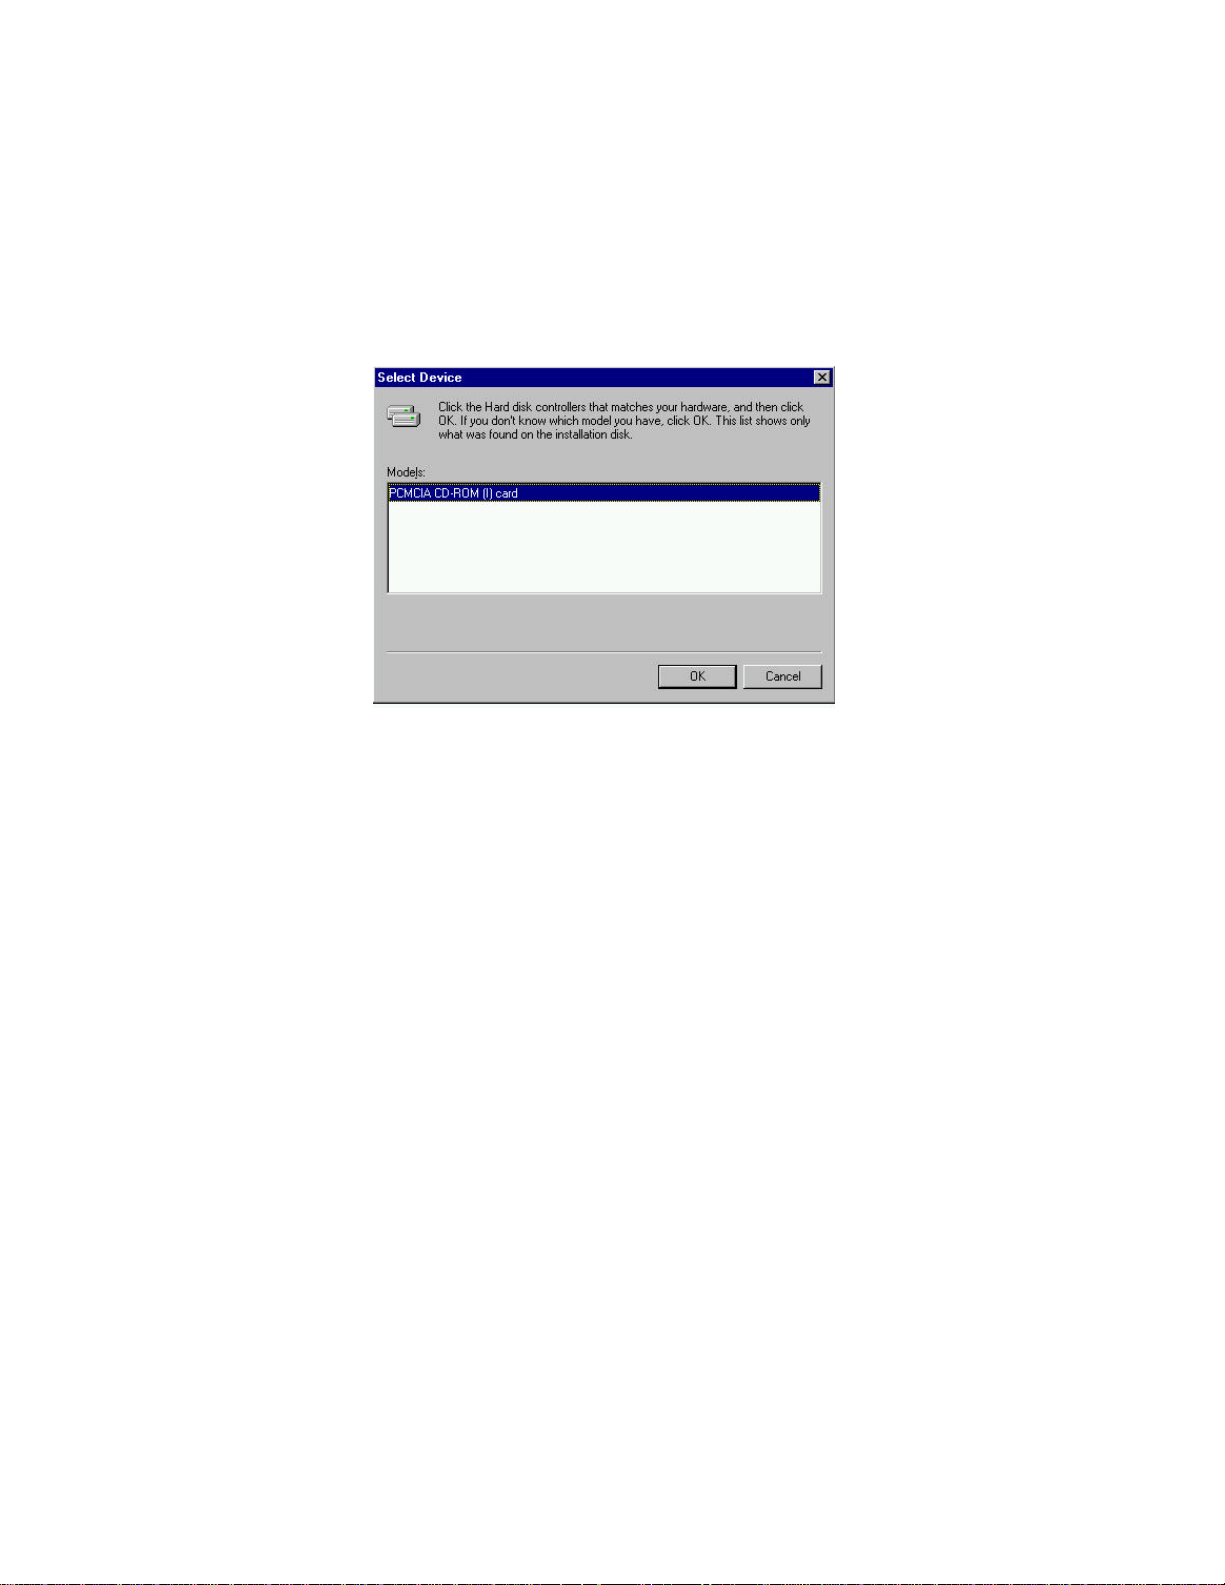
When the following dialog box appear, select PCMCIA CD-ROM (I) card and click
on the OK button.
Figure 9
Follow the on-screen instruction to continue. After finishing, if you are prompt to
shutdown and restart Windows 95 please do so. Otherwise there should be a CD
icon in ‘My Computer’ icon.
Note: In Windows 95 it is not necessary to connect the PCMCIA CD-ROM every
time you reboot your computer; inserted the CD’s Card when you need to use it.
Using the PCMCIA CD-ROM to Install Windows 95
You may also use PCMCIA CD-ROM to upgrade your operating system from
DOS/Window to Windows 95. If you are about to do this, the PCMCIA CD-ROM
DOS device driver should be properly installed first. Please refer to the section titled
“Software Installation for DOS/Windows”. Then, perform the following steps to
install Windows 95.
1. Start Windows 3.1.
2. Insert the Windows 95 CD into the PCMCIA CD-ROM.
3. Run File Manager and select the PCMCIA CD-ROM drive.
4. Find and double-click the file SETUP.EXE.
5. Follow the on-screen instructions to complete the installation of Windows 95.
6. After the installation is completed, please refer to the next section titled
“Enabling 32-BIT CARD SUPPORT OF WINDOWS 95”.
- -
11
Page 14

Enable 32-bit Card Support of Windows 95
To verify first, double-click on the “System” icon from “Control Panel” folder (you
can select the “Control Panel” under “Settings” from the “Start” menu to open the
“Control Panel” folder).
Click on the Device Manager Tab. If “PCMCIA Socket” is found with a cross (x)
sign next to the PCMCIA Controller as the following figure shows, it means the
PCMCIA device driver is not using 32-Bit Card Support.
Figure 10
- -
12
Page 15

In this case, double click on the PCMCIA Controller, and a dialog box will be
displayed as below. Please place a check mark next to the current configuration of
Device usage box, then select OK.
Figure 11
After the PCMCIA 32-Bit Card support is installed, Windows will ask you to reboot
your computer. Then you should refer to the first section titled “Using CD-ROM
Under Windows 95” to configure the PCMCIA CD-ROM.
If the PCMCIA Socket is not found, then you must add a PCMCIA socket to your
system. Please click on the “Add New Hardware” icon in the Control Panel folder
and select “PCMCIA socket”. Select the appropriate type of PCMCIA Controller
that matches with yours and follow the on-screen instructions.
- -
13
Page 16

SOFTWARE INSTALLATION FOR WINDOWS NT 4.0
There are different ways to install the Windows NT drivers for CDROM. The way describe here is the best way we have found the drivers will
work with most computers.
Install the CD-ROM under Windows NT 4.0
This procedure will install CD-ROM drive as additional storage device. Shutdown
the system, turn the power switch off. Insert the CD-ROM PC into the slot then
restart the computer. Once the system comes up Go to Start, Setting, and Control
Panel.
Figure 12
Double click on SCSI Adapters, Click on Driver tab and Add
button.
- -
14
Page 17

Under Install Driver window select ‘Have Disk..’ button.
Figure 13
Windows NT ‘s driver installation program will search the disk and display the
model of the CD-ROM, click OK.
Reboot the computer when prompt.
- -
15
Page 18

Using the PCMCIA CD-ROM to Install Windows NT 4.0
Boot up the computer using either a Windows NT boot disk, which should have our
CD-ROM drivers on them or DOS bootable diskette with CD-ROM driver.
Start with WinNT32 /b or WinNT /b (if you boot from DOS). This will install
Windows NT without copying to floppy disks.
There will be a point where the installation program will ask you for a Mass Storage
device.
You have to skip that and do not providing any drivers.
Once installation is complete then load our drivers from SCSI Adapter icon.
If you are installing from Windows 95 then the best way to do it from there is to use
the DOS mode. at the DOS prompt WinNT32 /b or boot disk and skip the process of
creating the NT disks.
- -
16
Page 19
SOFTWARE INSTALLATION FOR DOS/WINDOWS
Automatic Installation
The INSTALL program helps you install the device driver into the computer easily.
Please follow the instructions below to proceed with automatic installation.
1. Insert the device driver diskette into a floppy disk drive on your computer.
2. Change the working directory to the floppy drive containing the device driver
diskette by typing “A:” or “B:” then press ENTER.
3. At the DOS prompt (A:\> or B:\>), type “INSTALL” followed by the ENTER key.
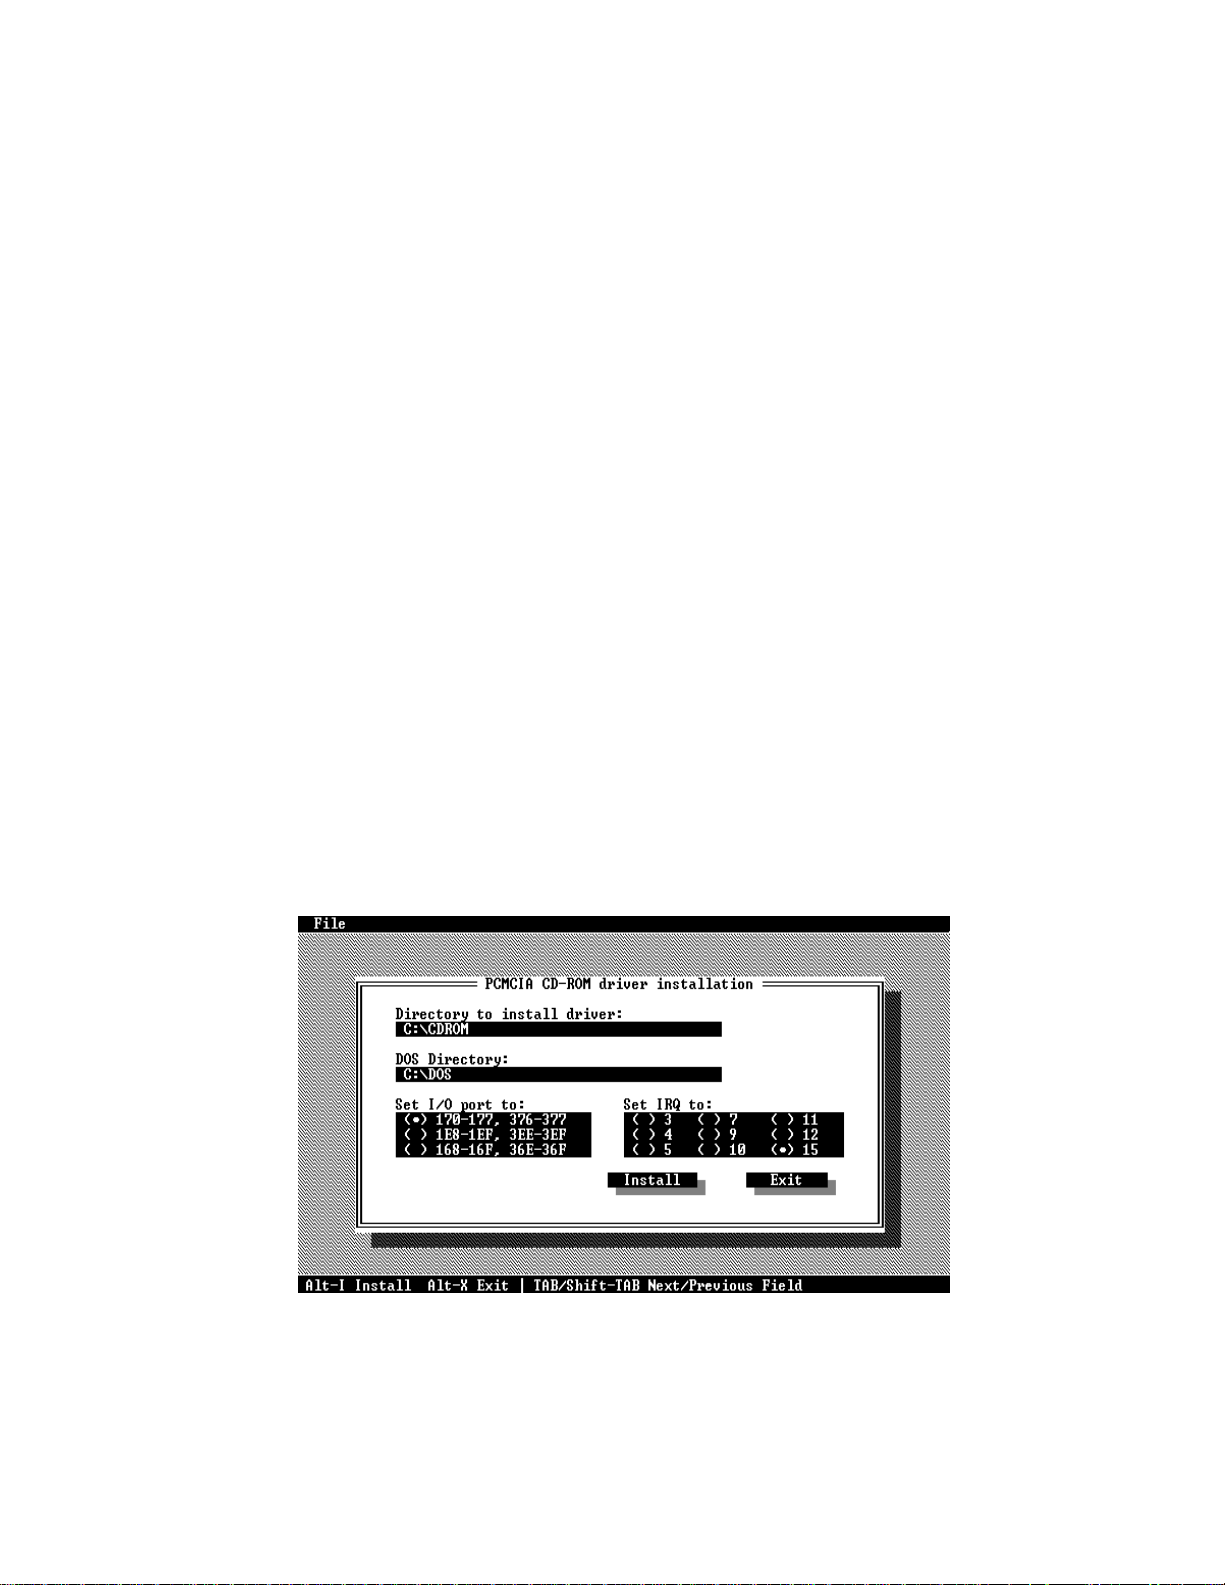
4. Press ENTER or click on the OK button to continue. When the opening screen
appears, a dialog box will be displayed for you to specify the necessary
parameters:
• Directory to install the device driver.
• The DOS directory to specify the location of the MSCDEX driver.
• The I/O port address
• The IRQ number.
Enter the directory you select to install the driver and press the TAB key to
forward to the next field to indicate the DOS Directory. Press the TAB key again
to set the I/O port and then the IRQ. The default setting of the I/O ports are (170177, 376-377), and the default IRQ is 15.
5. After completing the selection, click on the Install button to continue.
Figure 14
- -
17
Page 20

6. The rest of the installation should proceed automatically, and the CONFIG.SYS
and AUTOEXEC.BAT files on your computer will be updated.
7. Reboot your computer and the CD-ROM drive will be defined as the next
available drive letter. For example, if the last hard drive of the computer is drive
C, the CD-ROM drive will be assigned to be drive D automatically.
Manual Installation
You may also manually install the PCMCIA CD-ROM device driver if the default
setting conflicts with your system. Please following procedures below to complete
the manual installation.
1. Copy the files EXPCDI.EXE from the PCMCIA CD-ROM device driver disk to
your hard disk.
2. Add “LASTDRIVE=Z” to the TOP of your CONFIG.SYS file. If you already have
a LASTDRIVE line with a letter other than Z, change it to Z.
3. Add the following lines to the BOTTOM of your CONFIG.SYS file:
DEVICE=drive:\path\EXPCDI.EXE /P:1 /I:15 /D:MSCD001
where drive:\path specifies the directory containing the file EXPCDI.EXE.
Note: If your CONFIG.SYS file is already loaded with PCMCIA software, such as
Cardsoft of SystemSoft or Cardtalk of Databook, it is necessary to add the
above line AFTER all the PCMCIA statements.. Otherwise, the PCMCIA
interface card will not be initialized properly. To make sure if any PCMCIA
software has been loaded in your system and to know more about PCMCIA,
please refer to the section titled “PCMCIA Software Information”.
The EXPCDI.EXE is device driver for the PCMCIA CD-ROM. The parameters of
EXPCDI.EXE are described as below:
/P Set the I/O ports, and the valid numbers are 1, 2, and 3. Each number
represents the I/O port pairs of (170-177, 376-377), (1E8-1EF, 3EE-3EF),
and (168-16F, 36E-36F) respectively. The default setting is /P:1.
/I Set the IRQ number. The valid IRQs are 3, 4, 5, 7, 9, 10, 11, 12 and 15, and
the default setting is /I:15.
/D is used to set the device name. It can be any name up to 8 characters. This
name must be the same as the name you will specify in the MSCDEX.EXE
option /D: name in the next step.
4. Add the following line at the TOP of your AUTOEXEC.BAT:
drive:\path\MSCDEX.EXE /D:MSCD001 /M:4
where drive:\path specifies the DOS directory or the directory containing the file
MSCDEX.EXE.
- -
18
Page 21

Note: If your AUTOEXEC.BAT file loads a menu program such as DOSSHELL or
Windows, you have to add the above line to start your menu program.
Otherwise, MSCDEX will not have a chance to load before your menu
program begins.
The example above shows the default setting. The /D: switch indicates the device
name. It MUST be the same name as you specified by the /D: switch of
EXPCDI.EXE in your CONFIG.SYS file. The /M: switch indicates how much
memory to allocate for caching information on the CD-ROM. The default /M:4
caches 8KB.
For more information about the switches of MSCDEX, please type “help MSCDEX”
at the DOS prompt.
5. Now, reboot your computer to activate the CD-ROM drive.
- -
19
Page 22

SOFTWARE INSTALLATION FOR OS/2 WARP
Before installing PCMCIA CD-ROM device driver for OS/2 WARP, make sure the
PCMCIA support is enable. If you are not sure about this, please refer to the last part
of this section “Add PCMCIA Support”.
Automatic Installation
For automatic installation of the PCMCIA CD-ROM for OS/2 WARP, follow the
below steps,
1. Insert the device driver disk into a floppy disk drive on your computer.
2. Open OS/2 System.
3. Open Drives.
4. Select Drive A: or B: depending on which floppy drive is containing the device
driver diskette.
5. Open “OS/2 WARP” folder.
6. Double-click on “INSTALL2.EXE” file.
7. A dialog box will be displayed for you to specify the OS/2 directory, the I/O
address for the PCMCIA CD-ROM and the IRQ number. After specifying the
OS/2 directory, press TAB to set the I/O port and then the IRQ. The default
setting of the I/O ports are (170-177, 376-377), and the default IRQ is 15. After
completing the selection, click on Install button to continue.
Figure 15
8. The rest of the installation should proceed automatically. At last, the on-screen
instruction will prompt your to restart your computer to activate the new device
driver for OS/2 Warp.
- -
20
Page 23

Manual Installation
You may also install the PCMCIA CD-ROM OS/2 device driver manually, if the
default setting conflicts with your system. Perform the following procedure to
complete the manual installation.
1. Copy EXPCD2.FLT file from A:\OS2WARP to the BOOT sub-directory of OS/2
directory (for example: C:\OS2\BOOT.)
2. Add the following line to the BOTTOM of your CONFIG.SYS file:
BASEDEV=EXPCD2.FLT /P:1 /I:15
The parameters of EXPCD2.FLT are described as below:
/P is used to set the I/O ports, and the valid numbers are 1, 2, and 3. Each number
represents the I/O ports group of (170-177, 376-377), (1E8-1EF, 3EE-3EF),
and (168-16F, 36E-36F) respectively. The default setting is /P:1.
/I is used to set the IRQ number, the valid IRQs are 3, 4, 5, 7, 9, 10, 11, 12 and
15, and the default setting is /I:15.
/V verbose mode, displays the initialization message. The default is quiet mode.
Meanwhile, check if the following lines exist in CONFIG.SYS, if not, add the
following lines:
DEVICE=C:\OS2\BOOT\OS2CDROM.DMD /Q
IFS=C:\OS2\BOOT\CDFS.IFS /Q
DEVICE=C:\OS2\MDOS\VCDROM.SYS
Adding PCMCIA Support
PCMCIA Support can be automatically installed during OS/2 installation or it can be
installed through Selective Install after OS/2 installation.
To check or install PCMCIA support, perform the following steps:
1. Open OS/2 System.
2. Open System Setup.
3. Open Selective Install.
4. Check if PCMCIA Support has been installed as the System Configuration
window displayed (See Figure 16), if yes, you may exit now, otherwise, perform
the following steps to continue.
- -
21
Page 24

Figure 16
1. Select the check box to the left of the PCMCIA Support to display the Select
PCMCIA system window.
2. Select the appropriate system (this should either be a direct match with your
target install system or a known compatible system). Select OK.
3. Select Install.
1. Follow the on-screen instructions to carry through the installation.
Figure 17
- -
22
Page 25
BASIC OPERATING PROCEDURES
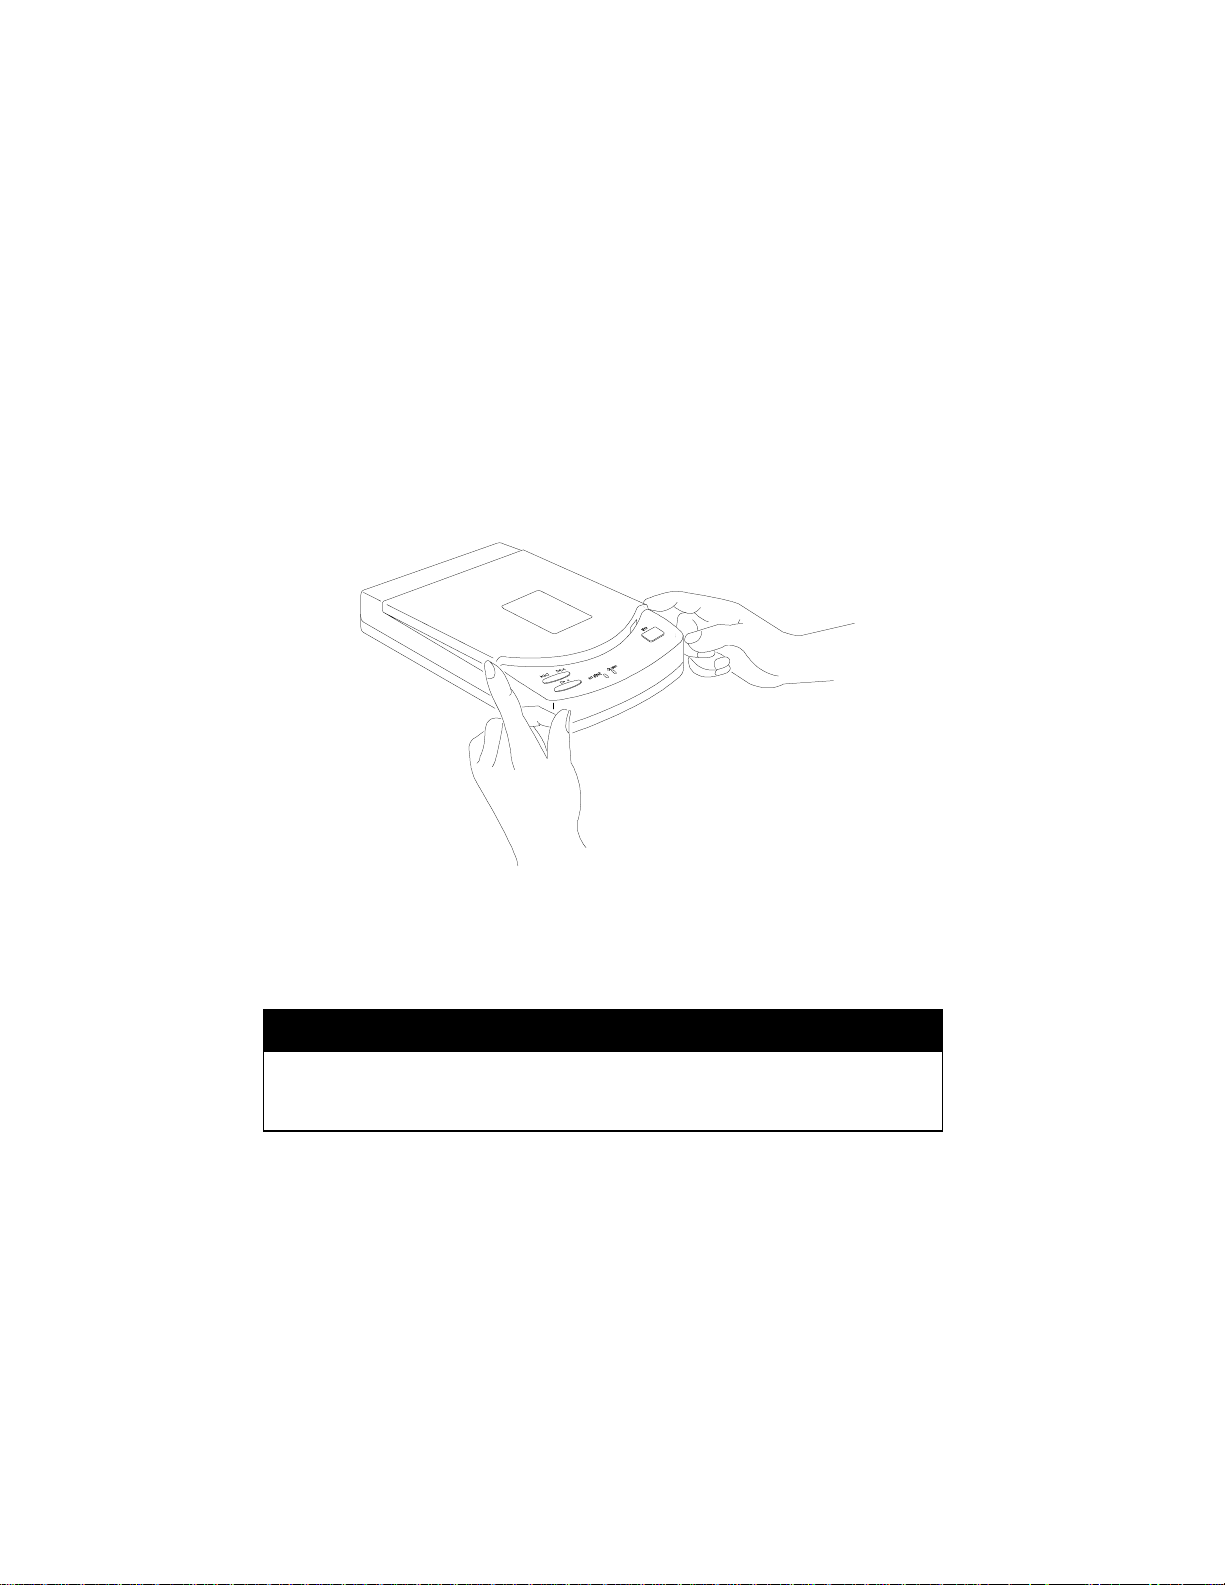
Follow the instructions listed below to open the disc cover and insert/remove a CD.
1. Press the OPEN button. The disc cover will slightly opened, and the ON/BUSY
LED will blink as a warning signal.
1. If there is no disc inside, go to next step. Otherwise, wait until the drive stop
spinning. You may check if the disc stop by seeing through the disc cover
window.
2. Lift the disc cover by the edges as shown in Figure 18.
Figure 18
3. Insert the disc with the label side facing up or remove the disc.
4. Close the disc cover.
CAUTION
Do not lift the disc cover until the drive stop spinning. Failure to
do so may damage the CD disc.
- -
23
Page 26
USE THE PCMCIA CD-ROM AS A STAND-ALONE CD PLAYER
In a stand-alone audio CD player operation, the CD need either AC adapter or
batteries for its power source, remember to set the POWER SOURCE SWITCH to
“DC/BATT”. Refer to the section titled “CD-ROM POWER SOURCE” for details.
It is not necessary to remove the PCMCIA interface card from the CD-ROM drive
when the CD-ROM is in stand-alone mode. You may pack the card in the card
holder at the back panel of the drive.
The following control buttons will be used in stand-alone mode.
Power Button
• Press the POWER button will turn on the PCMCIA CD-ROM in stand-alone mode.
Press the POWER button again will turn off the drive.
• The PCMCIA CD-ROM will spin in a lower speed (single speed) in stand-alone
mode.
• As another power saving feature, the PCMCIA CD-ROM will be automatically
turned off if it has not played for over 40 seconds approximately.
Play/Pause Button
• Press this button will activate the drive to start playing.
• If the drive is in play state, pressing this button will make it pause.
• This button will work in the audio CD playing mode only..
Next/Previous Button
• In the play state, press the right edge of the button to skip to the next track.
• Press the left edge of the button to skip to the previous track.
• This button will work in the audio CD playing mode only..
Volume Control Knob
• Use this knob to adjust the headphone volume.
- -
24
Page 27

Headphone Jack
• Connect your headphone to his jack for listening to audio CD.
Line-Out Jack
• Connect this jack to the LINE-IN jack of the sound card in your computer or an
amplifier with a 3.5 mm audio cable for better sound quality from the audio CD.
USE THE PCMCIA CD-ROM WITH A COMPUTER
Check the power source switch set it according to the power source.
PCMCIA Socket => PC
AC adapter or Battery => DC/BATT
(Make sure the AC adapter is properly connected or the batteries are installed)
CAUTION
Connect the PCMCIA interface cable to CD-ROM drive before inserting
the PCMCIA interface card into your computer. DO NOT
connect/disconnect the PCMCIA interface cable to/from the CD-ROM
drive while the card is inserted and the system is in power-on state.
Once the PCMCIA card is initialized, the computer will control the power to the
PCMCIA CD-ROM drive. As a result, the POWER button at the rear panel will not
functioning in this mode. The drive will remain inactive until the first command from
the computer is accepted, then the drive will begin to spin to reach its highest speed.
DO NOT CHANGE THE POWER SOURCE SWITCH WHEN THE PCMCIA CDROM IS POWERED ON.
Play an Audio CD by Using Software
You can use CD audio software utilities in Windows 3.1, OS/2 or Windows 95 etc. to
play the audio CD on your PCMCIA CD-ROM.
To play audio CD by using Media Player in Windows 3.1, for example,
1) Check if the [MCI] CD Audio driver is installed.
- -
25
Page 28
2) Choose the Drivers icon from Control Panel, and choose the Add button to set
up the driver [MCI] CD Audio.
3) Start the Media Player.
4) Select Device CD Audio from the menu bar.
5) Click the play button on the screen to start it.
6) Connect headphones set to the Headphone Jack
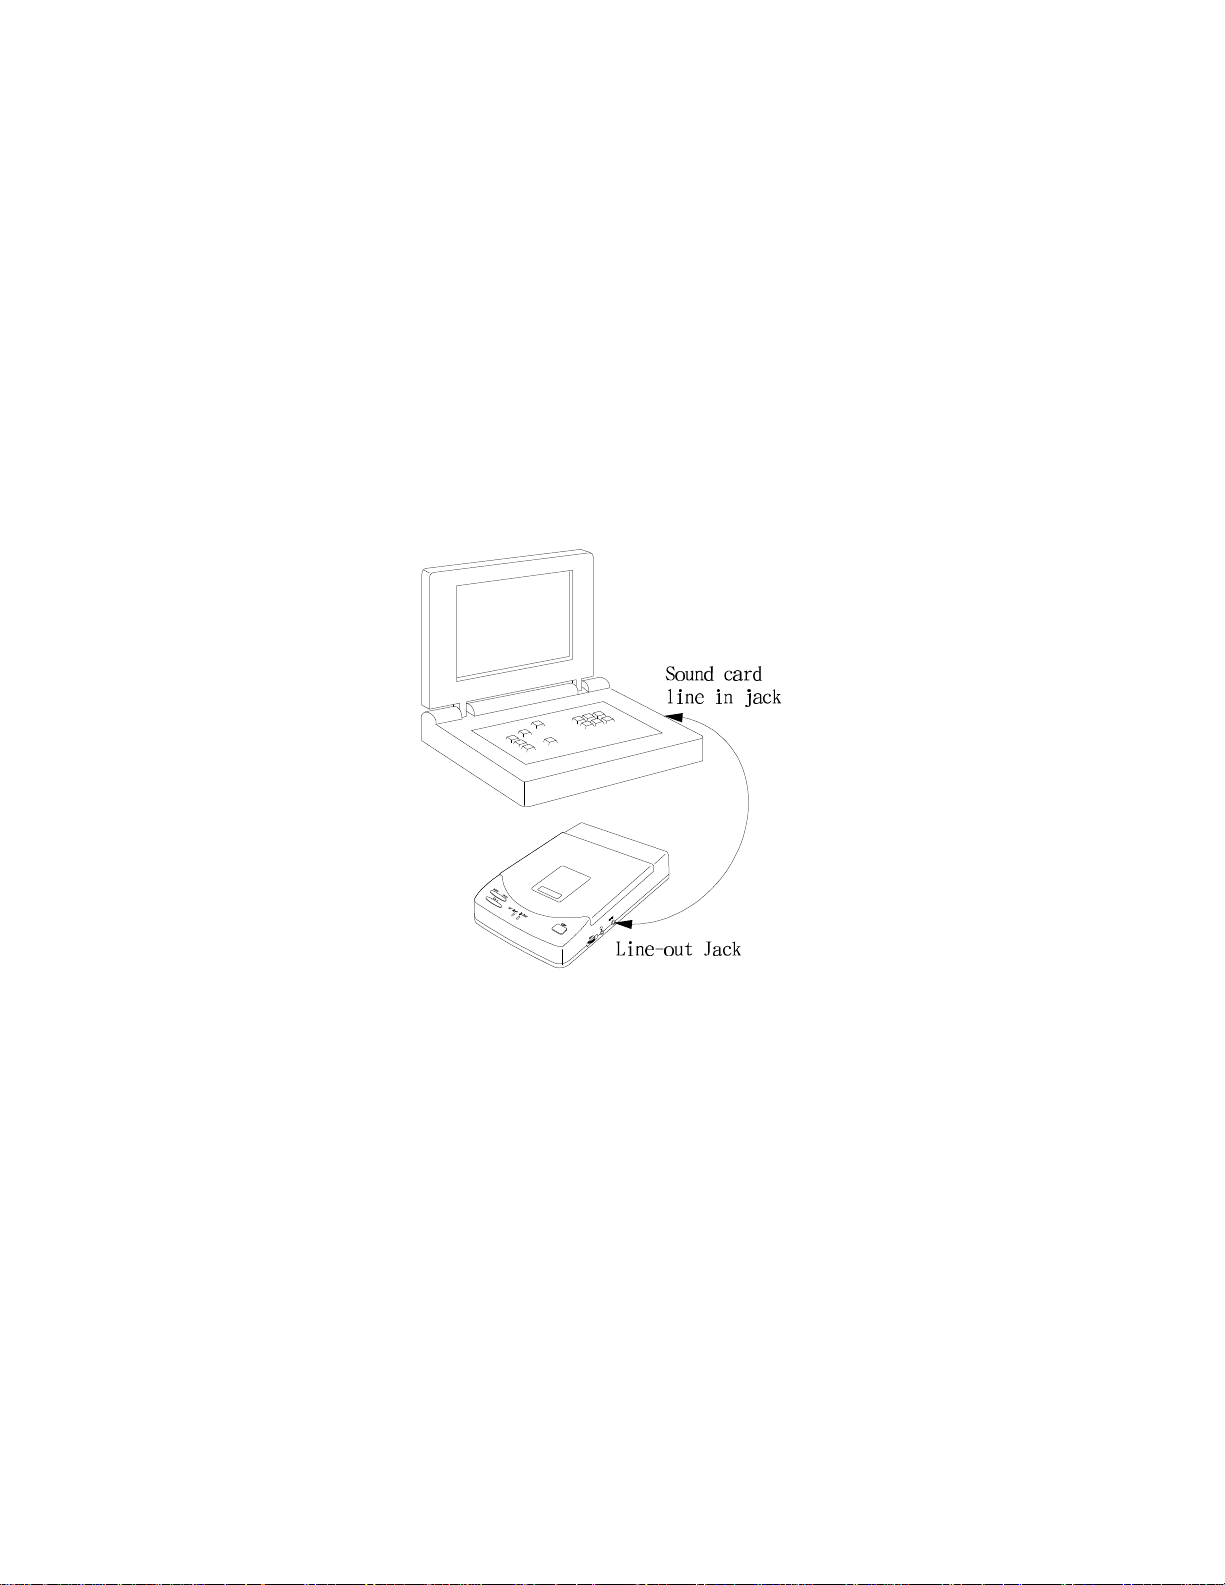
1) If your computer is equipped with a sound card, you can also connect the LINE-
OUT jack of your CD-ROM to the LINE-IN jack of the sound card with a 3.5
mm audio cable. This will result in a better audio output from the speakers of the
sound card.
Figure 19
The PLAY/PAUSE, NEXT/PREVIOUS buttons will still work in CD-ROM mode.
However, these buttons should be used in audio CD playing mode ONLY. Use these
buttons other than playing audio CD will cause error. Also, do use these buttons
along with a CD audio software utilities. Otherwise, incorrect information may be
reported by the CD audio software.
- -
26
Page 29

INSTALL A CD TITLE
DOS/Windows 3.x
Most of the CD-ROM titles for Windows 3.1/3.11 contains the SETUP.EXE or
INSTALL.EXE program in the CD disc. User needs to start either one of the
programs to add a Program Group and its icons into your computer, and perform the
following,
1) In Program Manager click File => Run
2) Type in D: (or the drive letter assigned for CD-ROM) SETUP.EXE or
INSTALL.EXE.
3) Follow the on-screen instructions.
4) After complete setting up, click the icon for the program.
Windows 95
The up-coming CD-ROM for the Windows 95 title will include the AUTO RUN
feature. This means when you close the disc cover with this type of CD disc inside,
Windows 95 will start the opening screen automatically. You can add the program,
browse content of the CD, etc. from this screen.
The other procedure is from ‘Control Panel’ click on ‘Add/Remove Programs’ icon,
click on ‘Install’ button then follow the on screen instruction.
Hot Insert/Remove the PCMCIA CD-ROM
The PCMCIA interface specification define that you may hot
insert/remove the PCMCIA interface card, which means to insert,
remove or exchange the card from your system at any time without
rebooting or turning off your system.
However, for any given system, the PCMCIA CD-ROM, being a
storage device itself, can not be hot removed when it is in use by a
program. To avoid some sort of system failure, read the following
carefully before using hot-removing technology.
DOS/Windows 3.X
you are allowed to hot insert/remove the PCMCIA CD-ROM ONLY when your
computer is loaded with a PCMCIA software which is ExCA compliant. If your
system doesn’t have such software, it is necessary to connect the PCMCIA CD-ROM
first before your computer is being booted. Do not hot remove the card when the CDROM is accessing the data particularly in OS/2 system.
Windows 95
- -
27
Page 30
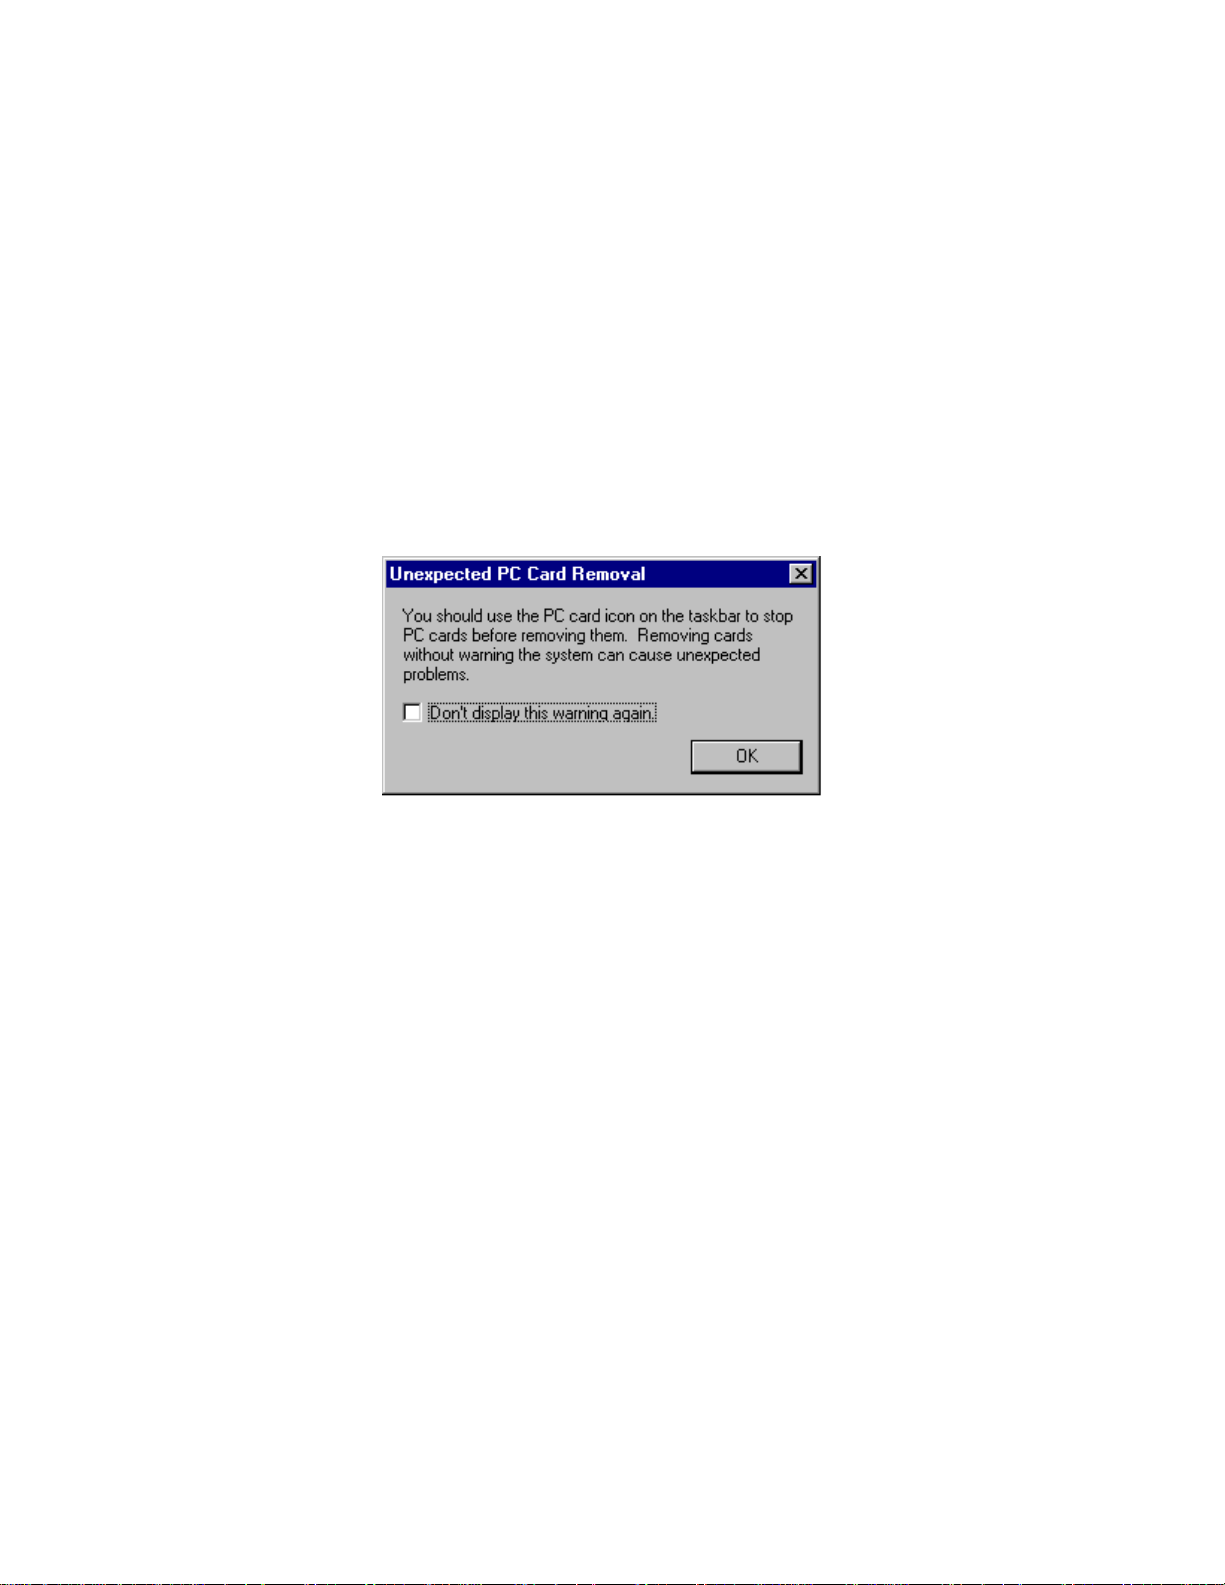
The hot-swapping is allowed with more limitation. To avoid system failure, always
follow the below steps to hot remove the PCMCIA CD-ROM in Windows 95,
1) Click the PC card indicator on the task bar at the right bottom of screen.
2) Click the command to stop the card you want to remove.
3) Read the screen prompts instruction carefully. If the system prompts you not to
remove the card, DO NOT remove the card. You should exit the present
application and return to step 1.
Be sure you are removing the card by the procedures described above, otherwise, the
following dialog will be displayed:
Figure 20
To display the PC card indicator on the task bar, perform the following steps,
1. Double-click the PC Card (PCMCIA) icon in the Control Panel.
2. Make sure the box ‘Show the control on task bar’ is checked.
If the PC Card (PCMCIA) wizard appears when you click the button in step 1,
complete the wizard. After restarting your computer, double-click the PC Card
(PCMCIA) icon in the Control Panel, and then check the box to see the status
indicator on the task bar.
NOTICE
• While operating the CD-ROM, the speed of your computer’s CPU and display
card will dominate the overall performance, especially when playing full motion
video. Slow display speed often causes “still frames”.
• To play the sound portion of the Multimedia CD Titles, your computer must be
equipped with a sound card.
- -
28
Page 31

PCMCIA SOFTWARE INFORMATION (DOS/WINDOWS 3.1)
If you have installed the PCMCIA software, such as SystemSoft’s CardSoft or
Databook’s Cardtalk, then the PCMCIA CD-ROM device driver will call this
PCMCIA software to enable the card. If you don’t have one, the PCMCIA CD-ROM
device driver still can directly access your hardware to enable the card. In this case,
your computer should have an Intel 82365SL Personal Computer Interface Controller
(PCIC) or another compatible controller.
PCMCIA software contains several components: Socket services, Card Services,
Resource Initialization Utility and Card Installation Utility. The remainder of this
section will explain the four components and list the device driver names for the
major PCMCIA software.
Socket Services provide the interface between a system’s BIOS and the host
controller chips (such as the Intel 82365SL PCIC, Vadem 468, etc) Socket Services
includes functions such as configuring a socket for an I/O or memory interface and
controlling socket power voltages. The Socket Services driver you have varies with
the host computer chip of your computer.
Card Services provides the interface between the PC Card and the PCMCIA sockets.
Card Services must be aware of the I/O, IRQ, and memory resources already used by
the system so it can accurately assign unused resources to the PC Cards.
To ensure Card Services will operate reliably regardless of the system it is installed
on, some PCMCIA software provides its own resource initialization utility, which
will check I/O ports, IRQs, and memory addresses and then report that information to
Card Services.
The Card Installation Utility detects the insertion and removal of PC cards, and
automatically determines the card type upon insertion so the card and socket will be
configured properly.
- -
29
Page 32

The device driver names of the major PCMCIA software are listed below:
Software/Device
Driver
Socket Services SS365SL.EXE,
Card Services CS.EXE PCMCS.EXE PCCS.EXE IBMDOSCS.SYS
Resource
Initialization Utility
IDE/ATA Driver ATADRV.EXE PCMATA.SYS
SRAM Card Driver MTSRAM.EXE
Flash Card Support MTAA.EXE,
SystemSoft
CardSoft
SS365LP.EXE,
SSCIRRUS.EXE,
SSDBOOK.EXE,
SVADEM.EXE,
SSVLSI.EXE
CSALLOC.EXE PCMRMAN.SYS PCRM.EXE DICRMU02.SYS
MTAB.EXE,
MTI1,EXE
MTI2P.EXE
Phoenix Award
Cardware
PCMSS.EXE SSPCIC.EXE IBMDSS02.SYS
IBM
ThinkPad
Memory Card
Driver
Card Installation
Utility
Card Services
Power Management
MEMDRV.EXE
CARDID.EXE PCMSCD.EXE PCENABLE.EXE AUTODRV.SYS
CS_APM.EXE $ICPMDOS.SYS
If you are not sure which PCMCIA software you are using, you may check it by
typing TYPE CONFIG.SYS at the DOS prompt followed by the ENTER key. The file
should come up and look like one of the following examples.
- -
30
Page 33

SYSTEMSOFT PCMCIA SOFTWARE SAMPLE CONFIG.SYS FILE
LASTDRIVE=Z
DEVICE=C:\DOS\HIMEM.SYS
DEVICE=C:\DOS\EMM386.EXE NOEMS X=D000-D3FF
FILES=40
BUFFERS=20
STACKS=9,256
DEVICEHIGH=C:\CARDSOFT\SS36SSL.EXE
DEVICEHIGH=C:\CARDSOFT\CS.EXE
DEVICEHIGH=C:\CARDSOFT\CSALLOC.EXE
REM** The REM’s should be removed from the following
REM** lines to enable memory and hard drive card support
REM** DEVICEHIGH=C:\CARDSOFT\ATADRV.EXE
REM** DEVICEHIGH=C:\CARDSOFT\MTSRAM.EXE
REM** DEVICEHIGH=C:\CARDSOFT\MTDDRV.EXE
DEVICEHIGH=C:\CARDSOFT\CARDID.EXE
DEVICE=C:\CDROM\EXPCDI.EXE /P:1 /I:15 /D:MSCD001
PHOENIX PCMCIA SOFTWARE SAMPLE CONFIG.SYS FILE
LASTDRIVE=Z
DEVICE=C:\DOS\HIMEM.SYS
DEVICE=C:\DOS\EMM386.EXE NOEMS X=D000-D3FF
DOS=HIGH, UMB
STACKS=9,256
DEVICE=c:\PCMPLUS3\CNFIGNAM.EXE/DEFAULT
DEVICE=C:\PCMPLUS3\PCMSS.EXE
DEVICE=C:\PCMPLUS3\PCMCS.EXE
DEVICE=C:\PCMPLUS3\PCMRMAN.EXE
DEVICE=C:\PCMPLUS3\PCMSCD.EXE
DEVICE=C:\CDROM\EXPCDI.EXE /P:1 /I:15 /D:MSCD001
AWARD PCMCIA SOFTWARE SAMPLE CONFIG.SYS FILE
LASTDRIVE=Z
DEVICE=C:\DOS\HIMEM.SYS
DEVICE=C:\DOS\EMM386.EXE NOEMS X=D000-D3FF
FILES=40
BUFFERS:20
STACKS=9,256
DEVICE=C:\CARDWARE\SSPCIC.EXE
- -
31
Page 34

DEVICE=C:\CARDWARE\PCCS.EXE
DEVICE=C:\CARDWARE\PCRM.EXE/AUTODETECT
DEVICE=C:\CARDWARE\PCENABLE.EXE
DEVICE=C:\CDROM\EXPCDI.EXE /P:1 /I:15 /D:MSCD001
IBM PCMCIA SOFTWARE SAMPLE CONFIG.SYS FILE
LASTDRIVE=Z
DEVICEHIGH=C:\DOS\HIMEM.SYS/TESTMEM:OFF /MACHINE:2
DEVICEHIGH=C:\DOS\EMM386.EXE NOEMS X=D000-DFFF
BUFFERS=40
FILES=40
STACKS=9,256
DOS=HIGH
DEVICEHIGH=C:\THINKPAD\IBMDSS02.SYS /S0=2
DEVICEHIGH=C:\THINKPAD\IBMDOSCS.SYS
DEVICEHIGH=C:THINKPAD\DICRMU02.SYS /MA=D000-DFFF
DEVICEHIGH=C:\THINKPAD\$ICPMDOS.SYS
DEVICE=C:\THINKPAD\AUTODRV.SYS C:\THINKPAD\AUTODRV.INI
DEVICE=C:\CDROM\EXPCDI.EXE /P:1 /I:15 /D:MSCD001
- -
32
Page 35

POWER SAVING
The PCMCIA CD-ROM is designed to save power.
− Built-in inactivity timer for about 40 seconds in stand-alone mode, the power
will be turned off automatically.
− when used with the computer, the drive will automatically enter the sleep mode
(spindle off) when it has not been accessed for about 1 minutes.
− if you remove the Compact Disc (CD) from your CD-ROM drive, the drive will
manually get into the sleep mode.
− when the PCMCIA CD-ROM is turned on, it will spin in a lower speed to save
power. The operating current will then be reduced.
The “Hot insert/remove” feature of a PCMCIA card helps to save power, too. If
Exchangeable Card Architecture (ExCA) compliant PCMCIA software has been
loaded on to your computer, then you can remove the PCMCIA CD-ROM after the
system has been booted, and insert it again when you need to use the CD-ROM
device. For notebook computer users, removing the card will preserve power and
prolong battery life.
Note: You are allowed to remove and insert the PCMCIA CD-ROM from the
computer at any time. But DO NOT remove the PCMCIA card from your
CD-ROM drive
- -
33
Page 36

TROUBLE SHOOTING
This section explains the most common error messages users may encounter.
DOS/Windows
After rebooting your computer, the following messages will be displayed on your
screen, which are generated by EXPCDI.EXE and MSCDEX.EXE.
Configure card to:
I/O Port:170-177, 376-377
IRQ number: 15
Device Name: MSCD001
PCMCIA CD-ROM card is present in socket 1
.
.
.
Drive D: = Driver MSCD001 unit 0
If any error occurs or the PCMCIA CD-ROM does not work, you should reboot your
computer again. During boot up the system displays 'Starting MS-DOS...', press the
F8 key to make the system executes the CONFIG.SYS and AUTOEXEC.BAT step
by step, so that you can consistently press the ‘Y’ key to see each command's
message.
Error messages generated by EXPCDI.EXE:
v Error: PCMCIA CD-ROM card is not present!
If the above message appears, it means EXPCDI can't find any PCMCIA CD-ROM
card in your PCMCIA slots. Make sure the card is inserted firmly.
Check the memory management program statement for the UBM exclusion
DEVICE=C:\DOS\EMM386.EXE NOEMS X=D000-D3FF
v Error: Illegal arguments!
For help, type "expcdi /?".
The above error message means that there are invalid arguments in the EXPCDI line
of CONFIG.SYS. Please refer to the section titled “MANUAL INSTALLATION”
for the usage of EXPCDI.EXE.
v Error: I/O port and IRQ number must be specified!
The above message means you have not specified the I/O port and IRQ number
argument in the EXPCDI line of CONFIG.SYS.
- -
34
Page 37

v Error: Illegal I/O port!
The above message means invalid I/O ports in the EXPCDI line of CONFIG.SYS has
been selected. The legal I/O port numbers are: 1, 2, and 3.
v Error: Illegal IRQ number!
The above message means an invalid IRQ number in EXPCDI line of CONFIG.SYS
has been selected. The legal IRQ numbers are 3, 4, 5, 7, 9, 10, 11, 12 and 15.
v Error: There is no available 4K memory for mapping!
The above message means EXPCDI can't find available 4K memory between C000:0
to EFFF:0. This error can be corrected by changing the EMM386 line of
CONFIG.SYS to exclude at least 4K memory for mapping. For example,
DEVICE=C:\DOS\EMM386.EXE ... X=D000-D3FF
v Error: The INTEL 82365SL PCMCIA controller is not
detected in your system. You should contact your
dealer to get PCMCIA support software.
The above message means the PCMCIA controller for your system is not INTEL
82365SL compatible. In this case, you should install PCMCIA support software
which should be supplied by the notebook manufacturer.
v CD-ROM Drive is not found!
The above message means EXPCDI.EXE can't find the PCMCIA CD-ROM drive.
Please make sure the CD-ROM drive is properly connected to the PCMCIA
interface card cable.
The other cause of error is invalid interrupt number (/I:xx) in EXPCDI line of
CONFIG.SYS. Change the number to 5, 7 , 9, 10, 11, 12, or 15. Reboot every
time you change the number.
Error message generated by MSCDEX.EXE:
v Device driver not found: 'MSCD001'
This means that EXPCDI.EXE is not installed properly or you have entered a
different /D: switch in the MSCDEX line of AUTOEXEC.BAT. The /D: switch
must be the same as the /D: switch in the EXPCDI.EXE line of CONFIG.SYS.
If the error message displayed is none of the above, please contact Technical
Support.
- -
35
Page 38

WINDOWS 95
CD-Traveler with sound option.
v CD-ROM drive icon does not show in ‘My Computer’
Reinstall the driver and choose ‘CD-ROM Only’. Go to Start, Setting, Control Panel,
System and the Device Manager. Double click on Multi-function adapter, select
Driver, click on the Update Driver or Change Driver button.
All CD-Traveler card.
v I run ‘Install’ from the device driver diskette, the program indicate NOT for
Windows 95.
The CD-Traveler is a Plug-and Play device, the computer should detect the card
insertion and prompt user for the device driver diskette. To verify if the computer
detect the card or not, go to Start, Setting, Control Panel, Click on PC Card
(PCMCIA) icon. CD Traveler card should be listed in a socket. Reseat the card if
necessary.
v The CD card is listed in a socket but still CD-ROM drive icon does not show in
‘My Computer’
Go to Go to Start, Setting, Control Panel, System and the Device Manager. Check to
see if there is any Yellow circle with an exclamation point (!) on the CD-ROM relate
items. Double click on the item, go to “Resources” and resolve any conflict that you
may have.
v The CD card is listed in a socket but still CD-ROM drive icon does not show in
‘My Computer’. In Device Mgr. There is a Yellow circle with an exclamation
point (!) on Hard Disk Controller “Standard IDE/ESDI Controller”.
Remove the CD-ROM card from the PCMCIA slot. Recheck the Device Mgr. Again,
If you still have a Yellow circle with an exclamation point (!) on Hard Disk
Controller “Standard IDE/ESDI Controller” then your computer may have been
infected with some kind of computer’s virus. Verify by click on ‘Performance’ tab
you should have 32 bit setting on your File system and the PC Card.
- -
36
 Loading...