

Page 1
Audio Applications
USER GUIDE
Version 3.0
August, 1994
ESS Technology, Inc.
46107 Landing Parkway
Fremont, California 94538
Page 2

Copyright 1994 by ESS Technology, Inc.
All rights reserved.
The contents of this manual and the associated Audio
Applications software are the property of ESS
Technology, Inc. For additional copies of the
software, please contact ESS Technology, Inc.
AudioDrive is a trademark of ESS Technology, Inc.
Microsoft, MS-DOS, Windows, and the Windows
Sound System are registered trademarks of
Microsoft Corporation.
Page 3

Audio Applications 3.0 User Guide
_________________________________________________________________________
Contents
Chapter 1: Introduction .......................................................................... 1
Features of the Audio Applications........................................................ 1
Audio Applications Overview................................................................ 2
Chapter 2: Installation............................................................................. 3
Introduction.......................................................................................... 3
Starting the Setup Program................................................................... 3
Installing the AudioDrive Driver and Applications................................. 4
Changing Audio Boards........................................................................ 11
Chapter 3: The Audio Recorder.............................................................. 12
Introduction.......................................................................................... 12
Starting the Audio Recorder.................................................................. 13
Audio Recorder Menu Commands......................................................... 14
The Audio Recorder Toolbar .............................................................. 19
Making a Recording..............................................................................20
Playing an Audio File ............................................................................22
Editing an Audio File ............................................................................ 24
Changing the Waveform with Effects Commands ..................................27
Adding Sound to a Document: Drag and Drop...................................... 28
Changing an Audio File's Properties ......................................................29
_________________________________________________________________________
Contents Page i
Page 4

Audio Applications 3.0 User Guide
_________________________________________________________________________
Chapter 4: The Recording Control......................................................... 31
Introduction.......................................................................................... 31
Starting the Recording Control.............................................................. 31
Recording Control Menu Commands..................................................... 33
Chapter 5: The Volume Control.............................................................. 34
Introduction.......................................................................................... 34
Starting the Volume Control ................................................................. 34
The Volume Control Options Menu ...................................................... 36
Chapter 6: The Mixer..............................................................................37
Introduction.......................................................................................... 37
Starting the Mixer................................................................................. 37
Mixer Menu Commands........................................................................39
Chapter 7: The Extended Recorder........................................................ 40
Introduction.......................................................................................... 40
Starting the Extended Recorder............................................................. 41
Extended Recorder Menu Commands.................................................... 42
The Extended Recorder Toolbar .......................................................... 44
Making a Recording..............................................................................45
Playing an Audio File ............................................................................46
_________________________________________________________________________
Contents Page ii
Page 5

Audio Applications 3.0 User Guide
_________________________________________________________________________
Chapter 8: The Audio Clip Library........................................................47
Introduction.......................................................................................... 47
Starting the Audio Clip Library ............................................................. 47
Audio Clip Library Menu Commands.................................................... 53
Chapter 9: The Talking Calculator.........................................................55
Introduction.......................................................................................... 55
Starting the Talking Calculator.............................................................. 55
Performing Calculations........................................................................ 56
Calculator Functions ............................................................................. 57
Using Calculator Memory ..................................................................... 58
Regulating the Announcements ............................................................. 59
The Help Menu..................................................................................... 60
Chapter 10: The Talking Clock............................................................... 61
Introduction.......................................................................................... 61
Starting the Talking Clock..................................................................... 61
Positioning the Clock............................................................................ 62
Announcing the Time............................................................................ 62
Setting the Clock................................................................................... 63
The Help Menu..................................................................................... 65
Chapter 11: The Chime........................................................................... 66
Introduction.......................................................................................... 66
Starting the Chime ................................................................................ 66
_________________________________________________________________________
Contents Page iii
Page 6

Audio Applications 3.0 User Guide
_________________________________________________________________________
Setting the Chime .................................................................................. 67
The Help Menu..................................................................................... 67
Chapter 12: The Audio Reminder........................................................... 68
Introduction.......................................................................................... 68
Starting the Audio Reminder................................................................. 68
Setting an Alarm ...................................................................................69
Audio Reminder Menu Commands........................................................ 72
Chapter 13: The Stopwatch..................................................................... 73
Introduction.......................................................................................... 73
Starting the Stopwatch.......................................................................... 73
Operating the Stopwatch....................................................................... 74
Controling the Appearance of the Stopwatch......................................... 74
The Help Menu..................................................................................... 75
Chapter 14: The Timer............................................................................ 76
Introduction.......................................................................................... 76
Starting the Timer................................................................................. 76
Setting the Timer .................................................................................. 77
Operating the Timer.............................................................................. 78
Controling the Appearance of the Timer................................................ 79
The Help Menu..................................................................................... 80
_________________________________________________________________________
Contents Page iv
Page 7

Audio Applications 3.0 User Guide
_________________________________________________________________________
1: Introduction
The Audio Applications enable you to record, store, and play back voice,
music, and other sound on your PC. These applications are designed to
enhance communication and improve productivity by incorporating audio into
your daily use of the computer.
The Audio Applications take full advantage of the capabilities of the
AudioDrive family of audio chips (ES488, ES1488, and ES688).
The ES488 and ES1488 provide for the recording and play back of
monophonic audio files. The ES688 provides stereo capabilities and a fivechannel mixer. See your hardware manual for a description of your
computer's capabilities.
Features of the Audio Applications
The Audio Applications:
• Are compatible with Microsoft Windows 3.1.
• Comply with Windows 3.1 Object Linking and Embedding (OLE)
requirements.
• Enable you to add, edit and update voice annotations in OLE-compliant
Windows applications such as WordPerfect, Word, Excel, and Lotus 123.
• Record and play audio files in the PCM (Pulse Code Modulation) format,
compatible with Windows 3.1 and other sound cards that use this format.
• Are compatible with the Microsoft Windows Sound Recorder for
recording and play back.
_________________________________________________________________________
Introduction Page 1
Page 8

Audio Applications 3.0 User Guide
_________________________________________________________________________
Audio Applications Overview
• The Audio Recorder records, compresses, stores and plays voice, music,
and other sound in .WAV and .AUD formats.
• The Recording Control regulates the recording level and stereo balance
of multiple sources during recording.
• The Volume Control regulates the volume and stereo balance of sound
during playback.
• The Mixer combines signals from multiple sources during playback.
• The Extended Recorder records, compresses, and stores audio files
directly to the hard disk, giving you longer recording times.
• The Audio Clip Library enables you to organize your audio files in
folders. It includes a variety of audio files under the folders music,
phrases and sounds.
• The Talking Calculator announces numbers entered, operation executed
and resulting answers.
• The Talking Clock announces the time on request.
• The Chime provides a choice of audio announcements at 15, 30 or 60
minute intervals.
• The Audio Reminder features two alarms. The time these alarms go off
can be set and the audio announcement of your choice can be selected.
• The Stopwatch makes audio announcements for time elapsed.
• The Timer makes audio announcements for time remaining.
The Windows driver is installed when you run the Setup program. The next
chapter describes the installation process.
_________________________________________________________________________
Introduction Page 2
Page 9

Audio Applications 3.0 User Guide
_________________________________________________________________________
2: Installation
Introduction
The Setup program provides an easy way for you to install the AudioDrive
driver and applications.
Starting the Setup Program
First-time installation:
1. Start Windows 3.1 or higher.
2. In Program Manager, choose Run from the File menu.
3. Place Disk 1 in a floppy drive. In the Run dialog box, type the letter of
the drive and setup (for example B:\setup), then click the OK button.
The first AudioDrive Setup window appears.
Changing the setup after Audio Applications are installed:
1. Start Windows and open the Audio Applications program group.
2. Double-click the Setup icon, or select it and press the Enter key.
The first AudioDrive Setup window appears.
_________________________________________________________________________
Installation Page 3
Page 10
Audio Applications 3.0 User Guide
_________________________________________________________________________
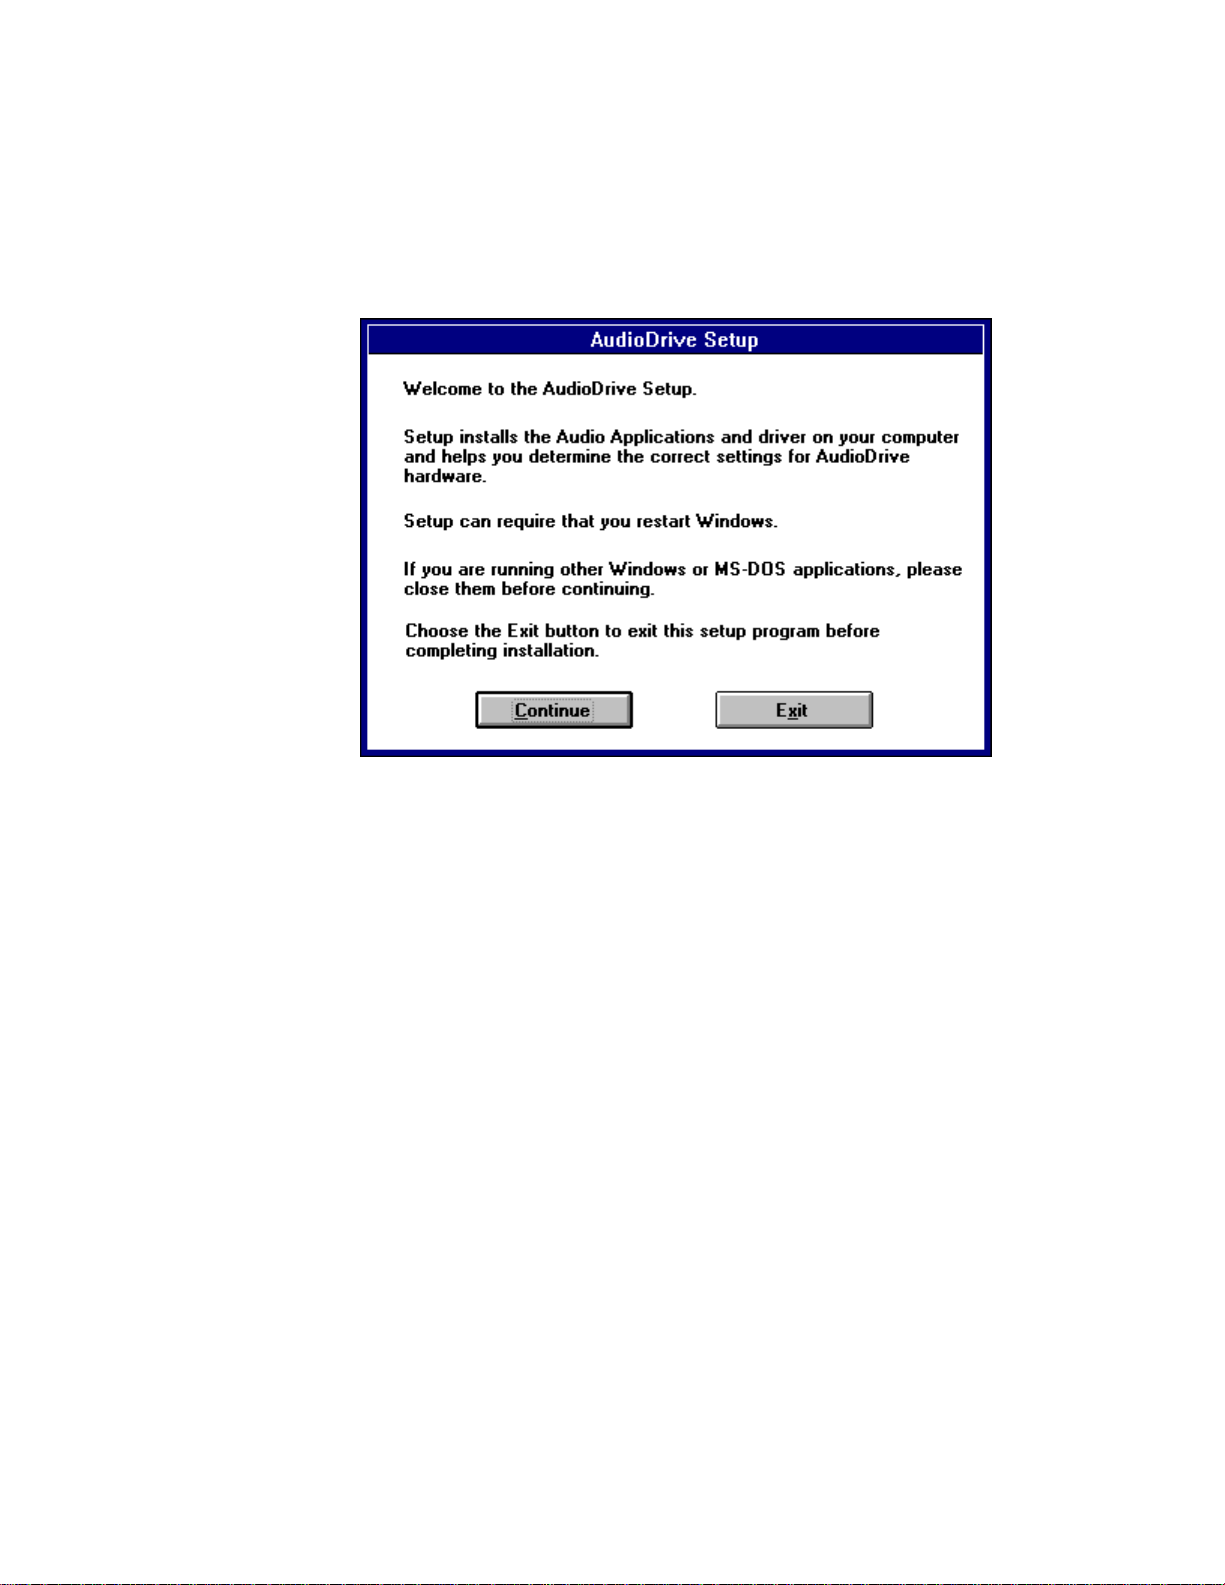
Installing the AudioDrive Driver and Applications
Here is the first AudioDrive Setup window:
Note the instructions, then click Continue to go on, or Exit to leave Setup.
_________________________________________________________________________
Installation Page 4
Page 11
Audio Applications 3.0 User Guide
_________________________________________________________________________
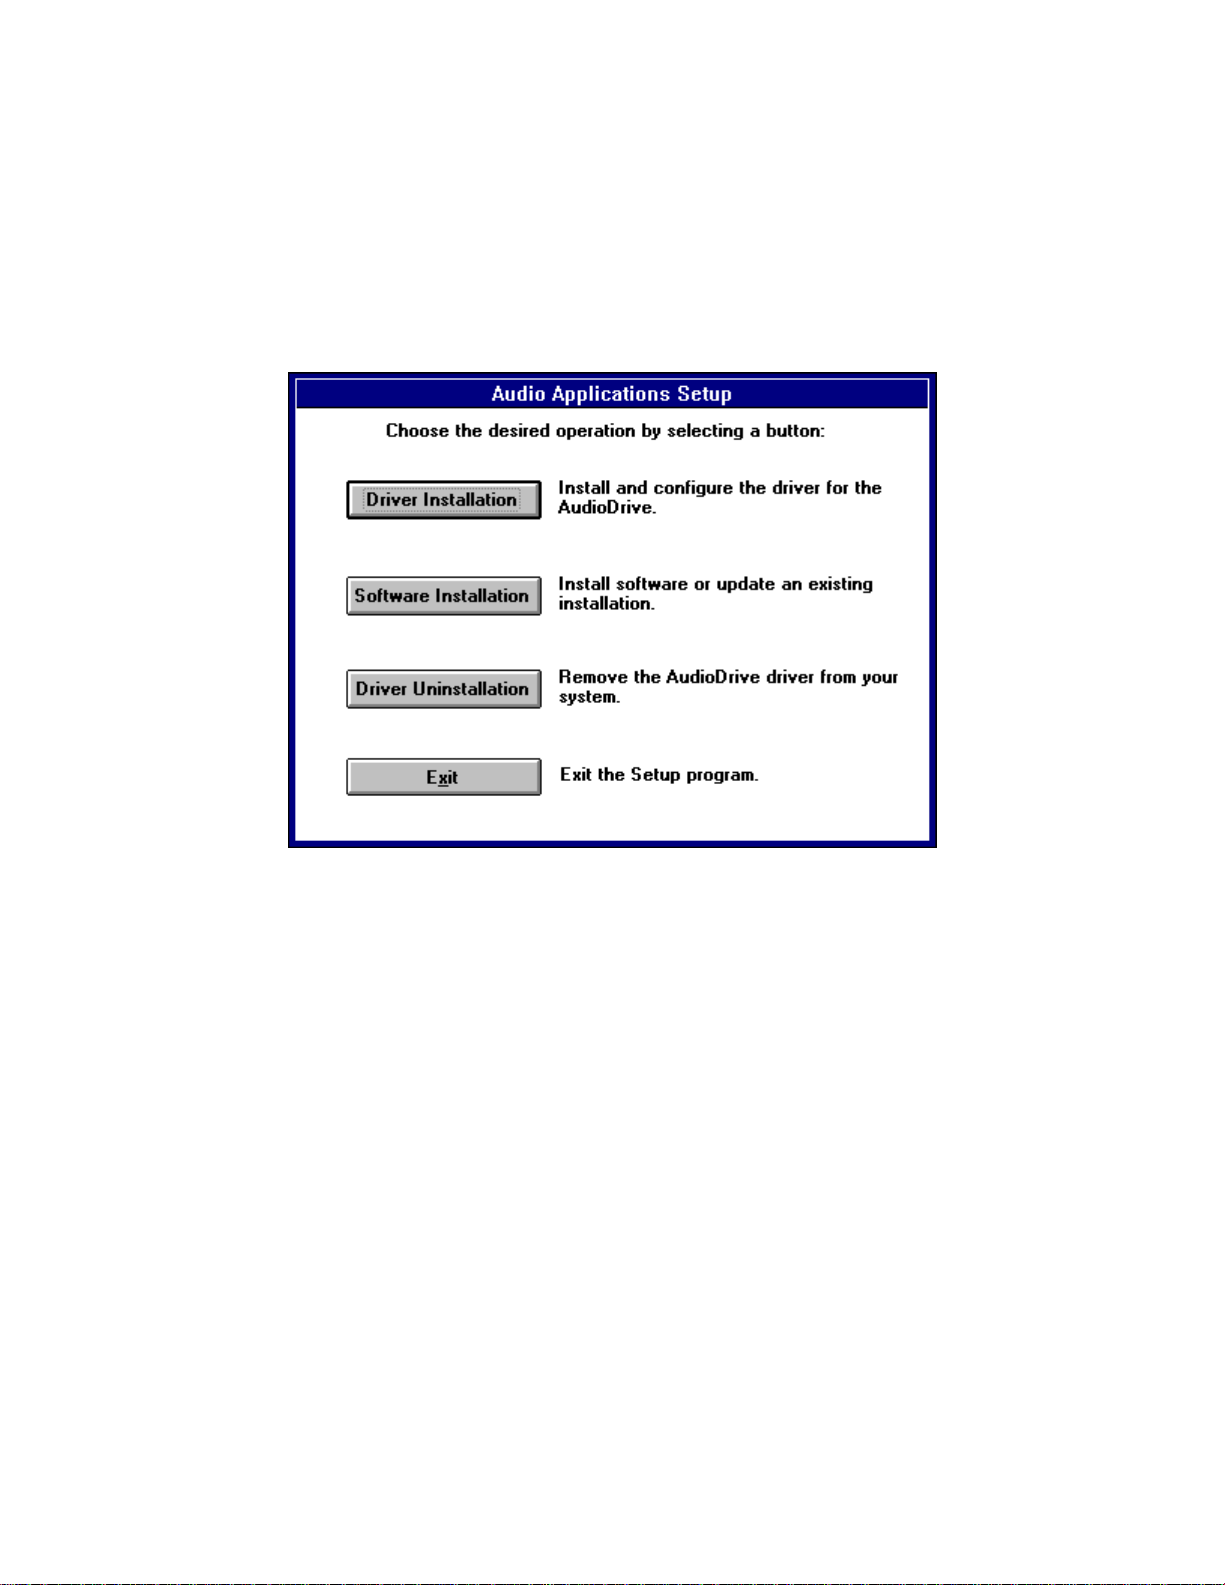
In the second Setup window, click the first button to install the hardware
driver (if an AudioDrive driver has been previously installed, first choose
Driver Uninstallation, restart windows, then install the new driver), the second
button to install the Audio Applications, or the third button to remove the
current hardware driver.
Let's examine each of these options.
_________________________________________________________________________
Installation Page 5
Page 12
Audio Applications 3.0 User Guide
_________________________________________________________________________
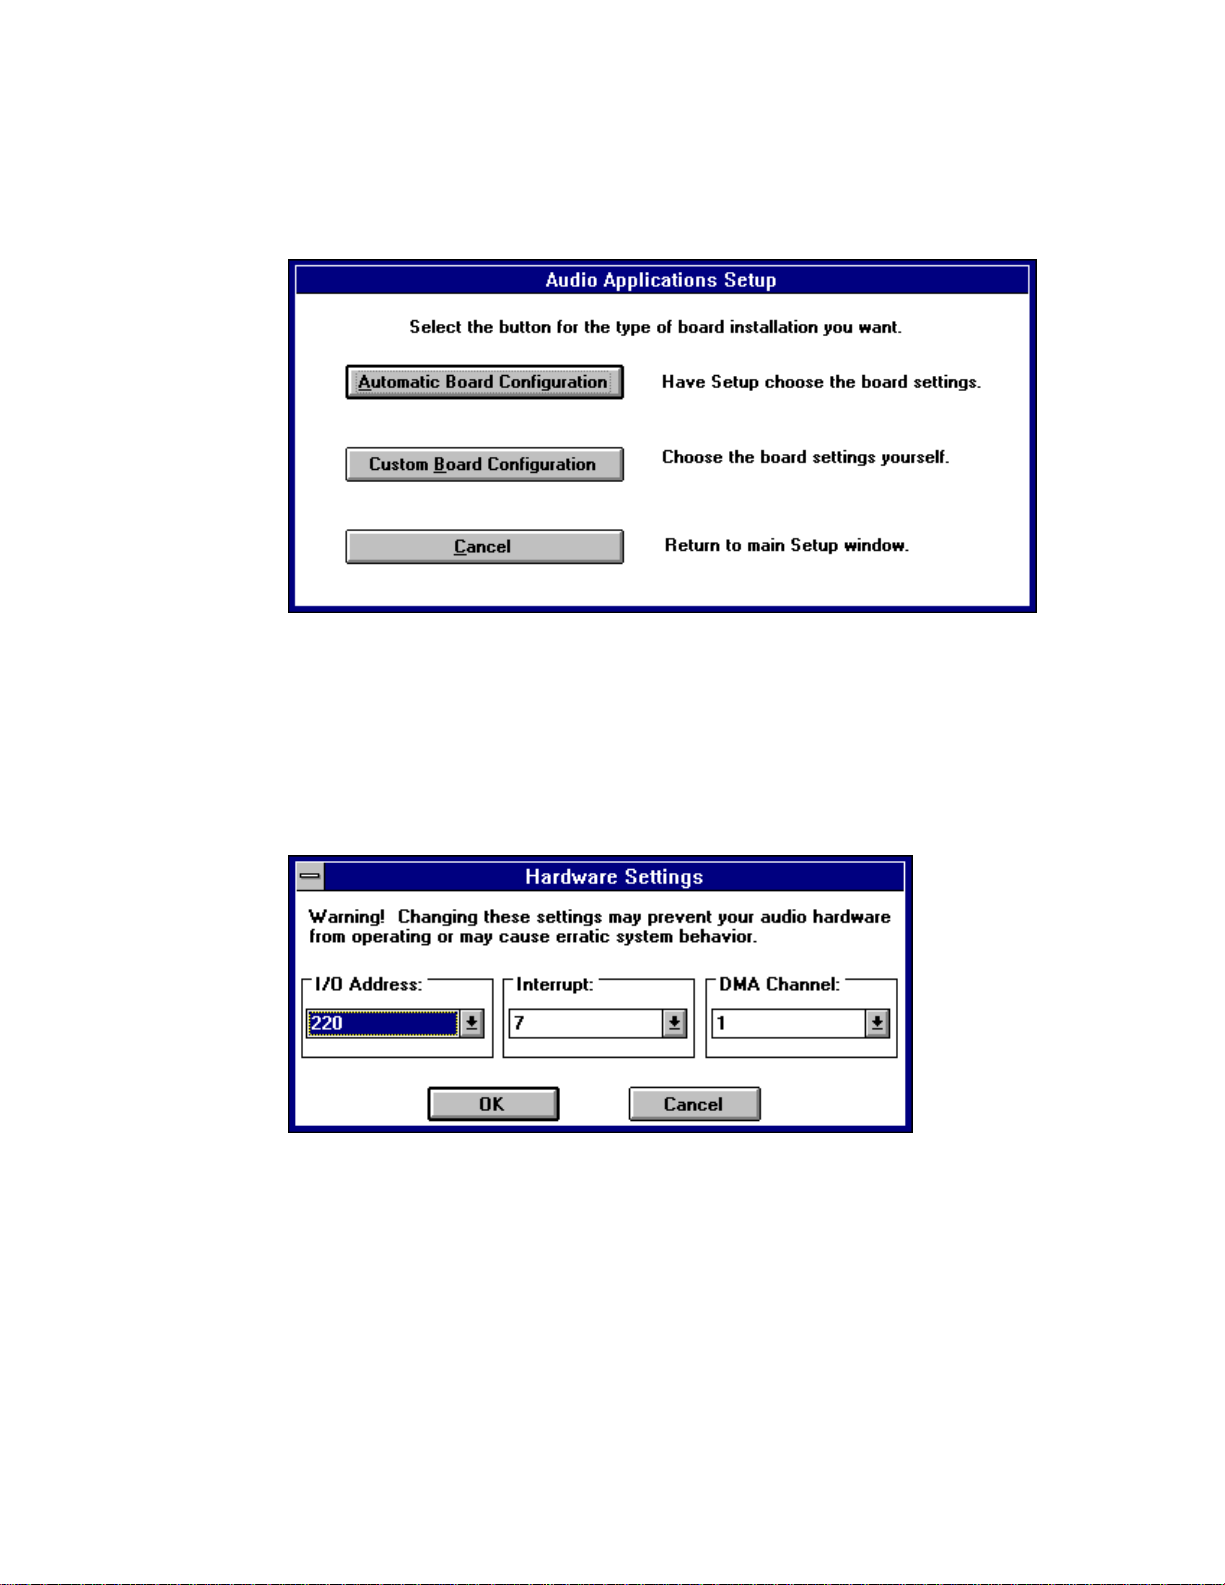
If you choose Driver Installation, the following window appears:
Unless you need to configure the board settings yourself, choose the
Automatic Board Configuration button to install the hardware driver.
Automatic Board Configuration will attempt to determine the I/O address,
interrupt, and DMA channel settings of your board.
If you choose Custom Board Configuration, the following window
appears:
The window opens showing the factory default settings. If you do not know
the I/O address, interrupt, and DMA channel of your board, refer to the
hardware installation manual. For the Stereo Magician Plus (ES688) board,
the interrupt and DMA channel are software configurable.
_________________________________________________________________________
Installation Page 6
Page 13
Audio Applications 3.0 User Guide
_________________________________________________________________________
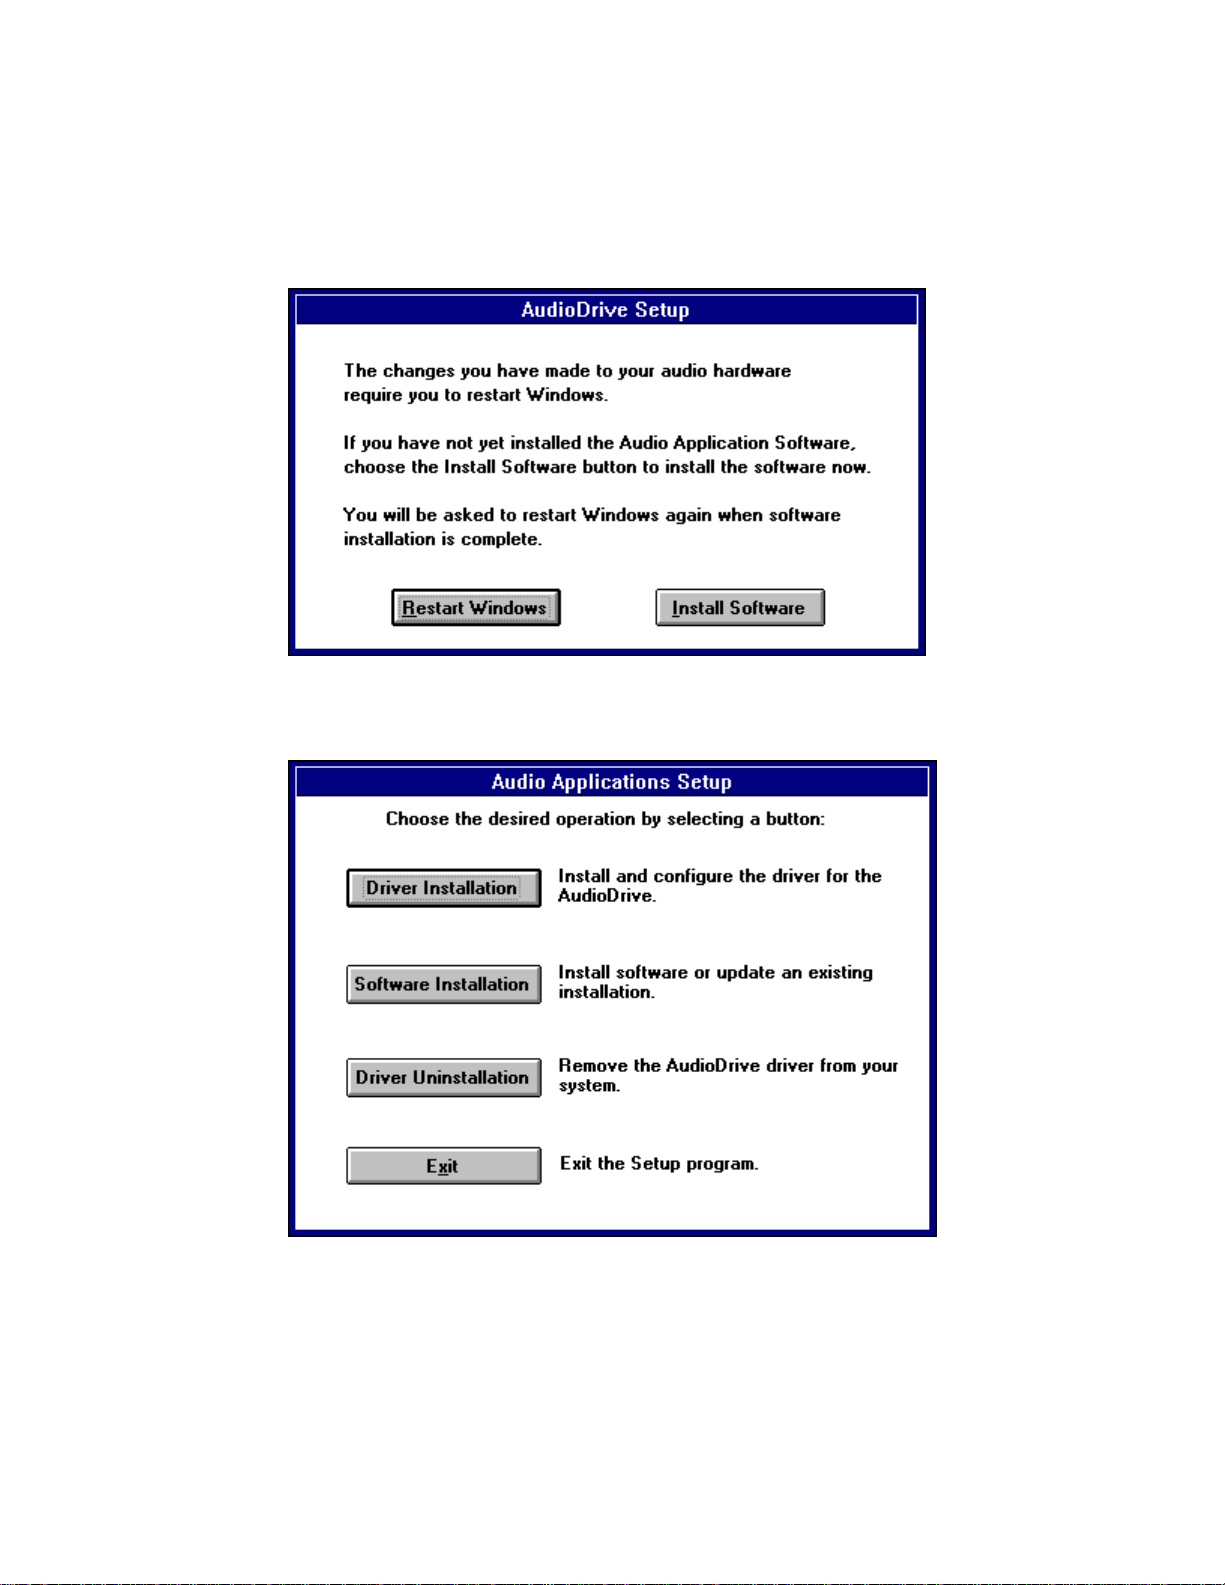
In the next window (below), choose Restart Windows if
the Audio Applications are already installed. If not, choose Install Software.
From the main setup window, click the Software Installation button to install
the Audio Applications.
_________________________________________________________________________
Installation Page 7
Page 14

Audio Applications 3.0 User Guide
_________________________________________________________________________
The default directory is PCAUDIO. To store the Audio Applications in
another directory, type its name and click OK.
If the directory you specify does not exist, Setup will create it for you.
If the Audio Applications have been previously installed, this window appears:
_________________________________________________________________________
Installation Page 8
Page 15
Audio Applications 3.0 User Guide
_________________________________________________________________________
Choose Change Directory to install the files in another directory, preserving
the previous installation. If you choose Continue, this window appears:
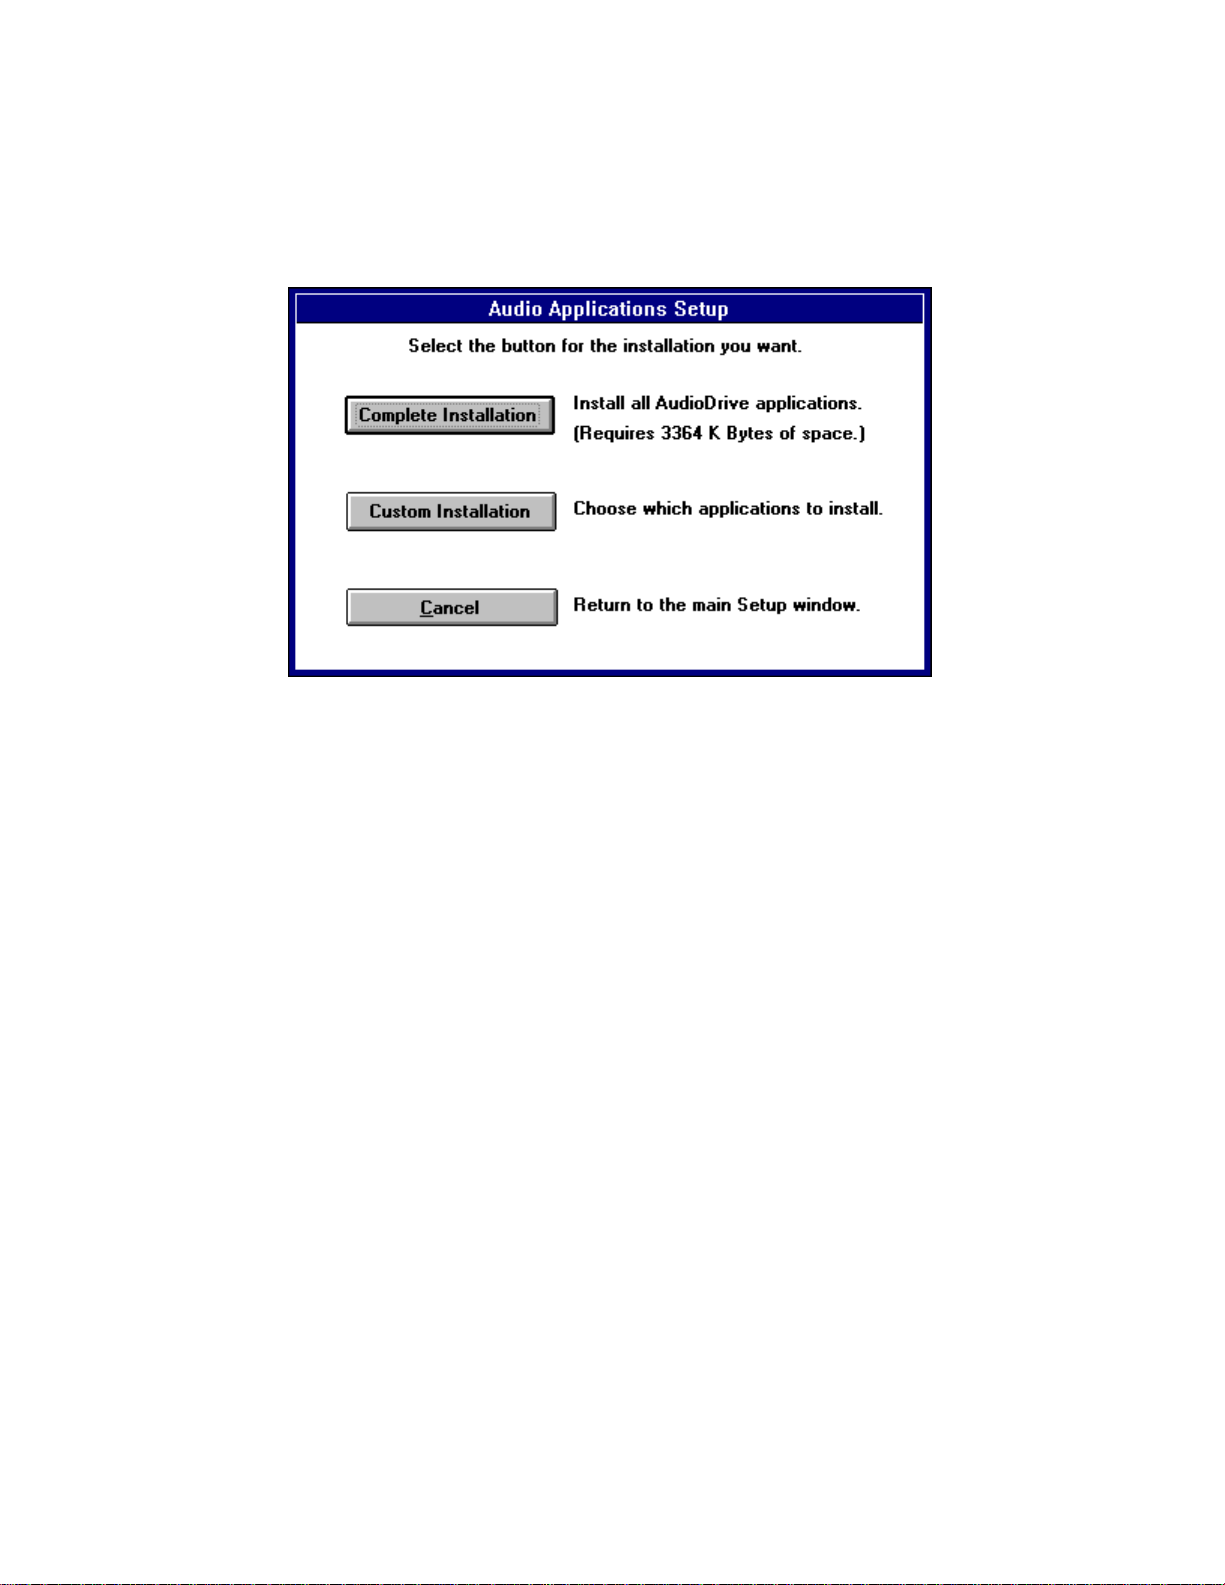
To install all the Audio Applications, click the Complete Installation button.
To install only some Audio Applications, choose Custom Installation.
_________________________________________________________________________
Installation Page 9
Page 16
Audio Applications 3.0 User Guide
_________________________________________________________________________
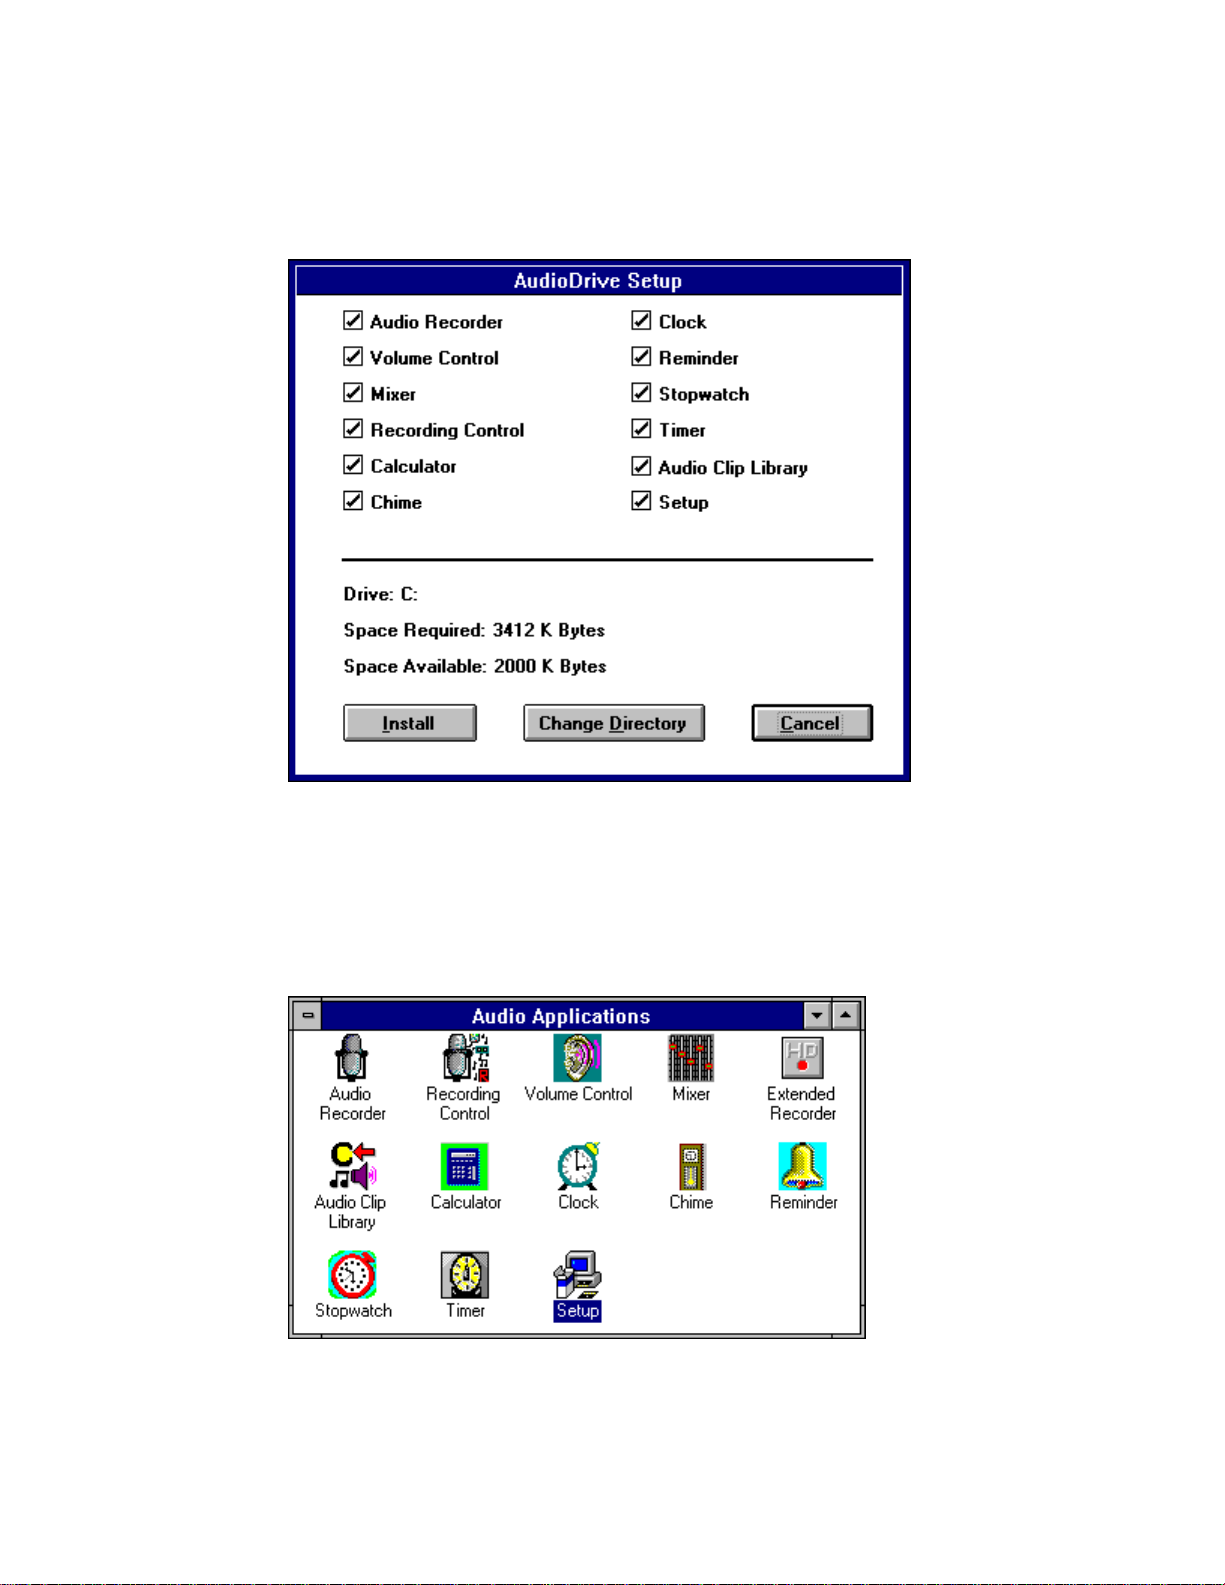
If you choose Custom Installation, this window appears:
To exclude an application from the installation, click its box. To store the
applications in another directory, choose Change Directory and specify the
directory. Choose Install to install the selected Audio Applications.
After installation, the application icons appear in the Audio Applications
program group:
_________________________________________________________________________
Installation Page 10
Page 17

Audio Applications 3.0 User Guide
_________________________________________________________________________
Note: If you have a previous version of the software and the Setup program
is unable to load the driver, follow this procedure:
1. Exit Windows and reboot your system.
2. Delete auddrive.drv, vaudrv.386, and threed.vbx from the directory
windows\system, if any of these files are present.
3. Restart Windows, ignoring any Windows error messages.
4. Insert Setup Disk 1 in a drive, then choose Run from the File menu,
enter a: or b: and setup, and click the OK button.
5. Go through the Setup program again.
Changing Audio Boards
You may wish to replace your present audio board with another type-for example, replacing Audio Magician Plus with Stereo Magician Plus.
Before doing so, run the Setup program and choose the Driver Uninstall
option before you turn off the computer to change the board.
Once the new board is installed, run the Setup program again and choose the
Driver Installation option. This procedure loads the correct MIDI mapper
configuration file and other system information.
Important: Skipping the driver reinstallation procedure will most likely cause
the audio system to malfunction.
_________________________________________________________________________
Installation Page 11
Page 18

Audio Applications 3.0 User Guide
_________________________________________________________________________
3: The Audio Recorder
Introduction
The Audio Recorder enables you to record, compress, store and playback
voice, music, and other sound. It provides settings for sound attributes such
as mono/stereo, compression level, and sampling rate. You can use it to
embed sound objects in documents created in applications that support object
linking and embedding (OLE). The Audio Recorder's record, edit and
playback capabilities are compatable with the Windows Sound Recorder and
other recorders that record and playback in the PCM format.
The Audio Recorder can record to and playback from both .WAV and .AUD
formats. .WAV is the Microsoft Windows 3.1 audio file format. The .AUD
format uses ESPCM/ADPCM compression to produce an audio file. The
Audio Recorder provides a choice of linear PCM, ADPCM and low, medium
and high ESPCM compression.
The following chart shows the capabilities of the AudioDrive on-chip
compression/decompression feature:
Compress/Decompress Format ES688 ES1488 ES488
ESPCM Low (4-bit) Record Yes Yes Yes
ESPCM Low (4-bit) Playback Yes Yes Yes
ESPCM Medium (3-bit) Record No No No
ESPCM Medium (3-bit) Playback Yes Yes Yes
ESPCM High (1-bit) Record No No No
ESPCM High (1-bit) Playback Yes Yes Yes
ADPCM Record No No Yes
ADPCM Playback Yes Yes Yes
_________________________________________________________________________
The Audio Recorder Page 12
Page 19
Audio Applications 3.0 User Guide
_________________________________________________________________________
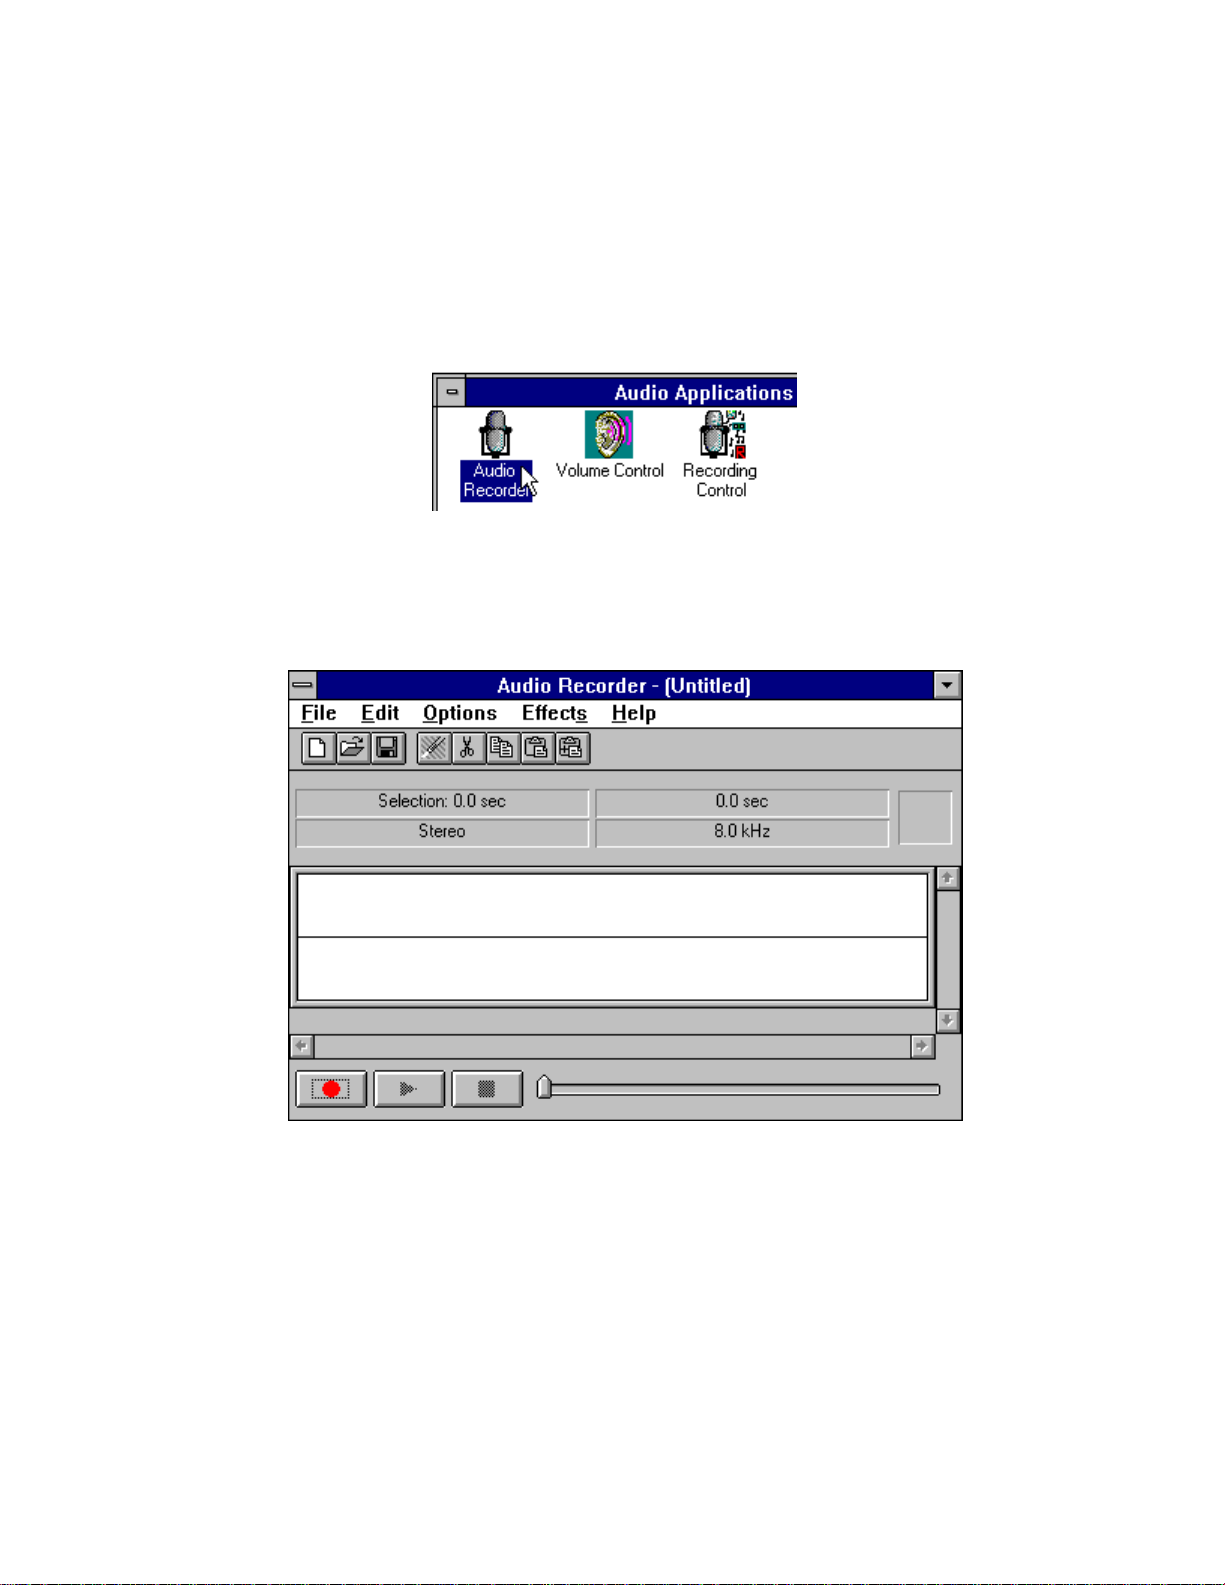
Starting the Audio Recorder
To start the Audio Recorder, open the Audio Applications program group and
double-click the Audio Recorder icon.
OR: choose Run from the Program Manager's File menu, then type
c:\pcaudio\audiorec and click the OK button.
The Audio Recorder window appears:
The Audio Recorder can receive input from microphones, a cassette tape
player, a compact disk player, or any other line-in source.
Areas under the button bar show the length of a selected part of the current
audio file, the total time, mono or stereo, and the sampling rate in kilohertz.
The large area in the center of the window shows the waveform of the current
audio file.
_________________________________________________________________________
The Audio Recorder Page 13
Page 20

Audio Applications 3.0 User Guide
_________________________________________________________________________
The buttons at the bottom of the Audio Recorder window enable you to start
and stop recording and playback.
RECORD PLAY STOP
Begins recording. Begins playback. Ends recording/playback
Audio Recorder Menu Commands
File Menu
New begins a new audio file. The Audio Recorder starts with a new file.
Open enables you to load an existing audio file.
Save stores the current audio file to disk under its existing file name.
Save As enables you to change the name of the audio file before saving it.
Choosing this command displays the Save As Sound File dialog box.
See the page 20 for a description of Options in this dialog box.
Revert restores the previously saved version of the current audio file.
Properties displays the Properties dialog box, from which you can see and
change properties of the current audio file.
Exit closes the Audio Recorder window.
_________________________________________________________________________
The Audio Recorder Page 14
Page 21
Audio Applications 3.0 User Guide
_________________________________________________________________________
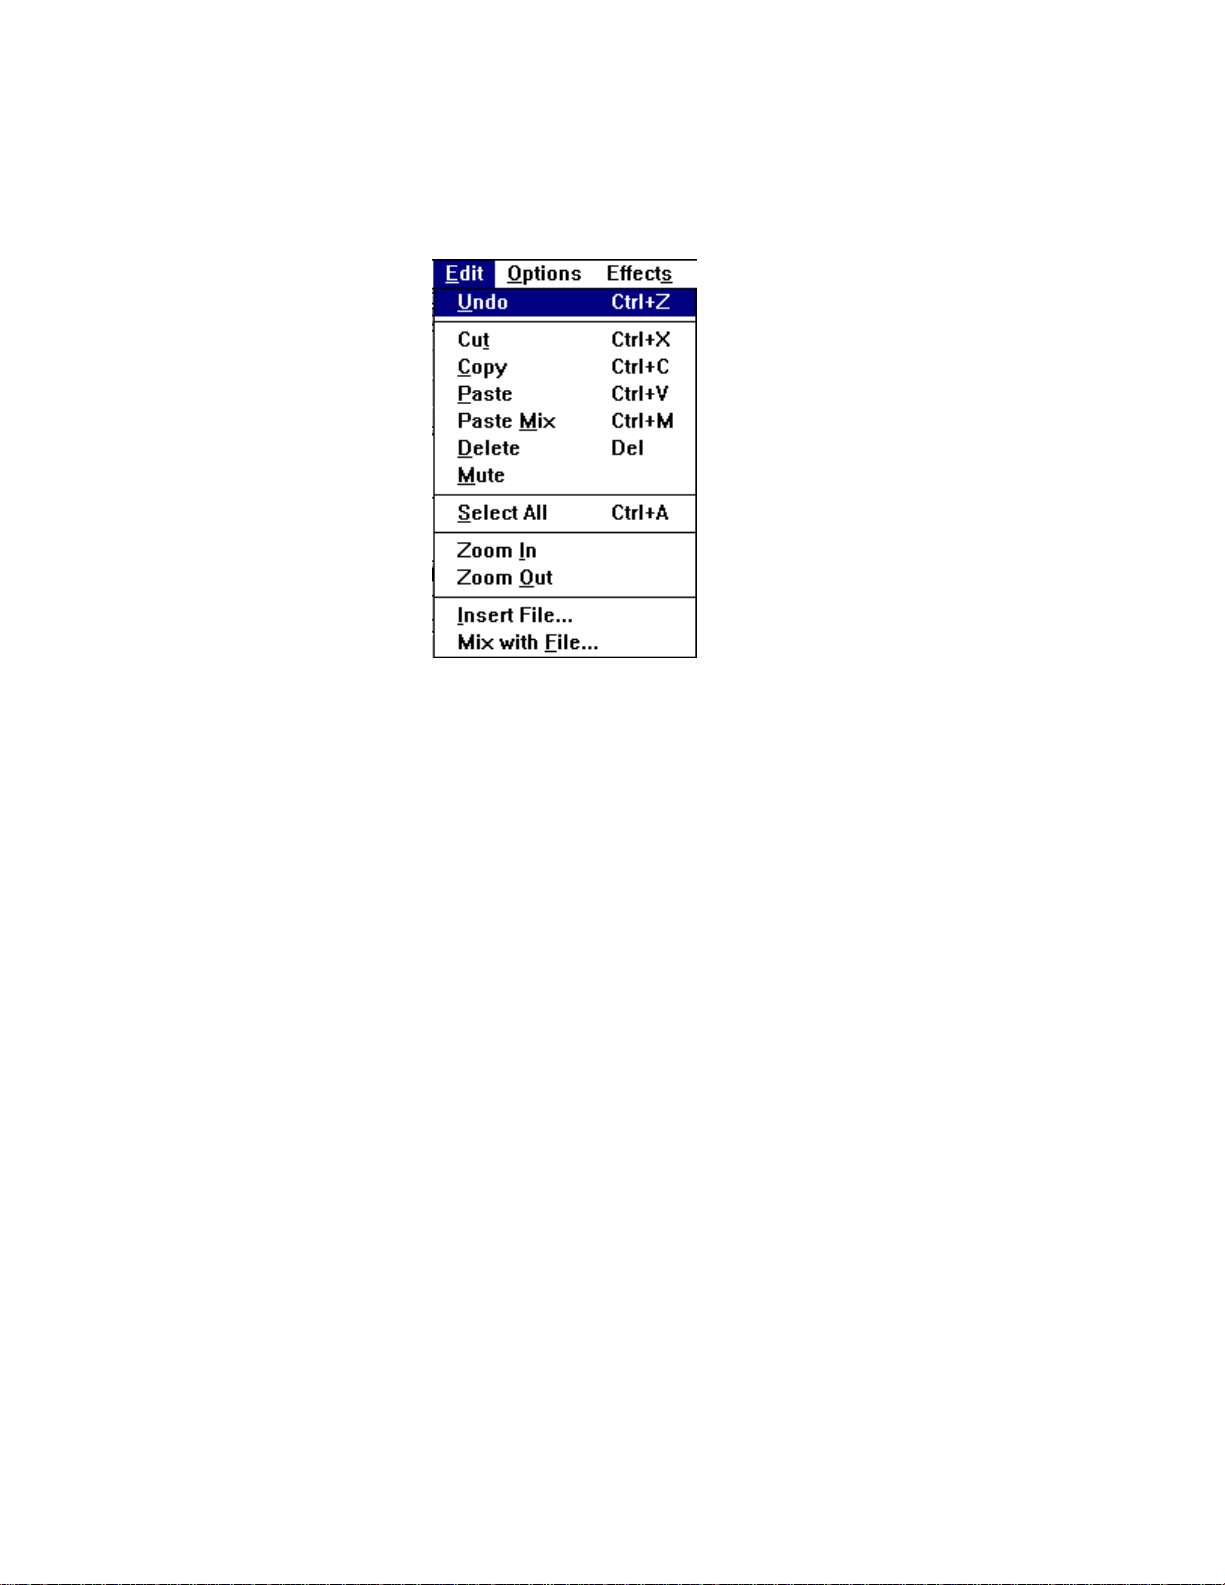
Edit Menu
Undo reverses the last change you made to the current audio file.
Cut erases the selected audio portion and stores it on the Clipboard.
Copy copies the selected audio portion to the Clipboard without removing it.
Paste inserts the Clipboard audio at the cursor, pushing other material ahead.
If audio is selected, Paste replaces the selection with the Clipboard audio.
Paste Mix mixes the Clipboard audio with the audio beginning at the cursor.
Delete erases the selected portion of the recording. To recover a deleted
sound, use the Undo command immediately after using Delete.
Mute silences the selected portion of the audio file, leaving it blank.
To recover a muted sound, use Undo immediately after using Mute.
Select All select the entire recording.
Zoom In enlarges the waveform display.
Zoom Out reduces the waveform display.
_________________________________________________________________________
The Audio Recorder Page 15
Page 22
Audio Applications 3.0 User Guide
_________________________________________________________________________
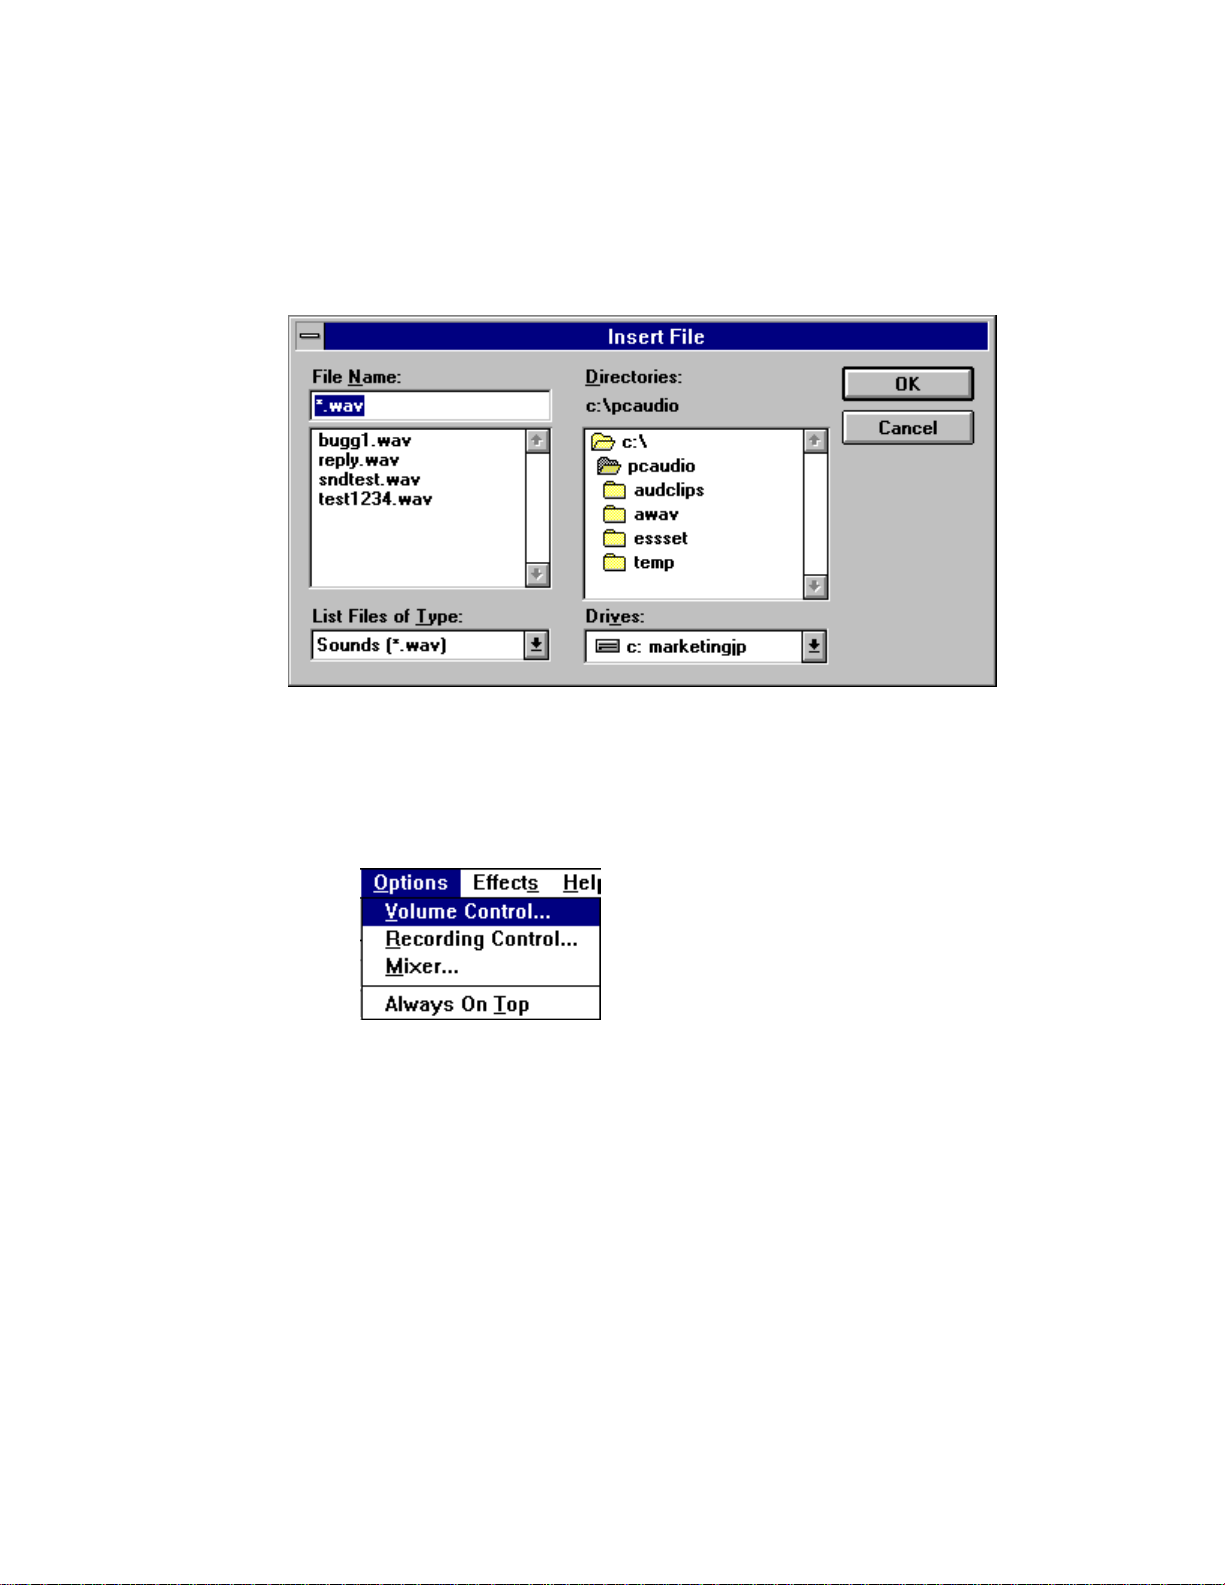
Insert File displays the Insert File dialog box. From here you select an
audio file to be inserted into the current file at the cursor. If audio is
selected, the inserted audio file replaces the selected audio.
Mix with File displays the Mix with File dialog box. From here you select
an audio file to be mixed with the current file, beginning at the cursor.
Options Menu
Options menu commands enable you to display the Volume Control,
Recording Control, and Mixer windows.
Recording Control mixes audio from several sources in a recording.
Volume Control adjusts the play volume.
Mixer combines audio from several sources during playback.
Always On Top displays the Audio Recorder on top of other windows.
_________________________________________________________________________
The Audio Recorder Page 16
Page 23
Audio Applications 3.0 User Guide
_________________________________________________________________________
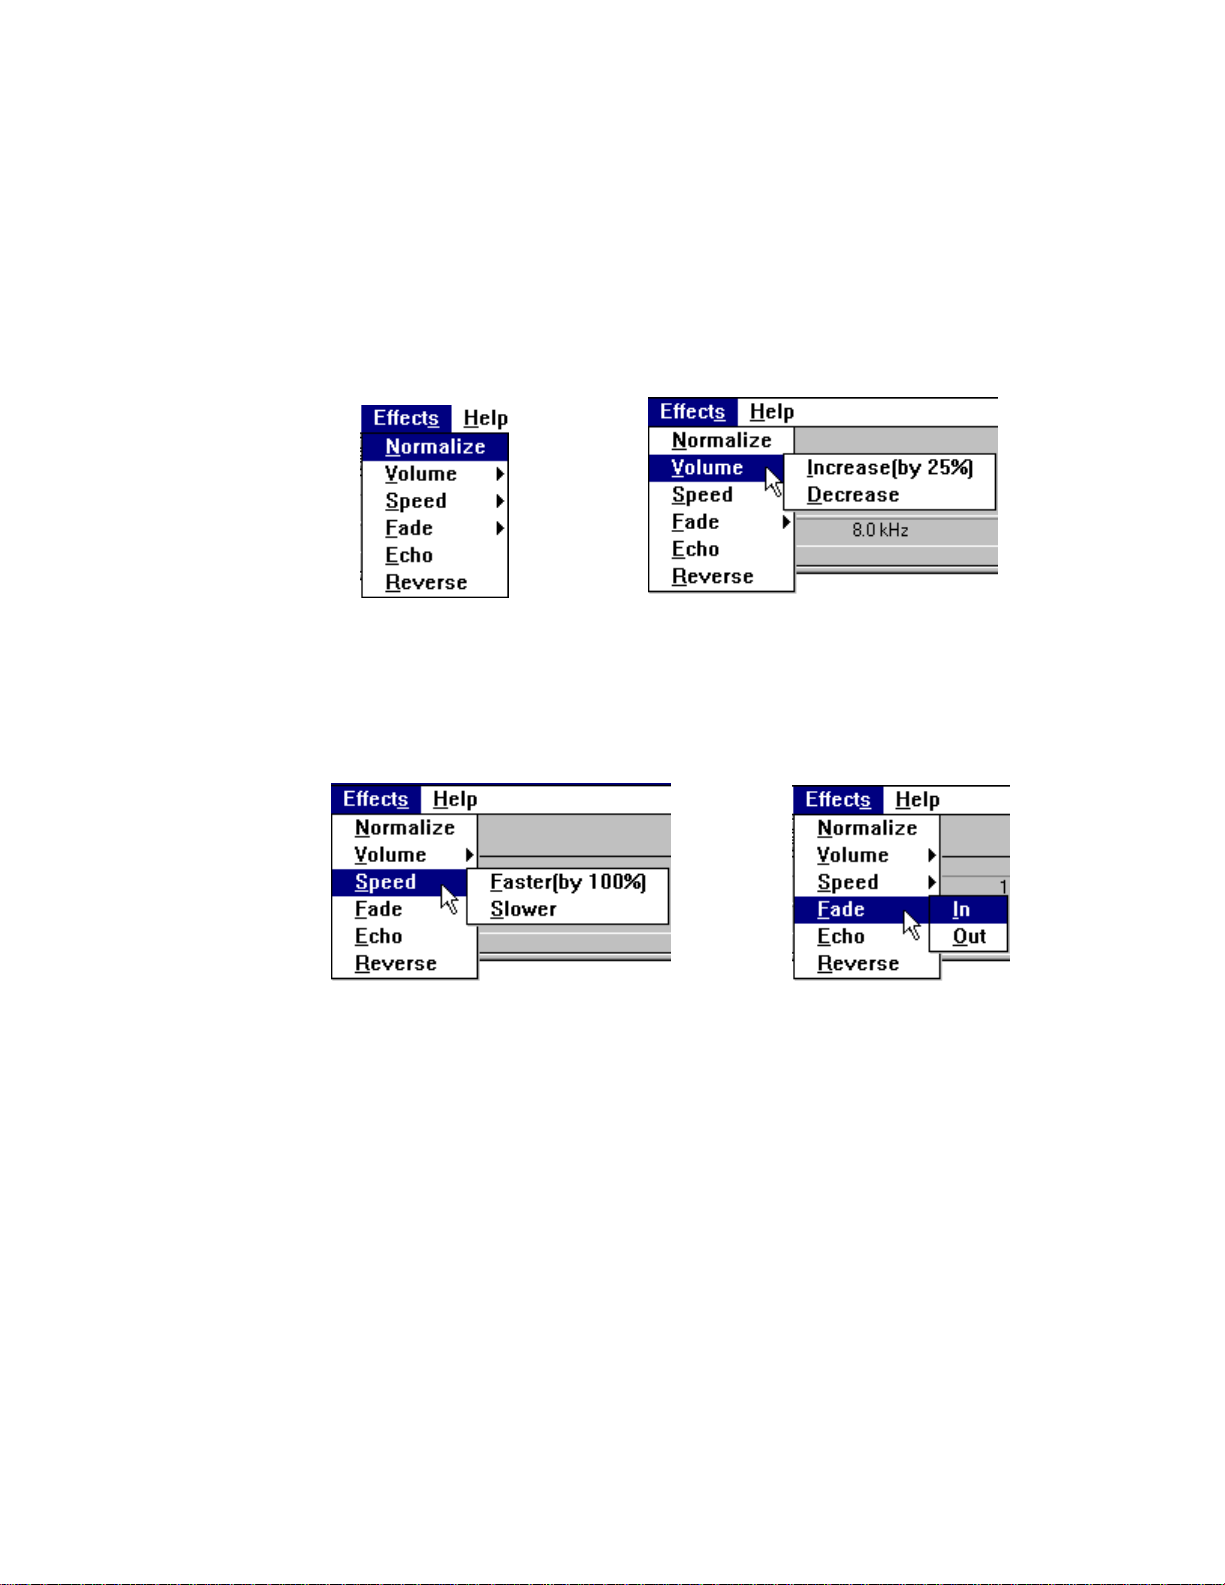
Effects Menu
The Audio Recorder's Effects commands change the waveform of the audio
you have selected. If there is no selection, the entire file is affected. To
change the audio back to what it was before you used an Effects command,
choose Undo from the Edit menu before using any other command.
Normalize amplifies the selected audio to the maximum volume possible
without distortion.
Volume increases or decreases the amplitude of the selected audio by 25%.
Speed changes the selected audio to be 100% faster or slower. The frequency
is not changed.
Fade causes the selected audio to Fade In from its lowest amplitude to its
highest, or Fade Out from its highest amplitude to its lowest.
_________________________________________________________________________
The Audio Recorder Page 17
Page 24

Audio Applications 3.0 User Guide
_________________________________________________________________________
Echo displays the Echo Rate dialog box. From here you set the echo delay
and echo volume for the selected audio.
Reverse flips the selected audio backwards, so the end becomes the beginning
and the beginning becomes the end.
Help Menu
Contents displays topics you can choose for information.
About Audio Recorder gives the version number and copyright information.
_________________________________________________________________________
The Audio Recorder Page 18
Page 25
Audio Applications 3.0 User Guide
_________________________________________________________________________
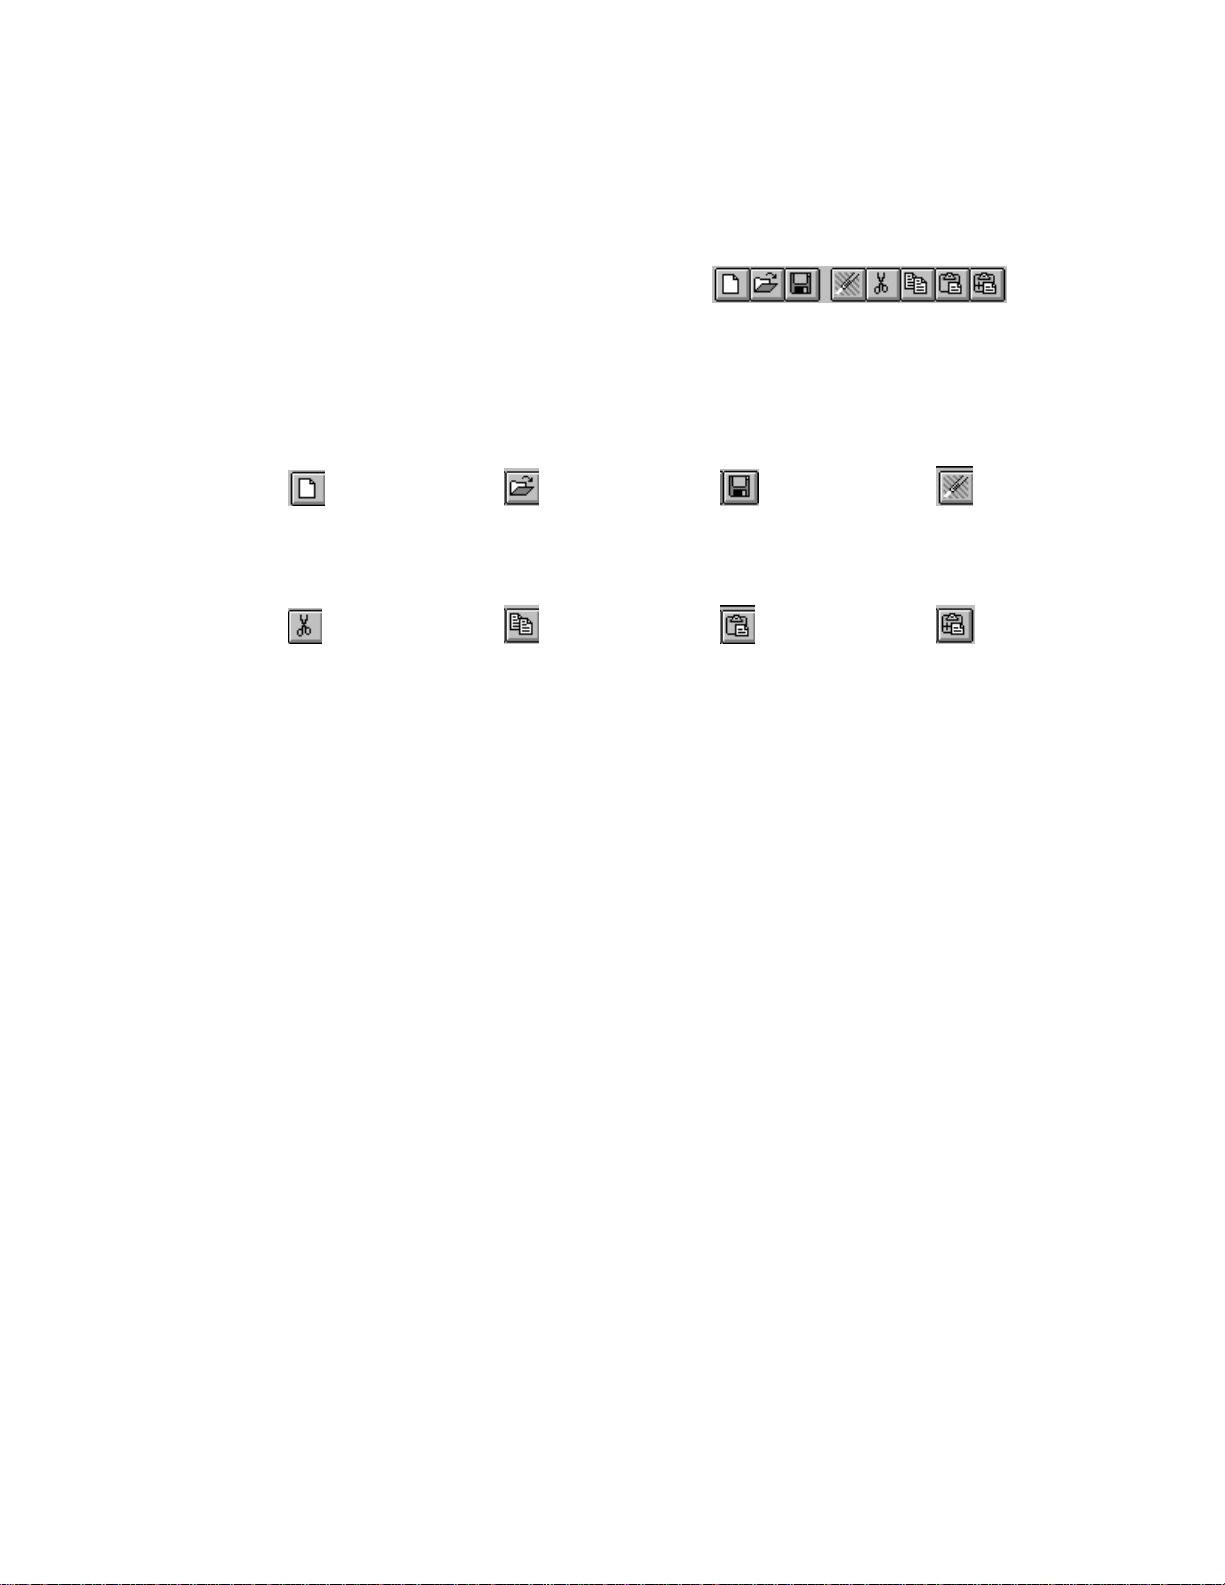
The Audio Recorder Toolbar
For your convenience, eight often-used menu commands are also available as
toolbar buttons at the top of the Audio Recorder window. Here is the
meaning of each button:
New Open Save Undo
Cut Copy Paste Paste Mix
_________________________________________________________________________
The Audio Recorder Page 19
Page 26

Audio Applications 3.0 User Guide
_________________________________________________________________________
Making a Recording
1. Select New from the File menu. The Sound Attributes dialog box
appears:
2. In the Sound Attributes dialog box, choose settings for Sampling Rate,
Stereo (on or off), and Format, then click the OK button.
• Choose one of the PCM (uncompressed) formats if you want the
highest sound quality, or it you wish to edit or modify the recording
with Effects commands before you save it.
• Choose one of the ESPCM or ADPCM compression formats if you
wish to save disk space and don't mind sacrificing some sound quality.
2. In the Audio Recorder window, click the Record button.
Speak into the microphone or turn on the line-in source.
3. Click the Stop button to end the recording.
_________________________________________________________________________
The Audio Recorder Page 20
Page 27

Audio Applications 3.0 User Guide
_________________________________________________________________________
4. Select Save As from the File menu. The Save As dialog box appears:
5. In the Save As dialog box:
• If the file is uncompressed and you wish to save it uncompressed,
do not click the Options button. Just choose a directory location,
enter a name for the audio file, then click the OK button to save it.
The extension for an uncompressed audio file is .wav.
• If the file is uncompressed and you wish to compress it, click the
Options button and select the compression you want, then click the
OK button. The extension for a compressed audio file is .aud.
You can use the Recording Control window to regulate the mix of audio from
several sources. To display this window, choose Recording Control from
the Options menu. If you do not open the Recording Control window, the
Audio Recorder uses the source settings previously in effect. See the
Recording Control section for more information.
_________________________________________________________________________
The Audio Recorder Page 21
Page 28

Audio Applications 3.0 User Guide
_________________________________________________________________________
Playing an Audio File
1. Load an audio file into the Audio Recorder. It can be a recording you
have just made, or use the Open command (File menu) to load a file
stored on disk.
2. Click the Audio Recorder's Play button to hear the audio file. The file
will play to the end unless you interrupt it by pressing the Stop button.
_________________________________________________________________________
The Audio Recorder Page 22
Page 29

Audio Applications 3.0 User Guide
_________________________________________________________________________
Using the Waveform Display
The Audio Recorder's waveform display provides a graphic representation of
the audio file currently in memory. You control the display with the vertical
and horizontal scroll bars.
• To zoom in on (or magnify) the waveform, move the vertical scroll
button down. To zoom out, move the vertical scroll button up.
• To see more of the waveform ahead or behind the part currently
displayed, click the right or left area of the horizontal scroll bar.
• To mark a portion of the audio file for playback, use the mouse to select
that portion in the waveform display. Then choose Play to hear the
selected section.
• To deselect a selected portion of the waveform, click anywhere in the
waveform display.
• To select the entire file, double-click anywhere in the waveform display.
Adding the Volume Control and Mixer
To regulate the playback sound level or stereo balance, choose Volume
Control from the Options menu. The Volume Control window appears. See
the Volume Control section for more information.
To play the current audio file together with other sound sources, choose
Mixer from the Options menu. The Mixer window appears. See the Mixer
section for more information.
_________________________________________________________________________
The Audio Recorder Page 23
Page 30

Audio Applications 3.0 User Guide
_________________________________________________________________________
Editing an Audio File
Use the Open command (File menu) to load an audio file from disk to the
Audio Recorder. You can also edit a file you just recorded.
To delete an audio section:
1. With the mouse, select the waveform of the audio to be deleted.
2. Press the Del key, or choose the Delete command. The selected audio
disappears, joining the audio before and after it. If you wish to save the
deleted section, use the Cut command instead of Delete.
To restore a deleted audio section, choose the Undo command before making
any other changes to the audio file.
To mute an audio section:
1. Select the waveform of the audio to be muted.
2. Choose Mute from the Edit menu. The selected audio is silenced; its
waveform is reduced to a flat line.
To restore a muted audio section, choose the Undo command before making
any other changes to the audio file.
_________________________________________________________________________
The Audio Recorder Page 24
Page 31

Audio Applications 3.0 User Guide
_________________________________________________________________________
To move or copy an audio section:
1. Select the waveform of the audio to be moved or copied.
2. Click the Cut button to erase the selected audio and place it on the
Clipboard, or click the Copy button to leave the selected audio as is while
copying it to the Clipboard.
3. Place the cursor where you want the Clipboard material to appear and
click the Paste button.
To record new audio and place it on the Clipboard:
1. Place the cursor at the end of the waveform, or play the file to the end.
2. With microphones or other input sources ready, click the Record button
to record new material. Click the Stop button to finish.
3. Use the mouse to select the section just recorded, then click the Cut or
Copy button to put that audio section onto the Clipboard.
To insert audio from the Clipboard:
1. Place the cursor at the point in the waveform where you want to insert
audio from the Clipboard.
2. Click the Paste button. The Clipboard audio waveform appears at the
cursor. No audio is erased.
To replace the selected audio with Clipboard audio:
1. Use the mouse to select the waveform of the audio to be replaced.
2. Click the Paste button. The Clipboard audio appears in place of the
selected audio.
_________________________________________________________________________
The Audio Recorder Page 25
Page 32

Audio Applications 3.0 User Guide
_________________________________________________________________________
To mix Clipboard audio with the selected audio:
1. Place the cursor at the beginning of the audio to be mixed, or select a
section of audio to be mixed.
2. Click the Paste Mix button. The Clipboard audio is combined with the
audio after the cursor. If a section of audio was selected, the Clipboard
audio is combined with the selected audio until the end of either the
Clipboard or the selected audio.
To insert audio from a file, or replace a selected audio segment
with audio from a file:
1. Place the cursor at the point in the waveform where you want to insert an
audio file, or select the audio you want to replace with an audio file.
2. From the Edit menu, choose Insert File to display the Insert File dialog
box. Then choose an audio file to insert into the current file. If audio is
selected, the inserted audio file replaces the selected audio.
_________________________________________________________________________
The Audio Recorder Page 26
Page 33

Audio Applications 3.0 User Guide
_________________________________________________________________________
To mix audio from a file:
1. Place the cursor at the beginning of the audio to be mixed.
2. From the Edit menu, choose Mix with File to display the Mix With File
dialog box. Then choose an audio file to combine with the current file,
beginning at the cursor.
Changing the Waveform with Effects Commands
The Effects commands are described in the section above on Audio Recorder
Menu Commands--Effects Menu. These commands change the waveform of
the audio you have selected. If there is no selection, the entire file is affected.
The commands are:
Normalize: highest amplitude possible Fade: In or Out
Volume: Increase or Decrease Echo: you set the delay, volume
Speed: Faster or Slower Reverse: reverses the recording
_________________________________________________________________________
The Audio Recorder Page 27
Page 34

Audio Applications 3.0 User Guide
_________________________________________________________________________
Adding Sound to a Document: Drag and Drop
The Audio Recorder's drag and drop feature enables you to embed audio files
in documents.
1. Open a document in the appropriate Windows application.
2. Load an audio file from disk to the Audio Recorder, or use an audio file
you just recorded.
3. Move the cursor to the icon at the top right of the Audio Recorder. The
cursor changes into a hand. Hold the mouse button and drag the icon to
the document window, then release the button at the place you want the
audio icon to appear.
4. To play an audio object in a document, double-click its icon.
You can also add audio to a document from the document's application. Place
the cursor where you want the audio icon to appear, choose the application's
command for inserting an object, then select Audio Recorder in the list box.
Refer to the OLE section of Windows User Guide for more information.
_________________________________________________________________________
The Audio Recorder Page 28
Page 35

Audio Applications 3.0 User Guide
_________________________________________________________________________
Changing an Audio File's Properties
An audio file contains more than sound. You can attach a title, description,
and an icon to the current audio file. To do so, choose Properties from the
File menu. The Properties dialog box appears.
In this dialog box, you can place the cursor in the Label or Description area to
add or change the label or description for the audio file.
Click the Play button to hear the audio file.
_________________________________________________________________________
The Audio Recorder Page 29
Page 36

Audio Applications 3.0 User Guide
_________________________________________________________________________
The Audio Recorder assigns a default picture of a microphone to each audio
file. To select another picture more representative of the audio file's contents,
click the Set Picture button. The Set Picture dialog box appears:
From here, select the picture to appear with the audio file. It can be any
graphic contained in a bitmap (.BMP or .DIB), wave (.WAV), icon (.ICO),
executable (.EXE) or library (.DLL) file.
The picture you select will appear in the Audio Recorder. It will also appear
in any document in which you embed the audio file.
When you are finished, click the OK button.
_________________________________________________________________________
The Audio Recorder Page 30
Page 37

Audio Applications 3.0 User Guide
_________________________________________________________________________
4: The Recording Control
Introduction
The Recording Control enables you to regulate the recording level and stereo
balance at which sound is recorded from multiple sources. You use the
Recording Control with the Audio Recorder or Extended Recorder during
recording.
Starting the Recording Control
There are several ways to start the Recording Control:
• From the Audio Applications program group, double-click the Recording
Control icon.
OR:
• From the Audio Recorder window, open the Options menu and choose
Recording Control.
_________________________________________________________________________
The Recording Control Page 31
Page 38

Audio Applications 3.0 User Guide
_________________________________________________________________________
The Recording Control window appears.
The Recording Control can receive input from a microphone, a compact disk
player, a synthesizer, or any other line-in source. The Recording Control
displays recording level and stereo balance controls (ES688 only) for each of
your computer's hardware sources.
To include a recording source, click the circle in front of its name.
To adjust the stereo balance of any source, drag its top horizontal sliding bar
left or right (for the ES688 only.)
To adjust the recording level of a source, drag its vertical sliding bar up or
down.
To monitor a recording in progress, click Record Monitor.
_________________________________________________________________________
The Recording Control Page 32
Page 39

Audio Applications 3.0 User Guide
_________________________________________________________________________
Recording Control Menu Commands
Turn on Always On Top to display the Recording Control on top of other
windows.
Help displays information about how to use Recording Control.
About Recording Control gives the version number and copyright
information.
_________________________________________________________________________
The Recording Control Page 33
Page 40

Audio Applications 3.0
_________________________________________________________________________
The Volume Control
Introduction
(ES688 only) at which sound is played. You can use the Volume Control
with the Audio Recorder during playback. If you are playing multiple sources,
regulator.
Starting the Volume Control
• Open the Audio Applications program group and double-click the
OR:
• From the Audio Recorder Options menu or the Mixer menu, choose the
Volume Control command.
_________________________________________________________________________
Page 34
Page 41

Audio Applications 3.0 User Guide
_________________________________________________________________________
The Volume Control window appears.
The Volume Control can recieve input from a microphone, a cassette tape
player, a compact disk player, or any other line-in source.
• To adjust the stereo balance, drag the horizontal sliding bar left or right
(for the ES688 only.)
• To adjust the volume, drag the vertical sliding bar up or down.
• To turn the sound off, click the Mute button.
• To turn the sound back on, click the Mute button again.
_________________________________________________________________________
The Volume Control Page 35
Page 42

Audio Applications 3.0 User Guide
_________________________________________________________________________
The Volume Control Menu
Turn on Always On Top to display the Volume Control on top of other
windows.
Mixer displays the Mixer window if you want to mix the playing of sounds
from several sources.
Help displays information on how to use Volume Control.
About Volume Control gives the version number and copyright information.
_________________________________________________________________________
The Volume Control Page 36
Page 43

Audio Applications 3.0 User Guide
_________________________________________________________________________
6: The Mixer
Introduction
The Mixer enables you to combine signals from several audio sources during
playback, with control over the volume and stereo balance of each source.
When you use the Audio Recorder to play an audio file, you can open the
Mixer to combine the audio from the file with audio from other sources.
The Volume Control is a natural companion to the Mixer. The Volume
Control acts as a master regulator of the combined signal from the Mixer.
Starting the Mixer
There are several ways to start the Mixer:
• From the Audio Applications program group, double-click the Mixer
icon.
OR:
• From the Audio Recorder Options menu or the Volume Control menu,
choose Mixer.
_________________________________________________________________________
The Mixer Page 37
Page 44

Audio Applications 3.0 User Guide
_________________________________________________________________________
The Mixer Window
The Mixer can recieve input from a waveform audio file, a microphone, a
compact disk player, a synthesizer, or other line-in source. The Mixer's
appearance depends on your computer hardware; the Mixer pictures here
assume the presence of the ESS Stereo Magician Plus (ES688) card.
To adjust the stereo balance of a source, drag its top sliding bar left or right
(for the ES688 only.) To adjust the volume of a source, drag its vertical
sliding bar up or down.
To turn off the audio from any source, click its Mute button. Click the Mute
button again to turn the audio back on.
Adding the Volume Control
The Volume Control serves as a master control to the Mixer. To display the
Volume Control window, choose Volume Control from the menu.
_________________________________________________________________________
The Mixer Page 38
Page 45

Audio Applications 3.0 User Guide
_________________________________________________________________________
Mixer Menu Commands
Turn on Always On Top to display the Mixer on top of other windows.
Volume Control displays the Volume Control at the left side of the Mixer.
Help displays information about how to use the mixer.
About Mixer gives the version number and copyright information.
_________________________________________________________________________
The Mixer Page 39
Page 46

Audio Applications 3.0 User Guide
_________________________________________________________________________
7: The Extended Recorder
Introduction
The Extended Recorder is designed as a tool for recording meetings,
conversations, and dictation. Like the Audio Recorder, the Extended
Recorder records, compresses, stores, and plays voice, music, and other
sound. Unlike the Audio Recorder, the Extended Recorder compresses and
stores the audio file directly to your hard disk, using on-chip ESPCM
compression. The recording time is limited only by the amount of hard disk
space you have available.
The Extended Recorder can record to and playback from both PCM and
.AUD formats. PCM is the Microsoft Windows 3.1 audio file format. The
.AUD format uses ESPCM compression to produce an audio file. The
Extended Recorder provides a choice of linear PCM (8 or 16 bits) and
ESPCM low (4 bits) compression.
System Requirements
Use the Extended Recorder with a hard disk compression utility only if you
have a high-performance system and are using a low data rate for recording
and playback. Otherwise, the computer's CPU may become overloaded.
If you wish to use 16-bit stereo at 44 kHz for recording or playback, we
recommend that your computer have the following capabilities:
• a 486 running at 50 MHz or more
• 8 megabytes or more of RAM
• an average hard disk access time of 15 milliseconds or faster
Computers without these capabilities may lose data if you attempt 16-bit
stereo, 44 kHz recording or playback.
_________________________________________________________________________
The Extended Recorder Page 40
Page 47

Audio Applications 3.0 User Guide
_________________________________________________________________________
Starting the Extended Recorder
Open the Audio Applications program group and double-click the Extended
Recorder icon.
The Extended Recorder window appears. To expand the wndow so it shows
more information, turn on Expanded View in the Options menu:
Here is the expanded view of the Extended Recorder window:
total length in seconds, the length in megabytes, the sample rate, mono or
stereo, bits per sample, and the free disk space and recording time avauilable.
_________________________________________________________________________
The Extended Recorder Page 41
Page 48

Audio Applications 3.0 User Guide
_________________________________________________________________________
These buttons enable you to start and stop recording and playback:
RECORD PLAY STOP
Begins recording. Begins playback. Ends recording/playback
Extended Recorder Menu Commands
File Menu
New creates a new audio file. When you start the Extended Recorder, a new
file is created automatically. New also opens the Sound Attributes dialog box,
which enables you to set the sampling rate, mono or stereo, and sound format.
Open displays the Open dialog box, from which you can select an audio file to
bring into the Extended Recorder.
_________________________________________________________________________
The Extended Recorder Page 42
Page 49

Audio Applications 3.0 User Guide
_________________________________________________________________________
Save As saves the audio file with the name and in the location you specify.
You can also choose to save the file as read only.
Exit closes the Extended Recorder.
Options Menu
Temp. File Directory enables you to set the hard drive location for the .TMP
files that the Extended Recorder creates while recording. When you save an
audio file, its .TMP file is copied to the name and location you specify.
Voice Activation displays the following dialog box:
Voice Activation will pause the recording when there is no input from the
recording source. To turn voice activation on, click the Pause Recording
After check box, then set the Seconds of Silence field. The recording will be
paused only after the amount of time of no input set in the Seconds of Silence
field has passed. Recording will resume when input from the recording source
resumes.
Help Menu
_________________________________________________________________________
The Extended Recorder Page 43
Page 50

Audio Applications 3.0 User Guide
_________________________________________________________________________
Contents displays a list of topics you can choose for information on Extended
Recorder features.
About Extended Recorder gives the version number and copyright
information.
The Extended Recorder Toolbar
For your convenience, five often used menu commands are also available as
toolbar buttons at the top the the Extended Recorder window.
New Open Save Exit
Expanded View Normal View
_________________________________________________________________________
The Extended Recorder Page 44
Page 51

Audio Applications 3.0 User Guide
_________________________________________________________________________
Making a Recording
1. Open the File menu and select New. New opens the Sound Attributes
dialog box, where you can set the sample rate, the sound format, and
whether to record in mono or stereo. After you set the attributes, click
OK.
2. Click the Record button. Speak into the microphone or turn on the linein source.
3. Click the Stop button to pause or end the recording.
4. Open the File menu and select Save As. In the Save As dialog box,
choose a directory location and type a name for the audio file, and click
Read Only if you want to save the file as read only. Click the OK
button to save it.
Adding the Recording Control
If your hardware includes a mixer, you can use the Recording Control window
to regulate the mix of audio from several sources. If you do not open the
Recording Control window, the Extended Recorder uses the source settings
previously in effect. See the Recording Control section for more information.
_________________________________________________________________________
The Extended Recorder Page 45
Page 52

Audio Applications 3.0 User Guide
_________________________________________________________________________
Playing an Audio File
1. Load an audio file into the Extended Recorder. It can be a recording you
have just made, or use the Open command (File menu) to load a file
stored on disk.
2. Click the Extended Recorder's Play button to hear the audio file. The file
will play to the end unless you interrupt it by pressing the Stop button.
You don't have to play an audio file from the beginning. Use the scroll bar to
select any place in the file to begin playing.
Adding the Volume Control and Mixer
To regulate the playback sound level or stereo balance, open the Volume
Control window. See the Volume Control section for more information.
To mix the audio file with other sound sources, open the Mixer window.
See the Mixer section for more information.
_________________________________________________________________________
The Extended Recorder Page 46
Page 53

Audio Applications 3.0 User Guide
_________________________________________________________________________
8: The Audio Clip Library
Introduction
From the Audio Clip Library you can select and play audio files stored under
three headings (or folders): music, phrases, and sounds. You can also add
folders and audio files of your own to the Audio Clip Library.
You can play any audio file in the library by using the Audio Recorder
(opened automatically by the Audio Clip Library), the Microsoft Sound
Recorder, or other recorders compatible with the Windows .WAV format.
Audio Clip Library folders are stored in the directory PCAUDIO under the
subdirectory AUDCLIPS.
Starting the Audio Clip Library
Open the Audio Applications program group and double-click the Audio Clip
Library icon.
_________________________________________________________________________
The Talking Calculator Page 47
Page 54

Audio Applications 3.0 User Guide
_________________________________________________________________________
The Audio Clip Library window appears:
The Audio Clip Library displays folders titled music, phrases, and sound.
The Music folder contains short musical interludes. The Phrases folder
contains phrases used in business settings. The Sound folder contains a
variety of mechanical and animal sound clips.
To open a folder:
Double-click the folder, or select one and choose Open from the File menu.
The folder's window appears on top of the Audio Clip Library window. For
example, here is the music folder window with its music audio files:
_________________________________________________________________________
The Talking Calculator Page 48
Page 55

Audio Applications 3.0 User Guide
_________________________________________________________________________
To open an audio file:
In the music, phrases, or sounds window, double-click the name of an audio
file or select the name and choose Open from the File menu. The Audio
Recorder opens automatically, and the file you selected is loaded. For
example, here is the QUEST1 audio file in the Audio Recorder:
For information on recording, editing, and playback, see the section on
the Audio Recorder.
To add an audio file to the Audio Clip Library:
1. Bring the audio file into the Audio Recorder.
2. From the Audio Recorder, choose Save As from the File menu.
3. In the dialog box, select the directory PCAUDIO, select the AUDCLIPS
subdirectory, then select a subdirectory (folder) for the audio file, and
enter a file name. For example, you could store a clip from Beethoven's
Fifth Symphony in the music folder:
_________________________________________________________________________
The Talking Calculator Page 49
Page 56

Audio Applications 3.0 User Guide
_________________________________________________________________________
4. Click the OK button. The next time you open or refresh the music folder
window, the new audio file appears:
_________________________________________________________________________
The Talking Calculator Page 50
Page 57

Audio Applications 3.0 User Guide
_________________________________________________________________________
To add a new folder to the Audio Clip Library:
1. From the DOS prompt or a file manager, select the directory PCAUDIO,
then select the subdirectory AUDCLIPS.
2. Create a subdirectory with the name you want on the new folder.
The next time you open or refresh the Audio Clip Library window, the new
folder appears. For example, here is a new folder for audio clips of laughter:
_________________________________________________________________________
The Talking Calculator Page 51
Page 58

Audio Applications 3.0 User Guide
_________________________________________________________________________
To change a file name:
1. With the music, phrases, or sounds window open, select the audio file
whose name you wish to change.
2. Choose Rename from the File menu. The Rename dialog box appears
with the name of the file.
3. Type a new name and click the OK button. The file name is changed.
_________________________________________________________________________
The Talking Calculator Page 52
Page 59

Audio Applications 3.0 User Guide
_________________________________________________________________________
Audio Clip Library Menu Commands
File Menu
Open displays the currently selected item. From the Audio Clip Library
window, Open displays the files in the selected folder. From a folder
window, Open loads the selected audio file into the Audio Recorder.
Rename enables you to change the name of the currently selected file.
Exit closes the current window. Choose Exit from a folder to close it and
display the Audio Clip Library window. Choose Exit from the Audio
Clip Library window to quit the program.
_________________________________________________________________________
The Talking Calculator Page 53
Page 60

Audio Applications 3.0 User Guide
_________________________________________________________________________
Window Menu
Refresh checks the directory and updates the contents of the Audio Clip
Library window or folder window.
Help Menu
Contents displays a list of topics you can choose for information on the
Audio Clip Library.
About gives the version number and copyright information.
_________________________________________________________________________
The Talking Calculator Page 54
Page 61

Audio Applications 3.0 User Guide
_________________________________________________________________________
9: The Talking Calculator
Introduction
The Talking Calculator enables you to perform all the operations of a regular
calculator. In addition, it tells you each number and operator as you enter it,
then announces the result when you choose the equal operator.
Starting the Talking Calculator
Open the Audio Applications program group and double-click the
Talking Calculator icon.
The Talking Calculator window appears.
_________________________________________________________________________
The Talking Calculator Page 55
Page 62

Audio Applications 3.0 User Guide
_________________________________________________________________________
Performing Calculations
The calculator is easiest to use with the mouse -- just point to a calculator
number or function button and click it. You can also use the keyboard for
basic operations such as addition (+), subtraction (-), multiplication (*),
division (/), and summation (=). As you work, the Talking Calculator speaks
each number and operation you enter, as well as the resulting answer.
To perform a calculation
1. Enter the first number in the calculation.
2. Choose the operator you want to use. See the next page for a list of
calculator buttons, their keyboard equivalents, and their functions.
3. Enter the next number. To erase a digit, click the Back button.
To erase the entire line, click the CE (Clear Entry) button.
4. To hear and see the result, click the = (equal) button.
From the keyboard, press either the = key or the Enter key.
To erase the entire calculation and start again, click the AC (All Clear) button
or press the Esc key.
Here are some example of calculations:
100 + 8 = 108
100 + 8 ∗ 2 = 216
100 + 8 + 10 = 118
_________________________________________________________________________
The Talking Calculator Page 56
Page 63

Audio Applications 3.0 User Guide
_________________________________________________________________________
Calculator Functions
Button Key Function
AC Esc All Clear--deletes the current calculation.
CE Del Clear Entry--deletes the current number.
Back Backspace Deletes the last digit of the current number.
+ + Addition
- - Subtraction
* * Multiplication
/ / Division
sqrt @ Square root of current number
% % Percentage
+/- F9 Change the sign of the current number
1/x r Reciprocal of the current number
= = or Enter Result of the current calculation
Click again to repeat the operation
. . or , Decimal point
REP Repeat the last announcement
DIG Hear each digit of the result
NUM Hear the result as a whole number
ANS Hear only the result
MUT Silence the calculator
_________________________________________________________________________
The Talking Calculator Page 57
Page 64

Audio Applications 3.0 User Guide
_________________________________________________________________________
Using Calculator Memory
The buttons to the left of the numbers enable you to store a value and recall it
at any time. When a value is stored in memory, it appears with an M in the
top left of the display.
Button Key Function
M+ Mem Plus Crtl+P Store the current value
M- Mem Minus Ctrl+M Store the negative of the current value
MC Mem Clear Crtl+L Erase any value stored in memory
MR Mem Recall Ctrl+R Insert the value stored in memory
_________________________________________________________________________
The Talking Calculator Page 58
Page 65

Audio Applications 3.0 User Guide
_________________________________________________________________________
Regulating the Announcements
• To repeat any announcement, click the REP button.
• To hear each digit of the result, click the DIG button or choose Digit
from the Options menu. To hear the result as a whole number, click the
NUM button or choose Number from the Options menu.
• To hear only the result announced, click the ANS button or choose
Answer Only from the Options menu.
• To silence the calculator, click the MUT button or choose Mute from the
Optioins menu.
• To hear results announced to three decimal places, choose 3 Decimal
from the Options menu. To hear all the decimal places announced,
choose All Decimal.
_________________________________________________________________________
The Talking Calculator Page 59
Page 66

Audio Applications 3.0 User Guide
_________________________________________________________________________
The Help Menu
Contents displays a list of topics you can choose for information on the
Talking Calculator.
About Talking Calculator gives the version number and copyright
information.
_________________________________________________________________________
The Talking Calculator Page 60
Page 67

Audio Applications 3.0 User Guide
_________________________________________________________________________
10: The Talking Clock
Introduction
The Talking Clock displays the time in an analog or digital format. It also
announces the time whenever you choose the Say command.
You can set the time and whether or not the date and seconds appear. For the
digital time, you can choose the font used and select the 12 or 24 hour format.
Starting the Talking Clock
Open the Audio Applications group and double-click the Talking Clock icon.
The Talking Clock window appears with the analog or digital time display.
_________________________________________________________________________
The Talking Clock Page 61
Page 68

Audio Applications 3.0 User Guide
_________________________________________________________________________
Positioning the Clock
As with most windows, you can size and move the Talking Clock window as
you like. The System menu (the button in the top left corner of the window)
provides two additional settings for posititioning the clock.
Always On Top displays the clock window or icon on top of other windows,
even if they are selected.
Always Minimize keeps the Talking Clock minimized to an icon, with the
time and date (if on) visible. To announce the time, double-click the icon.
To display the window again, click the icon to open the System menu, turn off
Always Minimize, then open the System menu again and choose Restore.
Announcing the Time
To announce the current time, click Say in the menu bar:
To announce the time by double-clicking the icon, turn on Always Minimize
from the System menu. See the next page for details.
_________________________________________________________________________
The Talking Clock Page 62
Page 69

Audio Applications 3.0 User Guide
_________________________________________________________________________
Setting the Clock
Commands on the Settings menu enable you to regulate what appears in the
Talking Clock.
To set the time:
1. From the Settings menu, choose Set Time. This dialog box appears:
2. Select the hour and minute and type new values, or use the up or down
arrows to increase or decrease the number of hours and minutes.
4. Click the OK button.
To switch between the analog and digital display:
• Choose Analog or Digital from the Settings menu.
_________________________________________________________________________
The Talking Clock Page 63
Page 70

Audio Applications 3.0 User Guide
_________________________________________________________________________
To change the font used by the digital display:
1. From the Settings menu, set the display to Digital.
2. Choose Set Font from the Settings menu to display the Font dialog box.
3. Select a font from the list box.
4. Click the OK button.
To turn the seconds display on and off:
• From the Settings menu, choose Seconds.
To turn the date display on and off:
• From the Settings menu, choose Date.
To select the 12 hour or 24 hour digital display:
• From the Options menu, choose 24 Hour Mode or 12 Hour Mode.
_________________________________________________________________________
The Talking Clock Page 64
Page 71

Audio Applications 3.0 User Guide
_________________________________________________________________________
The Help Menu
Contents displays a list of topics you can choose for information on the
Talking Clock.
About Talking Clock gives the version number and copyright information.
_________________________________________________________________________
The Talking Clock Page 65
Page 72

Audio Applications 3.0 User Guide
_________________________________________________________________________
11: The Chime
Introduction
The Chime announces the time or plays other sound every hour, half hour, or
quarter hour.
Starting the Chime
From the Audio Applications group, double-click the Chime icon.
The Chime window appears.
To activate or deactivate the Chime, click the ON or OFF button. To hear
the chime, click the Play button. Click the Stop button to halt the playing.
The Chime continues to be active if you reduce it to an icon.
_________________________________________________________________________
The Chime Page 66
Page 73

Audio Applications 3.0 User Guide
_________________________________________________________________________
Setting the Chime
To set the Chime, click the Settings menu. The Set Chime dialog box
appears:
• To activate or deactivate the Chime, click the ON or OFF button.
• To hear the Chime, click the Play button.
• To change the Chime's sound, select the one you want from the Chime
Sound Type list box.
• To change the Chime interval, under Chime Time select Hour, Half
Hour, or Quarter.
When you are finished, click the OK button.
The Help Menu
Contents displays topics you can choose for information on the Chime.
About Chime gives the version number and copyright information.
_________________________________________________________________________
The Chime Page 67
Page 74

Audio Applications 3.0 User Guide
_________________________________________________________________________
12: The Audio Reminder
Introduction
The Audio Reminder has two alarms, each with a separate time, sound, and
snooze settings. Once you set the alarms, they will go off on schedule every
day as long as the Audio Reminder window is open or minimized to an icon.
Starting the Audio Reminder
In the Audio Applications group, double-click the Reminder icon.
The Audio Reminder window appears:
_________________________________________________________________________
The Audio Reminder Page 68
Page 75

Audio Applications 3.0 User Guide
_________________________________________________________________________
Setting an Alarm
The Audio Reminder provides two alarms. To set one, choose Set Alarm 1
or Set Alarm 2 from the Settings menu. The Set Alarm dialog box appears:
• In the Alarm area, click ON or OFF to enable or disable the alarm.
• Under Hour and Minute, set the time for the alarm to go off.
• In the Sound area, select Buzzer, Gong, or Voice File. If you select
Voice File, a dialog box appears for you to choose an audio file:
_________________________________________________________________________
The Audio Reminder Page 69
Page 76

Audio Applications 3.0 User Guide
_________________________________________________________________________
Choose an audio file and click the OK button. The path and name of the
audio file now appear in the Set Alarm dialog box:
• To hear what the alarm sounds like, click the Play button.
Snooze: If ON, the snooze feature will continue sounding the alarm after it
first goes off. With the settings above, for example, the alarm will first go off
at 2:30 PM, then at 2:33, 2:36, 2:39, and so on until you turn it off.
• Under Snooze, click ON or OFF to enable or disable the snooze feature.
• After Snooze (Min), set the interval to wait before replaying the alarm.
When you are finished setting the alarm, click the OK button.
_________________________________________________________________________
The Audio Reminder Page 70
Page 77

Audio Applications 3.0 User Guide
_________________________________________________________________________
The Audio Reminder window now shows the new settings for Alarm 1:
• To enable or disable either alarm, click its ON or OFF button.
• To hear either alarm, click its Play button.
• To stop an alarm currently playing, click its Stop button.
To hear the alarms go off on schedule, leave the Audio Reminder window
either open or minimized to an icon.
_________________________________________________________________________
The Audio Reminder Page 71
Page 78

Audio Applications 3.0 User Guide
_________________________________________________________________________
Audio Reminder Menu Commands
Settings Menu
Set Alarm 1 and Set Alarm 2 enable you to specify the time, sound, and
snooze interval for each alarm.
Help Menu
Contents displays a list of topics you can choose for information on the
Audio Reminder.
About Audio Reminder gives the version number and copyright information.
_________________________________________________________________________
The Audio Reminder Page 72
Page 79

Audio Applications 3.0 User Guide
_________________________________________________________________________
13: The Stopwatch
Introduction
The Stopwatch keeps track of the time elapsed since it was started. You can
set the Stopwatch to sound a tick each second it is running and announce the
amount of time elapsed since it was activated.
Starting the Stopwatch
From the Audio Applications group, double-click the Stopwatch icon.
The Stopwatch window appears with the analog or digital display:
_________________________________________________________________________
The Stopwatch Page 73
Page 80

Audio Applications 3.0 User Guide
_________________________________________________________________________
Operating the Stopwatch
• To begin the Stopwatch, click the Start button. While the Stopwatch is
running, the Start button is replaced with the Stop button.
• Click the Stop button to stop the Stopwatch and announce the elapsed
time. The Stop button is replaced with the Start button. To resume the
timing, click the Start button again.
• The Stopwatch ticks as it runs. To stop the ticking click the Mute button.
• To set the Stopwatch to 00:00 again, click the Reset button.
Controling the Appearance of the Stopwatch
• From the Settings menu, choose Analog or Digital to change the format.
• Choose Set Font to change the font of numbers in the digital display.
In the Font dialog box, select the font you want and click the OK button.
_________________________________________________________________________
The Stopwatch Page 74
Page 81

Audio Applications 3.0 User Guide
_________________________________________________________________________
Here is the System menu for the Stopwatch:
• To reduce the Stopwatch to an icon, choose Minimize. The icon
continues to show the elapsed time.
• To keep the Stopwatch window or icon on top of other windows, choose
Always On Top from the System menu.
The Help Menu
Contents displays a list of topics you can choose for information on the
Stopwatch.
About Stopwatch gives the version number and copyright information.
_________________________________________________________________________
The Stopwatch Page 75
Page 82

Audio Applications 3.0 User Guide
_________________________________________________________________________
14: The Timer
Introduction
The Timer works the opposite of the Stopwatch. The Timer counts down
from the time you set to 00:00. Whenever you stop the Timer, it announces
the amount of time remaining. The Timer sounds a bell each second it is
running. From 19 seconds on down, the Timer announces each second.
You can also set the Timer to announce each minute as it passes.
Starting the Timer
From the Audio Applications group, double-click the Timer icon.
The Timer window appears with either the analog or the digital display:
_________________________________________________________________________
The Timer Page 76
Page 83

Audio Applications 3.0 User Guide
_________________________________________________________________________
Setting the Timer
To set the timer, choose Set Time from the Settings menu. The Set Timer
dialog box appears:
• Under Min and Sec, set the amount of time for the Timer to count down.
• In the Minute Sound area, choose ON or OFF to activate or deactivate
the voice announcement of each minute as it passes.
• In the Sound area, choose Gong, Buzzer, or Voice File for the sound to
be played when the Timer runs out (reaches 00:00). If you choose Voice
File, a dialog box appears for you choose an audio file. The name and
path of the file will appear in the rectangle at the bottom of the window.
• To hear the sound played when the timer runs out, click the Play button.
When you are finished, click the OK button.
_________________________________________________________________________
The Timer Page 77
Page 84

Audio Applications 3.0 User Guide
_________________________________________________________________________
Operating the Timer
• To begin the Timer, click the Start button. While the Timer is running,
the Start button is replaced with the Stop button.
• Click the Stop button to stop the Timer and announce the time remaining.
The Stop button is replaced with the Start button. To continue the
countdown, click the Start button again.
• The Timer sounds a bell each second as it runs. To silence the bell, click
the Mute button. If the anouncement of each minute is ON (see above),
it is also silenced.
• To set the Timer back to its original starting time, click the Reset button.
_________________________________________________________________________
The Timer Page 78
Page 85

Audio Applications 3.0 User Guide
_________________________________________________________________________
Controling the Appearance of the Timer
• From the Settings menu, choose Analog or Digital to change the format.
• Choose Set Font to change the font of numbers in the digital display.
In the Font dialog box, select the font you want and click the OK button.
_________________________________________________________________________
The Timer Page 79
Page 86

Audio Applications 3.0 User Guide
_________________________________________________________________________
Here is the System menu for the Timer:
• To reduce the Timer to an icon, choose Minimize. The icon continues to
show the time remaining.
• To keep the Timer window or icon on top of other windows, choose
Always On Top from the System menu.
The Help Menu
Contents displays a list of topics you can choose for information on the
Timer.
About Timer gives the version number and copyright information.
_________________________________________________________________________
The Timer Page 80
 Loading...