

Page 1

HEAT MAT
Operating Instructions
Mode d’emploi
Bedienungsanleitung
Manual de Instrucciones
Istruzioni per il funzionamento
Gebruiksaanwijzing
PT2022 / PT2024 / PT2026 / PT2028
PT2030 / PT2035 / PT2040
Page 2

INDEX
ENGLISH 3
FRANÇAIS 9
DEUTSCH 16
ESPAÑOL 22
ITALIANO 28
NEDERLANDS 34
EXO TERRA
HEAT MAT RAINFOREST SMALL
2
PT-2022
EXO TERRA
HEAT MAT RAINFOREST MEDIUM
PT-2024
EXO TERRA
HEAT MAT RAINFOREST LARGE
PT-2026
EXO TERRA
HEAT MAT DESERT EXTRA SMALL
PT-2028
EXO TERRA
HEAT MAT DESERT SMALL
PT-2030
EXO TERRA
HEAT MAT DESERT MEDIUM
PT-2035
EXO TERRA
HEAT MAT DESERT LARGE
PT-2040
HEAT MAT
Operating
Instructions
Terrarium Substrate Heater
IMPORTANT SAFETY INSTRUCTIONS
Please read and understand the following before installing
the Heat Mat Substrate Heater!
1. Do not immerse cord, plug or the device in water or other
liquid.
2. Do not operate any appliance with a damaged cord or plug.
3. Do not unplug by pulling on cord. To unplug, grasp the plug,
not the cord.
4. Do not handle plug with wet hands.
5. Warning: For use on exterior surface of glass tanks only.
6. The Heat Mat can be applied without the use of spacers
(provided) when used with an Exo Terra Terrarium or other
terrariums which have a bottom frame.
The spacers MUST be used when no bottom frame is present
to provide air space and ventilation around the heater.
7. Do Not allow the heating surface of this heater to come into
direct contact with flammable substrates
8. For Indoor Household Use Only. Dry Location Use Only.
9. Do not use for any purpose other than described in this
user’s guide.
10. This appliance is not intended for use by persons (including
children) with significantly impaired physical or mental
capabilities, unless they have been given supervision
or instruction concerning the use of the appliance by a
person responsible for their safety. Children should always
be supervised to ensure that they do not play with the
appliance.
11. A short power supply cord is provided to reduce the risk
resulting from becoming entangled in or tripping over a
longer cord.
12. Extension cords are available and may be used if care is
exercised in their use.
13. If an extension cord is used, the marked electrical rating
of the extension cord should be at least as great as the
electrical rating of the appliance. The longer extension cord
should be arranged so that it will not drape over the counter
top or table where it could be pulled on by children or tripped
over unintentionally.
14. Spacers (supplied) must be installed underneath terrarium to
provide air space and ventilation around heater. (see point 6)
15. CAUTION: (for N.A. only) This appliance has a polarized
plug (one blade is wider than the other) To Reduce the risk
of electric shock; the plug is intended to fit into a polarized
receptacle on in one way. If the plug cannot be fully inserted
into the receptacle, reverse the plug. If it still does not fit,
ENGLISHFRANÇAISDEUTSCHESPAÑOLITALIANONEDERLANDS
Page 3

contact a qualified electrician in order to have a proper
polarized receptacle installed. Do not attempt to modify the
plug or receptacle in any way.
IMPORTANT:
Never position the Heat Rock on the surface heated by a Heat Mat
Substrate Heater!
SAVE THESE INSTRUCTIONS
Introduction
Reptiles (and amphibians) are ectotherms, or cold-blooded animals
(ecto, outside; therm, temperature). Although they do produce metabolic
heat, they have no efficient means of conserving it or of increasing or
decreasing its production.
This means they have to absorb heat from the surrounding
environment. Although unable to maintain a constant body temperature,
reptiles (and other ectotherms) use homeostatic regulation to
compensate for high and low temperatures. The blood flow to the skin
tissues is regulated, increasing heat loss or heat absorption. Reptiles
can also regulate the body temperature by simply moving to a cooler
or warmer spot, seeking sun or shade. In their natural biotope, reptiles
often use surfaces heated by the sun (branches, rocks, sand or the
forest floor) as a heat-conductor. The Heat Mat Substrate Heater
simulates this by heating the substrate of the terrarium. It is important
to leave sufficient ‘cold spots’ to provide the animals with options and
make thermo-regulation possible.
4
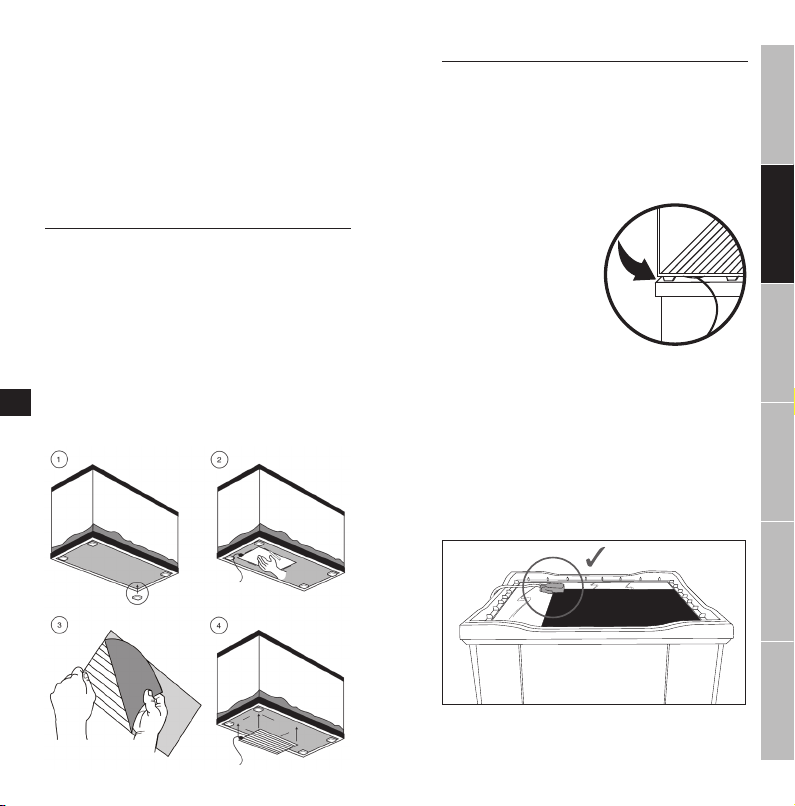
Under-Tank Mounting
For heating the terrarium substrate
The Heat Mat Substrate Heater should be mounted under one end of
the tank. The entire mat must be adhered to the glass. No portion of the
mat should overlap the glass terrarium base frame.
1. Clean the outside surface of the bottom glass
2.
Place the spacers under each corner of the tank bottom,
applicable (see point 6 of safety instructions)
3. With the protective backing still intact, place the Heat Mat Substrate
Heater on the bottom of the tank to determine its final position.
4. Mark the position with a wax
pencil or other marker.
5. Remove the protective backing and
carefully fit the Heat Mat Substrate
Heater to the bottom. Remove the
white protective backing ONLY. Do
NOT remove the clear film backing
from the other side of the mat.
Once in place, the Heat Mat should
not be removed.
Ensure that the tank does not
press down on the electrical cord. Use the provided spacers! where
applicable (see point 6 of safety instructions). Put the tank on a hard
surface (no carpet) like a terrarium stand or table.
6. Plug in the Heat Mat Substrate Heater.
7. Add the substrate and decorative accessories (see Substrates and
Decoration). The Heat Mat Substrate Heater is not designed to be
used without a substrate.
where
ENGLISHFRANÇAISDEUTSCHESPAÑOLITALIANONEDERLANDS
Page 4

IMPORTANT:
When installing this substrate heater it is important that the electrical
contact block is not bent and that it sits flat against the glass surface
of the terrarium. This heater is not to be installed with the contact block
portion resting on the bottom frame of the terrarium.(see picture)
The terrarium must not sit on the contact block. Under no
circumstances should the heater sheet be bent or folded in any way,
this may result in product failure. The use of the rubber spacers
provided is mandatory when installing the substrate heater on a
terrarium without a bottom frame.
Background or wall mounting
For heating terrarium walls
Not to be used with paper backgrounds!
1. Clean the surface of the glass.
2. With the protective backing still intact, place the Heat Mat Substrate
Heater on the outside of the tank to determine its final position.
3. Mark the position on the background or wall with a wax pencil or
other marker.
4. Remove the white protective backing and carefully fit the Heat Wave
Substrate Heater to the tank wall. Do NOT remove the clear film
backing on the other side of the mat.
Once in place, the Heat Mat Substrate Heater should not be removed.
5. Place the tank in its final location.
6
6. Plug in the Heat Mat Substrate Heater.
7. Add the substrate and decorative accessories (see Substrates and
Decoration).
SUBSTRATE THERMAL CONDUCTIVITY
Material (W/mK)
Granite................................................... 2.90
Sandstone ............................................. 1.70
Wet Desert Sand .................................... 1.55
Wet Soil ................................................. 1.50
Glass ..................................................... 1.38
Water ..................................................... 0.60
Wet Peat, Bark, Coconut Fiber ................ 0.33
Dry Desert Sand .................................... 0.21
Dry Soil .................................................. 0.20
Dry Peat, Bark, Coconut Fiber.................0.08
Substrates
When mounted under the tank, the Heat Mat Substrate Heater should
not be used without a substrate in order to prevent reptiles from being
burned. The efficiency of the Heat Mat Substrate Heater depends on
the kind of substrate used and the thickness of the layer, as some
substrates are more conductive than others (see table).
Moistened substrates increase the humidity in the tank rapidly when
heated by a Heat Mat Substrate Heater. This is ideal for damp and
warm-loving reptiles and amphibians. Make sure to use warm (30ºC)
water when adding it to the tank to prevent cracks in the bottom glass,
as it reacts to temperature changes.
Decoration
Always place the water bowl on the opposite side of where the Heat
Mat Substrate Heater is positioned. This prevents the water from
overheating and evaporating. Hiding boxes or caves should also be
placed in the cold zone of the tank to promote natural behavior. Reptiles
seek these hiding places to cool down and hide from warm substrates
or the sun. Other decorations like rocks or wood can be placed in the
warm zone (on the Heat Mat Substrate Heater) to create even more
temperature zones.
Additional heat sources
Next to the Heat WMat Substrate Heater several types of heating
devices can be applied to create the ideal environment. In nature heat
is transferred in three different ways from its source to the animal.
Heat can be transferred by:
Conduction (Heat Mat Substrate Heater and Heat Rock): the transfer
of heat by means of physical contact. The larger the contact area, the
more efficient the heat transfer.
Convection (almost all heat sources create a form of convection):
the movement of heat by moving air. Convection results from the
differences in the densities of the air at different temperatures. As air
raises in temperature, it becomes less dense and thus lighter thereby
rising above its cooler and denser counterparts, which in turn sink.
Radiation (Sun Glo, Night Glo, Heat Glo and Repti Glo): energy in
the form of electromagnetic waves. Different forms of radiation
comprise the electromagnetic spectrum and are characterized by
their different wavelength. The following types of radiation make up
the electromagnetic spectrum (in order of decreasing energy and
increasing wavelength): ultraviolet rays, visible light rays and infrared.
The shortest wavelength forms of radiation are most penetrating.
Incandescent light bulbs (Sun Glo, Night Glo, Heat Glo and Solar Glo)
should not be mounted immediately above the surface heated by the
Heat Mat Substrate Heater, and place them in such a way that a cooler
area is still present.
Heat Rocks can be used in conjunction with the Heat Mat Substrate
Heater but is more as an alternative heat source as it can be placed
inside the terrarium. Never position the Heat Rock on the surface
heated by a Heat Mat Substrate Heater!
Guarantee
This product is guaranteed for defects in material or workmanship
for a period of 2 years from date of purchase. The guarantee is valid
with proof of purchase only. The guarantee is limited to repair or
replacement of the unit only and does not cover consequential loss
or damage of or to animate or inanimate objects. This guarantee
is valid only under normal operating conditions for which the unit
ENGLISHFRANÇAISDEUTSCHESPAÑOLITALIANONEDERLANDS
Page 5

is intended. It excludes any damage caused by unreasonable use,
improper installation, negligence, tampering, or abuse of the unit. For
guarantee service or spare parts contact your local pet dealer or write
to the representative in your country. This guarantee does not affect
your statutory rights.
Service
If you have any problem or question about the operation of this
product, please let us try to help you before you return the product
to your dealer. Most problems can be handled promptly with a phone
call. When you call (e-mail or write), please have all relevant
information such as model number and/or part numbers available,
as well as the nature of the problem. Call our Customer Service
Department:
Canada Only: Toll Free Number 1-800-55HAGEN
(1-800-554-2436) Between 9:00 am and 4:30 pm (Eastern Time)
U.S.A. Only: Toll Free Number 1-800-724-2436
Between 9:00 am and 4:00 pm (Eastern Time)
U.K. Only: Helpline Number 01977 556622
Between 9:00 am and 5:00 pm
For Authorized Warranty Repair Service:
Return unit with dated receipt and reason for return to:
Canada:
Hagen Industries Ltd, 3235 Guenette, Montreal, QC H4S 1N2
Rolf C. Hagen Inc., 8770-24th Street, Edmonton AB T6P 1X8
U.S.A.: Rolf C. Hagen (U.S.A.) Corp.
50 Hampden Road, Mansfield, MA. 02048-9107
8
U.K.: Rolf C. Hagen (UK) Ltd.
California Dr. Whitwood Industrial Estate
Castleford, West Yorkshire WF10 5QH
For general information on our whole product range,
explore our websites at: www.exo-terra.com or www.hagen.com.
Distributed by:
Canada: Rolf C. Hagen Inc., Montreal, QC H9X 0A2
U.S.A.: Rolf C. Hagen (U.S.A.) Corp., Mansfield MA. 02048
U.K.: Rolf C. Hagen (U.K.) Ltd. Castleford, W. Yorkshire WF10 5QH
RECYCLING
This item bears the selective sorting symbol for waste
electronic and electrical equipment (WEEE).
This means that the product must be handled pursuant to European Directive 2002/96/EC in order to be
recycled or dismantled to minimise it’s impact on the
environment. For further information please contact
included in the selective sorting process are potentially dangerous
for the environment and human health due to the prescence of
hazardous substances.
your local or regional Authorities. Electronic products not
HEAT MAT
Mode d’emploi
Pellicule chauffante
de substrat pour terrarium
MESURES DE SÉCURITÉ IMPORTANTES
Prière de lire et de comprendre les directives suivantes avant d’installer
la pellicule chauffante de substrat Heat Mat Exo Terra.
1. Ne pas immerger le cordon d’alimentation, la fiche ou la pellicule
chauffante de substrat dans l’eau ni dans un autre liquide.
2. Ne pas faire fonctionner un appareil dont la fiche ou le cordon sont
endommagés.
3. Ne pas débrancher en tirant sur le cordon d’alimentation. Pour
débrancher, prendre la fiche entre les doigts, et non le cordon
d’alimentation.
4. Ne pas manipuler la fiche avec les mains mouillées.
5. Mise en garde : Pour utilisation sur la surface extérieure des bacs en
verre seulement.
6. Dans le cas d’un terrarium Exo Terra ou autre pourvu d’une base, il
n’est pas nécessaire d’utiliser les pieds en caoutchouc (compris) lors de
l’installation de la pellicule chauffante de substrat. Par contre, dans le cas
où un terrarium est dépourvu de base, il FAUT NÉCESSAIREMENT utiliser
les pieds en caoutchouc afin de s’assurer qu’il y a suffisamment d’air et
de ventilation autour de la pellicule.
7. Ne pas laisser la surface chauffante de cette pellicule chauffante entrer en
contact direct avec des substrats inflammables.
8. Pour usage domestique et à l’intérieur seulement. Pour utilisation
dans les endroits secs seulement.
9. Ne pas l’employer dans un autre but que celui décrit dans ce guide de
l’utilisateur.
10. Cette pellicule chauffante de substrat ne doit pas être utilisée par des
personnes (y compris des enfants) aux capacités physiques ou mentales
réduites, à moins qu’elles soient placées sous la supervision d’une
personne chargée de leur sécurité ou qu’elles en aient reçu les directives
nécessaires à l’utilisation de cet appareil. Toujours surveiller les enfants
pour les empêcher de jouer avec cette pellicule chauffante de substrat.
11. Le cordon d’alimentation est court afin de réduire le risque de s’empêtrer
dans un long cordon ou de trébucher dessus.
12. Une rallonge électrique peut être utilisée en prenant garde de s’en servir
correctement.
13. Si une rallonge est employée, le calibre indiqué doit être au moins aussi
élevé que celui de la pellicule chauffante de substrat. Si la rallonge
électrique est longue, elle ne doit pas tomber sur le comptoir ni sur la
table où des enfants pourraient tirer ou trébucher dessus sans le vouloir.
14. Des pieds en caoutchouc (fournis) doivent être installés sous le terrarium
pour assurer la circulation d’air et la ventilation autour de la pellicule
chauffante. (voir point 6)
15. ATTENTION : (pour l’Amérique du Nord seulement) Cette pellicule
ENGLISHFRANÇAISDEUTSCHESPAÑOLITALIANONEDERLANDS
Page 6
chauffante de substrat a une fiche polarisée (une broche est plus large
que l’autre). Afin de réduire le risque de choc électrique, la fiche n’entrera
dans une prise polarisée que d’une seule façon. Si la fiche ne peut être
insérée complètement dans la prise, l’insérer de l’autre côté. Si elle
n’entre toujours pas, contacter un électricien qualifié pour l’installation
d’une prise polarisée convenable. Ne pas essayer de modifier la fiche ni la
prise d’aucune façon.
IMPORTANT :
Ne jamais placer la pierre chauffante Heat Rock Exo Terra sur la surface
chauffée par une pellicule chauffante de substrat Heat Mat Exo Terra.
CONSERVER CES INSTRUCTIONS
Introduction
Les reptiles (et amphibiens) sont des animaux ectothermes ou à sang froid (ecto,
au dehors; therm, thermie). Même s’ils produisent une chaleur métabolique, ils
n’ont pas de moyen efficace de conserver sa production, ni de l’augmenter ou
de la réduire.
Ils ont donc à absorber la chaleur de leur milieu environnant. Même s’ils sont
incapables de maintenir une température corporelle constante, les reptiles (et
autres animaux ectothermes) profitent de l’homéostasie pour équilibrer les
températures basses ou élevées. Le débit sanguin qui circule dans les tissus
cutanés est réglé, augmentant ainsi la perte ou l’absorption de chaleur. Les
reptiles peuvent également régler leur température corporelle en se déplaçant
simplement vers un endroit plus frais ou plus chaud, à la recherche de soleil ou
d’ombre. Dans leur biotope naturel, les reptiles profitent souvent des surfaces
chauffées par le soleil (branches, roches, sable ou tapis forestier) comme
conductrices de chaleur. La pellicule chauffante de substrat Heat Mat reproduit
10
cette chaleur en chauffant le substrat du terrarium. Il est important de laisser
suffisamment d’« endroits froids » afin de laisser le choix aux animaux et de
rendre la thermorégulation possible.
Montage sous le terrarium
Pour chauffer le substrat du terrarium
La pellicule chauffante de substrat Heat Mat doit être montée sous une extrémité
du terrarium. La totalité de la pellicule doit adhérer au verre. Aucune portion de la
pellicule ne doit empiéter sur le cadre de la base du terrarium.
1. Nettoyer la surface extérieure du fond de verre du bac.
2. Placer les rondelles d’espacement sous chaque coin du fond du bac, là où
nécessaire (voir point 6 des consignes de sécurité).
3. La pellicule de protection étant
toujours intacte, placer la pellicule
chauffante de substrat Heat Mat
sous le bac afin de déterminer sa
position finale.
4. Indiquer la position à l’aide d’un
crayon de maquillage ou d’un autre
marqueur.
5. Enlever la pellicule de protection et
placer soigneusement la pellicule
chauffante de substrat Heat Mat
sous le bac. N’ENLEVER QUE la
partie protectrice blanche; NE
PAS enlever le film transparent qui
recouvre l’autre côté de la pellicule
chauffante de substrat.
Une fois en place, la pellicule chauffante Heat Mat ne doit pas être déplacée.
Vous assurer que le cordon n’est pas écrasé sous le bac. Utiliser les rondelles
d’espacement qui sont fournies, là où nécessaire (voir point 6 des consignes de
sécurité). Déposer le bac sur une surface dure (et non un tapis) comme un support
pour terrarium ou une table.
6. Brancher la pellicule chauffante de substrat Heat Mat.
7. Ajouter le substrat et les ornements (voir Substrats et Décoration). La pellicule
chauffante de substrat Heat Mat ne doit pas être utilisée sans substrat.
ENGLISHFRANÇAISDEUTSCHESPAÑOLITALIANONEDERLANDS
Page 7

IMPORTANT :
Au moment de l’installation de la pellicule chauffante, il est important
que le bloc de contact électrique ne soit pas courbé, mais plutôt
adossé contre la paroi de verre du terrarium. De plus, la pellicule
ne doit pas être installée de façon à ce que le bloc de contact soit
appuyé sur le cadre inférieur du terrarium (voir ill.). Le terrarium ne
doit pas écraser le bloc de contact. La pellicule chauffante ne devrait
jamais être courbée ni pliée en aucune façon. Sinon, elle pourrait
cesser de fonctionner. L’utilisation des pieds en caoutchouc inclus
avec la pellicule chauffante de substrat est obligatoire lors de son
installation sur un terrarium sans cadre inférieur.
Montage sur arrière-plan ou sur paroi
Pour chauffer les parois du terrarium
12
Ne doit pas être utilisée sur arrière-plans en papier!
1. Nettoyer la surface du verre.
2. La pellicule de protection étant toujours intacte, placer la pellicule
chauffante de substrat Heat Mat à l’extérieur du bac afin de
déterminer sa position finale.
3. Indiquer la position sur l’arrière-plan ou la paroi à l’aide d’un
crayon de cire ou d’un autre marqueur.
4. Enlever la pellicule de protection blanche et placer soigneusement
la pellicule chauffante de substrat Heat Mat sur la paroi du bac.
NE PAS enlever le film transparent qui recouvre l’autre côté de la
pellicule chauffante de substrat.
Une fois en place, la pellicule chauffante Heat Mat ne doit pas
être déplacée.
5. Placer le bac à son emplacement définitif.
6. Brancher la pellicule chauffante de substrat Heat Mat.
7. Ajouter le substrat et les ornements (voir Substrats et Décoration).
SUBSTRAT CONDUCTIVITÉ THERMIQUE
Matériau (W/mK)
Granit .................................................... 2,90
Grès....................................................... 1,70
Sable humide du désert ......................... 1,55
Terre humide ......................................... 1,50
Verre...................................................... 1,38
Eau ........................................................ 0,60
Tourbe humide, écorce, fibre de coco ..... 0,33
Sable sec du désert ............................... 0,21
Terre sèche ............................................ 0,20
Tourbe sèche, écorce, fibre de coco ....... 0,08
Substrats
Lorsqu’installée sous le bac, la pellicule chauffante de substrat
Heat Mat ne doit pas être utilisée sans un substrat afin d’empêcher
les
reptiles de se brûler. L’efficacité de la pellicule chauffante
de substrat Heat Mat dépend du type de substrat utilisé et de
l’épaisseur de la couche, étant donné que certains substrats sont
plus conductifs que d’autres (voir tableau).
Les substrats humectés augmentent rapidement l’humidité dans
le bac quand ils sont chauffés avec une pellicule chauffante de
substrat Heat Mat. Cette température est idéale pour les reptiles
et amphibiens aimant l’humidité et la chaleur. S’assurer d’utiliser
de l’eau chaude (30 ºC) quand on en ajoute au bac afin de prévenir
les craquelures dans le fond de verre, étant donné qu’il réagit aux
changements de température.
Décoration
Toujours placer le bol d’eau du côté opposé à la pellicule
chauffante de substrat Heat Mat pour empêcher l’eau de
surchauffer et de s’évaporer. Des cachettes sous forme de boîtes
ou de grottes devraient également être placées dans la zone
froide du bac pour favoriser un comportement naturel. Les reptiles
recherchent ces cachettes pour se rafraîchir et se cacher des
substrats chauds ou du soleil. D’autres décorations, comme des
rochers ou du bois, peuvent être placées dans la zone chaude (sur
la pellicule chauffante de substrat Heat Mat) afin de créer plus de
zones avec différentes températures.
Sources supplémentaires de chaleur
En plus de la pellicule chauffante de substrat Heat Mat plusieurs
types d’appareils chauffants peuvent être utilisés pour créer
l’environnement idéal. Dans la nature, la chaleur est transférée de
trois différentes façons de sa source jusqu’à l’animal.
La chaleur peut être transférée par :
Conduction (la pellicule chauffante de substrat Heat Mat et la
roche chauffante Heat Rock) : le transfert de chaleur par contact
physique. Plus la surface de contact est importante, plus efficace
est le transfert de chaleur.
ENGLISHFRANÇAISDEUTSCHESPAÑOLITALIANONEDERLANDS
Page 8

Convection (presque toutes les sources de chaleur créent
une convection) : le mouvement de l’air déplaçant la chaleur.
La convection résulte des variations dans la densité de l’air à
différentes températures. Au fur et à mesure que l’air augmente
de température, il devient moins dense et plus léger s’élevant ainsi
au-dessus de ses équivalents plus frais et plus denses, qui à leur
tour baissent.
Radiation (Sun Glo, Night Glo, Solar Glo, Heat Glo et Repti Glo) :
énergie sous forme d’ondes électromagnétiques. Différentes
formes de radiation comprennent le spectre électromagnétique et
sont caractérisées par leurs diverses longueurs d’ondes. Les types
suivants de radiation complètent le spectre électromagnétique
(selon leur ordre de diminution de l’énergie et d’augmentation de
la longueur d’ondes) : rayons ultraviolets, rayons de la lumière
visible et rayons infrarouges. Les longueurs d’ondes les plus
courtes sont celles qui pénètrent davantage.
Les ampoules incandescentes (Sun Glo, Heat Glo, Solar Glo
et Night Glo) ne devraient pas être installées juste au-dessus de
la surface chauffée par la pellicule chauffante de substrat Heat
Mat, et vous devriez les placer de telle sorte que l’animal profite
toujours d’un endroit plus frais.
Les roches chauffantes Heat Rock peuvent être utilisées avec
la pellicule chauffante de substrat Heat Mat mais constituent
davantage une source de chaleur de remplacement étant donné
qu’elles peuvent être placées à l’intérieur du terrarium. Ne jamais
déposer une roche chauffante Heat Rock sur la surface
chauffée par une pellicule chauffante de substrat Heat Mat!
14
Garantie
Le produit est garanti contre tout défaut de matériaux et de
fabrication pour une période de deux ans à partir de la date
d’achat. La garantie est valide uniquement avec une preuve
d’achat. La garantie est limitée à la réparation ou au remplacement
de l’article et exclut tout dommage ou perte relative à d’autres
objets ou à des animaux. Cette garantie est valide seulement
dans des conditions normales de fonctionnement pour lesquelles
l’appareil a été conçu. Elle exclut tout dommage causé par un
usage excessif, une installation incorrecte, la négligence ou la
modification de l’appareil. Pour le service sous garantie ou pour
des pièces de rechange, prendre contact avec votre détaillant
d’animalerie locale ou écrire au représentant de votre pays. Cette
garantie ne porte pas atteinte à vos droits prévus par la loi.
Service
Si cet appareil vous semble défectueux ou que vous vous posez
des questions quant à son fonctionnement, n’hésitez pas à
communiquer avec nous avant de le retourner au marchand. La
plupart des problèmes peuvent être réglés rapidement par un
appel téléphonique. Lorsque vous téléphonez (envoyez un courriel
ou écrivez) ayez à portée de la main tous les renseignements
pertinents comme le numéro de modèle ou le numéro des pièces
et tâchez de décrire la nature du problème. Téléphonez à notre
Service à la clientèle :
Canada seulement :
Numéro sans frais 1 800 55HAGEN (1 800 554-2436)
Entre 9 h et 16 h 30 (HNE)
(1 800 554-2436)
Entre 9 h et 16 h (HNE)
É.-U. seulement : numéro sans frais 1 800 724-2436
Entre 9 h et 16 h (HNE)
Fr: Hagen France S.A. F-77388 Combs la Ville. Tel: (33) 01 64 88
14 18
Du lundi au vendredi - 9H00 à 12H00 et 13H00 à 17H00.
GB seulement : Helpline Number 01977 556622
Entre 9 h et 17 h
Pour le service de réparations autorisé sous garantie :
Retournez l’article avec le reçu daté et la raison du retour à :
Canada : Les Industries Hagen ltée, 3235, rue Guénette, Montréal
QC H4S 1N2
Rolf C. Hagen Inc., 8770-24th Street, Edmonton AB T6P 1X8
É.-U. : Rolf C. Hagen (U.S.A.) Corp.
50 Hampden Road, Mansfield, MA. 02048-9107
GB : Rolf C. Hagen (UK) Ltd.
California Dr. Whitwood Industrial Estate
Castleford, West Yorkshire WF10 5QH
Pour des renseignements généraux sur notre gamme complète
de produits, explorez nos sites Web au www.exo-terra.com ou au
www.hagen.com.
Distribué par:
Canada : Rolf C. Hagen inc., Montréal QC H9X 0A2
É.-U. : Rolf C. Hagen (U.S.A.) Corp., Mansfield MA. 02048
GB : Rolf C. Hagen (U.K.) Ltd. Castleford, W. Yorkshire WF10 5QH
RECYCLAGE
Cet article porte le symbole de la collecte
sélective des déchets d’équipements électriques
et électroniques (DEEE), ce qui signifie qu’on doit
éliminer ce produit conformément à la directive
européenne 2002/96/EC afin de le recycler ou de le
désassembler pour minimiser ses répercussions sur
pour l’environnement afin d’obtenir les instructions relatives à
l’élimination des déchets ou apporter dans le point de collecte
agréé d’un conseil officiel reconnu. Les produits électroniques non
compris dans le processus de collecte sélective sont potentiellement
dangereux pour l’environnement et la santé humaine en raison de la
présence de substances dangereuses.
l’environnement. Vérifier auprès d’agences locales
ENGLISHFRANÇAISDEUTSCHESPAÑOLITALIANONEDERLANDS
Page 9

HEAT MAT
Bedienungsanleitung
Substratheizung für
Terrarien
WICHTIGE SICHERHEITSHINWEISE
Bitte lesen und verstehen Sie die folgenden
Sicherheitshinweise, bevor Sie den Exo Terra Heat Mat
Substratheizer installieren!
1. Tauchen Sie das Kabel, den Stecker oder das Gerät nicht in
Wasser oder andere Flüssigkeiten.
2. Kein Gerät mit beschädigtem Kabel oder beschädigtem
Netzstecker benutzen.
3. Nicht am Netzkabel ziehen, um den Stecker aus der
Steckdose zu ziehen. Immer am Stecker anfassen und
ziehen.
4. Fassen Sie den Stecker nicht mit nassen Händen an.
5. Warnung: Ausschließlich für den Gebrauch auf den
16
Außenflächen von Glasbecken geeignet.
6. Die Exo Terra Heat Mat kann ohne den Gebrauch von
Abstandhaltern (enthalten) in Betrieb genommen werden,
wenn sie mit einem Exo Terra Terrarium oder mit anderen
Terrarien mit einem Bodenrahmen verwendet wird. Die
Abstandhalter MÜSSEN benutzt werden, wenn kein
Bodenrahmen vorhanden ist.
7. Die Heizfläche des Heizers darf nicht mit leicht
entzündlichen Substraten in direkten Kontakt kommen.
8. Ausschließlich für den Gebrauch in geschlossenen
Räumen und an trockenen Orten geeignet.
9. Benutzen Sie das Gerät nur für den vorgesehenen
Verwendungszweck.
10. Das Gerät ist nicht für den Gebrauch durch Personen
(einschließlich Kinder) mit eingeschränkten körperlichen
oder geistigen Fähigkeiten geeignet, außer wenn diese
Personen vor der Nutzung des Gerätes entsprechende
Bedienungsanweisungen erhalten oder sie unter Aufsicht
einer Person stehen, die für ihre Sicherheit verantwortlich ist.
Kinder sollten immer beobachtet werden, um sicherzustellen,
dass sie nicht mit dem Gerät spielen.
11. Das Gerät ist mit einem kurzen Netzkabel ausgerüstet. Damit
wird das Risiko vermindert, dass man sich in dem Kabel
verfängt oder darüber stolpert.
12. Verlängerungskabel stehen zur Verfügung und können
verwendet werden. Dabei müssen Sie jedoch vorsichtig
vorgehen.
13. Wenn ein Verlängerungskabel benötigt wird, muss ein Kabel
mit geeigneter Leistung benutzt werden. Achten Sie darauf,
das Verlängerungskabel so zu verlegen, dass man nicht
darüber stolpert oder es abzieht.
14. Die Abstandhalter (enthalten) müssen unter dem Terrarium
installiert werden, um einen Luftraum und Belüftung um den
Heizer herum zu schaffen. (siehe Punkt 6)
WICHTIG:
Stellen Sie den Exo Terra Heat Rock niemals auf die Stelle,
die von dem Exo Terra Heat Mat Substratheizer geheizt wird!
BEWAHREN SIE DIESE ANLEITUNG AUF
Einleitung
Reptilien (und Amphibien) sind Ektotherme oder kaltblütige Tiere (ecto
- außen, therm - Temperatur). Wenngleich sie metabolische Wärme
erzeugen, verfügen sie nicht über ausreichende Mittel, um Wärme zu
speichern oder die Wärmeproduktion zu erhöhen oder zu senken.
Das bedeutet, dass sie Wärme aus der Umgebung aufnehmen müssen.
Reptilien (und andere Ektotherme) sind zwar nicht in der Lage, eine
konstante Körpertemperatur beizubehalten, verwenden aber eine
homöostatische Regulierung, um hohe und niedrige Temperaturen
auszugleichen. Der Blutfluss zum Hautgewebe wird gesteuert, um den
Wärmeverlust oder die Wärmeaufnahme zu erhöhen. Reptilien können
die Körpertemperatur außerdem regeln, indem sie sich einfach an einen
kühleren oder wärmeren Ort bewegen, die Sonne oder den Schatten
aufsuchen. In ihrem natürlichen Biotop benutzen Reptilien häufig
Flächen, die von der Sonne aufgeheizt sind (Zweige, Steine oder den
Waldboden), als Wärmeleiter. Die Heat Mat Substratheizung simuliert
dies, indem sie das Substrat des Terrariums heizt. Es ist wichtig,
für ausreichend “kalte Stellen” zu sorgen, um den Tieren mehrere
Möglichkeiten zu bieten und eine Wärmeregulierung zu ermöglichen.
Montage unter dem Behälter
Zum Beheizen des Terrariensubstrats
ENGLISHFRANÇAISDEUTSCHESPAÑOLITALIANONEDERLANDS
Page 10

Die Heat Mat Substratheizung wird unter einem Ende des Behälters
montiert. Der Substratheizer muss vollständig auf das Glas geklebt
werden. Teile dürfen den Bodenrahmen des Glasterrariums nicht
überlappen.
1. Reinigen Sie die Außenfläche des Glasbodens.
2.
Legen Sie gegebenenfalls die Abstandhalter unter die Ecken des
Behälterbodens (siehe Punkt 6 der Sicherheitshinweise).
3. Lassen Sie die Schutzschicht unversehrt, und führen Sie die Heat
Mat Substratheizung unter den Behälterboden, um ihre endgültige
Position festzulegen.
4. Markieren Sie die Position mit
einem Wachsstift oder einem
anderen Marker.
5. Entfernen Sie die Schutzschicht,
und montieren Sie die Heat Mat
Substratheizung sorgfältig am
Boden. Entfernen Sie NUR die
weiße Schutzschicht. Entfernen
Sie NICHT die transparente
Schutzschicht von der anderen
Seite der Substratheizung.
Sobald die Heat Mat Heizung
montiert ist, sollte sie nicht mehr
entfernt werden.
Achten Sie darauf, dass der Behälter nicht auf das Netzkabel drückt.
Verwenden Sie gegebenenfalls die mitgelieferten Abstandhalter (siehe
18
Punkt 6 der Sicherheitshinweise)! Stellen Sie den Behälter auf eine
harte Oberfläche (nicht auf einen Teppich), wie etwa ein Terrariengestell
oder einen Tisch.
6. Schließen Sie die Heat Mat Substratheizung an.
7. Geben Sie das Substrat und das dekorative Zubehör (siehe Substrate
und Dekoration) in den Behälter. Die Heat Mat Substratheizung darf
nicht ohne Substrat verwendet werden.
WICHTIG:
Wenn Sie den Substratheizer installieren, ist es wichtig, dass der Block mit
der elektrischen Verbindung nicht abgewinkelt ist, sondern flach auf der
Glasfläche des Terrariums liegt. Dieser Heizer darf nicht installiert werden,
wenn sich der Block mit der elektrischen Verbindung auf dem Bodenrahmen
des Terrariums befindet (siehe Abb. III). Das Terrarium darf nicht auf dem
Verbindungsblock stehen. Das Heizerblatt darf unter keinen Umständen
verbogen oder gefaltet werden, da dies zu Störungen beim Betrieb dieses
Produktes führen kann. Wenn Sie den Substratheizer an einem Terrarium
ohne Bodenrahmen installieren, ist es zwingend erforderlich, dass Sie die
mitgelieferten Abstandhalter aus Gummi verwenden.
Hintergrund- oder Wandmontage
Zum Heizen von Terrarienwänden
Nicht für Papierrückwände geeignet!
1. Reinigen Sie die Glasoberfläche.
2. Lassen Sie die Schutzschicht unversehrt, und führen Sie die Heat
Mat Substratheizung an die Außenseite des Behälters, um ihre
endgültige Position festzulegen.
3. Markieren Sie die Position auf dem Hintergrund oder an der Wand
mit einem Wachsstift oder einem anderen Marker.
4. Entfernen Sie die weiße Schutzschicht, und montieren Sie die Heat
Mat Substratheizung sorgfältig an der Behälterwand. Entfernen Sie
NICHT die transparente Schutzschicht von der anderen Seite der
Substratheizung.
Sobald die Heat Mat Heizung montiert ist, sollte sie nicht mehr
entfernt werden.
5. Stellen Sie den Behälter an seine endgültige Position.
6. Schließen Sie die Heat Mat Substratheizung an.
7. Geben Sie das Substrat und das dekorative Zubehör (siehe Substrate
und Dekoration) in den Behälter.
SUBSTRATMATERIAL WÄRMELEITFÄHIGKEIT
Material (W/mK)
Granit .................................................... 2.90
Sandstein .............................................. 1.70
Feuchter Wüstensand ............................ 1.55
Feuchte Erde ......................................... 1.50
Glas ....................................................... 1.38
Wasser .................................................. 0.60
Feuchte(r) Torf, Rinde, Kokosfaser .......... 0.33
Trockener Wüstensand ...........................0.21
Trockene Erde ........................................ 0.20
Trockene(r) Torf, Rinde, Kokosfaser ........0.08
ENGLISHFRANÇAISDEUTSCHESPAÑOLITALIANONEDERLANDS
Page 11

Substrate
Wenn die Heat Mat Substratheizung unter dem Behälter montiert wird,
darf sie nicht ohne Substrat benutzt werden, um Verbrennungen der
Reptilien zu vermeiden. Die Effizienz der Heat Mat Substratheizung
hängt von der Art des verwendeten Substrats und der Schichtstärke ab,
da einige Substrate leitfähiger als andere sind (siehe Tabelle).
Feuchte Substrate erhöhen die Feuchtigkeit im Behälter schnell,
wenn sie mit einer Heat Mat Substratheizung aufgeheizt werden. Dies
ist ideal für Reptilien und Amphibien, die eine feuchte und warme
Umgebung bevorzugen. Geben Sie nur warmes Wasser (30° C) in den
Behälter, um ein Reißen des Glasbodens zu verhindern, da dieser auf
Temperaturveränderungen reagiert.
Dekoration
Stellen Sie die Schale mit Wasser stets auf der gegenüberliegenden
Seite von der Heat Mat Substratheizung auf. Damit verhindern Sie,
dass das Wasser zu heiß wird und verdampft. Verstecke oder Höhlen
sollten ebenfalls in der kalten Zone des Behälters angeordnet werden,
um das natürliche Verhalten zu unterstützen. Reptilien suchen diese
Verstecke auf, um sich abzukühlen und warmen Substraten oder der
Sonne auszuweichen. Andere Dekorationen, wie etwa Steine oder
Holz, können in der warmen Zone (auf der Heat Mat Substratheizung)
untergebracht werden, um mehr Temperaturzonen zu erzeugen.
Zusätzliche Wärmequellen
Neben der Heat Mat Substratheizung können verschiedene Heizgeräte
eingesetzt werden, um eine ideale Umgebung zu schaffen. In der
20
Natur wird Wärme auf drei verschiedene Arten von der Quelle zum Tier
übertragen.
Wärme kann auf folgende Weise übertragen werden:
Leitung (Heat Mat Substratheizung und Heat Rock): die Übertragung
von Wärme durch Körperkontakt. Je größer der Kontaktbereich, desto
effizienter ist die Wärmeübertragung.
Konvektion (fast alle Wärmequellen erzeugen eine Form der
Konvektion): die Bewegung der Wärme durch die Bewegung der Luft.
Konvektion entsteht durch die Unterschiede in der Dichte der Luft bei
verschiedenen Temperaturen. Wenn die Lufttemperatur ansteigt, wird
die Luft weniger dicht und damit leichter. Sie steigt über die kühleren
und dichteren Luftmassen an, die wiederum sinken.
Strahlung (Sun Glo, Night Glo, Solar Glo, Heat Glo und Repti Glo):
Energie in Form von elektromagnetischen Wellen. Verschiedene Formen
der Strahlung bilden das elektromagnetische Spektrum und zeichnen
sich durch ihre unterschiedlichen Wellenlängen aus. Die folgenden
Arten von Strahlung bilden das elektromagnetische Spektrum (in der
Reihenfolge abnehmender Energie und ansteigender Wellenlänge):
Ultraviolettstrahlen, sichtbare Lichtstrahlen und Infrarot. Die kürzesten
Wellenlängen dringen am tiefsten vor.
Glühlampen (Sun Glo, Night Glo, Solar Glo und Heat Glo) dürfen nicht
unmittelbar über der Fläche angebracht werden, die durch die Heat Mat
Substratheizung beheizt wird. Achten Sie bei der Anordnung außerdem
darauf, dass weiterhin ein kühlerer Bereich zur Verfügung steht.
Heat Rocks können in Kombination mit der Heat Mat Substratheizung
verwendet werden, sollten aber eher als alternative Wärmequelle
dienen, da sie im Terrarium selbst angeordnet werden können.
Plazieren Sie den Heat Rock keinesfalls auf der Fläche, die durch
die Heat Mat Substratheizung beheizt wird!
GARANTIE
Wir gewährleisten Ihnen, dass die Exo Terra Heat Mat bei normaler
Verwendung für die Dauer von 2 Jahren ab dem Zeitpunkt des Erwerbs
von Material- bzw. Verarbeitungsfehlern frei ist. Sollte dies nicht
der Fall sein, verpflichtet sich der Hersteller nach seinem alleinigen
Ermessen zur Reparatur oder zum Ersatz der Einheit. Diese Garantie
erstreckt sich nicht auf Geräte, die unsachgemäßer oder fahrlässiger
Verwendung oder Manipulationen ausgesetzt wurden oder die durch
Unfall beschädigt wurden. Eine Haftung für Verluste oder Schäden an
Tierbestand oder persönlichem Eigentum ist unabhängig von ihrer
Ursache ausgeschlossen.
Kundendienst
Falls dieses Produkt fehlerhaft sein sollte, geben Sie es zusammen mit
dem Kaufnachweis entweder an Ihren örtlichen Zoofachhändler oder
senden Sie es mit im Voraus bezahlten Versandkosten an:
HAGEN Deutschland GmbH & Co. KG
Lehmweg 99-105
25488 Holm
Weitere Informationen über unser gesamtes Produktsortiment erhalten
Sie auf: www.exo-terra.com oder www.hagen.com.
RECYCLING
Dieses Symbol steht für die getrennte Entsorgung
von elektrischen und elektronischen Artikeln (WEEE).
Das bedeutet, dass diese Produkte gemäß der
europäischen Richtlinie 2002/96/EC recycelt oder
demontiert werden müssen, um Umweltschäden
zu minimieren. Wenden Sie sich für weitere
Elektronische Produkte, die nicht der Abfalltrennung unterzogen
werden, sind potenziell gefährlich für die Umwelt und für die
menschliche Gesundheit, da sie gefährliche Substanzen
enthalten können.
Informationen an die zuständigen Behörden.
ENGLISHFRANÇAISDEUTSCHESPAÑOLITALIANONEDERLANDS
Page 12

HEAT MAT
Instrucciones
de operación
Calentador de substratos para
terrarios
IMPORTANTES INSTRUCCIONES DE
SEGURIDAD
Favor leer y entender lo siguiente antes de instalar Heat Mat Substrate
Heater!
1. NO sumerja el cable, enchufe o dispositivo en agua u otro líquido.
2. NO opere ningún equipo con el cable o enchufe dañado.
3. NO desenchufe jalando el cable. Para desenchufar, agarre el
enchufe, no el cable.
4. NO manipule el enchufe o el equipo con las manos húmedas.
5. PRECAUCIÓN: Para usar únicamente en superficies exteriores de
tanques de vidrio.
6. La alfombra calentadora puede utilizarse sin necesidad de usar
los separadores (suministrados) cuando se utilice con un terrario
22
Exo Terra u otros terrarios que posean un bastidor en la base. Los
separadores DEBERÁN utilizarse cuando no exista un bastidor en la
base, con el fin de permitir el paso de aire y la ventilación alrededor
del calentador.
7. NO permita que la superficie caliente de este calentador entre en
contacto directo con substratos inflamables.
8. Para usar dentro de casa solamente. Usar en sitios secos
solamente.
9. NO usar para cualquier otro propósito distinto al descrito en este
manual del usuario.
10. Este aparato no está destinado para usar por personas (incluyendo
niños) con impedimento significativo de sus capacidades
mentales o físicas, a menos que se le haya dado la supervisión o
instrucciones sobre el uso del equipo por una persona responsable
de su seguridad. Niños siempre deben ser supervisados para
asegurar que no jueguen con el equipo.
11. Un cable de alimentación corto se presta a reducir el riesgo
resultante de enredarse o tropezarse que con un cable más largo.
12. Cables de extensión están disponibles y pueden usarse si se tiene
cuidado durante su uso.
13. Si un cable de extensión es usado, grado eléctrico marcado debe
ser al menos mayor que grado eléctrico del equipo. Cables de
extensión eléctricos largos deben ser colocados de manera que no
cuelgue de la encimera o mesa donde este podría ser jalado por
niños o tropezado involuntariamente.
14. Espaciadores (incluidos) deben ser instalado debajo del terrario
para proporcionar espacio de aire y ventilación alrededor del
calentador. (ver punto 6)
15. PRECAUCION: (Para N.A solamente). Este equipo tiene un enchufe
polarizado ( una lamina es mas ancha que la otra) para reducir
el riesgo de descarga eléctrica; el enchufe esta destinado a un
receptáculo polarizado en una sola manera. Si el enchufe no
puede insertado completamente dentro del receptáculo, invierta
el enchufe. Si este todavía no encaja, contacte a un electricista
calificado para tener un receptáculo polarizado instalado de
manera apropiada. No intente modificar el enchufe o el receptáculo
en ninguna forma.
IMPORTANTE:
Nunca coloque el Heat Rock en la superficie calentada por un Heat Mat
Substrate Heater!
GUARDE ESTAS INSTRUCCIONES
Introducción
Los reptiles (y los anfibios) son animales exotérmicos o de sangre fría (exo:
fuera; termos: temperatura). Aunque producen calor metabólico, no tienen
medios eficientes de conservarlo o de aumentar o disminuir su producción.
Esto significa que tienen que absorber el calor del ambiente que los rodea.
A pesar de que no son capaces de mantener una temperatura corporal
constante, los reptiles (y otros animales exotérmicos) emplean la regulación
homeostática para compensar las altas o las bajas temperaturas. El flujo de
sangre a los tejidos de la piel se regula, aumentando la pérdida de calor o
la absorción del mismo. Los reptiles también pueden regular la temperatura
corporal sencillamente trasladándose a un lugar más fresco o más caluroso,
buscando el sol o la sombra. En su biótopo natural, los reptiles con frecuencia
emplean superficies calentadas por el sol (ramas, piedras, arena o el suelo de
los bosques) como conductores de calor. El Calentador de Substratos Heat Mat
simula esta situación calentando el substrato del terrario. Es importante dejar
suficientes “lugares fríos” para que los animales tengan opciones distintas y
hacer posible la termorregulación.
ENGLISHFRANÇAISDEUTSCHESPAÑOLITALIANONEDERLANDS
Page 13

Instalación debajo del acuario
Para calentar el substrato del terrario
El Calentador de substratos Heat Mat debe instalarse debajo de un
extremo del terrario. La totalidad de la alfombra debe quedar adherida al
cristal. Ninguna parte de la alfombra debe sobrepasar el bastidor de la
base del terrario de cristal.
1. Limpie la superficie exterior del cristal del fondo.
2. Coloque las arandelas espaciadoras debajo de cada esquina del
fondo del tanque, si procediera (ver punto 6 de las Instrucciones de
seguridad).
3. Con el refuerzo protector aún
intacto, coloque el Calentador
de substratos Heat Mat sobre
el fondo del tanque para
determinar su posición final.
4. Marque la posición con un lápiz
de cera u otro marcador.
5. Retire la protección del adhesivo
y adhiera cuidadosamente
la alfombra calentadora de
substrato a la base. Retire
ÚNICAMENTE la protección
blanca. NO retire el film
transparente de la otra cara de
la alfombra.
24
Una vez en su sitio definitivo, la alfombra calentadora no deberá ser
desplazada.
Asegúrese de que el tanque no se apoye sobre el cable eléctrico. Use los
separadores suministrados cuando proceda (ver punto 6 Instrucciones
de seguridad). Coloque el tanque sobre una superficie dura (no sobre una
alfombra) como un mueble o mesa para terrario.
6. Enchufe el Calentador de substratos Heat Mat.
7. Añada el substrato y los accesorios decorativos (ver Substratos y
Decoración). El Calentador de Substratos Heat Mat no está diseñado
para uso sin substrato.
IMPORTANTE:
Al instalar este calentador de sustrato es importante que el contacto
eléctrico del bloque no esté doblado y que se asiente plano contra la
superficie del cristal del terrario. Este calentador no se instala con el
bloque de contactos descansando en la parte inferior del marco del
terrario. (Ver III) El terrario no debe asentarse en el bloque de contactos.
Bajo ninguna circunstancia debe estar la lámina del calentador doblada
o plegada de ninguna manera, esto puede originar averías del producto.
El uso de los separadores de caucho es obligatorio siempre y cuando se
instale el calentador de sustrato en un terrario sin un marco inferior.
Montaje sobre el fondo trasero o la pared
Para calentar las paredes del terrario
No utilizar con fondos decorativos de papel
1. Limpie la superficie del cristal.
2. Con el refuerzo protector aún intacto, coloque el Calentador de substratos
Heat Mat en la parte exterior del tanque para determinar su posición final.
3. Marque la posición en el fondo o pared con un lápiz de cera u otro marcador.
4. Retire la capa protectora blanca y adhiera cuidadosamente el Calentador
de sustrato a la pared del tanque. NO retire el film transparente de la otra
cara de la alfombra.
Una vez colocado, el Calentador de substratos Heat Mat no debe ser
retirado.
5. Coloque el tanque en su ubicación final.
6. Enchufe el Calentador de Substratos Heat Mat.
7. Añada el substrato y los accesorios decorativos (ver Substratos y
Decoración).
CONDUCTIVIDAD TÉRMICA
Material del Substrato (W/mK)
Granito.............................................................................2.90
Piedra arenisca ................................................................1.70
Arena húmeda del desierto ..............................................1.55
Tierra húmeda .................................................................1.50
Cristal ..............................................................................1.38
Agua ................................................................................0.60
Turba húmeda, corteza húmeda, fibra de coco húmeda ....0.33
Arena seca del desierto ...................................................0.21
Tierra seca.......................................................................0.20
Turba seca, corteza seca, fibra de coco seca ....................0.08
ENGLISHFRANÇAISDEUTSCHESPAÑOLITALIANONEDERLANDS
Page 14

Substratos
Si ha sido montado debajo del terrario, el Calentador de substratos Heat Mat no
debe ser usado sin substrato, para evitar quemaduras a los reptiles. La eficacia
del Calentador de Substratos Heat Mat depende del tipo de substrato empleado
y el grosor de la capa, pues algunos substratos son mejores conductores que
otros (ver tabla).
Los substratos humedecidos aumentan la humedad en el tanque rápidamente
cuando son calentados por el Calentador de substratos Heat Mat. Esto es ideal
para los reptiles y anfibios amantes de la humedad y el calor. Asegúrese de
emplear agua caliente (30ºC) cuando la añada al terrario para evitar rajas en el
cristal del fondo, ya que éste reacciona ante los cambios de temperatura.
Decoración
Coloque siempre el bebedero en la parte opuesta a donde esté ubicado el
Calentador de substratos Heat Mat. Esto evitará que el agua se recaliente y se
evapore. Las cajas o las cuevas para esconderse deben colocarse también en
la zona fría del terrario para favorecer un comportamiento natural. Los reptiles
buscan estos escondrijos para refrescarse y esconderse de los substratos
calientes o del sol. Otras decoraciones como piedras o madera pueden ubicarse
en la zona caliente (sobre el Calentador de substratos Heat Mat) para crear aún
más zonas de altas temperaturas.
Fuentes adicionales de calor
Junto al Calentador de substratos Heat Mat pueden emplearse varios tipos de
dispositivos calentadores para crear un entorno ideal. En la naturaleza, el calor
es transferido por tres vías diferentes desde su fuente hasta el animal:
Conducción (Calentador de substratos Heat Mat y Piedra Heat Rock): el
26
traspaso del calor por medio del contacto físico. Cuanto mayor es la zona de
contacto, más eficiente es el traspaso de calor.
Convección (casi todas las fuentes de calor crean una forma de convección): el
movimiento del calor a través del movimiento del aire. La convección resulta de
las diferencias entre las densidades del aire a temperaturas distintas. Cuando
la temperatura del aire sube, éste se hace menos denso y por tanto más ligero,
y de ese modo se coloca por encima de sus homólogos más fríos y densos, que
caen sucesivamente.
Radiación (Sun Glo, Night Glo, Solar glo, Heat Glo y Repti Glo): energía en forma
de ondas electromagnéticas. Las diferentes formas de radiación constituyen
el espectro electromagnético (en orden decreciente de energía y creciente
de longitud de onda): rayos ultravioleta, rayos de luz visible e infrarrojos.
Las formas de radiación con una longitud de onda más corta son las más
penetrantes.
Los Fluorescentes de luz incandescente (Sun Glo, Night Glo, Solar glo y Heat
Glo) no deben instalarse inmediatamente encima de la superficie calentada
por el Calentador de Substratos Heat Mat, y deben colocarse de modo que siga
quedando una zona más fresca.
Las Piedras Heat Rock pueden utilizarse junto con el Calentador de substratos
Heat Mat, pero es más bien como una fuente de calor alternativa ya que puede
colocarse dentro del terrario. Nunca ubique la Piedra Heat Rock sobre una
superficie calentada por el Calentador de substratos Heat Mat.
Garantía
Este producto está garantizado para defectos de material o de fabricación,
durante un periodo de 2 años a partir de la fecha de su compra. Esta garantía
es únicamente válida con la prueba de compra. La garantía se limita sólo a la
reparación o sustitución de la unidad y no cubre daños inmateriales o daños
a entes animados o inanimados. Esta garantía sólo es válida en condiciones
normales de la utilización para la que ha sido fabricado este aparato. Y excluye
cualquier daño causado por el uso desmedido, la instalación incorrecta,
negligencia, alteración o abuso de este aparato. Para el servicio de garantía
o piezas de repuesto, consulte a su proveedor de productos para mascotas
o diríjase por escrito al representante en su país. Esta garantía no afecta sus
derechos legales.
Servicio
Si tiene algún problema o duda sobre el funcionamiento de este
producto, por favor, permítanos de tratar de ayudarle antes de
devolver el producto a su distribuidor. La mayoría de los problemas
pueden ser resueltos inmediatamente con una llamada telefónica.
Cuando se llama (e-mail o escrito), por favor tenga toda la
información pertinente, tales como número de modelo y / o números
de piezas, así como la naturaleza del problema. Llame a nuestro
Departamento de Servicio al Cliente:
Sólo en Canadá: Número gratuito 1-800-55-HAGEN (1-800-554-
2436) Entre las 9:00 am y 4:30 pm (Hora del Este)
Sólo en EE.UU: Número gratuito 1-800-724-2436 Entre 9:00 am y
4:00 pm (Hora del Este)
Sólo en el Reino Unido: Línea de Ayuda Nº 01977 55662. Entre
9:00 am y 5:00 pm
Para el Servicio de Reparación Autorizado:
Devuelva la unidad con el recibo y el motivo a:
Canadá:
Rolf Hagen Inc. Industries, 3235 Guenette, Montreal, QC H4S 1N2
Rolf C. Hagen Inc., 8770- Calle 24, Edmonton AB T6P 1X8
EE.UU: Rolf C. Hagen (EE UU) Corp. 50 Hampden Road, Mansfield,
MA 02048-9107
Reino Unido: Rolf C. Hagen (Reino Unido) Ltd. California Dr.
Withwood Industrial Estate, Castleford, West Yorkshire WF10 5QH
Para información general sobre nuestros productos, visite nuestras
páginas Web: www.exo-terra.com o www.hagen.com
Distribuido por:
Canadá:
Rolf Hagen Inc. Montreal, QC H9X 0A2
EE UU:
Rolf C. Hagen (EE UU) 50 Hampden Road, Mansfield, MA.
02048-9107
Reino Unido:
Rolf C. Hagen (Reino Unido) Ltd. Castleford, West Yorkshire WF10 5QH
España:
Rolf C. Hagen España S.A Avda. de Beniparrell, 11 y 13 - P.I L’Alteró
46460 Silla (Valencia)
RECICLAJE
Este articulo lleva el símbolo de la clasificación
selectiva de residuos de aparatos eléctricos
y electrónicos (RAEE). Esto significa que el
producto debe ser usado con base a la Directiva
Europea 2002/96/CE con el fin de ser reciclados o
desmantelados para minimizar su impacto sobre el
contacto con las autoridades locales o regionales. Los productos
electrónicos no incluidos en el proceso de clasificación selectiva
son potencialmente peligrosas para el medio ambiente y la salud
humana debido a la presencia de sustancias peligrosas.
medio ambiente. Para más información, póngase en
ENGLISHFRANÇAISDEUTSCHESPAÑOLITALIANONEDERLANDS
Page 15

HEAT MAT
Istruzioni per il
funzionamento
Riscaldamento di superficie
per terrari
IMPORTANTI AVVERTENZE DI SICUREZZA
Si prega di leggere attentamente le istruzioni seguenti
prima di procedere all’installazione. Riscaldamento per
substrato Heat Mat!
1. Non immergete il cavo, la spina o il dispositivo in acqua o altri
liquidi.
2. Non utilizzate il dispositivo in caso di cavo o spina danneggiati.
3. Non scollegate il dispositivo tirando direttamente il cavo. Tirate
sempre la spina.
4. Non maneggiate la spina con le mani bagnate.
5. ATTENZIONE: Da utilizzare esclusivamente sulle superfici
esterne di contenitori in vetro.
6. Il tappetino riscaldante può essere usato senza distanziatori
28
(forniti) se usato con un terrario Exo Terra o con altri terrari che
hanno un telaio di fondo. I distanziatori DEVONO essere usati se
nessun telaio di fondo è presente per far sì che ci sia l’aria e la
ventilazione intorno alla fonte di calore.
7. Non mettete in contatto diretto la superficie riscaldante del
dispositivo con substrati infiammabili.
8. Solo per uso domestico interno. Non utilizzate l’apparecchio
in presenza di umidità.
9. Non utilizzate il dispositivo per scopi diversi da quelli descritti
nel presente manuale.
10. Il presente dispositivo non è destinato all’uso da parte di
persone (inclusi i bambini) che presentano importanti invalidità
fisiche o mentali, salvo nel caso in cui non siano sotto la stretta
supervisione di una persona responsabile per la loro sicurezza.
Tenere lontano dalla portata dei bambini. Non lasciate che i
bambini giochino con il dispositivo.
11. La lunghezza del cavo di alimentazione fornito in dotazione è tale
da impedire il rischio di inciampare o calpestare il cavo.
12. Le prolunghe sono disponibili e possono essere utilizzate, ma
facendo particolarmente attenzione.
13. Qualora fosse necessario ricorrere all’uso di una prolunga, il
voltaggio della prolunga deve essere almeno pari al voltaggio del
dispositivo. La prolunga deve essere sistemata in modo che non
ricada sul tavolo o la superficie di appoggio, affinché non sia alla
portata dei bambini o non venga tirata involontariamente.
14. I distanziatori (forniti in dotazione) devono essere installati sotto
il terrario per garantire spazio libero e una corretta ventilazione
intorno al dispositivo di riscaldamento. (vedere il punto 6)
15. ATTENZIONE: (solo per Nord America)
Il presente dispositivo è dotato di una spina polarizzata (una
spina con un terminale più largo dell’altro). Per ridurre il rischio
di scossa elettrica, la spina si inserisce nella presa di corrente
solo in un senso. Se non è possibile inserire completamente
la spina nella presa, capovolgete la spina. Se non è ancora
possibile, rivolgetevi ad un elettricista qualificato per
l’installazione di una presa polarizzata adeguata. Non tentate in
nessun modo di modificare la spina o la presa.
IMPORTANTE:
Non posizionate mai la roccia riscaldante Heat Rock sulla superficie
riscaldata dal riscaldatore per substrati Heat Mat!
CONSERVATE QUESTE ISTRUZIONI
Introduzione
Rettili e anfibi sono animali a sangue freddo e sebbene producano calore
durante il processo metabolico, non sono in grado di conservarlo o aumentarne
e diminuirne la produzione.
Ciò significa che devono assorbirlo dall’ambiente circostante. Nonostante
l’incapacità di mantenere una temperatura corporea costante, i rettili (e
altri animali a sangue freddo) utilizzano una regolazione omeostatica per
compensare temperature troppo elevate o troppo basse. Il loro flusso
sanguigno destinato ai tessuti epidermici è regolabile per aumentare la
dispersione o l’assorbimento del calore. Inoltre i rettili sono in grado di regolare
la temperatura corporea spostandosi semplicemente da un posto freddo a uno
caldo o viceversa, ovvero spostandosi al sole o all’ombra. Nel proprio habitat
naturale, i rettili sfruttano le superfici riscaldate dal sole (rami, rocce, sabbia o
terreno) che fungono da conduttori di calore. Heat Mat Substrate Heater simula
tale processo riscaldando il substrato del terrario. È importante che vengano
lasciati dei punti freddi per consentire all’animale di scegliere il freddo o il
caldo per termoregolarsi.
Montaggio sotto il terrario
Per riscaldare il substrato del terrario
ENGLISHFRANÇAISDEUTSCHESPAÑOLITALIANONEDERLANDS
Page 16

Il tappetino riscaldante per substrati deve essere montato sotto
un’estremità del terrario. L’intero tappetino deve aderire al vetro.
Nessuna parte del tappetino può sovrapporsi al telaio di vetro del fondo
del terrario.
1. Pulire la superficie esterna del fondo in vetro del terrario.
2. Mettere i distanziatori sotto ogni angolo del fondo del terrario, dove
applicabile (vedere il punto 6 delle istruzioni di sicurezza)
3. Senza rimuovere i sostegni di protezione, posizionare Heat Mat
Substrate Heater sul fondo del terrario per determinarne la posizione
finale.
4. Contrassegnare la posizione
con un colore a cera o altro
pennarello.
5. Rimuovere lo strato protettivo e
mettere il tappetino riscaldante
per substrati con precisione
sul fondo. Rimuovere SOLO lo
strato protettivo bianco. NON
rimuovere il foglio trasparente
dall’altra parte del tappetino.
Assicurarsi che il terrario non
faccia pressione sui fili elettrici.
A tale scopo, utilizzare gli
appositi spaziatori.
Assicurarsi che il terrario non schiacci il filo elettrico. Usare i
distanziatori forniti! dove applicabile (vedere il punto 6 delle istruzioni di
30
sicurezza). Mettere il terrario su una superficie dura (non sul tappetino)
come uno stand per terrari o una tavola.
6. Collegare Heat Mat Substrate Heater alla presa elettrica.
7. Aggiungere il substrato ed eventuali accessori decorativi (vedere
Substrati e Decorazioni). Heat Mat Substrate Heater deve essere
utilizzato esclusivamente con un substrato.
IMPORTANTE:
Quando installate il tappetino riscaldante è importante che il blocco
connettore non si pieghi, bisogna installare il tappetino in maniera
perfettamente aderente alla superficie del vetro del terrario. Questo
tappetino non può essere installato con il blocco connettore sotto la
cornice inferiore del terrario. Per nessuna ragione piegate il tappetino
perché comporterebbe un cattivo funzionamento. L’uso degli spaziatori
in gomma è fortemente consigliato quando si posiziona il tappetino
riscaldante in un terrario senza cornice inferiore.
Montaggio su sfondo o a parete
Per riscaldare le pareti del terrario
Non utilizzare con sfondi di carta
1. Pulire la superficie del vetro.
2. Senza rimuovere i sostegni di protezione, posizionare Heat Mat
Substrate Heater sull’esterno del terrario per determinarne la
posizione finale.
3. Contrassegnare la posizione con un colore a cera o altro pennarello.
4. Rimuovere la protezione bianca e posizionare con precisione il
tappetino riscaldante per terrari sulla parete del terrario. NON
rimuovere il foglio trasparente dall’altro lato del tappetino.
Una volta inserito, Heat Mat non deve essere rimosso.
5. Mettere il terrario nel luogo prescelto.
6. Collegare Heat Mat Substrate Heater alla presa elettrica.
7. Aggiungere il substrato ed eventuali accessori decorativi (vedere
Substrati e Decorazioni
SUBSTRATO CONDUZIONE TERMICA
Materiale (W/mK)
Granito.............................................................................2.90
Arenaria ...........................................................................1.70
Sabbia desertica umida ...................................................1.55
Terra umida .....................................................................1.50
Vetro ................................................................................1.38
Acqua ..............................................................................0.60
Fibra di cocco, torba e corteccia umide ............................0.33
Sabbia desertica asciutta .................................................0.21
Terreno asciutto ...............................................................0.20
Fibre di cocco, torba e corteccia asciutta .........................0.08
ENGLISHFRANÇAISDEUTSCHESPAÑOLITALIANONEDERLANDS
Page 17

Substrati
Se montato sotto il terrario, Heat Mat Substrate Heater non deve
essere utilizzato senza un substrato che protegga i rettili dalle ustioni.
L’efficacia di Heat Mat Substrate Heater dipende dal tipo e dallo
spessore del substrato perché alcuni substrati conducono il calore
meglio di altri (vedere tabella).
Quando riscaldati da Heat Mat Substrate Heater i substrati inumiditi
aumentano con rapidità l’umidità all’interno del terrario. Si tratta di
un ambiente ideale per anfibi e rettili che amano il caldo e l’umidità.
Quando si aggiunge acqua al serbatoio, assicurarsi che la temperatura
del liquido sia intorno ai 30 ºC per evitare spaccature del vetro inferiore
che è sensibile ai cambiamenti di temperatura.
Decorazioni
Mettere il contenitore dell’acqua nel lato opposto rispetto a Heat Mat
Substrate Heater. In questo modo è possibile prevenire situazioni di
surriscaldamento ed evaporazione. Anche gli accessori quali cavità
o ripari devono essere posti nella zona fredda per incentivare un
comportamento naturale. I rettili cercano posti nascosti per raffreddarsi
e ripararsi da substrati caldi o dal sole. Altri accessori, come piccole
rocce o pezzi di legno, possono essere posti nella zona calda (sopra
Heat Mat Substrate Heater) per creare zone ancora più calde
Altre fonti di calore
È possibile affiancare Heat Mat Substrate Heater a molti altri tipi di
dispositivi per il riscaldamento e ricreare ambienti ideali. In natura il
32
calore viene trasmesso agli animali in tre modi diversi:
Conduzione (Heat Mat Substrate Heater e Heat Rock): trasmissione di
calore tramite contatto fisico. Un’area di contatto di grandi dimensioni
consente una migliore trasmissione di calore.
Convezione (quasi tutte le fonti di calore creano forme di convezione):
spostamento di calore tramite il movimento dell’aria. La convezione è
data dalla differente densità dell’aria a diverse temperature. Quando
l’aria si riscalda diviene meno densa e più leggera e tende a spostarsi
verso l’alto rispetto all’aria fredda che a sua volta tende a scendere.
Radiazione (Sun Glo, Night Glo, Solar glo, Heat Glo e Repti Glo): energia
sotto forma di onde elettromagnetiche. Lo spettro elettromagnetico è
formato da diverse forme di radiazioni caratterizzate da varie lunghezze
d’onda. Di seguito vengono elencati i tipi di radiazioni che compongono
lo spettro elettromagnetico (in ordine di energia decrescente e
lunghezza d’onda crescente): raggi ultravioletti, raggi di luce visibili e
infrarossi. Le forme di radiazione con minore lunghezza d’onda sono
le più penetranti.
Lampadine incandescenti (Sun Glo, Night Glo, Solar glo e Heat Glo)
non dovrebbero essere montate sopra la superficie riscaldata da
Heat Mat Substrate Heater e vanno installate in modo da garantire
comunque la presenza di zone fredde.
Heat Rocks può essere utilizzato insieme a Heat Mat Substrate Heater,
tuttavia si tratta di una fonte di calore alternativa in quanto può essere
installato all’interno del terrario. Non posizionare mai Heat Rock sulla
superficie riscaldata da Heat Mat Substrate Heater!
Garanzia
Questo prodotto è garantito per difetti nel materiale o di fabbricazione
per un periodo di 2 anni dalla data d’acquisto. La garanzia è valida
solo se è presentata la prova dell’acquisto. La garanzia è limitata alla
riparazione o alla sostituzione dell’unità sola e non copre qualsiasi
perdita o danno di o da parte di oggetti animati o inanimati. Questa
garanzia vale solo per condizioni di uso normale per cui l’unità è
stata creata. Esclude qualsiasi danno causato dall’uso irragionevole,
l’installazione impropria, negligenza, compressione o abuso dell’unità.
Per il servizio di garanzia o ricambi, contattare il venditore di rettili
locale o scrivere al rappresentante del proprio paese. Questa garanzia
non influenza i vostri diritti legali.
Servizio
Se avete qualsiasi problema o domanda sul funzionamento di questo
prodotto, chiedeteci aiuto prima di riportarlo al rivenditore. La maggior
parte dei problemi può essere risolta subito per telefono. Se chiamate
(e-mail o lettera), vi preghiamo di avere ogni informazione importante
a portata di mano, come il numero del modello e/o numeri delle parti
disponibili e il tipo di problema riscontrato. Chiamate il nostro Servizio
Clientela:
Solo per il Canada: Numero gratuito: 1-800-55HAGEN (1-800-554-
2436) Tra le 9:00 am e le 4:00 pm (Eastern Time)
Solo per gli Stati Uniti : Numero gratuito: 1-800-724-2436 Tra le 9:00
am e le 4:30 pm (Eastern Time)
Solo per il Regno Unito : Numero della helpline 01977 556622 Tra le
9:00 am e le 5:00 pm
Per servizio autorizzato di riparazione garantita:
Spedire l’unità con la ricevuta datata e la ragione a:
Canada: Hagen Industries Ltd, 3235 Guenette, Montreal, QC H4S 1N2
Rolf C. Hagen Inc., 8770-24th Street, Edmonton AB T6P 1X8
Stati Uniti: Rolf C. Hagen (U.S.A.) Corp.
50 Hampden Road, Mansfield, MA. 02048-9107
Regno Unito: Rolf C. Hagen (UK) Ltd.
California Dr. Whitwood Industrial Estate Castleford, West Yorkshire
WF10 5QH
Per ottenere delle informazioni generali sull’intera gamma di prodotti,
consultare i nostri siti a: www.exo-terra.com o www.hagen.com.
Distribuito da:
Canada: Rolf C. Hagen Inc., Montreal, QC H9X 0A2
Stati Uniti: Rolf C. Hagen (U.S.A.) Corp., Mansfield MA. 02048
Regno Unito: Rolf C. Hagen (U.K.) Ltd. Castleford, W. Yorkshire WF10
5QH
locali o regionali. I prodotti elettronici non inclusi nel processo di raccolta differenziata sono potenzialmente pericolosi per l’ambiente e la
salute umana a causa della presenza di sostanze pericolose.
RICICLAGGIO
Questo documento porta il simbolo di raccolta differenziata per i rifiuti di apparecchiature elettriche ed
elettroniche (RAEE). Ciò significa che il prodotto deve
essere gestito in conformità alla Direttiva Europea
2002/96/CE, per essere riciclato o smantellato al fine
di ridurre al minimo il suo impatto sull’ambiente. Per
ulteriori informazioni si prega di contattare le autorità
ENGLISHFRANÇAISDEUTSCHESPAÑOLITALIANONEDERLANDS
Page 18

HEAT MAT
Gebruiksaanwijzing
Substraatverwarming voor
Terrarium
BELANGRIJKE
VEILIGHEIDSVOORSCHRIFTEN
Gelieve het volgende te lezen en te begrijpen alvorens u de
Heat Mat Substrate Heater installeert.
1. Het snoer, noch de stekker noch het apparaat
onderdompelen.
2. Geen enkel toestel met een beschadigd snoer of stekker
gebruiken.
3. Nooit ontkoppelen door aan het snoer te trekken.
Ontkoppelen door de stekker te nemen.
4. Nooit de stekker met natte handen hanteren.
5. Waarschuwing: Alleen te gebruiken aan de buitenzijde van
glazen aquaterrariums
34
6. De Heat Mat kan aangebracht worden zonder het gebruik van
de bijgeleverde spacers indien ze geïnstalleerd wordt onder
een Exo Terra terrarium of een ander terrarium voorzien van
een bodemchassis. De spacers MOETEN gebruikt worden als
er geen bodemchassis aanwezig is.
7. Het verwarmende oppervlak niet in onmiddellijk contact
laten komen met een brandbare ondergrond.
8. Enkel voor gebruik binnenshuis. Enkel gebruiken op
droge locaties.
9. Niet gebruiken voor andere doeleinden dan beschreven in
deze handleiding.
10. Dit toestel is niet geschikt voor gebruik door personen
(inclusief kinderen) met beduidend verminderde fysieke
of mentale bekwaamheden, tenzij een persoon die
verantwoordelijk is voor hun veiligheid hen begeleidt en
informeert aangaande het gebruik van dit toestel. Kinderen
moeten steeds begeleid worden om te voorkomen dat ze met
het toestel spelen.
11. Een kort snoer is bijgeleverd om het risico om verward te
geraken of te struikelen over een lang snoer te voorkomen.
12. Verlengsnoeren zijn beschikbaar en mogen gebruikt worden
als er voorzichtig wordt mee omgegaan.
13. Als een verlengsnoer gebruikt wordt, moet de opgegeven
elektrische stroomsterkte van het verlengsnoer minstens
even hoog zijn als de stroomsterkte van het toestel. Het
langere verlengsnoer moet zo geplaatst worden dat het
niet over de tafel hangt, zodat het niet door kinderen kan
uitgetrokken worden of kan over gestruikeld worden.
14. Afstandsvoetjes (bijgeleverd) moeten onder het terrarium
geplaatst worden om ventilatie en ruimte te voorzien rond de
verwarmer. (zie punt 6)
BELANGRIJK:
Plaats nooit de Heat Rock op het oppervlak verwarmd door de Heat
Mat Substrate Heater!
BEWAAR DEZE VEILIGHEIDSVOORSCHRIFTEN
Introductie
Reptielen en amfibieën zijn ectothermisch, of koudbloedige dieren
(ecto, buiten; therm, temperatuur). Alhoewel ze enige vorm van
metabolische warmte produceren, hebben ze geen middelen om
deze op te slaan, laat staan te verhogen of verlagen. Dit betekent dat
ze afhankelijk zijn van de omgevingstemperatuur. Hoewel ze niet in
staat zijn een constante lichaamstemperatuur te behouden, wordt
dankzij homeostase het evenwicht bewaard. De bloedstroom in het
huidweefsel wordt geregeld om zo meer warmte te absorberen of
af te geven. Reptielen kunnen dus hun temperatuur regelen door
zich simpelweg naar koelere of warmere zones te verplaatsen, het
opzoeken van zon of schaduw. In hun natuurlijke biotoop maken
reptielen dikwijls gebruik van door de zon opgewarmde oppervlakken
(takken, rotsen, zand of bodemgrond) als warmtegeleider. De Heat Mat
Substraat Verwarming simuleert dit door het substraat in het terrarium
op te warmen. Het is belangrijk voldoende koude zones te behouden
om zo thermo-regulatie mogelijk te maken.
Montage onder het terrarium
Voor het verwarmen van het substraat
ENGLISHFRANÇAISDEUTSCHESPAÑOLITALIANONEDERLANDS
Page 19

De Heat Mat Substraat Verwarming dient gemonteerd aan een kant
onder het terrarium. De hele mat moet op het glas gekleefd worden. De
mat mag zelfs niet gedeeltelijk op het chassis rusten.
1. Maak de onderkant van de terrariumbodem schoon
2.
Plaats de spacers onder elke hoek van de terrariumbodem, waar aan
te brengen (zie punt 6 van de veiligheidsvoorschriften)
3. Plaats de Heat Mat Substraat Verwarmer Verwarmer mét de
lijmbescherming onderaan de bodem, om zo de uiteindelijke positie
te bepalen.
4. Markeer de positie met een markeerstift.
5. Verwijder de lijmbescherming
en breng de Heat Mat Substraat
Verwarming zorgvuldig aan
op de gemarkeerde plaats.
Verwijder ENKEL de witte
beschermfolie. Verwijder de
transparante film aan de andere
zijde van de mat NIET.
Let op dat de draad niet geklemd
zit onder het gewicht van het
terrarium.
Gebruik de spacers waar aan
te brengen (zie punt 6 van de
veiligheidsvoorschriften) Plaats het
terrarium op een hard oppervlak, niet op tapijt.
36
6. Plaats de stekker in het stopcontact.
7. Voeg het substraat en decoratie toe (zie Substraten en Decoratie).
De Heat Mat Substraat Verwarming kan niet worden gebruikt zonder
substraat.
BELANGRIJK:
Bij het installeren van het elektrisch contactblok van de
substraatverwarmer is het belangrijk dat deze niet gebogen is en dat
hij plat tegen het glas van het terrarium aan zit. De verwarmer mag niet
geïnstalleerd worden met het contactblok rustend op het bodemframe
van het terrarium. (zie de illustratie)
Het terrarium mag niet op het contactblok rusten. Onder geen
enkel voorwendsel mag het verwarmingsblad gebogen of geplooid
worden, dit leidt tot defect. Het gebruik van de bijgevoegde rubberen
afstandsvoetjes is noodzakelijk indien de warmtemat onder een
terrarium zonder bodemframe wordt geïnstalleerd.
Achterwand of zijde montage
Voor het verwarmen van terrarium zijdes
Niet gebruiken met papieren achterwandfoto’s!
1. Maak de buitenkant van het terrarium schoon
2. Plaats de Heat Mat Substraat Verwarmer mét de lijmbescherming,
aan de buitenzijde, om zo de uiteindelijke positie te bepalen.
3. Markeer de positie met een markeerstift.
4. Verwijder de witte beschermfolie en breng de Heat Wave Substraat
verwarmer voorzichtig aan op de wand van het terrarium. Verwijder
de transparante film aan de andere zijde van de mat NIET.
De Heat Mat kan niet meer worden verwijderd eens geplakt.
5. Plaats het terrarium op zijn plaats.
6. Plaats de stekker in het stopcontact.
7. Voeg het substraat en decoratie toe (zie Substraten en Decoratie).
Substraten
Indien de Heat Mat Substraat verwarming gemonteerd is onder het
terrarium dient een substraat te worden aangebracht om oververhitting
van de dieren en zelfs brandwonden te voorkomen. De efficiëntie van
de Heat Mat Substraat Verwarming is afhankelijk van het gebruikte
substraat en de dikte van de laag, daar sommige substraten beter
geleidend zijn dan andere (zie tabel).
SUBSTRAATGELEIDING
Material (W/mK)
Graniet.............................................................................2.90
Zandsteen........................................................................1.70
Nat zand ..........................................................................1.55
Natte grond .....................................................................1.50
Glas .................................................................................1.38
Water ...............................................................................0.60
Natte turf, bark, kokosnoot vezel ......................................0.33
Droog zand ......................................................................0.21
Droge grond.....................................................................0.20
Droge turf, bark, kokosnoot vezel .....................................0.08
ENGLISHFRANÇAISDEUTSCHESPAÑOLITALIANONEDERLANDS
Page 20

Vochtige substraten verhogen de vochtigheid in het terrarium snel
indien verwarmd door een Heat Mat Substraat Verwarming. Dit is ideaal
voor vocht- en warmteminnende reptielen en amifibieën. Gebruik enkel
warm (30ºC) water bij het toevoegen aan het terrarium om barsten in
de bodemplaat te voorkomen bij plotse temperatuursverandering.
Decoratie
Plaats altijd een waterschaaltje aan de tegenovergestelde zijde dan
waar de Heat Mat Substraat Verwarming is gemonteerd. Dit voorkomt
snelle verdamping en te warm water. Schuilgrotjes dienen ook in de
koude zone te worden geplaatst om zo natuurlijk gedrag te bevorderen.
Reptielen zoeken deze plaatsen op om af te koelen en te zich te
beschermen. Andere decoratiematerialen zoals stenen of hout kunnen
in de warme zone (op de Heat Mat Substraat Verwarming) worden
geplaatst om zo nog meer temperatuurzones te creëren.
Andere warmtebronnen
Naast de Heat Mat Substraat Verwarming kunnen tal van andere
supplementaire warmtebronnen worden gebruikt om zo een optimale
omgeving te creëren. In de natuur wordt warmte overgebracht op drie
manieren.
Door:
Geleiding of conductie (Heat Mat Substraat Verwarming of Heat Rock):
geschiedt door fysiek contact. Hoe groter het contactoppervlak, des te
efficiënter de geleiding.
38
Convectie (vrijwel alle warmtebronnen creëren een vorm van
convectie): de overbrenging van warmte door lucht in beweging.
Convectie ontstaat door de verschillen in densiteit van de lucht bij
verschillende temperaturen. Warme lucht is minder zwaar (dens)
waardoor het stijgt boven koelere lucht, die op zijn beurt zakt.
Straling of radiatie (Sun Glo, Solar Glo, Heat Glo, Night Glo en Repti
Glo): energie in de vorm van elektromagnetische stralen. Verschillende
vormen van radiatie maken deel uit van het elektromagnetisch
spectrum en verschillen in golflengte. Dit spectrum bestaat uit (in orde
van grootte in energie): ultravioletstralen, zichtbaar licht en infrarood.
De kortste golflengte (UV) is de meest penetrerende.
Gloeilampen (Sun Glo, Solar Glo, Heat Glo and Night Glo) niet plaatsen
boven het gebied verwarmd door de Heat Mat Substraat Verwarming,
en op een dusdanige manier dat een koelere plaats nog steeds
beschikbaar is.
Heat Rocks kunnen ook worden gebruikt als supplementaire
verwarming, maar worden meer beschouwd als alternatieve bron daar
deze in het terrarium kunnen worden geplaatst. Plaats de Heat Rock
nooit op de Heat Mat Substraat Verwarming!
Waarborg
Dit product is gewaarborgd voor materiaal of productiefouten
gedurende een periode van twee jaar vanaf de aankoopdatum. De
waarborg is enkel geldig met een bewijs van aankoop. De waarborg
beperkt zich uitsluitend tot het herstellen of vervangen van het
toestel en dekt niet het verlies of beschadiging van dierlijk of niet-
dierlijk materiaal. Deze garantie is enkel geldig bij normaal gebruik
waarvoor het toestel bedoeld is. Het sluit elke beschadiging uit
veroorzaakt door onoordeelkundig gebruik, nalatigheid, geknoei, of
verkeerdelijk gebruik van het toestel. Voor de waarborg service of losse
onderdelen, contacteer uw locale dierenspeciaalzaak, of schrijf naar
de vertegenwoordiger in uw land. Deze waarborg tast uw wettelijke
rechten niet aan.
Service
Indien u enige problemen of vragen hebt aangaande het gebruik van
dit product, laat ons dan eerst proberen het euvel te herstellen alvorens
u het toestel terug naar uw dealer brengt. De meeste problemen
kunnen eenvoudig verholpen worden via telefoon. Wanneer u belt
(mailt of schrijft) vermeld dan al de noodzakelijke informatie zoals
modelnummer en/of onderdeelnummers evenals de aard van het
probleem. Bel onze klantendienst:
Canada Only: Toll Free Number 1-800-55HAGEN
(1-800-554-2436) Between 9:00 am and 4:30 pm (Eastern Time)
U.S.A. Only: Toll Free Number 1-800-724-2436
Between 9:00 am and 4:00 pm (Eastern Time)
U.K. Only: Helpline Number 01977 556622
Between 9:00 am and 5:00 pm
Voor de gemachtigde hersteldienst:
Het toestel met het gedateerde aankoopbewijs en de reden van
terugzenden, terugzenden naar:
Canada: Hagen Industries Ltd, 3235 Guenette, Montreal, QC H4S 1N2
Rolf C. Hagen Inc., 8770-24th Street, Edmonton AB T6P 1X8
U.S.A.: Rolf C. Hagen (U.S.A.) Corp.
50 Hampden Road, Mansfield, MA. 02048-9107
U.K.: Rolf C. Hagen (UK) Ltd.
California Dr. Whitwood Industrial Estate
Castleford, West Yorkshire WF10 5QH
Voor algemene informatie aangaande ons hele gamma producten, kijk
op onze websites: www.exo-terra.com of www.hagen.com.
Verdeeld door:
Canada: Rolf C. Hagen Inc., Montreal, QC H9X 0A2
U.S.A.: Rolf C. Hagen (U.S.A.) Corp., Mansfield MA. 02048
U.K.: Rolf C. Hagen (U.K.) Ltd. Castleford, W. Yorkshire WF10 5QH
RECYCLAGE
Dit item is voorzien van het selectief sorteren symbool
voor afgedankte elektronische en elektrische
apparatuur. Dit betekent dat het product moet worden
behandeld overeenkomstig de Europese Richtlijn
2002/96/EG om te worden gerecycleerd of ontmanteld
om het effect op het milieu te minimaliseren. Voor
lokale of regionale overheden. Elektronische producten die niet zijn
opgenomen in het selectief sorteren proces zijn potentieel gevaarlijk
voor het milieu en de menselijke gezondheid ten gevolge van de
aanwezigheid van gevaarlijke stoffen.
meer informatie kunt u contact opnemen met uw
ENGLISHFRANÇAISDEUTSCHESPAÑOLITALIANONEDERLANDS
Page 21

40
Distributed by:
Canada: Rolf C. Hagen Inc., Montreal, QC H9X 0A2
U.S.A.: Rolf C. Hagen (U.S.A.) Corp., Mansfield, MA. 02048
U.K.: Rolf C. Hagen (U.K.) Ltd., Castleford,
W. Yorkshire WF10 5QH
France: Hagen France SA., F-77388 Combs la Ville.
Germany: HAGEN Deutschland GmbH & Co. KG, 25488 Holm
Malaysia: Rolf C. Hagen (SEA) SDN,
43200 Cheras, Selangor D.E., Malaysia.
Spain: Rolf C. Hagen España S.A.,
Av. de Beniparrell n.11 y 13, 46460 Silla, Valencia
Printed in China
VER: 04/09
 Loading...