

Page 1
QuickSet Pro
Programming Instructions
(for MS, MLS and CDH/W products only)
The QuickSet Pro digital programmer handset is
designed for use with Ex-Or’s range of lighting control
products. The programmable parameters of the
various products can be configured via this battery-
powered, hand-held, infrared unit. The Quickset
Pro allows programming and re-programming to
be carried out with virtually no disturbance to the
building’s occupants. Settings are chosen from the
QuickSet Pro menu and transferred instantaneously
process. Settings from one product can be copied
in seconds to another and settings can be checked
at any time using the QuickSet Pro’s download
function. Reprogramming of the parameters can
be carried out quickly using the QuickSet Pro.
The QuickSet Pro can be easily upgraded to
accommodate product revisions/additions via
USB connection to the PC software package.
(Refer to back page)
to the product being programmed by pressing
the upload button. The commissioning engineer
receives positive feedback at all stages of the
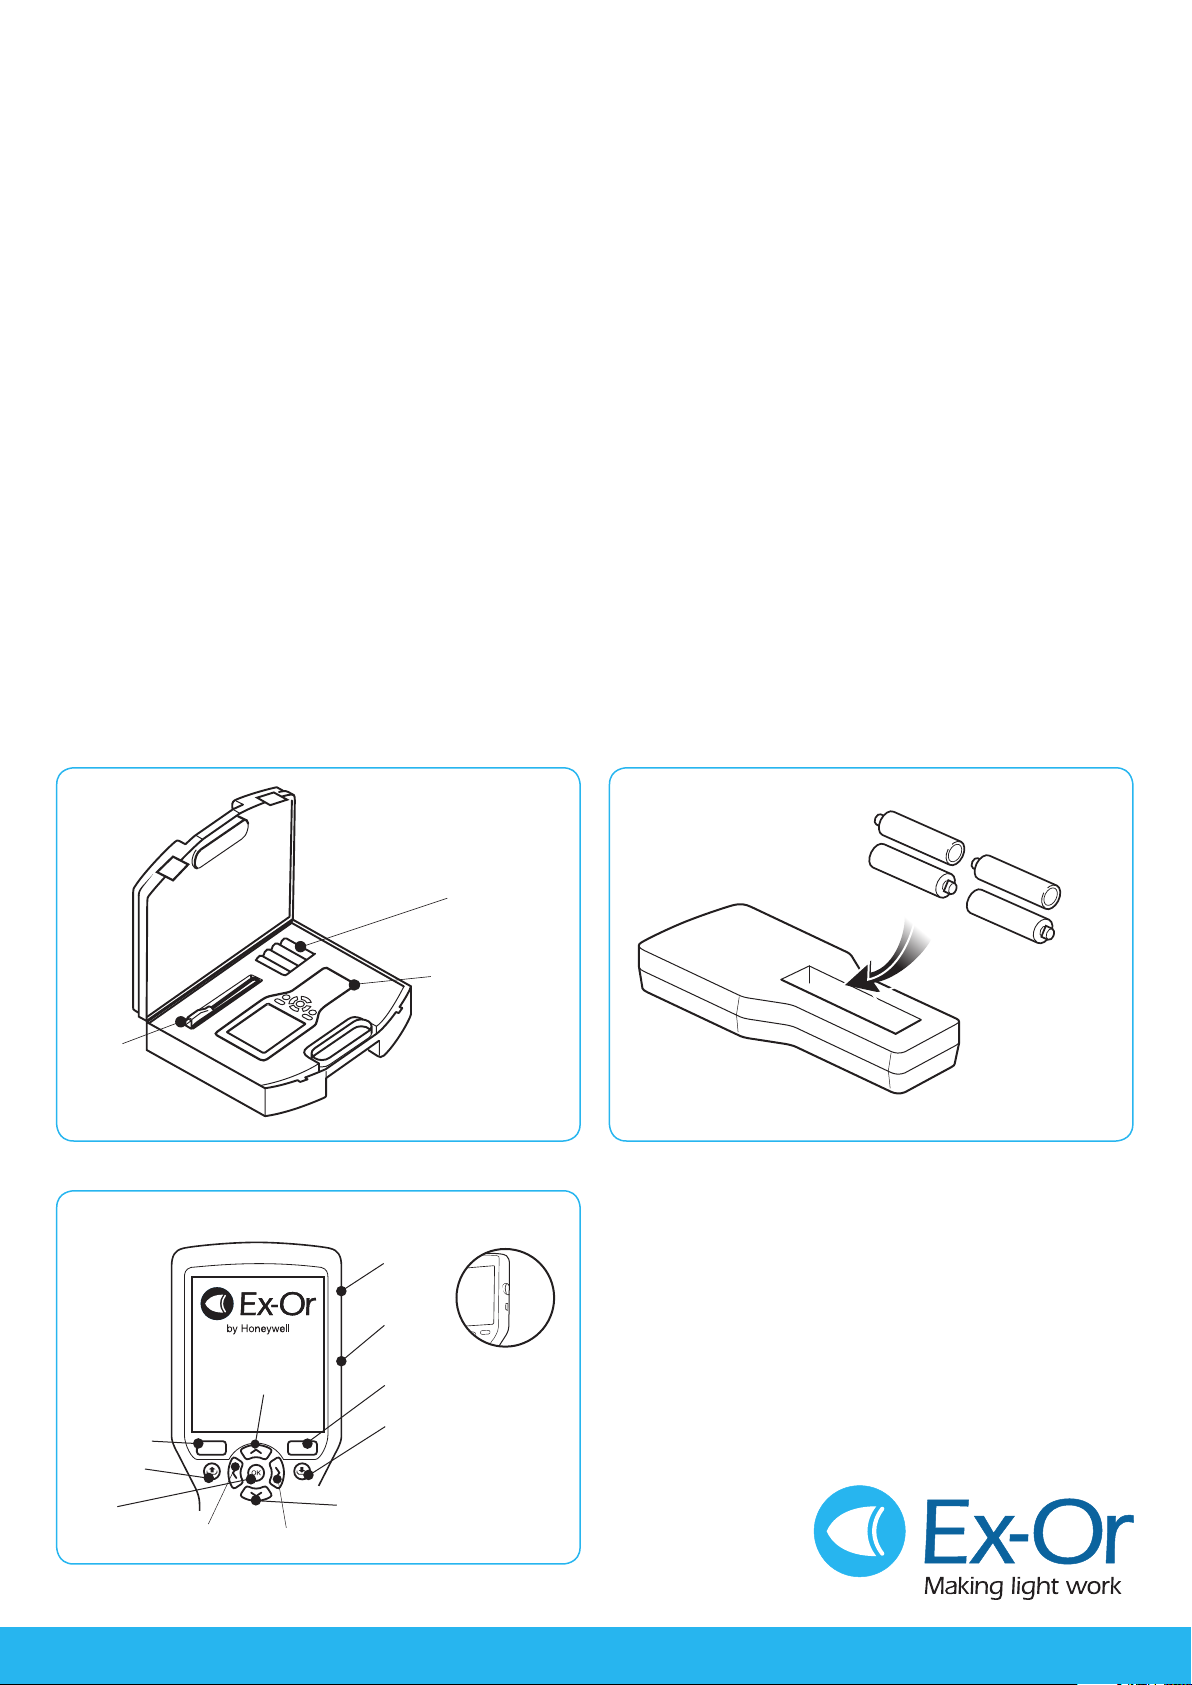
CONTENTS: 1 x QuickSet Pro, 4x AA Batteries, 1 x USB Lead
FIG. 1 FIG. 2
Alkaline Cells
USB
Lead
FIG. 3
Page Down
Upload
OK
Up Key
Left Key
QuickSet Pro
Insert Batteries
Micro SD
Card
USB Port
Option
Download
Press any key to start
Down Key
Right Key
Page 2
QuickSet Pro
Programming Instructions
(for MS, MLS and CDH/W products only)
Energy Conservation Solutions Pty Ltd - Exclusive Distributor - Australian and New Zealand
Locations: VIC/TAS, NSW, QLD, FNQ, ACT, SA/NT, WA, NZ. For Contact Details Visit: www.ecs.net.au
COMMUNICATING WITH
A SENSOR
‘Downloading’ the settings from a
sensor copies the contents of the
sensor’s memory onto the screen and
memory of the programmer.
Caution: ‘Uploading’ new settings
into the sensor over-writes the
memory of the sensor with the
contents of the programmer.
Always download sensor settings
prior to commencing.
Note: If programmed incorrectly,
repeat steps below.
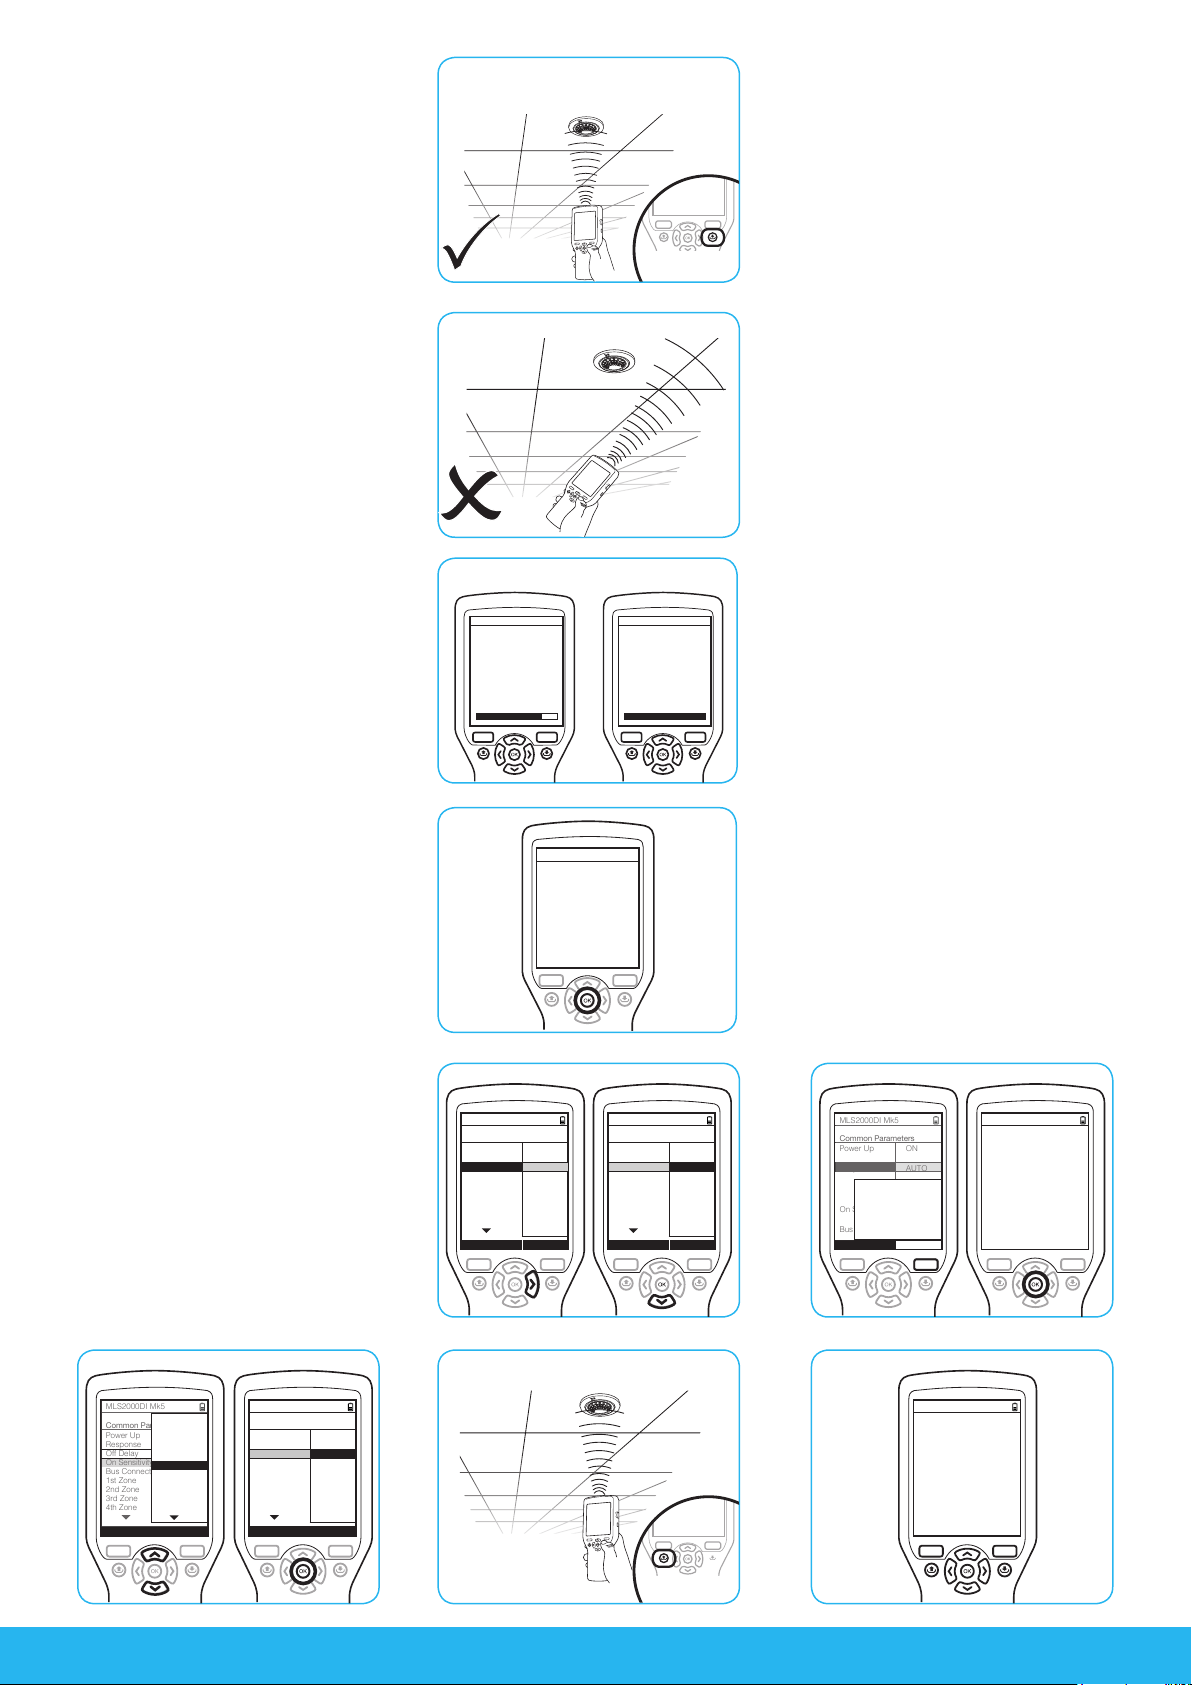
To perform a download from a
sensor:
1 Turn the programmer on by
pressing any key. (Fig.3)
2 Point the programmer at the lens
of the sensor, ideally from directly
below and from 1 to 1.5 metres away.
(Fig.4 and 5)
3 Holding the programmer steady,
press and release the DOWNLOAD
key. (Fig.4) Continue to hold
the programmer still while the
programmer and sensor exchange
information (this may take up to
10 seconds). (Fig.6) If the lights
controlled by the sensor are ‘on’
prior to a download, they will switch
off then on while the download is
occurring. The download is complete
when the QuickSet Pro displays
information from the sensor. (Fig.7)
Note: If the exchange is disrupted,
typically due to the programmer being
moved too much, (Fig.5) the lights
will not come on. Simply repeat the
process, after adjusting the distance
or aim if necessary.
FIG.4
FIG.5
FIG.6
Download
Download in progress...
FIG.7
FIG.8
MLS2000DI Mk5
Common Parameters
Power Up
Response
Off Delay
On Sensitivity
Bus Connect
1st Zone
2nd Zone
3rd Zone
4th Zone
Next View Options
Download
MS2000D Mk2.1 v20
Illumination113
Replies = 32
Comms = 30kHz
ON
AUTO
20 mins
80
YES
--
--
--
--
Download Button
Download
Download Summary
MLS2000DI Mk5
Common Parameters
Power Up
Response
Off Delay
On Sensitivity
Bus Connect
1st Zone
2nd Zone
3rd Zone
4th Zone
Next View Options
ON
AUTO
20 mins
80
YES
--
--
--
--
ADJUSTING THE
TIME DELAY SETTINGS
4 Use the right ARROW key to go
to the next screen, scroll DOWN to
highlight ‘off delay’, right ARROW so
the time delay parameter is highlighted
e.g. 20 mins (Fig.8) then press OK.
If information about this parameter is
required, press the OPTION key (Fig.9)
scroll DOWN to highlight help, then press
the OK key. Press the left ARROW key to
return to the previous menu.
5 Scroll UP or DOWN to select
the desired time delay. Then press
OK (Fig.10). The new time will be
highlighted. This will be the new ‘off
delay’ setting to control the length
of time the lights remain on once
movement is no longer detected by
the sensor.
6 To upload the new setting to the
sensor use the UPLOAD key pointing
the QuickSet Pro directly towards the
sensor (Fig.11). The lights will turn off
then on to acknowledge a successful
upload. (Fig.12) Press LEFT key to go
back to Home Menu
Note: To establish the current
settings of a sensor, at anytime,
perform a download (Repeat Steps
1, 2 & 3). Press the right arrow for
the current parameters.This will not
alter the settings in the sensor. This
simply allows the settings within the
sensor to be read on the screen of
the programmer.
FIG.9
MLS2000DI Mk5
Common Parameters
Power Up
Response
Off Delay
On Sensitivity
Bus Connect
Next View Options
ON
AUTO
Load From Favourite...
20 mins
Store as Favourite
Upload Selected
80
Help
Switch Off
YES
Exit to Home
Help
Off Delay: Thois is the
time it takes since the last
occupancy was detected
for the lights to turn off or
go to the exit condition.
You may set this time to 10
seconds for walk testing.
Check the rmware version
No. before selecting •
DISABLED • - it may not
work with older detectors.
FIG.10
MLS2000DI Mk5
10 secs
Common Parameters
1 min
Power Up
Response
Off Delay
On Sensitivity
Bus Connect
1st Zone
2nd Zone
3rd Zone
4th Zone
2 min
5 min
10 mins
15 mins
20 mins
25 mins
30 mins
35 mins
40 mins
ON
AUTO
20 mins
80
YES
--
--
--
--
Options
MLS2000DI Mk5
Common Parameters
Power Up
Response
Off Delay
On Sensitivity
Bus Connect
1st Zone
2nd Zone
3rd Zone
4th Zone
ON
AUTO
15 mins
80
YES
--
--
--
--
Options
FIG.11
Upload Button
FIG.12
Upload
MS2000D Mk2.1 v20
Ballast = DALI 1%
Burn in Hrs = 0
Illumination 59
Replies = 32
Comms = 30kHz
Page 3

QuickSet Pro Programming Instructions
FIG.13
FIG.16
Home
Utilities
LightSpot HD
LightSpot/MLS/LCM
LightSpot/MLS/LCM
Set Light Level
En Ocean
DALI LED Fast Fade
Toggle Channel
User Remote
User Test
Download
Up / Down / OK (Send)
Options
Options
Press OK
FIG.14
Press OK
FIG.15
Press OK
Press OK
SETTING THE PHOTOCELL
To set the photocell correctly, the lights
will need to be on and have been on
for at least 15 minutes. If the lights are
already on, go to Step 10.
If the lights are O, you will need to
turn the lights on manually by using
the Quickset Pro. Power up and wait
until the Home Menu appears, scroll to
Utilities and then press OK. (Fig.13)
7 Scroll to LightSpot/MLS/LCM then
press OK. (Fig 14)
8 Select ‘Set Light Level’ then Press
OK. (Fig 15)
9 Up/Down/Ok (Send) will appear
on the screen. Point the QuickSet
Pro at the sensor and press the UP
button. (Fig.16) The lights will turn on.
Now go to Step 10 for Non-Dimming
Luminaires or Step 11 for Dimming
Luminaires to set the photocell.
10 Non-Dimming Luminaires
To set the Photocell, wait until you have
the desired light conditions* then point
the QuickSet Pro at the sensor and
press OK.
* Desired light level to be a
combination of incoming daylight
and light coming from the luminaire,
this can be achieved at certain times
of the day such as dawn and dust
Note: Non-Dimming Luminaries
When the natural light exceeds the
‘upper threshold’ value, the lights do
not turn off immediately. The lights will
turn off only when the ‘upper threshold’
has been exceeded for the duration of
the Off Delay. If the Off Delay is set to
‘Disabled’, then the lights will turn OFF
after 20 minutes.
11 Dimming Luminaires “Up/Down/
Ok (Send)” will appear on the screen.
(Fig 16) Point the QuickSet Pro at the
sensor and adjust the light level using
the UP/DOWN keys. (Fig.17)
14 Once dimming level has been set
to the requirements press ok (Fig 18).
Note: The sensor takes measurements
and sets the threshold parameters
automatically. The lights will flash
(Regulating) or switch off and on
(Switching) to acknowledge correct
setup. Please note that the threshold
values are not in lux, rather non-specific
digital values.
FIG.17
To investigate other parameters, download from the relevant detector and navigate
the screen to the relevant parameter. Use the ‘help’ facility for that parameter to
remind or inform yourself of the operation and consequences of the parameter
and the options available.
MLS RB2000 DATA BUS POWER SUPPLY
Adjust Up/Down
The colourless Activity LED flashes
FIG.18
green only when there is activity in any
zone on the bus.
(Note: only sensors without a
programmed zone can cause this LED
to flash.) It flashes red/amber when
a bus installation fault is detected
regardless of movement or occupancy
Press OK
Energy Conservation Solutions Pty Ltd - Exclusive Distributor - Australian and New Zealand
in the building. Please note that not all
faults will be indicated by this LED.
Locations: VIC/TAS, NSW, QLD, FNQ, ACT, SA/NT, WA, NZ. For Contact Details Visit: www.ecs.net.au
Page 4

QuickSet Pro
Programming Instructions
(for MS, MLS and CDH/W products only)
Energy Conservation Solutions Pty Ltd - Exclusive Distributor - Australian and New Zealand
Locations: VIC/TAS, NSW, QLD, FNQ, ACT, SA/NT, WA, NZ. For Contact Details Visit: www.ecs.net.au
by Honeywell
INSTALLING DESKTOP APPLICATIONS OR QUICKSET PRO FIRMWARE UPDATES
The QuickSet Pro Desktop Application keeps you up-to-date with new functionalities, backs up frequently used
configurated files and helps manually upgrade or downgrade the firmware.
USB
lead
FIG.4
Windows Explorer
Computer
Hard Disk Drives
Local Disk (C:)
42.5 GB free of 228 GB
Devices with Removable Storage
QuickSet Pro (F:)
4.62 MB free of 7.72 MB
QUICKSETPRO
Alkaline cells
QuickSet Pro
Double click
FIG.2
Connected to host...
USB2.0
FIG.5
Windows Explorer
QuickSet Pro
Data
InstallInstallInstall
Install
InstallInstallInstall
QUICKSETPRO
XP, Vista, Win 7 & 8
Double click
FIG.3FIG.1
FIG.6
by Honeywell
QuickSet Pro
Desktop Application
DOWNLOAD DESKTOP
Making light work
APPLICATIONG
New mass
storage device
QuickSet Pro
found
FIG.7
by Honeywell
QuickSet Pro
Desktop Application
Do you want to run or save this file QSP_DA_2.40.exe (9.65MB)
from lightingprogrammer.net?
CancelRun
Save
FIG.8
QuickSet Pro Desktop Application
Please wait while the InstallShield Wizard installs QuickSet
Pro Desktop Application. This my take several minutes.
QuickSet Pro
Desktop Application
Status
Back Next
Cancel
FIG.9
QuickSet Pro Desktop Application
Firmware
Transfer
Config Files
Emulator
Making light work
Ready
Software Information
Check Update
Device Information
Check Update
Please note, display might vary depending on the most current version.
File Converter
by Honeywell
 Loading...