

Page 1
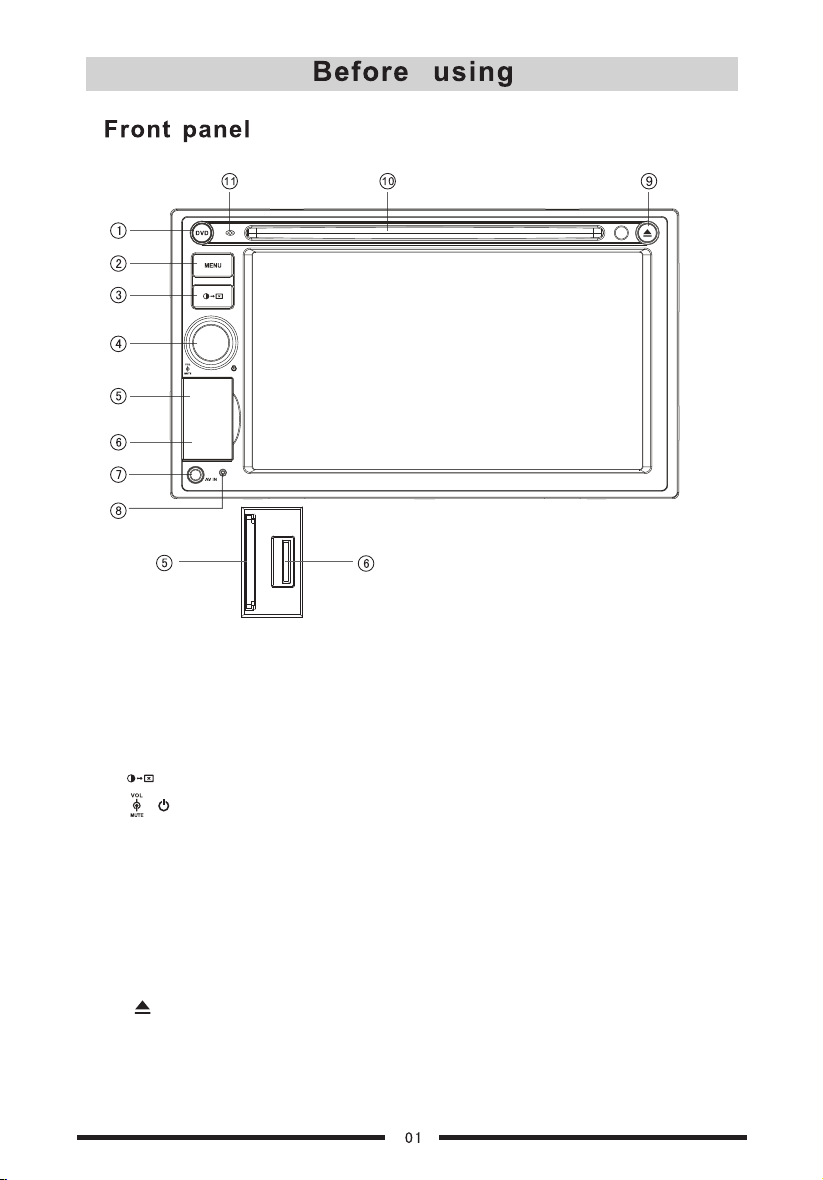
In Car Audio,
[ék-san-ik] means
Sonic Excellence by
Mobile Entertainment
INSTRUCTION MANUAL
EXONIC Mobile Entertainment
Buena Park, CA 90621 U.S.A.
www.exonicmobile.com
P/N :1270 75012 584
EXD 7088
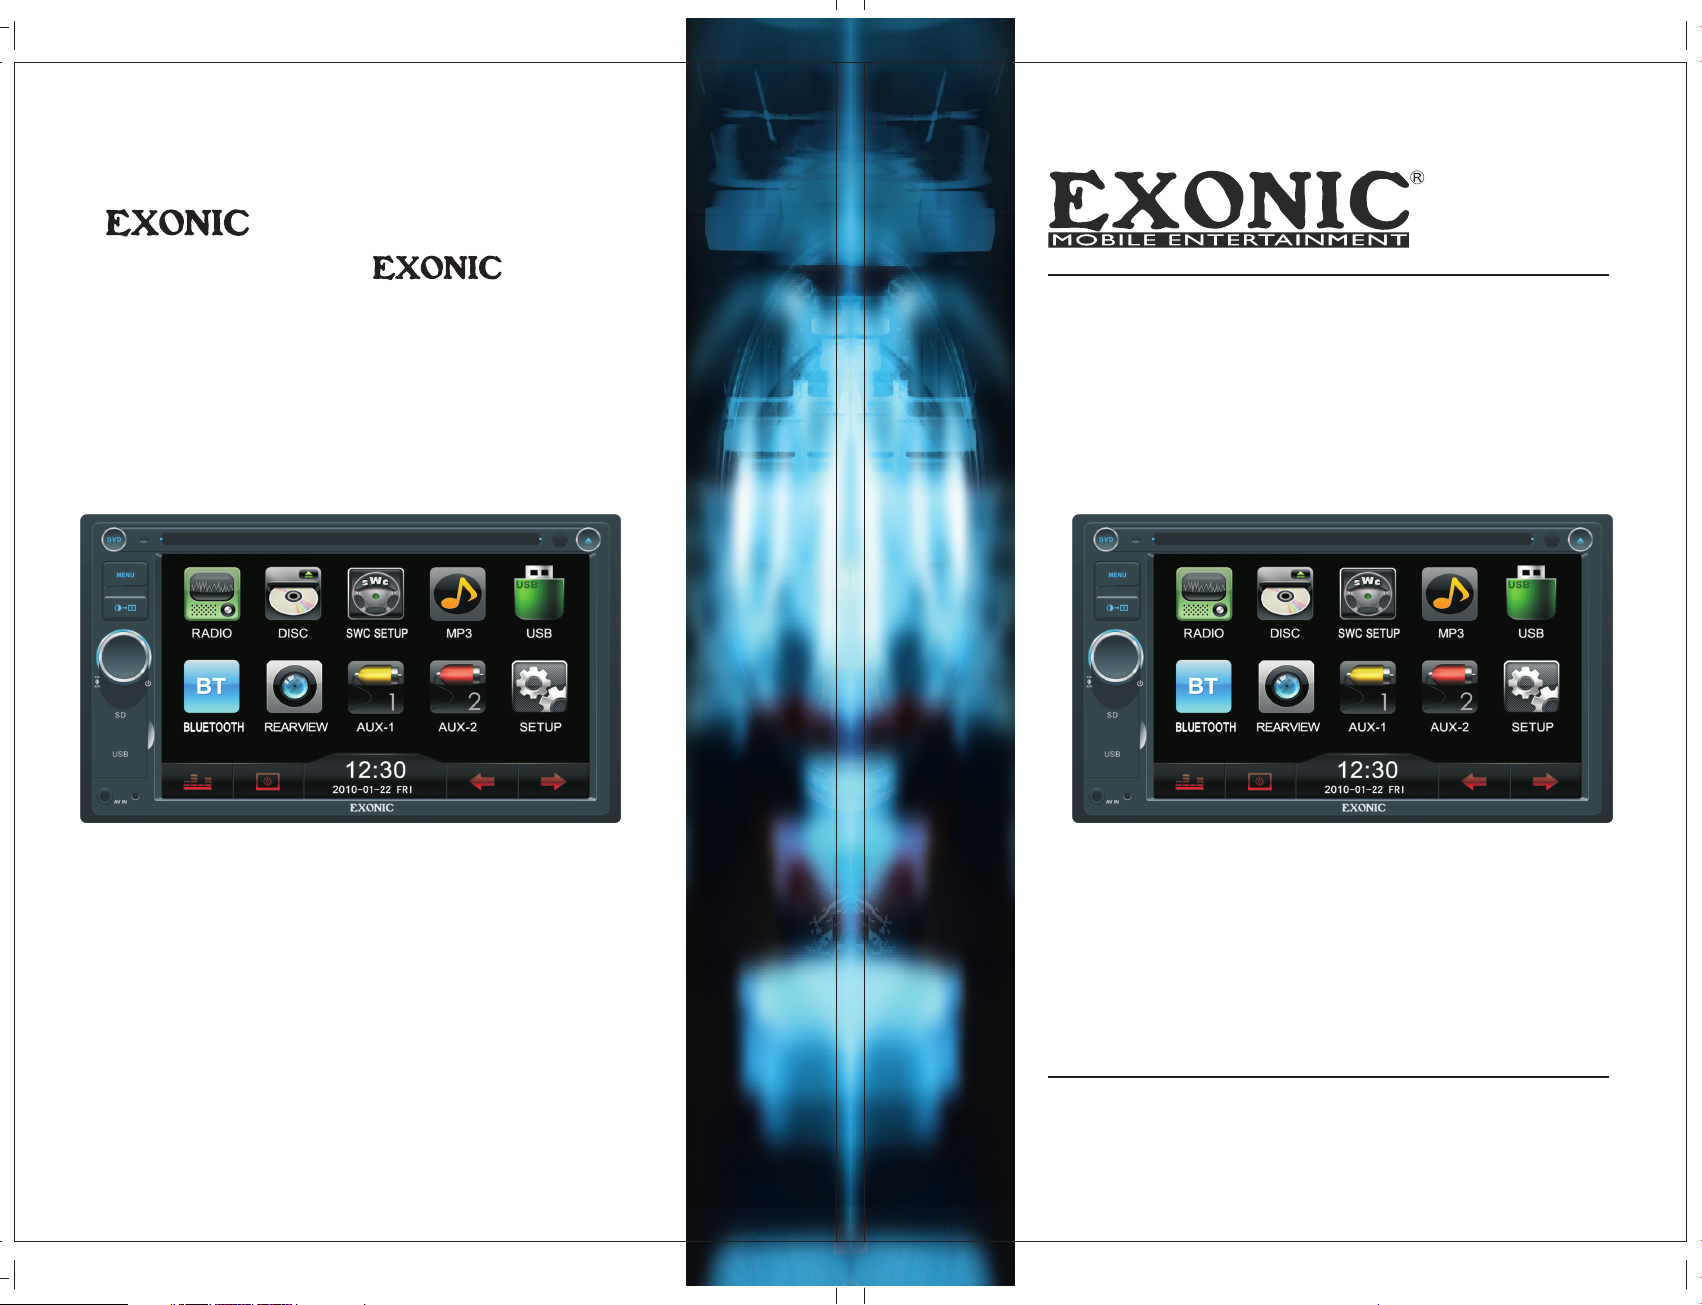
2-DIN 6.2" WVGA Digital TFT Multimedia Disc Player
Page 2
Page 3

Before using
Fron t panel 01
Remo te contro l............. 02
............. . . .
Basic operations
Powe r on/off. . . . . . . . . . . . . . . .04
Mute . . . . . . . . . . . . . . . . . . . . . .0 4
Adju st the volu me. . . . . . . . . . .04
Main m enu/Sou rce menu
and se lection . . . . . . . . . . . . . . . 04
Disp lay syste m time. . . . . . . . . 04
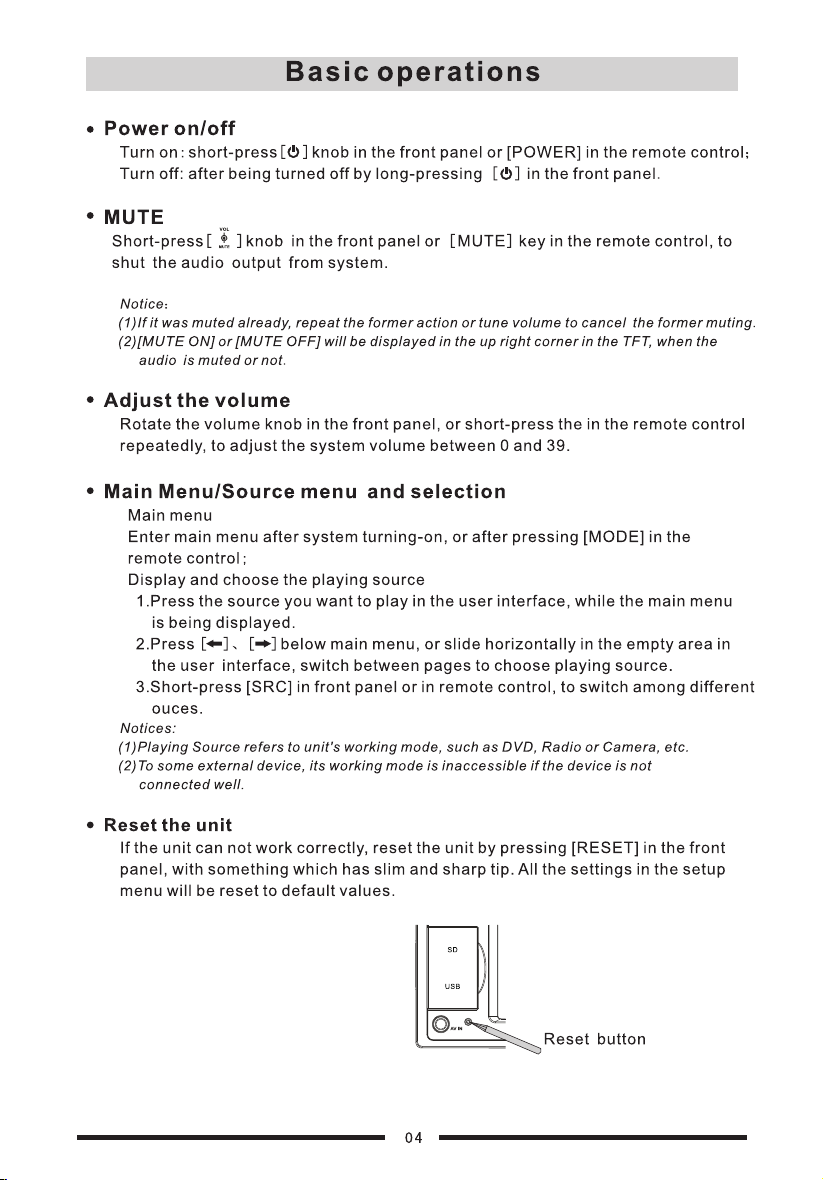
Rese t the unit. . . . . . . ........04
Radio mode
Sele ct radio mo de. . . . . . . . . . . 05
Sele ct band........ . . . . . . . . 05
Auto t uning........ . . . . . . . . .05
Manu al tuning . . . . . . . . . . . . . . 05
Auto s ave................. 05
Manu al save........ . . . . . . . 05
Loca l seeking . . . . . . . . . . . . . . .05
Ster eo select ion.............05
Reca ll the pres et stations . . . . . 06
Swit ch to video f iles. . . . . . . . . .06
Repe at playba ck 10
Repe at A-B 10
Rand om playba ck 11
DVD me nus/tit les............ 11
Sele ct audio ch annel.........11
Sele ct subtit le language s......11
Sele ct multi- angle views . . . . . . 11
PBC fu nction. . . . . . . . ....... 11
Sele ct a partic ular file... . . . . . 12
Play back info rmation dis play. . .13
SD / USB mod e
Onsc reen cont rol icons.. . . . . .1 4
Paus e.....................14
Stop . . . . . . . . . . . . . . . . . . . . . . 14
Fast f orward/ reverse... . . . . . . 14
Play t he next or pr evious file
Repe at playba ck. . . . . . . . . . . . 14
Rand om playba ck. . . . . . . . . . . 14
Video fu ll screen
Zoom i n/out........ . . . . . . . . 1 5
Play back info rmation dis play. . 15
Rota te pictur e.............. 15
Sele ct a partic ular file... . . . . . 15
............
............. . . .
...........
... 14
............ 14
Disc mode
Inse rt a disc........ . . . . . . . . 07
Ejec t the disc. . . . . . . . ....... 0 7
Touch sc reen cont rols. . . . . . . 07
Play . . . . . . . . . . . . . . . . . . . . . . 1 0
Paus e.................... 10
Stop . . . . . . . . . . . . . . . . . . . . . . 10
Fast r ewind Fast f orward. . . .
Play t he next or pr evious file . . .
/ 10
10
Bluetooth mode
Sele ct Blueto oth mode. . . . . . . .16
Pair ing................ . . . . 16
Sear ching........ . . . . . . . . . 16
Auto a nswer........ . . . . . . . 17
Make a c all
Voice t ransfer . . . . . . . . . . . . . . 17
Hang p................... 17
Scan
phon e book . . . . . . . . . . . 17
............. . . . 17
u
Page 4

Look f or callin g record
Play m usic. . . . . . . . . . . . . . . . . 18
Other modes
AUX. . . . .................. 19
Back v iew
SWC 20
............. . . . . 19
............. . . . . . . . . .
.......18
SETUP
Setu p step s................22
Tim e..................... .22
Radi o..................... 23
Video. . . . . . . .............. 23
Cali bration
Volum e................... 24
............. . . . 2 4
EQ. . . . . . . . . . . . . . . . . . . . . . . 25
Troubleshooting..........26
Device Connection. . . . . . . .28
Specifications............31
Appendix............ . . . . .3 3
Page 5
SD
USB
Notice:
The but to ns i n this pi ct ure is for re fe rence o nl y,and may b e di ffere nt f ro m that in r ea l unit.
Refer en ce t o real un it i s suggest ed .
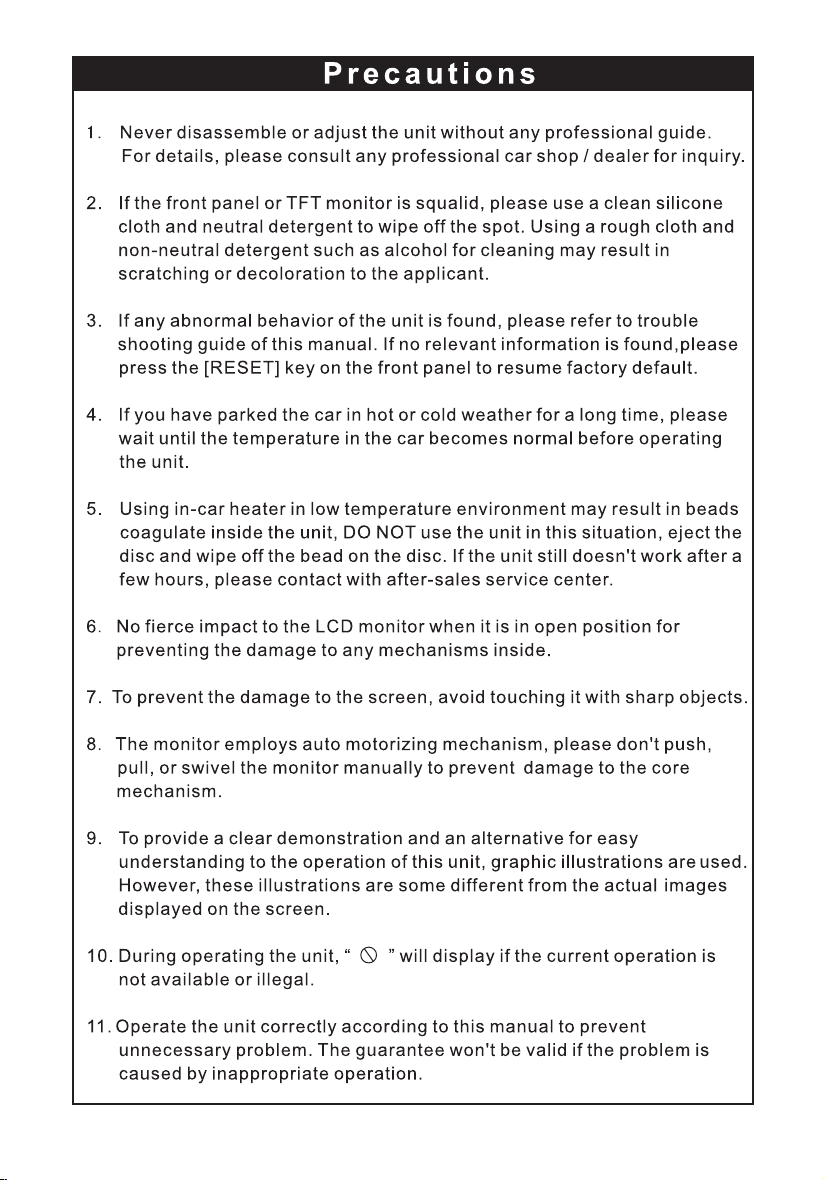
1.[D VD] key: En ter the DVD sys tem or exit
2.[M ENU] key: R eturn to the ho me menu
3.[ ] ke y: Turn on /off the screen b rightne ss and enter th e nightti me mode
4.[ / ] kn ob: ajust vol ume
Tur n mute on/o ff(s hort pres s)
Tur n the unit on o r off( long pres s)
5. Ope n the cover a nd insert/r emove the S D card
6. USB s lot
7. AV jack
8. [Re set] key: R eset the unit
9. [ ] key : Eject disc
10. Di sc slot
11. Built -in microph one
Page 6
Page 7

Page 8
Page 9
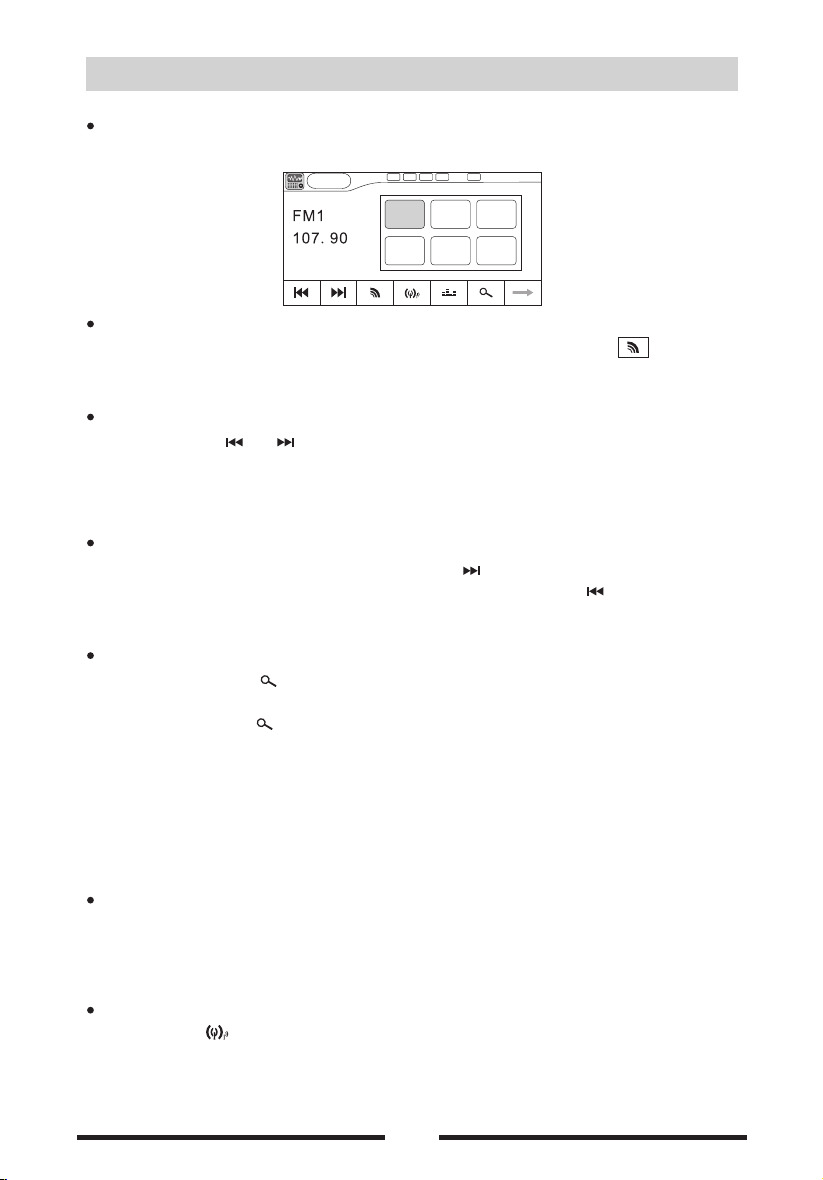
Rad io mode
Select Radio mode
[ ]
Enter Main Menu and choose R AD IO mo de .
Rad io
P1
P1
87.50
P4
106.10P5107.90
P2 P3
90.10 98.10
P6
87.50
00:12AM
Select band
Press [BAND]in the remote control, [FM/AM] in the front panel or in the user
interface, to choose a band among FM1, FM2, FM3, AM1 and Am2 .
Auto tuning
[ ]/[ ]
Long-press icon in th e fr on t pa ne l, s ea rc hi ng f or a s ta ti on a lo ng t he
increasing frequencies.
Notice: W he n a stati on i s receive d, s earch in g st ops and t he s tation is p la yed.
Manual tuning
During manual tuning,repeat- press the [ ] on the user interface and the
frequency to tune in a higher station. rep ea t- press the [ ] on the user
interface and the frequency to tune in a low er s ta ti on .
Auto save
Short- press the icon and auto scan among station w he n a station
.
is rec ei ve d a nd the played for 5 seconds
Long-press the[ ] icon, on ly s ta tions with suffi ci en t si gn al s tr en gt h wi ll b e
detected and stored in the memory. When you want to listen to the station,
don't need to search again,and only need to press the number button.
Notice:
After aut o sa ving, t he prev io us saved st at ions wi ll b e overwri tt en.
The unit ha s 5 ba nds, su ch as FM1、F M2、F M3、AM1、AM2, and each b an d can sto re
6 station s; he nc e th e unit ca n st ore 30 stat io ns in all .
[ ] P1-P6 ,
Manual save
When one expected radio station has be en d et ec te d, long- press the anyone
icon P1- P6 on the user inferface and store the corresponding location.
Notice: Wh en the ma nu al saving , wi ll cove r wi th t he last ed s tation.
Local seeking
Press the[ ] icon and choose the[LOCAL] / [ DI STANCE] .
When the local radio station searching i s [DISTANCE] , on ly s ta ti on s wi th
sufficient signal strength will be detected.
05
Page 10
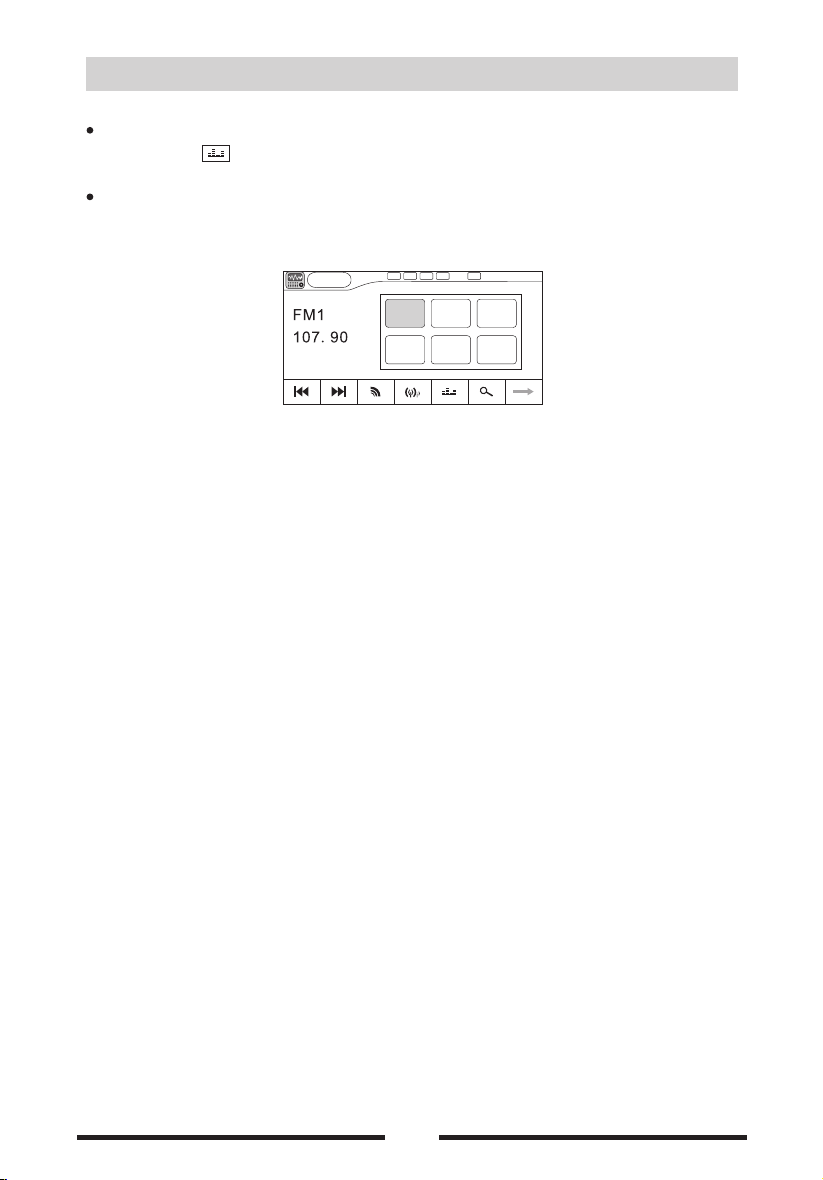
Rad io mode
selection
EQ
Press the icon and .
enter the EQ s et up
Recall the stations
preset
When you want to the store station,select the P1- P6 on the list and fleetly
listen t o the station.
Rad io
P1
P1
87.50
P4
106.10P5107.90
P2 P3
90.10 98.10
P6
87.50
00:12AM
06
Page 11
DVD m ode
Insert a disc
Upon inserting a disc, the unit will switch to [ DISC] mode automatically.
Notes:
① Please co nf irm whe th er there is a d is c in the un it b efore you i ns ert anoth er o ne.
② Some re co rd ed disc s, s uch as CD-R , CD -RW, DVD -R , DVD+R,
DVD-R W, DV D+ RW ca nn ot be playe d ba ck beca us e of differ en t
recor di ng s tatus . Ot herwise , th e discs w it hout bein g cl osed co ul d
not be pl ay ed b ack.
③ About the c au tions o f di sc using, p le ase ref er t o the appen di x.
④Don't ple dg e to comp at ible the al l di sc.
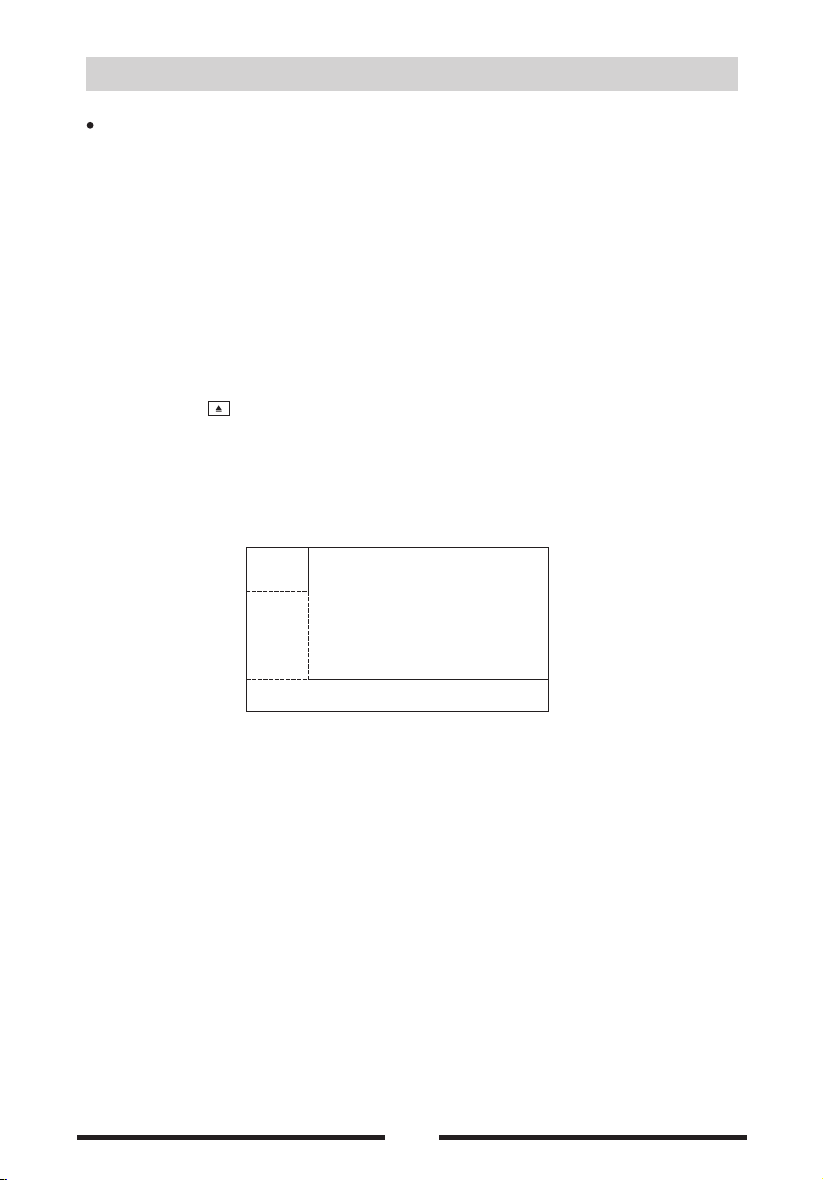
Eject the disc
Press the key on the front panel or remote control to eject the disc. Wh en
the disc is ejected, the unit switches to the previous source, if connected.
Otherwise, the unit switches to [Radio] mode automatically.
Touch screen controls
The to uch key are as for DVD play back are ou tlined be low
:
A
B
A:
:
C:
Return the last menu
B P la y t he vedio and display playback information
Display onscreen control menu
C
07
Page 12
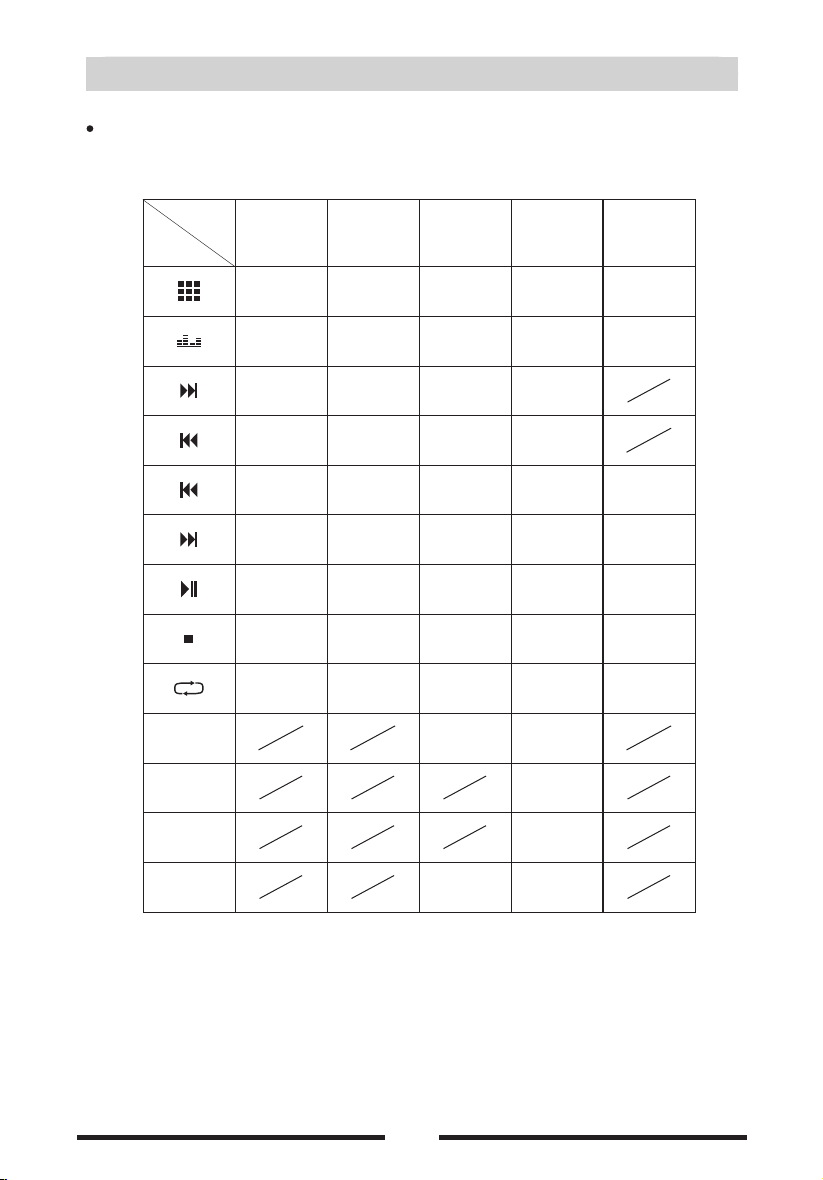
Onscreen control icons
DVD m ode
D V D播 放 源
Disc
type
Icon
RET
A-B
SUBTITLE
Pictu re( pi ct ure
in disc c an' t
be read )
Numer ic
keypa d
last
picture
Next
picture
MP3/ WM A
Numer ic
keypa d
EQ Setu p EQ Set up EQ Se tu p EQ Setu p EQ S et up
Fast fo rward
(long p ress)
Fast re wi nd
(long p ress)
Previ ou s
Next
Play/ Pa use Play/ Pa use Play/ Pa use Play/ Pa use Pl ay/ Pa use
Stop Stop Stop Stop St op
Repea t Repea t Repea t Repea t Repea t
CD VC D DVD
Numer ic
keypa d
Fast fo rward
(long p ress)
Fast re wi nd
(long p ress)
Previ ou s P re vio us
Next
Numer ic
keypa d
Fast fo rward
(long p ress)
Fast re wi nd
(long p ress)
Next
Segme nt
repea t
Numer ic
keypa d
Fast fo rward
(long p ress)
Fast re wi nd
(long p ress)
last
content
Next
content
Segme nt
repea t
Subti tl e
Langu ag e
TITLE
N/ P
PAL/ NT SC
AUTO/ OF F
08
DVD TIT LE
PAL/ NT SC
AUTO/ OF F
Page 13

Continued
DVD m ode
Disc
type
Icon
MP3/ WM A
CD VC D DVD
MENU
ZOOM
ANGLE
PROGR AMM E PROGR AMM E
OSD
AUDIO
Audio f ile
Pictu re file Pictu re file
Vedio fi le
Rando m
PBC
ZOOM ZOOMZOOM
Chann el
switc hi ng
MENU PL AY
ANGLE
dis play pl aybac k
inf ormat ion
Chann el
switc hi ng
Pictu re( pi ct ure
in disc c an' t
be read )
Notice:
“return th e la st menu”i co n is always o n th e fixed p os it ion,
but may tur n di ffere nt f lash and ic on a t diffe re nt s ource .
09
Page 14

DVD m ode
Play
Insert the disc into the disc slot with label si de f ac in g up a nd p la y st ar ts
automatically.
Pause
When play the audio/ vedio file, press the to stop and the top left corner
of screen shows[ stop ], press the icon again and continue to play.
Stop
For audio files, press the icon to stop, and the screen wi ll d is pl ay [ PR E ]
on the upper left corner. Press to resume from the pausin g po in t.
Press the icon again to stop entirely, and the screen will display [STOP ]
on the upper left corner. Press to playback from the top fi le .
For video files, press the icon to stop, and the screen wi ll d is pl ay a [ PR E ]
on the upper left corner. Press to resume from the paus in g po in t.
Press the icon again to stop entirely, and the screen will display a [STOP ]
on the upper left corner. Press to playback from the top fi le .
Fast rewind Fast fo rward
/
Long press the icon to fast rewind;
Long press the icon to fast forward.
Play the next or previous file
Press to select the precious file, and press to select the next file.
Repeat playback
Press the to switch the repeat modes as below:
DIS C Style
DVD
VCD( PBC O FF)
CD
MP3/ WMA
MPEG
PICT URE
CHA PTER
CHA PTER
REP 1
REP 1
REP 1
REP 1
REP EAT MODE
TIT LE REP AL L OFF
REP A LL
REP A LL
REP D IR
REP D IR
REP D IR
OFF
OFF
REP A LL
REP A LL
REP A LL
OFF
OFF
OFF
Notice: When p la y th e VCD dis c, open t he [ PBC] f un ction a nd t he [ re pe at ] funct io n
is abate.
Repeat A-B
When a DVD, VCD or CD disc is played back, you can play ba ck t he contents between
the time points from A to B repeatedly:
REP EAT A- REP EAT B- A-B C ANCEL
10
Page 15

DVD m ode
Random playback
You can play audio tracks/files in random order.
During play CD ,touch repeatedly to turn random play on or off.
is highlighted: start random play
turns gray: cancel random play
Notice:when the [random] turn off,the unit resume natural play from the current sequence.
DVD menu/title
This function is only available for the DVD discs having “MENU / TITLE”.
In full screen playing of DVD disc touch anywhere except for the upper left corner
,
to display menu on the screen,touch the icon and enter the DVD control
menu interface,touch the icon and enter the TITLE control menu interface.
Select audio channel
For DVD containing multi-language audio files, press the on the remote
icon
control repeatedly or open the onscreen control icons menu and then touch the
[AUDIO] icon repeatedly to change dialogue language.
TITLE
1 ENGLISH 5 .1 CH
2 ENGLISH 2 CH
3 FRENCH 5. 1C H
Select subtitle language
Press the [SUBTITLE] key on the remote control repeatedly or open the onscreen control
icons menu and then touch the icon repeatedly to choose a subtitle language.
SUBTITLE
MENU
AUDIO
PBC function
This function is available for the VCD discs with PBC function (Ver 2.0 or higher).
Press the [MENU] key on the remote control to activate this function.
Press again to cancel.
Notes:
① When PBC is on, playback goes back to the track list and starts from the first track.
② When PBC is on, fast motion playback, slow motion playback or skip search is available but
repeat playback and searching for a particular chapter or track is prohibited.
③ If you do the operation of random playback, scan playback or searching playback when PBC
is on, PBC will be off automatically.
11
Page 16

DVD m ode
Select a particular file
playing DVD disc,touch anywhere except for the upper left corner to
During the
display menu on the screen.
For DVD touch the icon to display information
,
and shown as below
:
input are a
1
2
choose ar ea o f the tra ck a nd number
delete th e in put tra ck a nd number
3
aff ir m th e input t ra ck and numb er
4
exit the se tu p inter fa ce
5
display t he i nform ai on of searc hi ng:t it le、trac k、ti me
6
delete th e in put num be r st ep by ste ptrack and
7
For VCD touch the icon to display information
,
and shown as below
:
input are a
1
2
choose ar ea o f the tra ck a nd number
delete th e in put tra ck a nd number
3
aff ir m th e input t ra ck and numb er
4
exit the se tu p inter fa ce
5
display t he i nform ai on of searc hi ng:t it le、trac k、ti me
6
delete th e in put num be r st ep by ste ptrack and
7
For CD touch the icon to display information
,
and shown as below
:
plea se inpu t title :
1
2
1 2 3 4
7
6
3
plea se inpu t track :
1
2
1 2 3 4
7
6
3
_/ 1
8
9 0
OK
_/ 1
8
9 0
OK
5
4
5
4
7
6
5
7
6
5
1
2
3
4
5
6
input are a
choose ar ea o f the tra ck a nd number
delete th e in put tra ck a nd number
aff ir m th e input t ra ck and numb er
exit the se tu p inter fa ce
delete th e in put num be r st ep by ste ptrack and
12
plea se inpu t track :
1
2
1 2 3 4
7
6
3
_/ 1
8
9 0
OK
6
5
5
4
Page 17

DVD m ode
Playback information
Touch the top center area of TFT LCD when playing back DVD and VCD discs and the
playback information will be displayed on the top area of the TFT.
1、For DVD:
DVD
TT 1/11
1 2
CH 2/1 3
3
00:01:3 4
4
(1) Disc type.
(2) DVD Title information. “1/11” indicates that this DVD has11 titles and the title playing back now
is the first title.
(3)DVD Chapter information. “2/13” indicates that current title has 13 chapters and the chapter
playing back now is the second chapter.
(4)Elapsed time of the current title.
2、For CD:
CD
TRK 3/1 9
1 2 3
(1)Disc type
(2)CD Title information. “3/19” indicates that this DVD has19 titles and the title playing back
now is the third title.
(3)PBC display
(4)The setup of repeat playing
(5)Elapsed time of the current title.
PBC
A
4
00:01:3 4
5
3、For VCD:
VCD
TRK 3/1 9
1 2
(1)Disc type.
(2)VCD Title information. “3/19” indicates that this DVD has19 titles and the title playing back
now is the third title.
(3)PBC display.
(4)The setup of repeat playing
(5)Elapsed time of the current title.
PBC
3 4
A
00:01:3 4
5
4、For SD/USB:
CARD
(1)Device type
(2)SD/USB title information. “3/19” indicates that this DVD has19 titles and the title playing back
1
TRK 3/1 9
2 3 4
A
00:01:3 4
now is the third title.
(3)The setup of repeat playing
(4)Elapsed time of the current title.
13
Page 18

SD/ US B mod e
Open the source menu and then select [ SD/ USB] mode.
Notice:
1. If the re a re a udio fi le s support ed i n the SD/ U SB stic k, t he system w il l enter th e au dio fil es
menu auto ma tical ly.
If ther e ar e no a udio fi le s, but ther e ar e video f il es suppor te d in the SD / USB sti ck , the
system wi ll e nter th e vi deo files m en u autom at ic ally.
If ther e ar e no a udio or v id eo files, b ut t here ar e pi cture fil es s upporte d in t he SD/ US B
stick, th e sy stem wi ll e nter the pi ct ure fil es m enu autom at icall y.
If ther e no a bo ve audi o/ video/p ic ture fi le s support ed i n the SD/U SB stic k, t he s creen w il l
display : Th ere are n o au dio/vid eo /pict ur e fi les sup po rted.
2. Not all ki nd s of SD/ US B devic es a re compat ib le with t he u nit.
Onscreen control icons
Audio/video/picture files mode are the s am e as d is c mo de .
Pause
For audio files, press the icon to pause, and the screen w il l di sp la y a [pause ]
icon on the upper left corner. Press again to res um e.
For video files full screen playing back, pres s an yw he re o f th e sc re en , th e sc re en
will display a control menu, press to pause, and t he s cr ee n wi ll d is pl ay a
[pause ] icon on the upper left corner. Press again to re su me .
Stop
Audio/video/picture files mode is the sa me a s DI SC m od e.
Fast forward/ Fast reverse
Except in the full screen mode, long press to fast forwa rd , an d lo ng p re ss
to fast reverse.
Play the next or previous file
Audio/video/picture files mode is the same a s di sc m od e.
Repeat playback
Audio/video/picture files mode is the same a s di sc m od e.
Random playback
Audio/video/picture files mode is the same as d is c mo de .
Zoom in /ou t
During picture playing back, press [ ZOOM ] to zoom the picture.
14
Page 19

SD/ US B mod e
Playback information display
In the video full screen mode, press the [KEY] icon under the sc re en , th e d is pl ay
control menu will appear. Press the [ DISP ] icon to select the pla yi ng b ac k
information display on the upper of screen .
Rotate picture
Press anywhere on the screen except the upper left corner, th e di sp la y co nt ro l
menu will appear. Press the [ ANGEL] icon to sel ec t y ou d es ir ed a ng le to view.
Search for a particular file
In the full screen mode, press anywhere on the screen ex ce pt t he u pp er l ef t
corner, the display control menu will appea r. Pr es s th e to s el ec t yo u de si re d
file. Shown as below:
pleas e inp ut trac k:
1
2
3
1. Input area
2. Digi area
3. Cancel number input
4. Confirm number input
5. Exit
6. Cancel number one by one
1 2 3 4
7
6
_/ 1
8
9
OK
5
0
4
6
5
15
Page 20

Blu etoot h mod e
Bluetooth is a wireless transmission way for s ho rt d is ta nc e. The built-in bluetooth
can connect with the mobile phones havin g bl ue to ot h fu nc ti on .
After connecting, you can control your mobile ph on e th ro ug h th e un it .
Ico n Fun cti on Ico n IconFun ction Fu nct ion
Aut o Conne ct
Cha nge
Aut o Answe r
Cal ling Re cord
Notice: C om prehe ns ive compa ti bilit y to a ll B lueto ot h units is no t gu arant ee d.
Not e
Re- dia l
Ans ./Dia l
Han gup
Pre vious
Nex t
Pla y/Pau se
Del ete
Select bluetooth m ode
the [B- T] mode
Enter Main Menu and choose .
Blu etoot h
Aut o
Typi ng:
Con nect
Cha nge
Aut o
Ans wer
Cal ling
Rec ord
Not e
0
1 2
5
6
3
7
8 9
4
*
#
Pairing
Manual connect
1 Search for Bluetooth de vi ce w it h th e device
. .
2 Select EX D 70 88 in th e pa ir in g li st
. " " .
3 Enter default password 0000 .
. " "
If pairing succeeds the user int er fa ce d is pl ay BT Connected ,
, " "
If pairing isn t su nc ce ed t he user interface display BT Di sc on ne ct in g .
' , " "
Auto connect
The unit will memory the name of the last connected Bl ue to ot h device. After the
unit is power on, it will search the mobile phon e paired successfully last time
automatically. If the mobile phone paired successfully last time is in the valid
communicating range, the connection will be done automatically. If out of the valid
communicating range, the unit will not con ne ct a ny B lu et oo th d ev ic e.
Pairing lu etooth mo de h ave bel ow s ome funct io ns:
(1) Make a call ( 2)A ns wer an in co mi ng call
(3) Look for th e ph one not e by t he u nit
(4) Look for th e te lepho ne b ook of mobi le t elephon e
(5) Play the au di o A2DP of t he m ob ile tel ep hone
b
Searching
Enter ain enu and choose the system begin to au to s ea rc hi ng
m m blu et oo th , .
If the device ha ve con ne ct ed a nd t he interface displays B T C on ne ct ed
bluetooth " ";
If have no dev ice an d th e user interface display BT D is co nn ec ti ng .
bluetooth " "
16
Page 21

Blu etoot h mod e
Auto answer
By default,all incoming calls are receiv ed a ut om at ic al ly .
Touch the icon turns bright, if there is incoming call,the call will switch
to the mobile telephone automatically an d di sp la y th e ph on e nu mb er .
Touch the icon turns gray, if there is incoming call,you need to answer
the call.
Make a call
By default,you can make a call by mobile telepho ne、s cr ee n ke yb oa rd、m ob il e
telephone taiking note or phone not e.
(1 )
By phone
Use the phone to a call and the screen display"Diali ng ";
(2 )
By screen
Touch the number area on the user interface to input the num be r, and short
press the icon to delete number on by one, long press the icon to
delete totally,touch the to call.
(3 )
By phone boo k or t al ki ng r ec or d
The Bluetooth module will download phone b oo k an d ca ll r ec or ds f ro m yo ur
mobile phone after pairing.If you want to call someone, touch icon.
(4 )R e- dial
Touch the i co n to r e-dia l th e last call .
Voice transfer
After connecting, pressing the voice transfer icon on the us er i nt er fa ce u nd er
the conditions of calling, dialing or talk in g to b re ak v oi ce c on ne ct io n be tw ee n
the built-in bluetooth and your mobile pho ne a nd t ra ns fe r vo ic e to y ou r mo bi le
phone. To transfer voice to the built-in bluetooth, do the operation again.。
Hangup
While talking, hangup on your mobile phone or touch the
press the k ey
hangup ic on on the screen to end the conver sa ti on .
Auto
Answe r
Auto
Answe r
Scan phone book
Touch the on the bluetooth interface to enter the menu list.There are fo ur
Note
options on the menu list,including delet e On e、De le te A ll、R ea d Nu mb er B oo k、
Details. When you press one of them,the bluetooth mo du le w il l en te r it .
Press the icon to exit.
Notice:
1.After pairing,touch the " " icon and the unit will store the telepho ne
Note
number from your mobile phone.
After disconnection,you can scan the telephone n um be r th at t he l as t
connected unit all the same,please delect the ne ed le ss t el ep ho ne n um be r
after you use over.
2.Not all mobile phone support the function.
17
Page 22

Blu etoot h mod e
Look for calling record
Touch the icon on the bluetooth interface to e nt er t he m en u, then the
Call ing
Reco rd
menu list displays five options: Delete One、Delete All、Received Call、Missed
Call、Dialed Call,touch the anyone to the menu.
If you want to exit the menu,touch the [ ].
Call R EC
Dele te One
Dele te All
Rece ived
Call
Miss ed
Call
Dial ed Call
Play music
If the connected Bluetooth device supp or ts A dv an ce d Au di o Di st ri bu ti on
Profile( A2DP) , yo u ca n li st en t o th e mu si c st or ed o n th e de vi ce t hr ou gh t he
unit. If the device also supports Audio Video Remote Control Profile(AV RC P) ,
you can use the control on the unit or its remote co nt ro l to p la y mu si c st or ed
on the device.
1. Pair the phone with the unit.
2. Touch the upper left corner to return to home menu.
3. Touch [ Bl ue to oc h] , th e Bl ue to ot h me nu i s di sp la ye d.
4. Start play music via device.
If your device support AVRCP.
(1) Touch[ ] to start play or pause.
(2) Touch[ ][ ] t o pr ev io us o r ne xt .
Blu etoot h
Auto
Typin g:
Conn ect
Chan ge
Auto
Answ er
Call ing
Reco rd
Note
0
1 2
5
6
3
4
*
8 9
#
7
Notice:
The but to ns i n this pi ct ure is for re fe rence o nl y,and may b e di ffere nt f ro m that in r ea l unit.
Refer en ce t o real un it i s suggest ed .
18
Page 23

Oth er mode s
AUX
External peripheral devices with R CA a ud io a nd v ed io o ut pu ts c an b e
connected with the unit.
For more details,please refer to( Electrical Connections Overall Diagram) .
Open the ' SOURCE MENU',and select 'AUX- 1' o r ' AU X- 2'to enter AUX
IN mode.
REARVI EW
The back view can be connected with the un it .
For more details,please refer to (Electrical Connections Overall Diagram).
1. Manual mode
Open the " SOURCE MENU", and select " RE ARVI EW "mode.
2. Auto mode
The unit automatically switches to REARVIEW source during reverse
driving and the audio is mute.
Note:T his fun ct io n is not re la ted with wh et her the v ie w video cam er a is connec te d.
3. Exit current mode
For manual mode, press anywhere on the screen to exit.
For auto mode, if the car exits the reverse driving, the unit will exit
"REARV IE W" m ode automatically.
19
Page 24

Oth er mode s
SWC
1. Open the main menu, and press the [ ] icon to enter the next page.
Select SWC source to enter.
Shown as figure 1.
STEE R
SETU P
SEEK+
VOL+
MODE
POWER
MUTE
VOL-
SEEK-
Assig n
Reset
Enter
CH+
SRC
CH-
2. Press the [ ]、[ ]、[ ]、[ ] 、[MODE] button orderly.
VOL+ VOL-
Shown as figure 2.
Origina l st eerin g wh eel on the ca r
Each time you press the button,the numerica value of the button will appear
on the setup menu accordingly.
Shown as figure 3.
STEE R
SETU P
SEEK+
VOL+
MODE
POWER
MUTE
VOL-
SEEK-
Assig n
Reset
Enter
CH+
SRC
CH-
3
Note:
Figure 3 il lu strat io n maybe not a s sa me as the a ct ua l image f ou nd on the uni t fo r
the diffe re nt car mo de ls
3. Press the [ Assign] icon, and then press one number.
The number will be highlighted.
Shown as figure 4.
STEE R
SETU P
SEEK+
VOL+
MODE
POWER
MUTE
VOL-
SEEK-
Assig n
Reset
Enter
CH+
SRC
CH-
4
20
Page 25

Oth er mode s
Then you press the desired function the nu mb er w il l ch an ge t o th e fu nc ti on
word correspondingly.
Shown as figure 5.
4. F ollow the method of Figure 3 illustration to setup each icon, then press
[Enter] to confirm and store. Press the upper left corner of the screen to exit.
STEE R
SETU P
SEEK+
VOL+
MODE
POWER
MUTE
VOL-
SEEK-
Assig n
Reset
Enter
CH+
SRC
CH-
5
21
Page 26

SET UP
Setup Steps
1. Enter setup menu
Press the [SETUP] icon on the main menu,the setup main menu shown
as below:
2.Select the sub-menu
Repeatedly press the touch key on the screen.
3.Select the item
Repeatedly press the touch key on the screen.
4.Adjust the setting
Repeatedly press the touch key on the screen.
Notice: All th e se tup can b e fi ni shed by t he t ouch key on t he s creen .
Time
1.Tim e ad ju st me nt
Press the icon of time or date appears on the scre en ,and use the 、 to
adjust. The setting will be stored automat ic al ly b y th e un it .
SETU P
Gener al
Time
Lan guage s etup
Lam pligh t setup
TV se tup
Vers ion
GPS
Radio Video
Red
PAL_B G
Calib ratio n
Blu e
Volume
SETU P
Gener al
Time
Dat e
Time
Time m ode
GPS
Radio Video
Calib ratio n
Volume
2. Clock mode
12Hr: the clock displays in the type of 12 hou rs s uc h as 11:1 8 AM .
24Hr: the clock displays in the type of 24 hou rs s uc h as 2 0: 18.
Notice: T ime and dat e wi ll be upd at ed automa ti cally b y th e si gnal of G PS r eceives .
22
Page 27

SET UP
Radio
Press the [Radio] icon on the setup menu to enter radio mode.
Shown as below:
Choose the desired radio region.
Video
Press the [VIDEO] icon on the setup menu to enter video mode.
Shown as belown:
SETU P
Gener al
Time
GPS
Rad io setu p
SETU P
Gener al
Time
GPS
Bri ghtne ss setu p
Bac k view
For bid pla ying on r unnin g
Radio Video
Europ e、China
Ameri ca 2
Russi a
Radio Video
Norm al Mi rror
ON
Calib ratio n
Ameri ca 1
Japan
Calib ratio n
OFF
Volume
Volume
Brightness:Use the 、 to adjust, t he d ef au lt s et ti ng i s 5.
Back vuew: The default setting is mirror mode.
Parking: The default setting is off.
23
Page 28

SET UP
Calibration
When the touch operation is not sensitiv e or v al id ,you should calibrate the
touch screen through TS CAL Screen functio n.
SETU P
Gener al
Time
Radio Video
GPS
Calib ratio n
Volume
Do yo u want to C alibr ate?
OK
Press the [Calibration] icon on the setup menu
to enter.
1. The information appears on the screen:
Whether calirate the touch screen?
OK
2. Start calibrating
Use a pointed object to touch the center of
[ ],the [ ] will move automatically.
3. Exit calibrating
Aim at center of [ ] , follow the path as shown of the figure, after steps from
1
1 to 5,the system will exit calibrating automatically.
Volume
Press the [VOLUME] icon on the setup menu to enter. Shown as below:
SETU P
Genera l
DVD
RADI O
AUX
B-T
VOL RE SET
RESE T SETTI NG
Use the 、 to adjust.
Time
Radio V ideo
GPS
Volume
Calibr ation
OK
OK
Notice: The se tu p of S D/ US B is as same as D IS C.
24
Page 29

EQ
Audio control allows you to easily adj us t th e au di o sy st em t o ge t th e be st
possible sound effect.
Procedures of EQ setup
1. Enter EQ setup mode
Press the icon on the user interface.
Audi o
TRE BAS S S UB OUT
SUB FRE Q:OF F E Q:US ER
LOUD: OFF
2. Select EQ mode
a. There are following equalizer options: USER/POP/ ROCK/ CL AS S.
Press to select.
EQ:U SER
b. Select a crossover frequency: 80Hz/ 120Hz/160Hz/ OF F.
C. Select loudness on or off.P re ss t o se le ct .
LOUD: OFF
Notice:
After one m od e is sele ct ed,i t wi ll be store d au tomat ic ally and th e pr evious st or ed will
be overwr it ten.
3. Adjust EQ parameters
To adjust EQ parameters, touch and drag the EQ parameters adjustment bar.
Bass: From + 7 to -7
Tre bl e: F ro m + 7 to - 7
Subwoofer out volume: From 0 to 21
4. Adjust Front/ Rear/ Le ft / Ri gh t fa de r an d ba la nc e.
Adjust with 、 、 、 icon.
Notice: The US ER m od e of EQ has t he m emory fun ct ion.
25
Page 30

Troubleshooting
What a ppears to b e trouble is no t always se rious. Pl ease check th e followi ng
poin ts before c alling a serv ice cente r.
Prob lem
Unit can no t
power on
Remote co nt rol
does not wo rk
No/low au di o outpu t
Poor soun d qu ality
or distor ti on
Tel-Mute ma lf uncti on
Unit rese ts i tself w he n
engine is o ff
Monitor d oe s not
open auto ma tical ly
War ning info rm ation
is shown at a ll t imes
Flashin g im age or
interfe re nce app ea rs
on screen
Caus e Corr ective ac tion
General
Unit fuse b lo wn.
Car batte ry f use blo wn . Ins tall ne w fu se w ith cor re ct rating .
Illegal o pe ratio n
Battery d ep leted .
Battery i ns talle d in correct ly. I nstal l th e battery c or rectl y.
Imprope r au dio out pu t
connect io n.
Volume set t oo l ow. Inc rease v ol ume level .
Speaker s da maged .
Heavily b ia sed vol um e
balance .
Speaker w ir ing is in c on tact
with meta l pa rt of car.
Piratic d is c is in use .
Speaker p ow er rati ng d oes
not match u ni t.
Wro ng c on necti on s.
Speaker i s sh orted .
MUTE wire i s gr ounde d.
Incorre ct c onnec ti on
between AC C an d BATT.
TFT monitor
TFT Auto O pe n is turn ed o ff. Tur n TFT Auto Open o n.
Parking b re ak wiri ng i s not
correct .
The color s ys tem of DV D di sc
does not ma tc h the mon it or.
Piratic d is c is in use .
Vid eo c ab le dama ge d.
Imprope r vi deo sig na l
connect io ns.
Install n ew f use wit h co rrect rat in g.
Reset the u ni t.
Change th e ba ttery.
Check wir in g and cor re ct.
Replace s pe akers .
Adjust th e ch annel b al ance to cen te r
positio n.
Insulat e al l speak er w iring con ne ction s.
Use origi na l disc.
Replace s pe akers .
Check wir in g and cor re ct.
Check wir in g and cor re ct.
Check the ' MU TE' wir in g and corre ct .
Check wir in g and cor re ct.
Check wir in g and cor re ct.
Adjust th e co lor sys te m of the DVD di sc
playing b ac k or the mo ni tor in use.
Use origi na l disc.
Replace c ab les.
Check wir in g and cor re ct.
26
Page 31

(Con tinued)
Troubleshooting
Prob lem
Cannot in se rt disc
Disc does n ot
play back
PBC canno t be u sed
during VC D pl aybac k
Repeat or s ea rch
functio n is i nvali d
during VC D pl aybac k
No disc
Bad disc
Unknown d is c
Region Error
Caus e Corr ective ac tion
Disc playback
A disc insid e th e unit al re ady. E ject cu rr ent disc an d in sert ne w on e.
Disc is war pe d or scra tc hed.
Disc is dir ty o r wet.
Incompa ti ble dis c is u sed. Use co mp atibl e di sc.
Disc is ins er ted ups id e down. Inser t di sc with lab el s ide up.
Disc regi on c ode is no t
compati bl e with un it .
PBC is not av ai lable o n
the disc.
PBC is on. Tur n PBC off .
Error messages
Disc is dir ty.
Disc is ups id e down.
No disc ins id e. Ins ert disc.
Disc is dir ty.
Disc is ups id e down.
Disc form at i s not com pa tible
with this u ni t.
region co de
DVD is not
compati bl e with th is
unit.
Use disc in g oo d condi ti on.
Clean dis c wi th soft c lo th.
Use disc wi th p roper r eg ion code.
Use disc wi th P BC avai la ble.
Clean dis c wi th soft c lo th.
Insert di sc w ith lab el s ide up.
Clean dis c wi th soft c lo th.
Insert di sc w ith lab el s ide up.
Use disc wi th c ompat ib le format .
Use disc wi th re gion code .compati bl e
27
Page 32

Device connections
Notes
negative grounding. Before installing this unit to a recreational vehicle,
a bus, o r a truck, make s ure the bat tery volt age is approp riate for t his
unit t o be used, otherwise, in stall a tra nsformer by p rofessi onal to
conv ert the output voltage t o 12V.
To avoid sh ort circu it in the elect rical sys tem, ensu re that the neg ative
batt ery cable i s disconnec ted befor e installat ion.
To preven t short cir cuit in the wir ing and dam aging to th is unit, secu re
all wi rings wit h cable clamp o r adhesiv e tape. Rou te the wiring s in a
secu red, out of heating plac e without t ouching any m oving par ts such
as gear shift, handbrake, and seat rails to prevent the wiring insulation
bein g melted / wo re off .
N ever pass the y ellow pow er cord through the inst allatio n hole into the
engi ne compar tment and con nect to the c ar battery. Othe rwise, a hi gh
poss ibility o f serious sho rt circui t to the electr ical syst em may be
occu rred.
R eplacing a ne w fuse with 1 0A rati ng when the o ld one is broke n, using
no fus e or fuse with improper ra ting may ca use damage to t his unit or
even f ires. If a prop er fuse is in stalled a nd electric al proble ms still
occu r, please co ntact with an y profess ional car sho ps for inqu iry.
D connect other equipments with the car battery to avoid battery
over heating .
P lease make su re all the wi ring conn ections & the c ables of th e
spea kers are we ll-insula ted. Othe rwise, this u nit may be da maged by
shor t circuit .
I f there is no ACC av ailable,P lease con nect ACC lead to t he power
supp ly with a swi tch.
I f an external p ower ampl ifier is conn ected, pl ease don' t connect
P.CON T le ad to the power l ead of the ex ternal po wer amplifi er,
othe rwise, el ectric spar k or other da mage may be res ulted.
N ever ground t he speake r output to pre vent the da mage to the b uilt-in
powe r amplifi er.
The min imum rati ng of the speak ers conne cted to thi s unit is 50W wit h
4 to 8Ω im pedance .
of connection
This u nit is desi gned to be used i n a vehicle w ith a 12-vo lt battery an d
O NOT
28
Page 33

Device connections
Control Cables
Aut o Brightne ss Control
To avoid the d isplay bein g too brigh t at night ti me, if the head light
cabl e is connec ted to ILLUMI , turning on the head light wil l dim the
back light of th e TFT LCD an d vice versa.
Tele phone Mute
If the MUTE cable is connected to a car ph one, other audio outputs
mute whe n one call is received by the car phone.
Reverse Dr iving
If a rea r view is conn ected with th e unit, the p laying so urce
swit ches to [ BAC K VIEW] autom aticall y when you st art reverse d riving.
As the re verse dri ving is done, t he playin g source sw itches to the
prev ious.
Parking Brake
1) If "P RK SW" cabl e is connecte d to hand bra ke switch, vi deo
disp lay on the TFT monito r will be contr olled by th is functi on.
Parking cable function ceases when the playing source is
BACK VIEW.
2) The mon itor displa ys the blue s creen with wa rning inf ormatio n to
prev ent the dri ver watchin g video con tents dur ing driving , but the
pass engers at t he rear seat ca n watch vid eo conten ts normally.
came ra
29
Page 34

Device connections
Parking Brake Cable Connections
Parking Brake Lead
2A
Green Wire
Parking Brake Switch
Reverse Driving Cable Connections
Car Frame
Pink Cable
Reverse Driving Cable
Reverse Driving Signal Light
P
P
R
R
N
N
D
D
2
2
L
L
Gearbox
Battery
Brake Light
Parking Brake Switch
Car Battery
Car Frame
Car Frame
30
Page 35

Spe cific ati ons
Geneal
Reference Supply Voltage 12V( D C)
Operating Voltage Range..................................................10.5~1 5 . 8 V ( DC )
Max Operating Current..........................................................................1 5 A
Grounding System................................................Car Battery Negative Pole
Dimensions(WXHXD) ......................................................≈7X 3.9X 6.8 inch
Weight(m ain unit) .. .. .. .. .. .. .. .. .. .. .. .. .. .. .. .. .. .. .. .. .. .. .. .. .. .. .. .. .. .. .. .. .. .. .. .. .≈5. 5 ib s
FM
Signal Noise Ratio............................................................................≥55dB
Residual Noise Sensitivity(S/N=30dB)..............................................18dBμV
Frequency Response(±3dB)..................................................40Hz~12.5KHz
Station Seeking Level................................................................20~28dBμV
Distortion.........................................................................................≤1.5%
Stereo Separation(1KHz)..................................................................≥25dB
Antenna Impedance..............................................................................75Ω
AM
Residual Noise Sensitivity (S/N=20dB).............................................30dBμV
Selectivity (±9KHz) ..........................................................................≥50dB
LCD
Screen size..........................................................................6.2inch(16:9)
Display resolution..................................................................800X480dots
Contrast radio......................................................................................500
Brightness....................................................................................350cd/m
DVD Player
Signal / Noise Ratio.............................................................................90dB
Dynamic Range.................................................................................. 90dB
Distortion(line out)............................................................................≤0.1%
Frequency Response(±3dB).................................................... 20Hz~20KH z
Maximum Output Power....................................................................4×40W
Load Impedance.....................................................................................4Ω
AUX IN
Distortion.........................................................................................≤0.5%
Frequency Response(±3dB)....................................................20Hz~20KHz
Audio Input Level...............................................................................1Vrm s
Audio
Audio Output Impedance.....................................................................10ΚΩ
Audio Output Level....................................................................4Vrms(Max)
Video
Normal Video Input Level(CVBS).....................................................1.0±0.2V
Video Input Impedance..........................................................................75Ω
Video Output Impedance........................................................................75Ω
Video Output Level.........................................................................1.0±0.2V
.............................................................
2
31
Page 36

Spe cific ati ons
Envi ronment
Operating Temperature............................................................-10℃~+60℃
Storing Temperature................................................................-20℃~+70℃
Operating Humidity.................................................................45%~80%RH
Storing Humidity.....................................................................30%~90%RH
Notice:
When the un it i s opera te d extreme ly, such a s op erated wi th m aximu m po wer out pu t fo r a
long time , or t he temp er ature is ov er 7 0 C , it will en te r heat pr ot ection mo de , the vol um e
°
will be low er a utoma ti cally. Thi s is norm al .
Supp orted for mats:
·USB or memory file format: FAT16,FAT32
·Mp3 bit rate(date rate) :32-3 20 K bp s and variable bit rate
·WMA v9 or earlier
·Directory nesting up to a maximum of 8 level s
·Number of albums/folders: maximum 99
·Number of tracks/titles:maximum 999
·ID3 tag v2.0 or later
·File name in Unicode UTF8( maximum length: 128 bytes)
Unsu pported f ormates:
·Empty albums:an empty album is an album that does not contain MP3/WMA
files, and is not be shown in the display.
·Unsupported file formats are skipped .For example, Wo rd d oc um en ts ( .doc) or
Mp3 files with extension.dlf are ignored and not played.
·AAC, WMV,PCM audio files
·DRM protected WMA files( . wav,. m4 a, . m4p ,.mp4, . aa c)
·WMA files in Lossless format
Supp orted MP3 d isc format:
·ISO9660, Joliet
·Maximum title number:512( depending on file name length)
·Maximum album number:255
·Supported sampling frequencies :32kHz, 44. 1kHz, 48 kH z
·Supported Bit- rates:32-3 20 Kbps and variable bit rate
Supp orted vid eo formats:
·DVD
·MP4
·Xvid
Notice:
Specifi ca tions a nd t he design a re s ubjec t to c ha nge wit ho ut notice d ue t o impro ve ments
in techno lo gy.
32
Page 37

App endix
Region code
Acco rding to DV D sale region , the whole w orld is div ided into six
regi ons. A DVD d isc can be pl ayed back o nly when its re gion code
is com patible w ith that of the p layer in us e.
Regi on 1: USA, Ca nada, East Pa cific Oce an Islands;
Regi on 2: Japan , West E urope, No rth Europe, E gypt, Sou th Africa,
Midd le East;
Regi on 3: Taiwan of China , Hong Kong o f China, So uth Korea, Thai land,
Indo nesia, Sout h East Asia;
Regi on 4: Austra lia, New Zeal and, Mid & so uth Americ a, South Paci fic
Ocea n Islands/O ceania;
Regi on 5: Russi a, Mongolia , India, Mi ddle Asia, E ast Europe,
Nort h Korea, Nort h Africa, No rth West Asia;
Regi on 6: Chine se Mainland .
Cautions of disc using
1) DO NO T use irreg ular shaped d isc
2) Dis c Cleanin g
Use a dr y, soft c loth to wip e the disc fr om center to ed ge, only
neut ral deter gent can be use d.
3) Whe n playing a new d isc
New di sc may have s ome rough spo ts around t he inner and outer
edge s. If such a disc i s used, rem ove these r ough spots wi th a pencil
or bal l-point p en, etc.
33
Page 38

Overall wiring diagram
Rear
Rear
displ ay
displ ay
Radio
anten na
YELLO E
YELLO E
VIDEO O UT 1VIDEO O UT 2
RADIO AN T
App endix
to pann el
BROWN
RED
WHITE
RED
WHITE
SUB.W
REAR L
REAR R
AUX IN R 1
AUX IN L 1
AUX IN VI DEO 1
AUX IN VI DEO 2
AUX IN L 2
AUX IN R 2
Ampli fier
FRONT L
FRONT R
RED
WHITE
YELLO E
YELLO E
WHITE
RED
AUX
AV SYST EM
AUX
AV SYST EM
BROWN /BLAC K
BLUE
GREEN
CAMER A-VID EO
YELLO W
YELLO W
CAMER A-GND
BLACK
CAMER A
RED
CAMER A-B+
BRAKE
KEY GND
ORANG E/WHI TE
KEY A
WHITE /BROW N
KEY B
GREEN /WHIT E
PRND2
L
PINK
REVER SE
BLUE/ WHITE
P.CONT
Steering Wheel
Control
Gearb ox
Rear R-
Front L -
Rear L+
Front R -
Rear R+
Rear L-
Front L +
Front R+
ANT.C ONT
Notic e: c onnec t th e AV ca bl e to the AV I N so cket on t he f ront pa nel.
34
ACC
GND
MUTE
ILLUM E
BATTERY (+)
 Loading...