

Page 1
Page 2

Content
Prec aution... ....... ......... ......... .........
Safe ty Informat ion.... ......... ......... ...
Disc N ote...... ....... ......... ......... ........
Inst allation .. ....... ......... ......... .........
Deta ching contr ol panel. ......... ......... .
Atta ching contr ol panel. ......... ......... ..
Pane l angle adjus tment ... ......... ........
Elec tric Connec tion .... ......... .........
Remo te Control .. ....... ......... .........
Basi c Operation ....... ......... ......... ...
TFT Monito r Adjustme nt ........ ........
Rear Vie w Ca mera .... ......... ......... ..
Audi o Quality Adju stment. ......... .......
Sett ing Audio Mode . ....... ......... ........
Sett ing Time ......... ......... ....... ......... .
Rese t Factory Set tings.. ......... .........
Exte rnal Audio Sou rce.... ......... ........
Cont rol Panel ... ....... ......... ......... ....
Unit k eys ....... ....... ......... ......... ........
Radi o Operation ....... ......... ......... ...
List ening to the ra dio ..... ......... ........
Stor ing station s in memory . ......... ....
Auto matic Memor y Storing &
Prog ram Scannin g...... ......... .......
DISC O peration. ....... ......... ......... ...
Basi c Operation ....... ......... ......... .....
Sele cting Play Mo des.... ......... .........
On-S creen Displ ay Functi on....... .....
Digi tal Vi deo Speci al Function .......
2
Mult i-subtitl e languag e function. .......
3
Mult i-audio lan guage fun ction.... .......
4
Mult i-angle fun ction.. ......... ......... .....
5
Tit le menu fun ction ..... ....... ......... .....
7
Mult i-media Set up Menu.. ......... ......
7
Syst em Setup... ....... ......... ......... ......
8
Lang uage Setup. ....... ......... ......... ....
9
Video Se tu p ....... ......... ......... ....... ....
10
Digi tal Setup ... ....... ......... ......... .......
13
AUX Op eration.. ....... ......... ......... ....
13
BLUE TOOT H Operati on....... ......... ..
14
USB Op eration.. ....... ......... ......... ....
14
SD/M MC Card Opera tion... ......... .....
14
MP3/ WMA/JPEG/ MPEG4 Pla y.... .....
14
Spec ification ....... ......... ......... .........
15
Troub leshootin g...... ......... ......... .....
15
16
16
18
18
19
19
20
21
21
23
24
24
24
24
24
25
25
27
28
29
30
31
33
34
35
36
37
-1-
Page 3

Precaution
THANK YOU FOR PURCHASING THIS CAR Digital Video PLAYER .
Before op erating th e unit, read t his manual t horoughl y and keep it handy
for futur e referenc e .
To avoid inj ury or accid ent , read the f ollowing p recautio ns before
install ing and oper ating the un it .
ON INSTALLATION
DO NOT install any receiver in locations where;
- it may obst ruct the ste ering whee l and gearsh ift lever op erations, as this
may resul t in a traffic accident.
- it may obst ruct the ope ration of sa fety devic es such as air bags, as this
may resul t in a fatal acc ident.
- it may obst ruct visib ility.
DO NOT operate any receiver while manipulating the steering wheel, as
this may re sult in a traffic accident.
The drive r must not wat ch the monit or while dri ving.
IF THE DRIVER watches the monitor while driving, it may lead to
careles sness and ca use an accid ent.
IF YOU NEED to operate the receive while driving, be sure to look a head
careful ly or you may be i nvolved in a t raffic accident.
IF THE PARK ING BRAKE is not engaged.“ ParkingBrake” flashes on the
monitor, a nd no playba ck picture w ill be shown .
- This warning appears only when the parking brake wire is connected to
the parki ng brake sys tem built in t he car ( refer t o the electric connection)
ABOUT THE L IQUID CRYSTAL DISPLAY (LCD) PANEL
Do not pres s on the LCD pan el on the unit a s doing so can d istort the
picture o r cause a malf unction . The picture may be come uncle ar , or the
LCD panel m ay be damage d .
NOTES ON CL EANING
-Clean th e LCD panel wi th a slightl y damp soft cl oth.
-Do not use s olvents su ch as benzin e, thinner, c ommercia lly availa ble
cleaner s or antista tic spray .
-Do not use alcohol to cle an the scree n .
If your car w as parked in a c old or hot pla ce, the pict ure may not be clear .
The monitor is not damaged . The picture will become clear the temper ature in yo ur car becom es normal .
-2-
Page 4

Safety Information
CAUTION :
THIS Digit al Video PLAYER IS A CLASS I L ASER PRODUC T. HOWEVER THIS
DIGI TAL VIDEO PLAYER USE S A VISIBL E/INVIS IBLE LASER BE AM WHICH
COUL D CAUSE .
HAZA RDOUS RADIATIO N EXPOSURE IF D IRECTED. BE S URE TO OPE RATE
THE DIGITAL VI DEO PLAYER CORRE CTLY AS INST RUCTED.
USE OF C ONTROLS OR ADJ USTMENT S OR PERFORMA NCE OF
PROC EDURES OTHE R TH AN THO SE SPECIF IED HEREIN MAY RESULT IN
HAZA RDOUS RADIATIO N EXPOSURE. DO NOT OPEN COVER S AND DO NOT
REPAIR YOURSE LF. REFE R SERVICING TO QUALIFIE D PERSONN EL.
WARNING:
TO RE DUCE THE RISK OF FI RE OR ELECT RIC SHOCK, DO N OT EXPOSE THIS
EQUI PMENT TO RAIN OR M OISTURE .
TO RE DUCE THE RISK OF FI RE OR ELECT RIC SHOCK, AND AN NOYING
INTE RFERENCE, U SE ONLY THE REC OMMENDED ACC ESSORIE S.
THIS DEVIC E IS INTEND ED FOR CONTIN UOUS OPERATION .
This produ ct incorp orates copy right pro tection tec hnology t hat is protec ted
by met hod claims of c ertain U. S. Patents an d other int ellectual p roperty rig hts
owne d by Macrovis ion Corpo ration and ot her right s owners.Us e of this
copy right prote ction tec hnology mus t be author ized by Macro v ision Corpo ration,
and is i ntended for h ome and oth er limited vi ewing use s only unless
othe rwise autho rized by Ma crovision C orporat ion. Revers e enginee ring or
disa ssembly is pr ohibite d.
REGION MA NAGEMENT I NFORMATION:
This Digit al Video Player i s designe d and manufac tured to re spond to the Re gion
Mana gement Info rmation t hat is record ed on a Digit al Vid eo disc. If the R egion
numb er describe d on the Digi tal Vi deo disc do es not corres pond to the R egion
numb er of this Digi tal Video Playe r, this Digi tal Vi deo Playe r cannot play t his disc.
-3-
Page 5

Disc Note
Disc form ats suppor ted by this
player
Digit al
Vid eo
VCD
CD
MP3
Dig ital
Vide o
VCD
CD
MP3
Audio and Vid eo
Disc size 12 cm
Audio and Vid eo
Disc size 12 cm
Audio
Disc size 12 cm
Audio
Disc size 12 cm
Discs whi ch cannot be p layed
with this p layer
Digi tal Vi deo-RAM
CDV
CDG
Handlin g and Cleani ng
Dirt , dust, scrat ches and wa rping disc
will c ause misope ration.
Do not p lace sticke rs or make
scra tches on disc s.
Do not w arp discs.
A disc shoul d always be kep t in its
case w hen not in use to p revent fr om
dama ging.
Do not p lace discs in t he follow ing
plac es:
1.Dir ect sunligh t
2.Dir ty, dus ty and damp a reas
3.Nea r car heaters
4.On th e seats or dash board
Disc Clea ning
Use a dr y soft cloth to w ipe the sur face.
If the d isc is quite di rty, use a soft clot h
slig htly moistu red with is opropyl (ru bbing)
alco hol. Never us e solvent s such as
benz ine, thinne r or conven tional reco rd
clea ners as they ma y mar the sur face of
the di sc.
Note:
A disc ma y become some what scra tched
(alt hough not eno ugh to make i t
-4-
unus able) depen ding on you r handle it
and co nditions in t he usage en vironment .
Note t hese scratc hes are not a n
indi cation of any p roblem wi th the player.
Lab el s ide
up
Do no t to uch
the
und er sid e
of th e di sc
Do no t
ben d
Wip e th e dis c fro m
cente r
tow ar d the o uts id e
edg e
Prepari ng New Discs w ith Rough
Spots
A new disc may h a ve r o u gh e d ges o n
its insi d e an d outs i d e ed g es. I f a d isc
with r o u gh e d ges i s use d , th e prop e r
sett ing w ill n ot b e perf o rmed a nd t h e
play er will n ot pla y t he dis c. The ref ore,
remo ve the rough e d g e s i n a d v a n c e
by usi ng a ball point p en or penci l as
show n on the right. To r e m ove the
roug h edges, pres s the s i d e o f t h e p en
or pen cil against t he inside a nd outside
edge s of the disc.
Rou gh spot s
on
out side ed ge
Bal l point p en
or pe ncil
Rou gh spot s
on in side
edg e
Page 6

Installation
NOTES:
1. Cho ose the mount ing locat ion where the u nit will no t interfere w ith the nor mal
driv ing functio n of the driv er.
2. Bef ore finally i nstalli ng the unit, co nnect the w iring tempo rarily an d make sure
it is al l connected u p properl y and the unit an d the syste m work proper ly.
3. Use o nly the parts i ncluded w ith the unit to e nsure pro per install ation. The use
of una uthorized p arts can ca use malfunc tions.
4. Con sult with you r nearest d ealer if inst allatio n requires th e drillin g of holes or
othe r modificat ions of the v ehicle.
5. Ins tall the unit w here it doe s not get in the dr iver s way and canno t injure the
pass enger if ther e is a sudden s top, like an em ergency s top.
6
. Avoid ins talling the u nit where it wo uld be subj ect to high tem peratur e, such
as fro m direct sunl ight, or fr om hot air, from t he heater, o r where it woul d be
subj ect to dust, di rt or exces sive vibrat ion.
7. If in stallatio n angle exc eeds 30 from ho rizonta l, the unit mig ht not give its
opti mum perform ance.
DIN FRONT /REAR-MO UNT
This u nit can be prop erly inst alled eithe r from "Fro nt"(conve ntional D IN
Fron t-mount) or " Rear"(D IN Rear-mou nt instal lation, uti lizing thre aded
scre w holes at the si des of the un it chassis) . For detai ls, refer to th e following
illu strated ins tallati on methods.
'
30
Revoving the unit
1. Pre ss the REL b utton to re lease the fro nt panel .
2. Rem ove the contr ol panel .
-5-
Page 7

Installation
Installation the unit
3. Remove the PLASTIC COVER of the both sides away
PLASTIC COVER
4. Insert the two KEY PLAT into the grooves at both sides
of the unit as shown in figure until they click .
KEY PLATE
5. Pulling the levers makes it possible to remove
the unit from the dashboard .
SPRING WASHER
PLAIN WASHER
TAPPING SCREW
DASH BOARD
HEX NUT
METAL MO UNTING
STRAP
CONSOLE
SLIDE BRACKET
HOUSING
HEX BOLT
-6-
Page 8

Installation
How To Remove And Install Control Panel
When d etaching or a ttachin g the control p anel, be ca reful not to da mage the
conn ectors on the b ack of the co ntrol panel a nd on the pan el holder.
Detachi ng Control P anel
Before de taching th e control pa nel, be sure t o turn off the pow er.
1). Pr ess the “REL” re lease but ton and the lef t hand side of fr ont panel w ill release .
RELEASE BUTTON
2). Pu ll-off the fron t panel and kee p the front p anel into the c ase .
PROTECTIVE CASE
Attachi ng Control P anel
1). Fi rst insert th e right han d side of the fro nt panel in to the hollow o f the unit .
(NOT E : the “bulge” p oint on the p anel must be at tached in to the hollow o f the unit .)
2). Ge ntly push the l eft hand si de of the front p anel unti l you feel a “ Clic k” .
Hollow
Bulge
-7-
Page 9

Panel Angle Adjustment
CHANGING THE CONTROL PANEL ANGLE
When you wa nt to change t he viewing a ngle of the op erating un it to play,
you can tou ch the secti on on touch sc reen (or press the button
on the fron t panel) rep eatedly to s elect the de sired angl e as follows :
ANGLE 1 - ANGLE 2 - ANGLE 3 - ANGLE 4 - ANGLE 1 .
ANGLE 1 ANGLE 2
ANGLE 3ANGLE 4
Caution:
Do not inse rt your fing er behind th e control pa nel.
-8-
Page 10
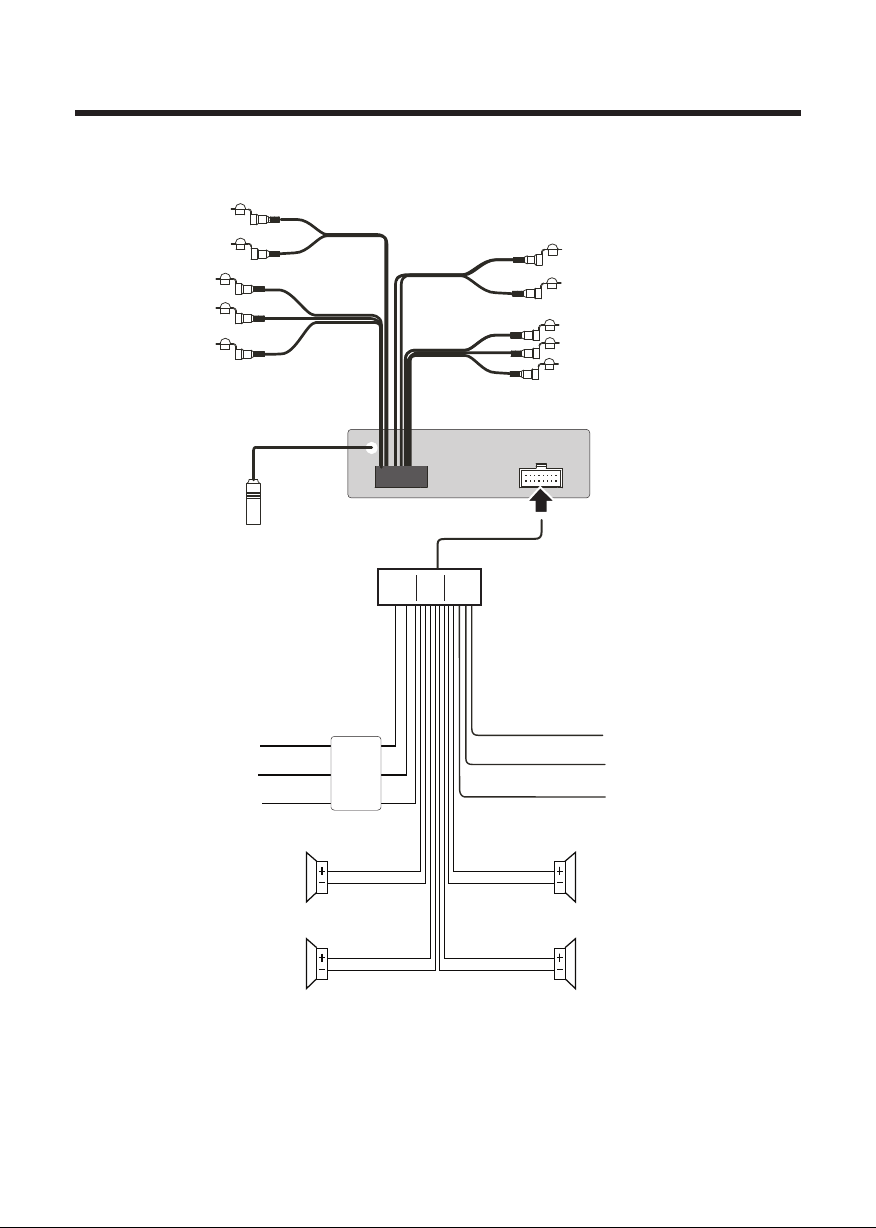
Electric Connection
WI RING C ONNE CTIO N
AUDIO O UTP UT-R (R ED)
AUDIO O UTP UT-L (W HIT E)
AUDIO I NPU T-R( RE D)
VID EO I NPU T(Y EL LOW )
AUDIO I NPU T -L( WHI TE )
RADIO AN TE NN A JACK
IGN IT ION S WIT CH (B+ )
MEM ORY B ACK -U P(B +)
GRO UN D(B -)
REA R AUX OUT PUT
AUX INP UT
RED
YEL LOW
CHO KE
BOX
BLA CK
FRO NT AUX OU TPUT
BROWN
ORA NG E
BLUE
REARV IEW C AME RA IN PUT (YE LL OW)
SUB WO OFE R OUT PU T (GR EY)
AUDIO O UTP UT-R (R ED)
VID EO O UTP UT (Y EL LOW )
AUDIO O UTP UT-L (W HIT E)
REV ERSE TR IGG ER( BROWN , B+)
PARK ING B RA KE( ORA NG E,B -)
AUTO AN TEN NA
FRONT
LCH SPK .
REAR
LCH SPK .
WHI TE
WHI TE/BL ACK
GRE EN
GRE EN/BL ACK
GRE Y
GRE Y/BLA CK
VIO LET
VIO LET/B LACK
FRONT
RCH SPK .
REAR
RCH SPK .
Note :
In ord er to use the DVD p layer fun ction, the “ EM ERGENCY BRAKE S AFTY
WIRE ( B-) ” must be con nected pr operly . If not p roperly connected th e unit will
disp lay “PARKING BRA KE ” .
-9-
Page 11

Remote Control
Ref #
1
2
3
4
5
6
7
Butt on
CLK
PAIR/
STOP
SETU P
MO/S T
(AUD IO)
SUBTITLE
LOCAL/
DISTANT
Redi al/
15
7
2
22
14
18
10
17
19
13
24
11
PLA Y/PAU SEPLA Y/PAU SE
MUT EM UTE
MOD EMODE
RED IAL
PAIR
MEN UMEN U
LO/ DXL O/D X
6
4
OSDOSD
BAN DBA ND
TIT LE/PB CTIT LE/PB C
A/P SA/P S
VOLVOL
VOLVOL
SELSEL
SET UP SET UP
TOP
11
RDM
44
77
GOT OGOT O
ANG LEAN GLE
ZOO MZO OM
LOU D
EQEQ
ENT ERENT ER
RPT
22
55 66
88
+1 0+10
STO PSTO P
MO/ STMO/ ST
CLKC LK
INT
33
99
00
16
3
5
20
1
21
23
9
12
27
26
25
8
Func tion
Pres s it briefly to v iew the clo ck time , Press a gain to ret urn to
norm al display mo de . Press lo nger to set the t ime .
Pres s it to use the BT , refe r to see the page 3 1 .
Pres s once to pause p layback . Press PLAY/PAUSE to res ume
play back. Pleas e note: if yo u press STOP twice, pla yback wil l
star t at the beginn ing of the di sc.
Pres s this button t o open the SE TUP me nu.
In Rad io mode, pres s this butt on to change be tween Mon o and
Ster eo receptio n modes (wh en a station is w eak, some times
swit ching to Mono w ill impro ve sound qual ity). In Di sc Playback
mode , pressing th is button o pens the AUDIO s etup menu f or
maki ng changes to t he way the so undtrack is r eproduc ed.
In Dig ital Video Disc P layback mod e, pressi ng this butto n will
allo w you to change t he subtit le language o n discs whi ch have
this a s an option.
In Rad io mode, pres s this butt on to change th e radio rec eption
sens itivity in st ations ar e near or far.
Pres s it to use the BT , refe r to see the page 3 1 .
-10-
Page 12

Remote Control
Ref #
8
9
10
11
12
13
14
15
16
17
Butt on
GOTO
/
SEL
VOL+ /-
/ / /
Menu
SubWoofer
( )
BAND
(OSD )
/MOD
PLAY/
PAUSE
MUTE
Func tion
Pres s it button to be gin playb ack at a moment i n the progr am you
desi gnate. Use nu mber butt ons to enter th e data that i s needed.
In BT menu, it s erves as th e asterisk bu tton on you r mobile
hand set.
Pres s these butto ns to skip ah ead or back one t rack.
Brief ly p re ss this b ut ton rep ea tedly to sw it ch betw ee n BASS,TR E, BAL,FA DE R,
COLOR ,B RI GHT,CON TR , TIN T and VOL ; Lo ng p ress th is b utton t o sw itch BT, then
briefly p re ss this b ut ton rep ea tedly to sw it ch betw ee n LOUD, SWF,E Q, DX/LO CA L,
STERE O/ MONO, TIM E 24H/1 2H , CLOCK,B UZ Z,EUR /U SA FREQ, AN IMA and BG;
After s wi tc hing a de si red ite m ab ove, pres s VO L+ or VOL - bu tton to set .
Use th ese control s to adjust t he volume lev el.
Pres s to navigate t he variou s menus prese nt in the pro duct.
Pres s this button b riefly to d isplay the ro ot level di rectory of a
DVD di sc. Press and h old this bu tton to turn on o r off the
SUBW OOFER outpu t.
In Rad io mode, pres s this butt on repeated ly to switc h between
the fi ve radio band s: FM1 > FM2 > FM3 > AM1(MW1) > AM2 ( MW 2) .
In Dis c Playback mo des, Pres s this button t o see infor mation
abou t the disc curr ently in pl ay.
Pres s this button to tu rn the unit ON , press and hol d to turn the
unit OFF. Pre ss it briefl y to select the DIS C, RAD IO , AUX IN ,
BT MU SIC mode .
In Dis c Playback mo de, press t o pause playb ack. Pres s again to
star t where playb ack stopp ed.
Pres s this button t o turn off the audi o. Press ag ain to restor e the
soun d to its prior vo lume leve l.
18
19
20
21
22
TITL E/
PBC( A/P)
ZOOM /
ANGL E
EQ/L OUD
When p laying a Digi tal Video, pres sing this b utton will op en the
TITL E menu which is r ecorded o n the Digital Vid eo. When play ing
a VCD di sc, press thi s button to c reate a PBC (Pl ayback Co ntrol)
menu f or the disc to as sist in mak ing playbac k selecti ons. In
Radi o mode, press a nd hold thi s button to sta rt the Auto- Program
mode , during whic h the tuner w ill scan for al l strong st ations and
assi gn them to the ra dio prese t buttons.
Pres s it button to ch ange the vi ewing angel o f the opera te unit .
For Di gital Video dis cs which have a lternat e viewing ang les
enco ded, when you s ee the "ang le mark" symb ol advisi ng you
that t hese angles a re availa ble, longer p ress this b utton to see
them .Shortly pr ess to incr ease the pict ure in size .
Pres s repeatedl y to cycle th rough the diffe rent equali zer curve
pres ets you may wis h to use for en hanced list ening. Pr ess longer
to swi tch the LOUDN ESS funct ion ON and OFF .
In Disc Playback mode, press for fa st forwa rd pla yback.
-11-
Page 13

Remote Control
Ref #
23
24
25
26
27
Butt on
ENTE R
0-9
+10/
1-6
This b utton is used t o confirm s elections a nd settin gs within
many o f the menus in th e OSD syste m.
In Disc playback mode, press it to search reverse rapid ly
Use to i nput numeri cal value s during prog ramming , with the GOTO
butt on, or to direc tly selec t a track to play .
This b utton is used w ith the oth er number but tons for us e with
two- digit numbe r entries . In BT me nu, it serv es as the hash
butt on on your mobi le handse t.
Six number ed prese t butt ons st ore an d recall stati ons fo r each band
Func tion
Preparing the Remote Control
Inserti ng the Batte ry
1.Fi rst push to ins ide as the di rection ind icated by t he arrow (See ) And then
Remo ve the batter y holder as t he directio n indicat ed by the arrow ( See ).
2.Re place the bat tery Set a ne w battery pro perty wit h (+)side up as i llustrate d
(See ) .
3.In sert the batt ery holde r. Push in the hol der to the or iginal posi tion(Se e ).
3
1
2
4
Using the R emote Cont rol
Face t he remote con trol towa rds the playe r front fac e IR mark (remo te control si gnal
rece iver).
Oper ation angle : About 30 deg ree in each the d irectio n of the front of t he IR mark.
Note :
The li thium cell in t he batter y compartme nt of remot e control has b een secured f or
tran sport with a fo il . Before i nitial use pl ease remo ve this foil so t hat the remot e
cont rol is ready fo r operati on .
-12-
Page 14

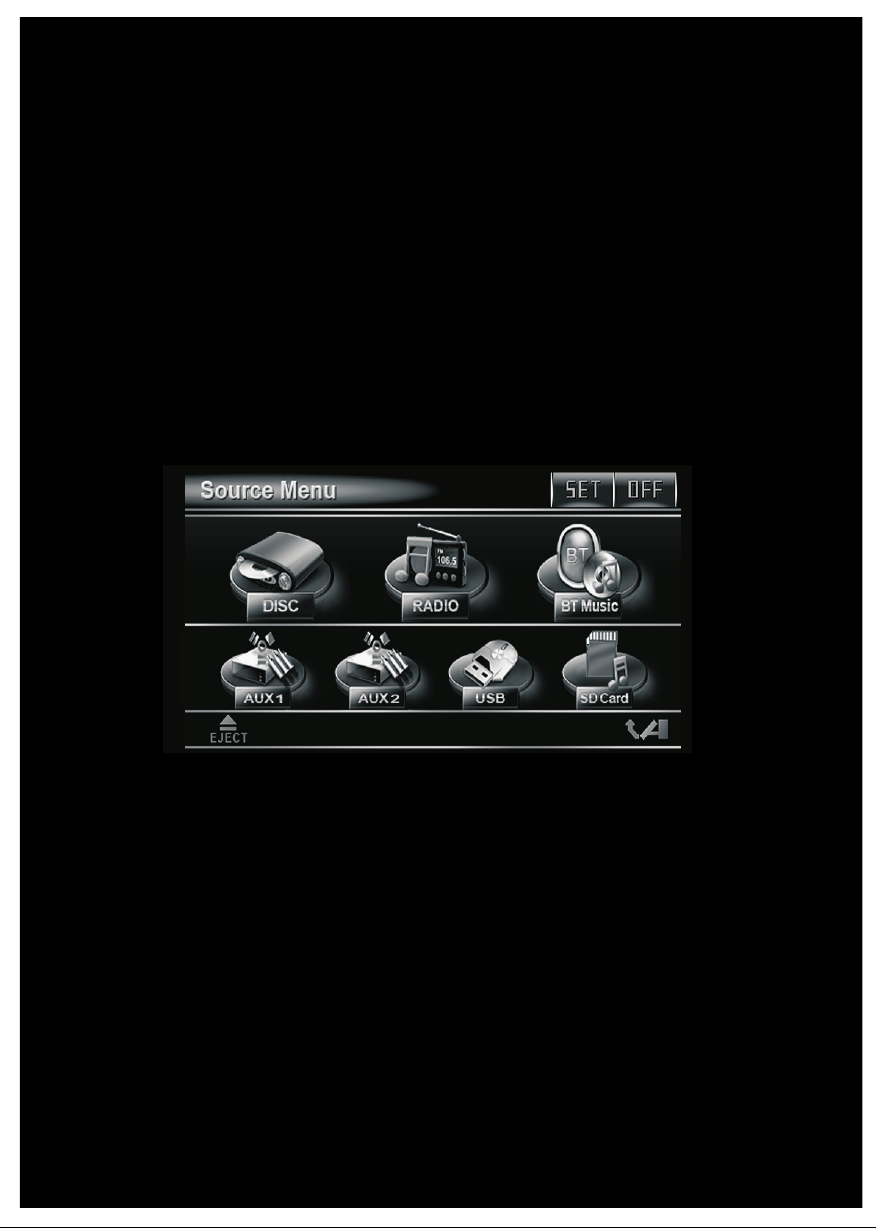
Basic Operation
TFT Monitor Adjustment
In Dig ital Video mode , t ouch screen o f “ ”
rang e to enter the ma in menu . Touch
“SET ” ICON to e nter the sett ing menu,
the me ssage displ ay in the scr een:
Touch th e “SET” range o n touch scr een
to ent er the settin g mode, the m essage
will d isplay like f ollowin g :
to return to the previ ous playback
SETSET
BRI GHTNE SS
CONT RAST
COLOR
15
UP
Dow n
(1) (2)
(3) (4)
(1). SET button
touc h to enter the SE TTING mod e .
(2). OFF (Power) button
in any m odes, touch t he “ OFF ” I CON
to swi tch the unit off .
(3). Button
touc h this icon, th e panel wil l to slide
down , you can inser t the disc or e ject
the di sk .
(4). Button
touc h this range to a djust the a ngle of
moni tor until you r desired a ngle .
Lef t
Right
Touch th e “ SYSTEM ” sect ion on the
sett ing menu, tou ch the “ / ” rang es
to sel ect the adjus tment ite m, touch the
“ / ” rang es to adjust th e selectm ent
item , I t`s depend on y our habit t o setup
the da ta . Touch the “SET” icon to r eturn
to the p revious pla yback .
ADJUSTABLE ITEMS:
CONTRAST: 0 to 32
Adju st the contra st of the bri ght and dark
port ion.
COLOR: 0 to 32
Adju st the color fo r the pictu re-lighte r or
dark er.
BRIGHT: 0 to 32
Adju st if the pictu re is too bri ght or
too da rk.
TINT: 0 to 32
Adjus t the tint if the h uman skin c olor is
unna tural.
-Adj ustable whe n “NTSC “ is se lected for
“NTS C/PAL “ .
BT ON/OFF
Touch to s witch the BT
func tion ON and OFF .
-13-
Page 15

Basic Operation
ANIMATION
In RADIO mode, you c an change the
play ing time of ani mation am ong of
“10SEC, 30SEC, 60SEC,90SEC, 2MIN, 3MIN,
4MIN and OFF ”.
Note:
Plea se set the play ing time of t he anim atio n to “ 10SEC ” for the f irst, when yo u
turn t he unit on .
Rear View Camera
When c onnecting t he rear vie w camera.
the mi rror image of t he rear vie w through
the re ar view camer a is automa tically
disp layed on the mo nitor whe n you
chan ge the gear to th e back posi tion.
(Not e: addition al monito r can not displ ay
the im age .)
AUDIO QUALITY ADJUSTMENT
In mai n menu mode , tou ch the “ SET ”
ICON t o enter the Set ting mode , the
mess age will disp lay in the sc reen :
SETSET
SUBWOOFER
Touch to s witch the SUB WOOFER
func tion ON and OFF .
BALANCE: R 0-10 to L 0-10
Adju st sound bala nce betwe en left
and ri ght speaker s .
FADER: F 0-10 to R 0-10
Adju st sound bala nce betwe en front and
rear s peakers .
BUZZER SET
Touch to s witch the BUZ ZER BEEP
func tion ON and OFF .
SETTING AUDIO MODE
In any m odes, touch t he “EQ” range o n
the to uch screen (o r press the E Q button
on rem ote control ) to select o ne of
the pr eset sound mo des: ROCK /POP/
JAZZ /CLASSIC/ FLAT .
The in formation w ill displ ay in the
moni tor as follow :
ROCK
USER
JAZZ
RAD IO LOC/DX
TRE BLE
BAS S
06
06
Touch th e “ SOUND ” sectio n on the
sett ing menu, tou ch the “ / ” rang es
to sel ect the adjus tment ite m, touch the
“ / ” rang es to adjust th e selectm ent
item , I t`s depend on y our habit t o select
the Aud io mode . Then touc h the “SET”
icon t o return to the p revious p layback .
ADJUSTABLE ITEMS:
TREBLE: -7 to +7
Adju st treble lev el .
BASS: -7 to +7
Adju st bass level .
POP
CLASSIC
It`s d epend on your h abit to sel ect the
Audio m ode .
SETTING TIME
In SET TING mode, to uch the “TIME”
rang e to select the t ime mode .
SETSET
HOU R
MIN UTE
12H /24H
36
-14-
36
Page 16

Basic Operation
touc h the “ / ” ranges to s elect the
adju stment item , touch the “ / ”
rang es to adjust th e selectm ent item ,
then t ouch “ SET ” icon to co nfirm .
It`s d epend on your n eed to setu p the
data .
EXTERNAL AUDIO SOURCE
On the f ront panel of t he unit , the re is an
AUX IN j ack, to conne ct analog ue replay
devi ces. Use this j ack to repl ay sound of
othe r replay equi pment suc h as
MP3 pl ayers, etc. Via t he loudspea kers.
ADJUSTABLE ITEMS:
Hour a djustment : 0-23
Minu tes adjustm ent: 0-59
Tim e format se lectment : 12 H/24H
Reset Factory Settings
RESE T butt on is place d on the housin g
and mu st be activat ed with eit her a
ball point pen or th in metal ob ject.
The RE SET bu tton is to be a ctivated fo r
the fo llowing rea sons:
A. Ini tial instal lation of t he unit when
all wi ring is compl eted.
B. All th e function bu ttons do no t operate.
C. Err or symbol on th e display.
RESET
NOTE :
If RES ET is se lected, a ll memory dat a
will d eleted, ple ase re-ad just .
RET
1). Pl ease f
conn ect the exter nal devic e with a
ollo wing the diag ram below,
3.5 mm s tereo jack pl ug to the AUX IN
sock et .
2). Pr ess the MOD but ton to sele ct the
AUX IN c onnection .
3). You no w hear the so und from the
exte rnal device p layed bac k throuch
the lo udspeaker s .
3). Fo r the remaini ng proced ure please
see th e operating i nstruct ions of the
exte rnal sound so urce .
A X N
U
I
Hea
ph n
o
e
s p r
o
td
-15-
Page 17

Control Panel
Unit Keys :
10
9
8
7
6
5
4
SEL
REL
MOD
CH1-6
VOL
MIC
RET
12
13
3
2
IR
AUX IN
1
Control Panel
11
Sliding Plate diagram after removing Control Panel
1 AUX Input JACK
For in formation a bout conn ecting a AUX dev ice, plea se see page 30 .
2 IR SENSOR
3 VOL+/ VOL- KNOB
In nor mal mode, thi s knob is use d to increase o r decreas e the volume. I t is also
used a s an UP/DOWN kn ob when aud io or video set tings are b eing adjust ed
when a ccessed usi ng the SELE CT but ton.
4 ANGLE (Screen position)
Pres s this button r epeated ly to cycle thr ough the di ffer ent positio ns.
-16-
Page 18

Control Panel
5 /CH 1-6 (RADIO PRESET)BUTTON
A) In Dis c Playback Mo de
Pres s this button t o pause pla yback, pres s it again to res ume playb ack.
B) In Ra dio Mode
Pres s this button r epeated ly to preset st ation. With t his syste m a total of 30
stat ions can be sto red in the me mory . Each ban d store up to s ix preset
stat ions. The stati ons might be FM 1, FM2, FM3, AM1 ( MW1) and AM2
(MW2 ) band.
-Store in Memory
> Sele ct the freque ncy band
> Pres s repeatedl y the butto n to select the d esired me mory key .
> Sele ct the statio n
> Keep t he desired me mory key pr essed in unti l the stati on is heard aga in
afte r a brief inter ruption .
The operat ion as belo w:
-Retrieve a preset station
pres s the button re peatedl y to retrieve a s tation wh ich had been st ored in the
memo ry in advance t he chose nu mber is shown o n display .
6 (POWER On/Off )/MODE BUTTON
Pres s this button t o switch th e device on. WE LCOME appea rs in the dis play.
Pres s it again to swi tch the dev ice off. SEE YOU appear s in the disp lay.
In pla yback mode, y ou can use th e button to sel ect the inp ut mode by pres sing
repe atedly unti l the prope r one is found :
DISC > AUX IN > RADIO > BT MP3 .
7 REL BUTTON
Pres s this button t o release t he front pane l for removal . R efer to see p age 7.
8 SELECT BUTTON
Briefly press this button repeatedly to switch between BASS,TRE,BAL,FADER,COLOR,
BRIGHT,CONTR, TINT and VOL; Long press this button to switch BT, then briefly press
this button repeatedly to switch between LOUD, SWF,EQ,DX/LOCAL, STEREO/MONO,
TIME 24H/12H, CLOCK,BUZZ,EUR/USA FREQ,ANIMA and BG; After switching a desired
item above, rotate VOL knob to set.
9 (EJECT ) BUTTON
Pres s it button to ej ect the DIS C or insert the D ISC to start pl ay .
10 USB OPERATION
For in formation a bout conn ecting a USB de vice, ple ase see page 33 .
11 SD/MMC CARD SLOT
12 MIC
Micr ophone .
13 RESET BUTTON
Pres s this button t o return to f actory sett ings .
-17-
Page 19

Touch Screen Operation
RADIO Operation
Listening to the radio
Pres s repeatedl y the MOD but ton on the
fron t panel to sele ct the RADI O mode .
(You can enter th e main menu to se lect
the RA DIO mode )
Touch Screen Configuration
(1) (2) (3) ( 4)
DXDX
(14 ) (15 )
FLATFLAT
STST
(13 )
FM1FM1
MHZMHZ
SWFSWF
33
6655
86. 508 6.50107 .00107 .00106 .00106 .00
RadioRadio
11 22
44
87.5087.50
87. 508 7.50 90. 009 0.00 98. 009 8.00
(12 )
(1) Source icon
Show w hich source h as been sel ected .
Touch to retur n to enter th e main menu .
(2) Information display zone
(3) Shortly touch to perform manual
tuning, touch and hold to perform seek
tuning . (Refer to see page 19)
(4) Touch to select preset sound mode .
(5) Time indicator (note: when you pressed
the SEL button the corresponding informa tion will display in here .)
(6) Touch to adjust the Volume level .
(7) Touch to switch the Mute func tion
on or off .
(8) Touch to switch the Loudness function
on or off .
(9) Touch to pair with your handset.
In BT mode ,touch to make or
answer the telephone call .
APSAPS
00: 060 0:06
EQEQ
(5)
(6)
(7)
(8)
(9)
(10 )
(11 )
(10) Touch to change the frequency band .
(11) Touch to start manual search the
radio station. Touch longer to start
search the radio station automatically .
(12) Touch : recalling the preset station.
Touch and hold: storing broadcast station .
(13) Touch to switch the Subwoofer
function on or off .
(14) Local/Stereo/EQ/Subwoofer indicator .
(15) BT indicator .
Selecting The Frequency Band
Touch the scre en of “ BAND ” se ction
repe atedly to sel ect the ban d , the
mess age will show i n turn :
FM1 FM2 FM3
AM2( MW2)
AM1( MW1)
When an FM stereo broadcast is
hard to receive
Pres s ST/MO butto n on the remo te
cont rol to select t he MONO or ST EREO
mode . ( When Stereo m ode is acti vated,
the ST symbo l will appe ar . )
Start Searching For a Station
Manu al Search
Duri ng Radio mode , briefly t ouch the
scre en of “ ” section t o increas e
freq uency by one st ep of chann el
spac ing . Briefly t ouch the “ ” se ction
to dec rease frequ ency by one s tep of
chan nel spacing .
-18-
Page 20

Touch Screen Operation
Auto matic Searc h
Duri ng Radio mode , touch and h old
(for m ore than 2’s ) the sc reen of “ / ”
sect ion to start se arch for a ra dio
stat ion automat ically .
To tune in strong-singnal FM
Station only (LO/DX function)
In hom e menu, then to uch the “ SET ”
icon t o enter the set ting menu , the
mess age will disp lay as belo w :
SETSET
RAD IO LOC/DX
TRE BLE
DX
DX
Storing Stations In Memory
Setting M emory
RadioRadio
11 22
44
87.5087.50
87. 508 7.50 90. 009 0.00 98. 009 8.00
FM1FM1
MHZMHZ
FLATFLAT
DXDX
STST
SWFSWF
33
6655
86. 508 6.50107 .00107 .00106 .00106 .00
With t his system, a t otal of 30 st ations
can be s tored in the me mory of six
butt ons. Each ban d stores up t o six
pres et stations .
The op eration is as b elow :
- Store in Memory
>Sel ect the frequ ency band .
>Sel ect the stati on .
>Kee p the desired m emory key p ressed
in unt il the statio n is heard ag ain after
a brie f interrupt ion .
APSAPS
00: 060 0:06
EQEQ
- Retrieve a preset station
Touch th e 1-6 ranges br iefly to re trieve
a stat ion which had b een store d in the
memo ry in advance t he chose nu mber
is sho wn on display .
Automatic Memory Storing &
Program Scanning
RadioRadio
11 22
44
87.5087.50
87. 508 7.50 90. 009 0.00 98. 009 8.00
FM1FM1
MHZMHZ
FLATFLAT
DXDX
STST
SWFSWF
33
6655
86. 508 6.50107 .00107 .00106 .00106 .00
Auto matic Prese t Setup
In Rad io Mode, touc h and keep (f or more
than 2 ’ S) the scre en of “ APS ” ra nge to
acti ve automati c station s torage.
The radio se arches wi thin the curr ent
freq uency band, e .g. FM1, fo r the stron ger si gnal level un til the sea rch cycle
has fi nished . The six st rongest sta tions
are th en allocate d to the corr esponding
stor age locatio ns . Then the stati on of
the fi rst storage l ocation i s set .
Scan F unction
In Rad io mode, brie fly touch t he “APS”
sect ion on the touc h screen , th e radio
brie fly plays all t he preset s tations of th e
freq uency band .
APSAPS
00: 060 0:06
EQEQ
-19-
Page 21

Touch Screen Operation
DISC Operation
In any m odes, repea tedly pre ss MOD
butt on on front pan el to enter t he disc
play m ode .
The me ssage will di splay as be low :
(Whe n Parking Bra ke suppli ed .)
Mute f unction
To decre ase the volum e level
To incre ase the volum e level
To enter t he main menu
Rand om Function
Repe at Function
Intr o Function
Next m enu
To searc h fast forwar d
To skip th e previous tr ack
To searc h the disc with n umbers
In DVD m ode, touch to d isplay th e
MENUMENU
root m enu. In VCD mod e, touch to
PBCPB C
swit ch the PBC ON and P BC OFF.
To selec t the viewing a ngle
ANGLEANGL E
To show/ hide the Subt itle
(dep ending on the D VD)
To chang e the AUDIO sett ing
(dep ending on the D VD)
ZOOM I N and OUT
Redi aling
Regi stering dev ices with o ne
anot her. In blueto oth mode, t ouch
to cal l up the blueto oth menu .
To displ ay the SETUP menu
To selec t the Equaliz er mode
On scr een- displa y
To searc h fast backwa rd
Stop
Play /Pause the di sc
To skip th e next track
To show / hi de the clock
Loud ness Functi on
Subw oofer Funct ion
Prev ious menu
-20-
Page 22

Touch Screen Operation
BASIC OPERATION
Stoppin g Play
Touch th e screen the ra nge to
stop t he unit playb ack. touc h the
rang e to start play.
Pause (st ill pictur e)
Touch th e “ ” section on to uch
scre en during pla yback wil l stop
play t emporary, touc h it again to
retu rn the normal p layback .
Rapid For ward/Rap id Reverse
Duri ng DISC playb ack, touc h the
scre en of “ / ” range the
spee d of rapid forw ard/rev erse
chan ges accordi ng to the dis c as
foll ow:
Digital Video/VCD/CD/MP3:
Norma l Pl ayb ac k 2x 4x 8x 20 x
Skippin g Track
Duri ng DISC playb ack, Tou ch the
/ sect ion on the touc h screen
to ski p to next/bac k one track .
Note:
when t he JPEG disc pl ayback, i n normal
mode , you can use the c ursor but tons to
rota te the pictur e .
Pres s UP to in vert an ima ge .
Pres s DOWN to mirro r an image .
Pres s LEFT to rotate an i mage to left .
Pres s RIGHT to rotate a n image to righ t .
SELECTING PLAY MODES
Duri ng the Disc pla yback, to uch the
“RPT, RD M, INT ” range to sel ect the
differen t playing m ode .
1). REPEAT FUNCTION
FOR Di gital Video :
Touch th e screen the of “ RPT” rang e
(or pr ess longer 2/ RPT butto n on the
remo te control) t o select RE PEAT mode
as fol low :
CHAPT ER REP EAT ON TI TLE R EPEA T ON
REP EAT OFF
FOR VC D/CD/MP3 :
Touch th e screen the of “ RPT” rang e
(or pr ess longer 2/ RPT butto n on the
remo te control) t o select RE PEAT mode
as fol low :
REPEAT O NE REPEAT ALL
REP EAT ALL
REPEAT O FF
Note :
For so me VCD2.0 dis c (PBC-pl ayback
cont rol), above t hese butt ons may be
unav ailable .
Zoom Func tion
Repe atedly touc h it button , the
disp laying rate c an be “zoom 2,
zoom 3, zoom 4 , zoom ½,
zoom 1/3, zoom 1/4 , zoom off . ”
Use th e direction k eys ( / / / on
remo te control to m ove the enl arged
pict ure .
1. Con tinuously r epeat at th e current
chap ter/track , when sele cted REP-ON E
mode .
2. Sel ect REP-ALL mode to con tinuous ly
repe at all chapte r/track o n the current
disc .
2). INTRO FUNCTION
FOR CD :
Touch th e screen of the “ INT” sect ion
(or lo nger press th e 3/INT but ton on the
remo te control ) to p lay the pre vious 10
seco nds part of eac h track/c hapter on
disc .
(Touch i t again to canc el this mod e)
-21-
Page 23

Touch Screen Operation
FOR VCD :
Touch th e screen of the “ INT” sect ion
REPEAT function
Refe r to see page 21 .
(or lo nger press th e 3/INT but ton on the
the re mote contro l ). It displ ay will
foll owing menu as b elow :
SEQ P LAY INTRO 1
INTRO function
Refe r to see page 21 .
RANDOM function
Refe r to see page 22 .
Note : when select t he INTRO Mode, t his
play er to start to pl ay the prev ious 10
DISC Search (GOTO)
seco nds part of eac h track/c hapter on
disc . (Tou ch it again to ca ncel
this m ode .)
FOR Digital Video/MP3 :
For Di gital Video/M P3 , press the IN T bu tton is
FOR Di gital Video :
Touch th e screen the of “ GOTO” range
the sc reen will dis play the fo llowing
mess age :
not av ailable .
3). RDM(RANDOM) FUNCTION
Duri ng DISC playb ack, touc h screen of
“RAN DOM” sectio n ( press the 4 /RDM
butt on longer on th e remote co ntrol to
play i n random. Eac h playing , the order
is differe nt . (Depen d on the disc use d
for VC D).
Touch it a gain to cance l this func tion .
Note : i n random mode , the butto n is
not av ailable .
Touch th e / to select the y our
adju stment item , then sele ct the item
you wa nt to watch thr ough CHAP TER/
TIME s etting by tou ching the n umberic
butt ons , then touc h the ENTER b utton
to con firm .
Digit al V ideo TT 0 1/ 01 CH 03/ 31 0 :01:4 4
TOP/RPT/INT/RDM FUNCTION
(Only for the RC.)
VOLVOL
TOP
11
VOLVOL
RDM
44
SELSEL
77
TOP func tion
ForDigital Video/ VCD/CD/MP3:
In the s tate of Digit al Video/VCD/ CD/
MP3 di sc playing, p ress the bu tton to
sele ct the first tr ack/cha pter to play.
(dep end on the disc u sed for VCD )
RPT
22
55 66
88
INT
33
99
FOR VC D (With PBC OFF ):
Touch th e screen the of “ GOTO” range ,
the sc reen will dis play the fo llowing
mess age :
VCD TRK 01/1 9 PB C 0: 01 :4 4
A
Touch th e / to select the y our
adju stment item , then sele ct the item
you wa nt to watch thr ough TRACK/TI ME
sett ing by touchi ng the numb eric
butt ons , then touc h the ENTER b utton
to con firm .
-22-
Page 24

Touch Screen Operation
ON-SCRE EN DISPLAY FUN CTION
OS D
1. Dig ital Video:
A.Touc h or Press OSD fo r first tim e:
Digit al Vide o TT 01 /01CH 0 4/ 31 C 0: 02 :06
Tit le Number, Total Titl e Number,
Chap ter Number, Total Ch apter Numbe r
of thi s Title of the dis c current ly being
play ed will be show n on the scre en,
alon g with the elap sed time.
B.Touc h or Press OSD fo r second ti me:
½ ENG 2CH OFF OFF
C.Touc h or Press OSD fo r third tim e:
Digit al Vi de o TT 01 /01CH 0 4/31 C -0 :0 1:3 2
Duri ng playback , touch the
scre en of the OSD sec tion,
it wil l display the f ollowin g
as bel ow :
2.Ex ample for VCD /SVCD/C D:
A.Touc h or Press OSD fo r first tim e:
VCD TRK 1/19 PBC C 0:01:36
A
B.Touc h or Press OSD fo r second ti me:
VCD TRK 1/19 PBC C -0:06:06
A
C.Touc h or Press OSD fo r third tim e:
VCD TRK 1/19 PBC T 0:02:12
A
D.Touc h or Press OSD fo r fourth ti me:
VCD TRK 1/19 PBC T -1:23:06
A
E.Touc h or Press OSD fo r the fifth t ime:
The me ssage on the sc reen will b e
clea red for SVCD an d VCD.
NOTE :
For CD (audio) Dis c, touch OS D button
is not a vailable .
D.Touc h or Press OSD fo r fourth ti me:
Digit al Vide o TT 01 /01CH 0 4/ 31 T 0: 16:00
E.Touc h or Press OSD fo r fifth tim e:
Digit al Vi de o TT 01 /01CH 0 4/31 T -1:36 :55
F. Touc h or Press OSD fo r sixth time:
The me ssage on the sc reen will b e
clea red.
3. Exa mple for MP3
A.Touc h or Press OSD fo r first tim e:
CDrom TRK 2 /7 6 C 0:00:36
A
B.Touc h or Press OSD fo r second ti me:
CDrom TRK 2 /7 6 C 0:03:38
A
C. Touch or Pres s OSD for thi rd time:
The me ssage on the sc reen will b e
clea red.
-23-
Page 25

Touch Screen Operation
Digital Video Special Function
1. Multi-subtitle Language
Function (for Digital Video Only)
Duri ng Digital Vide o playback.
Touch th e SUBTITLE se ction
on tou ch screen(o r press the
SUBT ITLE on the rem ote) .
Each t ime the butto n is presse d or touch,
numb er of the subti tle langu age changes
in seq uential ord er.
Note s:
- The langua ge number i s diff erent
acco rding to the di sc.
- Some d iscs only con tain one su btitle
lang uage.
- When n o diff erent sub title langu age
are re corded, “ INVALID KEY ” will be
disp layed at scre en left top c orner.
2. Multi-Audio Language Function
For Di gital Video:
Duri ng Digital Vide o playback ,
touc h the AUDIO sec tion on
on the r emote .) Each t ime the but ton is
pres sed or touch , nu mber of the a udio
soun dtrack lang uage chan ges on
sequ ential orde r.
Note s:
- The langua ge number i s diff erent
acco rding to the di sc.
- Some d isc only cont ain one lan guage
soun dtrack
- When n o diff erent lan guage sound tra ck are r ecorded will b e
disp lay at screen l eft top cor ner.
For VC D/CD:
duri ng playback , touch the A UDIO
sect ion of the touc h screen or P ress
AUDI O on the remote . I t is possib le to
swit ch the sound be tween mon aural
and st ereo sound.
MON O LEFT MO NO RIGH T
touc h screen (or pr ess the AUDI O
“ INVALID KEY ”
MIX-MONO
STE REO
3. Multi-Angle Function
(for Digital Video Only)
Duri ng Digital Vide o playback, t ouch the
ANGL E button on the t ouch scre en .
Each t ime the butto n is presse d , the
numb er of the angle c hanges in s equential o rder.
Note s:
- The angle nu mber is differe nt
acco rding to the di sc.
- The functi on only wor k for disc havi ng
scen es recorded a t different ang les.
- When n o diff erent ang le are record ed,
“ INVALID KEY ”
will b e displayed a t
scre en left top cor ner.
4. Title Menu Function
For Di gital Video:
If the D igital Video ha s multiple ti tles
reco rded on the dis c. It can sel ect
pref erred title f rom the tit le menu to star t
play back.
- Duri ng Digital Vide o playback, p ress
TITL E button on the r emote .Th e title
menu i s display.
- Sele ct preferre d title by th e cursor
butt on and confir med by pres s the
ENTE R button .
For VC D:
Pres s TITLE/PBC b utton on th e remote
cont rol while the d isc is play ing, you can
swit ch between "P BC ON"and " PBC off"
mode .
-24-
Page 26

Touch Screen Operation
SYSTEM SETUP
Multi-media Setup Menu
SYS TE M SE TU P
SYS TE M SE TU P
TV S YS TE M
SC RE EN S AV ER
TV T YP E
PAS SW OR D
RAT IN G
DE FAULT
EX IT
1. Touch the scr een of “ ” rang e
or pre ss the SETUP but ton on remo te .
2.Th e SETUP menu is dis played.
3.Touc h directly th e desired i tem to
sele ct the prefer red item .
Or by us ing the / / / butto ns .
4. Touch the EXIT sectio n to clear the
setu p menu or press t he SETUP on th e
remo te control .
Overview Of The Main Menu
(1) (2) (3) (4)
(1). System Settings
(2). Language Settings
(3). Video Settings
(4). Digital S ettings
TV S YS TE M
SC RE EN S AV ER
TV T YP E
PAS SW OR D
RAT IN G
DE FAULT
EX IT
NT SC
PAL
AU TO
TV TYP E SETUP
This p layer is capa ble of play ing discs
reco rded in eithe r PAL or NTSC for mats.
Make t he selectio n based on wh ether you
are co nnecting th e unit to a PAL TV or an
NTSC TV. You can a lso set the uni t to
AUTO (auto select) . The di sadvant age to
auto select is tha t each time y ou turn the
unit o n it checks to se e what kind o f
moni tor is connec ted, whic h causes a
smal l delay and som e flicker ing of the
disp lay image whi ch you may fi nd
unpl easant.
SYS TE M SE TU P
TV S YS TE M
SC RE EN S AV ER
TV T YP E
PAS SW OR D
RAT IN G
DE FAULT
EX IT
ON
OF F
SCRE EN SAVE R SETUP
If the s creen displ ays a stati c image for
too lo ng, some "bur n-in" may o ccur,
leav ing a permane nt trace of t he image
behi nd. To avoid this, tu rn ON the
SCRE ENSAVER item. Aft er a short
peri od of inactiv ity on the mo nitor, the
unit w ill substit ute a movin g image to
avoi d burn-in.
-25-
Page 27

Touch Screen Operation
SYS TE M SE TU P
TV S YS TE M
SC RE EN S AV ER
TV T YP E
PAS SW OR D
RAT IN G
DE FAULT
EX IT
16:9
4: 3P S
4: 3L B
16 :9
4:3 Letter Box
4:3 Pan Scan
TV DIS PLAY SETUP
This is to sel ect the app ropriate TV
aspe ct (4:3 or 16:9 ) accordi ng to the
conn ected TV set.
Norm al/PS (For 4: 3 TV)
Play ed back in the PAN & SCA N style.
(If co nnected to wi de-scre en TV, the
left a nd right edge s are cut off.)
Norm al/LB (For 4: 3 TV)
Play ed back in LETT ER BOX styl e.
(If co nnected to wi de-scre en TV, black
band s appear at top a nd bottom o f the
scre en.)
Wide (Fo r 16:9 TV)
Sele ct when a wide- screen TV set is
conn ected.
SYS TE M SE TU P
TV S YS TE M
SC RE EN S AV ER
TV T YP E
PAS SW OR D
RAT IN G
DE FAULT
-----
EX IT
PASSWORD SE LECTION
The pa ssword must b e used to mak e
chan ges to the Pare ntal Cont rol menu
belo w . The fa ctory def ault passwo rd is
0000. You w ill be asked fo r the current
pass word. Key in “0000” and then pres s
“ENT ER” on remote c ontrol to c onfirm .
you ha ve the opport unity to ch ange it
and en ter your new pa ssword . Then
when y ou enter the Pa rental Co ntrol
menu , you can make an y changes .
SYS TE M SE TU P
TV S YS TE M
SC RE EN S AV ER
TV T YP E
PAS SW OR D
RAT IN G
DE FAULT
EX IT
1 KI D SA FE
2 G
3 PG
4 PG 13
5 PG -R
6 R
7 NC -1 7
8 AD ULT
RATING
Sele ct suitable p arental g uidance wit h
the cu rsor button s and confi rm it by
pres sing the ENTE R button.
-26-
Page 28

Touch Screen Operation
SYS TE M SE TU P
TV S YS TE M
SC RE EN S AV ER
TV T YP E
PAS SW OR D
RAT IN G
DE FAULT
RE ST OR E
EX IT
DEFAU LTS
Sele cting the DEFA ULT item an d confirming R ESTO RE will ret urn ALL per sonal
sett ings you have m ade, incl uding radio
and TV prese ts, to the fa ctory defau lt
sett ings.
LANGUAGE SETUP
LA NG UAG E SET UP
OS D LA NG UA GE
AU DI O LA NG
SU BT IT LE L AN G
ME NU L AN G
EX IT
EN GL IS H
GE RM AN
SPA NI SH
FR EN CH
PO RT UG UE SE
ITA LI AN
RU SS IA N
LA NG UAG E SET UP
OS D LA NG UA GE
AU DI O LA NG
SU BT IT LE L AN G
ME NU L AN G
EN GL IS H
GE RM AN
SPA NI SH
FR EN CH
PO RT UG UE SE
ITA LI AN
RU SS IA N
EX IT
AUDI O LANGUAGE SE TUP
Sele ct the prefer red AUDIO so undtrack
lang uage by touch ing direc tly the
desi red languag e .
LA NG UAG E SET UP
OS D LA NG UA GE
AU DI O LA NG
SU BT IT LE L AN G
ME NU L AN G
EX IT
EN GL IS H
GE RM AN
SPA NI SH
FR EN CH
PO RT UG UE SE
ITA LI AN
RU SS IA N
OF F
OSD LA NGUAGE SETU P
Sele ct the prefer red OSD lan guage by
touc hing direct ly the desi red languag e .
SUBT ITLE LANGUA GE SETUP
Sele ct the prefer red Subti tle languag e
by tou ching direc tly the des ired
lang uage .
-27-
Page 29

Touch Screen Operation
LA NG UAG E SET UP
OS D LA NG UA GE
AU DI O LA NG
SU BT IT LE L AN G
ME NU L AN G
EN GL IS H
GE RM AN
SPA NI SH
FR EN CH
PO RT UG UE SE
ITA LI AN
RU SS IA N
EX IT
DISC M ENU LANGUAG E SETUP
Sele ct the prefer red DISC ME NU langu age by t ouching dir ectly the d esired
lang uage .
VIDEO SETUP
thes e settings al low you to se t the video
sign al brightne ss, contr ast, hue, and
satu ration .
VI DE O SET UP
BR IG HT NE SS
CO NT RA ST
HU E
SAT UR ATI ON
SH AR PN ES S
12
10
8
6
4
2
0
VI DE O SET UP
BR IG HT NE SS
CO NT RA ST
HU E
SAT UR ATI ON
SH AR PN ES S
12
10
8
6
4
2
0
EX IT
CONT RAST- the cont rast of the v ideo
sign al (the dark po rtions of p ictures).
VI DE O SET UP
BR IG HT NE SS
CO NT RA ST
HU E
SAT UR ATI ON
SH AR PN ES S
+6
+4
+2
0
- 2
- 4
- 6
EX IT
HUE- t he hue of the vid eo signal ( the
colo r of the pictur es) .
EX IT
BRIG HTNESS- the b rightne ss of the
vide o signal (how l ight the pi cture is) .
-28-
Page 30

Touch Screen Operation
DIGITAL SETUP
VI DE O SET UP
BR IG HT NE SS
CO NT RA ST
HU E
SAT UR ATI ON
SH AR PN ES S
12
10
8
6
4
2
0
EX IT
SATURATION- th e saturatio n of the
vide o signal (the v ividnes s of the color)
all ab ove can be adju sted to you r
tast ers .
VI DE O SET UP
BR IG HT NE SS
CO NT RA ST
HU E
SAT UR ATI ON
SH AR PN ES S
EX IT
8
6
4
2
0
DI GI TAL SE TU P
FULL
DY NAM I C RA NG E
6/8
4/8
2/8
OFF
EX IT
DYNA MIC RANGE CON TROL
Sele ct DRC and adju st the dyna mic
rang e of a Dolby Digi tal encod ed
prog ram. There are 8 st eps between
full c ompressio n and off compres sion.
SHAR PNESS- the sh arpness o f the video
sign al (the image s etting ac umination ) .
-29-
Page 31

Touch Screen Operation
AUX Operation
This u nit feature s AUX IN line in put jacks
on bot h the front (he adphone t ype) and
rear ( RCA type ) panel . f ollow the
diag ram below to co nnect ana logue
repl ay devices. U se this jac k to replay
soun d of other repl ay equipm ent such
as Dig ital Video play ers, comput ers, etc.
Via the lo udspeaker s.
1). Pl ease connec t the exter nal device
with s tereo jack pl ug the Aux in so cket .
AUX IN JACK FRONT PANEL
MOD
To return to the m ain menu
AUX 1 IN
Func tion
zon e
3). You no w hear the so und from the
exte rnal device p layed bac k through
the lo udspeaker s .
4). Touch the vo lume+/- s ections on
touc h screen or use t he VOL+/- o n
the pa nel to adjust t he volume l evel.
VIDEO IN (yellow)
RCH IN (red)
LCH IN (white)
2). In a ny mode, pres s the “MOD” b utton
on the f ront panel to s elect AUX mo de .
-30-
Page 32

Touch Screen Operation
BT OPERATION
1. “Pair” To You r BT Phone
Prio r to using the Ca r Kit for the f ist time,
you mu st pair it with a B T-enable d
mobi le handset.
The fo llowing ste ps descri bes pairing
the in struction f or a typica l BTenab led mobile ha ndset.
1). Pl ace the Car Kit a nd mobile h and set in 3 m eters apart .
2). Pu t the Car Kit in pa iring mod e.
a. Press the POW ER button t o turn
ON, th e BT ICO N will flas h on TFT .
b. Touch the scr een of “ ” sect ion
or pre ss longer the “PAIR/ ” on
the re mote contro l until the w ord
“ BT ” ico n flashing , it ’s n ow ready
for pa iring.
3). Se t your BT phone t o
“dis cover” the Ca r Kit .
Foll owing your ph one’s instruc tion
guid e for details , active yo ur mobile
hand set’s BT, the
hand set will sear ch for acce ssible
BT devices .
IMPORTANT:
1). If t he pairing ca n not be comp leted
with in approxim ately 2 min utes ,
whil es the pairin g mode is act ivated,
and yo u will need to re attempt p airing
(See s teps 2-5 abov e) .
2). Aft er pairing is c omplete d, if the BT
ICON i s stilling fl ash on the TFT ,
plea se follow the s teps to rea ttempt
pair ing through y our hands et until the
BT ICON rema ins solid o n the screen.
2. Using Th e BT Car Kit.
Once c onnecting i s complet e, you
may ac cess the foll owing fun ction.
Some o f the below men tioned fu nct ions o nly accessi ble for han dset
supp orted with ha nds-fre e profile.
MAKE A CALL
Tou ch the screen o f “ ” section ,
the di al numbers wi ll displa y on the
moni tor . then you ca n touch the
numb er section on s creen , and
then t ouch the “ ” sect ion to call .
To retu rn to mai n menu
CALL DIA L OUT
4). Your phone wi ll find this Ca r Kit .
Sele ct this Car Kit f rom the lis t.
5). En ter passkey “8888”, th en press
“OK” to pair the Car K it and the ha nd set .
6). Se lect the “CONNECT” from the l ist
on the p hone, if you co nnect suc ces sful ly , the BT ICON rema ins solid on
the sc reen , then you c an operat e
the fu nction of BT abou t the
unit e .
Func tion
1380013 80 00
Note : When you dial t he wrong nu mber,
you ca n touch the scr een of “ ” to
dele te the wrong nu mber . (You c an also
pres s the “ ” button on t he remote
cont rol to do so .)
Plea se note : “ ” and “ ” ser ves as
the “ ” an d “ ” button on you r
mobi le handset .
-31-
zon e
Func tion
zon e
Page 33

Touch Screen Operation
ANSWER A CALL
After y ou hear the rin g tone, a inc oming
tele phone numbe r will disp lay on the
TFT monitor . Touch the sc reen of “ ”
rang e to listen or pr ess the “PAIR/ ”
butt on shortly on t he remote c ontrol .
To retu rn to mai n menu
CALL COM E IN
Func tion
1235618 75
CALL TRANSFER
zon e
Func tion
zon e
Duri ng talking mo de , user can t ouch
the sc reen of the “ ” ran ge (or pres s
the “PAIR/ ” but ton on remote c ontrol )
to tra nsfer the aud io from the u nit back
to the m obile phone f or privac y reason .
END/REJECT A CALL
In BT menu, to uch the scr een
of “ ” ran ge (or press br iefly “BND/ ”
butt on on remote co ntrol) .
REDIAL LAST NUMBER
In BT menu, to uch “ ” range
(or pr ess longer “ BND/ ” butto n on
the fr ont panel the “DIAL LAST CALL
/DIAL OUT NOW ” will displa y on the
TFT monitor .
PLAY BT MUSIC
In BT mode, re peatedl y the MOD
on the p anel to selec t the “BT MUSIC”
Mode . The mes sage will d isplay like
foll owing as belo w :
To retu rn to mai n menu
Inf ormat ion dis play zone
FLATFLAT
DXDX
STST
SWFSWF
00: 060 0:06
Func tion
zon e
Note:
plea se make sure it s upport th e
BT A2DP & AVRCP profile.
Note:
1). Be fore using th e functio n of the BT
abou t the unit , plea se check yo ur
phon e’s in structi on guide or con tact
phon e manufactu re if you are n ot sure
if you r phone suppo rts the han ds-free
BT .
2). Wh en operatin g the funct ion of BT
abou t the unit , you ne ed make
your c all-phone a nd the unit s uccess full y for one time. Af terward s, you only
need t o take on the pow er and the
func tion of BT will w ork in thre e
minu tes automat ically if y ou want to
oper ate the funct ion of BT .
3). If y ou want not to us e the funct ion of
the BT a bout the unit , y ou can
sele ct the BT OFF .
ADJUST THE VOLUME
Duri ng conversa tion in pro gress,
tune t he Volume swit ch until yo u reach
the de sired volum e level.
-32-
Page 34

Touch Screen Operation
USB Operation
Foll owing the dia gram belo w, connect
your U SB device to th e front pan el
USB po rt . If it is prope rly conne cted,
the de vice will be mo unted and s tart
play ing automat ically.
In U SB Pl ayback mode
User c an use your fin ger direc tly to touch
the de sired track t o start pla y .
You can use the UP, DOWN, RIG HT or
LEFT butto ns to navig ate and to sele ct
file s to play, and press E NTER to begin
play back (or view ing, in the c ase of
JPEG f iles).
To skip to t he next or last t rack, tou ch or
pres s the or . Press th e or
butt ons for Fast Fo rward or Fa st
Reve rse playbac k.
REPE AT play m odes are al so availabl e
by rep eatedly pus hing REPE AT unti l
the de sired mode is f ound.
Chan ging From DIS C to USB Play back
Mode s
If the d isc present i n the playe r is an
Digi tal Vi deo or VCD or M P3/WMA or
MP4 di sc, touch the s creen of th e “ ”
rang e to enter the ho me menu, th en touch
the “USB” I CON to ente r the USB mode .
Importa nt Note:
To preve nt damage to th e USB devic e,
do not r emove or disc onnect it d uring
play back. it is als o a good prac tice to
remo ve the USB driv e during di sc
play back.
Chan ging From USB t o DISC Play back
mode s
If you a re in USB Playb ack mode an d
wish t o begin playb ack of a disc a lready
in the p layer, touch t he screen o f the
“ ” rang e to enter the ho me menu,
then t ouch the “ DISC ” ICO N to enter the
DISC m ode .
-33-
Page 35

Other Main Operation
SD/MMC card OPERATION
The un it can suppor t playbac k MP3/WMA/J PEG/MP4 a nd Divx forma t which are
stor ed into SD and MM C memory ca rd .
Plea se read below b efore you s tart the oper ation of me mory card .
Inser ting a SD or MMC card .
Labe l side
REL b utt on
Press REL button to
detach control panel .
First hold the left end up a
little and then pull it leftwards
to remove.
Removing a SD or MMC card .
Insert a card, push in till heard
a “CLICK”, then attach the
control panel again to play.
faci ng upwa rd
REL b utt on
Press REL button to
detach control panel .
First hold the left end up a
little and then pull it leftwards
to remove.
Push in till heard a “CLICK”,
then remove the card and
attach control panel to play.
Mode change to SD/MMC card
Afte r a SD or MMC card is i nserted i nto the main un it card slo t . The un it will start s
play ing the files c ontaine d on the memory c ard . Once th e unit read the m emory card
succ essfully, the fi rst file on the m emory car d will automa tically sta rt play bac k .
Pres s the mode butt on repeat edly is allow ing chang ing to other mo des .
Change DISC to SD/MMC card
The op erations ar e same as USB m ode, refer to U SB operat ion .
Change SD/MMC card to DISC
The op erations ar e same as USB m ode, refer to U SB operat ion .
File Playback Operation
All th e SD or MMC memor y car playb ack operati on functi on is same as the o peratio n
on MP3/WMA .
Plea se to see “ MP3/WMA” operation fo r more deta ils .
-34-
Page 36

Touch Screen Operation
MP3/WMA/JPEG/MPEG4 DISC PLAY
The un it is support M P3/WMA/ JPEG/MPEG 4 . When a disc is in serted in to player,
the fo llowing pic ture will a ppear on the mo nitor . The unit wi ll play the f irst track
auto matically . You c an touch to d irectly oth ers mode (M P3/JPEG /MP EG4) to play .
EX. : wh en the MP3 mode i s selecte d .
2
[M P3 ][ M P3 ]
ITL E / SONG: T RACK 03 / ITL E / SONG: T RACK 03 /
WMAWMA
1
Mp3Mp3
001001
002002
003003
001001
002002
003003
004004
005005
006006
007007
007007
008008
3 4 5 6
Tou ch directly t o select the pl ay mode and t hen touch the d esired tr ack to play .
Or Use / / / on th e remote co ntrol to sele ct the play m ode or item, th en
pres s ENTER butto n on the remo te control to c onfirm.
MOVING TO ANOTHER TRACK :
1. Touch direc tly the des ired song to st art play .
2. Touch the or ra nge on the to uch screen to s kip a track ahe ad or back.
3. Pre ss the or butto n on the remo te control to s kip a track ahe ad or back.
FAST FORWARD/FAST BACKWARD
1. Touch bri efly the “ / ” rang e on touch scre en for fast f orward / fast b ackward.
2. Pre ss shortly th e or button o n the remote co ntrol for for ward or bac kward .
1 Curr ent type (hig hlighte d bar) .
2 Curr ent track (ID 3 TAG displ ay) .
3 The cu rrent play mo de(MP3) .
4 Sele ct the play mod e(JPEG) .
5 Sele ct the play mod e(MPEG4 ).
6 Curr ent song in MP3 f older .
REPEAT FUNCTION
Touch th e screen of “RE PEAT ” range or pres s longer “2 /RPT” on the re mote
cont rol repeate dly can sel ect two kinds o f repeat pl ay mode.
REP- ONE:
Play t he same song ov er and over a gain.
REP ALL :
Play a ll songs on the d isc, then r epeats the en tire disc o ver and over ag ain .
NOTE:
in JPE G/MPEG4 mod e, the deta ils operati ons as same a s MP3/WMA oper ation .
-35-
Page 37

Specification
Generall :
Supp ly Voltage: 12 V DC (11V-15V)
Curr ent Consump tion: Les s than10 A
Sign al System: Co mpositi ve video 1.0V p-p 75
Disc s Played: (1)D igital Video Di sc
5"(12 cm ) single- sided, sing le-laye r
5"(12 cm ) single- sided, doub le-laye r
(2)Comp act Disc (C D-DA, VIDEO C D)
5"(12c m) disc
Audi o Signal Outp ut: 2ch&4 ch line out
Char acteristi cs: (1)Fre quency Resp onse 20 Hz - 20 KHz
(2)S/N Ra tio 90 dB (JIS)
(3)Wow and Fl utter Below m easurable l imits
RADIO Section:
For 3 Band s For 2 Bands For 2 B ands
(Europ e) (Europ e) (U.S.A.)
FM FM FM
Freq uency Cover age: 87.5 t o108 MHz 87.5 t o108 MHz 87 .5 t o107.9 MH z
IF: 10.7 MH z 10.7 MHz 10.7 M Hz
Sens itivity (S/ N = 30 dB): 15 dBu 15 dB u 15dBu
MW MW AM
Freq uency Cover age: 522 to 1620 KHz 522 to 1620 KHz 53 0 to1710 KHz
IF: 450 KHz 4 50 KHz 450 KHz
Sens itivity (S/ N = 20 dB): 40 dBu 40 dB u 40 dBu
TFT Monitor:
Moni tor Screen Si ze: 7 Inch Wi de
Reso lution: 144 0 X 234 dots
Colo r System: NTS C/PAL
BT:
BT spe cificatio n: V1.2 Class 2
BT pro file suppor ted: Head set, Handsf ree and A2DP & AVRCP profiles
Rang e of frequenc y: 2.4GHz S pectrum
NOTE:
Spec ification s and desig n are subject t o modific ation, with out notic e, due to
impr ovements in t echnolo gy.
-36-
Page 38

Troubleshooting
Befo re going thro ugh the che ck list, chec k wiring co nnection. I f any of the prob lems
pers ist after che ck list has b een made, con sult your n earest serv ice dealer.
SYMPTOM CAUSE SOLUTIO N
If the p ower supply i s properl y
conn ected to the ca r accesso ry
term inal,swit ch the igni tion key
to "AC C"
Repl ace the fuse
Remo ve the disc in th e player,
then p ut a new one
Inse rt the compac t disc with
the la bel facing up ward
Clea n the disc or try t o play a
new on e
Cool o ff or un til the amb ient
temp erature ret urn to norm al
Plea se switch to co rrect col or
syst em from menu
Make proper con nection
acco rding to wi re conne ction “ ”
For sa fety reason s no televi sion
/vid eo images are d isplaye d
whil e the vehicle i s moving.
Enga ging the park ing brake w ill
caus e images to be di splayed .
Plea se the televi sion mode o f
the ch oice accomm odation
Chan ge the disc
Chan ge the disc Rec ord JPEG
file s using a compl iant
appl ication
Pres s the RESET butto n.
Fron t panel is not pr operly fi xed
into i ts place
Inse rt the antenn a cable fir mly
Sele ct a station ma nually
No pow er
Disc c an not be
load ed or ejected
Televi sion/vide o
imag eappears
blac k-white
No tel evision/v ideo
imag e appears
No col or in picture
JPEG d isc can
not be p layed
back
The op eration key s
do not w ork
The ra dio does not
work
The ca r ignition sw itch is
not on
The fu se is blown
Pres ence of disc in side the
play er.
Inse rting the dis c in revers e
dire ction
The di sc is extreme ly dirty
or def ective
Temper ature insid e the car
is too h igh
The co lor system is
set in correctly
The un it is not conne cted
to the p arking brak e
dete ction switc h
The pa rking brake i s not
enga ged
The disc for mat is not
acco rdingto the TV-s et
used ( PAL/N TSC)
No JPE G files are rec orded
on the d isc.
JPEG f iles are not re corded
in a com pliant form at
The bu ilt-in micr ocomput er
is not o perating pr operly
due to n oise
The an tenna cable i s not
conn ected
The si gnals are too w eak
-37-
88-J900 3-13
 Loading...