

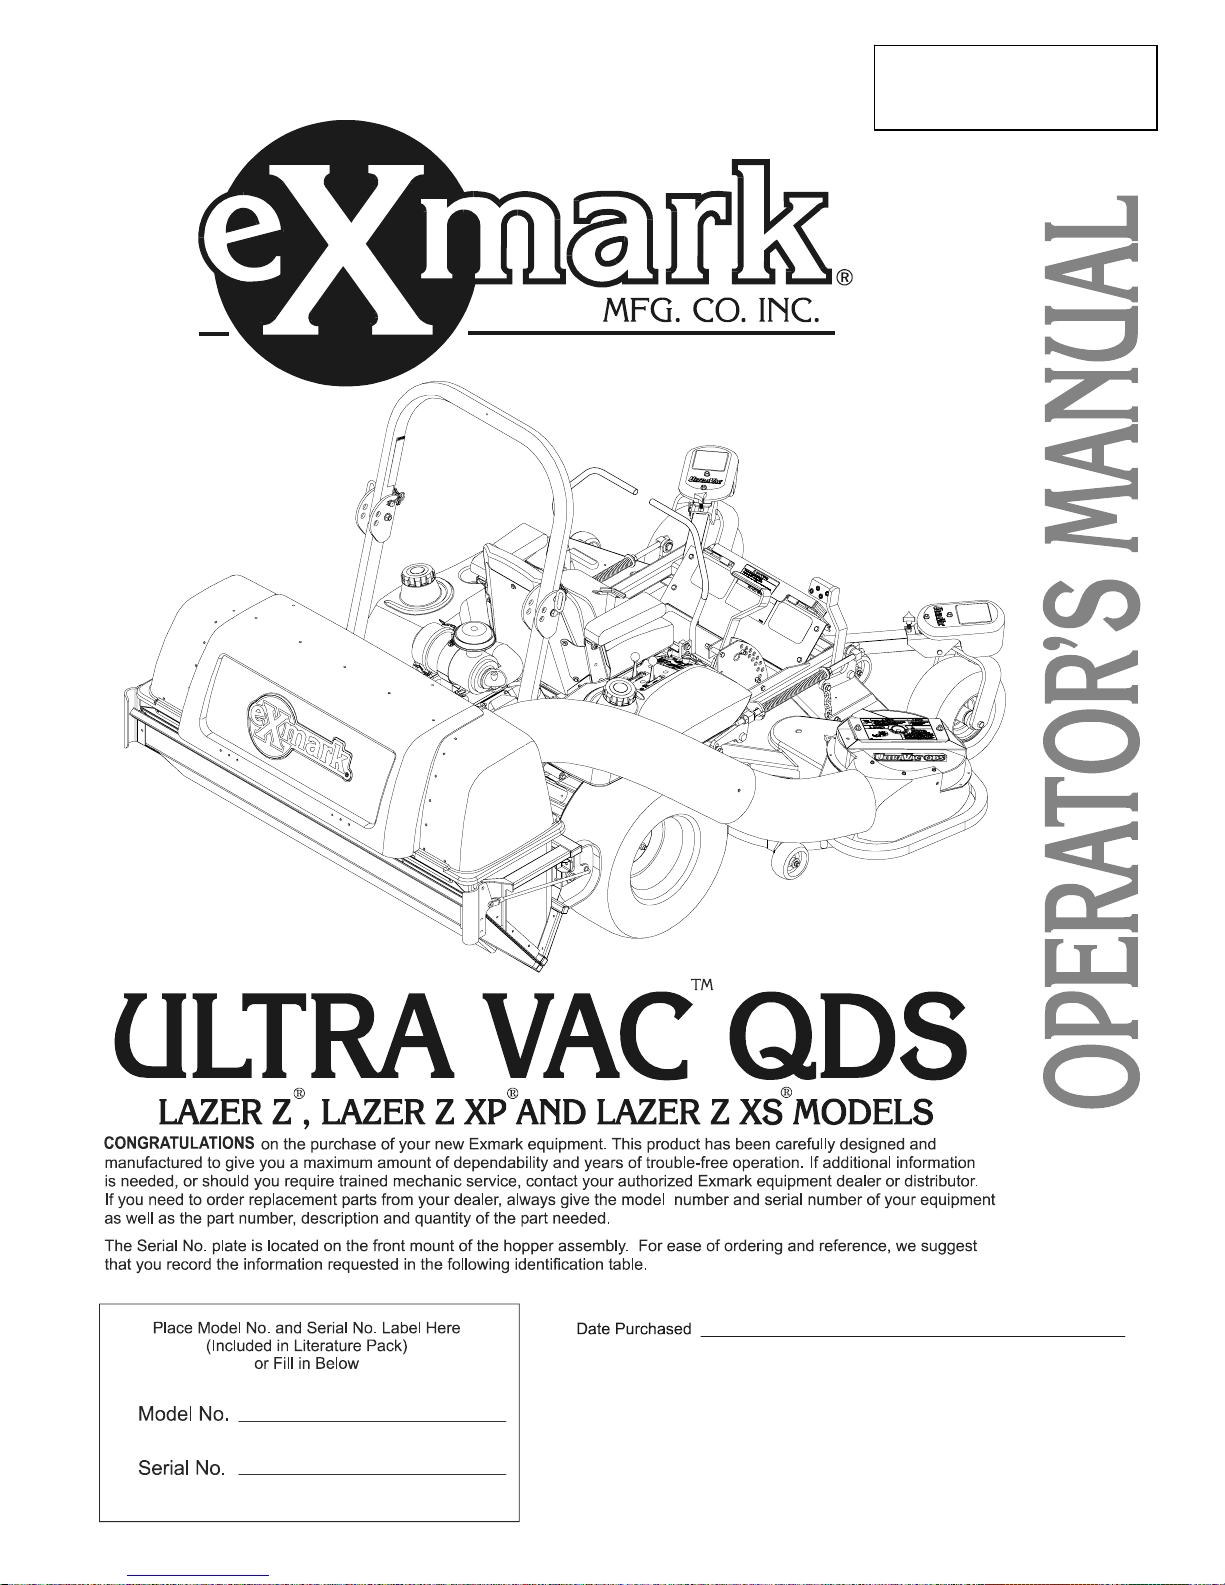
Exmark Ultra VAC QDS LAZER Z, Ultra VAC QDS Lazer Z XP, Ultra VAC QDS LASER Z XS, Ultra Vac QDS UVD60C, Ultra Vac QDS UVD72C Operator's Manual
Page 1
For Ultra Vac Serial Nos.
510,000 & Higher
(to fit Units 352,000 & Higher)
Part No. 103-8854
Page 2

POTENTIAL HAZARD
♦ This product is a piece of power equipment.
WHAT CAN HAPPEN
♦ Failure to follow safe operating pr actices can result in serious
operator injury or even death.
HOW TO AVOID THE HAZARD
♦ Keep all shields, guards and safety devices (especially the grass
discharge system) in place and in proper working condition.
♦ Stop engine and wait for all moving parts t o st op. Remove key
before adjusting, servicing, or performing maint enance.
♦ If mower deck or blower becomes clogg ed, st op engine and wait
for all moving parts to stop. Remove spark plug wire(s) or
remove key before cleaning blockage.
♦ Keep hands, feet and clothing away from power driven parts.
♦ Keep off mower unless seat platf orm is provided.
♦ Keep others off mower.
WARNING
Exmark reserves the right to make changes or add improvements to its products at any time
without incurring any obligation to make such chang es t o products manufactured previously.
Exmark, or its distributors and dealer s, accept no responsibility for variations which may be evident
in the actual specifications of it s pr oduct s and t he st atements and descriptions contained in this
publication.
ii
Page 3
EXMARK PARTS PLUS® PROGRAM
EFFECTIVE DATE: September 1, 1995
Program
If your Exmark dealer does not have the Exmark part in stock,
Exmark will get the parts to the dealer the next business day or the
part will be FREE* Guaranteed!!
How the Program Works
1. If dealer does not have part in stock for a "down" unit at
the time of request by customer, the dealer contacts his
distributor by 1:00 p.m., local time, and requests Exmark
Parts Plus
®
shipment of six (6) line items or less.
2. Distributor ships part(s) to dealer or customer, as
requested by dealer, same day, overnight UPS Distributor
3. If distributor does not have the part(s) in stock to satisfy
bills dealer for part and freight charges where applicable.
Exmark Parts Plus
p.m., central time, with an Exmark Parts Plus
®
order, he contacts Exmark by 3:00
®
order of six
(6) line items or less.
4. If order is received by 3:00 p.m. central time, Exmark ships part(s) direct to dealer or customer, as requested by
distributor, same day, overnight UPS Exmark bills the distributor for parts and shipping charges, where
applicable.
5. The customer pays for the part and freight if it is shipped under the Exmark Parts Plus® and if it arrives in
6. Who pays for the part and freight if it fails to arrive overnight in accordance to the program?
A. Under any circumstance the customer does not pay.
accordance to the program.
B. If the part does not arrive overnight due to:
®
1. The dealer not submitting the Exmark Parts Plus
dealer pays for the part and freight.
order to his Exmark distributor by 1:00 p.m., the
2. The Distributor being unable to ship the part the same day or not submitting the Exmark Parts Plus®
order to Exmark by 3:00 p.m., central time, the Distributor pays for the part and freight.
3. Exmark being unable to ship the part and the Exmark parts order is received by 3:00 p.m., central time,
Exmark pays for the part and freight.
4. If the part does not arrive overnight due to the shipper (UPS), the shipper pays for the freight and
Exmark pays for the part.
The following restrictions apply -- The Exmark Parts Plus® Program is available only through participating
Exmark Dealers and applies only to orders submitted on this program Monday through Thursday. Parts Plus service is
available only in the 48 contiguous United States. UPS has initiated a Saturday delivery program to many areas of the
continental United States and can be requested for an overnight shipment on Friday to be delivered Saturday. The next
day air charge, plus the Saturday delivery fee will be the responsibility of the purchaser. Exmark Mfg. will assume no
responsibility for Saturday delivery shipments. To qualify, all Exmark Parts Plus® orders must be received by Exmark by
3:00 p.m., central time. Orders must be six (6) line items or less. Exclusions from the Exmark Parts Plus
®
Program are:
Any wholegood or accessory in its entirety, engines and engine replacement parts, 5-speed Peerless transmissions and
5-speed transaxles, hydraulic or hydrostatic wheel motors, cutter decks and engine decks or any item exceeding United
Parcel Service size and weight restrictions.
Due to UPS restrictions, aerosol spray paint is considered a hazardous material and cannot be shipped via UPS next day
or Second Day Air.
Exmark Manufacturing stocks a limited supply of parts for transaxles, pumps and wheel motors. These parts can be
ordered for Next Day Air shipment but will not be guaranteed per the Parts Plus Program.
iii
Page 4

OPERATOR'S MANUAL
This manual contains assembly, operating, maintenance, adjustment and safety instructions
for your Exmark Ultra Vac Q DS.
BEFORE OPERATING YOUR ULTRA VAC QDS, CAREFULLY READ AND
UNDERSTAND THIS MANUAL AND THE OPERATOR’S MANUAL FOR YOUR MOWER IN
THEIR ENTIRETY.
By following the operating, maintenance and safety instructions, you will prolong the lif e of
your Ultra Vac QDS, maintain its maximum efficiency and promote safe operation.
If additional information is needed, or should you require trained mechanic ser vice, cont act
your authorized Exmark equipment dealer or dist r ibut or .
All Exmark equipment dealers and dist r ibut or s ar e kept informed of t he latest methods of
servicing and are equipped to provide prompt and ef ficient service in the field or at their ser vice
stations. They carry ample stock of ser vice part s or can secure them promptly for you from t he
factory.
All Exmark parts are thoroughly tested and inspected before leaving the factory, however,
attention is required on your part if you are to obtain the fullest measure of satisfaction and
performance.
iv
Page 5

TABLE OF CONTENTS
Description
Page
1. Safety
1.1 Safety Alert Symbol.............................................................................. 1
1.2 Training ................................................................................................ 1
1.3 Preparation........................................................................................... 1
1.4 Operation...........................................................................................2-3
1.5 Safety Signs.........................................................................................4
2. Specifications
2.1 Model Number and Required Accessories............................................ 5
2.2 Dimensions........................................................................................... 5
2.3 Bagging System ................................................................................... 5
3. Assembly Instructions
3.1 Assembly Diagram................................................................................ 6
3.2 Install Hopper Assembly..................................................................7-11
3.3 Install Blower Assembly................................................................. 11-12
3.4 Assemble Tubes............................................................................ 12-13
3.5 Install the Front Weight.................................................................. 13-15
3.6 Install the Caster Weights................................................................... 15
3.7 Adjustments................................................................................... 15-16
4. Operation
4.1 Pre-Start............................................................................................. 16
4.2 Mowing.......................................................................................... 16-17
4.3 Bagger Removal for Side Discharge.............................................. 17-18
4.4 Transporting..................................................................................18-19
5. Maintenance
5.1 Periodic Maintenance.................................................................... 20-21
5.2 Adjustments................................................................................... 21-22
6. Warranty ...............................................................................................
23
v
Page 6

1. SAFETY
1.1 SAFETY ALERT SYMBOL
This SAFETY ALERT SYMBOL is used both in this manual and on the machine to
identify important safet y messages which must be followed to avoid accidents. This
symbol means:
ATTENTION! BECOME ALERT!
YOUR SAFETY IS INVOLVED!
The safety alert symbol appears above information which alerts you to unsafe actions or
situations and will be followed by the word DANGER, WARNING, or CAUTION.
DANGER: White lett ering/Red background. Indicat es an im minently hazardous situation
which, if not avoided, WILL result in death or serious injur y.
CAUTION: Black lettering/ Yellow backgr ound. Indicates a potentially hazardous situation
1.2 TRAINING
1.2.1 Regar d the Exmark Ultra Vac QDS as a piece of power equipm ent and t each this
1.2.2 Bef or e oper at ing your Ultra Vac QDS, carefully read and understand this manual and
1.2.3 Do not allow operation of this machine by untrained personnel. Never allow
1.2.4 Avoid mowing while people, especially children, or pets, are nearby. Keep in
1.3 PREPARATION
1.3.1 Evaluate the terrain to determine what accessories and attachment s ar e needed
1.3.2 The use of personal protective equipment , such as (but not limited to) protect ion
WARNING: Black lettering/Or ange background. Indicates a potent ially hazardous
situation which, if not avoided, COULD result in deat h or ser ious inj ury.
which, if not avoided, MAY result in minor or moderate injury.
regard to all who operate this unit.
the operator’s manual for your m ower in their entirety. Familiarize yourself with the
controls and the proper use of the eq uipm ent. If the operator(s ) or m echanic( s) can
not read English, it is the owner’s responsibility to explain this ma t er ial t o t hem .
children, teenagers, or people unfamiliar with these instructions to use the mower.
Local regulations may restrict the age of the operator.
mind that the operator or user is responsible for accidents or hazards occurring to
other people or their property.
to properly and safely perform the job. Only use accessories and attachments
approved by Exmark.
for the eyes, ears, feet , and head is r ecom m ended.
POTENTIAL HAZARD
♦ This machine produces sound levels in excess of 85
dBA at the operator’s ear when in operation.
WHAT CAN HAPPEN
♦ Exposure to sound levels of 85 dBA or above for
extended periods of time can cause hearing loss.
HOW TO AVOID THE HAZARD
♦ Wear hearing protection when operating this machine.
1.3.3 While mowing, always wear substantial footwear and long trousers. Do not
operate equipment when barefoot or when wearing open sandals.
1.3.4 Thoroughly inspect the area where the equipment is to be used and remove all
stones, sticks, wires, bones, and other foreign objects which may damage the
equipment or cause personal injury to the operat or or bystander s.
CAUTION
1
Page 7
1.4 OPERATION
Although hazard control and accident prevention are partially dependent upon the
design and configuration of the equipment, t hese factors are also dependent upon
the awareness, concern, prudence, and proper training of t he personnel i nvol ved in
the operation, transport, maintenance, and st orage of t he equi pment . It is essential
that all Operator Safety Mechanisms be connect ed and i n operat i ng condi t ion prior
to use for mowing. Refer to the Operator’s Manual for the mower for additional
hazard control and accident prevention information.
POTENTIAL HAZARD
♦ An uncovered discharge opening will allow objects to
be thrown in operator’s or bystander’s direction.
Also, contact with blade could occur.
WHAT CAN HAPPEN
♦ Thrown objects or blade contact can cause serious
injury or kill you or bystanders.
HOW TO AVOID THE HAZARD
♦ Never operate mower unless discharge chute or
entire grass collection system is installed.
HOW TO AVOID THE HAZARD
1.4.1 Use EXTREME caution when mowing and/or turning on slopes as loss of traction
and/or tip-over could occur. The operator is r esponsible for safe operation on slopes.
POTENTIAL HAZARD
♦ There are rotating blades in the blower and under the
mower deck.
WHAT CAN HAPPEN
♦ Blade contact can cause serious operator or bystander
injury or even death.
♦ Do NOT reach into Blower unless Rotation Indicator
has Stopped. Disengage PTO, stop engine, remove
key, WAIT FOR MOVING PARTS TO STOP
♦
Do NOT operate mower without deflector chute or
entire bag system in place.
WARNING
DANGER
POTENTIAL HAZARD
♦ Mowing on wet grass or steep slopes can cause
sliding and loss of control.
WHAT CAN HAPPEN
♦ Wheels dropping over edges, ditches, steep banks,
or water can cause rollovers, which may result in
serious injury, death or drowning.
HOW TO AVOID THE HAZARD
♦ Do not mow slopes when grass is wet.
♦ Do not mow near drop-offs or near water.
♦ Do not mow slopes greater than 15 degrees.
♦ Reduce speed and use extreme caution on slopes.
♦ Avoid sudden turns or rapid speed changes.
DANGER
2
Page 8
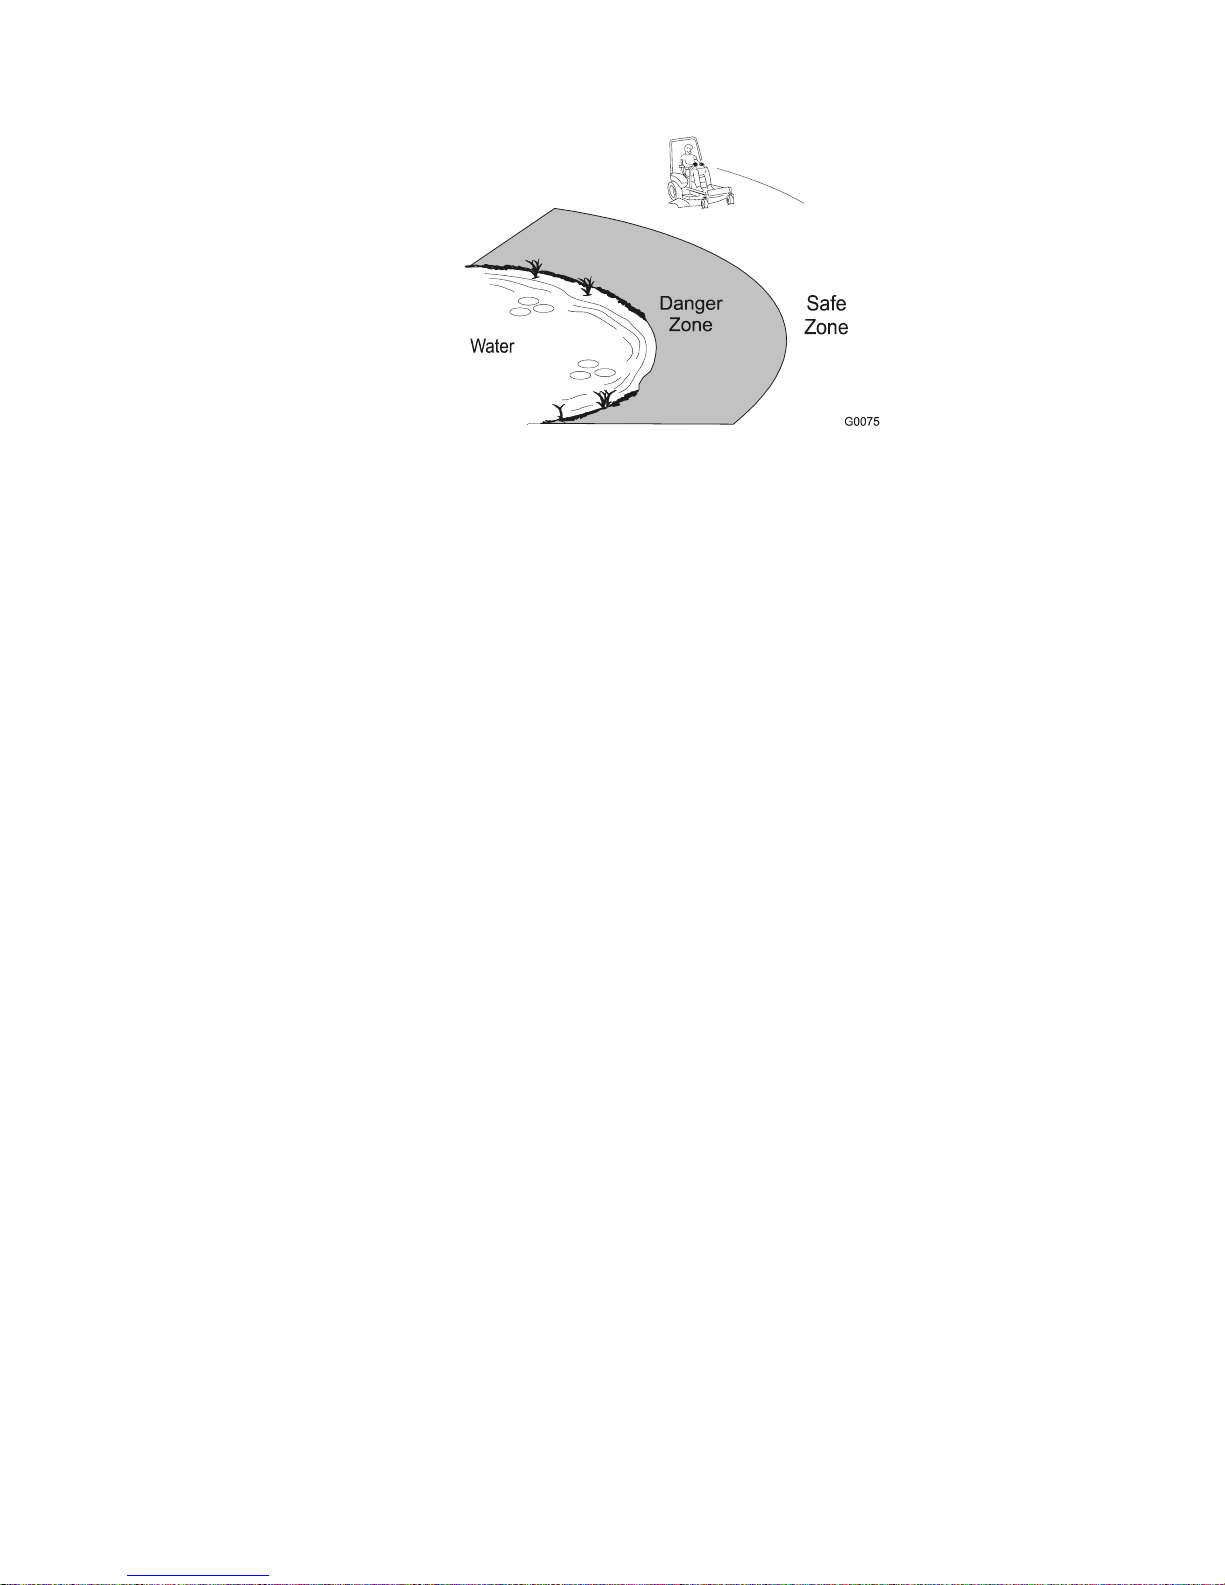
• Use a walk behind mower and/or a hand trimmer near drop-offs, ditches, steep
banks or water. This area can be dangerous, see Figure 1.
Figure 1
SAFE ZONE FOR MOWING
• Progressively greater care is needed as the slope increases.
• Always avoid sudden starting or stopping on a slope. If tires lose traction,
disengage the blades and proceed slowly off the slope.
• Avoid sudden starts when mowing uphill. Mower may tip backwards.
• Be aware that loss of traction may occur going downhill. Weight transfer to
the front wheels may cause drive wheels to slip and cause loss of braking
and steering.
• Watch for ditches, holes, rocks, dips, and r ises t hat change the operating
angle, as rough terrain could overtur n the machine.
• Remove or mark obstacles such as rocks, t r ee lim bs, et c. from the mowing
area. Tall grass can hide obstacles.
• The operating characteristics of the machine will change with the Ultra Vac
QDS installed. The stability and traction of the machine will change as the
Ultra Vac QDS hopper fills with grass clipping s. Use pr ogressively greater
care on slopes as the hopper fills.
• Always install and remove the Ultra Vac QDS, including counterweights, as
instructed. Failure to do so will cause a reduction in stability or tr act ion. Do
not operate the mower with only a portion of the Ultra Vac Q DS inst alled.
1.4 SAFETY SIGNS
1.4.1 Keep all safety signs legible. Rem ove all g r ease, dirt and debris from saf et y
signs and instructional labels.
1.4.2 Safety signs must be replaced if they are missing or illegible.
1.4.3 When new components ar e inst alled, be sur e that current safety signs are
affixed to the replaced components.
1.4.4 Replacement safety signs may be obtained from your authorized Exmark
equipment dealer or distributor or from Exmark Mfg. Co. Inc.
1.4.5 Safety signs may be affixed by peeling off the backing t o expose the adhesive
surface. Apply only to a clean, dry surface. Smooth to remove any air bubbles.
1.4.6 Familiarize yourself with the following safet y signs and instruction labels. They
are critical to the safe operation of your Exmark Ultra Vac QDS.
3
Page 9
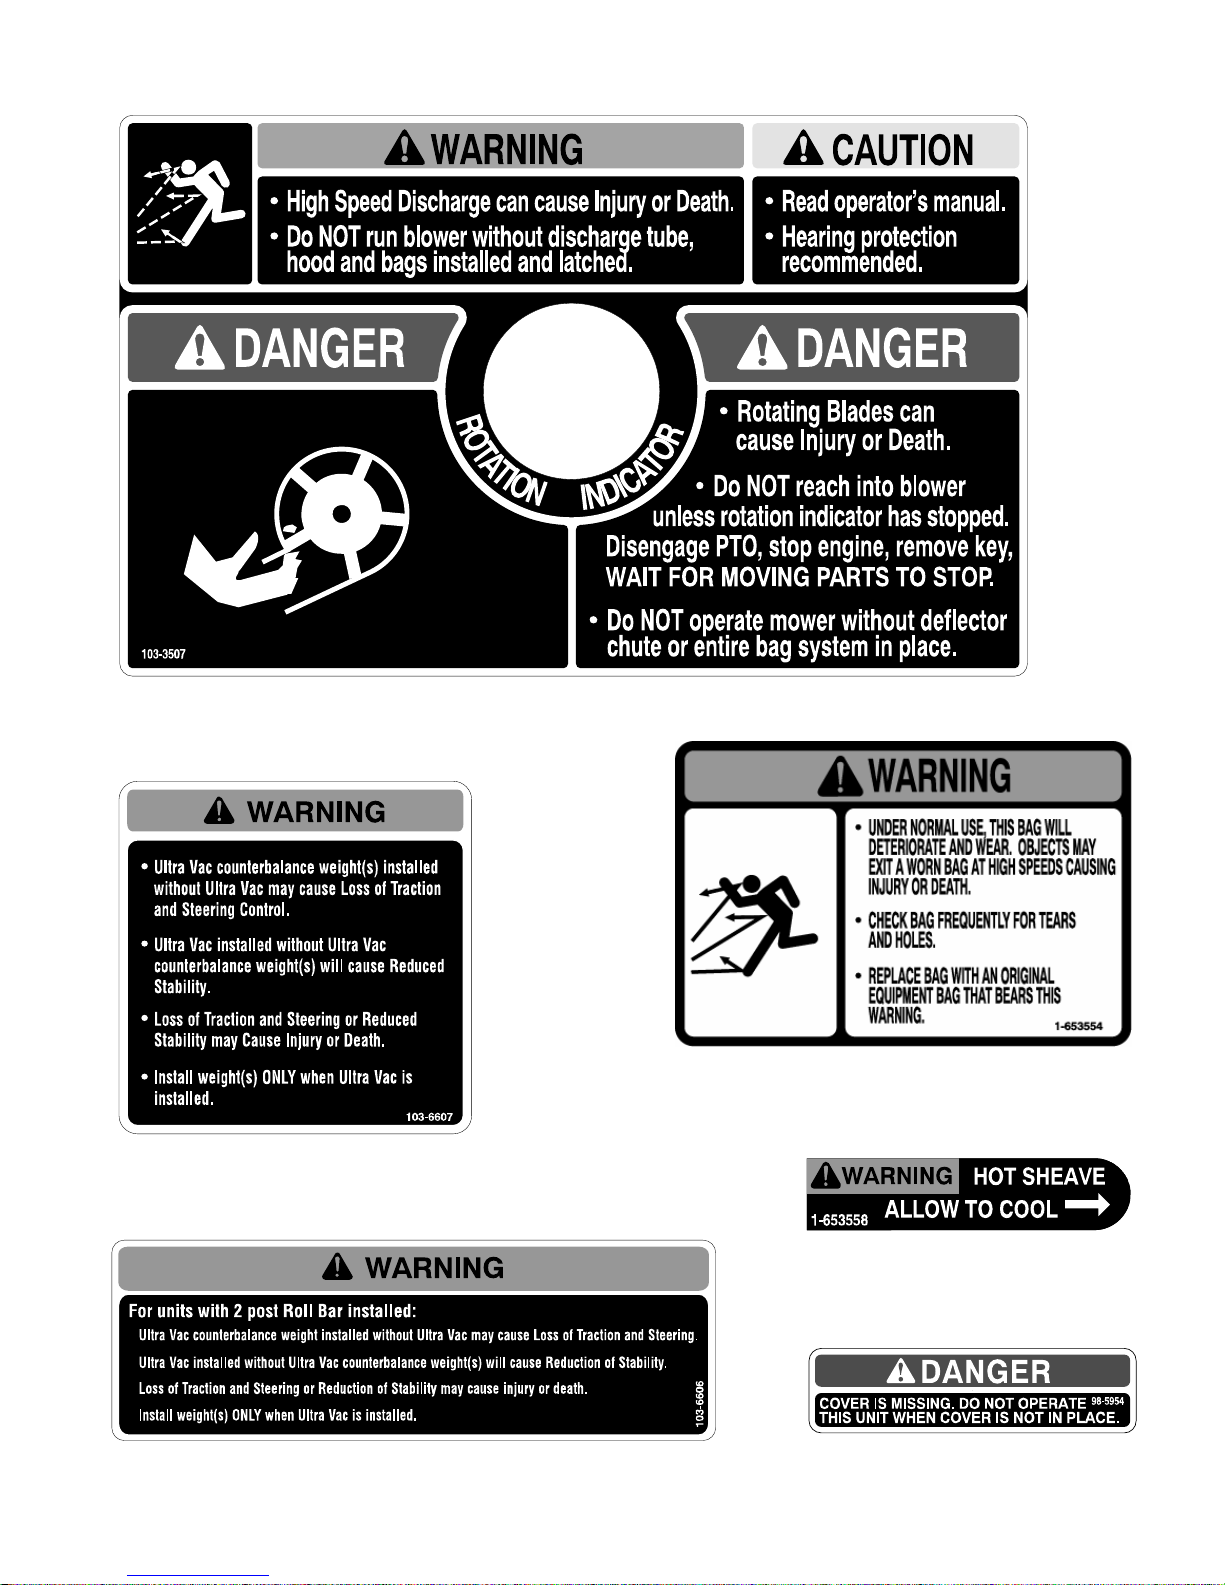
PART NO. 103-3507
LOCATION: Top of Blower
PART NO. 103-6607
LOCATION: Top of Caster Weights &
Top of Blower
PART NO. 1-653554
LOCATION: Rear of Bag
PART NO. 1-653558
LOCATION: Top of Idler Arm
PART NO. 103-6606
LOCATION: Top of Front Weight
4
PART NO. 98-5954
LOCATION: Under Bearing
Cover
Page 10

2. SPECIFICATIONS
2.1 MODEL NUMBERS AND REQUIRED ACCESSORIES:
UVD60C
The following accessories are required for installation:
Unit Serial Number Required to Mount Ultra Vac QDS
60” Lazer Z 510,000 and Higher None Required
60” Lazer Z SN 352,000 – 509,999 103-7419- Kit, 05 UV to previous Lazer Z units
60” Lazer Z XP All Serial Numbers None Required
60” Lazer Z XS All Serial Numbers 103-7876 - Kit, UV to XS
UVD72C
The following accessories are required for installation:
Unit Serial Number Required to Mount Ultra Vac QDS
72” Lazer Z 510,000 and Higher None Required
72” Lazer Z SN 352,000 – 509,999 103-7419- Kit, 05 UV to previous Lazer Z units
72” Lazer Z XP All Serial Numbers None Required
72” Lazer Z XS All Serial Numbers None Required
2.2 DIMENSIONS
5.2.1 Overall unit length w/Ultra Vac Q DS:
60" Deck 72" Deck
Lazer Z XP & Lazer Z XS 107.90" (274.1 cm) 112.00" (284.5 cm)
Lazer Z - Air Cooled 106.65" (270.9 cm) 110.75" (281.3 cm)
Lazer Z - Liquid Cooled 106.90" (271.5 cm) 111.00" (281.9 cm)
5.2.2 Overall unit width w/Ultra Vac QDS:
60" Deck 72" Deck
All Units 74.44" (189.1 cm) 86.49" (219.7 cm)
2.3 BAGGING SYSTEM
5.3.1 Weight:
60" Deck 72" Deck
Lazer Z XP 308 lbs. (140 kg) 308 lbs. (140 kg)
Lazer Z & Lazer Z XS 361 lbs. (164 kg) 308 lbs. (140 kg)
5.3.2 Collection Hopper : Steel and Polyethylene hopper. Commercial grade, cloth
mesh door with reinforced bottom.
Capacity: 11.0 bushels
5.3.3 Dump Mechanism: Manual dump from seat
5.3.4 Blower tube: fixed, abrasion resist ant m olded polyethylene
5.3.5 Impeller: 5-bladed, 0. 25” thick abrasion resistant steel, with vertical axis.
Impeller bearings: 1” (2. 54 cm) sealed, non-greaseable bearings.
5
Page 11

g
3. ASSEMBLY INSTRUCTIONS – LAZER Z & LAZER Z XP
(
y)
3.1 ASSEMBLY DIAGRAM
Item Description
1 Hopper Assembly 1 1
2 Upper Tube 1 1
3 Lower Tube 1 1
4 #10-24 X .75 Screw 3 / 6 3 / 6
5 #10-24 Nyloc Nut 3 / 6 3 / 6
6 #10 Flat Washer 3 / 6 3 / 6
7 Handle Assembly 1 1
8 Blower Assembly 1 1
9 Bagger Mount Weldment 1 1
10 Belt Cover 1 1
11 Removable Weight 2 2
12 Jackshaft 1 1
13 Blower Drive Belt 1 1
14 Frame Bracket RH 1
15 Frame Bracket LH 1
16 Frame Bracket 2
17 Mount Spacer 2
18 Mount Pin Weldment 1 1
19 Clevis Pin 4 4
20 Hair Pin (large) 4 4
21 Chute Pivot Pin 1 1
22 Hair Pin (small) 1 1
23 3/8-16 x 1.00 Hex Screw 13 16
* Used only on units below SN 352,000
Items 21, 22, 29, 30, 31, 32 and 44 not shown.
See figure 7 for installation of 29 and 30.
See figure 16 for installation of 21 and 22.
See fi
ure 13 for use of 44.
LZ
(352,000-
(60/72)
509,999)
QTY
LZ XP, XS
(All) & LZ
Higher)
(510,000 &
Item Description
24 3/8 Whizlock Nut 20 23
25 3/8 Spring Disk Washer 13 16
26 Handle Mount 1
27 Belt Shield Stud 1 1
28 3/8-16 x .75 Hex Screw 3 3
29 Belt Cover Spacer
30 7/16 Spring Disk Washer
31 Washer – ¼ thick *
32 3/8-16x3.25 Tap Bolt *
33 Weight Bracket 2 2
34 3/8-16 Square Head Bolt 4 4
35 Weight Plate 5 5
36 5/16-18 Hex Screw 4 4
37 5/16 Flat Washer 4 4
38 5/16-18 Whizlock nut 4 4
39 Plug 1 1
40 Weight Plate Assembly 2 2
41 Weight Mounting Plate 2 2
42 Cotter Hairpin 2 2
43 Spacer 6
44 Drill Template 1 1
45 Nut, Nyloc thin 2 2
LZ
509,999)
(352,000-
LZ XP, XS
QTY
(60/72)
1 - 60 only 1 - 60 only
2 - 60 only 2 - 60 only
2 - 60 only
2 - 60 only
(All) & LZ
Higher)
(510,000 &
LAZER Z SN 352,000 – 509,999
ASSEMBLY DIAGRAM
(Shown w i t hout ROPS for clarity)
LAZER Z XP, LAZER Z XS,
and LAZER Z SN 510,000 & HIGHER
ASSEMBLY DIAGRAM
Shown wi t hout ROPS for clarit
6
Page 12

3.2 INSTALL THE HOPPER ASSEMBLY
Lazer Z XP, Lazer Z XS and Lazer Z SN 510,000 & Higher units only (Lazer Z SN
352,000 – 509,999 units skip to section 3.2. 9)
NOTE: Units with a 2 post folding ROPS installed, the ROPS must be temporarily
removed for installation of the Ultra Vac QDS.
For Lazer Z units SN 510,000 and Higher:
3.2.1 When installing the Ultra Vac QDS onto a liquid cooled Lazer Z, the rear bumper
plate must be removed. Remove rear bumper plate. Reattach the lower side
bumper bars to the vertical “HOT” engine guard shield using two of the original
screws, washers and whizlock nuts removed from the bumper plate.
3.2.2 Remove the lower two screws holding the rear engine guard (“HOT” eng ine guard
on liquid cooled units) to the rear frame of the Lazer Z unit.
3.2.3 Install the m ount weldment (Item 9) loosely to the rear of the machine using the
two screws and nuts removed in section 3.2.2.
For Lazer Z XP and Lazer Z XS units:
3.2.4 Install r ear mount weldment (Item 9) loosely to the rear bum per using the two
holes provided. Use the 3/8-16 x 1.00 screws (Item 23), 3/8 spring disk washers
(Item 25) and 3/8-16 whizlock nuts (Item 24).
For Lazer Z XP, Lazer Z XS and Lazer Z SN 510,000 and Higher units:
3.2.5 Attach t he handle assem bly (I t em 7) onto frame bracket (Item 16) using 3/8-16 x
1.00 screws (Item 23), 3/8 spring disk washers (I t em 25) and 3/8-16 whizlock
nuts (Item 24). Make sure that the raised portion of the spring disk washer f aces
the head of the screw.
3.2.6 Install t he frame brackets (Item 16) and spacers (Item 17) loosely to the mount
weldment (Item 9). Use (2) 3/8-16 x 1 screws (Item 23) , ( 2) 3/8 spring disk
washers (Item 25) and (2) 3/8-16 whizlock nuts (Item 24) . Make sure that the
raised portion of the spring disk washer f aces t he head of the screw.
3.2.7 For units without a ROPS installed: I nstall the frame bracket s ( Item 16) to the
mounting pads on the Lazer frame. Use ( 4) 3/ 8- 16 x 1 screws (Item 23), (4) 3/8
spring disk washers (Item 25) and (4) 3/ 8- 16 whizlock nuts ( I t em 24).
3.2.8 For units with a ROPS installed: I nst all the frame brackets (Item 16), and ROPS
lower roll bar tubes LOOSELY to the mounting pads on the Lazer frame. Use
the ROPS mounting hardware, 3/8-16 x 1 1/2 screws, 3/8 spr ing disk washers
and 3/8-16 whizlock nuts. Make sure that the raised portion of the spring disk
washer faces the head of the screw. See Figure 4.
FIGURE 4
LOWER ROLL BAR INSTALLATION
7
Page 13

Lazer Z units SN 352,000 – 509,999 only (Lazer Z XP, Lazer Z XS, and Lazer Z
510,000 units skip to section 3.2.17) :
3.2.9 When installing the Ultra Vac QDS onto a liquid cooled Lazer Z, the rear bumper
plate must be removed. Remove rear bumper plate. Reattach the lower side
bumper bars to the vertical “HOT” engine guard shield using two of the original
screws, washers and whizlock nuts removed from the bumper plate.
3.2.10 Remove the lower two screws holding the rear engine guard (“HOT” engine g uard
on liquid cooled units) to the rear frame of the Lazer Z unit.
3.2.11 I nstall the mount weldment (Item 9) loosely to the r ear of the machine using the
two screws and nuts removed in section 3.2.7.
POTENTIAL HAZARD
♦ Relying solely on mechanical or hydraulic jacks to
support the mower could be dangerous.
WHAT CAN HAPPEN
♦ The mechanical or hydraulic jacks may not be enough
support or may malfunction allowing the unit to fall,
which could cause injury.
HOW TO AVOID THE HAZARD
♦ DO NOT rely solely on mechanical or hydraulic jacks
for support. Use adequate jack stands or equivalent
support.
3.2.12 Remove the E-clip and handle from the handle assembly (Item 7). Discard the
mount that came with the handle assembly. Install the handle and E- clip onto
the handle mount (Item 26) that came in the completing kit.
3.2.13 Mount the handle assembly (I t em 7) onto left hand frame bracket (Item 15) using
3/8-16 x 1.00 screws (Item 23), 3/8 spring disk washers (Item 25) and 3/8-16
whizlock nuts (Item 24). Make sure that the r aised por t ion of the spring disk
washer faces the head of the bolt.
3.2.14 Jack the rear of the unit up and safely support it on jack stands. Remove the
rear wheels.
CAUTION
3.2.15 I nstall the right and left hand frame brackets (It em s 14 and 15) loosely to the
mount weldment and the wheel channels of the Lazer Z frame. The flanges on
the right and left hand frame brackets should face in towards the unit to provide
the maximum tire clearance.
FIGURE 2
8
Page 14

Secure using (8) 3/8-16 x 1.00 screws (Item 23), ( 8) 3/8 spring disk washers
(Item 25) and (8) 3/8-16 whizlock nuts (I t em 24). Make sure that the raised
portion of the spring disk washer faces the head of the bolt.
NOTE: On units with a ROPS installed, the lower f r ont screw that attaches to the
wheel motor channel must be left uninstalled. Units with Serial Numbers above
440,000 will have a captured bolt in this position. See Figure 2.
NOTE: On 60 inch units, this bolt on the wheel channel is best installed by
positioning the nut behind the hole using a deep sock et and turning the bolt
through the hole into the nut.
For installation (or re-inst allation) of a 2 post foldable ROPS on Lazer Z uni t s w ith
SN 352,000 – 509,999:
3.2.16 Inst all t he two lower roll bar tubes.
a) Align three spacers on each side and tape with masking tape to the rear
frame as shown in Figure 3.
b) Align lower roll bar tubes along wheel motor channels as shown in Figur e 3.
c) LOOSELY install the lower roll bar hardware from the bolt bag to the tubes
in the following order (Refer ence Figure 3 for alignment and inst allation
instructions below):
1) Discard the 3/8-16 regular nyloc nut provided with the Lazer Z unit or
ROPS kit and replace with the 3/8-16 thin nyloc nut (Item 45) provided
with this Ultra Vac.
2) Inst all the 3/8-16 thin nyloc nut and spring disk washer to bolt prot r uding
from the wheel motor channel as shown.
NOTE: Be sure the spring disk washer cone is installed towards the
nyloc nut.
Units with Serial Numbers below 440,000 require use of a Gr ade 5 3/ 8-
16 x 1 1/2 screw, spring disk washer and whizlock nut. These items are
included with ROPS kit number FRPSLZ.
NOTE: On 60 inch units, the lower bolt on the wheel channel is best
installed by positioning the nut behind the hole using a deep sock et and
turning the bolt throug h the hole into the nut.
3) Install one 3/8-16 x 1 1/2 hex capscrew, spring disk washer and 3/8-16
whizlock nut to the top front hole as shown (it will be necessary to push
the capscrew through the masking t ape applied in step a).
4) Install one 3/8-16 x 1 1/2 hex capscrew, spring disk washer and 3/8-16
whizlock nut to the top rear hole as shown (it will be necessary to push
the capscrew through the masking t ape applied in step a).
5) Install one 3/8-16 x 4 1/2 hex capscrew, spring disk washer and 3/8-16
whizlock nut through the top tube as shown (it will be necessary to push
the capscrew through the masking t ape applied in st ep a).
NOTE: Be sure the spring disk washer cone is installed towards the
head of all capscrews.
9
Page 15

FIGURE 3
LOWER ROLL BAR INSTALLATION
3.2.17 All units with a ROPS installed: Inst all t he upper u-shaped section of the roll bar.
(Reference Figure 4 f or alignment and installation instructions below):
a) Locate the latch pin assemblies (pin and hairpin connected with a lanyard).
b) Install a 1/2-13 x 3 1/4 capscrew in the washer on the lanyard of each pin
assembly.
Note: Make sure the bent tab in the washer points toward the head of the
capscrew.
b)
Lightly oil the inside surfaces of t he ear - shaped plates at the upper end of
the lower roll bar tubes.
c) Locate the upper u-shaped section of the roll bar. Install the upper roll bar
section using one 1/2-13 x 3 1/4 capscrew (from step b) and one 1/ 2- 13 hex
flange lock nut on each side. Do not over t ighten. Make sure upper roll bar
can pivot freely.
Notes:
• Make sure the capscrew and nuts are installed with the nut to the inside of
the roll bar.
• Make sure the tab on the lanyard washer is installed as shown and points
toward the front of t he unit .
d) Raise the roll bar into the upright posit ion and secure with the latch pin
assemblies on each side. Install latch pin from outer surface of roll bar
assembly and secure with the hairpin to the inside.
e) Tig hten the front knobs ag ainst t he upper roll bar ends.
10
Page 16

FIGURE 4
UPPER ROLL BAR INSTALLATION
3.2.18 All Units: Tighten all the hardware that attaches the Ultra Vac mount to the
machine frame. Start with the screws that hold t he mount weldment to the rear of
the unit and work forward.
3.2.19 All Units with a ROPS installed: Torque all lower roll bar hardware att ached to
the machine frame to 30-35 ft-lbs. (41-47 N-m).
3.2.20 All Lazer Z units SN 352,000 – 509,999: Reinstall the rear wheels and lower the unit
from the jack stands.
3.2.21 Apply a light coat of grease to the front and rear of the upper tube of the mount
weldment. Install the hopper assembly (Item 1) onto the mount by slipping the
hook portion over the top mounting t ube of the mount weldment. Secure the
assembly to the mount using the clevis pins (Item 19) and hair pins (Item 20).
3.2.22 Attach the handle link to t he act uation arm on the hopper assembly.
3.3 INSTALL BLOWER ASSEMBLY
3.3.1 Lower the deck f ully. Rem ove the r ight hand belt cover. Remove the belt cover
mounting stud that protrudes from the deck.
3.3.2 Remove the deck drive belt from around t he r ight hand spindle sheave.
3.3.3 Support the righ t m ower blade and shaft so that it will not fall out of the deck
when the right sheave nut is removed.
3.3.4 Remove the rig ht sheave nut, spr ing disk washer, and sheave from the spindle shaft .
Block the blade rotation with a block of wood between the blade and baf f les
as indicated in the blade service section of t he Lazer Z operat or’ s manual .
Do not use the blade bolt to prevent rotation.
3.3.5 Apply a light coat of Mobile HTS grease (or food gr ade antisieze) to the top
portion of the spindle shaft where the sheave mounts.
3.3.6 Install t he jackshaft (Item 12) ont o the right spindle shaft. Inst all the spring
disk washer and nut. Torque the sheave nut to 140-145 ft. lbs. Make sure
that the spring disk washer cone is installed towards nut. See Figure 5.
Block the blade rotation with a block of wood between the blade and baf f les
as indicated in the blade service section of t he Lazer Z operat or’ s manual .
Do not use the blade bolt to prevent rotation.
11
Page 17

Check blade bolt torque after compl et i ng t hi s installation:
For units with a 5/8-18x2 3/4 blade bolt, torque to 115-120 ft-lbs (156-163 N-m)
For units with a 1/2-20x2 blade bolt, torque to 55-60 ft-lbs (75-81N-m)
3.3.7 Re-install the deck dr ive belt in t he lower g r oove of the double sheave.
Install the plug (Item 24) into the bore of the double sheave.
3.3.8 Remove the discharge chute from the deck. Discard the m ount ing hardware, but
save the discharge chute for use during side discharge operation. The chute pivot
pin (Item 21) and hairpin (Item 22) may be stored in the pivot holes on the discharge
chute during bagging operation.
3.3.9 Install the belt cover mounting stud (Item 27) included in the Ult ra Vac QDS
completing kit.
FIGURE 5
For 60 inch units only, install the spacer (Item 29), t wo 7/16 spring disk
washers (Item 30) and the pl ast i c knob as shown in Figure 6. The knob
does not need to be tightened against the washers at this time.
FIGURE 6
3.3.10 Install the mounting pin weldment (Item 18) to the blower assembly using the 3/816 x .75 screws (Item 28) and whizlock nuts (Item 24). Maximum deck clearance
will be provided if the bolts are installed from below the mounting pin. The mount
pin can be installed in two positions. For 60 inch decks the pin should be installed
as far away from the bumper end as possible. For 72 inch decks the pin should
be installed close to the bumper end. See Figure 7.
FIGURE 7
12
Page 18

3.3.11 Install the belt (Item 13) onto the blower by working it ar ound t he im peller sheave.
3.3.12 Mount the blower on the deck by sliding the mounting pin into the tube at the rear
right corner of the deck. Swing the blower closed. Adjust the position of the front
pin to engage the slot in the front of the deck. Use t he latch to lock the blower in
this position. Adjust the tension on the lat ch to draw the blower up to the deck,
yet allow for release by hand.
3.3.13 Pull the spring loaded idler back and slip the belt over the top sheave on the deck
spindle.
3.3.14 Install the plastic belt cover (Item 10). On 60” units t he out side end of the cover is
slotted and can slip between the two washers assembled in step 3.3.9. The
plastic knob does not need to be removed. On 72” units t he cover has a hole,
and the plastic knob must be installed after the cover has been positioned.
3.4 ASSEMBLE THE TUBES
3.4.1 Remove the (6) screws, nuts, and washers (Item s 4, 5, and 6) from the lower tube
(Item 3) and slide the lower and upper tube (It em 2) together. The arrow on the
upper tube should align with the dimple on the lower tube. There ar e two sets of
holes on the lower tube. The first set r eached is for use with Lazer XP and Lazer
XS units. The second set reached is f or Lazer Z unit s. Align the arrow on the
upper tube with the dimple on the lower tube and slide them toget her until the
proper set of holes is reached.
3.4.2 Fasten the upper and lower tubes toget her using three of the hardware sets
removed from the lower tube in step 3.4.1. The heads of the screws must be inside
the tube to prevent accumulation of gr ass inside the tube. The washer and the nut
should be installed on the outside of the tube. Use t he remaining three hardware
sets to plug the exposed holes in the lower tube. On 60“ Lazer Z units, discar d the
remaining hardware sets.
3.4.3 Slip the upper end of t he t ube assembly into the hopper opening. Slide the lower
end of the tube assembly over the blower outlet and align the not ch with the t ube
latch. Latch the tube to the blower.
3.5 INSTALL THE FRONT WEIGHTS
3.5.1 A total of five weight plates (Item 35) must be inst alled on t he front panel of the
floor pan. Four of these weight s ar e m ount ed behind the front panel of the floor
pan. The remaining weight plate must be mounted on top of the f r ont panel of
the floor pan. These weights give proper balance to the machine when the mount
and handle are installed and the blower, hopper, and tubes are removed f or side
discharge operation.
Units with the 2 post foldable ROPS installed require additional mounting plates
(Item 44) and front weight (Item 43) to be installed. The front weight is removable
and retained by using hairpins (Item 45).
Lazer Z units prior to SN 440,000:
3.5.2 Locate the position of t he mounting holes by clamping a weight plate to the front
of the floor pan (See Figur e 8). The ears on the weight plate should be towards
the bottom (upside down from the act ual m ounted position). Align the bottom
edge of the weight plate with the bottom edge of the floor pan front panel. Center
the weight plate side to side. Mark the position of all four holes using a center
punch.
13
Page 19

FIGURE 8
3.5.4 Drill 3/8” holes at the points marked.
3.5.5 For Lazer Z units without a ROPS: Open the floor pan and install four weight
plates (Item 35) behind the f ront panel and one weight plate (Item 35) in front of
the panel using the 5/16-18 x 1.75 screws, 5/16 washers and5/16-18 whizlock
nuts (Items 36, 37, and 38). The weight plates will only fit with the ears located
near the bend in the floor pan (See Figur e 9) . Apply the decal included in the
literature pack to the center of the weight plate that was mounted to the t op of the
floor pan.
FIGURE 9
3.5.6 For Lazer Z units prior to SN 440,000 with a ROPS: Open the floor pan and install (4)
weight plates behind the front panel, ( 1) weight plate in front of t he front panel, and
(2) weight mounting plates (I t em s 35, and 41) as shown in Figur e 12 using (4) 5/1618 x 2.0 screws, (4) 5/16 flat washers, and (4) 5/16-18 whizlock nuts (Items, 36, 37,
and 38).
3.5.7 Hook weight plate assembly (Item 40) over the top of the weight mounting plates and
secure with two hairpins (Item 42) as shown in Figure 10.
Note: The removable weight i s heavy. Use care when lifting. Make sure
that you can hold the weight securely before lifti ng. Use caut ion when
positioning your hands so that you do not set the weight down on your
hands or fingers.
14
Page 20

FIGURE 10
Lazer Z units SN 440,000 and higher:
3.5.8 Locate the position of the mounting holes by aligning the template (P/N 103-5865)
on the front face of the floor pan as shown in Figure 11. Clamp the t emplate in
place. Using a center punch, mark t he positions of the holes on the floor pan. Flip
the template over and repeat on the other end of the floor pan face.
Align template along
these 3 edges.
FIGURE 11
3.5.9 Drill 3/8” holes at the points marked.
3.5.10 Follow steps 3.5.6 through 3.5.7 for weight installation ( See Fig ure10).
3.6 INSTALL THE CASTER WEIGHTS
Note: The caster weights are heavy. Use care when lif t i ng them. Make sure that
you can hold them securely before lifting them. Use caution w hen posi t ioning
your hands so that you do not set them down on your hands or fingers.
3.6.1 Assemble the weight brackets (Item 33) to the caster weight s ( I tem 11) using the
3/8-16 square head bolts (Item 34) and 3/ 8 whizlock nuts ( I t em 25) .
Unit 1.5” Bracket 2.0” Bracket
Lazer Z 60” Units 1 1
Lazer Z 72” Units 2
Lazer Z XP 60” Units 2 1
Lazer Z XP 72” Units 2
Lazer Z XS 60” Units 2 2
Lazer Z XP 72” Units 2
1 Second 2.0” bracket is included in Ultra Vac XS completion kit 103-7876.
3.6.2 Install the caster weight assemblies over the
3.6.3 Inst all a clevis pin (I t em 19) and hairpin (Item
3.6.4 Tighten knob on weight assembly until the
2
Second 2.0” bracket is included in Ultra Vac XP completion kit 103-7420.
caster arms. On 60 inch Lazer Z machines one
weight has a wide mounting bracket and one has
a narrow bracket. They will only fit the machine
one way. Weights for the 60 Lazer XP, 60” Lazer
XS, and all 72’s are interchangeable left and right.
20) on each caster weight to retain them.
weight is clamped securely to the caster arm.
FIGURE 12
15
Page 21

3.7 ADJUSTMENTS:
Your Ultra Vac QDS was adjusted at the factory to operate properly. However, there are
three basic adjustments that can be made, should your unit r equire them:
3.7.1 Door closi ng: The closing of the door is controlled by the two hinge links (Figure
13 – A) and the two stop screws (Figure 13 – B). The stop screws should be
adjusted so that both will be contacted when the contacting arm is straight up and
down. With the stop scr ews adjusted, t he length of the hinge links can be
changed to provide complete closing of t he door , and reasonable force on the
handle to latch or unlatch the door. Lengthen the links to reduce the for c e.
Shorten the links to increase the force. With the door closed, both links should be
slightly tight to minimize rattling.
3.7.2 Door openi ng: After adjusting the hinge links for door closing, the handle link
(Figure 13 – C) can be adjusted to obtain m aximum door opening. Lengthen the
link to open the door fart her . Shorten the link to open the door less. The
maximum door opening is limited by the contacting ar m hitting the stop (Figure 13
– D). This stop is non adjustable, and prevents over opening dam age from
occurring to the linkage.
3.7.3 Latches: Once the open and closed positions have been set, the latches (Figur e 13
– E) can be adjusted. With the door closed, the latch link should be set so that the
latch plate completely engages and contacts the latch rod welded to the door. The
latch plates should not be tight against the latch rod. They should easily “wiggle”.
FIGURE 13
16
Page 22

4. OPERATION:
4.1 PRE-START
4.1.1 Read the operator’s manual for your mower and fam iliar ize yourself with all
controls before operating t he machine. Make sure that you understand the
controls, their locations, their functions, and their safety requirements.
4.1.2 Ensure the blower, belt cover, door m esh, tube and hopper are in good condition,
properly attached, and latched.
Note: When mowing in areas with sandy soil, use low lift blades on the cutting
deck and higher cutting heights to minimize wear on the blower component s.
4.2 MOWING
4.2.1 The Ult r a Vac QDS blower operates when deck drive is engaged. Be sure that all
persons are clear of the mower deck bef ore engagi ng t he cutting blades. Set
the throttle to “midway” position. Pull out ward on the PTO switch to the
“ROTATE” position. Accelerate to full throttle to begin mowing.
4.2.2 To disengage the PTO and blower, set the throttle to “midway” position. Push in
on the PTO switch to the “STOP” position to stop the cutting blades and blower.
The cutting blades will require a slightly longer amount of time t o com e to a
complete stop when the blower is installed on the deck. Verify that all rotation
indicators have stopped before clearing blower assembly or mower deck
4.2.3 To em pt y the hopper , first shut off deck drive. Lift up on the handle to open the
door and empty the hopper. If the unit i s t o be dri ven onto a truck or t r ai ler
with the hopper full, always back the unit up the ramp. This will reduce the
chance of rearward tip up. See secti on 4. 1 Transporti ng f or addi t ional
information regarding loading a unit on a truck or t r ai l er.
4.2.4 Close and latch t he door before continuing mowing. Do not engage the cutt ing
blades while the door is in the open position.
4.3 BAGGER REMOVAL FOR SIDE DISCHARGE:
4.3.1 Disengage the PTO, stop engine and wait f or all moving parts to stop. Remove
spark plug wire(s) or remove key.
4.3.2 Remove the discharge tube by releasing the latch at the blower. Slide the tube
off the blower outlet and remove the upper end from the hopper.
4.3.3 Remove the Belt cover by loosening t he knobs. For 60” units the outboard knob
does not need to be removed completely to remove the belt cover.
CAUTION
POTENTIAL HAZARD
♦ The deck sheave will become very hot
WHAT CAN HAPPEN
♦ Touching a hot deck sheave can cause severe burns.
HOW TO AVOID THE HAZARD
♦ Allow the deck sheave to cool completely before
removing the belt.
4.3.4 Pull the idler release handle and remove the belt from the upper groove of the
deck sheave.
4.3.5 Unlatch t he front end of the blower. Pivot the blower back and lift it off t he deck.
4.3.6 Install the discharge chute using the chute pivot pin and hairpin (See Figure 14).
17
Page 23

21
22
FIGURE 14
DISCHARGE CHUTE INSTALLATION
4.3.7 Re-install the plastic belt cover and tig hten the knobs.
4.3.8 Disconnect the handle link from the actuation arm on the hopper. Connect the
link to the arm on the handle mount for storage during side dischar ge operation.
4.3.9 Remove the hair pins and clevis pins holding the hopper assembly to t he m ount
weldment.
4.3.10 Lift the hopper assembly off the mount.
4.3.11 The removable weights must be removed from above the caster wheels (and front
of floor pan for unit s with a 2 post foldable ROPS). To remove the caster weight s.
Loosen the clamping knobs until the weight can be m oved relative to t he cast er
arm. Remove the hairpins and clevis pins that hold the weights to the cast er
arms. Carefully lift the weights off of the caster arms.
For units with 2 post foldable ROPS: To remove the front weight , r emove the 2
hairpins that retain it and then lift it from the m ount plates.
The weights and brackets bolted to t he floor pan remain on the unit.
Note: The removable weights are heavy. Use care when lifti ng t hem. M ake sure t hat
you can hold them securely before lifting them. Use caution w hen posi t i oning
your hands so that you do not set them down on your hands or fingers.
Note: The portions of the Ultra Vac QDS bagger that are not bol t ed t o t he mower
are designed to be installed or removed in their entirety. Failure to do so
will cause a reduction in stability or traction. Do not operate the mower
with only a portion of the Ultra Vac QDS installed.
CAUTION
POTENTIAL HAZARD
♦ Caster or front floor pan weights installed without
bagger may cause Loss of Tract ion and St eer ing
control.
WHAT CAN HAPPEN
♦ Loss of control can result in an accident, which may
cause Death, Injury, or property damag e.
HOW TO AVOID THE HAZARD
♦ Install caster and front floor pan weights ONLY when
bagger is installed.
4.3.12 The machine can now be used for side discharge mowing.
18
Page 24

4.4 TRANSPORTING
4.4.1 Transporting a Unit: Use a heavy-duty trailer or truck to tr anspor t t he machine. Lock
brake and block wheels. Securely fasten the machine to the trailer or truck with
straps, chains, cable, or ropes. Be sure t hat t he trailer or truck has all necessary
lighting and marking as required by law. Secure a trailer with a safety chain.
POTENTIAL HAZARD
♦ This unit does not have proper turn signals, lights, reflective
markings, or a slow moving vehicle emblem. These items
are required to drive on a public street or roadway.
WHAT CAN HAPPEN
♦ Driving on a street or roadway without such equipment is
dangerous and can lead to accidents causing personal injury.
♦ Driving on a street or roadway without such equipment may
also be a violation of State laws and the operator may be
subject to traff ic tickets and/or fines.
HOW TO AVOID THE HAZARD
♦ Do not drive a unit on a public street or roadway.
POTENTIAL HAZARD
♦ Loading a unit on a trailer or truck increases the possibility of
backward tip-over.
WHAT CAN HAPPEN
♦ Backward tip-over of the unit could cause serious injury or
death.
HOW TO AVOID THE HAZARD
♦ Use extreme caution when operating a unit on a ramp.
♦ Use only a single, full width ramp; DO NO T use individual
ramps for each side of the unit .
♦ If individual ramps must be used, use enough ram ps t o
create an unbroken ramp surf ace wider than t he unit .
♦ DO NOT exceed a 15° angle between ramp and ground or
between ramp and trailer or truck.
♦ Avoid sudden acceleration while driving unit up a ramp to
avoid tipping backward.
♦ Avoid sudden deceleration while backing unit down a ramp to
avoid tipping backward.
CAUTION
WARNING
4.4.2 Loading a Unit: If the unit is to be driven onto a truck or trailer with the
hopper full, always back the unit up the ramp. This will reduce the chance
of rearward tip up. Use extrem e caut ion when loading unit s on trailers or trucks.
One full width ramp that is wide enough to extend beyond the rear tires is
required instead of individual ramps for each side of the unit. The lower rear
section of the tractor frame extends back between the rear wheels and serves as
a stop for tipping backward. Having a full width ramp provides a surface for the
frame members to contact if the unit starts to tip backward. If it is not possible to
use one full width ramp, you must use enough individual ramps to simu lat e a full
width continuous ramp.
19
Page 25

Ramp should be long enough so that t he angles between the ramp and the
ground and the ramp and the trailer or truck do not exceed 15°. A steeper angle
may cause mower deck components to get caught as the unit moves from ramp
to trailer or truck. St eeper angles may also cause the unit to tip backward. If
loading on or near a slope, position the trailer or truck so it is on the down side of
the slope and the ramp extends up the slope. This will minimize the ramp angle.
The trailer or truck should be as level as possible.
DO NOT attempt to turn the unit while on the ramp, you may lose control and
drive off the side.
Avoid sudden acceleration when driving up a ramp and sudden deceleration when
backing down a ramp. Both maneuvers can cause the unit to tip back ward.
Dump contents of hopper before transport. Do not transport the unit with the
hopper full.
5. MAINTENANCE
POTENTIAL HAZARD
♦ While maintenance or adjustments are being made,
someone could start the engine.
WHAT CAN HAPPEN
♦ Accidental starting of the engine could seriously injure
you or other bystanders.
HOW TO AVOID THE HAZARD
♦ Remove the key from the ig nit ion switch and pull the
wire(s) off the spark plug(s) before you do any
maintenance. Also push the wire(s) aside so it does
not accidentally contact the spark plug(s ) .
POTENTIAL HAZARD
♦ The engine can become very hot.
WHAT CAN HAPPEN
♦ Touching a hot engine can cause severe burns.
HOW TO AVOID THE HAZARD
♦ Allow the engine to cool completely before service or
making repairs around the eng ine area.
WARNING
WARNING
5.1 PERIODIC MAINTENANCE
5.1.1 Blower Housing/Impeller Service Interval: Daily.
Inspect for wear or damage daily. Replace or repair worn parts as needed.
Note: When mowing in areas with sandy soil, use low lift blades on the
5.1.2 Idler Bushings: Service Interval: 25 Hours.
Lubricate with 1-2 pumps of SAE No. 2 m ulti-purpose grease.
5.1.3 Door Handle: Service Interval: 25 Hours.
Lubricate with 1-2 pumps of SAE No. 2 multi-purpose grease.
IMPORTANT: Before conducting any maintenance, Disengage the PTO, stop engine
and wait for all moving parts to st op. Remove spark plug wire(s) or remove key.
cutting deck and higher cutting heights to mi ni mi ze wear on the blower
components.
20
Page 26

5.1.4 Door cloth m esh: Service Interval: Daily.
Inspect the cloth mesh for wear, tear s, or dam age.
POTENTIAL HAZARD
♦ Under normal use the cloth mesh will deteriorate and
wear. Objects could exit through worn cloth mesh at
high speeds.
WHAT CAN HAPPEN
♦ Thrown objects can cause serious injury or kill you or
bystanders.
HOW TO AVOID THE HAZARD
♦ Check cloth mesh frequently for tears and holes.
Replace worn cloth mesh.
5.1.5 Belts. Service Interval: 50 Hours.
Inspect the belt for damage or wear. Replace belt with one of the following.
60” deck – PN 103-0866
72” deck – PN 103-0867
5.1.6 Clean muffler and r ear frame area: Service Interval: Daily
POTENTIAL HAZARD
♦ Operating engine parts, especially the m uffler, become
extremely hot.
WHAT CAN HAPPEN
♦ Severe burns can occur on contact.
♦ Debris, such as leaves, grass, brush, etc. can catc h fire.
HOW TO AVOID THE HAZARD
♦ Allow engine parts, especially the muff ler, to cool before
touching.
♦ Remove accumulated debris from muffler and engine area.
♦ Install and maintain in working order a spar k arrester before
using equipment on forest - covered, grass-covered, brushcovered unimproved land.
WARNING
WARNING
5.2 ADJUSTMENTS
Your Ultra Vac QDS was adjusted at the fact or y to oper at e pr operly. However, there are
three basic adjustments that can be made, should your unit r equire them:
5.2.1 Door closing: The closing of the door is controlled by the two hinge links (Figur e
15 – A) and the two stop screws (Figure 15 – B). The stop screws should be
adjusted so that both will be contacted when the contacting arm is straight up and
down. With the stop scr ews adjusted, t he length of the hinge links can be
changed to provide complete closing of t he door , and reasonable force on the
handle to latch or unlatch the door. Lengthen the links to reduce the for c e.
Shorten the links to increase the force. With the door closed, both links should be
slightly tight to minimize rattling.
21
Page 27

5.2.2 Door opening: After adjusting the hinge links for door closing, the handle link
(Figure 15 – C) can be adjusted to obtain m aximum door opening. Lengthen the
link to open the door fart her . Shorten the link to open the door less. The
maximum door opening is limited by the contacting ar m hitting the stop (Figure 15
– D). This stop is non adjustable, and prevents over opening dam age from
occurring to the linkage.
5.2.3 Latches: Once the open and closed positions have been set, the latches (Figur e 15
– E) can be adjusted. With the door closed, the latch link should be set so that the
latch plate completely engages and contacts the latch rod welded to the door. The
latch plates should not be tight against the latch rod. They should easily “wiggle”.
6. Tips and Troubleshooting
Your Exmark Ultra Vac has been designed to be the m ost pr oductive bagging system on the
market. The following tips have been collected to help you get the most out of your Ultra Vac
right from the star t .
6.1 When mowing in areas with sandy soil, use low lift blades on the cutting deck and
higher cutting heights t o minimize wear on the blower components.
6.2 When mowing in wet conditions, such as just after a rain or in heavy dew, use low
lift blades on the cutting deck to minimize plugging of t he blower.
6.3 When the bags get full, the sound of the blower will change and there will be slight
blowout from the front right corner of the deck . Emptying the bags at this point will
minimize the potential for the tube to plug.
6.4 If there is excessive blowout from the deck, check to make sure that the rear
screen in the hood is clear of grass build up. I t is recommended that the screen
and mesh portions of the bags be cleaned regularly to maintain proper air flow.
This is especially important in wet conditions.
6.5 During dry conditions check engine air cleaners and clean cooling fins more
frequently. The Ultr a Vac has been designed to minimize the impact of dust and
debris on the mower, but bagging can be a dir t y environment.
6.6 During dry conditions, switching to a lower lift blade may reduce blowout without
hurting quality of cut.
6.7 Maintaining a ground speed that does not pull down the engine RPM will allow for
the highest productivity and best quality of cut . Bogging the engine RPM down by
going too fast will cause plugg ing and quality of cut issues.
6.8 When stor ing the Ultra Vac, it is recommended that any build up in the blower be
cleaned out. Dry grass build up may cause problems with the impeller when the
unit is put back into operation.
6.9 The condition of the belt drive is critical t o proper operation. A sticking idler ar m or
worn belt may cause plugging or blowout. Replace the belt when the idler arm is
riding on or near the stop.
22
Page 28

6.
2-Year Limited Warranty
Exmark Turf Equipment
Conditions and Products Covered
Exmark Mfg. Co. Inc. and its affiliate, Exmark Warranty
Company, pursuant to an agreement between them, jointly
warrant on the terms and conditions herein, that we will repair,
replace or adjust any part manufactured by Exmark and found
by us (in the exercise of our reasonable discretion) to be
defective in factory materials or workmanship for a period of
two years.
This warranty applies to Exmark turf equipment purchased on
or after October 1, 2004 sold in the US or Canada. This
warranty may only be assigned or transferred to a second (or
third) owner by an authorized Exmark dealer. The warranty
period commences upon the date of the original retail
purchase.
Products
• All Products (except as noted below) 2 years
• All Attachments and Accessories 1 year
• Metro 21 Series 1 year
• Belts and Tires 90 days
• Battery 1 Year Prorated
• Engine* Warranty is covered by engine manufacturer
*Please refer to the engine manufacturer’s warranty statement
that is included in the literature packet. We are not authorized
to handle warranty adjustments on engines.
This warranty only includes the cost of parts and labor.
This warranty does not cover the following:
• Pickup and delivery charges to and from any authorized
• Any damage or deterioration due to normal use, wear
• Cost of regular maintenance service or parts, such as
• Any product or part which has been altered or misused
• Any repairs necessary due to use of parts, accessories
All warranty work must be performed by an authorized Exmark
Service Dealer using Exmark approved replacement parts.
1. Contact any Exmark Service Dealer to arrange service at
their dealership. To locate a dealer convenient to you,
access our website at www.exmark.com. U.S. Customers
may also call 402-223-6375.
2. Bring the product and your proof of purchase (sales
receipt) to the Exmark Service Dealer.
If for any reason you are dissatisfied with the Service Dealer’s
analysis or with the assistance provided, contact us at:
Exmark Customer Service Department
The Exmark Warranty Company
2101 Ashland Avenue
Beatrice, NE 68310
402-223-6375 or
service@exmark.com
Warranty Period
Items and Conditions Not Covered
Exmark Service Dealer.
and tear, or exposure.
filters, fuel, lubricants, tune-up parts, and adjustments.
or required replacement or repair due to normal wear,
accidents, or lack of proper maintenance.
or supplies, including gasoline, oil or lubricants,
incompatible with the turf equipment or other than as
recommended in the operator's manual or other
operational instructions provided by Exmark.
Instructions for Obtaining Warranty Service
(For units purchased on or after October 1, 2004)
Owner’s Responsibilities
The Exmark turf equipment, including any defective part,
must be returned to an authorized Exmark service dealer
within the warranty period. This warranty extends only to
turf equipment operated under normal conditions. You
must properly service and maintain your Exmark product
as described in the operator’s manual. Such routine
maintenance, whether performed by a dealer or by you, is
at your expense.
As a condition to this warranty, customer shall have read
the operator's manual and shall have completed and
submitted to Exmark Warranty Company, within the
prescribed time, the Exmark warranty registration.
General Conditions
The sole liability of Exmark and Exmark Warranty Company
with respect to this warranty shall be repair and replacement
as set forth herein. Neither Exmark nor Exmark Warran ty
Company shall have any liability for any other cost, loss
or damage, including but not limited to, any incidental
or consequential loss or damage.
In particular, we shall have no liability or responsibility for:
• Expenses related to gasoline, oil or lubricants.
• Travel time, overtime, after hours time or other
extraordinary repair charges or charge relating to
repairs or replacements outside of normal business
hours at the place of business of the authorized
Exmark service dealer.
• Rental of like or similar replacement equipment
during the period of any warranty, repair or
replacement work.
• Any telephone or telegram charges or travel charges.
• Loss or damage to person or property other than that
covered by the terms of this warranty.
• Any claims for lost revenue, lost profit or additional
cost as a result of a claim of breach of warranty.
• Attorney's fees.
No Claim of breach of warranty shall be cause for
cancellation or rescission of the contract of sale of any
Exmark mower.
There are no understandings, agreements, representations,
or warranties, express or implied, including but not limited to
any regarding the merchantability (that product is fit for
ordinary use) or fitness for use (that product is fit for a
particular purpose), not specified herein, respecting the
equipment which is the subject of this warranty.
Some states do not allow exclusions of incidental or
consequential damages, or limitations on how long an
implied warranty lasts, so the above exclusions and
limitations may not apply to you.
This warranty gives you specific legal rights, and you may
also have other rights which vary from state to state.
23
Page 29

NOTES
24
Page 30

NOTES
25
Page 31

SERVICE RECORD
Date Descri pt i on of Work Done Service Done By
26
Page 32

M
M
SEE EXMARK’S COMPLETE
LINE OF ACCESSORIES
RIDING ACCESSORIES
CUSTOM RIDE SEAT SUSPENSION SYSTEM
DECK LIFT ASSIST KIT
HITCH KIT
LIGHT KIT
MICRO-MULCH SYSTEM
ROLL OVER PROTECTION SYSTEM (ROPS)
SNOW BLADE
SUN SHADE
TRASH CONTAINER
TURF STRIPER
ULTRA VAC COLLECTION SYSTEM
ULTRA VAC QUICK DISPOSAL SYSTEM
WALK BEHIND ACCESSORIES
GRASS CATCHER
MICRO-MULCH SYSTEM
STEERABLE SULKY
SULKY HITCH KIT
TURF STRIPER
Check us out on the Web:
www.exmark.com
©2000-2004 EXMARK MFG. CO. INC. PART NO. 103-8854
INDUSTRIAL PARK BOX 808 (402) 223-6300
BEATRICE, NE 68310 FAX (402) 223-5489
ALL RIGHTS RESERVED PRINTED IN U.S.A.
FG. CO. INC.
FG. CO. INC.
®
®
 Loading...