

Page 1

QUEST®BAGGER
ForSerialNos.
850,000&Higher
PartNo.4500-653Rev.A
Page 2

Exmarkreservestherighttomakechangesor
addimprovementstoitsproductsatanytime
withoutincurringanyobligationtomakesuch
changestoproductsmanufacturedpreviously.
Exmark,oritsdistributorsanddealers,accept
noresponsibilityforvariationswhichmaybe
evidentintheactualspecicationsofitsproducts
andthestatementsanddescriptionscontained
inthispublication.
©2010—ExmarkMfg.Co.,Inc.
IndustrialParkBox808
Beatrice,NE68310
Contactusatwww.Exmark.com.
2
PrintedintheUSA
AllRightsReserved
Page 3
Introduction
CONGRATULATIONSonthepurchaseofyour
ExmarkBagger.Thisproducthasbeencarefully
designedandmanufacturedtogiveyouamaximum
amountofdependabilityandyearsoftrouble-free
operation.
Thismanualcontainsoperating,maintenance,
adjustment,andsafetyinstructionsforyourExmark
Bagger.
BEFOREOPERATINGYOURMOWER,
CAREFULLYREADTHISMANUALINITS
ENTIRETY.
Byfollowingtheoperating,maintenance,andsafety
instructions,youwillprolongthelifeofyourBagger,
maintainitsmaximumefciency,andpromotesafe
operation.
Ifadditionalinformationisneeded,orshouldyou
requiretrainedmechanicservice,contactyour
authorizedExmarkequipmentdealerordistributor.
Exmarkpartsmanualsareavailableonlineat
http://www.exmark.com/manuals.htm.
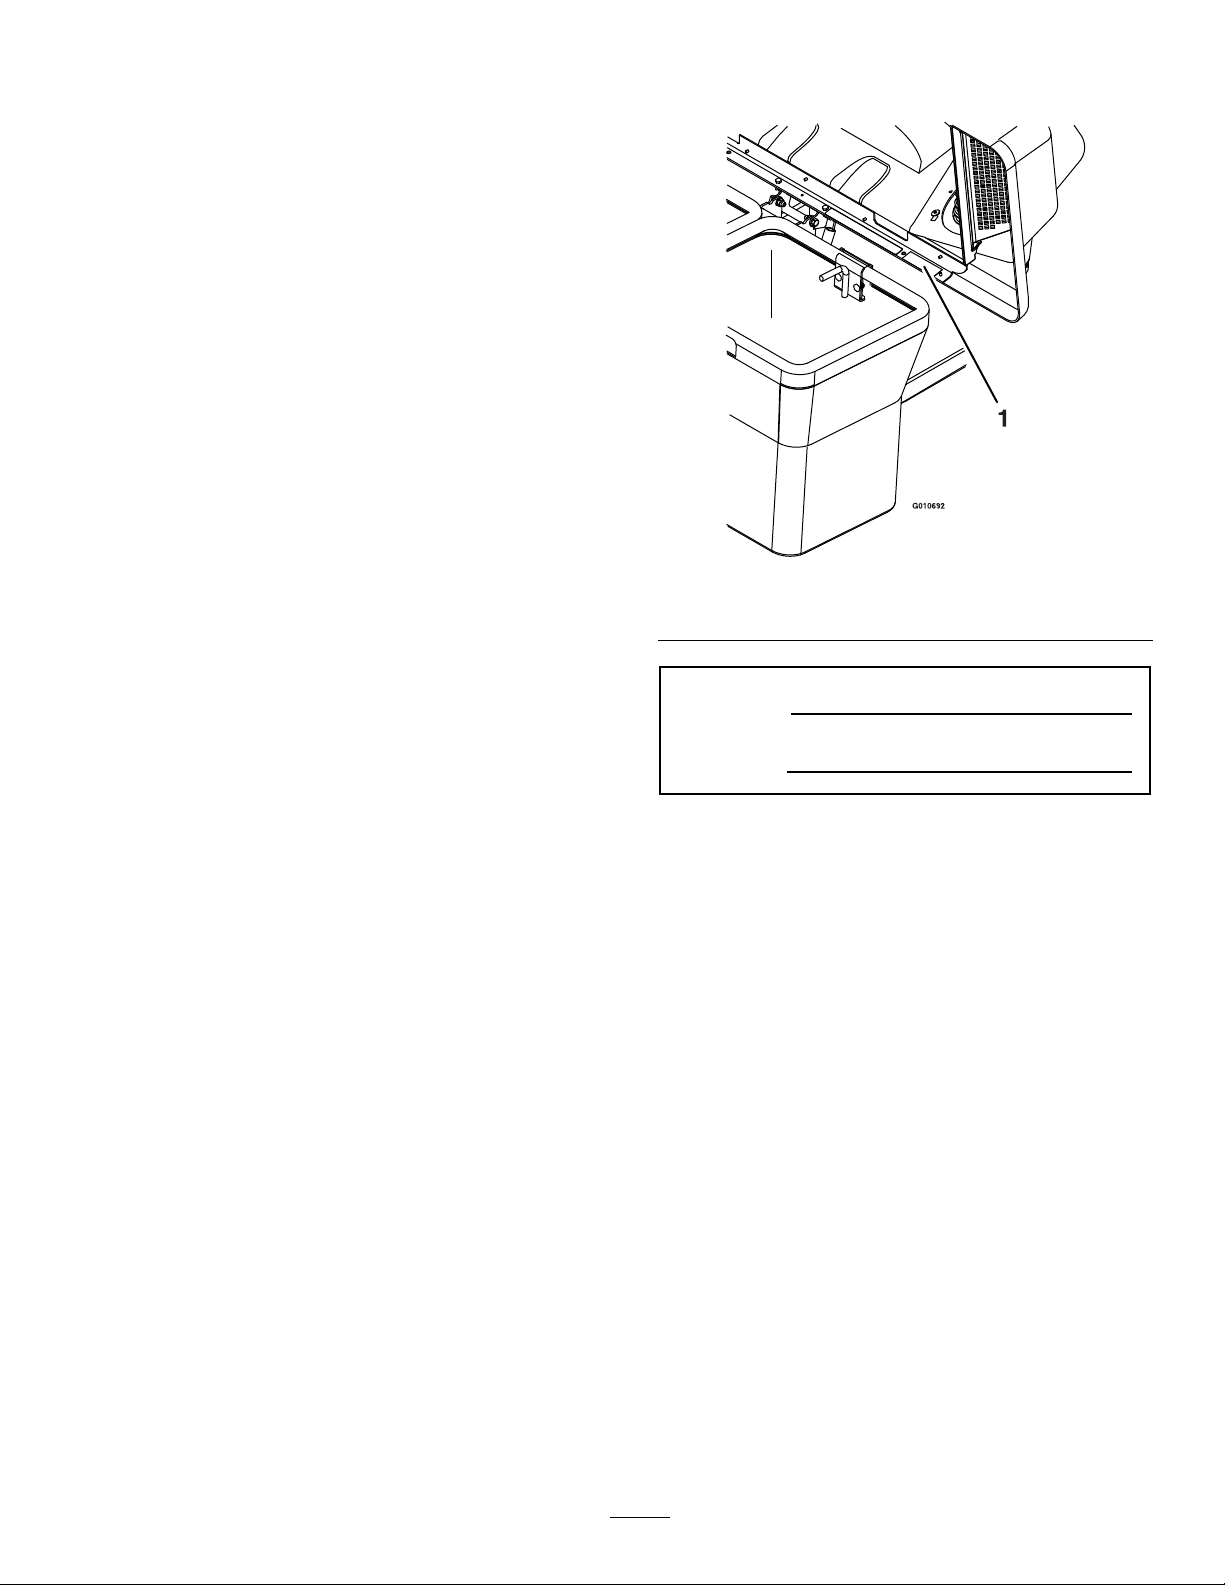
Figure1
1.Modelandserialnumberlocation
ModelNo.
SerialNo.
AllExmarkequipmentdealersanddistributorsare
keptinformedofthelatestmethodsofservicing
andareequippedtoprovidepromptandefcient
serviceintheeldorattheirservicestations.They
carryamplestockofservicepartsorcansecurethem
promptlyforyoufromthefactory.
AllExmarkpartsarethoroughlytestedandinspected
beforeleavingthefactory,however,attentionis
requiredonyourpartifyouaretoobtainthefullest
measureofsatisfactionandperformance.
Wheneveryouneedservice,genuineExmarkparts,
oradditionalinformation,contactanAuthorized
ServiceDealerorExmarkCustomerServiceandhave
themodelandserialnumbersofyourproductready .
Figure1identiesthelocationofthemodelandserial
numbersontheproduct.Writethenumbersinthe
spaceprovided.
3
Page 4

Contents
Introduction...........................................................3
Safety.....................................................................5
SafetyAlertSymbol.........................................5
SafeOperatingPractices..................................5
SafetyandInstructionalDecals.......................8
Specications.........................................................9
ModelNumbers..............................................9
Systems...........................................................9
Dimensions.....................................................9
ProductOverview................................................10
Operation.............................................................10
EmptyingtheGrassBags...............................10
ClearingObstructionsfromthe
Bagger.......................................................10
RemovingtheBagger....................................11
ReplacingtheDischargeDeector.................12
InstallingtheBagger......................................12
OperatingTips..............................................13
Transporting.................................................14
Maintenance.........................................................16
RecommendedMaintenanceSchedule(s)...........16
PeriodicMaintenance.......................................16
InspectingtheBaggerAttachment.................16
Cleaning...........................................................17
CleaningtheBaggerAttachment....................17
Storage.................................................................18
StoringtheBaggerAttachment......................18
Troubleshooting...................................................19
4
Page 5

Safety
Safety
SafetyAlertSymbol
ThisSafetyAlertSymbol(Figure2)isusedbothin
thismanualandonthemachinetoidentifyimportant
safetymessageswhichmustbefollowedtoavoid
accidents
Thissymbolmeans:ATTENTION!BECOME
ALERT!YOURSAFETYISINVOLVED!
Figure2
1.Safetyalertsymbol
Thesafetyalertsymbolappearsaboveinformation
whichalertsyoutounsafeactionsorsituations
andwillbefollowedbythewordDANGER,
WARNING,orCAUTION.
DANGER:Whitelettering/Redbackground.
Indicatesanimminentlyhazardoussituationwhich,if
notavoided,Willresultindeathorseriousinjury.
WARNING:Blacklettering/Orangebackground.
Indicatesapotentiallyhazardoussituationwhich,if
notavoided,Couldresultindeathorseriousinjury.
CAUTION:Blacklettering/Yellowbackground.
Indicatesapotentiallyhazardoussituationwhich,if
notavoided,Mayresultinminorormoderateinjury.
Thismanualusestwootherwordstohighlight
information.Importantcallsattentiontospecial
mechanicalinformationandNoteemphasizes
generalinformationworthyofspecialattention.
•Neverletchildrenoruntrainedpeopleoperate
orservicetheequipment.Localregulationsmay
restricttheageoftheoperator.
•Onlyadultsandmatureteenagersshouldoperate
amower,andevenmatureteenagersshouldhave
adultsupervision.Besureateenager:
1.hasreadandunderstandstheOperator’s
Manualandrecognizestherisksinvolved;
2.issufcientlymaturetousecaution;and
3.isofsufcientsizeandweighttooperate
thecontrolscomfortablyandtomanagethe
mowerwithouttakingrisks.
•Theowner/usercanpreventandisresponsible
foraccidentsorinjuriesoccurringtohimselfor
herself,otherpeopleorproperty.
Preparation
•Evaluatetheterraintodeterminewhataccessories
andattachmentsareneededtoproperlyandsafely
performthejob.Onlyuseonmachinesapproved
byExmark.
•Wearappropriateclothingincludingsafetyglasses,
substantialfootwear,longtrousers,andhearing
protection.DoNotoperatewhenbarefootor
whenwearingopensandals.
•Inspecttheareawheretheequipmentistobe
usedandremoveallrocks,toys,sticks,wires,
bones,andotherforeignobjectswhichcanbe
thrownbythemachineandmaycausepersonal
injurytotheoperatororbystanders.
Operation
•Operateonlyindaylightorgoodarticiallight,
keepingawayfromholesandhiddenhazards.
SafeOperatingPractices
Training
•ReadthetractorandBaggerOperator’sManuals
andothertrainingmaterial.Iftheoperator(s)or
mechanic(s)cannotreadEnglishitistheowner’s
responsibilitytoexplainthismaterialtothem.
•Becomefamiliarwiththesafeoperationofthe
equipment,operatorcontrols,andsafetysigns.
•Alloperatorsandmechanicsshouldbetrained.
Theownerisresponsiblefortrainingtheusers.
•Neverremovethedischargetube,bags,bagger
topordischargedeectorwhiletheengineis
running.
•Neverdomaintenanceorrepairswhiletheengine
isrunning.
•Nevermowwiththedischargedeectorraised,
removedoralteredunlessthereisagrass
collectionsystemormulchkitinplaceand
workingproperly.
•Stopengine,waitforallmovingpartstostop,
removekeyandengageparkingbrake:
5
Page 6
Safety
–Beforechecking,cleaningorworkingonthe
mower.
–Afterstrikingaforeignobjectorabnormal
vibrationoccurs(inspectthemowerfor
damageandmakerepairsbeforerestarting
andoperatingthemower).
–Beforeclearingblockages.
–Wheneveryouleavethemower.
•Stoptheblades,slowdown,andusecautionwhen
crossingsurfacesotherthangrassandwhen
transportingthemowertoandfromtheareato
bemowed.
•Beawareofthemowerdischargepathanddirect
dischargeawayfromothers.
SlopeOperation
UseExtremecautionwhenmowingand/orturning
onslopesaslossoftractionand/ortip-overcould
occur.Theoperatorisresponsibleforsafeoperation
onslopes.
DANGER
Operatingonwetgrassorsteepslopescan
causeslidingandlossofcontrol.Wheels
droppingoveredges,ditches,steepbanks,or
watercancauserollovers,whichmayresult
inseriousinjury,deathordrowning.
•DoNotmowslopeswhengrassiswet.
•DoNotmowneardrop-offsornearwater.
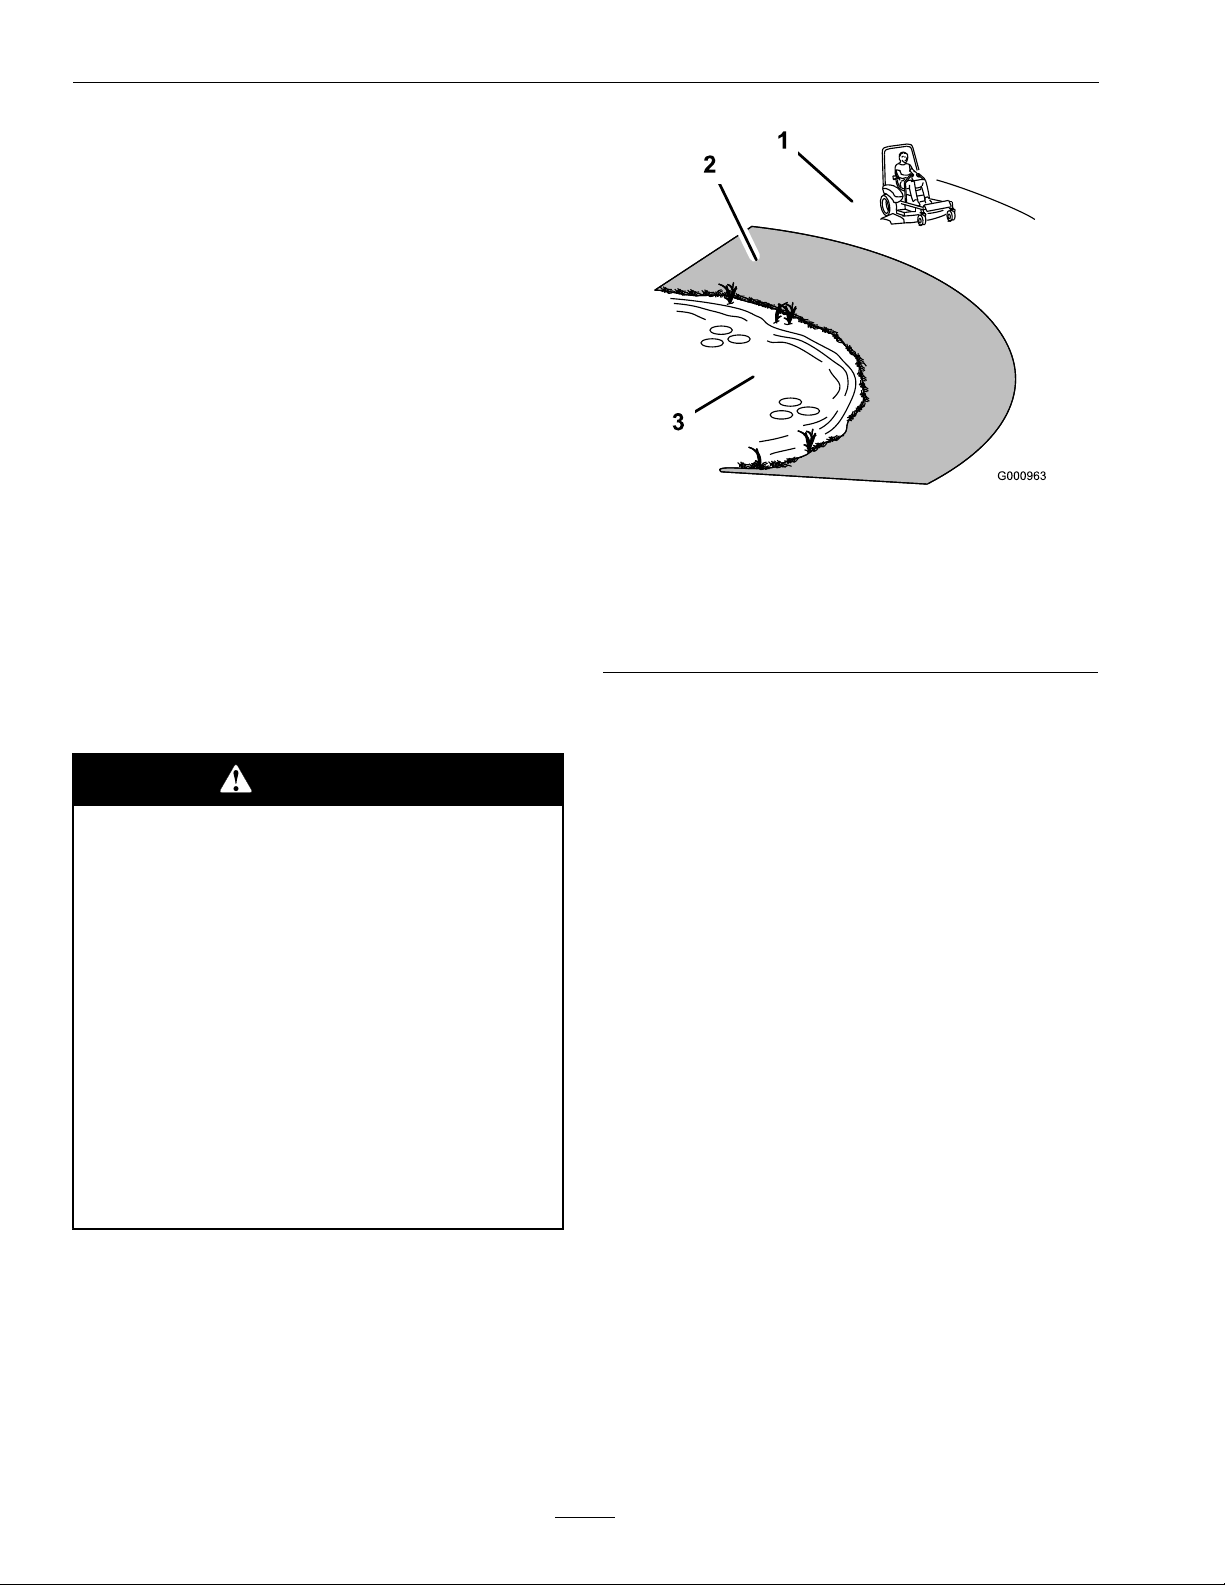
Figure3
1.SafeZone-Usethemowerhereonslopeslessthan15
degrees
2.DangerZone–Usewalkbehindmowerand/orhand
trimmeronslopesgreaterthan15degrees,near
drop-offsandwater.
3.Water
•Removeormarkobstaclessuchasrocks,tree
limbs,etc.fromthemowingarea.Tallgrasscan
hideobstacles.
•Watchforditches,holes,rocks,dipsandrisesthat
changetheoperatingangle,asroughterraincould
overturnthemachine.
•Avoidsuddenstartswhenmowinguphillbecause
themowermaytipbackwards.
•Beawarethatoperatingonwetgrass,acrosssteep
slopesordownhillmaycausethemowertolose
traction.Lossoftractiontothedrivewheelsmay
resultinslidingandalossofbrakingandsteering.
•DoNotmowslopesgreaterthan15
degrees.
•Reducespeedanduseextremecaution
onslopes.
•Avoidsuddenturnsorrapidspeed
changes.
•Seeinsidethebackcovertodeterminethe
approximateslopeangleoftheareatobemowed.
•Useawalkbehindmowerand/orahandtrimmer
neardrop-offs,ditches,steepbanksorwater.
(Figure3).
•Alwaysavoidsuddenstartingorstoppingona
slope.Iftireslosetraction,disengagetheblades
andproceedslowlyofftheslope.
•Followthemanufacturer’srecommendationsfor
wheelweightsorcounterweightstoimprove
stability.AlwaysinstallandremovetheBagger,
includingcounterweights,asinstructed.Failure
todosowillcauseareductioninstabilityor
traction.DoNotoperatethemowerwithonlya
portionoftheBaggerinstalled.
•Useextremecarewithgrasscatchersor
attachments.Thesecanchangethestabilityofthe
machineandcauselossofcontrol.Thestability
andtractionofthemachinewillchangeasthe
Baggerllswithgrassclippings.Useprogressively
greatercareonslopesastheBaggerlls.
6
Page 7

MaintenanceandStorage
•Disengagedrives,setparkingbrake,stopengine
andremovekeyordisconnectsparkplugwire.
Waitforallmovementtostopbeforeadjusting,
cleaningorrepairing.
•Usecarewhencheckingblades.Wraptheblade(s)
orweargloves,andusecautionwhenservicing
them.Onlyreplacedamagedblades.Never
straightenorweldthem.
•Keepallguards,shieldsandallsafetydevicesin
placeandinsafeworkingcondition.
•Checkallboltsfrequentlytomaintainproper
tightness.
•Frequentlycheckforwornordeteriorating
componentsthatcouldcreateahazard.
WARNING
Safety
Removingstandardoriginalequipment
parts,orusingnon-Exmarkreplacement
partsandaccessoriesmayalterthewarranty,
traction,andsafetyofthemachine.Failure
touseoriginalExmarkpartscouldcause
seriousinjuryordeath.
Replaceallpartsincluding,butnotlimited
to,tires,belts,andbladeswithoriginal
Exmarkparts.
7
Page 8

Safety
SafetyandInstructionalDecals
•Keepallsafetysignslegible.Removeallgrease,
dirtanddebrisfromsafetysignsandinstructional
labels.
•Replaceallworn,damaged,ormissingsafety
signs.
•Whenreplacementcomponentsareinstalled,be
surethatcurrentsafetysignsareafxedtothe
replacedcomponents.
•Ifanattachmentoraccessoryhasbeeninstalled,
makesurecurrentsafetysignsarevisible.
109-6809
1.Crushinghazardofhand—DoNotremovethewholebaggerfromthemachine;openthebaggertopandthenremovethe
bag(s)fromthebagger.DoNotremovethebaggertopwhenitisclosed;openthebaggertopandthenremoveit.
•Newsafetysignsmaybeobtainedfrom
yourauthorizedExmarkequipmentdealeror
distributororfromExmarkMfg.Co.Inc.
•Safetysignsmaybeafxedbypeelingoffthe
backingtoexposetheadhesivesurface.Apply
onlytoaclean,drysurface.Smoothtoremove
anyairbubbles.
•Familiarizeyourselfwiththefollowingsafetysigns
andinstructionlabels.Theyarecriticaltothesafe
operationofyourExmarkcommercialmower.
8
Page 9

Specications
ModelNumbers
SerialNos:850,000andHigher
116-1084
Specications
Systems
BaggingSystem
•CollectionBins:
–Commercialgrade,clothmeshbagswith
reinforcedbottoms.
–Capacity:6bushels(2bagsandhood)
•DumpMechanism:Manualliftoff
•BlowerTube:Fixed,abrasionresistantmolded
polyethylene.
Dimensions
OverallWidth:
w/Bagger
42inchDeck53.0inches(135cm)
48inchDeck57.0inches(145cm)
52inchDeck60.0inches(152cm)
RecommendedHighLiftBlades:
PartNumber
42inchDeck
48inchDeck
52inchDeck
Thesebladesarerecommendedtoobtainmaximum
airowtothebag.
116-1202
109-6391
109-6392
OverallLength:
w/Bagger
42inchDeck95inches(241cm)
48inchDeck95inches(241cm)
52inchDeck95inches(241cm)
OverallHeight:
w/Bagger
42inchDeck44.5inches(113cm)
48inchDeck44.5inches(113cm)
52inchDeck44.5inches(113cm)
CurbWeight:
125lb(57kg)includingfrontweight.
9
Page 10

Operation
ProductOverview
Figure4
1.Hood
2.Bag4.Lowertube
3.Upperexibletube
Operation
Note:Determinetheleftandrightsidesofthe
machinefromthenormaloperatingposition.
EmptyingtheGrassBags
Becarefulwhenliftingorhandlingagrassbagthatis
full.Toemptythegrassbags:
1.Movethemotioncontrolleversoutwardto
neutralposition,disengagethepowertakeoff
(PTO),engageparkingbrake,stoptheengine,
removethekey,andwaitforallmovingpartsto
stopbeforeleavingtheoperatingposition.
2.Open(raise)thehood.
3.Compressdebrisintothebags.Withbothhands,
liftuponthebagandunhookitfromtheretaining
bracket.Emptythebag.Repeattheprocedure
fortheotherbag.
4.Installthebagsbyslidingthebagframehook
ontotheretainingbracket(Figure5).
Figure5
1.Bagframehook
5.Lowerthehoodontothebags.
2.Retainingbracket
ClearingObstructionsfrom
theBagger
1.Movethemotioncontrolleversoutwardto
neutralposition,disengagethepowertakeoff
(PTO),engageparkingbrake,stoptheengine,
removethekey,andwaitforallmovingpartsto
stopbeforeleavingtheoperatingposition.
2.Checkthegrassbagsandemptythemiftheyare
full.
3.Removeandseparatethedischargetubeand
chutefromthebaggerhoodandmower.Usinga
stickorsimilarobject,carefullyremoveandclear
10
Page 11

theobstructionfromthemower,dischargetube,
chute,andthehood.
4.Afteryouremovetheobstruction,installthe
completebaggersystemandresumeoperation.
RemovingtheBagger
DANGER
Anuncovereddischargeopeningwill
allowobjectstobethrowninoperator’sor
bystander’sdirection.Also,contactwith
bladecouldoccur.Thrownobjectsorblade
contactcancauseseriousinjuryorkillyou
orbystanders.
Neveroperatemowerunlessdischarge
deector,orentiregrasscollectionsystem,or
mulchkitisinstalled.
1.Movethemotioncontrolleversoutwardto
neutralposition,disengagethepowertakeoff
(PTO),engageparkingbrake,stoptheengine,
removethekey,andwaitforallmovingpartsto
stopbeforeleavingtheoperatingposition.
2.Removetheupperexibletubefromthehood
junctiontube.
WARNING
Operatingthemowerwiththebagger
installedandthefrontweightremovedmay
causelossoftractionandsteeringcontrolor
anunstableconditionwhichcouldresultin
injuryordeath.
Installthebaggeronlywhenthefrontweight
isinstalled.
3.Removethebaggermountbracketfromthedeck
andretainallhardwareseeFigure6.
Note:Thebootmountbracketdoesnothaveto
beremovedfromthedeck.
Operation
Figure6
1.Upperexibletube
2.Clamp
3.Lowertube7.Latch
4.Nut8.Mountbracket
5.Bootmountbracket
6.Bolt
CAUTION
Ifyouremovethespring-loadedhoodwhen
itisclosed(inthedownposition),thehood
maysuddenlyyopenandyouorsomeone
elsemaybebruised,pinched,orinjuredin
anotherway.
Alwaysopen(raise)thehoodbeforeyou
removeorinstallitonthequick-attach
bracket.
4.Openthehoodandremovethetwobagsfrom
thebagframehooks(Figure5).
5.Liftthebaggermountassemblyandhoodoffthe
baggerhitch.
Note:Thebaggerhitchdoesnothavetobe
removedfromtheunit.
Note:Theremovableweightisheavy.Usecare
whenliftingit.Makesurethatyoucanhold
itsecurelybeforeliftingit.Usecautionwhen
positioningyourhandssothatyouDoNotsetit
downonyourhandsorngers.
6.Removetheweightonthefrontofthemower.
Note:Theweightsupportassemblycanstay
mountedtotheunitwhenthebaggerandweight
areremoved.
7.Storeallhardwareinaconvenientlocation.
11
Page 12

Operation
Note:Onthe42and52inchdecks,thedischarge
bafedoesnothavetoberemovedfromthedeck;
youmaynoticebetterdischargewithitinstalled.
Ifremoved,replacetheoriginalhardwareinthe
deckholes.
ReplacingtheDischarge
Deector
1.LocateitemsshowninFigure7.
deectoruptotestthatitsnapstothefull
downposition.
InstallingtheBagger
1.Movethemotioncontrolleversoutwardto
neutralposition,disengagethepowertakeoff
(PTO),engageparkingbrake,stoptheengine,
removethekey,andwaitforallmovingpartsto
stopbeforeleavingtheoperatingposition.
2.Slidetherodoutoftheshortstand-off,spring,
anddischargedeector.Removethedischarge
deector(seeFigure7).
3.Installthehoodassemblyontothehitch.
4.Installthebagsbyslidingthebagframehook
ontotheretainingbracket(seeFigure8).
Figure7
1.Rod4.Mowerdeck
2.Spring5.Dischargedeector
3.Dischargedeector
bracket
6.Assembledview
2.Placethedischargedeectoronthedeck.
3.Orientthespringsothattheshortlegpoints
towardsthedischargedeectorandthelonger
legpointstowardsthedeckasshowninFigure7.
Placespringonrodandsliderod,straightend,
throughthefrontdischargedeectorbracket,
dischargedeector,andreardeectorbracket.
4.Makesurethatthespringandrodareinstalledso
thattherodisretainedfromslidingoutbythe
frontbracketandthespringholdsthedischarge
deectorinthedownposition.Referto(Figure7)
forproperorientation.
Important:Thedischargedeectormustbe
springloadedinthedownposition.Liftthe
Figure8
1.Bagframehook
2.Retainingbracket
5.Lowerthehoodontothebags.
6.Insertthemountbrackettabonthelowertube
assemblyintothebootmountbracketasshown
inFigure6.
7.Usethelatchonthelowertubeassemblytolock
thebrackettothedeck.Adjustthetensionon
thelatchtoholdthebracketuptothedeck,yet
allowforreleasebyhand.
8.Sliptheupperexibletubeintojunctiontubeof
thehoodopening.
9.Installthefrontweight.Thelockrodhasakey
ononeend.Slidethelockrodthroughtheweight
supportassembly,notchintheweightandthe
ovalholeintheframebracket.
10.Rotatethelockrodtosecureitintoplace.
12
Page 13

Operation
WARNING
Thefrontweightinstalledwithoutthebagger
maycauselossoftractionandsteering
controloranunstableconditionwhichcould
resultininjuryordeath.
Installthefrontweightonlywhenthebagger
isinstalled.
Note:Theremovableweightisheavy.Usecare
whenliftingit.Makesurethatyoucanhold
itsecurelybeforeliftingit.Usecautionwhen
positioningyourhandssothatyouDoNotsetit
downonyourhandsorngers.
11.Installthebaggerblades.Refertothemower
operator’smanualforbladeinstallation.
Note:Originalequipmentbladescanbeused;
howeverhighliftbladesarerecommendedfor
bestperformance.
WARNING
Incorrectinstallationofthebladeor
componentsusedtoretainthebladecause
thebladetocomelooseandcouldseriously
injureorkillyouorbystanders.
AlwaysinstalltheoriginalExmarkblades,
washersandbladeboltsasshowninthe
mowerOperator’smanual.
CuttingHeight
DoNotsetthemowercuttingheighttoolowbecause
longgrasssurroundingthemowercanpreventair
fromgettingunderthemowerandenteringthe
baggingsystem.Ifenoughairdoesn’tgetunderthe
mower,thebaggingsystemwillplug.
CuttingFrequency
Cutthegrassoften,especiallywhenitgrowsrapidly .
Youwillhavetocutyourgrasstwiceifitgets
excessivelylong.
CuttingTechnique
Forbestlawnappearance,besuretoslightlyoverlap
themowerintothepreviouslycutarea.Thishelps
reducetheloadontheengineandreducesthechance
ofpluggingthechuteanddischargetube.
UsingBagLiners
Althoughnotrequired,baglinersmaybeinserted
intoeachgrassbagtocollectclippingsandmake
disposalmoreconvenient(Figure9).Ifyouuseabag
liner,removethelledgrassbagandclosethetopof
theliner.Thenpullthelineroutofthegrassbagor
turnthebagupsidedownwhileholdingthehandle
onthebottomofthegrassbag,allowingthelinerto
slideout.
OperatingTips
LargerMachinewithBagger
Rememberthatthemowerislongerandwiderwith
thisattachmentinstalled.Byturningtoosharplyin
connedplacesyoumaydamagetheattachment.
Maintenance
Forbestcutquality,besuretocheckthedeckleveling
andbladeslope(rake).SeethetractorOperator’s
manual.
Trimming
Alwaystrimwiththeleftsideofthemower.DoNot
trimwiththerightsideofthemowerbecauseyou
coulddamagethebagger’schuteanddischargetube.
Figure9
1.Clothgrassbag
2.Bagliner
BaggingSpeed
Mostoftenyouwillbagwiththemowerthrottlein
theFastpositionanddriveatanormalgroundspeed.
However,inextremelydryanddustygrass,youmay
13
Page 14

Operation
wanttoslightlyreducethethrottlespeedandincrease
thegroundspeedofthemower.Thebaggingsystem
mayplugifyoudrivetoofastandtheenginespeed
getstooslow .Onhillsitmaybenecessarytoslowthe
mowergroundspeed.Thishelpsmaintaintheengine
speedandbaggingefciency.
CAUTION
Asthebaggerlls,extraweightisaddedto
thebackofthemachine.Ifyoustopand
startsuddenlyonhills,youmaylosesteering
controlorthemachinemaytip.
•DoNotstartorstopsuddenlywhengoing
uphillordownhill.Avoiduphillstarts.
•Ifyoudostopthemachinewhengoing
uphill,disengagethebladecontrol
switch.Thenbackdownthehillusinga
slowspeed.
•DoNotchangespeedsorstoponslopes.
Transporting
TransportingaUnit
Useaheavy-dutytrailerortrucktotransportthe
machine.Lockbrakeandblockwheels.Securely
fastenthemachinetothetrailerortruckwithstraps,
chains,cable,orropes.Besurethatthetrailerortruck
hasallnecessarylightingandmarkingasrequiredby
law .Secureatrailerwithasafetychain.
CAUTION
Thisunitdoesnothaveproperturn
signals,lights,reectivemarkings,ora
slowmovingvehicleemblem.Drivingona
streetorroadwaywithoutsuchequipment
isdangerousandcanleadtoaccidents
causingpersonalinjury.Drivingonastreet
orroadwaywithoutsuchequipmentmayalso
beaviolationofStatelawsandtheoperator
maybesubjecttotrafcticketsand/ornes.
BaggingLongGrass
Excessivelylonggrassisheavyandmaynotbe
propelledcompletelyintothegrassbags.Ifthis
happens,thedischargetubeandchutemayplug.To
avoidpluggingthebaggingsystem,mowthegrassat
ahighheightofcut,thenlowerthemowertoyour
normalcuttingheightandrepeatthebaggingprocess.
BaggingWetGrass
Alwaystrytocutgrasswhenitisdrybecauseyour
lawnwillhaveaneatappearance.Ifyoumustcutwet
grass,usetheconventionalsidedischargefeatureof
themower.Severalhourslater,whentheclippings
aredry,installthecompletebaggerattachmentand
vacuumupthegrassclippings.
SignsofPlugging
Asyouarebagging,asmallamountofgrassclippings
normallyblowoutthefrontofthemower.An
excessiveamountofclippingsblowingoutindicates
thatthebagsarefullorthesystemisplugged.
DoNotdriveaunitonapublicstreetor
roadway.
14
Page 15

Operation
WARNING
Loadingaunitonatrailerortruckincreases
thepossibilityofbackwardtip-over.
Backwardtip-overcouldcauseseriousinjury
ordeath.
•Useextremecautionwhenoperatinga
unitonaramp.
•Useonlyasingle,fullwidthramp;Do
Notuseindividualrampsforeachside
oftheunit.
•Ifindividualrampsmustbeused,use
enoughrampstocreateanunbroken
rampsurfacewiderthantheunit.
•DoNotexceeda15°anglebetweenramp
andgroundorbetweenrampandtrailer
ortruck.
•Avoidsuddenaccelerationwhiledriving
unituparamptoavoidtippingbackward.
•Avoidsuddendecelerationwhilebacking
unitdownaramptoavoidtipping
backward.
rampangle.Thetrailerortruckshouldbeaslevel
aspossible.
Important:DoNotattempttoturntheunit
whileontheramp,youmaylosecontroland
driveofftheside.
Avoidsuddenaccelerationwhendrivinguparamp
andsuddendecelerationwhenbackingdownaramp.
Bothmaneuverscancausetheunittotipbackward.
LoadingaUnit
Emptygrassbagsbeforeattemptingtoload
unitontrailerortruck.Useextremecautionwhen
loadingunitsontrailersortrucks.Onefullwidth
rampthatiswideenoughtoextendbeyondtherear
tiresisrecommendedinsteadofindividualrampsfor
eachsideoftheunit.Thelowerrearsectionofthe
tractorframeextendsbackbetweentherearwheels
andservesasastopfortippingbackward.Having
afullwidthrampprovidesasurfacefortheframe
memberstocontactiftheunitstartstotipbackward.
Ifitisnotpossibletouseonefullwidthramp,use
enoughindividualrampstosimulateafullwidth
continuousramp.
Rampshouldbelongenoughsothattheangles
betweentherampandthegroundandtherampand
thetrailerortruckdonotexceed15°.Asteeperangle
maycausemowerdeckcomponentstogetcaughtas
theunitmovesfromramptotrailerortruck.Steeper
anglesmayalsocausetheunittotipbackward.If
loadingonornearaslope,positionthetraileror
trucksoitisonthedownsideoftheslopeandthe
rampextendsuptheslope.Thiswillminimizethe
15
Page 16

Maintenance
Maintenance
Note:Determinetheleftandrightsidesofthemachinefromthenormaloperatingposition.
WARNING
Whilemaintenanceoradjustmentsarebeing
made,someonecouldstarttheengine.
Accidentalstartingoftheenginecould
seriouslyinjureyouorotherbystanders.
Removethekeyfromtheignitionswitch,
engageparkingbrake,andpullthewire(s)
offthesparkplug(s)beforeyoudoany
maintenance.Alsopushthewire(s)aside
soitdoesnotaccidentallycontactthespark
plug(s).
RecommendedMaintenanceSchedule(s)
MaintenanceService
Interval
MaintenanceProcedure
WARNING
Debrisbuiltupintheenginecompartment,
ifnotremoved,couldbeignitedbyahot
engine.Areintheenginecompartment
canburnyouandothersandcandamage
property.
•Beforeusingandwhiletheengineis
cool,checkfordebrisintheengine
compartment.
•Keepthemachinefreeofgrass,leaves,or
otherdebrisbuild-up.
•Cleanupoilorfuelspillageandfuel
soakeddebris.
•Allowthemachinetocoolbeforestoring.
Aftertherst10hours
Beforeeachuseordaily
Monthly
Yearlyorbeforestorage
•Checkthebaggerattachment.
•Cleanthebaggerattachment.
•Checkthebaggerattachment.
•Cleanthebaggerattachment.
PeriodicMaintenance
InspectingtheBagger
Attachment
ServiceInterval:Aftertherst10hours
Monthlythereafter.
1.Checkthechute,dischargetube,andthebagger
top.Replacethesepartsiftheyarecrackedor
broken.
2.Tightenallnuts,bolts,andscrews.
3.Undernormalusethebagswilldeteriorateand
wear.Inspectthegrassbagsfordeterioration.
WARNING
Youorbystanderscouldbeseverelyinjured
byyingdebrisorthrownobjectsthatmay
passthroughtorn,wornordeterioratedgrass
bags.
•Frequentlycheckthegrassbagsforholes,
rips,wear,andotherdeterioration.
•Donotwashthegrassbags.
•Ifthebaghasdeteriorated,installnew
grassbagssuppliedbythemanufacturer
ofthisbaggerattachment.
16
Page 17

Maintenance
InspectingtheMowerBlades
ServiceInterval:Asrequired
RefertoyourmowerOperator’sManualforcomplete
blademaintenance.
CaringfortheGrassBags
ServiceInterval:Asrequired
Washingthegrassbagsisnotrecommended.
Undernormalusethebagswilldeteriorateandwear.
Topreventrapiddeteriorationofthebagmaterial,
storethebagswheretheywilldrycompletelyafter
eachuse.
Cleaning
CleaningtheBagger
Attachment
ServiceInterval:Beforeeachuseordaily
1.Aftereachuse,removeandwashtheinside
andoutsideofthebaggertop,dischargetube,
chute,andtheundersideofthemower,using
watersprayedfromagardenhose.Useamild
automotivedetergenttoremovestubborndirt.
2.Makesureyouremovemattedgrassfromallparts
3.Afterwashing,letallofthepartsdrythoroughly.
DoNotwashthegrassbags.
17
Page 18

Storage
Storage
StoringtheBagger
Attachment
1.Cleanthebaggerattachment;refertoCleaning
theBaggerAttachmentinMaintenance.
2.Inspectthebaggerattachmentfordamage;refer
toInspectingtheBaggerAttachmentin
Maintenance.
3.Makesurethegrassbagsareemptyand
thoroughlydry.
4.Storethebaggerinaclean,dryplace,outof
directsunlight.Thisprotectstheplasticpartsand
extendsthelifeofthebagger.Ifyoumuststore
thebaggeroutside,coveritwithaweatherproof
cover.
18
Page 19

Troubleshooting
Troubleshooting
Important:Itisessentialthatalloperatorsafetymechanismsbeconnectedandinproperoperating
conditionpriortomoweruse.
Whenaproblemoccurs,donotoverlookthesimplecauses.Forexample:startingproblemscouldbecaused
byanemptyfueltank.
Thefollowingtablelistssomeofthecommoncausesoftrouble.DoNotattempttoserviceorreplacemajor
itemsoranyitemsthatcallforspecialtimingoradjustmentprocedures(suchasvalves,governor,etc.).Have
thisworkdonebyyourEngineServiceDealer.
Note:WhendisconnectingelectricalconnectorsDoNotpullonthewirestoseparatetheconnectors.
ProblemPossibleCauseCorrectiveAction
Excessivegrassblowoutfromthedeck.
Tubesplugtoofrequently.
1.Bagsarefull.1.Dumpmorefrequently.
2.Pluggedscreeninbaggerhood.2.Removedebris,leavesorgrassclippings
3.Groundspeedistoofast.
4.Pluggedtube.4.Locateandremovepluggeddebris.
5.Conditionsaredry.5.Uselowerliftbladeorreduceengine
1.Bagsaretoofull.1.Dumpmorefrequently
2.Groundspeedistoofast.
3.Grassistoowet.
4.Grassistoolong.4.Cutgrassmorefrequentlyorathighercut
5.Pluggedscreeninbaggerhood.5.Removedebris,leaves,orgrassclippings
6.Pluggedtube.6.Userecommendedhighliftblades.
fromthescreen.
3.Drivesloweratfullthrottle.
speed.
2.Drivesloweratfullthrottle.
3.Cutgrasswhenitisdry.
height.
fromthescreen.
19
Page 20

Consumer Warranty Conditions and Products Covered
Exmark Mfg. Co. Inc. and its affiliate, Exmark Warranty Company,
pursuant to an agreement between them, jointly warrant on the terms
and conditions herein, that we will repair, replace or adjust any part
on these products and found by us (in the exercise of our reasonable
discretion) to be defective in factory materials or workmanship for a
period of one year for residential usage of Exmark Quest attachments
and accessories.
Residential usage means use of the product on the same lot as your
home. Use at more than one location is considered commercial use,
and the commercial use warranty detailed below would apply.
This warranty applies to Exmark Quest attachments and accessories
sold in the U.S. or Canada. This warranty may only be assigned or
transferred to a second (or third) owner by an authorized Exmark
dealer. The warranty period commences upon the date of the original
retail purchase.
Warranty Exceptions Warranty Period
• Bags, Belts and Tires 90 days
This warranty only includes the cost of parts and labor.
Limited Warranty for Commercial Use
Exmark Quest attachments and accessories used for commercial,
institutional, or rental use are warranted against defects in materials
or workmanship for a period of 30 days from the date of original
purchase.
Items and Conditions Not Covered
This warranty does not cover the following:
• Pickup and delivery charges to and from any authorized Exmark
Service Dealer.
• Any damage or deterioration due to normal use, wear and tear, or
exposure.
• Cost of regular maintenance service or parts, such as filters, fuel,
lubricants, tune-up parts, and adjustments.
• Any product or part which has been altered or misused or required
replacement or repair due to normal wear, accidents, or lack of
proper maintenance.
• Any repairs necessary due to use of parts, accessories or supplies,
including gasoline, oil or lubricants, incompatible with the
attachments and accessories or other than as recommended in the
operator's manual or other operational instructions provided by
Exmark.
All warranty work must be performed by an authorized Exmark
Service Dealer using Exmark approved replacement parts.
Instructions for Obtaining Warranty Service
The product must be registered with original proof of purchase by an
Exmark Service Dealer before obtaining any warranty service.
Contact any Exmark Service Dealer to arrange service at their
dealership. To locate a dealer convenient to you, access our website at
www.exmark.com. U.S. or Canada customers may also call
402-223-6375.
If for any reason you are dissatisfied with the Service Dealer’s
analysis or with the assistance provided, contact us at:
Exmark Customer Service Department
The Exmark Warranty Company
2101 Ashland Avenue
Beatrice, NE 68310
402-223-6375 or
service@exmark.com
Owner’s Responsibilities
If your product requires warranty service it must be returned to an
authorized Exmark service dealer within the warranty period. This
warranty extends only to Quest attachments and accessories operated
under normal conditions. You must read the operator’s manual. You
must also properly service and maintain your Exmark product as
described in the operator’s manual or other operational instructions
provided by Exmark. Such routine maintenance, whether performed
by a dealer or by you, is at your expense.
General Conditions
The sole liability of Exmark and Exmark Warranty Company with
respect to this warranty shall be repair or replacement of defective
components as set forth herein. Neither Exmark nor Exmark
Warranty Company shall be liable for any incidental or
consequential loss or damage.
Such damages include but are not limited to:
• Expenses related to gasoline, oil or lubricants.
• Travel time, overtime, after hours time or other extraordinary
repair charges or charges relating to repairs or replacements
outside of normal business hours at the place of business of the
authorized Exmark Service Dealer.
• Rental of like or similar replacement equipment during the period
of any warranty, repair or replacement work.
• Any telephone or telegram charges or travel charges.
• Loss or damage to person or property other than that covered by
the terms of this warranty.
• Any claims for lost revenue, lost profit or additional cost as a result
of a claim of breach of warranty.
• Attorney's fees.
No Claim of breach of warranty shall be cause for cancellation or
rescission of the contract of sale of any Exmark mower.
All implied warranties of merchantability (that the product is fit
for ordinary use) and fitness for use (that the product is fit for a
particular purpose) are limited to the duration of the express
warranty.
Some states do not allow exclusions of incidental or consequential
damages, or limitations on how long an implied warranty lasts, so
the above exclusions and limitations may not apply to you.
This warranty gives you specific legal rights, and you may also have
other rights which vary from state to state.
Exmark Quest Attachments and Accessories
1-Year Limited Consumer Warranty
(30-Day Limited Commercial Warranty)
G4500-429_B
20
Page 21

Notes:
21
Page 22

ServiceRecord
Date:
DescriptionofWorkDone:ServiceDoneBy:
22
Page 23

G011841
Figure10
Thispagemaybecopiedforpersonaluse.
1.Themaximumslopeyoucansafelyoperatethemachineonis15degrees.Usetheslopeindicatortodeterminethe
degreeofslopeofhillsbeforeoperating.DoNotoperatethismachineonaslopegreaterthan15degrees.Fold
alongtheappropriatelinetomatchtherecommendedslope.
2.Alignthisedgewithaverticalsurface,atree,building,fencepole,etc.
3.Exampleofhowtocompareslopewithfoldededge.
23
Page 24

MI D-MOUNT RIDING ACCE SSORIES AND OPTIONS
SEE EXMARK’S COMPLETE LINE OF ACCESSORIES AND OPTIONS
WALK-BEHIND ACCESSORIES AND OPTIONS
GRASS CATCHER
MICRO-MULCH SYSTEM
TURF STRIPER
STANDON
CUSTOM RIDE SEAT SUSPENSION SYSTEM
FULL SUSPENSION SEAT
DECK LIFT ASSIST KIT
HITCH KIT
LIGHT KIT
12
V POWER PORT
MICRO-MULCH SYSTEM
OPERATOR CONTROLLED DISCHARGE
ROLL OVER PROTECTION SYSTEM (ROPS)
SUN SHADE
TRASH CONTAINER
TURF STRIPER
ULTRA VAC COLLECTION SYSTEM
ULTRA VAC QUICK DISPOSAL SYSTEM
OU T-FRONT R IDING ACCE SSORIES AND OPTIONS
CUSTOM RIDE SEAT SUSPENSION SYSTEM
DUAL-TAIL WHEEL
FLOOR PAN EXTENDER
HITCH KIT
LIGHT KIT
MICRO-MULCH SYSTEM
ROLL OVER PROTECTION SYSTEM (ROPS)
SNOW BLADE
SNOWBLOWER
SUN SHADE
TRASH CONTAINER
ULTRA VAC COLLECTION SYSTEM
ULTRA VAC QUICK DISPOSAL SYSTEM
WEATHER CAB
PlaceModelNo.andSerialNo.
LabelHere(IncludedintheLiterature
Pack)orFillinBelow
ModelNo.
SerialNo.
©2010ExmarkMfg.Co.,Inc.
IndustrialParkBox808
Beatrice,NE68310
AllRightsReserved
DatePurchased
PartNo.4500-653Rev.A
(402)223-6300
Fax(402)223-5489
PrintedintheUSA
www.exmark.com
 Loading...