

Page 1

For Serial Nos.
510,000 & Higher
Part No. 103-8614 Rev. A
Page 2
EXMARK PARTS PLUS® PROGRAM
EFFECTIVE DATE: September 1, 1995
Program
If your Exmark dealer does not have the Exmark part in stock,
Exmark will get the parts to the dealer the next business day or
the part will be FREE* Guaranteed!!
How the Program Works
1. If dealer does not have part in stock for a "down" unit at
2. Distributor ships part(s) to dealer or customer, as
3. If distributor does not have the part(s) in stock to satisfy Exmark Parts Plus
4. If order is received by 3:00 p.m. central time, Exmark ships part(s) direct to dealer or customer, as requested by
5. The customer pays for the part and freight if it is shipped under the Exmark Parts Plus® and if it arrives in
6. Who pays for the part and freight if it fails to arrive overnight in accordance to the program?
A. Under any circumstance the customer does not pay.
B. If the part does not arrive overnight due to:
2. The Distributor being unable to ship the part the same day or not submitting the Exmark Parts Plus® order
3. Exmark being unable to ship the part and the Exmark parts order is received by 3:00 p.m., central time,
4. If the part does not arrive overnight due to the shipper (UPS), the shipper pays for the freight and Exmark
the time of request by customer, the dealer contacts his
distributor by 1:00 p.m., local time, and requests Exmark
Parts Plus
®
shipment of six (6) line items or less.
requested by dealer, same day, overnight UPS
Distributor bills dealer for part and freight charges where
applicable.
®
order, he contacts Exmark by 3:00 p.m.,
central time, with an Exmark Parts Plus
®
order of six (6) line items or less.
distributor, same day, overnight UPS, Exmark bills the distributor for parts and shipping charges, where applicable.
accordance to the program.
®
1. The dealer not submitting the Exmark Parts Plus
order to his Exmark distributor by 1:00 p.m., the dealer
pays for the part and freight.
to Exmark by 3:00 p.m., central time, the Distributor pays for the part and freight.
Exmark pays for the part and freight.
pays for the part.
The following restrictions apply
-- The Exmark Parts Plus® Program is available only through participating Exmark
Dealers and applies only to orders submitted on this program Monday through Thursday. Parts Plus service is available
only in the 48 contiguous United States. UPS has initiated a Saturday delivery program to many areas of the continental
United States and can be requested for an overnight shipment on Friday to be delivered Saturday. The next day air
charge, plus the Saturday delivery fee will be the responsibility of the purchaser. Exmark Mfg. will assume no
responsibility for Saturday delivery shipments. To qualify, all Exmark Parts Plus® orders must be received by Exmark by
3:00 p.m., central time. Orders must be six (6) line items or less. Exclusions from the Exmark Parts Plus
®
Program are:
Any wholegood or accessory in its entirety, engines and engine replacement parts, 5-speed Peerless transmissions and
5-speed transaxles, hydraulic or hydrostatic wheel motors, cutter decks and engine decks or any item exceeding United
Parcel Service size and weight restrictions.
Due to UPS restrictions, aerosol spray paint is considered a hazardous material and cannot be shipped via UPS next day
or Second Day Air.
Exmark Manufacturing stocks a limited supply of parts for transaxles, pumps and wheel motors. These parts can be
ordered for Next Day Air shipment but will not be guaranteed per the Parts Plus Program.
ii
Page 3

POTENTIAL HAZARD
♦ This product is a piece of power equipment.
WHAT CAN HAPPEN
♦ Failure to follow safe operating pr actices can result in serious
HOW TO AVOID THE HAZARD
♦ Keep all shields, guards, and safety devices (especially the grass
♦ Stop engine and wait for all moving parts to stop. Remove spark
♦ If mower deck becomes clogged, stop engine and wait for all
♦ Keep hands, feet, and clothing away from power driven parts .
♦ Keep off mower unless seat platf o r m is pr ovided.
♦ Keep others off mower.
WARNING
operator injury or even death.
discharge system) in place and in proper working condit ion.
plug wire(s) or remove key before adjust ing, servicing, or
performing maint enance.
moving parts to stop. Remove spark plug wire(s) or r em ove k ey
before cleaning blockage.
iii
Page 4

CONGRATULATIONS on the purchase of your Exmark Navigat or Cut ting Deck.
This product has been carefully designed and manufactured to give you a maximum
amount of dependability and years of trouble- free operation.
OPERATOR'S MANUAL
This manual contains assembly, operating, maintenance, adjustment, and safety
instructions for your Navigator Cutting Deck.
BEFORE OPERATING YOUR MOWER,
CAREFULLY READ THIS MANUAL IN ITS ENTIRETY.
By following the operating, maint enance, and safety instructions, you will prolong
the life of your equipment , maintain its maximum eff iciency, and pr om ot e safe
operation.
If additional information is needed, or should you require trained mechanic
service, contact your authorized Exmark equipment dealer or distributor.
All Exmark equipment dealers and distribut or s are kept informed of the latest
methods of servicing and are equipped t o pr ovide prom pt and efficient service in the
field or at their service stations. T hey carr y ample stock of service parts or can
secure them promptly for you fr om the factory.
All Exmark parts are thoroug hly test ed and inspect ed before leaving the factory,
however, attention is required on your part if you are t o obt ain the fullest measure of
satisfaction and performance.
iv
Page 5

TABLE OF CONTENTS
1. SAFETY PAGE
1.1 Safety Alert Symbol....................................................................................... 1
1.2 Training.........................................................................................................1
1.3 Preparation.................................................................................................1-2
1.4 Operation ......................................................................................................2
1.5 Maintenance & Storage................................................................................. 2
1.6 Safety Signs...............................................................................................2-3
2. SPECIFICATIONS
2.1 Model Number...............................................................................................4
2.2 Dimensions.................................................................................................... 4
2.3 Torque Requirements.................................................................................... 4
3. ASSEMBLY INSTRUCTIONS
3.1 Uncrate Deck.................................................................................................4
3.2 Assemble Discharge Chute...........................................................................4
3.3 Assemble Deck to Navigator......................................................................4-6
3.4 Deck Removal............................................................................................... 6
4. MAINTENANCE & ADJUSTMENTS
4.1 Deck Raising and Lowering........................................................................6-8
4.2 Maintenance.............................................................................................8-11
4.3 Adjustments ...........................................................................................11-12
5. PARTS LIST
5.1 Deck Group............................................................................................13-14
5.2 Front Frame Group.................................................................................15-16
5.3 Gearbox Components ................................................................................17
6. WARRANTY.......................................................................................................... 18
v
Page 6

1. SAFETY
1.1 SAFETY ALERT SYMBOL
This SAFETY ALERT SYMBOL is used both in this manual and on the unit to identify
important safety messages which must be followed to avoid accidents. This symbol means:
ATTENTION! BECOME ALERT!
YOUR SAFETY IS INVOLVED!
The safety alert symbol appears above information which alerts you to unsafe actions or
situations and will be followed by the word DANGER, WARNING, or CAUTION.
DANGER: White lett e r ing / Red background. Indicates an im minently hazardous situation
which, if not avoided, WILL result in death or serious injur y.
WARNING: Black lettering / O r ange background. Indicates a pot ent ially hazardous situat ion
which, if not avoided, COULD result in death or ser ious inj ur y.
CAUTION: Black lettering / Yellow backgr ound. Indicates a potentially hazardous situation
which, if not avoided, MAY result in minor or moderate injury.
1.2 TRAINING
1.2.1 Regard the Exmark mower as a piece of power eq uipm ent and teach this regard to all
who operate this unit.
1.2.2 Before operating your mower, read the Navigator tractor and cutting deck manual
instructions carefully. Familiarize yourself with the cont r ols and the proper use of the
equipment. If t he oper at or(s) or mechanic(s) can not read Eng lish, it is the owner’s
responsibility to explain this material to them.
1.2.3 Do not allow operation of this machine by untrained personnel. Never allow children,
teenagers, or people unfamiliar with these instructions to use the mower. Local
regulations may restrict the age of the operator.
1.2.4 Avoid mowing while people, especially children, or pets, are nearby. Keep in mind
that the operator or user is responsible for accidents or hazards occurring to other
people or their property.
1.3 PREPARATION
1.3.1 Do not modif y the Navigat or cutting deck and only use on approved Exmark
machines.
1.3.2 The use of personal protective equipment, such as (but not lim it ed to) protection for
the eyes, ears, feet, and head is recomm ended.
POTENTIAL HAZARD
♦ This machine produces sound levels in excess of 85
dBA at the operator’s ear when in operation.
WHAT CAN HAPPEN
♦ Exposure to sound levels of 85 dBA or above for
extended periods of time can cause hearing loss.
HOW TO AVOID THE HAZARD
♦ Wear hearing protection when operating this
machine.
CAUTION
1
Page 7

1.3.3 While mowing, always wear substantial footwear and long trousers. Do not operate
equipment when barefoot or when wearing open sandals.
1.3.4 Thoroughly inspect the area where the equipment is to be used and remove all
stones, sticks, wires, bones, and other foreign objects which may damage the
equipment or cause personal injury to the operat or or bystander s.
1.4 OPERATION
Although hazard control and accident prevention are partially dependent upon the
design and configuration of the equipment, t hese f act ors are al so dependent upon the
awareness, concern, prudence, and proper training of the personnel i nvolved in the
operation, transport, maintenance, and st orage of t he equi pment. It is essential that all
Operator Safety Mechanisms be connected and in operating condit i on prior to use for
mowing.
WARNING
POTENTIAL HAZARD
♦ Hands, feet, hair, clothing, or accessories can become
entangled in rotating part s.
WHAT CAN HAPPEN
♦ Contact with rotating parts can cause traum at ic am putation
or severe lacerations.
HOW TO AVOID THE HAZARD
♦ Do not operate the machine without guards, shields, and
safety devices in place and working.
♦ Keep hands, feet, hair, je welry, or clot hing away from
rotating parts.
1.4.1 Give complete, undivided attention to the job at hand.
1.4.2 Mow only in daylight or good artif icial light, keeping away from holes and hidden
hazards. NEVER carry passengers.
1.4.3 Use EXTREME caution when backing up. LOOK BEHI ND YO U!
1.4.4 Stop the blades when crossing surfaces other than grass and when transporting the
mower to and from the area to be mowed.
1.4.5 Never operate the mower with damaged g uards, shields, or covers. Always have
safety shields, guards, switches, and other devices in place and in proper work ing
condition.
1.5 MAINTENANCE AND STORAGE
1.5.1 Check all bolts frequently to maint ain proper tightness.
1.5.2 Keep all g uar ds, shields, and all safety devices in place and in safe working condition.
1.5.3 Frequently check for worn or deteriorating components that could create a hazard.
1.5.4 All replacement part s m ust be the same as or equivalent to the parts supplied as
original equipment.
1.6 SAFETY SIGNS
1.6.1 Keep all safety signs legible. Remove all grease, dirt and debris from safety signs and
instructional labels.
1.6.2 Safety signs must be replaced if they are missing or illegible.
1.6.3 When new components are installed, be sure that current saf et y sig ns ar e affixed to
the replaced components.
1.6.4 New safety signs may be obtained from Exmark Mfg. Co. Inc.
2
Page 8
1.6.5 Safety signs may be affixed by peeling off the backing t o expose the adhesive surface.
Apply only to a clean, dry surface. Smooth to remove any air bubbles.
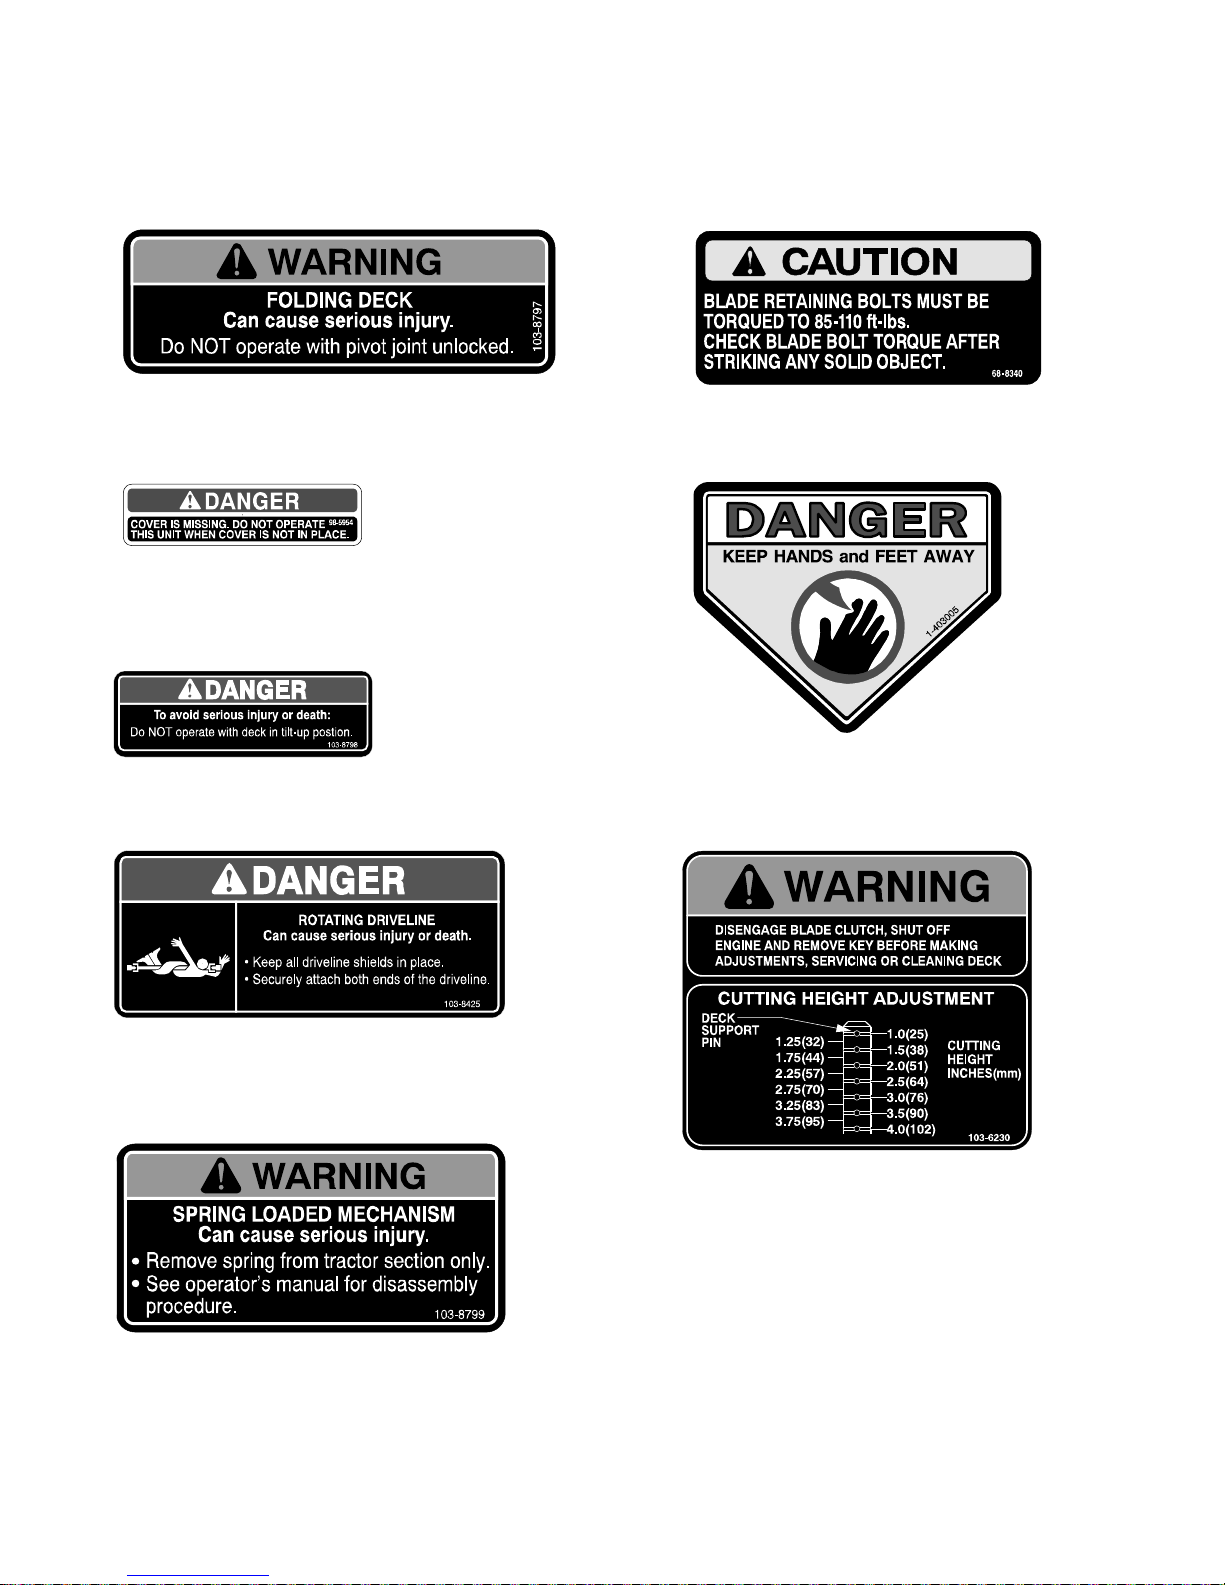
1.6.6 Familiarize yourself with the following safety signs and inst r uct ion labels. They are
critical to the safe operation of your Exmark commercial mower.
PART NO. 103-8797
LOCATION: On Top RH and LH Sides of
PART NO. 98-5954
LOCATION: - On Top of Deck, Under Gear Box Cover
- On LH Frame, Under PTO Shield
- On RH Lower Frame, behind fuel tank
PART NO. 103-8798
LOCATION: Front RH Surface of Front Frame
Front Frame
PART NO. 68-8340
LOCATION: On Top of Deck LH & RH Sides
PART NO. 1-403005
LOCATION: On Top of Mower Deck
LH & RH Sides
PART NO. 103-8425
LOCATION: - On Driveshaft
PART NO. 103-8799
LOCATION: On Top of Front Frame, Near Deck
Springs
PART NO. 103-6230
LOCATION: On Top of Deck,
Centered on Each Side
3
Page 9

2. SPECIFICATIONS
2.1 MODEL NUMBER: CD42CD; CD48CD
2.2 DIMENSIONS
Overall Width 43.2” (109.7 cm) 49.2” (125.0 cm)
Overall Height 13.1” (33.3 cm) 13.1 (33.3 cm)
Overall Length 37.2” (94.4 cm) 39.9” (101.3 cm)
Weight 295 lbs. (134 kg) 325 lbs. (147 kg)
2.3 TORQUE REQUIREMENTS
Bolt Location
Blade Mounting Bolt.....................................................85-110 ft-lbs. (115-149 N-m)
Gearbox Mounting Bolts....................................................30-35 ft-lbs. (41-47 N-m)
Gearbox Assembly Bolts....................................................50-55 ft-lbs. (68-75 N-m)
Torque
42” Deck 48” Deck
3. ASSEMBLY INSTRUCTIONS
3.1 UNCRATE DECK
a) Remove flat hairpins from under front fr am e and discard. See Figure 1.
3.2 ASSEMBLE DISCHARGE CHUTE
a) Locate the 3 holes at the rear of t he m ower deck shown in Figur e 1 and r em ove the 3
#10-24 x 3/4 truss head screws and 3 #10-24 nyloc nuts.
b) Assemble the discharge tube to the mower deck as shown using the har dware rem oved in
3.2.1., with hinge positioned on top of m ower deck .
c) Locat e t he dischar ge tube spring on the mower deck and hook onto t he dischar ge tube
spring bracket. See Figur e 1.
FIGURE 1
DISCHARGE TUBE ASSEMBLY
3.3 ASSEMBLE DECK TO NAVIGATOR
a) Stop engine, wait for all moving parts to stop and remove key.
b) Roll the mower deck up to the Navigator tr act or with the discharge tube down, making sure
the deck springs are located above the drive wheel and below the console on each side.
4
Page 10

c) Raise seat and install dr ive shaft onto jackshaft ( See Figure 2).
FIGURE 2
JACKSHAFT AND DRIVE SHAFT CONNECTION
d) Align deck push arm tubes to tractor push arms and push deck rearward. Secure push
arms with lynch pins on left and right sides of t he unit. See Figure 3.
FIGURE 3
PUSH ARM INSTALLATION
e) Align upper portion of the PTO r ubber guard to the tabs on the fr ont of the console and
secure with a clevis pin and hairpin on each side. See Figure 4.
FIGURE 4
PTO GUARD INSTALLATION
f) Release the deck locking pins on each side, r aise m ower deck to the service position and
secure deck latch onto hook. See sect ion 4. 1. 1, Raising the Deck to the Service Position.
g) Install springs onto the spring anchor pins under the left and right consoles and secure with
a washer and hairpin. See Figure 5.
5
Page 11

FIGURE 5
DECK SPRING INSTALLATION
h) Un-latch deck from raised position, slowly lower deck to gr ound and lock deck locking pins
on each side per section 4.1.2, Lowering the Deck t o t he Operation Position.
3.4 DECK REMOVAL
a) Stop eng ine, wait for all moving parts to stop, and r emove key.
b) Raise mower deck up and latch with deck locking pins per section 4.1. 1, Raising the
Mower Deck to the Service Position.
c) Remove hairpins and washers at the top of the deck lift assist spr ing on each side of the
unit. See Figure 5.
d) Remove the spring from the spring anchor . Repeat for other side of unit.
e) Un-latch deck from raised position and slowly lower deck to ground per sect ion 4. 1.2,
Lowering the Mower Deck to the Operation Position.
NOTE: Deck will become heavier once springs are removed from the anchors. Lower
deck carefully.
f) Remove lynch pins at front of push ar m s on both sides of the unit. See Figure 3.
g) Remove hairpin and clevis from both sides of the PTO guard. See Figure 4.
h) Raise seat and disconnect drive shaft using quick coupler at jackshaft. See Fig ur e 2.
i) Pull mower deck forward to remove from unit.
4. MAINTENANCE & ADJUSTMENTS
POTENTIAL HAZARD
♦ While maintenance or adjustments are being made,
someone could start the engine.
WHAT CAN HAPPEN
♦ Accidental starting of the engine could seriously injure
you or other bystanders.
HOW TO AVOID THE HAZARD
♦ Remove the key from the ig nit ion switch and pull the
wire(s) off the spark plug(s) before you do any
maintenance. Also push the wire(s) aside so it does
not accidentally contact the spark plug( s) .
WARNING
6
Page 12

4.1 DECK RAISING AND LOWERING
4.1.1 Raising the Mower Deck into Service Position:
a) Stop engine, wait for all moving par ts to stop and remove key.
WARNING
POTENTIAL HAZARD
♦ Incorrectly raising or lowering a mower deck can be
dangerous.
WHAT CAN HAPPEN
♦ A dropped mower deck can result in a serious injury or
property damage.
HOW TO AVOID THE HAZARD
♦ Always raise and lower deck on flat, dry ground, free
of any obstructions.
♦ Firmly grasp the deck lift handle and lower in a slow
controlled manner.
♦ Always make sure the deck is securely latched in the
“up” or “down” position.
b) Release t he deck locking pins on each side. See Figure 6.
FIGURE 6
RAISING THE DECK
c) Using deck lift handle, lift deck up and latch in “ up” position (latch is located at
front center of seat). See Figure 6.
WARNING
POTENTIAL HAZARD
♦ Operating the mower deck in the r aised ser vice
position can be dangerous.
WHAT CAN HAPPEN
♦ Engaging the PTO with a deck in t he raised position
can result in a serious injury or property damage.
HOW TO AVOID THE HAZARD
♦ Always lower and lock mower deck in the operation
position before engaging the PTO.
4.1.2 Lowering t he Mower Deck to t he O per ation Position:
a) While firm ly holding ont o deck lift handle, unhook deck latch from tractor section
and slowly lower deck to ground.
7
Page 13

b) Push deck locking pins inward and rotate for ward to secur ely lock deck in
lowered position. See Figure 6.
WARNING
POTENTIAL HAZARD
♦ Operating mower without locking pins securely latc hed
can result in the mower deck folding up unexpectedly.
WHAT CAN HAPPEN
♦ The mower deck folding up unexpectedly can cause
serious injury.
HOW TO AVOID THE HAZARD
♦ Always operate mower with locking pins securely
latched.
4.2 PERIODIC MAINTENANCE
4.2.1 Clean grass build-up under deck.
Service Interval: Daily
a) St op engine, wait for all moving parts to st op, and remove key.
b) Raise mo wer deck and secur e in latched position. See section 4.1.1, Raising
the Mower Deck to the Service Position.
c) Clean out any grass build- up from underside of deck and in dischar ge chute.
d) Lower deck to cutting position and lock deck locking pins. See section 4.1.2,
Lowering the Mower Deck to the Operation Position.
4.2.2 Check mower blades
Service Interval: Daily
a) Stop engine, wait for all moving parts to stop, and r em ove k ey.
b) Lift deck and secure in raised position as stated in Section 4.1.1, Raising the
Mower Deck to the Service Position.
c) Inspect blades and sharpen or replace as required.
d) To remove blade, use a block of wood or locking pliers to hold blade in place and
remove the 1/2-20 x 2 1/4 blade bolt that secures the blade and blade driver.
e) If blade is worn or damaged, remove the shear pins that secure the blade dr iver
to the blade. Re-install a new blade to the blade driver and secure with the
shear pins.
f) Re-install the blade driver (with new blades) by using a block of wood or locking
pliers to hold the blade in place and torque the blade bolt s to 85-110 ft-lbs. (115-
149 N-m).
NOTE: Blade driver flats must be aligned with the flats on the shaft when
installing blade on the mower deck.
g) Lower the mower deck to the operation position. See section 4.1.2, Lowering
the Mower Deck to the Operation Position.
.
8
Page 14

CAUTION
POTENTIAL HAZARD
♦ Operating a mower deck with loose or weakened blade
bolts can be dangerous.
WHAT CAN HAPPEN
♦ A loose or weakened blade bolt could allow a blade
rotating at a high speed to come out from under the deck,
causing serious injury or property damage.
HOW TO AVOID THE HAZARD
♦ Replace the blade bolt after striking a foreign object.
Use only the following replacement parts:
Blade bolt – 92-5816
Washer – 86-1990
♦ DO NOT lubricate the threads of the bolt or spindle before
assembly.
♦ Torque the blade bolt to 85-110 ft. lbs. (115-149 N-m)
FIGURE 7
BLADE BOLT INSTALLATION
4.2.3 Check for loose hardware
Service Interval: Daily
a) St op engine, wait for all moving parts to st op, and remove key.
b) Visually inspect machine for any loose hardware or any other possible
4.2.4 Check tire pressur es
The front caster tires are semi-pneumatic and do not need to be inflated.
NOTE: Do not add any type of tire liner or foam fill material to the tires.
Excessive loads created by foam filled tires may cause failures to the hydro drive
system, frame, and other components. Foam filling tires will void the warranty.
4.2.5 Lubricate grease fittings
Service Interval: Refer to chart.
a) St op engine, wait for all moving parts to st op, and remove key.
b) Lubricate fittings with one to two pumps of NGLI grade #2 multi-purpose gun
grease.
Refer to t he following chart for fit t ing locations and lubrication schedule.
:
:
:
9
Page 15

GREASE FITTING LUBRICATION CHART
FITTING
LOCATIONS
1. Drive Shaft 1 3 40 hours
2. Front Caster Wheel Hub 1 2 8 hours
3. Deck Flip-Up
4. Push Arm Tubes
5. Caster Pivots *0 3 *yearly
∗ See Section 4.2.5 c) for special lubrication instructions on
the front caster pivots and Section 5. 2. 6 for special
lubrication instructions on the rear caster wheel hub.
c) Lubricate caster pivots once a year. Remove hex plug
and cap. Thread grease zerk in hole and pump with
grease until it oozes out around top bearing. Remove
grease zerk and thread plug back in. Place cap back on.
INITIAL
PUMPS
1 4 100 hours
1 2 100 hours
NO. of
PLACES
SERVICE
INTERVAL
4.2.6 Lubricat e cast er wheel hub:
Service Interval: Once Yearly
a) Stop engine, wait for all moving parts t o stop,
and remove key.
b) Remove caster wheel from caster forks.
c) Remove seal guards from the wheel hub.
d) Remove one of the spacer nuts from the
axle assembly in the caster wheel. Note
that thread locking adhesive has been
applied to lock the spacer nuts to the axle.
Remove the axle (with the other spacer
nut still assembled to it) f r om the wheel
assembly.
CASTER WHEEL ASSEMBLY
e) Pry out seals, and inspect bearings for wear or
damage and replace if necessary.
f) Pack the bearings with a NGLI gr ade #1 m ulti-purpose grease.
g) Insert (1) bearing, (1) new seal into the wheel.
NOTE: Seals (Exmark PN 103-0063) must be r eplaced.
h) If the axle assembly has had both spacer nuts removed (or broken loose), apply
a thread locking adhesive to (1) spacer nut and thread onto the axle with the
wrench flats facing outward. Do not t hr ead spacer nut all of the way onto the
end of the axle. Leave approximately 1/8” (3 mm) from the outer surface of the
spacer nut to the end of the axle inside the nut.
i) Insert t he assem bled nut and axle into the wheel on the side of the wheel with
the new seal and bearing.
j) With the open end of the wheel facing up, fill the area inside the wheel around
the axle full of NGLI g r ade #1 multi-purpose grease.
k) Insert the second bearing and new seal into the wheel.
nd
l) Apply a thread locking adhesive to the 2
spacer nut and thread onto the axle
with the wrench flats facing outward.
m) Torque the nut to 75-80 in-lbs. (8-9 N-m), loosen, then re-torque to 20-25 in-lbs.
(2-3 N-m). Make sure axle does not extend beyond either nut.
FIGURE 8
10
Page 16

n) Re-install the seal guards over the wheel hub and insert wheel into caster fork.
Re-install caster bolt and tighten nut fully.
IMPORTANT: To prevent seal and bearing damage, check the bearing
adjustment often. Spin t he caster tire. The tire should not spin freely (more
than 1 or 2 revolutions) or have any side play. If the wheel spins freely, adjust
torque on spacer nut until there is a slight amount of drag. Re- apply thr ead
locking adhesive.
c) Lubricate switch actuator rod with spray type lubricant or light oil.
4.2.7 Change gearbox oil:
Change oil in all 3 gearbox housings after first 50 hrs of operation. Check
every 100 hours thereafter. Add oil as needed until level with oil drain plug.
a) Stop engine, wait for all moving parts to st op, and remove key.
b) Place unit on a level surface.
c) Remove the gearbox and drive shaft assembly from the mower deck. Retain
hardware for re-use.
d) Remove the large oil drain plug on the front of each of the 3 gearboxes and drain
oil. See Figure 9.
e) Remove small magnetic plugs and wipe away any material accumulated on the
plugs. See Figure 9.
FIGURE 9
GEARBOX OIL DRAIN LOCATIONS
f ) Apply a Teflon pipe sealant to all small magnetic plugs and re-install into the
gearbox.
g) Re-install the gearbox and drive shaft assembly to the mower deck.
h) Fill gearbox with Mobil 1 75W-90 gear lube oil unt il level with oil drain plug.
NOTE: Mower deck should remain level to the ground when filling gear box with oil.
Do not fill gearbox with deck raised in the ser vice position.
i) Apply a Teflon pipe sealant to the 3 large oil plugs and re-install into the gear box.
4.2.8 Thread locking adhesives such as “Loctite 242” or “ Fel- Pr o, Pro-Lock Nut Type” are
used on the following fasteners:
a) Cast er wheel spacer nuts.
4.3 ADJUSTMENTS
IMPORTANT: Disengage PTO, shut off engine, wait f or al l moving parts to stop, and
remove key before servicing, cleaning, or making any adjustments to the unit.
4.3.1 Cutting Heig ht Adjustment
a) Stop engine, wait for all moving part s t o st op, and remove key.
b) Move cotter pins on four deck support pins to proper hole for height of cut
desired.
:
11
Page 17

4.3.2 Deck Leveling:
a) Position mower on a flat surface.
b) Stop engine, wait for all moving parts to stop, and r em ove k ey.
c) Inflate drive tires t o 15 psi ( 103 kPa).
d) Verify all hairpins are in the 3” deck height holes with the spacers under the hair
pins. See Figure 10.
e) Shorten/lengthen each deck support pin to obtain blade tip height of 3.0” at the
front of the deck and 3.25” at the rear of the deck.
FIGURE 10
DECK SUPPORT PIN ASSEMBLY
4.3.3 Caster pivot bearings pr e-load adjustment
:
a) Remove dust cap f r om caster and tighten nyloc
nut until washers are flat. Back the nyloc off 1/4
of a turn to properly set the pr e- load on t he
bearings.
Note: If disassembled, make sure the spring
washers are reinstalled as shown in Figure 11.
4.3.4 Deck Locking pin stop adjustment:
CASTER ADJUSTMENT
FIGURE 11
a) Slide deck locking pins in on both sides and
rotate to lock the deck in t he “ operation” position.
b) Loosen the jam nut and turn the stop screw clockwise until the locking pins is
tight and cannot be rotated by hand. See Figur e 12.
c) Loosen the stop screw counter clockwise 1/2 turn and tighten the jam nut.
d) Test the locking pin t o m ake sure it slides freely. Readjust if necessary.
FIGURE 12
DECK LOCKING PIN ADJUSTMENT
12
Page 18

5. PARTS LIST
5.1 DECK GROUP
Item Part No.
1 1-403005 Danger, Decal........................................2
2 1-413425 Spacer, Deck Support............................4
3 1-513690 Clip, Deck Holdup Rod.... .......... .............1
4 1-523420 Bumper..................................................2
5 1-613204 Balljoint..................................................2
6 1-803075 Screw, Truss Head #10-24 x 3/4.......... ..14
7 1-806003 Hairpin, Cotter........................................2
8 30-8770 Washer..................................................2
9 67-7490 K ey, Machine 1/4 x 1/4 x 1 1/2............ ...1
10 68-8340 Decal, Blade B ol t Torque............. ..........2
11 92-5816 Bolt, Bl ade 1/2-20 x 2 1/4.. .......... .......... .2
12 98-5954 Decal, Danger........................................2
13 99-0283 Bolt, Shear 1/4-20 x 7/8 ................. ........4
14 1-808280 Pin, Clevis 5/16 x 1 ........ .......... ..............2
15 103-9487 Asm, Discharge Tube .......... .......... ........1
16 109-0321 Asm, Front Deck Height Adj.... .......... .....2
17 103-3698-03 Guard, Plenum.......................................1
18 103-3700 Roller, Deck...........................................2
19 109-0322 Asm, Rear Deck Hei ght Adj. (42”)..........2
109-0323 Asm, Rear Deck Height Adj . (48”)..........2
20 103-9485 Asm, Drive Shaft W/Decal ............ .........1
103-9327 Asm, Cross "U" Joi nt ....................... ......2
103-9328 Yoke, Keyed ..........................................1
103-9329 Yok e, Quick Disconnect............ .......... ...1
21 103-4230 Spacer, Roller........................................2
22 103-4974 Hinge.....................................................1
23 103-5868-01 Wld, Spring Mount .................................1
24 103-5979 Guard, PTO ...........................................1
25 103-6183-03 Bracket, PTO Guard ............................. .1
26 103-6230 Decal, Cutting Height Adjustment ..........2
27 103-6290-03 Plate, Drive Line Cover ...... ................... .1
28 103-7353 Hairpin, Cut Height.................................4
29 103-7705 Driver, Blade..........................................2
30 103-7994 Balljoint..................................................1
31 103-8307 Latch, Deck............................................1
32Q 103-8363 Asm, Deck Latch....................................1
33 103-8425 Decal, Driveline......................................1
34 103-8496 Nut, Jam 7/8-9 .......................... .......... ...2
35 103-8610 Stand-Off, 1/2 Hex .................. .......... . ....2
36 103-8841 Spring....................................................1
37 321-2 Screw, HH 1/4-20 x 1/2... . ................... ...2
38 322-3 Screw, HH 5/16-18 x 3/4........... .............7
Exmark red touch up paint (spray paint - P/N 1-850337 - .6 oz liquid bottle - P/N 103-9140).
V Use Pro-Lock, Nut Type (P/N 1-840022, .5ml tube) on setscrew, item #45.
O Deck assembly includes anti skid pad, item #66.
P Gearbox cover assembly includes anti skid pad, item #62.
Q Deck latch assembly includes nyloc nut, item #52.
Rear deck height adj. assembly includes (1) whizlock nut. Item #48.
Description
Qty.
Item Part No.
39 322-5 Screw, HH 5/16-18 x 1...........................3
40 323-11 Screw, HH 3/8-16 x 2 1/4 (42”)..............2
323-8 Screw, HH 3/8-16 x 1 1/2 (48”) ..............2
41 323-7 Screw, HH 3/8-16 x 1 1/4.......................4
42 323-9 Screw, HH 3/8-16 x 1 3/4.......................1
43 325-14 Screw, HH 1/2-13 x 3 1/2.......................2
44 3219-3 Nut, Hex 3/8-24......................................3
45V 3247-2 Setscrew, 3/8-16 x 3/8...........................1
46 3256-14 Washer, #10 Std....................................9
47 3290-134 Screw, HH Machine 10-24 x 5/8.............1
48 3290-357 Nut, Whizlock 3/8-16 .............................6
49 3296-2 Nut, Nyloc #10-24..................................15
50 3296-29 Nut, Nyloc 5/16-18................................. 3
51 3296-39 Nut, Nyloc 3/8-16...................................1
52 3296-6 Nut, Nyloc 3/8-24 ...................................1
53 32128-20 Nut, Whizlock 5/16-18 ...........................4
54 32128-49 Nut, Whizlock 1/2-13 .............................2
55 114439 Rivet......................................................5
56 103-9024 Decal, Commercial (42")........................ 1
1-403131 Decal, Commercial (48")........................ 1
57 106-5620 Spacer (42") ..........................................2
106-5597 Spacer (48") ..........................................2
58 103-3460 Gearbox,(42") Std.................................. 1
103-3387 Gearbox,48 Std......................................1
59O 103-9479 Asm, Deck W/ Decals (42") ....................1
103-9478 Asm, Deck W/Decals (48") 1
O
60 103-4209 Blade, LH (42") Black ............................1
103-4207 Blade, LH (48") Black ............................1
61 103-4210 Blade, RH (42") Red.............................. 1
103-4208 Blade, RH (48") Red ..............................1
62P 103-9497 As m, Gearbox Cover W/Decal (42") ...... 1
103-9496 Asm, Gearbox Cover W/Decal (48" ) ...... 1
P
63 103-8556-01 Wld, Baffle Discharge LH (42")..............1
103-8590-01 Wld, Baffle Discharge LH (48"). ............. 1
64 103-8557-01 Wld, Baffle Discharge RH (42") ............. 1
103-8591-01 Wld, Baffle Discharge RH (48") ............. 1
65 103-8626 Pad, Anti Skid (42")...............................1
103-8629 Pad, Anti Skid (48") ............................... 1
66 103-8667 Pad, Anti Skid (42")...............................1
103-8630 Pad, Anti Skid (48") ............................... 1
67 3296-42 Nut, Nyloc 1/4-20...................................4
68 3256-23 Washer, 5/16 SAE................................. 3
Description
Qty.
13
Page 19

5.1 DECK GROUP
14
Page 20

5.2 FRONT FRAME GROUP
Item Part No.
1 1-303334 Was her, Spring Disk 5/16 ................ ......2
2 1-513810 Bushing, Flanged...................................4
3 1-543508 Cup, Bearing Tapered Roller ......... ........4
4 1-543509 Cone, Bearing Tapered Roller................4
5 1-543511 Seal, Grease..........................................2
6 1-633508 Washer, Spring Disk..............................6
7 1-811010 Plug .......................................................2
8Q 103-3729-01 Wld, Deck P i vot (RH)....... ......................1
9Q 103-3732-01 Wld, Deck Pivot (LH) .................... .........1
10 103-3772 Plug, Spring Adjuster.............................2
11 103-3773 Shaft, Spring Adjustment .......................2
12 103-4017 Spacer, Front Caster. .......... .......... .........2
13 103-4118 Wld, Deck Loc k (LH) ................... ...........1
14 103-4119 Wld, Deck Loc k (RH).............................1
15 103-9482 Asm, Deck Lift Handl e W/Decal............ .1
16 103-4284 Wld, Spring Tensioner ...........................2
17 103-4285 Mount, Deck Lift Spring....... .......... .........2
18 103-4588 Bearing, Roller Straight..........................2
19 103-4882 Cap, Grease ..........................................2
20 103-7353 Pin, Cut Height.......................................2
21 103-7436 Bushing, Deck Support ... .......... .......... ...2
22 103-7448 E-Ring....................................................2
23 103-7865 Wld, Spring Tube...................................2
24 103-7971 Cover, Deck Spring..... .......... .................2
25 103-8504 Decal, Navigator Model..........................1
26 103-8667 Pad, Anti Skid (42”)................ .......... ......1
103-8630 Pad, Anti Skid (48”)........ .......... .......... ....1
Exmark red touch up paint (spray paint - P/N 1-850337 - .6 oz liquid bottle - P/N 103-9140).
V Includes frame weldment plus items #7, #13, #14, #19, #21, #25, #37, #38, and Decals.
Q Include zerk, item #30.
O Includes (2) nyloc nuts, item #38.
Description
Qty.
Item Part No.
27 103-8797 Decal, Folding Deck...............................2
28 103-8798 Decal, Danger........................................1
29 103-8799 Decal, Spring.........................................2
30 302-19 Zerk, 1/4-28 Str......................................4
31 302-61 Zerk, 45° 1/4-28..................................... 4
32 322-4 Screw, HH 5/16-18 x 7/8........................2
33 325-38 Screw, HH 1/2-13 x 4 3/4.......................2
34 3218-3 Nut, Jam 3/8-16.....................................2
35 3243-5 Setscrew, SQH 3/8-16 x 1 .....................2
36 3256-28 Washer, 3/4 SAE................................... 2
37 3296-29 Nut, Nyloc 5/16-18................................. 2
38 3296-39 Nut, Nyloc 3/8-16...................................4
39 3296-45 Nut, Nyloc 1/2-13...................................2
40 3296-51 Nut, Nyloc 3/4-10...................................2
41 32120-33 Ring, Retaining......................................2
42 32121-3 Rollpin 3/16 x 3/4...................................2
43 614672 Screw, Shoulder 3/8-16 x 1.295.............2
44 103-3655-01 Wld, Fork & Spindle...............................2
45 103-4324 Asm, Wheel & Tire 8x3.00-4 Sp.............2
46V 103-9481 Asm , Front Frame W/Decals (42"). ........ 1
103-9480 Asm, Front Frame W/Decals (48").........1
V
47 103-4281 Spring, Extension...................................2
48 103-9495 Asm, Caster Wheel W/Axle................... 1
49O 103-4280 Asm, Spring Lift Assist...........................2
Description
Qty.
15
Page 21

5.2 FRONT FRAME GROUP
16
Page 22

5.3 GEARBOX COMPONENTS FOR 103-3460 & 103-3387
Item Part No.
1 109-0188 Asm, I nput Pinion 42”................ .......... ...1
109-0189 As m, Input Pinion 48”............ .......... .......1
2V 109-0190 Center Housing W/Plugs... .......... ...........1
3V 109-0191 End Housing W/Plugs & Race ... . ...........2
4O 109-0192 Output S haft, Gear & Brgs (42” LH) ..... .1
109-0193 Output Shaft, Gear & Brgs (48” LH) ... . ..1
O
5O 109-0194 Output S haft, Gear & Brgs (42” RH)......1
109-0195 Output Shaft, Gear & Brgs (48” RH)......1
O
6R 109-0196 Output Cap W/Race...............................2
7VR 109-0197 Asm, Connector Tube 42” S hort......... ....1
Exmark red touch up paint (spray paint - P/N 1-850337 - .6 oz liquid bottle - P/N 103-9140).
V Includes o-rings, item #11
O Includes (1) output seal assembly, item #9
Apply bead of Mobil HTS grease (P/N 103-5217 1.5 oz packet) between seal, item #10 and v-ring, item #13.
S Does not include screw, item #14.
Description
Qty.
Item Part No.
109-0198 Asm, Connector Tube 48” Short............1
V
8VR 109-0199 Asm, Connector Tube 42” Long............. 1
109-0200 Asm, Connector Tube 48” Long.............1
V
9 109-0201 Kit, Output Seal ..................................... 2
10 109-0202 Seal, Input.............................................1
11 109-0203 O-ring....................................................7
12 109-0204 Washer, Cupped....................................1
13 109-0205 V-ring.....................................................1
14 93-3987 Screw, HH 3/8-24 x 1 1/4 Gr8................28
Description
Qty.
17
Page 23

6. 2-Year Limited Warranty
Exmark Turf Equipment
Conditions and Products Covered
Exmark Mfg. Co. Inc. and its affiliate, Exmark Warranty
Company, pursuant to an agreement between them, jointly
warrant on the terms and conditions herein, that we will repair,
replace or adjust any part manufactured by Exmark and found
by us (in the exercise of our reasonable discretion) to be
defective in factory materials or workmanship for a period of
two years.
This warranty applies to Exmark turf equipment purchased on
or after October 1, 2004 sold in the US or Canada. This
warranty may only be assigned or transferred to a second (or
third) owner by an authorized Exmark dealer. The warranty
period commences upon the date of the original retail
purchase.
Products
• All Products (except as noted below) 2 years
• All Attachments and Accessories 1 year
• Metro 21 Series 1 year
• Belts and Tires 90 days
• Battery 1 Year Prorated
• Engine* Warranty is covered by engine manufacturer
*Please refer to the engine manufacturer’s warranty statement
that is included in the literature packet. We are not authorized
to handle warranty adjustments on engines.
This warranty only includes the cost of parts and labor.
This warranty does not cover the following:
• Pickup and delivery charges to and from any authorized
• Any damage or deterioration due to normal use, wear
• Cost of regular maintenance service or parts, such as
• Any product or part which has been altered or misused
• Any repairs necessary due to use of parts, accessories
All warranty work must be performed by an authorized Exmark
Service Dealer using Exmark approved replacement parts.
1. Contact any Exmark Service Dealer to arrange service at
their dealership. To locate a dealer convenient to you,
access our website at www.exmark.com. U.S. Customers
may also call 402-223-6375.
2. Bring the product and your proof of purchase (sales
receipt) to the Exmark Service Dealer.
If for any reason you are dissatisfied with the Service Dealer’s
analysis or with the assistance provided, contact us at:
Exmark Customer Service Department
The Exmark Warranty Company
2101 Ashland Avenue
Beatrice, NE 68310
402-223-6375 or
service@exmark.com
Warranty Period
Items and Conditions Not Covered
Exmark Service Dealer.
and tear, or exposure.
filters, fuel, lubricants, tune-up parts, and adjustments.
or required replacement or repair due to normal wear,
accidents, or lack of proper maintenance.
or supplies, including gasoline, oil or lubricants,
incompatible with the turf equipment or other than as
recommended in the operator's manual or other
operational instructions provided by Exmark.
Instructions for Obtaining Warranty Service
(For units purchased on or after October 1, 2004)
Owner’s Responsibilities
The Exmark turf equipment, including any defective part,
must be returned to an authorized Exmark service dealer
within the warranty period. This warranty extends only to
turf equipment operated under normal conditions. You
must properly service and maintain your Exmark product
as described in the operator’s manual. Such routine
maintenance, whether performed by a dealer or by you, is
at your expense.
As a condition to this warranty, customer shall have read
the operator's manual and shall have completed and
submitted to Exmark Warranty Company, within the
prescribed time, the Exmark warranty registration.
General Conditions
The sole liability of Exmark and Exmark Warranty Company
with respect to this warranty shall be repair and replacement
as set forth herein. Neither Exmark nor Exmark Warranty
Company shall have any liability for any other cost, loss
or damage, including but not limited to, any incidental
or consequential loss or damage.
In particular, we shall have no liability or responsibility for:
• Expenses related to gasoline, oil or lubricants.
• Travel time, overtime, after hours time or other
extraordinary repair charges or charge relating to
repairs or replacements outside of normal business
hours at the place of business of the authorized
Exmark service dealer.
• Rental of like or similar replacement equipment
during the period of any warranty, repair or
replacement work.
• Any telephone or telegram charges or travel charges.
• Loss or damage to person or property other than that
covered by the terms of this warranty.
• Any claims for lost revenue, lost profit or additional
cost as a result of a claim of breach of warranty.
• Attorney's fees.
No Claim of breach of warranty shall be cause for
cancellation or rescission of the contract of sale of any
Exmark mower.
There are no understandings, agreements, representations,
or warranties, express or implied, including but not limited to
any regarding the merchantability (that product is fit for
ordinary use) or fitness for use (that product is fit for a
particular purpose), not specified herein, respecting the
equipment which is the subject of this warranty.
Some states do not allow exclusions of incidental or
consequential damages, or limitations on how long an
implied warranty lasts, so the above exclusions and
limitations may not apply to you.
This warranty gives you specific legal rights, and you may
also have other rights which vary from state to state.
- 18 -
Page 24

M
SEE EXMARK’S COMPLETE
LINE OF ACCESSORIES
RIDING ACCESSORIES
CUSTOM RIDE SEAT SUSPENSION SYSTEM
DECK LIFT ASSIST KIT
HITCH KIT
LIGHT KIT
MICRO-MULCH SYSTEM
ROLL OVER PROTECTION SYSTEM (ROPS)
SNOW BLADE
SUN SHADE
TRASH CONTAINER
TURF STRIPER
ULTRA VAC COLLECTION SYSTEM
ULTRA VAC QUICK DISPOSAL SYSTEM
WALK BEHIND ACCESSORIES
GRASS CATCHER
MICRO-MULCH SYSTEM
STEERABLE SULKY
SULKY HITCH KIT
TURF STRIPER
E-Z RIDER
Check us out on the Web:
www.exmark.com
© 2005 EXMARK MFG. CO. INC. PART NO. 103-8614 Rev A.
INDUSTRIAL PARK BOX 808 (402) 223-6300
BEATRICE, NE 68310 FAX (402) 223-5489
ALL RIGHTS RESERVED PRINTED IN U.S.A.
FG. CO. INC.
®
 Loading...