

Page 1

AT
AT
10.1
10.1
SERIES CHARGERS
SERIES CHARGERS
Section 94.20
INSTALLATION & OPERATING
INSTRUCTIONS
FOR
2011-11
JA0128-01
AT10.1 SERIES
BATTERY CHARGER
GROUP I
(6-25 ADC OUTPUT)
I & O MANUALS
I & O MANUALS
Page 2
HOW TO READ THE AT10.1 MODEL NUMBER
GROUP I RATINGS (6-25 Adc)
Your AT10.1 model number is coded to describe the options that are included. Please find the model
number on the data nameplate and write it in the spaces provided below. Then follow the chart to
determine the configuration of your battery charger.
AT10 X X
A B C D E F K L M N P Q R
DESCRIPTION CODE FEATURE DESCRIPTION CODE FEATURE
A SERIES AT10 AT10.1 CHARGER S STANDARD
NOMINAL
B
DC OUTPUT
VOLTAGE
NOMINAL
C
DC OUTPUT
CURRENT
D FILTERING
AC INPUT
E
VOLTAGE
DESCRIPTION CODE FEATURE DESCRIPTION CODE FEATURE
1 - 120/208/240 Vac multi-tap input - Unit is wired and shipped from factory at specified voltage.
2 - 480 Vac input requires addition of medium or high ampere interrupting capacity circuit breakers.
3 - Special order, consult factory for availability.
012 12 Vdc M MEDIUM AIC
024 24 Vdc
048 48 Vdc
130 130 Vdc AUX SUPPLIED
006 6 Adc
012 12 Adc
016 16 Adc G SUPPLIED
020 20 Adc
025 25 Adc
U UNFILTERED L SUPPLIED
F FILTERED
E ELIMINATOR
120 120 Vac 60 Hz 1 F APPLIED
208 208 Vac 60 Hz 1
240 240 Vac 60 Hz 1 S APPLIED
480 480 Vac 60 Hz 2
220 220 Vac 50/60 Hz 3
380 380 Vac 50/60 Hz 3 Q
416 416 Vac 50/60 Hz 3 R
INPUT AND OUTPUT CIRCUIT BREAKER INTERRUPTING RATINGS
CODE TYPE
S STANDARD 240 Vac: 10,000 AIC
M MEDIUM AIC
H HIGH AIC
4 - Rating applies to 130Vdc 16-25 Adc units.
5 - Approximate rating applies to all other units.
(ALL INPUT VOLTAGES)
240 Vac: 25,000 AIC
480 Vac: 18,000 AIC
240 Vac: 65,000 AIC
480 Vac: 25,000 AIC
NOTE
The model number listed on the charger data nameplate does not include any field-installed
options. Also, certain accessories are not included in the model number, even if they are shipped with the
charger. Check off below any accessories that were included, or that you install yourself.
CIRCUIT
BREAKER
F
RATING
(SEE TABLE)
AUX ALARM
K
RELAY BOARD
L GROUND PAD
LIGHTNING
M
ARRESTOR
FUNGUS
N
PROOFING
STATIC
P
PROOFING
NOT USED
NOT USED
AC RATINGS
H HIGH AIC
XXX NOT SUPPLIED
X NOT SUPPLIED
X NOT SUPPLIED
X NOT APPLIED
X NOT APPLIED
X
X
DC RATINGS
(125 Vdc)
10,000 AIC
5,000 AIC
10,000 AIC
20,000 AIC
4
5
floor/rack mounting brackets analog ac voltmeter (penthouse-mounted)
NEMA-2 type drip shield assembly analog ac ammeter (penthouse-mounted)
NEMA-4/12/13 type enclosure barrier type auxiliary alarm terminal block(s)
cabinet heater assembly external temperature compensation probe
pad lock for front panel door DNP3 Level 2 / Modbus communications module
zero-center ground detect meter forced load sharing interconnection cable
Please find the serial number on the
data nameplate and record it here:
Page 3

IMPORTANT SAFETY INSTRUCTIONS
PLEASE READ AND FOLLOW
ALL SAFETY INSTRUCTIONS
1. Before using this equipment, read all instructions and cautionary
markings on: A) this equipment, B) battery, and C) any other equipment
to be used in conjunction with this equipment.
2. This manual contains important safety and operating instructions, and
therefore should be filed for easy access.
3. Remove all jewelry, watches, rings, etc. before proceeding with
installation or service.
4. Do not touch any uninsulated parts of this equipment, especially the
input and output connections, as there is the possibility of electrical
shock.
5. During normal operation, batteries may produce explosive gas. Never
smoke, use an open flame, or create arcs in the vicinity of this equipment
or the battery.
6. Maintain at least 6in / 152mm clearance from all obstructions on the top,
bottom and sides of this equipment. Allow sufficient clearance to open
the front panel for servicing.
7. Turn this equipment off before connecting or disconnecting the battery
to avoid a shock hazard and/or equipment damage.
8. Connect or disconnect the battery only when the battery charger is off to
prevent arcing or burning.
9. De-energize all ac and dc inputs to the battery charger before servicing.
10. Do not operate battery charger if it has been damaged in any way. Refer
to qualified service personnel.
11. Do not disassemble battery charger. Only qualified service personnel
should attempt repairs. Incorrect reassembly may result in explosion,
electrical shock, or fire.
12. Do not install the battery charger outdoors, or in wet or damp locations
unless specifically ordered for that environment.
PLEASE READ AND FOLLOW
ALL SAFETY INSTRUCTIONS
i
Page 4

TABLE OF CONTENTS
QUICK OPERATION.................................................................................................. Back Cover
HOW TO READ THE AT10.1 MODEL NUMBER.......................................... Inside Front Cover
IMPORTANT SAFETY INSTRUCTIONS...................................................................................... i
1 Receiving and Installing the AT10.1 Battery Charger
1.1 Storing the AT10.1................................................................................................. 2
1.2 Reporting shipping damage...................................................................................2
1.3 Unpacking and inspecting the AT10.1...................................................................2
Inspection checklist................................................................................................ 2
1.4 Moving the AT10.1.................................................................................................3
Enclosure type and weight table............................................................................3
1.5 Mounting the AT10.1 ............................................................................................. 3
1.5.1 Wall-Mounting the AT10.1............................................................................... 4
1.5.2 Floor-Mounting the AT10.1..............................................................................6
1.5.3 Rack-Mounting the AT10.1..............................................................................8
1.6 Changing transformer taps .................................................................................. 10
1.7 Making the ac input connections......................................................................... 12
1.8 Making the dc output connections....................................................................... 14
1.9 Wiring the AT10.1 for remote sensing.................................................................16
1.10 Wiring to the remote alarm contacts.................................................................... 18
Auxiliary Relay Board (optional) .......................................................................... 19
1.11 Installing the temperature compensation assembly (optional)............................20
Using temperature compensation........................................................................ 22
1.12 Installing the AT10.1 for remote communications (optional)............................... 23
1.13 Installing the AT10.1 for forced load sharing (optional).......................................23
2 Operating the AT10.1 Battery Charger
2.1 Starting the AT10.1
2.1.1 Understanding the start-up sequence...........................................................24
2.1.2 Checking the installation ............................................................................... 24
2.1.3 Starting the AT10.1 ....................................................................................... 24
Using the digital meter................................................................................... 24
Factory settings table.................................................................................... 25
2.2 Using the AT10.1 front panel features
2.2.1 If the meter displays an error message......................................................... 26
2.2.2 Selecting the meter mode ............................................................................. 26
2.2.3 Selecting the Float or Equalize mode ........................................................... 27
2.2.4 Choosing the Equalize method.....................................................................27
Manual Timer method ................................................................................... 27
Manual Equalize method...............................................................................28
Auto-Equalize Timer method......................................................................... 28
2.2.5 Testing the front panel indicators & Summary Alarm Relays........................29
2.2.6 Testing the Auxiliary Relay Board.................................................................29
2.2.7 Interpreting the alarm indicators.................................................................... 29
ii
Page 5

TABLE OF CONTENTS
2.3 Setting the AT10.1 parameters
2.3.1 Understanding parameter settings ................................................................30
2.3.2 Setting the Float and Equalize voltages........................................................31
2.3.3 Setting the Equalize timer..............................................................................32
2.3.4 Setting the Alarms.........................................................................................32
Setting the high and low dc voltage alarms...................................................33
Adjusting ground detection sensitivity ...........................................................34
Disabling the ground detection alarm............................................................35
2.3.5 Setting the current limit value........................................................................35
2.3.6 Enabling the high dc voltage shutdown feature.............................................36
2.3.7 Adjusting the Voltmeter accuracy..................................................................37
2.3.8 Using the Low Level Detector (LLD)..............................................................38
2.3.9 Using the front panel security feature............................................................39
2.4 Performing routine maintenance..........................................................................40
Sample preventive maintenance procedure..................................................42
3 Servicing the AT10.1 Battery Charger
3.1 A step-by-step troubleshooting procedure...........................................................44
3.2 Interpreting front panel error messages...............................................................45
3.3 Using the troubleshooting chart...........................................................................48
3.4 Troubleshooting chart begins on..........................................................................49
3.5 Replacing defective components.........................................................................58
3.6 Ordering replacement parts .................................................................................64
Replacement parts tables (begin on)...................................................................64
APPENDIX A: AT10.1 Performance Specifications ...............................................................70
APPENDIX B: Field Installable Accessories ..........................................................................71
APPENDIX C: Standard Drawings *
Outline: AT10.1 Group I Battery Charger NEMA-1 Style-586 Enclosure..................................... 72
Outline: AT10.1 Group I Battery Charger NEMA-1 Style-594 Enclosure..................................... 73
Optional AT10.1 Group I Enclosure Dimensions (with penthouse and/or drip shield) ................. 74
Internal Component Layout: AT10.1 Style-586/594 Enclosure w/Common Options....................76
Instrument Panel / PC Board Detail: AT10.1 Group I Battery Charger........................................ 78
Schematic: AT10.1 Group I Battery Charger - Standard w/o Options.......................................... 80
Schematic: AT10.1 Group I Battery Charger - with Common Options......................................... 82
Connection Diagram: AT10.1 Group I Battery Charger - Standard w/o Options.......................... 84
Connection Diagram: AT10.1 Group I Battery Charger - with Common Options.........................86
APPENDIX D: Recommended Float/Equalize Voltages / Temp. Compensation...............88
APPENDIX E: Communications Module.................................................................................89
APPENDIX F: Forced Load Sharing........................................................................................90
APPENDIX G: UL Data..............................................................................................................92
MANUAL SPECIFICATIONS (document control information / online availability).....................94
* Note: A customized record drawing package is available for your AT10.1 battery charger, featuring an
itemized internal component layout, electrical schematic with componen t ratings, and a full connection
diagram. If the standard drawings featured in this manual ar e not sufficient, please contact your Sales
Representative for drawing availability from the battery charger manufacturer.
iii
Page 6

RECEIVING THE AT10.1
1. RECEIVING THE AT10.1
1.1. STORING THE AT10.1
If you store the AT10.1 for more than a few days before installation, you
should store it in its original shipping container, and in a temperature
controlled, dry climate. Ambient temperatures of 32 to 122° F / 0 to 50° C
are acceptable. Storage should not exceed 2 years due to the limited shelf
life of the dc filter capacitors when they are not in service.
1.2. REPORTING SHIPPING DAMAGE
If, on delivery of the AT10.1 or related goods, you discover any damage
or shortage, make notation on all copies of delivering carrier's delivery
receipt before signing, and notify the delivery person of your findings. If
loss or damage is discovered after delivery, notify delivering carrier
immediately and request an inspection. The manufacturer does not assume
any liability for damage during transportation or handling.
Should the goods require an inspection by or return to the manufacturer,
please contact your sales representative for further instructions. Any
returned material must be properly packed in compliance with shipping
regulations. It is preferable to use the original shipping materials if
possible. Mark the outside of the shipping container with the Return
Material Authorization (RMA) number issued by the manufacturer.
1.3. UNPACKING AND INSPECTING THE AT10.1
Carefully remove all shipping materials from the AT10.1. Remove the
AT10.1 from the shipping pallet for inspection. Save all shipping
materials until you are sure that there is no shipping damage.
Once the AT10.1 is unpacked, inspect the unit for possible shipping
damage, using the checklist below. If shipping damage has occurred, refer
to Section 1.2 on this page for proper reporting.
INSPECTION CHECKLIST
Enclosure exterior and interior are not marred or dented.
There is no visible damage to exterior or interior components.
All internal components are secure.
Printed circuit boards are firmly seated on their standoffs.
All hardware is tight.
All wire terminations are secure.
The User's Manual is included.
You received all items on the packing list.
2
Page 7
1.4. MOVING THE AT10.1
Once you have established that the AT10.1 is undamaged, identify the
enclosure style and weight of your unit. Refer to the table below.
AT10.1 Enclosure Style and Shipping Weight Table
Group I NEMA-1 Cabinets (Style-586 / Style-594)
Output
Voltage 6 Adc 12 Adc 16 Adc 20 Adc 25 Adc
INSTALLING THE AT10.1
Ampere Rating
Style-586
12 Vdc
24 Vdc
48 Vdc
130 Vdc
NOTE: Actual unit is approximately 20 lbs / 9kg below listed shipping weight in table.
44 lbs
20 kg
Style-586
44 lbs
20 kg
Style-586
58 lbs
26 kg
Style-586
80 lbs
36 kg
Style-586
44 lbs
20 kg
Style-586
58 lbs
26 kg
Style-586
75 lbs
34 kg
Style-594
147 lbs
67 kg
Style-586
67 lbs
30 kg
Style-586
75 lbs
34 kg
Style-594
110 lbs
50 kg
Style-594
193 lbs
88 kg
Style-586
67 lbs
30 kg
Style-586
75 lbs
34 kg
Style-594
110 lbs
50 kg
Style-594
193 lbs
88 kg
Style-586
67 lbs
30 kg
Style-586
75 lbs
34 kg
Style-594
110 lbs
50 kg
Style-594
193 lbs
88 kg
The AT10.1 Style-586 & Style-594 enclosures do not feature lifting eyes
for moving. Whenever possible, move the unit with a forklift truck, using
the supplied shipping pallet. To lift or relocate the AT10.1 into a wallmount or rack-mount location, use a heavy-duty sling on a hoist or forklift
truck applicable for the enclosure size and unit weight listed above.
For further AT10.1 standard cabinet information, see the outline drawings
for the Style-586 (JE5023-03
) and Style-594 (JE5024-03) enclosures in
Appendix C on pages 72 and 73.
1.5. MOUNTING THE AT10.1
Chose the mounting method for the unit enclosure from the table below.
MANUAL
SECTION
1.5.1 Wall-Mounting
1.5.2 Floor-Mounting OPTIONAL OPTIONAL
1.5.3
3
MOUNTING METHOD
STANDARD STANDARD
19in / 483mm Rack-Mounting OPTIONAL N/A
23-24in / 584-610mm
Rack-Mounting
OPTIONAL OPTIONAL
ENCLOSURE
Style-586 Style-594
Page 8
INSTALLING THE AT10.1
1.5.1. Wall-Mounting the AT10.1
Wall-mounting the AT10.1 is the standard means to install the Group I
enclosures (Style-586 & Style-594). In planning for wall mounting of the
AT10.1, consider the following:
1. The wall must be strong enough to properly support the weight of the
AT10.1. See the Weight Table located in Section 1.4 on page 3. The weight
of your AT10.1 may be different from the table value, depending on options
or accessories you ordered.
2. Select conduit entrances carefully. Use of the pref-fab knockouts on the
sides or bottom of the enclosure will allow removal of the cabinet shroud
(and internal access for servicing) without removal of unit from the wall.
3. The location:
• Should be free of drips and splatter. If dripping liquids are a problem,
install a drip shield kit (EI0191-00). For kit availability, see ordering
information in Appendix B on page 71.
• Should be between 32 and 122 °F / 0 and 50 °C, with relative humidity
between 5 and 95% non-condensing.
• Must be free of explosive materials.
4. Maintain at least 6in / 152mm of free air on top, bottom and both sides for
cooling air.
5. Allow 36in / 914mm front clearance for operation and maintenance.
4
Style-586 Enclosure Style-594 Enclosure
Page 9

INSTALLING THE AT10.1
PROCEDURE
To wall-mount the AT10.1, install four (4) .25in / 6.4mm bolts on the wall
rated to support the charger weight plus a safety factor of at least two (2)
times. Place the AT10.1 on the bolts, add appropriate mounting hardware
and tighten. Refer to the graphics below for mounting dimensions and
specifications.
WALL-MOUNTING THE AT10.1 - GRAPHICS
NOTE
1. For further AT10.1 standard cabinet information, see the outline
drawings for the Style-586 (JE5023-03
) and Style-594 (JE5024-03)
enclosures in Appendix C on pages 72 and 73.
5
Page 10
INSTALLING THE AT10.1
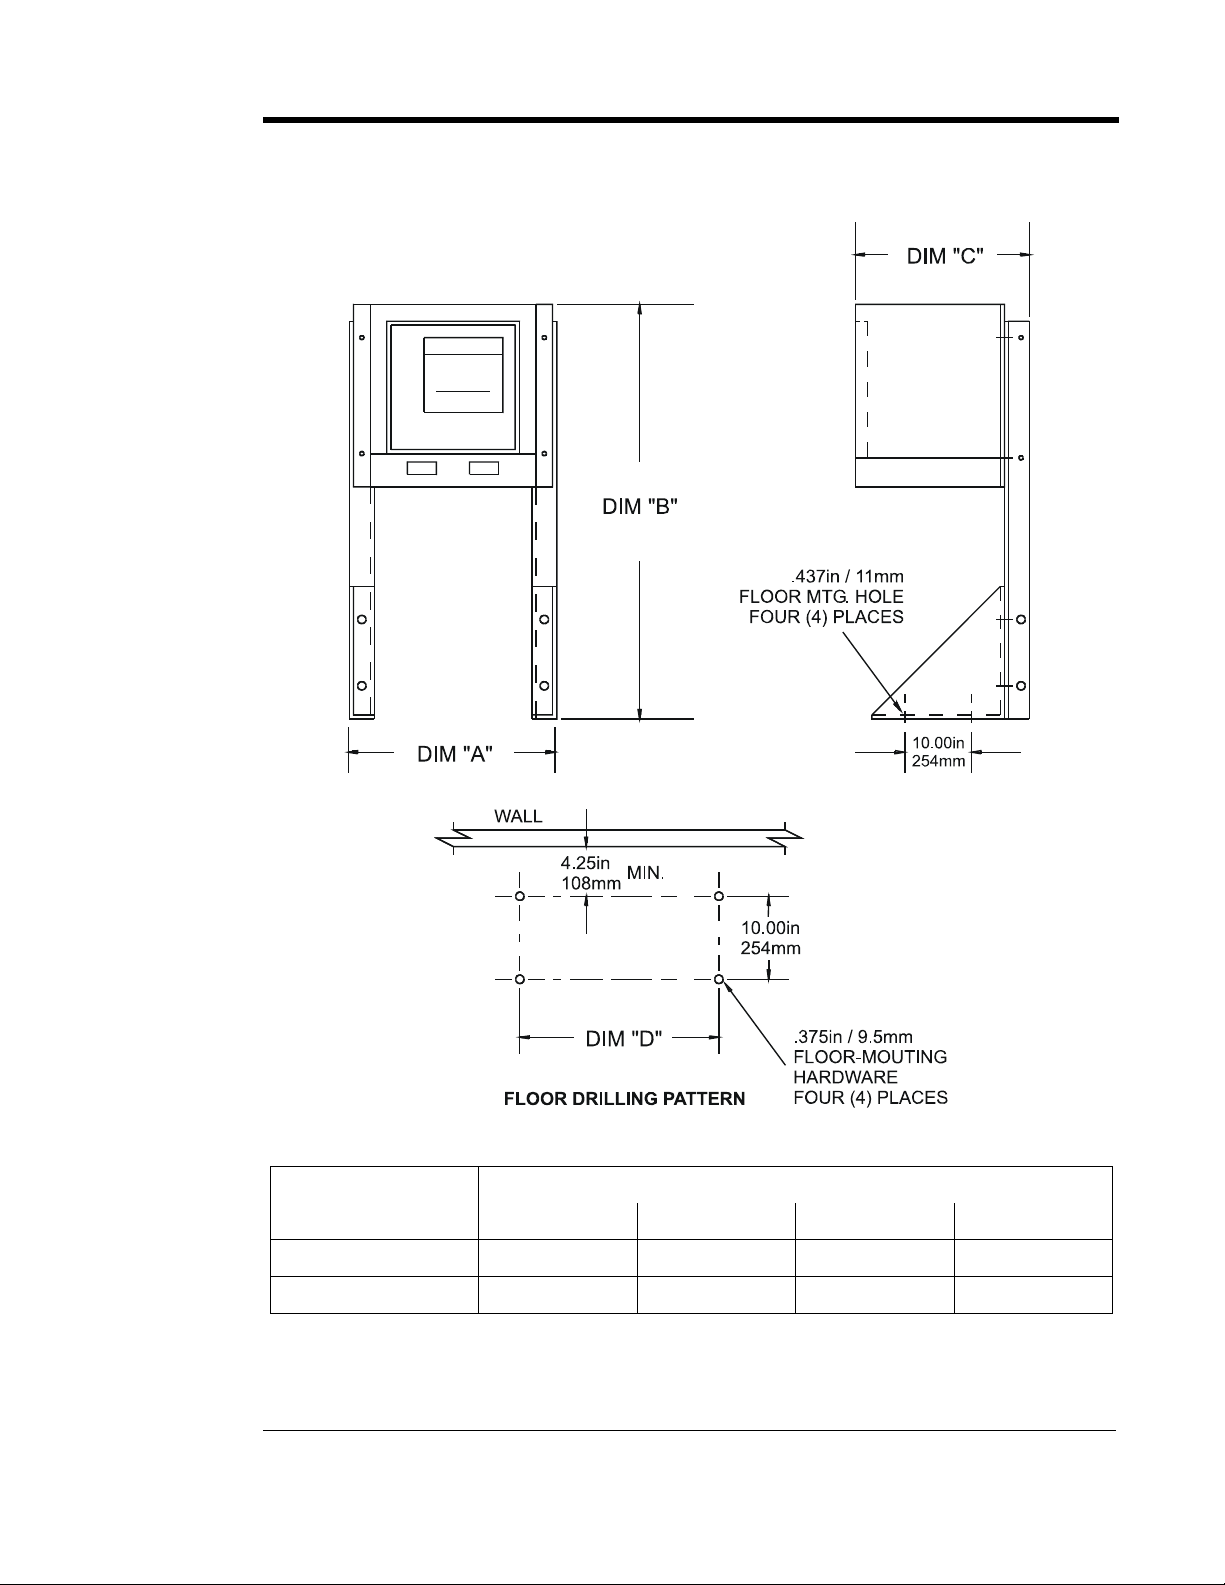
1.5.2. Floor-Mounting the AT10.1
To floor mount the AT10.1, you must use the floor mounting accessory kit
(EI0192-00). For kit availability, see ordering information in Appendix
B on page 71. The kit contains brackets that elevate the top of the AT10.1
approximately 47in / 1194mm above floor level, with provision for floor
anchoring. The kit includes an instruction sheet (JA0083-00
assembly dimensions and mounting details.
You must locate the anchor-bolt holes at least 4.25in / 108mm from any
wall, to allow clearance for the charger enclosure behind the mounting
brackets. In addition, you must consider the following:
1. Placement of conduit entrances (use the knockouts on the sides or bottom of
the charger to allow access for servicing without removing the unit from the
mounting brackets).
2. The location:
• Should be free of drips and splatter. If dripping liquids are a problem,
install a drip shield kit (EI0191-00). For kit availability, see ordering
information in Appendix B on page 71.
• Should be between 32 and 122 °F / 0 and 50 °C, with relative humidity
between 5 and 95% non-condensing.
• Must be free of explosive materials.
3. Maintain at least 6in / 152mm of free air on top, bottom and both sides for
cooling air.
4. Allow 36in / 914mm front clearance for operation and maintenance.
PROCEDURE
) showing
6
To floor-mount the AT10.1,
follow the directions featured in
instruction sheet (JA0083-00
),
included with your floormounting kit (EI0192-00).
These instructions showing
assembly dimensions and
mounting details.
Place the AT10.1 assembly on
the mounting bolts, add
appropriate mounting hardware
and tighten.
Reference the graphics on the
next page.
Page 11
INSTALLING THE AT10.1
FLOOR-MOUNTING THE AT10.1 - GRAPHICS
DIMENSION (in / mm)
ENCLOSURE
Style-586
Style-594
7
A B C D
16.50 / 419 46.63 / 1184 11.75 / 298 15.00 / 381
19.75 / 502 47.75 / 1213 14.25 / 361 18.25 / 463
Page 12

INSTALLING THE AT10.1
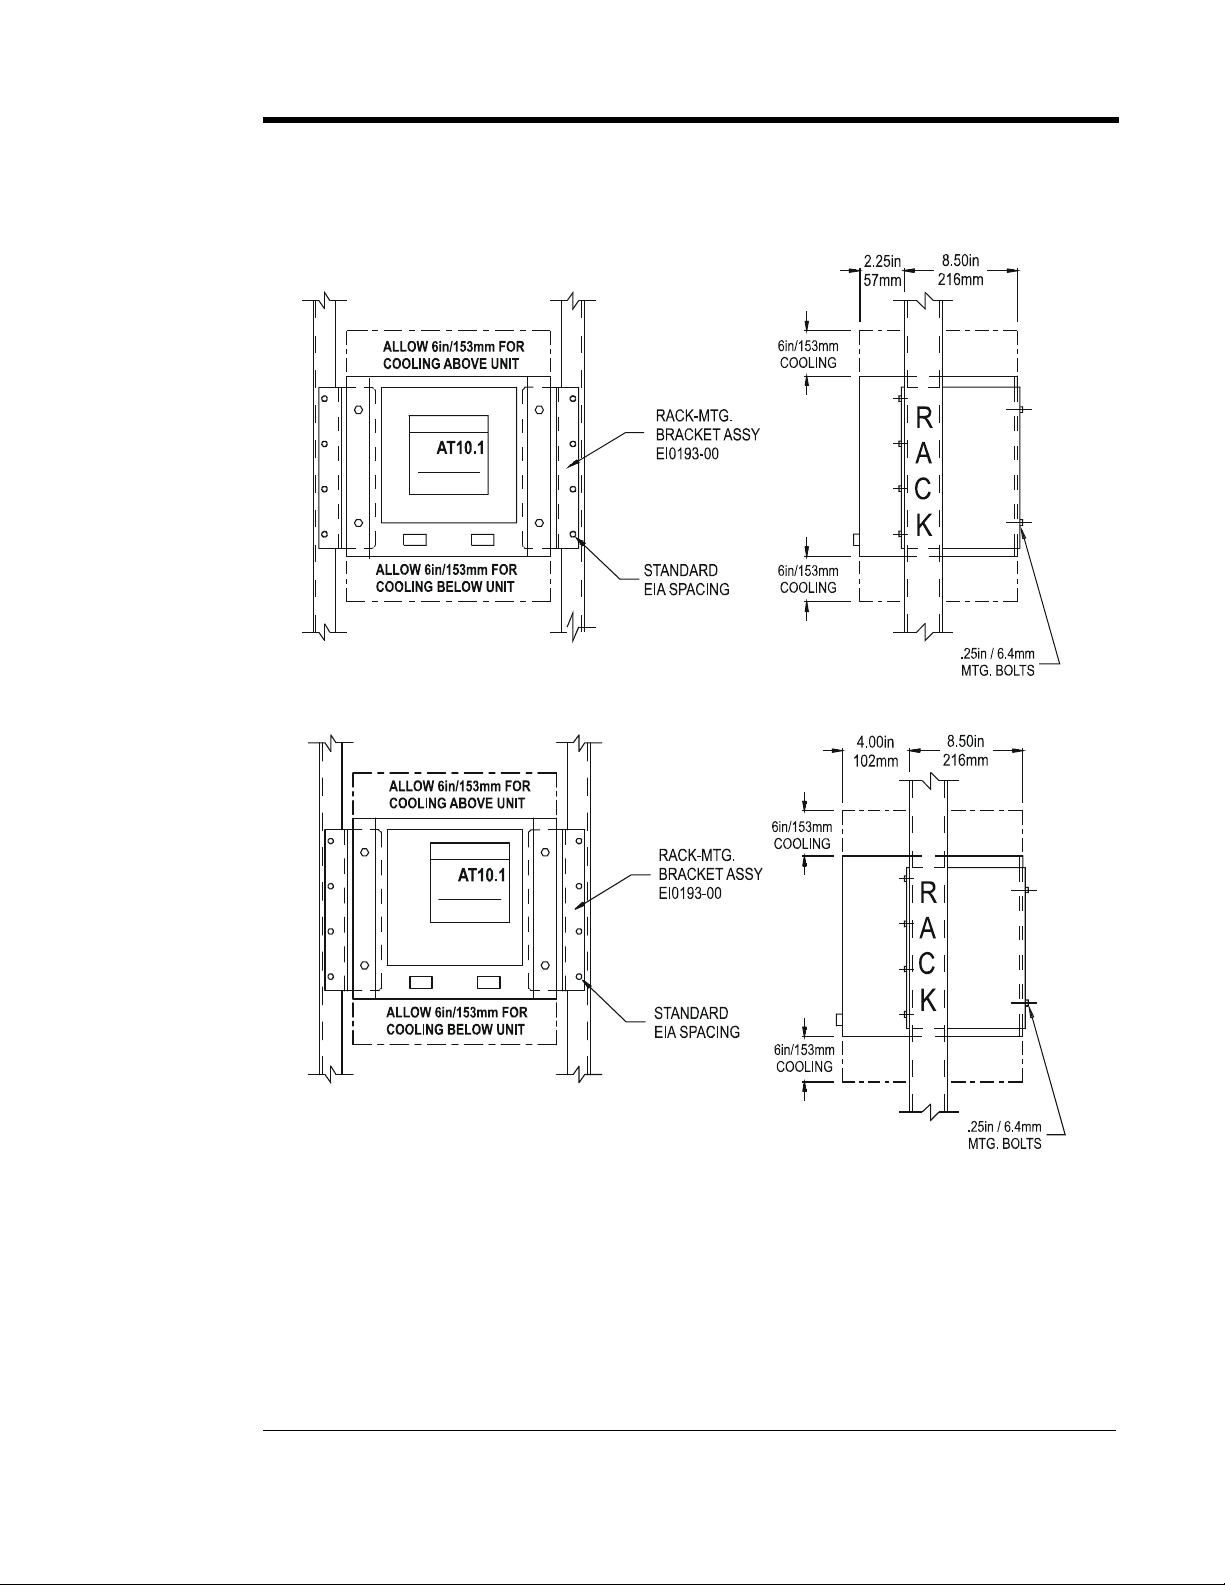
1.5.3. Rack-Mounting the AT10.1
The AT10.1 can be installed in most relay racks with standard EIA hole
spacing (see the table below for the allowable combinations). The rack
mounting kit (EI0193-00), includes mounting brackets and the necessary
hardware to install one AT10.1 battery charger. The kit includes an
instruction sheet (JA0091-00
availability see ordering information in Appendix B on page 71.
When rack mounting the AT10.1, you must consider the following:
1. The rack must be strong enough to properly support the weight of the
AT10.1. See the Weight Table located in Section 1.4 on page 3.
2. Placement of conduit entrances (be sure the knockouts on the sides or
bottom of the charger are accessible after the charger is rack-mounted).
3. The location:
• Should be free of drips and splatter. If dripping liquids are a problem,
install a drip shield kit (EI0191-00). For kit availability, see ordering
information in Appendix B on page 71.
• Should be between 32 and 122 °F / 0 and 50 °C, with relative humidity
between 5 and 95% non-condensing.
• Must be free of explosive materials.
4. Maintain at least 6in / 152mm of free air on top, bottom and both sides for
cooling air.
5. Allow 36in / 914mm front clearance for operation and maintenance.
PROCEDURE
) showing installation details. For kit
To rack mount the AT10.1 enclosure, first install the brackets onto the
rack. Second, mount the AT10.1 onto the rack-mounting brackets using
the hardware supplied. Provide at least 6in / 152mm of air space above
and below the AT10.1 in the rack for cooling. You do not need to modify
the AT10.1 enclosure. Rack-mount outline dimensions are shown on the
next page.
RACK WIDTH CHARGER RATING
Vdc Adc
12 Vdc all Yes Yes Yes
24 Vdc all Yes Yes Yes
48 Vdc 6-12 Adc Yes Yes Yes
48 Vdc 16-25 Adc
130 Vdc 6 Adc Yes Yes Yes
130 Vdc 12-25 Adc
8
19in / 483mm 23in / 584mm 24in / 610mm
No
No
Yes Yes
Yes Yes
Page 13
RACK-MOUNTING THE AT10.1 - GRAPHICS
Style-586 Enclosure
INSTALLING THE AT10.1
Style-594 Enclosure
NOTES
1. Units are installed from the front.
2. Units shown above without penthouse enclosure. If penthouse is used, add
7in / 178mm to top of enclosure.
3. Refer to the outline drawings in Appedix C for enclosure dimensions.
9
Page 14

INSTALLING THE AT10.1
1.6. CHANGING TRANSFORMER TAPS
Before you wire ac power to the AT10.1, check the wiring of the main
transformer (T1), to be sure it is connected for your ac input voltage. The
AT10.1 accepts standard input voltages of 120, 208 or 240 Vac by
changing jumpers on T1. No other changes are required. The AT10.1 is
wired at the factory for 240 Vac, except on special order. Models for 220,
380 or 416 Vac at 50/60 Hz are available on special order.
EXCEPTION: An AT10.1 battery charger rated for 480 Vac input uses a
special transformer that has no taps or jumpers. The 480 Vac
transformer cannot be used for any other input voltage.
Before changing the T1 taps, be sure that ac and dc supplies to the AT10.1
are turned off and locked out. Verify that no voltage is present by using a
voltmeter at terminals TB1-L1 and TB1-L2 (ac), TB1(+) and TB1(-) (dc)
and remote sense terminals (dc). Note that turning off the ac and dc circuit
breakers on the AT10.1 does not eliminate live voltages inside the
enclosure. Also de-energize any external wiring to the alarm relay
contacts.
Verify that all voltages within the enclosure are de-energized and locked
out. See Section 3.5 for necessary steps to follow when accessing internal
components within the AT10.1. Change the jumpers on T1 as shown in
the table on the next page. All transformers have (2) jumpers; always use
both as specified in the table. The transformers used in the small enclosure
(586) use piggyback quick-connect terminals. The transformers in the
larger enclosure (594) use 10-32 stud terminals.
Models designed for 220 Vac, 50/60 Hz have no jumpers, and can be used
only for that voltage. Models designed for 380 or 416 Vac also have no
jumpers, and can be operated on either voltage.
NOTE: This procedure refers only to Group I AT10.1 battery chargers
(rated 6-25 Adc). A different procedure exists for Group II AT10.1
battery chargers (rated 30-100 Adc). Refer to the Operating and
Service Instructions specific to the Group II AT10.1 battery charger for
changing the transformer taps on these larger units. Otherwise, damage
to your charger and equipment may occur.
10
Page 15
INSTALLING THE AT10.1
CHANGING TRANSFORMER TAPS - GRAPHICS
T1 CONNECTION TABLE
INPUT VAC JUMPERS
120 H1-H3, H2-H5
208 H2-H4 (2) JUMPERS
240 H2-H3 (2) JUMPERS
480 NONE
TYPICAL FOR TRANSFORMER
IN 586 ENCLOSURE
480 V
PRIMARY
120/208/240 V
PRIMARY
SECONDARY
H4
H5
H5
H2
H3
H1
H1
TRANSFORMER SCHEMATIC
PROCEDURE:
1) BE SURE ALL VOLTAGES ARE DE-ENERGIZED AND LOCKED OUT.
2) BE SURE TERMINALS ARE FULLY SEATED (586 ENCL).
3) BE SURE STUD TERMINALS ARE TIGHT (594 ENCL).
4) CHECK YOUR WORK AFTER COMPLETION.
5) FOR ADDITIONAL INFORMATION, SEE WIRING DIAGRAM
IN APPENDIX.
TYPICAL FOR TRANSFORMER
IN 594 ENCLOSURE
.
X1
X4
Y2
Y1
H1
H3
H2
H5
H4
JUMPERS (2)
H1
H3
H2
H5
H4
F1-5R2
11
Page 16

INSTALLING THE AT10.1
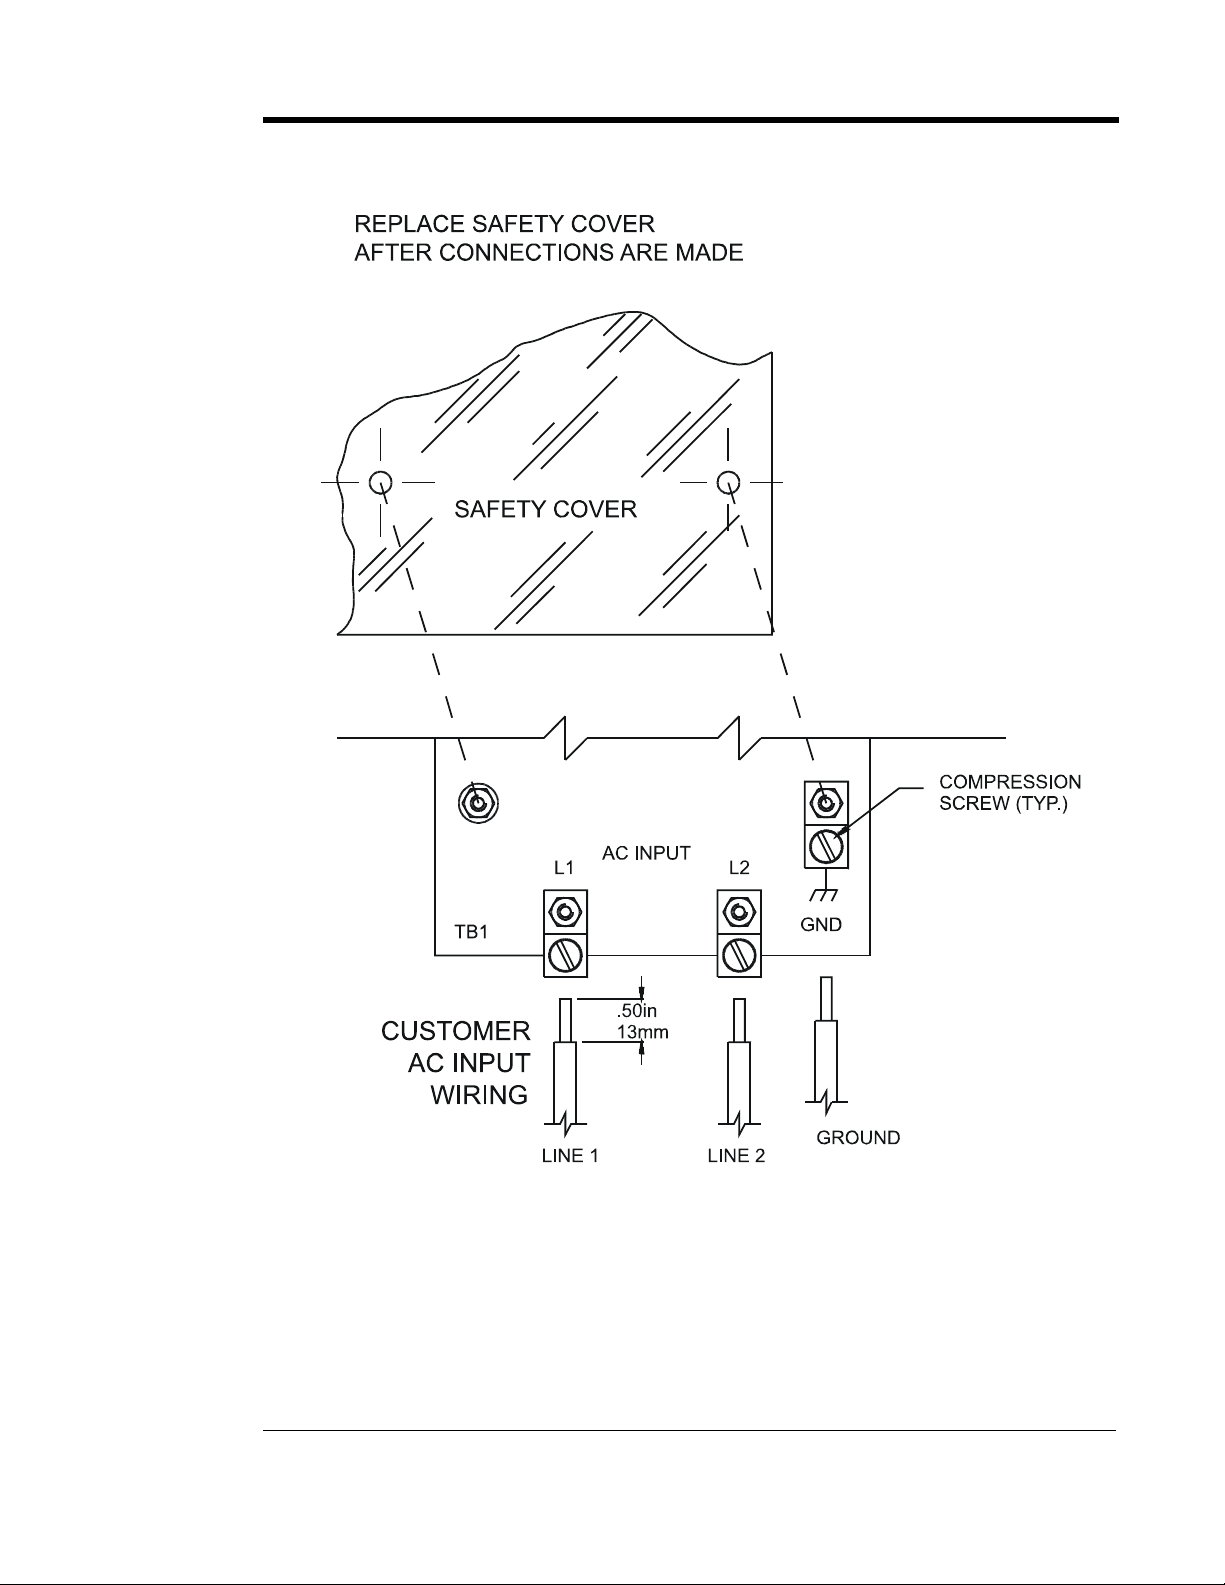
1.7. MAKING THE AC INPUT CONNECTIONS
Follow these steps to connect ac power to the AT10.1:
1. Confirm that the AT10.1 main power transformer (T1) is properly jumpered
for your ac input supply voltage. See Section 1.6 for details.
2. Use a branch circuit breaker or fused disconnect switch upstream from the
AT10.1. This device should have lockout capability so that the ac input
supply to the AT10.1 can be de-energized for charger maintenance. A time
delay circuit breaker or slow-blow fuse is recommended.
3. Size the branch circuit breaker or fused disconnect switch for the maximum
ac input current of the AT10.1. This rating is listed on the left-hand side of
the AT10.1 data nameplate. For a comprehensive list of these maximum ac
input values, access standard (DC5016-00
4. Size ac input wiring per the National Electric Code (NEC) and local codes
for the trip rating of the branch circuit breaker or fused disconnect switch.
5. Do not run external ac input power wiring through the same conduit of the
AT10.1 enclosure as external dc output power wiring.
6. All site requirements of your facility take precedence over these instructions.
).
PROCEDURE
1. Remove the plexiglas safety cover.
2. Run the ac input supply wiring into the AT10.1, ending at terminals TB1-L1,
TB1-L2, and TB1-GND on the I/O panel board.
3. The AT10.1 features three (3) CU-AL compression lugs on the ac input
terminals, which accept #14 - 6 AWG wire. Strip 0.50in / 13mm from the
insulation of the incoming ac input supply wiring.
4. Connect the wires to the appropriate ac lugs as shown on the next page.
5. Using a flat-head screwdriver, securely tighten the compression screws on
the ac lugs to 35-45 in-lb / 4.0-5.1 Nm.
6. Check all connections and reinstall the plexiglas safety cover.
12
Page 17
INSTALLING THE AT10.1
MAKING THE AC INPUT CONNECTIONS - GRAPHICS
NOTES
1. The drawing above does not show other components mounted to the I/O
panel. Be careful not to disconect any other component leads.
2. Always use a proper ground.
3. Use copper or aluminum conductors only.
4. On 120 Vac input, connect the neutral leg to the terminal L2.
13
Page 18

INSTALLING THE AT10.1
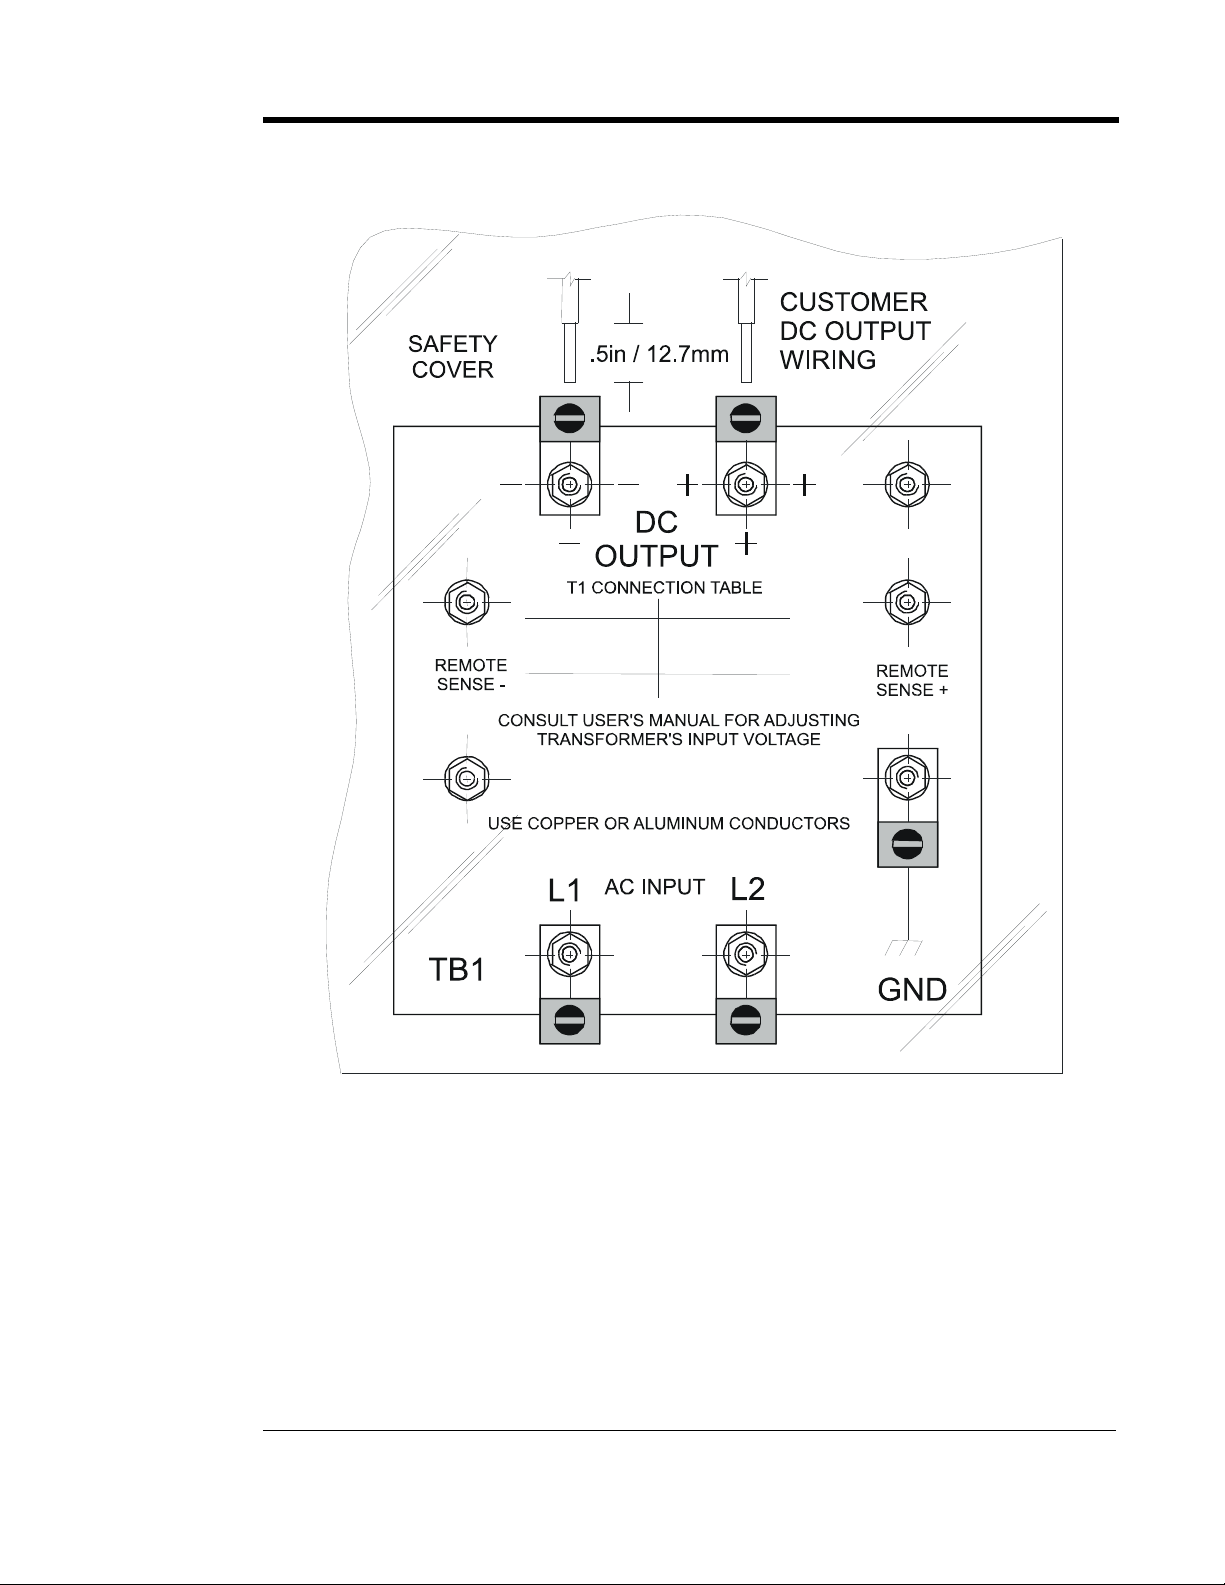
1.8. MAKING THE DC OUTPUT CONNECTIONS
Follow these steps to connect the battery to the AT10.1:
1. Size the dc wiring to minimize voltage drop. The acceptable wire size
depends on your installation. As a guideline, the voltage drop should not
exceed 1% of nominal output voltage at full current. Refer to the table below
to determine the voltage drops for various wire sizes, currents and distances.
WIRE SIZING CHART
VOLTAGE DROP PER 100ft / 30.5m OF WIRE (FOR COPPER AT 68° F / 20° C)
WIRE SIZE
(AWG)
#16
#14
#12
#10
#8
#6
#4
EXAMPLE: 100ft / 30.5m of #8 AWG wire at 16A has a 1.1V drop.
6 12 16 20 25
2.5V 5.0V 6.7V 8.2V 10.5V
1.6V 3.2V 4.2V 5.3V 6.6V
1.0V 2.0V 2.6V 3.3V 4.2V
0.63V 1.3V 1.7V 2.1V 2.6V
0.40V 0.80V 1.1V 1.3V 1.7V
0.25V 0.50V 0.66V 0.83V 1.1V
0.16V 0.32V 0.42V 0.52V 0.65V
2. The AT10.1 is factory wired to regulate output voltage at the output
terminals. If the total voltage drop is greater than 1% (e.g., 1.3V for a 130
Vdc system), remote sense wiring is recommended, see Section 1.9.
3. Do not run external ac and dc power wiring, feeding the battery charger,
through the same conduit.
4. All specific requirements of your facility take precedence over these
instructions.
PROCEDURE
1. Use a dc disconnect switch or circuit breaker between the AT10.1 and dc
bus. This device should have lockout capability to allow the AT10.1 to be
disconnected from the dc bus for maintenance.
2. Remove the safety cover.
3. Run the dc wiring to terminals TB1(+) and TB1(-) on the I/O panel in the
enclosure. Compression lugs, accepting wire sizes #14-6 AWG, are supplied
for your convenience. To make these connections, strip the insulation .50in /
12.7mm on the incoming wires. Connect the wires to the appropriate lugs as
shown on the next page.
4. Using a flat-head screwdriver, securely tighten the compression screws on
the lugs to 35-45 in-lb / 4.0-5.1 Nm.
5. Reinstall the safety cover after you have made and checked all connections.
DC CURRENT (Amperes)
14
Page 19
INSTALLING THE AT10.1
MAKING THE DC OUTPUT CONNECTIONS - GRAPHICS
NOTES
1. The drawing above does not show other components mounted to the I/O
panel. Be careful not to disconect any other component leads.
2. Always use a proper ground.
3. Use copper or aluminum conductors only.
15
Page 20
INSTALLING THE AT10.1
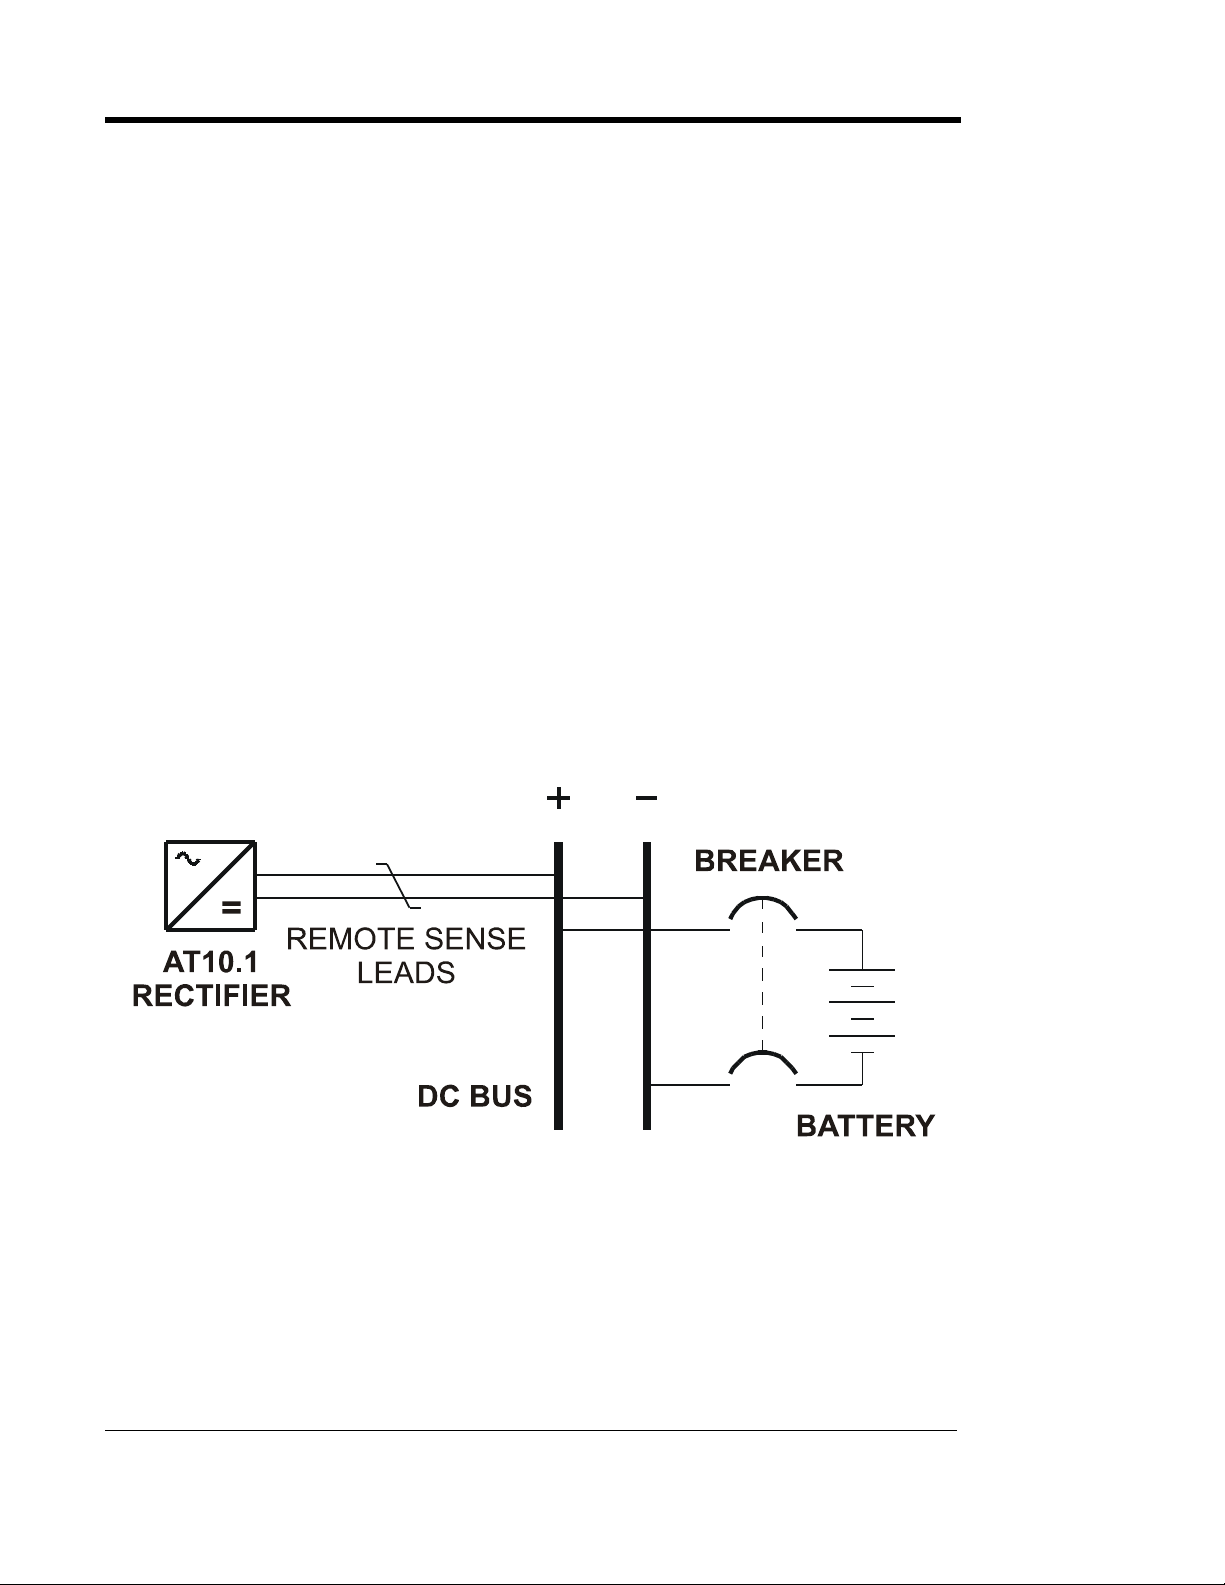
1.9. WIRING THE AT10.1 FOR REMOTE SENSING
You can wire the AT10.1 to regulate the output voltage at the battery
terminals, instead of at the charger output terminals. Remote sensing does
the following:
1. Compensates for voltage drop in the dc wiring between the AT10.1 and the
battery.
2. Directly monitors the battery or dc bus voltage. The front panel meter
displays the actual voltage on the battery or dc bus.
You wire the AT10.1 for remote sensing by installing twisted pair cabling
from the AT10.1 remote sense terminals to the battery terminals. The
AT10.1 control circuitry then measures the dc voltage at the battery
terminals, and controls the output of the charger to maintain the battery
voltage at the desired float or equalize voltage.
NOTE: If the remote sense wiring fails, the AT10.1 detects the fault,
and displays E 06 on the front panel meter. See Section 3.2 for details.
CAUTION: The AT10.1 cannot protect against short circuits in the
remote sense wiring. You should install a 1.0A fuse at the battery or dc
bus end of the remote sense cable.
SCHEMATIC
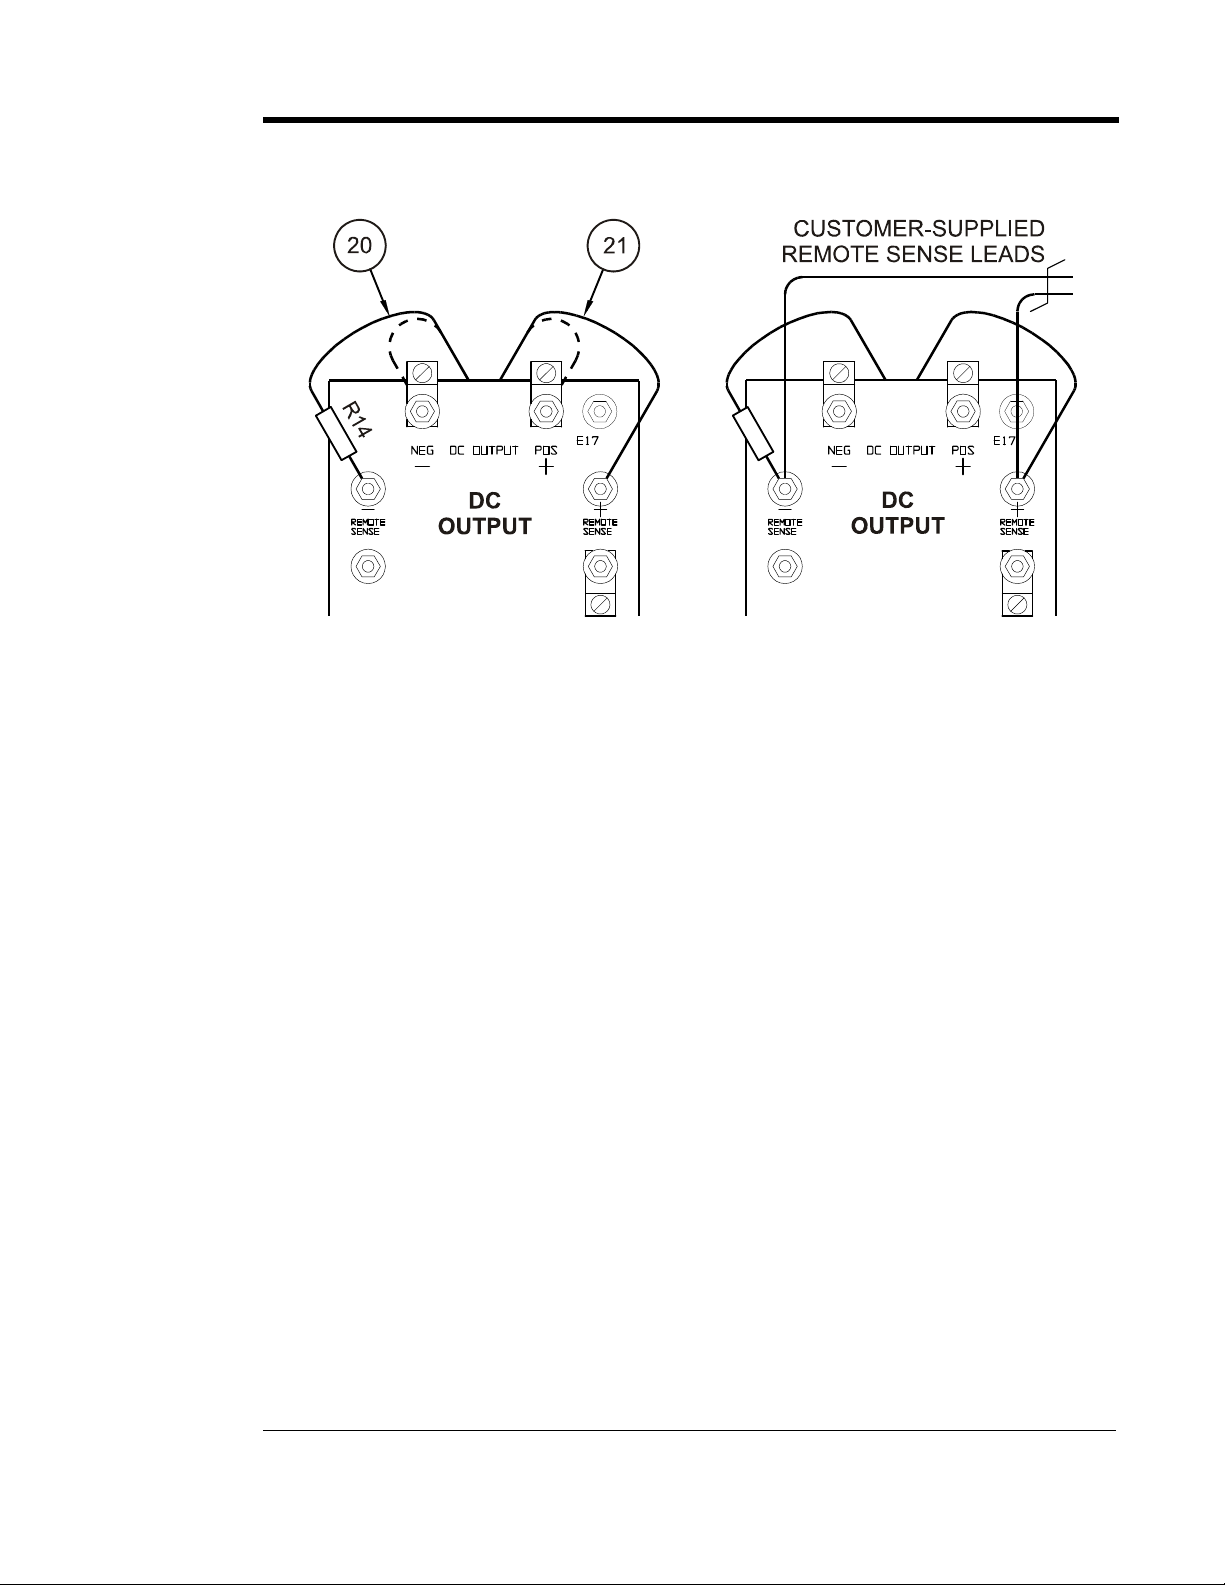
PROCEDURE
1. De-energize and lock out all ac and dc voltages within the AT10.1 enclosure.
Check with a voltmeter.
2. Remove safety shield.
3. Remove the two (2) dc output CU-AL compression lugs.
4. Move lugged end of R14 (with wire # 20) from TB1(-) to REM SENSE(-).
5. Move wire # 21 from TB1(+) to REM SENSE (+).
16
Page 21
INSTALLING THE AT10.1
6. Connect user-supplied external remote sense leads from the battery or dc bus
to the remote sense terminals on the I/O panel.
7. Replace the two (2) dc output CU-AL com p ression lugs and tighten all
hardware.
8. Check your work thoroughly. Replace the safety shield before reeneregizing
the AT10.1.
9. Restart the AT10.1 according to the instructions in Section 2.1.
NOTES
1. Use #16 AWG twisted pair wire.
2. Maximum current is 150 mA.
3. Run leads in their own conduit.
4. Fuse the wiring at the battery or dc bus.
DISABLING REMOTE SENSE
If you ever need to disable remote sense, follow the steps below:
• De-energize and lock out all ac and dc voltages to the AT10.1. Check
with a voltmeter.
• Disconnect the remote sense wires from the battery or dc bus terminals
first.
CAUTION: You must do the steps above first.
• Remove the remote sense leads from the remote sense (+) and (-)
terminals on the I/O panel. Insulate each lead separately. Coil up the
wires and leave them in the bottom of the charger, in case you want to
wire for remote sense again in the future.
• Reconnect the lugged end of R14 (with wire # 20) to TB1(-).
• Reconnect wire # 21 to TB1(+).
• Restart the AT10.1 according to the instructions in Section 2.1.
17
Page 22
INSTALLING THE AT10.1
1.10. WIRING TO THE REMOTE ALARM CONTACTS
Built-in Summary (Common) Alarm Relay (standard)
The AT10.1 Main
Control PC Board (A1)
is equipped with a
"common" Summary
Alarm relay. This relay
contact transfers when
any one or more of the
standard AT10.1
alarms exist.
See Section 2.2.7 for a
description of the alarm
functions. One form-C
alarm contacts are
provided, and
accessible via terminal
block (TB3), as show
in the figure on the
right.
Follow the procedure
below to wire a remote
annunciator to this
contact.
PROCEDURE
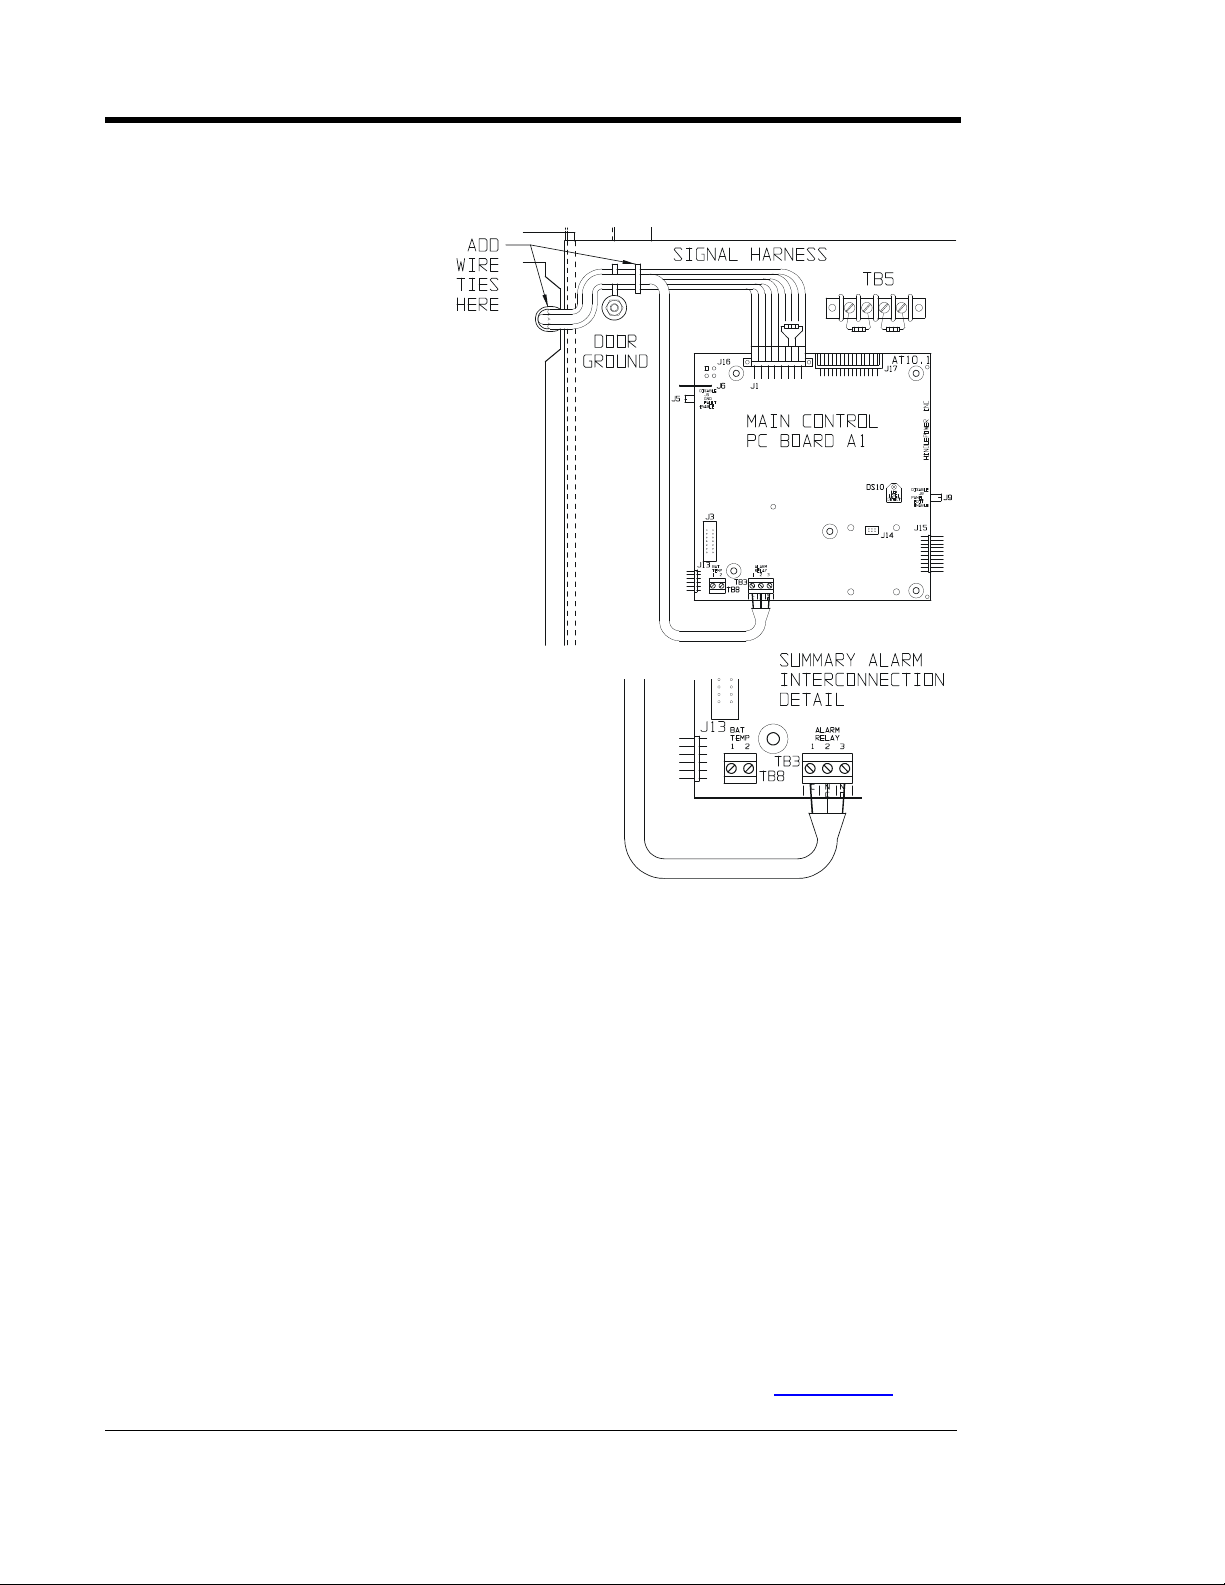
1. Allow 30in / 762mm of wire inside the enclosure. Excess will be trimmed.
2. Route annunciator wires to the AT10.1 front panel door by following the
existing harness through the door hinge as shown. Use two (2) wire ties and
allow a 4-6in / 102-153mm loop for the hinge.
3. Trim wires to the proper length for connecting to TB3. Strip 0.25in / 6.4mm
of insulation from the wires.
4. Make the connections at TB3, and securely tighten compression screws.
NOTES
1. Alarm contacts are rated at 0.5A / 125 Vac or Vdc.
2. Summary Alarm relay terminal block (TB3) is compression type, accepting
wire sizes #22-14 AWG.
3. Terminals are labeled in non-alarm condition.
4. If user alarm contacts (TB3 and/or TB4A/B) are to drive inductive dc loads
(e.g. a larger dc relay) an external protective diode must be applied at the dc
relay to avoid equipment damage. See Application Note (JD5011-00).
18
Page 23
INSTALLING THE AT10.1
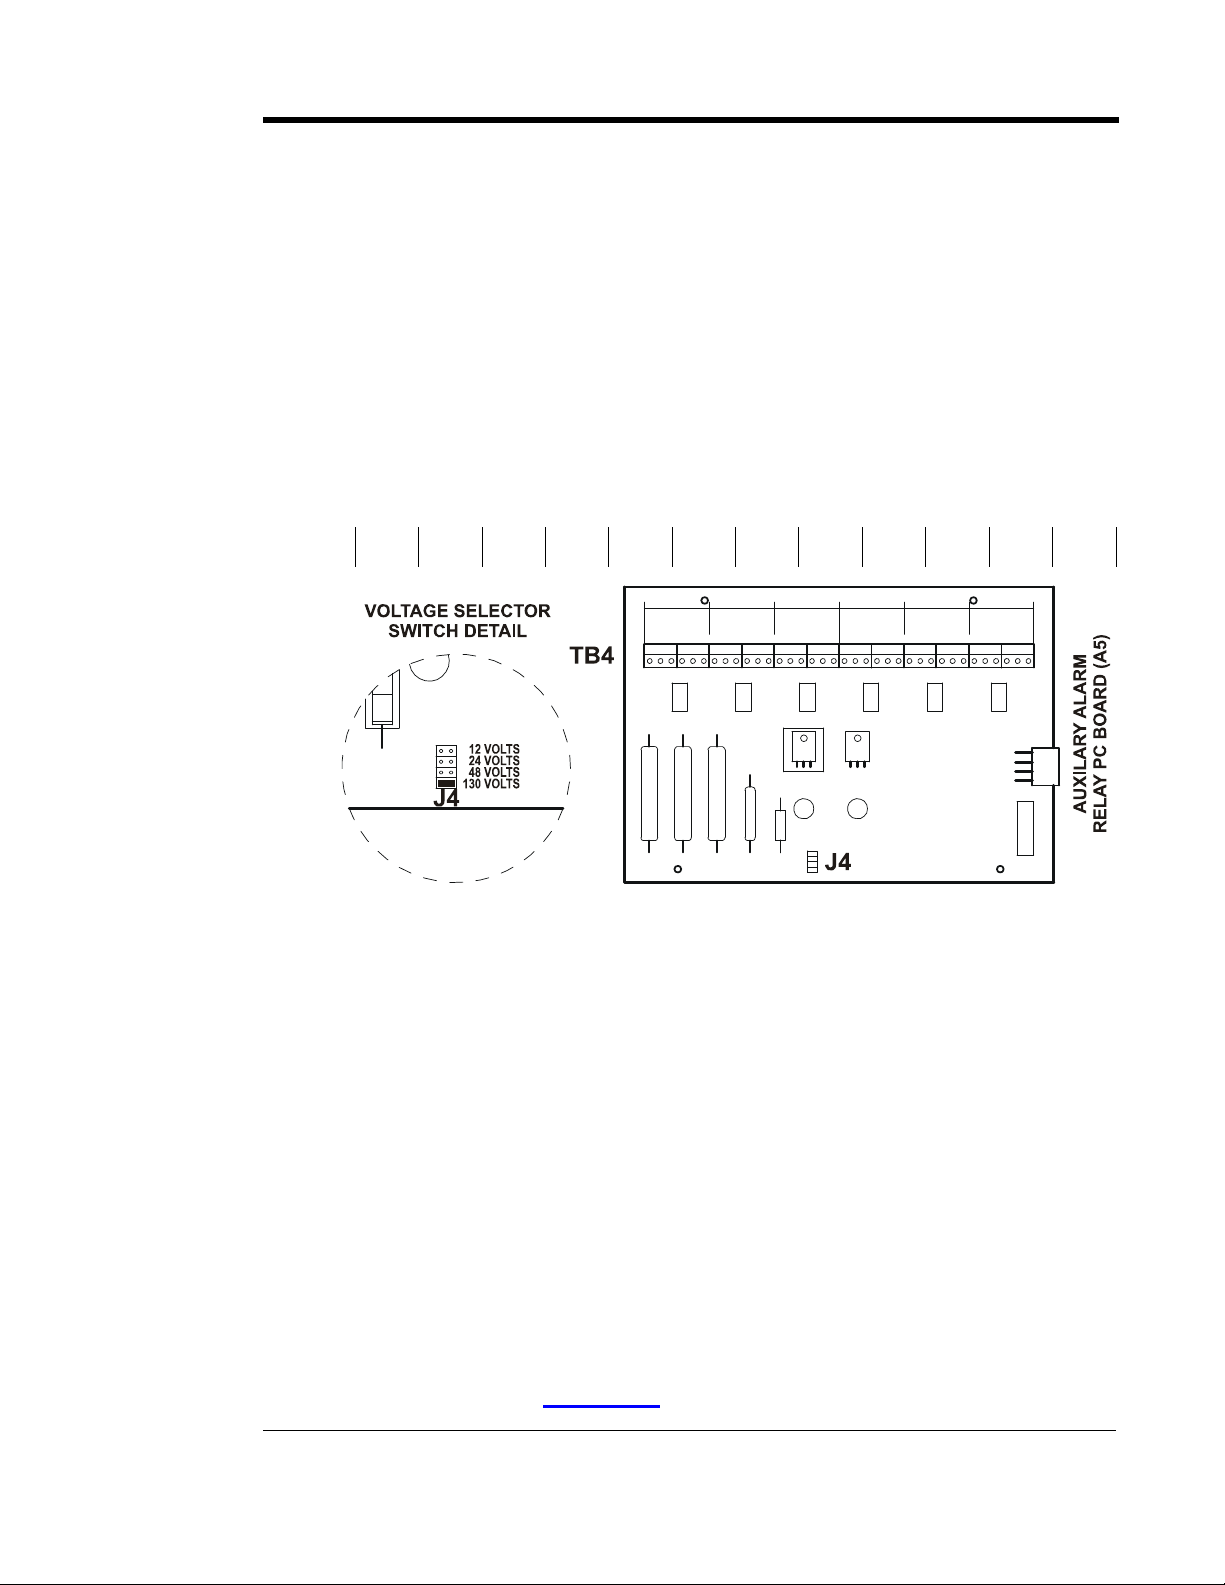
Auxiliary Relay Board (optional)
The optional Auxiliary Alarm Relay PC Board (A5), mounted inside the
separate top enclosure (penthouse), provides two (2) form-C contacts
(TB4-1 through TB4-36) for each of the following individual alarms:
• High DC Voltage
• Low DC Voltage
• DC Output Failure
• AC Input Failure
• Ground Fault Detection (positive or negative)
• Summary (common) Alarm
Alarm contacts (TB4) are as follows, shown in non-alarm condition:
DC OUT
HVDC HVDC LVDC LVDC
C, NC, NO C, NC, NO C, NC, NO C, NC, NO C, NC, NO C, NC, NO C, NC, NO C, NC, NO C, NC, NO C, NC, NO C, NC, NO C, NC, NO
1 2 3 4 5 6 7 8 9 10 11 12 13 14 15 16 17 18 19 20 21 22 23 24 25 26 27 28 29 30 31 32 33 34 35 36
FAILURE
DC OUT
FAILURE
AC FAIL AC FAIL
GROUND
DETECT
GROUND
DETECT
SUMMARY
SUMMARY
PROCEDURE
1. Deenergize and lock out all ac and dc voltages to the AT10.1.
2. Allow internal voltages to dissipate, then check with a voltmeter.
3. Remove the top panel from the penthouse enclosure (on top of charger).
4. Route your remote annunciator wiring into the penthouse enclosure through
one of the unused knockouts on the side of the enclosure.
5. Connect the wiring (use #22-14 AWG) to the appropriate terminals of TB4
on the Auxiliary Relay Relay board (as shown in the figure above). Strip
each wire 0.25in / 6.4mm, and securely tighten the terminal screws.
6. Replace the top panel on the penthouse enclosure and restart the AT10.1.
NOTES
1. Alarm contacts are rated at 0.5A / 125 Vac or Vdc.
2. Terminal block (TB4) is compression type, accepting #22-14 AWG wire.
3. Terminals are labeled in non-alarm condition.
4. For a detailed view of the optional Auxiliary Alarm Relay PC Board (A5),
refer to drawing (JE5030-19) listed in Appenix C on Page 78.
19
Page 24

INSTALLING THE AT10.1
1.11. INSTALLING THE TEMPCO PROBE ASSEMBLY (OPTIONAL)
The temperature compensation probe contains a temperature-dependent
resistor in an epoxy module that you install near your battery. There are
three steps in installing the assembly:
1. Mounting the probe assembly near the battery.
2. Installing an interconnection cable from the probe assembly to the AT10.1.
3. Wiring the charger end of the cable to a terminal block on the main control
circuit board.
The actual TempCo probe is the same for all battery types and all output
voltages of the AT10.1. The accessory part numbers differ depending on
cable length ordered. See the tables in Appendix B on page 71 for
ordering information. Each kit contains detailed installation instructions
(JA5015-00
user details. The main elements of the installation are outlined below.
WARNING
), and a separate Application Note (JD5003-00) for further
High voltages appear at several points inside the AT10.1. Use extreme
caution when working inside the unit. Do not attempt to work inside the
AT10.1 unless you are a qualified technician or electrician.
Disconnect and lock out all power from the AT10.1 before starting to
remove or replace any components. Turn the ac power off at the
distribution panel upstream from the charger. Disconnect the battery
from the AT10.1 output terminals TB1(+/-).
PROCEDURE
1. De-energize and lock out all ac and dc voltage sources to the AT10.1, and
check with a voltmeter before proceeding.
2. Mount the probe on a clean, dry surface, as close to the battery as possible,
such as the battery rack. DO NOT mount the probe:
• on the battery itself
• on unpainted wood, or bare galvanized metal
• on plastic surfaces
3. To apply the probe, clean the mounting surface with isopropyl alcohol, and
allow to dry thoroughly. Remove the protective backing from the doublefaced adhesive tape on the probe, and securely press it onto the surface.
4. Install the cable supplied with the temperature compensation probe kit:
20
• Start at the AT10.1 charger. The end of the cable with two stripped
wires and one lead with a quick-connect terminal will be connected
inside the AT10.1. Leave 30in / 762mm of cable inside the enclosure,
and route the other end to the probe at the battery.
Page 25
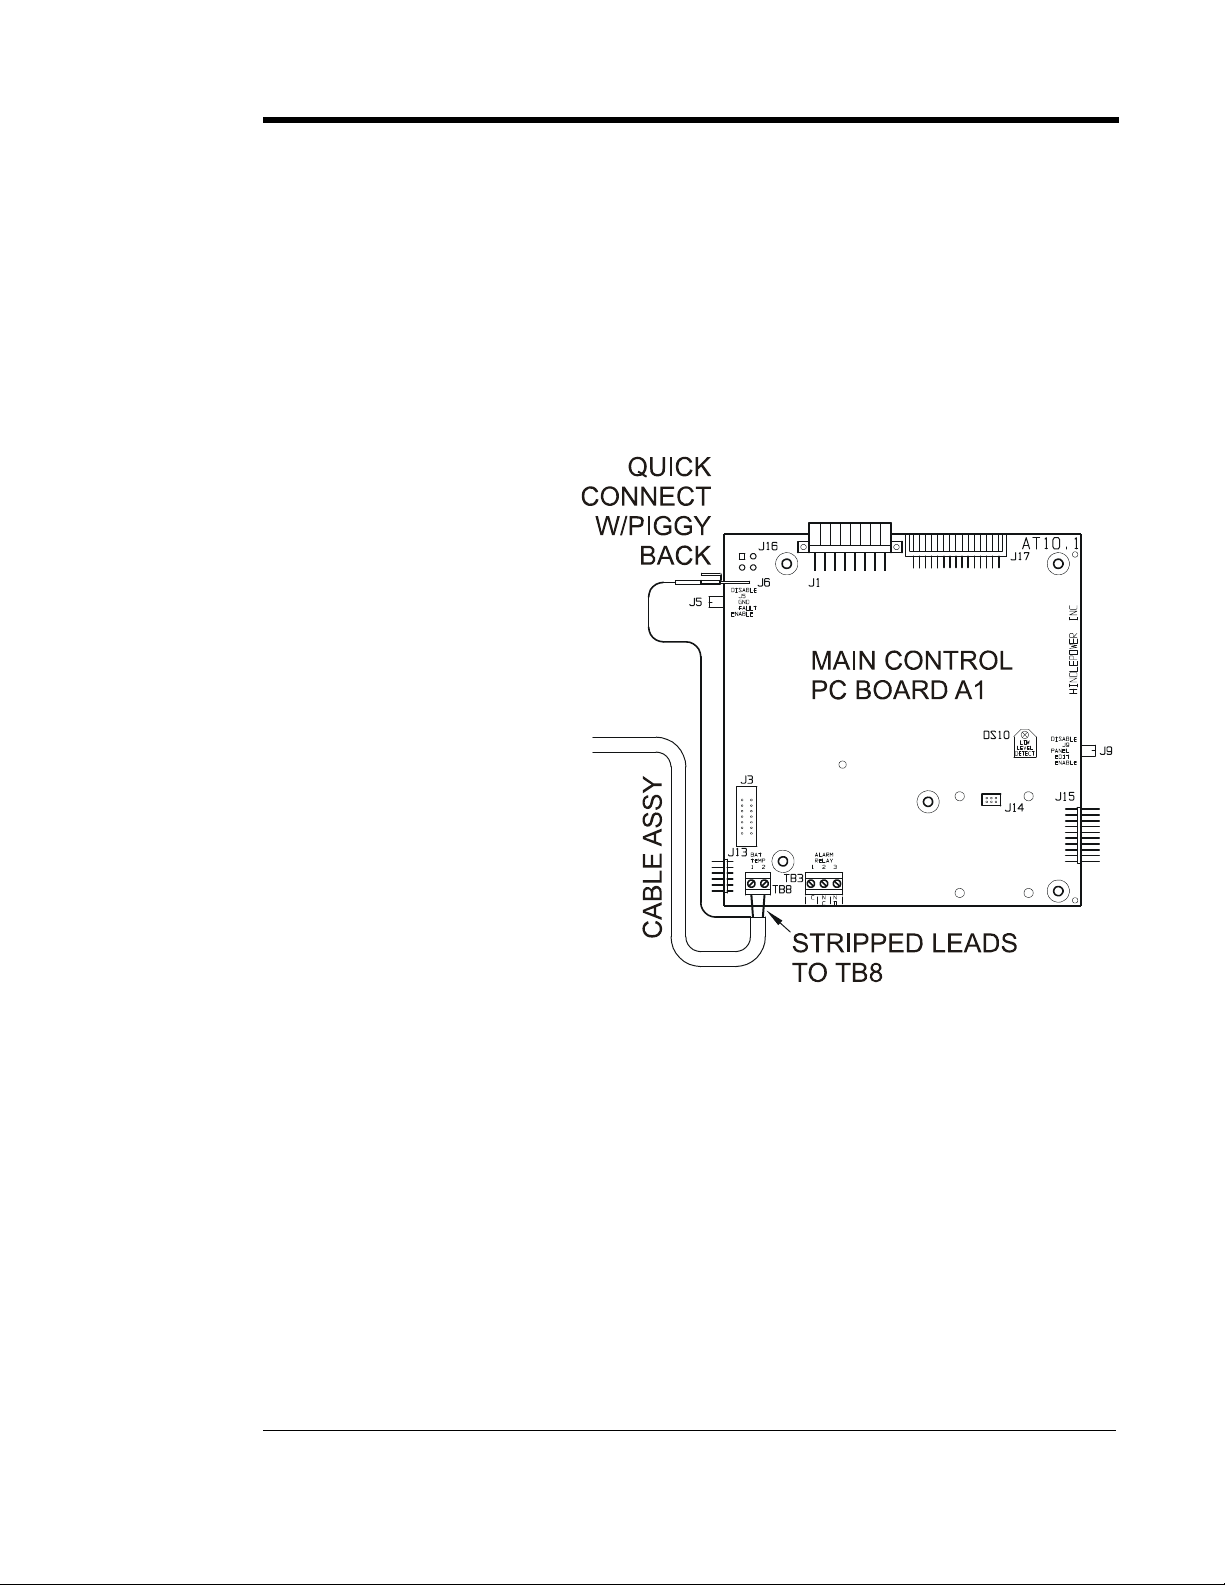
INSTALLING THE AT10.1
• Run the cable though a conduit if possible, but not through a conduit
containing any power wiring.
• Route the other end to the probe at the battery and coil up excess cable.
NOTE: If the standard (25ft / 7.6m) cable is not long enough, longer
cable assemblies are available in lengths of 50, 100 & 200ft / 15.2,
30.5 & 61.0m. See Appendix B on page 71 for ordering information.
• Be sure your wiring conforms to the NEC and your facility requirements.
5. Attach the interconnection cable to the AT10.1 as shown in the figure below:
• Route the
cable within
the AT10.1
enclosure so it
runs with the
wire harness
to the back of
the front
panel, and
easily reaches
the main
control circuit
board.
• At the main
control circuit
board, insert
one of the bare
wires from the
cable into each
terminal of
TB8. Polarity
is not
important.
• Unplug the harness ground wire # 30 from terminal J6 on the left edge of
the main control circuit board. Plug the connector at the end of the
nylon-shielded wire of the cable assembly onto J6. Reconnect the
ground wire # 30 from the system harness onto the piggy-back connector
featured at the end of the nylon-shielded wire.
• Using plastic wire ties, fasten the interconnection cable loosely to the
existing wire harness. Make sure that the cable conforms to the service
loop at the hinge end of the door.
6. At the battery, connect the quick-connect terminals to the temperature
compensation probe. Polarity is not important. Coil up any excess wire and
tape or tie it together to prevent damage.
21
Page 26

INSTALLING THE AT10.1
7. Check your work. Be sure that:
• All connections are secure.
• The shield is connected to ground at the charger end only (on the main
circuit board).
• The cable is connected to TB8 on the circuit board. Other terminal
blocks may look similar.
8. Restart the AT10.1 using the startup procedure in Section 2.1. During
startup, the AT10.1 displays LEAD on the front panel, indicating that the
temperature compensation is set up for lead-acid batterie s. While this is
being displayed, you can press any front panel key to change the display to
read NICD, to change the temperature compensation setup for nickel
cadmium batteries. The choice you make is saved internally, and will be
used again by the AT10.1 the next time it starts.
9. Adjust the output float and equalize voltages to the battery manufacturer's
recommended values, using the AT10.1 front panel meter, as described in
Section 2.3.2.
NOTE: If the temperature compensation probe, or the wiring
from the probe to the AT10.1, is damaged and becomes an
open circuit, the AT10.1 detects the damage and displays
E 08 on the display. The charger then reverts to normal non-
temperature-compensated operation until the probe or wiring
is repaired. Once the probe is repaired, you must restart the
AT10.1 to activate the probe, as described in Section 2.1.
Using temperature compensation
When an electric storage battery is being charged, the terminal voltage of
the battery changes a small amount whenever the battery temperature
changes. As the battery temperature increases, its terminal voltage
decreases. When a battery is charged by a float type charger with a
constant output voltage, float current increases when the temperature
increases. This results in overcharging the battery, which can result in
damage to the materials, or at least the need for more frequent
maintenance.
When the AT10.1 is equipped with a temperature compensation probe, it
is able to adjust the output voltage applied to the battery to keep the float
current constant, thereby avoiding overcharging. The probe senses the
ambient temperature at the battery, and adjusts the output float/equalize
voltages to compensate for variations in temperature. If the ambient
temperature increases, the AT10.1 output voltage decreases.
If you are experiencing any inconsistencies in the AT10.1 when the
temperature compensation probe is utilized, temporarily disconnect the
probe, and refer to the Application Note (
JD5003-00
) for further details.
22
Page 27

INSTALLING THE AT10.1
Note the following:
• You should set the Float and Equalize voltages to the values
recommended by your battery manufacturer for 77° F (25° C).
• When you enter the Edit mode to adjust the Float or Equalize voltage
(see Section 2.3.2), the front panel meter shows the 77° F (25° C) value
for the Float or Equalize voltage, even if the battery is warmer or cooler
than 77° F (25° C).
• The actual output voltage of the AT10.1 may be different from the value
shown on the front panel meter, if the battery is warmer or cooler than
77° F (25° C).
• Use a digital meter to measure the actual output voltage of the AT10.1.
If you know the temperature at the temperature compensation probe, you
can use the graph below to determine that the output voltage is correct.
• If the battery temperature goes below 32° F (0° C), there will be no
further increase in charger output voltage. Likewise, if the battery
temperature goes above 122° F (50° C), there is no further decrease in
output voltage.
OUTPUT VOLTAGE VS BATTERY TEMPERATURE
108
106
104
102
Nickel-Cadmium
100
Percent Output Voltage
98
96
94
20 40 60 80 100 120
Temperature, D egrees Fahrenheit
Lead-Acid
EXAMPLE: Suppose you have a lead-acid battery whose temperature is
100° F / 37.8° C. As shown on the graph, the output voltage should be
approximately 97% of the 77° F voltage. If the float voltage is set on the
front panel to 132 Vdc, the actual output voltage will be:
132 x 0.97 = 128 Vdc
Example:
100 Deg. F
97% Output
Voltage
1.12. INSTALLING FOR REMOTE COMMUNICATION (OPTIONAL)
Refer to separate Operating Instructions (JA0102-04
).
1.13. INSTALLING FOR FORCED LOAD SHARING (OPTIONAL)
Refer to Appendix F on page 90, or Instructions (JA5054-0
23
).
Page 28

OPERATING THE AT10.1
2. OPERATING THE AT10.1 BATTERY CHARGER
2.1. STARTING THE AT10.1
2.1.1. Understanding the startup sequence
The AT10.1 is set up at the factory to work with most common batteries
and loads without further adjustment. When you start the AT10.1 for the
first time, the factory settings (float voltage, equalize voltage, etc.) control
the operation of the charger. You can change the settings after you start
the charger. The FACTORY SETTINGS are shown in table on page 25.
The AT10.1 startup routine takes about five seconds. The microprocessor
that controls the AT10.1 initializes the charger by reading the settings that
are stored internally. The control circuit then "soft starts" the charger, and
the dc output voltage and current increase gradually to the rated value.
2.1.2. Checking the installation
Be sure that you have followed the installation
instructions carefully. Check the ac input
supply voltage and the battery voltage, and be
sure that they match the information on the
AT10.1 nameplate. Verify that the jumpers on
the main transformer T1 are correct for your
ac supply voltage. Open the front panel, and
check the battery polarity at the TB1 (+) and (-)
terminals.
2.1.3. Starting the AT10.1
When you are sure that all connections to the
AT10.1 are properly made, follow these steps
to start up the AT10.1:
• Turn on the front panel dc circuit breaker. The digital meter indicates the
battery voltage only. If the meter display doesn't light, do not proceed.
Turn off the dc breaker, and check all connections and the battery
polarity again. Also check the battery voltage. It must be above 50% of
nominal voltage to turn on the display. If you can't find the problem,
refer to the Troubleshooting Procedure in Section 3.1 on page 44.
Using the Digital Meter
When you first start the
AT10.1, the meter display
alternates between dc output
voltage and dc output current.
Each reading is held for two
seconds; lights to the left of
the display indicate whether
the meter is displaying
voltage or current.
If you want to "freeze" the
meter to display only voltage,
press the METER MODE
key on the front panel. To
freeze the meter to display
only current, press the key
again. Press the key twice
more to revert to the
alternating display.
24
CAUTION: If you try to turn on the dc circuit breaker with the battery
connected in reverse polarity, the circuit breaker will immediately
trip. Do not try to close the dc breaker again, since this may damage
the battery charger. Correct the battery polarity before proceeding.
Page 29

OPERATING THE AT10.1
• If you have an optional temperature compensation probe installed, the
front panel displays LEAD during startup, indicating that the
temperature compensation is set up for lead-acid batterie s. While this is
being displayed, you can press any front panel key to change the display
to read NICD, to change the temperature compensation setup for nickel
cadmium batteries. The choice you make is saved internally, and will be
used again by the AT10.1 then next time it starts.
• Turn on the front panel ac circuit breaker. The digital meter displays the
output voltage and current. See Using the Digital Meter on page 24. You
should hear a soft hum from the AT10.1 as the output current increases.
NOTE: If you turn on the ac breaker before the dc breaker,
and you have a filtered model of the AT10.1, there is a
possibility that the dc breaker will trip when you try to turn it
on. This is caused by the filter capacitors discharging into the
battery. To get around this problem, turn off the ac breaker.
Restart the AT10.1 by turning on the dc breaker first.
• The green FLOAT indicator lights. Press the CHRG MODE key on the
front panel. The FLOAT indicator goes off, and the yellow EQLZ
indicator lights. Press the CHRG MODE key again to return the charger to
the float mode.
The table below shows the normal factory settings for float and equalize
voltages, equalize time, current limit setting, and alarm settings. If your
purchase order specified other float or equalize voltage settings, a tag
attached to the front panel of the AT10.1 lists the actual voltage settings.
FACTORY SETTINGS FOR ALL PARAMETERS
Parameter
Float Voltage
Equalize Voltage
HVDC Alarm
LVDC Alarm
Equalize Time
Equalize Method
Current Limit
HVDC Shutdown
Nominal Vdc
12 24 48 130
13 26 52 131
14 28 56 139
14.4 28.8 57.6 144
12 24 48 120
24 Hours
Manual Timer
110% of nominal output current
Disabled
25
Page 30

OPERATING THE AT10.1
2.2. USING THE AT10.1 FRONT PANEL FEATURES
2.2.1. If the meter displays an error or status message
The AT10.1 microprocessor control circuit performs diagnostic checks of
the battery charger during system start-up, then continuously during
operation. If it detects a failure or special status, an intermittent code will
appear on the front instrument panel, displayed between dc output values.
The following table is a list of these error (E ##) and status (A ##) codes.
Code Explanation
E 01
E 02
E 03
E 04
E 06
E 07
E 08
E 09
E 10
E 12
E 13
E 14
A 01
A 02
A 04
A 05
resistor R2 open or defective
short circuit on dc output
high dc voltage shutdown occurrence
internal memory failure
remote sense wiring failure
dc breaker open, or dc output wiring defective
temperature compensation probe defective
current limit setting misadjusted
internal feedback loop open
defective internal thermostat
internal over-temperature occurrence
forced load sharing not working properly
manual equalize enabled for more than 24 hrs
equalize mode inhibited
voltmeter calibration inhibited w/tempco active
dc output at Current Limit setting
Codes E 05, E 11, and A 03 are not used. See Section 3.2 on page 45 for
a full explanation of each code.
2.2.2. Selecting the meter mode
• Press the
meter has four operating modes:
• When the charger starts initially, the meter alternates, showing output
voltage and output current. The DC Volts and DC Amps indicators light
alternately to indicate what is being displayed.
26
METER MODE key to change the meter display mode. The digital
1. Alternating between output voltage and output current. When the
charger is in a timed equalize mode, the meter alternates between
output voltage, output current, and equalize hours remaining.
2. Displaying output voltage only. The DC Volts indicator lights.
3. Displaying output current only. The DC Amps indicator lights.
4. Displaying equalize hours remaining only. The EQLZ HRS
REMAINING
equalize mode, the meter displays the full programmed equalize
time.
indicator lights. If the AT10.1 is not in a timed
Page 31

OPERATING THE AT10.1
2.2.3. Selecting the Float or Equalize mode
The AT10.1 has two output voltage settings, Float and Equalize. Use the
Float mode for all normal battery charging and to operate your dc system.
Use the Equalize mode if it is necessary to balance the level of charge
among the cells of the battery. Consult your battery data sheets for
information on equalize-charging your battery.
• Press the CHRG MODE key to change to the equalize mode.
If the equalize method is set to manual timer or auto-equalize timer, the
charger will revert to the float mode at the end of the selected equalize
time.
• You can press the CHRG MODE key at any time to change back to the float
mode.
2.2.4. Choosing the Equalize method
Press the EQLZ MTHD key to choose the desired equalize method. The
indicator next to the desired equalize method will light. Three equalize
methods are available in the AT10.1:
• Manual Timer
• Manual Equalize
• Auto-Equalize Timer
These equalize methods are described below.
Manual Timer Method
Choose the manual timer method if you perform regularly scheduled
equalize charging, or if you base your equalize charging on regular
readings of the specific gravity of each cell of your battery (for lead-acid
batteries). When your battery requires equalize charging, adjust the
manual timer to 1-2 hours for each 100 AH of battery capacity (see
Section 2.3.3 to learn how to adjust the equalize time). The battery
manufacturer can help you determine the best equalizing schedule for
your battery.
After you select the manual timer method, press the
CHRG MODE key to put
the charger into the equalize mode. The EQLZ indicator will light. When
the equalize timer is finished, the charger reverts automatically to the float
mode, and the FLOAT indicator lights.
At any time during the equalize charge, you can switch the charger back
to float mode by pressing the
CHRG MODE key. The FLOAT indicator will
light.
If there is an ac power failure during a timed equalize charge, the AT10.1
remembers the remaining equalize time. When ac power is restored, it
resumes the equalize charge where it left off.
27
Page 32

OPERATING THE AT10.1
Manual Equalize Method
Choose the manual equalize method when you want to equalize charge the
battery, but only when you are able to monitor the battery voltage and
gassing rate. After you select the manual equalize method, press the
CHRG MODE key to put the charger into the equalize mode. The EQLZ
indicator will light.
Press the
CHRG MODE key again to return the charger to the float mode. The
FLOAT indicator will light.
NOTE: Never leave the AT10.1 unattended in the equalize mode with the
manual equalize method selected, because a sustained overcharge may
cause permanent damage to the battery.
Auto-Equalize Timer Method
Choose the auto-equalize timer method if you have a flooded (non-sealed)
battery that is subject to infrequent discharges, or when the battery will be
discharged by at least half of its rated capacity during an ac power failure.
When ac power is restored to the charger, it turns on in the equalize mode
automatically, and the EQLZ indicator lights. At the end of the equalize
charging-time that you select, the charger reverts automatically to the float
mode, and the FLOAT indicator lights. At any time during the equalize
charge, you can switch the charger back to float mode by pressing the
CHRG MODE key. The FLOAT indicator will light.
Consult your battery manufacturer's instructions before using the autoequalize timer method with sealed (valve-regulated) lead-acid batteries.
Whenever the ac supply fails for 12 seconds or longer, the auto-equalize
timer is enabled. For shorter periods, the timer behaves as shown below:
Mode before
ac failure
FLOAT
EQUALIZE
FLOAT or
EQUALIZE
AC falure
duration
less than
12 seconds
less than
12 seconds
12 seconds
or greater
Mode after
ac failure
FLOAT
Resume EQUALIZE
with time remaining
EQUALIZE
with full time
28
Switching to Equalize Mode with Auto-Equalize Timer Method Selected
You can start an equalize charge at any time.
Press the CHRG MODE key. The EQLZ indicator lights.
•
When the equalize timer is finished, the charger reverts automatically to
the float mode, and the FLOAT indicator lights.
Page 33

OPERATING THE AT10.1
2.2.5. Testing the front panel indicators
• Press the DOWN key. This is also the LAMP TEST key.
The meter will display 8888, and all status & alarm indicators will light.
LAMP TEST key does not test the AC ON indicator. The AC ON
The
indicator lights whenever ac power is present and the ac circuit breaker is
turned on. The
To test the action of the AT10.1 summary alarm relay, press and hold the
LAMP TEST key for four seconds to transfer the relay. If you are monitoring
the relay with a remote annunciator, it will detect the alarm condition.
2.2.6. Testing the Auxiliary Alarm Relay PC Board (optional)
If you have the optional Auxiliary Relay Board (A5) installed, you can
similarly test the six individual alarm relays. Press and hold the
key for four seconds to transfer the relays. If you are monitoring the
relays with a remote annunciator, it will detect the alarm conditions.
2.2.7. Interpreting the alarm indicators
There are six red alarm indicators at the right side of the front panel. An
indicator lights for each of the following alarm conditions:
LAMP TEST key does not operate when ac power is off.
LAMP TEST
• HIGH DC VOLTAGE: lights whenever the dc output voltage exceeds the
specified alarm voltage setting. See Section 2.3.4 to learn how to adjust the
HVDC alarm setting.
• LOW DC VOLTAGE: lights whenever the dc output voltage is below the
specified alarm voltage setting. See Section 2.3.4 to learn how to adjust the
LVDC alarm setting.
• DC OUTPUT FAILURE: lights whenever the AT10.1 cannot provide its full
rated output voltage or its full rated output current. You cannot adjust this
alarm setting.
• AC INPUT FAILURE: lights whenever the ac power supply to the AT10.1 is
interrupted.
• POS GND: lights whenever leakage current from the battery positive (+)
terminal to ground exceeds a specified threshold (see note).
• NEG GND: lights whenever leakage current from the battery negative (-)
terminal to ground exceeds a specified threshold (see note).
NOTE: You can adjust the sensitivity of the ground fault detection
from 5K to 50k ohms. Adjusting the ground fault sensitivity
affects the positive and negative ground fault sensitivities equally.
When an alarm occurs, the indicators will light immediately. The AT10.1
also features a summary alarm relay with one form-C contacts (TB3) rated
0.5A / 125 Vac/Vdc. If an alarm condition lasts for 30 seconds or longer,
the summary alarm relay transfers. Under standard settings, when the
alarm condition is corrected, the corresponding relay and indicator resets
automatically. Latching alarm capability for the AT10.1 battery charger is
available, featured in a supplemental document (JA5098-00
).
29
Page 34

OPERATING THE AT10.1
2.3. SETTING PARAMETERS IN TH E A T1 0 . 1
2.3.1. Understanding Parameter Settings
You can change the settings of the AT10.1 while the charger is operating,
using the front panel controls. The changes you make take effect
immediately, and are saved internally. If the charger is taken out of
service, and then later returned to service, it restarts using the last values
you set. You can adjust the following parameters:
• Float voltage
• Equalize voltage
• Equalize timer (in hours)
• High dc voltage alarm setting
• Low dc voltage alarm setting
• Current limit value (in Amperes)
• High dc voltage shutdown feature (on or off)
Your choice of equalize method is also saved internally.
When you want to change any parameter, press the
EDIT/ENTER key to put
the AT10.1 into EDIT mode. The meter display flashes about once per
second, and the status indicators prompt you to adjust the respective
parameter. You adjust each parameter by pressing the
UP or DOWN key
until the reading you want shows on the meter display. You can make the
display scroll up or down continuously by pressing and holding the
DOWN key.
UP or
You cannot exceed certain upper and lower limits for the operating
parameters. To see what the limits are for your charger, refer to the
AT10.1 Specifications in Appendix A on page 70.
When you first press the
EDIT/ENTER key, the AT10.1 prompts you to
adjust the first parameter in the list above (float voltage). When you obtain
the value you want on the display, press the
EDIT/ENTER key again. The
AT10.1 saves the new setting internally, and then prompts you to adjust
the second parameter. You continue this way to adjust the first six
parameters in the list above. If you want to skip adjusting any parameter,
just press the
EDIT/ENTER key again. The AT10.1 moves to the next
parameter.
When you are finished adjusting the sixth parameter (current limit), press
the
EDIT/ENTER key again. The AT10.1 saves all adjustments you made
internally, and reverts to normal operation. The new settings take effect
immediately.
30
Edit mode ends automatically if you don't press any front panel key within
25 seconds, and any change you made to the last setting is not saved.
Page 35

OPERATING THE AT10.1
2.3.2. Setting the Float and Equalize voltages
• Press the EDIT/ENTER key.
The FLOAT and DC VOLTS indicators light, and the display flashes the
present value of the float voltage. Press and release the
increase or decrease the value in the display by one count, or press and
hold the
downward. When the display shows the float voltage you want to set,
release the
UP or DOWN key again to reach the voltage you want to set.
The EQLZ and DC VOLTS indicators light, and the display flashes the
present value of the equalize voltage. Press and release the
key to increase or decrease the value in the display by one count, or press
and hold the
downward. When the display shows the equalize voltage you want to set,
release the
UP or DOWN key again to reach the voltage you want to set.
UP or DOWN key to scroll the value in the display upward or
UP or DOWN key. If you go past the voltage you want, press the
• Press the EDIT/ENTER key. The new float voltage setting is saved
internally.
UP or DOWN key to scroll the value in the display upward or
UP or DOWN key. If you go past the voltage you want, press the
UP or DOWN key to
UP or DOWN
• Press the EDIT/ENTER key. The new equalize voltage setting is saved
internally.
If you want to adjust the equalize timer duration, skip to Section 2.3.3.
OR
If you want to exit the Edit mode now, press the
EDIT/ENTER key four more
times until the charger returns to normal operation.
Edit mode ends automatically if you don't press any front panel key within
25 seconds, and any change you made to the last setting is not saved.
31
Page 36

OPERATING THE AT10.1
2.3.3. Setting the Equalize Timer
• Press the EDIT/ENTER key until the EQLZ HRS REMAINING,
MANUAL TIMER and AUTO EQLZ TIMER indicators light, and the
display flashes the present value of the equalize timer duration in hours.
Press and release the UP or DOWN key to increase or decrease the value in
the display by one count, or press and hold the UP or DOWN key to scroll
the value in the display upward or downward. When the display shows
the equalize time, in hours, that you want to set, release the
key. If you go past the number of hours you want, press the UP or DOWN
key again to reach the number you want to set.
If you set the equalize time to zero hours, the equalize mode is disabled.
• Press the EDIT/ENTER key. The new equalize timer duration is saved
internally. The timer setting works for both the manual timer and the
auto-equalize timer.
If you want to adjust the alarm settings, skip to Section 2.3.4.
OR
If you want to exit the Edit mode now, press the
more times until the charger returns to normal operation.
UP or DOWN
EDIT/ENTER key three
2.3.4. Setting the Alarms
After you save the equalize timer setting, the Edit mode automatically
prompts you to adjust the settings of the high dc voltage and low dc
voltage alarms. There is a red indicator light on the front panel of the
AT10.1 for each of the following alarm conditions:
• High DC Voltage
• Low DC Voltage
• DC Output Failure
• AC Input Failure
• Ground Fault Detection (+)
• Ground Fault Detection (-)
When an alarm occurs, the indicators will light immediately. The AT10.1
also features a summary alarm relay with one form-C contacts (TB3),
rated 0.5A / 125 Vac/Vdc. If an alarm condition lasts for 30 seconds or
longer, the summary alarm relay contacts transfer, and can be monitored
remotely from TB3. When the alarm condition is corrected, the relay and
all indicators reset automatically. If latching alarms/relays are enabled the
relay will need to be reset manually, see Section 2.2.7 on page 29.
The summary alarm contacts (TB3) also transfer when the AT10.1 detects
certain secondary errors, indicated by codes (E 03, E 04, E 06, E 07, E
08, E 09, E 10, E 12, E 13, and A 01) on the meter display, rather than a
red alarm light. See Section 3.2 on Page 45 for all error and status codes.
32
Page 37

OPERATING THE AT10.1
Setting the High DC Voltage Alarm
• Press the EDIT/ENTER key until the HIGH DC VOLTAGE indicator
flashes, and the display flashes the present value of the high dc voltage
alarm.
Press and release the UP or DOWN key to increase or decrease the value in
the display by one count, or press and hold the UP or DOWN key to scroll
the value in the display upward or downward. When the display shows the
high dc voltage alarm point that you want to set, release the
key. If you go past the voltage you want, press the UP or DOWN key again
to reach the voltage you want to set.
• Press the EDIT/ENTER key. The new high dc voltage alarm setting is
entered into permanent memory.
Setting the low DC Voltage Alarm
• Press the EDIT/ENTER key until the LOW DC VOLTAGE indicator
flashes, and the display flashes the present value of the low dc voltage
alarm.
Press and release the UP or DOWN key to increase or decrease the value in
the display by one count, or press and hold the UP or DOWN key to scroll
the value in the display upward or downward. When the display shows the
low dc voltage alarm point that you want to set, release the
key. If you go past the voltage you want, press the UP or DOWN key again
to reach the voltage you want to set.
UP or DOWN
UP or DOWN
• Press the EDIT/ENTER key. The new low dc voltage alarm setting is
entered into permanent memory.
If you want to adjust the current limit setting, skip to Section 2.3.5.
OR
If you want to exit the Edit mode now, press the
EDIT/ENTER key again to
return the charger to normal operation.
33
Page 38

OPERATING THE AT10.1
Adjusting Ground Detection Sensitivity
You can adjust the sensitivity of
the ground detection alarm circuit.
You must have a test resistor
whose value is the sensitivity you
want. You can adjust the
sensitivity from 5 to 50 kΩ.
The potentiometer for adjusting
ground detection circuit
sensitivity is located on the main
control circuit board. It is the
lower of the two potentiometers
labeled RA3 SENS, as shown in
the figure at the right.
NOTE: Do not try to adjust the upper potentiometer labeled RA2
BALANCE. This adjustment is made at the factory for proper
circuit operation.
CAUTION: Before connecting or disconnecting a test resistor,
de-energize and lock out all ac and dc voltage sources to the
AT10.1. Check with a voltmeter before proceeding. Restart the
AT10.1 only when necessary to make the sensitivity adjustment.
If your battery is grounded, do not attempt this procedure.
Remove the safety cover. Connect
the test resistor between TB1(+)
and chassis ground, as shown to
the right. Adjust RA3
counterclockwise until the front
panel indicator goes out, then
adjust slowly clockwise until the
POS GND indicator just lights.
Make this adjustment slowly; the
indicator is updated once in every
four seconds. De-energize and
lock out power to the AT10.1,
then remove the test resistor and
verify that the indicator goes out.
Now connect the test resistor between TB1(-) and chassis ground. Verify
that the NEG GND indicator lights. If not, adjust RA3 clockwise until it
does. Remove the test resistor.
34
Page 39

OPERATING THE AT10.1
Using Ground Detection in Charger Standby Mode
If you put the AT10.1 into standby mode by opening the dc circuit breaker
(CB2), the ground detection circuit will send an erroneous negative
ground alarm. There are two ways to work around this:
• Disable the ground detection circuit while the charger is in standby, as
described below.
• Put the charger into standby by opening the ac input circuit breaker
(CB1), and leaving the dc circuit breaker closed.
Operating the charger with the ac breaker (CB1) closed and the dc breaker
(CB2) open is an abnormal condition, and is not recommended.
Disabling the Ground Detection Alarm
You can disable the ground detection alarm circuit, and isolate the circuit
from chassis ground. If your battery is normally grounded, or you want to
defeat the alarm for any other reason, follow these steps:
• De-energize and lock out all ac and dc voltage sources to the AT10.1.
Check with a voltmeter before proceeding. This includes remote sense
wires if they were installed.
• Open the AT10.1 front panel, and locate jumper J5 at the top left of the
Control Circuit Board (shown on the previous page). Move the jumper to
the DISABLE position. The POS GND and NEG GND indicators and
the summary alarm relay will not respond to a ground fault.
Restart the AT10.1, following the instructions in Section 2.1.
2.3.5. Setting the current limit value
The AT10.1 automatically limits its dc output current in case of overload
or battery discharge. You can adjust the value of the current limit from
50% to 110% of rated current. The factory setting is 110%.
The current limit adjustment is the last step in the normal Edit sequence. If
the AT10.1 is not in the Edit mode, press the
until the meter display flashes the value of current limit, in Amperes. Press
and release the
UP or DOWN key to increase or decrease the value in the
display by one count, or press and hold the UP or DOWN key to scroll the
value in the display upward or downward. When the display shows the
current limit value that you want to set, release the
go past the number you want, press the UP or DOWN key again to reach the
number you want to set.
• Press the EDIT/ENTER key. The new current limit setting is saved
internally.
Edit mode ends automatically if you don't press any front panel key within
25 seconds, and any change you made to the last setting is not saved.
EDIT/ENTER key five times,
UP or DOWN key. If you
35
Page 40

OPERATING THE AT10.1
2.3.6. Enabling the High DC Voltage shutdown feature
The AT10.1 has a built-in high dc voltage shutdown feature. In case of
any maladjustment or internal failure that results in a continuous output
voltage that is too high, the AT10.1 shuts down after 30 seconds to protect
the battery. The digital display reads E 03, and the summary alarm relay
contact transfers.
The AT10.1 is shipped with the high dc voltage shutdown feature disabled.
You can adjust the high dc voltage shutdown
(the setting is the same as the high dc voltage
alarm setting). Refer to Section 2.3.4.
The charger must be in normal operation (not
the Edit mode) to enable the high dc voltage
shutdown.
To enable the shutdown feature:
• Press and hold the UP key, then
• Press the CHRG MODE key.
The HIGH DC VOLTAGE indicator lights, and
the display flashes ON. You can toggle the
shutdown feature OFF and ON by pressing the
CHRG MODE key repeatedly.
Parallel Operation
If two (or more) AT10.1
chargers are connected in
parallel, both sense the
output voltage. If one
charger runs away, it will
supply all the output
current; the other has zero
output current. The high dc
voltage shutdown does not
operate in a charger with
zero output current, so that
only the defective charger
(of two or more in parallel)
shuts down. The other
charger continues to supply
the load normally.
If you don't press any key within 4 seconds, the last state indicated (ON or
OFF) is saved internally. Note that you don't use the
EDIT/ENTER key for
this feature.
If the AT10.1 shuts down because of a high dc voltage, the meter display
shows error code E 03. Reset the charger by turning the ac breaker off,
then on again.
36
Page 41

2.3.7. Adjusting the Voltmeter Accuracy
The AT10.1 voltmeter is adjusted at the factory to display the actual
output voltage within ±0.25%. If you replace any component that affects
meter accuracy, such as the main control circuit board or R4, you should
readjust the meter. This adjustment procedure is different from all others,
because the meter reading remains constant, while the output voltage of
the charger changes. Do this adjustment with a fully charged battery and
with no load connected.
First, use the Edit procedure to adjust the float voltage to the desired
value. See Section 2.3.2 for instructions on setting the float voltage.
Second, press and hold the
UP key, then press the EQLZ MTHD key.
The DC VOLTS METER MODE indicator will light, and the meter display
flashes the output voltage reading. Measure the output voltage of the
AT10.1 using a dc meter accurate to ±0.25% or better.
While watching the meter connected to the AT10.1 output (not the front
panel meter), press the
UP or DOWN key until the actual output voltage
matches the float setting on the front panel meter.
OPERATING THE AT10.1
Each time you press
UP or DOWN, you change the AT10.1 output voltage
by a small amount. Continue to press UP or DOWN until the actual output
voltage agrees with the front panel reading within ±0.25%.
NOTE: Allow one or two seconds for the output voltage to stabilize
each time you press the
UP or DOWN key.
When you are finished adjusting the output voltage, the AT10.1 waits 5
seconds, then the display returns to normal operation.
37
Page 42

OPERATING THE AT10.1
2.3.8. Using the Low Level Detector (LLD)
The AT10.1 battery charger is equipped with a summary alarm safety
override circuit. This feature forces the summary alarm (common alarm)
relay contact to transfer, sending an alarm, even if there is a catastrophic
failure of the charger's control circuitry. A low battery voltage triggers the
safety circuit.
Main control circuit board hardware, not software, maintains the low level
detect circuit. Therefore, to remotely monitor this alarm, user connections
must be made at TB3. The summary alarm contacts on the auxiliary alarm
relay pc board at TB4 will not signal a low level detect alarm.
If you have a dc power supply, you can adjust the battery voltage that
triggers the alarm. On the back of the main control circuit board, find the
potentiometer RA1, as shown in the figure below.
38
Disconnect all ac and dc power sources from the AT10.1, and connect
your dc power supply to the dc output terminals of the charger (positive to
positive and negative to negative). Adjust the power supply to the voltage
at which you want to activate the alarm.
NOTE: You need at least 50% of the nominal output voltage to power the
AT10.1 control circuit board.
Adjust RA1 with a small jeweler's screwdriver clockwise until the alarm
just activates. A red LED indicator (DS10) next to RA1 indicates when
the alarm is active.
Page 43

OPERATING THE AT10.1
2.3.9. Using the front panel security feature
The AT10.1 charger is shipped with all the front instrument panel keys
enabled. You can disable the following front panel functions:
• Selecting Equalize method
• Changing settings using the EDIT/ENTER key
• Toggling the high dc voltage shutdown feature
To disable the front instrument panel keys, open the AT10.1 door and
locate the small plastic jumper J9 on the right side of the main control
circuit board. See the figure below.
Move the jumper up to the DISABLE position (pins 2 and 3). With this
setting, only the front panel
METER MODE and CHRG MODE keys will
function. All indicators will still work normally. Return the jumper down
to the ENABLE position (pins 1 and 2) to return all front panel key
functionality.
39
Page 44

OPERATING THE AT10.1
2.4. Performing routine maintenance
WARNING
High voltages appear at several points inside the AT10.1. Use extreme
caution when working inside the unit. Do not attempt to work inside the
AT10.1 unless you are a qualified technician or electrician.
Disconnect and lock out all power from the AT10.1 before starting to
remove or replace any components. Turn the ac power off at the
distribution panel upstream from the charger. Disconnect the battery
from the AT10.1 output terminals TB1(+/-).
2.4.1. Keep it clean
The AT10.1 charger is cooled by natural convection. At least once a year,
vacuum the vents at the top and bottom of the enclosure to ensure that
there is an adequate supply of cooling air. If you have an extremely dusty
environment (especially if airborne dust is conductive), carefully vacuum
out the interior. Be sure to clean surfaces of circuit boards, and around
electrical terminals.
The AT10.1 is rated for operation up to 122° F / 50° C. If your charger is
in a warmer environment, or at an elevation over 3000ft / 914m, contact
your sales representative for operating information.
2.4.2. Check power and signal connections
Check the tightness of all field connections inside the charger, and
connections to the battery. A loose or corroded connection at the battery
terminals can be a fire or explosion hazard, and may cause erroneous
operation of the AT10.1 charger.
2.4.3. Check remote sense wiring (optional)
If you wired the AT10.1 charger for remote sense, check the signal
connections to the battery or load, and check the wiring to be sure the
insulation is in good condition. If there is a failure of the remote sense
signal wiring, the AT10.1 charger displays the error code E 06, and goes
back to local control, sensing the output voltage at the charger output
terminals.
40
Page 45

OPERATING THE AT10.1
2.4.4. Check temperature compensation probe (optional)
If you are using the optional temperature compensation probe, be sure that
the probe is securely installed. Be sure the connectors and the wiring from
the probe to the AT10.1 charger are in good condition.
If there is a failure of the temperature compensation probe, or the wiring,
the AT10.1 charger displays the error code E 08.
2.4.5. Measuring the output ripple voltage (filtered models only)
If your AT10.1 charger is a filtered model, at least once a year measure
the ac ripple voltage at the battery terminals. Use an rms responding ac
voltmeter.
specifications in Appendix A on page 70, if the battery ampere-hour
capacity is at least 4 times the output current rating of the charger.
If you suspect that the output ripple voltage is too high, see "Output ripple
voltage too high" of the Troubleshooting Chart in Section 3.4, page 53.
2.4.6. Viewing the voltage and alarm settings
You can review the parameter settings in the AT10.1 charger by pressing
the
EDIT/ENTER key on the front panel. Each time you press the key, a
different parameter displays, in the following order:
1
The ripple voltage should be no higher than shown in the
• Float voltage
• Equalize voltage
• Equalize time (in hours)
• High dc voltage alarm setting
• Low dc voltage alarm setting
• Current limit, in Amperes
1
Don't use a dc voltmeter. The ripple voltage on a battery is a very small ac voltage.
41
Page 46

OPERATING THE AT10.1
SAMPLE PREVENTIVE MAINTENANCE PROCEDURE
AT10.1 BATTERY CHARGER
Suggested frequency: every 6 months
Maintenance date Performed by
Step
(standard features)
Clean battery
charger
Check all
electrical
connections
and wiring
Check ac input
voltage
Check dc
output voltage
Check ripple
voltage
Test font panel
indicators
Test common
alarm relay
• All vents clean and open.
• Remove dust and debris from inside of
unit.
• TB1 connections all tight.
• Internal wiring connections tight, slip-on
connectors fully seated. Wire and lug
insulation in good condition.
• Terminations at battery or bus are tight
and corrosion free.
• Measure between TB1-L1 and TB1-L2
using an ac voltmeter. Value must be
within +10%, -12% of nominal voltage.
• Measure at TB1(+) and TB1(-) using a dc
voltmeter. Value should agree with front
panel voltmeter within 0.25%, and must
be correct values for your battery. If the
AT10.1 is using a temperature
compensation probe, see the graph on
page 23 to determine correct battery
voltage. You need to know the battery
temperature for this step.
• Measure at battery terminals using an ac
voltmeter set to the milliVolts scale.
Check against specification in Appendix
A on page 70.
• Press
• Press
seconds. Common alarm relay will
transfer.
Instructions Results
OK
OK
OK
OK
OK
Input Vac
LAMP TEST key on front panel.
LAMP TEST key and hold for 4
Float
Equalize
Ripple
OK
OK
Vdc
Vdc
mVac
42
Page 47

Exercise front
panel controls
Check voltage
and alarm
settings
Final checks
OPERATING THE AT10.1
• Switch from float to equalize, then back
to float.
• Turn off the dc circuit breaker. E 07 may
appear on display (requires at least 5% of
rated output current). Reset breaker.
• Cycle through meter modes.
• Cycle through equalize methods.
• Turn off ac circuit breaker. The AC
INPUT FAILURE indicator should light.
Reset breaker.
• Use
• Make sure plexiglas safety cover is in
• Restore charger to normal operation.
• Close latch on front panel.
EDIT/ENTER key to scroll through
settings. See page 30.
place.
OK
OK
VOLTS OK
AMPS OK
HOURS OK
MANUAL TIMER OK
MANUAL EQLZ OK
AUTO EQLZ TIMER OK
Alar m OK
FLOAT OK
EQUALIZE OK
HVDC alarm OK
LVDC alarm OK
Current limit
Adc
OK
OK
OK
Step
(optional features)
Test auxiliary
alarm relays
Check
integrity of
remote wiring
Final checks
• Press LAMP TEST key and hold for 4
seconds. Alarm relays will transfer.
• Remote sense wiring. See page 16.
• Temperature compensation wiring. See
page 20.
• Temperature compensation probe. See
page 20.
• Close padlock or key lock.
Instructions Results
OK
OK
OK
OK
OK
A downloadable worksheet of this Preventive Maintenance Procedure (JD0064-00)
is available online.
43
Page 48

SERVICING THE AT10.1
3. SERVICING THE AT10.1
3.1. A STEP-BY-STEP TROUBLESHOOTING PROCEDURE
The AT10.1 battery charger is fully tested and calibrated at the factory and
should work for years with a minimum of attention. If you do encounter
trouble, there are three steps you should take to find the problem and
return the charger to service.
1. Check the front panel meter for an error code. The AT10.1 is able to
diagnose common problems with the battery charger, or with the application
or installation. If the front panel displays an error code, see Section 3.2,
Interpreting Front Panel Error Messages, for help in interpreting the code
and solving the problem.
2. If the charger does not work properly, but there is no front panel error code,
turn off the front panel circuit breakers (or disconnect ac and dc power
externally). Then turn the dc and ac power back on. This will return the
charger to normal operation as long as there is no internal component failure.
Note: Do this only once. If the charger does not resume
normal operation, go to the next step.
3. If the charger still does not work properly, make a list of the symptoms that
you observe, then turn to Using the troubleshooting chart in Section 3.3. The
troubleshooting chart relates common trouble symptoms to their causes, and
gives the proper procedures for correcting the problem.
4. If the symptom doesn't appear on the troubleshooting chart, or if the
recommended repair doesn't work, consult your sales or service
representative to arrange for on-site or factory service.
44
Page 49

SERVICING THE AT10.1
3.2. INTERPRETING FRONT PANEL ERROR MESSAGES
If the AT10.1 control circuit detects hardware or wiring problems, it may
display an error code on the front panel. To solve an error code problem,
refer to the table below, which lists the codes and procedures to use.
WARNING
High voltages appear at several points inside the AT10.1. Use extreme
caution when working inside the unit. Do not attempt to work inside the
AT10.1 unless you are a qualified technician or electrician.
Disconnect and lock out all power from the AT10.1 before starting to
remove or replace any components. Turn the ac power off at the
distribution panel upstream from the charger. Disconnect the battery
from the AT10.1 output terminals TB1(+/-).
Error
Code
E 01
E 02
E 03
Meaning Repair Procedure
resistor R2
open or
defective
short circuit on
dc output
High DC
Voltage
Shutdown
activated
Resistor R2 is installed at the back of the front panel, in the control circuit
board input connector. R2 is measured by the control circuit on startup,
and is used to determine some of the AT10.1's parameters, such as the
float voltage.
If the AT10.1 finds that R2 is defective, it must be replaced. See Section
3.6 for parts ordering information. When you have completed the repair,
restart the AT10.1 according to Section 2.1.
You may get this error code if the battery is discharged to less than 6
volts. When the battery charges to greater than 6 volts, the error code
disappears. If you have a seriously discharged battery, allow the AT10.1
to run for 24 hours and check the battery voltage again. If it has not
increased to the normal voltage rating, consult the battery manufacturer
for help.
If the battery voltage is normal, then check the wiring at the dc output
terminals for a short circuit.
If the battery voltage is normal and all external wiring is OK, check the dc
breaker on the AT10.1. If it is tripped, try once to reset it. If it trips again
immediately, there may be an internal short circuit in the AT10.1. Check
the internal wiring. If the AT10.1 is filtered, check the dc filter capacitors
and the polarity diode.
The AT10.1 normally recovers automatically from an E 02 condition. If
you have shut down the AT10.1 for service, restart it according to Section
2.1.
To restart the AT10.1, turn the ac breaker off, then on. Check the
Equalize voltage and High DC Voltage alarm settings. The alarm setting
must be higher than the Equalize voltage setting.
If you get another High DC Voltage shutdown after a few minutes of
operation, there may be an internal component failure. See Charger
output not controllable of the troubleshooting chart in Section 3.4.
45
Page 50

SERVICING THE AT10.1
Error
Code
E 04
E 05
E 06
E 07
E 08
Meaning Repair Procedure
internal memory
failure
not used
defective R4 or
R14, or remote
sense wiring
failure
dc breaker
open, or internal
dc wiring failure
defective
temperature
compensation
probe
Any parameters that you set, such as Float or Equalize voltage, are saved
internally. The internal memory is tested on startup. If the memory test
fails, E 04 appears on the front panel display. The error may also appear
if the controller was trying to write to the memory while a power failure
occured.
If an E 04 appears, try restarting the AT10.1 by turning the ac and dc
breakers off, then on. If the AT10.1 restarts normally, you must reenter
any changes you made to the factory settings (float voltage, etc.).
If E 04 appears repeatedly, the internal memory has been damaged. You
must replace the control circuit board. See Section 3.6 for parts ordering
information.
This error code was formerly used to indicate a reverse battery
connection. It is not available in the AT10.1.
Locate R4 mounted on TB5, on the back of the front panel. Remove the
resistor and measure its value with an Ohmmeter (see table 3-1 for the
correct value). If the resistor is not within 1% of the specified value, it
must be replaced.
Locate R14 inside the enclosure, connected to TB1(-). Remove the
lugged end and measure the resistor's value with an Ohmmeter (see table
3-1 for the correct value). If the resistor is not within 1% of the specified
value, it must be replaced.
If you are using remote sense wiring from the battery to the AT10.1, the
wiring may have failed. The usual failure is an open circuit; a short circuit
will usually be indicated by smoke or fire in the wiring.
The AT10.1 displays the error code if it detects this wiring failure. You
should respond to this problem quickly to be sure that the AT10.1
regulates the output voltage properly. Wire an annunciator (e.g. buzzer) to
the summary alarm relay contact (TB3) for remote indication of any
charger problem, or monitor the AT10.1 operation using the optional DNP3/MODBUS communications board.
If a failure exists in remote sense wiring, the AT10.1 regulates its output
voltage locally until you correct the problem, see Section 1.9. The locally
controlled voltage may not reflect the true requirements of the battery.
When you complete the repair, restart the AT10.1 per Section 2.1.
If the dc breaker is open, open the ac breaker, then reclose the dc and ac
breakers. If the dc breaker trips again, see the troubleshooting chart in
Section 3.4.
If the dc breaker is closed, but you have an E 07 display, check your
battery. If the battery is disconnected, and you then disconnect the load,
the AT01.1 may display an E 07 code. Restart the AT10.1 according to
Section 2.1.
If the battery and load are OK, see the troubleshooting chart in Section 3.4
for help in locating the problem.
See Application Note (JD5003-00) for more detailed user instructions.
If a temperature compensation probe is connected to the AT10.1, the
control circuit detects the probe on startup, and uses the temperature
measured by the probe to control the output voltage of the AT10.1. To
understand temperature compensation, see Section 1.11.
If the temperature compensation probe, or the wiring that connects it to the
AT10.1, fails during normal operation, the AT10.1 detects the failure, and
shows E 08 on the front panel meter.
46
Page 51

SERVICING THE AT10.1
Error
Code
E 08
E 09
E 10
E 11
E 12
E 13
E 14
A 01
A 02
A 04
A 05
Meaning Repair Procedure
defective
temperature
compensation
probe
(continued)
misadjusted
current limit
open internal
feedback loop
not used
defective
internal
thermostat
internal overtemperature
forced load
sharing not
working
properly
manual eqlz
enabled for
more than 24 hr
equalize mode
inhibited
voltmeter
calibration
inhibited
w/tempco active
dc output at
Current Limit
setting
Disconnect the wiring from the probe, and measure the resistance of the
probe with an Ohmmeter. The resistance should be approximately 10,000
Ohms at normal room temperature (77° F / 25° C). If the probe reads
open or shorted, it needs to be replaced.
If the probe checks good, examine the wiring between the probe and the
AT10.1. Also check the connection of the cable to the control circuit board
on the back of the front panel. If the wiring is OK, then the probe needs to
be replaced. Once you have replaced the probe, you must restart the
AT10.1 to activate temperature compensation.
This code has been discontinued with main ctrl pcb (A1) firmware version
6.52. See Application Note (JD5035-00
A redundant internal feedback loop (control loop) is provided as
redundancy, to increase reliability when remote sensing is used. If there is
a problem with the internal loop wiring, the AT10.1 will display E 10.
Check the internal wiring in the signal harness, especially wire # 33. Also
check the harness connector on the main control circuit board.
This error code is not implemented at this time.
The AT10.1 rectifier heat sink assembly has beem equipped with a non-
standard over-temperature thermostat (S2). On startup, the AT10.1 tests
the thermostat, and displays E 12 if it is defective.
Check the thermostat (S2) for continuity. Disconnect the wiring and
resistor (R28) from the quick connect terminals. The thermostat switch
should be closed (NC) at normal room temperature.
The non-standard rectifier thermostat (S2) has detected an overtemperature condition. If the rectifier is equipped with a fan (B2), check
the fan for proper operation. Also make sure that all enclosure vents are
clear of debris, and that the ambient temperature is below 50°C (122°F).
See Appendix F on page 90.
Verify both AT10.1s are functioning properly. Ensure that the forced load
sharing interconnection cable assembly is not broken, is properly installed,
and that the connector for the Secondary charger has the jumper as
described. Ensure that both AT10.1s are connected to the same ac
supply, and that source phase rotation is the same for both AT10.1s.
If the AT10.1 was accidentally left in manual equalize mode, switch the
unit back to float, manual equalize timer, or auto-equalize timer mode,
according to Section 2.2.4 on Page 27.
If you set the equalize timer to zero (0) hours, the equalize mode is
inhibited. When you try to put the AT10.1 into equalize mode from the
front panel controls, the display shows the message A 02. If you want to
enable the equalize mode, set the equalize timer to one (1) or more hours.
While using temperature compensation, the AT10.1 internal dc voltmeter
cannot be calibrated. Disconnect one wire of the tempco cable from TB8
on A1, and restart the AT10.1. Perform the voltmeter calibration according
to Section 2.3.7 on Page 37. Reconnect the tempco cable to TB8 and
restart the AT10.1. See Application Note (JD5003-00
The AT10.1 is in Current Limit mode. This will occur when there is a large
load on the dc bus, or the battery has discharged. Make sure that the
AT10.1 is sized correctly for the application, and that the Current Limit
value has been set correctly. See Section 2.3.5 on Page 35.
) for a description of this code.
) for further details.
47
Page 52

SERVICING THE AT10.1
3.3. USING THE TROUBLESHOOTING CHART
WARNING
High voltages appear at several points inside the AT10.1. Use extreme
caution when working inside the unit. Do not attempt to work inside the
AT10.1 unless you are a qualified technician or electrician.
Disconnect and lock out all power from the AT10.1 before starting to
remove or replace any components. Turn the ac power off at the
distribution panel upstream from the charger. Disconnect the battery
from the AT10.1 output terminals TB1(+/-).
Before you try to use the troubleshooting chart, be sure that you have
followed the steps in Section 3.1.
The troubleshooting chart that begins on the next page is divided into
three columns. To use the chart:
1. Make a list of the charger's condition, including the trouble symptoms.
2. Find the symptom(s) in the first column of the chart.
3. The middle column contains common causes for the problem you observe, in
order of probability.
4. Follow the action described in the right-hand column to correct the problem
and return the charger to normal service.
Determining the condition of the charger:
• Is the front panel AC ON indicator lit?
• What is the ac voltage at the input terminals (measured with an ac
voltmeter)?
• What is the dc voltage at the output terminals (measured with a dc
voltmeter)?
• Does the meter on the front panel display any voltage or current?
• Are any alarm indicators lit?
• Do the front panel status indicators work (Charge Mode, for example)?
• Can you change the charger to the Equalize mode and back to Float?
• Is the charger making any noise? Is it unusually loud?
• Is there any sign or smell of smoking or burning?
Refer to the wiring diagrams and parts layout drawings in Appendix C
while using the chart. For instructions on replacing components, see
Section 3.5.
48
Page 53

3.4. TROUBLESHOOTING CHART
SERVICING THE AT10.1
SYMPTOM
Front panel
meter
displays all
segments
"On" or all
segments
"Off." AT10.1
may have no
output.
AC breaker
trips
immediately
AC breaker
trips after a
few minutes
DC breaker
trips
immediately
PROBABLE
CAUSE
1. An external
surge has
interrupted
operation of the
microprocessor
or the display
controller.
1. Shorted
rectifier diode
or SCR
2. Defective
wiring to T1 or
to the rectifier
heat sink
assembly
3. Defective
transformer T1
1. Loose
connection to
breaker
2. Wrong ac
voltage, or T1
taps miswired
3. Open SCR
4. SCR not
controllable
1. Battery
connected with
reverse polarity
2. Defective
rectifier bridge
(if unfiltered
charger)
1A. Soft Reset of control board by pressing S7 reset switch.
S7 is located inside the AT10.1, on the control board's right
edge (as viewed from the rear of the front panel). This will
restart the control board without modifying any settings.
1B. Hard Reset of control board by pressing and holding the
"UP" button on the front panel, and simultaneously pressing
S7 reset switch. This will restart the control board and restore
all settings to factory default. Reset parameters per Section
2.3 of this manual.
1C. Remove all power from AT10.1 to allow control board to
discharge all voltages. This can be done by opening the AC
circuit breaker and disconnecting the control board plug(s).
Keep power removed for approximately 5 minutes to allow
voltages to discharge.
1. Test by disconnecting wire # 12 from the rectifier assembly.
Measure resistance between the two top rectifier terminals
(labeled "AC" on the wiring diagram); it should be at least
100,000 Ohms (check both polarities). Replace rectifier
assembly if resistance is low in either direction.
2. Check spacing of terminals; check wiring for signs of
insulation damage, burns, etc. Repair as necessary.
3. Test by disconnecting wires from X1, X4, Y1 and Y2. If ac
breaker still trips, replace T1.
1. Check and tighten connections as required.
2. Be sure the T1 primary taps are wired correctly for your
input voltage. See Section 1.6 for details.
3. Use a clamp-on ammeter to measure the current in wire #
11 or # 12. If it less than 70% of the dc output current, one of
the SCRs or diodes is defective. Replace the rectifier module.
4. Disconnect wire # 24 from terminal E3 of the rectifier
assembly (near the left front of the enclosure). Restart the
AT10.1. If You are able to measure output current, one of the
SCRs is defective. Replace the rectifier module.
1. Check and correct battery wiring if necessary.
2. Test by disconnecting wire # 12 from the rectifier assembly.
Measure resistance between the two top rectifier terminals
(labeled "AC" on the wiring diagram); it should be at least
100,000 Ohms (check both polarities). Replace rectifier
assembly if resistance is low in either direction.
RECOMMENDED ACTION
49
Page 54

SERVICING THE AT10.1
SYMPTOM
DC breaker
trips
immediately
(continued)
DC breaker
trips after a
few minutes
No output
current, but
ac and dc
breakers are
on; AC ON
lamp is out
PROBABLE
CAUSE
3. Defective
free-wheeling
diode in SCR
module A16
4. Defective
polarity diode
(if filter
assembly is
installed)
5. Defective
wiring
1. Loose
connection to
breaker
2. Open SCR
3. SCR not
controllable
4. Defective
Main Control
circuit board A1
1. AC supply
failure
2. Input fuse F1
is blown (480
Vac input only)
3. Defective
wiring
4. Defective
transformer T1
3. Remove wire # 13 from the rectifier control pc board A3.
Test the SCR module's internal free-wheeling diode by
measuring the resistance from E2 to E10 on A3 with an
Ohmmeter. The reading should be at least 100,000 Ohms in
one polarity, and less than 1,000 Ohms in the other polarity.
Replace the entire A16 SCR module if it is defective.
4. Remove wire # 15 from terminal E14 on the CR1 heat sink.
Measure the resistance from the heat sink to E8 on the
rectifier control pc board at the left front of the AT10.1 (check
both polarities). If the resistance is less than 1,000 Ohms in
both directions, replace the filter assembly.
5. Check spacing of terminals; check wiring for signs of
insulation damage, burns, etc. Repair as necessary.
1. Check and tighten connections as required.
2. Use a clamp-on ammeter to measure the current in wire #
12 or # 11. If it less than 70% of the dc output current, then
one of the SCRs or diodes is defective. Replace the rectifier
module.
3. Disconnect wire # 24 from terminal E3 of the rectifier
assembly (near the left front of the enclosure). Restart the
AT10.1. If You are able to measure output current, one of the
SCRs is defective. Replace the rectifier assembly.
4. If the front panel meter shows more than 110% of rated dc
current, the control board may be defective. Disconnect wire #
24 as above. If the output current goes to zero, replace the
control board.
1. If AC ON indicator is out, check feeder circuit breaker or
fuse.
2. Remove F1 from its fuseholder (located on the bottom of the
enclosure) and check with an Ohmmeter or fuse tester.
Replace if required.
NOTE: If the new fuse blows, see the sections titled "AC
breaker trips immediately" and "AC breaker trips after a few
minutes" for further troubleshooting hints.
3. Check terminals and wiring between T1 and the rectifier
assembly, inductor L1, dc filter (if present), the dc breaker, and
the output terminals. Check wire # 29 from T1-Y1 and wire #
28 from T1-Y2 to the control circuit board connector J1. Repair
as necessary.
4. Use an ac voltmeter to measure the ac voltage from T1-X1
to X4. It is normally 50% to 80% higher than the rated dc
output voltage. If it is too low, check the wiring of the primary
taps. See Section 1.6 for details. If it is zero, replace T1.
RECOMMENDED ACTION
50
Page 55

SERVICING THE AT10.1
SYMPTOM
No output
current, but
ac and dc
breakers are
on; AC ON
lamp is on
Front panel is
dead; ac and
dc voltages
are present at
TB1
PROBABLE
CAUSE
1. Battery is
fully charged
2. Float or
Equalize
voltage set too
low
3. Wrong ac
input voltage,
or T1 taps miswired
4. Defective
wiring
5. Defective
rectifier bridge
6. Defective
control circuit
board A1
7. Defective
transformer T1
8. Defective
inductor L1 or
L2
9. Defective
CR2
10. Defective
dc breaker
1. Control
circuit board A1
is not
connected
2. Defective
control circuit
board A1
3. Defective
wiring
1. This is normal operation in a system with little or no dc load.
As long as the AT10.1 maintains Float voltage, it is operating
normally.
2. Check the Float and Equalize voltages and adjust them if
necessary. Consult your battery manufacturer for the proper
voltage settings.
3. Be sure the T1 primary taps are wired correctly for your
input voltage. See Section 1.6 for details.
4. Check terminals and wiring between T1 and the rectifier
assembly, inductor L1, dc filter (if present), the dc breaker, and
the output terminals. Repair as necessary.
5. Use an ac voltmeter to measure the voltage between
terminals E3 and E4 of the rectifier circuit board (A3). If you
measure about 1.0 Vrms, but there is no output current,
replace the rectifier assembly.
6. If you do not measure any ac voltage in step 5 above, and
the battery voltage is less than the Float voltage setting,
replace the control circuit board.
7. Use an ac voltmeter to measure the ac voltage from T1-X1
to X4. It is normally 50% to 80% higher than the rated dc
output voltage. If it is too low, check the wiring of the primary
taps. See Section 1.6 for details. If it is zero, replace T1.
8. Disconnect the wiring from L1 and measure the resistance
between the terminals. If it is an open circuit, replace L1.
Repeat for L2 if the optional dc filter is installed.
9. Disconnect wire # 52 from L1 to CR2, then check CR2 with
an Ohmmeter (check both polarities). If CR2 is open, replace
the filter assembly. This is a very rare occurrence.
10. Disconnect the battery, and connect a light dc load to the
AT10.1. Measure the dc voltage from the input terminal to the
output terminal of the circuit breaker, with the breaker on. It is
normally no more than 50 millivolts. If it is near the rated
output voltage, replace the breaker.
1. Make sure the connector at the top edge of the control
circuit board is firmly seated.
2. If the AC ON indicator is lit, but the rest of the front panel is
dead, replace the control circuit board.
3. Check the harness wiring to the control circuit board
connector for signs of insulation damage, burns, etc. Be sure
all wires are securely crimped in the connector.
RECOMMENDED ACTION
51
Page 56

SERVICING THE AT10.1
SYMPTOM
Front panel
dies during ac
power failure;
dc voltage is
present at
TB1
AT10.1
output
voltage too
high, not
controllable
Output
voltage does
not agree
with front
panel meter
PROBABLE
CAUSE
1. Defective
power resistor
R3
2. Defective
wiring
1. Defective
SCR
2. R4 or R14 is
defective, or
wrong value
3. Defective
temperature
compensation
probe (optional)
4. Defective
control circuit
board A1
1. Temperature
compensation
probe is
installed
2. Circuit board
or another
component may
have been
replaced
3. R4 or R14 is
defective, or
wrong value
4. Defective
control circuit
board A1
1. Use a dc voltmeter to measure the dc voltage from E17 on
the I/O panel to TB1(-). It is normally 12 Vdc when the rated
output voltage is at TB1(+) and TB1(-). Remove all power from
the AT10.1, and measure the resistance from TB1(+) and E17.
See the table in Section 3.6 for the proper resistance values. If
the resistance is not within 10% of the table value, replace R3.
2. Remove the enclosure shroud, and check the wiring to and
from TB1 and the control circuit board for signs of insulation
damage or burns. Repair any damaged wiring.
1. Disconnect wire # 24 from terminal E3 of the rectifier
assembly (near the left front of the enclosure). Restart the
AT10.1. If You are able to measure output current, one of the
SCRs is defective. Replace the rectifier assembly.
2. Remove one end of R4 from TB5 (on the back of the front
panel). Repeat for R14 connected to TB1(-). Measure their
values with an Ohmmeter. See the table in Section 3.6 for
resistance values. If either resistor is not within 1% of the
specified value, it must be replaced.
3. Remove the leads from the probe and measure its
resistance. At 77° F / 25° C the resistance should be about
10,000 Ohms. If it is not, replace the probe assembly.
4. If the front panel meter shows more than 110% of rated dc
current, the control board may be defective. Disconnect wire #
24 from terminal E3 of the rectifier assembly (near the left front
of the enclosure). Restart the AT10.1. If the output current
goes to zero, replace the control board.
1. If the optional temperature compensation probe is installed,
the output voltage may be different from the selected float or
equalize voltage. The difference in the voltages depends on
the probe temperature. The front panel meter always displays
the proper voltage for 77° F / 25° C.
2. Recalibrate meter as described in Section 2.3.7.
3. Remove one end of R4 from TB5 (on the back of the front
panel). Repeat for R14 connected to TB1(-). Measure their
values with an Ohmmeter. See the table in Section 3.6 for
resistance values. If either resistor is not within 1% of the
specified value, it must be replaced.
4. Turn off both front panel circuit breakers. Then turn on the
dc breaker, followed by the ac breaker. If the AT10.1 still has
the wrong output voltage, replace the control circuit board.
RECOMMENDED ACTION
52
Page 57

SERVICING THE AT10.1
SYMPTOM
AT10.1 never
reaches float
(or equalize)
voltage
(within 1%)
Input current
too high
Output ripple
voltage too
high
PROBABLE
CAUSE
1. Current limit
set too low
2. Defective
battery or dc
load, or load is
too great
3. Wrong ac
input voltage, or
voltage too low,
or T1 wired
incorrectly
4. Defecive
rectifier bridge
5. Defective
control circuit
board A1
1. Wrong ac
input voltage, or
transformer T1
wired
incorrectly
2. Defective
rectifier bridge
3. Defective T1
1. Charger is
unfiltered
2. Battery is
disconnected or
defective
3. Battery too
small for
charger rating
4. One or more
defective filter
capacitors, C1
or C2
1. If the AT10.1 is not in the Edit mode, press the
EDIT/ENTER key five times, until the meter display flashes the
current limit value (in Amperes). If the current limit is less than
110%, adjust it to 110% as described. See Setting the Current
Limit Value, Section 2.3.5 for details.
2. Check each cell of the battery. If one or more cells are
shorted, the AT10.1 may not be able to reach the Float
voltage. You may have the same problem if the normal load
current is more than the rated output current of the charger.
3. Make sure the T1 primary taps are wired correctly for your
input voltage. See Changing Transformer Taps, Section 1.6 for
details. The actual ac input voltage must be at least 88% of the
rated value for the charger to produce full output power.
4. Use a clamp-on ammeter to measure the current in wire #
12 or # 11. If it less than 70% of the dc output current, one of
the SCRs or diodes is defective. Replace the rectifier module.
5. Turn off both front panel circuit breakers. Then turn on the
dc breaker, followed by the ac breaker. If the AT10.1 output
current is below the current limit value, but it still has the wrong
output voltage, replace the control circuit board.
1. Be sure the T1 primary taps are wired correctly for your
input voltage. See Changing Transformer Taps, Section 1.6 for
details. The actual ac input voltage must be at least 88% of the
rated value for the charger to produce full output power.
2. Disconnect wire # 24 from terminal E3 of the rectifier
assembly (near the left front of the enclosure). Restart the
AT10.1. If You are able to measure output current, one of the
SCRs is defective. Replace the rectifier assembly.
3. Test by disconnecting wires from X1, X4, Y1 and Y2. If ac
input current is still too high, replace T1.
1. Verify by checking nameplate against the ordering code on
the inside front cover. Order and install filter option if
necessary.
2. Be sure battery is connected. Inspect battery according to
the manufacturer's instructions.
3. Check the measured ripple against the specification for your
AT10.1 model on page 70. The ripple rating is for a battery
whose Ampere-hours are four (4) times the charger Ampere
rating. For a smaller battery, ripple voltage may be higher.
4. Test with capacitance meter; replace as necessary.
RECOMMENDED ACTION
53
Page 58

SERVICING THE AT10.1
SYMPTOM
AT10.1 very
noisy
Meter
readings are
erratic
Lamp test key
does not
work, or
some lamps
don't light
One or more
front panel
keys don't
work
Two AT10.1s
connected in
parallel, but
only one has
output current
PROBABLE
CAUSE
1. Loose
hardware or
enclosure panel
2. Defective
rectifier bridge
1. Defective or
disconnected
battery
2. Defective
scaling resistor
R4 or R14
3. Defective
control circuit
board A1
1. No Vac
2. Control
circuit board A1
is not secured
to front panel
3. Defective
control circuit
board A1
1. Front panel
is locked
2. Control
circuit board A1
is not secured
to front panel
3. Defective
control circuit
board A1
1. If the forced
load sharing
option is not
supplied, check
for normal
operation of
both chargers
2. EJ5126-##
option
1. Remove the enclosure shroud. Check and tighten all
component mounting hardware. Replace the shroud, being
sure all assembly hardware is secure.
2. Use a clamp-on ammeter to measure the ac current in wire
# 11 or # 12 (connected between T1 and the rectifier
assembly). If it less than 70% of the dc output current, one of
the SCRs or diodes is defective. Replace the rectifier module.
1. Turn off the AT10.1. With a light dc load connected to the
battery, be sure each cell reads the nominal cell voltage (2.0V
for lead-acid; 1.25V for Ni-Cd). Restart the AT10.1. Each cell
should now read the nominal Float voltage (2.2V for lead-acid;
1.35V for Ni-Cd).
2. Remove one end of R4 from TB5 (on the back of the front
panel). Repeat for R14 connected to TB1(-). Measure their
values with an Ohmmeter. See the table in Section 3.6 for
resistance values. If either resistor is not within 1% of the
specified value, it must be replaced.
3. If the output voltage is constant, replace the control circuit
board.
1. The lamp test key doesn't work during an ac power failure.
2. Open the front panel, and be sure that the control circuit
board is securely mounted on the standoffs on the back of the
panel. All indicators should extend about 0.125in / 3.2mm
through the front of the panel.
3. When you press the LAMP TEST key, if some but not all of
the indicators light, or the digital meter does not display all 8's,
replace the control circuit board.
1. Open the front panel, and be sure that jumper J9 on the
main control circuit board is in the ENABLE position.
2. Open the front panel, and be sure that the control circuit
board is firmly seated on the standoffs on the back of the
panel. Front panel keys must operate freely.
3. Turn off both front panel circuit breakers. Then turn on the
dc breaker, followed by the ac breaker. If some of the front
panel keys still do not work, replace the control circuit board.
1. Multiple AT10.1s are not designed to share load current,
without the optional forced load sharing cable installed. When
two or more AT10.1s are connected in parallel without this
option, it is normal for one of the units to have no output
current. You can check the operation of the "off" charger by
increasing its Float voltage until it starts to deliver output
current. When you have finished the test, be sure both
AT10.1s are set to the same Float and Equalize voltages.
2. See Appendix F on page 90 for troubleshooting of Forced
Load Sharing feature.
RECOMMENDED ACTION
54
Page 59

SERVICING THE AT10.1
SYMPTOM
HIGH DC
VOLTAGE
indicator is on
No alarm, but
output
voltage is
above High
DC Voltage
setting
LOW DC
VOLTAGE
indicator is
on, but ac
and dc
breakers are
closed; ac
input voltage
is normal;
there is
output current
PROBABLE
CAUSE
1. High DC
Voltage alarm
and Equalize
voltage settings
are mismatched
2. Defective
rectifier bridge
3. Defective
control circuit
board A1
1. Output
current is below
2%
2. Defective
control circuit
board A1
1. Be sure that the High DC Voltage alarm setting is higher
than the Equalize voltage setting. See Sections 2.3.2 and
2.3.4.
2. Disconnect wire # 24 from terminal E3 of the rectifier
assembly (near the left front of the enclosure). Restart the
AT10.1. If You are able to measure output current, one of the
SCRs is defective. Replace the rectifier assembly.
3. Turn off both front panel circuit breakers. Then turn on the
dc breaker, followed by the ac breaker. If the charger output
voltage is normal, but the HIGH DC VOLTAGE indicator is still
on, replace the control circuit board.
1. Output current must be greater than 2% of rated current to
produce a High DC Voltage alarm. See Parallel Operation in
Section 2.3.6.
2. Turn off both front panel circuit breakers. Then turn on the
dc breaker, followed by the ac breaker. If the charger output
voltage is above the alarm setting, but the
RECOMMENDED ACTION
HIGH DC VOLTAGE indicator still doesn't light, replace the
control circuit board.
1. Battery is
discharged
2. Low DC
Voltage alarm
and Float
voltage settings
are mismatched
3. Defective
rectifier bridge
4. Defective
control circuit
board A1
5. Defective dc
breaker
1. After an ac power failure, or a battery discharge for any
other reason, it may take several hours to recharge the
battery. It is normal for the LOW DC VOLTAGE indicator to be
on until the battery voltage is above the Low DC Alarm
voltage.
2. Be sure that the Low DC Voltage alarm setting is lower than
the Float voltage setting. See Sections 2.3.2 and 2.3.4.
3. Use a clamp-on ammeter to measure the current in wire #
11 or # 12. If it less than 70% of the dc output current, one of
the SCRs or diodes is defective. Replace the rectifier
assembly.
4. Turn off both front panel circuit breakers. Then turn on the
dc breaker, followed by the ac breaker. If the charger output
voltage is normal, but the LOW DC VOLTAGE indicator is still
on, replace the control circuit board.
5. Disconnect the battery, and connect a light dc load to the
AT10.1. Measure the dc voltage from the input terminal to the
output terminal of the circuit breaker, with the breaker on. It is
normally no more than 50 millivolts. If it is near the rated
output voltage, replace the breaker.
55
Page 60

SERVICING THE AT10.1
SYMPTOM
DC OUTPUT
FAILURE
indicator is
on, but ac
and dc
breakers are
closed; ac
input voltage
is normal
AC INPUT
FAILURE
indicator is on
PROBABLE
CAUSE
1. Defective
rectifier bridge
2. Defective
control circuit
board A1
3. Defective
transformer T1
4. Defective dc
breaker
1. Use a clamp-on ammeter to measure the current in wire #
12 or # 11. If it is less than 70% of the dc output current, one
of the SCRs or diodes is defective. Replace the rectifier
module.
2. Turn off both front panel circuit breakers. Then turn on the
dc breaker, followed by the ac breaker. If the charger output
voltage and current are normal, but the DC OUTPUT
FAILURE indicator is still on, replace the control circuit board.
3. Use an ac voltmeter to measure the ac voltage from T1-X1
to X4. It is normally 50% to 80% higher than the rated dc
output voltage. If it is too low, check the wiring of the primary
taps. See Section 1.6 for details. If it is zero, replace T1.
4. Disconnect the battery, and connect a light dc load to the
AT10.1. Measure the dc voltage from the input terminal to the
RECOMMENDED ACTION
output terminal of the circuit breaker, with the breaker on. It is
normally no more than 50 millivolts. If it is near the rated
output voltage, replace the breaker.
1. AC power
failure
2. Upstream
feed
breaker/fuse is
tripped
3. Defective
wiring
4. Defective
control circuit
board A1
1. If the ac input power fails, the front panel AC ON indicator
goes out, and the AC INPUT FAILURE indicator goes on.
2. Be sure the front panel ac circuit breaker is closed. Measure
the ac voltage at TB1-L1 and L2. If it is zero, check upstream
distribution breakers and fuses.
3. Measure ac voltage at T1-H1 and T1-H5. It should be the
same as the ac supply voltage.
4. Turn off both front panel circuit breakers. Then turn on the
dc breaker, followed by the ac breaker. If the AC ON indicator
is on, but the AC INPUT FAILURE indicator is still on, replace
the control circuit board.
56
Page 61

SERVICING THE AT10.1
SYMPTOM
POS GND or
NEG GND
indicator is on
Summary
alarm relay is
in alarm
mode, but no
front panel
alarm
indicator is on
PROBABLE
CAUSE
1. Ground fault
on external dc
bus
2. DC circuit
breaker is open
and NEG GND
indicator is on
3. Alarm needs
calibration
4. Defective
wiring
5. Defective
Main Control
circuit board A1
1. Defective
Main Control
circuit board A1
RECOMMENDED ACTION
1. Disconnect the AT10.1 from the battery and dc bus, and
check the battery and dc bus for a ground fault.
2. If the AT10.1 has been placed into standby by opening the
dc breaker (CB2), the ground detection circuit gives an
erroneous alarm. Close the dc breaker and the alarm should
end. If you want the AT10.1 to be in standby, open the ac
circuit breaker (CB1).
3. Calibrate the ground detection sensitivity. See Section
2.3.4.
4. Disconnect the AT10.1 from the battery and dc bus. Turn
the AT10.1 back on, and measure the voltage from TB1(+) to
chassis, and from TB1(-) to chassis. The voltage readings
should be equal, each approximately half of the total output
voltage. If there is more than a 10% imbalance, turn off the
AT10.1, and inspect all wiring from TB1(+/-) to the dc circuit
breaker (CB2), and the rectifier bridge to the dc filter inductor
(L1). Look for evidence of insulation damage, insufficient
spacing between terminals and chassis, or wires run too close
to metal edges.
5. Turn off both front panel circuit breakers (CB1/CB2). Turn
on the dc breaker, followed by the ac breaker. Wait one minute
before returning the dc connection, followed by the ac
connection If you are sure there is no ground fault on the
external bus or within the AT10.1, but the POS GND or NEG
GND indicator is still on, replace the main control circuit board
(A1).
1. Turn off both front panel circuit breakers (CB1/CB2). Then
turn on the dc breaker, followed by the ac breaker. Wait one
minute before returning the dc connection, followed by the ac
connection. If the relay remains in alarm mode, check the Low
Level Detect indicator on main control circuit board. See
Section 2.3.8. If no other alarm is on, replace the main control
circuit board (A1).
57
Page 62

SERVICING THE AT10.1
3.5. REPLACING DEFECTIVE COMPONENTS
WARNING
High voltages appear at several points inside the AT10.1. Use extreme
caution when working inside the unit. Do not attempt to work inside the
AT10.1 unless you are a qualified technician or electrician.
Disconnect and lock out all power from the AT10.1 before starting to
remove or replace any components. Turn the ac power off at the
distribution panel upstream from the charger. Disconnect the battery
from the AT10.1 output terminals TB1(+/-).
NOTE: Refer to the standard drawings in Appendix C while performing
the following procedures.
Removing the safety shield
Some of the repair procedures described below requires removal of the
plexiglas safety shield, mounted in front of the I/O panel. Unscrew the
wing nuts and remove the washers to remove the shield. Do not lay the
shield on the top of the AT10.1. The top vents are required for cooling.
CAUTION: Hazardous ac and dc voltages are present on the I/O
panel terminals and several internal components.
Removing the enclosure shroud
You may need to remove the enclosure shroud in order to make some
internal measurements, and to replace or repair components. Turn off and
remove all power to the AT10.1. Disconnect the battery from the output
terminals.
Remove the eleven (11) screws that hold the shroud on the rear and
bottom of the enclosure, then the two screws on the left side that hold the
rectifier heat sink assembly. Support the front panel and lift the shroud
straight up to remove it. Be sure to save the plastic washers from the door
hinge.
The heat sink assembly is supported from the rear panel. Avoid putting
any mechanical stress on the heat sink.
Replacing the enclosure shroud
Lower the shroud onto the enclosure base. Install and tighten the eleven
(11) screws that hold the shroud on the rear and bottom of the base before
you install the two screws that support the heat sink assembly on the left
side wall. Remember to reinstall the plastic washers on the door hinge.
58
Page 63

SERVICING THE AT10.1
Replacing the Main Control printed circuit board (A1)
For details of this procedure, refer to service instruction (JD5012-00).
CAUTION: The printed circuit board A1 is sensitive to damage from
static discharges. Leave replacement boards in their anti-static
bags until you are ready to install them. Ground yourself before
handling the board by touching the ground stud on the back of the
door. Handle boards only by their edges.
Turn off and remove all power to the AT10.1. Remove the plexiglas
safety shield. Disconnect the battery from the output terminals. If the
optional tempco probe is installed, disconnect the leads from TB8.
Remove the harness plug from the upper left edge of the Main Control pc
board (A1), and unplug wire # 30 from the quick-connect terminal near
the upper left corner of the board. The board is mounted on six plastic
standoffs. Compress the tab on each standoff, and pull the A1 board
toward you until it clears all the standoffs. Put the replacement board in
place with the same orientation, and push it onto the standoffs. Be sure
that the board is fully seated on the standoffs. Replace wire # 30 on the
quick-connect terminal, and connect the harness plug to the board at the
top edge. Replace any optional wiring, such as the tempco probe on TB8.
See Section 2.1 for steps to restart the AT10.1. If your charger parameters
(float voltage, etc.) are different from the factory preset values, you should
program in the new values now. See Section 2.3. You should also
recalibrate the dc voltmeter according to Section 2.3.7.
Replacing the rectifier heat sink assembly (A6)
Refer to the customer instruction supplement (JD5009-00) supplied with
your replacement rectifier heat sink assembly (EJ1243-00).
Turn off and remove all power to the AT10.1. Remove the plexiglas
safety shield. Disconnect the battery from the output terminals. Check
with a voltmeter before proceeding. Remove the enclosure shroud as
described in the previous section. Make sure the rectifier heat sink has
cooled, and remove the entire assembly by the front edge. Remove all
wires attached to the rectifier pc board(s) as you pull the assembly out.
Hold the replacement assembly in front of the AT10.1 (in the same
orientation as the old), and reconnect all wires removed from the old
rectifier as you insert it into the enclosure. To ensure correct replacement,
see the wiring diagrams in Appendix C of this manual or the customer
instruction supplement, supplied with the replacement assembly. When
you are done, check to ensure all wires are connected to the proper
terminals, and all lugs are fully seated. If any lug does not fit snugly,
disconnect it and carefully tighten the ears of the lug using long-nosed
pliers and reconnect.
59
Page 64

SERVICING THE AT10.1
Rotate the rectifier assembly into position in the enclosure. Line up the
metal tab with the mounting hole on the back panel of the AT10.1 and
slide the assembly into position. Replace the shroud as described in the
previous section. Tighten all screws and restart the AT10.1.
Replacing the optional dc filter assembly (A7)
The dc filter assembly consists of a diode heat sink, inductor L2, and one
or two capacitors installed on a single bracket.
Turn off and remove all power to the AT10.1. Remove the plexiglas
safety shield. Disconnect the battery from the output terminals TB1(+/-).
Find the flying lead from the inductor L2 (wire # 50) and disconnect the
other end from the center terminal of inductor L1 (at the upper right
corner of the rear panel). Disconnect wire # 15 from the quick-connect
terminal at the top center of the diode heat sink, and remove wire # 54
from terminal E7 on the front circuit board on the rectifier assembly.
Carefully note which terminal the wire is connected to. Remove the four
screws at the top of the dc filter bracket. The bracket and the inductor will
both fall forward, away from the rear panel.
Lift the filter bracket up about .25in / 6.4mm to release it from the clips at
the bottom of the bracket. Swing the filter assembly outward to the left,
rotating it so that the heat sink comes out first and the capacitor(s) last.
Install the replacement filter assembly by inserting the capacitor end first,
and rotating the assembly inward so that the heat sink is last to go in.
Push the bottom edge of the bracket into the clips in the rear panel, and
install the four screws at the top of the bracket.
Connect wire # 15 to the quick-connect terminal at the top center of the
diode heat sink. Route the flying lead from the inductor L2 (wire # 50)
and connect it to the center terminal ("2") of the inductor L1. Reconnect
wire # 54 to terminal E7 of the front circuit board on the rectifier
assembly. Replace the shroud and the safety shield.
Replacing the ac input or dc output circuit breaker (CB1, CB2)
Turn off and remove all power to the AT10.1. Remove the plexiglas
safety shield. Disconnect the battery from the output terminals TB1(+/-).
Check with a voltmeter before proceeding. This includes remote sense
wires if they were installed. Remove the two circuit breaker mounting
screws on the front panel, and carefully rotate the circuit breaker upward
and pull it out of the enclosure. Remove the wires from the terminals, one
at a time, and transfer the wires to the terminals of the replacement
breaker. Be sure the terminal screws are tight. Install the replacement
breaker into the front panel, rotating it downward into place. Install the
two mounting screws.
60
Page 65

SERVICING THE AT10.1
Replacing the main transformer (T1)
Turn off and remove all power to the AT10.1. Remove the plexiglas
safety shield. Disconnect the battery from the output terminals TB1(+/-).
Check with a voltmeter before proceeding. This includes remote sense
wires if they were installed. Remove the enclosure shroud and the safety
shield. Disconnect the harness wires # 28 and # 29 from the upper row of
transformer terminals. Disconnect wires # 11 and # 12 from the top of the
rectifier heat sink. Disconnect harness wires # 3 and # 4 from the lower
row of terminals; leave both jumpers in place on the lower row.
Remove the four screws or nuts that secure the transformer to the rear
panel. Support the transformer by the top of the core and lift it up to get
the bottom bracket off the rear panel. Remove the transformer from the
enclosure.
Check the jumpers on the bottom row of terminals of the replacement
transformer. Make sure they are connected to the same terminals as the
jumpers on the transformer you just removed from the AT10.1. For
details see Section 1.6, Changing the Transformer Taps.
Hold the replacement transformer with the terminals labeled H1 through
H5 at the bottom, facing you. Place the transformer against the rear panel,
and slide the bottom of the transformer bracket into the slots on the rear
panel. Install the four screws or nuts onto the mounting bracket of the
transformer. Rewire the transformer, following the steps above in reverse.
Refer to Section 1.6, and verify that the transformer is properly connected
for your input voltage.
Replacing the ac surge suppressors (VR2, VR4 or VR5)
Turn off and remove all power to the AT10.1. Remove the plexiglas
safety shield. Disconnect the battery from the output terminals TB1(+/-).
For VR2, remove the hardware from the input terminal L1, and remove
the lead of the ac surge suppressor. Install one lead of the replacement
surge suppressor onto the L1 terminal. Replace the other wires and the
hardware. Repeat procedure for the L2 terminal. Tighten all hardware.
For VR4, remove the hardware from the input terminal L1, and remove
the lead of the ac surge suppressor. Install one lead of the replacement
surge suppressor onto the L1 terminal. Replace the other wires and the
hardware. Repeat procedure for the left ground stud. Tighten all
hardware.
For VR5, repeat procedure for the ac surge suppressor connected to the L2
terminal and the right ground terminal. Tighten all hardware.
NOTE: The surge suppressors are not polarized.
61
Page 66

SERVICING THE AT10.1
Replacing the dc surge suppressor (VR1)
Turn off and remove all power to the AT10.1. Remove the plexiglas
safety shield. Disconnect the battery from the output terminals TB1(+/-).
Remove the hardware from the output terminal TB1(+), and remove the
lead of the dc surge suppressor. Install one lead of the replacement surge
suppressor. Replace the other wires and the hardware. Repeat for the
output terminal TB1(-). Tighten all hardware.
NOTE: The surge suppressor is not polarized.
Replacing the dc surge suppressor networks (VR6/C4, VR7/C5)
Replace these networks as assemblies; do not replace individual parts.
Turn off and remove all power to the AT10.1. Remove the plexiglas
safety shield. Disconnect the battery from the output terminals TB1(+/-).
To replace the network VR6/C4, remove the hardware from the output
terminal TB1(-), and remove the lead of the network. Cut the plastic wire
ties holding the assembly tight against the I/O panel. Install one lead of
the replacement network. Replace the other wires and the hardware.
Repeat for the other lead of the network on the ground terminal. For the
VR7/C5 network, use the above procedure, but start with the lead on
TB1(+). Tighten all hardware. Replace cut wire ties if possible.
NOTE: The surge suppressor networks are not polarized.
Replacing the power (ballast) resistor (R3)
Turn off and remove all power to the AT10.1. Remove the plexiglas
safety shield. Disconnect the battery from the output terminals TB1(+/-).
Locate the power resistor R3 behind the I/O panel. In 12 & 24 Vdc units,
R3 is installed at the top right corner of the I/O panel. In 48 Vdc units, R3
is mounted on the bracket behind the I/O panel. In 130 Vdc units, R3 is
comprised of an assembly of two (2) resistors connected in series,
mounted to the bracket behind the I/O panel.
Disconnect the lead of R3 connected to TB1(+), and replace it with the
corresponding lead of the replacement power resistor. Remove the other
lead of R3 from terminal E17 on the I/O panel and replace it with the
remaining lead of the replacement power resistor. Tighten all hardware.
In 12 & 24 Vdc units, tuck the new R3 behind the I/O panel so that the
leads are properly spaced. In 48 & 130 Vdc AT10.1s, remove the screws
that mount the old resistor(s) to the bracket, and replace with the new
resistor(s). Tighten all mounting hardware and restart the AT10.1
For further instructions, refer to service instructions (JD5010-00
).
62
Page 67

SERVICING THE AT10.1
Replacing the positive scaling resistor (R4)
Locate the scaling resistor R4 on TB5 on the back of the front panel, just
above the control circuit board. The resistor (R4 is the one on the left) is
mounted on two quick-connect terminals. Remove the resistor by
grasping the terminals by the plastic insulation, and pulling out and
downward. Install the replacement resistor by pushing the terminals
firmly onto the quick-connect blades on the terminal block.
Replacing the voltage crowbar resistor (R6)
Locate the resistor R6 on TB5 on the back of the front panel, just above
the control circuit board. The resistor (R6 is the one on the right) is
mounted on two quick-connect terminals. Remove the resistor by
grasping the terminals by the plastic insulation, and pulling out and
downward. Install the replacement resistor by pushing the terminals
firmly onto the quick-connect blades on the terminal block.
Replacing the negative scaling resistor (R14)
Turn off and remove all power to the AT10.1. Remove the plexiglas
safety shield. Disconnect the battery from the output terminals TB1(+/-).
The scaling resistor R14 is connected to TB(-) with a ring lug. The other
lead of the resistor is soldered to wire # 20.
Remove the insulating sleeving from the soldered joint to wire # 20 (you
may have to remove a harness tie) and cut the resistor lead near the solder
joint. Disconnect the lugged-end of R14 from TB1(-) and discard the old
resistor.
Using a soldering iron no larger than 35 Watts, solder the bare lead of the
new R14 to wire # 20. Insulate the joint with plastic electrical tape. Crimp
a similar ring lug to the other lead of the new resistor. Connect the lugged
end of the new scaling resistor R14 to TB1(-).
63
Page 68

SERVICING THE AT10.1
3.6. ORDERING REPLACEMENT PARTS
All AT10.1 Series battery chargers ship with a supplemental parts data
package, itemizing all components within the unit. Contact your sales
representative to place an order for spare or replacement parts. Please
provide the following information for each component:
• Model number and serial number of your AT10.1 Series battery charger
• Circuit symbol, factory part number and description from the supplied
Parts Data Package report
• Quantity required
Note: Some of the factory part numbers listed on the Parts Data Package report may
differ from the standard replacement part numbers listed in this manual. Custom parts
may have replaced standard parts to satisfy your specification. In that case, you should
order the part number(s) listed on the report. The following table may specify part
replacement kits that include other materials, such as installation instructions and
packaging materials. You may order spare parts using either part number. To be sure
of getting the complete kit, specify "Complete Kit" on your order, and the factory will
make the necessary adjustments.
Refer to the table below for the most common items.
Table 3-1: REPLACEMENT PARTS
Factory Part Number
Symbol
A1 Main Control pc board assembly EJ1243-10 Y
A3 Rectifier Gate Driver pc board ass embly EJ5093-00
A5 Auxiliary Alarm Relay pc board assembly EJ1243-03 Y
A6 Rectifier / Heat Sink assembly (A3 + A16) EJ1243-00 Y
A7 DC Output Filter assembly See Table 3-2
Battery Eliminator Filter assembly
A8
(requires filtered charger)
A10 Temperature Compensation Probe assembly See Appendix B, Table 2
A16 Rectifier SCR module EJ5094-00
C1 DC Output Filter capacitor RP0019-09 RP0019-08 Y
C2 Battery Eliminator Filter capacitor RP0019-09 RP0019-08 Y
C4 EMI filter capacitor See VR6/C4
C5 EMI filter capacitor See VR7/C5
CB1 AC breaker (standard) 120/208/240 Vac See Table 3-3
CB1 AC breaker (medium AIC) 120/208/240 Vac See Table 3-4
CB1 AC breaker (high AIC) 120/208/240 Vac See Table 3-5
CB1 AC circuit breaker (medium AIC) 480 Vac RE0171-00
CB1 AC circuit breaker (high AIC) 480 Vac RE0043-00
CB2 DC circuit breaker (standard) See Table 3-6
CB2 DC circuit breaker (medium AIC) See Table 3-7
CB2 DC circuit breaker (high AIC) See Table 3-8
Description 12 Vdc 24 Vdc 48 Vdc 130 Vdc
6Adc
12-25Adc
EJ1155-00
EJ1155-01
EJ1155-02
Rec.
Spare
64
Page 69

SERVICING THE AT10.1
Factory Part Number
Symbol Description
CR1 Polarity diode EJ1243-04 Y
CR2 Blocking diode EJ1243-05
F1 480 Vac AC Input Fuse See Table 3-14 Y
L1 Main Inductor See Table 3-9
L2 DC Filter Inductor See Table 3-13
P5 Jumper for disabling Ground Detection circuit RC0100-00
Jumper for voltage selection on
P7
Auxiliary Alarm Relay circuit board (A5)
P9 Jumper for front panel lockout feature on A1 RC0100-00
R2 Rating resistor See Table 3-10
R3 Power Supply (Ballast) Resistor
R4 Scaling resistor (positive side)
R6 Voltage crowbar resistor EJ1135-00 EJ1135-01 EJ1135-02 EJ1135-03
R9 Filter capacitor (C1) bleed resistor EJ1137-00 EJ1137-00 EJ1137-01 EJ1137-02
R14 Scaling resistor (negative side)
T1 Main transformer (120/208/240 Vac) See Table 3-11
T1 Main transformer (480 Vac) See Table 3-12
TB1-X I/O terminal box lug for #14-6 AWG RC0056-04
Terminal block for Medium and
TB6
High AIC circuit breakers
VR1 Output Surge Suppressor EJ1132-01 Y
VR2 Input Surge Suppressor (120/208/240 Vac) EJ1132-01 Y
VR2 Input Surge Suppressor (480 Vac) EJ1132-02 Y
VR3 Input Lightning Arrestor EJ1074-00
VR4,
Input Surge Suppressor (120/208/240 Vac) EJ1132-01 Y
VR5
VR4,
Input Surge Suppressor (480 Vac) EJ1132-02 Y
VR5
VR6/C4 EMI Filter Network EJ5021-01
VR7/C5 EMI Filter Network EJ5021-01
12 Vdc 24 Vdc 48 Vdc 130 Vdc
RC0100-00
EJ1127-00
12Ω 2W
EJ1134-00
3160 Ω
EJ1222-00
3160 Ω
EJ1127-01
68Ω 11W
EJ1134-01
6980 Ω
EJ1222-01
6980 Ω
terminal section RC0014-00 (8 req'd)
end section RC0014-01 (1 req'd)
EJ1127-02
150Ω 50W
EJ1134-02
14.0 kΩ
EJ1222-02
14.0 kΩ
EJ1127-03
(note 1)
EJ1134-03
38.3 kΩ
EJ1222-03
38.3 kΩ
Note 1: In 130 Vdc units, a 500Ω 50W power supply resistor (R3), mounted behind the I/O
panel, may be comprised of an assembly of two (2) 250Ω resistors connected in series.
Rec.
Spares
Y
65
Page 70

SERVICING THE AT10.1
Table 3-2: DC FILTER ASSEMBLIES (L2/C1/R9/CR1/CR2)
Current Rating 12 Vdc 24 Vdc 48 Vdc 130 Vdc
6A
12A
16A
20A
25A
Table 3-3: STANDARD AC CIRCUIT BREAKERS (CB1) - 120/208/240 Vac
EJ1072-00 EJ1072-00 EJ1072-02 EJ1072-03
EJ1072-00 EJ1072-00 EJ1072-02 EJ1072-06
EJ1072-01 EJ1072-01 EJ1072-07 EJ1072-04
EJ1072-01 EJ1072-01 EJ1072-07 EJ1072-04
EJ1072-01 EJ1072-01 EJ1072-07 EJ1072-05
Current Rating 12 Vdc 24 Vdc 48 Vdc 130 Vdc
6A
12A
16A
20A
25A
Table 3-4: MEDIUM INTERRUPTING CAPACITY AC BREAKERS (CB1) - 120/208/240 Vac
RE0159-11 RE0159-11 RE0159-11 RE0159-13
RE0159-11 RE0159-11 RE0159-13 RE0159-16
RE0159-11 RE0159-12 RE0159-13 RE0159-19
RE0159-11 RE0159-12 RE0159-14 RE0159-20
RE0159-11 RE0159-12 RE0159-15 RE0159-20
Current Rating 12 Vdc 24 Vdc 48 Vdc 130 Vdc
6A
12A
16A
20A
25A
Table 3-5: HIGH INTERRUPTING CAPACITY AC BREAKERS (CB1) - 120/208/240 Vac
RE0171-00 RE0171-00 RE0171-00 RE0171-01
RE0171-00 RE0171-00 RE0171-01 RE0171-04
RE0171-00 RE0171-00 RE0171-01 RE0171-07
RE0171-00 RE0171-00 RE0171-02 RE0171-08
RE0171-00 RE0171-00 RE0171-03 RE0171-08
Current Rating 12 Vdc 24 Vdc 48 Vdc 130 Vdc
6A
12A
16A
20A
25A
66
RE0043-00 RE0043-00 RE0043-00 RE0043-01
RE0043-00 RE0043-00 RE0043-01 RE0043-04
RE0043-00 RE0043-00 RE0043-01 RE0043-07
RE0043-00 RE0043-00 RE0043-02 RE0043-08
RE0043-00 RE0043-00 RE0043-03 RE0043-08
Page 71

SERVICING THE AT10.1
Table 3-6: STANDARD DC CIRCUIT BREAKERS (CB2)
Current Rating 12 Vdc 24 Vdc 48 Vdc 130 Vdc
6A
12A
16A
20A
25A
Table 3-7: MEDIUM AMPERE INTERRUPTING CAPACITY DC CIRCUIT BREAKERS (CB2)
RE0159-01 RE0159-01 RE0159-01 RE0159-12
RE0159-02 RE0159-02 RE0159-02 RE0159-13
RE0159-03 RE0159-03 RE0159-03 RE0159-14
RE0159-04 RE0159-04 RE0159-04 RE0159-15
RE0159-06 RE0159-06 RE0159-06 RE0159-17
Current Rating 12 Vdc 24 Vdc 48 Vdc 130 Vdc
6A
12A
16A
20A
25A
Table 3-8: HIGH AMPERE INTERRUPTING CAPACITY DC CIRC UIT BREAKERS (CB2)
RE0171-00 RE0171-00 RE0171-00 RE0171-00
RE0171-01 RE0171-01 RE0171-01 RE0171-01
RE0171-02 RE0171-02 RE0171-02 RE0171-02
RE0171-03 RE0171-03 RE0171-03 RE0171-03
RE0171-04 RE0171-04 RE0171-04 RE0171-04
Current Rating 12 Vdc 24 Vdc 48 Vdc 130 Vdc
6A
12A
16A
20A
25A
Table 3-9: MAIN INDUCTOR (L1)
RE0043-00 RE0043-00 RE0043-00 RE0043-00
RE0043-01 RE0043-01 RE0043-01 RE0043-01
RE0043-02 RE0043-02 RE0043-02 RE0043-02
RE0043-03 RE0043-03 RE0043-03 RE0043-03
RE0043-04 RE0043-04 RE0043-04 RE0043-04
Current Rating 12 Vdc 24 Vdc 48 Vdc 130 Vdc
6A
12A
16A
20A
25A
67
AP0928-00 AP0928-00 AP0928-00 AP1122-00
AP0928-00 AP0928-00 AP0928-00 AP0930-00
AP0926-00 AP0926-00 AP0926-00 AP0931-00
AP0926-00 AP0926-00 AP0926-00 AP0931-00
AP0926-00 AP0926-00 AP0926-00 AP0931-00
Page 72

SERVICING THE AT10.1
Table 3-10: RATING RESISTOR (R2)
Current Rating 12 Vdc 24 Vdc 48 Vdc 130 Vdc
6A
12A
16A
20A
25A
Connector terminal
extraction tool
Table 3-11: MAIN TRANSFORMER (T1) - 120/208/240 Vac
EJ1133-00
34.8 kΩ
EJ1133-01
40.2 kΩ
EJ1133-02
53.6 kΩ
EJ1133-03
78.7 kΩ
EJ1133-04
118 kΩ
EJ1133-05
13.0 kΩ
EJ1133-06
15.4 kΩ
EJ1133-07
19.6 kΩ
EJ1133-08
23.7 kΩ
EJ1133-09
29.4 kΩ
EJ1133-10
5.11 kΩ
EJ1133-11
6.19 kΩ
EJ1133-12
7.50 kΩ
EJ1133-13
9.09 kΩ
EJ1133-14
11.0 kΩ
Molex Part No. 11-03-0044
EJ1133-15
1.50 kΩ
EJ1133-16
2.21 kΩ
EJ1133-17
2.74 kΩ
EJ1133-18
3.57 kΩ
EJ1133-19
4.32 kΩ
Current Rating 12 Vdc 24 Vdc 48 Vdc 130 Vdc
6A
12A
16A
20A
25A
Table 3-12: MAIN TRANSFORMER (T1) - 480 Vac
AA0718-00 AA0719-00 AB2023-00 AB1868-00
AA0718-00 AA0719-00 AB2023-00 AB1857-00
AA0720-00 AB1855-00 AB1856-00 AB1858-00
AA0720-00 AB1855-00 AB1856-00 AB1858-00
AA0720-00 AB1855-00 AB1856-00 AB1858-00
Current Rating 12 Vdc 24 Vdc 48 Vdc 130 Vdc
6A
12A
16A
20A
25A
AA0733-00 AA0734-00 AB2038-00 AB2039-00
AA0733-00 AA0734-00 AB2038-00 AB2032-00
AA0735-00 AB2035-00 AB2036-00 AB2037-00
AA0735-00 AB2035-00 AB2036-00 AB2037-00
AA0735-00 AB2035-00 AB2036-00 AB2037-00
68
Page 73

SERVICING THE AT10.1
Table 3-13: FILTER INDUCTOR (L2)
Current Rating 12 Vdc 24 Vdc 48 Vdc 130 Vdc
6A
12A
16A
20A
25A
Table 3-14: 480 Vac INPUT FUSE (F1)
AP0928-00 AP0928-00 AP0928-00 AP1081-00
AP0928-00 AP0928-00 AP0928-00 AP0928-00
AP0927-00 AP0927-00 AP0926-00 AP0926-00
AP0927-00 AP0927-00 AP0926-00 AP0926-00
AP0927-00 AP0927-00 AP0926-00 AP0926-00
Current Rating 12 Vdc 24 Vdc 48 Vdc 130 Vdc
6A
12A
16A
20A
25A
RE0008-00 RE0008-00 RE0008-02 RE0008-06
RE0008-00 RE0008-02 RE0008-06 RE0008-08
RE0008-02 RE0008-06 RE0008-08 RE0008-09
RE0008-02 RE0008-06 RE0008-08 RE0008-11
RE0008-02 RE0008-06 RE0008-08 RE0008-11
69
Page 74

APPENDIX A
77° F / 25 °C, nominal ac line voltage & nominal float voltage
Specification Conditions
Output voltage regulation
Transient response
Efficiency
SPECIFICATIONS
Except as noted, all specifications apply at:
12 Vdc 24 Vdc 48 Vdc 130 Vdc
Vac +10%, -12%
0 to 100% load
Temp. 32-122° F / 0-50° C
Freq. 60 ± 3 Hz
20-100% load change,
with battery connected
12 Adc rating, full load (%) 67.00 72.00 78.00 85.00
25 Adc rating, full load (%) 73.00 77.00 85.00 91.00
(see product literature for specific data)
Output voltage change ± 4% maximum
Recovery to ± 2.0% in 200 ms
Recovery to ± 0.5% in 500 ms
± 0.25%
Unfiltered (with battery)
Output ripple voltage
per NEMA PE5-1996
Current limit Adjustable 50-110 % of rated output current
Soft start 0 to 100% load 4 seconds
Voltage adjustment ranges
Voltmeter range (Vdc) 0 - 21 0 - 42 0 - 75 0 - 195
Ammeter range (Adc) All ratings 0 - 30
Surge withstand capability
Reverse current from
battery
Audible noise
Cooling Natural convection
Ambient temperature Operating
Elevation 3000ft / 1000m without derating
Relative humidity 0 to 95% non-condensing
Filtered (with battery)
Filtered (without battery) 1% rms (typ) 2% rms
Battery Eliminator Filter
Option (without battery)
Float (Vdc) 11.0-14.5 22.0-29.5 44.0-58.0 110-141
Equalize (Vdc) 11.7-15.5 23.4-31.0 46.8-59.0 117-143
High DC Voltage alarm (Vdc) 12-19 24-38 48-76 120-175
Low DC Voltage alarm (Vdc) 7-14.5 15-29.5 30-58 80-141
Test per
ANSI C37.90.1-1989
AC input power failure 90 mA maximum
Average for 4 sides,
5ft / 1.5m from charger
1% rms (typ) 2% rms
at battery terminals
30 mV rms (max) 100 mV
at battery terminals
30 mV rms 100 mV
No erroneous outputs
Less than 62 dB(A)
32-122° F / 0-50° C
Alarm relay contact rating 120 Vac / 125 Vdc 0.5 A resistive
70
Page 75

APPENDIX B
FIELD INSTALLABLE ACCESSORIES AND OPTIONS
All accessories/options listed below are available in kits for field installation.
Kits contain all parts and hardware with detailed installation instructions. To
order accessories/options, please provide the following information for each kit:
• Model number and serial number of your battery charger
• Factory part number and description, from the table below
• Quantity required
Contact your sales representative to place an order for accessories/options.
Description Kit Part Number
standard DC Output Filtering (per NEMA PE5-1996)
Battery Eliminator Filtering (per NEMA PE5-1996)
Auxiliary Relay PC Board (A5) for standard circuit breakers
Auxiliary Relay PC Board (A5) for med/high AIC circuit breakers
Copper Ground Bus with one (1) box lug for #14-6 AWG
AC Input Lightning Arrestor (VR3)
Floor Mounting Kit for Style-586/594 Enclosure
Relay Rack Mounting Kit for Style-586/594 Enclosure
NEMA-2 Type Drip Shield Assembly for Style-586/594 Enclosure
NEMA-4/12/13 Type Enclosure for Style-586/594 Enclosure
Cabinet Heater Assembly for Style-586/594 Enclosure
Padlock for Style-586/594 Enclosure Front Panel Door
Remote Temperature Compensation Probe Assembly (A10)
DNP3 Level 2 / Modbus Communications Module
Forced Load Sharing Accessory
see table 3-2
see table 3-1
EI0213-00
EI0213-01
EI0195-00
EJ1074-00
EI0192-00
EI0193-00
EI0191-00
EI0214-##
EJ1223-00
EI0215-00
see below
see Appendix E
EJ5126-##
Remote Temperature Compensation Probe
The temperature compensation assembly consists of two (2) components:
1. To order a replacement probe (or puck), request part number EJ5032-00. This
probe is good for all charger output voltages and all battery types.
2. The standard temperature compensation assembly is supplied with a 25ft / 7.6m
interconnection cable. If you need a longer cable, order it from the table below,
which also shows the ordering part number for a complete probe kit.
Temperature Compensation Probe Kits
Cable Length
(feet / m)
25 / 7.6 EJ5033-00 EJ5011-00
50 / 15.2 EJ5033-01 EJ5011-01
100 / 30.5 EJ5033-02 EJ5011-02
200 / 61.0 EJ5033-03 EJ5011-03
Use a single cable assembly. Do not try to splice cables together to increase the length.
71
Kit Part Number
(includes probe)
Replacement Cable
Part Number
Page 76

APPENDIX C (Standard Drawings)
Outline: AT10.1 Group I Battery Charger
NEMA-1 Style-586 Enclosure (JE5023-03)
72
http://www.ATSeries.net/PDFs/JE5023-03.pdf
Page 77

APPENDIX C (Standard Drawings)
Outline: AT10.1 Group I Battery Charger
NEMA-1 Style-594 Enclosure (JE5024-03)
http://www.ATSeries.net/PDFs/JE5024-03.pdf
73
Page 78

APPENDIX C (Standard Drawings)
Optional Enclosure Dimensions: AT10.1 Group I Battery Charger
w/Penthouse and Drip Shield - Style-586 Enclosure
DIMENSION in
Standard
WW
DD
HH
W
D
16.25
12.50
15.63
16.25
10.75
mm
495
324
457
495
337
with
Penthouse
WW
DD
HH
W
with
Drip Shield
WW
DD
HH
W
with
Penthouse &
Drip Shield
WW
DD
HH
W
D
D
D
14.00
10.75
22.63
16.25
10.00
18.75
12.50
19.50
16.25
10.75
18.75
12.50
26.50
16.25
10.00
356
337
572
495
324
559
318
552
495
337
476
337
729
495
324
74
Page 79

APPENDIX C (Standard Drawings)
Optional Enclosure Dimensions: AT10.1 Group I Battery Charger
w/Penthouse and Drip Shield - Style-594 Enclosure
DIMENSION
Standard
with
Penthouse
with
Drip Shield
with
Penthouse &
Drip Shield
WW
DD
HH
W
D
WW
DD
HH
W
D
WW
DD
HH
W
D
WW
DD
HH
W
D
in
19.50
12.75
18.00
19.50
13.25
14.00
13.25
25.00
19.50
12.75
22.00
12.50
21.75
19.50
13.25
18.75
13.25
28.75
19.50
12.75
mm
495
324
457
495
337
356
337
635
495
324
559
318
552
495
337
476
337
729
495
324
75
Page 80

APPENDIX C (Standard Drawings)
Internal Component Layout: AT10.1 Group I Battery Charger
Style-586/594 Enclosure w/Common Options (JE5027-99)
Note: This internal component layout drawing (JE5027-99) depicts an AT10.1 Series battery
charger housed in a Style-586 or Style-594 enclosure, with ALL available options. Standard
components (A1 through VR7) are supplied in all such units. Optional components (A5
through VR3) are supplied only in those AT10.1 chargers configured with such options.
76
Page 81

APPENDIX C (Standard Drawings)
Internal Component Layout: AT10.1 Group I Battery Charger
Style-596/594 Enclosure w/Common Options (JE5027-99)
http://www.ATSeries.net/PDFs/JE5027-99.pdf
77
Page 82

APPENDIX C (Standard Drawings)
Instrument Panel / PC Board Detail: AT10.1 Group I Battery Charger
w/Optional Auxiliary Alarm Relay Board (JE5030-19)
Note: This instrument panel drawing (JE5030-19) depicts the optional Auxiliary Alarm Relay
PC Board (A5), which provides two (2) sets of individual form-c contacts (TB4) for all alarm
conditions. Standard AT10.1 battery chargers feature one (1) set of form-c summary (common)
alarm contacts (TB3).
78
Page 83

APPENDIX C (Standard Drawings)
Instrument Panel / PC Board Detail: AT10.1 Group I Battery Charger
w/Optional Auxiliary Alarm Relay Board (JE5030-19)
http://www.ATSeries.net/PDFs/JE5030-19.pdf
79
Page 84

APPENDIX C (Standard Drawings)
Schematic: AT10.1 Group I Battery Charger
Standard w/o Options (JE5031-00)
80
Page 85

APPENDIX C (Standard Drawings)
Schematic: AT10.1 Group I Battery Charger
Standard w/o Options (JE5031-00)
http://www.ATSeries.net/PDFs/JE5031-00.pdf
81
Page 86

APPENDIX C (Standard Drawings)
Schematic: AT10.1 Group I Battery Charger
w/Common Options (JE5031-99)
82
Page 87

APPENDIX C (Standard Drawings)
Schematic: AT10.1 Group I Battery Charger
w/Common Options (JE5031-99)
http://www.ATSeries.net/PDFs/JE5031-99.pdf
83
Page 88

APPENDIX C (Standard Drawings)
Connection Diagram: AT10.1 Group I Battery Charger
Standard w/o Options (JE5033-00)
84
Page 89

APPENDIX C (Standard Drawings)
Connection Diagram: AT10.1 Group I Battery Charger
Standard w/o Options (JE5033-00)
http://www.ATSeries.net/PDFs/JE5033-00.pdf
85
Page 90

APPENDIX C (Standard Drawings)
Connection Diagram: AT10.1 Group I Battery Charger
w/Common Options (JE5033-99)
86
Page 91

APPENDIX C (Standard Drawings)
Connection Diagram: AT10.1 Group I Battery Charger
w/Common Options (JE5033-99)
http://www.ATSeries.net/PDFs/JE5033-99.pdf
87
Page 92

APPENDIX D
RECOMMENDED FLOAT AND EQUALIZE VOLTAGES
This table contains suggested values for commonly used batteries. Consult your battery
manufacturer's documentation for specific values and settings for your battery type.
Battery Cell Type
Antimony (1.215 Sp. Gr.) 2.17 2.33
Antimony (1.250 Sp. Gr.) 2.20 2.33
Selenium (1.240 Sp. Gr.) 2.23 2.33 - 2.40
Calcium (1.215 Sp. Gr.) 2.25 2.33
Calcium (1.250 Sp. Gr.) 2.29 2.33
Absorbed / Gelled Electrolyte *
Lead-Acid Types
* Sealed lead-acid battery types should not be used in ambient temperatures above 95°
F / 35° C, and should not normally be equalized. Consult your battery manufacturer's
documentation for specific equalizing recommendations.
(sealed lead acid type)
Nickel Cadmium 1.42 1.47
Recommended
Float Voltage/cell
2.25 *
Recommended
Equalize Voltage/cell
TEMPERATURE COMPENSATION
If batteries are to see temperature variations during charging, a temperature
compensation option (A10) is recommended. If this option is not part of your charger,
manual adjustments should be made. Refer to the equation and table below for
temperature-adjusted voltages.
88
temperature-adjusted voltage = charge voltage x K
Temperature
(°F)
35 1.7 1.058 1.044
45 7.2 1.044 1.034
55 12.8 1.031 1.023
65 18.3 1.017 1.013
75 23.9 1.003 1.002
77 25.0 1.000 1.000
85 29.4 0.989 0.992
95 35.0 0.975 0.981
105 40.6 0.961 0.970
Temperature
(°C)
K
(Lead Acid) K (Nickel Cadmium)
Page 93

APPENDIX E
COMMUNICATIONS MODULE
ONLINE SUPPLEMENTS
Operating Instructions http://www.ATSeries.net/PDFs/JA0202-04.pdf
Field Installation http://www.ATSeries.net/PDFs/JD5008-00.pdf
INTRODUCTION
Your AT10.1 Microprocessor-controlled Battery Charger features provisions for
an optional Communications Module that allows the user to remotely monitor and
control the unit over a serial connection. This option supports DNP3 Level 2 and
Modbus protocols over RS-232 or RS-485 half-duplex. Industry-standard SCADA
(Supervisory Control And Data Acquisition) systems will be able to control, monitor,
and log the events of the AT10.1 when this option is supplied. Using the
Communications Module, all features of the AT10.1's front instrument panel are
accessible remotely.
The AT Series Communications Module option (p/n EJ5037-0#), installed
within a battery charger, includes the Communications PC Board (A12), a dc power
supply resistor (R29), and an Operating Instructions manual (JA0102-04
Installation Kit (p/n EJ5037-1#) also includes special instructions (JD5008-00).
Also available are a compatible industry standard modem with interconnection
cable, or a fiber optic modem kit. Finally an Ethernet gateway option for either
Modbus or DNP Level 2 is available. Contact your sales representative to place an
order for the AT Series Battery Charger Communication Module. Refer to the table
below for ordering information.
). The Field
Description Part No.
Installed Communications Option for 12 Vdc AT10.1 EJ5037-01
Installed Communications Option for 24 Vdc AT10.1 EJ5037-02
Installed Communications Option for 48 Vdc AT10.1 EJ5037-03
Installed Communications Option for 130 Vdc AT10.1 EJ5037-04
Installed Communications Option for AT10-130-006 EJ5037-05
Communications Module Field Kit for 12 Vdc AT10.1 EJ5037-11
Communications Module Field Kit for 24 Vdc AT10.1 EJ5037-12
Communications Module Field Kit for 48 Vdc AT10.1 EJ5037-13
Communications Module Field Kit for 130 Vdc AT10.1 EJ5037-14
Communications Module Field Kit for AT10-130-006 EJ5037-15
Industry Standard Modem w/10ft Cable EJ5084-00
Industry Standard Modem w/25ft Cable EJ5084-01
Industry Standard Modem w/50ft Cable EJ5084-02
Fiber Optic Modem w/Interface for AT Comm EJ5230-0#
Ethernet Gateway Interface for MODBUS AT Comm EJ5226-0#
Ethernet Gateway Interface for DNP AT Comm EJ5226-1#
89
Page 94

APPENDIX F
FORCED LOAD SHARING
ONLINE SUPPLEMENT
http://www.ATSeries.net/PDFs/JA5054-00.pdf
INTRODUCTION
Multiple battery chargers are sometimes employed in dc power systems to provide
redundancy. Two or more chargers of the same voltage rating can be connected in parallel, each of
them capable of powering the connected dc load and charging the battery. If a battery charger
should fail during normal operation, the parallel charger can continue to supply the entire required
dc load current, and maintain charge on the battery.
When two (2) AT10.1s operate in parallel, they normally will not share the load current
equally. Since any two chargers will have slightly different characteristics, one of the two chargers
in a system will have a slightly higher dc output voltage, and will therefore assume more of the
burden of providing necessary load current. This section describes an optional accessory for the
AT10.1 that system operators can use to force units to share load equally. The accessory consists of
an interconnecting cable to provide such communication.
SYSTEM REQUIREMENTS
• The forced load sharing feature is designed only to work with two (2) AT10.1 Series battery
chargers. You cannot force load sharing with three (3) or more chargers.
• The units must have the same dc voltage and current rating, and have the same dc filtering level.
• Both chargers must have the same ac input source and the same phase rotation.
• Both chargers must feature Rev. 6 (or higher) builds of the main control circuit boards (A1), and
corresponding (Rev. 6 or higher) software programs .
• We recommend that both chargers use the same program version, since the load sharing option
has not been tested using a different program version in each charger. To view the program
version, press the LAMP TEST button on the front panel of the charger. When you release the
button, the version number is shown on the front panel display for two seconds.
• The interconnecting signal cable length should be no more than 50ft (15m).
INSTALLING THE INTERCONNECTION CABLE
The AT Series forced load sharing accessory is normally supplied by the factory with a
standard 15ft (4.6m) interconnection cable (EH5041-00). A 25ft (7.6m) long cable (EH5041-01)
and a 50ft (15.2m) long cable (EH5041-01) are also available. The interconnection cable is
terminated at each end with a 6-pin connector that mates with the plastic connector (J4) on lowerright corner of the Main Control pc board (A1). One end of the cable features an extra jumper in the
connector, and should be identified for use with the Secondary charger. The other end of the cable
connects to the Primary charger. Either AT10.1 may be selected as Primary or Secondary, but you
may wish to choose the unit that is more accessible to be the Primary. The Primary charger controls
the dc output voltage of both AT10.1s.
You may run the interconnection cable through conduit if necessary. However, do not run
the cable through the same conduit with power wiring. Do not remove the connectors in order to
"fish" the cable through the conduit. Maximum pulling tension is 46 lb. (20.9kg). The cable has a
plenum-rated outer jacket, and passes the NFPA 262 flame propagation test. Install the cable
between the AT10.1s, and anchor it in place at both ends before connecting. Connect each end to
the Main Control pc boards, inserting the connector into J4 until it is completely seated.
NOTE: DC power cabling for the battery charger, battery, and load interconnection is not
supplied with the AT Series Forced Load sharing option. All user-supplied system wiring should
meet National Electric Code (NEC) standards, as well as local/site codes. Confirm polarity of all dc
cabling before making connections.
90
Page 95

APPENDIX F
OPERATING CHARGERS WITH LOAD SHARING
Restore external power connections to both AT10.1s, and restart according to the normal
procedure in the AT Series Battery Charger Operating and Service Instructions. After the AT10.1s
restart, the Primary charger attempts to establish communication with the Secondary. If
communication is successful, the chargers behave as follows:
• The Primary charger displays the message LS P (Load Share, Primary) on the front panel,
alternating with the normal display of output voltage and current.
• The Secondary charger displays the message LS S (Load Share, Secondary) on the front panel,
alternating with the normal display of output voltage and current.
• The Primary charger controls all voltage settings for both AT10.1s. You may adjust any voltage
(float, equalize, alarm settings, etc.) at the front panel of the Primary charger. The front panel of
the Secondary charger will not allow any settings to be changed.
• If one charger loses ac power (or is turned off), the remaining charger returns to independent
operation, whether it was originally the Primary or Secondary. For this reason, it is important to
set up both chargers initially for the same operating voltages. If an alarm condition occurs, both
chargers revert to independent operation for the duration of the alarm.
• In the event of a fault in the interconnection, or any other problem with communication, the
chargers return to independent operation, and the front panel on each charger displays the
message E 14, indicating the fault.
• There is a delay of up to 4 seconds for the two (2) AT10.1s to establish forced load sharing
communication. If communication is broken (or power is lost for one charger), there is up to a 4
second delay for the other charger to resume independent operation.
• If you need to interchange the Primary and Secondary chargers, simply reverse the
interconnection cable.
• The presence of the interconnection cable (and a good interconnection) forces the two (2)
AT10.1s into load sharing. Controlling load sharing from the front panel is neither necessary
nor possible.
WHEN TEMPERATURE COMPENSATION IS INSTALLED
The AT Series forced load sharing feature is compatible with the external temperature
compensation accessory. It is recommended that each AT10.1 have a tempco probe, and that the
probes be located as close as possible to each other. When the AT10.1s are load sharing, the
primary charger will determine the temperature compensated voltage and adjust the output voltage
accordingly. The primary charger and secondary charger will display the set point voltage, not the
temperature compensated output voltage. The voltage displayed by the master and secondary may
be different, if either temperature probe is not installed or defective. A slight difference in the
displayed voltages may also occur if the two probes are not located in close proximity of each other.
TROUBLE SHOOTING
If the AT Series Forced Load Sharing option is installed, but the output currents of the
AT10.1s are unequal, refer to the following table.
PROBABLE
CAUSE
1. Connection cable
missing or installed
incorrectly.
2. Incorrect connections
to ac power sources.
3. Defective or improper
Main Control circuit
board A1
91
1. Ensure that the interconnection signal cable assembly is properly
installed, and that the connector for the Secondary charger has the
jumper as described at the top of page 3.
2. Ensure that both AT10.1s are connected to the same ac supply and
that source phase rotation is the same for both chargers.
3. Replace the Main Control circuit board in one charger at a time, noting
system requirements, to restore correct load sharing operation.
RECOMMENDED ACTION
Page 96

APPENDIX G
To operate this charger from inputs other than 120 Vac, you must
use branch circuit protection. To reduce the risk of fire, use only
on circuits provided with the following branch circuit protection
in accordance with the National Electrical Code, ANSI/NFPA 70.
Rating
12 Adc
16 Adc
20 Adc
25 Adc
NOTE: This table does not apply to AT10.1 chargers with 480 Vac input.
48 Vdc 130 Vdc 48 Vdc 130 Vdc
--- 25A --- 20A
15A 25A 12A 20A
20A 30A 15A 30A
25A 40A 20A 35A
208 Vac Branch Circuit
Protection (Amperes)
UL DATA
CAUTION
Charger Voltage Rating Current
240 Vac Branch Circuit
Protection (Amperes)
92
Page 97

93
Page 98

MANUAL SPECIFICATIONS
DOCUMENT NUMBER
The text and graphics contained within this manual are controlled by the battery charger
manufacturer's internal part number (JA5023-00). The revision level and dates of this manual's
text and graphics are listed below. These controls supercede all other available dates. The first
two and last two pages of this manual are reserved for company-specific front and back cover
artwork. Any revision levels, revision dates, or document numbers featured on the first two and
last two pages of this manual refer to the cover artwork only.
DOCUMENT INFORMATION
Document Number: JA5023-00
Revision Level: 10
Engineering Change Number: 22499
Electronic Filename: [JA5023-00.Rev10.doc]
Last Date Saved: [2/23/2011 8:30 PM]
Last Date Printed: [2/23/2011 8:34 PM]
PARTS DATA PACKAGE
Any job-specific customized Parts Data Package report supplied with this battery
charger and/or this manual supercedes the information featured in the standard parts list
starting on page 64. The data featured in that particular document is applicable only to the
battery charger featuring the same serial number listed on the Parts Data Package report.
DRAWINGS
A customized record drawing package is available for your AT10.1, featuring a unitspecific drawing list / data nameplate detail, outline drawing, itemized internal component
layout, electrical schematic with component ratings, and a full connection diagram. If the
standard drawings featured in this manual are not sufficient, please contact your Sales
Representative for drawing availability from the battery charger manufacturer.
Any job-specific custom drawings supplied with your AT10.1 and/or this manual,
supercede the standard drawings featured in Appendix C. The standard drawings and
corresponding page numbers featured in this section may not be included with custom printed
manuals, when job-specific custom drawings are supplied.
94
Page 99

MANUAL SPECIFICATIONS
ONLINE AVAILABILITY
An unlabeled version of this operating and service instruction manual is available online
at http://www.ATSeries.net/PDFs/JA0102-01.pdf
feature and accessory special instructions, standard drawings (including the ones listed in this
manual), field service instructions, and product application notes for the AT Series
microprocessor-controlled battery chargers and battery charger products are available online at
http://www.ATSeries.net/
. Saved in Adobe Acrobat Portable Document Format (PDF), they are
readily available for downloading and printing.
If revision levels differ between the drawings embedded in this manual and the full
online PDF drawings, refer to document with the higher revision level. For document availability
of private-labeled manuals and/or standard drawings, please contact your sales representative
or visit the web site listed on the back cover of this manual.
RELATED DOCUMENTS
Doc. No. Online Hyperlink Description
JA0102-01
JA0102-02
JA0102-03
JA0102-04
JA0102-05
JA5015-00
JA5054-00
JA5098-00
EJ5088-XX
EJ5130-XX
EJ5136-XX
EJ5137-XX
JD0064-00
JD5003-00
JD5008-00
JD5011-00
JD5012-00
DC5016-00
JD0052-00
JD5002-00
JD5006-00
JD5013-00
JA0083-00
JA0091-00
JA0092-00
JD5009-00
http://www.ATSeries.net/PDFs/JA0102-01.pdf
http://www.ATSeries.net/PDFs/JA0102-02.pdf
http://www.ATSeries.net/PDFs/JA0102-03.pdf
http://www.ATSeries.net/PDFs/JA0102-04.pdf
http://www.ATSeries.net/PDFs/JA0102-05.pdf
http://www.ATSeries.net/PDFs/JA5015-00.pdf
http://www.ATSeries.net/PDFs/JA5054-00.pdf
http://www.ATSeries.net/PDFs/JA5098-00.pdf
http://www.ATSeries.net/PDFs/EJ5088-XX.pdf
http://www.ATSeries.net/PDFs/EJ5130-XX.pdf
http://www.ATSeries.net/PDFs/EJ5136-XX.pdf
http://www.ATSeries.net/PDFs/EJ5137-XX.pdf
http://www.ATSeries.net/PDFs/JD0064-00.pdf
http://www.ATSeries.net/PDFs/JD5003-00.pdf
http://www.ATSeries.net/PDFs/JD5008-00.pdf
http://www.ATSeries.net/PDFs/JD5011-00.pdf
http://www.ATSeries.net/PDFs/JD5012-00.pdf
http://www.ATSeries.net/PDFs/DC5016-00.pdf
http://www.ATSeries.net/PDFs/JD0052-00.pdf
http://www.ATSeries.net/PDFs/JD5002-00.pdf
http://www.ATSeries.net/PDFs/JD5006-00.pdf
http://www.ATSeries.net/PDFs/JD5013-00.pdf
http://www.ATSeries.net/PDFs/JA0083-00.pdf
http://www.ATSeries.net/PDFs/JA0091-00.pdf
http://www.ATSeries.net/PDFs/JA0092-00.pdf
http://www.ATSeries.net/PDFs/JD5009-00.pdf
. Other related product operating manuals,
AT10.1 G1 Manual (unlabeled)
AT10.1 G2 Manual (unlabeled)
AT30 Manual (unlabeled)
AT Comm. Module Manual (unlabeled)
AT-DC Dist Panel Manual (unlabeled)
AT TempCo Probe Acsy. Instructions
AT Forced Load Sharing Instructions
AT Latching Alarm Relays Instructions
AT Series Ground Detection Voltmeter
AT Series Barrier Type Alarm Terminals
AT Series Battery Discharge Alarm
AT Series End Of Discharge Alarm
Preventative Maintenance Procedure
TempCo Probe Application Note
AT Comm. Module Field Installation
Ext. Free-Wheeling Diode Application Note
Main Ctrl PC Board (A1) Field Installation
AT Series AC Input Current Tables
Battery Discharge Dual Operation Note
DC Motor Starting Application Note
Alt. & Temp. De-Rating Application Note
AC Ripple Specification Application Note
AT10.1 Floor-Mtg. Instructions
AT10.1 St-586/594 Rack-Mtg. Instructions
AT10.1 St-586/594 NEMA-2 Drip Shield
AT10.1 G1 Rectifier Field Installation
95
Page 100

A Division of Exide Technologies
®
®
GNB Industrial Power –
The Industry Leader.
GNB Industrial Power, a division of Exide Technologies, is a
global leader in network power applications including com-
munication/data networks, UPS systems for computers and
control systems, electrical power generation and distribution
systems, as well as a wide range of other industrial standby
power applications. With a strong manufacturing base in
both North America and Europe and a truly global reach
(operations in more than 80 countries) in sales and service,
GNB Industrial Power is best positioned to satisfy your
backup power needs locally as well as all over the world.
GNB Industrial Power
USA – Tel: 888.898.4462
Canada – Tel: 800.268.2698
www.gnb.com
Based on over 100 years of technological innovation the Network
Power group leads the industry with the most recognized global brands such as ABSOLYTE
MARATHON
SPRINTER
®
, ONYX™, RELAY GEL®, SONNENSCHEIN®, and
®
. They have come to symbolize quality, reliability, per-
®
, GNB® FLOODED CLASSIC®,
formance and excellence in all markets served.
GNB
Industrial Power takes pride in its commitment to a bet-
ter environment. Its Total Battery Management program, an
integrated approach to manufacturing, distributing and recycling of lead acid batteries, has been developed to ensure a
safe and responsible life cycle for all of its products.
Section 94.20 2011-11
 Loading...