

Page 1
www.exhibio.com 1.877.EXHIBIO (394.4246)
®
First time setup Guide
Page 2

1
Standing Mount
USB Flash Drive
DVI to VGA Adapter
Power Adapter
VESA Mount
Exhibio M-500 Components & Accessories
Page 3
2
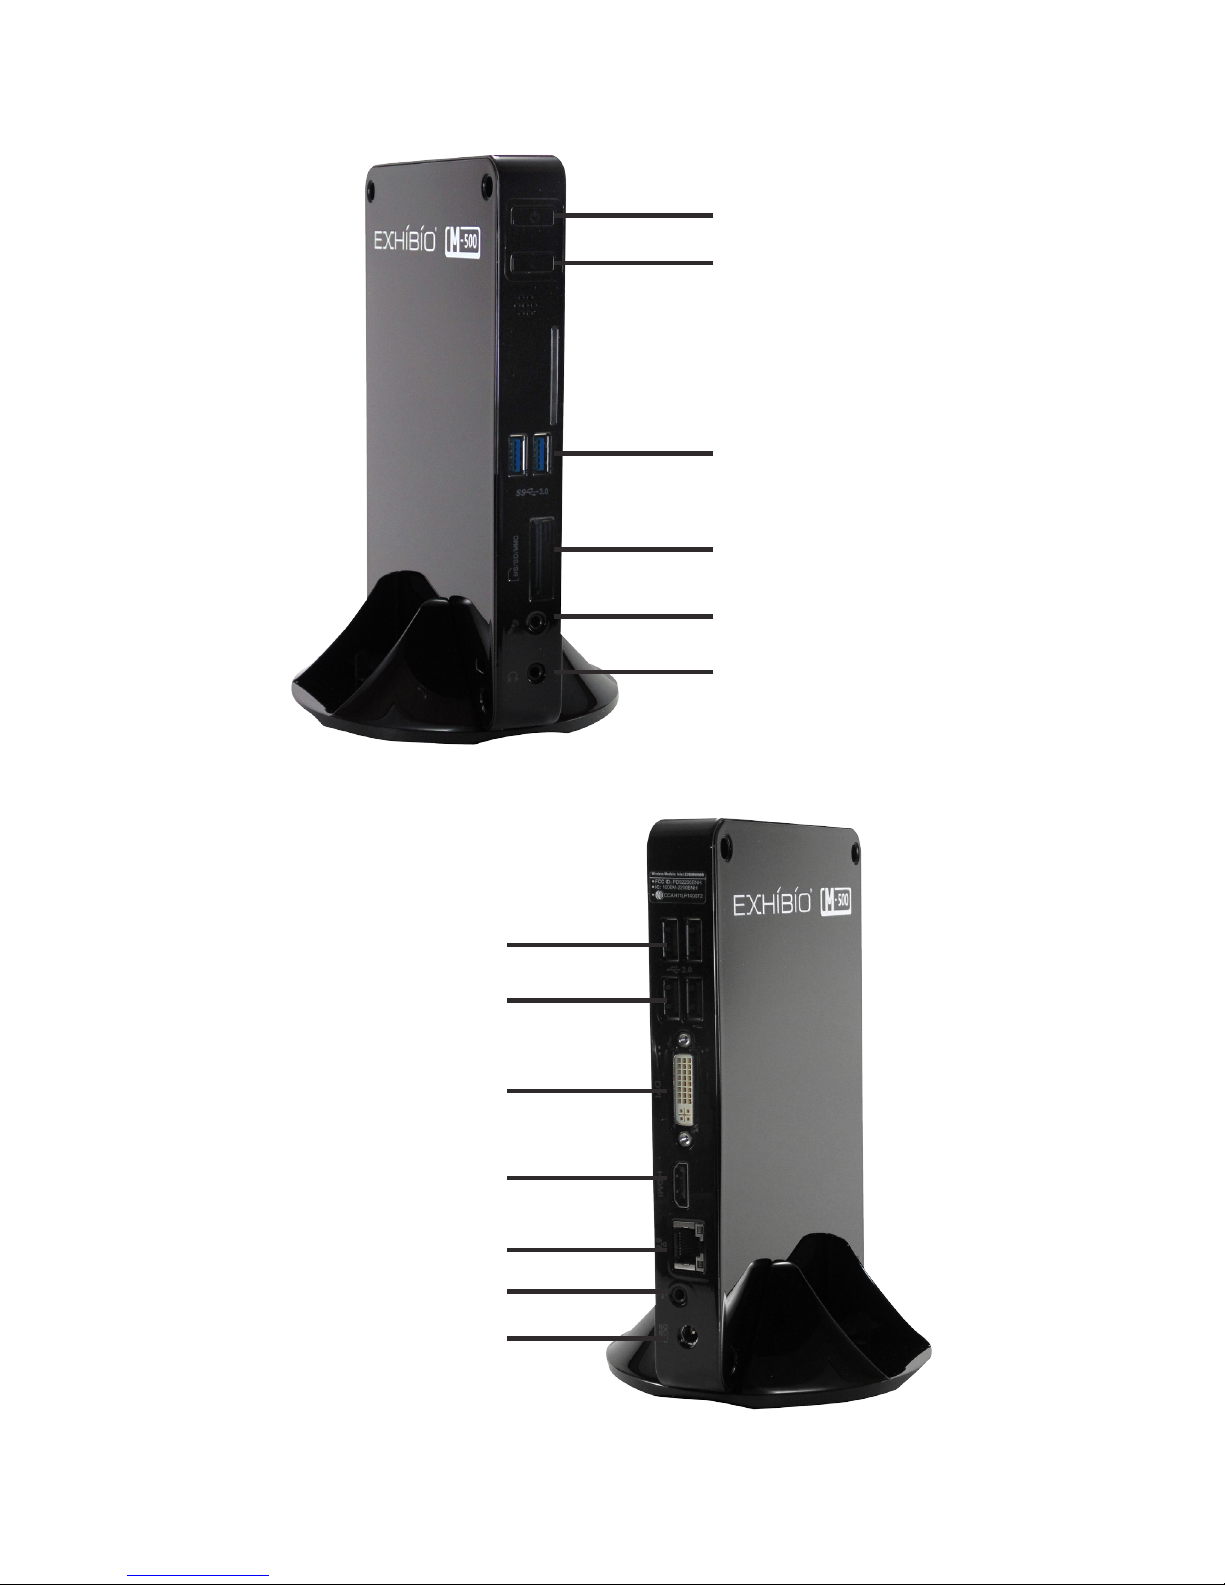
USB 2.0
USB 2.0
DVI
HDMI
Ethernet
Audio Out
Power Adapter In
Power On/Off
Standby
Memory Card
Reader
Headphone In
USB 3.0
Microphone In
Page 4
3
Start
Here!
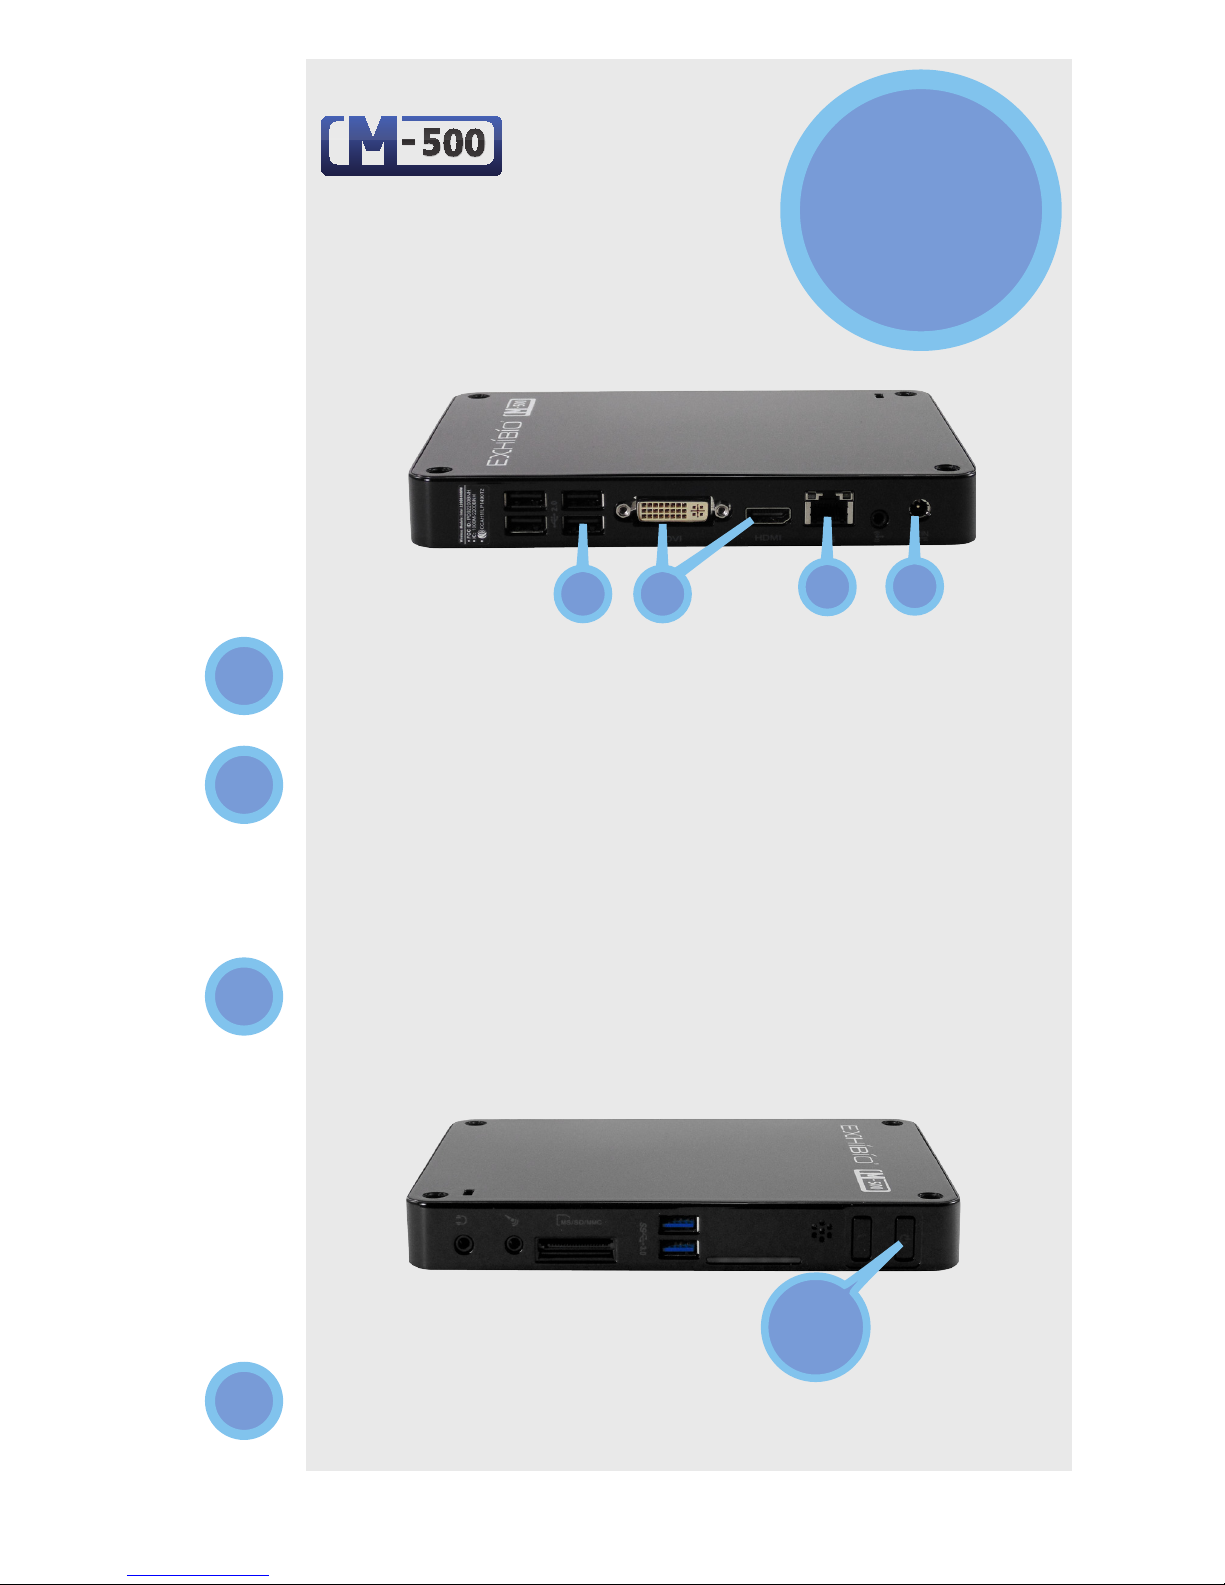
Connect Keyboard and Mouse
Only use a USB Keyboard and Mouse.
Plug in Monitor
Use either a DVI Cable or an HDMI Cable.
Note: You may use the optional DVI to VGA
adapter if required.
Connect to your broadband connection
Connect using either your network cable or your
wireless connection.
Power on the Exhibio unit
Plug in the power to the back of the system.
2
3
1
2
3
4
power
button
1
First time setup Guide
4
Page 5
4
Press the power button on the front of the unit to
power on the system for the rst time.
Initializing
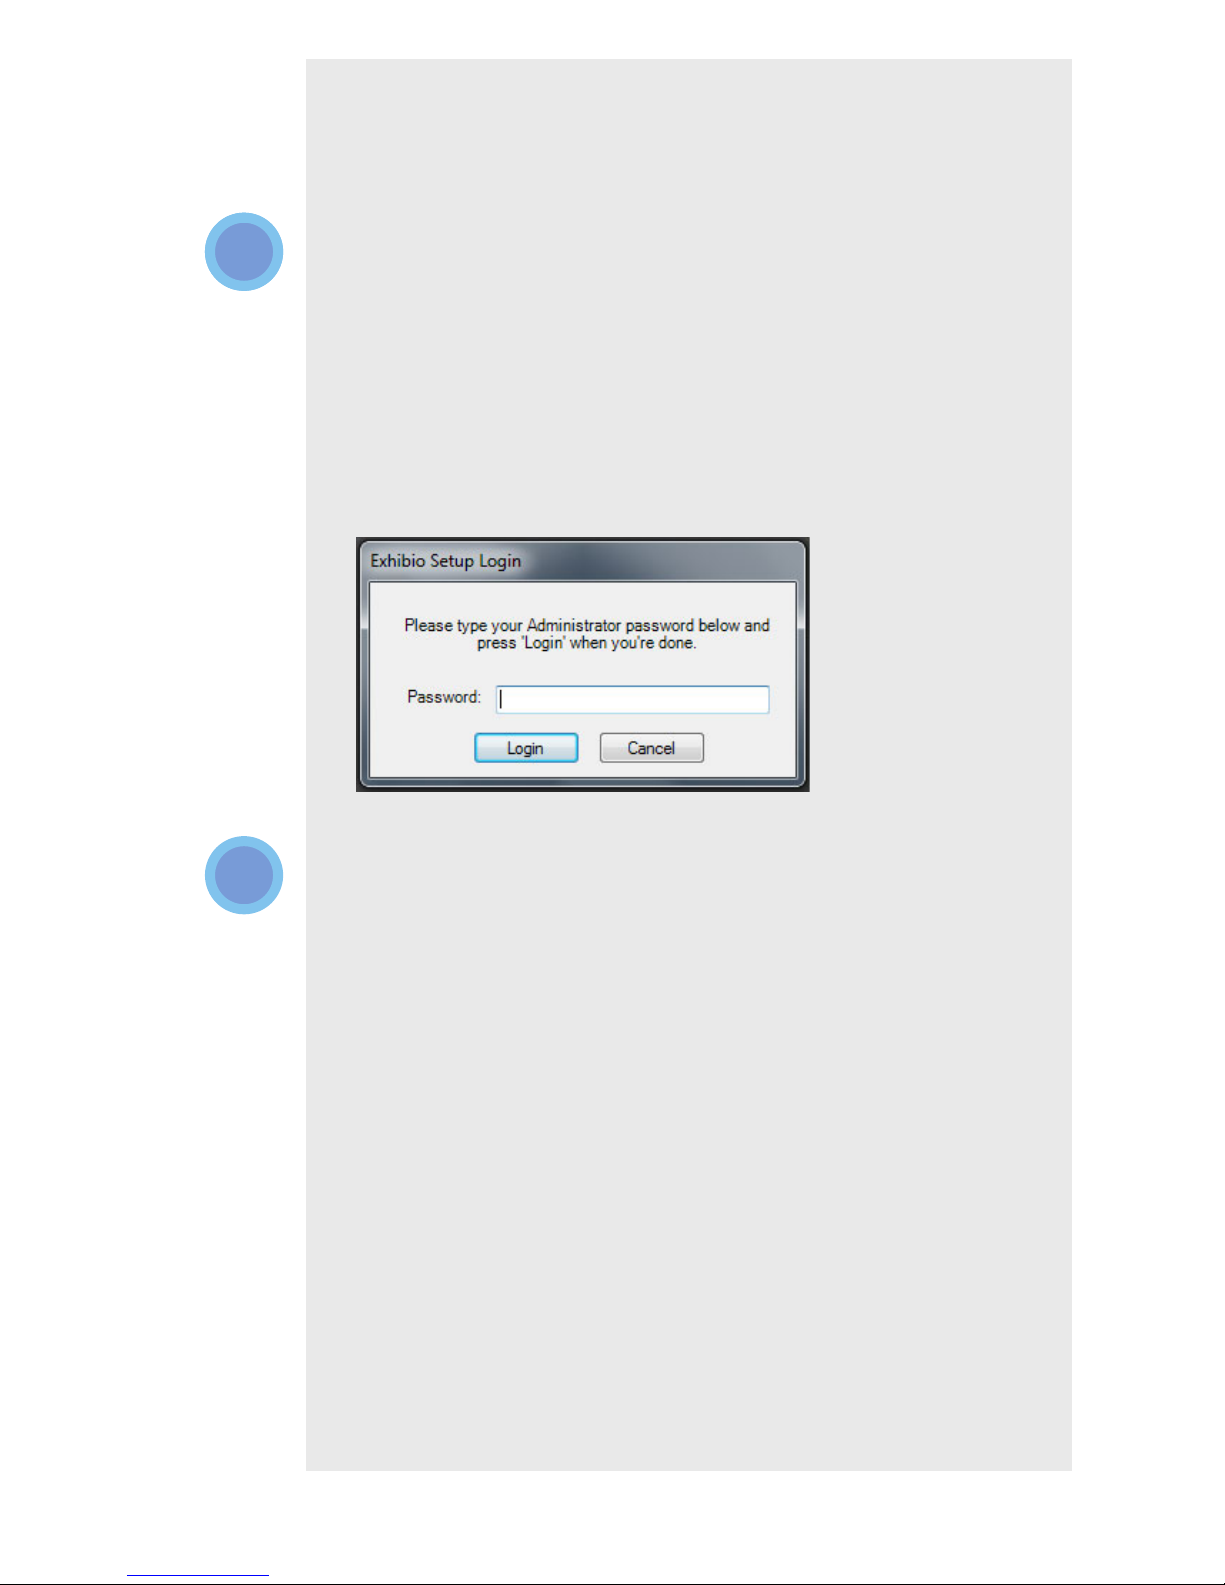
Enter the Administrator password and click
‘Login’.
The factory-set default password is exhibio.
Then Agree to the End User License Agreement
that appears.
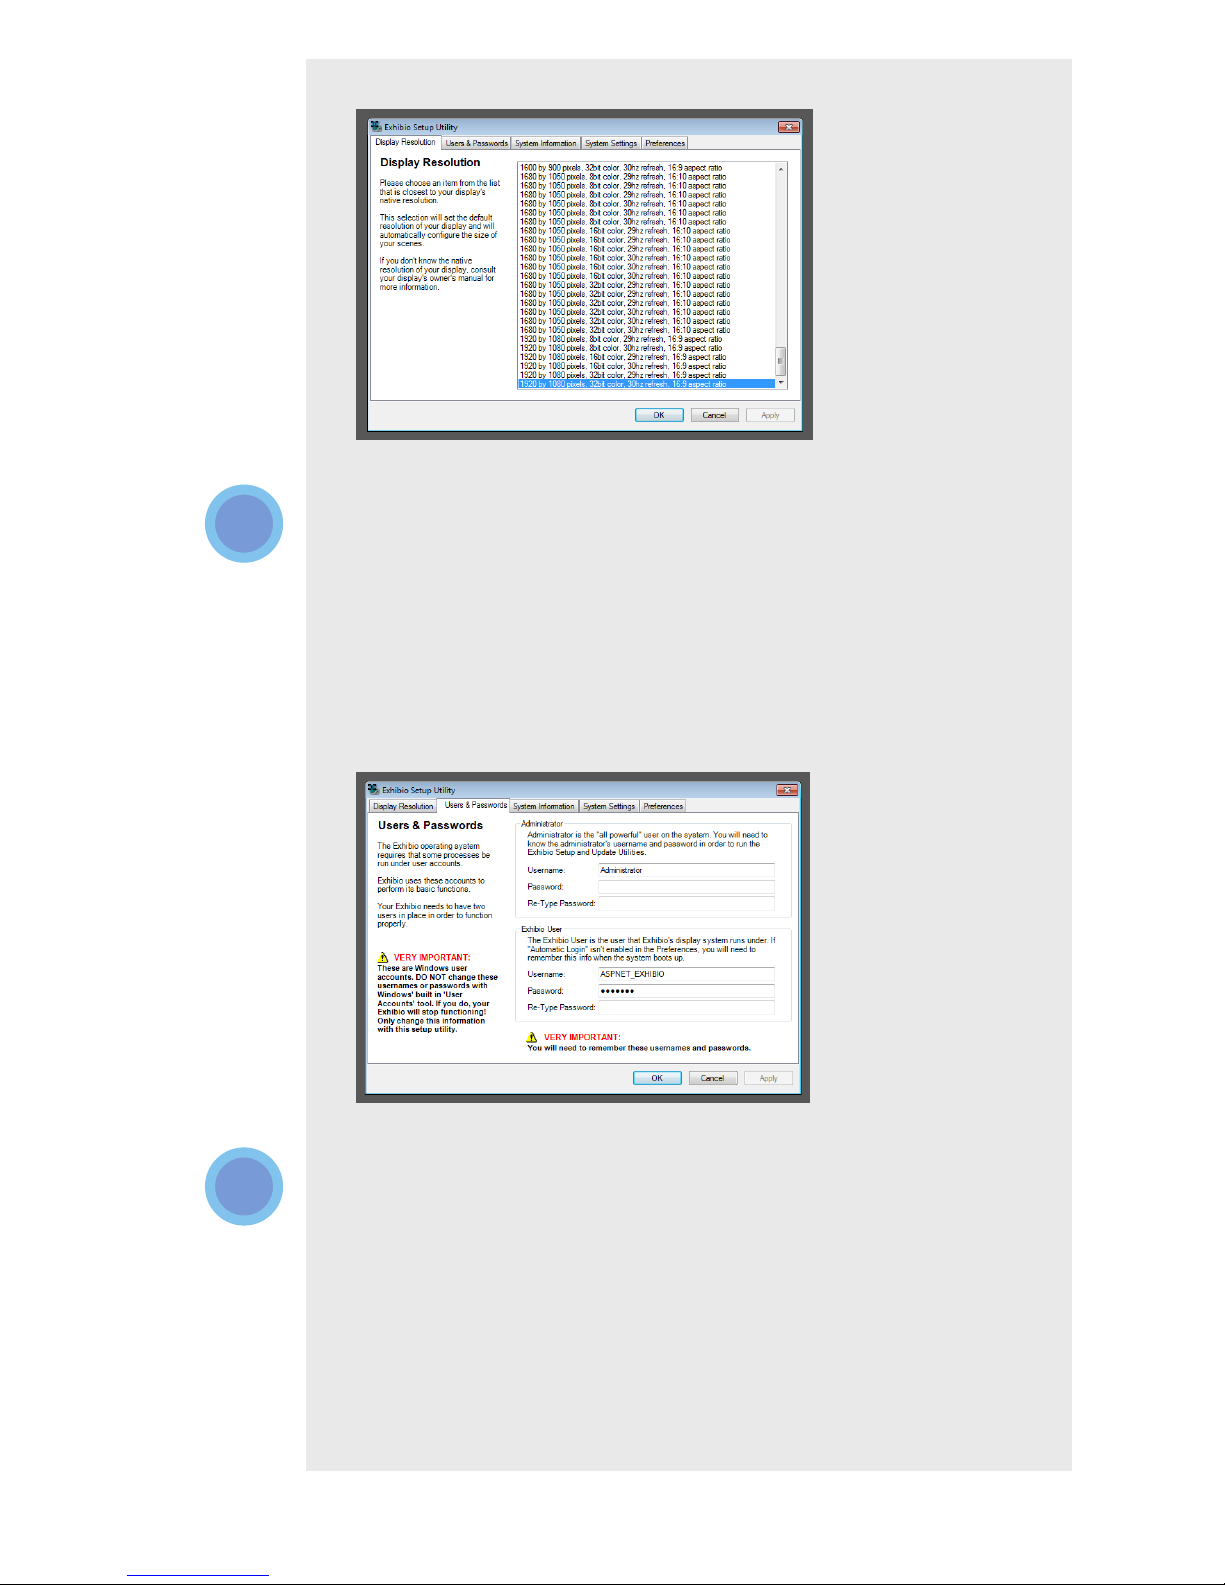
Display Resolution
Select the appropriate resolution for your display,
and then click ‘Next’.
Consult the owner’s manual of your monitor to
determine the optimal resolution, color bit depth,
refresh rate, and aspect ratio.
You will typically want to choose a resolution with
the same aspect ratio as your display to avoid
having your content appear stretched out.
65
6
Page 6
5
Users and Passwords
Change the Administrator and Exhibio user
passwords.
Please write down the username and password
for both the administrator and Exhibio User
accounts.
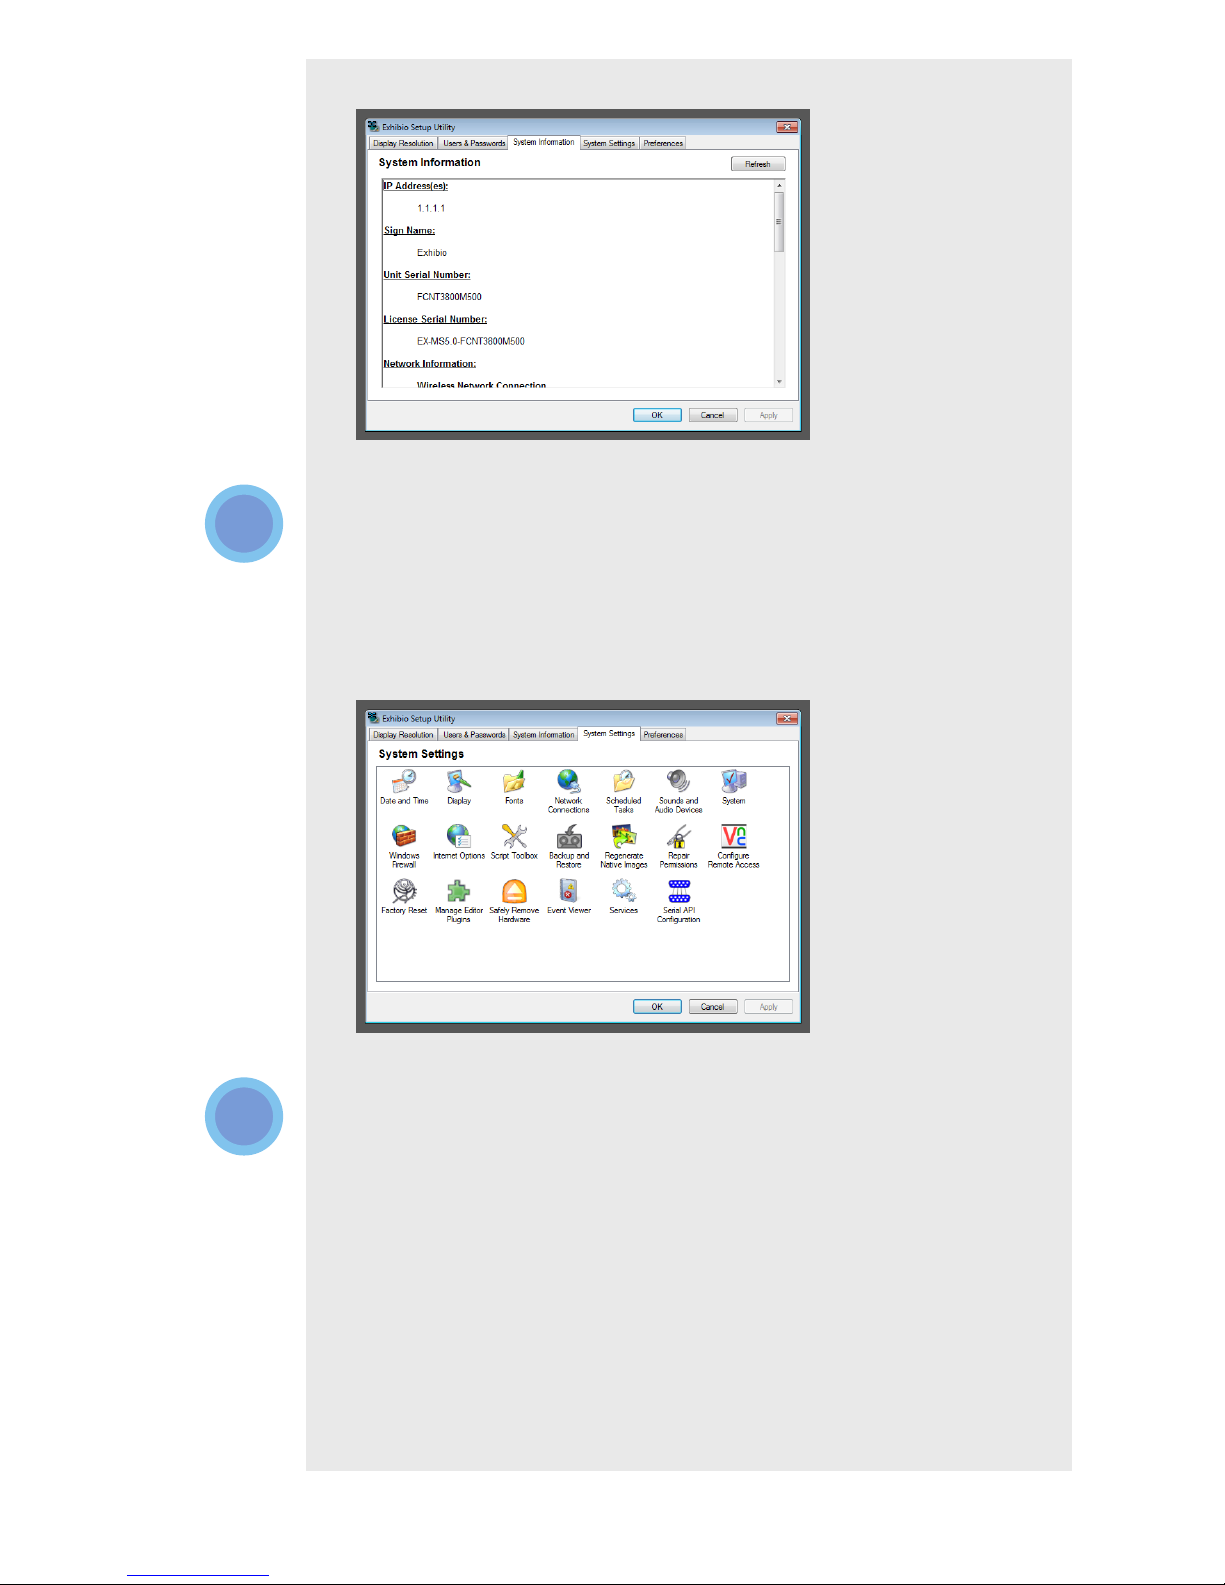
System Information
Write down the network IP address of your unit.
This is the address you will input into your web
browser to access the Exhibio Manager.
7
8
Page 7
6
System Settings
This section allows complete access to all
administrator level settings. Refer to the Software
Manual, found on the included USB Key, for
detailed information on all tools.
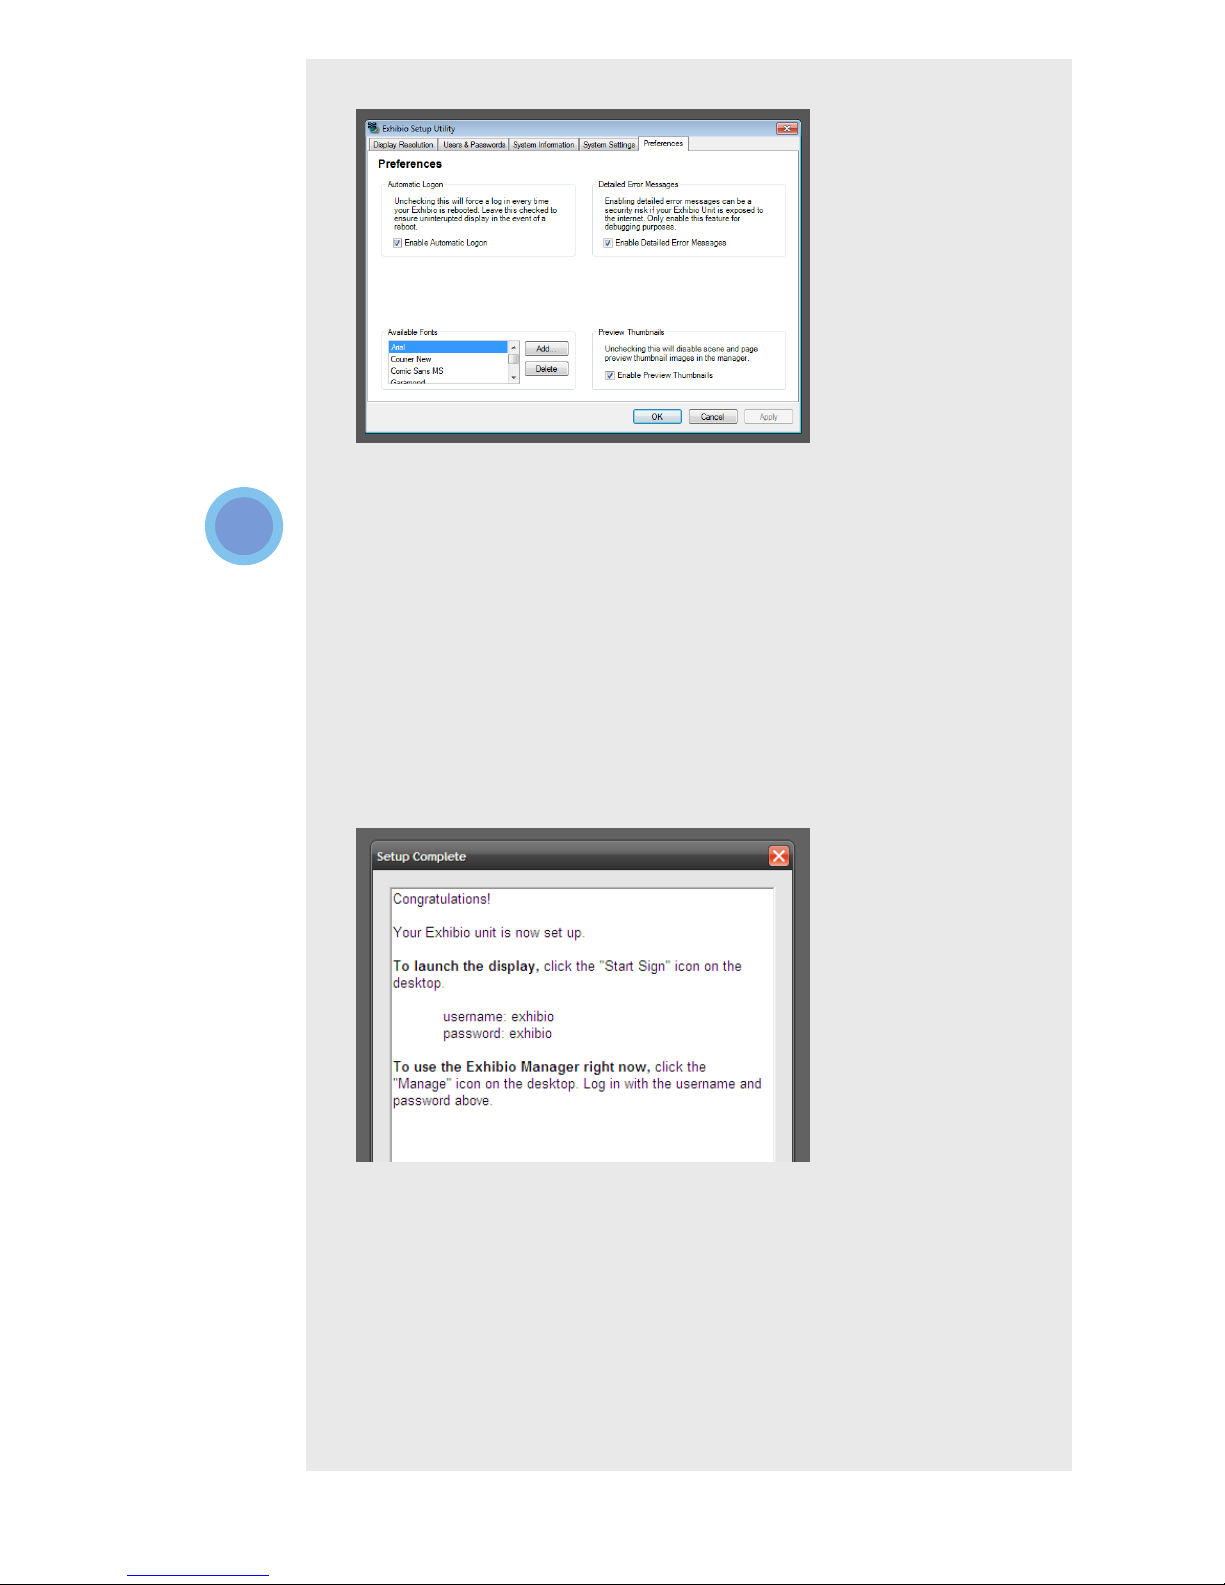
Preferences
You may check ‘Enable Automatic Logon’ which
will automatically login to the correct Exhibio User
upon restarting. Also, you may check ‘Enable
Detailed Error Messages’.
If you are nished and wish to not setup Live
Video or Digital/Analog TV, click ‘Finished’ and
skip to Step 13.
9
10
Page 8
7
Setup Complete
When the ‘Setup Complete’ dialog appears,
click ‘OK’. You may now remove the keyboard
and mouse that you previously attached to the
unit. You will only need to use the Setup Utility
occasionally from now on. All day-to-day content
management tasks are handled by the Exhibio
Manager web application.
Other instructiOns
Setting up Portrait Mode
1. Click on the ‘Setup’ icon on the desktop, and
login with your Administrator password.
2. Click on the ‘System Settings’ tab at the top.
11
Page 9

8
3. Select ‘Display’ from the icons below.
4. Expand ‘Display’ in the tree-view on the left,
and click ‘Rotate Display’. Select either ’90
Degrees to the left’ or ‘90 Degrees to the
right’ depending on how you plan to mount
your display. Click ‘Apply’ at the bottom of the
window.
5. Close the NVidia control panel and click on
the ‘Display Resolution’ tab at the top of the
‘Exhibio Setup Utility’.
6. Select your new resolution, and click ‘OK’.
Note Closed Captioning will not work with the
Live TV Input while in Portrait Mode.
Playing Audio Through HDMI
1. Click the ‘Setup’ icon on the desktop.
2. Click the ‘System Settings’ tab.
3. Select ‘Sounds and Audio Devices’ from the
icons below.
4. Click the ‘Audio’ tab.
5. Under ‘Sound Playback’, set the default
device to ‘NVIDIA High Denition Audio’. Click
‘OK’.
6. Click ‘OK’ again.
System Recovery
To restore your system to its initial factory state
perform the following steps.
1. Either hit <F11> at the bootup or click the
‘Factory Restore’ icon on the ‘system Settings’
tab of the Exhibio Setup Utility.
2. Click the ‘Restore System to Initial State’
button.
3. Click ‘OK’.
4. Click ‘OK’ when asked ‘All data in Windows
Page 10

9
drive will be deleted upon restoration. Do you
want to continue?’.
5. The ‘System Restoration’ dialog will appear
showing the progress of the restore operation.
6. Click ‘OK’ on the ‘Completed Restoration.
System is going to be restarted’ dialog.
Page 11

Page 12

 Loading...