


CONGRATULATIONS !
Dealer's Name____________________________
Date of Purchase__________________________
Installaon Shop__________________________
Installaon Date __________________________
CAU TIO N !
Connous exposure to sound pressure levels in excess of 100dB can cause permanent hearing loss. EXCURSIO N Products are capable
of producing sound pressure levels well over 170dB. Please observe all local sound ordinances while listening to your EXCURSION System.
EXCURSI ON Intl. acceptss no liability for hearing loss, bodily injury, or property damage due to the result of use or missuse of this product.
CONGRATULATIONS !
Dealer's Name____________________________
Date of Purchase__________________________
Installaon Shop__________________________
Installaon Date __________________________
CAU TIO N !
1
EXCURSION
You now own an EXCURSION HXA High Power Series Amplifier, the product of an
uncompromising design and german engineering philosophy. A product made
from Car Audio fanacs who truely believe in the relentless pursuit of perfecon.
EXCURSION amplifiers are the result of several decades of product improvements,
compeon, innovaon and highest quality parts and control standards in industry.
When properly installed these amplifiers will provide you with many years of
listening pleasere and are the perfect balance between high fidelity, extreme
performance and long-lasng reliabilty.
Should your amplifier ever need a service, Please record your informaon on
the following lines to refer to in the event that you may need it later.
At EXCURSION Intl. we are confident you will have many years of outstanding
enjoyment from your high performance investment. For maximum performance
we recommend that you have your new EXCURSION HXA Amplifier installed by
an exclusive Authorizied EXCURSION Dealer
To learn more about EXCURSION, please visit us on the World Wide Web at
hp://www.excursion.us
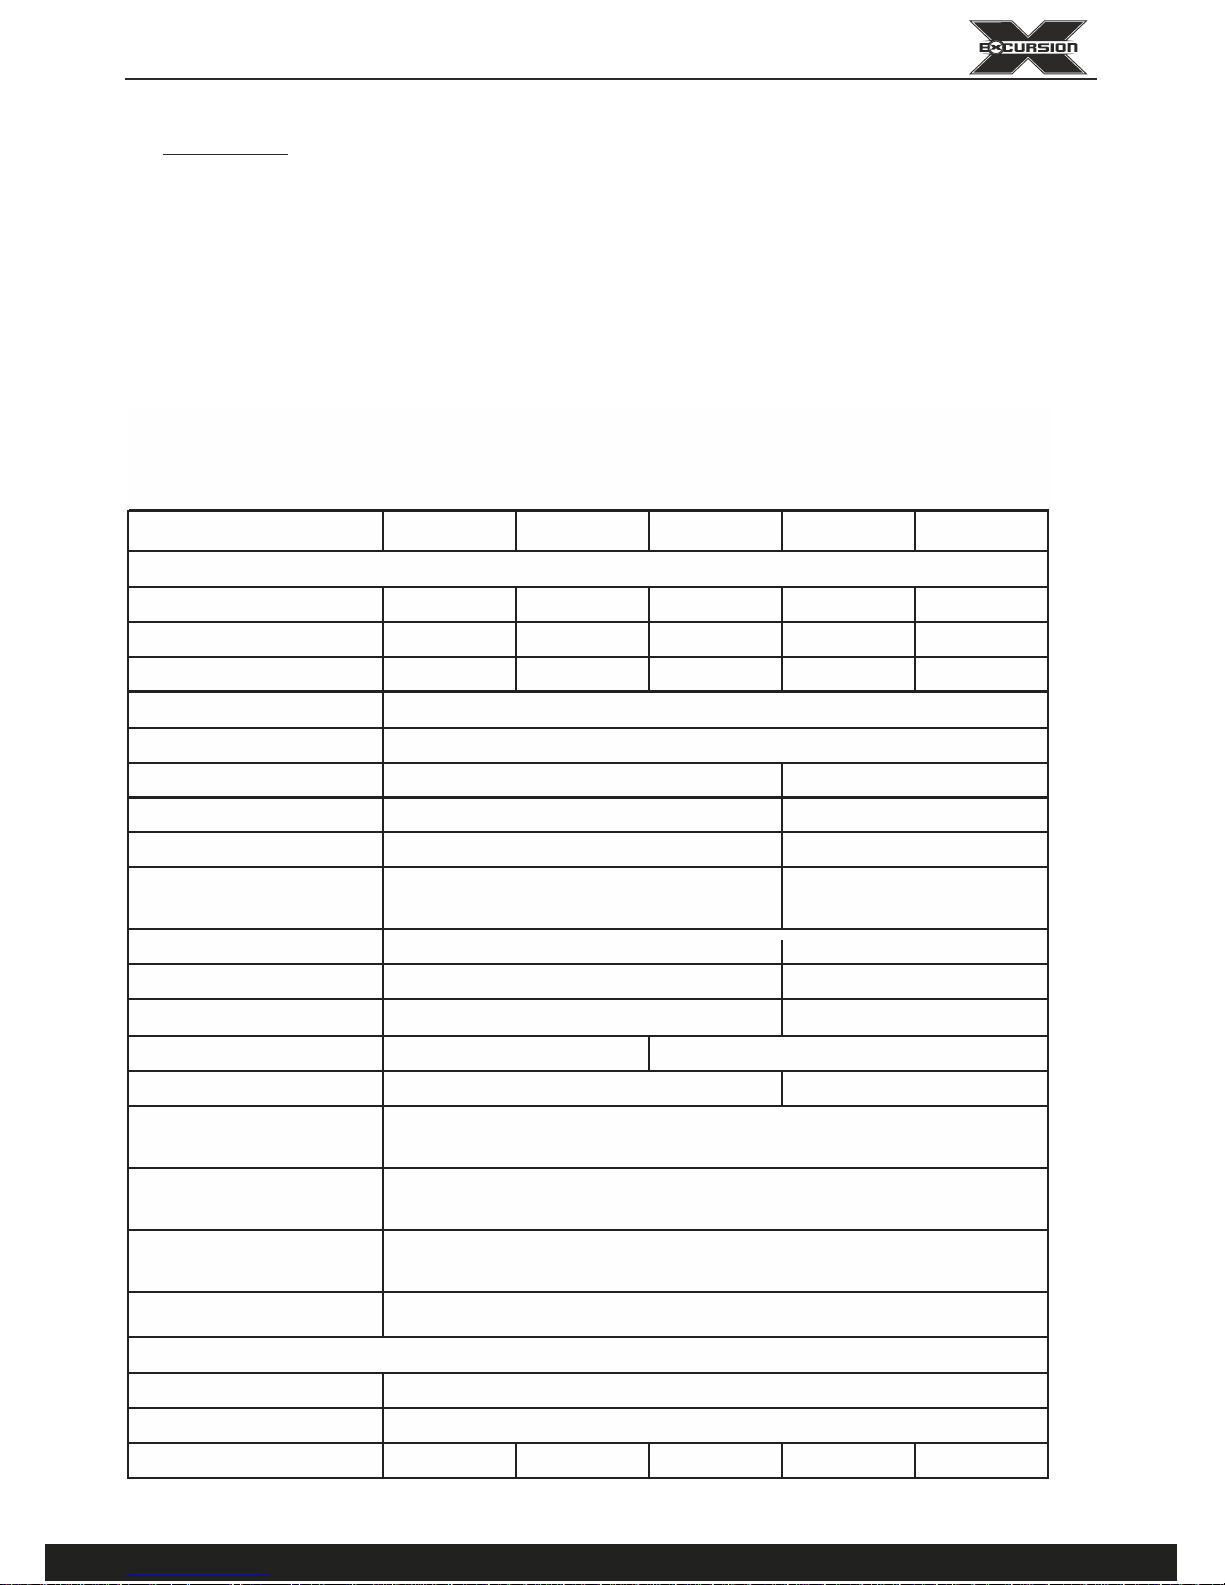
SPECIFICATIONS
Model HXA3K HXA2K HXA1K HXA45 HXA20
Description
Mono Mono Mono 4 Channel 2 Channel
1Ohm Load @ 14.4V
1800W 1200W NA NA NA
2Ohm Load @ 14.4V 1000W 800W 600W 4 X 100W 2 X 125W
4Ohm Load @ 14.4V 650W 400W 400W 4 X 75W 2 X 100W
Input Level
Frequency Response
LPF
SubSonic Filter(HPF)
THD at 4Ohm load
30% Rated Power
S/N Ratio
BassBoost
Efficiency @ 4Ohm
Minimum Load
Optional Remote
Low voltage
protection
ShortCircuit Test
@ max power
Overheat protect
temperature
Components & PCB
Height
Width
Length 340 260 185 255 185
140
0-6dB-12dB switchable
>80%
1Ohm 2Ohm
YES
Yes, protect < 8V
Pass
Protect at 80C / 176F
SMD parts / double side FR-4 pcb
Dimension(mm)
54
>60%
NA
>80dB
Features
NA
0.2~5V
10~220Hz
40~220Hz
10~50Hz
<0.3%
15Hz~25KHz
20Hz~250Hz
20Hz~250Hz
<0.05%
2
FEATURES
COMPACT SIZE AND TINY FOOTPRINT.
DOUBLE SIDE PCB AND SMD COMPONENTS.
FULL MOSFET DESIGN.
LPF AND HPF CROSSOVER.
ADJUSTABLE BASSBOOST.
1-OHM LOAD STABLE FOR HXA 2K & HXA 3K.
NOISE FREE DESIGN.
OVERLOAD, OVERHEAT, HIGH/LOW VOLTAGE PROTECTION.
RoHS COMPLIANT.

CONTROL FUNCTIONS
1. SPEAKERS
Connect speakers/subwoofers to these terminals. Be sure to check wire for proper polarity.
Never connect the speaker cables to chassis ground.
2. +12 Volt Power
Connect this terminal through a FUSE or CIRCUIT BREAKER to the posive terminal of the
vehicle baery or the posive terminal of an isolated audio system baery.
Warning: Always protect this power cable by installing a fuse or circuit breaker of the appropriate
size within 18 inches (45cm) of the baery terminal connecon.
3.Remote Turn On
This terminal turns on the amplifier when (+)12 volt is applied to it . Connect it to the remote
turn on lead of the head unit or signal source.
4.GND
Connect this cable directly to the frame of the vehicle. Make sure the metal frame has been
stripped of all paint down to the bare metal. Use the shortest distance possible. It is always a good
idea to replace the factory ground at this me with a larger cable equal to the new amplifier power
cable or larger. CAUTION: Do not connect this terminal directly to the vehicle baery ground
terminal or any other factory ground points.
5. RCA input jacks
These RCA input jacks are for use with source units that have RCA outputs. A source unit with
a minimum level of 200mV is required for proper operaon. The use of high quality twisted pair
cables is recommended to decrease the possibility of radiated noise entering the system.
6. REMOTE
Connect the remote controller to control the subwoofer amplifier volume from the driver
seat locaon, for ease of adjustment during playing.
7. Gain Control
The Gain control will match the amplifiers sensivity to the source units signal voltage. The
Operang range is 5V to 200mV. This is NOT a volume control!
8. Low Pass Filter Control (Mono block)
This control is used to select the desired low pass x-over frequency. The frequency can be
adjusted from 40Hz to 220Hz for all bass mono models.
9. Subsonic Filter Control (Mono block)
This control can filter out unwanted low frequency from 10Hz (OFF) to 50Hz. This funcon
will increase the power handling of your woofers.
10. Bass Boost Level switch (Mono block)
This switch can boost bass level by 0dB, 6dB or 12dB. The boost frequency is centered at
50Hz.
3
EXCURSION
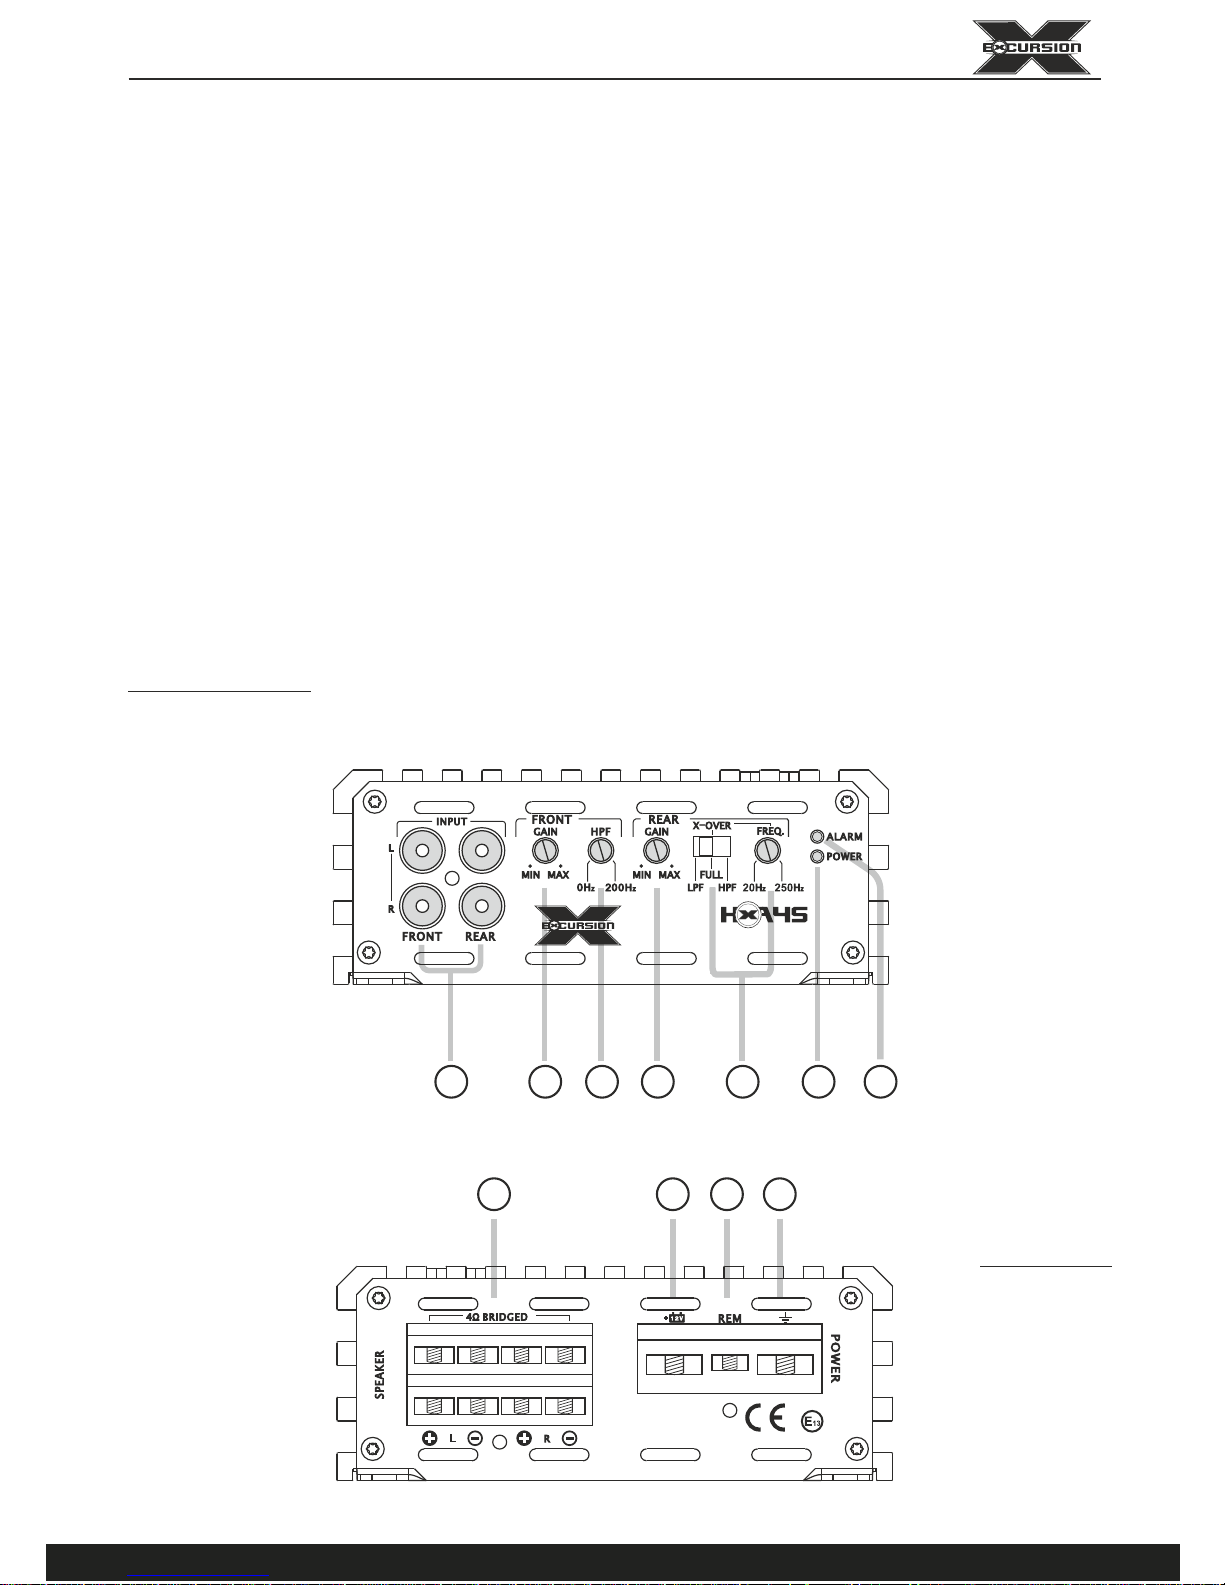
11. Hi-pass filter (Full range)
This knob controls the frequencies played for the front channels. Low frequencies can be cut
out from OFF to 200Hz. At OFF posion, none low frequency cut out, that means full pass.
12. X-over mode and frequency Control (Full range)
These controls allow control over the frequencies played for the rear channels. There is an
opon for Low Pass, Full Range or High Pass. In LP or HP mode, the crossover frequency can be
tuned from 20Hz to 250Hz by the frequency knob.
13. Power Indicator
This LED will light up when amplifier works properly.
14. Protecon Indicator
The red LED will light up and will be flashing if there is a fault presented to the amplifier.
Please disconnect the amplifier and resolve the fault before reconnecng the amplifier.
PANEL LAYOUT
Fig 1. 4-ch amplifier panel layout
1 2 3 4
5 7
11
13
1412
4
7
A
B
100RMS x 4CH MINI CAR AMP

1 2 3 4
PANEL LAYOUT
Fig 2. 2-ch amplifier panel layout
5
7
12
14
13
5
EXCURSION
125RMS x 2CH MINI CAR AMP

PANEL LAYOUT
Fig 3. Mono amplifier panel layout
5
7
8 96
10
14
13
HXA 1K
1
2 43
1
2 4 3
HXA 2K/HXA 3K
6
600RMS x 1CH MINI CAR AMP
INSTALLATION PRECAU TIONS
Before you install the amplifier, invesgate your car's layout very carefully. Take special care
when you work near the gas tank, fuel lines, hydraulic lines and electrical wiring. Before making
or breaking power connecons in your system, disconnect the vehicle baery. Confirm that
your head unit or other equipment is turned off while connecng the input jacks and speaker
terminals. If you need to replace the power fuse, replace it only with a fuse idencal to that
suggested by this manual. Using a fuse of a different type or rang may result in damage to your
audio system or your amplifier which is not covered by warranty .
CONNECTI NG THE AMPLIFIER
1. Select cable and fuse according to the following table.
2. Connect the amplifiers ground cable to a close, bare metal part of the frame or chassis.
Use a nut and bolt, NOT a screw! The ground cable must be at least the same size as the +12volt
cable.
3. Connect the remote terminal to remote output of the head unit using 16 gauge (or heavier)
wire.
4. Connect the fuse holder within 15”(30cm) of the car baery, and run the selected cable
from this fuse to the amplifier.
5. Connect all the inputs with high-quality cables. Connect Remote Control if necessary.
6. Insert fuse(s) into the baery fuse holder(s).
7. If using the rear channel of the HXA45 for a subwoofer, bridge the channels by using the
Le “+” and the Right “-“ terminals.
7
MODEL HXA 45 HXA 20 HXA 1K HXA 2K HXA 3K
CABLE 4 GA 8-4 GA 4 GA 4-0 GA 0 GA
FUSE 60 A 40 A 60 A 100 A 150 A
EXCURSION
FUS E
Source Unit
RCA signal
REM OTE signal
FUS E
Source Unit
REM OTE signal
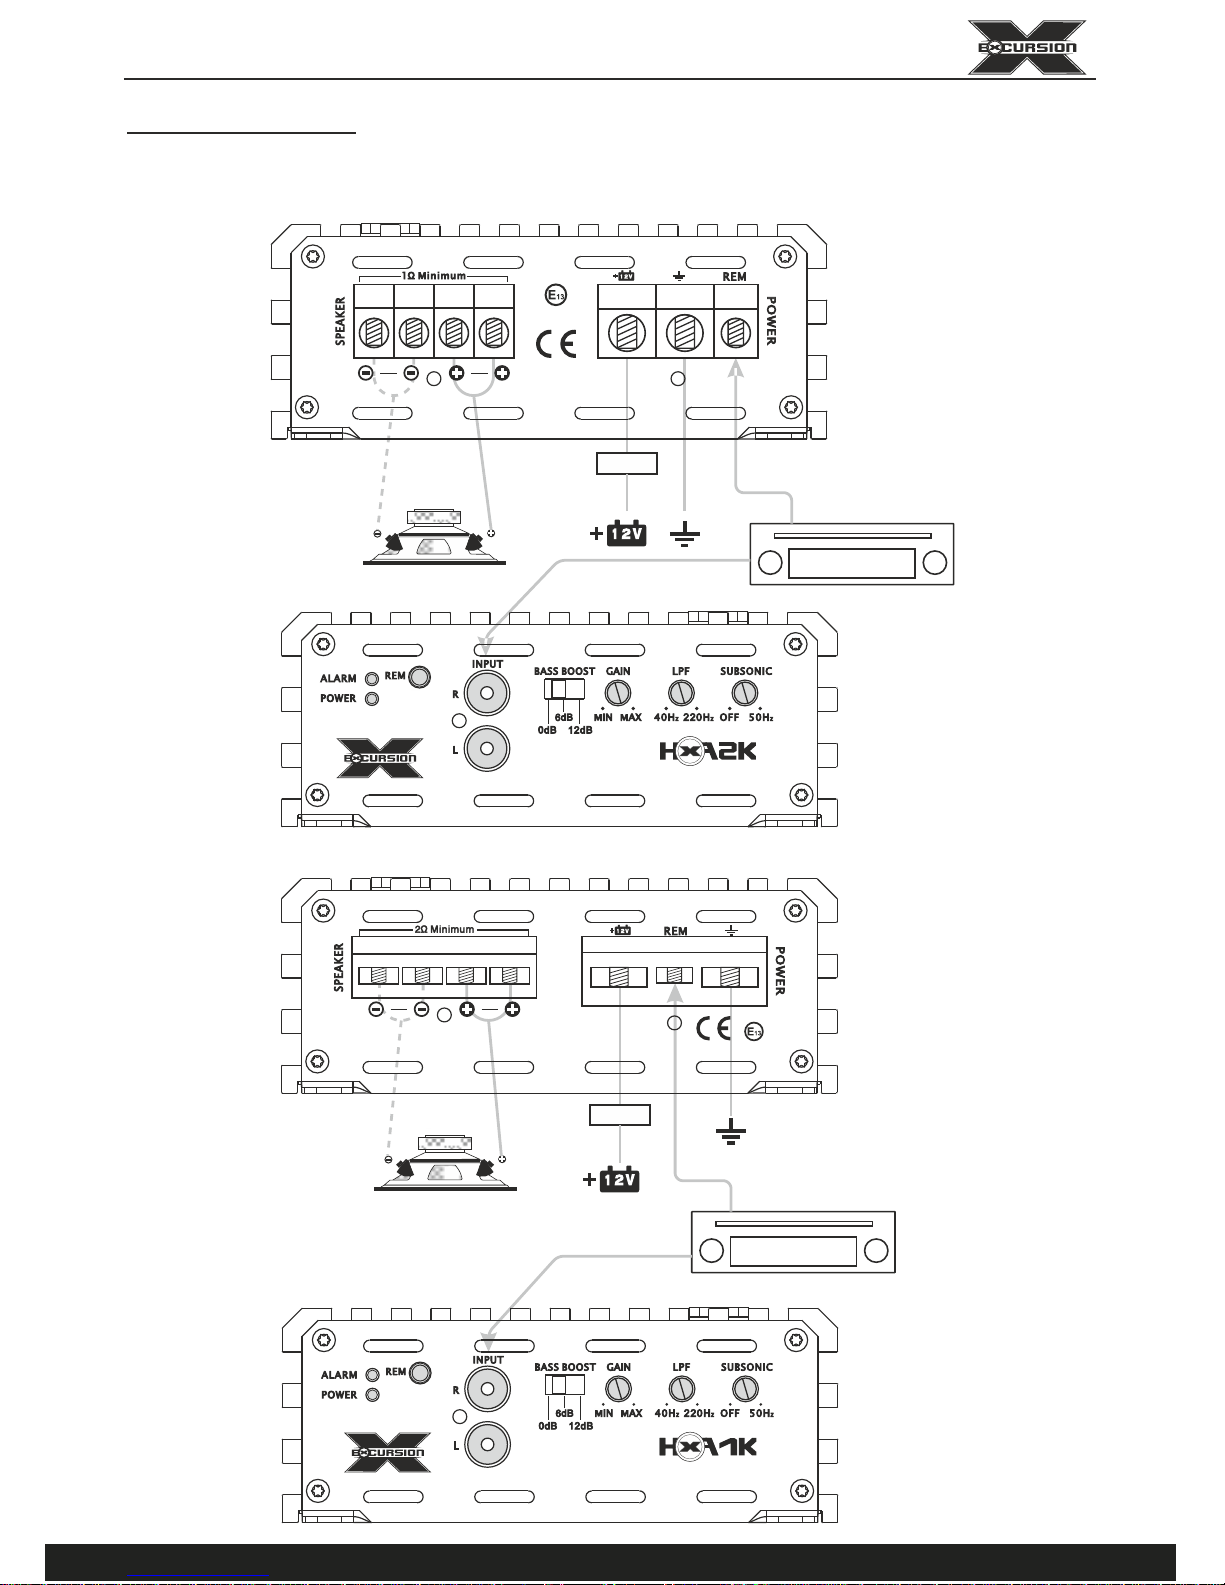
Fig 4. Mono amplifier wiring
WIRING DIAGRAM
( single woofer load)
RCA signal
HXA2K/HXA3K
1 OHM MINIMUM
2 OHM MINIMUM
HXA 1K
8
1200RMS x 1CH MINI CAR AMP
600RMS x 1CH MINI CAR AMP
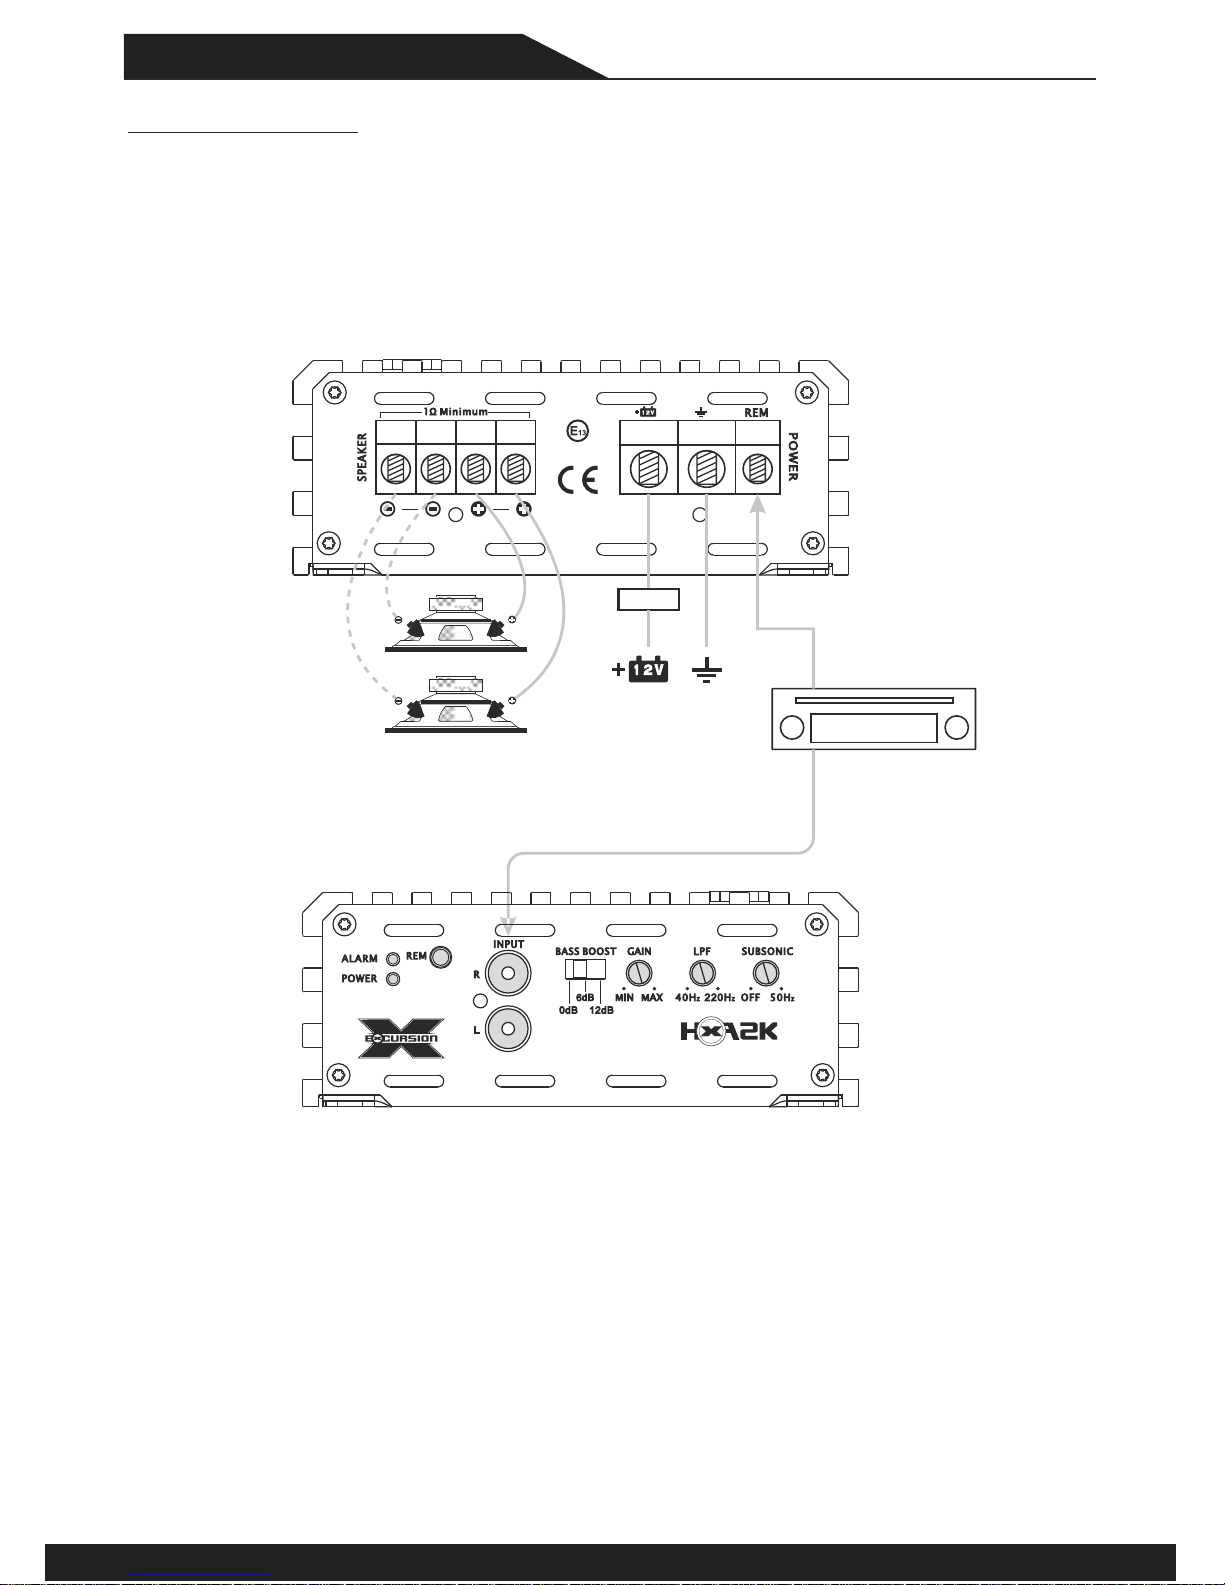
FUS E
Source Unit
*Equivalent parallel woofer load cannot be less than the minimum load rang. The 2 negave terminals are paralleled inside the
amplifiers, as are the 2 posive terminals. These are monoblock amplifiers, not mul-channel amplifiers. Minimum load for HXA 1K
is two ohms, for HXA 2K& is 1 ohm.HXA 3K
RCA signal
REM OTE signal
Fig 5. Mono amplifier wiring
WIRING DIAGRAM
(Mul-woofer load)
9
EXCURSION
1200RMS x 1CH MINI CAR AMP

FUS E
Source Unit
RCA signals
CROSSOVER CROSSOVER
REM OTE signal
CROSSOVERCROSSOVER
Fig 6. HXA 45 amplifier wiring
WIRING DIAGRAM
(4-channel mode)
RCA signals
10
A
B
100RMS x 4CH MINI CAR AMP

FUS E
RCA signals
CROSSOVER CROSSOVER
4-Ohm to 8-Ohm
Fig 7. HXA 45 amplifier wiring
WIRING DIAGRAM
(3-channel mode)
RCA signals
Source Unit
REM OTE signal
11
EXCURSION
A
B
100RMS x 4CH MINI CAR AMP
CROSSOVER CROSSOVER
FUS E
Source Unit
REM OTE signal
RCA signals
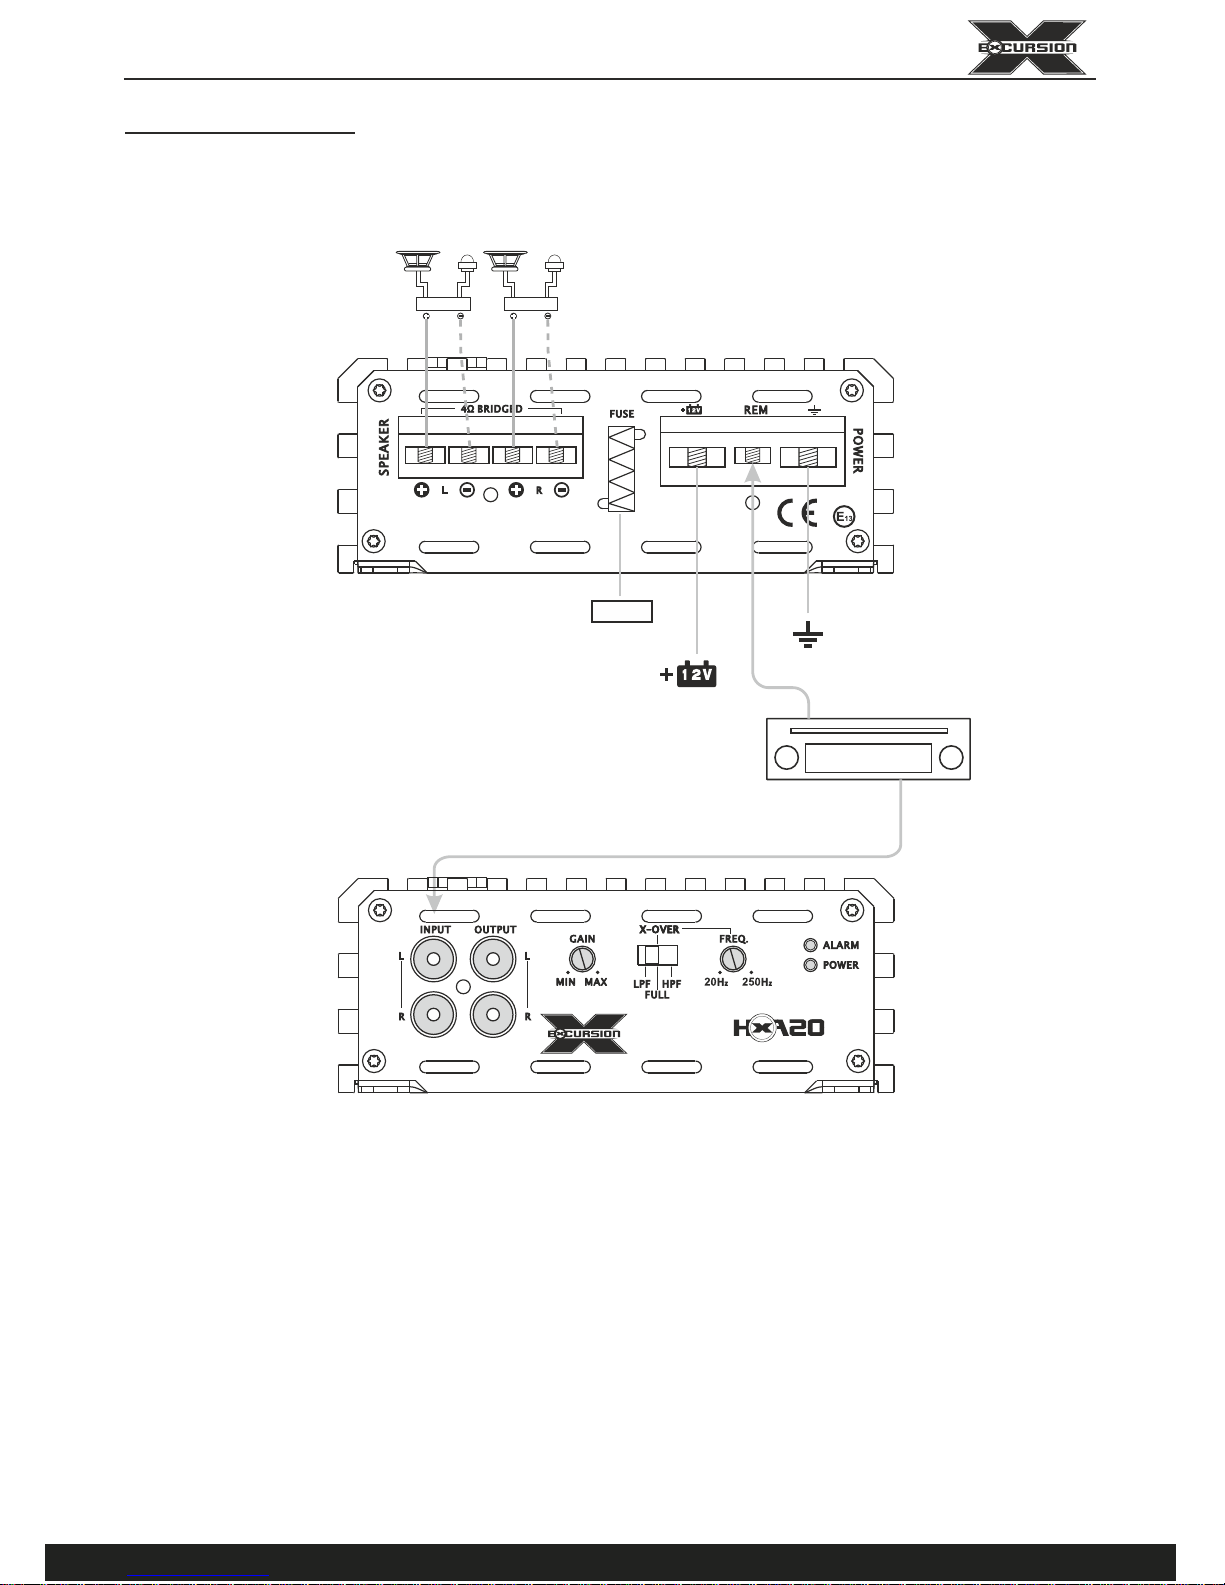
Fig 8. HXA 20 amplifier wiring
WIRING DIAGRAM
12
125RMS x 2CH MINI CAR AMP

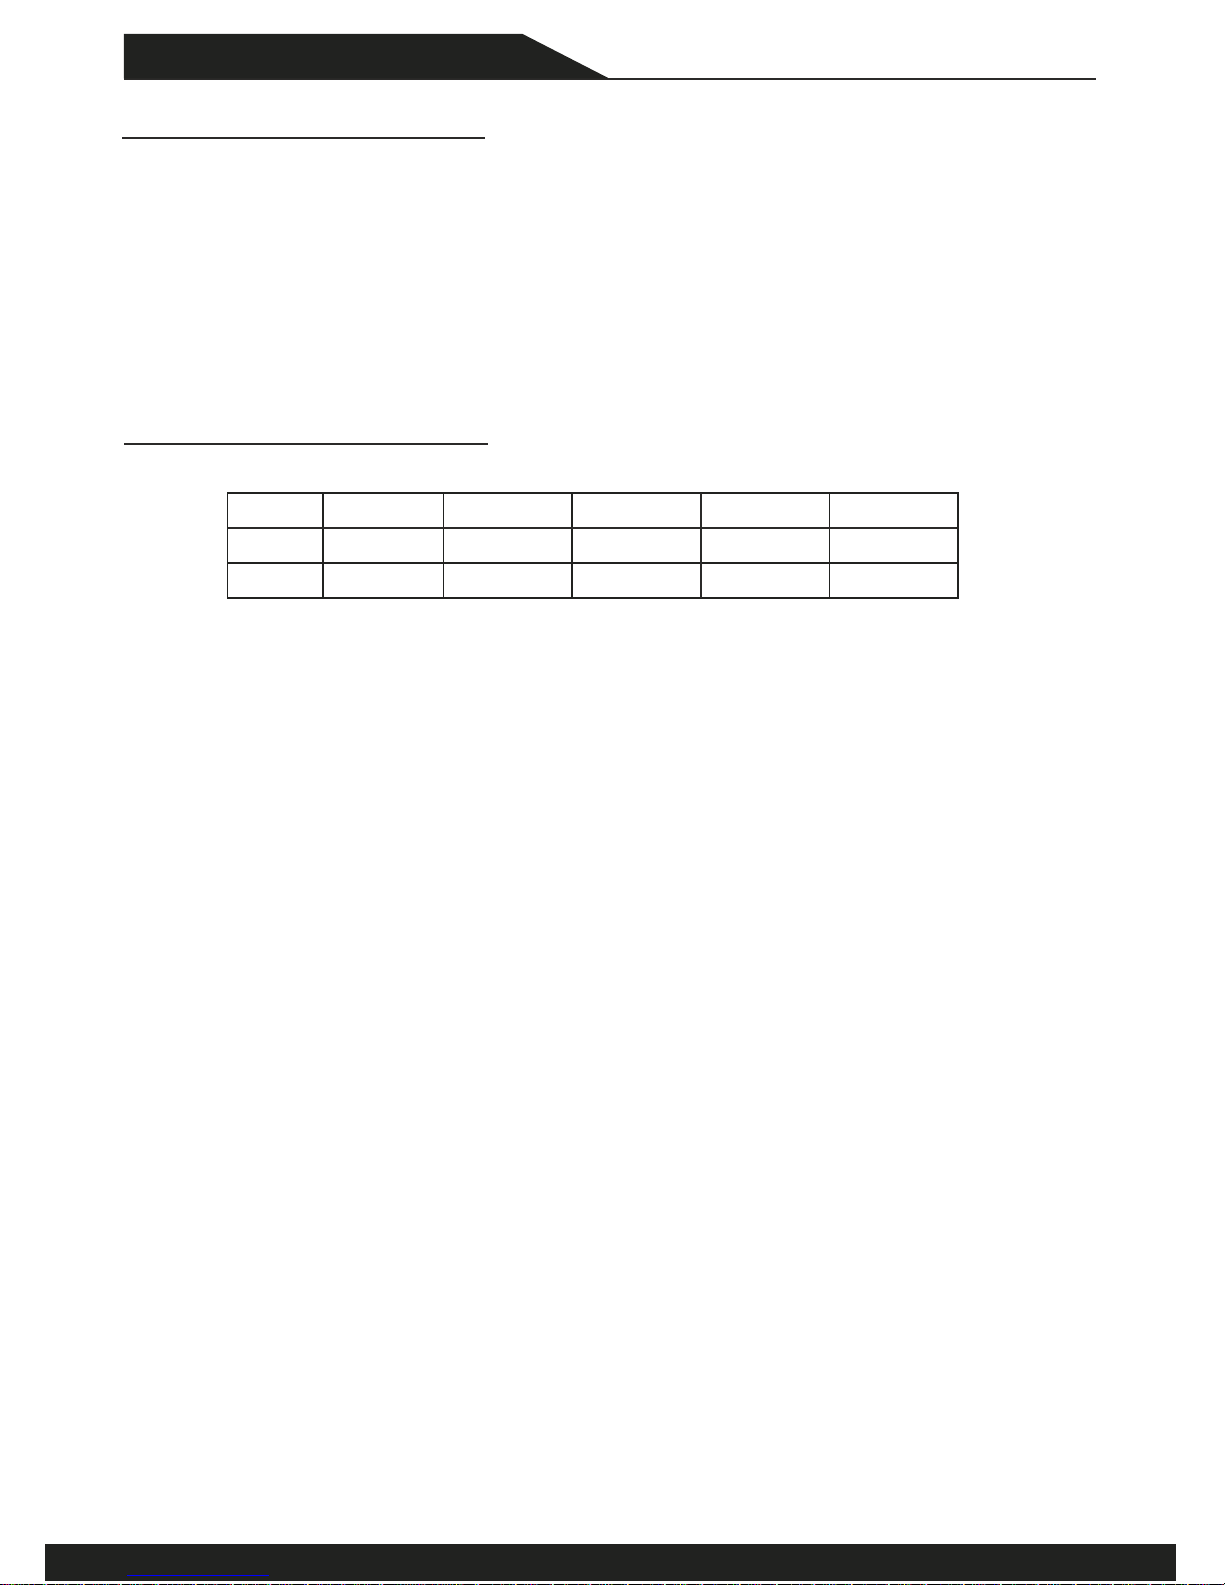
Symptom Possible Remedy
Amplifier
will not
power up
Check to make sure you have a good ground connecon.
Check that there is baery power on the (+)terminal .
Check all fuses, replace if necessary .
Make sure that the Protecon LED is not illuminated.
Protecon
LED Comes on
Check for short circuits on speaker leads.
Check the speaker load not beyond the minimum load.
Remove speaker lead, and reset the amplifier. If the protecon LED sll
Comes on, then the amplifier is faulty and needs servicing .
No output Check that the RCA audio cables are plugged into the proper inputs.
Check all speakers wiring.
Check the headunit output and the amplifier level seng.
Low output Reset the level Control.
Check the Crossover Control sengs.
High hiss in
The speakers
Check the RCA cable is not shorted to power ground at amplifier side.
Check the amplifier grounding.
Distorted sound
Check that the Input level control is set to match th e signal level of the head
unit. Always try to set the Input level as low as possible.
Check that all crossover frequencies are properly set.
Check for short circuits on the speaker leads.
Amplifier gets
Very hot
Check that the minimum load impedance for the amplifier model is correct.
Check that there is good air circulaon around the amp lifier. In some
applicaons, It may be necessary to add an external cooling fan.
TROUBLE SHOOTING
13
EXCURSION

EXCURSION LIMITED WARRANTY POLICY
EXCURSION Intl. offers limited warranty on EXCURSION products under normal use on the following terms:
EXCURSION Amplifiers are to be free of defects in material and workmanship for a period of one year.
This warranty applies only to EXCURSION products sold to consumers by Authorizied EXCURSION Dealers
in Germany. Products purchased by consumers from an EXCURSION dealer in another country are covered
only by that country´s Distributor and not by EXCURSION Intl.
This warranty covers only the original purchaser of EXCURSION product. In order to receive service, the
purchaser must provide EXCURSION with the receipt stang the consumer name, dealer, product and date
of purchase.
Products found to be defecve during the warranty period will be repaired or replaced (with a product
deemed to be equivalent) at Excursion`s discreon and will not be liable for incidental or consequenal
damages. EXCURSION will not warranty this product under the following situaons:
* Amplifiers received with apparent rust or corrosion
* Any evidence of liquid damage or exposure to excessive heat
* Aempted repairs or alteraons of any nature
* Product that has not been installed according to this owner manual
Any implied warranes including warranes of fitness for use and merchantability are limited in duraon
to the period of the express warranty set forth above. No person is authorizied to assume for EXCURSION
any other liability in connecon with the sale of this product.
Please call prior your authorizied EXCURSION dealer the product got purchased. In case they
are not accessible call 0961-416-0420 for EXCURSION Customer Service. You must obtain an RA#
(Return Authorizaon Number) to return any product to EXCURSION Intl. The RA number must
be prominently marked on the outside of the shipping carton or the delivery will be refused.
Please pack your return carefully! We are not responsibile for items damaged in shipping.
Return the defecve product along with a copy of the original dated retail sales receipt, plus 10,- EUR
for handling and diagnosc evaluaon to:
EXCURSION Intl. - A Division of CHPW
An: Returns (RA# ........................ )
Neustaedter Str. 20
D-92685 Floss / Germany
1414

EASCA
EUROPEAN AUTO SOUND ASSOCIATION
...is all you need
EXCURSION - A Division of CHPW
All Rights reserved - Intl. Trademark No: 010 640 597
Friedrich-Ebert-Str. 42 - D-92637 Weiden / Germany
Tel: (+49) 961-416 04 20 - Fax: (+49) 961-46 04 41
www.facebook.com/Excursion.us
 Loading...