

Page 1
CDX-IPH301 -VoIP User Manual V1.0
1
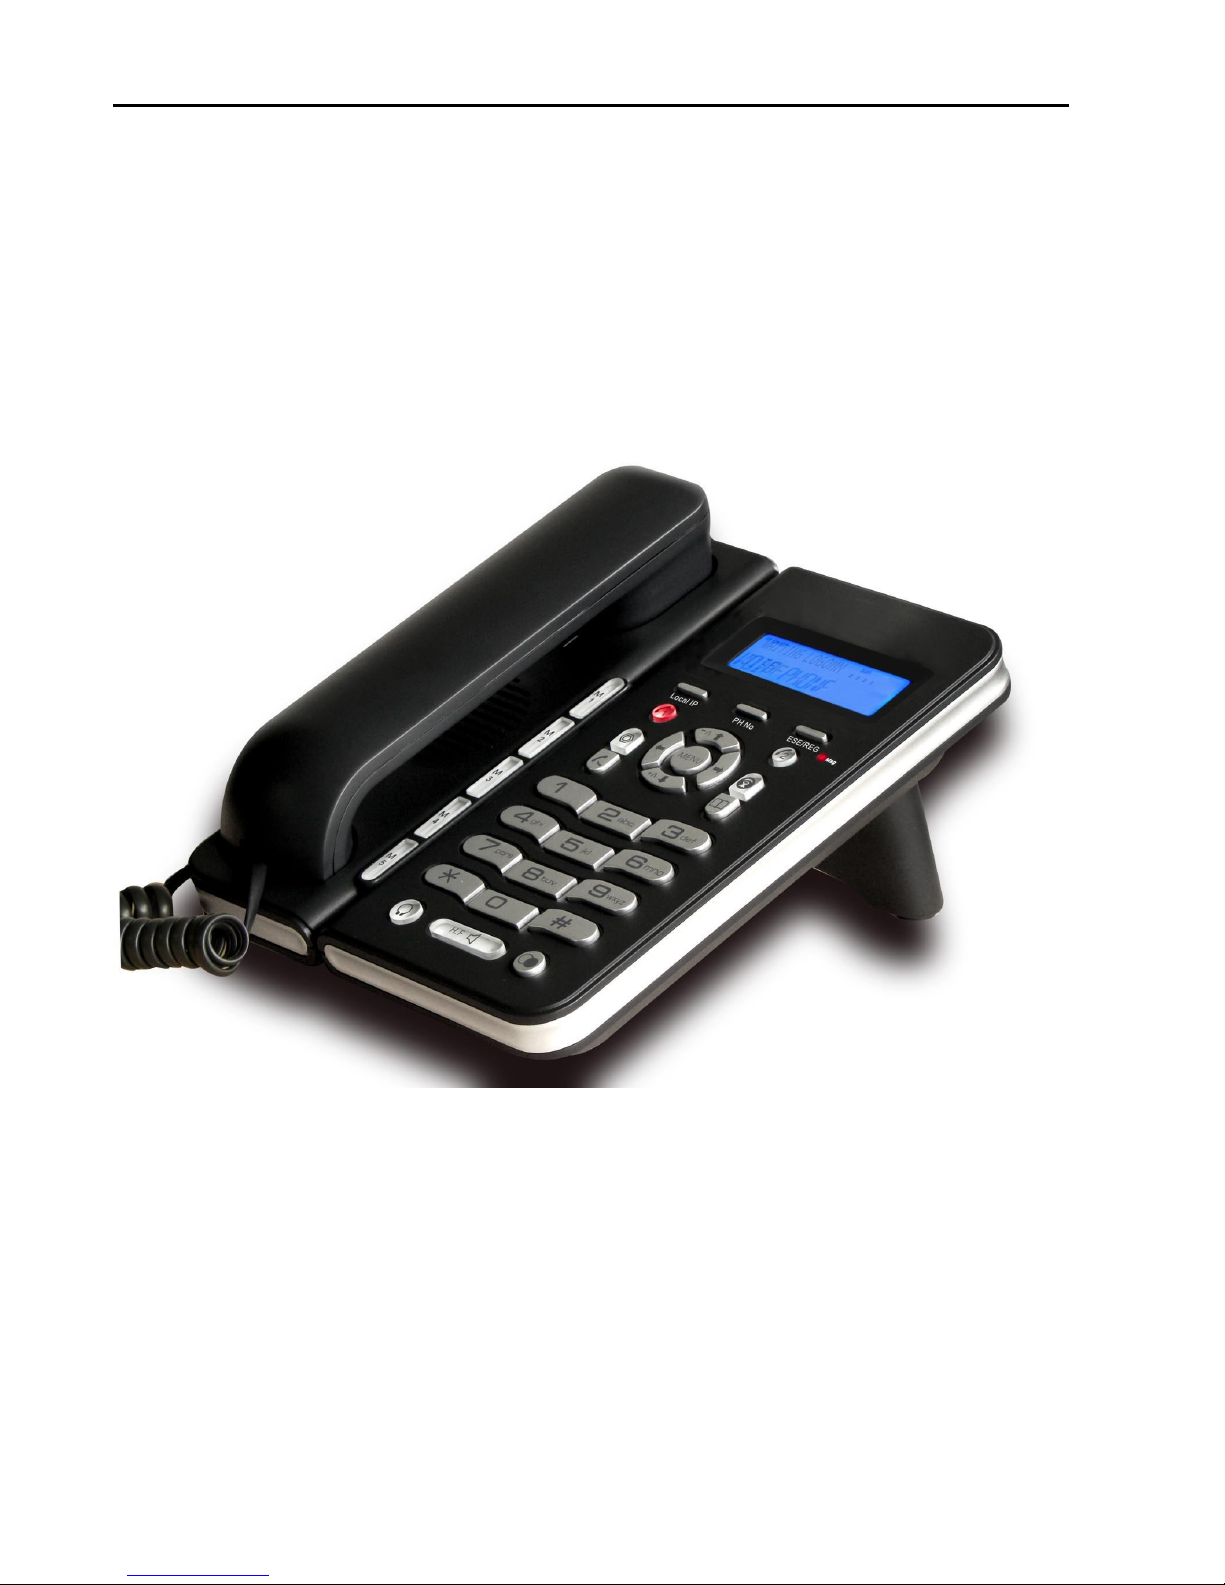
IP Phone User Manual
This Manual provides basic information on how to install and
connect IPH301 IP Phone to the network. It also includes features
and functions of IPH301 IP phone components, and how to use
them.
Page 2

CDX-IPH301 -VoIP User Manual V1.0
2
Contents
1 BEFORE GETTING STARTED............................................................. 5
2 PACKAGE CONTENTS........................................................................ 5
3 SPEC AND FEATURES....................................................................... 5
3.1 HARDWARE SPEC........................................................................... 5
3.2 DSP SPEC...................................................................................... 6
3.3 SIP PROTOCOL SPEC..................................................................... 6
3.4 SOFTWARE FEATURE...................................................................... 7
3.5 NETWORKING STANDARDS............................................................ 7
3.6 OTHERS......................................................................................... 8
3.7 PHYSICAL & ENVIRONMENTAL...................................................... 8
4 INSTALLATION.................................................................................. 9
5 GENERAL APPEARANCE.................................................................. 10
6 PHONE OPERATIONS....................................................................... 12
6.1 MAKE A CALL.............................................................................. 12
6.2 PHONE BOOK NUMBER STORE / EDIT / DELETE............................ 13
6.3 CALL LIST CHECK / DELETE / DIAL OUT....................................... 14
6.4 HOLD........................................................................................... 15
6.5 VOLUME ADJUSTMENT IN CONVERSATION................................... 15
6.6 BLOCK LIST SETTING / EDIT / DELETE......................................... 15
6.7 CALL TRANSFER........................................................................... 15
6.8 3-PARTY CONFERENCE................................................................. 15
7. UNIT CONFIGURATION................................................................... 16
7.1 IP DISTRIBUTION MODE SELECTION............................................. 16
7.2 CONFIGURATION WITH KEYPAD AND LCD DISPLAY.....................16
Page 3

CDX-IPH301 -VoIP User Manual V1.0
3
8 WEB INTERFACE CONFIGURATION................................................. 17
8.1 LOGIN WEB................................................................................. 18
8.2 CURRENT STATE........................................................................... 19
8.3 NETWORK CONFIGURATION......................................................... 19
8.3.1 WIDE AREA NETWORK(WAN)..............................................19
8.3.2 SERVICE PORT CONFIGURATION............................................... 22
9 VOIP CONFIGURATION...................................................................24
9.1 IAX2 CONFIGURATION................................................................ 24
9.2 SIP CONFIGURATION................................................................... 26
9.3 STUN CONFIGURATION............................................................... 32
9.4 DIAL PEER CONFIGURATION........................................................33
10 PHONE CONFIGURATION...............................................................37
10.1 DSP CONFIGURATION.................................................................38
10.2 CALL SERVICE CONFIGURATION.................................................39
10.3 PHONE BOOK CONFIGURATION.................................................. 42
11 SAVE AND CLEAR CONFIGURATION.............................................. 43
12 SECURITY CONFIGURATION.......................................................... 43
12.1 MMI FILTER CONFIGURATION...................................................43
12.2 FIREWALL CONFIGURATION....................................................... 44
12.3 NAT AND DMZ CONFIGURATION...............................................47
12.4 VPN CONFIGURATION................................................................ 50
13 UPGRADE ON-
LINE........................................................................... 51
13.1UPLOAD WEB PAGE................................................................... 51
13.2 FTP/TFTP DOWNLOAD..............................................................52
13.3 CONFIGURATION EXPLANATION:............................................... 52
13.4 CONFIGURE FILE ENCRYPTION.................................................. 54
Page 4

CDX-IPH301 -VoIP User Manual V1.0
4
13.5 AUTO-UPDATE............................................................................ 54
13.6 CONFIGURATION FILES WEB DOWNLOAD................................. 55
14 SYETEM MANAGEMENT............................................................
........56
14.1ACCOUNT MANAGEMENT............................................................ 56
14.2CONFIGURATION EXPLANATION:................................................ 56
14.3 TIME ZONE CONFIGURE............................................................. 59
15 CONFIGURATION VIA
TELNET......................................................... 59
15.1BASIC COMMAND........................................................................60
15.2 COMMAND STRUCTURE.............................................................. 61
15.3 STRUCTURE OF CONFIGURATION TERMINAL............................. 62
Page 5

CDX-IPH301 -VoIP User Manual V1.0
5
1 Before Getting Started
Before you can connect IPH301 to the network and use it, you must have a
high-speed Internet connection installed. A high-speed connection includes
such environments as DSL, cable modem, and a leased line. IPH301 IP
phone is a stand-alone device, which requires no PC to make Internet calls.
IPH301 IP is fully compatible with SIP and IAX2 industry standard and can
interoperate with many other SIP or IAX2 compliant devices and software in
market.
2 Package contents
1. IPH301 IP phone base unit.
2. Handset
3. Coiled handset connecting cord
4. One Straight Ethernet cable
5. One Power supply
6. User guide
3 SPEC and Features
3.1 Hardware Spec
32-bit 150MHz MIPS CPU
16-bit 100MHz DSP
2MB flash memory
32MB SDARM
Page 6

CDX-IPH301 -VoIP User Manual V1.0
6
2*16 character LCD
34 KEYS, 1 LED
WAN: 10/100M RJ45
LAN: 10/100M RJ45 (Option)
3.2 DSP Spec
G.711A/u, G.723.1(5.3k/6.3k), G.729a/b,G.722,G.726
G.168 echo cancel
Full duplex hand-free
VAD (Voice Activity Detection)
CNG (Comfortable Noise Generation)
AEC (Acoustic Echo Cancellation)
Adaptive voice jitter buffer
Codec negotiation supported for fixed and dynamic
3.3 SIP Protocol Spec
RFC Protocol Edition: RFC3261 and RFC2543
Compatible with all major SIP Servers: Cisco, Osip, Vocal, ser, Partysip,
Simens, Grandstream, etc.
DTMF Mode: RFC2833, RELAY, SIP INFO
Server authentication mode: none, basic, MD5
DNS name of SIP server
SIP signaling port setting
NAT traverse, STUN
NAT traverse, SIP Express router
Pubic Server/ Private server. Can connect to ISP and Private SIP server
Page 7

CDX-IPH301 -VoIP User Manual V1.0
7
at the same time9
Dual back- up servers
Peer to peer SIP call
3.4 Software feature
Languages: English
Flexible Dial Map: Fix length; End with #; Dial with time out
9 Kinds of ringer able select by number of Phone Box and 2 kinds of
ringer user defined
Speakerphone
Dial Map Table
5 Speed dial key.
Dual register No. for phone
Black list for reject authenticated call
Reject incoming call
Limit dialing out No. list
No Disturb
Caller ID display
Call forward, call transfer, call hold, call waiting
Call forward with unconditional, busy and no answer
3 party conference
50 entries each for dialed call, received call and missed call
3.5 Networking Standards
WAN/LAN port with Router or Bridge Mode
NAT ALG
PPPoE for xDSL, automatically keep alive
Page 8

CDX-IPH301 -VoIP User Manual V1.0
8
DHCP Client on WAN
DNS client with 2 servers IP
SNTP
RTP: RFC3550
802.1P QOS
3.6 Others
Boot Monitor
Upgrade firmware through POST mode
Keyboard Configuration
HTTP Web-Based Configuration
FTP, TFTP upgrade firmware·
WEB upgrade firmware
FTP, TFTP, HTTP upload/download configuration file
3.7 Physical & Environmental
Desktop / Wall mounting
Power Input: 100 to 240 ACV / 50/60Hz Output:7.5 DCV
Dimensions: 210 x 170 x 130 mm
Weight: 680 g (main unit)
Operating Temperature: 0°to +40°C (32°to +104°F)
Storage Temperature:-20°to +70°C (-40°to +158°F)
Humidity: 5% -95% non-condensing.
Page 9
CDX-IPH301 -VoIP User Manual V1.0
9
4 Installation
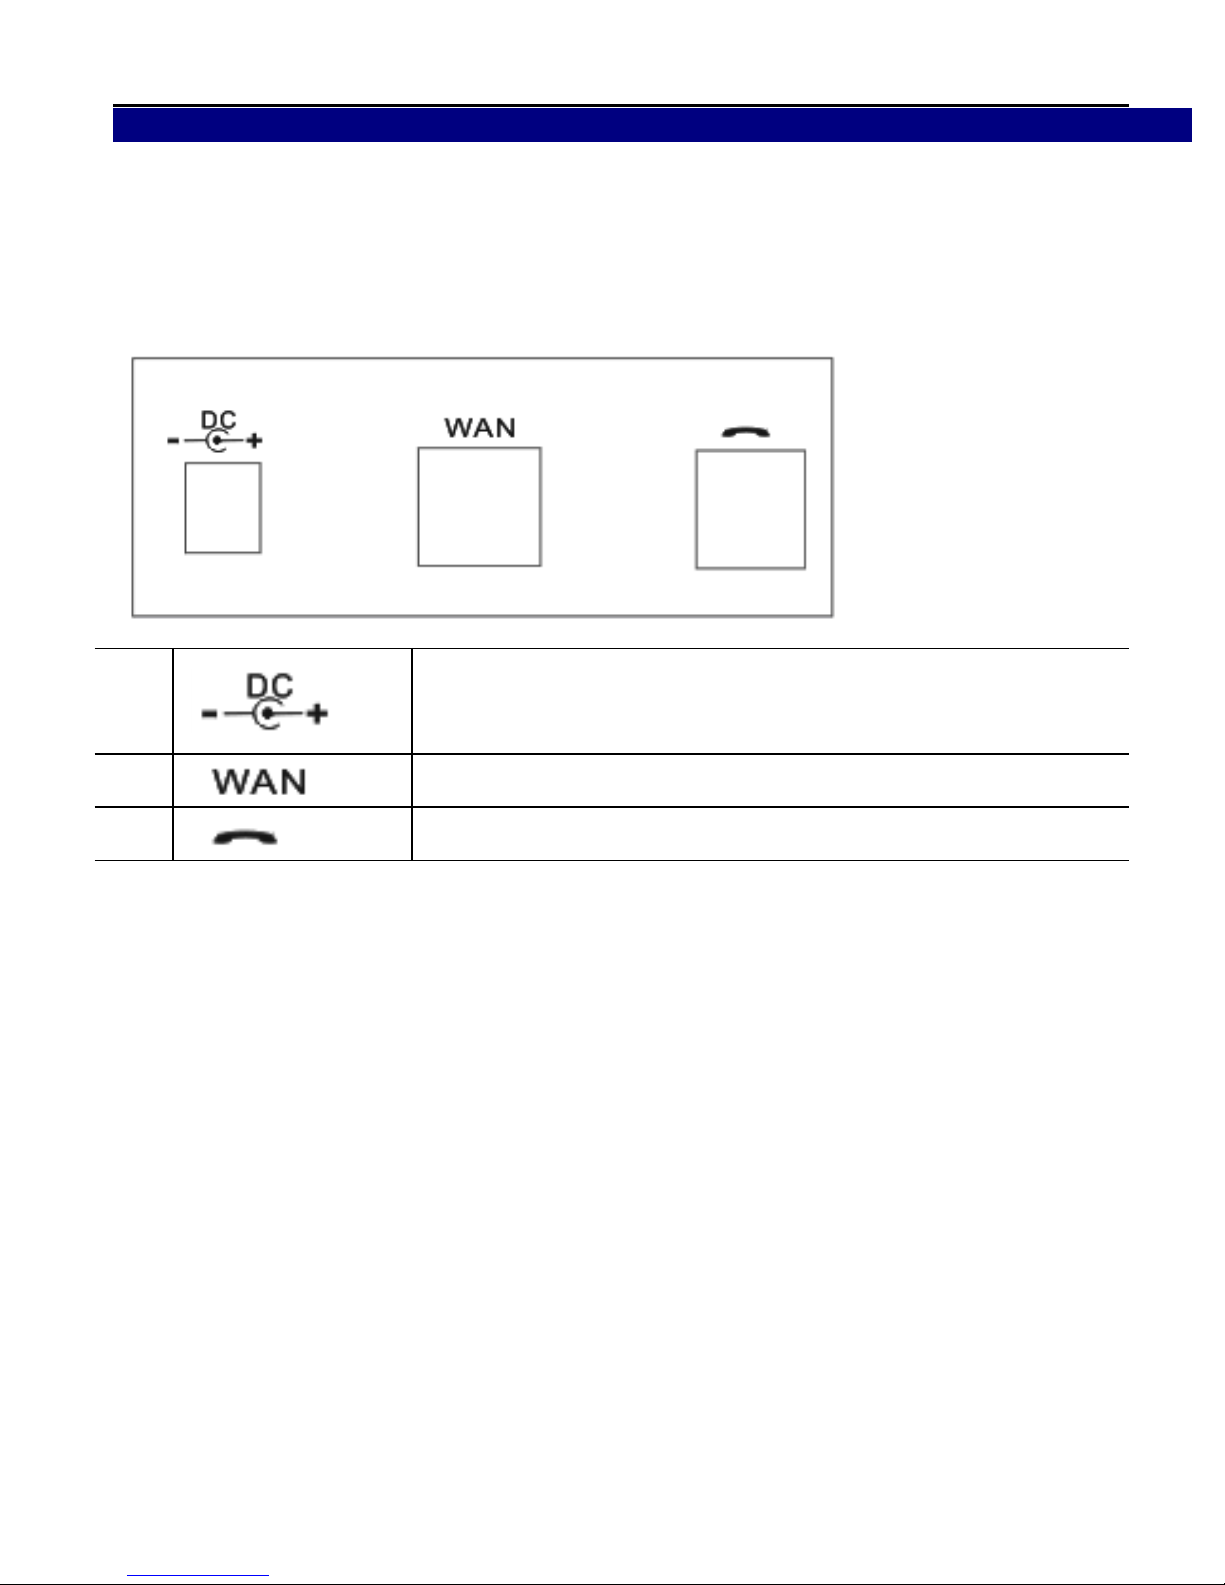
Use the cable for Internet connection; connect the ‘WAN’ port of IPH301 to
router. Get the cable from box and connect the WAN port of phone to your
PC. Connect the power supply in the box to ‘DC’. Then start your phone.
1
Connect to Power Supply
2 Connect to Ethernet cable
3 Connect to Handset
Page 10
CDX-IPH301 -VoIP User Manual V1.0
10
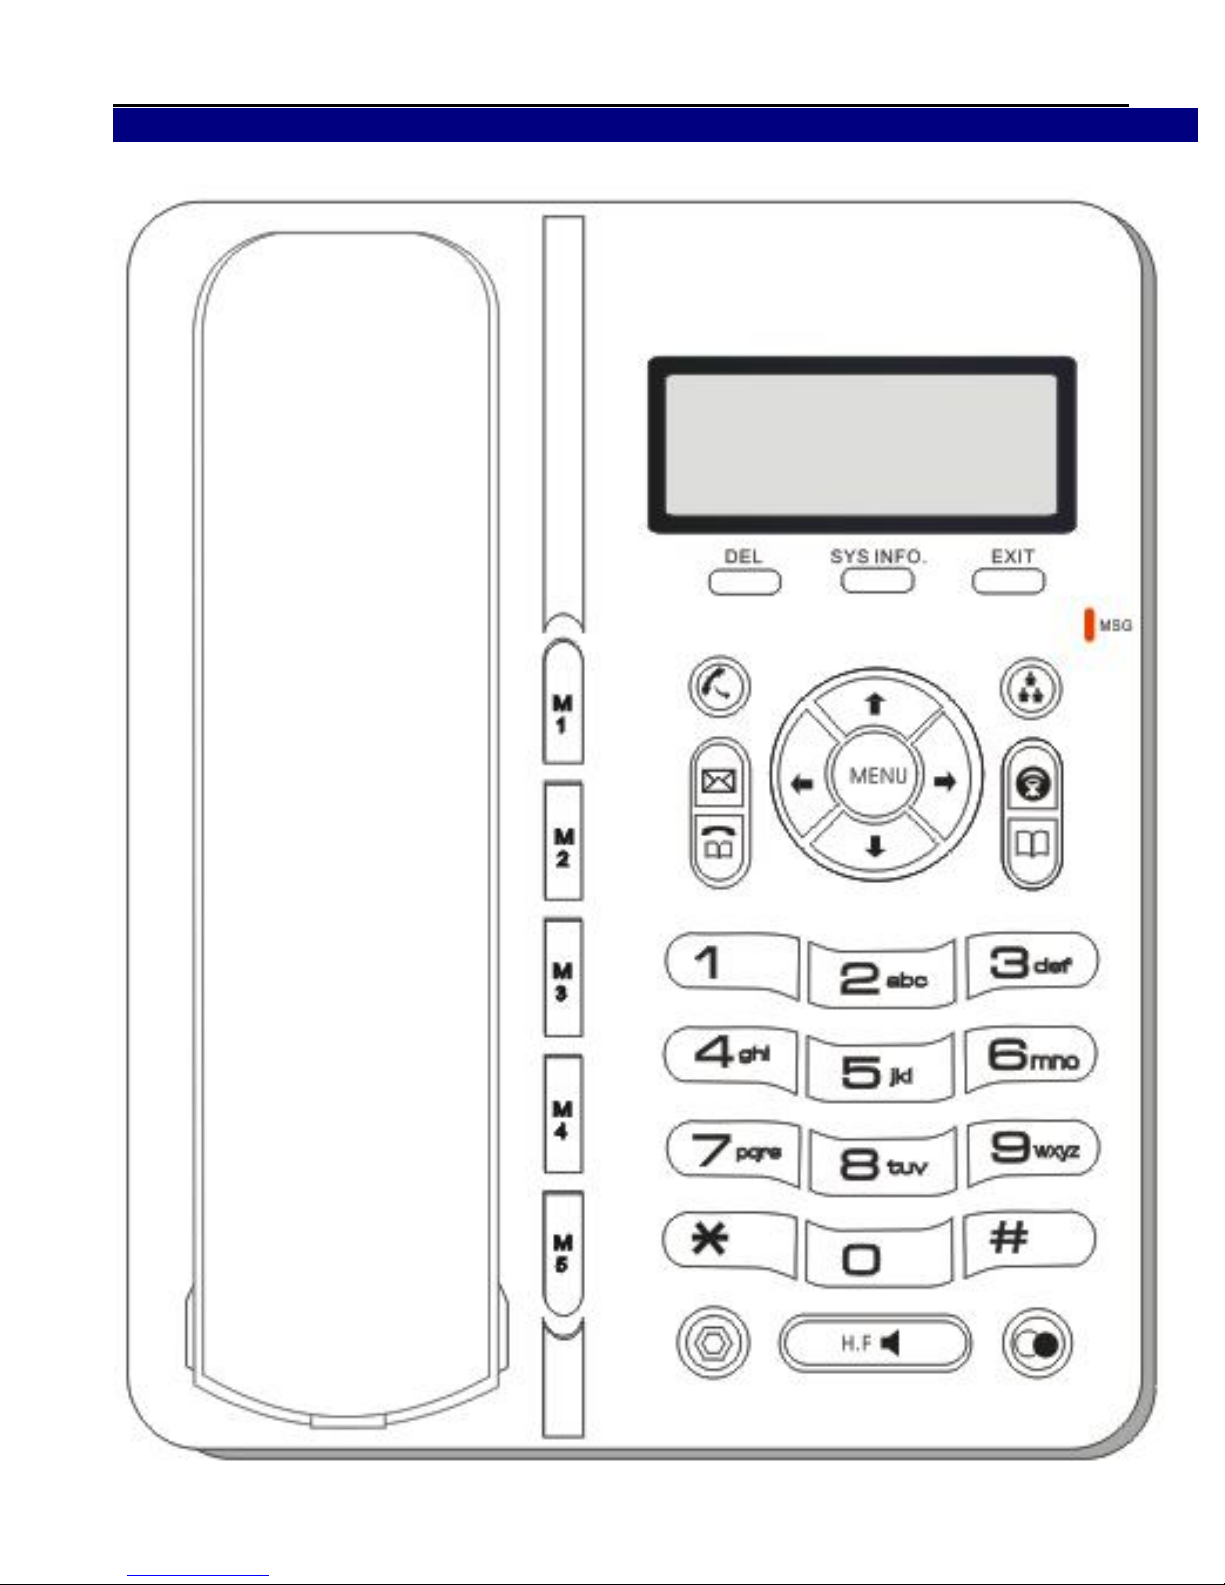
5 General Appearance
Page 11
CDX-IPH301 -VoIP User Manual V1.0
11
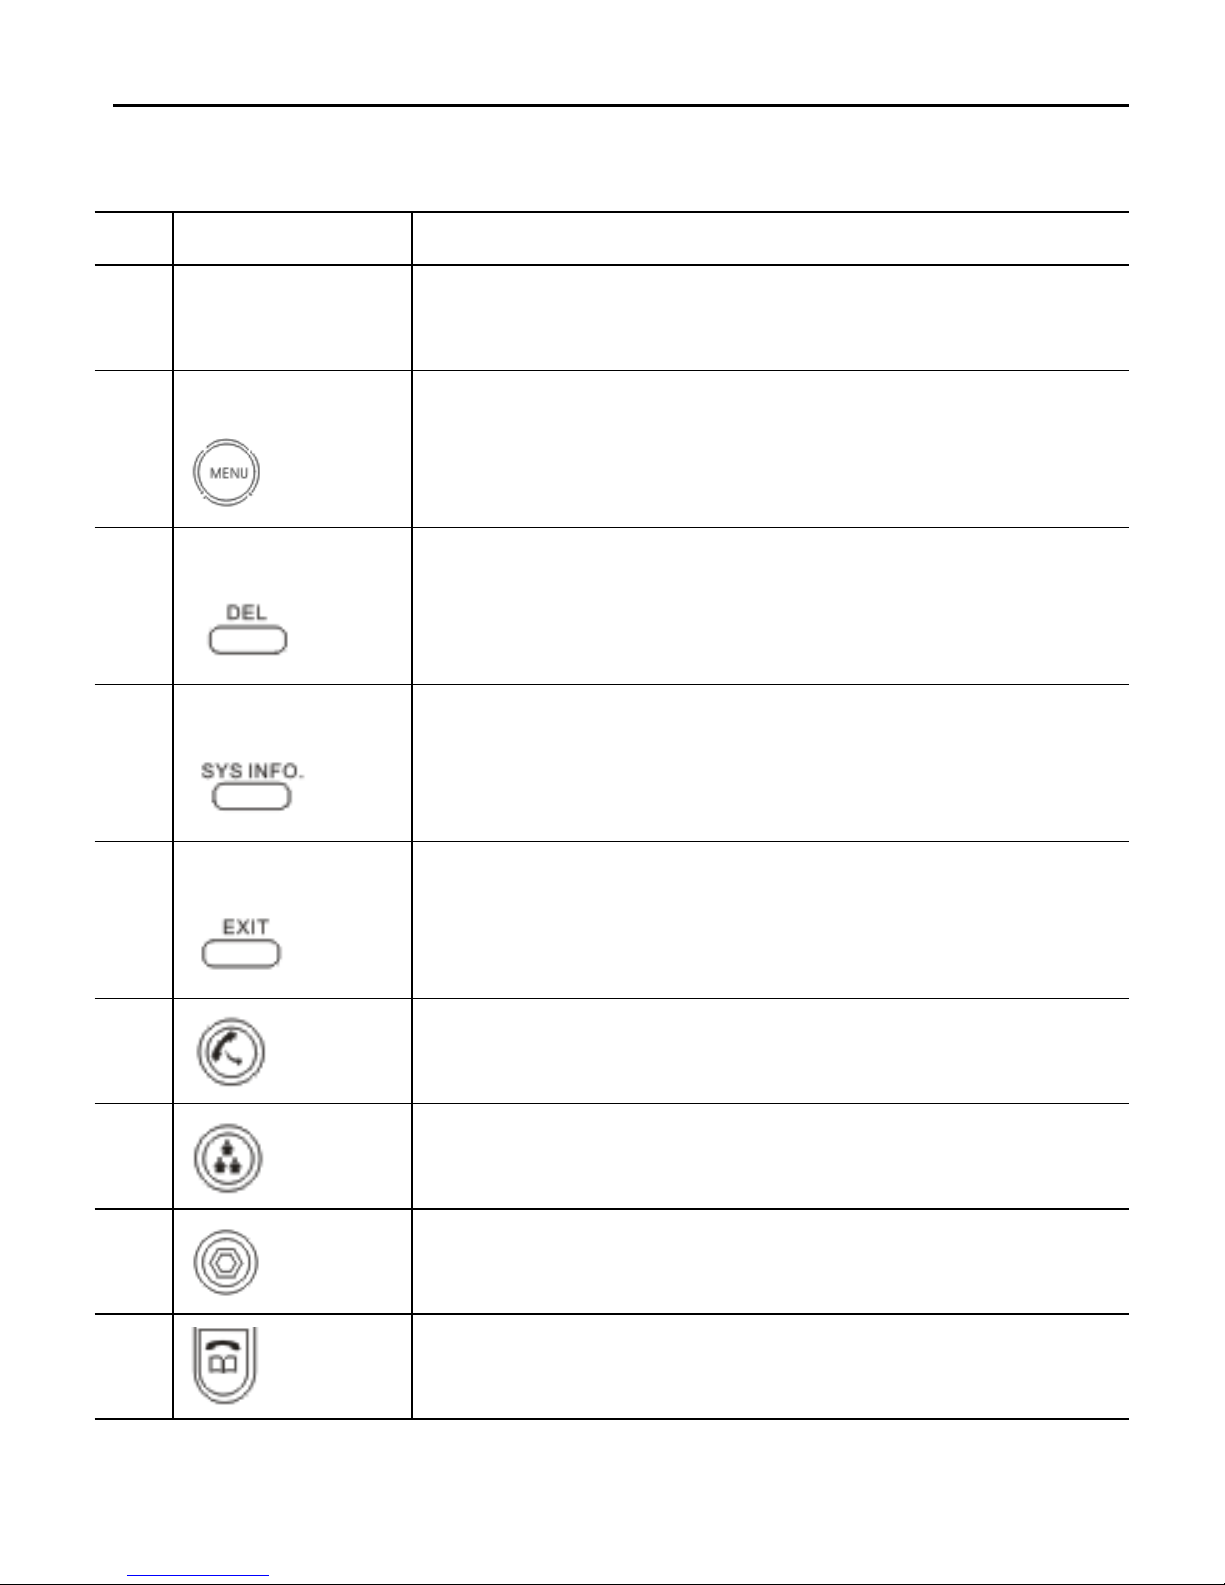
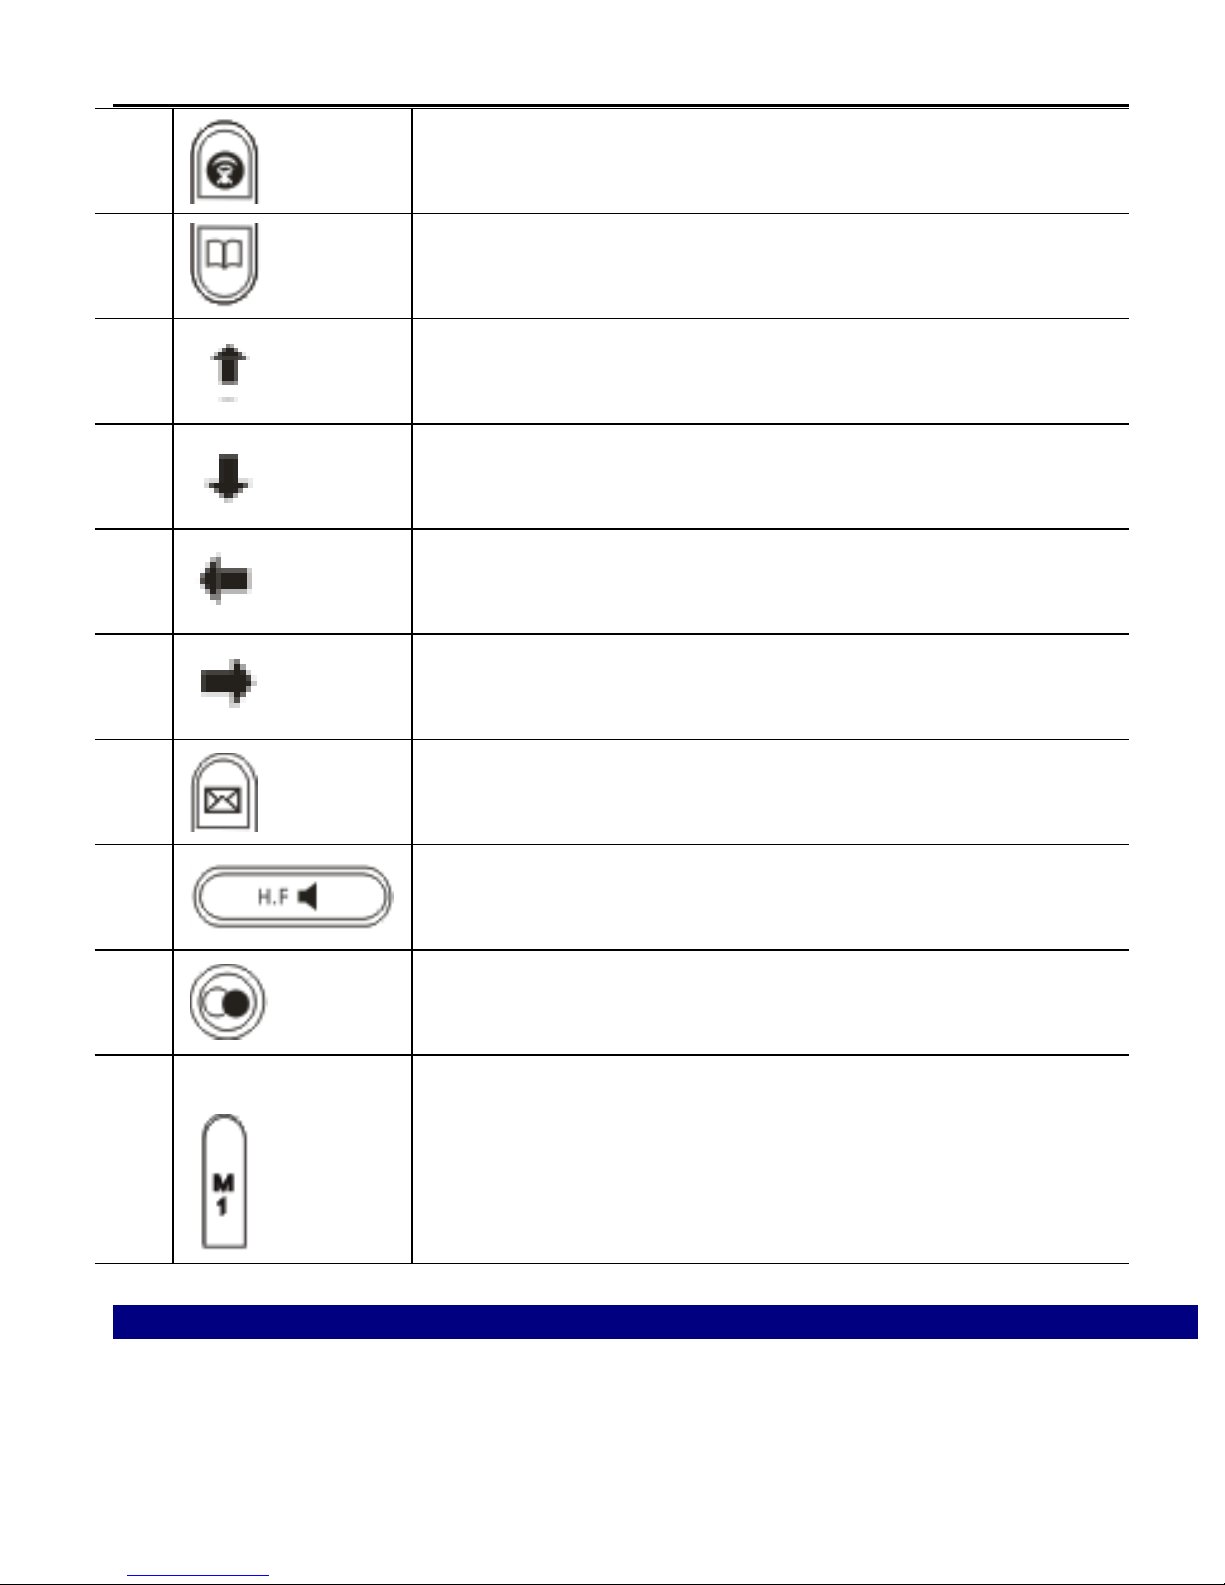
Key Button Key Button Definitions
1 0 - 9, *, # Digital, star and pound keys are also used for
setting and call process.
2 Menu/OK Menu: enter the main menu, or confirm current
status
3 DEL
delete the current editing content or delete the
incorrect number in pre-dial mode
4 Sys Info
Display local IP address on LCD
display the current registered account
display the register status
5 Exit
return the previous menu or exit the main menu
6
Transfer: used as blind transfer, attended transfer
and half attended transfer
7
Conference: used as three party conference
8
Hold: hold the active call
9 Call List: browse the call logs
Page 12
CDX-IPH301 -VoIP User Manual V1.0
12
10 Used as Mute
11 Used as phonebook
12 Navigation key used as UP in menu or Increase
handset / speakerphone volume
13
Navigation key used as DOWM in menu or reduce
handset / speakerphone volume
14
Navigation key used as LEFT in menu or reduce
handset/speaker volume
15
Navigation key used as RIGHT in menu or increase
handset/speaker volume
16
Enter to voice mail
17
Speaker: activate/deactivate the hands-free
function
18 Redial: Dial a new number or redial the last call.
19 M1-M5 Speed dial: make the speed dial call
6 Phone Operations
6.1 Make a Call
There are some ways to make a call:
Page 13
CDX-IPH301 -VoIP User Manual V1.0
13
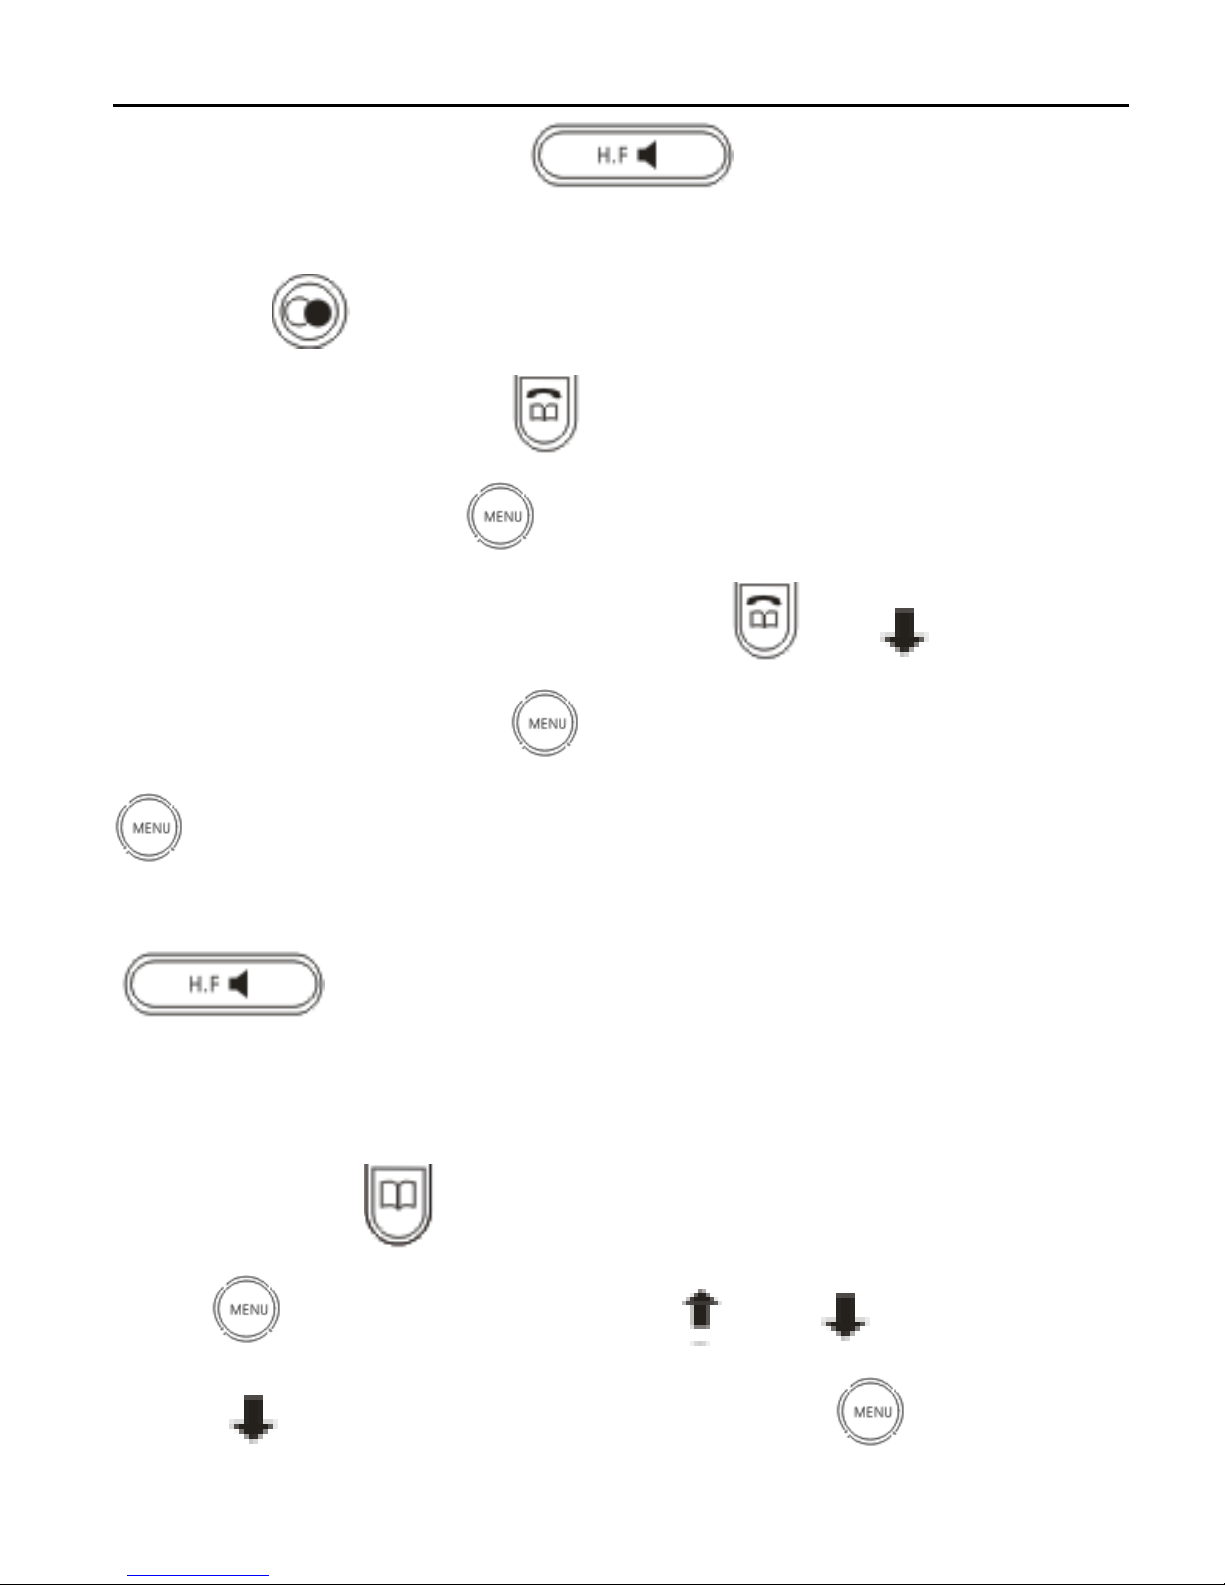
1. Pick up handset or press button,then dial the desired
numbers.
2. Press the button directly to redial the last call.
3. While checking call logs in menu such as Dialed call / Received call
/ Missed call, press【#】or button to dial out displayed number on LCD.
4. When the unit indicates Missed calls, press and button to enter
Missed call menu, then press button to review number. Press【#】or
button to dial out this number.
5. In standby, input the desired number to make pre-dial, Press 【 # 】
/ button to dial out this number.
6.2 Phone book number store / edit / delete
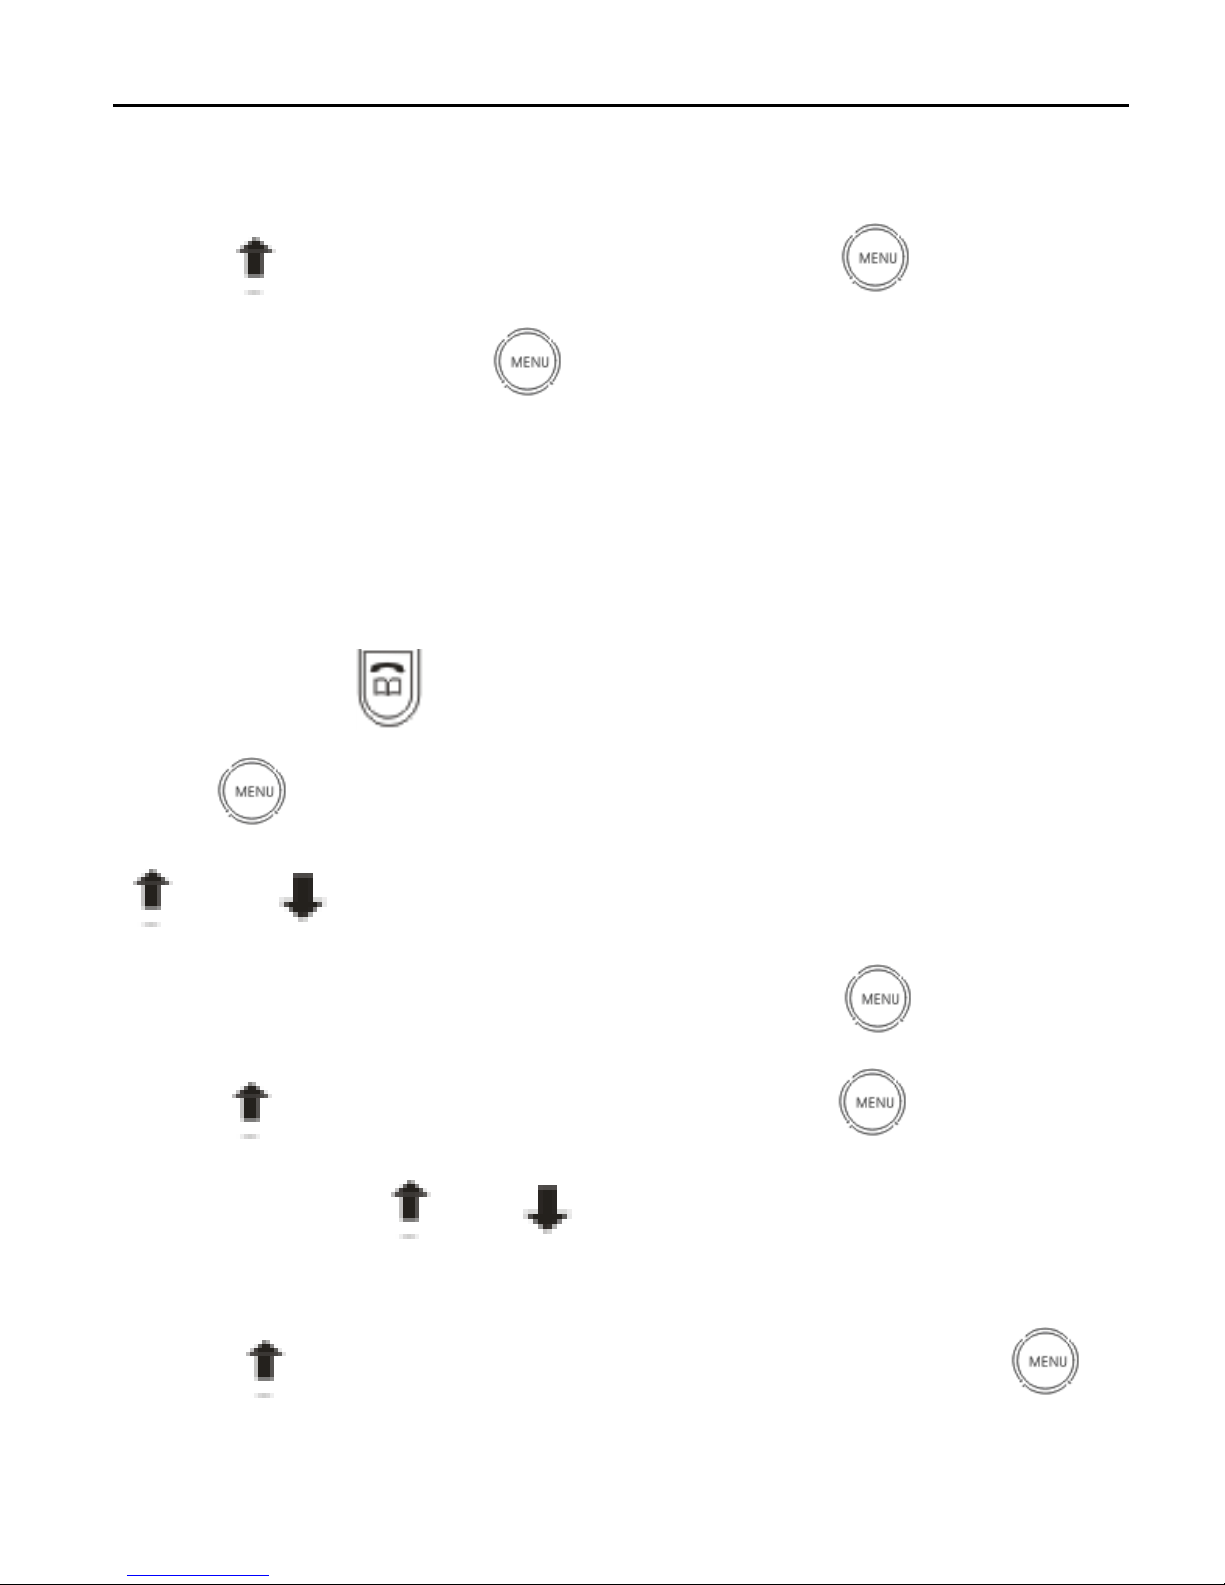
In standby, -press button, LCD display “Phone Book Current”
-press to check first record, press and to review others.
-press till LCD display “ ADD”, then press to input name,
Page 14
CDX-IPH301 -VoIP User Manual V1.0
14
number, ring types. During the operation, press Local IP/DEL to delete wrong
digit.
-press till LCD display “Search”, then press , input name of
desired number and press to check the item, if you want to edit it,
press Local IP/DEL while LCD displays “0=mod 1=del”, then press 0/1 to
modify/delete.
6.3 Call list check / delete / dial out
In standby, press , LCD display “Call Record Dialed”,
-Press to check last dialed out number and conversation time, press
and to review others; press 【#】to dial out this item; press Local
IP/DEL to delete, LCD displays “Are you sure?”, press to confirm.
- press till LCD display “Received”, then press to check latest
received call, press and to review others and press ”#” to dial out;
press Local IP/DEL to delete.
- press till LCD display “Call Record missed”, then press to
Page 15

CDX-IPH301 -VoIP User Manual V1.0
15
check latest miss call, press and to review other and press “#”
to dial out; press Local IP/DEL to delete.
6.4 Hold
During conversation, press to keep line, press it again to release.
6.5 Volume adjustment in conversation
During conversation, press navigation key to adjust receiving volume.
6.6 Block list setting / edit / delete
Please refer to below setting menu and CALL SERVICE setting in web
configuration.
6.7 Call transfer
TRANSFER: During conversation, press button and input transferred
number end with 【#】 to transfer the phone to the third part and hang up
automatically
6.8 3-party conference
During conversation, press , then dial another number plus # button,
Page 16
CDX-IPH301 -VoIP User Manual V1.0
16
while line connected, press to make conference call;
7. Unit Configuration
7.1 IP distribution mode selection
Press and hold 【1】 button for 5s, the LCD displays “STATIC MODE”;
Press and hold 【2】 button for 5s, the LCD display “DHCP MODE”;
Press and hold 【3】 button for 5s, the LCD display “PPPOE MODE”.
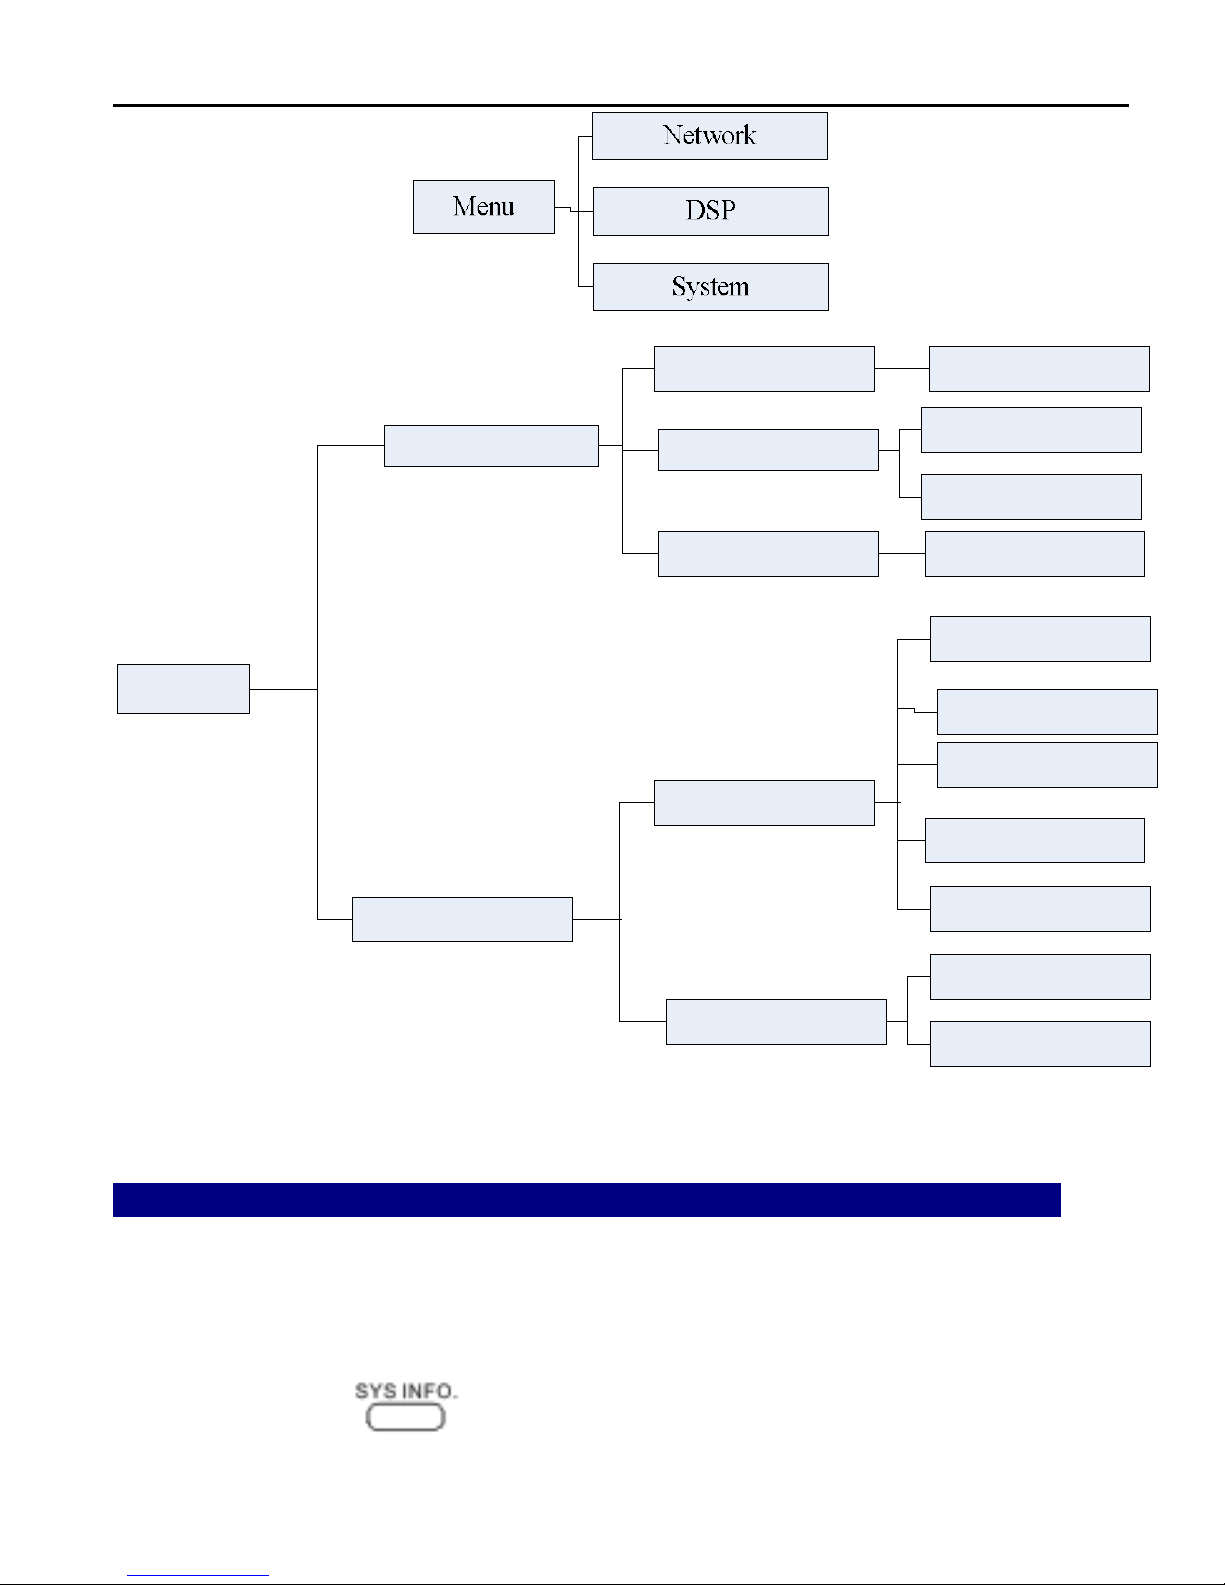
7.2 Configuration with keypad and LCD display
In standby, press button till LCD shows " Input Password: " input
correct password (default is 123), press key to enter the menu list.
Then follow below menu list to set parameters accordingly.
During configuration, operations as follows
-For browse and edit Configuration, press
and
;
-To change parameter, press【PH No./Edit】firstly, then input desired digit,
confirm and save by press buttons .
Page 17
CDX-IPH301 -VoIP User Manual V1.0
17
Network
IP
LAN
Bridge Mode
WAN
255.255.255.0
192.168.10.1
0[OFF]
1[ON]
NetMask
Static net
PPPoE
DNS2
DNS
Gateway
Netmask
IP
Password
User name
8 Web Interface Configuration
The IP Phone Web Configuration Menu can be accessed by the following
URI: http://Phone-WAN IP-Address/. The default WAN IP address is dynamic
acquisition, press can access the IP address.
Page 18
CDX-IPH301 -VoIP User Manual V1.0
18
If the web login port of the phone is configured as non-80 standard port, then
user need to input http://xxx.xxx.xxx.xxx:yyyy, otherwise the web will show
that no server has been found.
8.1 Login Web
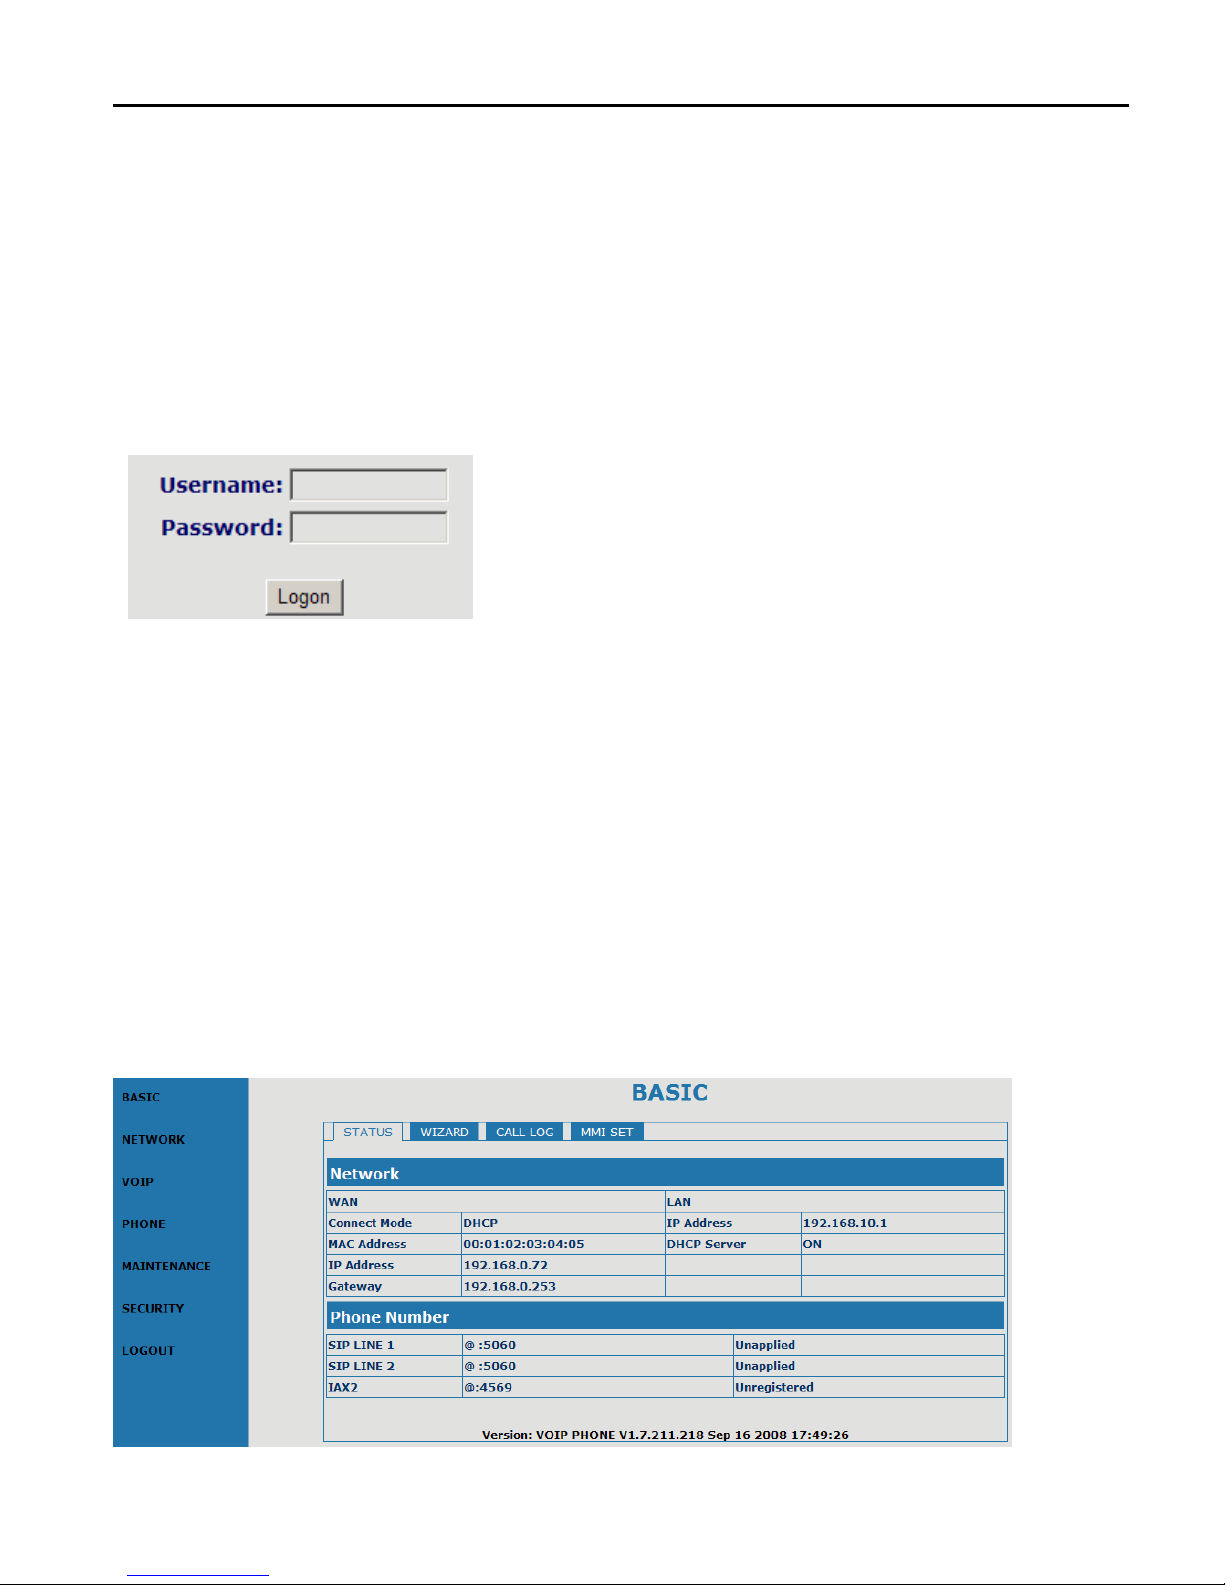
While input correct IP address as above, logon menu pop out as follows:
There are two level login as:
-Guest account: the default username and password is "guest", user can
have a browse of system.
-Administrator account: the default username and password is "admin", this
user can configure the system.
Note: After inputting username and password, user press carriage return
directly to enter the page.
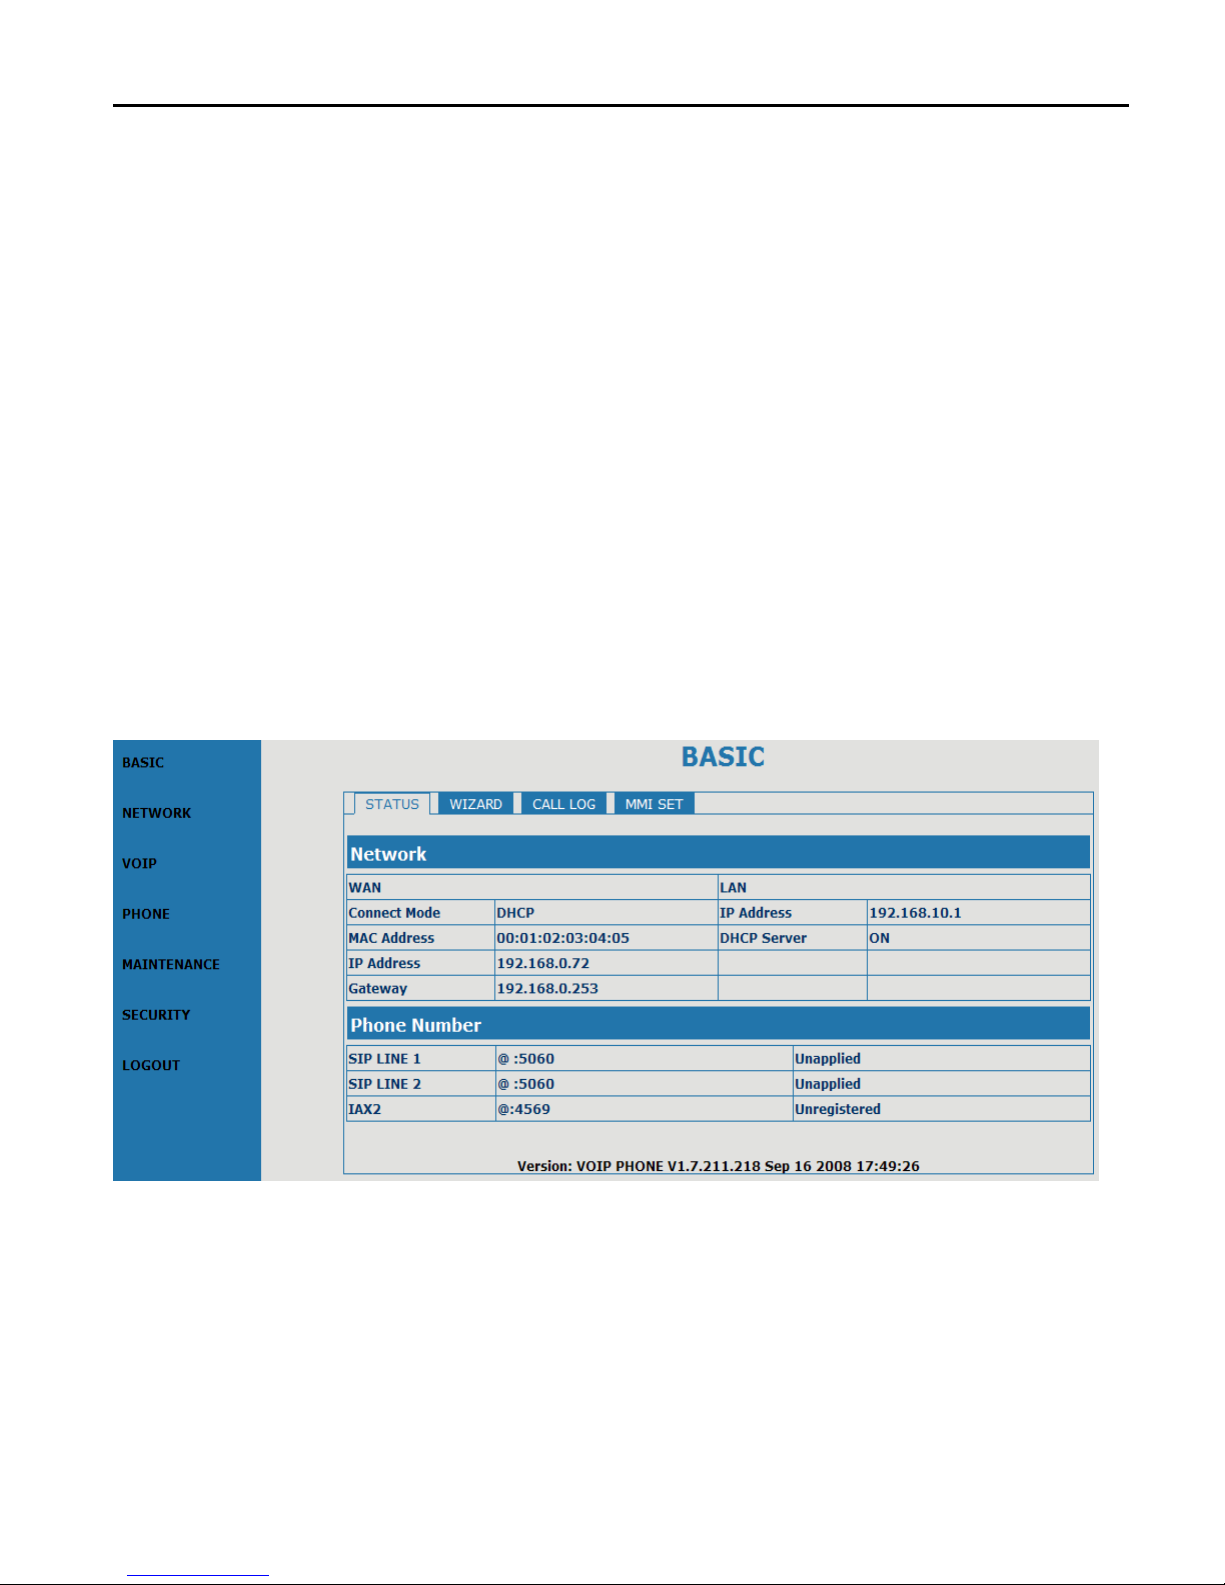
While successfully login, web shown as follows:
Page 19
CDX-IPH301 -VoIP User Manual V1.0
19
8.2 Current state
On this page user can gather information of each normal parameters, as:
-the network section shows the current WAN configurations of the phone,
including access way of WAN IP and IP(static state, DHCP, PPPoE), MAC
address, WAN IP address of the phone.
-The VoIP section shows the current default signaling protocol, and server
parameter; Register server IP of SIP, proxy server IP, whether enables
register, whether has registered on register server, whether enables
outbound proxy, whether enables STUN server.
-The Phone Number section shows corresponding phone number of each
protocol; the version number and date of issue have been shown at the end
of the page.
8.3 Network configuration
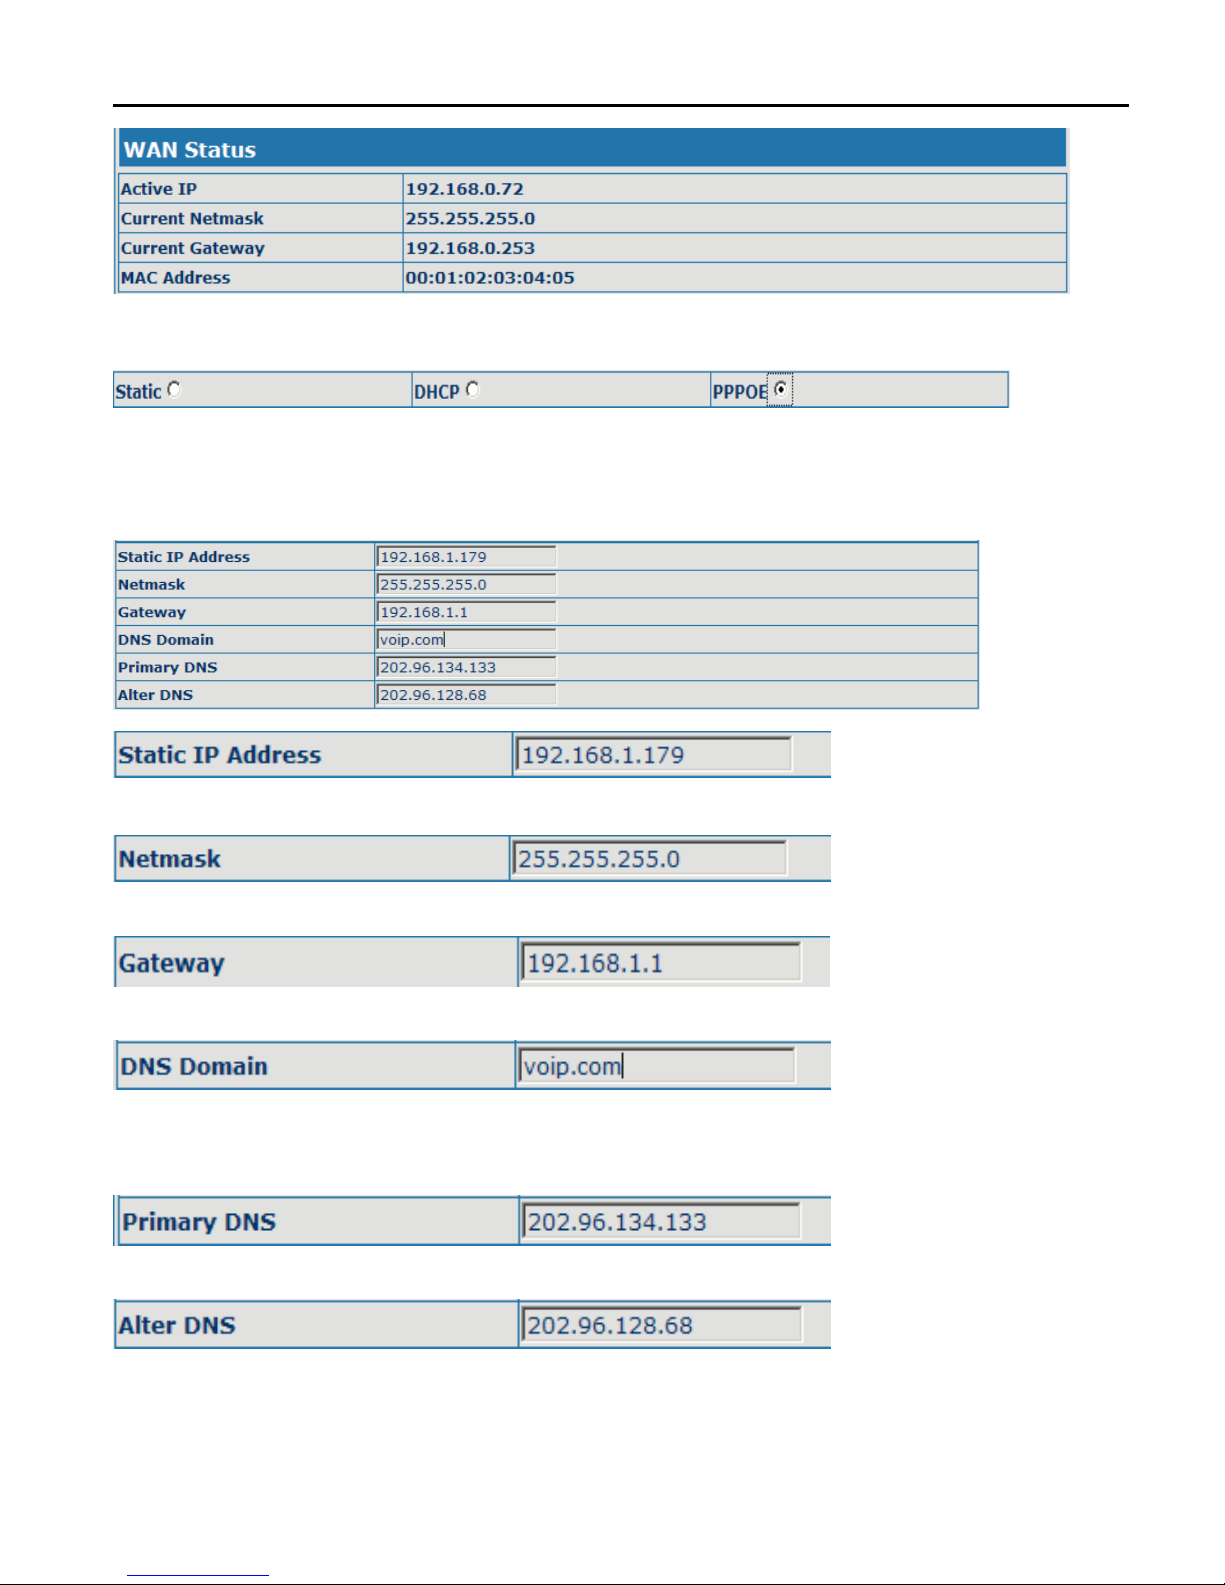
8.3.1 Wide area network(WAN)
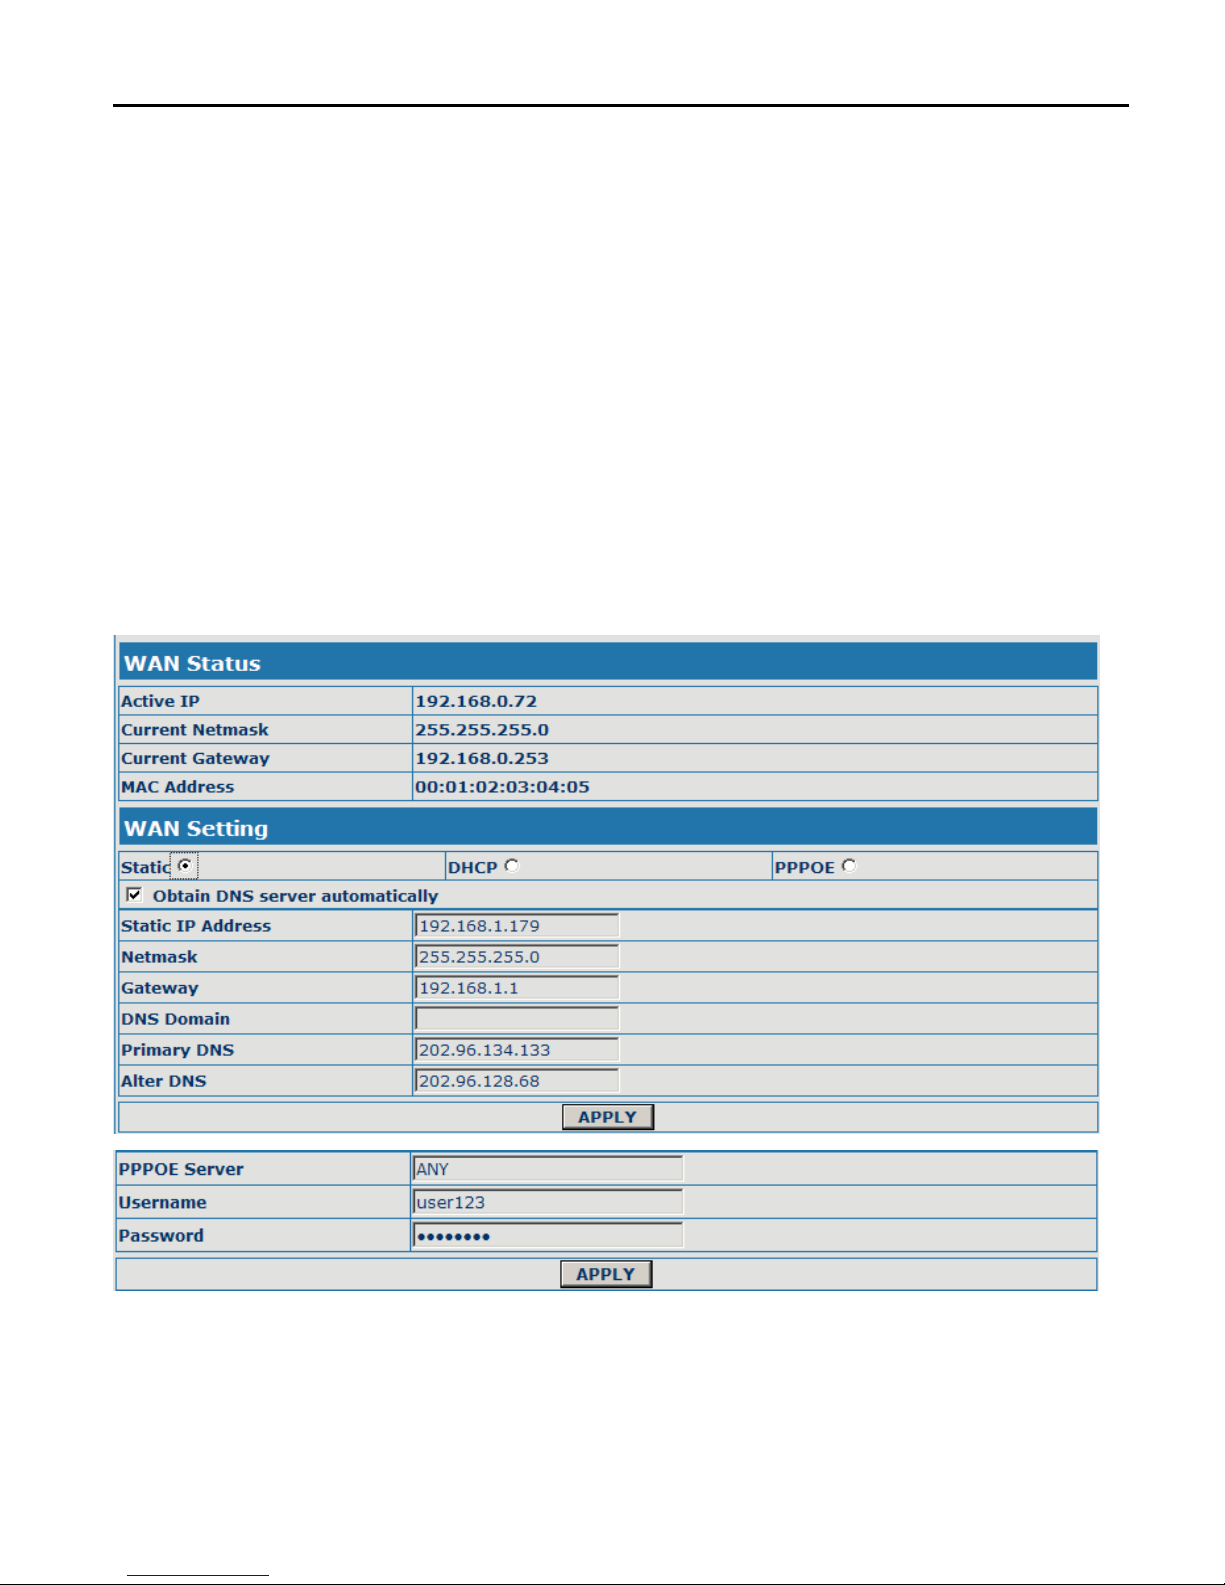
User can view the current network IP linking mode of the system on this
page.
Page 20
CDX-IPH301 -VoIP User Manual V1.0
20
User will be authorized to set the network IP, Gateway and DNS if the system
adopts the static linking mode.
If the system selects DHCP service in the network which is using DHCP
service, IP address will be gained dynamically.
If the system selects PPPOE service in the network which is using the
PPPOE service, then the IP address will be gained by the set PPPOE ISP
internet and password of the account.
Note: If IP address has been modified, the web page will no longer respond
owing to the modification, so new IP address should be input in the address
field now.
Configuration Explanation:
Page 21
CDX-IPH301 -VoIP User Manual V1.0
21
Current phone IP, subnet mask, MAC address and current phone IP;
,
Select acquisition way of IP for WAN; This is single option; Configure static IP
parameter for WAN;
Configure static IP address;
Configure subnet mask;
Configure IP address of the phone;
Configure "DNS domain" suffix; if user input "domain" and it can't be resolved,
then the phone will add and resolve the "domain" after user has input;
Main DNS server IP address;
The second DNS server IP address;
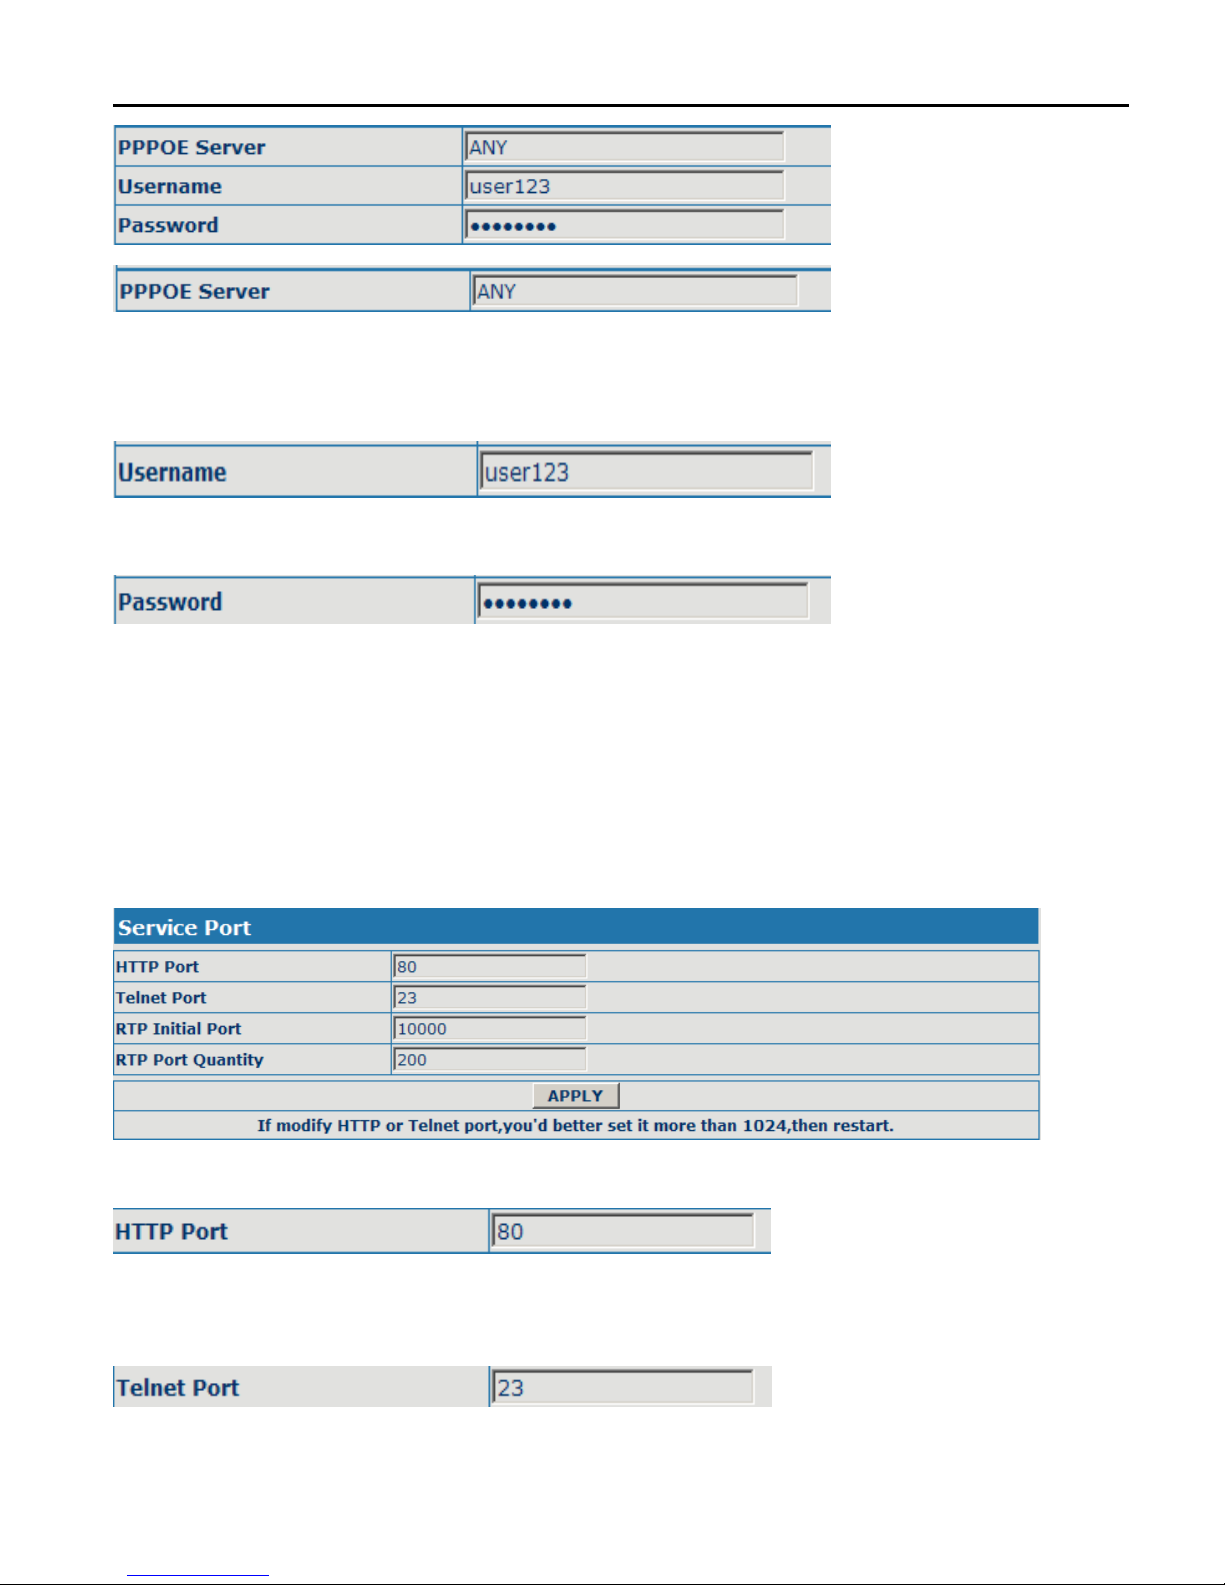
Configure PPPoE:
Page 22
CDX-IPH301 -VoIP User Manual V1.0
22
Service name, if PPPoE ISP has no special requirement for this name,
generally is the default;
PPPoE account;
PPPoE password;
Configure the parameter and then click "apply" to go into effect.
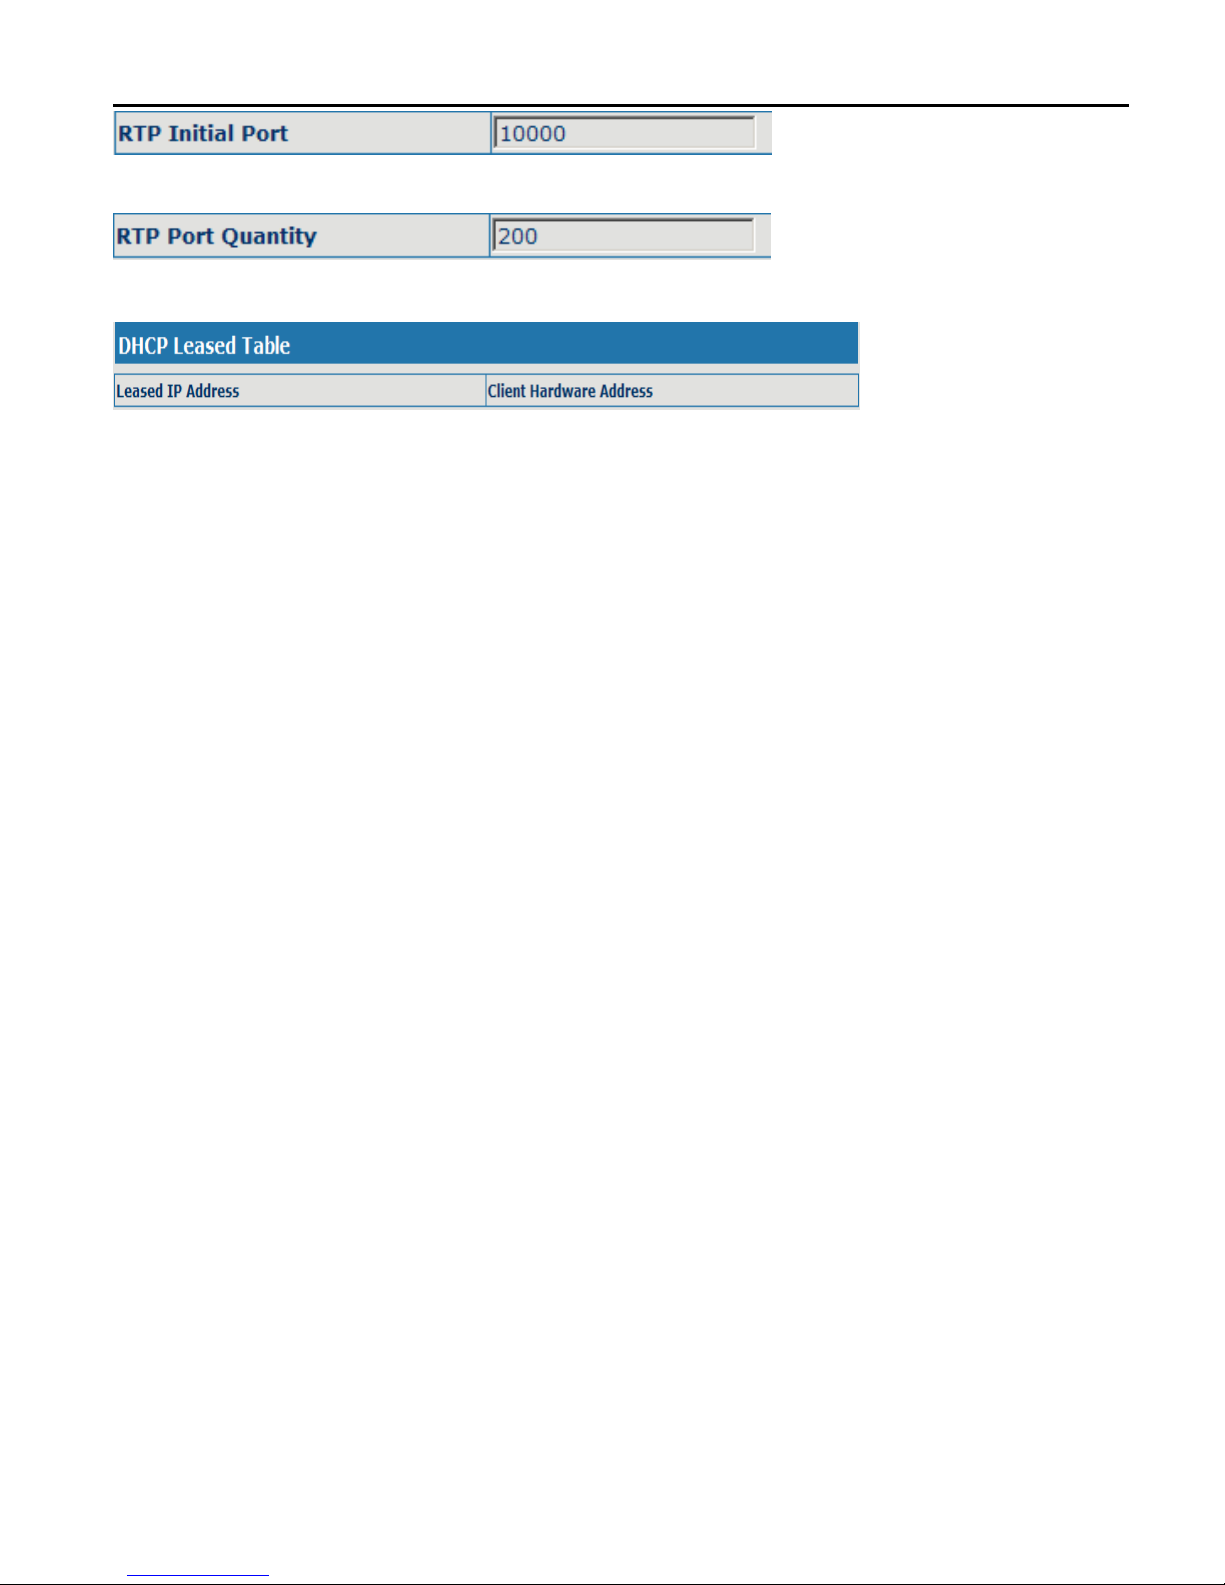
8.3.2 Service Port configuration
User can set up Telnet, HTTP, RTP port on this page and view DHCP table.
Configuration Explanation:
Configure web browse port, the default is 80 port, if you want to enhance
system safety, you'd better change it into non-80 standard port;
Configure telnet port, the default is 23 port;
Page 23
CDX-IPH301 -VoIP User Manual V1.0
23
Enable RTP initial port configuration. It is dynamic allocation;
Configure the maximum quantity of RTP port. The default is 200;
Leased IP-MAC correspondence table of DHCP;
※The configuration on this page needs to be saved after modified and will go
into effect after restarting.
※If the Telnet, HTTP port will be modified, the port is better to be set as
greater than 1024, because less than 1024 port system will save ports.
※Set the HTTP port as 0, then the http service will be disabled.
Page 24
CDX-IPH301 -VoIP User Manual V1.0
24
9 VOIP Configuration
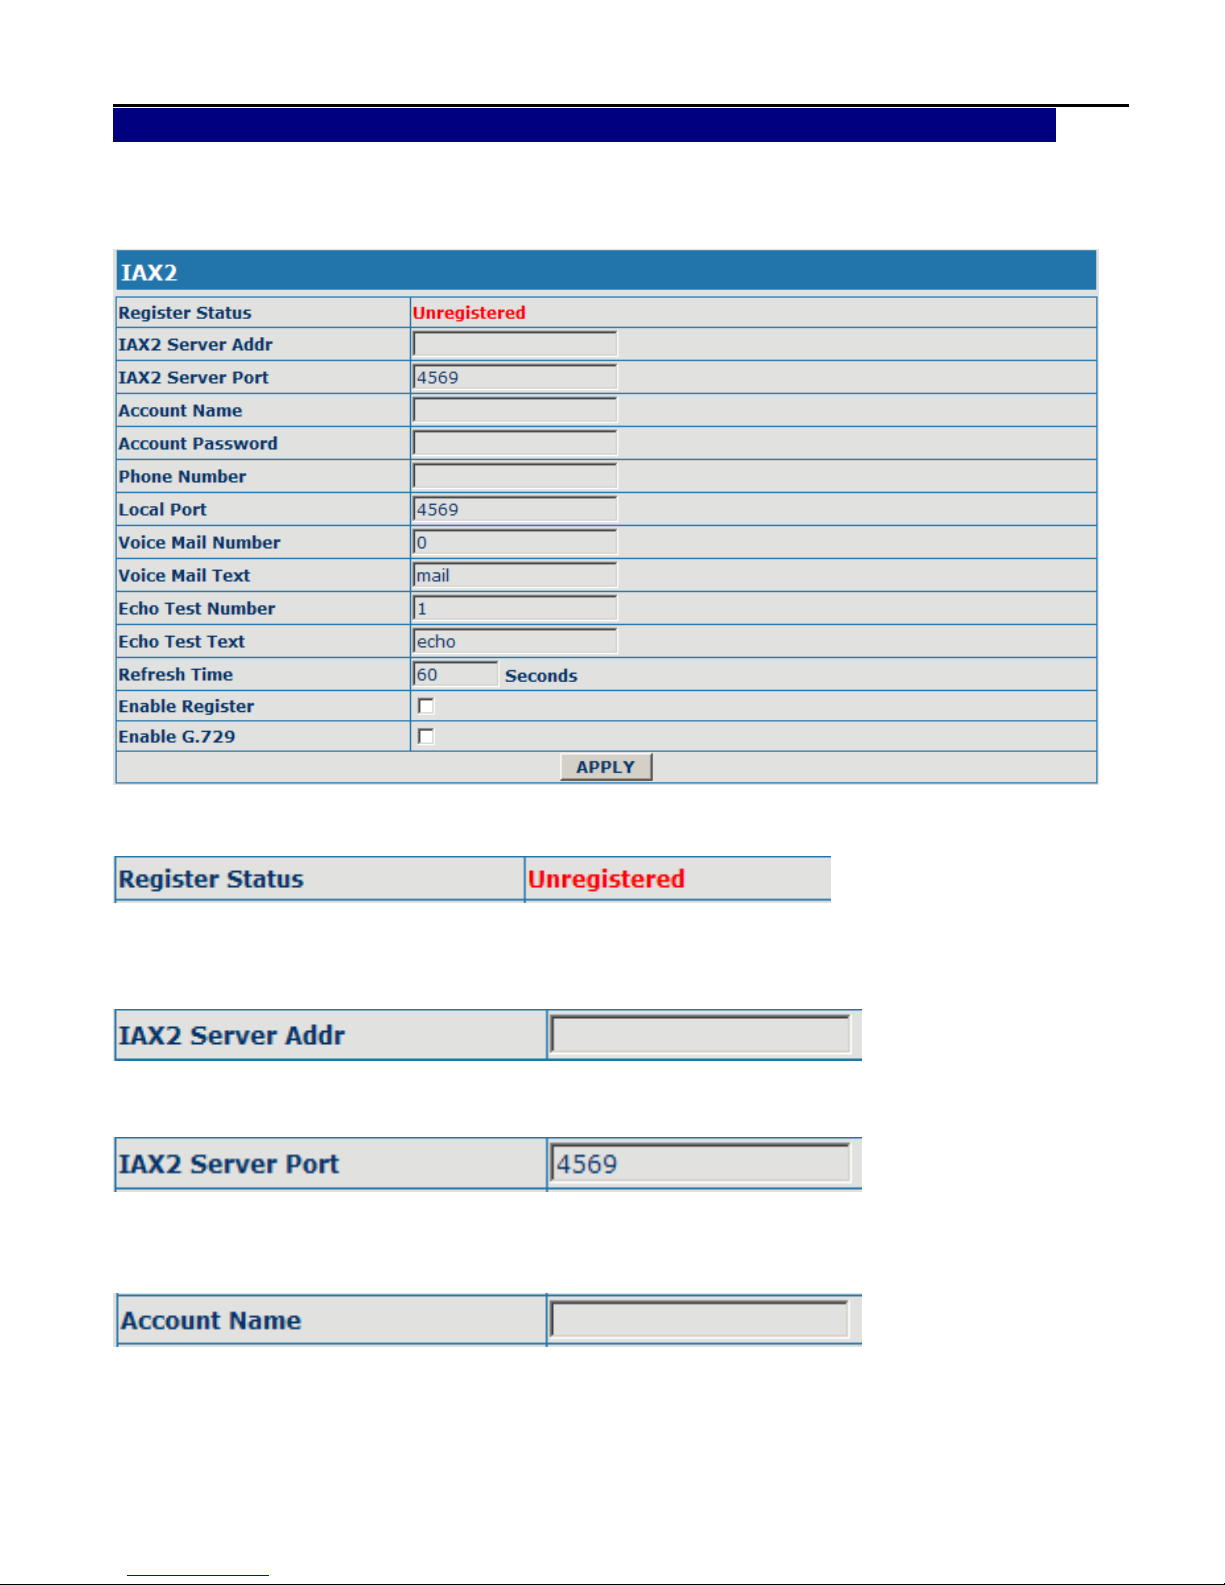
9.1 IAX2 Configuration
Configuration Explanation: Explanation:
IAX2 registration state display ; If register successfully, it will display
[Registered], otherwise will display [Unregistered];
Config IAX2 the server address, also can use domain name form;
Config IAX2 server port;
Config IAX2 account name;
Page 25
CDX-IPH301 -VoIP User Manual V1.0
25
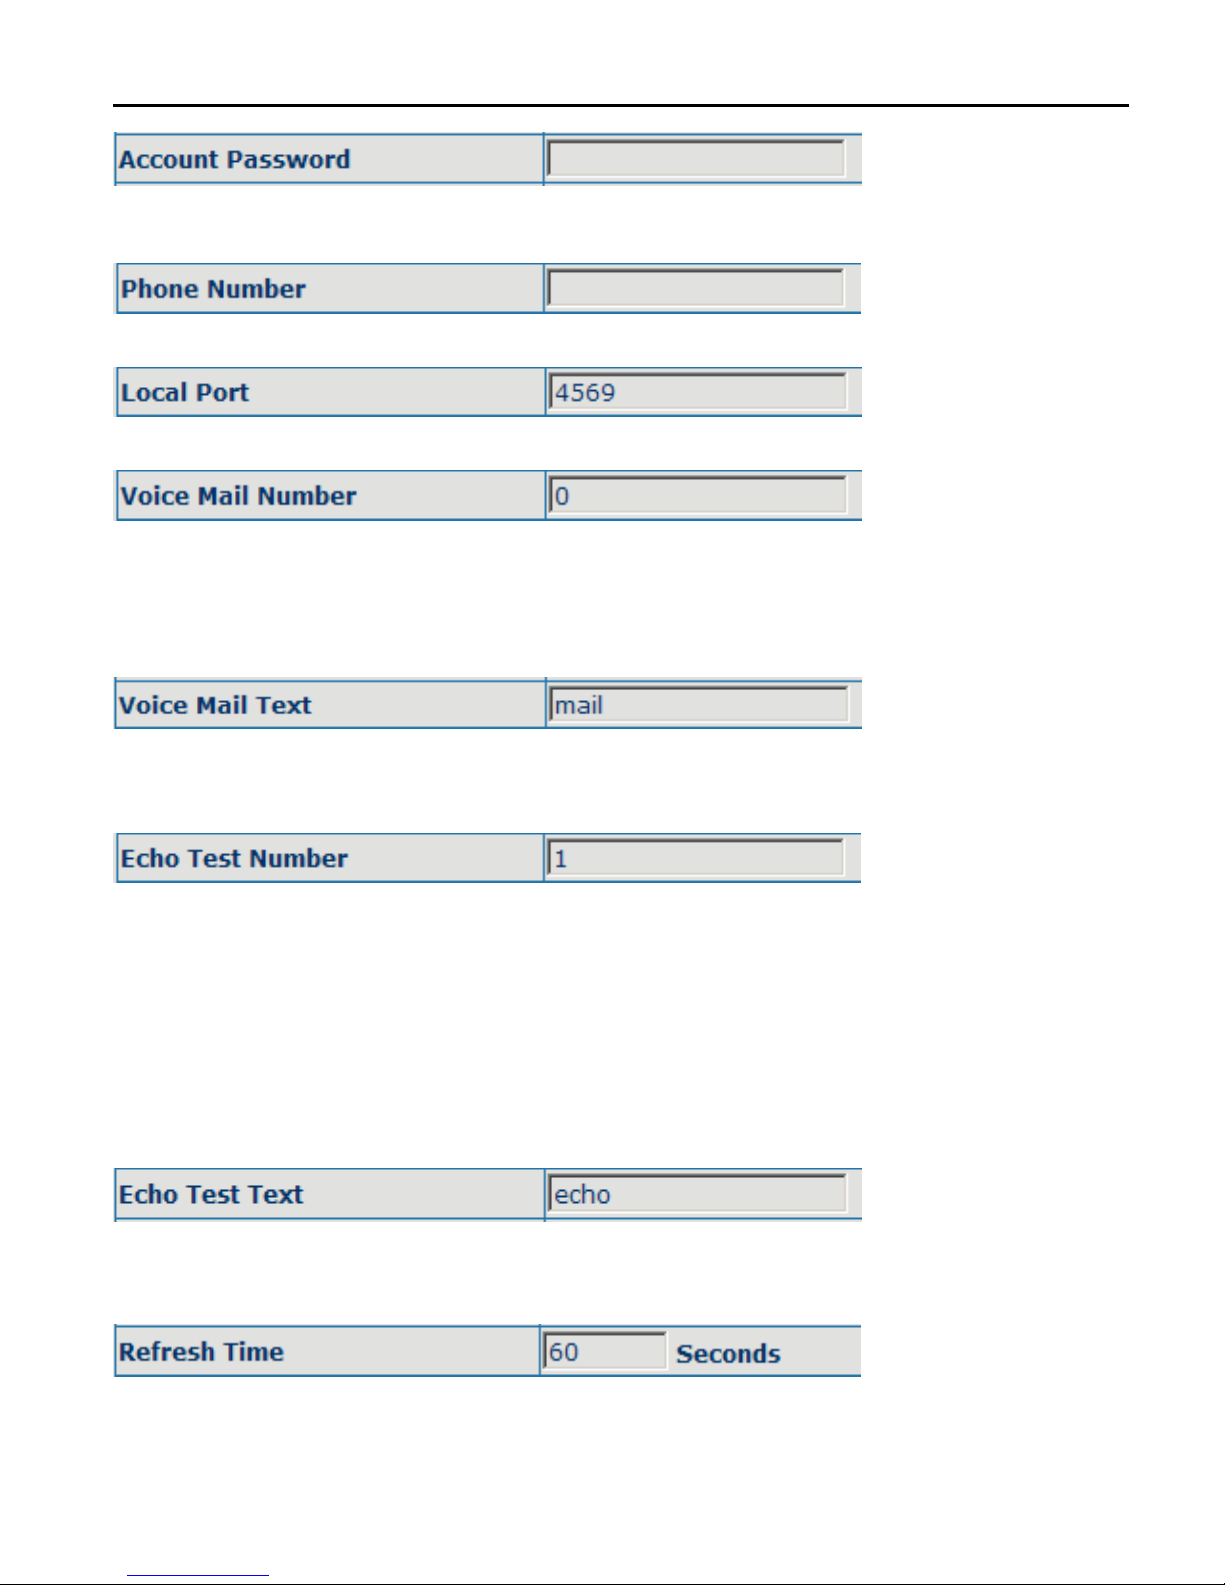
Config IAX2 account password;
Config IAX2 phone number;
Config equipment iax2 monitor port;
Config voice mail number , If the IAX2 support voice mailbox, the voice
mailbox is the letter form, the gateway is unable to input the letter, uses this
number to replace voice mail the name;
Config voice mailbox name; if the IAX2 support voice mailbox, here to config
the vocie mailbox the name;
Config whether supports echo. If the platform support echo, (echo number is
the text format), then the telephone config this echo test number replace
echo actual text number. This function is refers through the platform, the
terminal may carry on echo the call to test. To see the terminal to the platform
converses on the telephone whether normally;
Config echo test text;
Config IAX2 refresh time,The unit of time for the second, suggested the user
Page 26
CDX-IPH301 -VoIP User Manual V1.0
26
in makes the choice 60 to 3600 between;
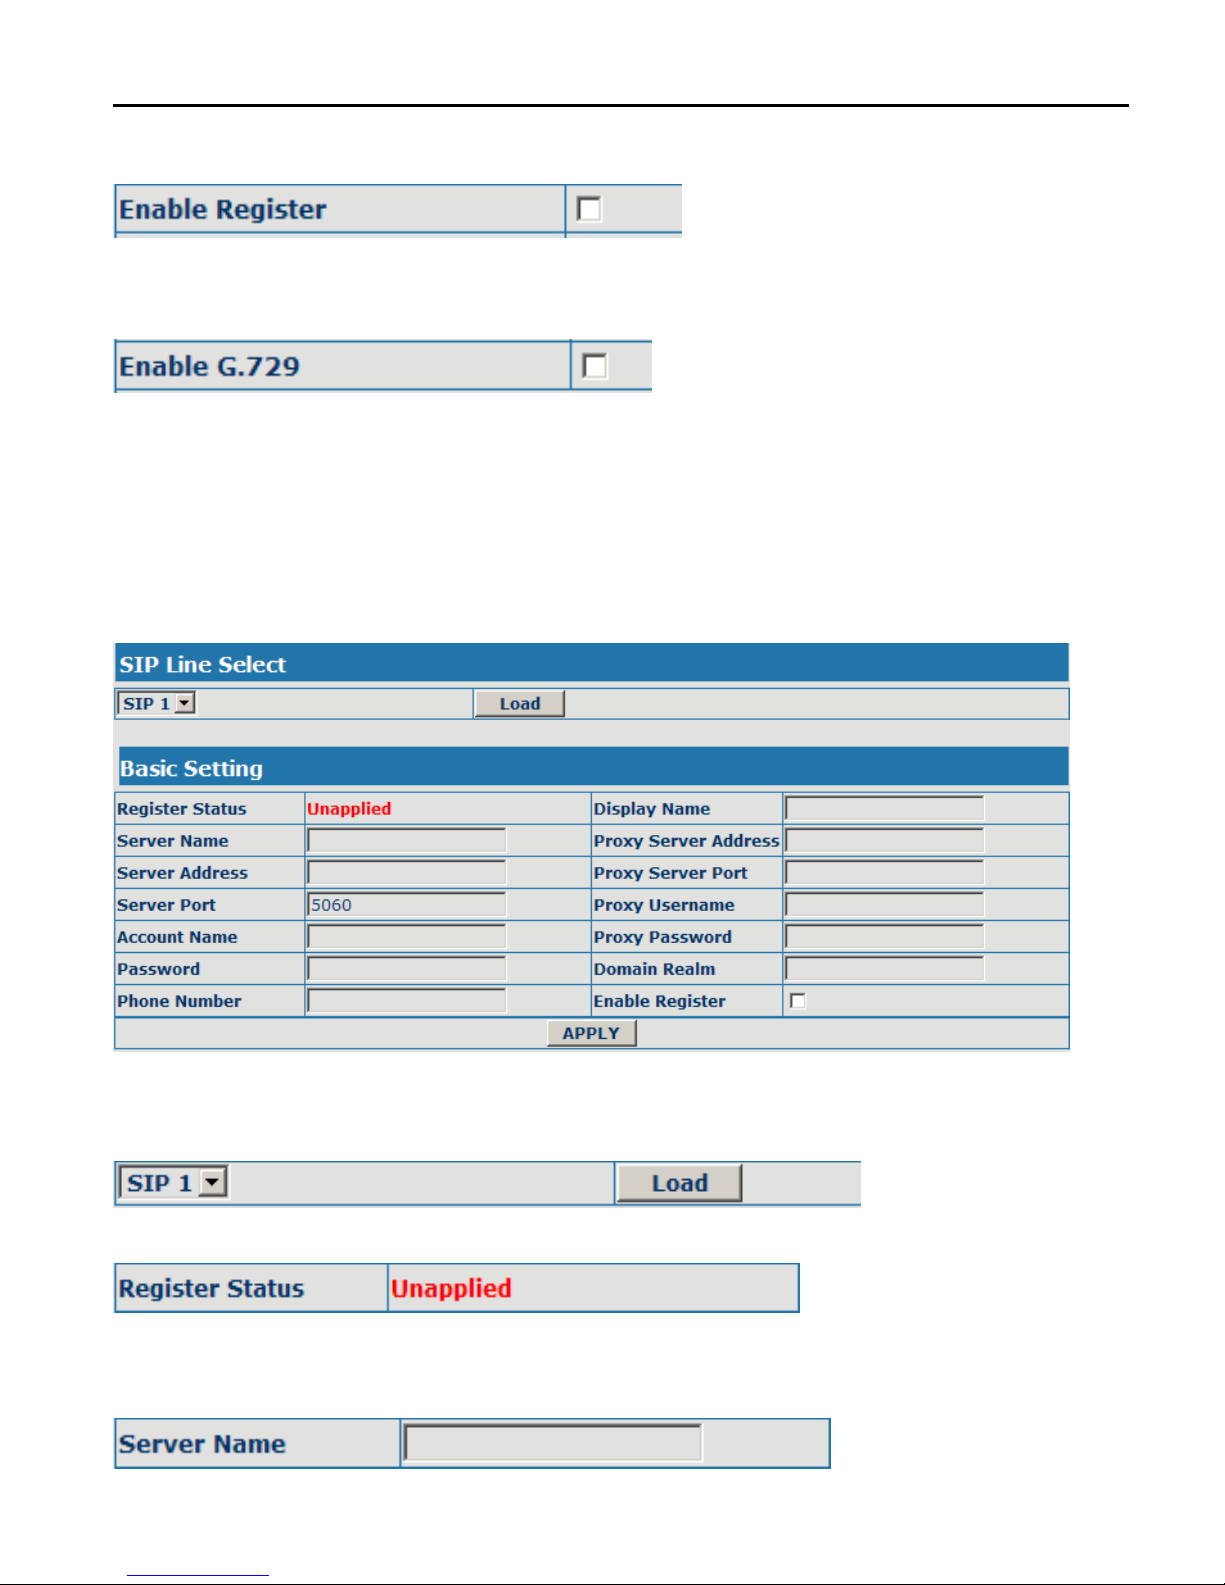
config the permission/prohibition registers the server;
Config whether supports G.729;
9.2 SIP Configuration
Sip register
Configuration Explanation:
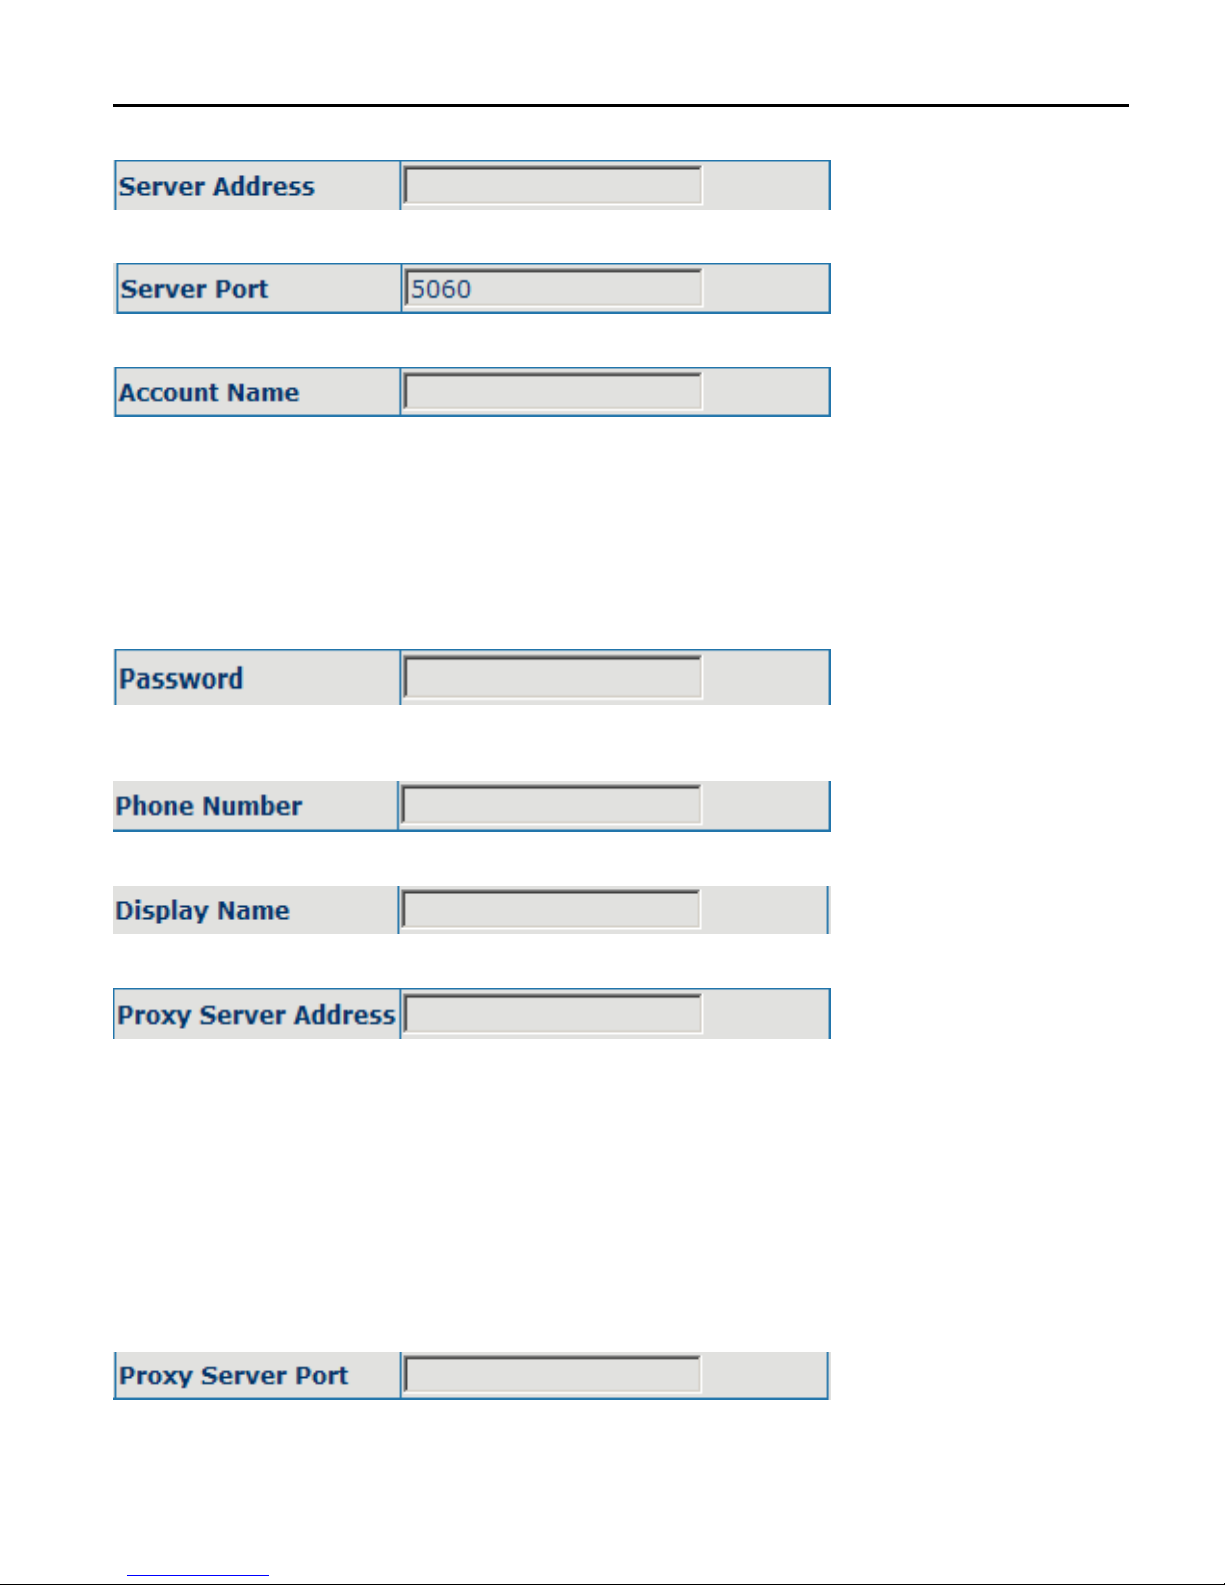
Select SIP1 or SIP2,then you can register and configure SIP1 or SIP2;
Show SIP register state; if register successfully, there will show Registered in
the square bracket, otherwise show Unregistered;
Page 27
CDX-IPH301 -VoIP User Manual V1.0
27
Configure the name of registration server;
Configure SIP register server IP address or Domain Name;
Configure SIP register server signal port;
Configure SIP register account(usually it is the same with the port number
that configured, some special SIP servers will have different port
configurations, then the port configuration needs to be configured to be
numbers, here the configuration account can be arbitrary character string);
Configure password of SIP register account;
Configure the phone number;
Configure display name;
Configure proxy server IP address or Domain Name(usually SIP will provide
user with service of proxy server and register server which have the same
configuration, so the configuration of proxy server is usually the same with
that of register server, but if the configurations of them are different(such as
different IP addresses or Domain Name), then each server's configuration
should be modified separately);
Configure SIP proxy server signal port;
Page 28
CDX-IPH301 -VoIP User Manual V1.0
28
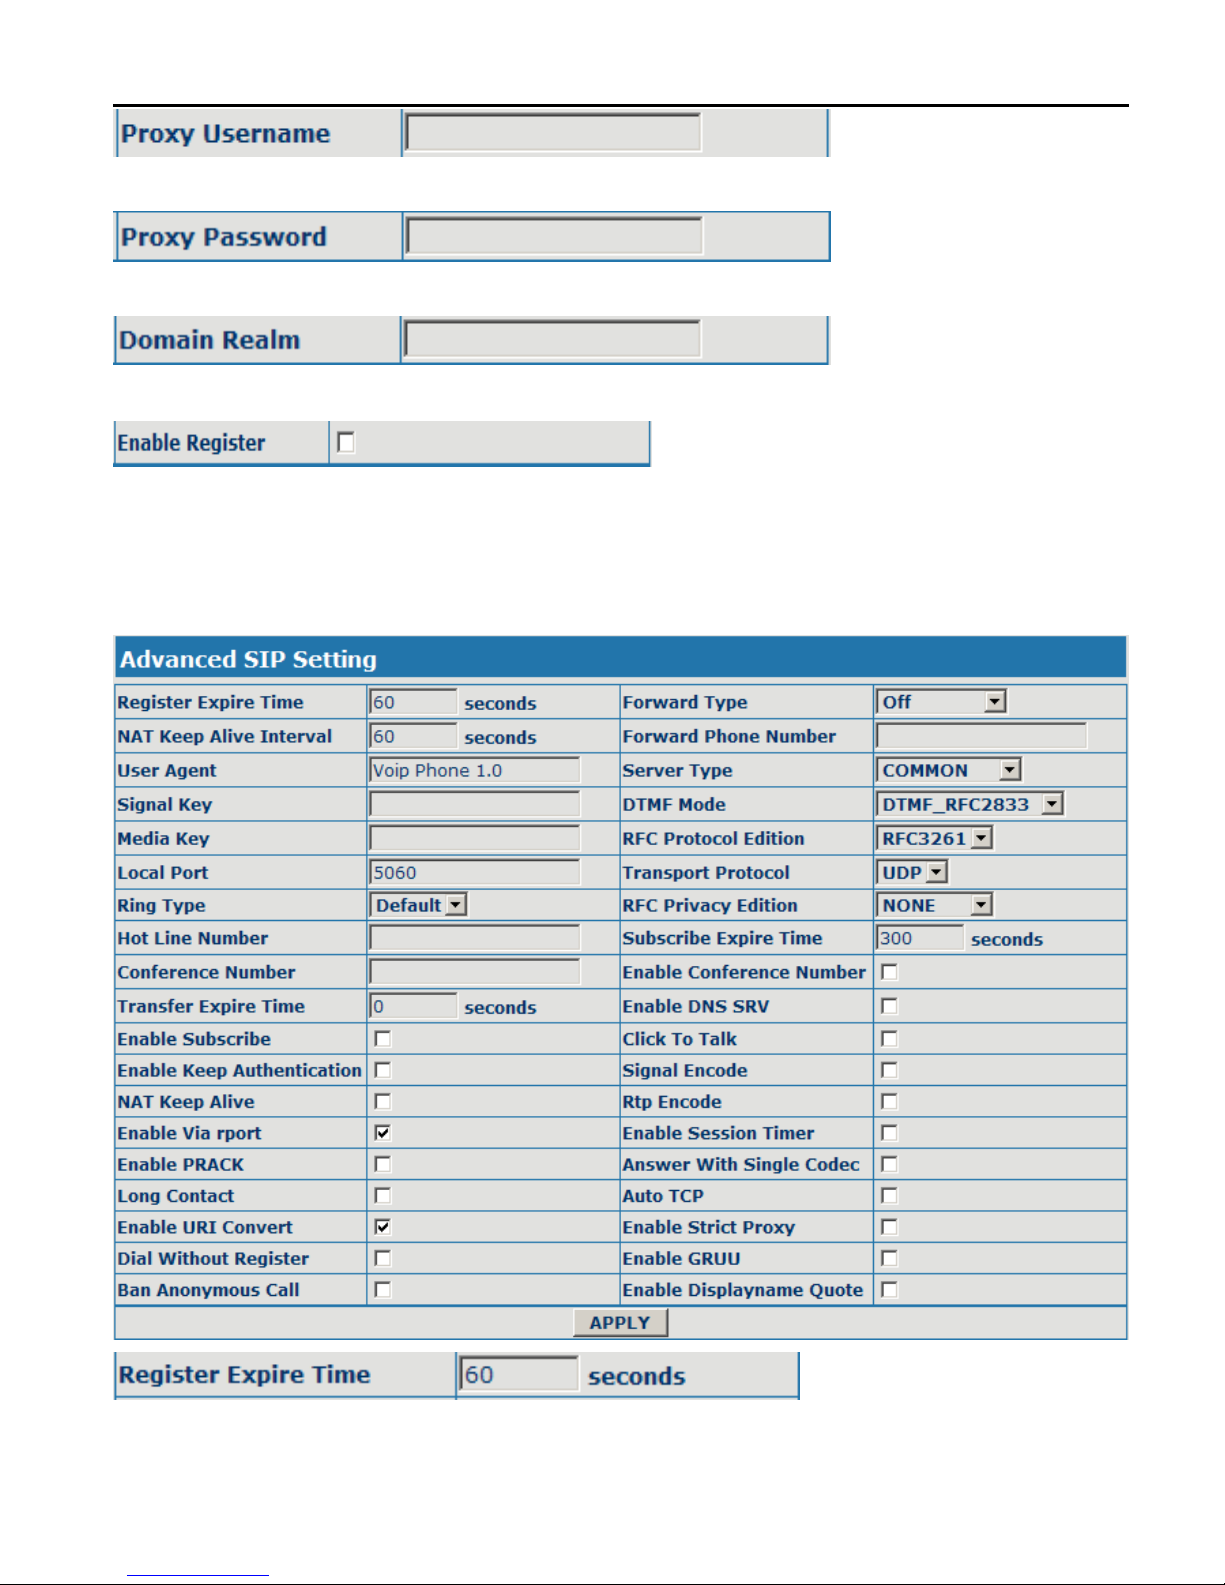
Configure proxy server account;
Configure proxy server password;
Configure domain realm;
Configure enable/disable register;
Advanced sip setting
Configure expire time of SIP server register, the default is 60 seconds. If the
Page 29
CDX-IPH301 -VoIP User Manual V1.0
29
expire time that server requires is more or less than that configured by the
phone, the phone can automatically modify it to the recommended time limit
and register;
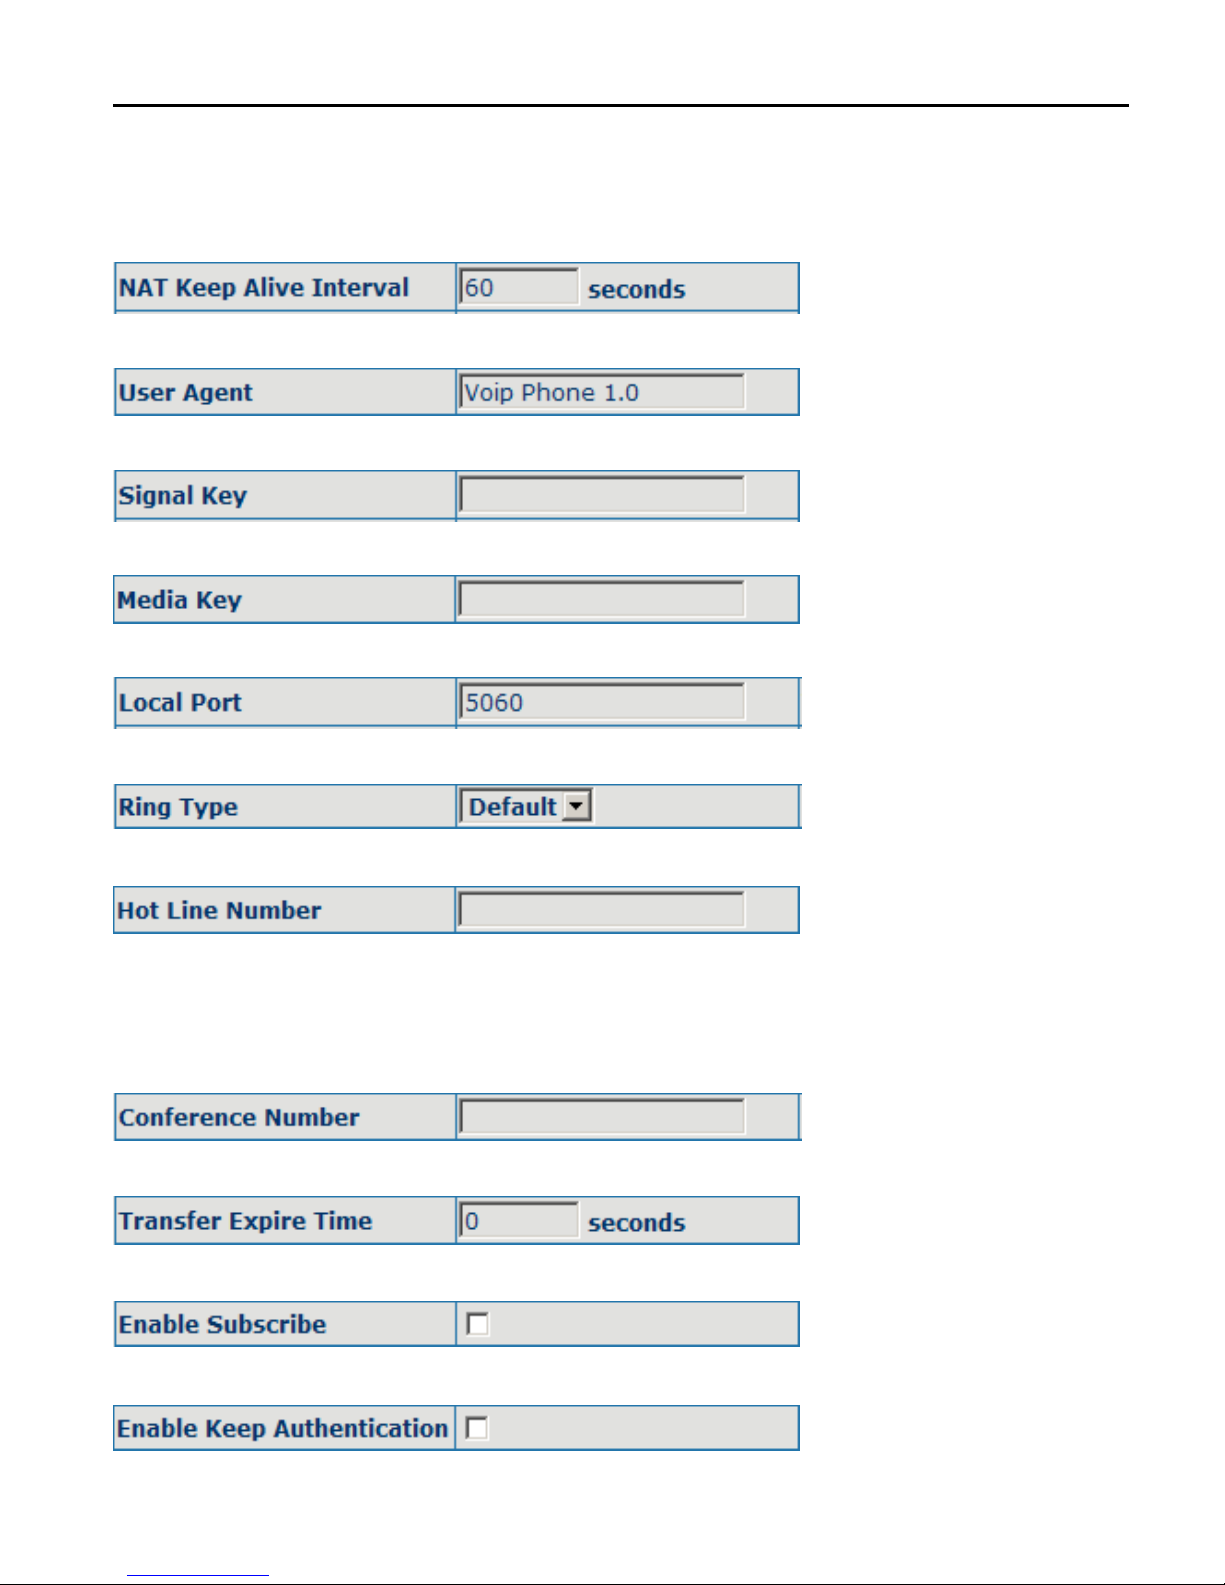
Configure the NAT keep alive interval;
Configure the User Agent;
Configure the Signal Key;
Configure the Media Key;
Configure the Local Port;
Select the Ring type;
Configure hot-line number of the port. With this number of the port, this
hot-line number will be dialed automatically as soon as off-hook and user
can't dial any other number;
Configure the Conference Number;
Configure the Transfer Expire time
Configure enable/disable Subscribe;
Page 30
CDX-IPH301 -VoIP User Manual V1.0
30
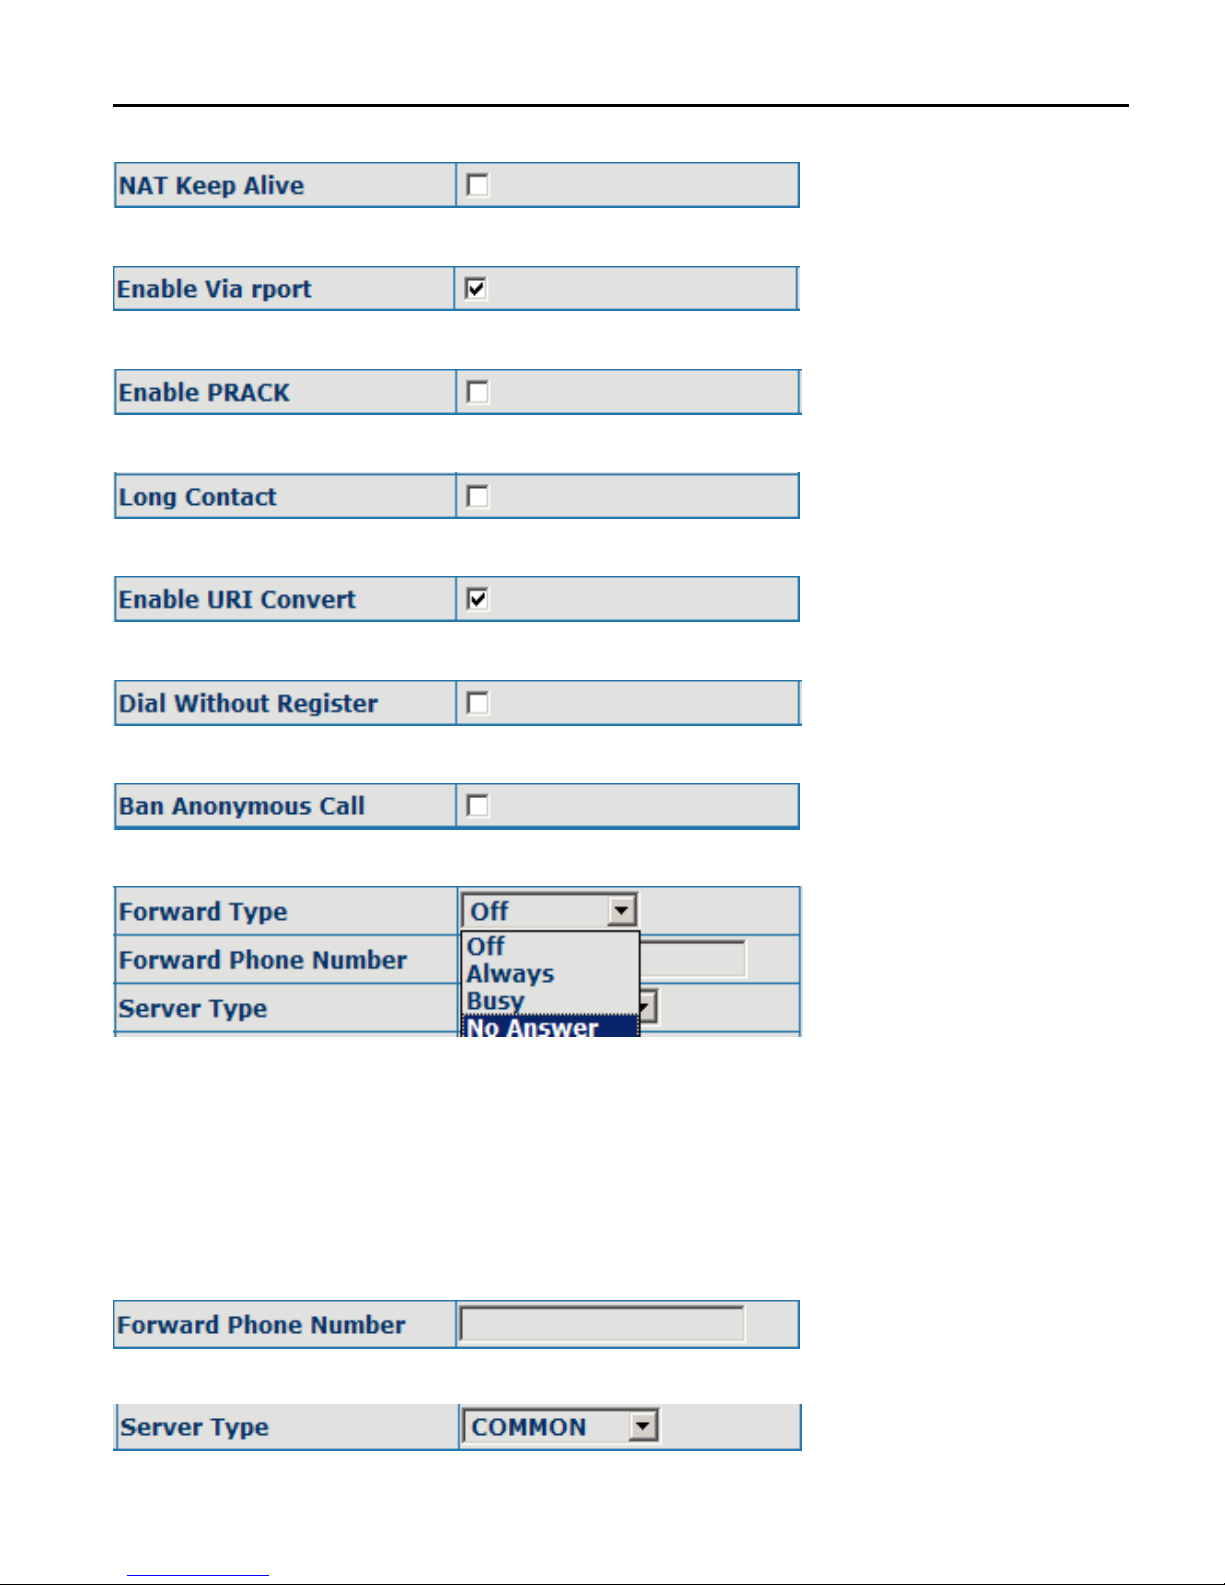
Configure enable/disable Keep Authentication;
Configure enable/disable NAT Keep Alive
Configure enable/disable Via rport
Configure enable/disable PRACK
Configure enable/disable Long Contact;
Configure enable/disable URI Convert;
Configure enable/disable Dial without register;
Configure enable/disable Ban Anonymous Call;
Call forwarding. The default is Disable; when busy is selected, if the number
dialed is engaged after the phone has received a call, then it will
automatically transfer to the configured number according to the following
configuration; when always is selected, then the phone will directly transfer all
the numbers that dial to this port to the configured numbers;
number configuration of call transfer (CT);
Page 31
CDX-IPH301 -VoIP User Manual V1.0
31
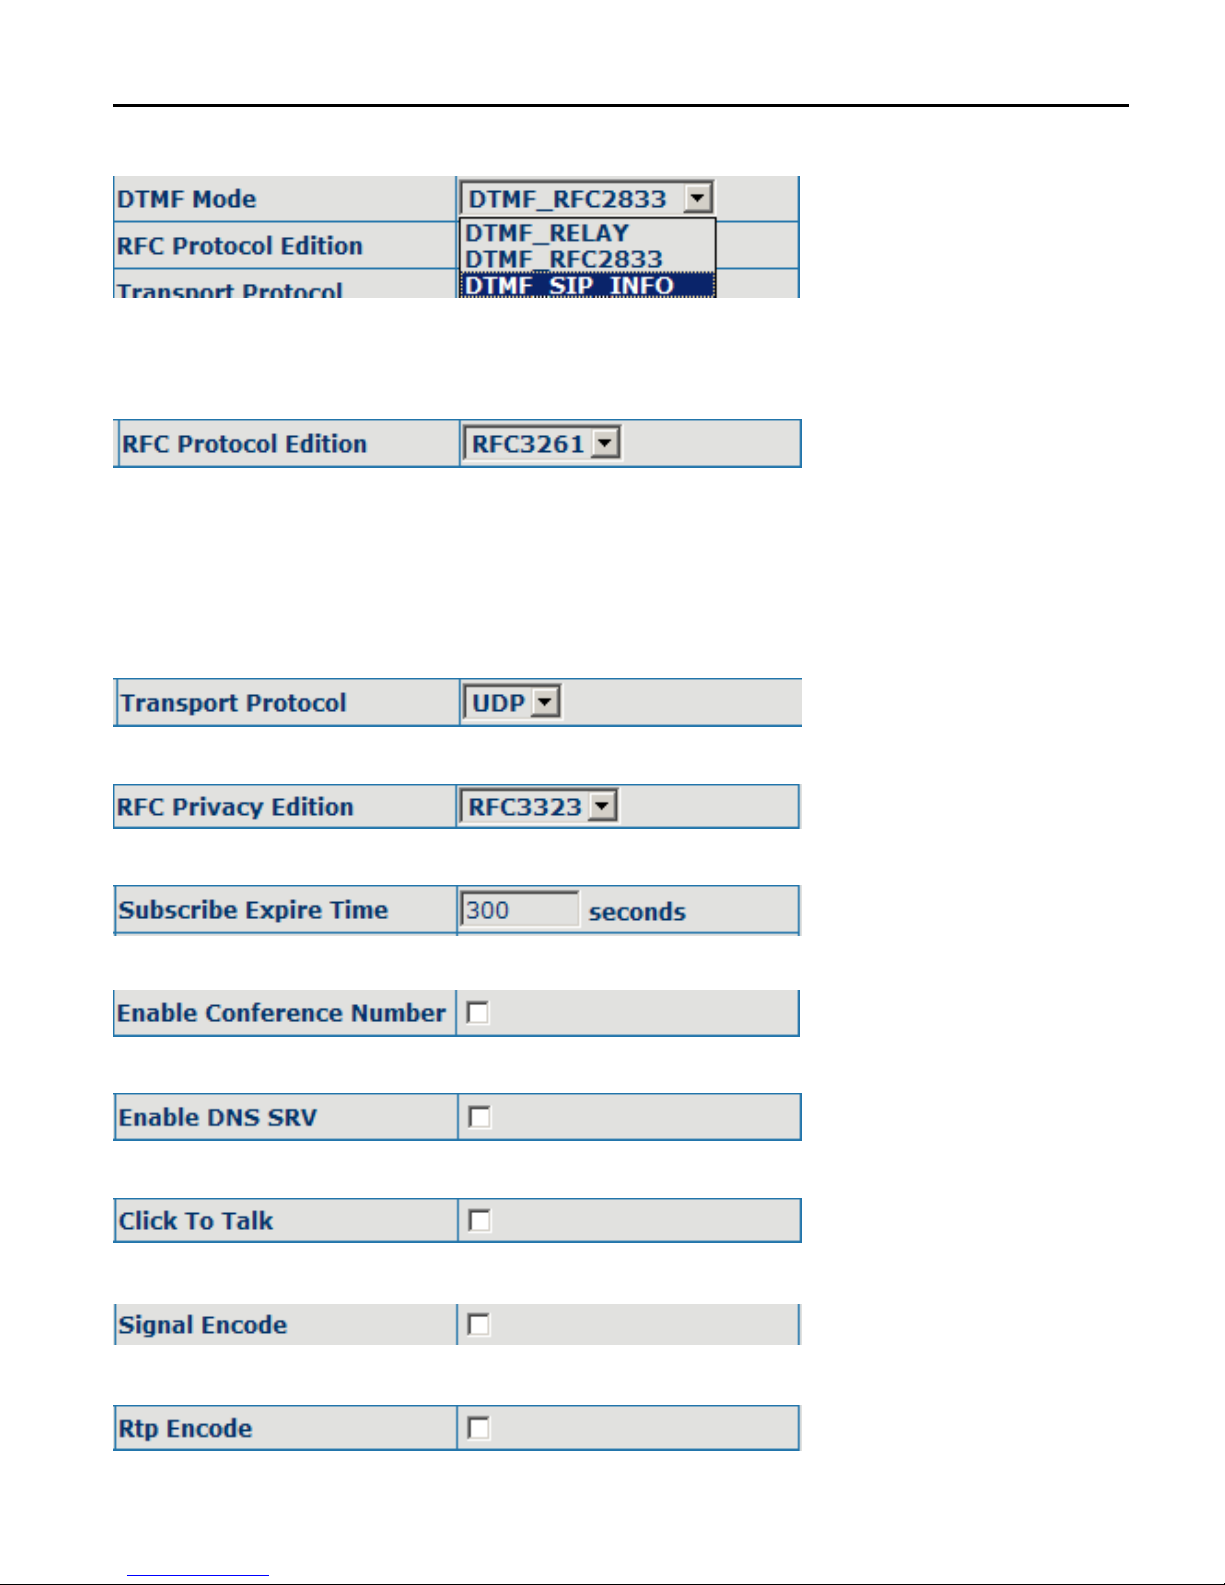
Select the Server type;
DTMF sending mode configuration; three kinds: the above are basic
configurations of SIP.
Enable the phone to use protocol edition. When the phone need to
communicate with phones which is using SIP1.0 such as CISCO5300 and so
on, then it should be configured into RFC2543 to communicate normally. the
default is to enable RFC3261;
Select the Transport Protocol(UDP or TCP);
Select the RFC Privacy Edition(none,RFC3323 or RFC3325);
Configure Subscribe expire time
Configure enable/disable Conference Number;
Configure enable/disable DNS service;
Configure enable/disable Click To Talk;
Configure enable/disable Signal Encode;
Page 32
CDX-IPH301 -VoIP User Manual V1.0
32
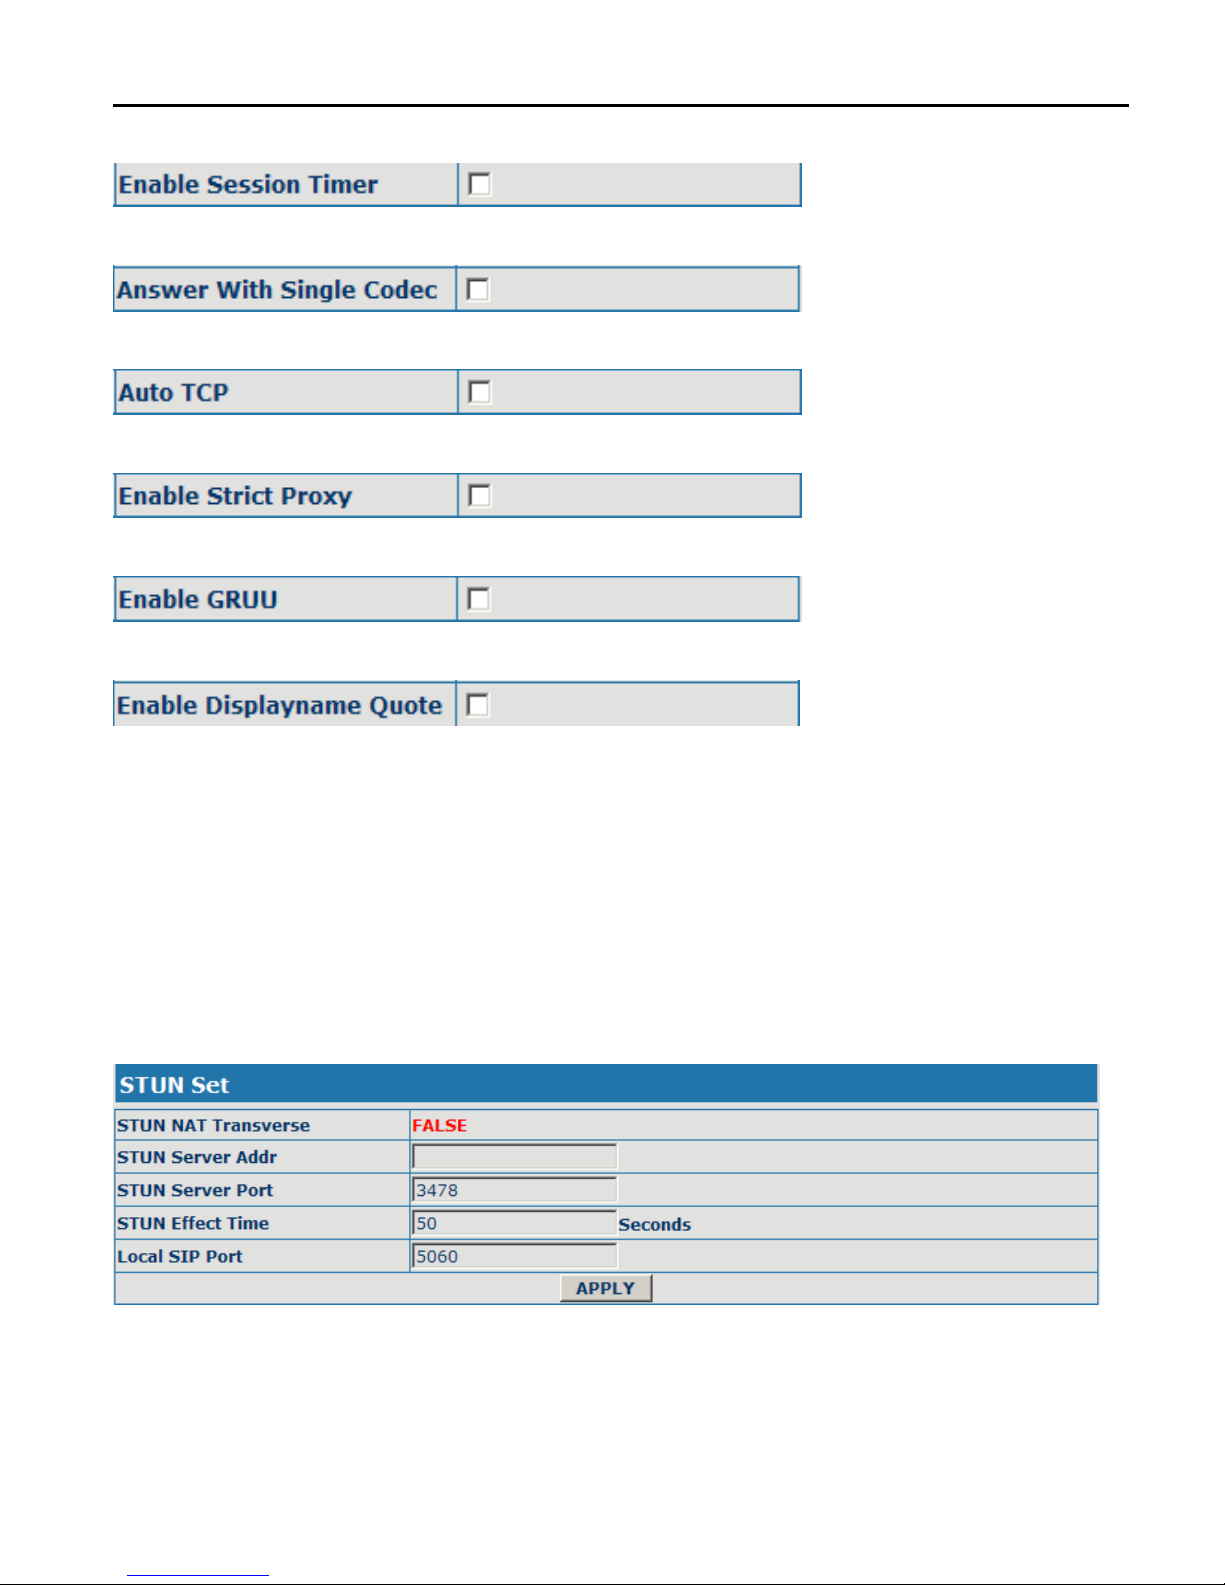
Configure enable/disable RTP Encode;
Configure enable/disable Session Timer;
Configure enable/disable answer with single codec;
Configure enable/disable Auto TCP;
Configure enable/disable Strict Proxy;
Configure enable/disable GRUU;
Configure enable/disable Displayname Quote;
9.3 STUN configuration
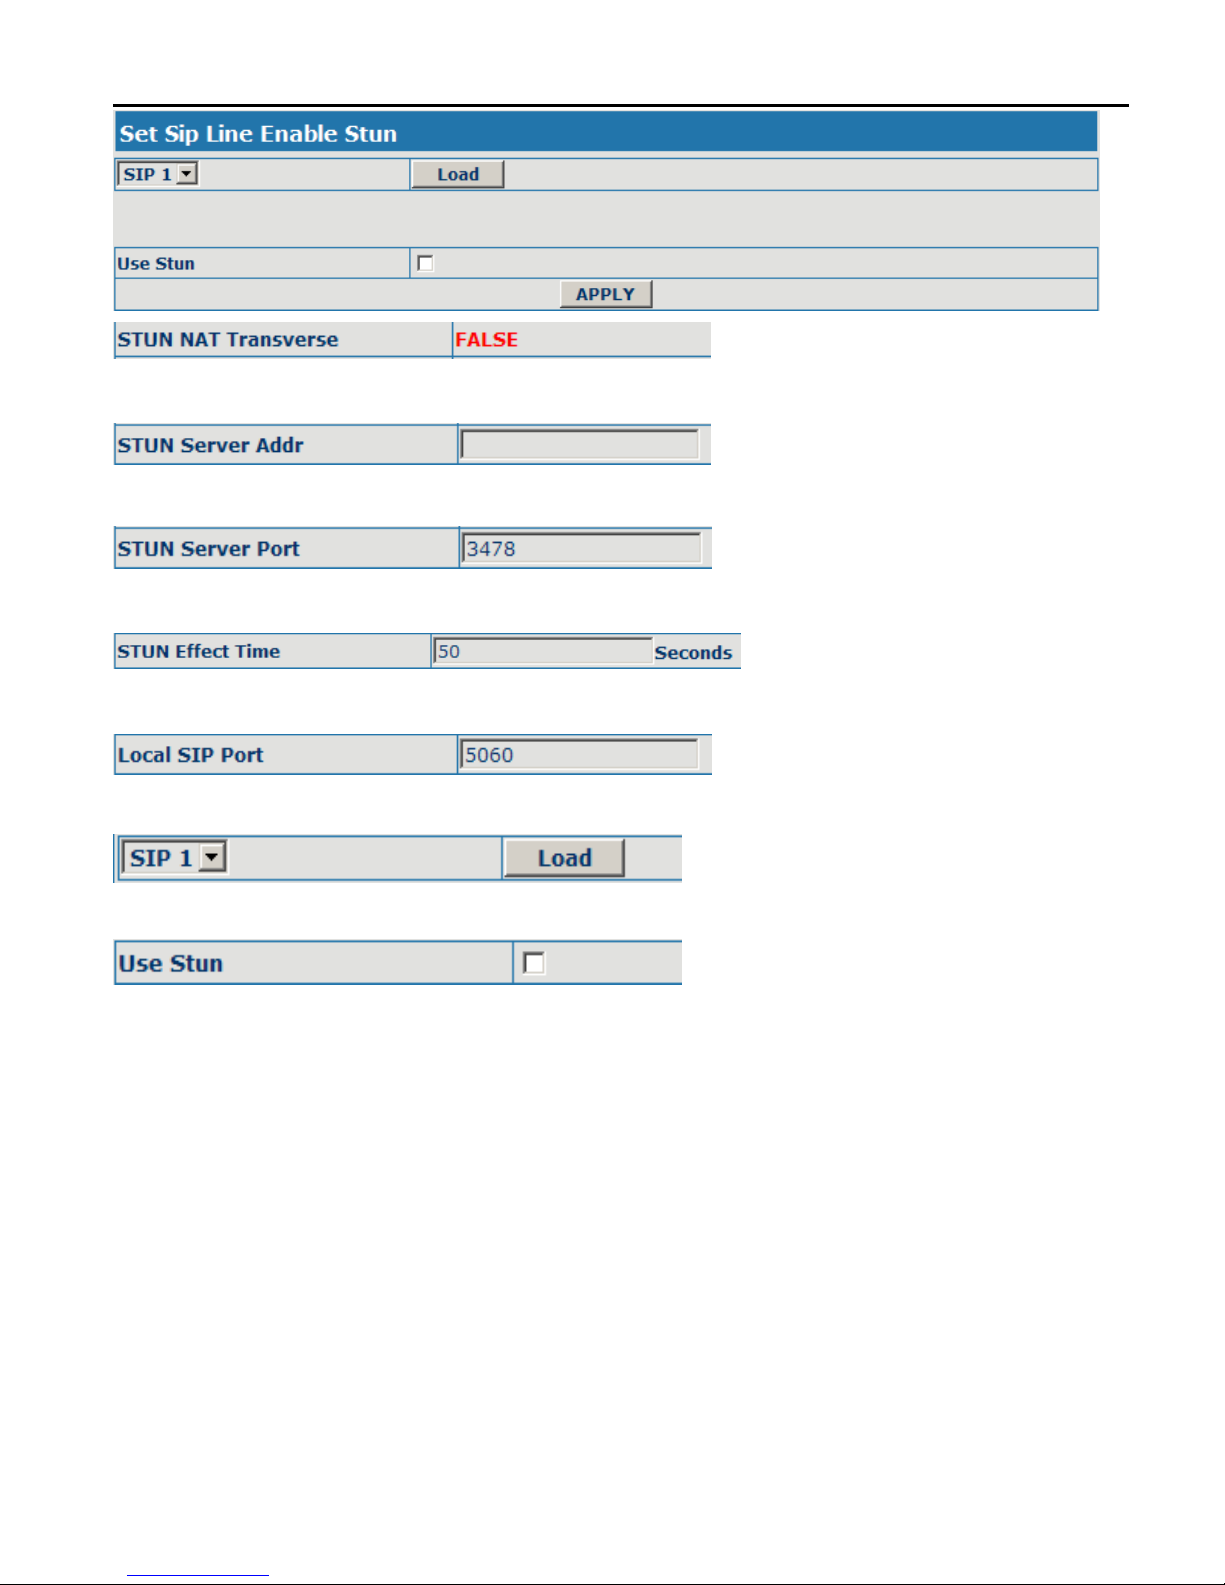
SIP STUN is a kind of server that used to realize the SIP's enablement of NAT,
when the STUN server IP of the phone has been configured(generally the
default port is 3478) and Enable SIP Stun has been selected, conventional
SIP server can be used to realize the phone's penetration of NAT.
Page 33
CDX-IPH301 -VoIP User Manual V1.0
33
Display the application status of the STUN NAT;
Configure IP address of SIP STUN server;
Configure port of SIP STUN;
Interval time for STUN's detection on NAT type, the unit is second;
Configure Local SIP port;
Select the Sip Line;
Configure enable/disable Use STUN;
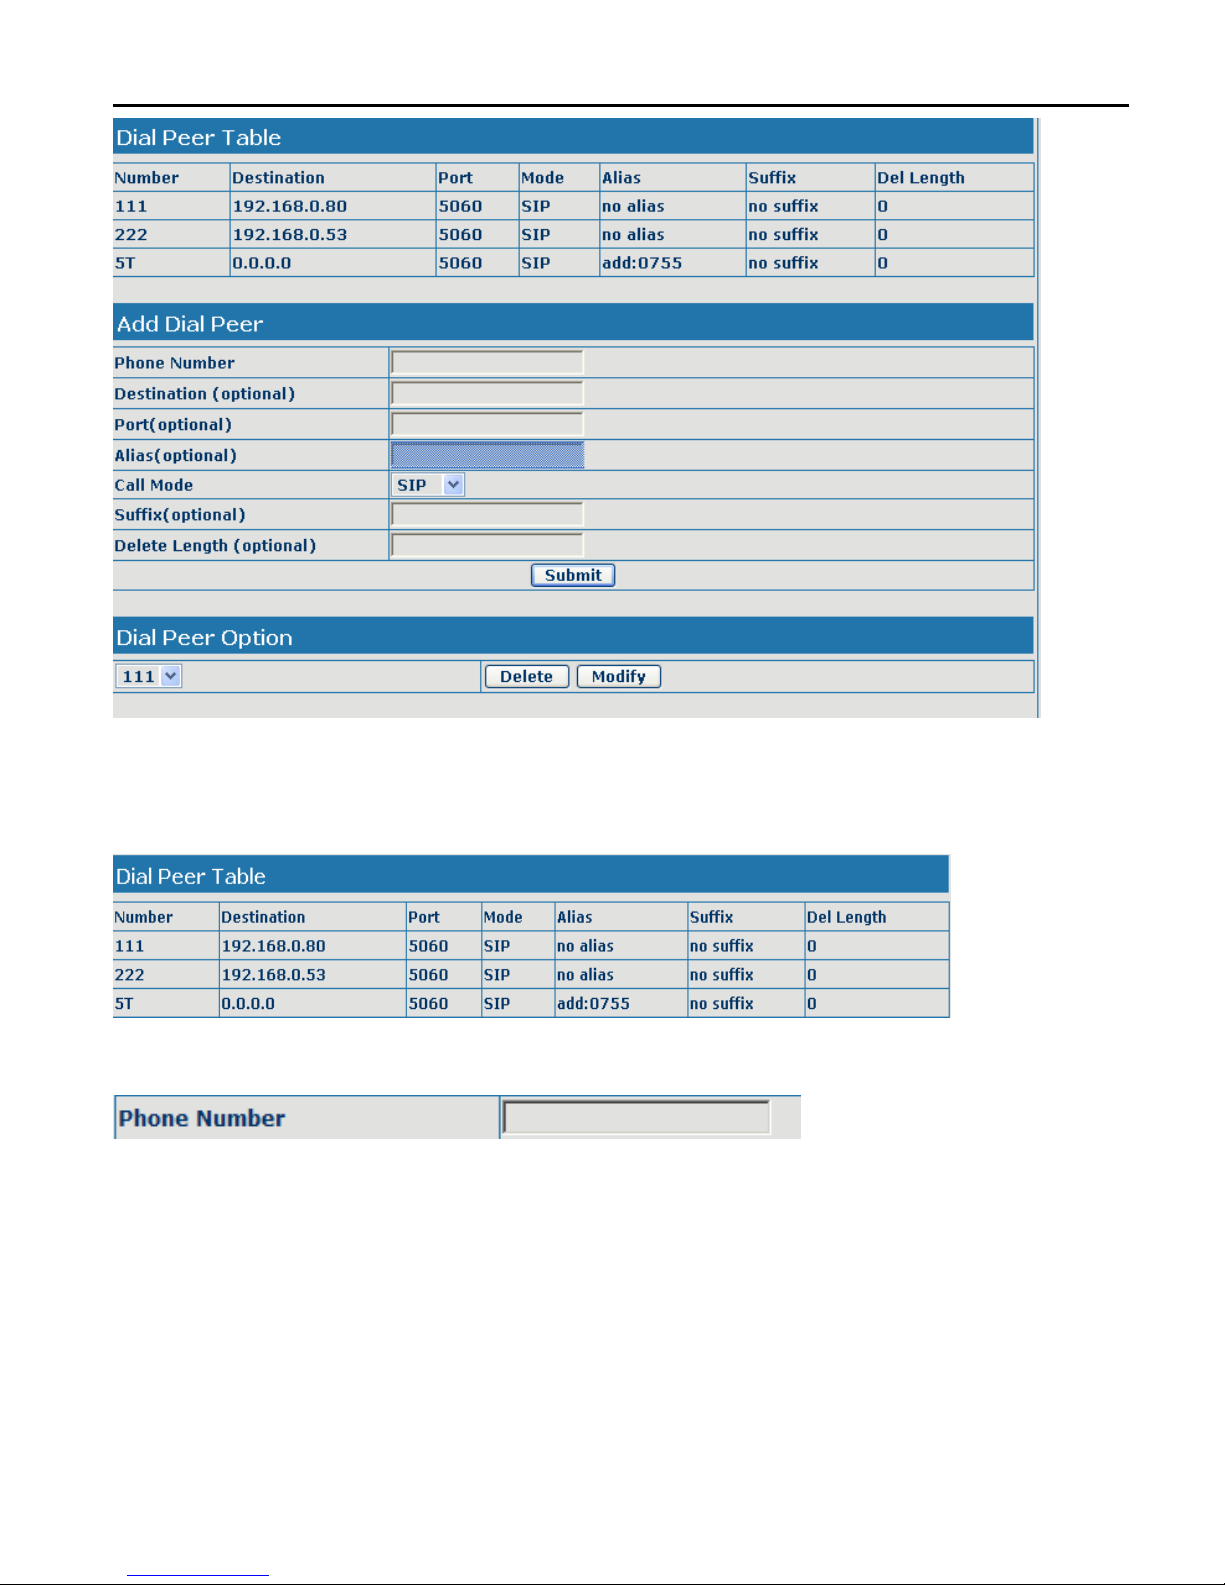
9.4 Dial Peer Configuration
Bases on this configuration, we can make the phone use different accounts
and run speed calling without swap.
When making deletion or modification, select the number firstly, then click
Delete or Modify, and complete the operation.
Page 34
CDX-IPH301 -VoIP User Manual V1.0
34
Configuration Explanation:
Display of calling number IP image list;
It is to add outgoing call number, there are two kinds of outgoing call number
setup: One is exactitude matching, after this configuration has been done,
when the number is totally the same with the user's calling number, the
phone will make the call with this number's IP address image or configuration;
Another is prefix matching( be equivalent to PSTN's district number prefix
function),if the previous N bits of this number are the same with that of the
Page 35
CDX-IPH301 -VoIP User Manual V1.0
35
user's calling number(the prefix number length),then the phone will use this
number's IP address image or configuration to make the call. When
configuring the prefix matching, letter "T" should be added behind the prefix
number to be distinguished from the exactitude matching; the longest length
is 30 bits.
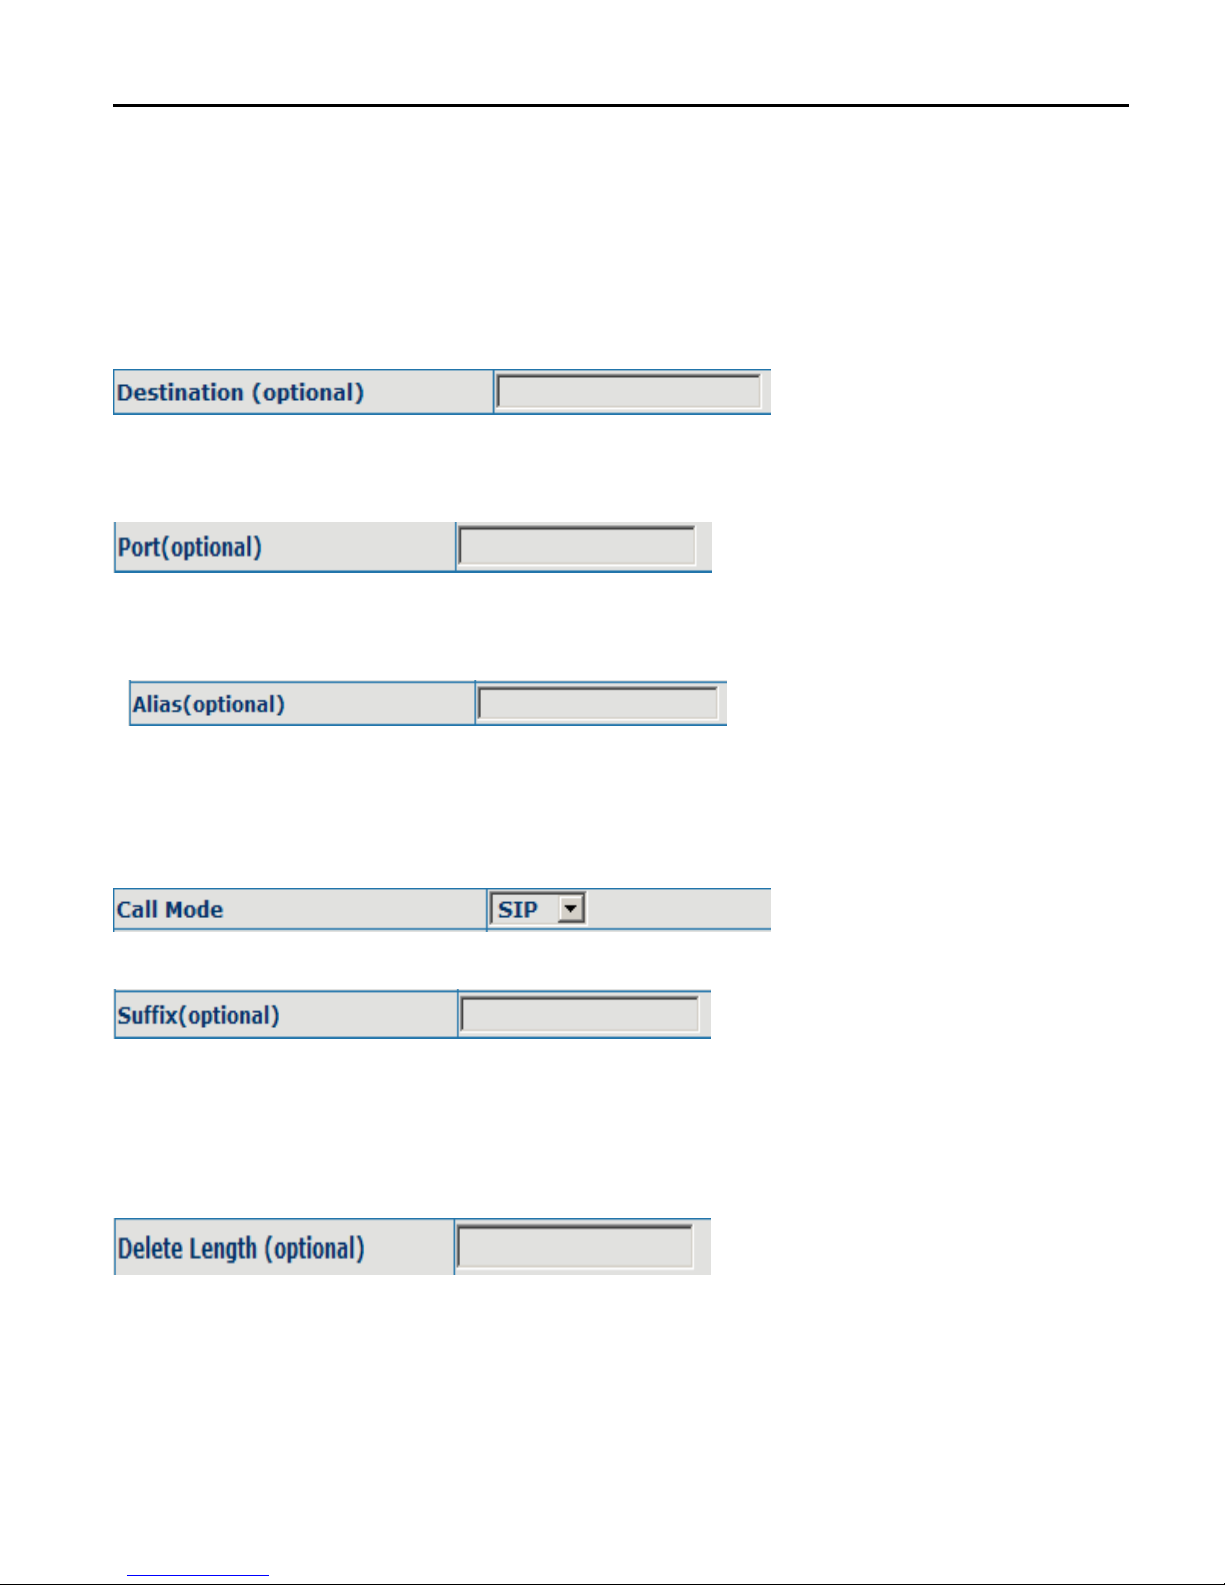
Configure destination address, destination is configured 0.0.0.0, it is SIP1
line.
Configure the protocol signal port, when nothing is input, the default of sip
protocol is 5060;
Configure alias, this is optional configuration item: it is the number to be used
when the other party's number has prefix; when no configuration has been
made, shown as no alias;
Configure the calling mode:IAX2 and SIP;
Configure suffix, this is optional configuration item: it is the additive dial-out
number behind the number; when no configuration has been made, shown as
no suffix;
Configure the replacing length, replace the number that user input according
to this length; this is optional configuration item.
Of which the alias can be divided into four types, it should be combined with
Page 36
CDX-IPH301 -VoIP User Manual V1.0
36
replacing length to make the setup:
Add: xxx, add xxx before number. in this way it can help user save the dialing
length;
All: xxx, the number is all replaced by xxx; speed dialing can be implemented,
for example, user configure the dialing number as 1, with the configuration
"all", the actual calling number will be replaced;
Del: delete n bit in the front part of the number, n can be decided by the
replacing length; this configuration can decide the protocol for appointed
number;
Rep: xxx, n bit in the front part of the number will be replaced. n is decided by
the replacing length. For example, user want to dial PSTN ( 0757 -
86228930 ) by VoIP's Rec/Finish over service, while actually the called
number should be 86757- 86228930,then we can configure called number
as 0757T,then rep:86757,and then set the replacing length as 3. So that
when user make a call with 0757 prefix, the number will be replaced as
86757 plus the number and then sent out. It is a convenient thinking mode for
user to make a call;
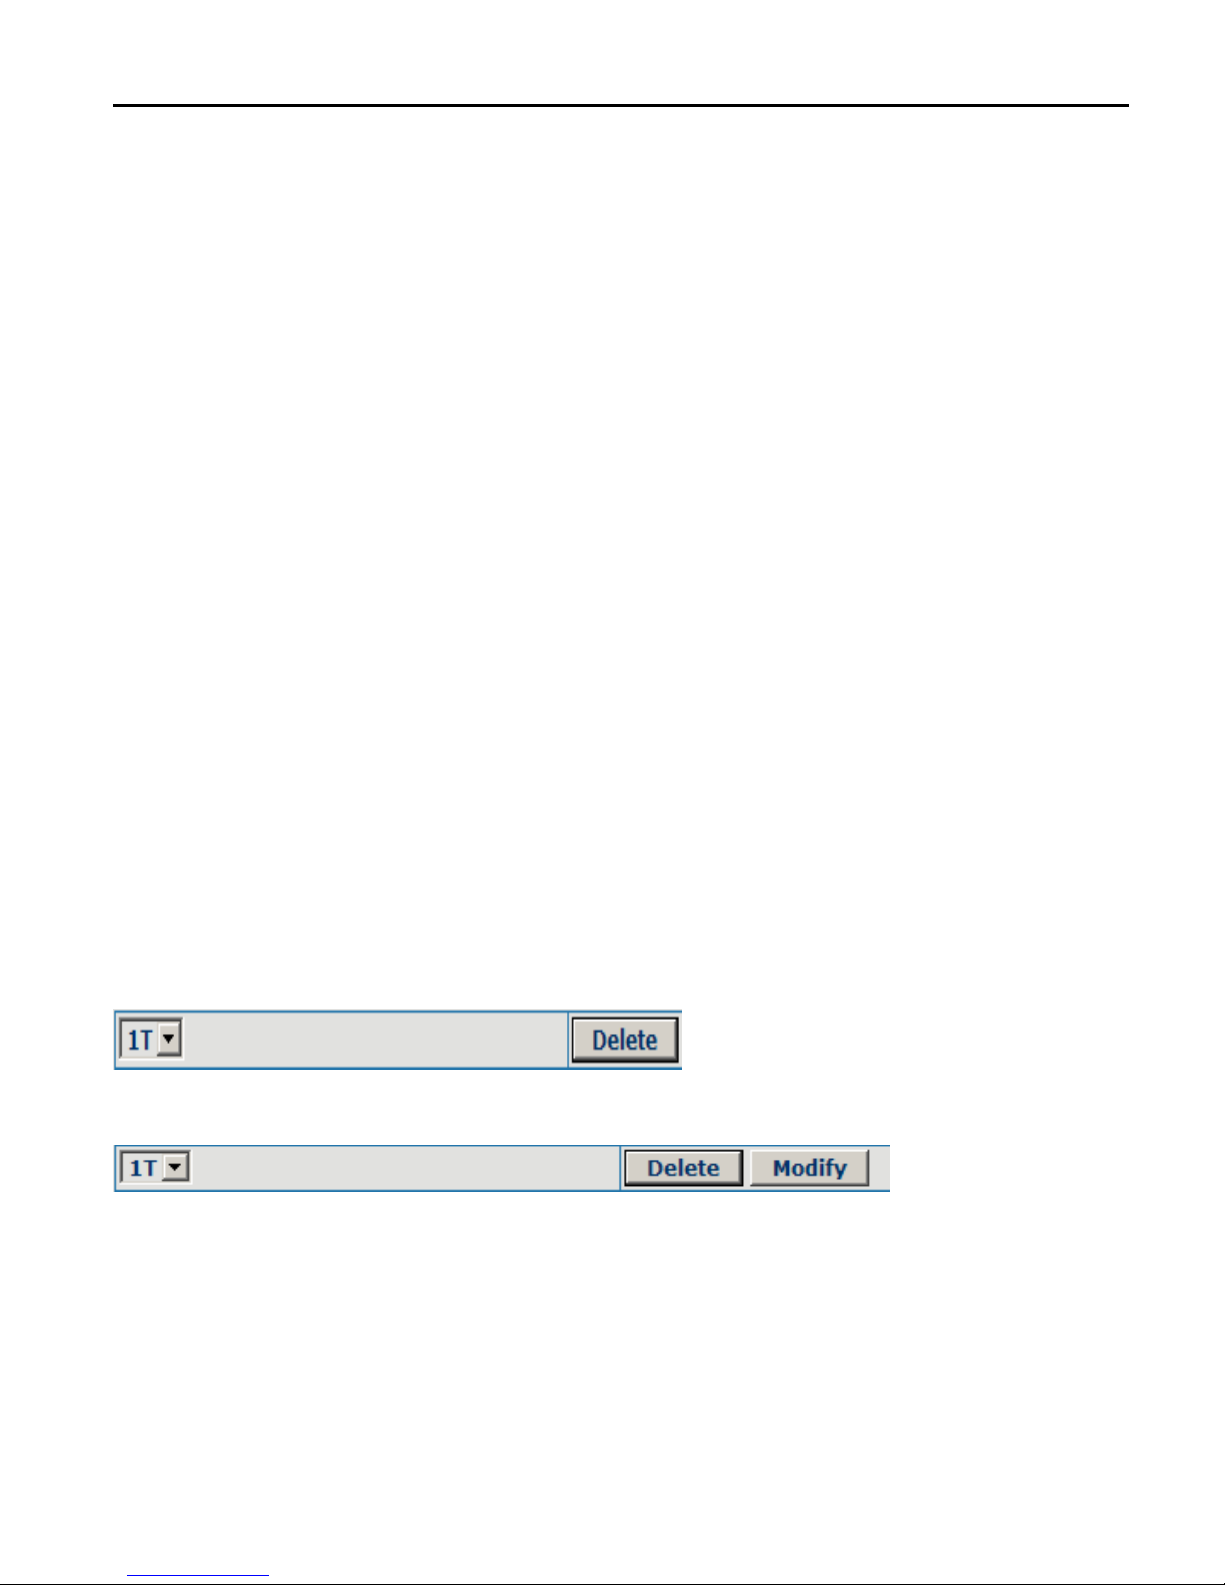
Delete selective number IP image;
If user want to modify a certain current number image, first select in the
drop-down menu and then load the image parameter of the said number,
click modify to make modification; of which:
Page 37
CDX-IPH301 -VoIP User Manual V1.0
37
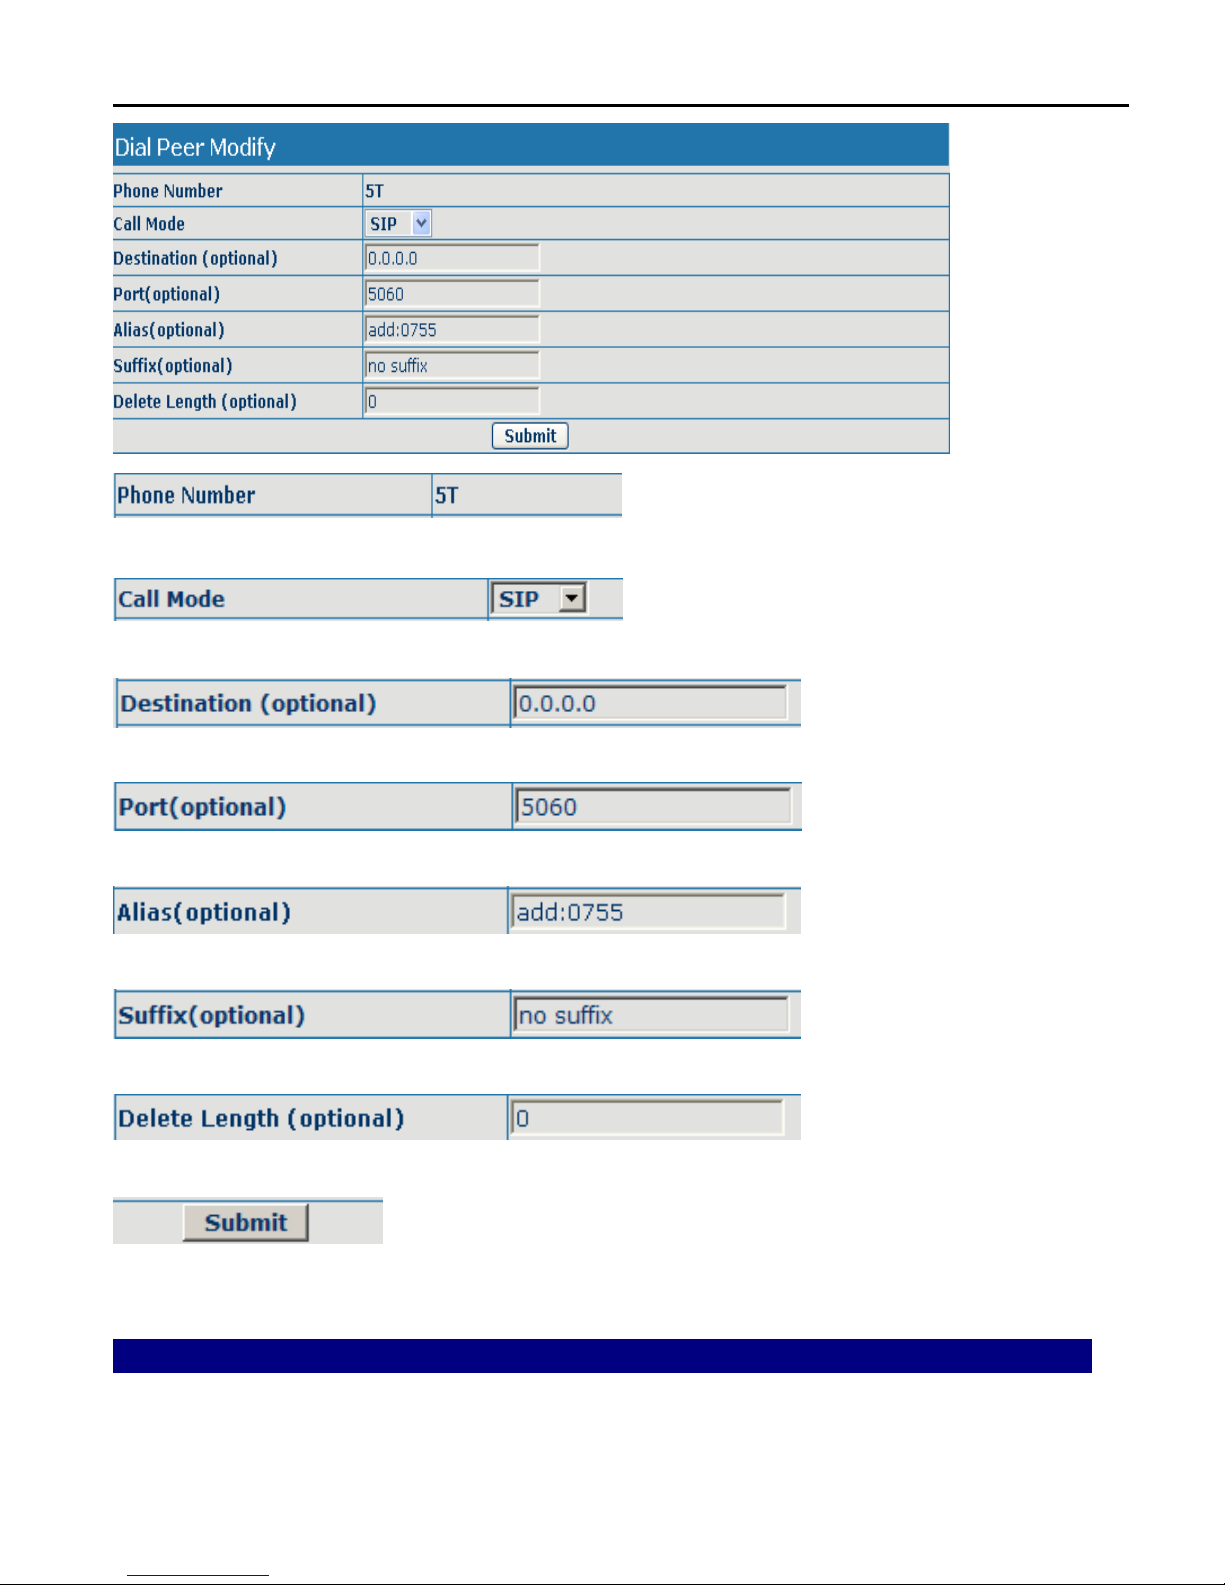
this is the modified number. read-only;
To modify call mode;
To modify destination address; this is optional configuration item;
To modify destination phone port; this is optional configuration item;
To modify alias; this is optional configuration item;
To modify suffix; this is optional configuration item;
To modify replacing length(if rep and del of alias have been configured);
Click submit to go into effect.
10 Phone Configuration
Page 38
CDX-IPH301 -VoIP User Manual V1.0
38
10.1 DSP configuration
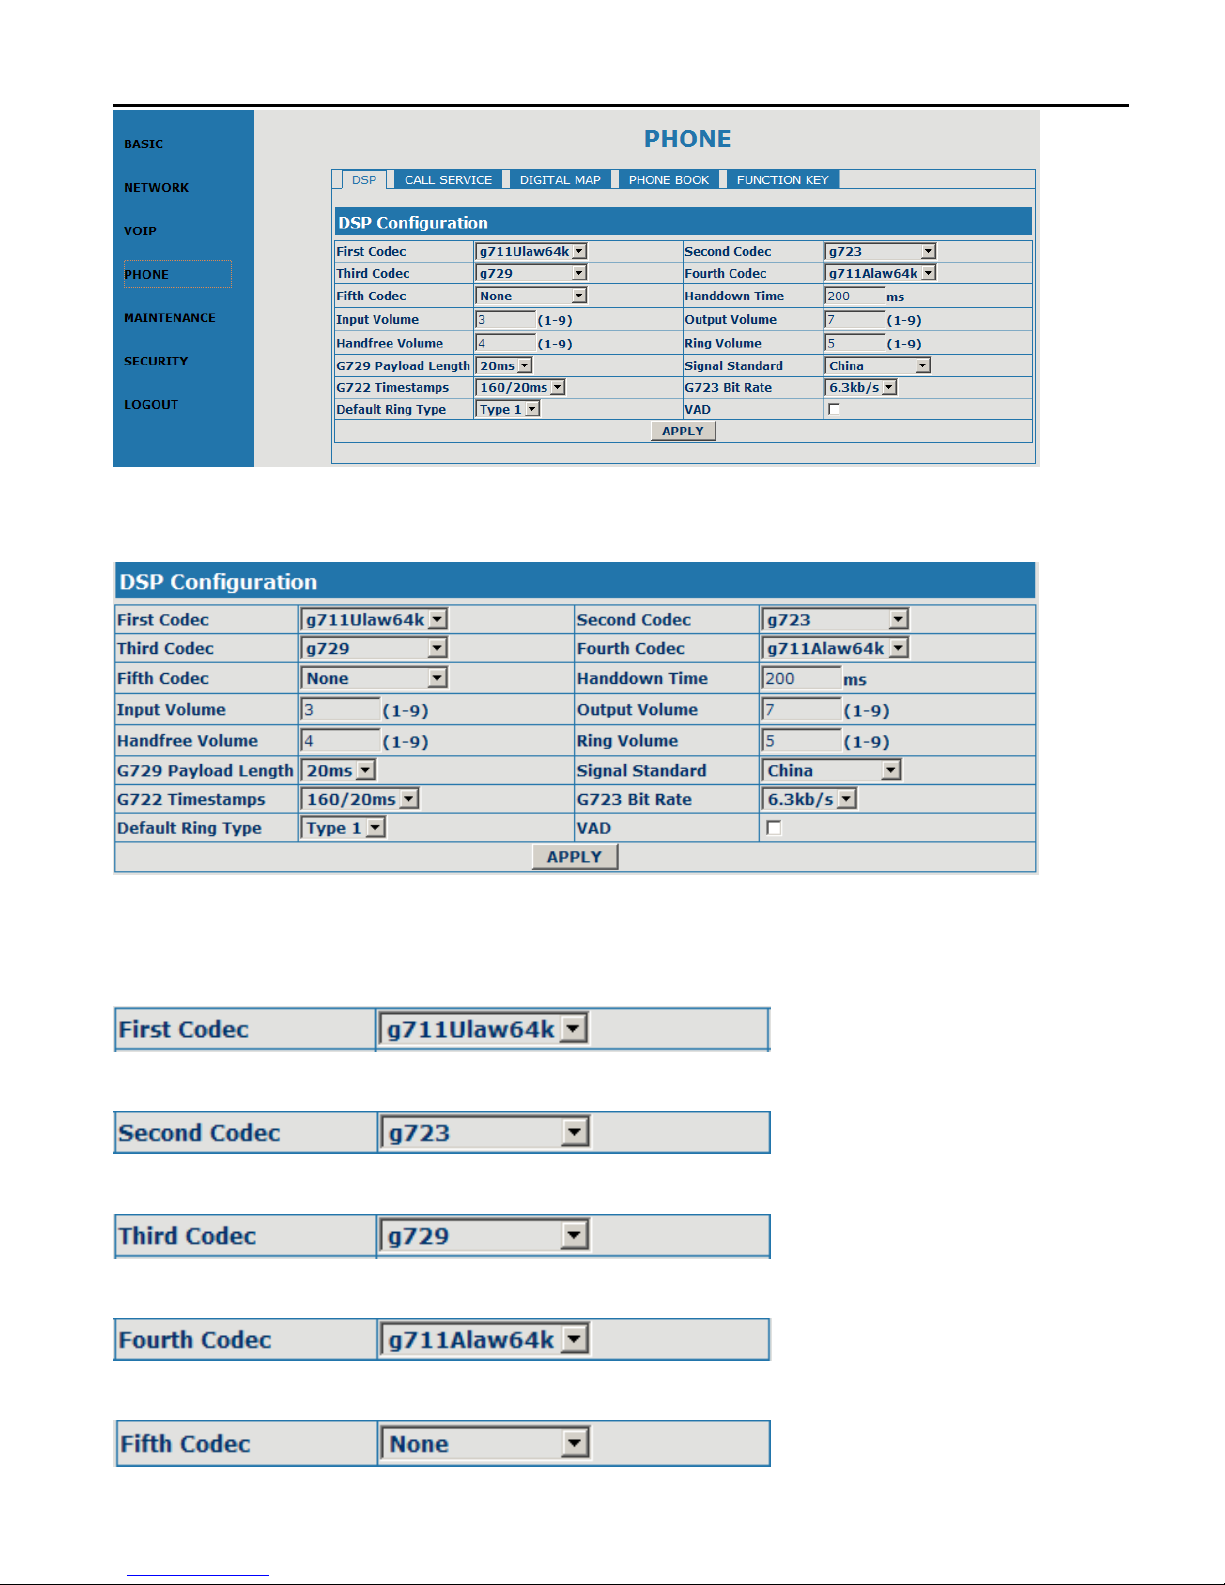
On this page, user can set speech coding, IO volume control, cue tone
standard, caller ID standard and so on.
Configure the first codec;
Configure the second codec;
Configure the third codec;
Configure the fourth codec;
Page 39
CDX-IPH301 -VoIP User Manual V1.0
39
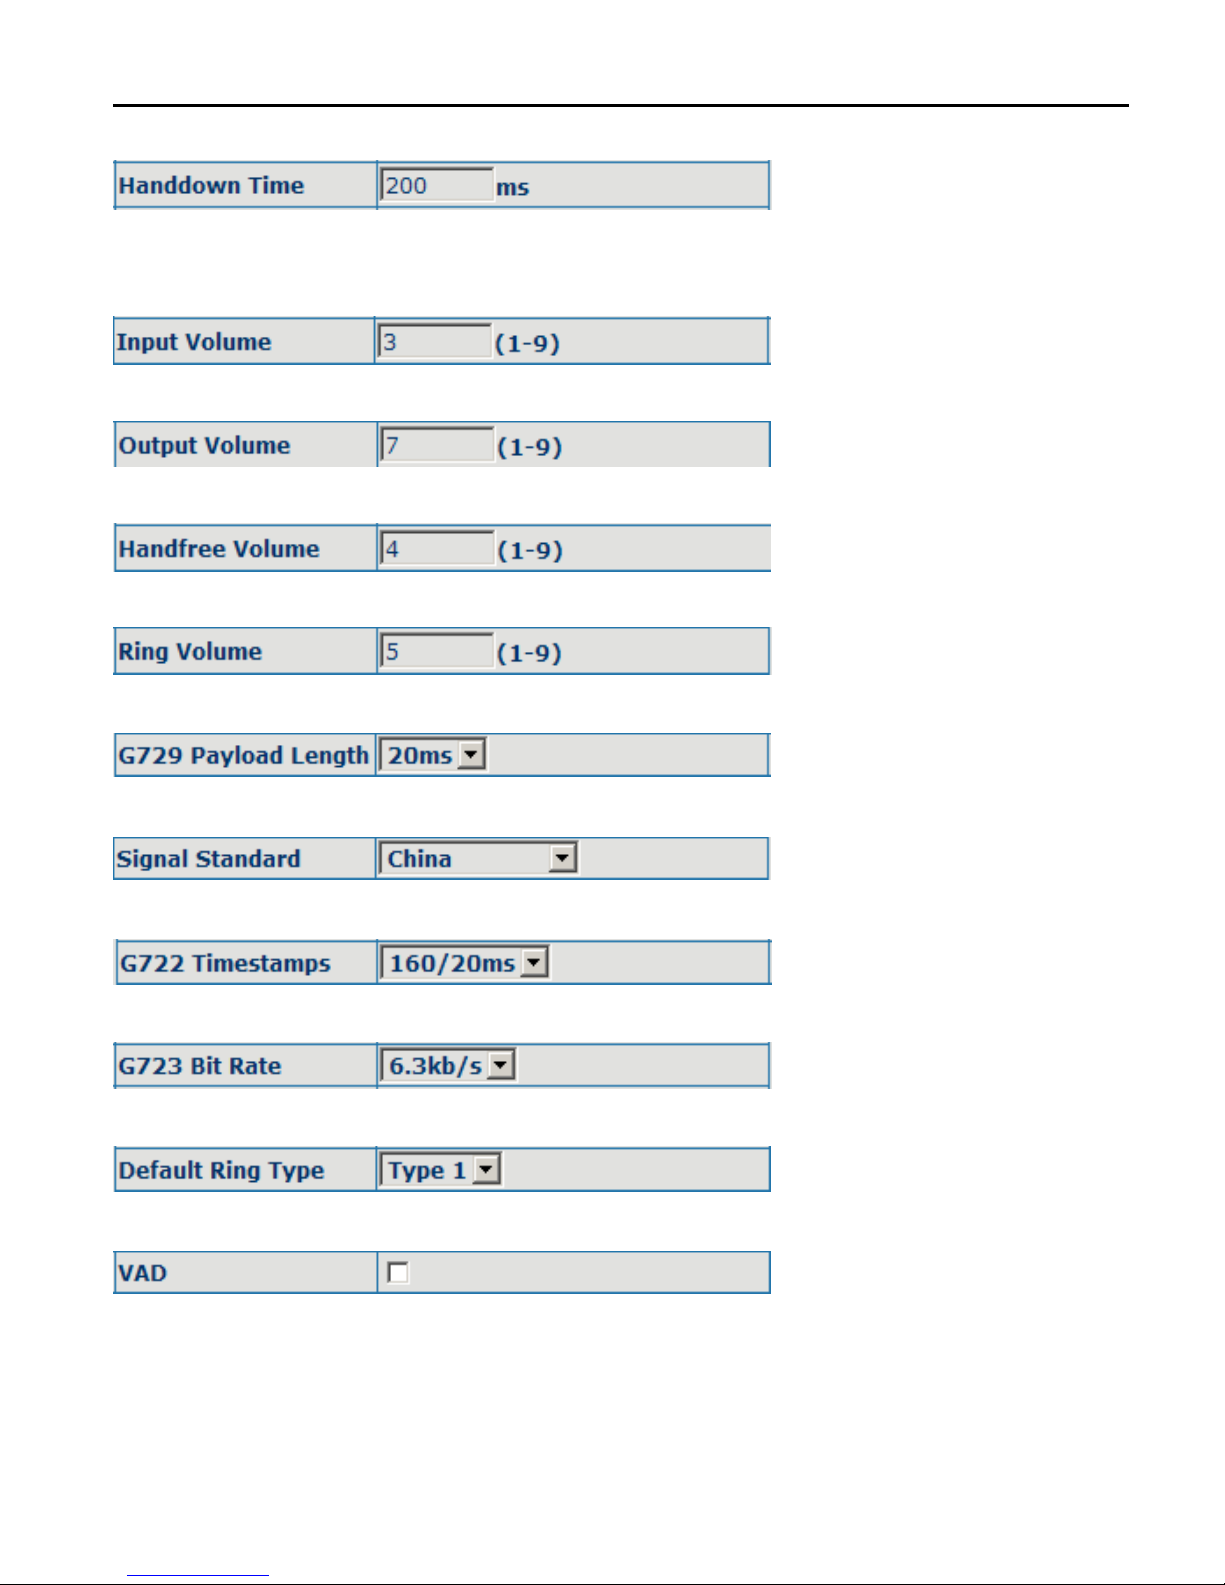
Configure the fifth codec;
Configure handdown time, that is, if the hooking time is shorter than this time,
then the gateway will not consider the user has handdown.
Configure input volume;
Configure output volume;
Configure handfree volume;
Configure ring volume;
Configure G729 payload length;
Configure signal standard;
Configure G.722 timestamps;
Configure G.723 bit rate;
Configure default ring type;
Configure enable/disable VAD.
10.2 Call service configuration
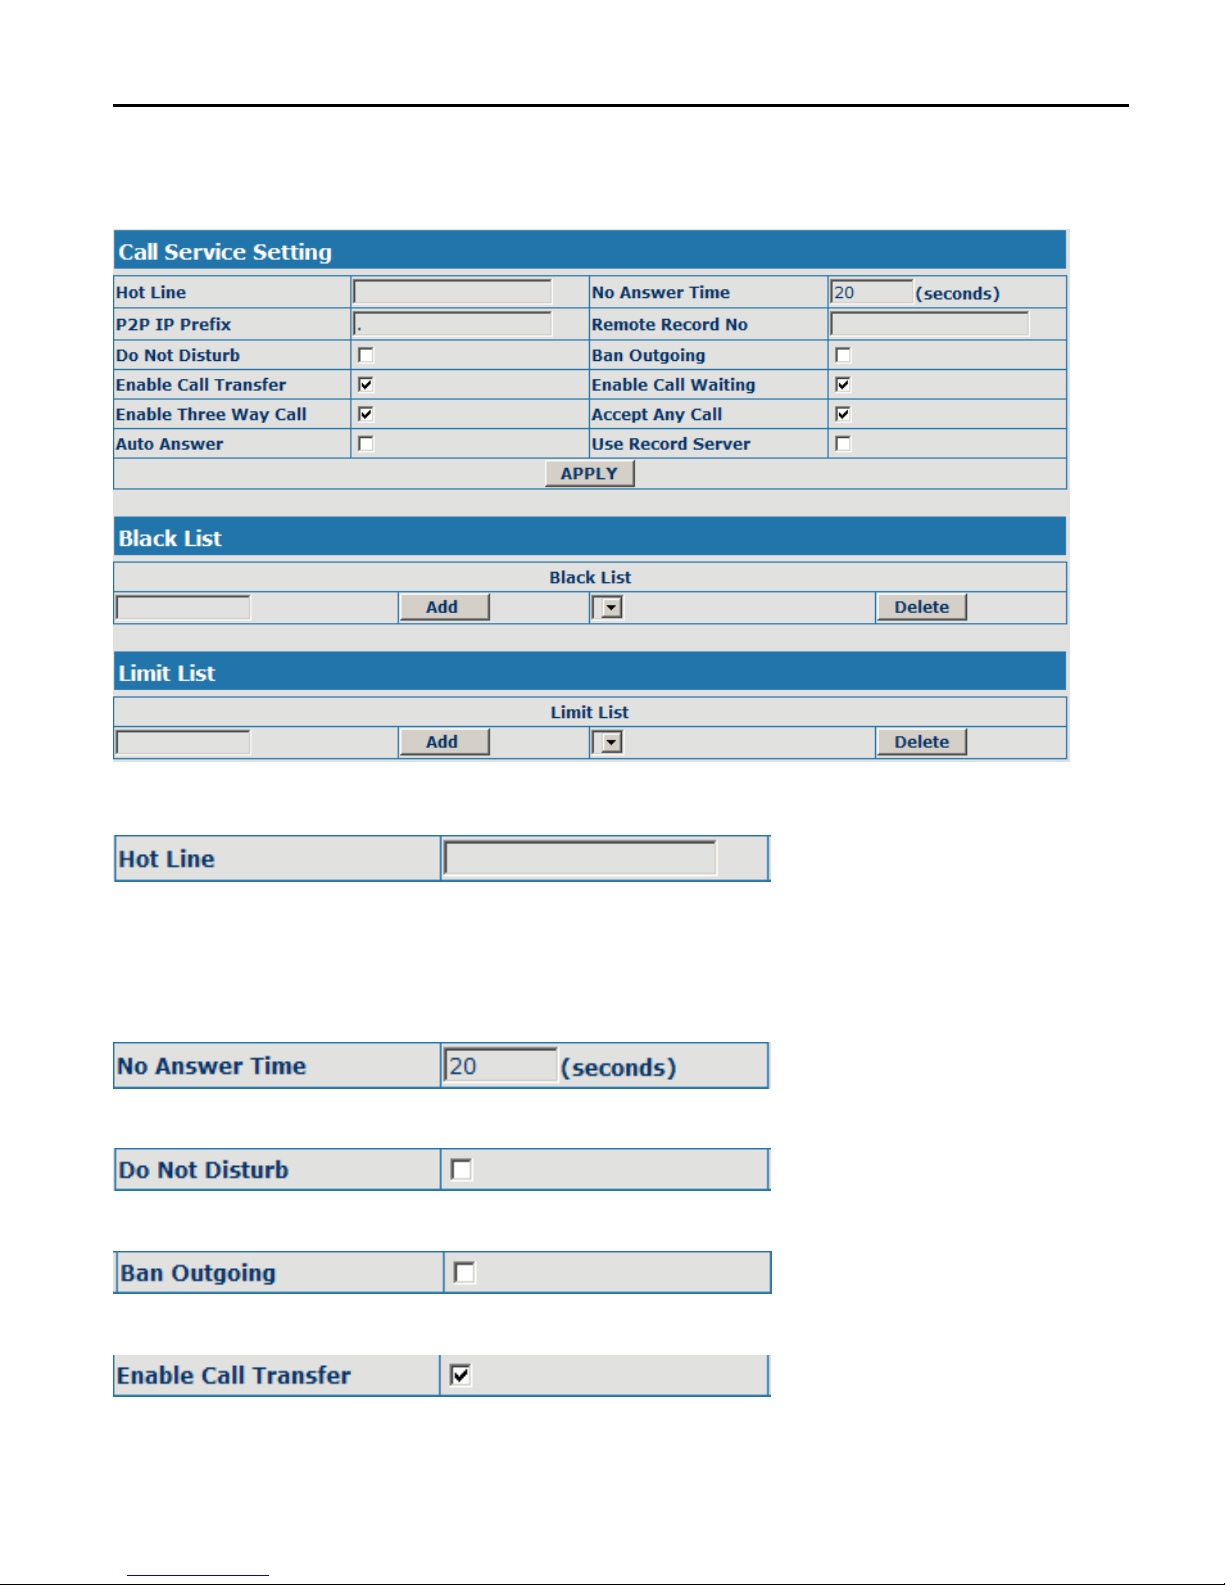
On this page, user can set value added services such as hot-line, call
Page 40
CDX-IPH301 -VoIP User Manual V1.0
40
forwarding, call transfer (CT), call-waiting, three way call, blacklist, out-limit
list and so on.
Configuration Explanation:
Configure hot-line number of the port. With this number of the port, this
hot-line number will be dialed automatically as soon as off-hook and user
can't dial any other number;
Configure no answer time;
Configure enable/disable Do Not Disturb;
Configure enable/disable Ban outgoing;
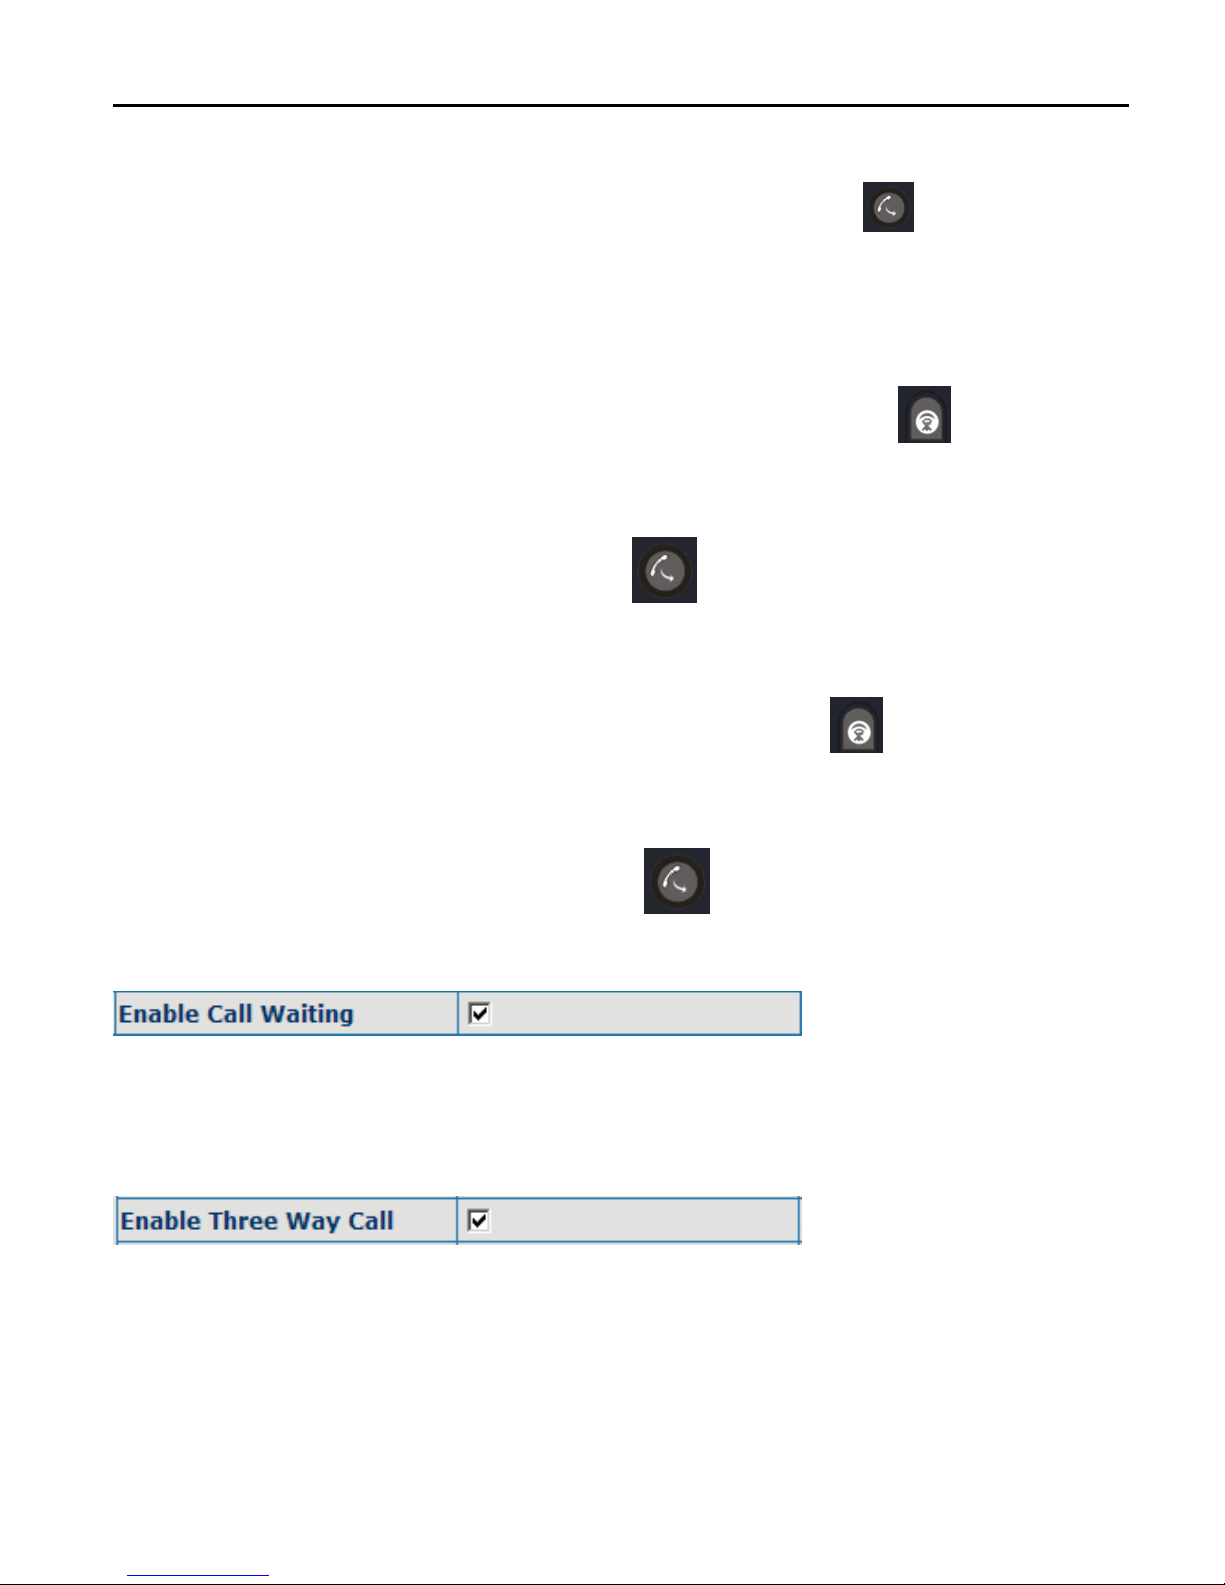
Configure enable/disable call transfer (CT); after it is enabled, there are two
Page 41
CDX-IPH301 -VoIP User Manual V1.0
41
modes call transfer as below:
UNATTENDED TRANSFER: During conversation, press button and input
transferred number end with 【#】 to transfer the phone to the third part and
hang up automatically
HALF ATTENDED TRANSFER: During conversation, press button to hold
this line, and input transferred number end with【 # 】to get through another
line. When third part is ringing, press button to end conversation and
transfer the phone to the third part and hang up automatically.
ATTENDED TRANSFER: During conversation, press button to hold this
line, and input transferred number end with【 # 】to get through another line.
After conversation with third part, press button to end conversation and
transfer the phone to the third part and hang up automatically.
Configure enable/disable call waiting service; after it is enabled, user can
hold calls of the other party by hooking, with hooking again, and the hold call
can go on;
Configure enable/disable three way call; user can call the other part as the
call origination, after talking, make hooking to hold this part and then press
【Speed Dial/Conference】 key to hear the dialing tone, after call completion
to the third party, hooking again to recover the talk with the second part, then
Page 42
CDX-IPH301 -VoIP User Manual V1.0
42
the three way call concurrently;
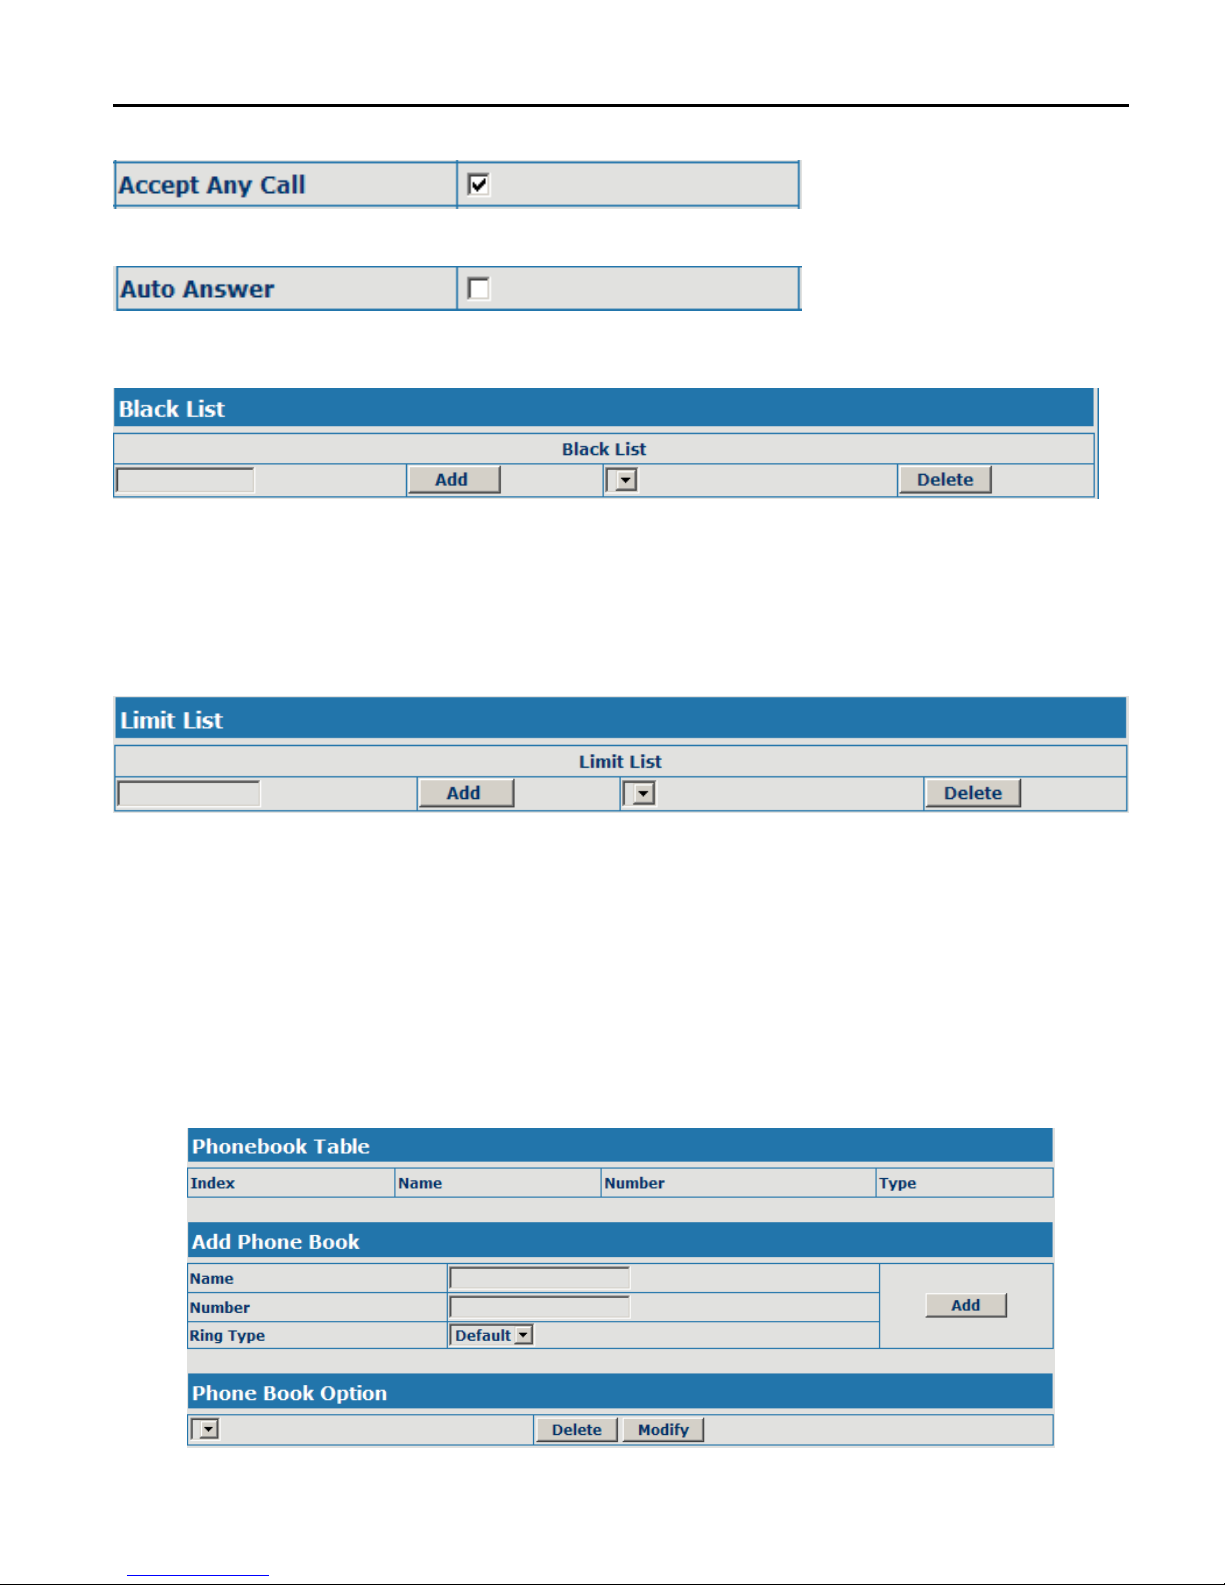
Configure enable/disable Accept Any Call;
Configure enable/disable Auto Answer;
Configure add/delete blacklist. If user doesn't want to answer a certain
number, please add this number to the list, and then this number will be
unable to get through the phone.
Configure out-limit list; for example, if user don't want the phone to dial
a certain number, please add the number to this table, and the user will
be unable to get through this number.
10.3 Phone book configuration
On this page, user can add, delete and modify telephone book.
Page 43
CDX-IPH301 -VoIP User Manual V1.0
43
NOTE: SOME ISP INTERNET MAY INHIBIT THE PHONE TO
REGISTER AND CANCEL THE REGISTER IN SUCCESSION, SO
USER HAD BETTER NOT APPLY OR REGISTER AND CANCEL
SOON IN SUCCESSION AND SUBMIT REGISTRATION
REPEATEDLY. SERVER MAY STOP RESPONSE OF DIALOGUE
MACHINE, THEN THE PHONE RECEIVES NO CERTIFICATION OF
REGISTER/CANCEL LOGIN REQUEST AND REGISTRATION
STATE WILL SHOW AS INCORRECT!
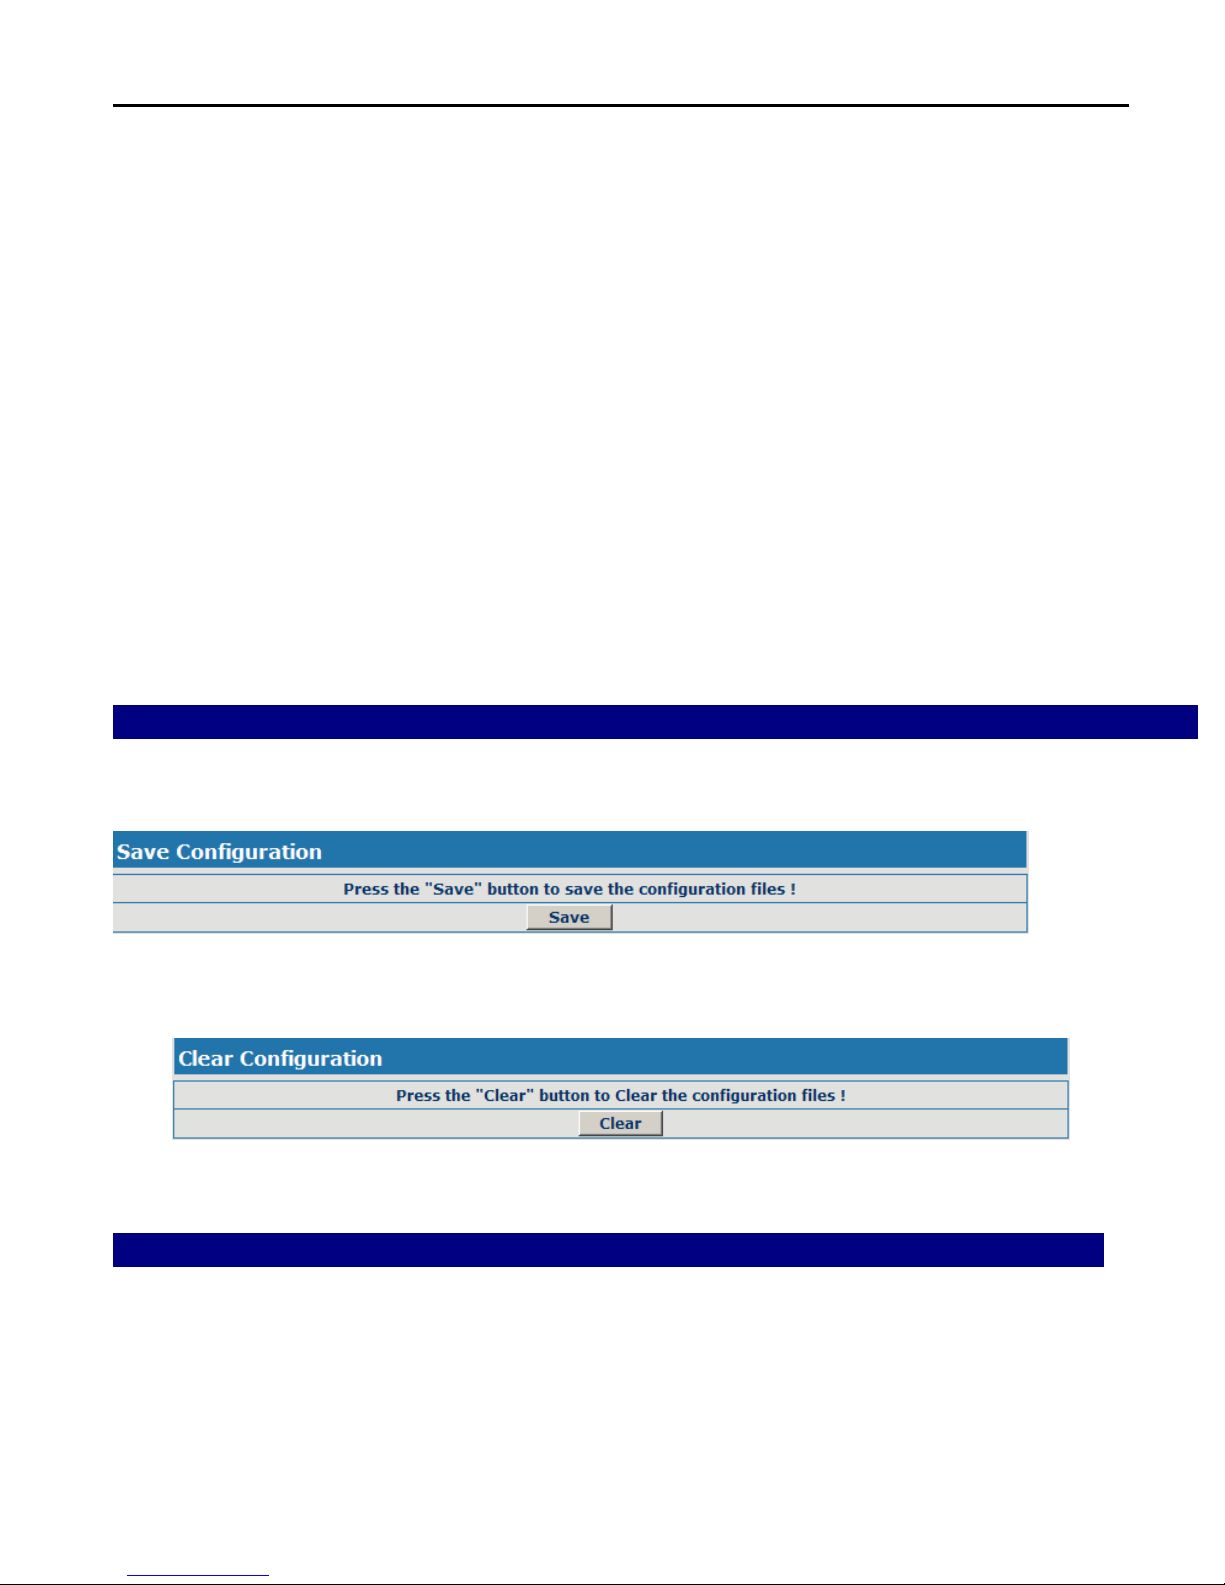
11 Save and Clear Configuration
User can save the current configuration on this page.
The system configuration can be set as factory default configuration on clear
config page and the phone will restart automatically.
12 Security Configuration
12.1 MMI Filter configuration
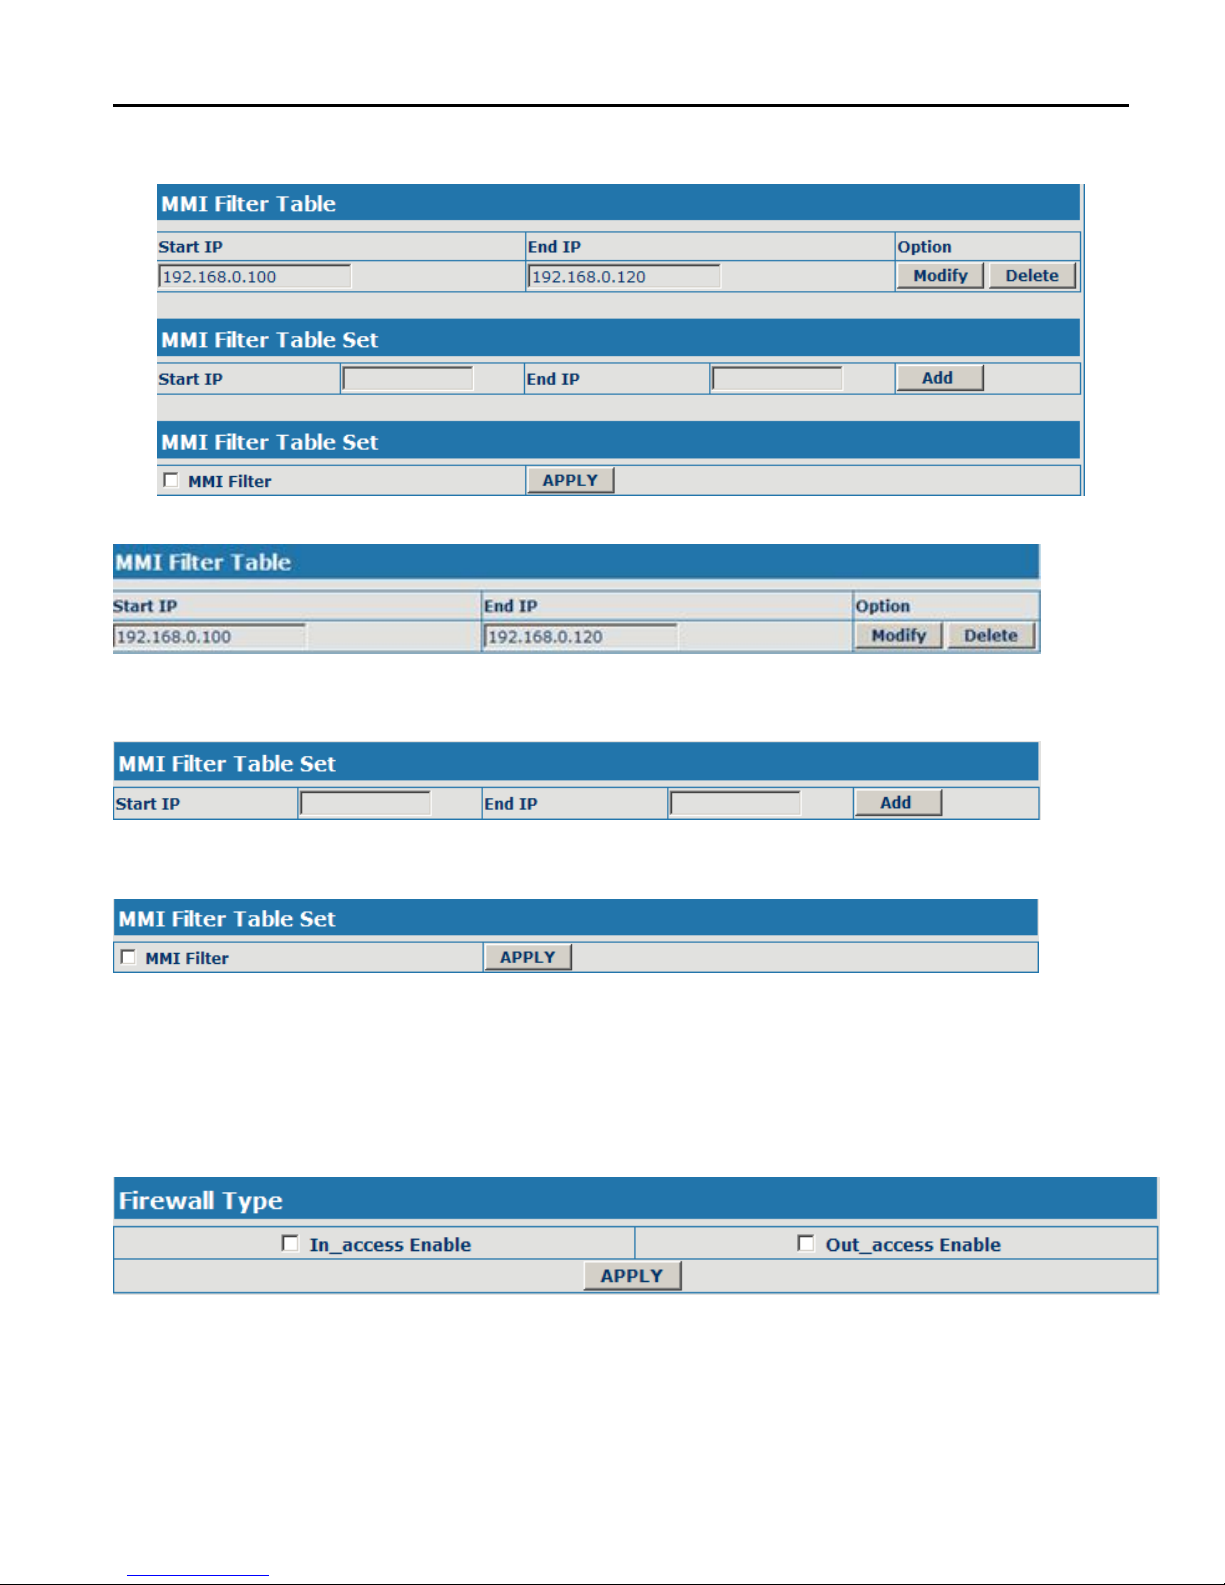
On the page, user can configure the function of the MMI Filter. This feature
allows only the host within the MMI filter table that they can logon the WEB
Page 44
CDX-IPH301 -VoIP User Manual V1.0
44
page.
On the MMI filter table, user can modify and delete the MMI filter;
Add MMI filter table;
Configure enable/disable MMI Filter.
12.2 Firewall configuration
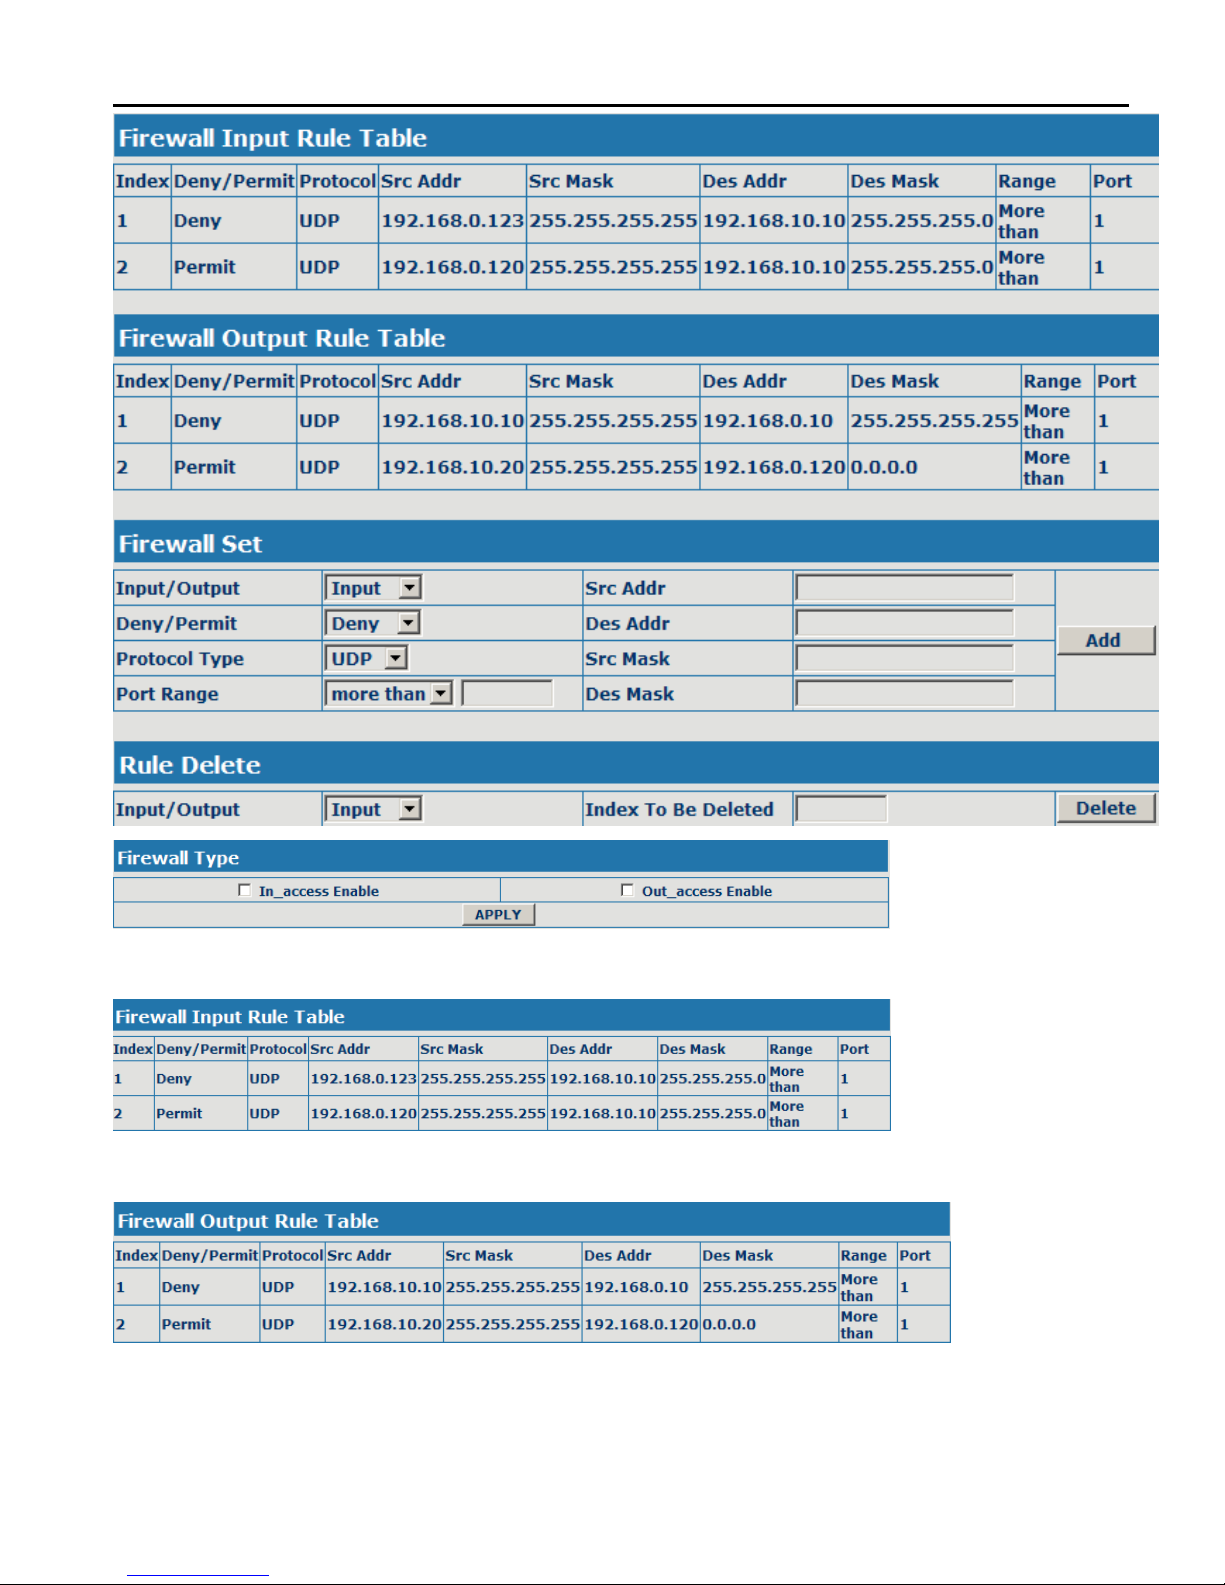
On the page, user can configure the function of the firewall.
Page 45
CDX-IPH301 -VoIP User Manual V1.0
45
Select firewall type;
Display firewall input rule table;
Display firewall output rule table; in the table , Src address and Src Mask
confirm the range of the source address, For example : Src
Page 46
CDX-IPH301 -VoIP User Manual V1.0
46
addr(192.168.10.10) and Src Mask(255.255.255.255) can confirm that the
host is 192.168.10.10;Dse addr(192.168. 0.120) and Des Mask(0.0.0.0)
can confirm any host; Src addr(192.168.10.20) and Src
Mask(255.255.255.0) confirm any host within the 192.168.10.0 network
segment. So, when the Index is “1” in the output rule table, and the definition
of rule is: the UDP package of the host(192.168.10.10) can’t was sent to
the host(192.168.10.10);when the Index is “1” in the output rule table, and
the definition of rule is:the host(192.168.10.20) can send the UDP package
to any host.
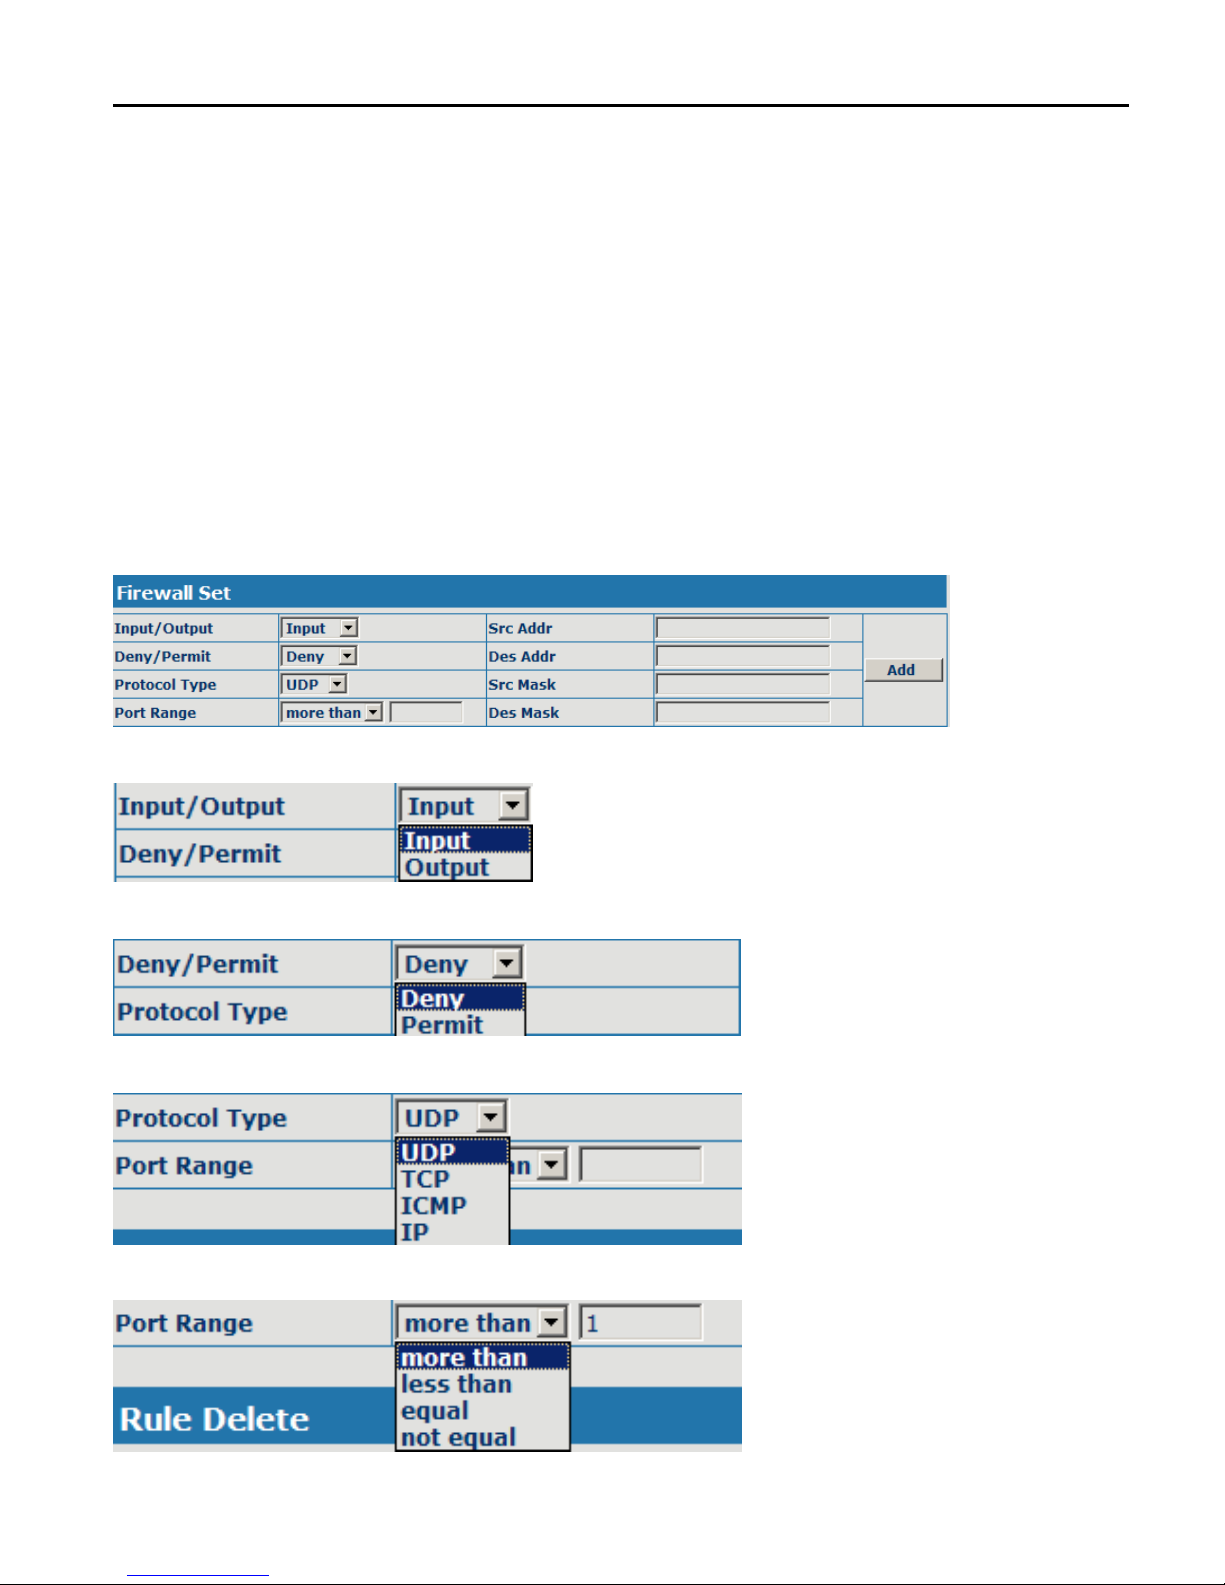
Configure the firewall.
Select the rule of the firewall( input or output);
Select the condition(deny or permit);
Select protocol type(UDP, TCP,ICMP or IP);
Page 47
CDX-IPH301 -VoIP User Manual V1.0
47
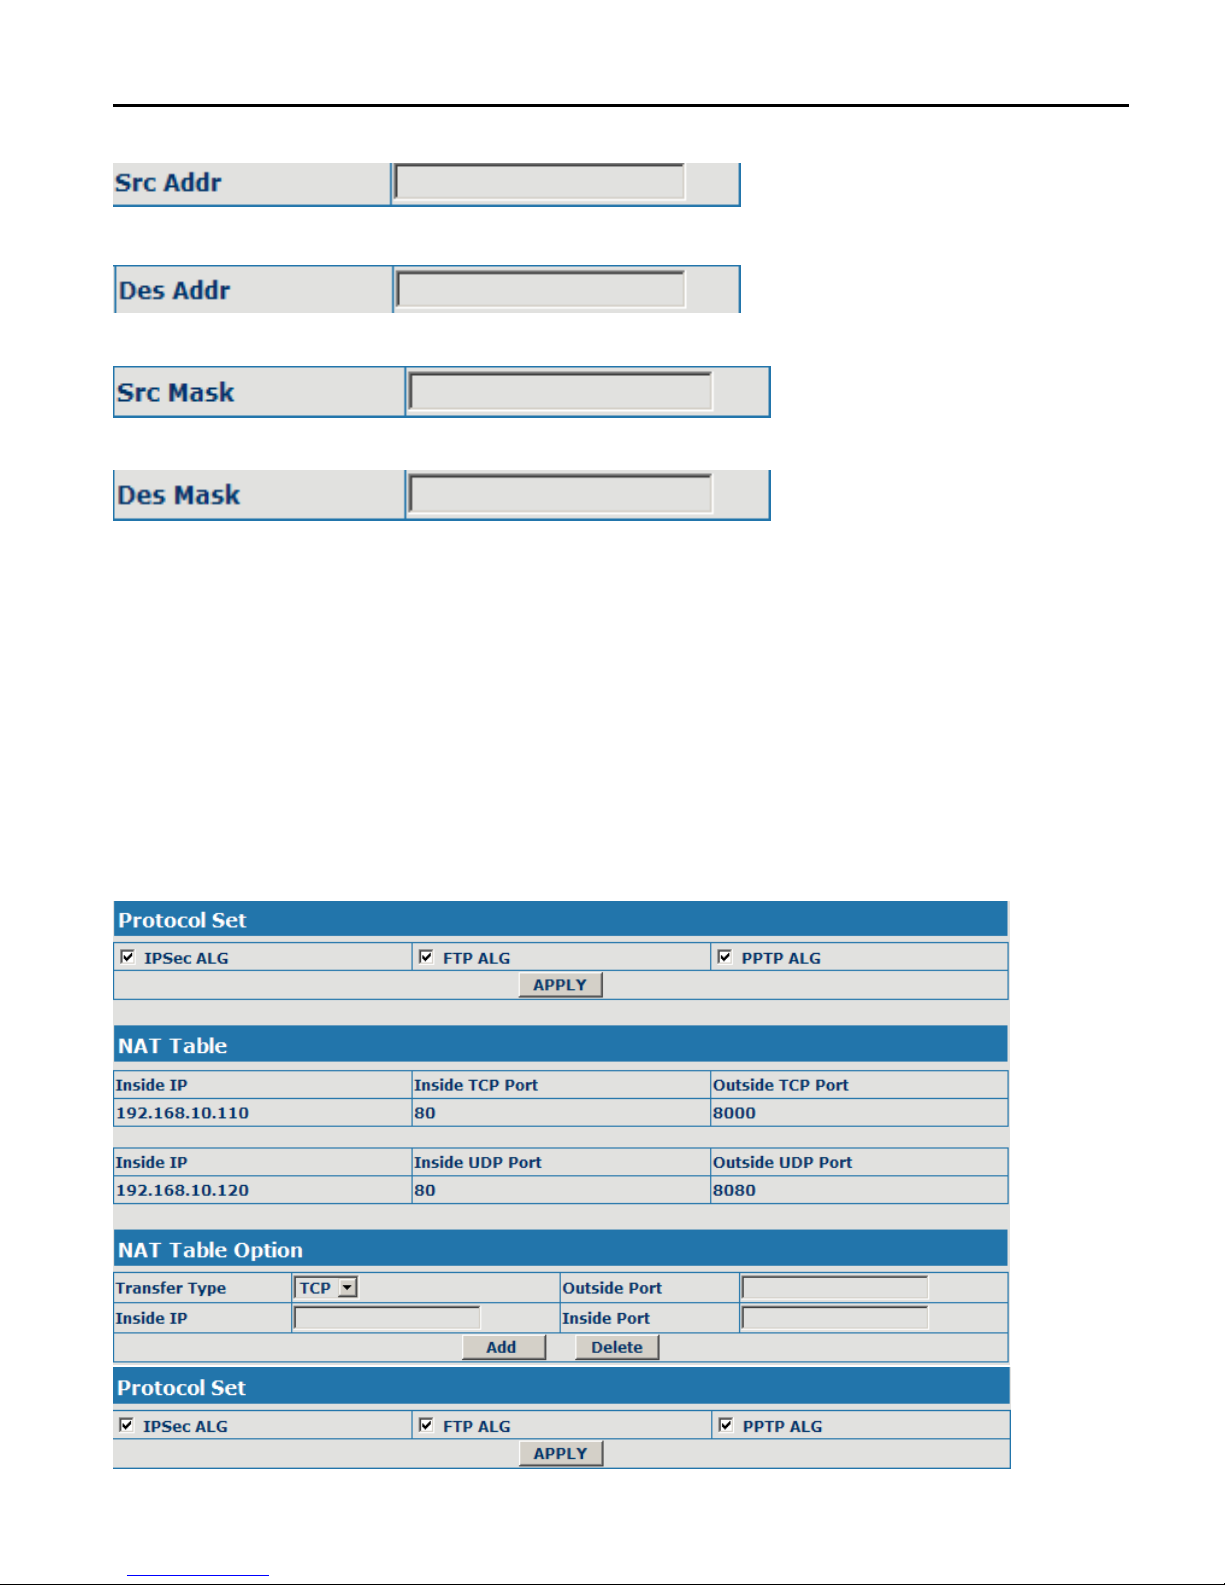
Configure port range;
Configure source IP address;
Configure destination IP address;
Configure source Mask;
Configure destination Mask;
12.3 NAT and DMZ configuration
On the page, user can configure NAT and DMZ. T function of the NAT is a
network port mapping and the function of the DMZ is a network address
mapping.
NAT configuration
Page 48
CDX-IPH301 -VoIP User Manual V1.0
48
Configure NAT of the Application Layer Gateway(ALG);the protocol includes:
IPSec, FTP and PPTP.
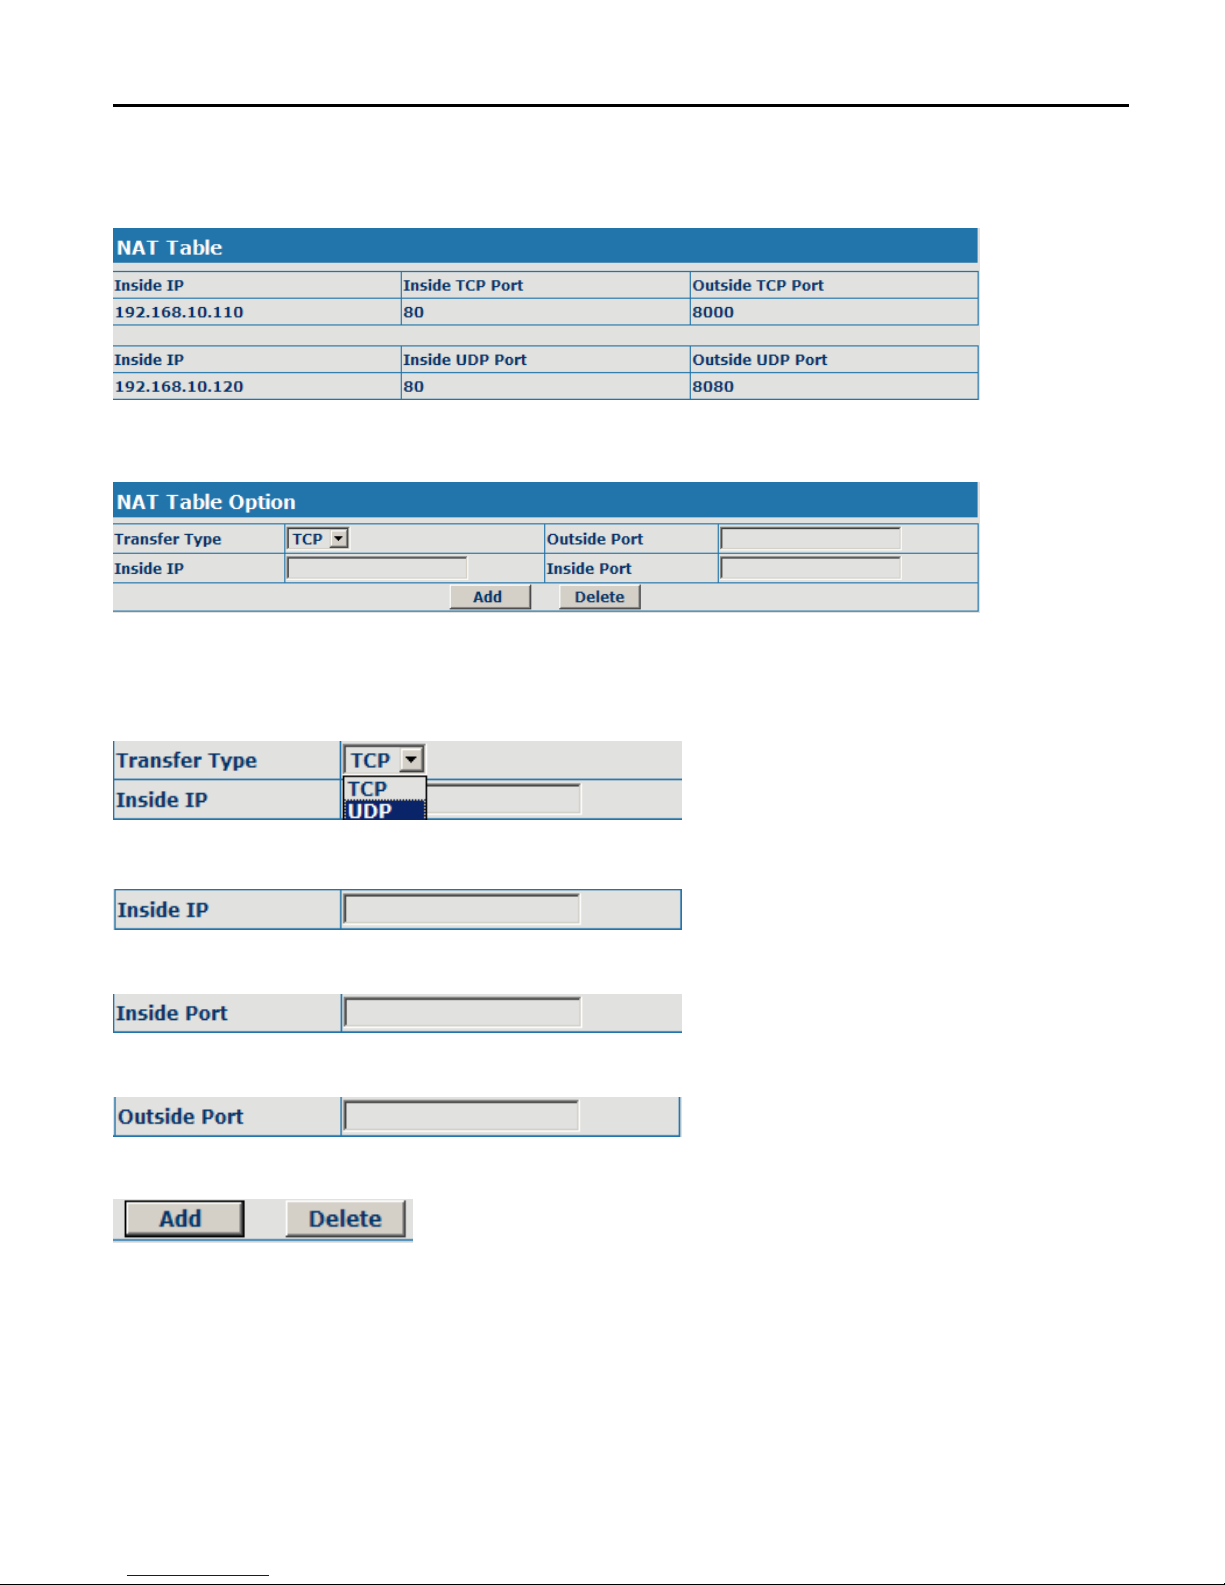
Display NAT table;
Add and delete NAT table (configure NAT of the Transport Layer, the protocol
includes: TCP and UDP);
Select transfer type;
Configure Inside IP;
Configure Inside port;
Configure Outside port;
Add or delete NAT table;
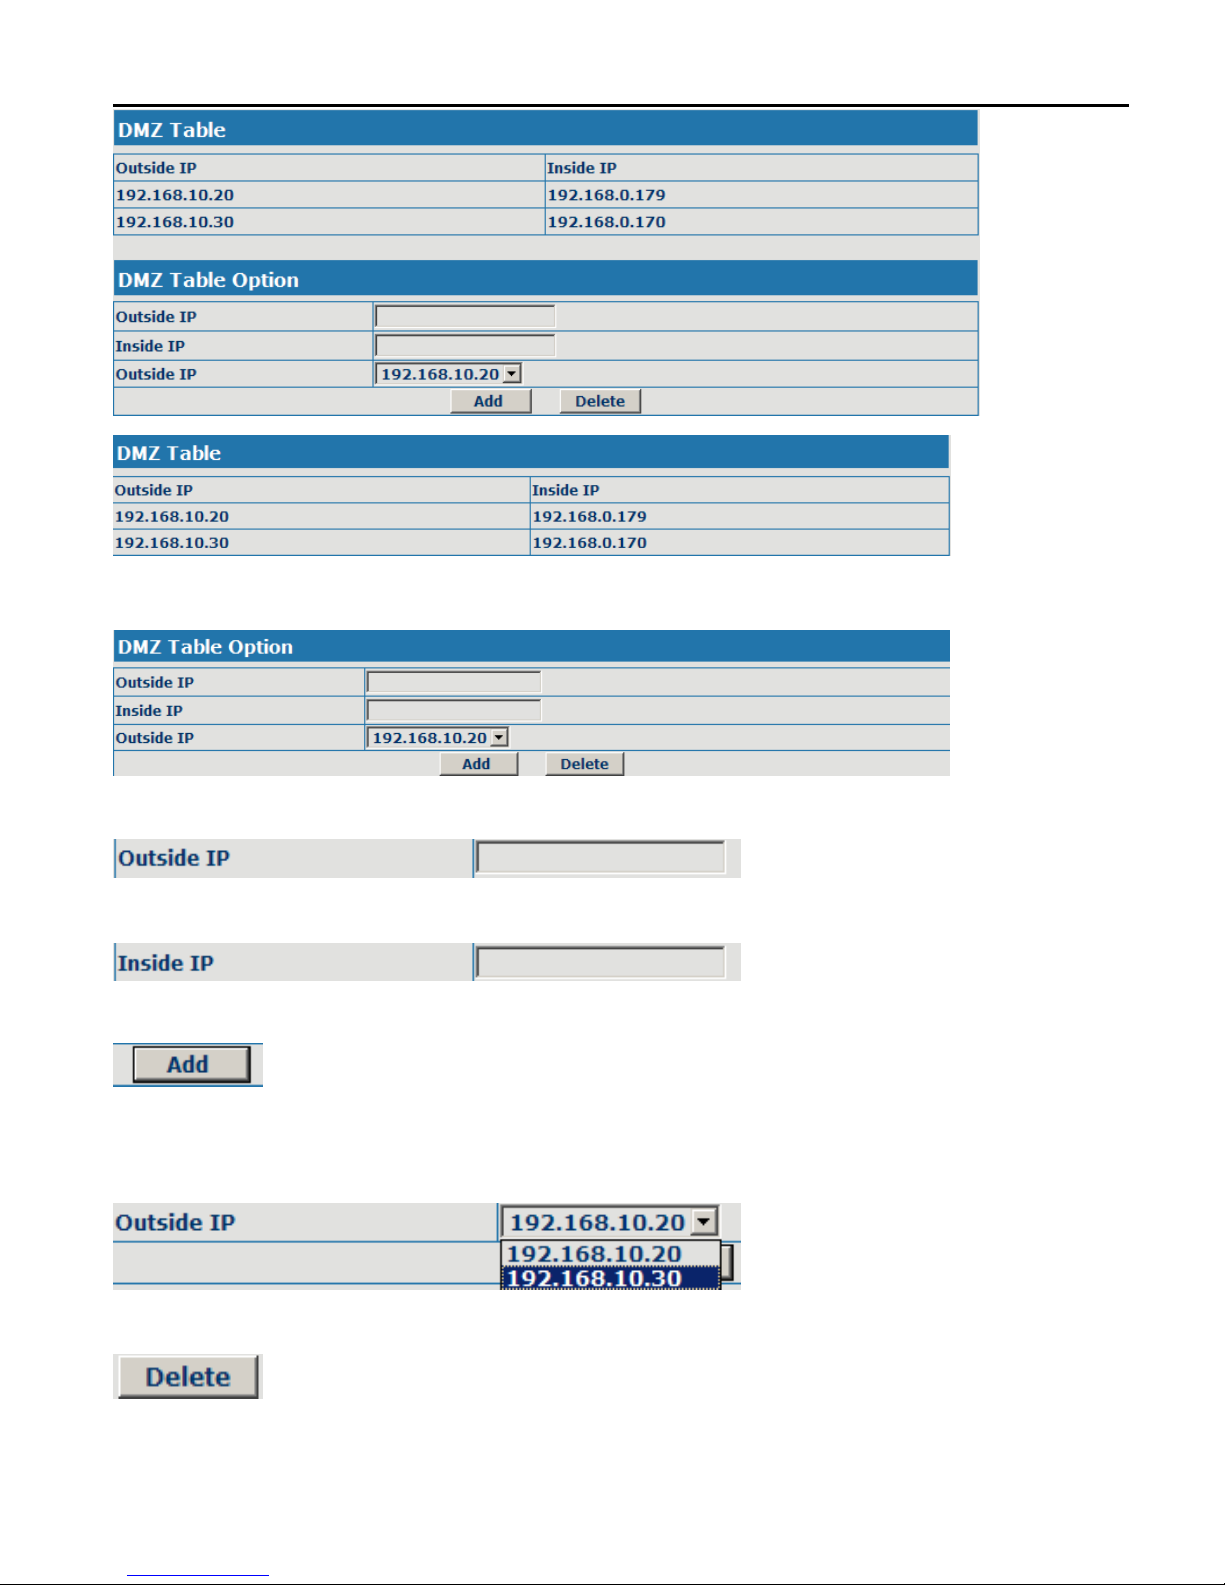
DMZ configuration
Page 49
CDX-IPH301 -VoIP User Manual V1.0
49
Display DMZ table;
Configure the DMZ rule.
Configure the outside IP of the DMZ;
Configure the inside IP of the DMZ;
Configure outside IP and inside IP, then click the Add, user can add the DMZ
table.
Select Outside IP;
Select outside ip, and click the Delete, user can delete the DMZ table.
Page 50
CDX-IPH301 -VoIP User Manual V1.0
50
12.4 VPN configuration
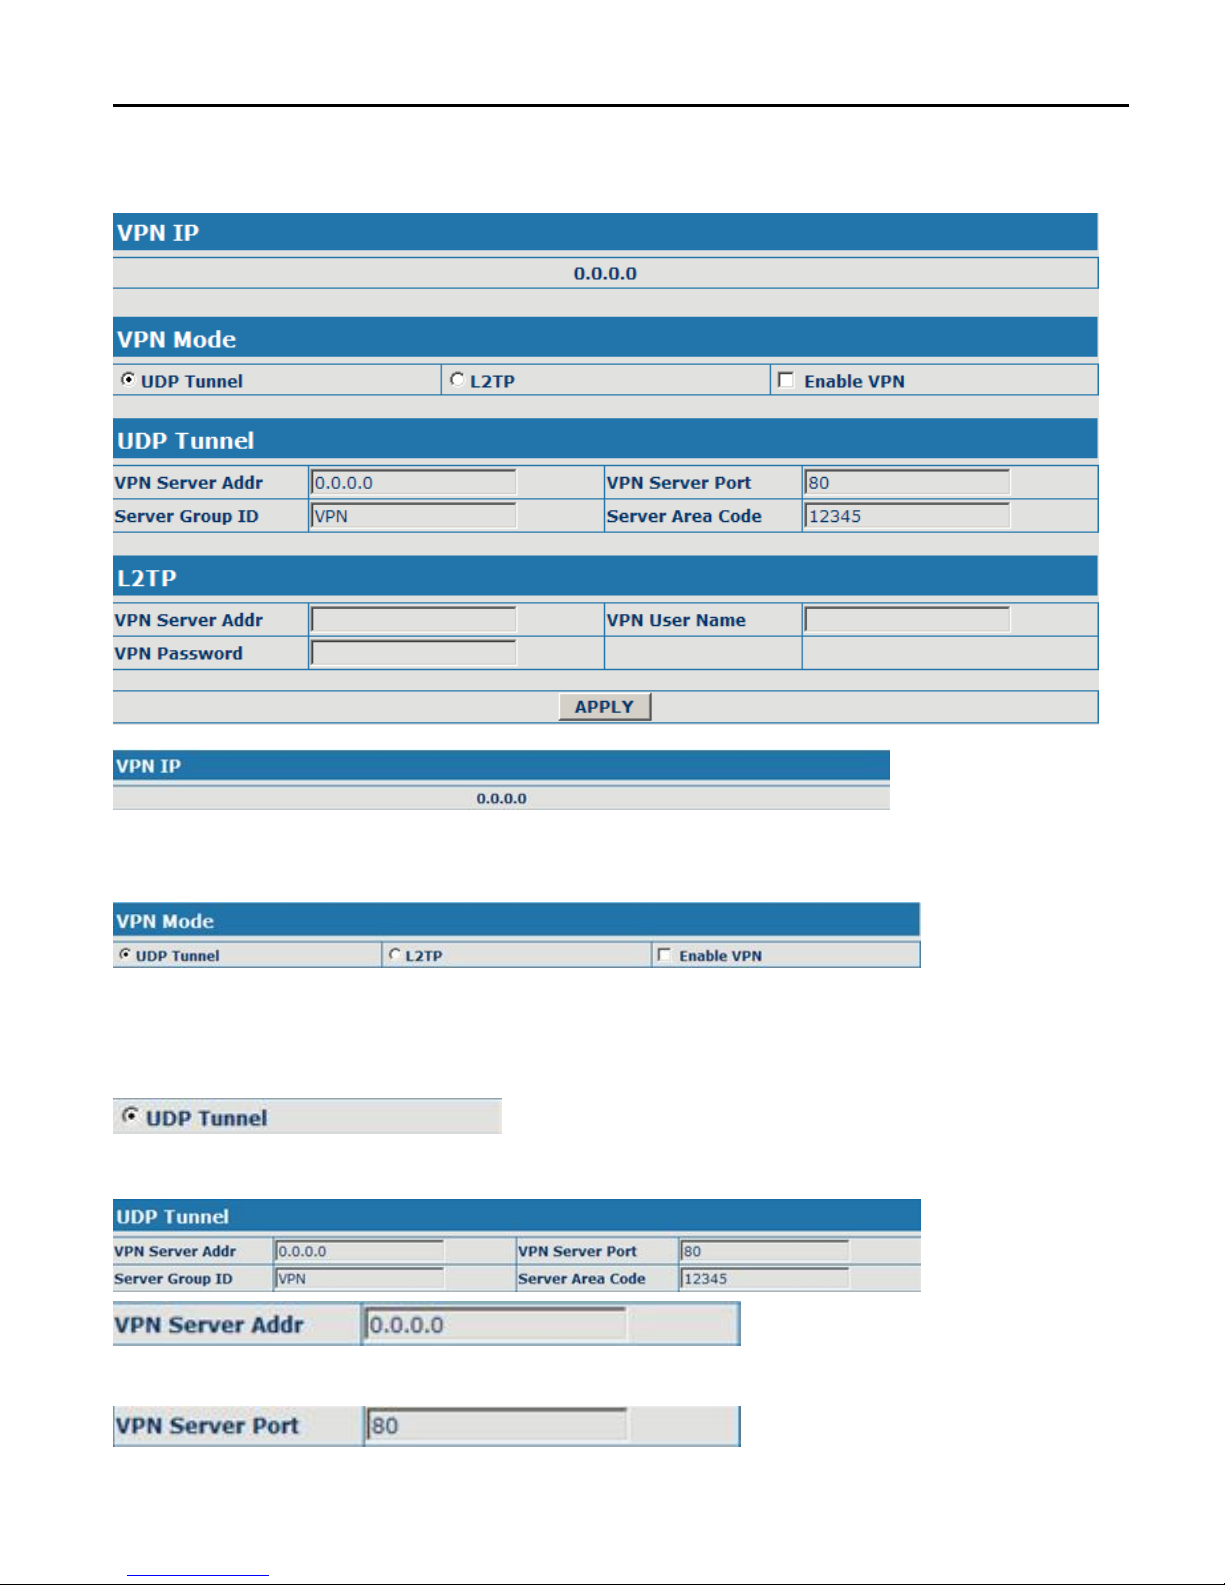
On this page, user can save and configure VPN setting.
Display the VPN IP of the IPH301;
Select VPN mode, and configure enable/disable VPN;
(1) Select UDP tunnel, and configure VPN:
Select UDP tunnel mode;
Configure VPN server address;
Page 51
CDX-IPH301 -VoIP User Manual V1.0
51
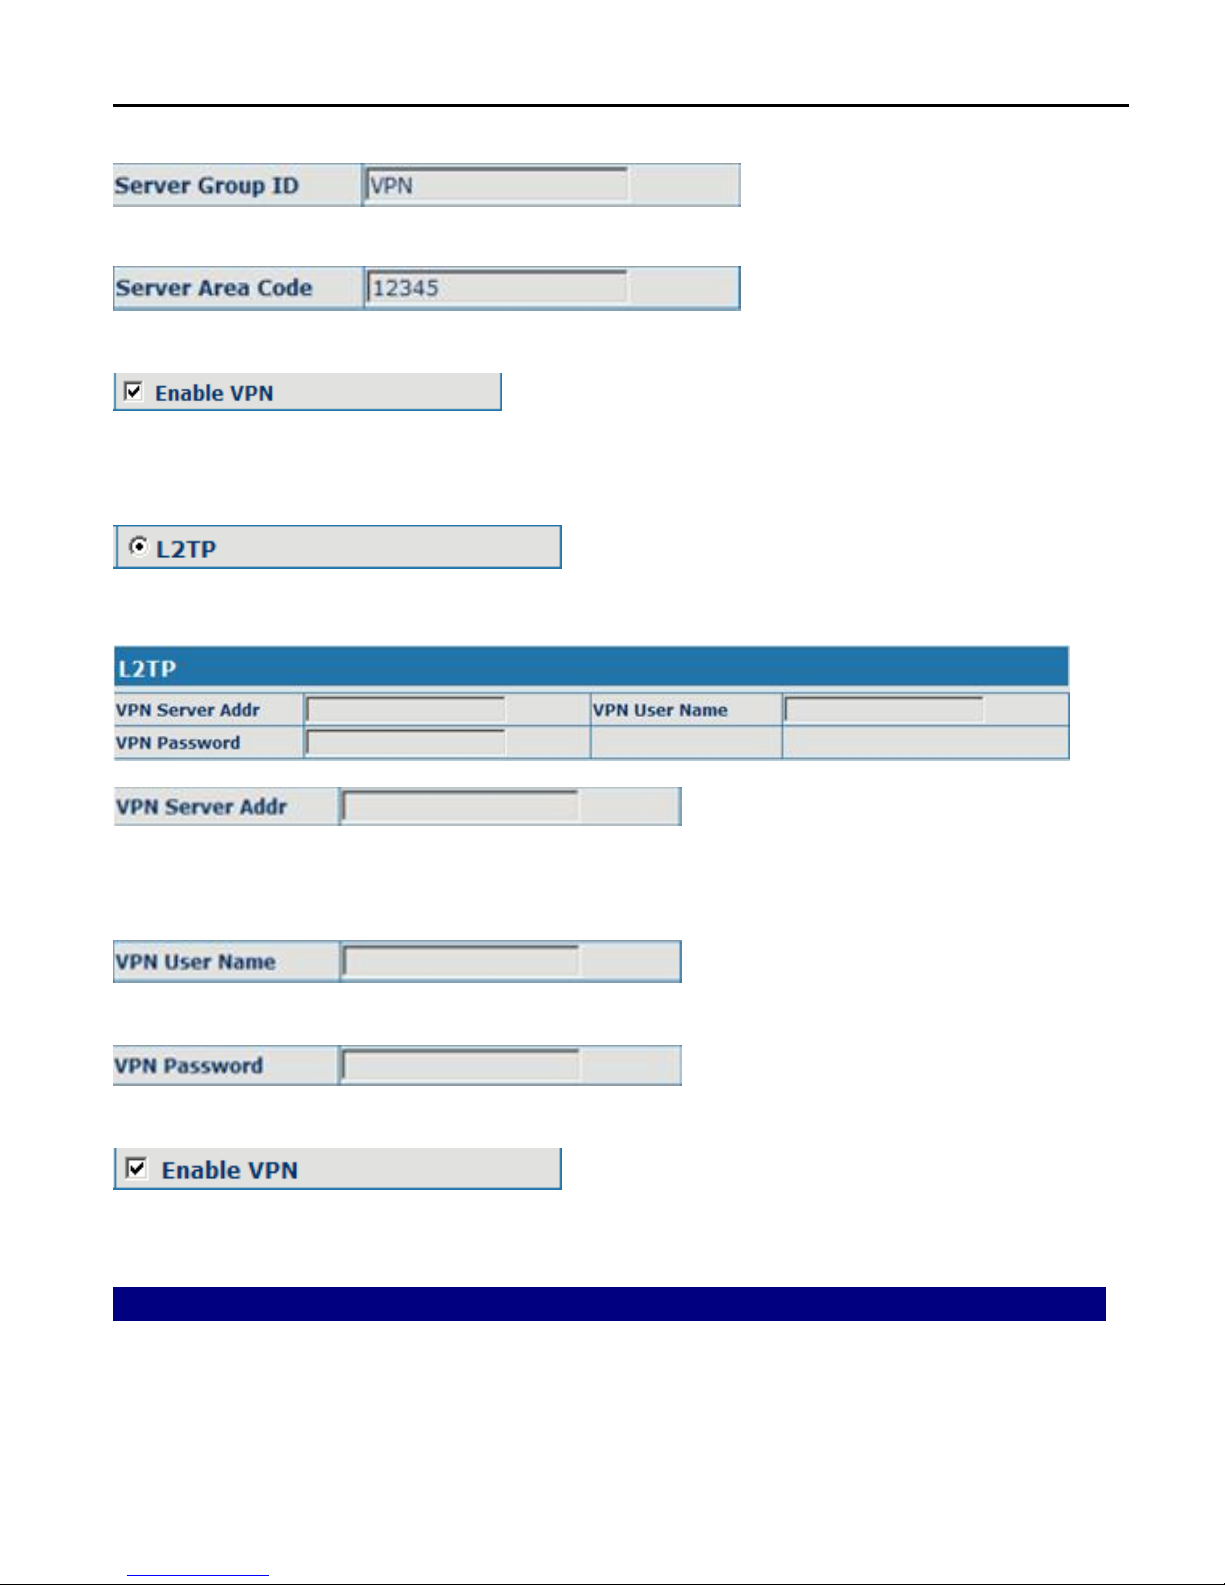
Configure VPN server port;
Configure VPN server group ID;
Configure VPN server area code;
Configure enable/disable VPN tunnel;
(2) Select L2TP, and configure VPN:
Select L2TP mode;
Configure VPN server address;
Configure VPN User Name;
Configure VPN Password;
Configure enable/disable VPN;
13 Upgrade on-line
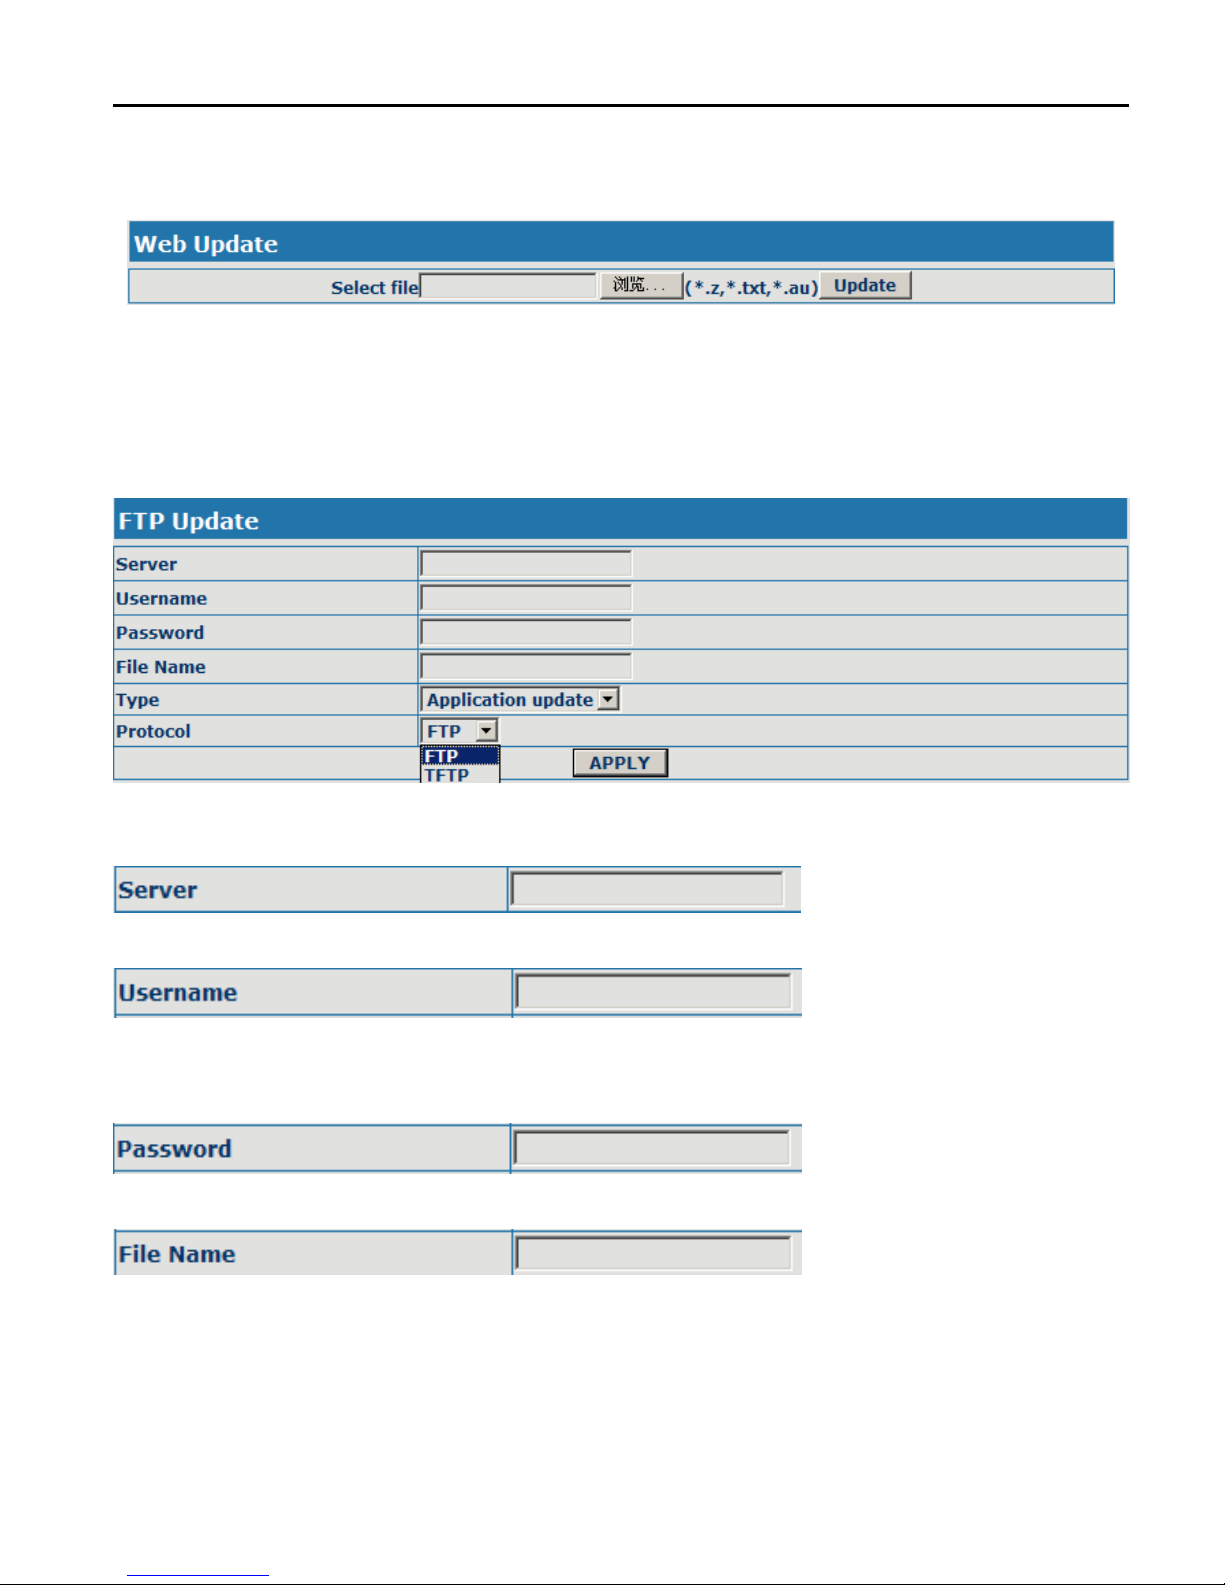
13.1Upload WEB page
On this page, user can select the upgrade document (firmware or config file)
Page 52
CDX-IPH301 -VoIP User Manual V1.0
52
on hard disk of the computer directly to run the system upgrade. After the
upgrade has been completed, restart the phone and it will be usable at once.
13.2 FTP/TFTP download
On this page, user can upgrade system and configure files by FTP or TFTP
mode.
13.3 Configuration Explanation:
Configure upload or download FTP/ TFTP server IP address;
Configure username of the upload or download FTP server. If user select
TFTP mode, username and password are not required to be configured;
Configure upload or download of FTP server password;
Configure upload or download system upgrade document or system layout
file name. It should be noted that system file take .dlf as suffix, configuration
files take .cfg as suffix;
Page 53
CDX-IPH301 -VoIP User Manual V1.0
53
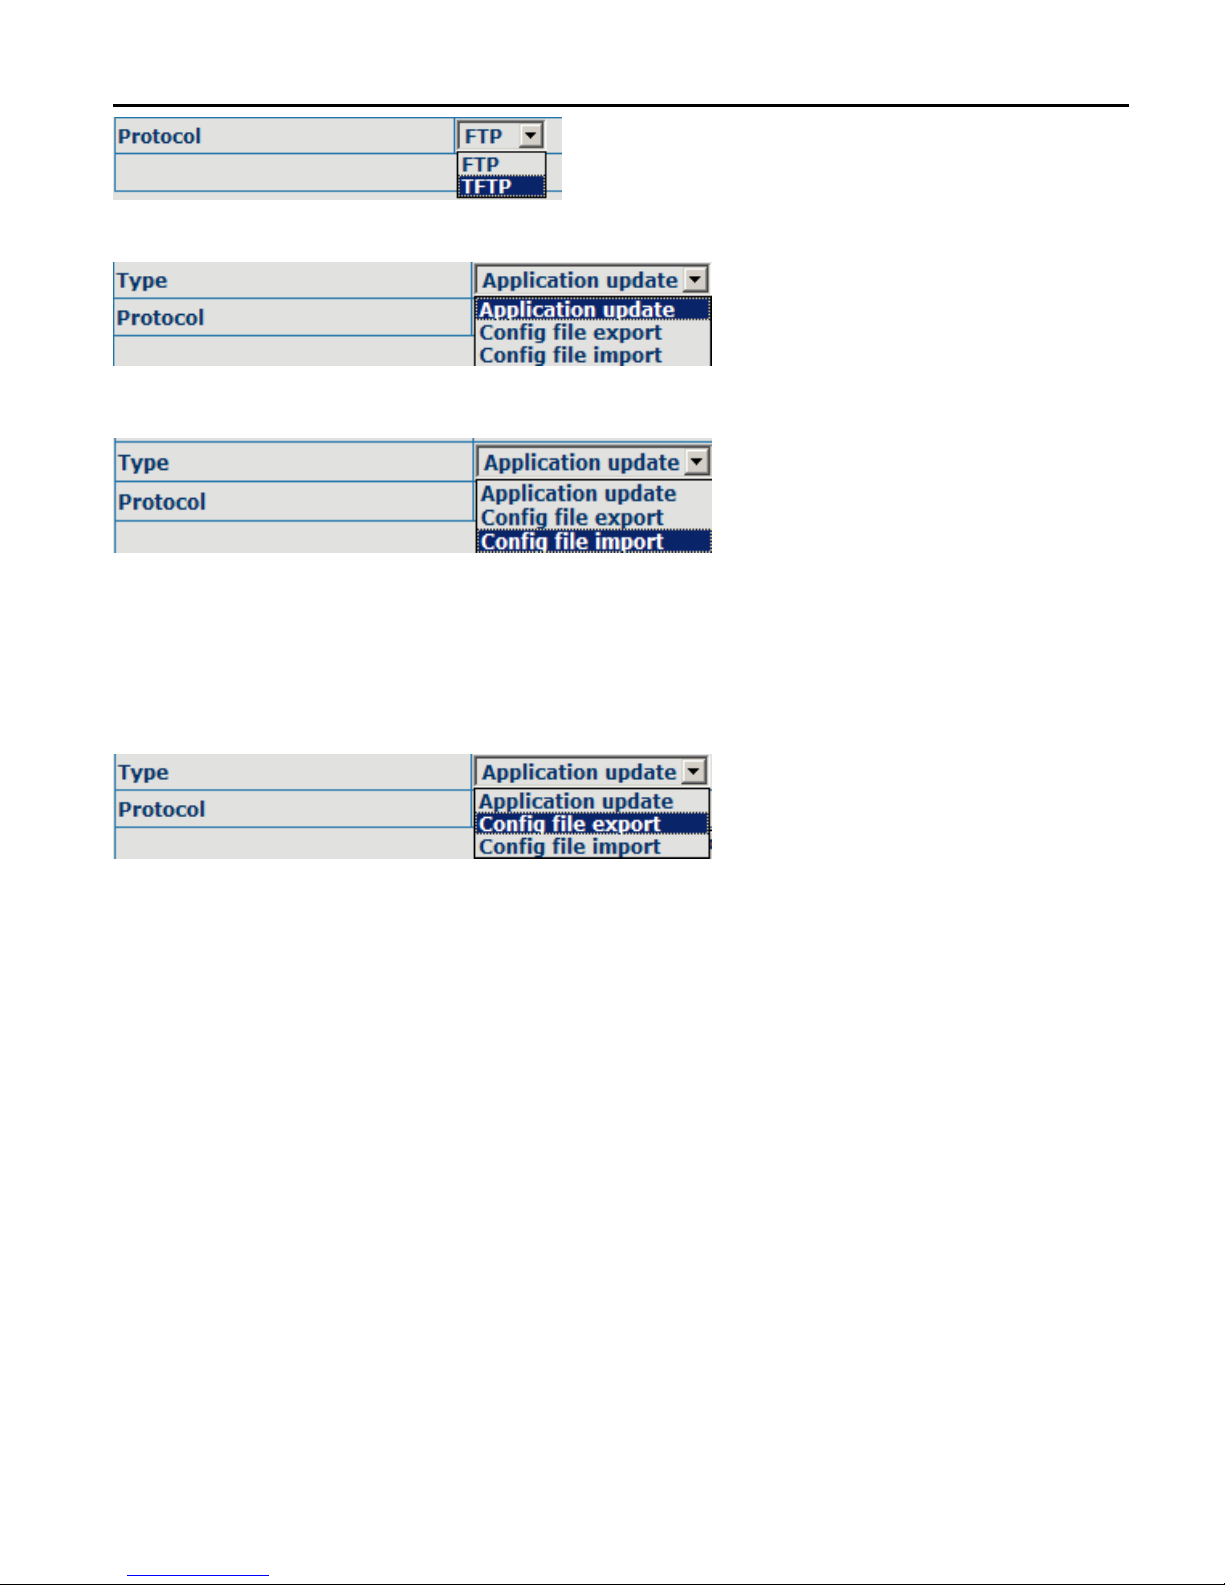
Select server type;
Select Application update type, the phone will upgrade system file;
Select Config file export type and click the Apply, the phone will upload its
configuration files to FTP/TFTP server and save with names of user-defined
configuration files;
Select Config file import type and click the Apply, the phone will download
configuration files of FTP/TFTP server to the phone and the configuration will
go into effect after restarting;
Output configure file can be edit, delete, or make comment starting by # on
each command. Unit support module upgrade, like if changes made to SIP
configure, others in configure file can be deleted and configuration in unit will
not be affected.
While upgrade unit with modified configure file, please make sure check each
parameter while finished upgrade. In case of anything wrong, please recover
configure under POST mode.
Page 54
CDX-IPH301 -VoIP User Manual V1.0
54
13.4 Configure file encryption
Configure file can be encryption with DOS command:
dsc.exe <key.txt> <e/d> <old configure> <new configure>.
Dsc.exe-encryption software tool
<key.txt>-user made encryption key file
<e/d> e(encrypt), d (decrypt)
< Old configure >former configure file name and path,
< New configure >new configure file name, defined by user.
13.5 Auto-update
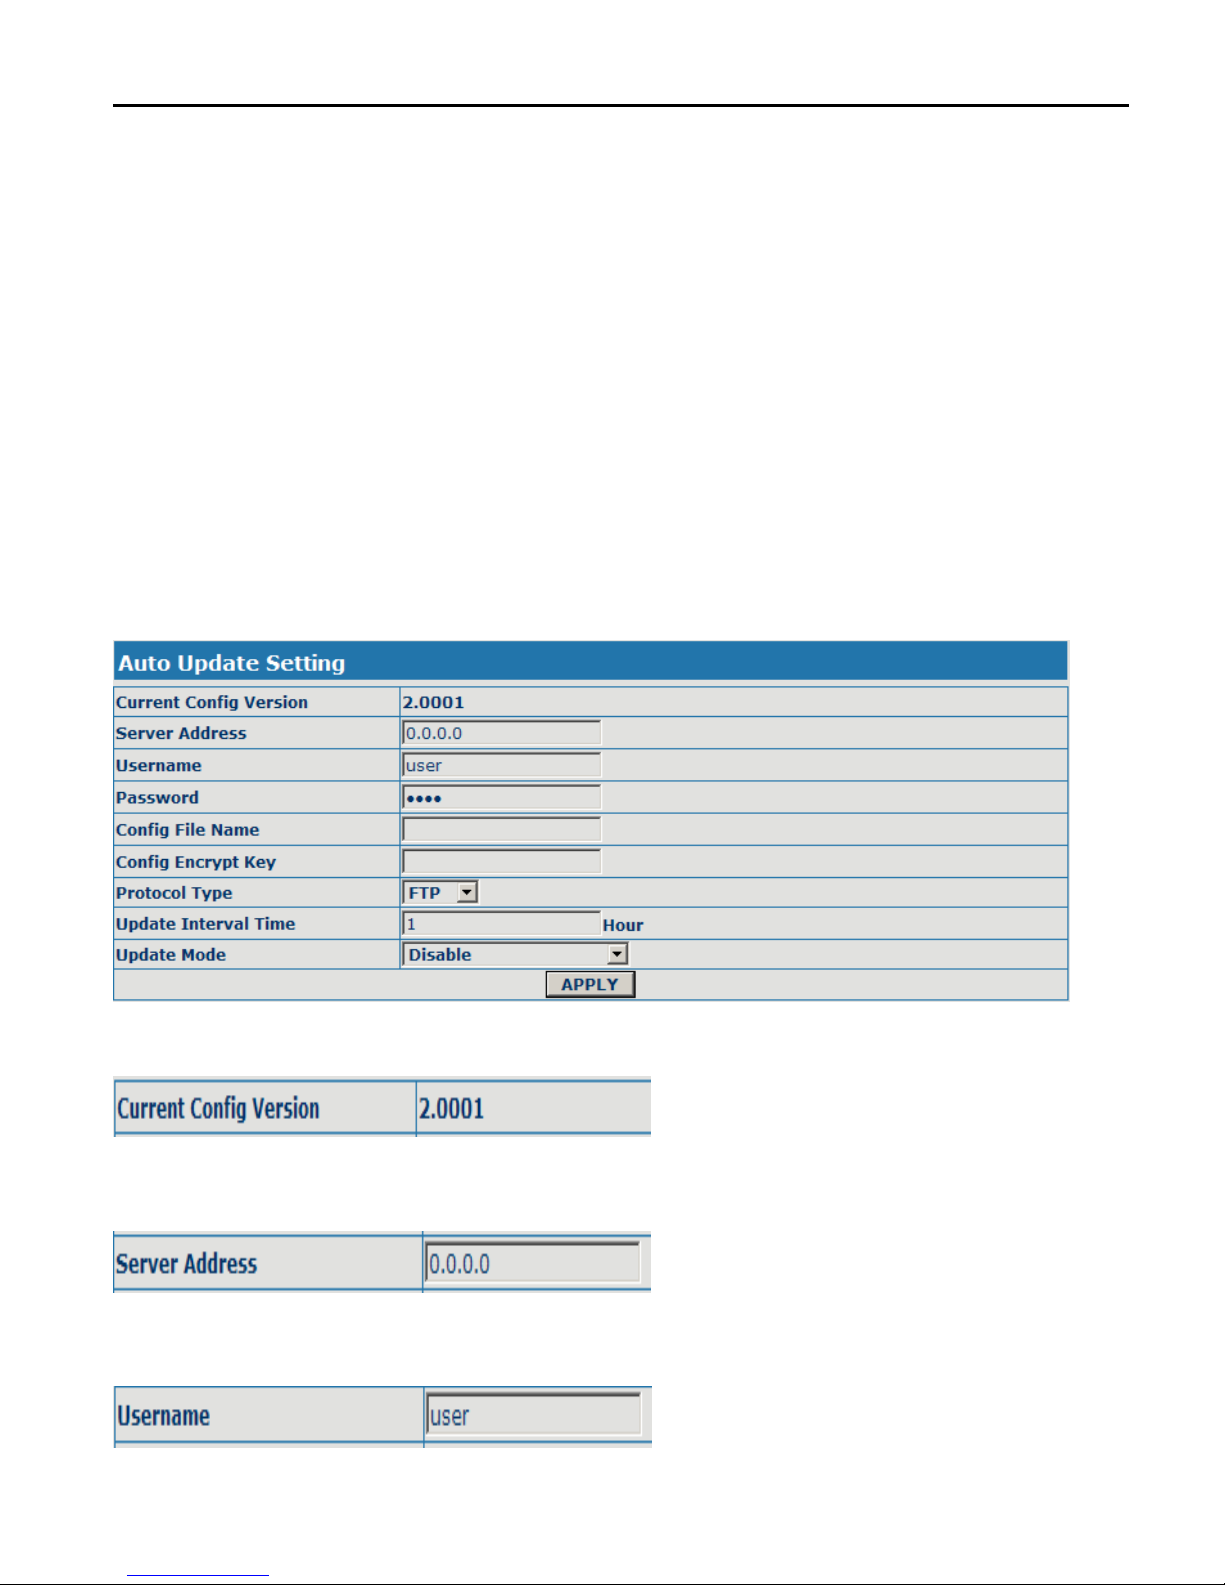
Unit can be set as automatically upgrade from desired FTP or TFTP server.
Display the current config version;
Configure unit as follow steps:
Input IP add. of desired FTP server.
Page 55
CDX-IPH301 -VoIP User Manual V1.0
55
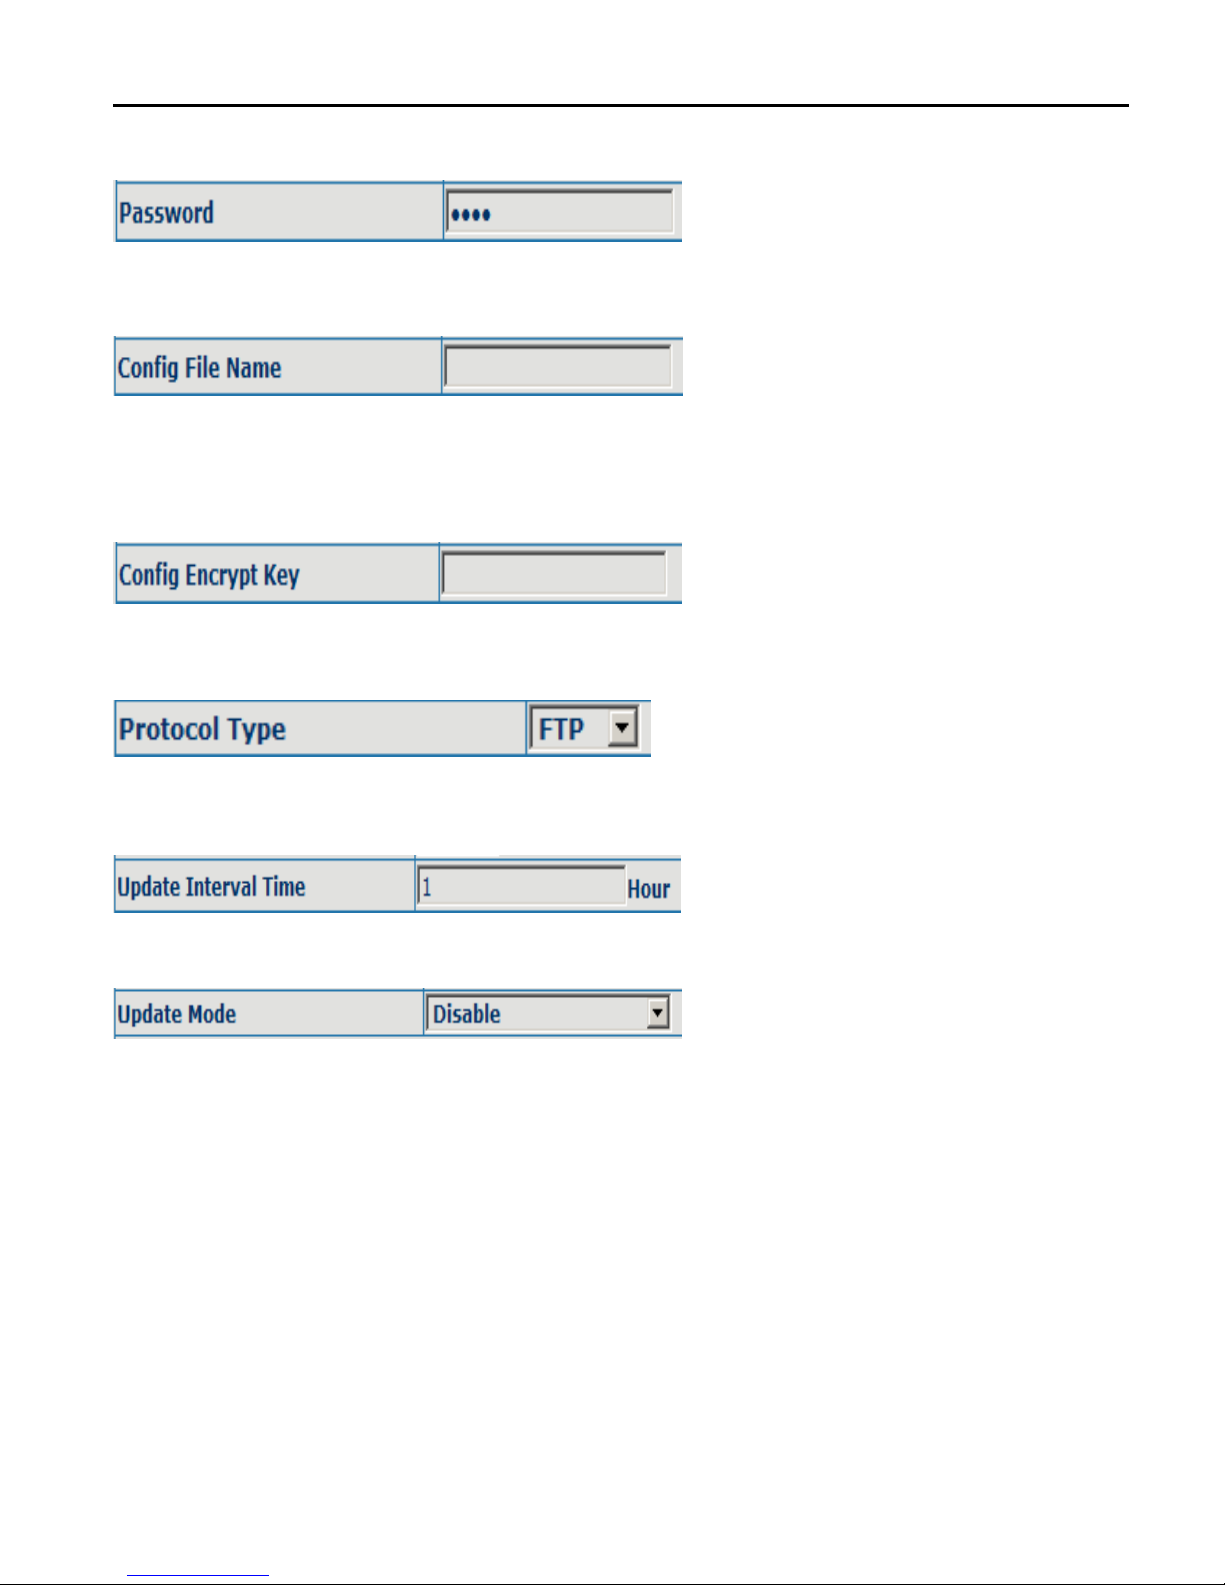
Input user name of desired FTP server.
Input user password of desired FTP server.
Input name configuration file. Software version must be different for each
upgrade file.
If configuration file is encrypted, password needed.
Chose server type as either FTP or TFTP.
Set auto-upgrade interval duration.
Chose auto-upgrade type.
13.6 Configuration files WEB download
On this page, user can directly select the configuration files on the hard disk
of the computer, and then make modification to the system configuration,
after the download, restart the phone and the configuration will go into effect.
Page 56
CDX-IPH301 -VoIP User Manual V1.0
56
14 Syetem management
14.1Account management
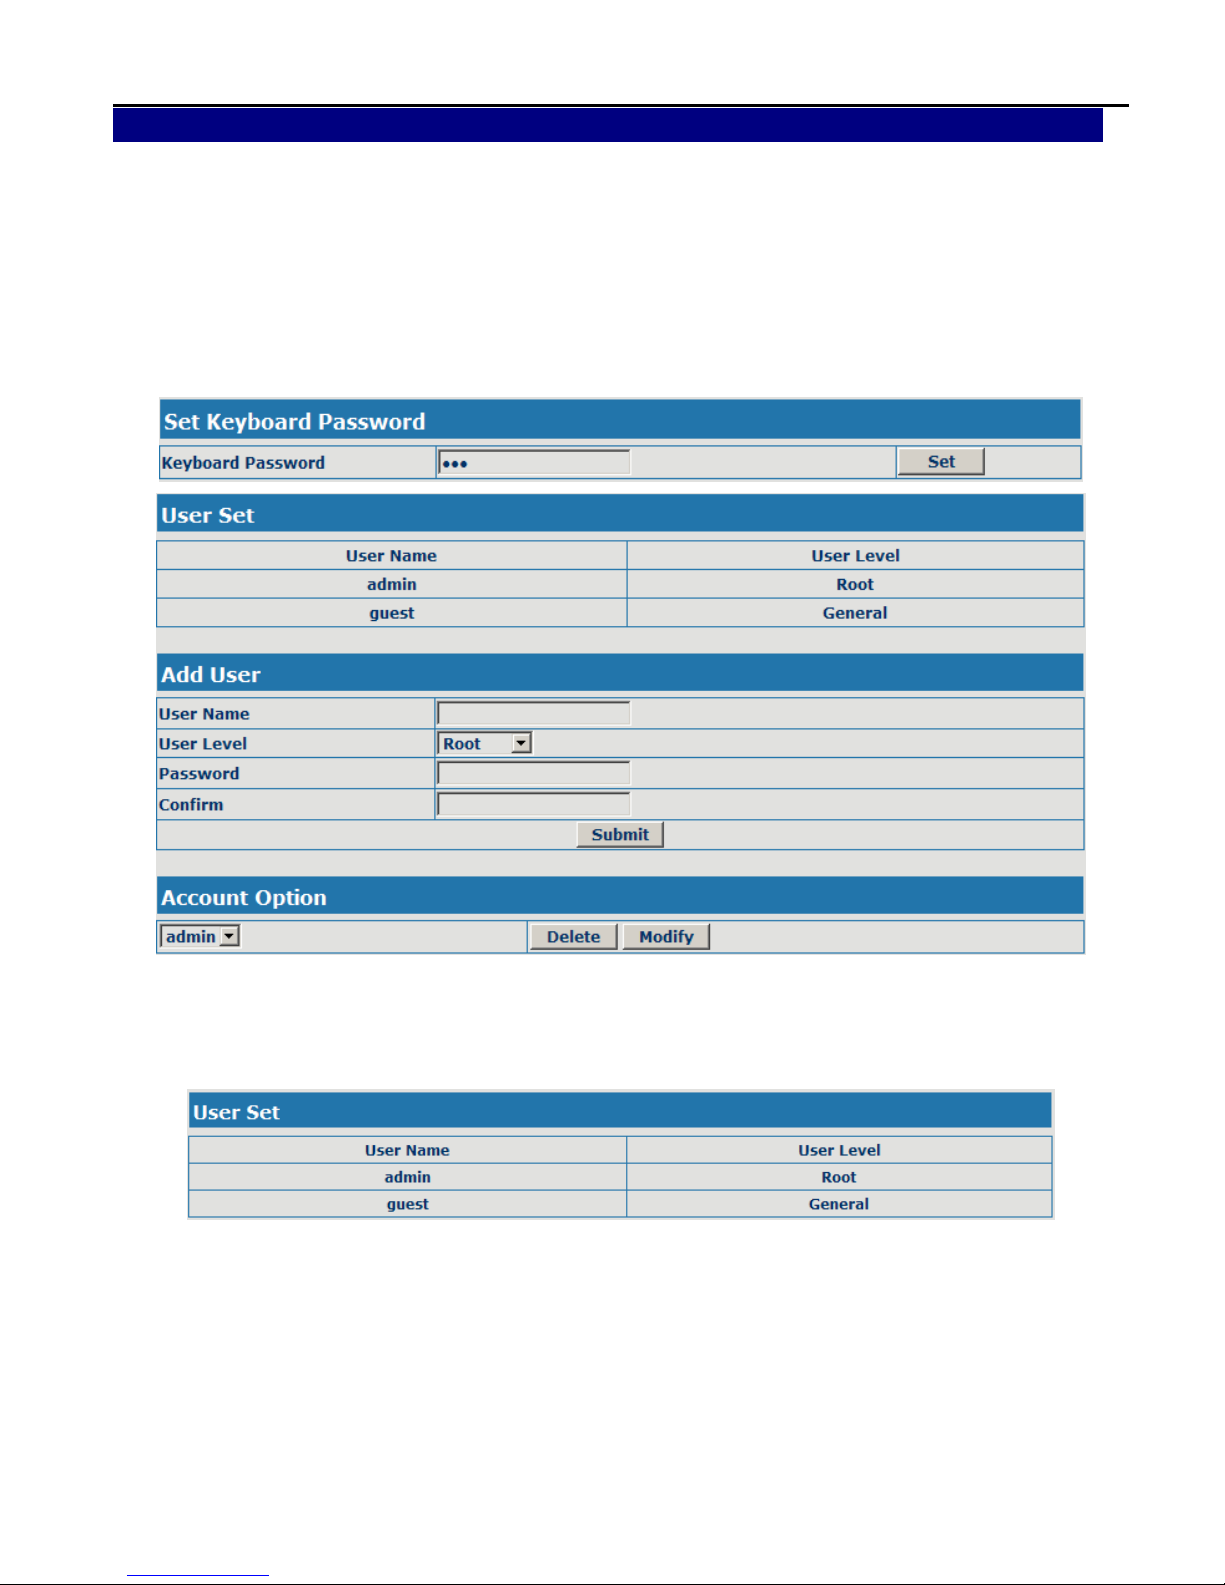
On this page, user can set the keyboard password, the same time, user can
add and delete users according to own needs and can modify user's
authorities there have been.
14.2Configuration Explanation:
display of phone user account list;
Page 57
CDX-IPH301 -VoIP User Manual V1.0
57
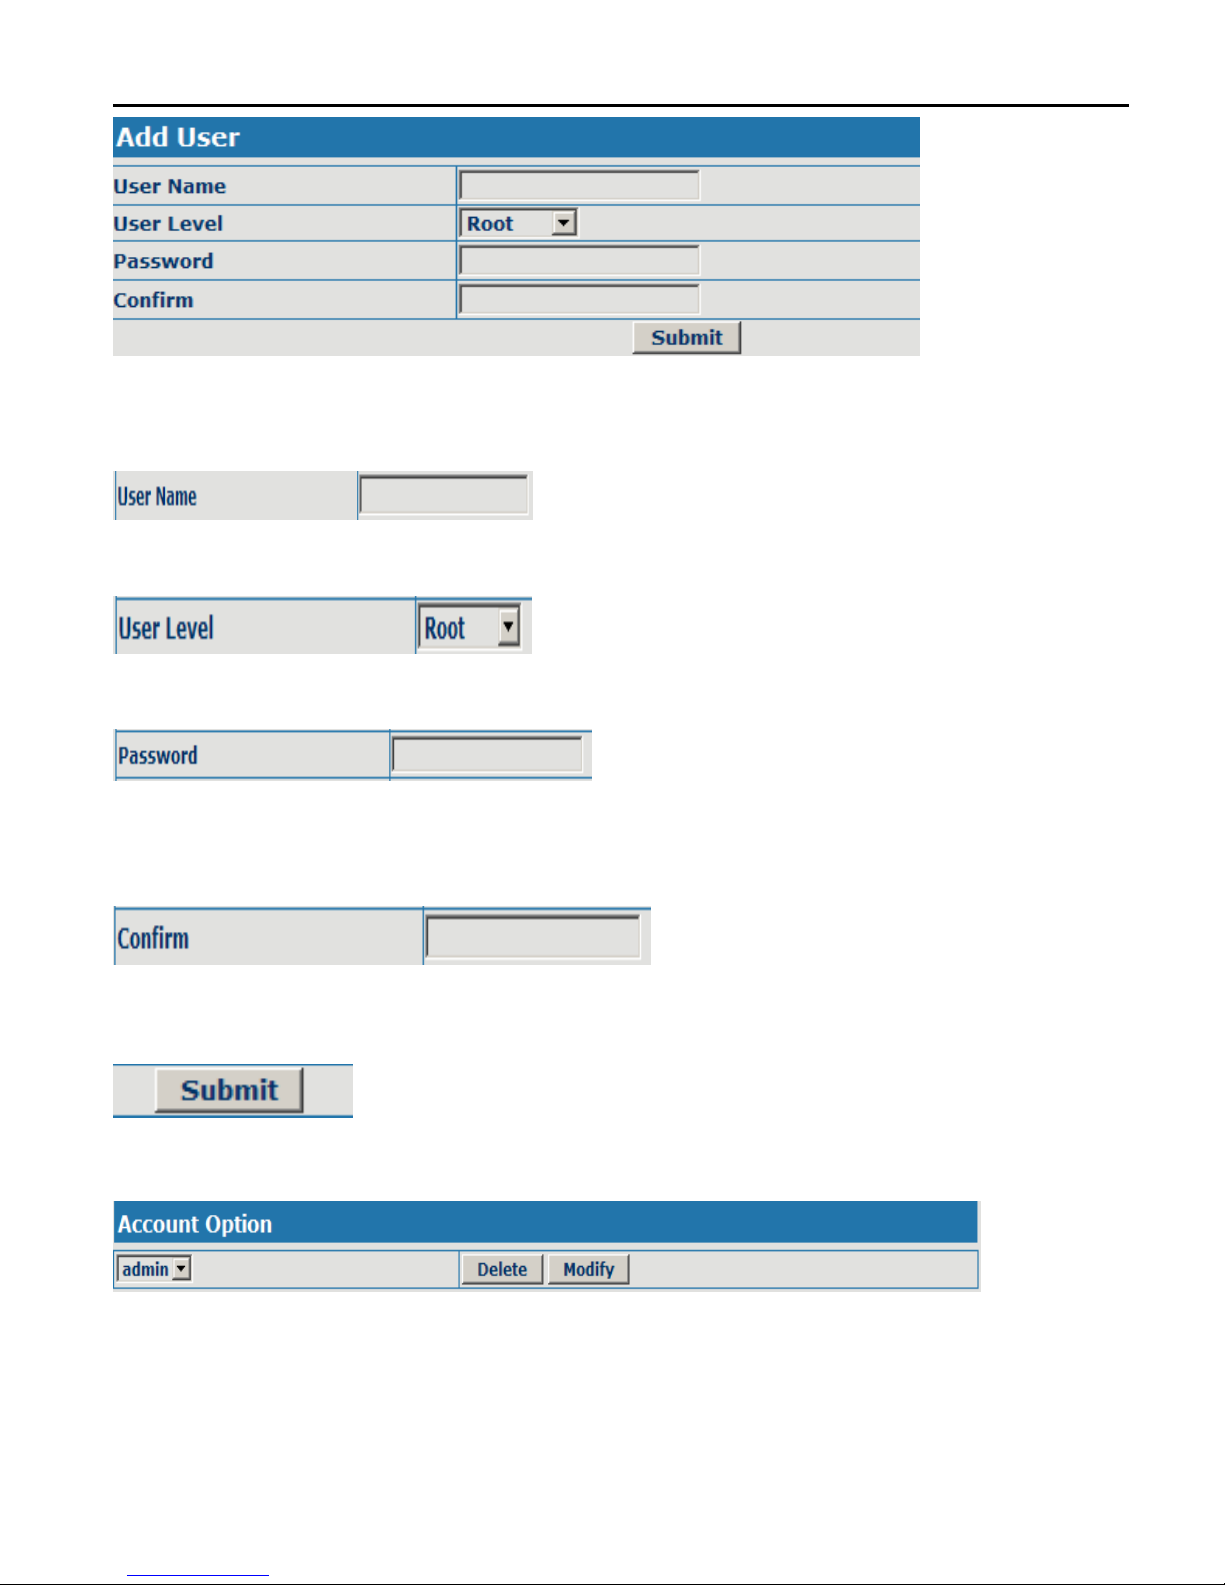
To add phone account; it will be shown at lower part of page as the following
figure, of which:
Add new accounts;
account level; root possesses
authorities to modify configuration,general possesses read-only authority;as
corresponding password of the additive account;
As second confirmation of password, to ensure correct setup of password;
Clicks submit to go into effect.
Select users that you want to delete in the drop-down menu, click Delete.
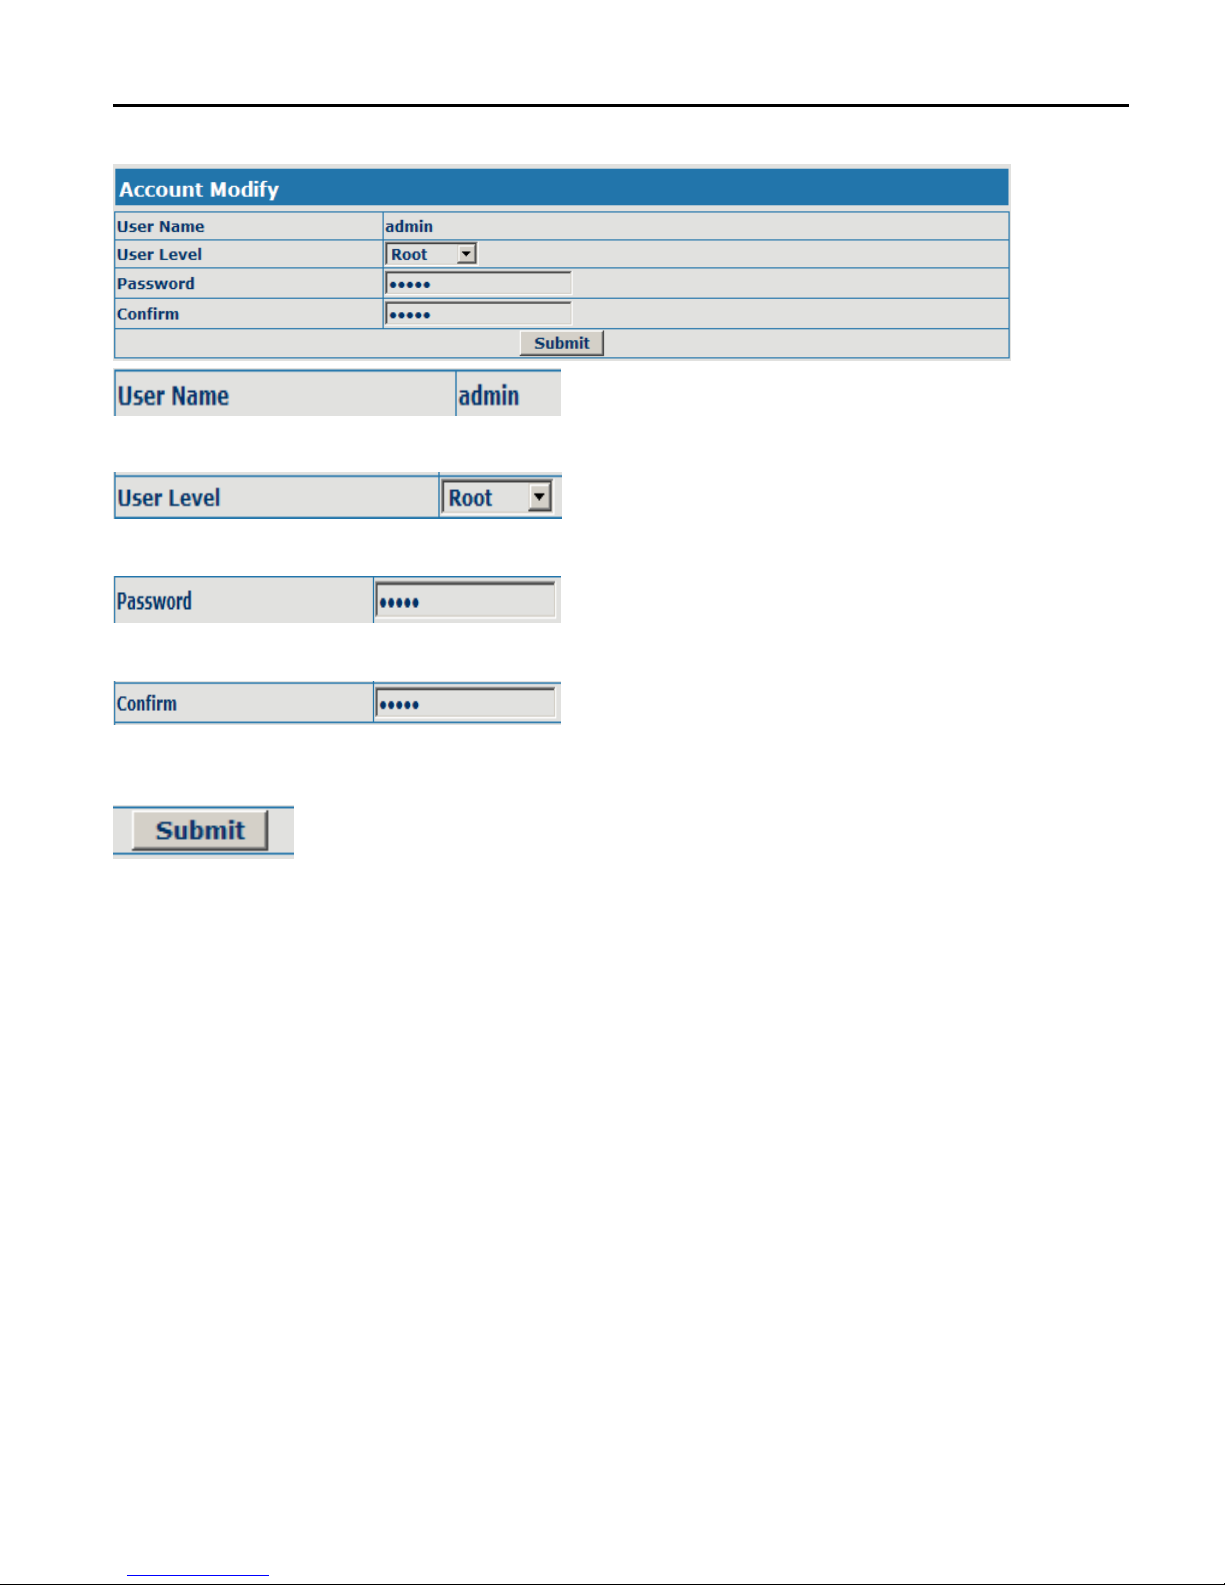
To modify the chosen accounts, need to select account first, click Modify,it will
be shown at lower part of page as the following figure, of which:
Page 58
CDX-IPH301 -VoIP User Manual V1.0
58
The modified username;
Modify user authorities;
Modify user password;
Make confirmation of the modified user password;
Submit the modification;
Owing to the phone's default account: accounts of the administrator
level-admin and the ordinary level - guest are all weak account and weak
password, the username and password will be easily to be guessed on public
network, so the user had better modify the administrator and ordinary user.
Enter with manager level when making modification, create a administrator
account and a browse account (you'd better not set the name as admin,
administrator, guest, etc.),set password and then save configuration, entering
with new manager account, delete default manager and browse account and
save configuration, security will be enhanced!
Page 59
CDX-IPH301 -VoIP User Manual V1.0
59
14.3 Time zone configure
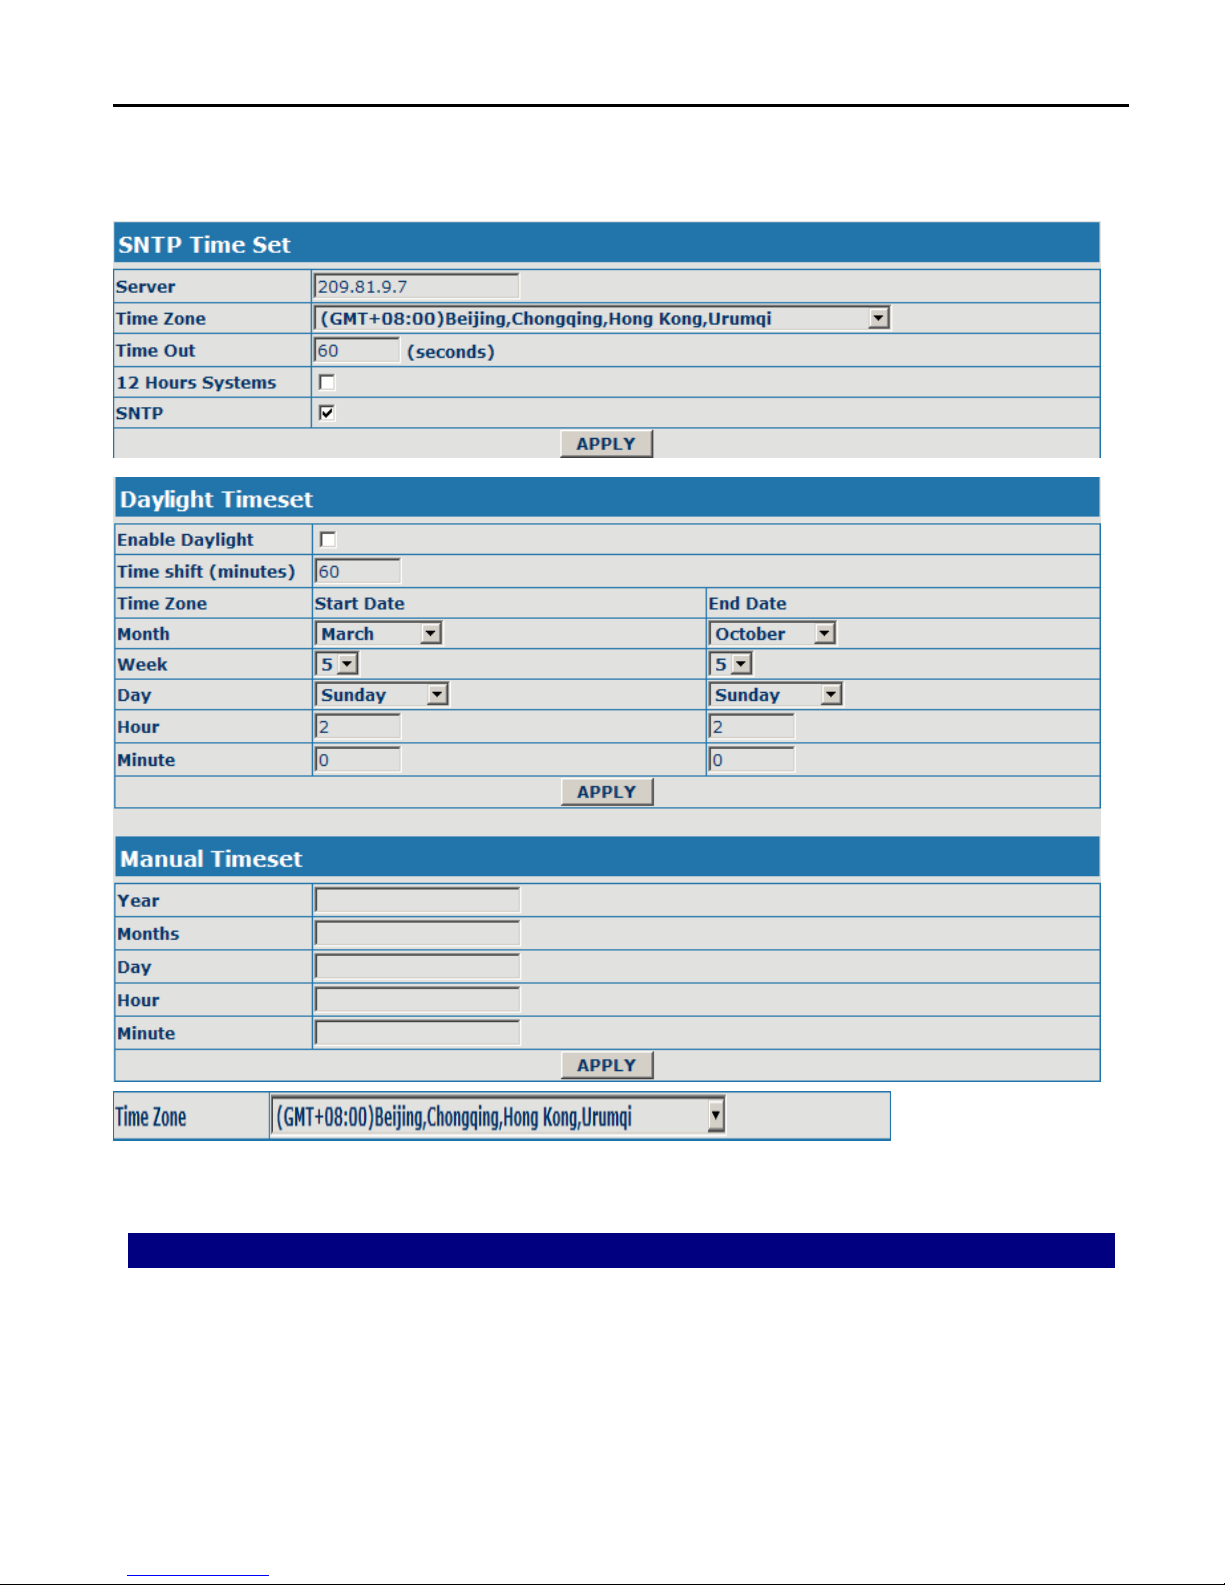
On this page, user can save and configure time zone setting.
Configure the desired time zone.
15 Configuration via Telnet
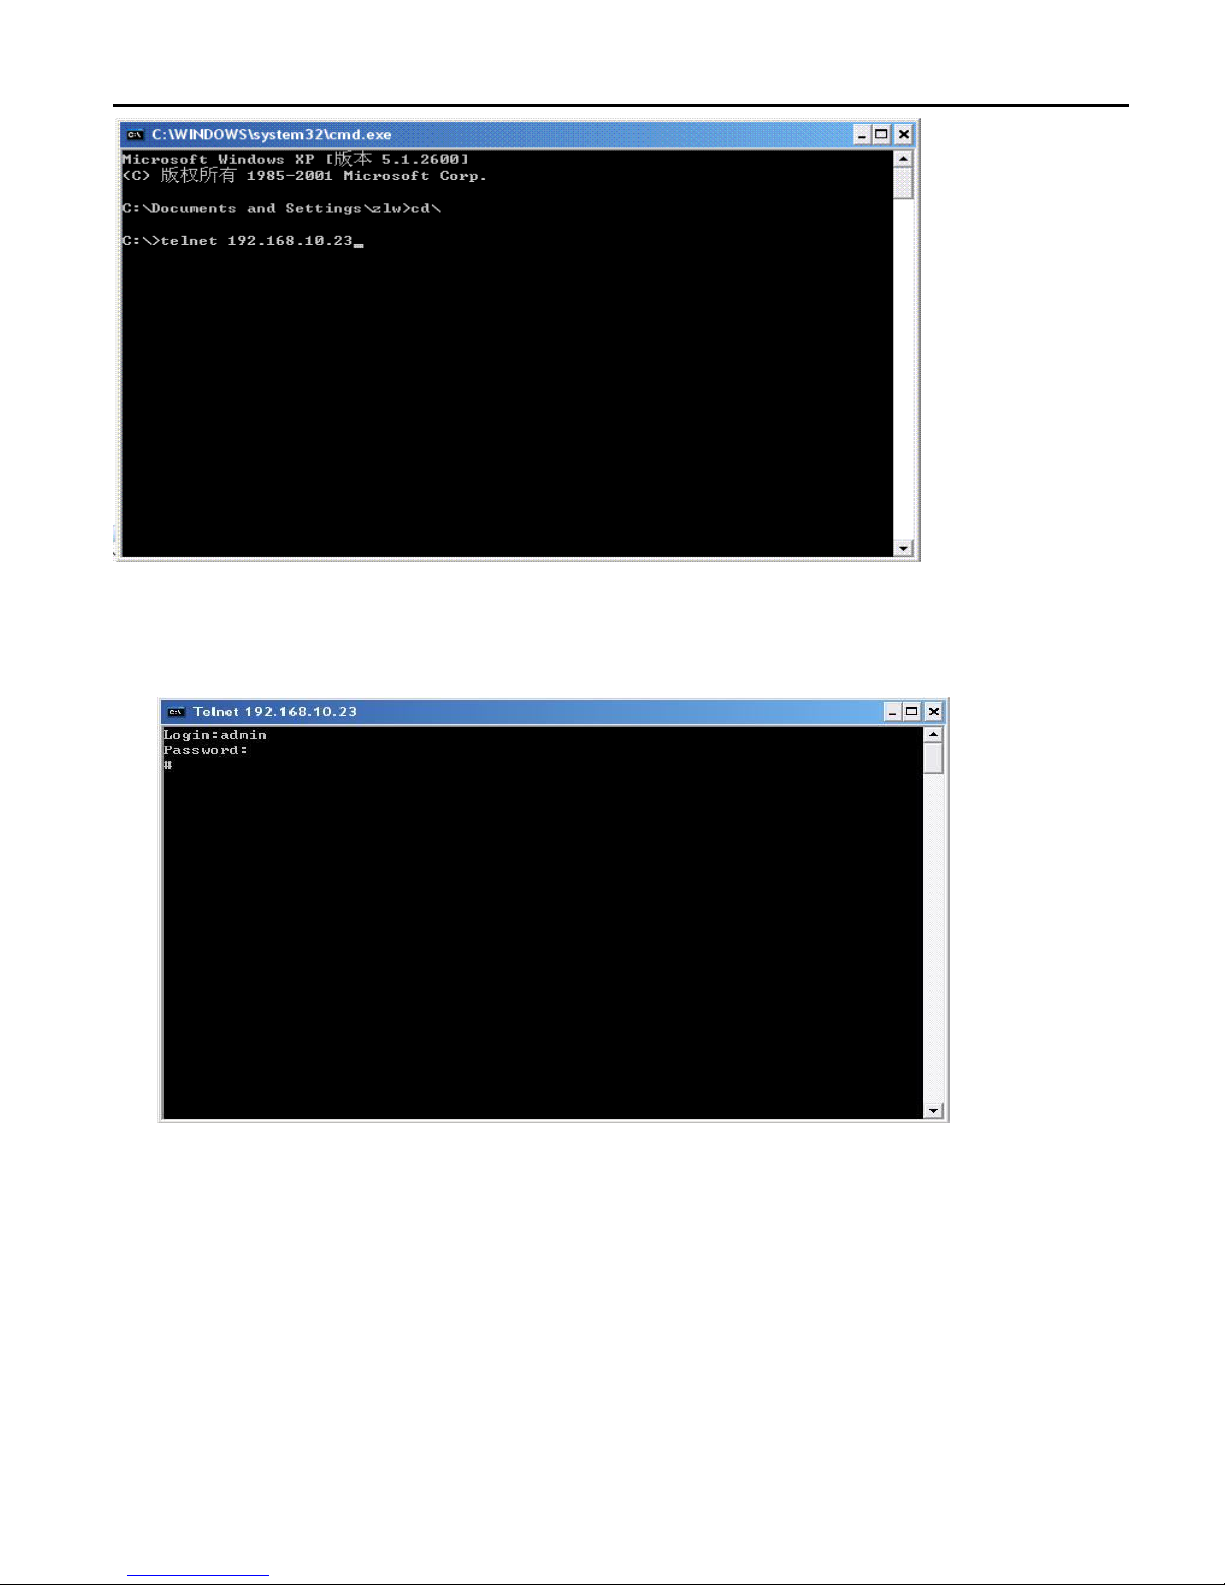
In DOS window, input telnet 192.168.10.23, enter:
Page 60
CDX-IPH301 -VoIP User Manual V1.0
60
Then input USER NAME:admin PASWORD:admin
15.1Basic Command
input “help” or “ ? ”under terminal to check all sub-terminal and globe
command; input “help” or “?”under command to check parameters;
input “!” or“exit”to quit former path. 。
while partly input terminal or command, press“TAB”, system will auto finish
balance command or list all option.
Page 61

CDX-IPH301 -VoIP User Manual V1.0
61
each help is with comment as <command> or <node> to identify.
parameter of each command including two types:“required” and“optional”:
all “required”start as “-”; all option,start as“_”. Also partly input available like
point 3.
after configure, make sure save with command “write”, other wise, all setting
lost while re-start.
15.2 Command structure
Root terminal with structure as
#
---config
---debug
---download
---language
---password
---setdefault
---show
---telnet
---trancert
---update
---upload
Most command parameters are under terminal “config”, which structures
as follows:
<config>#
---accesslist
---dialpeer
---digitalmap
Page 62

CDX-IPH301 -VoIP User Manual V1.0
62
---fastethernet
---mmifilter
---nat
---port
--qos
---syslog
---time
---user
---voip
---vpn
15.3 Structure of Configuration terminal
Access list firewall configuration
Path:<config-accesslist>#
[no] entry - <command>Set access list table
[no] in-access - <command>Enable/Disable In-access
[no] out-access - <command>Enable/Disable Out-access
show - <command>Show access list
Ex.: <config-accesslist>#
Add protocol ---entry –I/O xxx –P/D xxx –sraddr x.x.x.x –srcmask
x.x.x..x–desaccr x.x.x.x –desmask x.x.x.x –portrange xxx–portnum xxx
Ex.: <config-accesslist>#entry – I/O input – P/D deny – proto udp – straddr
202.112.10.1 – srcmask 255.255.255.0 – desaddr 210.25.132.1 –
desmask 255.255.255.0 – protrange neq – portnum 5060
Del protocol ---no entry –I/O xxx –index xxx
Ex: <config-accesslist>#no entry – I/O input – index 1
Fastethernet–Lan configuration
Page 63

CDX-IPH301 -VoIP User Manual V1.0
63
Path: <config–fastethernet–lan>#
[no] bridgemode - <command>Enable/Disable bridge mode
[no] dhcp-server - <command>Enable/Disable DHCP Server
dhcpshow - <command>Show DHCP current leased
table
[no] ip - <command>Set lan IP
ipshow - <command>Show LAN interface
configuration
[no] nat - <command>Enable/Disable NAT
natshow - <command>Show current NAT status
Ex: <config–fastethernet–lan>#ip –addr 192.168.1.10 –mask 255.255.255.0
Fastethernet–Wan configuration
Path: <config–fastethernet–wan>#
[no] dhcp - <command>Start DHCP client
[no] gateway - <command>Set default gateway
[no] ip - <command>Set WAN IP
[no] pppoe - <command>Enable/Disable PPPoE client
[no] qos - <command>Enable/Disable 802.1p QOS
show - <command>Show WAN interface
configuration
Ex: <config-fastethernet-wan>#ip –addr 202.112.241.100 – mask
255.255.255.0
MMI FILTER
Path: <config-mmifilter>#
Add: ---entry –start x.x.x. –end x.x.x.
Page 64

CDX-IPH301 -VoIP User Manual V1.0
64
Ex: <config-mmifilter>#entry –start 202.112.20.1 –end 202.112.20.255
Del ---no entry –start x.x.x.x
Ex: <config-mmifilter>#no entry –start 202.112.20.1
[no] entry - <command>Set IP filter table
modifyfilter - <command> modify mmifilter table
show - <command>Show IP filter table
[no] start-filter - <command>Enable/Disable MMI IP filter
NAT
Path: <config-nat>#
[no] ftpalg - <command>Set NAT FTP application level gateway
[no] ipsecalg - <command>Set NAT IpSec application level gateway
[no] pptpalg - <command>Set NAT Pptp application level gateway
show - <command>Show current NAT state
[no] tcp-entry - <command>Set NAT TCP map table
[no] udp-entry - <command>Set NAT UDP map table
Add TCP tcp-entry–ip x.x.x.x–lanport xxx–wanport xxx
Ex: <config-nat>#tcp-entry –ip 192.168.1.5 –lanport 1720 –wanport 1000
Del TCP ---no entry –ip x.x.x.x –lanport xxx –wanport xxx
Ex: <config-nat>#no tcp-entry –ip 192.168.1.5 –lanport 5060 –wanport 1000
Add UDP ---udp–entry–ip x.x.x.x –lanport xxx –wanport xxx
Del UDP ---no udp–entry –ip x.x.x.x –lanport xxx –wanport xxx
Check NAT ---show
Port configuration
While input PORT under terminal config, the configuration will valid to all
Page 65

CDX-IPH301 -VoIP User Manual V1.0
65
ports, if input as PORT X, valid only to port X. Some parameter only valid to
some port, then PORT X is needed, otherwise, error report as “Error: Missing
parameter”.
Path: <config–port>#
[no] accept-relay - <command>Set accept relay mode
[no] calltransfer - <command>Enable/Disable call transfer
[no] callwaiting - <command>Enable/Disable call waiting
codec - <command>Set Codec
[no] fastcalling - <command>Set fastcalled number
handdown - <command>Hand down delay
[no] in-limit - <command>Set the number which will be not accepted
[no] input - <command>Set Input gain
[no] out-limit - <command>Set the number which can not be
dialed
[no] output - <command>Set Output gain
[no] ringvolume - <command> set ring volume
show - <command>Show port configuration
[no] shutdown - <command>Disable/Enable the port
signalmode - <command>Set signal mode
[no] threetalk - <command>Enable/Disable threetalk
QOS
Path: <config-qos>#
[no] 8021p - <command> set 802.1P Priority
[no] diffsevenable - <command> Enable/Disable DiffServ
[no] diffsevvalue - <command> set DiffServ Value
Page 66

CDX-IPH301 -VoIP User Manual V1.0
66
show - <command>Show QOS configuration
[no] vlanid - <command> Set VLAN ID
USER management
Path: <config–user>#
[no] entry - <command>add a user with given level
password - <command>Change password
show - Show all users
Other configuration except Config terminal
TIME
Path: <config-time>#
Manual time setting ---manualset –year xxx –month xxx –day xxx –hour
xxx –minute xxx –second xxx
Ex: <config-time>#manulset –year 2004 –month 10 –day 1 –hour 8 –minitute
30 –second 0
manualset - <command>Manual set system time
print - <command>Print SNTP time
sntp - <node>Get current time by using SNTPUpdate
Path: #
Via FTP ---update ftp –user xxx –password –ip x.x.x.x –file x.x.x
Ex: #update ftp –user abc –password 123 –ip 202.112.20.15 –file abc.dlf
Via TFTP ---update tftp –ip x.x.x.x –file xxx
Via FTP uploading file ---upload ftd –user xxx –password xxx –ip
x.x.x.x –file xxx
Page 67

CDX-IPH301 -VoIP User Manual V1.0
67
Via TFTP uploading file ---upload tftp –ip x.x.x.x –file xxx
Via FTP download file ---download ftp –user xxx –password xxx –ip
x.x.x.x –file xxx
Via TFTP download file ---download tftp –ip x.x.x.x –file xxx
Other commands
Setting module debug message level ---debug all xxx
Setting MGR module debug message level ---debug MGR xxx
Setting SIP module debug message level ---debug sip xxx
Setting IAX2 module debug message level ---debug IAX2 xxx
Remove module debug message level ---debug no all
Remove MGR module debug message level ---debug no MGR
Remove SIP module debug message level ---debug no sip
Remove IAX2 module debug message level ---debug no IAX2
Reset to default ---setdefault
Reset all to default ---setdefault all
Check message of some module ---show xxx
Update present password ---password
Telnet remote login ---telnet x.x.x.x
Use special Telent port ---telnet x.x.x.x –port xxx
Telnet quit ---logout
save ---write
re-start ---reload
get help ---help
quit ---exit
clear screen displa ---clear
Page 68
CDX-IPH301 -VoIP User Manual V1.0
68
PING host ---ping x.x.x.x
trace ---trancert x.x.x.x
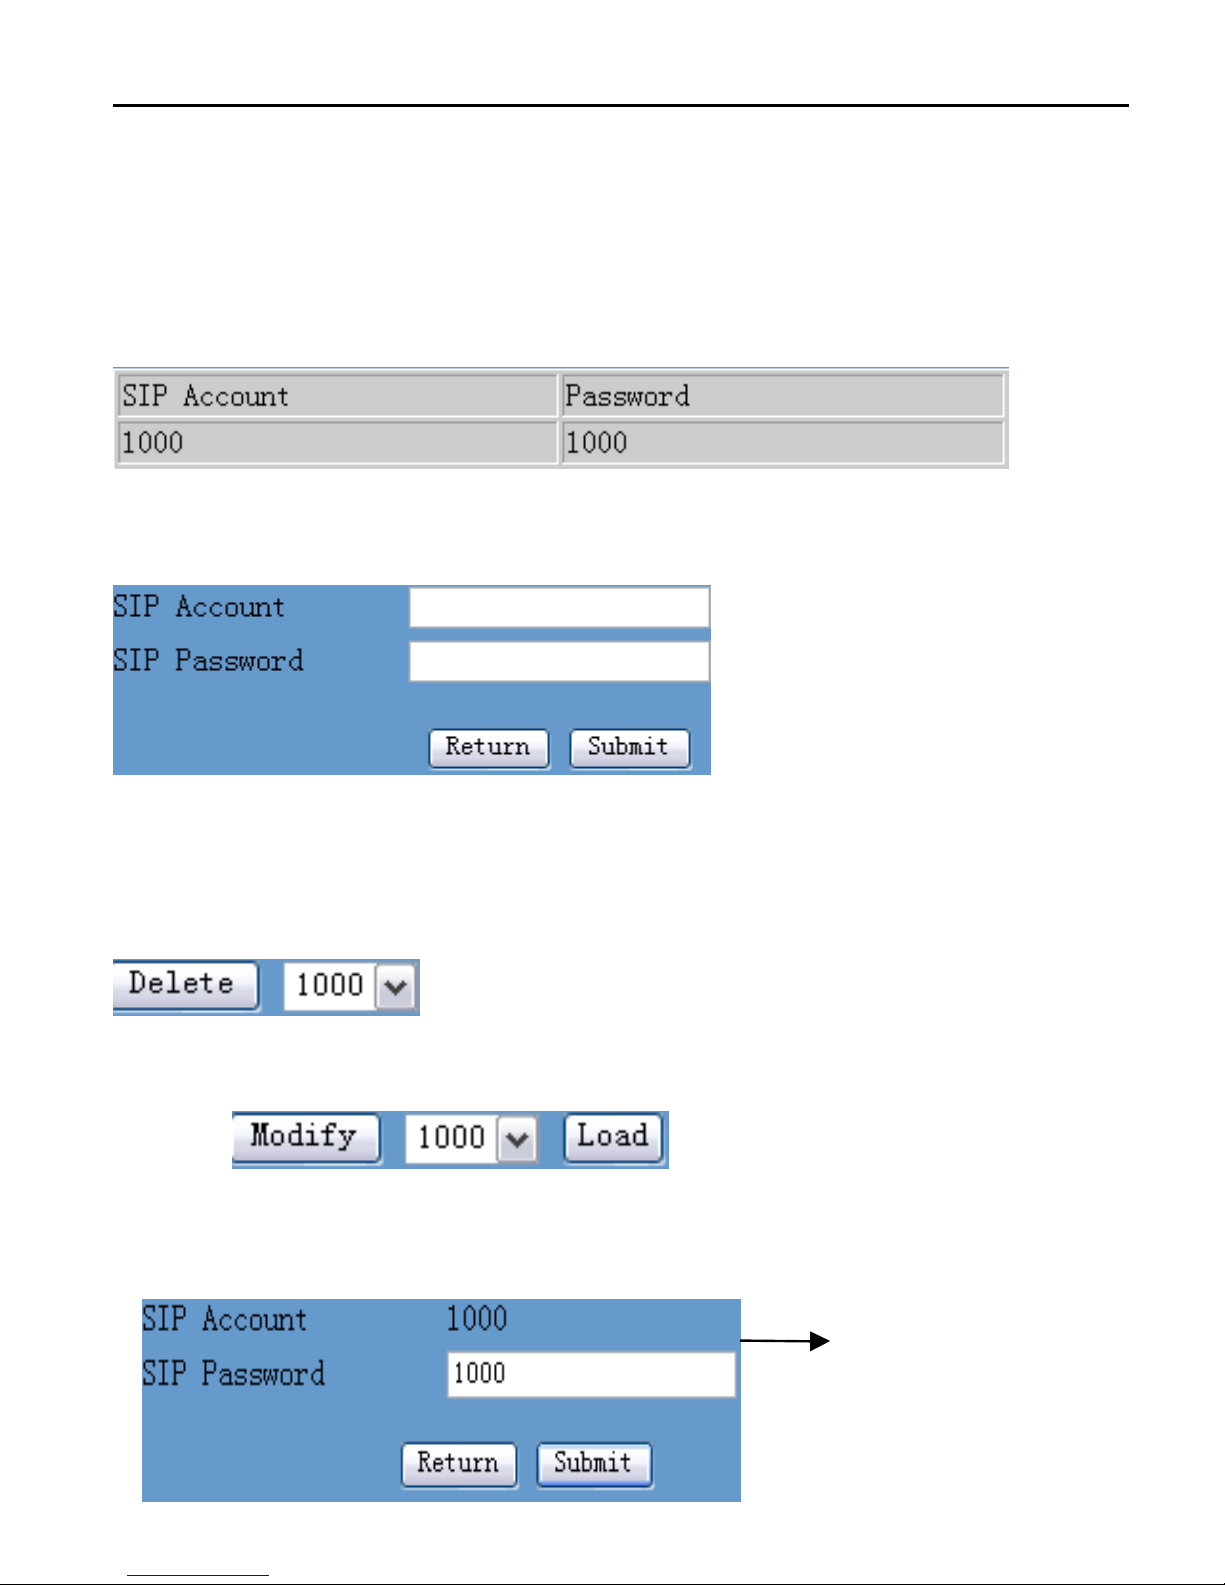
If user has accounts of a certain SIP server and each account has different
password, then user should add each account and its corresponding
password to the account& password table.
Configure display of account & password list;
Click Add to add account and password, it is shown as the following figure:
Configure additive accounts
Configure additive passwords
Click submit to submit the configuration, click return to cancel the
configuration and return;
Select accounts that you want to delete from the drop-down menu, click
delete.
Select drop-down menu to select accounts that want to modify, click load to
load the configuration and then click modify to modify;
Accounts to be
Modified, read-only;
Page 69

CDX-IPH301 -VoIP User Manual V1.0
Passwords to be
modified;
Click submit to submit,
click return to cancel the modification and then return.
1095 Budapest, Mester utca 34.
Tel.: *218-5542, 215-9771, 215-7550,
216-7017, 216-7018 Fax: 218-5542
Mobil: 30 940-1970, 20 949-2688
E-mail: delton@delton. hu Web: www.delton.hu
www. excelltel.hu
1141 Budapest, Fogarasi út 77.
Tel.: *220-7940, 220-7814, 220-7959,
220-8881, 364-3428 Fax: 220-7940
Mobil: 30 531-5454, 30 939-9989
 Loading...