

Record All Information and attach sales
receipt here for future reference:
Purchase Date:__________________________
Serial #: ________________________________
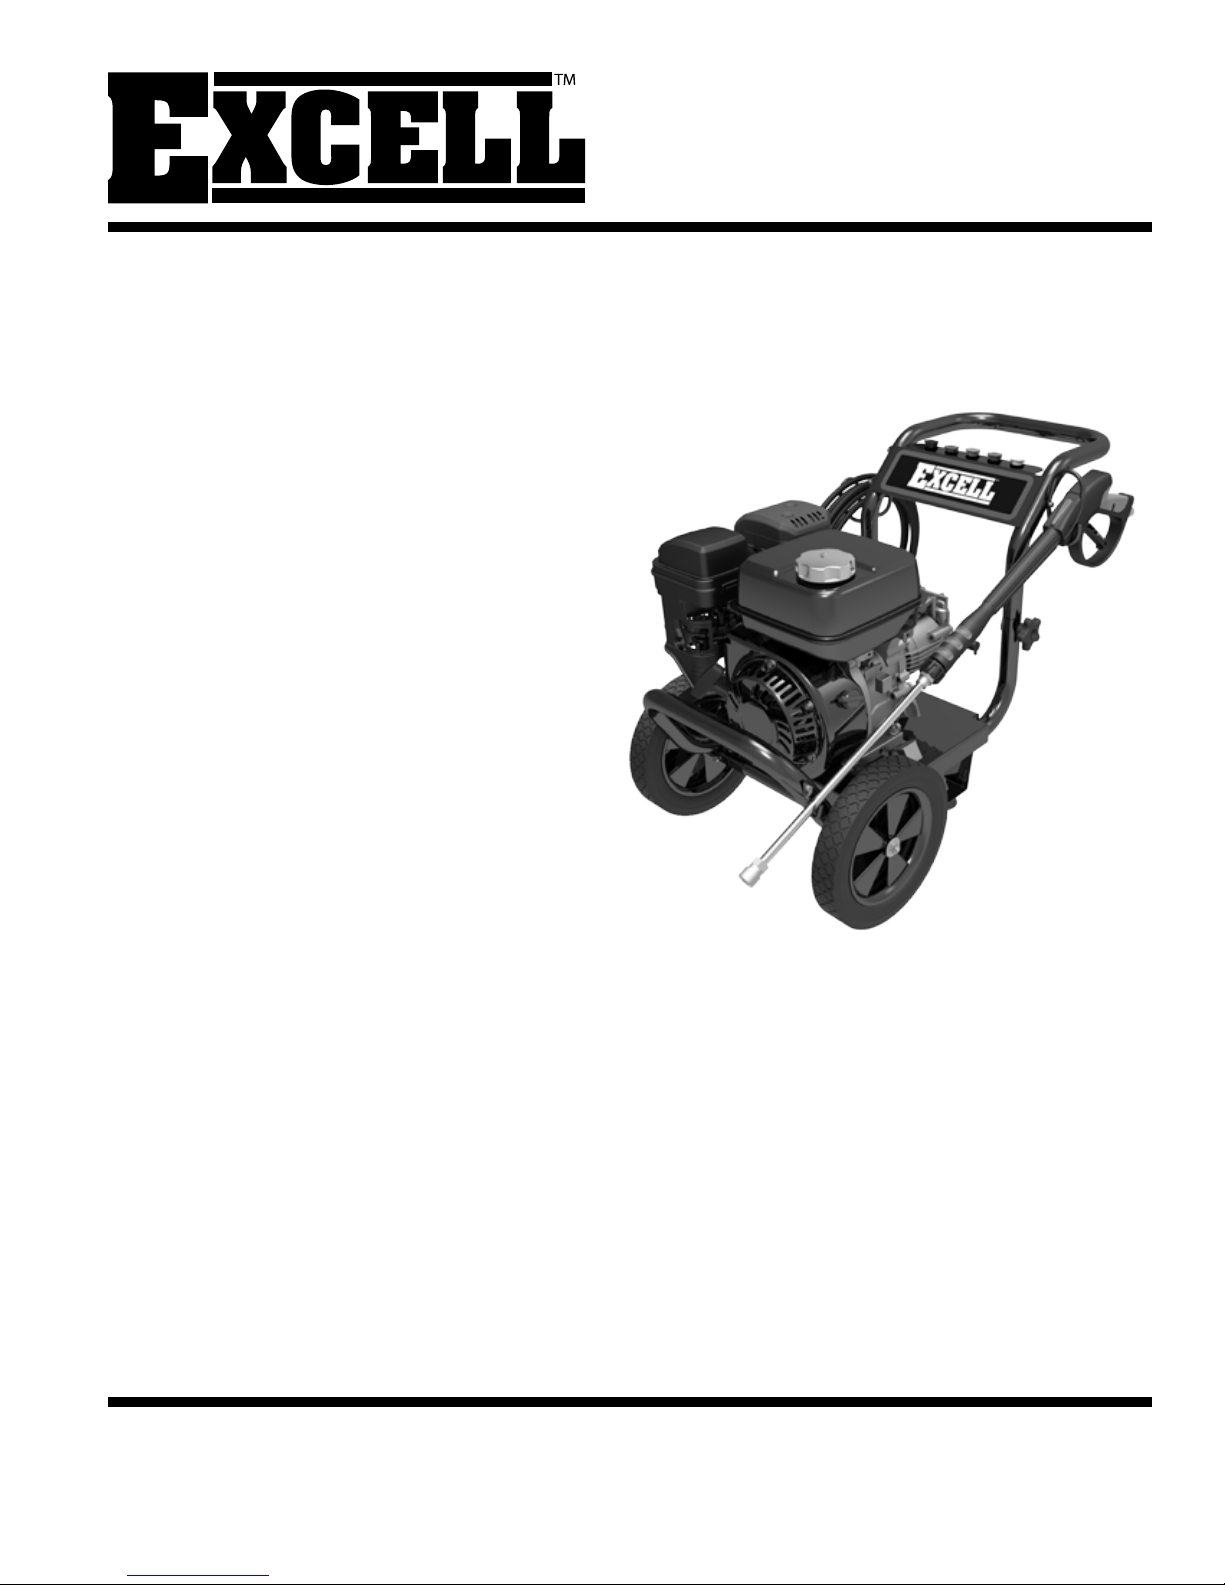
PRESSURE WASHER
OPERATION MANUAL
for model EPW2123100
Questions? 1-888-895-4549
Refer to the website for electronic
manual and parts book.
www.powermate.com
TABLE OF CONTENTS
Safety Guidelines/Denitions ........................... 2
Consumer Safety Information .......................... 2
Important Safety Instructions .......................... 2
Safety Features ............................................... 6
Specications .................................................. 6
Assembly instructions ..................................... 7
Spray Nozzle Selection .................................... 9
Before Operation ............................................. 9
Engine and Pump Features ........................... 10
Operating Connections.................................. 10
Operating Instructions ................................... 11
Start-Up Procedure ....................................... 11
Chemical Injection ......................................... 11
Cleaning Techniques ..................................... 12
End of Cleaning Operation ............................ 12
Maintenance .................................................. 13
Storage .......................................................... 14
Warranty ........................................................ 15
Troubleshooting Guide .................................. 16
Français ......................................................... 17
Español .......................................................... 33
IMPORTANT: Please make certain that the person who is to use this equipment carefully reads
and understands these instructions before operating.
10/31/2016 PRINTED IN CHINA
Part No. E110166// Rev. 0
SAFETY GUIDELINES - DEFINITIONS
• SAVE ALL INSTRUCTIONS
This manual contains information that is important for you to know and understand. This information
relates to protecting YOUR SAFETY and PREVENTING EQUIPMENT PROBLEMS. To help you recognize this
information, we use the symbols below. Please read the manual and pay attention to these symbols.
DANGER
Indicates an imminently hazardous situation which, if not
avoided , WILL result in DEATH OR SERIOUS INJURY.
WARNING
Indicates a potentially hazardous situation which, if
not avoided, COULD result in DEATH OR SERIOUS
INJURY.
CAUTION
Indicates a potentially hazardous situation which, if not
avoided, MAY result in MINOR OR MODERATE INJURY.
NOTICE
Indicates a potentially hazardous situation which, if
not avoided, MAY result in PROPERTY DAMAGE.
CONSUMER SAFETY INSTRUCTIONS
• SAVE ALL INSTRUCTIONS
WARNING
equipped and will be used around ammable materials, or on land covered with materials such as agricultural
crops, forest, brush, grass, or other similar items, then an approved spark arrester must be installed and is
legally required by the state of California. It is a violation of California statutes section 13005(b) and/or sections
4442 and 4443 of California Public Resources Code, unless the engine is equipped with a spark arrester, as
dened in section 4442, and maintained in effective working order. Spark arresters are also required on some
U.S. Forest Service land and may also be legally required under other statutes and ordinances.
WARNING
This product contains chemicals known to the State of California to cause cancer, birth defects and/or
reproductive harm.
This product may not be equipped with a spark arresting mufer. If the product is not
CALIFORNIA PROPOSITION 65 WARNING
IMPORTANT SAFETY INSTRUCTIONS
• SAVE ALL INSTRUCTIONS
WARNING
the Engine Owner's Manual for Safety, Operation, and Maintenance Instructions.
DANGER
• Spilled gasoline and its vapors can become ignited from
cigarette sparks, electrical arcing, exhaust gases and hot
engine components such as the mufer.
• Heat will expand fuel in the tank, which could result in
spillage and possible re explosion.
• Operating the pressure washer in an explosive
environment could result in a re.
Do not operate this unit until you have read and understand this Operator's Manual and
READ AND SAVE THESE INSTRUCTIONS
RISK OF EXPLOSION FOR FIRE
WHAT CAN HAPPEN HOW TO PREVENT IT
• Shut off engine and allow it to cool before adding fuel to
the tank.
• Use care in lling tank to avoid spilling fuel. Move
pressure washer away from fueling area before starting
engine.
• Fill tank to ½˝ (12.7 mm) below bottom of ller neck to
provide space for fuel expansion.
• Operate and fuel equipment in well-ventilated areas
free from obstructions. Equip areas with re extinguisher
suitable for gasoline res.
Copyright © 2017 MAT Industries, LLC
2 - ENG
IMPORTANT SAFETY INSTRUCTIONS (CONT.)
• SAVE ALL INSTRUCTIONS
DANGER
RISK OF EXPLOSION FOR FIRE (CONT.)
WHAT CAN HAPPEN HOW TO PREVENT IT
• Materials placed against or near the pressure washer
can interfere with its proper ventilation features causing
overheating and possible ignition of the materials.
• Mufer exhaust heat can damage painted surfaces, melt
any material sensitive to heat (such as siding, plastic,
rubber, vinyl, or the pressure hose, itself), and damage
live plants.
• Improperly stored fuel could lead to accidental ignition.
Fuel improperly secured could get into the hands of
children or other unqualied persons.
• Use of acids, toxic or corrosive chemicals, poisons,
insecticides, or any kind of ammable solvent with this
product could result in serious injury or death.
DANGER
RISK TO BREATHING (ASPHYXIATION)
WHAT CAN HAPPEN HOW TO PREVENT IT
• Breathing exhaust fumes will cause serious injury or
death! Engine exhaust contains carbon monoxide, an
odorless and deadly gas.
• Some cleaning uids contain substances which could
cause injury to skin, eyes or lungs.
• Never operate pressure washer in an area containing dry
brush or weeds.
• Always keep pressure washer a minimum of 4´ (1.2m)
away from surfaces (such as houses, automobiles or
live plants) that could be damaged from mufer exhaust
heat.
• Store fuel in an OSHA-approved container, in a secure
location away from work area.
• Do not spray ammable liquids.
• Operate pressure washer in a well-ventilated area. Avoid
enclosed areas such as garages, basements, etc.
• Never operate unit in a location occupied by humans or
animals.
• Use only cleaning uids specically recommended
for high-pressure washers. Follow manufacturer's
recommendations. Do not use chlorine bleach or any
other corrosive compound.
DANGER
RISK OF FLUID INJECTION AND LACERATION
WHAT CAN HAPPEN HOW TO PREVENT IT
• Your pressure washer operates at uid pressures
and velocities high enough to penetrate human and
animal esh, which could result in amputation or other
serious injury. Leaks caused by loose ttings or worn
or damaged hoses can result in injection injuries. DO
NOT TREAT FLUID INJECTION AS A SIMPLE CUT! See a
physician immediately!
• Injuries can result if system pressure is not reduced
before attempting maintenance or disassembly.
• Inspect the high-pressure hose regularly. Replace the
hose regularly. Replace the hose immediately if it is
damaged, worn, has melted from contacting the engine,
or shows any signs of cracking, bubbles, pinholes, or
other leakage. Never grasp a high-pressure hose that is
leaking or damaged.
• Never touch, grasp or attempt to cover a pinhole or
similar water leak on the high-pressure hose. The stream
of water IS under high pressure and WILL penetrate skin.
• Never place hands in front of nozzle.
• Direct spray away from self and others.
• Make sure hose and ttings are tightened and in good
condition. Never hold onto the hose or ttings during
operation.
• Do not allow hose to contact mufer.
• Never attach or remove wand or hose ttings while
system is pressurized.
• To relieve system pressure, shut off engine, turn off water
supply and pull gun trigger until water stops owing.
• Use only hoses and accessories rated for pressure
higher than your pressure washer’s PSI.
3 - ENG
Copyright © 2017 MAT Industries, LLC

IMPORTANT SAFETY INSTRUCTIONS (CONT.)
• SAVE ALL INSTRUCTIONS
DANGER
RISK OF INJURY FROM SPRAY
WHAT CAN HAPPEN HOW TO PREVENT IT
• High-velocity uid spray can cause objects to break,
propelling particles at high speed.
• Light or unsecured objects can become hazardous
projectiles.
DANGER
RISK OF FLUID INJECTION AND LACERATION
WHAT CAN HAPPEN HOW TO PREVENT IT
• Unsafe operation of your pressure washer could lead to
serious injury or death to you or others.
• If proper starting procedure is not followed, engine can
kickback causing serious hand and arm injury.
• The spray gun/wand is a powerful cleaning tool that could
look like a toy to a child.
• Reactive force of spray will cause gun/wand to kickback,
and could cause the operator to slip or fall or misdirect
the spray. Improper control of gun/wand can result in
injuries to self and others.
• Always wear ANSI-approved z87.1 safety glasses.
Wear protective clothing to protect against accidental
spraying.
• Never point wand at or spray people or animals.
• Always secure trigger lock when wand is not in service to
prevent accidental operation.
• Never permanently secure trigger in pull-back (open)
position.
• Do not use chlorine bleach or any other corrosive
compound.
• Become familiar with the operation and controls of the
pressure washer.
• Keep operating area clear of all persons, pets and
obstacles.
• Do not operate the product when fatigued or under the
inuence of alcohol or drugs. Stay alert at all times.
• Never defect the safety features of this product.
• Do not operate machine with missing, broken or
unauthorized parts.
• Never leave wand unattached while unit is running.
• If engine does not start after two pulls, squeeze trigger
of gun to relieve pump pressure. Pull starter cord slowly
until resistance is felt. Then pull cord rapidly to avoid
kickback and prevent hand or arm injury.
• Keep children away from the pressure washer at all
times.
• Do not overreach or stand on an unstable support.
• Do not use pressure washer while standing on a ladder.
• Grip gun/wand rmly with both hands. Expect the gun to
kickback when triggered.
DANGER
RISK OF INJURY OR PROPERTY DAMAGE WHEN TRANSPORTING
OR STORING
WHAT CAN HAPPEN HOW TO PREVENT IT
• Fuel or oil leak or spill could result in re or breathing
hazard. Serious injury or death can result. Fuel or oil
leaks will damage carpet, paint or other surfaces in
vehicles or trailers.
Copyright © 2017 MAT Industries, LLC
• If pressure washer is equipped with a fuel shut-off valve,
turn the valve to OFF position before transporting to
avoid fuel leaks. If pressure washer is not equipped
with a fuel shut-off valve, drain the fuel from tank before
transporting. Only transport fuel in an OSHA-approved
container. Always place pressure washer on a protective
mat when transporting to protect against damage to
vehicle from leaks. Remove pressure washer from
vehicle immediately upon arrival at your destination.
4 - ENG
IMPORTANT SAFETY INSTRUCTIONS (CONT.)
• SAVE ALL INSTRUCTIONS
WARNING
RISK OF HOT SURFACES
WHAT CAN HAPPEN HOW TO PREVENT IT
• Contact with hot surfaces, such as engine's exhaust
components, could result in serious burn.
WARNING
RISK OF CHEMICAL BURN
WHAT CAN HAPPEN HOW TO PREVENT IT
• Use of acids, toxic or corrosive chemical, poisons,
insecticides, or any kind of ammable solvent with
this product could result in serious injury or death.
WARNING
RISK OF ELECTRICAL SHOCK
WHAT CAN HAPPEN HOW TO PREVENT IT
• Spray directed at electrical outlets or switches, or objects
connected to an electrical circuit, could result in a fatal
electric shock.
• During operation, touch only the control surfaces of the
pressure washer. Keep children away from the pressure
washer at all times. They may not be able to recognize
the hazards of this product.
• Do not use acids, gasoline, kerosene, or any other ammable
materials in this product. Use only household detergents,
cleaners and degreasers recommended for use in pressure
washers.
• Wear protective clothing to protect eyes and skin from contact
with spraying materials.
• Unplug any electrically operated product before
attempting to clean it. Direct spray away from electric
outlets and switches.
WARNING
RISK OF INJURY FROM LIFTING
WHAT CAN HAPPEN HOW TO PREVENT IT
• Serious injury can result from attempting to lift too heavy
an object.
• The pressure washer is too heavy to be lifted by one
person. Obtain assistance from others before lifting.
5 - ENG
Copyright © 2017 MAT Industries, LLC

SAFETY FEATURES
• SAVE ALL INSTRUCTIONS
THERMAL RELIEF VALVE
A thermal relief valve is provided to protect the
pump from overheating if the spray gun is
closed for an extended length of time or the
nozzle becomes plugged. However, it is
intended to be used as a backup system and
every effort should be made to not permit the
pump to heat up.
We recommend turning the pressure washer
off if it will not be used for more than five
minutes. This saves wear on the unit, reduces
fuel consumption and extends the life of the
pump by avoiding heat.
NOTICE
be damaged, or cause damage if allowed to
circulate more that five minutes.
The pump will overheat and may
SAFETY LOCK OFF LATCH
To prevent accidental discharge of high
pressure water, the safety latch on the trigger
should be engaged whenever the pressure
washer is not in use. (Refer to Operating
Instructions.)
LOW-OIL SHUTDOWN
The unit is equipped with a low oil sensor. If the
engine oil level becomes lower than required,
the pressure washer will automatically shut off.
(Refer to the engine manual for this feature.)
This protects your pressure washer engine from
operating without proper lubrication.
If the pressure washer engine shuts off and the
oil level is according to specification, check to
see if the pressure washer is sitting at an angle
that forces oil to shift. Place on an even
surface to correct this. If the engine fails to
start, the oil level may not be sufficient to
deactivate low oil level switch. Be sure the
engine is completely full of oil. See engine
manual.
SPARK ARRESTING MUFFLER
THIS PRODUCT MAY NOT BE EQUIPPED WITH
A SPARK ARRESTING MUFFLER. If the product
will be used around flammable materials, such
as agricultural crops, forests, brush, grass, or
other similar items, then an approved spark
arrester should be installed and is legally
required in the State of California. The California
statutes requiring a spark arrester are Sections
13005(b), 4442 and 4443. Spark Arresters are
also required on some U.S. Forest Service land
and may also be legally required under other
statutes and ordinances. For more information,
contact our Customer Service Department at
1-888-895-4549.
SPECIFICATIONS
• SAVE ALL INSTRUCTIONS
Maximum Pressure (PSI) ...................................................... 3100
Gallons Per Minute (GPM) .......................................................2.8
Maximum Inlet Pressure ...............................................Up to 90 PSIG
RPM ..................................................................3750 RPM
Temperature of Pumped Fluids. . . . . . . . . . . . . . . . . . . . . . . . . . . . . . . . . . . . . . . . . . . . . Up to 80°F
Inlet Ports ........................................................... 3/4” GHT (F)
Discharge Ports ............................................................. M22
Your pressure washer has a maintenance-free pump. There is no need to change the pump oil.
Copyright © 2017 MAT Industries, LLC
6 - ENG

ASSEMBLY INSTRUCTIONS
• SAVE ALL INSTRUCTIONS
1. Place the unit on its back and insert wheel
axle into front tube. Use (1) M6 washer and
(1) M6 x 15mm long hex head screw to
assemble wheel axle to frame using the
supplied open-end wrench. Tighten securely.
Repeat for opposite side.
2. Remove (1) M8 washer and (1) M8 nut from
wheel axle and place wheel onto axle.
Be sure the hub on the wheel goes to the
inside. Re-assemble the washer and nut
onto axle using the supplied open-end
wrench. Tighten securely. Repeat for
opposite side.
3. With the unit still on its back, assemble the
rubber feet using (1) M8 x 30mm long
socket head cap screw and (1) M8 nut.
Using the supplied hex wrench and openend wrench, tighten securely. Repeat for
opposite side.
4. Place the unit on its wheels and rubber feet.
Remove the knobs and screws from the
handle.
7 - ENG
Copyright © 2017 MAT Industries, LLC

ASSEMBLY INSTRUCTIONS (continued)
• SAVE ALL INSTRUCTIONS
4. Remove the handle and rotate 180 degrees
and re-insert into the frame. Re-assemble
both knobs and screws.
5. Assemble the lower gun hook using (1) M6 x
45mm long socket head cap screw, (1) M6
nut, and the supplied hex wrench and openend wrench. Tighten securely.
6. Assemble the upper gun hook using (1) M6 x
45mm long socket head cap screw, (1) M6
nut, and the supplied hex wrench and openend wrench. Tighten securely.
7. Assemble the upper hose hanger using (2)
M6 x 45mm long socket head cap screws,
(2) M6 nuts, and the supplied hex wrench
and open-end wrench. Tighten securely.
Copyright © 2017 MAT Industries, LLC
8 - ENG

SPRAY NOZZLE SELECTION
• SAVE ALL INSTRUCTIONS
Following is information concerning the five
nozzles provided with your pressure washer.
NOTE: The force of the spray on the
surface you are cleaning increases as
you move closer to the surface.
0° High Pressure (Red): The water stream
discharged is very aggressive. Use with
extreme caution to prevent damage to the
surface being cleaned or injury to persons
or animals.
15° High Pressure (Yellow): This is the
nozzle used for most cleaning applications. It
provides narrow coverage and a highly
powerful water stream.
BEFORE OPERATION
• SAVE ALL INSTRUCTIONS
NOTE: The engine and pump on your
EXCELL™ Pressure Washer will often have
improved performance after a break-in
period of several hours.
PRE-START PREPARATION
Before starting the pressure washer, check for
loose or missing parts and for any damage
which may have occurred during shipment.
HOSE AND GUN ASSEMBLY
NOTE: Align threaded connections carefully to prevent damaging threads during
assembly. Tighten connections securely
to prevent leaks during operation.
25° High Pressure (Green): Use of this
nozzle offer both a medium coverage and
water stream. Best used for flushing dirt and
debris off surfaces.
40° High Pressure (White): This nozzle is
chemical injector to apply chemicals used for
cleaning with the widest coverage over a
larger area with a powerful water stream.
65° Low Pressure (Black): Provides low
pressure spray and a wide coverage. Used
primarily when operating the chemical injector
to apply chemicals.
FUEL
Fill the tank with clean, fresh unleaded
automotive gasoline. (See Figure 1). Regular
grade gasoline may be used provided a high
octane rating is obtained (at least 85 pump
octane).
WARNING
Serious injury may result from fire caused
by gasoline contacting hot surfaces.
Do not overfill the tank. Keep maximum
fuel level 1/2 inch below the bottom of the
filler neck. This will allow expansion in
hot weather and prevent overflow.
Gasoline is very dangerous.
Attach the hose to the inlet of the trigger gun.
LUBRICATION
DO NOT attempt to start the pressure washer
engine without filling the engine crank case
with the proper amount and type of oil. (See
the accompanying engine manual for this
information.) Your pressure washer engine
has been shipped from the factory without oil
in the engine crankcase. Operating the unit
without oil will ruin the engine.
The pump is not equipped with a dipstick or sight
glass windows. Check oil leaks from the pump.
Pump oil is shipped in the pump from factory.
9 - ENG
Copyright © 2017 MAT Industries, LLC

ENGINE AND PUMP FEATURES - FIGURE 1
• SAVE ALL INSTRUCTIONS
FUEL FILL
AIR FILTER
THROTTLE
LEVER
CHOKE LEVER
FUEL ON/OFF
RECOIL
STARTER
OPERATING CONNECTIONS
• SAVE ALL INSTRUCTIONS
OUTLET
CONNECTION
INLET
CONNECTION
SIPHON
INJECTOR
THERMAL
RELIEF VALVE
FUEL FILTER
OIL FILL
OIL DRAIN
ENGINE
ON/OFF
SWITCH
HIGH PRESSURE HOSE
Attach the high pressure hose to the outlet
connection located on the pump. (See Figure 1).
WATER CONNECTION
Before connecting to unit, run water through
the garden hose (not supplied) to flush out any
foreign matter. Check that the screen is clean
and is in the inlet of the pump. Attach garden
hose to the inlet connection located on the
pump. (See Figure 1).
NOTE: The water supply must provide a
minimum of 4 GPM at 40 to 80 PSI or the
pump will be damaged.
Copyright © 2017 MAT Industries, LLC
10 - ENG

OPERATING INSTRUCTIONS
• SAVE ALL INSTRUCTIONS
START-UP PROCEDURE
1. Ensure water supply is connected and
turned on.
2. Release gun safety lock.
3. To allow air to escape from the hose, squeeze
trigger on the gun until there is a steady
stream of water coming from the nozzle.
4. Remove any dirt or foreign matter from the
gun outlet and the male connector of the wand.
5. Insert the nozzle wand into the gun wand
and tighten the twistfast fitting securely by
hand.
CHEMICAL INJECTION
• SAVE ALL INSTRUCTIONS
1. Ensure that one end of the chemical
injection tube is attached to the siphon
injector on the pump (see Figure 1, page 10)
2. Ensure that the other end of the chemical
injection tube is attached to the nipple on
the bottom of the chemical tank
3. Fill your chemical tank with your cleaner of
choice (most cleaners are concentrated,
please follow the mixing instructions as
outlined by the manufacturer of the cleaner).
4. Install the black quick connect, low
pressure nozzle on the spray wand. The
solution will automatically be mixed with
the water and discharged through the nozzle.
STARTING THE ENGINE
(See Figure 1, page 10)
1. Check oil and fuel level.
2. Adjust choke as necessary.
3. Set the engine switch to the “ON” position.
4. Squeeze trigger on pressure washer to
release pressure while pulling on the
engine starter rope with a fast steady pull.
Pressure may otherwise build up making
starting the unit difficult.
5. As the engine warms up, open the choke
to full.
WARNING
not securely locked into place, it could
be ejected under high pressure when
operating the gun, possibly causing injury
or damage.
If the wand or nozzle is
NOTICE
intended for use only with liquid car wash
detergents, developed specically for
pressure washer and with mild soaps.
Only use chemicals compatible with the
aluminum and brass parts of the pressure
washer. Powdered soaps may clog the
injection system. Always use chemicals
according to manufacturer directions. MAT
Industries, LLC assumes no responsibility
for any damages caused by chemicals
injected through this pressure washer.
This pressure washer is
11 - ENG
Copyright © 2017 MAT Industries, LLC

CLEANING TECHNIQUES
• SAVE ALL INSTRUCTIONS
When cleaning with the pressure washer,
many cleaning tasks can be solved with water
alone, but for most tasks it is advantageous to
use a detergent also. A detergent ensures a
quick soaking of the dirt allowing the high
pressure water to penetrate and remove the
dirt more effectively.
Pressure washer chemicals are specially formulated to be used with your pressure washer.
APPLICATION OF SOAP OR
DEGREASER
1. Apply the solution to a DRY work surface.
On a vertical surface, apply horizontally
from side to side starting from the bottom
to avoid streaking.
NOTE: Wetting the surface first is not
recommended, as it dilutes the
detergent and reduces its cleaning
ability. Avoid working on hot surfaces
or in direct sunlight to minimize the
chances of the chemical damaging
painted surfaces. Damage may occur
to painted surface if chemical is
allowed to dry on the surface. Hold
nozzle far enough away from surface
to prevent damage to the surface.
2. Allow chemical to remain on the surface
for a short time before rinsing.
3. Rinse with clean water under high pressure.
On a vertical surface, first rinse from the
bottom up, then rinse from the top down.
Hold nozzle 6 to 8 inches from the work
surface at a 45° angle using the flat spray
as a peeling tool rather than a scrub brush.
APPLICATION OF WAX
1. Immediately after cleaning, apply pressure
washer wax. Place injection tube in
container of wax.
2. Apply the wax sparingly in an even layer.
Apply to wet surfaces from the bottom up
for even distribution and to avoid streaking.
3. Remove the suction tube from the wax
bottle and rinse off the surplus wax.
NOTE: IF SURPLUS WAX IS NOT
REMOVED, A HAZY FINISH MAY RESULT.
4. Wipe dry to reduce water spotting.
END OF CLEANING OPERATION
• SAVE ALL INSTRUCTIONS
When you have completed use of the chemical
injection system, remove tube from container.
Continue to run in low pressure position and
inject clean water through the tube and
injection system by placing end of tube in a
container of clean water. Continue to run until it
is thoroughly cleaned.
Copyright © 2017 MAT Industries, LLC
12 - ENG

MAINTENANCE
• SAVE ALL INSTRUCTIONS
CONNECTIONS
Connections on pressure washer hoses, gun
and spray wand should be cleaned regularly
and lubricated with silicon grease to prevent
leakage and damage to the o-rings.
NOZZLE
Clogging of the nozzle causes the pump
pressure to be too high and cleaning is
immediately required.
WARNING
only be used when the spray nozzle is
disconnected from the gun or personal
injury could result.
1. Remove the nozzle from the wand.
2. Clear the nozzle with the nozzle cleaner
pin provided with the pressure washer.
3. Flush the nozzle backwards with water.
4. Re-install the nozzle into the wand.
Restart the pressure washer and depress the
trigger on the spray gun. If the nozzle is still
plugged or partially plugged, repeat above
items 1-4.
A nozzle cleaner must
WATER SCREEN
The pressure washer is equipped with a water
inlet screen to protect the pump. If the screen
is not kept clean, it will restrict the flow of
water to the pressure washer and may cause
damage to the pump. Do not damage the
screen while removing or cleaning screen.
Any foreign particles entering the pump may
damage the pump. Do not operate pressure
washer without the screen in place.
Remove the screen and back flush to remove
impurities from screen. Replace immediately.
ENGINE MAINTENANCE
During the winter months, rare atmospheric
conditions may develop which will cause an
icing condition in the carburetor. If this
develops, the engine may run rough, lose
power, and may stall.
NOTE: Refer to the engine manufacturer’s
manual for service and maintenance of
the engine.
If the previous procedure does not clear the
nozzle, replace with a new nozzle.
13 - ENG
Copyright © 2017 MAT Industries, LLC

STORAGE
• SAVE ALL INSTRUCTIONS
PUMP STORAGE
If you must store your pressure washer in a
location where the temperature is below 32°F,
you can minimize the chance of damage to
your machine by utilizing the following
procedure:
1. Shut off water supply and relieve pressure
in the spray gun by depressing the trigger.
Disconnect the garden hose from the
pressure washer, but leave the high pressure hose connected.
2. Tip the unit on its side with the inlet
connection pointing up.
3. Insert a small funnel (to prevent spilling)
into the inlet and pour in approximately 1/4
cup of RV antifreeze.
4. Disconnect spark plug wire.
5. Without connecting garden hose pull the
recoil several times to circulate the anti
freeze in the pump system. Continue to
add antifreeze and pull the recoil until the
antifreeze is expelled when the trigger is
pulled.
6. Turn the unit upright.
NOTICE
any possible ice from the pressure washer hoses, spray gun and wand.
Prior to restarting, thaw out
ENGINE STORAGE
When the pressure washer is not being
operated or is being stored more than one
month, follow these instructions:
1. Replenish engine oil to upper level.
2. Drain gasoline from fuel tank, fuel line, fuel
valve and carburetor.
3. Pour about one teaspoon of engine oil
through the spark plug hole, pull the recoil
starter several times and replace the plug.
Then pull the starter slowly until you feel
increased pressure which indicates the
piston is on its compression stroke and
leave it in that position. This closes both
the intake and exhaust valves to prevent
the inside of the cylinder from rusting.
4. Cover the pressure washer and store in a
clean, dry place that is well ventilated away
from open flame or sparks.
NOTE: We recommend always using a
fuel stabilizer. A fuel stabilizer will
minimize the formulation of fuel gum
deposits during storage. The fuel
stabilizer can be added to the gasoline in
the fuel tank, or into the gasoline in a
storage container.
Another method of reducing risks of freeze damage is to drain your pressure washer as follow:
1. Stop the pressure washer and detach supply
hose and high pressure hose. Squeeze
the trigger of the discharge gun to drain all
water from the wand and hose.
2. Restart the pressure washer and let it run
briefly (about 5 seconds) until water no longer
discharges from the high pressure outlet.
Copyright © 2017 MAT Industries, LLC
14 - ENG

LIMITED WARRANTY
• SAVE ALL INSTRUCTIONS
Always specify model number when contacting the manufacturer.
We reserve the right to amend these specications at any time without notice. The only warranty applicable
is our standard written warranty. We make no other warranty, expressed or implied. MAT Industries, LLC
warrants this pressure washer and any parts thereof, to be free from defects in material and workmanship
for two (2) years (90 days for commercial use or for reconditioned unit) from the date of rst purchase from
an authorized dealer, provided that the product has been properly maintained and operated in accordance
with all applicable instructions. This warranty is extended to the original retail purchaser. The bill of sale or
proof of purchase must be presented at the time a claim is made under this warranty. This warranty does
not cover industrial or rental usage, nor does it apply to parts that are not in original condition because of
normal wear and tear, or parts that fail or become damaged as a result of misuse, accident, lack of proper
maintenance, tampering, or alteration. Exceptions to this standard warranty period would be normal wear
items such as air lters and spark plugs which are covered for sixty (60) days against defects in material
and workmanship. Travel, handling, transportation, and incidental costs associated with warranty repairs
are not reimbursable under this warranty and are the responsibility of the owner. To the full extent allowed
by the law of the jurisdiction that governs the sale of the product, this express warranty excludes any and
all other expressed warranties and limits the duration of any and all implied warranties, including warranties
of merchantability and tness for a particular purpose to two (2) years from the date of rst purchase, and
MAT Industries, LLC’s liability is hereby limited to the purchase price of the product and MAT Industries, LLC
shall not be liable for any other damages whatsoever including direct, incidental, or consequential damages.
Some states do not allow limitation of how long an implied warranty lasts or an exclusion or limitation
of incidental or consequential damages, so the above limitation of damages may not apply to you. This
warranty provides the original purchaser with specic rights.
For information regarding those rights, please consult the applicable state laws.
MAT Industries, LLC Corporate Ofce – CORRESPONDENCE ONLY
ATTN: Technical Services – MIND
6700 Wildlife Way
Long Grove, IL
60047
The Engine Emissions Control System Warranty is provided by the engine manufacturer, included with this
product and administered by MAT Industries, LLC.
15 - ENG
Copyright © 2017 MAT Industries, LLC

TROUBLESHOOTING GUIDE
• SAVE ALL INSTRUCTIONS
Problem Cause Correction
Engine will not start or
stops while operating
Engine is overloaded 1. Nozzle partially blocked. 1. Clean nozzle.
1. Low-oil shutdown.
2. Engine switch not in the “ON” position.
3. Pressure build up in hose.
1. Fill engine with oil.
2. Turn switch “ON”.
3. Squeeze trigger.
Water or oil leaking
from bottom of pump
Pressure increases
when gun is closed
Engine running but
pump not building
maximum pressure or
has irregular pressure
No intake of chemicals
Trigger will not move 1. Gun safety lock engaged. 1. Release safety lock.
Water in crankcase 1. High humidity.
Noisy operation 1. Worn bearings
Rough/pulsating
operation with
pressure drop
High crankcase
temperatures
1. A small amount of leakage is normal. 1. If excessive leaking occurs call the Customer
Service Department.
1. Bypass valve not operating properly. 1. Call the Customer Service Department.
1. Faucet closed.
2. Unit has been stored in freezing
temperatures.
3. Inadequate water supply.
4. Water inlet screen clogged.
5. Kink in garden hose.
6. Wand nozzle worn or damaged.
7. Air in pump.
8. Suction or discharge valves clogged or
worn out.
9. By-pass valve not operating effectively.
1. Injection tube not securely inserted into
unit.
2. Tube cracked or split.
3. Wrong nozzle.
4. Injection tube strainer clogged.
5. Nozzle blocked.
6. Dried chemicals in injector.
2. Worn seals.
2. Air mixed with water.
1. Worn packing.
2. Inlet restriction.
3. Unloader.
4. Air mixed in water.
1. Wrong grade of oil.
2. Improper amount of oil in crankcase.
1. Open faucet.
2. Thaw out unit completely including hose, gun
and wand.
3. Provide a minimum of 4 gpm at 20 psi.
4. Clean screen.
5. Straighten hose.
6. Replace nozzle.
7. Let run with gun open and wand removed
until steady stream of water is released.
8. Call the Customer Service Department.
9. Call the Customer Service Department.
1. Push firmly into injector.
2. Replace tubing.
3. Switch to low pressure nozzle.
4. Clean strainer.
5. Clean nozzle.
6. Dissolve by running warm water trough the
injection tube.
1. Change oil more frequently.
2. Call the Customer Service Department.
1. Call the Customer Service Department.
2. Check inlet lines for restrictions and /or proper
sizing.
1. Call the Customer Service Department.
2. Check system for stoppage, air leaks.
correctly sized inlet plumbing to pump.
3. Check unloader for proper operation.
4. Check inlet lines for restrictions and/or proper
sizing.
1. Use recommended oil.
2. Adjust oil level to proper amount.
Copyright © 2017 MAT Industries, LLC
16 - ENG
 Loading...