

Page 1
TH-2005 EXCEL PROGRAMMABLE THERMOSTAT
USER'S GUIDE (E-Series)
Choosing location for INSTALLATION
For obtaining thermostat's best performance upon using,
recommend user to follow up with precaution listed below.
(1). Place thermostat on wall inside the room approximate
1.5 meter above floor.
(2). Avoid position where temperature sensing easily interfered
by ambience, such as, directly exposed to Sun-Light, too
near to any Heat-Generate devices/refrigerator, right next to
entrance/exit/window, etc.
(3). Prevent thermostat from installed at position that furniture
may interfere air-flow, stagnant air-flow location is not
suitable for installing thermostat.
(4). Keep thermostat away from high humid ambience, high
humidity is hazardous to thermostat's operational duration,
(5). It's crucial, before installing thermostat, make sure house
renovation is finished, no tacky painting/plaster is right
on thermostat's installing position.
(6). To level thermostat prior to installation is not necessary
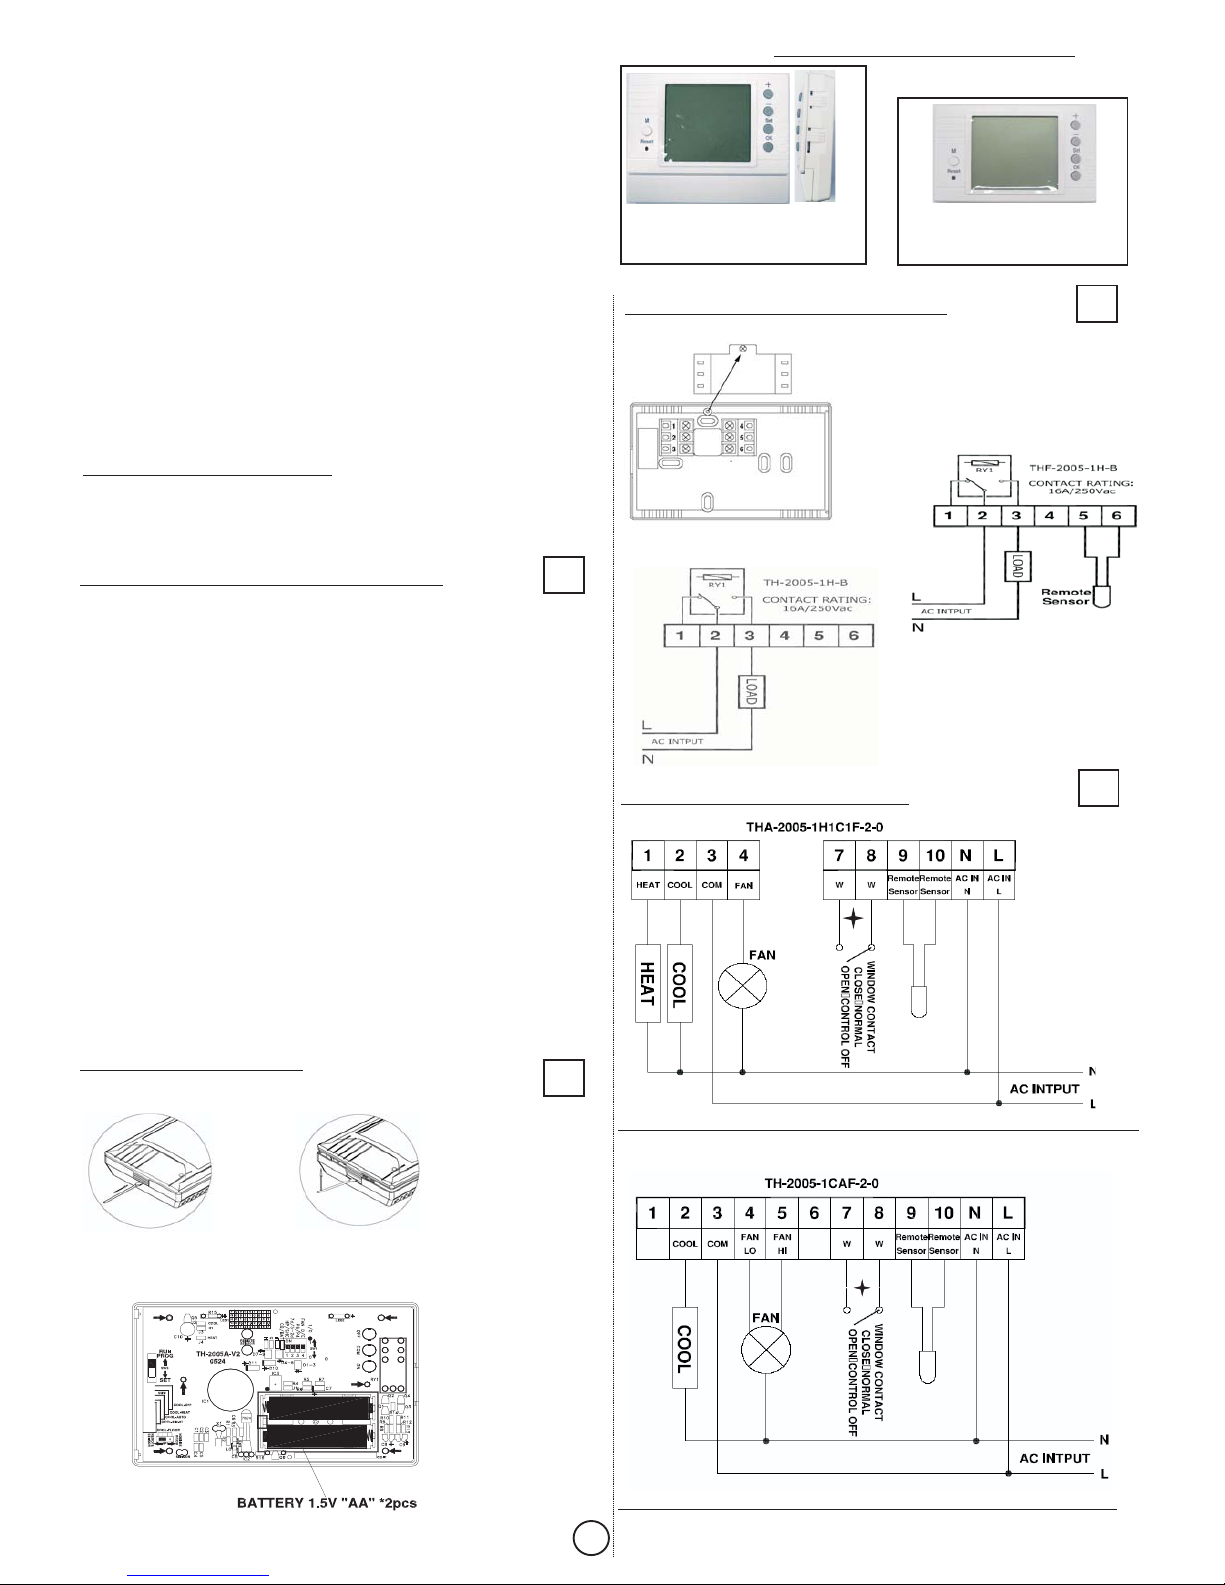
LINE-VOLTAGE -MODEL
(system switches on the side)
Fan
Switch
System
Switch
Dimension: 138 x 110 x 32 mm
BATTERY-MODEL
(no system switches)
Dimension: 138 x 86 x 32 mm
Content
Choosingllocation For
Installation & Replace Batteries---1
Start Installation-----------------------2
Battery Operate Model---------------3
Line Voltage Model-------------------4
To Use Window Contact--------------5
To Use Remote-sensor------------- -6
Floor Heating--------------------------7
-----8
Model Descriptions & Specs--------9
Description For Key Pads----------10
Wiring
Model Specs Descriptions &
Internal Setting
Start Programming Thermostat
Internal Setting-factory Preset
START INSTALLATION
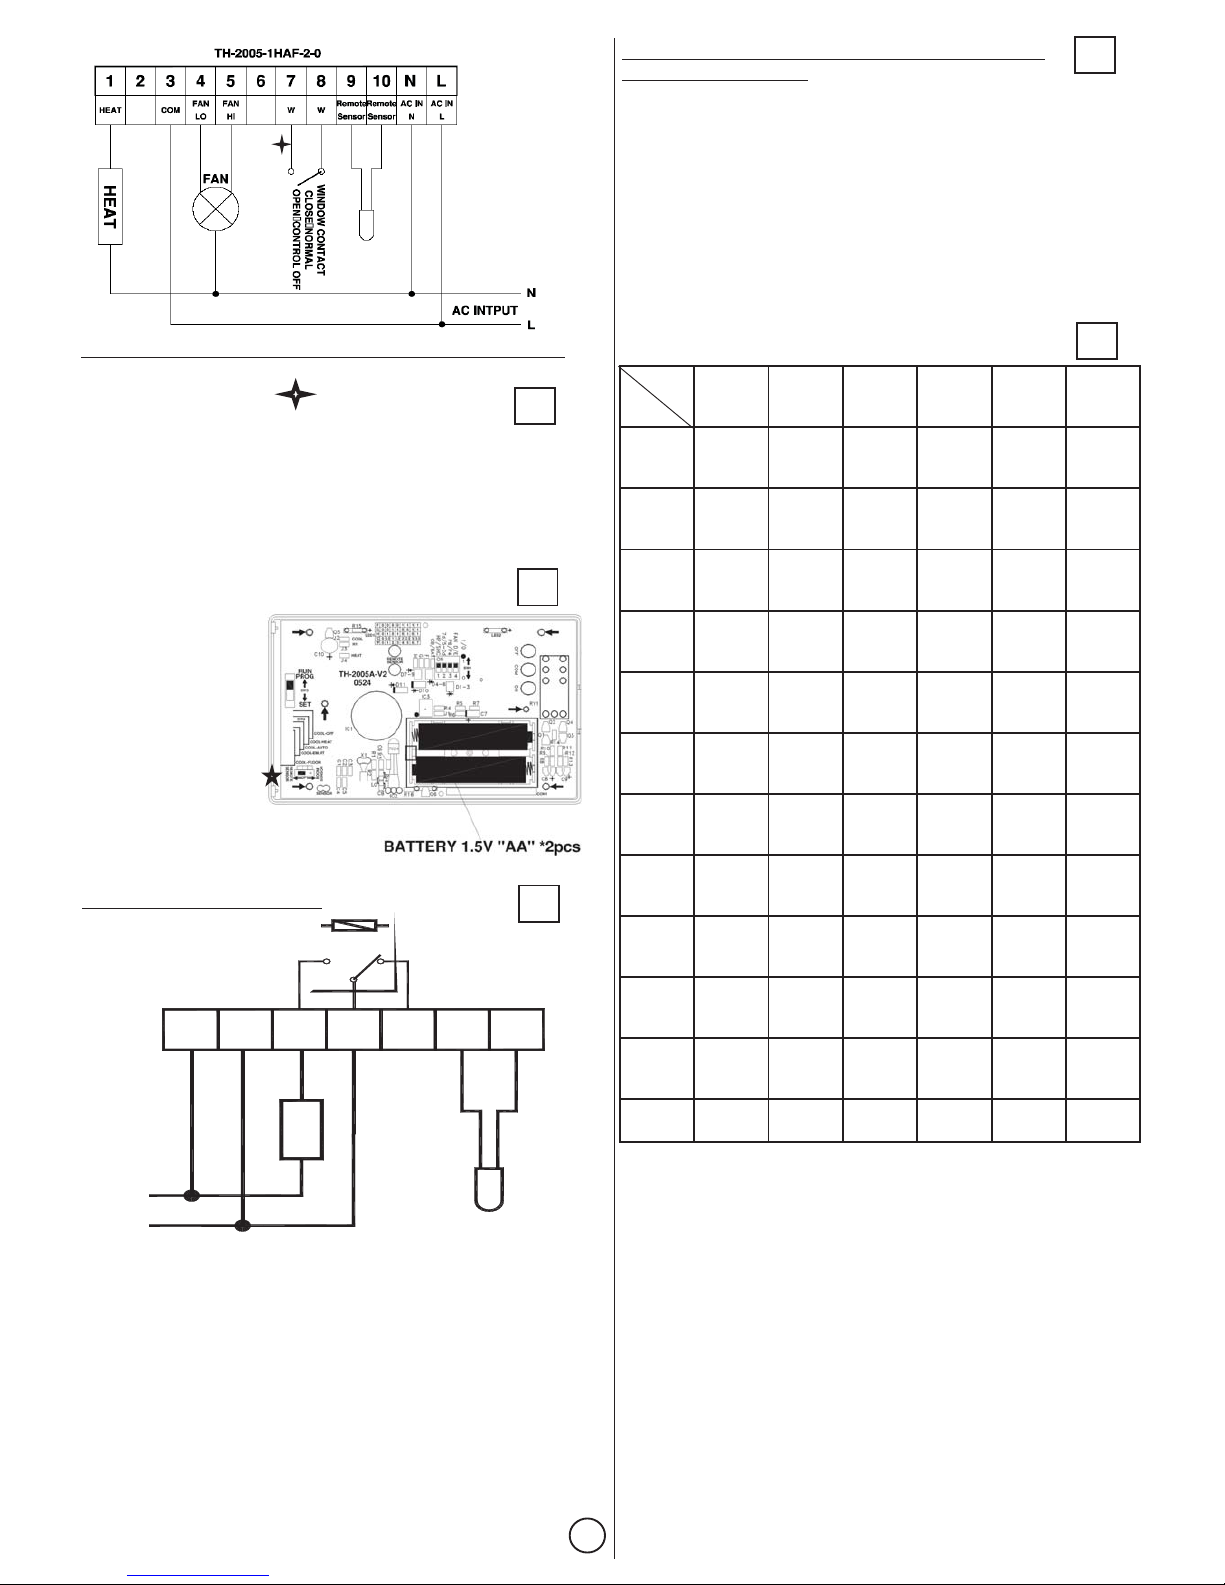
(1). How to open top housing
(2). How to install battery (For Battery Model only) 2xAA
WIRING Battery Operate Model-
Unscrew to take safety cover off and to
start wiring as illustration
WIRING Line Voltage Model-
THA-2005-1H1C1F-2-0(Line-Voltage-Model) Preset HP
Fan-Switch
ON/AUTO
System-Switch
Cool-Off
TH-2005-1CAF-2-0(Line-Voltage-Model) Preset SHC
2
4
3
1
1
This large LCD display thermostat series comprises
6 models with same two sizes of plastic housing.
Application of this thermostat covers Heating, Fancoil
and Floor-Heating.
Please take some moment to read this user's guide
before begin use of thermostat.
Program Setting ------11
function
------------------------12
Programming for 5+2D---13
Factory Preset (default)
Programs-------------------14
To Use Override
Function--------------------15
To Erase Memory
Backup(EEPROM)--------16
Backlight Option-----------17
7-D
COPY
in 7-d
Page 2
Fan-Switch
ON/AUTO
System-Switch
Heat-Off
TH-2005-1HAF-2-0(Line-Voltage-Model) Preset HP
WINDOW CONTACT:
Terminal7&8shorted by wire upon shipping
thermostat.,
when it is Disconnected, Heat/Cool/Fan
Output will be Cut-Off. This special-made
mechanism is for extensional ON/OFF
control purpose. Please do not take wire off
terminal7&8unlessWINDOW-CONTACT
Function shall be in use.
WIRING-- Floor-Heating
Sensor
Floor
24Vac INPUT
NCCOMNO
AC INAC INNAC INAC IN
L
S S
RY1
LO A D
N
L
7
Changing Jumper”
position accordingly
if users wants to
select Remotesensor to command
thermostat.
“JP1”(Jumpered
position on PCB)
shown as Figure on
the right.
5
6
1 on Battery-Operate models, preset
Heat only on Floor-Heating model.
-Preset Cool or Heat
2 HP/SHC mode selection by preset.
3-minute Delay-start-protection works in both
Heating and Cooling.
3-minute Delay-start-protection works in Cooling only.
Day-Program period(event) by preset
4 6 or 4 Program period(event) per day by preset.
-
:
:
-:
-:
HP
SHC
3 7d/5-2d
P6/P4
INTERNAL SETTING BY FACTORY PRESET
(UPON ORDERING)
8
2
Operating
Power
Terminal
Output
Contact
Rating
System
Switch
Fan
Switch
3-minute
Delay
Start
Purge
(Fan Delay
Stop)
Window
Contact
Remote
Sensor
Control
Function
Floor
Heating
Cool
or
Heat
Backlight
TH-2005
-1H-B-0
THF-2005
-1H-B-0
THF-2005
-1H-3
-0/CB
TH-2005
-1HAF
-2-0/CB
TH-2005
-1CAF-2
-0/CB
THA-2005
-1H1C1F
-2*3-0/CB
2xAA
1.5V x2 pcs
2xAA
1.5V x2 pcs
24 VAC
240 VAC
*2--24 VAC
240 VAC
*3--240 VAC
Dry
Contact
Dry
Contact
Dry
Contact
Dry
Contact
Dry
Contact
Dry
Contact
16 AMP
250 VAC
7 AMP
250 VAC
16 AMP
250 VAC
16 AMP
250 VAC
7 AMP
250 VAC
7 AMP
250 VAC
Cool-OffHeat-Off
Heat-Off
-Cool-Auto
On/Auto
(speed
Hi-Lo
Automatic)
On/Auto
(speed
Hi-Lo
Automatic)
On/Auto
No NoNo Yes
Yes
Yes
No NoNo
No No
No
No NoNo
Yes
Yes
Yes
Yes
Yes
Yes
Yes
Yes
Yes
No
Yes
Yes
No
No
No
Preset
Heat
Preset
Heat
Preset
Heat
Preset
Cool
Preset
Heat
By System
Switch
NoNo
Optional Optional OptionalOptional
Model
NO.
Specs
*Large LCD Display 72 x 64 mm.
*Interactive program setting pattern.
*EEPROM Memory backup.
*Temperature Display Range
0C~50C/32F~122F
*Temperature Control Range
Heat: 5 C ~ 35 C/41 F ~95 F
Cool: 6 C ~ 36 C/43 F ~ 97 F
Floor-Heating: 5 C ~ 45 C/41 F ~113 F
*24H/12H Format selectable by programming.
*6/4 program(ON/OFF)-period by factory preset.
*7-day/5-2-day day-program by factory preset.
*Switching Differential: 0.5 C-1.0 C/1 F-2.0 F
selectable by programming.
*Purge: Fan 90 seconds delay-off
for use of residue energy in pipe.
*Automatic Hi-Lo Fan Speed
by Switching-differential.( 1CAF/1HAF models only)
*Remote-Sensor for distant temperature
sensing and control.
*Built-in room temperature sensor
*Floor-Heating Model.
*Auto-Change-Over Model available.
*Heat-Cool Dead-band(Minimum Gap) 2
* function for programs setting.
*3-Minute delay-start for energy saving,
and system protection. (By factory preset)
*Window-Contact for Energy saving.
*Back-light ( Optional)
°°° °
°°°°
°°°°
°°° °
°°°°
°F/ 1°C
COPY
Model Descriptions & Specs
9
Page 3

START PROGRAMMING THERMOSTAT
*Within this program setting mode, Thermostat
shall resume works 30 seconds after there is no any
functional Command input.
Descriptions for KEY PADS
Set
Programming
Selection
:
+ /:
Up / Down keys.
–
Press to confirm
setting
ok:
Reset :Reset
Thermostat
M : Override function
control keys.
+
–
Set
OK
M
Reset
10
PROGRAM SETTING:
System Switch position, in
models which has system-switches.
In programming-mode, if users want to stop programming
thermostat, either to wait for 30 seconds, let thermostat
automatic begin executing or press key twice and then
press key, to set thermostat start executing programming.
If uncertain with programming procedure, please follow up
with guidance by flashing display on LCD screen
must not be be pointed at "OFF"
SET
OK
REMINDER
PROGRAMMING FOR 7-D — Each of 7 days of week,
be programmed separately. Thermostat has semi-interactive
function to guide users in programming thermostat. Please
follow up with flashing display to complete programming.
1. Press key to enter program setting, (users shall read
temperature reading in flashing)
2. Press key to set Temperature setpoint for 1st
program- period (event).
3. Press key to enter setting Time setpoint for
1st program-period (event),after temperature setpoint
of 1st program-period completed.
Users shall read "Hour & Start Time" in flashing.
4. Press key to set Time setpoint for 1st program-period
(event).
5.
6 Repeat programming procedure above, to complete each of
Temperature & Time setpoints for every program-period of
day and rest of days in week..
7. When programming completed, pressing key
and then pres key to start executing programs.
SET
OK
SET twice
sOK
''
'or'
or+–
+–
Press key to enter setting Temperature setpoint for
2nd program-period (event),after Time setpoint
of 1st program-period completed.
Users shall read temperature reading in flashing again.
OK
+–
+–
12
11
COPY function —In 7-d format only
reference base
COPY
*First to select any day of whole 7-day and to complete entire
Temperature/Time setpoints to each program-period of the
day. taking the selected day as for this
' ' function..
(programming procedure same as description on )
11
1. Press ' key to enter program setting, and then
press ' 'key again, users shall read ' ' flashing on LCD.
SET'
SET From
2. Press ' 'key to select any day in week whose daily
program-period setting was completed. Taking this day
as reference.
+
COPY
+
3. Press ' ' to confirm selected date of COPY reference,
and enter ' '. LCD shall begin flashing
' on screen after pressing ' '.
OK
copy programs to
To' OK
4. Press 'to select date that users want to copy programs to.
5.Press ' ' to confirm setting, and continue selecting
more days of week for " ".
6.Usres can press to delete " days was set to copy programs.
if wants to make changes.
'+'
OK COPY
copy programs to
''–
For 5+2D Program ( all 5 weekdays shall have same
programming Saturday Sunday to be programmed
separately)
&
1. Press ' key to enter program setting,.
2. Press ' or ' 'to set Temperature setpoint for 1st program
-period(event).
3. Press ' to enter setting Time setpoint for 1st program
-period,after temperature setpoint of 1st program-period
completed.
Users shall read "Hour & Start Time" in flashing.
4. Press or ' to set Time setpoint for 1st program-period
(event).
5.Press key to enter setting Temperature setpoint for 2nd
program-period (event),after Time setpoint of 1st
program-period completed.
Users shall read temperature reading in flashing again.
6.Repeat programming procedure above, to complete each of
Temperature & Time setpoints for every program-period of
weekdays(5-D).
7.Repeat programming procedure again to set setpoints for
Saturday & Sunday after weekdays Temperature & Time
setpoins was done.
8. Pressing key and then pressing ”
to start executing programs.
SET'
'
OK'
'' '─
OK
“SET” twice “OK ,
+ –
+
PROGRAMMING FOR 5+2 D
14
FACTORY PRESET PROGRAMS PERIOD
(INITIAL DEFAULT)
Weekday Temperat ure
Mon. ~ Fri .
Time
Switch on heat Switch on cooli ng
MORN(P1) 6:00 70 (21 ) 75 (24 )
DAY(P2) 8:30 60 (15.5 ) 85 (29.5 )
EVEN(P3) 4: 30 PM 70 ( 21 ) 75 (24 )
NIGHT(P4) 10:30 PM 65 ( 18.5 ) 80 ( 26.5 )
Temperat ure
Sat urday Ti me
Switch on heat Swit ch on cooli ng
MORN(P1) 7:00 70(21) 75(24)
DAY(P2) 8:30 70 ( 21 ) 85 (29.5 )
EVEN(P3) 4:30 PM 70 ( 21 ) 75 (24 )
NIGHT(P4) 10:30 PM 65 (18.5 ) 80 (26. 5 )
Temperat ure
Sunday Time
Switch on heat Swit ch on cooli ng
MORN(P1) 7:00 70 (21 ) 75 ( 24 )
DAY(P2) 8:30 60 (15.5 ) 85 (29. 5 )
EVEN(P3) 4:30 PM 70 ( 21 ) 75 (24 )
NIGHT(P4) 10:30 PM 65 ( 18.5 ) 80 ( 26.5 )
°F
°C
°F
°F
°C
°C
°C
°C
°C
°F
°F
°F
3
Mode 5+2d P4 Factory Preset
13
Page 4

Temperature
Mon, Tue,
Wed, Thu, Fri
Time
Switch on heat
Switch on
cooling
MORN(P1) 6:00 70(21)75(24 )
DAY(P2) 8:30 60 ( 15.5 ) 85 (29.5 )
NOON(P3) 12:00pm 70 (21 ) 75 (24 )
BREAK(P4) 2:00pm 60 (15.5 ) 85 (29.5 )
EVEN(P5) 4:30pm 70 ( 21 ) 75 (24 )
NIGHT(P6) 10:30pm 65 (18.5 ) 80 (26.5 )
Temperature
Saturday Time
Switch on heat
Switch on
cooling
MORN(P1) 7:00 70(21 )75(24 )
DAY(P2) 8:30 70(21 )75(24 )
NOON(P3) 12:00pm 70 (21 ) 75 (24 )
BREAK(P4) 2:00pm 70 (21 ) 75 (24 )
EVEN(P5) 4:30pm 70 (21 ) 75 (24 )
NIGHT(P6) 10:30pm 65 (18.5 ) 80 (26.5 )
Temperature
Sunday Time
Switch on heat
Switch on
cooling
MORN(P1) 7:00 70(21 )75(24 )
DAY(P2) 8:30 70(21 )75(24 )
NOON(P3) 12:00pm 70 (21 ) 75 (24 )
BREAK(P4) 2:00pm 70 (21 ) 75 (24 )
EVEN(P5) 4:30pm 70 (21 ) 75 (24 )
NIGHT(P6) 10:30pm 65 (18.5 ) 80 (26.5 )
Mode 7-d p6 factory preset
*When choose P4, and
will vanish from screen.
NOON BREAK
°C
°F
°C
°C
°C
°F
°F
°F
°F
°F
°C
°C
4
;
1. ending time
11:59 in 12H 23:59 in 24H
do not set 12:00 PM for NIGHT(P4)
nor 24:00 for NIGHT(P6)
To program's logic, each day's is at
-Format, -Format.
Therefore
.
2. Thermostat is designed to run programs by sequential
order, do not set program either “overlap”
In time sequence, nor non-sequential Time-setting in
program setting, this will lead chaos to
Thermostat's operational logic.
REMINDER
TO USE OVERRIDE FUNCTION
******************System switch must not be At .“OFF”
A. Temporary Override-
''or''to
OK'
Temporary Override displayed
on LCD
Temporary Override
OK
Change current Temperature
setting until next program's executing.
1. Press adjust Temperature.
(Temp. Set in flashing)
2. Wait for 10 seconds, thermostat shall automatically
run this temporary override function, or to press ' to run
(Users shall read “ ”
screen)
3. Upon is in executing,
Press shall terminate its executing.
+-
B.Comfort Override
.
- Change current temperature setting
and hold new setting for required hours. Thermostat shall
resume its original programmed setting upon
Comfort Override executing ceased
1. Press ' to enter.
2. Press adjust Temperature.
(Temp. Set in flashingon LCD screen)
3. Press to enter selecting duration
of comfort-override executing
4. Press to set HOURS
(minimum 1 hour).
5. Press to run .
6.Upon is in executing,
Press again shall terminate this Overrride command.
MANUAL'
'+ 'or ' 'to
OK
'+'or ' '
OK Comfort Override
Comfort Override
OK
-
-
There are 4 functions comprised.
C.Permanent Hold Temperature-Change current
temperature setting and to execute new setting
permanently Until this command is called off.
(by pressing ' OK')
1. Press ' key to enter setting mode.
2. Press adjust Temperature.
(Temp. Set in flashingon LCD screen)
3. Press to run
function. ( LCD display shall indicate its executing)
4. Upon is in executing,
Press shall terminate this Overrride command.
M'
'+ or -'to
OK Permanent Hold Temperature
Permanent Hold Temperature
OK
D. Temperature Until.(Vacation Hold)-Change
current temperature setting and to execute new setting
till to specified date.
1. Press ' key to select this Override.
2. Press or set Temperature setpoint.
(Temp. Set in flashing)
3. Press ' to select desired duration of
.
4. Press ' or to select first and then
Press again to select using ' or' ' again
to select desired
5. Press ' to run .
6. Upon . is in executing,
Press shall terminate its executing.
M'
'+' ' to
OK'
Hold-Temperature Until
+' '─' Month
OK Day, ' ─
DAY.
OK' Hold Temperature Until
Hold Temperature Until
OK
-'
+
-'
Please follow up with guidance by flashing on LCD screen
In Override setting mode, thermostat shall automatic
enter its prior programmed operation, 30 seconds
after, if users pending input any new command.
Keep to press key, users shall read Override modes
appears on LCD screen in sequence.
M
REMINDER
TO ERASE MEMROY BACKUP (EEPROM)
“Reset
Pressing 'OK' and ' ' two keys together for 6 seconds,
“Reset” shall appear on LCD display, then to press ”
key on Front housing, all previous setting shall be deleted,
thermostat shall resume its factory preset program
-
BACKLIGHT OPTION
+
( For Line-Voltage models only)
Pressing 'OK' and hold then pressing ' to select
'BACKLIGHT' mode. On top left of LCD screen,
users shall read indication by different
graphic of “BULB”, each of them stands for;
(when “Bulb” vanished from screen, Backlight function
is off)
Backlight always “ON” AUTO
17
16
15
B2-20050-00218
 Loading...