

ExaSAN B08S3-PS User Manual

`
ExaSAN B08S3-PS
User Guide
Support Host Bus Adapter:
PCIe 2.0: Z1M-G2
PCIe 3.0: Z2M-G3, Z2D-G3
Support Host Convertor:
Thunderbolt 2 to PCIe 2.0: C1M-G2
Support Switch System:
PCIe 2.0: SW08-Q4, SW16, SWF16
Accusys Storage Ltd.,
Version: V2.0
Reversion
Date
Revision Description
V1.0
11/10/2012
Initial release on CD.
V1.1
12/19/2012
Modify page 4-3(erase clear log explanation and add DAS and SAN log
file path)
V1.1.1
02/26/2013
Delete 5M copper cable on page 1-4 and 1-6
V1.1.2
12/24/2013
Modify Heartbeat LED indicator to flash on page 3-5
V1.1.3
09/22/2014
Modify item 3.3.4.2 Installing driver on Linux and RAIDGuardX Installation
V1.2
11/30/2014
Add C1M-G2,
Add Z2M-G3
Add Chapter plan you SAN
Add Chapter create array
V2.0
07/15/2016
Content updated
Revision Sheet
Revision Sheet
User Guide
Page i
Caution
This indicates the existence of a potential hazard that could result in
personal injury, damage to your equipment or loss of data if the safety
instruction is not observed.
Note
This indicates useful tips on getting the most from your RAID system.
PREFACE
Notice
The product features and specifications described in this guide are subject to change without
notice.
The manufacturer shall not be liable for any damage, or the loss of data resulting from the
performance or use of the information contained herein.
About This Guide
Congratulations on your purchase of the ExaSAN (pronounced X-sa-SAN) B08S3-PS. The 8
bay PCIe 3.0 tower model of the ExaSAN family, specifically designed for media streaming
workflow. It delivers stability, outstanding performance and scalability. This guide contains
instructions for installing and using the B08S3-PS .
Guide to Conventions
Inside the double boxes is important information that users should be aware of:
Trademarks
Accusys and the names of Accusys products and logos referenced herein are trademarks
and/or service marks or registered trademarks and/or service marks of Accusys Storage Ltd.
Xsan, Mac, Mac OS, and Macintosh are either registered trademarks or trademarks of Apple.
Other product and company names mentioned herein may be trademarks and/or service marks
of their respective owners.
All contents of this manual are copyrighted by Accusys Storage Ltd.
The information contained herein is the exclusive property of Accusys Storage Ltd. and shall not
be copied, transferred, photocopied, translated on paper, film, electronic media, or computerreadable form, or otherwise reproduced in any way, without the express written permission of
Accusys Storage Ltd..
© Copyright 2016 Accusys Storage Ltd.
All Rights Reserved.
User Guide Page ii

This device complies with Part 15 of the FCC Rules. Operation is subject to the following two
conditions: (1) this device may not cause harmful interference, and
(2) this device must accept any interference received, including interference that may cause
undesired operation.
User Guide Page iii

ExaSAN B08S3-PS User Guide
Table of content
Page #
Notice............................................................................................................................................................. ii
About This Guide ........................................................................................................................................ ii
Guide to Conventions ............................................................................................................................... ii
Trademarks .................................................................................................................................................. ii
Table of content ......................................................................................................................................... iv
1. Introducing ExaSAN PCIe 3.0 Storage System .............................................................................. 1-1
1.1 Overview .................................................................................................................................. 1-1
1.1.1 What is the ExaSAN Solution.............................................................................................................1-1
1.1.2 ExaSAN B08S3-PS features ...............................................................................................................1-3
1.2 What’s in the Box ................................................................................................................... 1-4
1.3 Your B08S3-PS at a Glance ................................................................................................... 1-5
1.3.1 Front view ...........................................................................................................................................1-5
1.3.2 Disk Mapping .....................................................................................................................................1-5
1.3.3 Disk Tray and LED Indicators ............................................................................................................1-5
1.3.4 Rear Panel ...........................................................................................................................................1-6
1.3.5 Z2M-G3 ..............................................................................................................................................1-7
2. Preparing to Install ExaSAN B08S3-PS ......................................................................................... 2-1
2.1 Precaution for Handling the System ..................................................................................... 2-1
2.2 Choosing the Location for the System .................................................................................. 2-1
2.3 Electrical Power ...................................................................................................................... 2-1
2.4 Operating Environment ......................................................................................................... 2-2
2.5 Security .................................................................................................................................... 2-2
3. Installing the ExaSAN B08S3-PS ................................................................................................... 3-1
3.1 Installing Disk Drive ............................................................................................................... 3-1
3.2 Installing the HBA Card ........................................................................................................ 3-2
3.3 Install driver and GUI ............................................................................................................ 3-3
3.3.1 Installing driver and GUI on MAC and Windows ..............................................................................3-3
3.3.2 Installing driver and GUI on Linux ....................................................................................................3-4
3.3.2.1 Driver Installation .....................................................................................................................3-4
3.3.2.2 RAIDGuardX Installation .........................................................................................................3-6
3.4 Create Array ........................................................................................................................... 3-7
4. Using RAIDGuardX GUI ................................................................................................................. 4-1
4.1 RAIDGuardX Overview ........................................................................................................ 4-1
4.1.1 Menu Bar ............................................................................................................................................4-1
4.1.2 RAIDGuardX main console ................................................................................................................4-2
4.2 Add/Remove Controller ......................................................................................................... 4-3
4.2.1 Add Controller ....................................................................................................................................4-3
User Guide Page iv

4.2.2 Remove Controller ..............................................................................................................................4-3
4.3 Create/Delete an Array .......................................................................................................... 4-4
4.3.1 Create Array................................................................................................................................ ........4-4
4.3.2 Delete an Array ...................................................................................................................................4-6
4.4 Email Notification ................................................................................................................... 4-7
4.5 Preference ................................................................................................................................ 4-8
4.5.1 Disk Lag Proof ....................................................................................................................................4-8
4.5.2 NCQ ....................................................................................................................................................4-9
4.5.3 SMART Mode ....................................................................................................................................4-9
4.5.4 Beeper ...............................................................................................................................................4-10
4.5.5 Equalization Mode ............................................................................................................................4-10
4.5.6 Cache ................................................................................................................................................4-10
4.5.7 MISC ................................................................................................................................................4-11
4.6 Option .................................................................................................................................... 4-13
4.6.1 Slicing ...............................................................................................................................................4-13
4.6.2 LUN Map ..........................................................................................................................................4-14
4.6.3 Expansion .........................................................................................................................................4-15
4.6.4 Migrations .........................................................................................................................................4-16
4.6.5 Snapshot ............................................................................................................................................4-19
4.6.6 Health Center ....................................................................................................................................4-22
4.6.7 Unlock Drives ...................................................................................................................................4-23
4.7 Updating the ExaSAN RAID system Firmware ................................................................ 4-24
4.8 Download controller log ....................................................................................................... 4-25
4.9 Disk RW Test ........................................................................................................................ 4-25
5. RAID Overview ................................................................................................................................. 5-1
5.1 How RAID Works .................................................................................................................. 5-1
5.2 RAID Levels ............................................................................................................................ 5-1
5.2.1 RAID 0: Striping .................................................................................................................................5-1
5.2.2 RAID 1: Mirroring ..............................................................................................................................5-2
5.2.3 RAID 5: Striping disks with distributed parity ...................................................................................5-2
5.2.4 RAID 6: Independent data disks with two Independent parity schemes .............................................5-2
5.2.5 RAID 0+1: Striped set with Mirroring ................................................................................................5-3
5.2.6 Enhance JBOD: Single disk ................................................................................................................5-3
6. Appendices ........................................................................................................................................ 6-1
Appendix A: FAQs .............................................................................................................................. 6-2
Appendix B: Customer Service and Support .................................................................................... 6-5
User Guide Page v

1. Introduction
1. Introducing ExaSAN PCIe 3.0 Storage System
User Guide
1. Introduction
1. Introducing ExaSAN PCIe 3.0 Storage System
1.1 Overview
1.1.1 What is the ExaSAN Solution
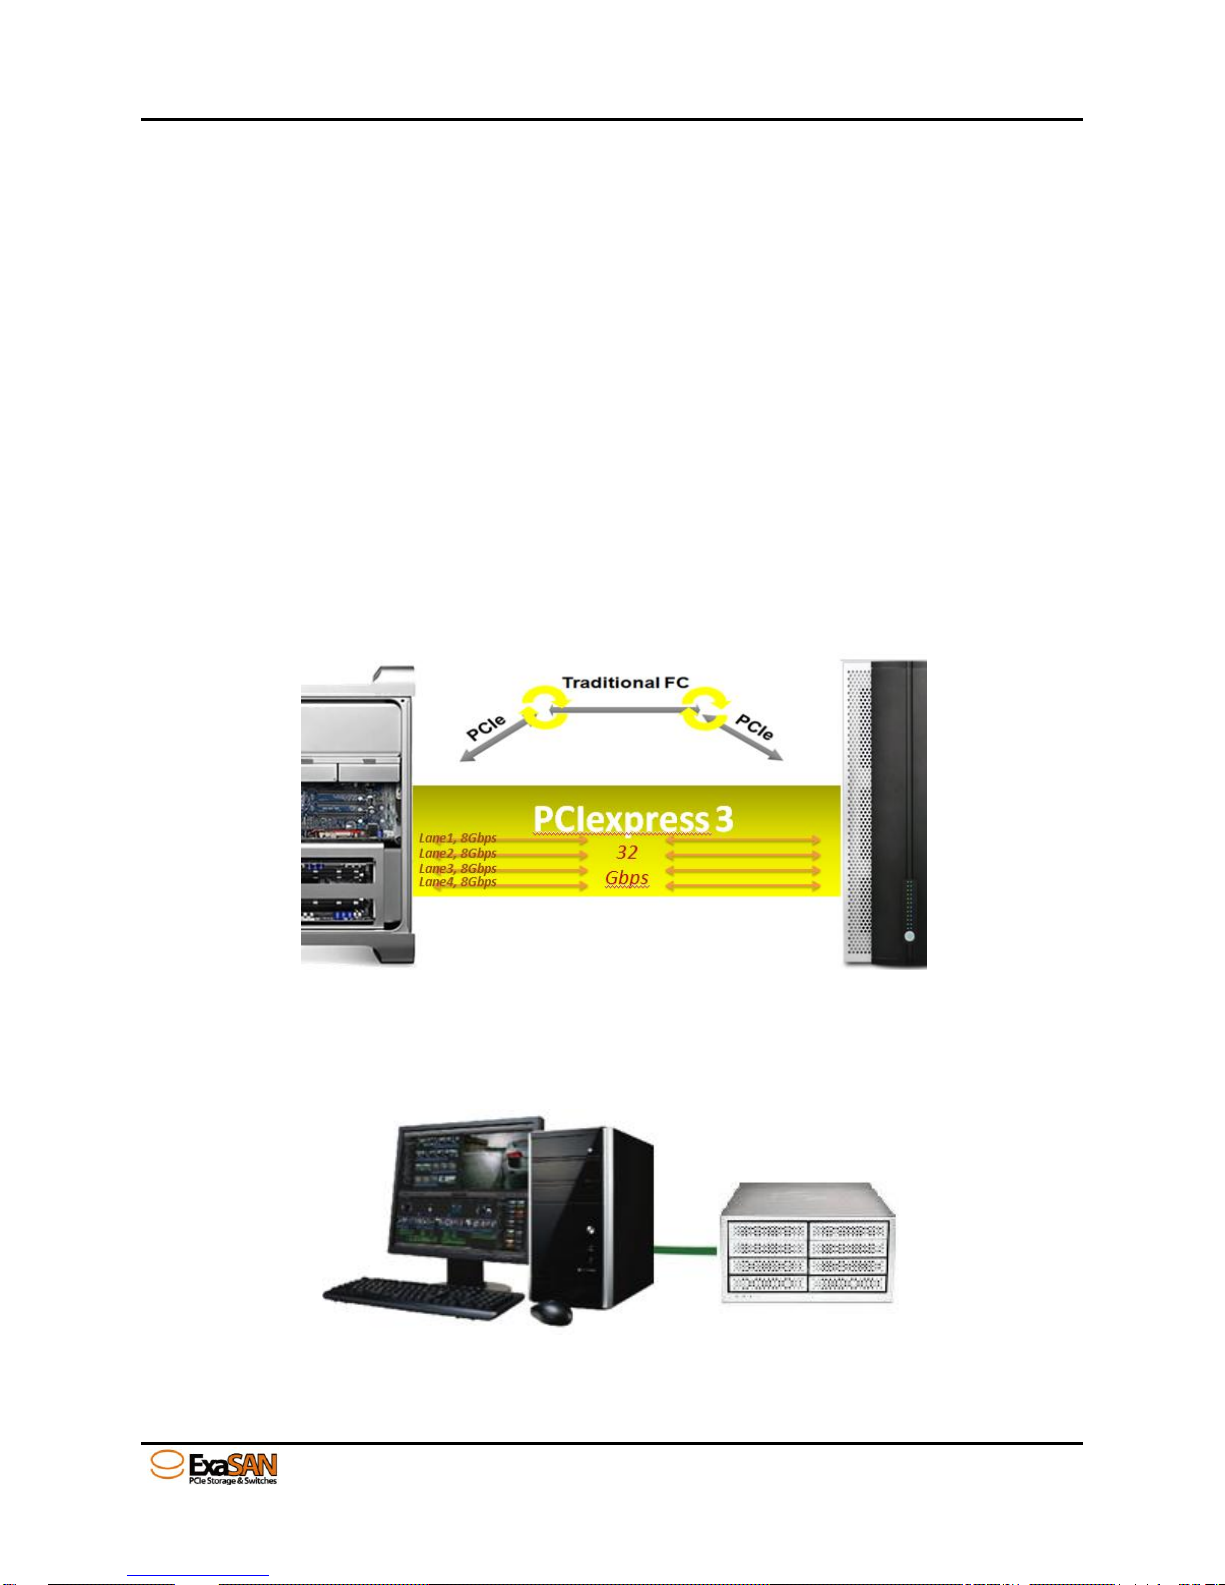
Developed by Accusys Storage Ltd., a worldwide leader in RAID (Redundant Array of
Independent Disks) storage systems, ExaSAN (pronounced “X-sa-SAN”) is a family of storage
and switch products that take advantage of well known PCIe (PCI Express) technology speeds,
standards, and roadmap.
The current ExaSAN products employ PCIe3.0 protocol that provides 8 Gb/s per lane transfers.
With 4 lane QSFP (Quad SFP) connector and cable, ExaSAN can transfer up to 32 Gb/s by
using single connection.
Post production work including non-linear editing (NLE) requires high bandwidth storage to
quickly move the volume of data being processed and ExaSAN storage solution meets those
demands. The high bandwidth provided by ExaSAN technology allows the client to complete
editing tasks in a much shorter time to save time and money.
ExaSAN solution, including its complete line of rack mount RAID systems, tower RAID systems,
PCIe switch systems and accessories, for different application purpose, user can build as DAS
(directly attached storage) via PCIe3.0 interface to provide extremely performance, in addition,
Accusys provide SAN (storage attached network) turnkey solution to build a fast and shareable
storage.
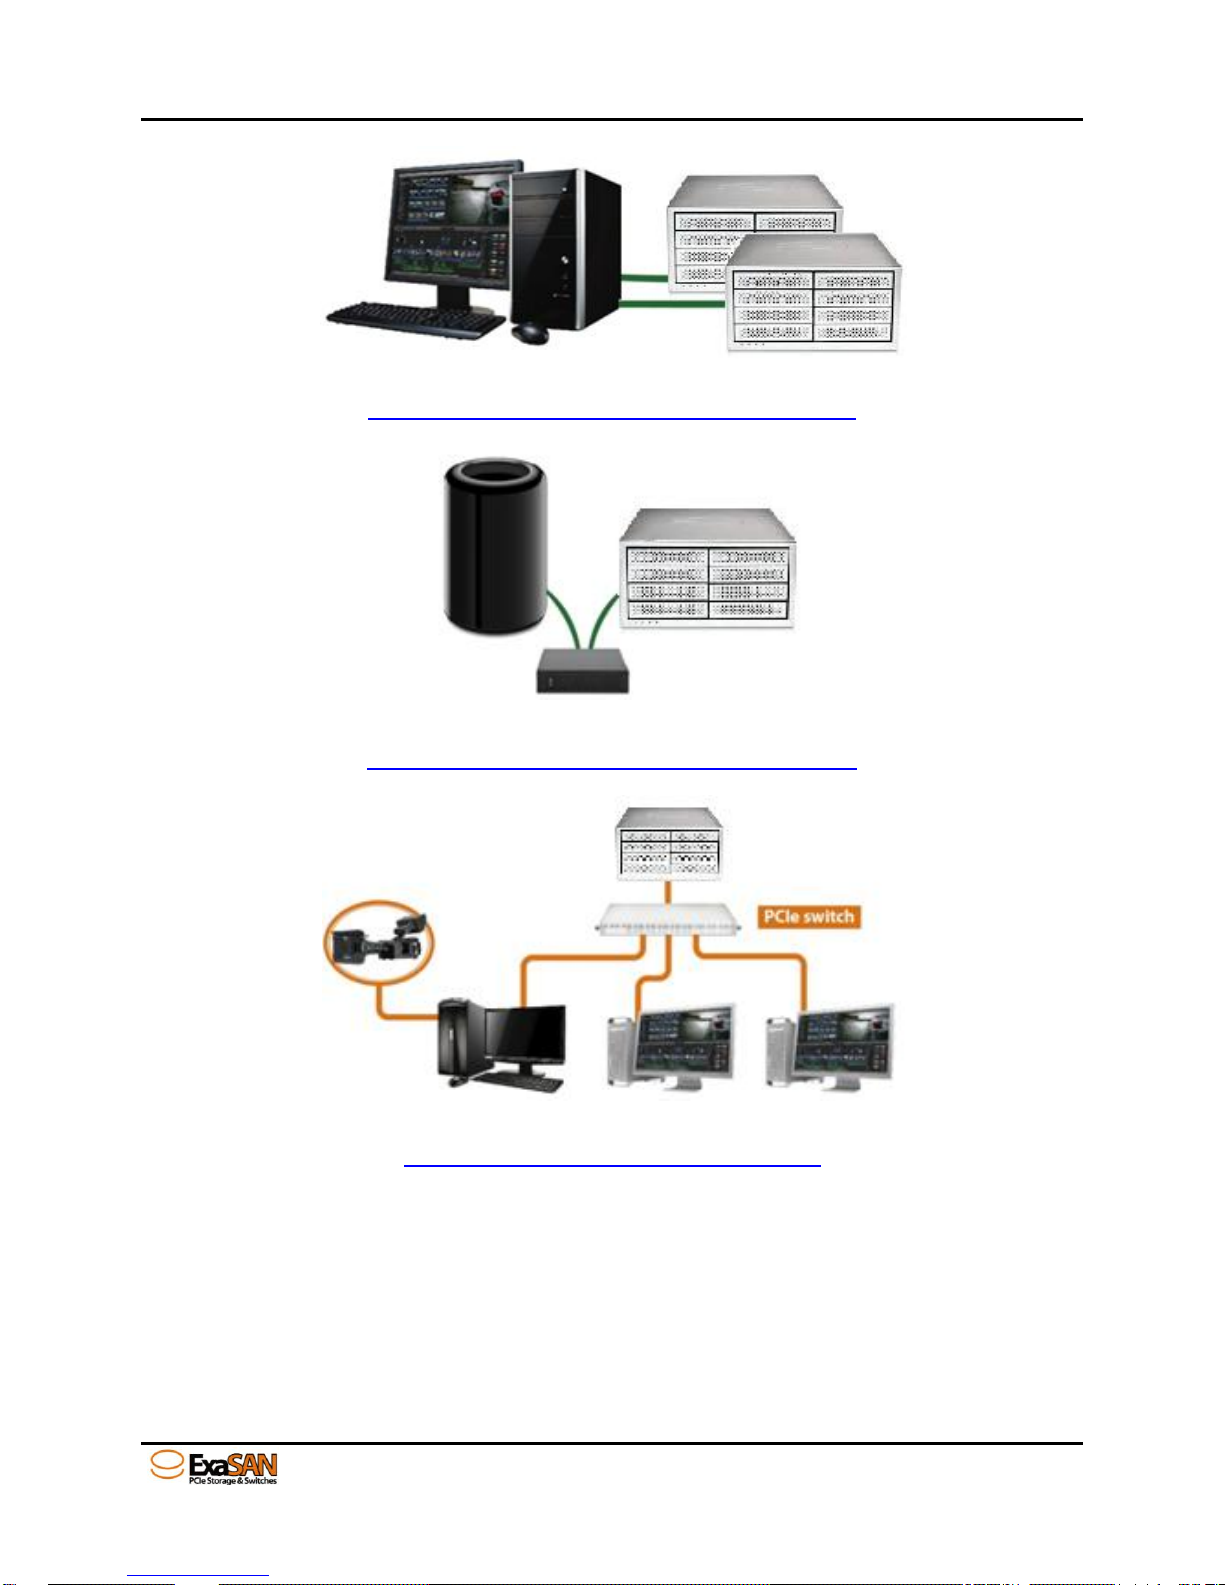
Standard DAS Environment
User Guide Page 1-1
1. Introduction
DAS with Z2D-G3, refer to below link to know more detail about Z2D-G3
http://www.accusys.com.tw/Accessories/HBA-Cable.html
Thunderbolt 2 DAS with C1M-G2, refer to below link to know more detail about C1M-G2
http://www.accusys.com.tw/Accessories/C1M.html
SAN environment. Refer to link for more detail of how to build a SAN environment.
http://www.accusys.com.tw/ExaSAN/SW16.html#
Whether it’s collaborative video editing in a post-production workgroup, or a shared research
project in a university, the ExaSAN solution offers a range of performance levels and storage
capacities that scale to meet the needs of small-to-medium-sized organizations. Equally
important and useful is its integrated design, centralized administration and monitoring, and a
suite of built-in management tools; which eliminate the need for a staff of experts to install and
maintain a SAN for the workgroups
User Guide Page 1-2

1. Introduction
1.1.2 ExaSAN B08S3-PS features
1. Hardware Specifications
One PCIe3.0 8Gb/s x4 lanes host port, transfers up to 32 Gb/s
Hardware XOR/Multi-Parity engine
2GB DDRIII memory, ECC-protected
Support 8 x 2.5” SAS/SATA drive and SSD
2. Software Specifications
Multiple RAID levels: 0,1,5,6, 0+1 and enhance JBOD
Up to 5 disk array groups
Up to 16 disk array slices
Up to 64 LUNs
Selective initialization method (on-the-fly and performance evaluation)
Online RAID set expansion and level migration
Support write-back and write-through caching of controller and drive
Automatic rebuilding
Disk health monitoring by S.M.A.R.T.
Disk RW Test to measure the real IO throughput on each disk
Array roaming and disk traveling
Dual firmware images for firmware recovery
Disk Lag Proof technology to guarantee disk timely response
Equalization mode to smooth the performance of sequential data transfers
3. Management
Java-based GUI, RAIDGuardX, centralized multiple RAID system management
LED indicator to monitor status of RAID enclosure
Event notification by email (SMTP)
Support SNMP traps
4. Enclosure
Dimensions: L: 374mm, W:175mm, H:394mm
Weight: 11.5 Kg (w/o drives)
5. Support OS
Windows 7, 8, 10, 2008 and 2012 (32/64bit)
Linux: Red Hat, SUSE, Fedora, CentOS etc.
MAC: OS X 10.5, 10.6, 10.7, 10.8, 10.9, 10.10 and 10.11.
6. Operating Conditions
Humidity: 5% - 85%
Operating Temperature: 0C – 40C
7. Certification
Humidity: 5% - 85%
Operating Temperature: 0C – 40C
User Guide Page 1-3
1. Introduction
Certification: RoHS, CE, FCC, BSMI
8. Support Cable
Copper 2M (standard), Optical 10M, 30M, 50M and100M.
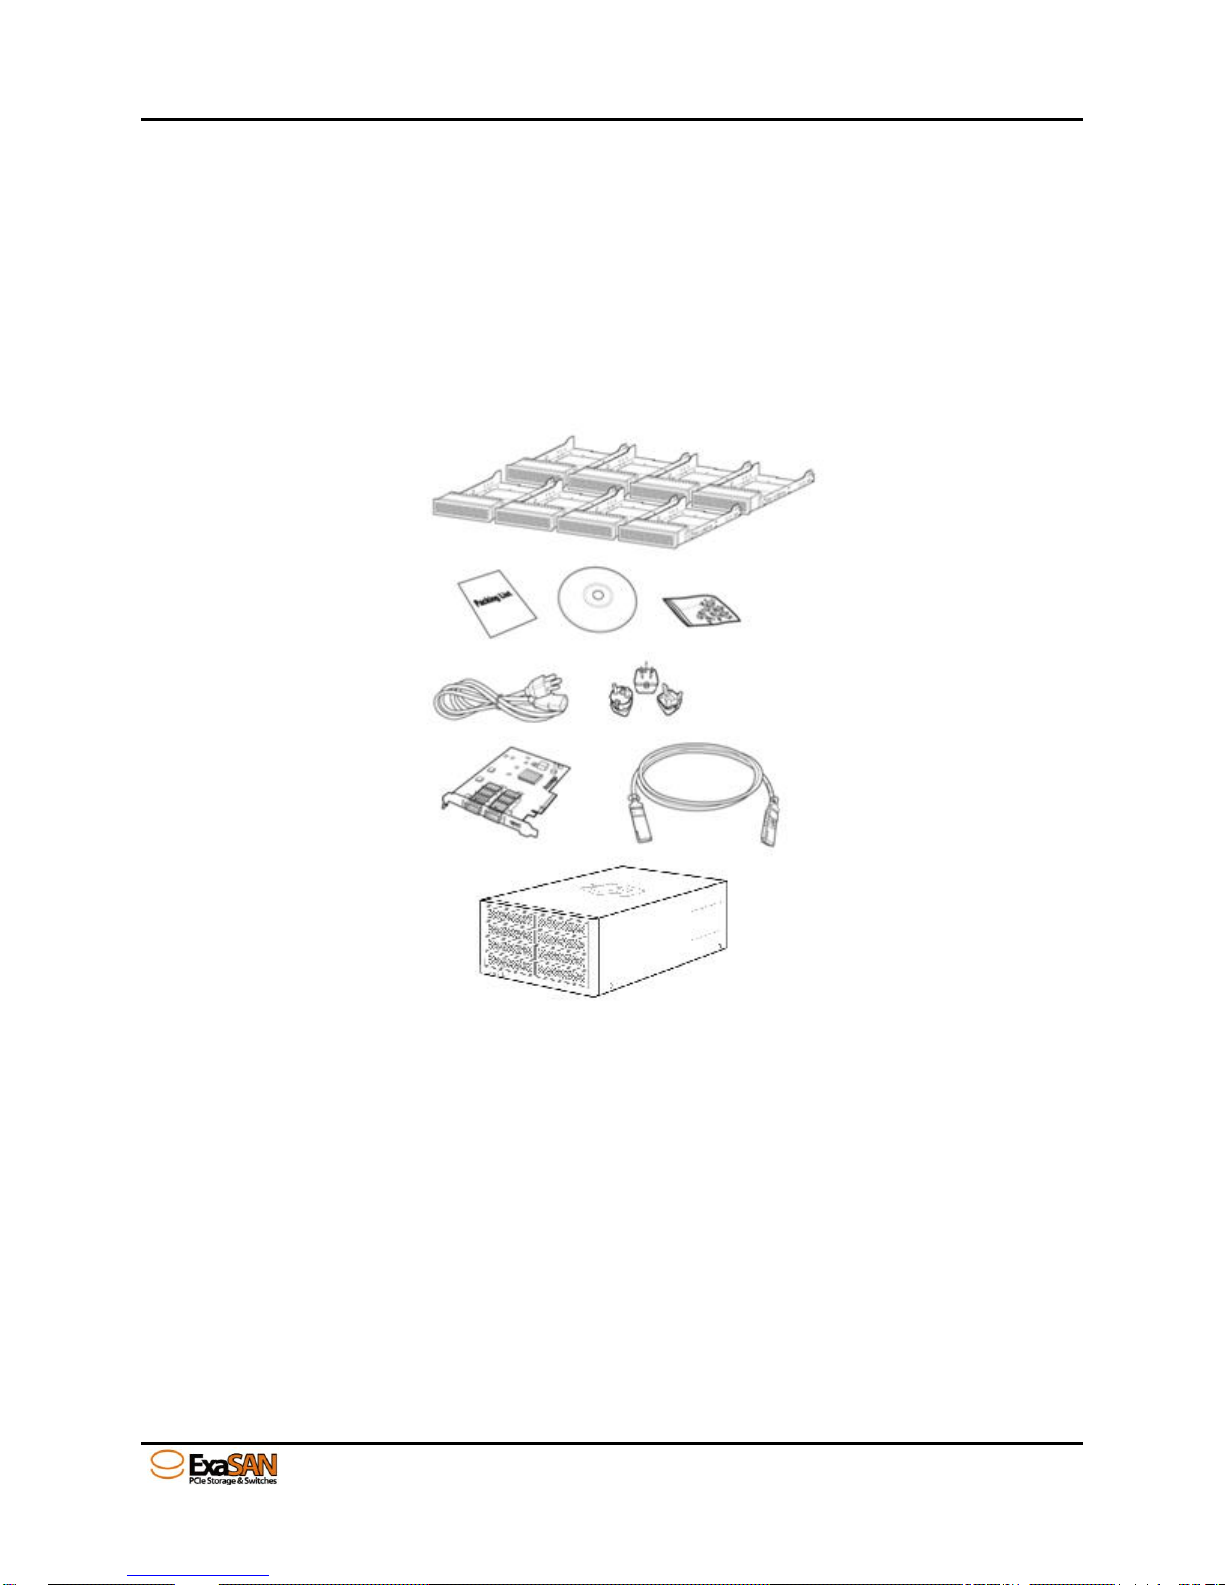
1.2 What’s in the Box
Your ExaSAN B08S3-PS is shipped in special packaging to provide protection during
transportation. Carefully check your carton contents against the included packing list, or the
inside flap of the box, and your original purchase order. You should have the items as described
in the sections below.
Contact your Accusys System Integrator/Value Added Reseller or Accusys Customer Service
(see Appendix C “Customer Service and Technical Support” for more information) to report any
missing item.
The Accessories package includes the following items. These items can also be ordered and
shipped separately from Accusys.
1. Installation DVD (x1)
2. AC power cord cable (x1)
3. Screw pack for disk tray (x2)
4. 2M QSFP copper cable (x1)
5. Plug adapter (x3)
6. ExaSAN B08S3-PS storage (x1)
7. Z2M-G3 HBA (x1)
User Guide Page 1-4

Name
Description
1
Power status
Blue indicates the power is working normally
2
Access
Flashing Blue indicates the host is accessing
3
System Fan
Blue Fan normal
Red Fan failed
4
Heartbeat
Blue indicates the controller is active
Disk 1
Disk 5
Disk 2
Disk 6
Disk 3
Disk 7
Disk 4
Disk 8
1. Introduction
1.3 Your B08S3-PS at a Glance
This section helps you get familiar with the physical appearance of your ExaSAN B08S3-PS.
1.3.1 Front view
1.3.2 Disk Mapping
1.3.3 Disk Tray and LED Indicators
User Guide Page 1-5

Disk Status
LED #1 (Access LED)
LED #2 (Status LED)
Disk Online/Locked
Steady Green
No Disk/Disk Fail
Steady Red
Disk Access/Initialization
Flashing Blue
Steady Green
Disk Rebuild
Flashing Blue
Switching in Red and Green
Disk Expansion
Flashing Blue
Extend Drives: Steady Red
Original Drives: Steady Green
Disk Migration
Flashing Blue
Migrate Drives: Steady Red
Original Drives: Steady Green
No.
Name
Description
1
FAN
System cooling FAN
2
QSFP host
port
PCIe3.0 host port
LED(left)
Green PCIe3.0 link status
Flash Green PCIe2.0 link status
LED(right)
Blue Data access status
3
Debug port
For engineer debugging only
4
Power Button
Click to power up
Push for 5 seconds to shut down
5
Power Supply
Connects to a power source with a power cord.
1. Introduction
1.3.4 Rear Panel
User Guide Page 1-6
No.
Name
Description
1
QSFP Port 1
For connection with switch.
LED1
Amber SAN mode enable
LED2
Green PCIe3.0 Link status
Flash Green PCIe2.0 link status
LED3
Blue Data access status
2
QSFP Port 2
For connection with ExaSAN storage directly.
LED1
Reserve
LED2
Green PCIe3.0 Link status
Flash Green PCIe2.0 link status
LED3
Blue Data access status
1. Introduction
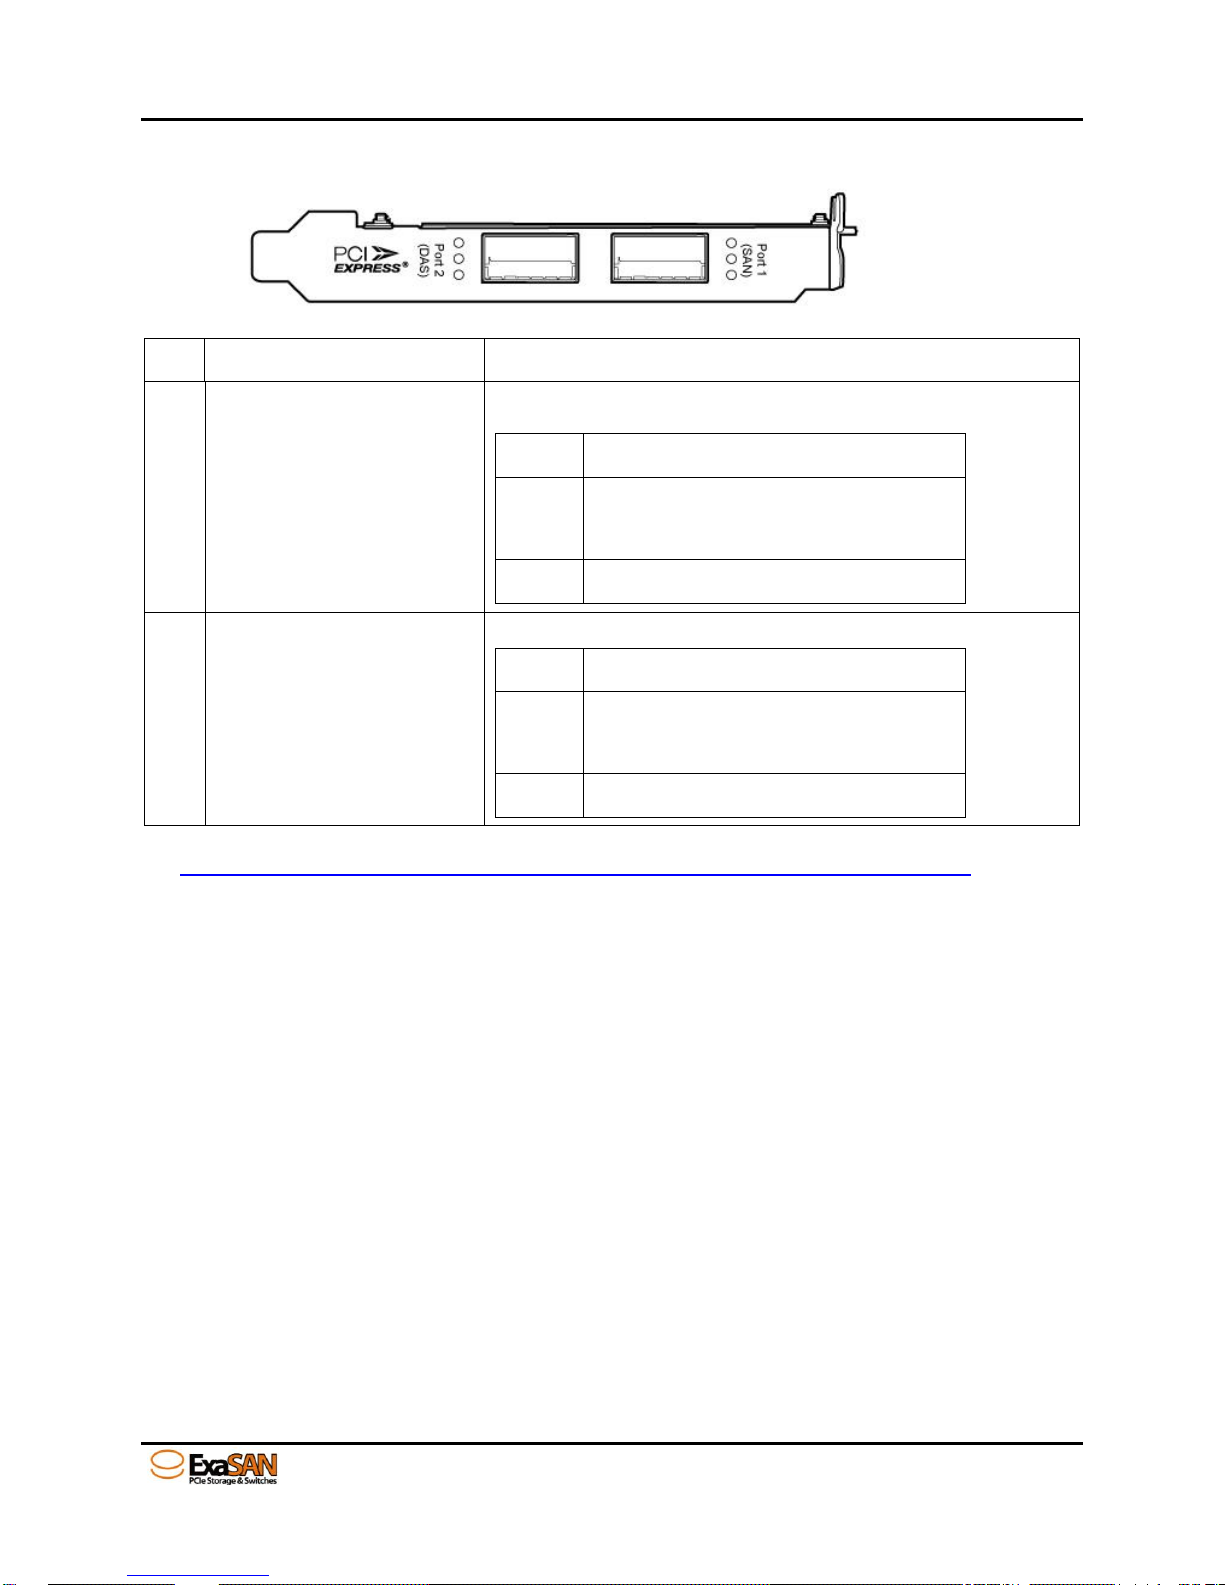
1.3.5 Z2M-G3
Refer to the link
http://www.accusys.com.tw/Document/HBA_Cable/Z2M_G3_QSG_20141216.pdf, for more
detail about Z2M-G3.
User Guide Page 1-7

2. Preparation
2. Preparing to Install ExaSAN B08S3-PS
User Guide

2. Preparation
2. Preparing to Install ExaSAN B08S3-PS
To ensure safe and smooth operation of your ExaSAN B08S3-PS, it is essential that you
choose an appropriate location for the system, provide an appropriate operating environment,
and adequate power for all components of the system. As you plan for installation, follow the
guidelines below to ensure that the system and its environment are safely and appropriately
positioned for efficient operation and service.
2.1 Precaution for Handling the System
Take the following precautions to avoid damage to the system or potential injury to you.
1. Prepare a flat, sturdy surface before removing the system from its packaging. The table or
cart that will hold the system should be as close as possible to the system carton.
2. Ensure that all power switches have been turned off and all power cords disconnected to
prevent personal injury and damage to the hardware.
3. Static electricity can damage electronic components of your system. Follow the guidelines
below to avoid such damage:
a. Work in a static-free environment
b. Wear a grounded anti-static wrist strap
c. Store uninstalled components in anti-static bags
d. Handle circuit boards by their edges and avoid touching chips and connectors
2.2 Choosing the Location for the System
The ExaSAN B08S3-PS is designed as a tower solution. Depending on where your desk or
rackmount cabinet or other install location is, you should keep the following points in mind when
determining where to place your system.
1. Measure the amount of available space on your desk. The amount of space required for the
B08S3-PS is L: 265mm, W:175mm, H: 87mm
2. Measure the distance between any two components that need to be connected via cable(s).
This measurement will help you determine the length of the required cable(s). Or if you’ve
already purchased the cables, determine the proximity of the components in question.
3. Leave sufficient room, at least two inches, around the unit to allow air ventilation.
4. Do not block or cover any of the ventilation holes in the front and back panels of the unit.
Consistent airflow is essential to keeping the system operating efficiently.
5. Allow additional room at the front and back of the unit for service.
6. The ExaSAN B08S3-PS uses several cables and cords. It’s a good idea to determine how
they will be arranged at the rear of the system, and where the cables will be routed to
connect to the host systems and RAID disk systems.
2.3 Electrical Power
At your chosen location for the ExaSAN B08S3-PS, make sure that the electrical circuitry and
power outlets are sufficient for the combined power needs of all hardware components. To plan
for safe and adequate power to the system, follow these guidelines:
1. Check the documentation for all hardware components at the chosen location to determine
their power requirements. Then make sure that the available power supply for that location
is sufficient for the planned components.
2. When possible use surge protectors or power conditions as part of the installation.
User Guide Page 2-1

2. Preparation
3. When planning for electrical power, make sure you have more power than the total power
requirements specified for all components. Also make certain that the power load is
distributed evenly among circuits to that location. Consult an electrician or other expert if you
need assistance with planning for the power needs for your components.
4. Make sure that the power outlets for all hardware components are grounded according to
local and national standards. Consult an electrician if you need assistance with grounding.
2.4 Operating Environment
The operating environment for the ExaSAN B08S3-PS must meet certain requirements:
1. Verify that the temperature range of the chosen location is within the limits established for
the system and all other components.
2. Make certain that the chosen location has adequate ventilation to maintain the necessary
temperature range.
3. If there are multiple hardware components installed at the chosen location, consider
additional cooling measures to assure efficient operation of the system and other
components.
4. Environment parameters:
a. Operating temperature: 0°C to 40°C (32°F to 104°F)
b. Operating humidity: 5-85%, non-condensing
c. Storage humidity:5%-95%, non-condensing
2.5 Security
To ensure the security of the ExaSAN B08S3-PS, make certain that the chosen location meets
your security requirements.
User Guide Page 2-2

3. Installation
3. Installing the ExaSAN B08S3-PS
User Guide
Note
The hard drives in a RAID system should match in size and speed. All
drives in an array should be identical models with the same firmware
version.
Note Caution
PCIe slots on some motherboards are for graphics cards only. Check
with the motherboard vendor for compatibility.
3. Installation
3. Installing the ExaSAN B08S3-PS
Follow the steps in this chapter to prepare your ExaSAN B08S3-PS system for installation.
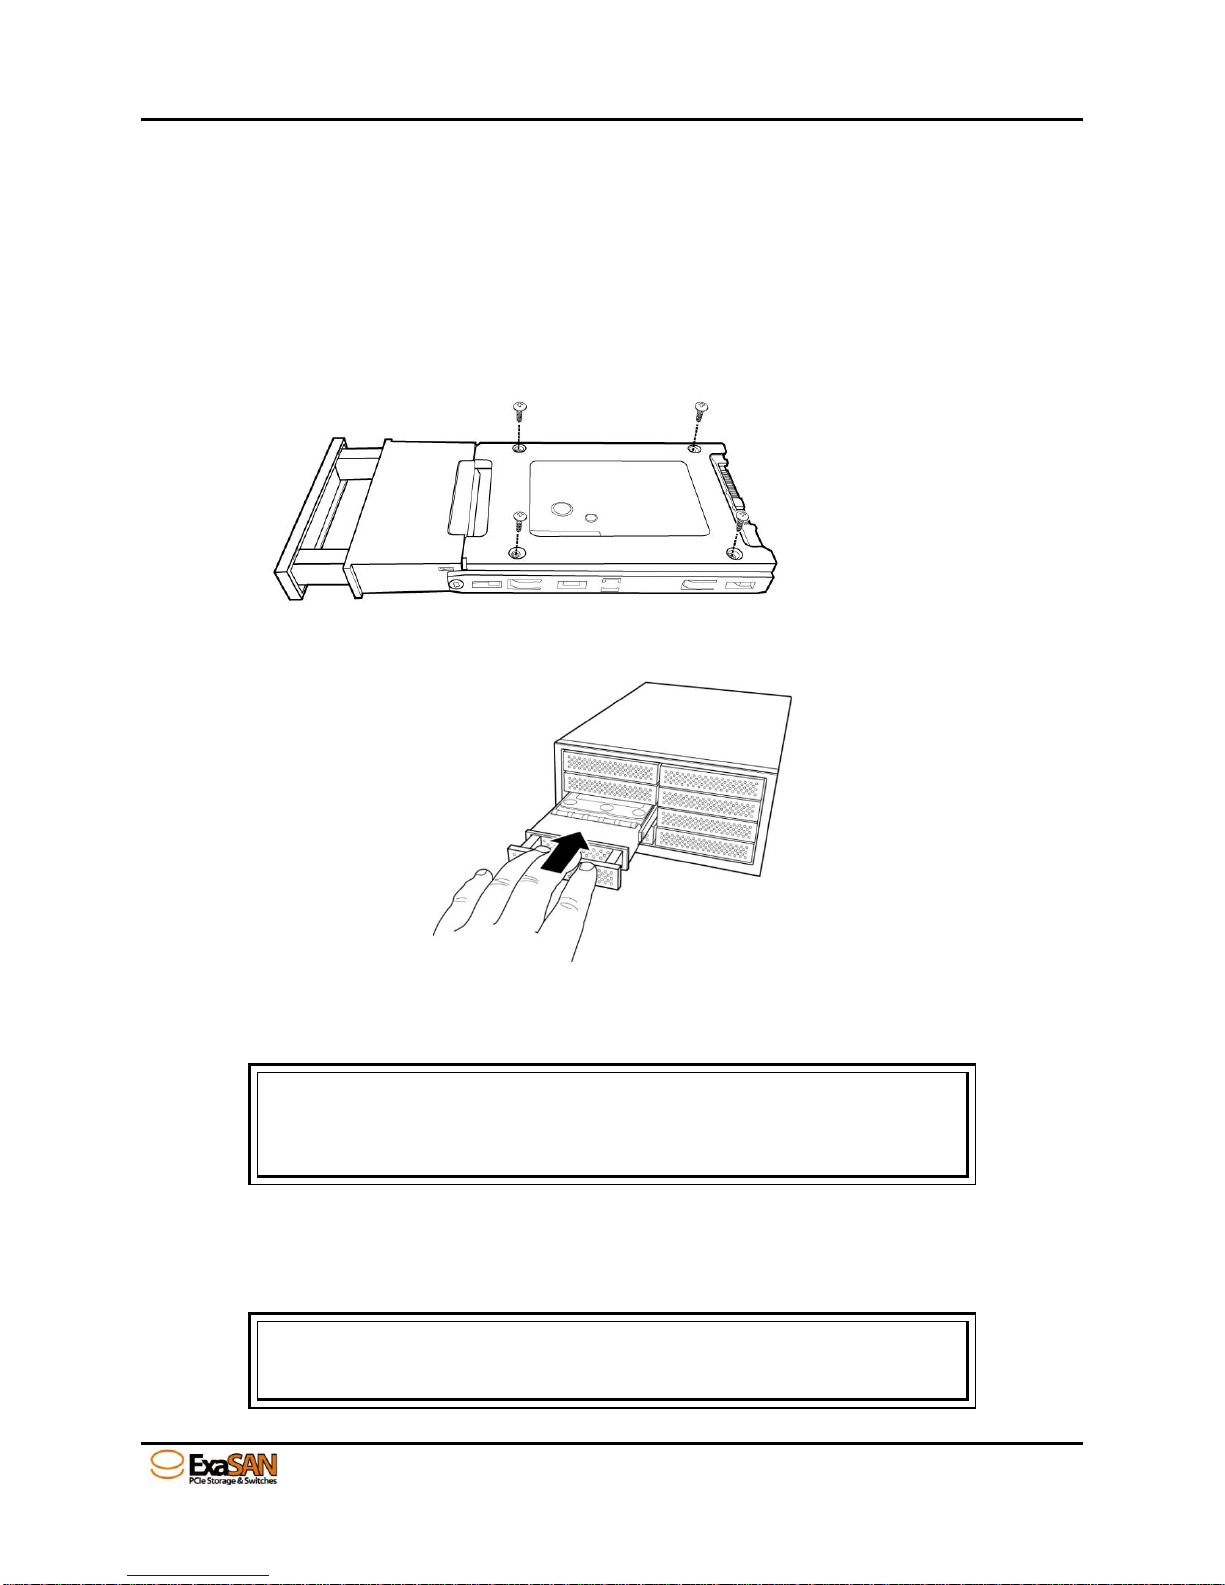
3.1 Installing Disk Drive
Follow the steps below to install your HDDs. .
1. Place the HDD with connector align with the edge of the disk tray.
2. Secure HDD with screws as below figure.
3. Slide the disk tray into the disk bays on the back of the chassis.
4. Push the tray inward until the tray firmly connects and you hear the tray click into place.
5. Repeat for all drives to be installed into the B08S3-PS.
Before the ExaSAN B08S3-PS is ready to be connected and powered on, you must install the
HBA card in the workgroup client system. The HBA card is compatible with PCIe x8, x16 slots
and both PCIe 2.0, 3.0 standards. Note, recommend to use PCIe x16 slots.
User Guide Page 3-1
 Loading...