

Exakt PS-160 Instructions For Use Manual

EXAKT PS-160
Instructions for Use
Patents Apply
Registered Design
Made in PRC
Distributed by JML USA, Inc.
3PL Worldwide 500 Bic Drive
Ground Floor, Building 4
Milford, CT 06461.
170310_revA

1 EXAKT PT Ltd. 2010
PS 160 Safety Warnings -
Instructions for Putting Into Use
Setting up the Saw for Use
After unpacking check that there are no parts missing
or damaged. If there are contact supplier and do not
operate.
Before using a blade needs to be fitted as described in
the operating instructions. (See Blade Changing
Section) A cardboard packing disk may be fitted in
place of the blade, which will need to be removed.
Information on Power Supply
This equipment should be connected to a normal
domestic socket outlet with a voltage rating of 120 V
Illustrated Description of Functions
1. Baseplate
6. and 7. Air vents
2. Guard lock (not shown)
8. Dust extract nozzle
3. Depth adjuster knob
9. Cutting width marks
4. Switch
10. Guard removal screw
5. Handle
11. Saw blade 2-1/8”ø
List of contents
1x PS 160 Saw
1x Torx key & 1x U key
1x Spare safety washer
Blades (dependant on
kit)
1x Dust extraction hose
1x Storage case
1x Instruction manual
PS 160 Safety Warnings – Operating
Instructions
This tool should always be used with the dust hose
connected and attached to a suitable vacuum
cleaner/dust extractor.
Setting the Cutting Depth
a) The depth of cut can be set by turning the depth
control knob. (Diagram A)
b) When cutting wood the depth of cut should be set to
slightly greater than the thickness of the material for
best results.
c) When cutting plastics the depth of cut should be set
to slightly greater than the thickness of the material.
If melting occurs a greater depth setting will improve
results.
d) When cutting metals the depth of cut should be set
to approximately 1/32” greater than the material
thickness for best results.
If it is desirable not to mark the surface beneath the
workpiece, the depth can be set to the same as the
material thickness, when cutting wood or plastics, but
this may result in a rough edge.
NOTE: If the depth control knob becomes difficult
to turn, unscrew it until the rubber seal can be
seen. Clean the surrounding area with a soft brush
and then apply a very small quantity of synthetic
grease to the seal.
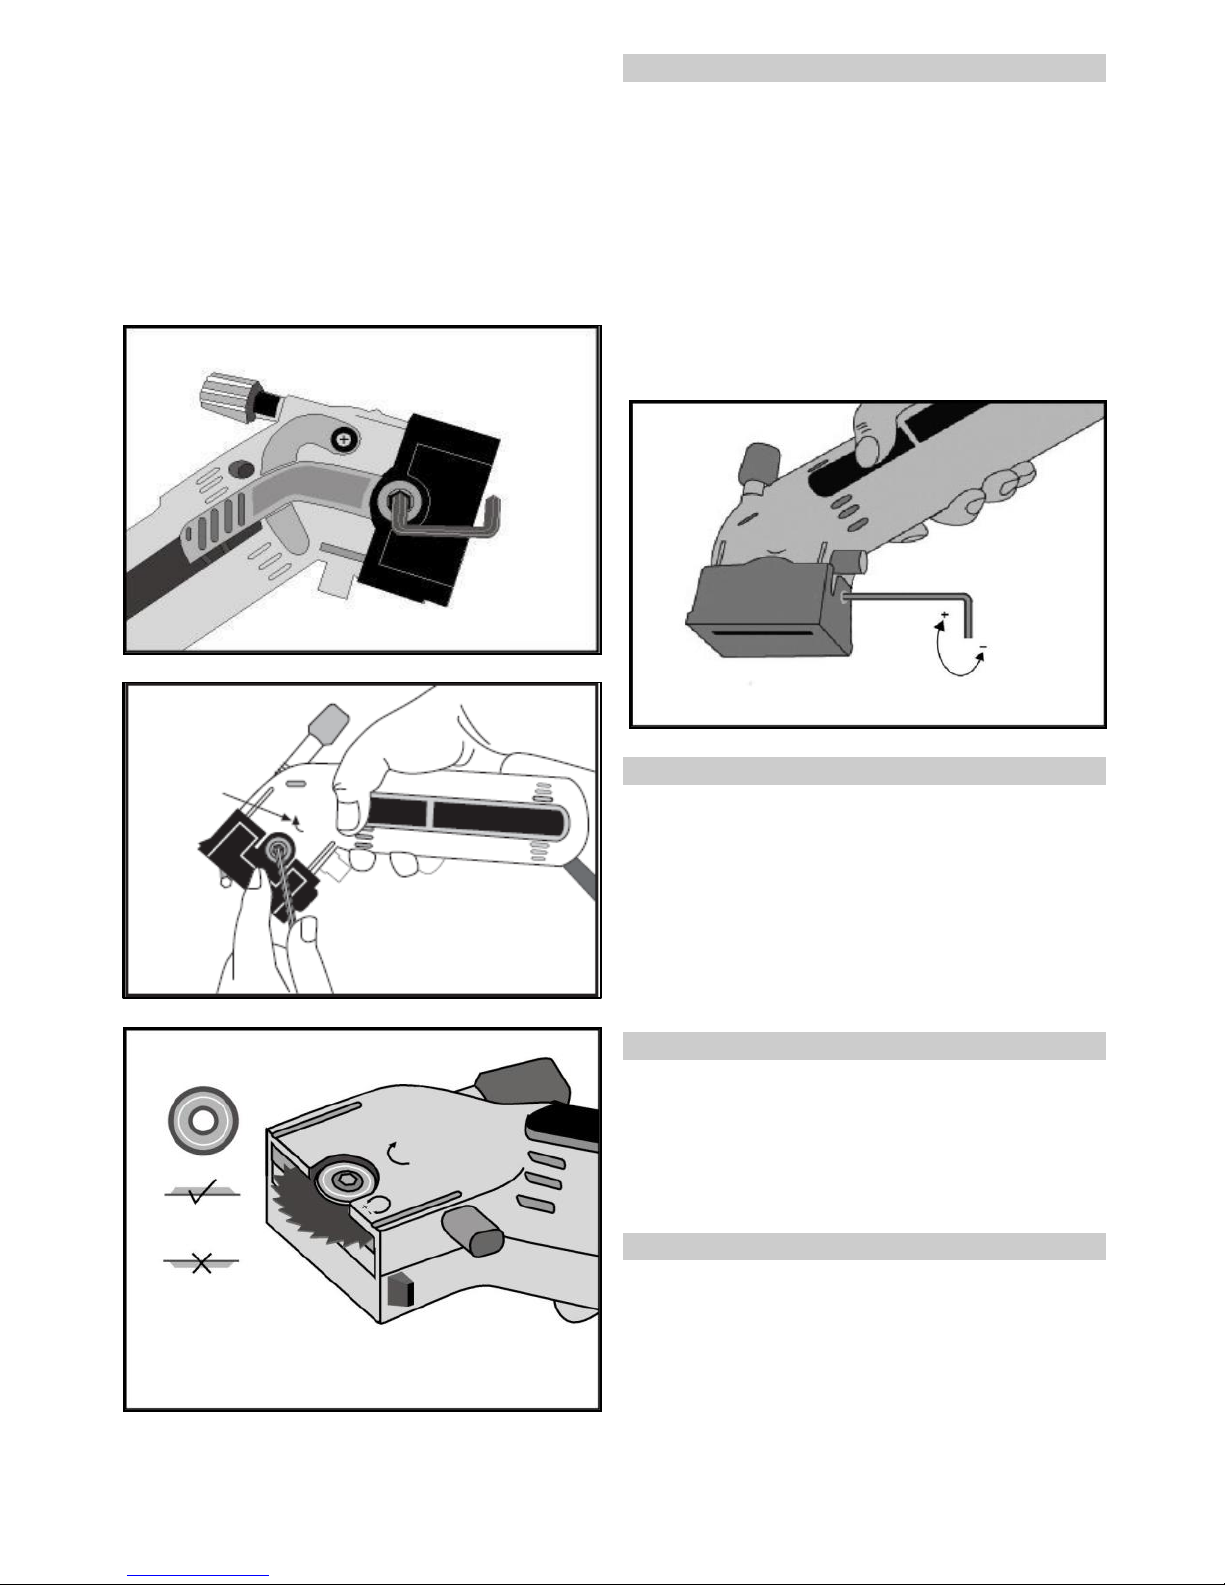
Blade Changing
NOTE: Incorrect positioning of the blade can
permanently damage the tool.
a) Ensure the tool is unplugged from the power supply.
b) Unscrew the depth adjuster until the number ½” is
visible.
a) Without removing the guard insert the U key into the blade
shaft to lock it. (Diagram B ) Slide off the removable
A
2 EXAKT PT Ltd. 2010
cover, insert the torx key into the blade retaining screw
and unscrew clockwise. (Diagram C)
b) Depress the guard to remove the blade.
c) Place the new blade onto the blade shaft ensuring
the hole locates correctly and the teeth point
forwards in the direction of the curved arrow.
(Diagram C)
d) Replace the safety retaining washer and tighten the
screw. (Diagram D)
e) Remove both keys before plugging in.
Guard Removal
NOTE: Do not use without the Guard.
a) Ensure the tool is unplugged from the power supply.
b) Unscrew the guard release screw. Slide off the
guard. (Diagram E)
NOTE: When replacing the guard the blade can
protrude through the slot in the base plate. To
avoid injury ensure that the hand is kept well
clear. Ensure the guard is replaced the correct
way round.
Clamping
It is not normally necessary to clamp the material
being cut as long as it is fully supported on a work
surface and held with one hand. Clamping should be
used where;
The operator is inexperienced in the use of power
saws or weak handed
Small parts or tough material is to be cut.
Cutting Limitations
There is no limitation on the size of material that can
be cut as long as it is fully supported.
The saw will cut up to ½” deep. Material up to twice
as thick can be cut if cutting is performed on both
sides.
Holding and Switching On
Holding the tool correctly will result in easier and safer
operation, with less fatigue.
Right handed operator: (Diagram F)
D
E
B
C
 Loading...