

Exagerate 970H3G, ZELIG PAD 970H3G, XZPAD970H3G, Zelig Pad 970H User Manual
ZELIG PAD 970H3G
9.7” MULTI TOUCH INTERNET 3G TABLET PC
USER MANUAL
XZPAD970H3G
www.hamletcom.com
2
Dear Customer,
thanks for choosing an Hamlet product. Please carefully follow the
instructions for its use and maintenance and, once this item has run
its life span, we kindly ask You to dispose of it in an environmentally
friendly way, by putting it in the separate bins for electrical/electronic
waste, or to bring it back to your retailer who will collect it for free.
We inform You this product is manufactured with materials and components in
compliance with ROHS directives: 2002/95/CE; with RAEE Directives:
2003/96/CE, Italian Legislative Decree 2005/151 and EMC Directive
2004/108/EC for the following standards:
EN 55022: 2010
EN 55024: 2010
EN 61000-3-2: 2006 + A1: 2009 + A2: 2009
EN 61000-3-3: 2008
CE Mark Warning
This is a Class B product. In a domestic environment, this product may cause
radio interference, in which case the user may be required to take adequate
measures.
The complete CE declaration of conformity of the product can be obtained by
contacting Hamlet at info@hamletcom.com.

3
The information on the importer for your country are available in the “About Us”
section of the Hamlet website at www.hamletcom.com.
Trademarks
All trademarks and company names mentioned in this manual are used for
description purpose only and remain property of their respective owners.
Changes
The material in this document is for information only and subject to change
without notice. Specifications and appearance are subject to change without
prior notice.
Support
The support service for the Exagerate by Hamlet tablets is provided by:
SC GROUP – Assistenza Tecnica Salvadori Claudio
Via del Bosco 44 – 21052 Busto Arsizio (VA) – Italy
You can contact technical support phone number: 0331-674306 or e-mail at
assistenza.tablet@hamletcom.com.
For more information on Zelig Pad Tablets visit the web site
www.hamletcom.com/ZeligTab.aspx.

4
1 Introduction
1.1 What’s Included
The following components are included with your purchased product:
• Zelig Pad 970H Tablet PC
• Power Adapter
• USB Cable
• Instruction Manual
1.2 Getting Started
Before operating your Tablet PC for the first time, please read this manual
carefully and follow the instructions as below.
1.3 Battery charging
The tablet is equipped with a built-in rechargeable Lithium battery. It is
suggested to fully charge the battery before use.
We strongly recommend to use the power adapter included in the packaging,
using other adapter may damage the tablet and void the warranty.
Charging Process
• Connect the power adapter to your tablet, and plug the power adapter to the
nearest electrical outlet.
• Users can still use the tablet while it is being charged.
5
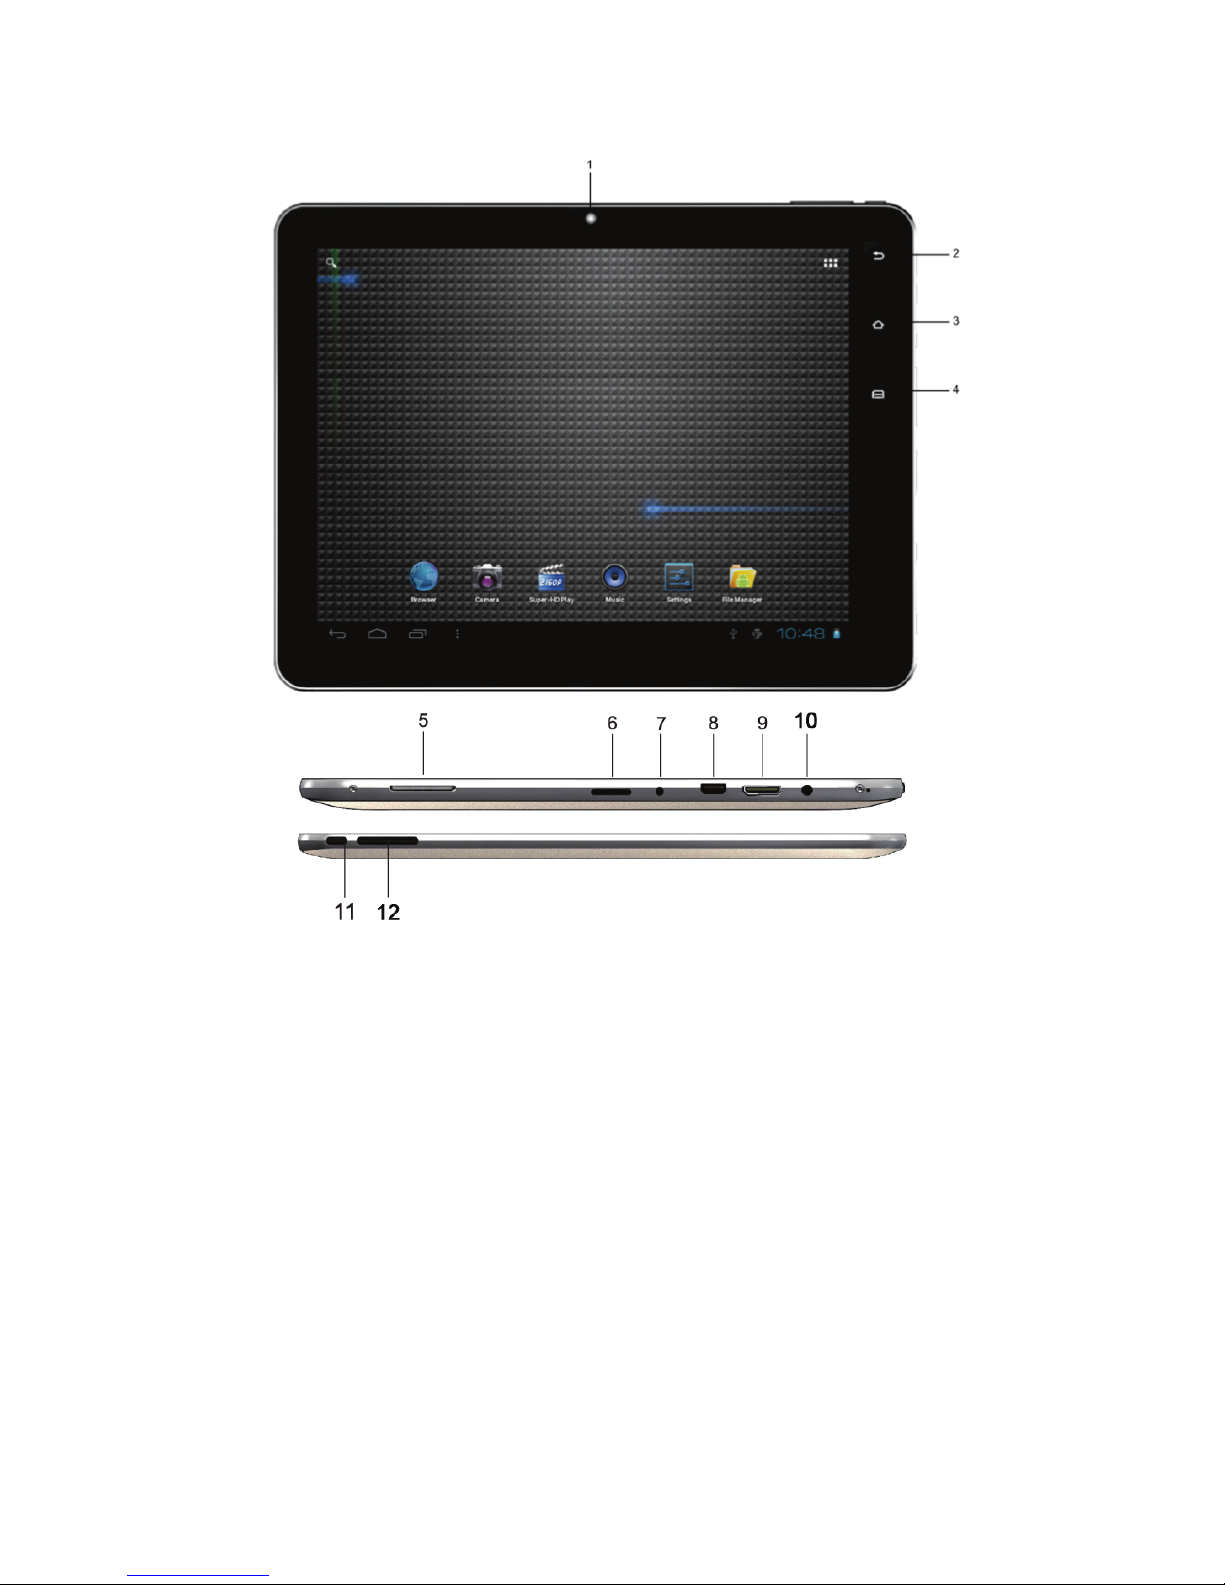
2 Appearance and buttons
2.1 Front camera
2.2 ESC
Tapping on ESC button will return the previous interface.
2.3 HOME
Tapping on HOME button will return to the main interface.
2.4 Menu
During operations, tap Menu button to show you the menu options.
2.5 SIM card slot
2.6 MicroSD card slot

6
2.7 DC power input
2.8 Mini USB
Mini USB port: you can use it to connect to PC for data transmission,
charging or connection with external USB devices.
2.9 HDMI output interface
2.10 Headphone socket
3.5 mm standard earphone jack.
2.11 ON/OFF Power Switch
Turn on/off tablet.
2.12 Volume +, Volume-
Press on the Volume +, Volume – buttons to increase or decrease the
sound volume.
7
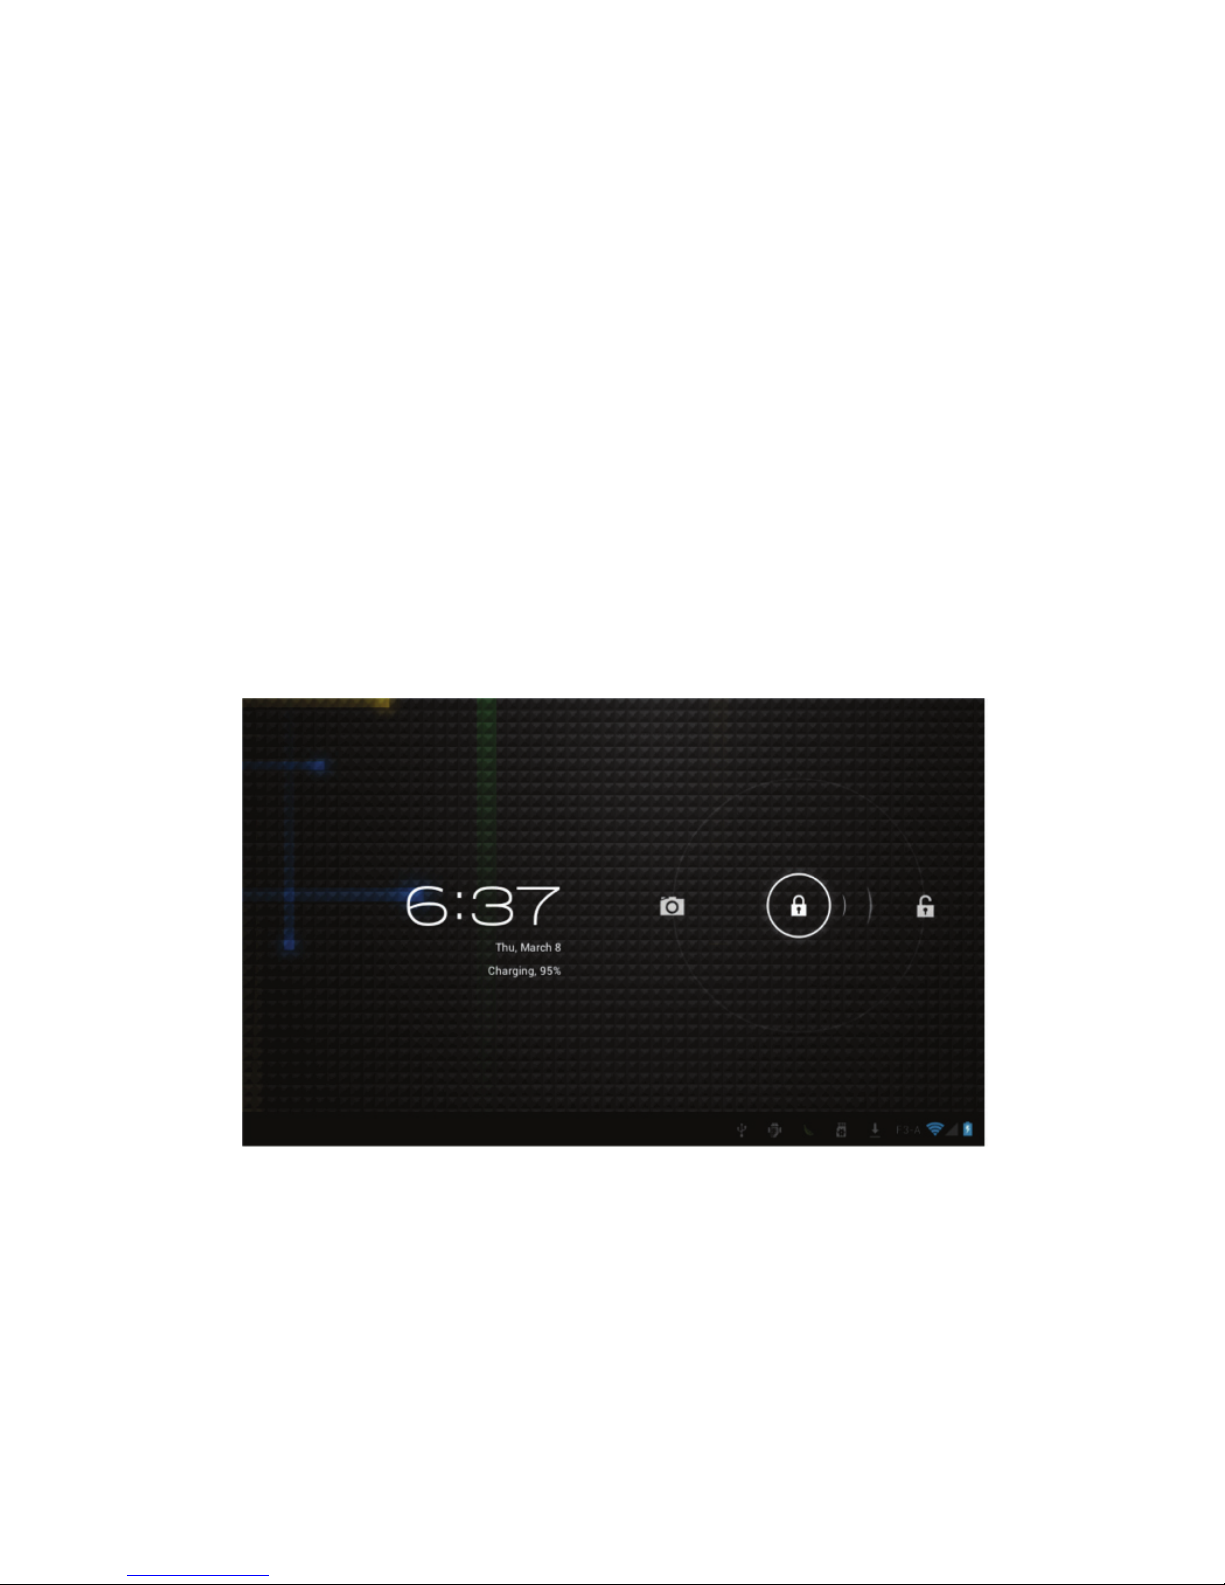
3 Turn ON/OFF Tablet
3.1 Turn On: after the battery has been fully charged, press & hold the power
switch for around 3 seconds to turn on the device. Screen lock will be
showed after starting up.
3.2 Turn Off: When the tablet is ON, press & hold the power switch for around
3 seconds and the system will popup out power off option, tap on it to turn
the tablet off.
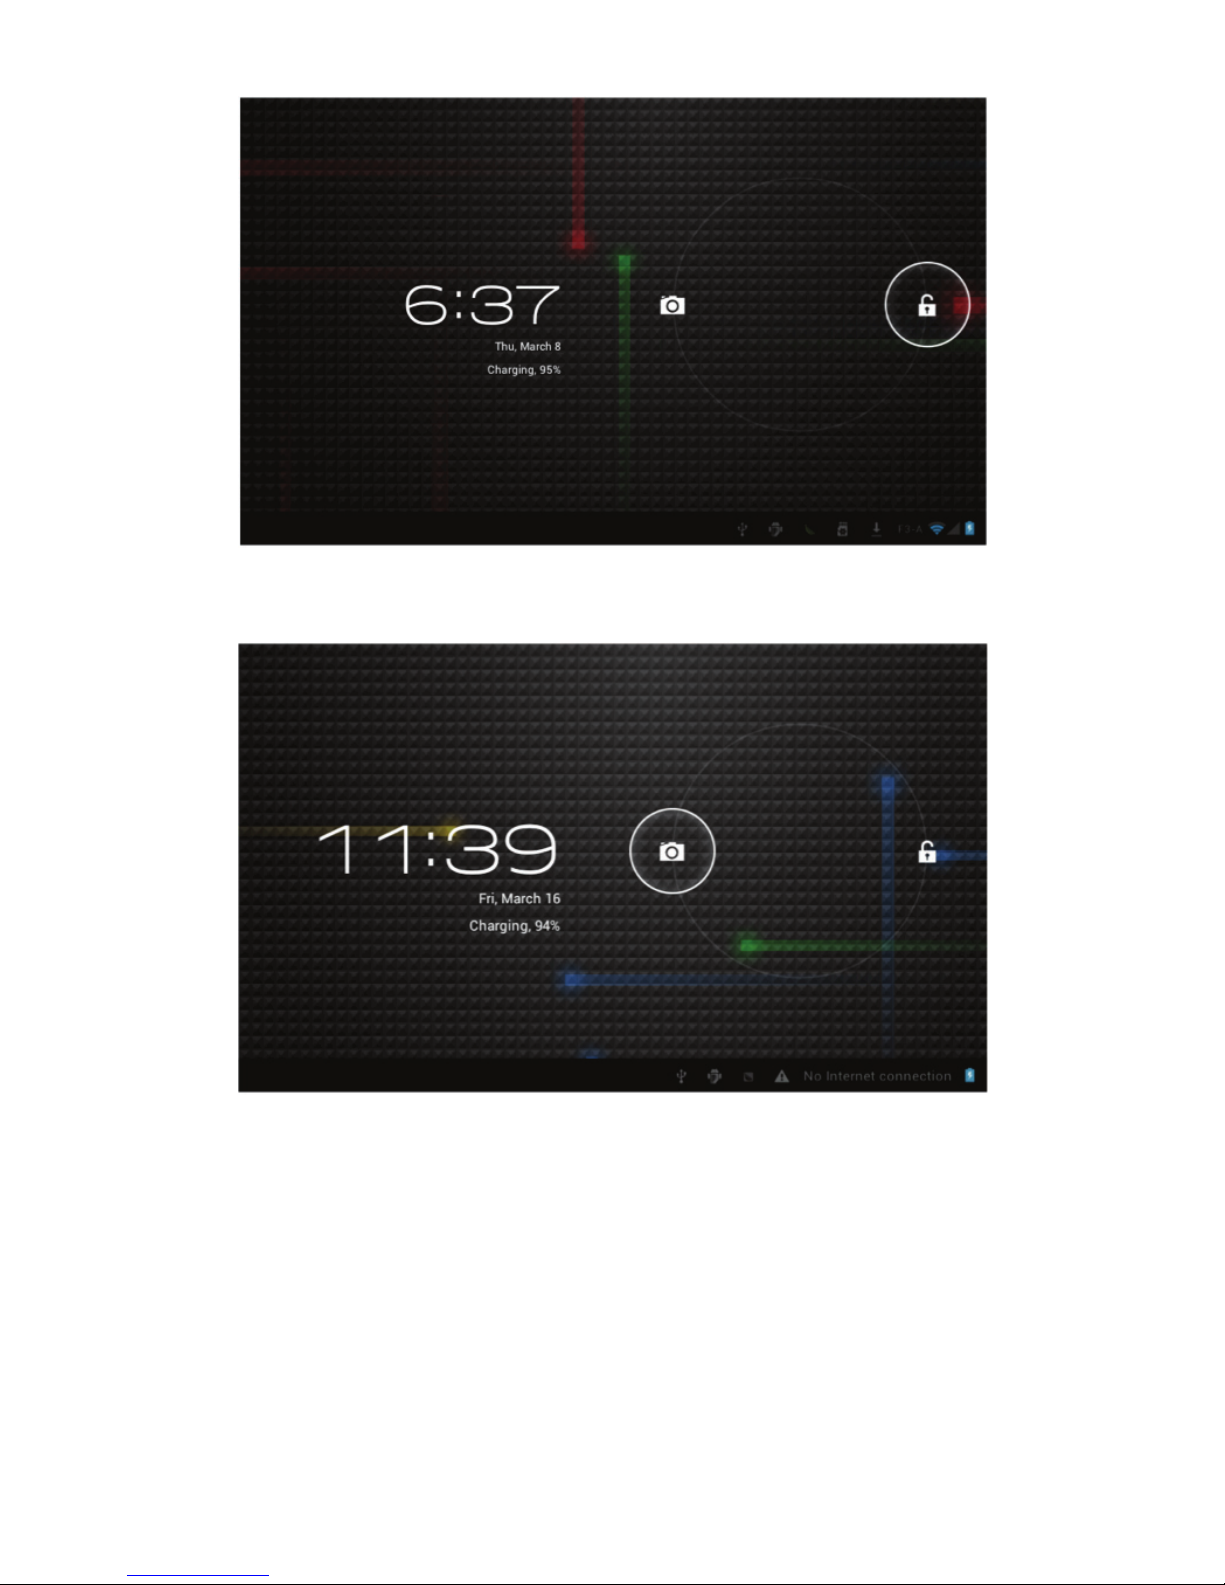
3.3 Lock screen: quickly press Power Switch and release to lock screen.
3.4 Unlock screen: slide the lock icon rightward onto the unlock icon to unlock
the screen and go to main interface; Slide the lock icon leftward onto the
camera icon to open camera.
8
Remarks:
When battery power has been used up, the tablet will shut down itself
automatically.
If you illegally turn off the device, restart will scan and restore the disk, it
may take longer time to enter into system.
9
4 Connection with PC
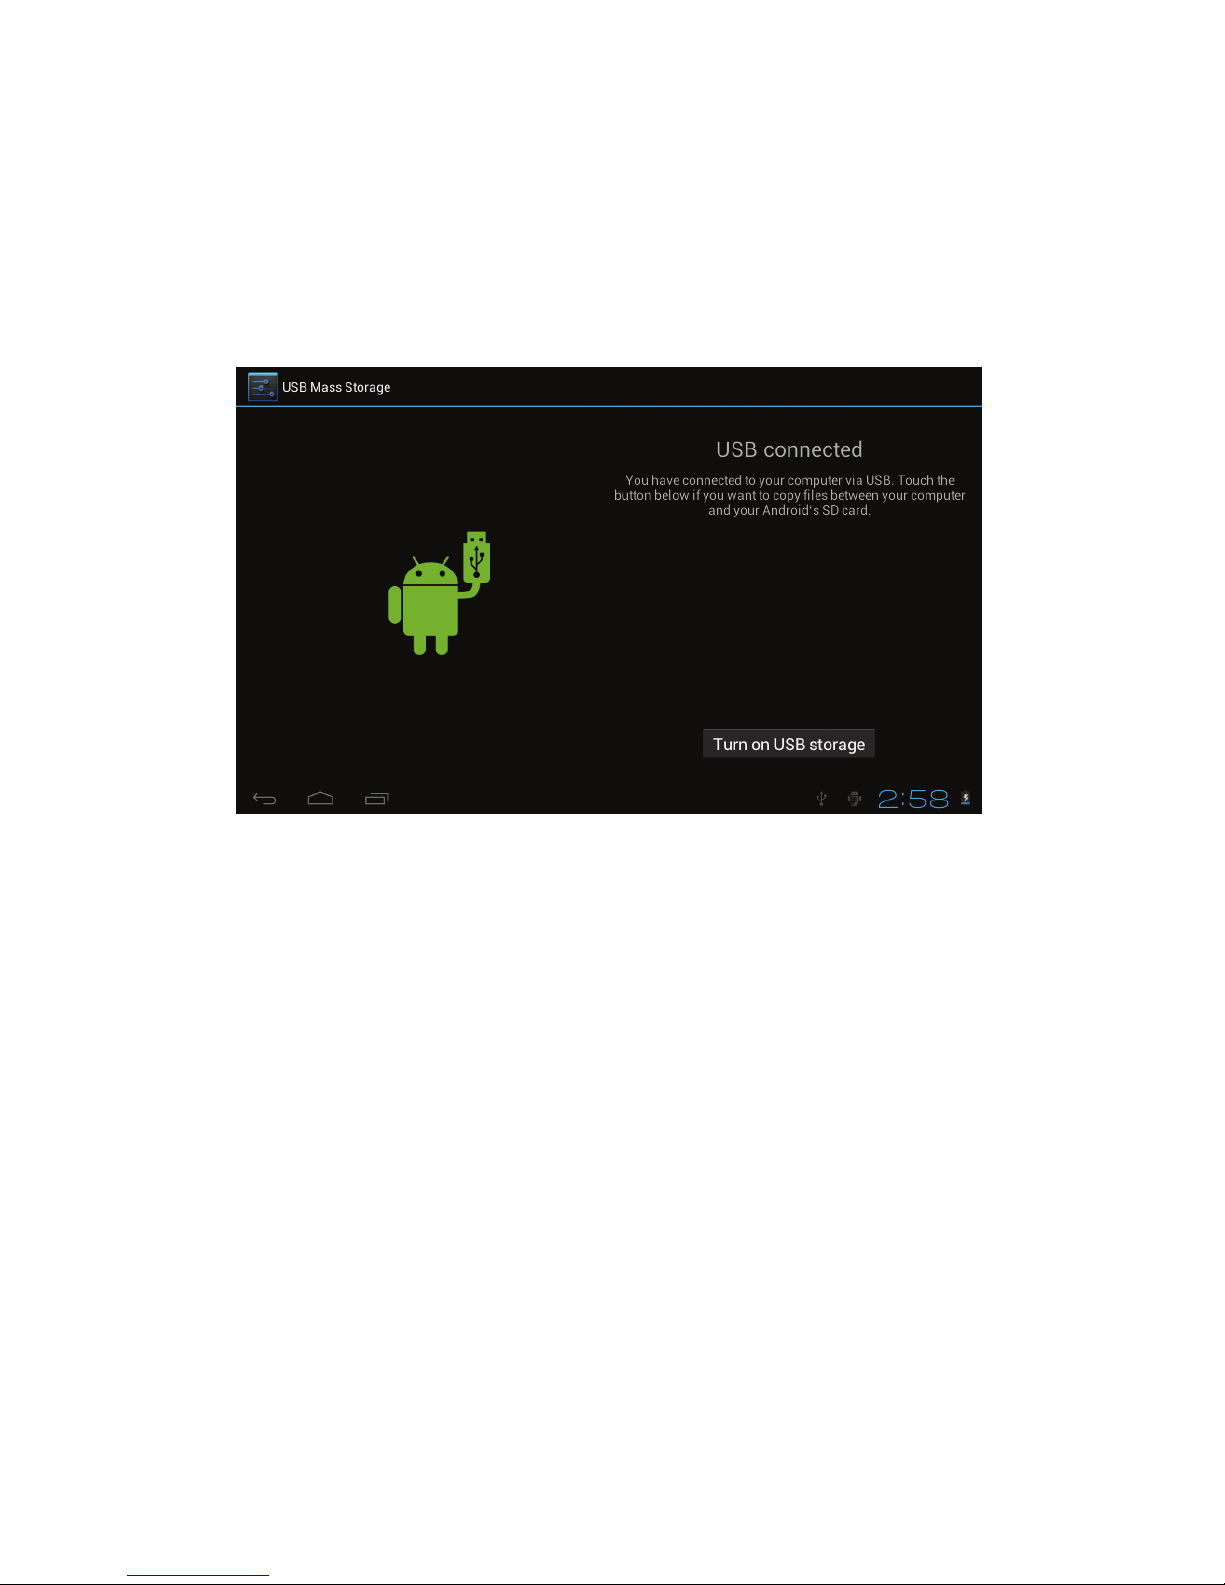
4.1 Use the USB cable provided to connect the tablet with PC, device will pop
up the USB connection window, click “Turn on USB storage” to connect
to PC, in the connection mode, you can copy or delete the file on the
device or the file on the memory device.
10
5 Tablet Operation Interface
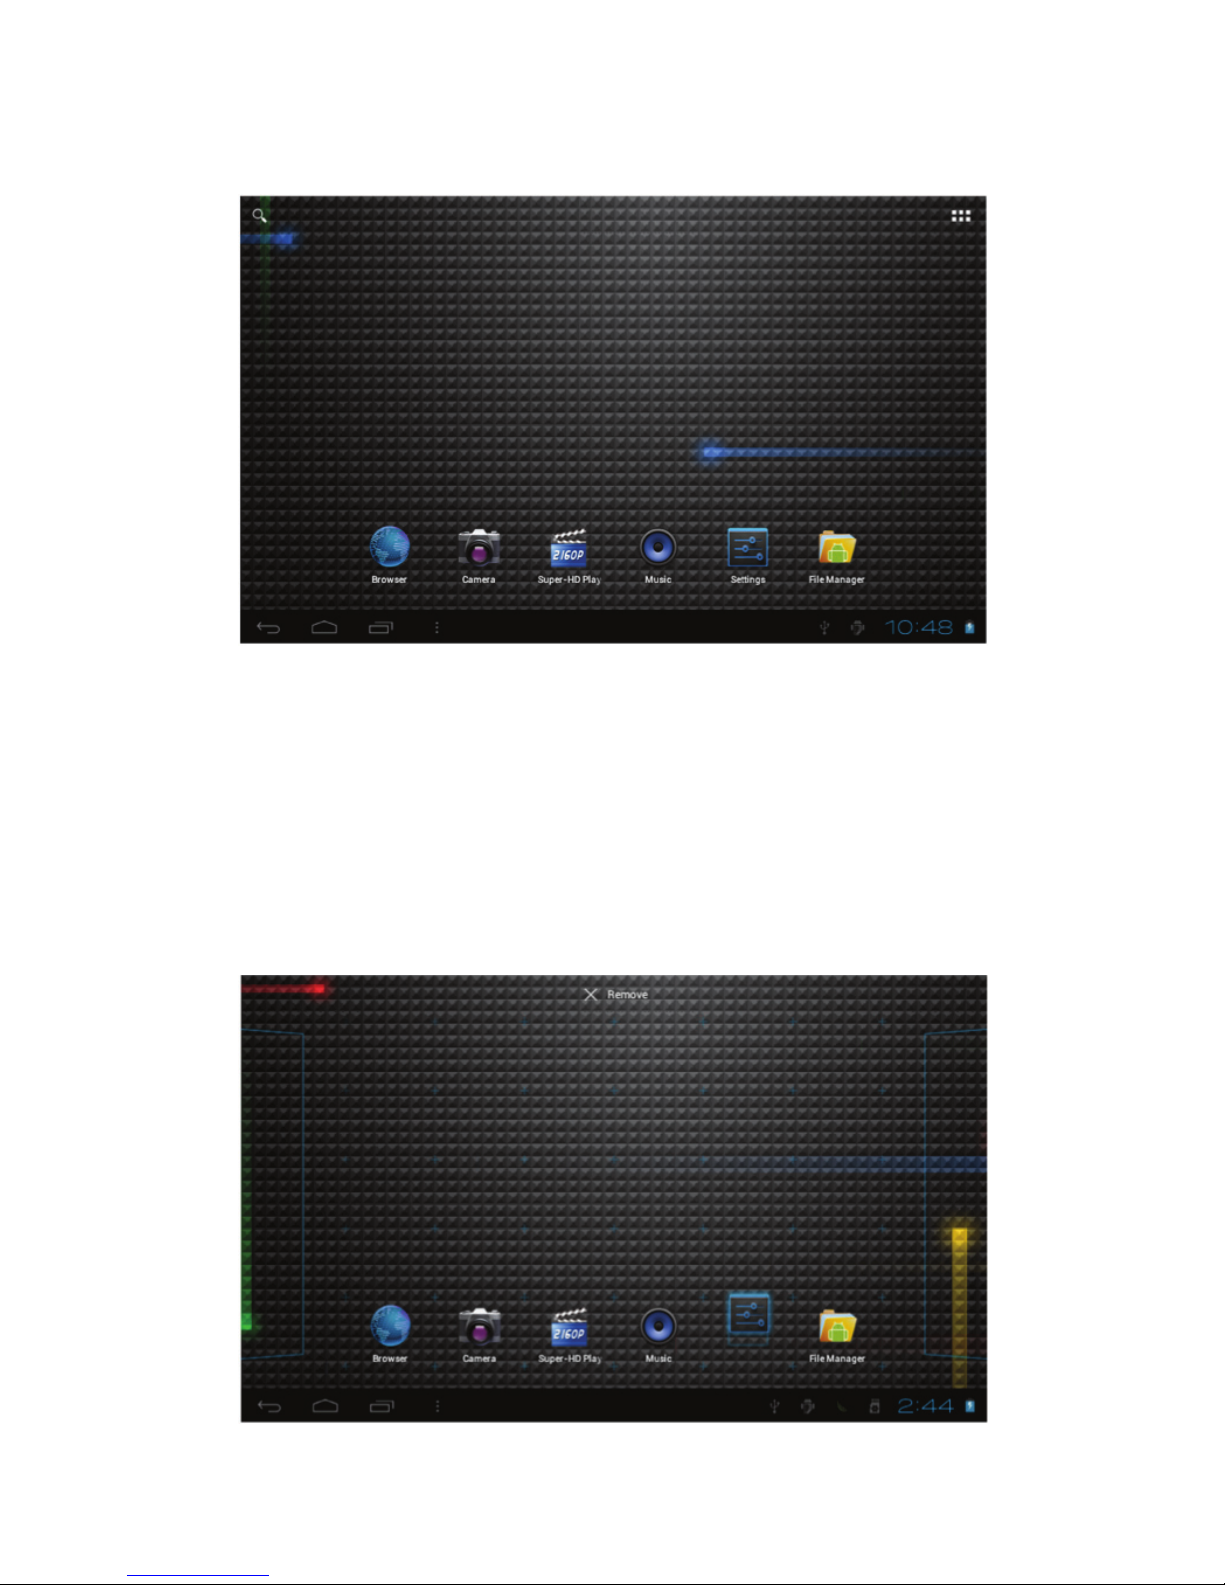
5.1 After starting up, you will enter into below main screen interface.
5.2 In the main interface, you can manage main interface software icons:
press the icon and hold it for 3 seconds, then you can drag anywhere in
the main interface.
5.3 Delete icons: press the icon and hold it for 3 seconds, and drag the icon
onto the “Remove” icon, then you can delete that icon from desktop.
11
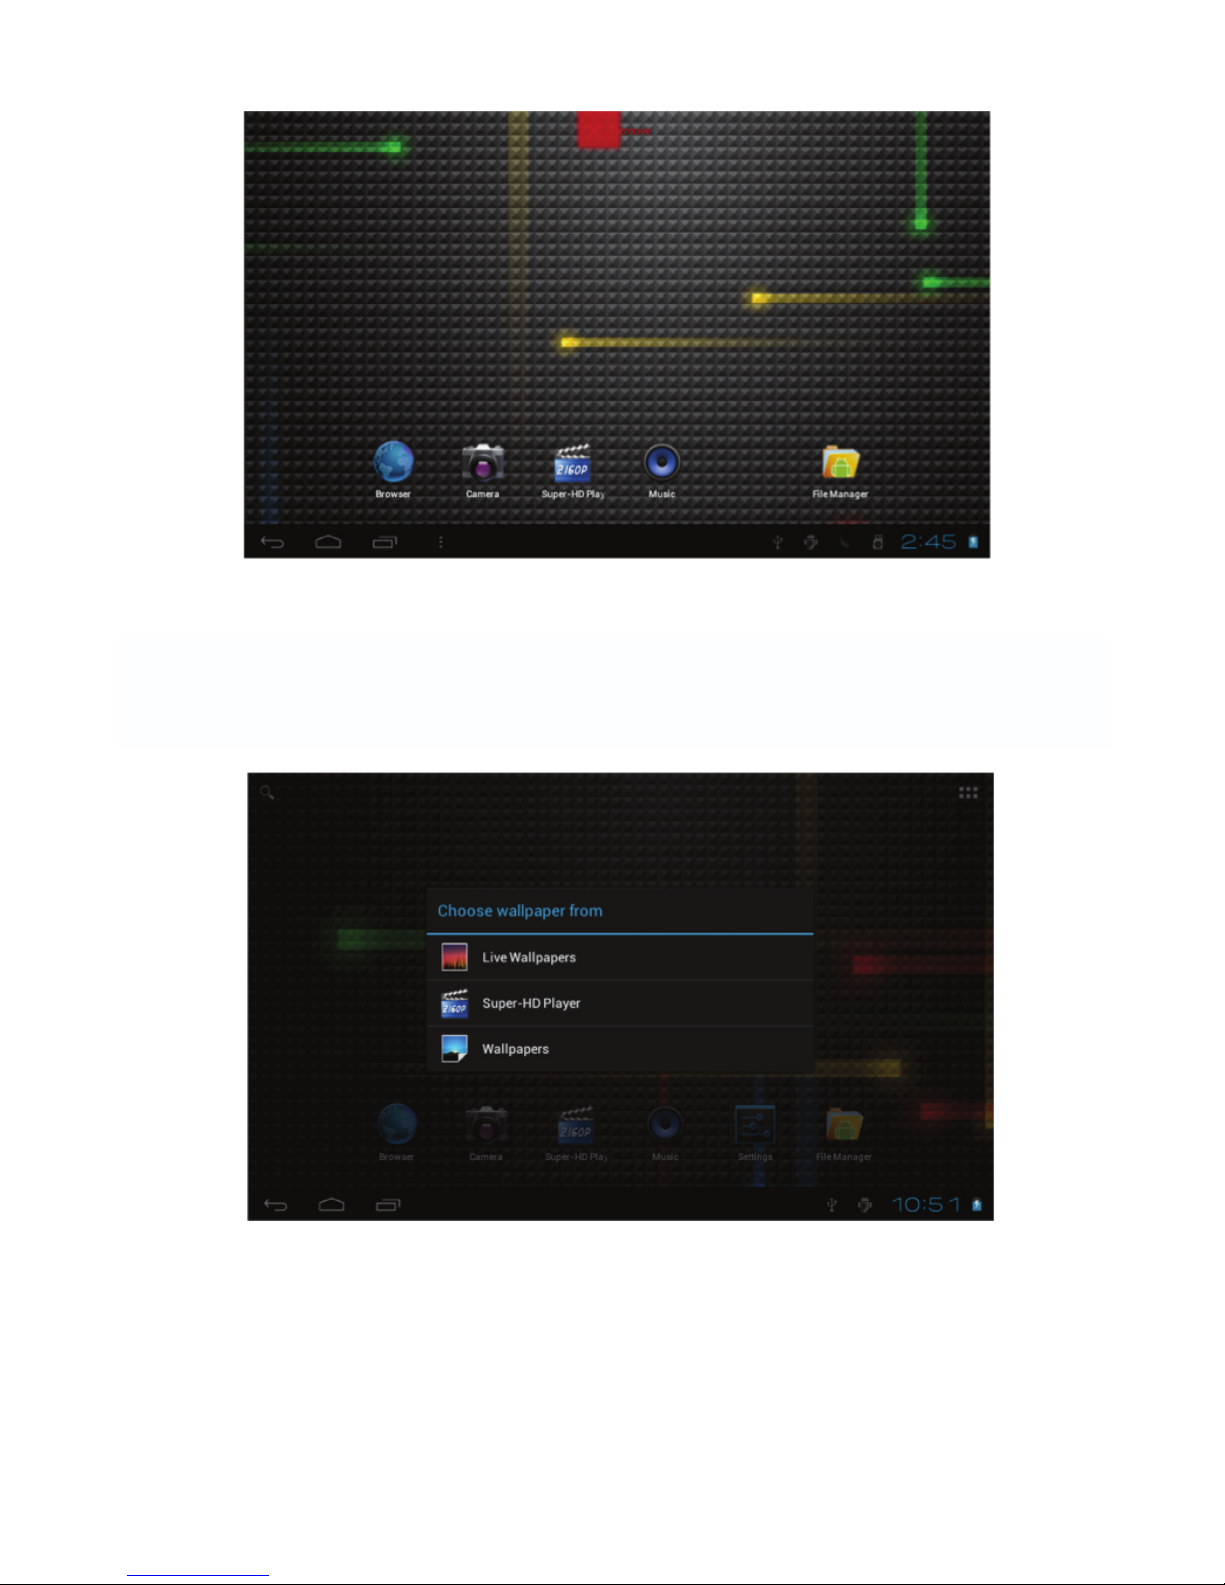
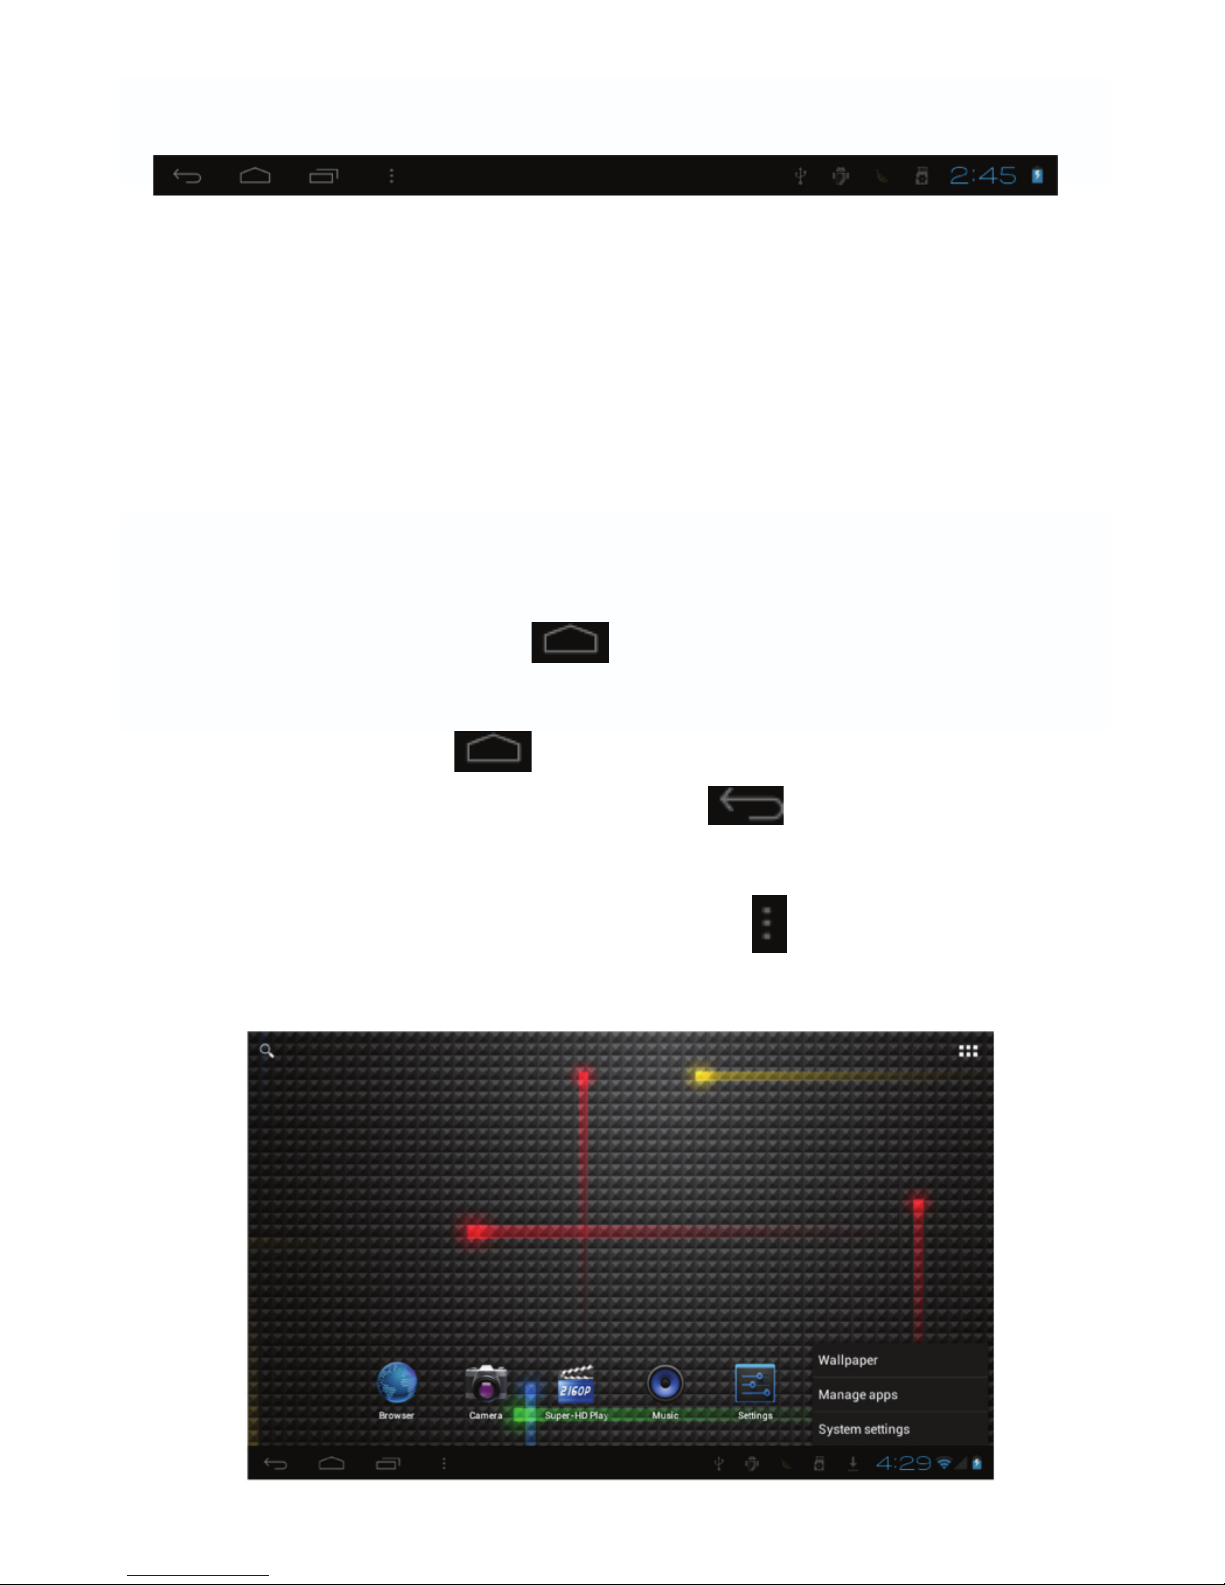
5.4 Touch the screen and hold for around 4 seconds, the dialog box “Choose
wallpaper from” will pop out as shown below:
You can choose the wallpaper from different sources and change the
wallpaper.
12
5.5 Status Bar Descriptions
From left to right: Back to previous interface, Back to main interface, Display the
Apps performed previously, Menu key, USB connected, USB connected, USB
debugging connected, TF-card information, Current time, battery charge icons,
current time.
5.6 Quick Guide For Touch Operations
No matter which interface you are on the screen, you can go back to main
screen by tapping the key located at the left bottom corner of the
main screen.
AttentionThe key functions as back to main screen interface.
During options, by tapping the back key at the left bottom corner
of the touch screen, you can return to previous screen interface.
During operations, by tapping the menu key on the left bottom corner
of touch screen, the screen will pop out the below interface:

13
Click to see all history of Apps performed previously.
In the main interface, you can touch the icon to see all the APPS,
tap on any App icon and hold it for around 3 seconds, you can drag that
App icon onto main screen interface.
 Loading...