

Page 1
SMART GUIDE
SMART METER SYSTEM
with
DIGITAL ACCURACY WITH EZ PH PROCEDURE
®
Page 2

2
©2018, Industrial Test Systems, Inc. Printed in USA
CONTENTS
Welcome . . . . . . . . . . . . . . . . . . . . . . . . . . . . . . . . . . . . . . .3
Warranty (2 years) . . . . . . . . . . . . . . . . . . . . . . . . . . . . . .3
Kit Overview . . . . . . . . . . . . . . . . . . . . . . . . . . . . . . . . . . . .4
Getting Started . . . . . . . . . . . . . . . . . . . . . . . . . . . . . . . . .4
Install “AAA” Batteries . . . . . . . . . . . . . . . . . . . . . . . . . . .4
eXact
®
pH+ Overview . . . . . . . . . . . . . . . . . . . . . . . . . . . . .5
For Best Accuracy . . . . . . . . . . . . . . . . . . . . . . . . . . . . . . .6
Safety Information . . . . . . . . . . . . . . . . . . . . . . . . . . . . . . .6
Probe Replacement . . . . . . . . . . . . . . . . . . . . . . . . . . . . . .6
Troubleshooting . . . . . . . . . . . . . . . . . . . . . . . . . . . . . . . . .7
Icons and Functions . . . . . . . . . . . . . . . . . . . . . . . . . . . . .7
Parameter Settings . . . . . . . . . . . . . . . . . . . . . . . . . . . . . 8-9
pH Calibration Procedure . . . . . . . . . . . . . . . . . . . . . 10-11
pH Test Procedure . . . . . . . . . . . . . . . . . . . . . . . . . . . . . .12
pH Calibration Notes . . . . . . . . . . . . . . . . . . . . . . . . . . . .13
Conductivity Calibration Procedure . . . . . . . . . . . . 14-15
Conductivity Test Procedure . . . . . . . . . . . . . . . . . . . . .15
Conductivity Test Notes . . . . . . . . . . . . . . . . . . . . . . . . .16
ORP Test Procedure . . . . . . . . . . . . . . . . . . . . . . . . . . . . .17
Using the eXact iDip® App . . . . . . . . . . . . . . . . . . . . . 18-30
Compatible Smart Devices . . . . . . . . . . . . . . . . . . . . . . . 18
Getting Started . . . . . . . . . . . . . . . . . . . . . . . . . . . . . . . . . 19
Bluetooth
®
SMART Technology. . . . . . . . . . . . . . . . . . .19
Download the App . . . . . . . . . . . . . . . . . . . . . . . . . . . . .19
Allow Access . . . . . . . . . . . . . . . . . . . . . . . . . . . . . . . . .19
eXact iDip
®
App Overview . . . . . . . . . . . . . . . . . . . . . . . .20
Navigating the App . . . . . . . . . . . . . . . . . . . . . . . . . . . 21-24
Menu . . . . . . . . . . . . . . . . . . . . . . . . . . . . . . . . . . . . . . . .21
Test . . . . . . . . . . . . . . . . . . . . . . . . . . . . . . . . . . . . . . . . .21
History . . . . . . . . . . . . . . . . . . . . . . . . . . . . . . . . . . . . . .22
Customers . . . . . . . . . . . . . . . . . . . . . . . . . . . . . . . . . . .22
Calendar . . . . . . . . . . . . . . . . . . . . . . . . . . . . . . . . . . . . .23
Results . . . . . . . . . . . . . . . . . . . . . . . . . . . . . . . . . . . . . .23
Profi le . . . . . . . . . . . . . . . . . . . . . . . . . . . . . . . . . . . . . . .24
Preferred Units of Measure . . . . . . . . . . . . . . . . . . . . . .24
Archiving . . . . . . . . . . . . . . . . . . . . . . . . . . . . . . . . . . . .24
Connect to pH+ . . . . . . . . . . . . . . . . . . . . . . . . . . . . . . 25-26
Select Customer . . . . . . . . . . . . . . . . . . . . . . . . . . . . . . .25
Power on eXact
®
pH+ . . . . . . . . . . . . . . . . . . . . . . . . . . .25
Select Bluetooth
®
Test . . . . . . . . . . . . . . . . . . . . . . . . . .26
Connect eXact
®
pH+ . . . . . . . . . . . . . . . . . . . . . . . . . . . .26
Auto-Calculated Methods . . . . . . . . . . . . . . . . . . . . . . . .27
Manual Entry . . . . . . . . . . . . . . . . . . . . . . . . . . . . . . . . . . .27
Managing Data . . . . . . . . . . . . . . . . . . . . . . . . . . . . . .28-30
Save/Send/Share . . . . . . . . . . . . . . . . . . . . . . . . . . . 29-30
Kits and Accessories . . . . . . . . . . . . . . . . . . . . . . . . . . . .31
Starter Kits . . . . . . . . . . . . . . . . . . . . . . . . . . . . . . . . . . . 31
Probe Replacement . . . . . . . . . . . . . . . . . . . . . . . . . . . .31
eXact
®
pH+ Test Specifi cations . . . . . . . . . . . . . . . . . . . .32
Technical Support. . . . . . . . . . . . . . . . . . . . . . . . . . . . . . .32
Page 3

3
exactph.com
WELCOME TO YOUR NEW EXACT® PH+
SMART METER SYSTEM
Thank you for your eXact® pH+ purchase! This guide will quickly
walk you through the technical details of your new pH
+
. You are on
your way to smart digital water testing! The benefi ts of purchasing
an eXact pH+ with Bluetooth® SMART is the ability to connect
your photometer to a smartphone or tablet and use our specially
designed app to easily save, send, and share your test results.
The eXact pH
+
meter is IP-67 rated for water and dust protection.
Therefore, it is able to withstand being submerged in 1m of water
for up to 30 minutes.
Please read this entire manual before unpacking, setting up,
or operating this equipment. Pay attention to all precaution
statements. Failure to do so could result in damage to the
equipment. Make sure that the safeguards provided by this
equipment are not impaired. Use this equipment according to the
specifi ed instructions in this manual.
WHAT YOU WILL NEED TO GET STARTED
• Four (4) AAA batteries
• Clean Water (distilled, deionized, purifi ed bottled water)
• Soft paper towel for drying probe
SMART METER SYSTEM
®
Using eXact iDip® app in combination with the meter completes the
eXact® pH+ Smart Meter System.
WARRANTY (2 YEARS)
Registration of your eXact® pH+ must be received within 30 days from date of
purchase to activate the warranty. The eXact
®
meter is warranted to be free
from defects in materials and workmanship for a period of two (2) years from
the date of purchase by the customer. The replaceable pH and ORP probes
are warranted for one (1) year. ITS will repair or replace any part of the product
which is deemed to be faulty or otherwise defective. The non–transferable
warranty does not cover product damage caused by abuse or improper use. If
the meter is faulty or otherwise defective contact ITS by phone
(+1–803–329–9712 Ext. 0) or email ([email protected]) to describe the problem
and obtain a return authorization form before returning the meter to ITS. Damage
caused by improper packing of the meter for return shipment to ITS will not be
covered by the warranty. Customer is responsible for shipping charges to ITS.
ITS pays postage when meter is returned to customer. A maximum processing
fee of $100 will be charged for repair or replacement of non–registered meters
and damages not covered by this warranty. Registration is available over the
phone (+1–803–329–9712 Ext. 0) or on–line at http://www.sensafe.com/micro/
warranty/ (Personal data is kept confi dential).
WELCOME
US Designed and US and International Patent-Protected by Industrial Test Systems, Inc. 1875 Langston Street, Rock Hill,
SC USA.
EXACT®, IDIP® , EXACT IDIP®, and SMART DIGITAL WATER TESTING® are registered trademarks of Industrial Test Systems, Inc.
Rock Hill, SC USA. Apple, the Apple logo, iPad, iPhone, and iPod touch are trademarks of Apple Inc., Android, Google, and Google Play
are trademarks of Google Inc., Registered in the U.S. Bluetooth® word mark and logos are owned by Bluetooth SIG and any use of such
marks is under license.
Page 4
4
©2018, Industrial Test Systems, Inc. Printed in USA
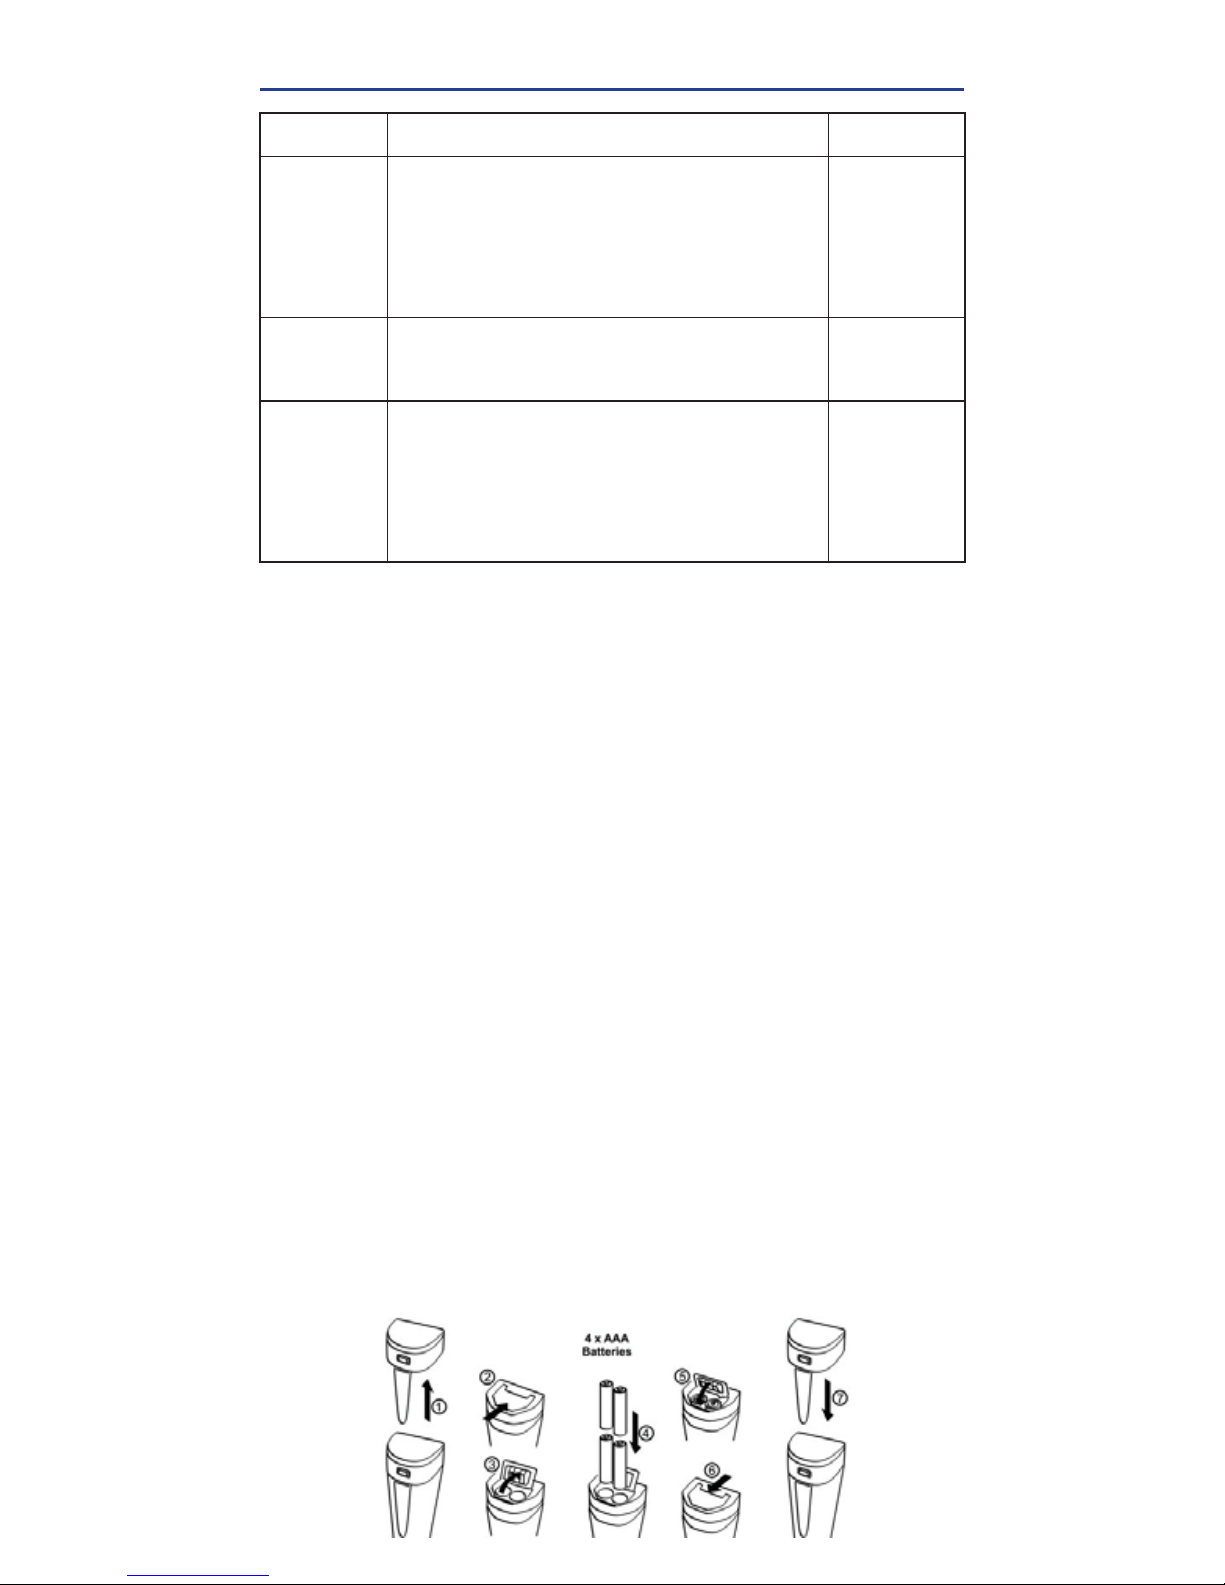
KIT OVERVIEW
GETTING STARTED
If fi rst-time use, or if the meter hasn’t been used for a long time, pour about 5mL of
3M KCL storage solution into the probe cap (about 1/5 of the cap) and soak probe
for a minimum of 15 minutes. Rinse the probe and place into the storage solution.
When not in use, store the pH probe in a pH 4.00 buffer solution. Use enough to
completely immerse the pH glass bulb. If the probe was stored dry, soak in pH
4.00 buffer for at least 4 hours to restore the probe’s sensitivity. Soak the probe for
12 hours to achieve maximum accuracy.
If the unit is stored dry, the probe will not be permanently damaged, but will
temporarily lose its stability. Stability can be restored by soaking the probe in the
supplied 3M KCl storage solution (one 10ml bottle of storage solution comes with
the kit). If this solution becomes cloudy replace it as soon as possible.
* DO NOT use a different brand of storage solution. Using a different chemical
may, potentially, cause the probe to function poorly (also void the warranty).
+
+
-
-
+
+
-
-
INSTALL "AAA" BATTERIES
1. Pull up the battery cover with clip.
2. Slide the battery cap in the direction of arrow.
3. Open the battery cap
4. Insert the batteries (ALL POSITIVE SIDES FACING UP)
5. Close the battery cap
6. Slide and lock the battery cap in the direction of arrow
7. Replace the battery cover with clip. Be sure to push all the way down.
Waterproof design may be compromised if cap is not fi tted correctly.
KIT
CONTAINS
PART NUMBER
eXact® pH
Multi Kit
eXact
®
pH+ meter (with pH probe), four AAA
batteries, lanyard, 3M KCl storage solution,
two pH calibration bottles, two pH calibration
solutions, two conductivity calibration bottles,
two conductivity calibration solutions, pH+
sample collection bottle
486301
eXact
®
ORP
Kit
eXact
®
pH+ meter (with ORP probe), four AAA
batteries, lanyard, 3M KCl storage solution, pH+
sample collection bottle
486302
eXact
®
Master Kit
with ORP
and pH
eXact
®
pH+ meter (with pH probe), ORP probe,
four AAA batteries, lanyard, 3M KCl storage
solution, two pH calibration bottles, two pH
calibration solutions, one conductivity calibration
bottle, two conductivity calibration solutions, pH+
sample collection bottle
486303
Page 5
5
exactph.com
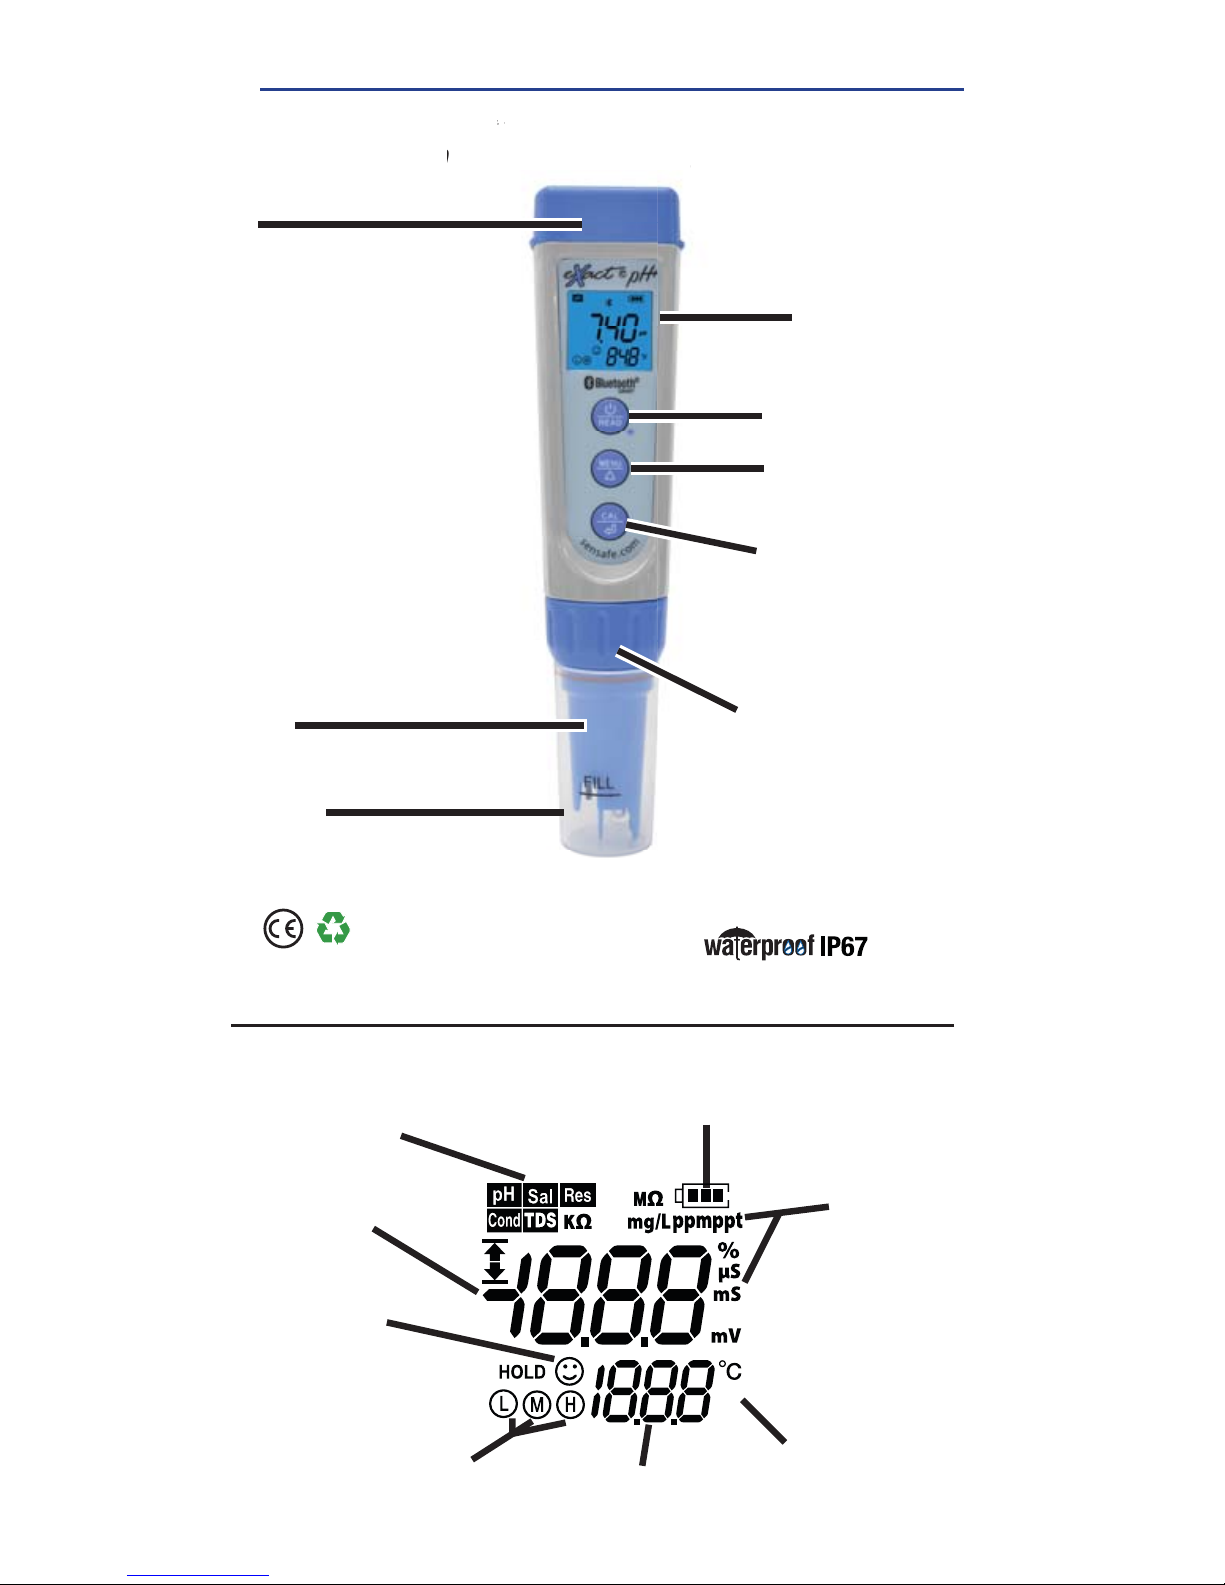
EXACT® PH+ OVERVIEW
YOUR NEW EXACT PH+ IS IDEAL FOR TESTING AND
MAINTAINING YOUR DRINKING WATER.
IS IDEAL FOR TESTING
R DRINKING WATER.
BATTERY COVER WITH CLIP
Protects the batteries from
water damage
LCD SCREEN
Displays results
and test type
ON/READ BUTTON
Turn on/off meter
and backlight
MENU BUTTON
Cycles through
available tests
RESULT UNITS
TEMP.
VALUE
TEMP.
SCALE
LOW BATTERY
RESULT MENUS / TEST
CALIBRATION
ICONS
CALIBRATION
BUTTON
Performs calibration
and navigates
parameter settings
PROBE COLLAR
Holds the probe
in place. Uncrews
to allow probe
replacement.
PROBE/STORAGE CAP
Protects the sensors
while not in use.
Protected against the effects of
immersion in water to depth of 1m.
PROBE
Install/replace probe here
°
F
pH
STEADY
ICON
DISPLAY
RESULT
Page 6

6
©2018, Industrial Test Systems, Inc. Printed in USA
FOR BEST ACCURACY
Buffers for calibration should be based on the measurement range.
Follow the calibration procedure properly.
Be sure to remove air bubbles from pH glass bulb for accurate measurements.
Store the meter and all test materials out of direct sunlight, heat, and away from
chemical storage areas.
Minimize exposure of meter and calibration solutions to heat above 100°F (38°C).
Dry the outside of the meter when testing is complete or before storage of the meter.
Pour pH 4.0 buffer solution up to the "FILL" line of the storage cap. Always store
the pH probe in clean 4.00 pH buffer solution.
Do not store the pH probe in a distilled or deionized water. This will cause
permanent damage to the probe.
Always fi ll the sample collection bottle with enough sample to completely
immerse the probe.
Rinse pH probe properly before putting in storage solution.
The meter has an automatic shut-off after 8 minutes of idle time.
This meter performs best in pool and typical tap water and does not give
reliable readings in distilled or deionized water.
Remove batteries when meter is not used for more than a month (Warranty Requirement).
Do not touch or rub the pH glass bulb.
To avoid cross-contamination, rinse the probe properly with clean water in
between measurements.
To clean the ORP sensor, dip the probe into 0.1 mol/L dilute hydrochloric
acid for 30 minutes; clean the platinum surface with dishwashing liquid; or use
plain white toothpaste to gently clean the platinum surface. Then, rinse with
clean water and soak for 6 hours in the KCl storage solution.
SAFETY INFORMATION
The manufacturer is not responsible for any damages due to
misapplication of this product including, but not limited to, direct,
indirect, incidental and consequential damages, and disclaims such
damages to the full extent permitted under applicable law. The user
is solely responsible to identify critical application risks and install
appropriate safeguards to protect processes during a possible
equipment malfunction. Caution: The pH probe has a glass bulb, do
not immerse directly in pool.
PROBE REPLACEMENT
1. Turn off the meter.
2. Unscrew the probe collar by turning counter-clockwise.
3. Gently pull downward to disconnect the probe from the meter.
Carefully plug in the replacement probe (pay attention to the probe
orientation when plugging into the meter).
4. Put back the probe collar and tighten fi rmly to secure the probe to
the meter (do not overtighten).
Page 7
7
exactph.com
TROUBLESHOOTING
Listed below are possible situations that may arise while testing.
Please contact one of our customer service representatives, or
watch our video online, if you require assistance
.
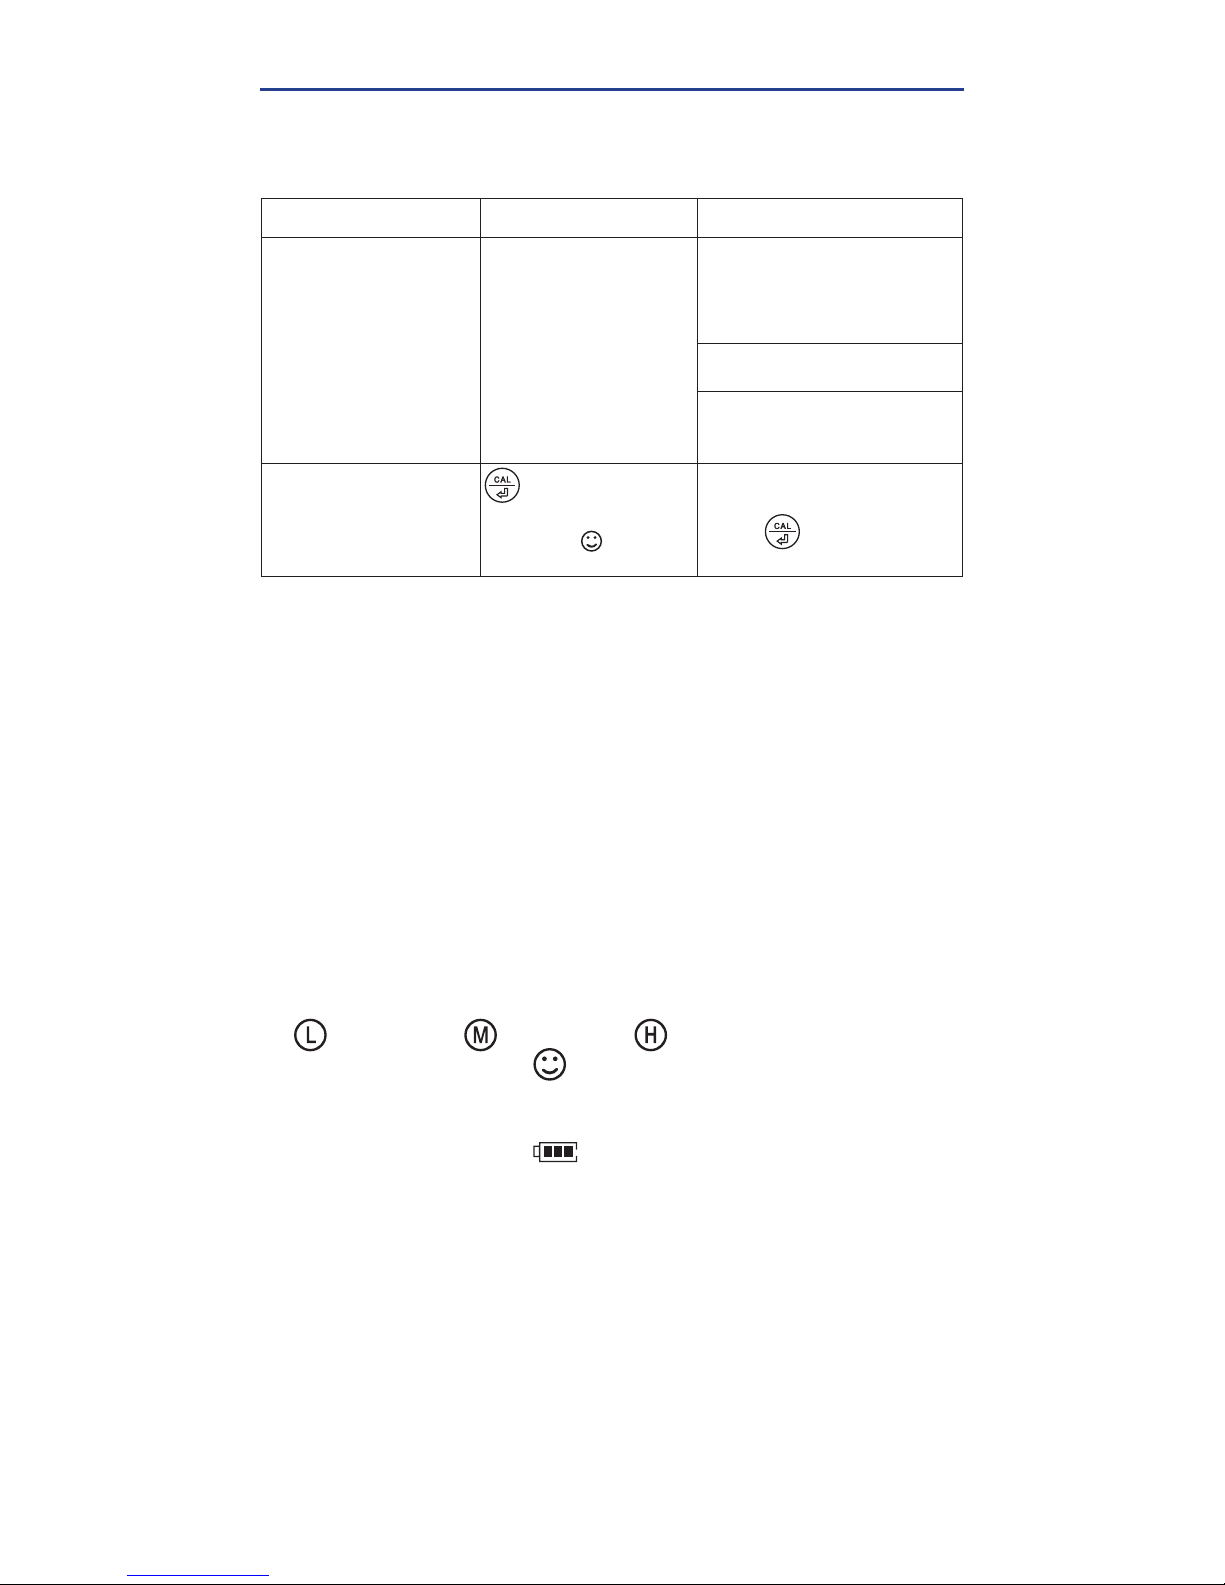
Subject Cause Solution
“ER1” on pH+ LCD
(DISPLAY)
Wrong calibration
solution or the
range of calibration
solution exceeds
standards
Check if calibration
solution is correct
(1st pH calibration must
be pH 7.00)
1
Check if probe is
damaged
Check if there is any air
bubble in the pH glass
bulb
2
“ER2” on pH+ LCD
(DISPLAY)
is pressed
before measurement
is stable ( comes
up and stays)
Wait for the smile icon to
come up and stay, then
press
1
The 1st point calibration must be in pH 7.00 buffer. Perform the
2nd point calibration (pH 4.00) immediately after the 1st point.
Do NOT turn off the meter before you conduct the 2nd point
calibration. If the meter is turned off after the 1st point calibration
the calibration process must be repeated. Calibrating directly in
pH 4.00 after turning the meter off and back on will cause Er1.
2
If you fi nd air bubbles in the pH glass bulb, shake the probe a few
times in an upward/downward motion to remove the bubbles. If
air bubbles are attached to the outside of the glass bulb, swirl the
probe in the solution to remove them. Air bubbles in the glass bulb
will cause unstable measurements.
ICONS AND SPECIAL FUNCTIONS
1. Calibration points indication:
(4.00pH)
(7.00pH)
(10.00pH)
2. Stable Measurement:
3. Reading value Auto Lock: HOLD
4. Self-Diagnostic Information: Er1, Er2
5. Low-Battery warning: fl ashes, replace battery
6. Two-Color backlight:
Blue—Measurement Mode;
Green—Calibration Mode;
7. Auto. Power off in 8 minutes if no operation.
Page 8
8
©2018, Industrial Test Systems, Inc. Printed in USA
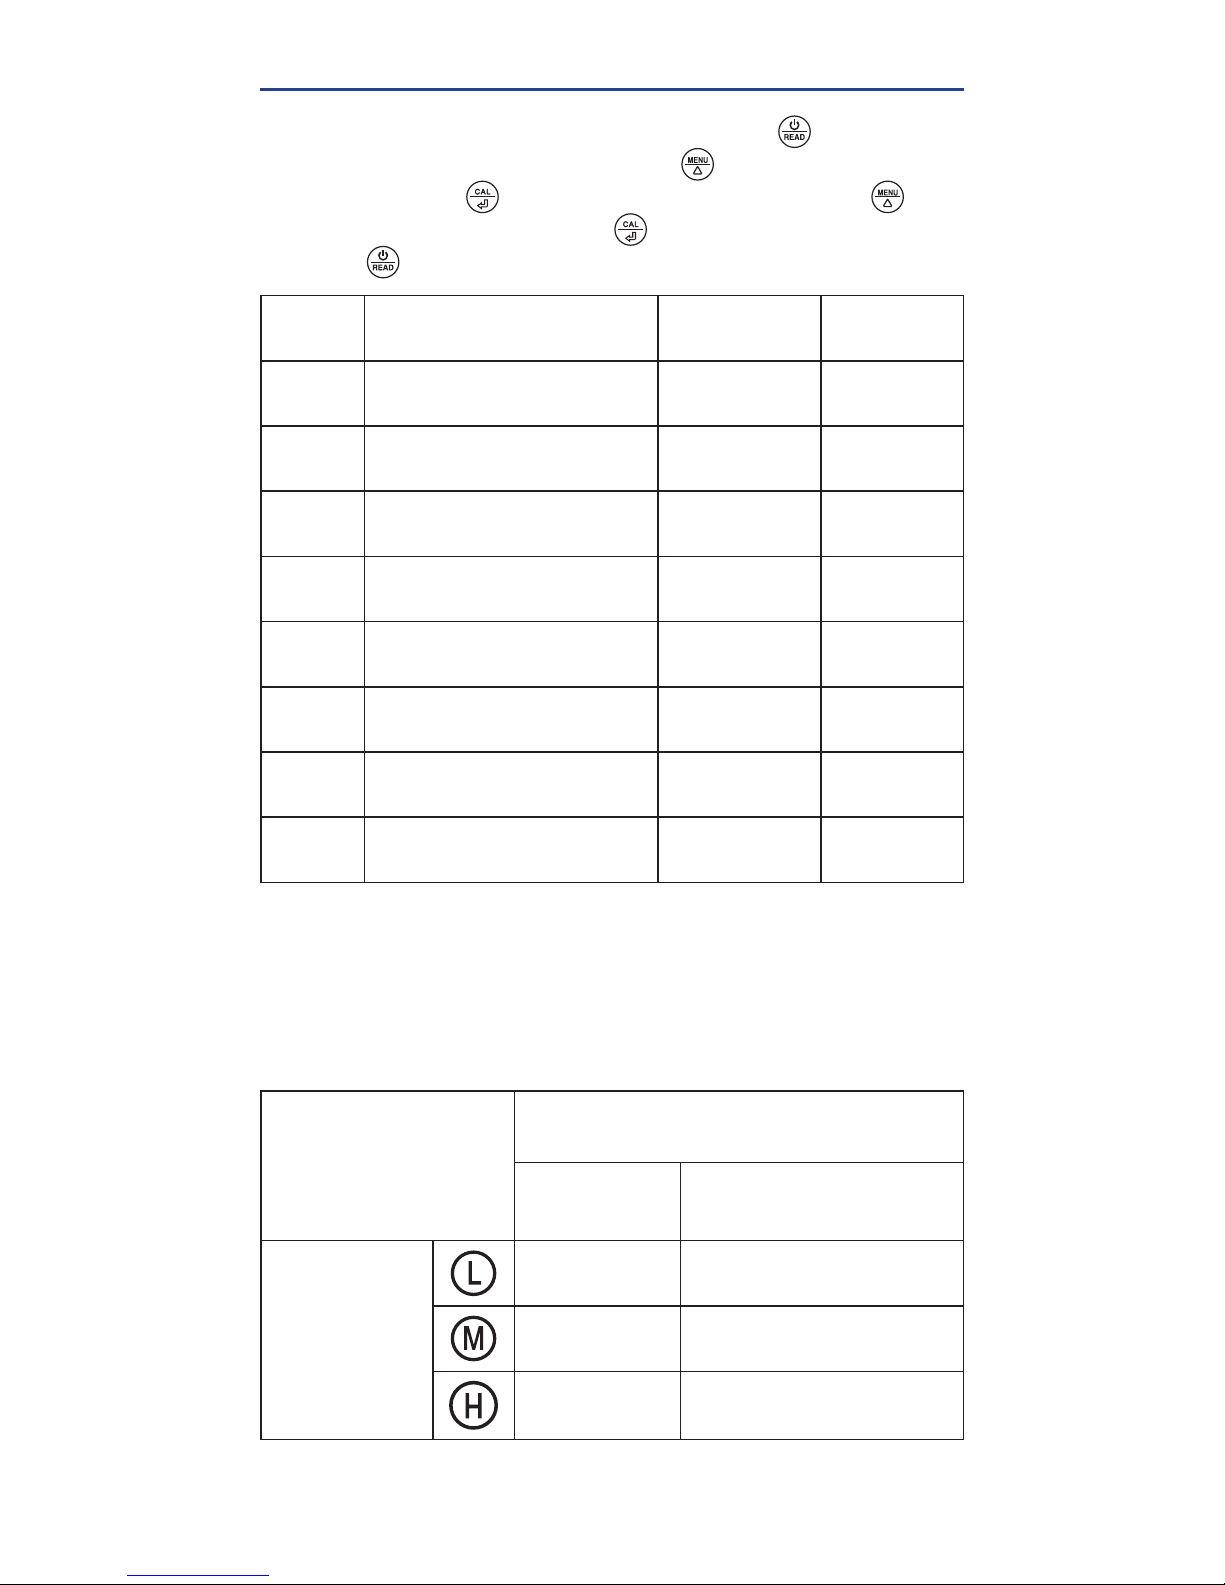
PARAMETER SETTINGS
Symbol
Parameter Setting
Contents
Code
Factory
Default
P1
Select pH buffer standards USA - NIST USA
P2
Select automatic lock Off - On Off
P3
Select backlight Off - 1 - On 1 (auto)
P4
Temperature
compensation factor
0.00 - 4.00% 2.00%
P5
TDS factor 0.40 - 1.00 0.71
P6
Salinity unit ppt - g/L ppt
P7
Select temperature unit °C - °F °F
P8
Back to factory default No - Yes No
When pH+ meter is turned off, press and hold button to
enter Parameter Setting. Then, press to cycle through
P1-P2…P8. Press , parameter starts to fl ash. Press to
choose parameter. Next, press to confi rm. Lastly, press
and hold to turn off meter.
P1 Select standard pH buffer solution: There are two options for
standard buffer solutions, the USA series or the NIST series. Refer
to following chart:
Icons
pH Standard Buffer
Solution Series
USA Series
(pH)
NIST Series
(pH)
Three-point
Calibration
1.68 and 4.00 1.68 and 4.01
7.00 6.86
10.01 and
12.45
9.18 and 12.45
Page 9

9
exactph.com
PARAMETER SETTINGS
P2 Automatic lock: “ON” is preferred
Select “On” to activate the auto-lock function. When the reading
is stable for more than 10 seconds, the tester will lock the value
automatically, and the HOLD icon will display on the LCD. Press
the
key to cancel auto hold. When auto-lock is off, take the
reading when the number on screen is stable for 10 seconds while
the stable icon
is present.
P3 Backlight: “1” is preferred
“Off”-turn off backlight
“On”-turn on backlight
“1”- backlight will last for 1 minute
P4 Temperature Compensation Factor: “2.00%” is default
See chart on
page 16 for examples of temperature compensation
factors for various solutions.
P5 TDS Factor: “0.71” is default
This factor can be modifi ed for the different types of minerals and
salts dissolved in the water sample.
P6 Salinity Unit: “ppt” is default
Can be changed to “mg/L” by preference.
1,000 mg/L = 1 ppt
P7 Temperature Scale: “°C” is default
Can be changed to “°F” by preference.
P8 Factory default setting:
Select “Yes” to reset instrument calibration to the initial theoretical
value (pH value in zero potential is 7.00, slope is 100%). This
function can be used when the instrument does not work well in
calibration or measurement. Calibrate and measure again after
returning the instrument to factory default status.
Page 10
10
©2018, Industrial Test Systems, Inc. Printed in USA
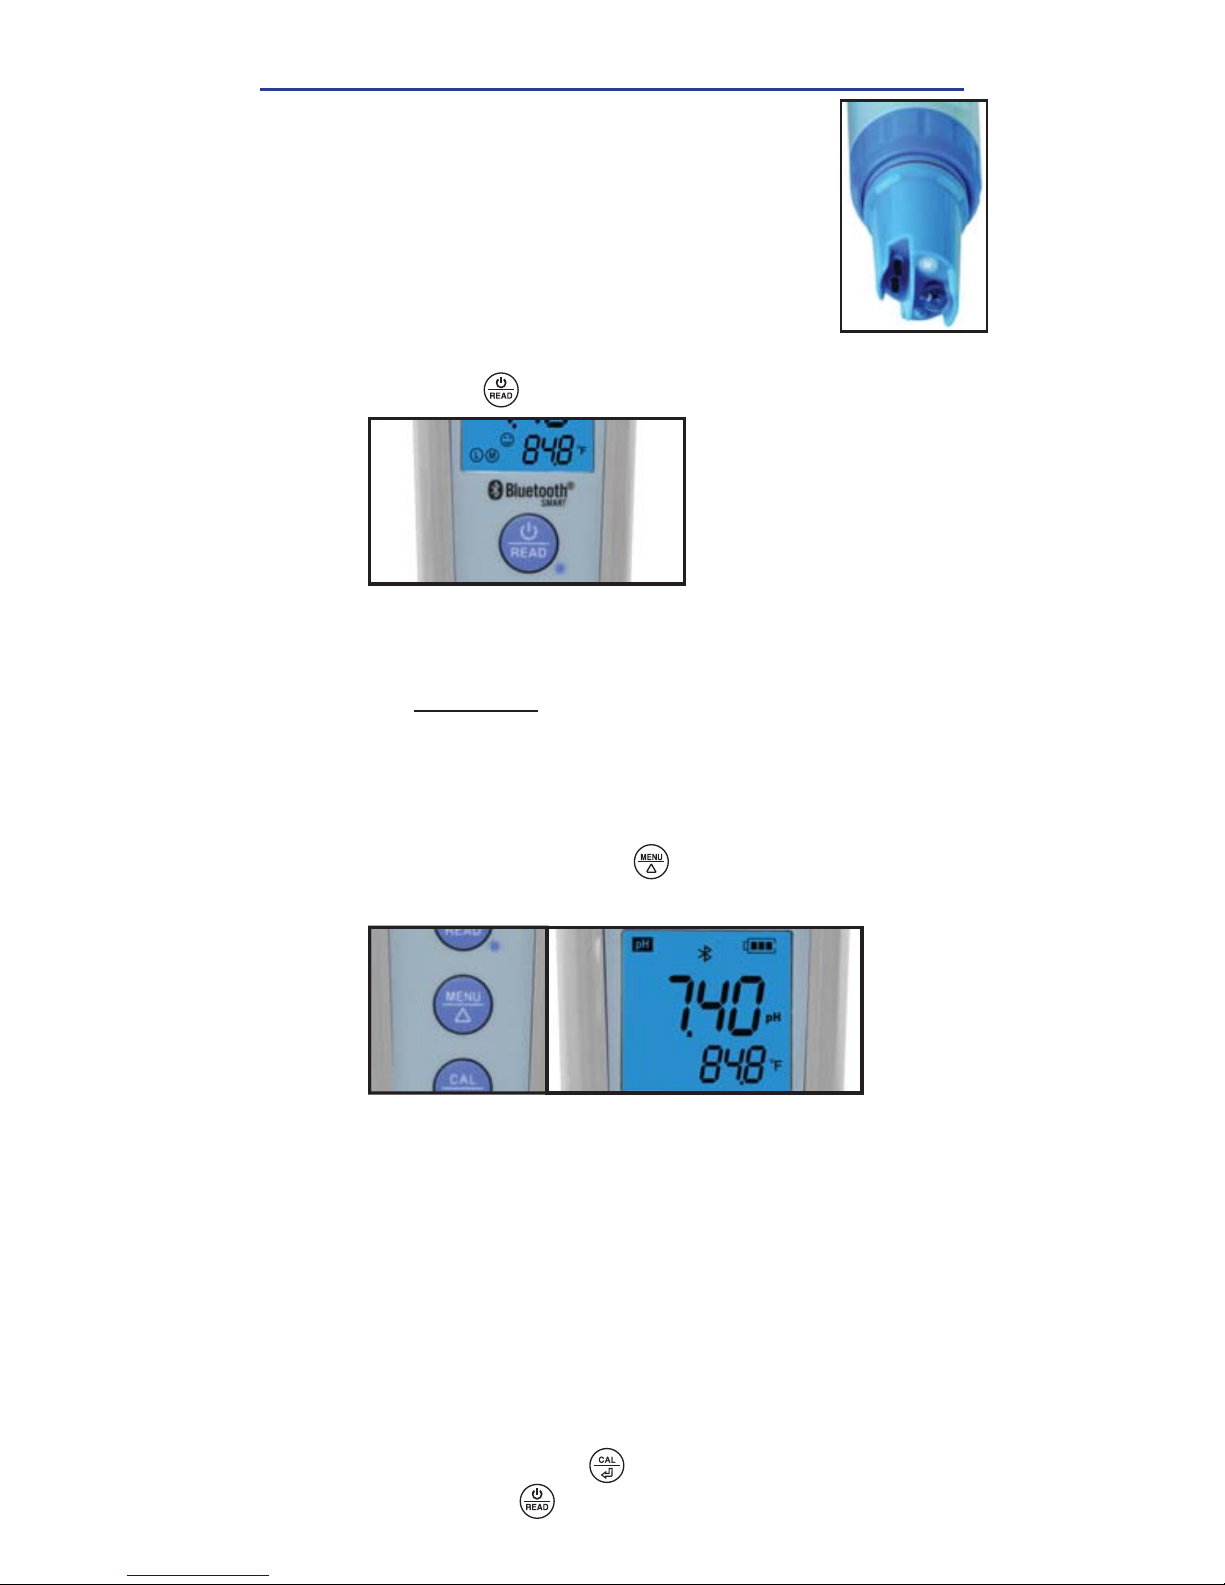
PH CALIBRATION PROCEDURE
POWER ON METER
Press the button to turn on the meter.
1
RINSE PH PROBE
Remove Probe/Storage Cap and rinse the pH probe
with clean water and blot pH probe with soft paper
towel or cloth to remove excess water
(never rub or
touch the pH glass bulb)
.
2
SELECT MENU
Press and re-press the button to select the pH
test parameter.
3
1-POINT, 2-POINT CALIBRATION
Pour 7.00 pH and 4.00 pH calibration solutions
into separate calibration bottles. Pour enough to
completely immerse the sensors into the solution.
4
ENTER CALIBRATION MODE
Press and hold the button to enter calibration
mode (press to exit).
5
Things needed in addition to what’s in the kit:
A clean plastic cup, clean water (distilled, deionized,
or purifi ed bottled water) for rinsing (16oz), and soft
paper towels for drying the probe. Ensure pH probe
is securely installed (see image at right). If not, see
page 6 for Probe Replacement.
Page 11
11
exactph.com
PH CALIBRATION PROCEDURE
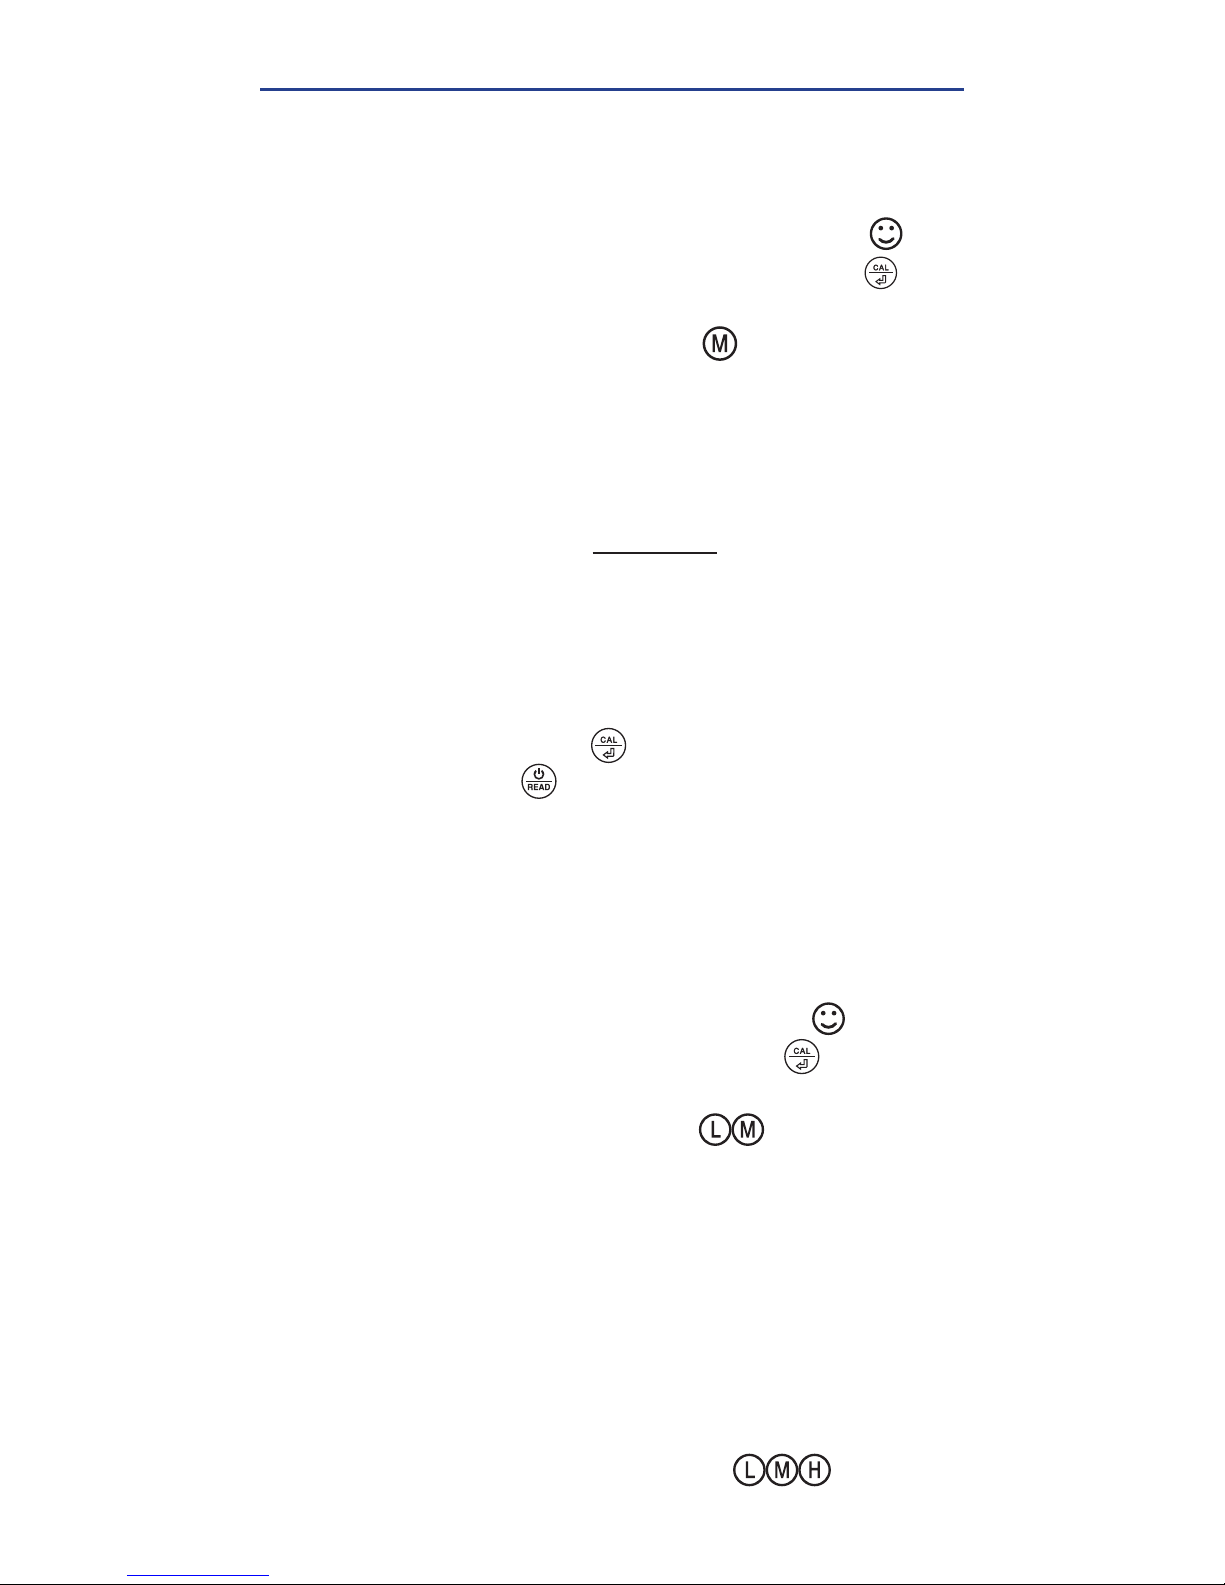
ENTER CALIBRATION MODE
Press and hold the button to enter calibration
mode (press to exit).
8
RINSE METER SENSORS
Rinse the sensors in clean water and blot dry
(never
rub or touch the pH glass bulb)
.
7
RUN 1
ST
CALIBRATION
Dip the meter in 7.00 pH calibration solution, stir
gently, and allow the probe to sit in the solution
until a stable reading is reached. When the
stable icon appears on the LCD, press the key to
complete one-point calibration. The meter returns to
measurement mode and the
icon will appear at
the bottom left of the LCD.
6
RUN 2ND CALIBRATION
Dip the meter in 4.00 pH calibration solution, stir
gently, and allow the probe to sit in the solution until
a stable reading is reached. When the stable
icon appears on the LCD, press the key to
complete one-point calibration. The meter returns to
measurement mode and the icons will appear
at the bottom left of the LCD.
9
RUN 3RD CALIBRATION (OPTIONAL)
If necessary, rinse the probe in distilled water, blot it
dry, enter calibration mode, and then dip the meter
in 10.01 pH buffer solution (not supplied in kit and
sold separately). Repeat as in step 8 to complete
the 3rd point of calibration. The icons will
appear at the bottom left of the LCD.
10
Page 12
12
©2018, Industrial Test Systems, Inc. Printed in USA
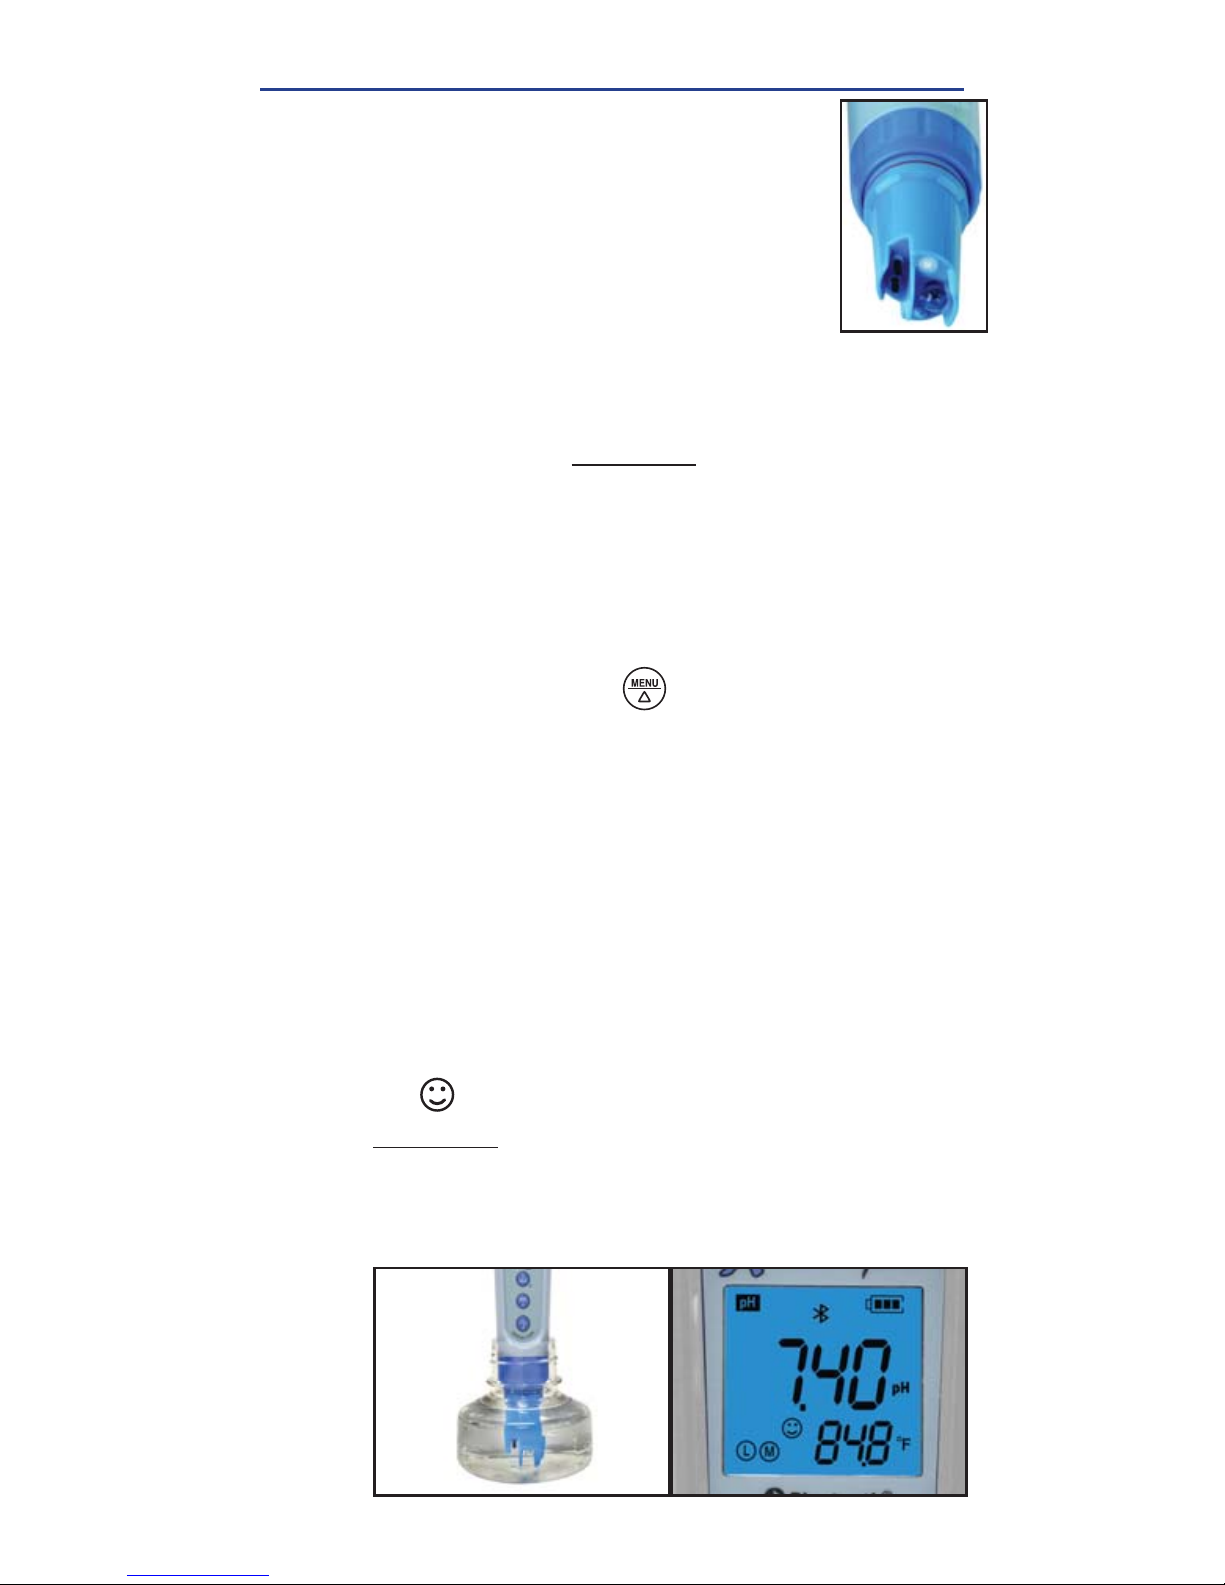
PH TEST PROCEDURE
RINSE PH PROBE
Remove Probe/Storage Cap and rinse
the pH probe with clean water and blot
pH probe with soft paper towel or cloth
to remove excess water
(never rub or
touch the pH glass bulb)
.
1
TEST
Fill Sample Collection Bottle with sample to be tested.
Submerge the probe in the sample and stir gently.
Then allow to sit in the bottle.
3
SELECT MENU
Press and re-press the button until pH appears in
the top left corner of the display.
2
Things needed in addition to what’s in the kit:
Clean sample collection bottle (provided), clean water
(distilled, deionized, or purifi ed bottled water) for rinsing
(16oz), and soft paper towels for drying the probe.
Ensure pH probe is securely installed (see image at
right). If not, see page 6 for Probe Replacement.
READ RESULTS
The stable icon comes up, rinse the probe with
clean water and return it to the included storage
solution or to pH 4 buffer. NOTE: If using the eXact
iDip® app, press the Save Result button at the top of
the Bluetooth Test page to store the displayed result.
4
Page 13
13
exactph.com
PH CALIBRATION NOTES
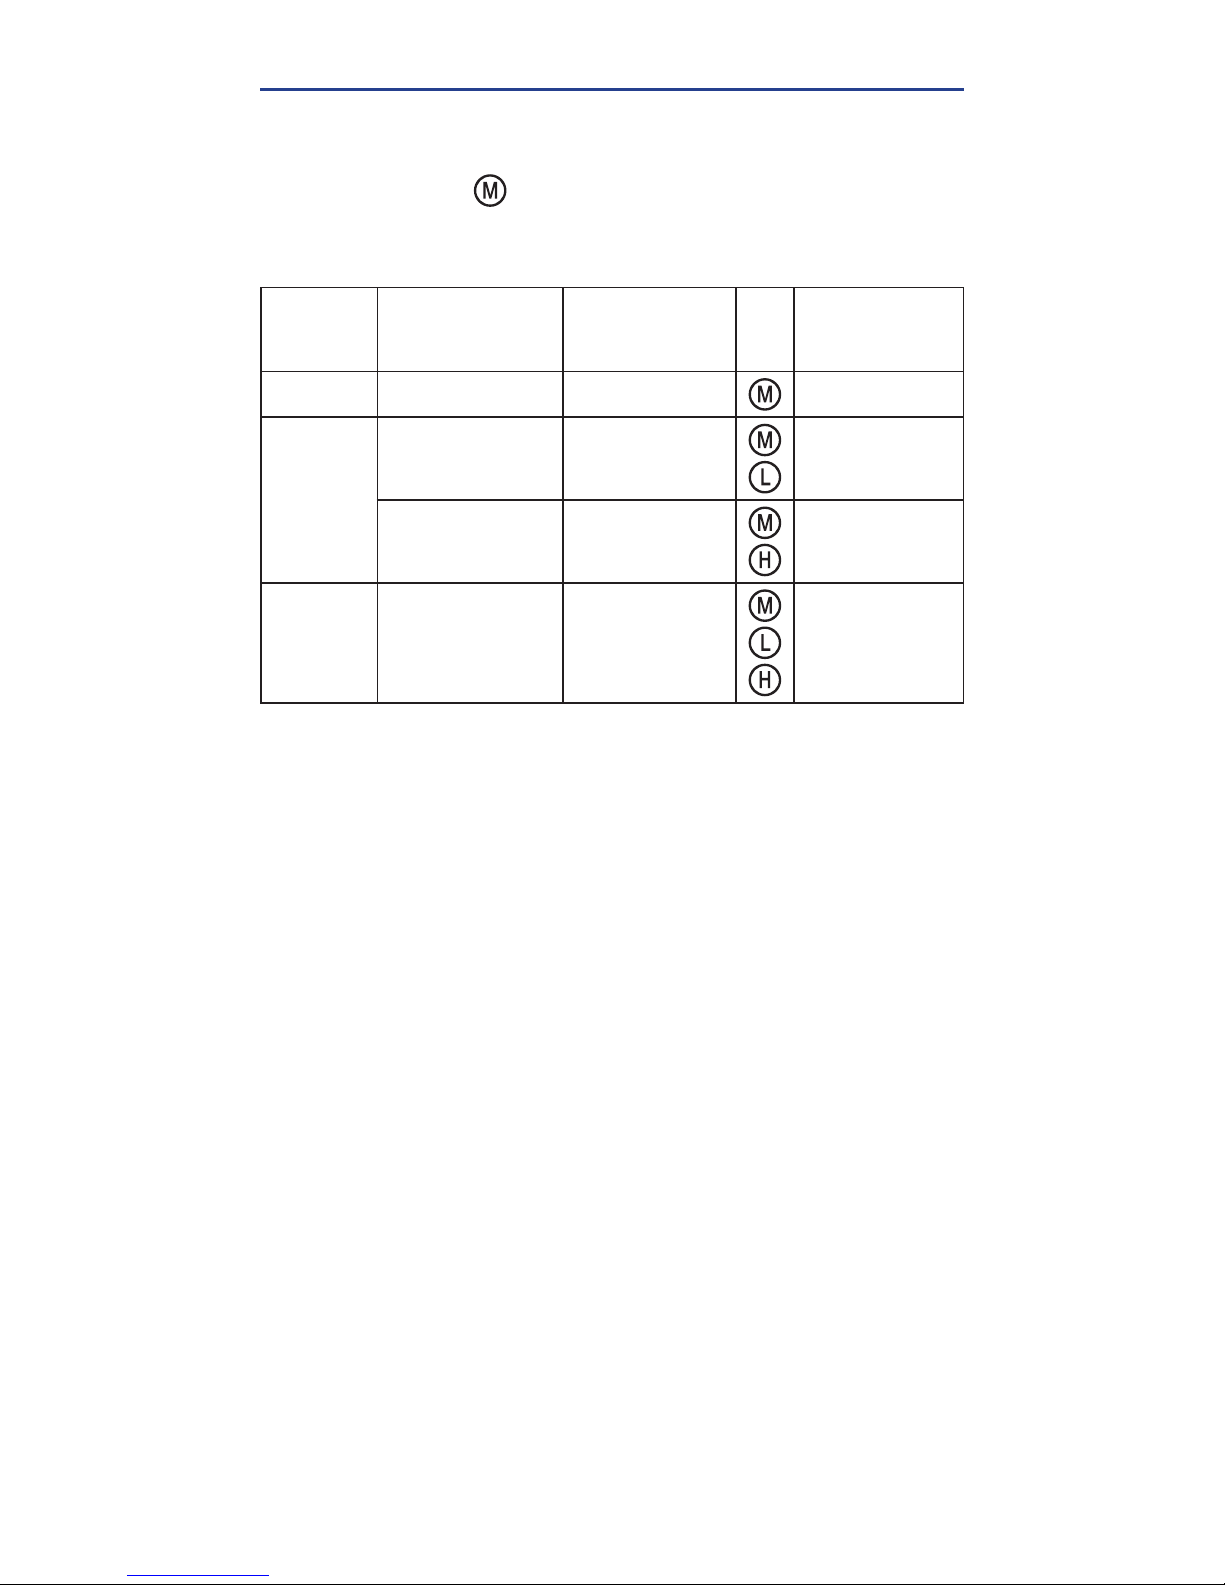
• The meter will automatically recognize 5 types of pH buffer
solution (see USA/NIST series list below). Users can perform
1-point, 2-point (recommended), or 3-point calibration.
• Perform one-point
calibration (7.00 buffer) fi rst before
proceeding to two-point and three-point calibration.
• Use pH buffers for two-point and three-point calibration as in the
table below:
• To maintain the accuracy of the pH buffer standards, replace them
after fi ve (5) uses. To prevent contamination, NEVER pour used pH
Buffer solutions back into the original pH Buffer solution bottles.
• This pH probe was not designed to give accurate readings for
distilled or deionized water There are not enough ions present in
these waters for accurate detection.
• When testing purifi ed water like spring water or drinking water, it
will take longer for the readings to stabilize (typically 3-5 minutes)
because there are low levels of ions for the sensor to detect.
• DO NOT store the pH probe in distilled water. This will cause
permanent damage to the probe.
• pH Buffers for calibration should be selected based on
the measurement. 2-point (7.00 and 4.00) Calibration is
recommended for most applications.
• Avoid cross-contaminating the pH buffers. Rinse the pH probe
and blot excess water after each measurement.
• Do not rub or touch the pH glass bulb!
Important Operation Note: the eXact pH+ Smart Meter was especially
engineered/designed for the nontechnical service person who requires
a quick and accurate (within ±0.05) on-site pH measurement. The test
methodology, if followed carefully, is this:
Perform 2-point calibration weekly and store pH probe in 4.00 pH Buffer
between measurements. During the week of use, each time you power ON
eXact pH
+
meter, the pH should display between 3.97 and 4.03. This verifi es
the meter is still maintaining calibration. When display is <3.97 or >4.03.
discard the solution and pour a fresh pH 4.0 buffer solution and check
display again. Remove Probe Storage Cap and set aside with pH 4.00
Buffer solution. Rinse the pH probe with clean water, then proceed to pH
measurement. More frequent calibrations may be needed if testing solutions
in extreme temperatures or substantial changes in pH such as from 10 to 4.
Calibration
USA Series
(pH)
NIST Series
(pH)
LCD
Icon
Recommended
Accuracy and
Range (pH)
1-point
(1) 7.00 (1) 6.86
Accuracy ≥ 0.1
2-point
(1) 7.00
(2) 4.00 or 1.68
(1) 6.86
(2) 4.01 or 1.68
Measurement
Range <9.00
(1) 7.00
(2) 10.01 or 12.45
(1) 6.86
(2) 9.18 or 12.45
Measurement
Range >9.00
3-point
(1) 7.00
(2) 4.00 or 1.68
(3) 10.01 or 12.45
(1) 6.86
(2) 4.01 or 1.68
(3) 9.18 or 12.45
Custom
Measurement
Range
Page 14
14
©2018, Industrial Test Systems, Inc. Printed in USA
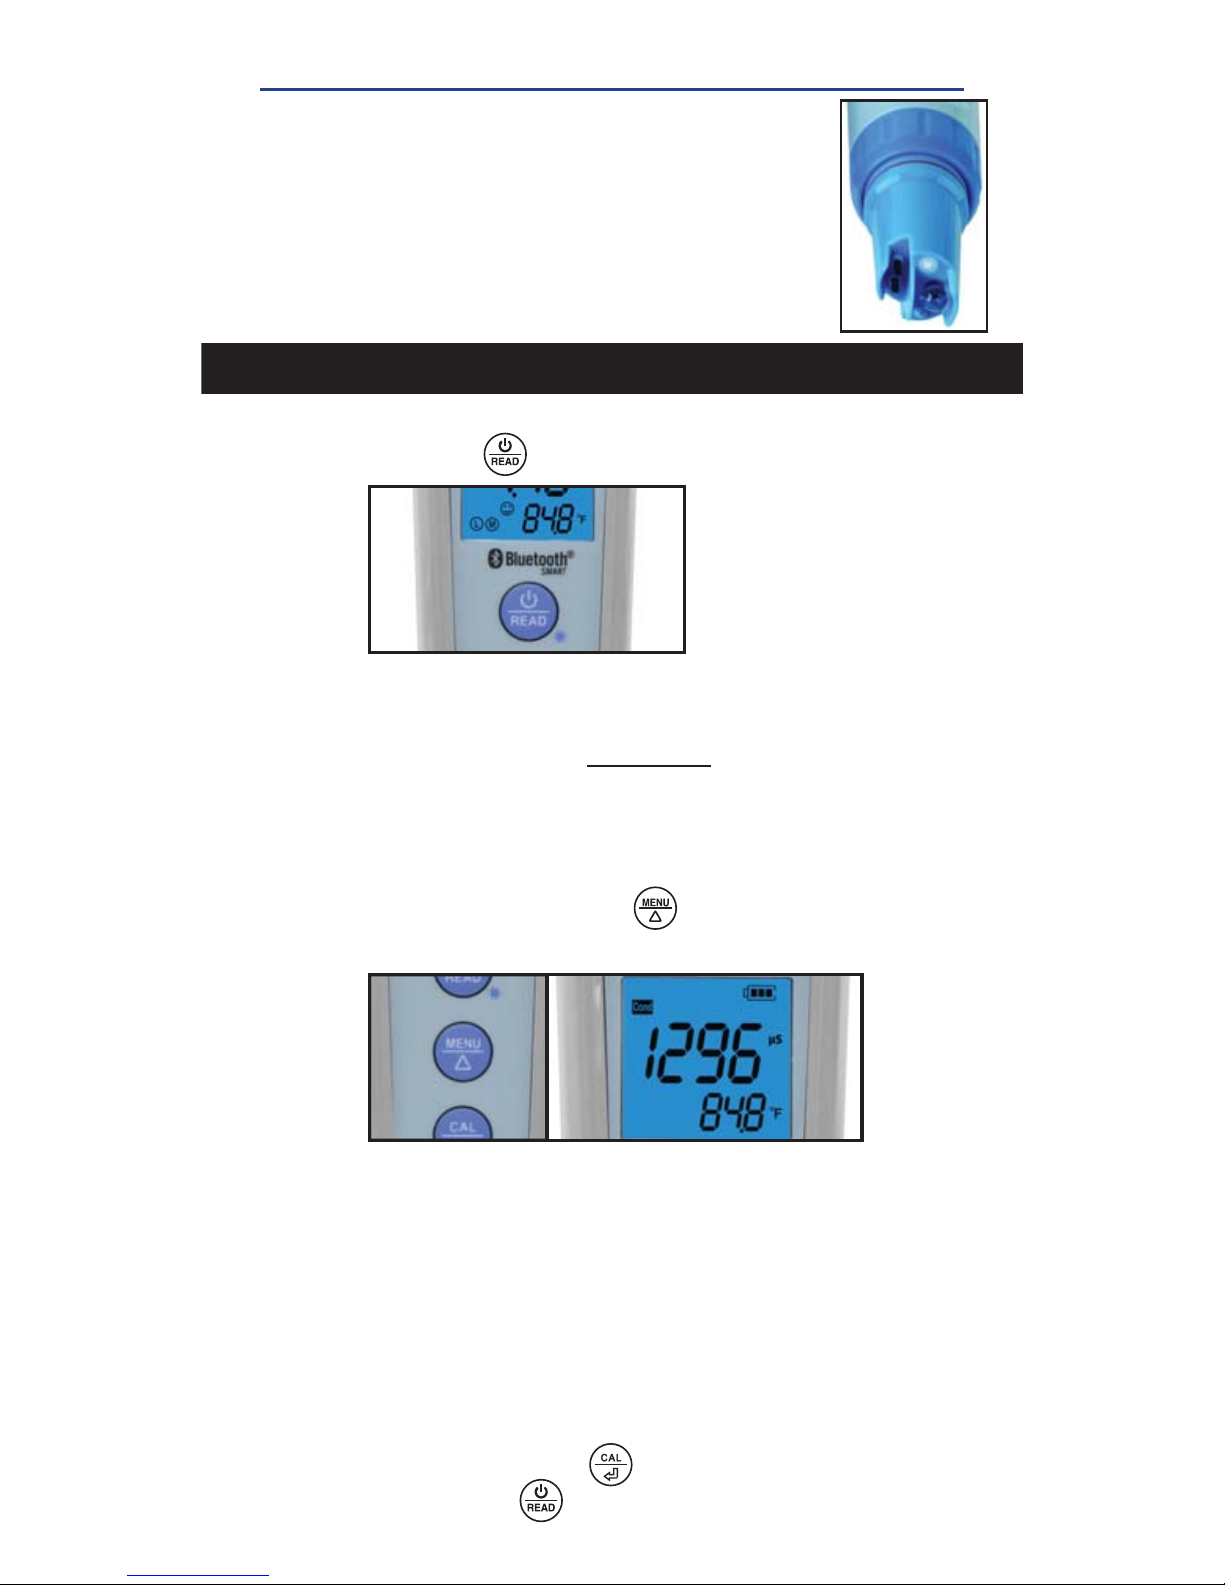
RINSE METER SENSORS
Rinse the sensors in clean water and blot dry
(never
rub or touch the pH glass bulb)
.
2
CONDUCTIVITY PROCEDURES
CALIBRATION PROCEDURE
POWER ON METER
Press the button to turn on the meter.
1
SELECT MENU
Press and re-press the button to select the
conductivity test parameter.
3
CALIBRATION SOLUTION
Pour 1413μS/cm and 12.88 mS/cm conductivity
calibration solutions into separate calibration bottles.
Pour enough to completely immerse the sensors into
the solution.
4
ENTER CALIBRATION MODE
Press and hold the button to enter calibration
mode (press to exit).
5
Things needed in addition to what’s in the kit:
Clean sample collection bottle (provided), clean water
(distilled, deionized, or purifi ed bottled water) for rinsing
(16oz), and soft paper towels for drying the probe.
Ensure pH probe is securely installed (see image at
right). If not, see page 6 for Probe Replacement.
Page 15
15
exactph.com
CONDUCTIVITY PROCEDURES
RINSE METER SENSORS
Rinse the sensors in clean water and blot dry
(never
rub or touch the pH glass bulb)
.
1
TEST PROCEDURE
VERIFY CALIBRATION
After calibration, dip the meter in 12.88 mS/cm
calibration solution. If the value is accurate, it is not
necessary to conduct a 2nd point calibration. If it is
inaccurate, follow steps 5 to 6 to complete the 2nd point
calibration using the 12.88 mS/cm buffer solution.
8
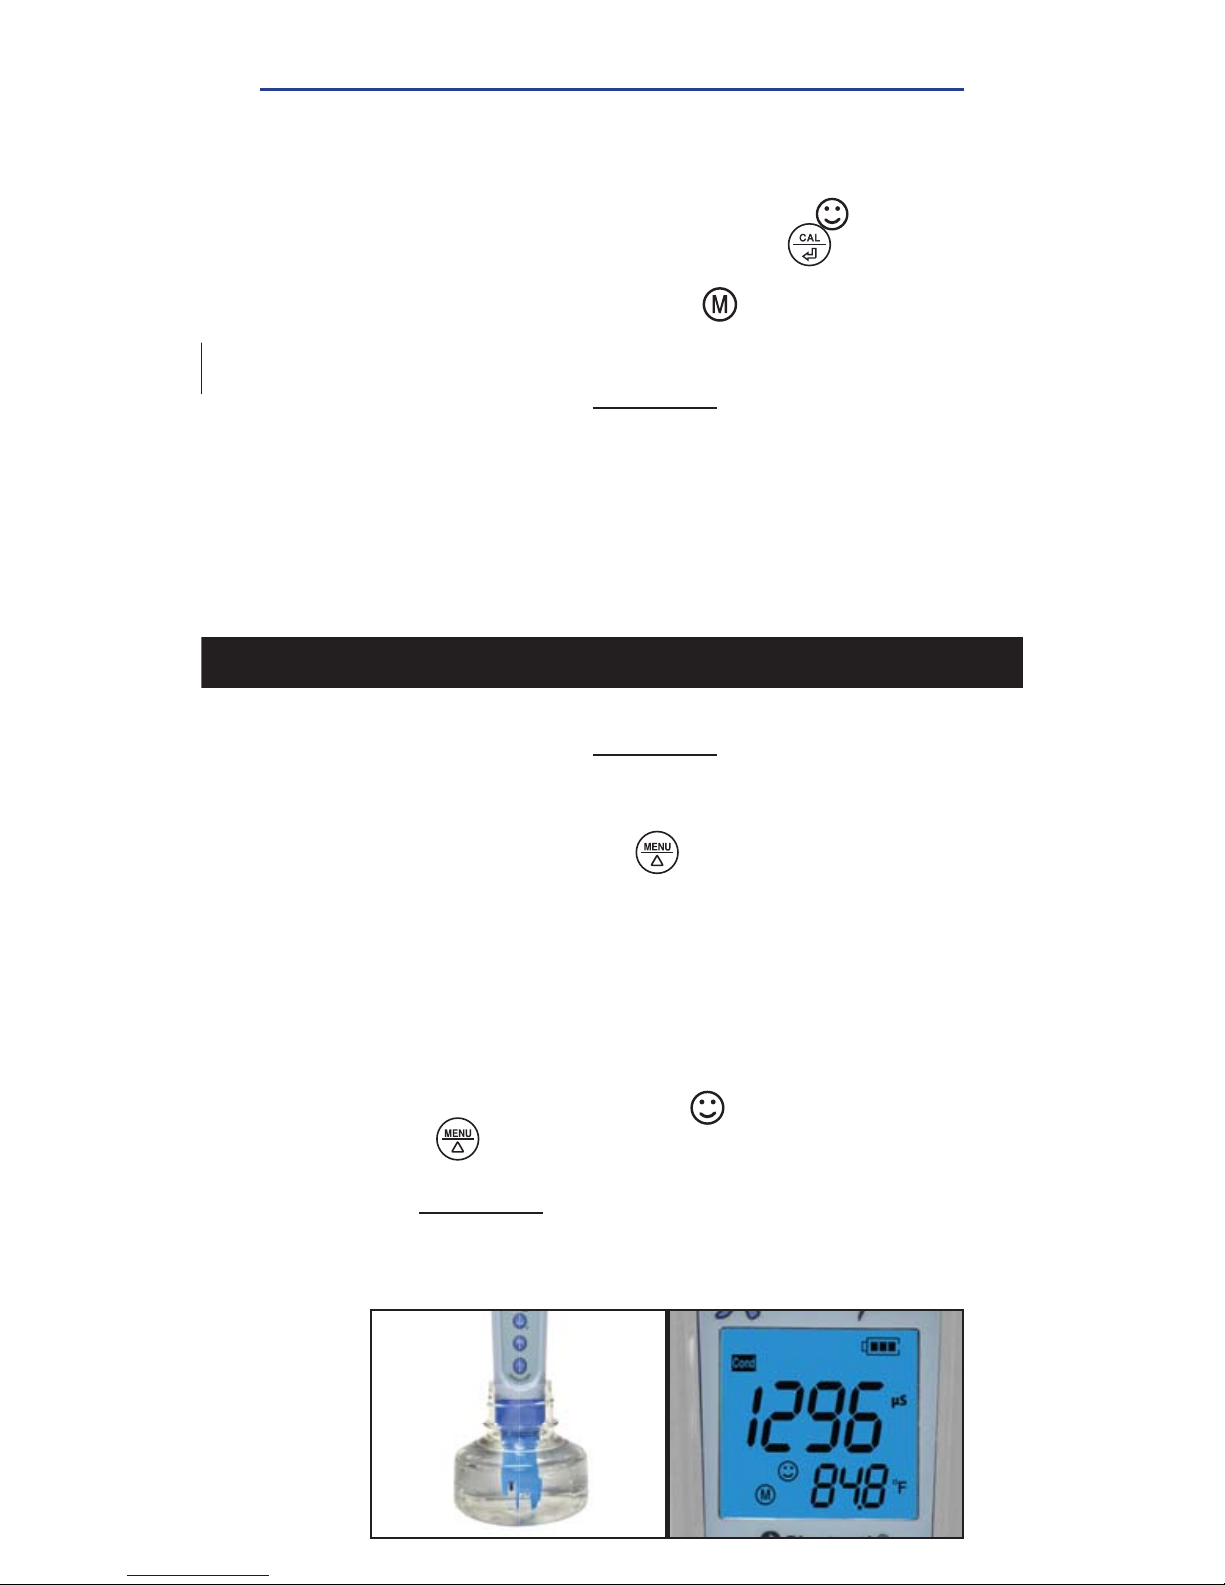
RUN CALIBRATION
Dip the meter in 1413 μS/cm calibration solution, stir
gently, and allow the probe to sit in the solution until
a stable reading is reached. When the
stable
icon appears on the LCD, press the key to
complete one-point calibration. The meter returns to
measurement mode and the icon will appear at
the bottom left of the LCD.
6
TEST
Fill Sample Collection Bottle with sample to be tested.
Submerge the probe in the sample and stir gently.
Then allow to sit in the bottle.
3
SELECT MENU
Press and re-press the button to select until
Cond appears in the top left corner of the display.
2
RINSE METER SENSORS
Rinse the sensors in clean water and blot dry
(never
rub or touch the pH glass bulb)
.
7
READ RESULTS
Record the readings after the stable icon comes up.
Press to switch from Conductivity to TDS and
Salinity. When fi nished with readings, rinse the probe
with clean water and return it to the included storage
solution or to pH 4 buffer. NOTE: If using the eXact
iDip® app, press the Save Result button at the top of the
Bluetooth Test page to store the displayed result.
4
Page 16
16
©2018, Industrial Test Systems, Inc. Printed in USA
• The TDS and Salinity measurements are calculated from the
conductivity measurements by using conversion factors.
•
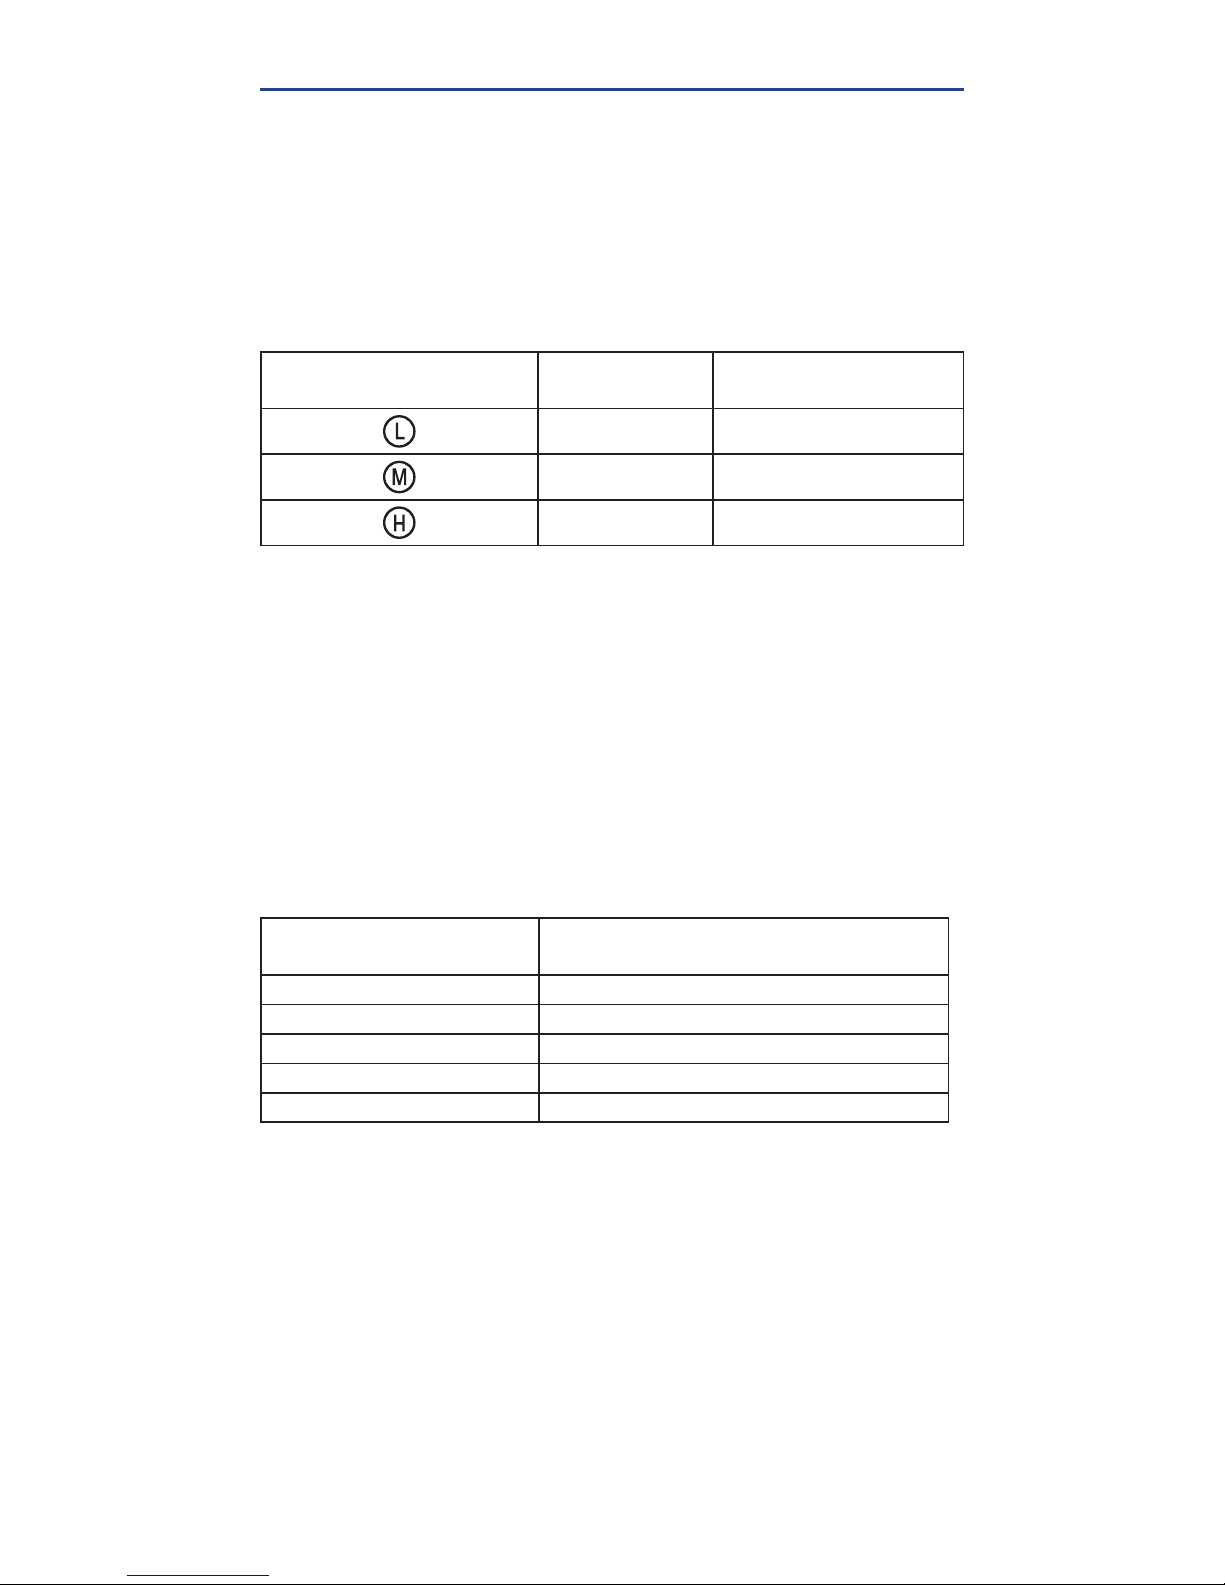
The meter can recognize 84μS, 1413 μS/cm and 12.88 mS/cm
conductivity calibration solutions. The user can conduct 1 to 3 points
calibration. Refer to the table below. Usually calibrating the tester with
1413 μS/cm conductivity buffer solution alone shall meet the testing
requirement. However, we recommend choosing a calibration solution
close to the expected conductivity of your sample.
Calibration indication
Icon
Calibration
Standards
Measuring Range
84μS/cm 0 - 200 μS/cm
1413 μS/cm 200 - 1999 μS/cm
12.88 mS/cm 2 - 20 mS/cm
•
The tester has been calibrated before leaving the factory. For best
accuracy we recommend testing a conductivity buffer solution
before use. If the error is large, then calibration is needed.
• To maintain the accuracy of conductivity calibration solutions, we
recommend replacing the solutions after 3 to 5 uses. To prevent
contamination, Do NOT pour used calibration solutions back into
the original bottles.
• Temperature compensation factor: The default setting of the
temperature compensation factor is 2.0%/°C. Users can adjust the
factor depending on the solution or experimental data (see table
below). Use parameter setting P4 to adjust the factor.
Solution
Temperature
compensation factor
NaCl
2.12%/°C
5% NaOH
1.72%/°C
Dilute ammonia
1.88%/°C
10% Hydrochloric acid
1.32%/°C
5% Sulfuric acid
0.96%/°C
• 1000 ppm = 1 ppt 1000 μS = 1 mS
• TDS and conductivity are linearly related; the conversion factor
ranges from 0.40-1.00. The factory default setting is 0.71. Salinity
and conductivity are also linearly related; the conversion factor
is 0.5. The tester only needs to be calibrated in Conductivity
mode. After calibration for conductivity, the meter can switch from
conductivity to TDS or salinity.
• Conversion Example: if conductivity measurement is 1000μS/
cm, then the default TDS measurement will be 710 ppm (under the
default 0.71 conversion factor), and the salinity will be 0.5 ppt.
• Avoid cross-contaminating the conductivity standard solutions.
Rinse the sensors and blot dry after every measurement.
CONDUCTIVITY TEST NOTES
Page 17
17
exactph.com
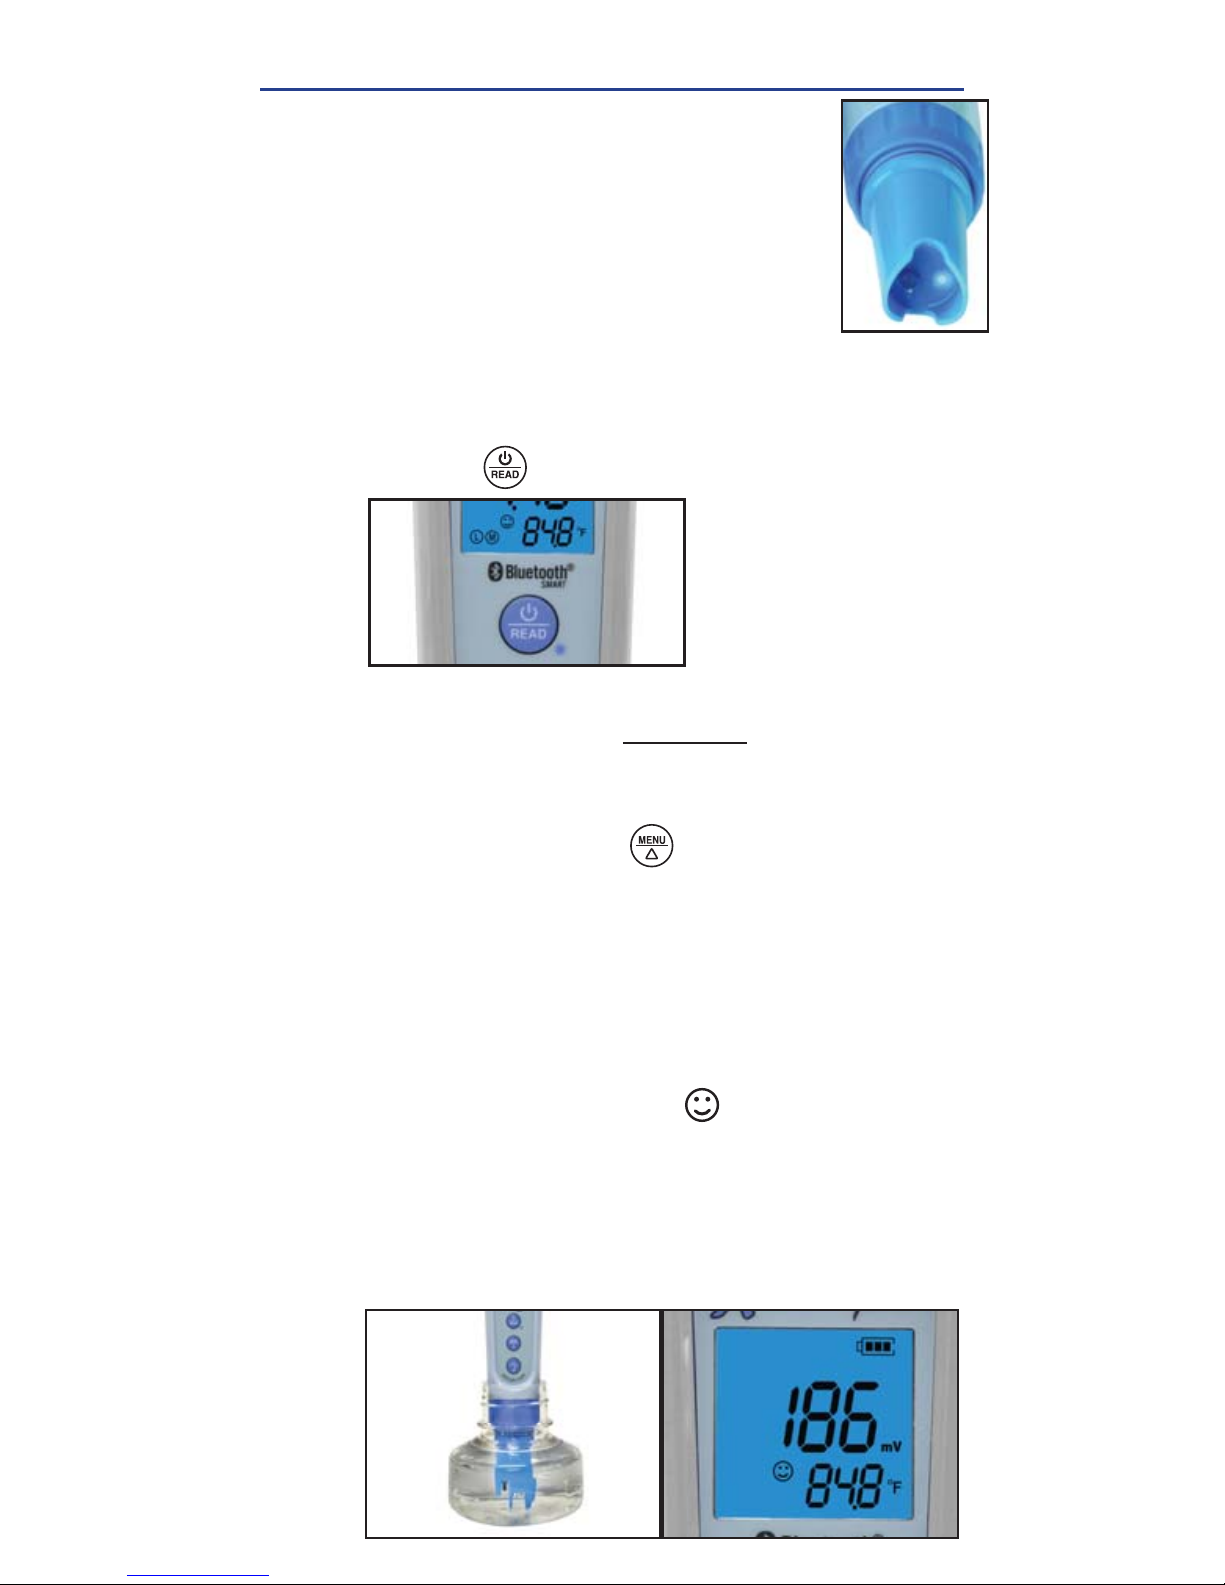
RINSE ORP PROBE
Rinse the ORP probe in clean water and blot dry with
soft paper towel or cloth to remove excess water.
2
SELECT MENU
Press and re-press the button to select the ORP
test parameter (mV unit of measure next to result).
3
ORP TEST PROCEDURE
POWER ON METER
Press the button to turn on the meter.
1
TEST
Fill Sample Collection Bottle with sample to be tested.
Submerge the probe in the sample and stir gently.
Then allow to sit in the bottle.
4
Things needed in addition to what’s in the kit:
Clean sample collection bottle (provided), clean water
(distilled, deionized, or purifi ed bottled water) for rinsing
(16oz), and soft paper towels for drying the probe.
Ensure ORP probe is securely installed (see image at
right). If not, see page 6 for Probe Replacement.
Preparation before use:
Pour enough 3M KCl solution into a small cap to cover the sensors.
Soak the probe for 3-5 minutes in the solution to activate the sensor.
There is no need to activate the sensor if it is used frequently.
READ RESULTS
Record the readings after the stable icon comes
up. When fi nished with readings, rinse the probe with
distilled water and return it to the included storage
solution or to pH 4 buffer. NOTE: If using the eXact
iDip® app, press the Save Result button at the top of
the Bluetooth Test page to store the displayed result.
5
Page 18
18
©2018, Industrial Test Systems, Inc. Printed in USA
USING THE EXACT IDIP® APP
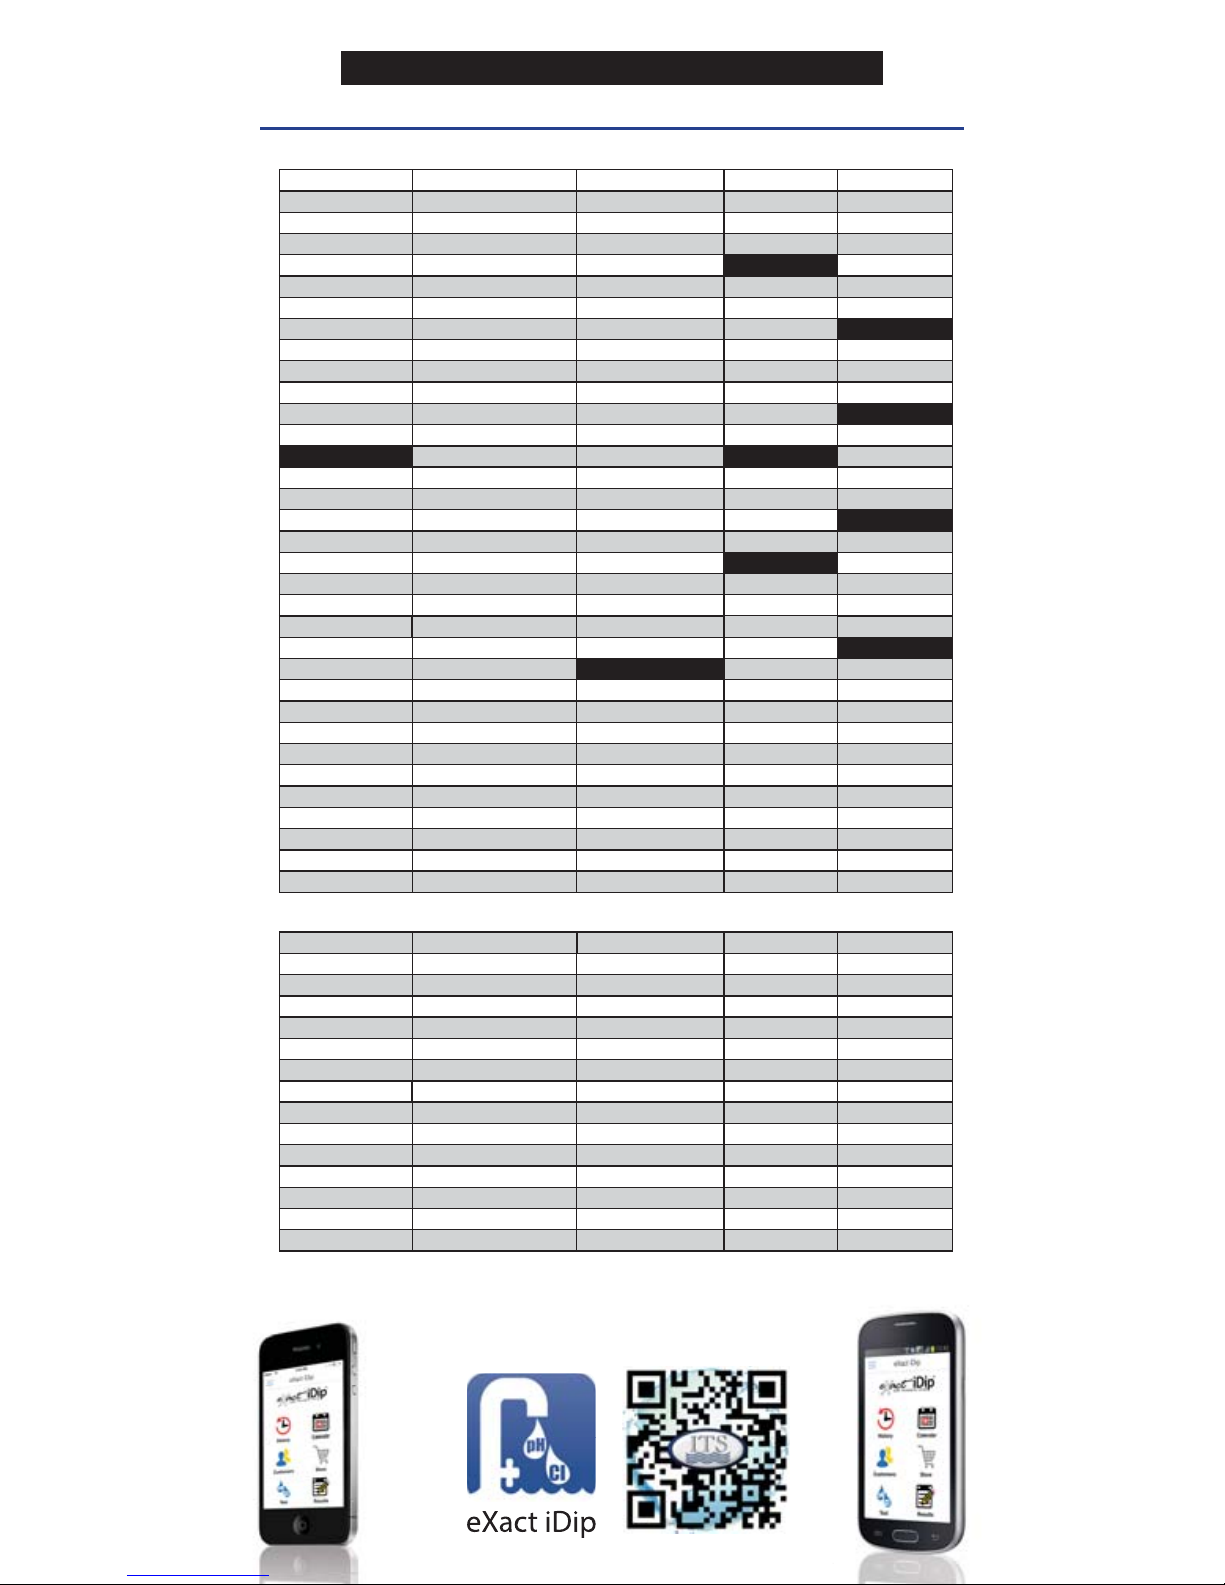
COMPATIBLE SMART DEVICES
SMART PHONE COMPATIBILITY
Updated
04/2017
APPLE SAMSUNG SONY MOTOROLA HTC
iPhone 4s AND UP Galaxy Ace Style Xperia E1 Moto E Desire 610
iPhone SE Galaxy Alpha Xperia M2 Moto G Desire 816
iPod touch 5th AND UP
Galaxy Core II Xperia T2 Ultra Moto X One
Galaxy Core Prime Xperia XA One Max
Galaxy Express J1 Xperia Z
GOOGLE
One Mini
Galaxy Express Prime Xperia Z ULTRA Nexus 4
AND UP
One Mini 2
Galaxy Grand 2 Xperia Z1
Galaxy Grand Duos Xperia Z2
Galaxy Grand Neo Xperia Z3 Pixel MX4
Galaxy J Xperia ZL Pixel V1 MX4 Pro
Galaxy Mega 6.3 Xperia ZR Pixel V2
Galaxy Mega 2 Pixel XL
OPPO
Galaxy S3 Neo A37
LG
Galaxy S4 AND UP
LENOVO
F1S
F70 Galaxy Xcover 3 Vibe X2 R9S
G Pro2 Galaxy Young II Duos Vibe Z2
G2 AND UP Vibe Z2 Pro
XIAOMI
Optimus Exceed 2 Mi Max
Optimus Fuel
ZTE
Mi3
Optimus G (E975)
Nubia X6
Redmi 3
Optimus G Pro
Nubia Z7 Max
Redmi Note (4G)
Optimus L40
Optimus L65
HUAWEI
Optimus L70
MOTOROLA DROID
Ascend Mate 7
Optimus L80 Maxx
Ascend P7
Optimus L90 Mini
Ascend P8
Optimus Zone 2 Razr HD
Honor 3C (4G)
Volt Razr HD Maxx
Honor 6
Razr M Honor 6 Plus
Turbo
Ultra
TABLET COMPATIBILITY
APPLE SAMSUNG LG SONY GOOGLE
iPad (3rd) Galaxy Note 10.1 G Pad Xperia Tablet Z Nexus 7 (2013)
iPad (4th) Galaxy Note 3 Neo Xperia Tablet Z2 Nexus 9
iPad Air
Galaxy Note 3 Neo Duos
iPad Air 2 Galaxy Note 4
iPad Pro Galaxy Note 8.0
iPad Mini Galaxy Note II
iPad Mini 2 Galaxy Note II Duos
iPad Mini Retina Galaxy Note III
iPad Mini 4
Galaxy Note III Round
Galaxy Note Pro
Galaxy Tab 3 V
Galaxy Tab 4
Galaxy Tab Pro
Galaxy Tab S
This list is current as of June, 2018. To view the most up-to-date list of compatible
devices, please visit
sensafe.com/idip-compatible-devices.
VIEW INSTRUCTIONAL VIDEO
©
evices, please
Page 19
19
exactpH.com
USING THE EXACT IDIP® APP
BLUETOOTH® SMART TECHNOLOGY
Bluetooth® SMART is a low-power networking standard
which uses short radio waves to allow electronic devices
to communicate with each other wirelessly. The eXact® pH+
comes standard with the latest Bluetooth® 4.0 technology
(bluetooth.com/Pages/Bluetooth-Smart.aspx). It is a class
2 device with a wireless working distance of up to 30 feet
(10 meters) and a 2.1 Mbps data transfer rate. This allows a
seamless transfer of data between a smart device and the
eXact
®
pH+.
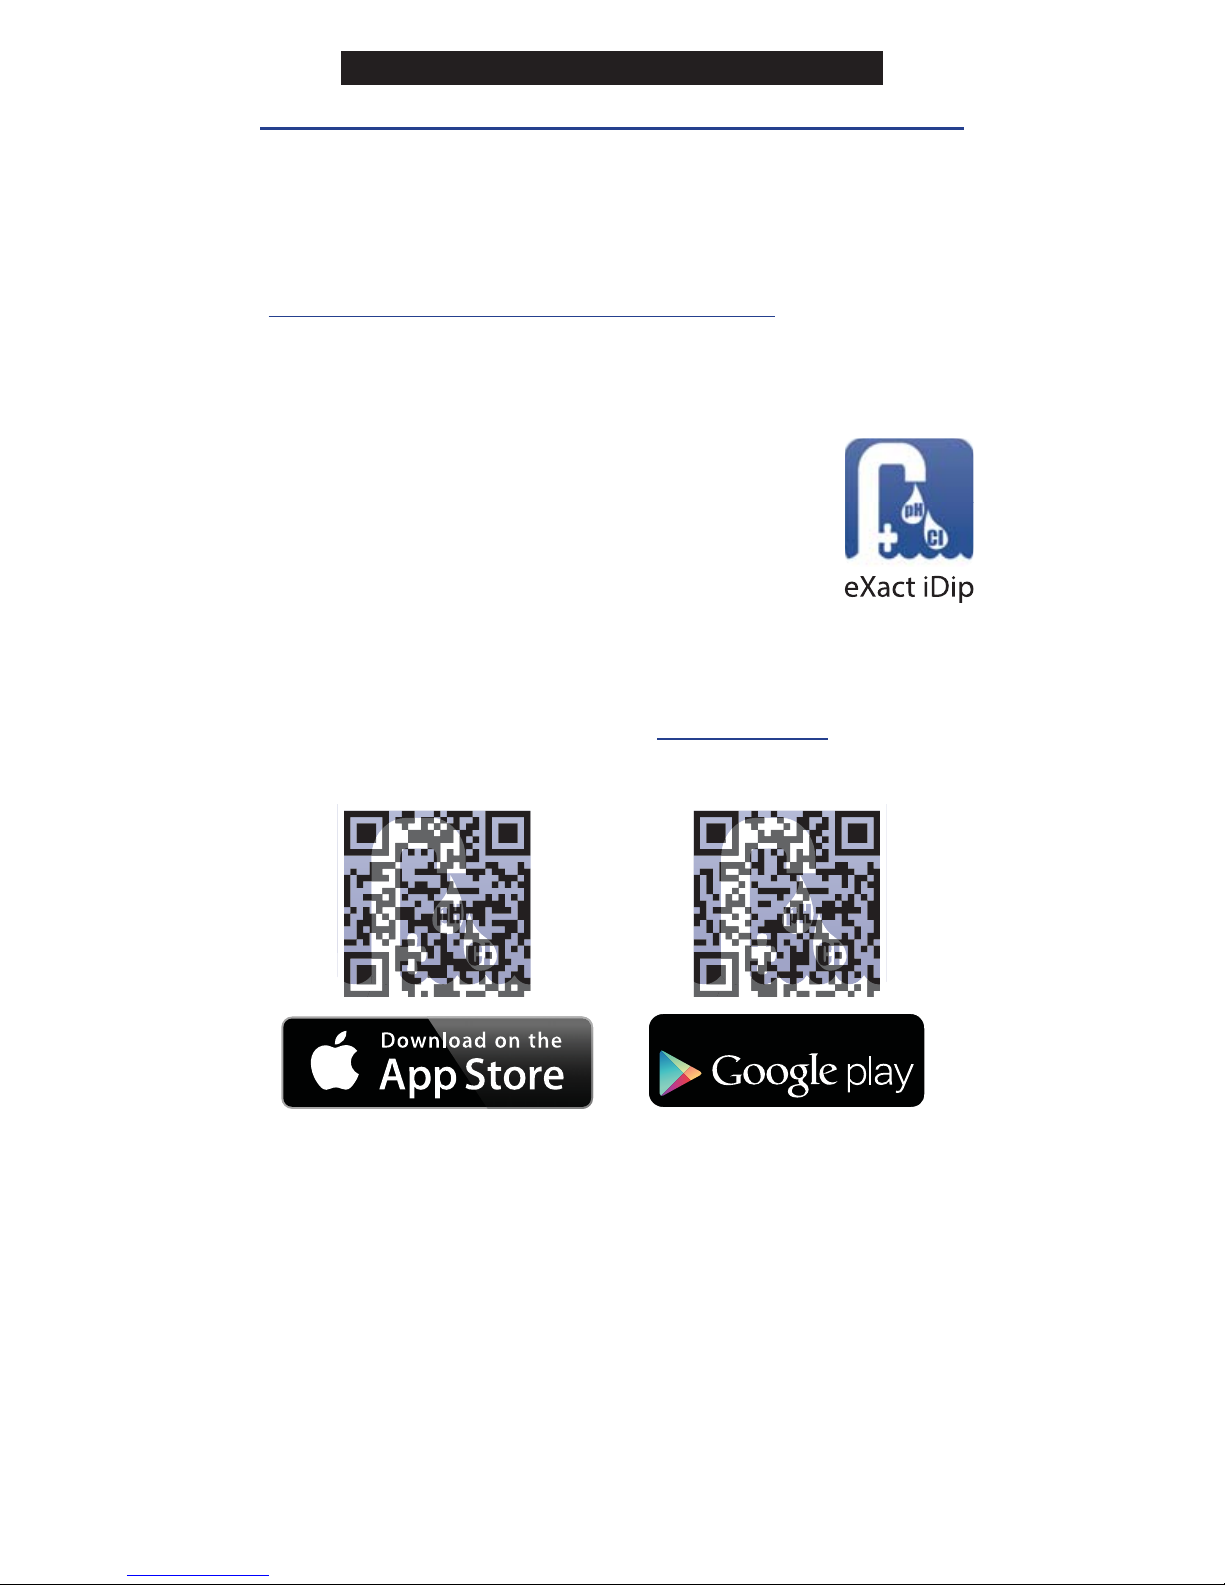
DOWNLOAD THE APP
Using your Smart Device, download the
eXact iDip
®
app. Download the latest update
to ensure you are using the current version
with up-to-date features. To see if your smart
device is compatible, visit
sensafe.com/idip-compatible-devices.
We are constantly improving the eXact iDip
®
app and
welcome your suggestions. Visit
exactidip.com or e-mail
ALLOW ACCESS
Upon opening, and while using the eXact iDip® app, popups will appear that ask for access to different functions of
your phone; Location, Contacts, Calendar, and Cellular
Data. In order to get full functionality of the app, be sure to
allow access to all of these features.
MAKING CALLS
The eXact iDip® photometer is not intended for use while
talking on your smart phone. Talking during testing may
cause the app to shutdown.
GET IT ON
Note: If using an Apple® iPad™, select 'iPhone only app' when
searching from the App Store, or scan the QR code above.
GETTING STARTED
Page 20
20
©2018, Industrial Test Systems, Inc. Printed in USA
USING THE EXACT IDIP® APP
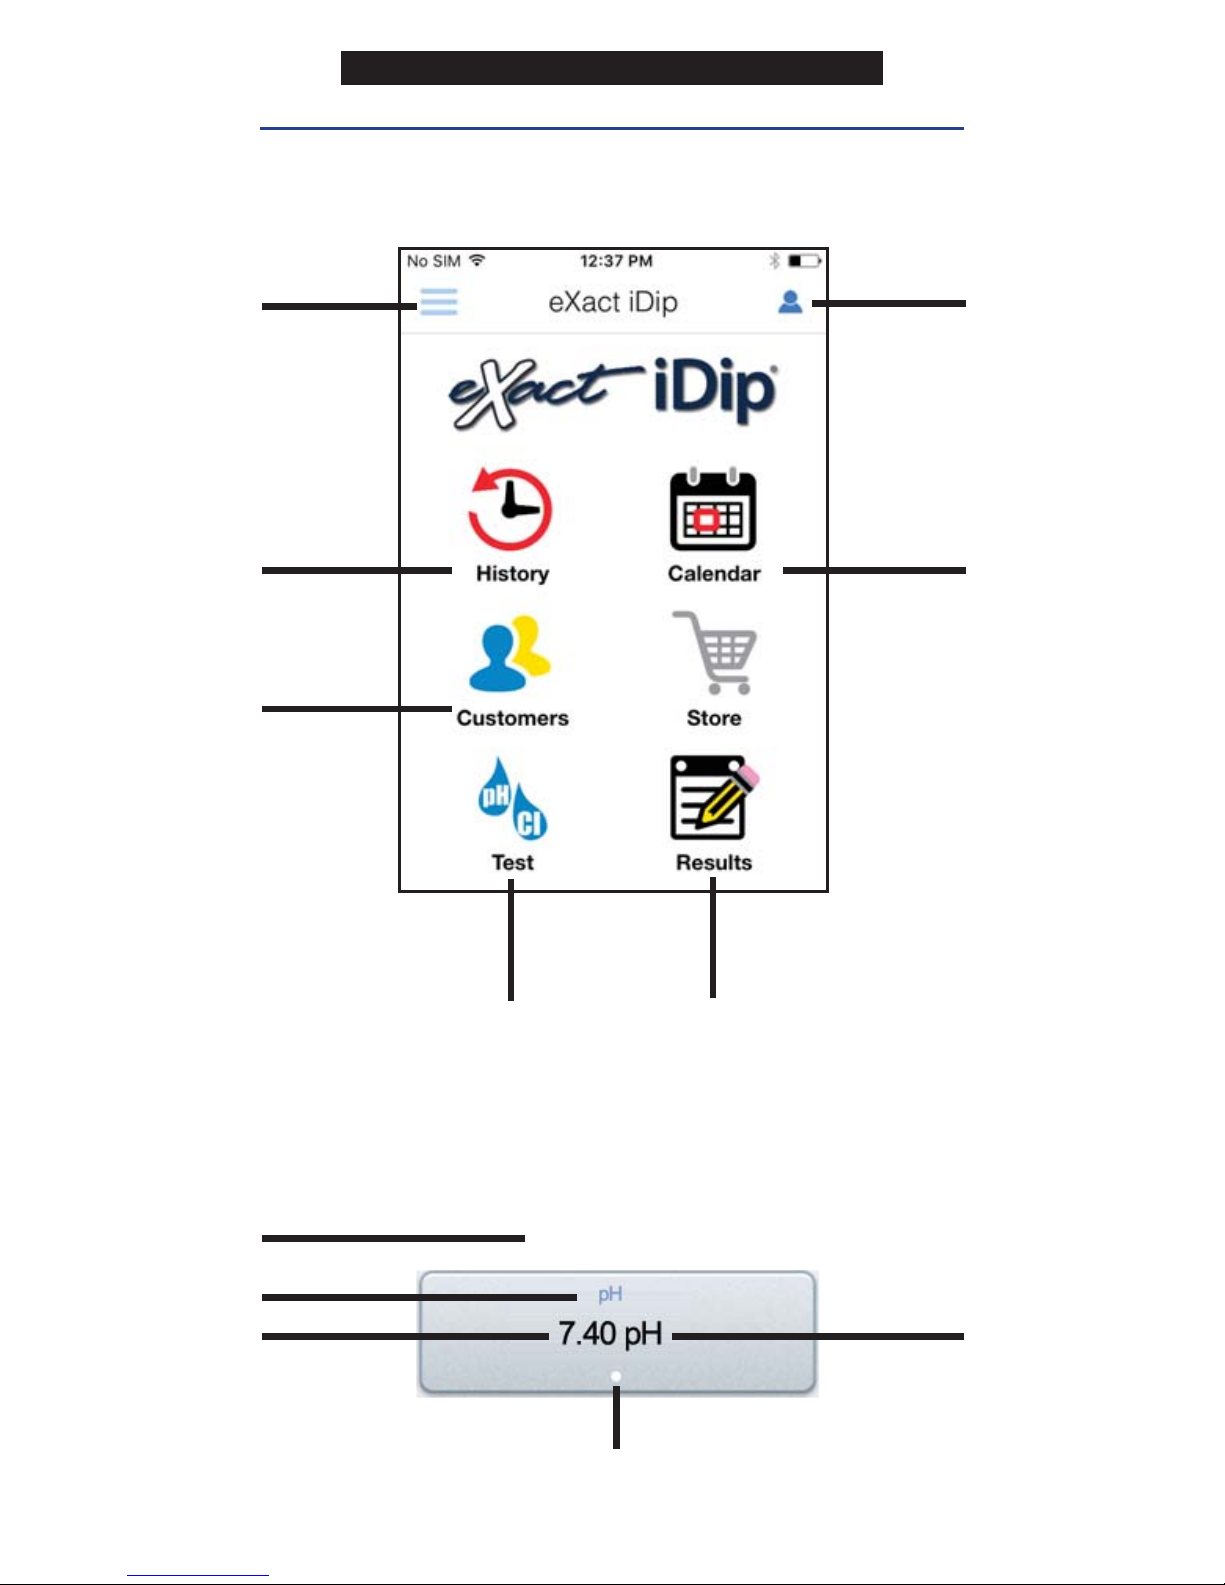
HISTORY:
Accesses
saved results
which can be
sorted, edited,
and emailed.
Also accesses
History Map
CALENDAR:
Displays your
schedule/
appointments
PROFILE:
Activate
Archiving
CUSTOMERS:
Attaches
results to
people and/or
locations from
your
smart
device contacts
TEST:
Initiates water
testing
RESULTS:
Accesses temporary
results that have
not been saved to
history
MENU:
Opens
slide-out for
easy access to
all app features
BLUETOOTH
DEVICE
TESTING
PARAMETER
PARAMETER
UNIT OF
MEASURE
HOME SCREEN
TEST RESULT SCREEN
TEST RESULT
DOTS INDICATE
MULTIPLE UNITS OF MEASURE
(Available for some tests)
EXACT IDIP® APP OVERVIEW
PHP8554838
Page 21
21
exactpH.com
USING THE EXACT IDIP® APP
The Menu slide-out is available from any screen within
the app. The Menu allows you to access any of the
app’s features with ease.
SETTINGS
CURRENT LOCATION
You can view your current GPS coordinates and/or refresh your
current location. In order to take advantage of the GPS feature,
make sure to allow eXact iDip® app to access your location.
CONFIGURATION FILES
Refreshing the confi guration fi les can help resolve issues with tests
not appearing correctly in the app.
ABOUT
Access the End-User License Agreement and contact information
to reach our offi ces in the USA and Europe from the About
section, located in the Menu slide-out. In the About section you
can fi nd the version of the app you are running. Be sure to check
your smart device’s app store for updates and install the latest
version before running a test as we are constantly updating and
adding more features to the app!
FAQS
Here you will fi nd videos, downloads, links, and answers to the
most frequently asked questions.
TEST
You can utilize two different testing methods
under Test: Manual Entry or Bluetooth Device.
BLUETOOTH TEST
Tests will be performed with your eXact pH+ meter.
MANUAL TEST
This feature allows you to utilize other testing methods and manually
enter your results into the app. Begin by selecting ‘Test’, ‘Manual
Entry’, and select your desired test. Enter the value obtained. Once
fi nished, tap ‘SAVE’ at the top left. If the test you need to enter is not
available on the list, tap ‘Custom*’. Enter the type of test that was
run, the value obtained, and the unit of measure used. Then, tap
‘SAVE’ at the top left (see
page 27).
NAVIGATING THE APP
Page 22
22
©2018, Industrial Test Systems, Inc. Printed in USA
USING THE EXACT IDIP® APP
NAVIGATING THE EXACT IDIP
®
APP
HISTORY
The History stores all your saved test result
information and allows you to sort by date,
customer name, or test type.
HOW TO SORT BY CUSTOMER
To sort by Customer begin by selecting 'History', then
'Sort by', 'Customer'. You can then scroll through your list of
customers by name, to fi nd a specifi c test result.
HOW TO SORT BY DATE
To sort by Date begin by selecting 'History' then 'Sort by',
'Date'. You can then scroll through a list of tests performed by
date. You can also set a specifi c date range by selecting 'Date
range'. Then set your From and To dates.
HOW TO SORT BY TEST
To sort by Test begin by selecting 'History' then 'Sort by',
'Test'. You can then scroll through a list of tests sorted in
alphabetical order.
HOW TO EMAIL AND SHARE DATA
See page 29 for instructions on how to utilize these features
HOW TO ACCESS HISTORY MAP
The History Map stores GPS locations of testing sites.
See page 30 for instructions on how to utilize this feature.
CUSTOMERS
Customers attaches results to people and/or
locations in your smart device. In order to fully
utilize the features and capabilities of the app, each test
result will need to be stored (linked) to a profi le. You can add
customers in two ways. 1. By adding from your existing contact
list on your smartphone/tablet or 2. You can create a new contact.
HOW TO ADD EXISTING CONTACTS
To add current contact information already stored on
your device, begin by selecting 'Customers' then 'Add
customers from contacts' (access to Contacts must be
allowed on your device).
HOW TO CREATE A NEW CONTACT
To create a new contact, select 'Customers', tap the '+', then
enter all of the customers contact information. Once fi nished,
tap 'Done'.
.
Page 23
23
exactpH.com
USING THE EXACT IDIP® APP
NAVIGATING THE EXACT IDIP
®
APP
CALENDAR
Never miss an appointment! With the app’s
Calendar feature, you can access your device’s
calendar directly from the app. View by date range
to see past entries or future appointments.
RESULTS
You can view details for tests that have not been
saved to History, add notes, or clear recent test
history from the Results section.
HOW TO ADD NOTES
To add notes begin by selecting ‘Results’ then select the
test result you would like to add notes to. Tap inside the blue
note section of the Results screen and add your notes. The
app will automatically save the information you enter. Tap
‘Results’ to return to the previous screen.
HOW TO CLEAR PREVIOUS TEST RESULTS
To clear ALL recent test results, tap
‘Results’
, then
‘Reset’
. A
notifi cation screen will display
‘Reset data results’
. “Are you
sure you want to reset all the results and notes?” Tap
‘Yes’
to clear.
If no entries are visible in the app, you may need to allow the
app to access your calendar. You can do this in the settings and
security section of your smartphone/tablet (instructions for each
will vary by make/model).
TIP
Page 24
24
©2018, Industrial Test Systems, Inc. Printed in USA
USING THE EXACT IDIP® APP
NAVIGATING THE EXACT IDIP
®
APP
PROFILE
The Profi le section of the app can be used to set
your preferred units of measure for your tests.
Another feature located in the Profi le section is
Archiving. To access the Profi le section of the app, tap
the person icon that appears in the top right of the screen
throughout the app.
PREFERRED UNITS OF MEASURE
In this section, you are able to select the appropriate unit
of measure for your testing needs. To do so, tap Preferred
Unit of Measure. Then, scroll until you fi nd the appropriate
test parameter (ex. Alkalinity, Total). Lastly, scroll through the
various Unit of Measure options until you fi nd the one that
works for your needs (ex. dKH). Select that option and tap
OK. The test parameter will now show the new preferred unit
of measure.
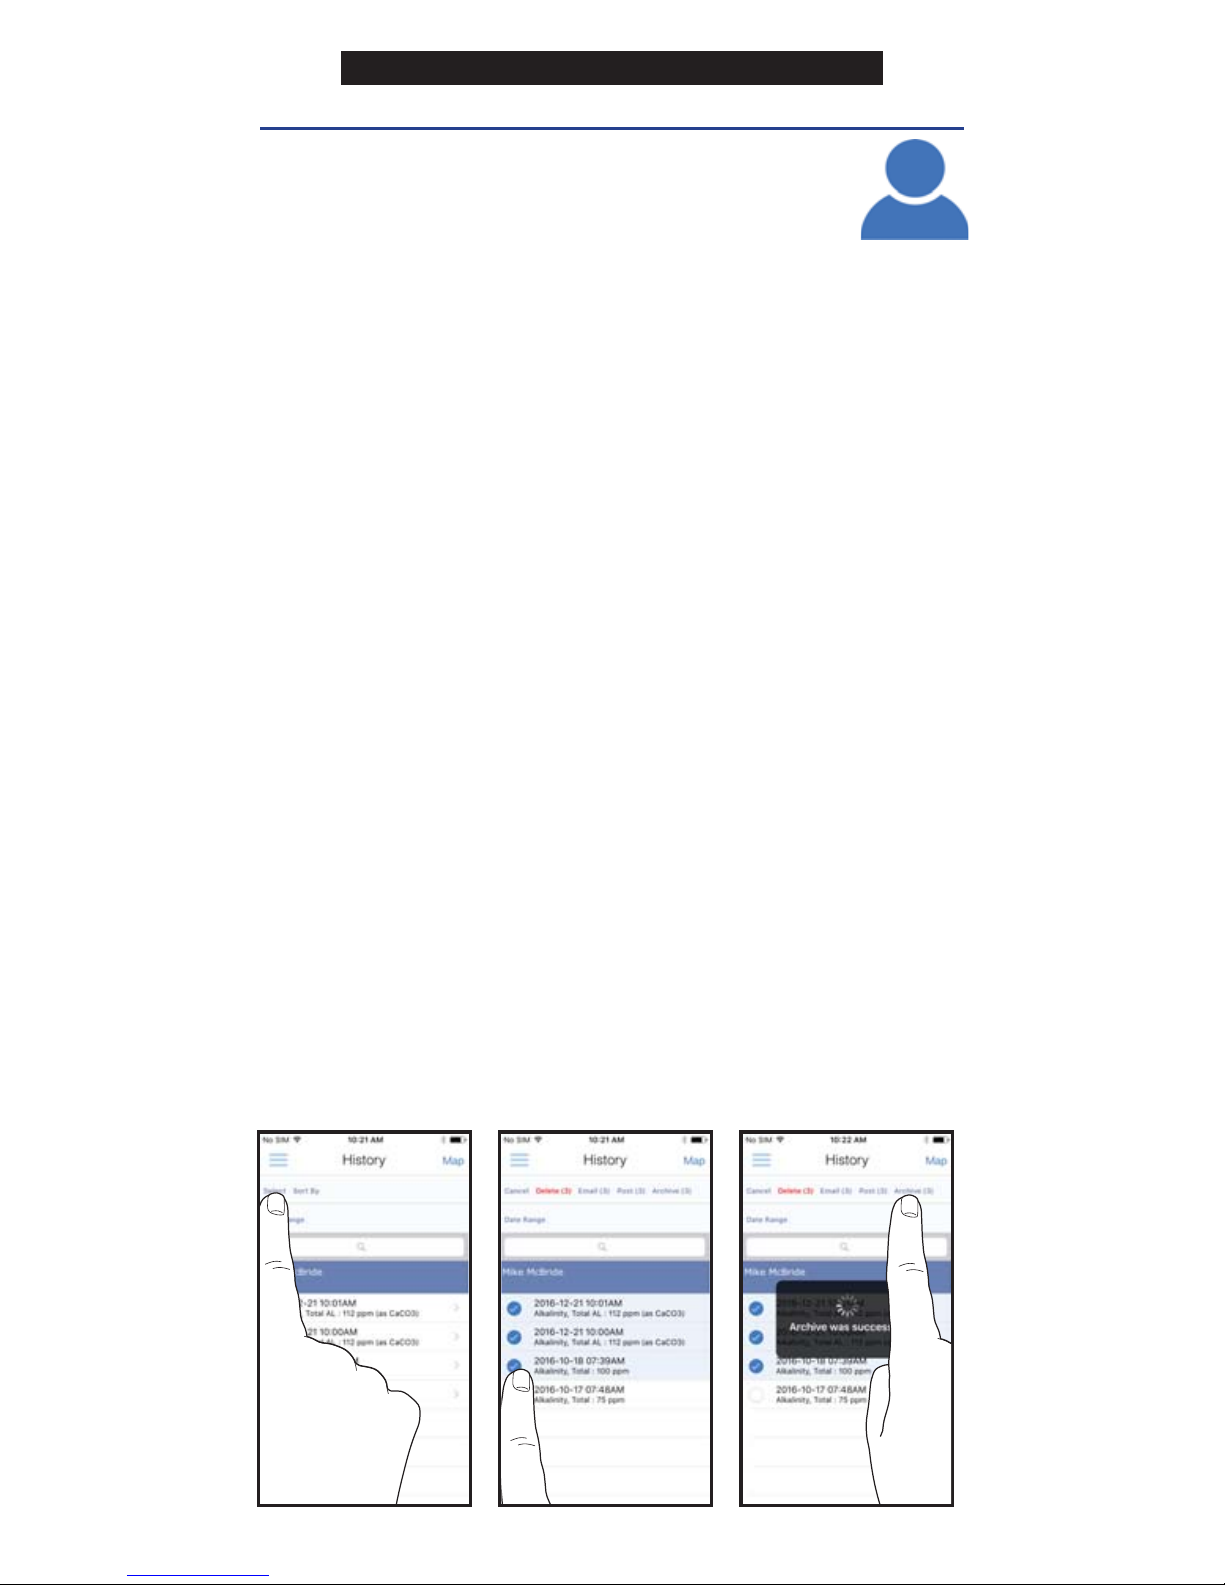
ARCHIVING
After creating an account, the archiving function gives you
the opportunity to upload your test results to the Cloud from
which they can be accessed at a later date
(https://www.idipdata.com). This is a helpful feature if you
notice that the app is behaving slowly due to data overload.
Images taken and saved with test results will also upload
to the cloud when archived. After signed in to the archiving
section with your new account, you can begin archiving your
results from the History page. While on the History page, tap
the Select button at the top left, select the tests to archive,
and press the Archive button at the top of the screen.
Page 25
25
exactpH.com
USING THE EXACT IDIP® APP
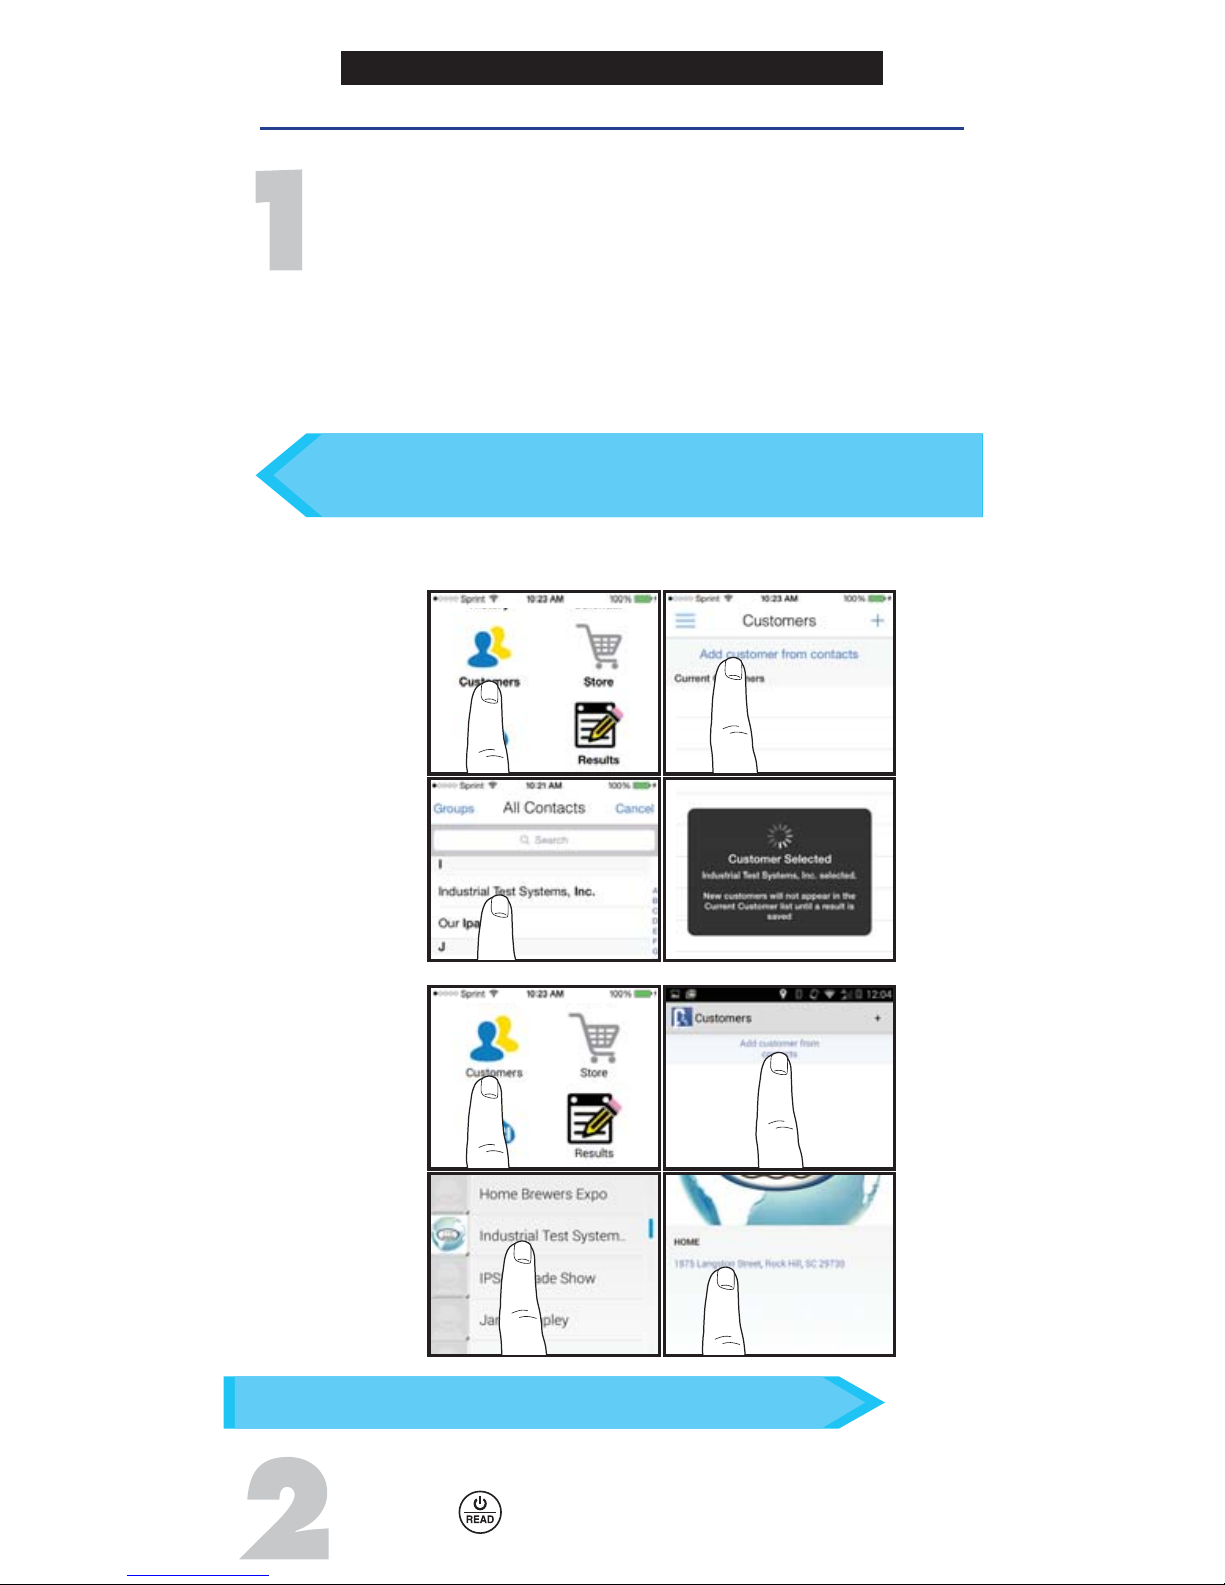
CONNECT TO PH
+
SELECT CUSTOMER
a. Select
'Customers'
from the
'Home'
screen.
b. Tap
'Add customer from contacts'.
c. Select a contact from your list. After selecting a
contact, tap on the customer's address if shown.
Android users: If no address is found, tap "No
addresses found"
d. Verify customer has been selected.
Note:
In order to take full advantage of the GPS and Data Storage
features, each test result is linked to a contact.
POWER ON EXACT® PH
+
Press the button to power on the pH+.
For helpful tips regarding test procedures, refer to tips “FOR BEST ACCURACY” on page 5.
After adding a customer, a test will need to be conducted
and a result saved in order for the customer’s information to
display in the app’s customers list.
TIP
You can also choose to complete this step after testing.
TIP
b
d
c
a
Apple
b
d
c
a
Android
Page 26
26
©2018, Industrial Test Systems, Inc. Printed in USA
USING THE EXACT IDIP® APP
CONNECT TO PH
+
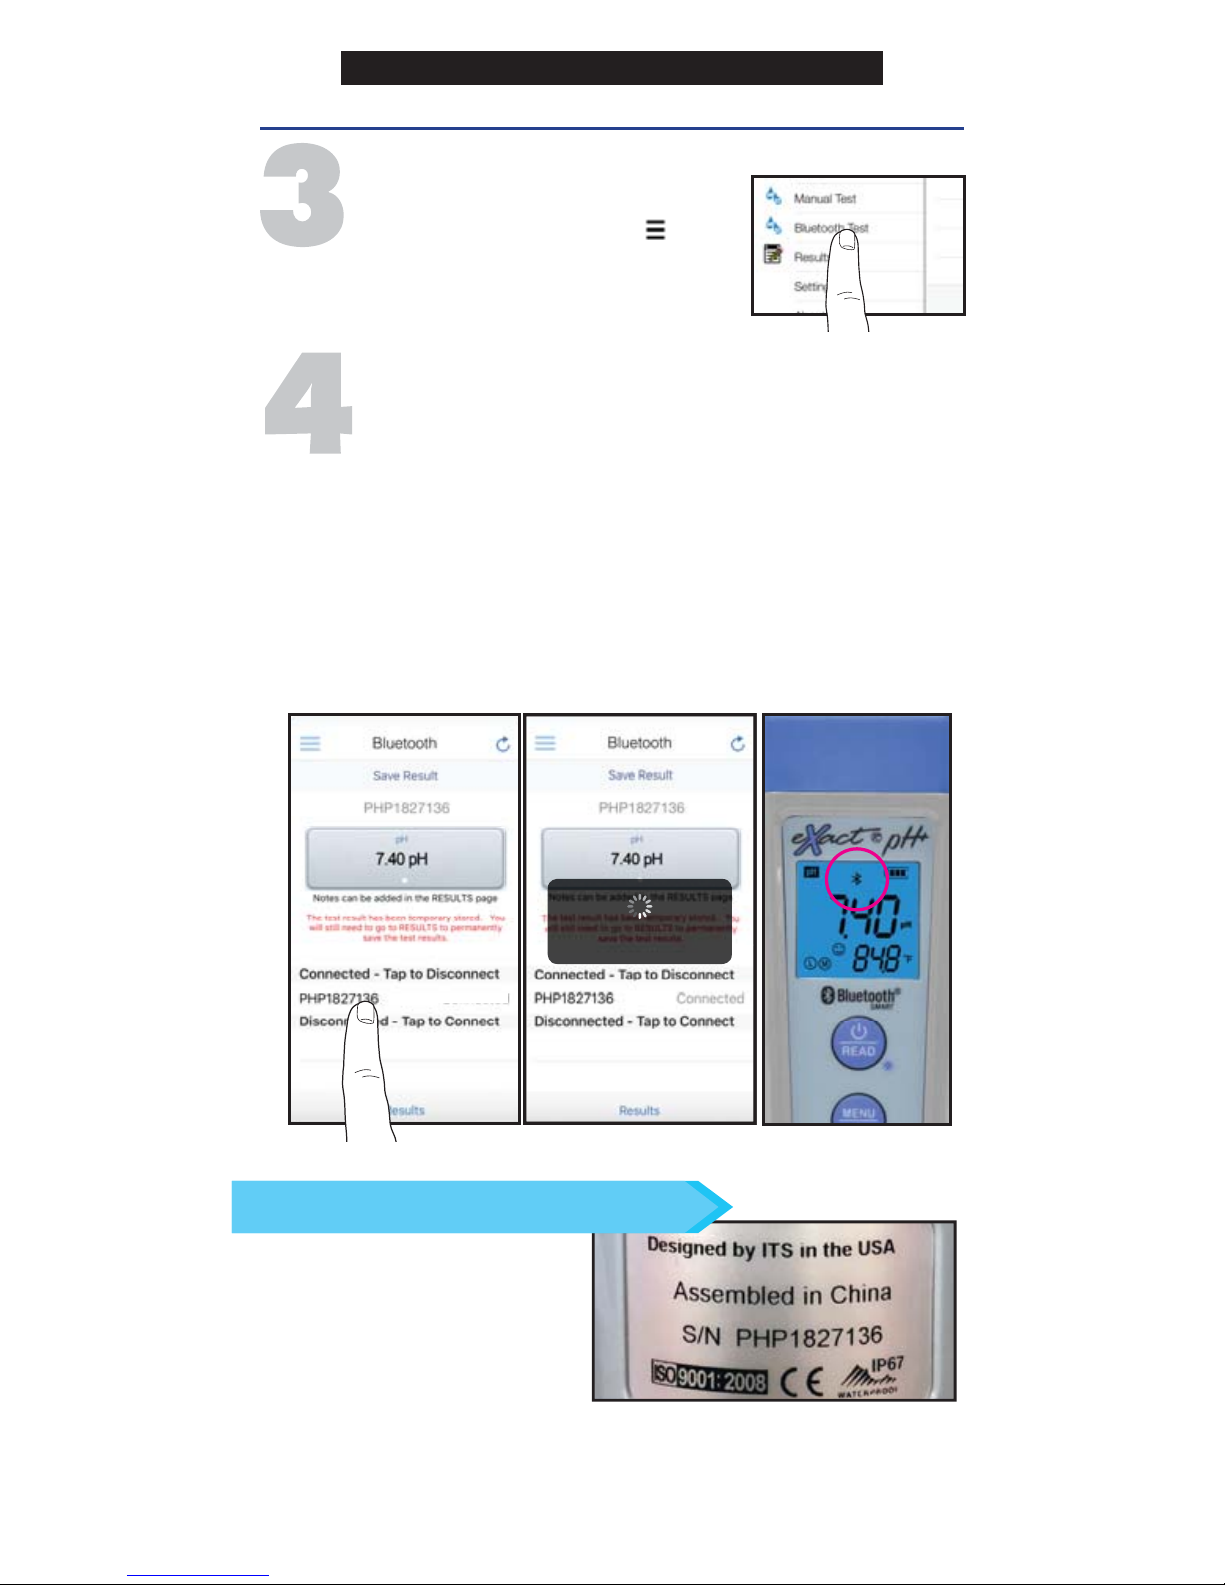
SELECT
BLUETOOTH
®
TEST
Tap the menu slide out ‘ ’
and select
'Bluetooth Test'
from the choices shown.
CONNECT EXACT® PH
+
The eXact iDip® app will automatically connect to the
most recently used device. If not, select your eXact®
pH+ from the bottom of the screen.
After connecting,
proceed with test procedure for chosen parameter.
Once connected to the pH+, you can run tests as usual (see
page 10). Test results will be stored in the Results section of
the app (see page 28 for next steps).
Note: Ensure you always connect your pH
+
photometer via the
Bluetooth
®
connection within the app. To verify connection look for
the Bluetooth icon in the upper right corner of your photometer.
If you experience an issue connecting your device, check to
ensure that your smartphone/tablet’s Bluetooth
®
function is turned
on and your device is compatible.
Refer to the back of your
pH
+
to determine the serial
number for your device. This
will also be the name for the
Bluetooth
®
connection.
TIP
Easily verify your device.
Not Connected
Date/Time Sync Successful
Check LCD display for Bluetooth icon.
Page 27
27
exactpH.com
USING THE EXACT IDIP® APP
LANGELIER SATURATION INDEX (LSI)
Refer to the instructions and perform the tests for TDS
(page 15) and pH (page 12). Then, obtain results for Total
Alkalinity and Calcium Hardness via alternate means (eXact
iDip® photometer - Part No. 486101 or eXact® Micro 20
photometer - Part No. 486700). Lastly, tap Results at the
bottom of the page and an LSI value will be calculated and
displayed automatically.
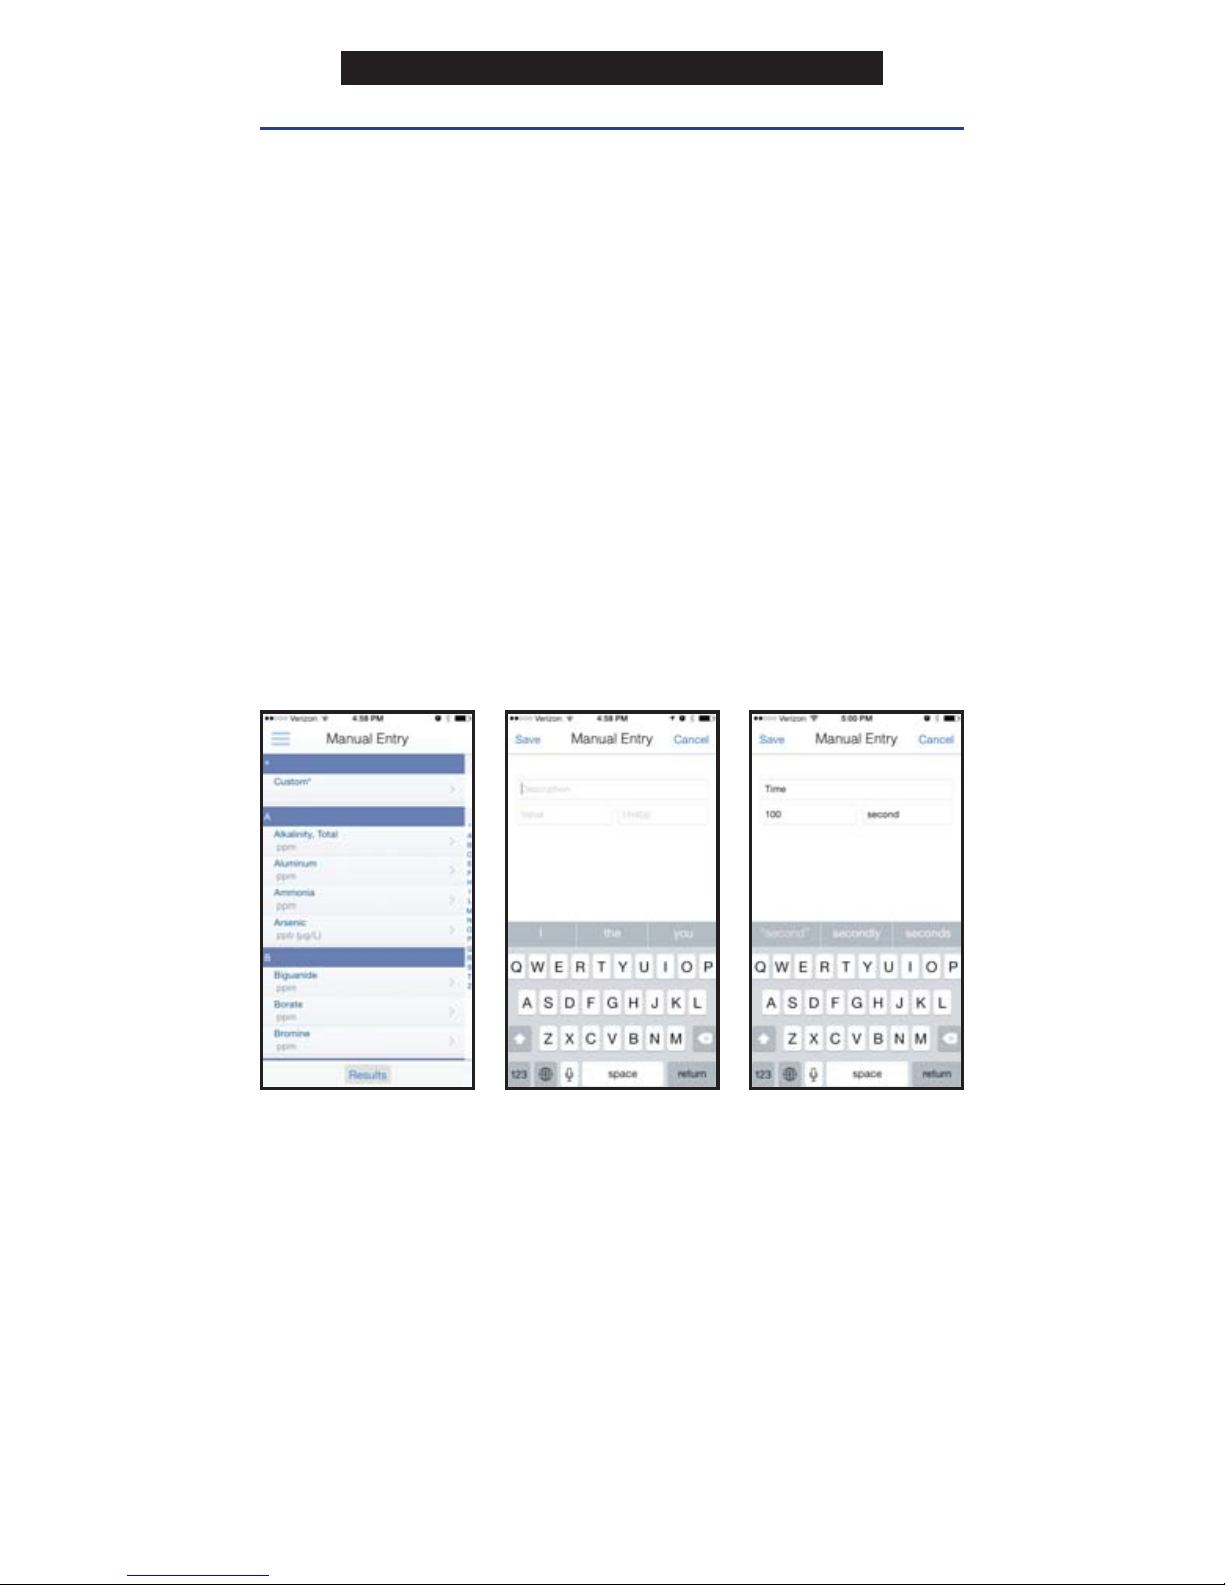
MANUAL ENTRY
This feature allows you to utilize other testing methods and
manually enter your results into the app. Begin by selecting
'Test', 'Manual Entry', select your desired test. Enter the value
obtained. Once fi nished, tap 'SAVE' at the top left. If the test
you need to enter is not available on the list, tap 'Custom*'.
Enter the type of test that was run, the value obtained, and the
unit of measure used. Then, tap 'SAVE' at the top left.
AUTO-CALCULATED METHODS
Visit exactph.com for complete test instructions.
Page 28
28
©2018, Industrial Test Systems, Inc. Printed in USA
USING THE EXACT IDIP® APP
MANAGING DATA
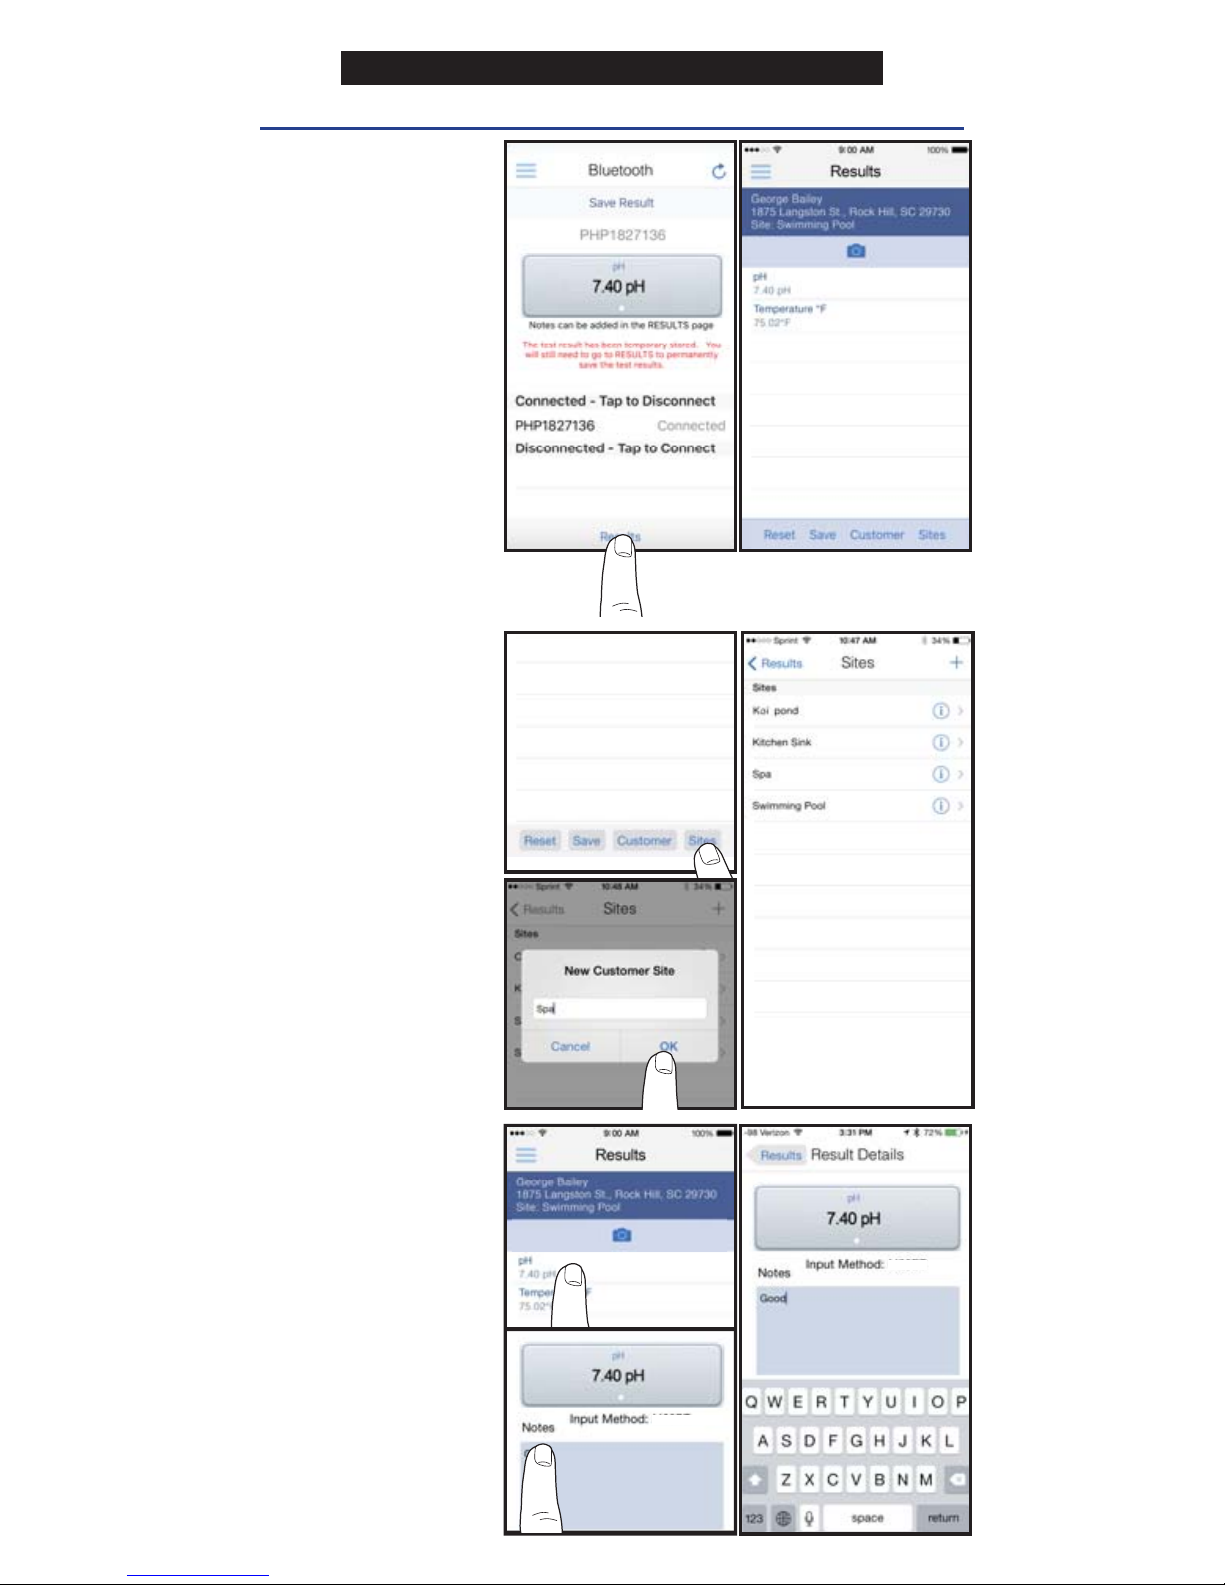
ADD SITES
Each set of results
can be saved to
a customers 'Site'
(water source at the
location). Select a
site from the list or
to add new sites,
tap 'Sites', then '+'.
Enter a Site name,
tap 'OK'.
ADD NOTES
To add notes to
each test tap the
desired test result.
Type notes in the
'Notes' box, which
are automatically
saved. Press
'Results' to return to
the results menu.
PHP1827136
PHP
RESULTS
After tests have
been performed,
tap 'Results' at the
bottom of the screen.
Page 29
29
exactpH.com
USING THE EXACT IDIP® APP
SAVE TO HISTORY
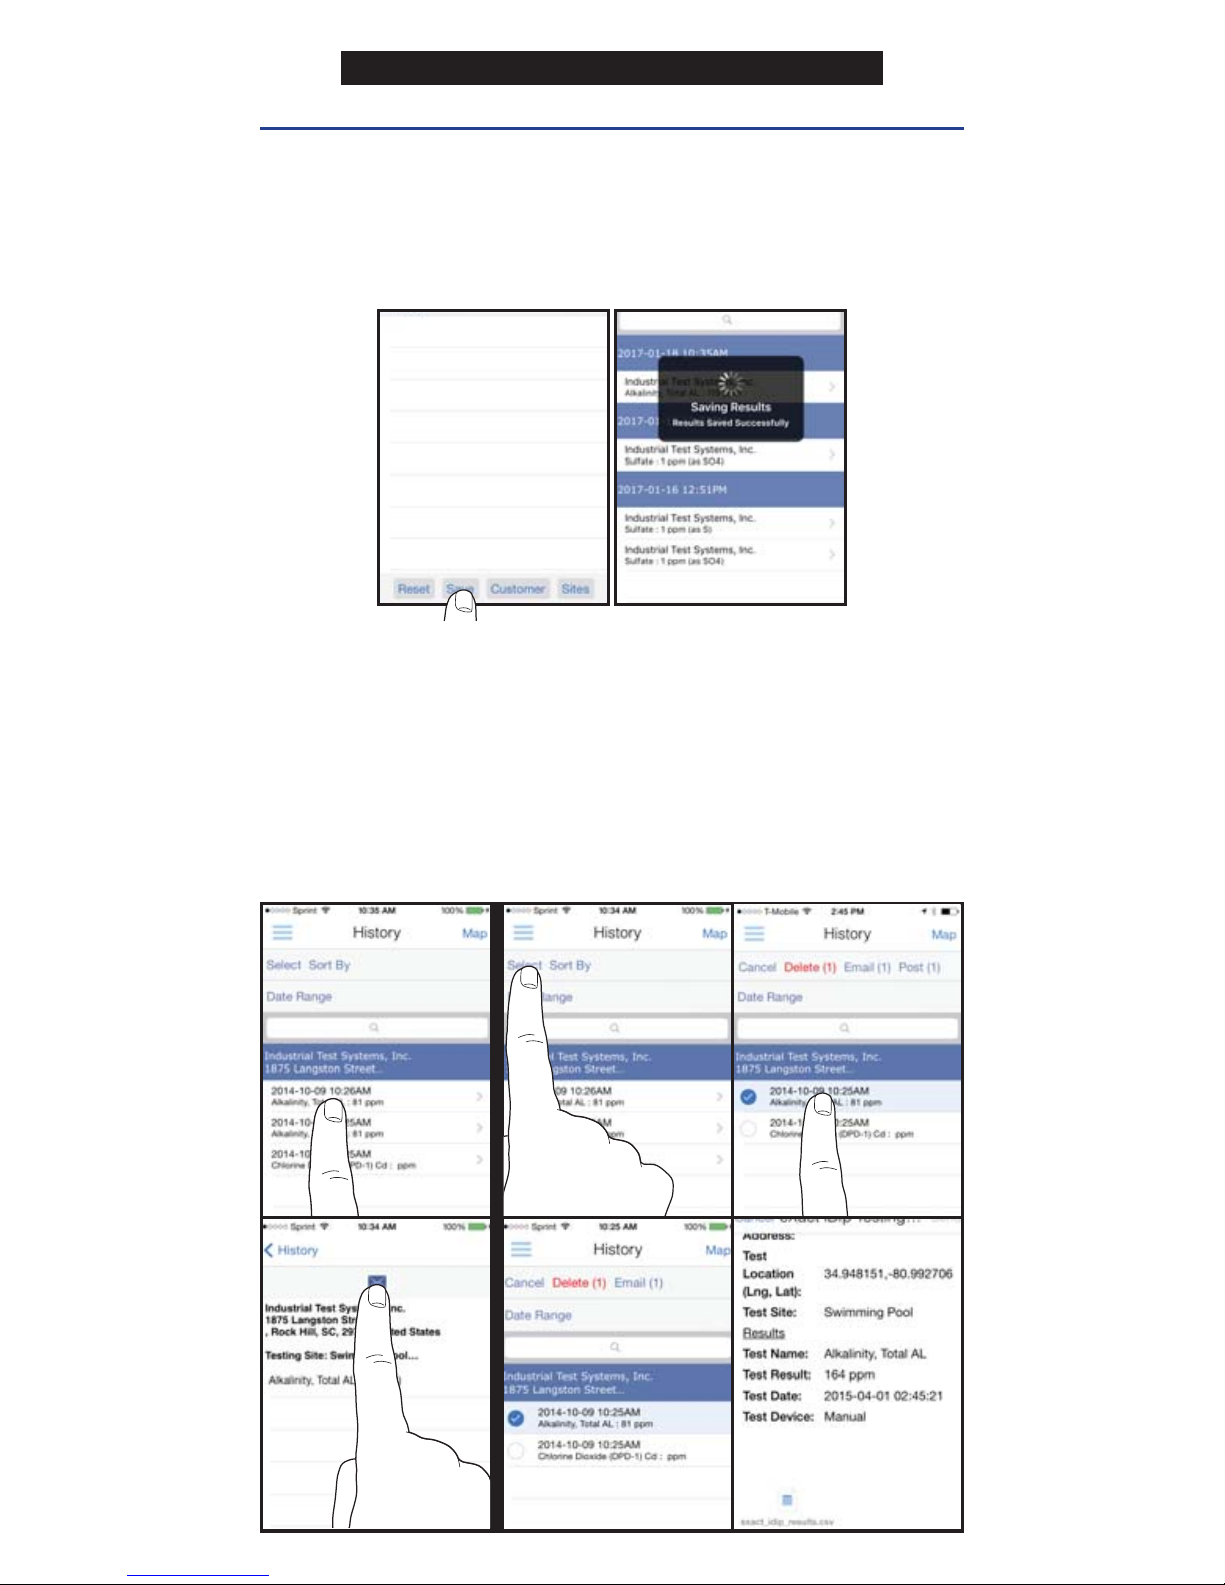
In 'Results' screen, tap 'Save' to store into 'History'. If this
step is omitted, test results will not be permanently saved.
A
'
Saving Results' pop-up appears, verifying that your result
is now successfully saved.
MANAGING DATA
SEND/SHARE VIA EMAIL
In History you can edit, select, and email your results.
To email you can either tap an individual result displayed,
or use the 'Select' button to access multiple data points.
Press the blue envelope icon if you tapped an individual result.
Select
'Email'
at the top if multiple tests are selected. A .csv
(spreadsheet) fi le will be attached at the bottom of the e-mail.
Individual Result Multiple Results
Page 30
30
©2018, Industrial Test Systems, Inc. Printed in USA
USING THE EXACT IDIP® APP
MANAGING DATA
SEND/SHARE VIA SOCIAL MEDIA
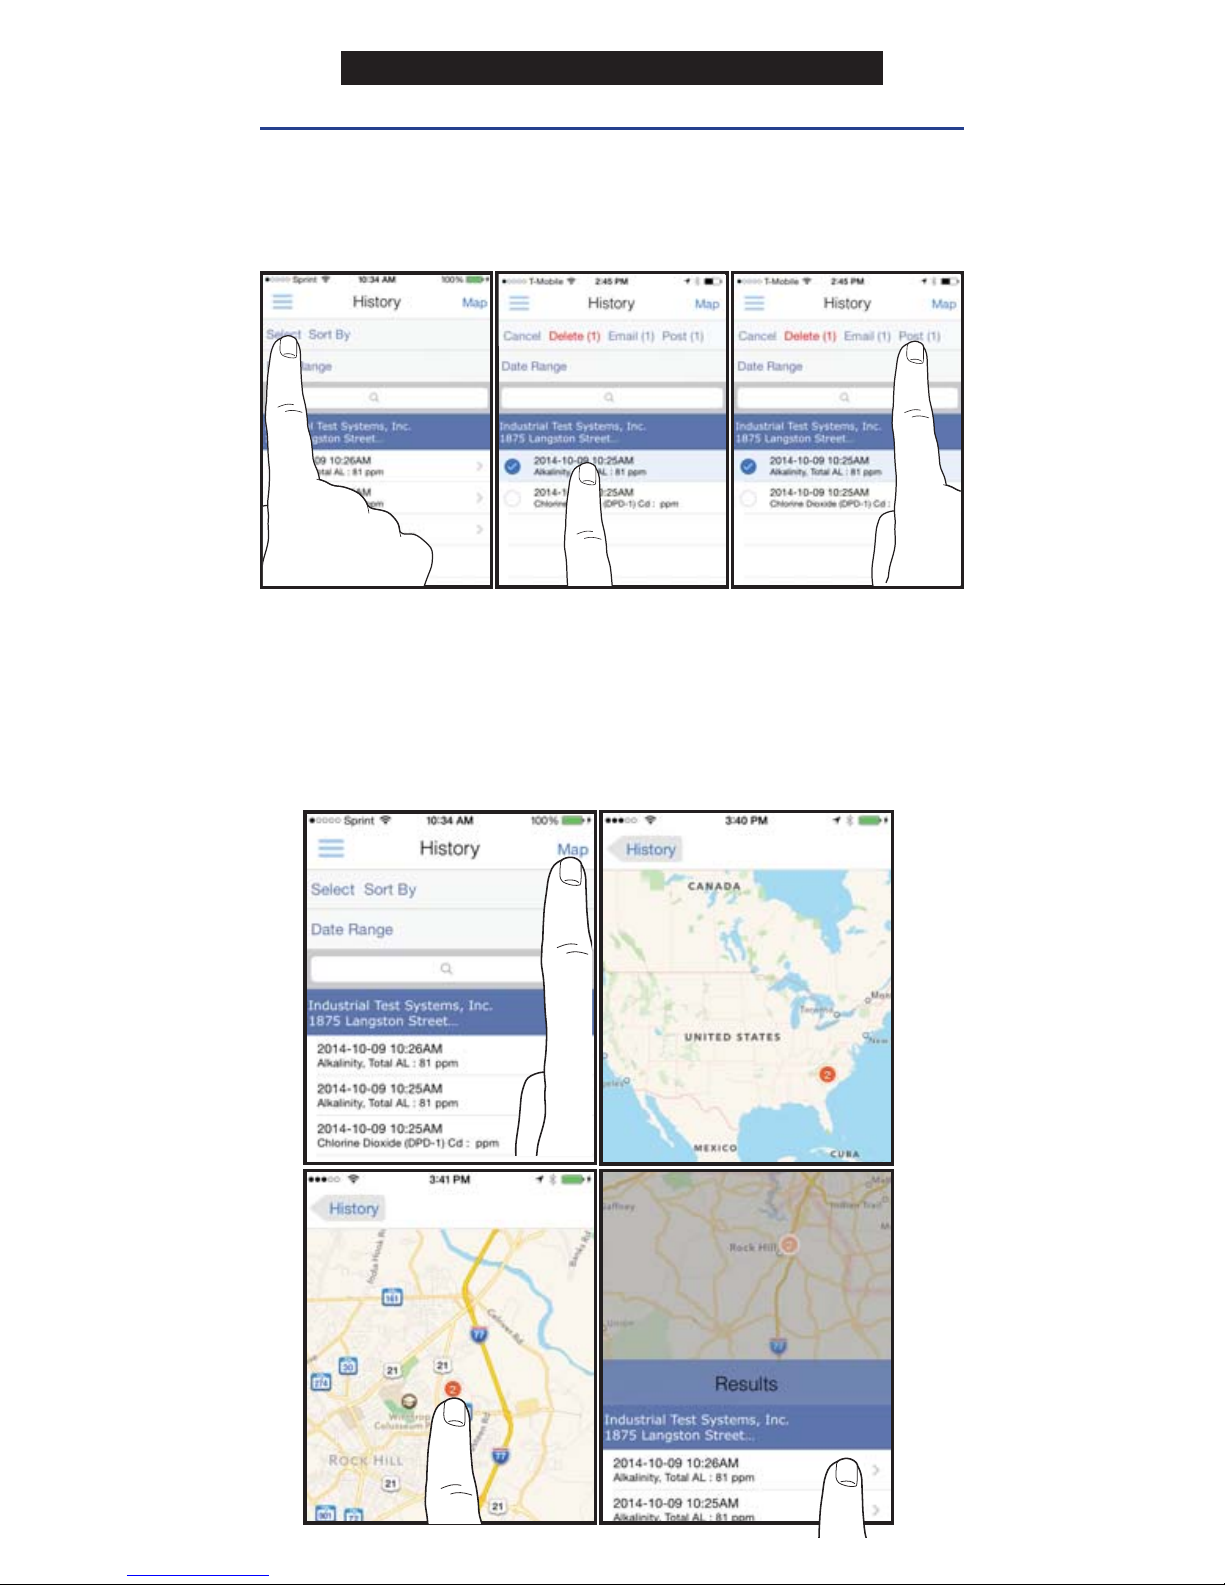
To share your results on social media, use the 'Select' button
and check the result(s) you want to share. Tap 'Post' at the
top and choose whether to share via Facebook or Twitter.
USING HISTORY MAP
Tap
'Map'
on History page to access History Map. Double-tap
or spread fi ngers to zoom. Tap on a pin to see results. Tap on
a result to bring up the details page.
ARCHIVE
See page 22 for details on using the Archiving feature.
Page 31
31
exactph.com
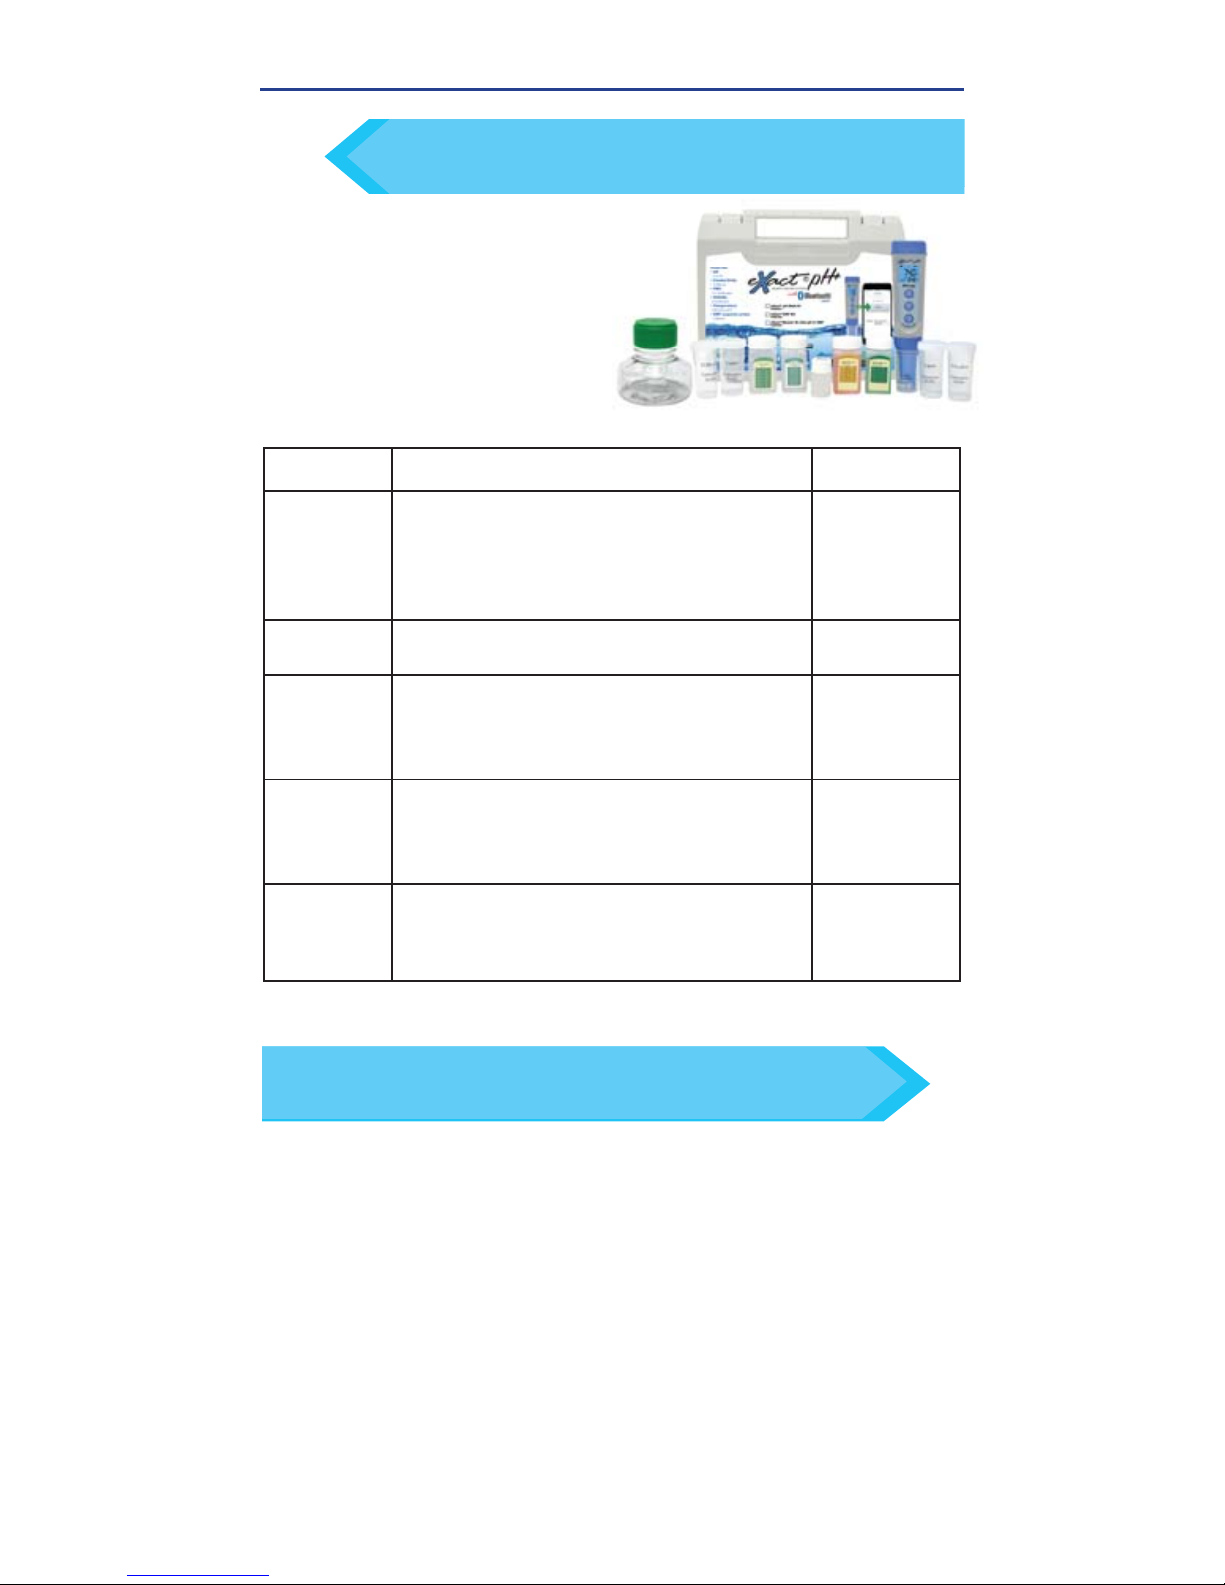
Store all your necessary reagents together with
your pH
+
in our convenient carrying case!
TIP
KIT
CONTAINS PART NUMBER
Multimeter
Kit
Conductivity calibration solutions (1413μS and
12.88mS), Conductivity calibration bottles x2, pH
calibration solutions (7.00pH and 4.00pH), pH
calibration bottles x2, Multimeter probe, lanyard,
pH+ Sample Collection Bottle (#481410)
486301
ORP Kit
ORP bottle, ORP probe, lanyard, pH+ Sample
Collection Bottle (#481410)
486302
Master Kit
Conductivity calibration solutions (1413μS & 12.88mS),
pH calibration solutions (7.00pH & 4.00pH), calibration
bottles x4, Multimeter probe, ORP probe , lanyard,
pH+ Sample Collection Bottle (#481410)
486303
eXact
iDip
®
Pool
Professional
Kit
eXact iDip® photometer, cleaning brush, 1 bottle of
25 tests each: Total Alkalinity, Cyanuric Acid, Free
Chlorine (DPD-1), Combined Chlorine (DPD-3), and
Calcium Hardness
486101-PP-K
eXact iDip®
SmartBrew
Professional
Kit
eXact iDip® photometer, cleaning brush, 1 bottle
of 25 tests each: Total Hardness High, Calcium
Hardness, Total Alkalinity, Chloride, and Sulfate
486101-SB3-K
Each kit contains:
• Carrying case
• eXact
®
pH+ meter (#486300)
• Probe cover
• AAA batteries x4
• pH
+
meter storage solution
• Quick Start Guide(s)
KITS
KITS & ACCESSORIES
Order online at exactph.com or call one of our helpful
customer service representatives at (800) 861-9712
TIP
PROBE REPLACEMENT
Screw off the probe ring, unplug the probe, plug in the
new replacement probe (pay attention to the probe’s
position), and screw on the probe ring. The part numbers
for replacement probes compatible with the pH+ are:
• PH60-E (Regular pH glass bulb probe)
• PH60S-E (Spear pH probe for solid/semi-solid testing)
• PH60F-E (Flat pH probe for surface testing)
• ORP60-E (ORP probe)
• EC60-E (Conductivity probe)
Page 32
pH+ Version 1.0
Revision 09/19/2018
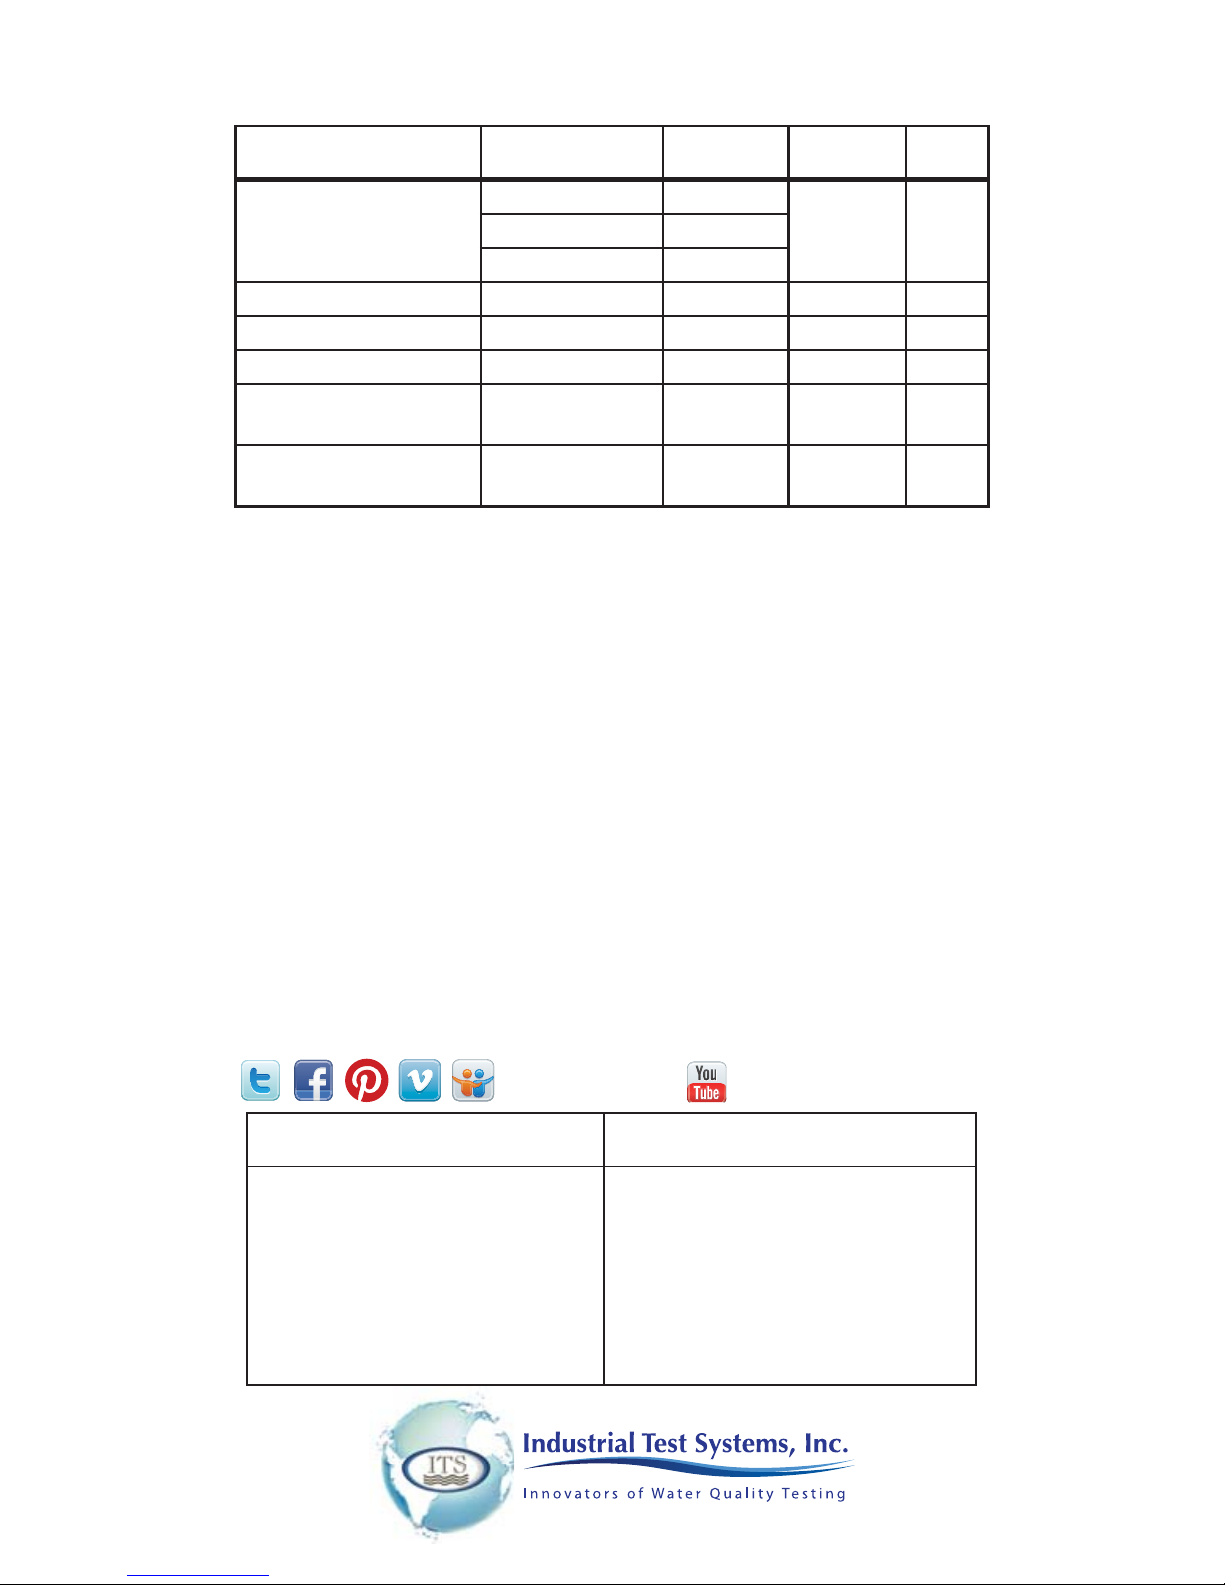
EXACT® PH+ TEST SPECIFICATIONS
PARAMETER / TEST RANGE
RESOLUTION
ACCURACY
CALIB
POINTS
Conductivity
0 - 200.0 μS 0.1 μS
±1% 1 to 30 - 2000 μS1 μS
0 - 20.0 mS 0.1 mS
ORP ±1000 mV 1 mV ±0.2% N/A
pH 0.00 - 14.00 pH 0.01 pH ±0.01 pH 1 to 3
Salinity 0 - 10.00 ppt N/A N/A N/A
TDS
0.1 ppm - 10.00
ppt
TDS Factor
0.40 - 1.00
N/A N/A
Temperature
32 - 122 °F
0 - 50 °C
0.1 °C
±0.9 °F
±0.5 °C
N/A
Visit us online: exactph.com
for up–to–date product information.
SENSAFE
ITSSENSAFE
Industrial Test Systems, Inc.
1875 Langston Street
Rock Hill, SC 29730
1–800–861–9712—Inside the U.S.A.
1–803–329–9712—Outside the U.S.A.
Fax:1–803–329–9743
Email: [email protected]
WWW.SENSAFE.COM
ITS EUROPE, LTD
The UK Centre for Homeland Security
Building 7, Chilmark
Salisbury, Wiltshire, SP3 5DU, UK
Phone: +44 (0)1722 717911
Email: [email protected]
WWW.ITSEUROPE.CO.UK
MANUFACTURED BY DISTRIBUTED BY
 Loading...