

Page 1
LC-Series Una Quick Start Guide
www.exacq.com 1 of 2 October, 2018, Rev C
Introduction
The exacqVision LC-Series is part of exacqVisions series of network video recorders (NVR). The exacqVision LC-Series Una NVR
provides high performance hardware with an exacqVision surveillance video management sof tware.
Installation
Before turning on the exacqVision LC-Series Una server, ensure that you meet the following requirements.
Mounting and operating environment requirements
• Mount the exacqVision server in a dust-free, and climate controlled location where the temperature is less than 70°F, and the
humidity level is less than 80% non-condensing.
Caution:
Dust can cause components of the server to overheat, and elevated temperatures can contribute to premature hard
drive failures.
• Place a surge suppressor between the camera and the recorder of all outdoor cameras.
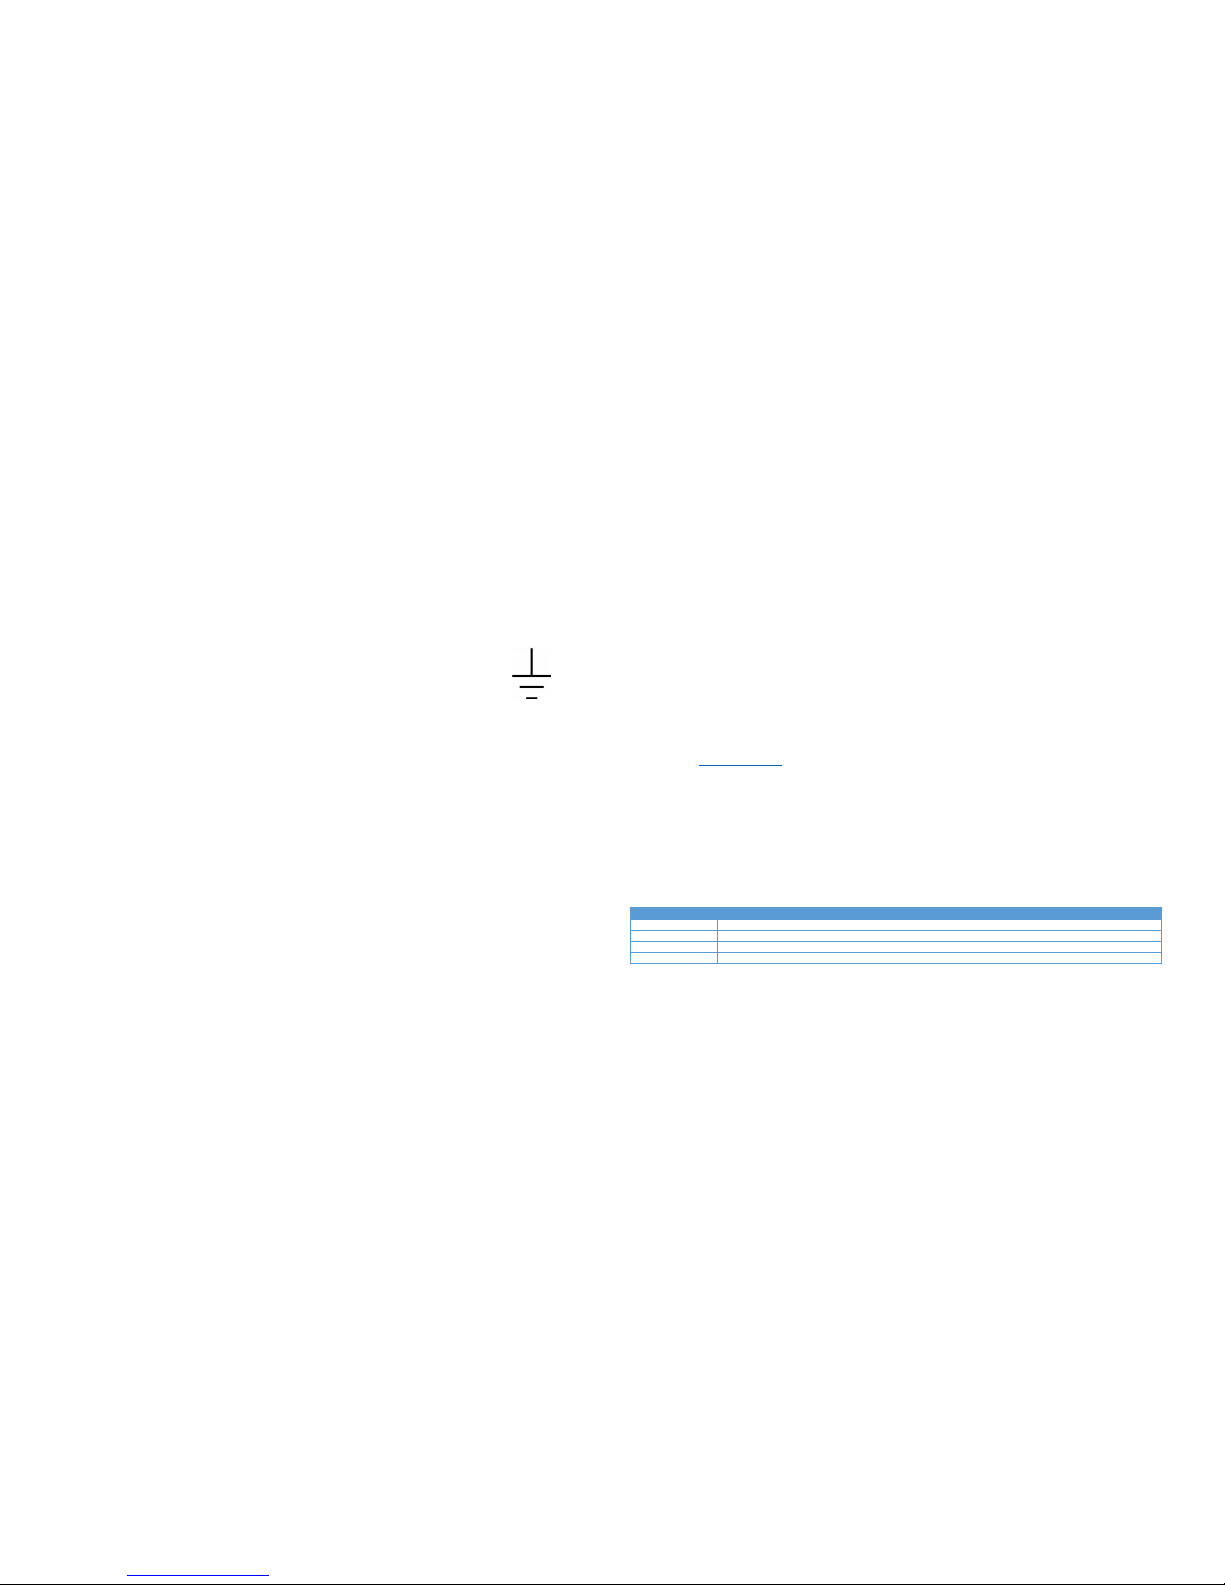
• If you are using an outdoor camera, the server must have a permanent connection to the ground
wire. Ensure that you use an 18 AWG wire or larger to make the connection, and that you label the
grounding screw near the power connector with the image in Figure 1.
Electrical environment requirements
• For maximum reliability, conne ct the exacqVision server to an online UPS. An online UPS filters
power surges and dips that can damage the server.
• Connect a mouse and a keyboard to the server.
• Connect the exacqVision server’s Net work Interface Card (NIC) to the appropriate network switc h ports.
• It is recommend to use cables with ferrite core for connecting to monitors. If the cable does not have a ferrite core, the unit still
performs as expected but may not meet
CE
safety regulation standards.
Configuration
After you turn on the exacqVision LC-Series Una Server, log on to the administration account using the following default credentials:
Username:
admin
Password:
admin256
Configuring the server
To configure the exacqVision LC-Series Una server, complete the following steps:
1. Open the exacqVision client.
2. From the navigation tree, select
Configure System
, and select the
Network
tab.
3. Choose one of the following options:
• If you install the server on a network that uses static IP add ressing, select
Static
and enter the IP address.
• If you install the server on a network using DHCP, select
Dynamic
. If the information does not automatically configure,
contact your network administrat or.
4. Click
Apply
.
Repeat this procedure for any additional network ports. For more information on configuring the server, refer to the
exacqVision
Start User Manual
.
Configuring the client
To configure the exacqVision client, complete the following steps:
Note
: To configure the server using a remote client computer, you must download and install version 7.4 or higher of the
latest exacqVision client software before completing the following procedure.
1. Start the exacqVision client applic ation.
2. Click the
Config (Setup) page
icon.
3. From the navigation tree, select
Add Systems
.
4. In the
Add Systems
window, click
New
, and enter the IP address or hostname of the exacqVision server.
5. Enter the following username and password:
Username:
admin
Password:
admin256
6. Select a connection speed.
7. Click
Apply
.
8. Verify that the server appears in the
Systems
list with a status showing
Connected
.
Note:
If the server does not connect, but you can confirm the server's ability to connect, check for anti-virus software on the
remote client machine that may block the communication between the server IP addresses and ports.
9. Change the default operating system administration and user accounts. For more information, refer to the
exacqVision User
Manual, and www.exacq.com/kb.
Camera connections with EasyConnect
The EasyConnect feature automatically discovers, and configures most DHCP cameras. To connect cameras to the system,
complete the following steps:
1. Ensure that the cameras are in their factory default states.
2. From the navigation tree, expand
Configure System,
and select
PoE Ports
.
3. On the back panel of the server, plug the cameras into the PoE ports.
4. Monitor the
PoE Ports
window to ensure that the cameras configure and connect. The connection can take up to 6 minutes.
For more information on the connection status of the ports, see
Table 1.
Port color status
Description
Grey
Camera is not connected.
Orange
Camera is discovered. Port scanning is taking place.
Green
Camera is not connected and streaming.
Red
Camera is not streaming, invalid username or password, or requires further configuration.
Table 1. Port status
PoE ports in the LC-Series Una server
Before using the PoE ports on the LC-Series Una server, read the following information:
• Each port is a unique interfac e, and is not a network switch or hub.
• Each port is a unique subnet, and you can connect only one IP camera.
• Each port provides a DHCP addressing service to connect cameras.
• Each port has an assigned IP address with a subnet mask of 255.255.255.0. For example, 192.168.2.1, or 172.16.5.61, or
10.16.2.21. The last value in the IP address (4th Octet) is usually the one that will be modified to assign a local address to a
device, along with sometimes the 3rd Octet (Subnet). These addresses will be supplied or assigned by a System Administrator.
Figure 1. Grounding wire
Page 2
LC-Series Una Quick Start Guide
www.exacq.com 2 of 2 October, 2018, Rev C
Troubleshooting
Camera connection unsuccessful
Problem:
When an EasyConnect camera successfully connects to the system, the status column in the
PoE Ports
window displays
Connected
. If
Connected
does not display, use the following troubleshooting guidelines.
Solution:
Troubleshooting may require you to delete and reconnect cameras that fail to connect. To delete and reconnect a camera,
complete the following steps:
Note:
For some of the troubleshooting procedures, you may need to log on to the system using an administration account.
For the default administration credentials, see
Configuration.
1. Open the
Add IP Cameras
window.
2. Select the camera that you want to delete, and then click
Delete
.
3. Click
Rescan Network
to reconnect the camera.
Invalid username or password
Problem:
An
Invalid username or password
status indicates that the recorder does not have the correct camera username or
password.
Solution:
For an
Invalid username or password
status, complete one of the following solutions:
• Reset the camera to its default settings by pressing the
Factory Reset
button on the camera.
• Open the
Add IP Cameras
window and enter the correct information for the camera. For more information, refer to the
exacqVision User Manual
.
• Use an administration account to open a browser with the Firefox application, navigate to the camera’s webpage, and reset the
camera’s credentials to default.
Manual intervention required
Problem: A Manual intervention requ ired
status indicates that the system detects a camera, but it has a static IP address.
Solution:
For a
Manual intervention requ ired
status, complete one of the following solutions:
• Place the pointer over the status message to receive a tooltip message about how to resolve the problem.
• Reset the camera to its default settings by pressing the
Factory Reset
button on the camera.
• On the exacqVision Client, complete the following steps:
1. From the navigation tree, select
Configure System
, and click the
Network tab
.
2. Select the
Show individual PoE adapters
check box, and select
PoE3
.
3. In the
Network Configuration
area, change the IP address to 10.16.5.1, and click
Apply
.
4. Use the Firefox browser to open the camera’s webpage, and change the DHCP or static IP to 192.168.203.2.
5. Change the Una port back to its original IP address.
No camera detected status
Problem:
The system displays a
No camera detected
status.
Solution:
If the
No camera detected
status displays, complete one of the following solutions:
• Ensure that the camera is on the supported camera list. You can access the supported camera list by using the following link:
https://exacq.com/integration/ipcams
.
• Unplug the camera, and then re -plug the camera.
• Open the
Add IP Cameras
window and click
Rescan Network
.
Not Present
Problem: A Not Present
status indicates that no device is connected, or that t here is a problem with the power supply.
Solution:
For a
Not Present
status, delete and reconnect the camera to the system. For more information, see
Camera connection
unsuccessful
.
Connections
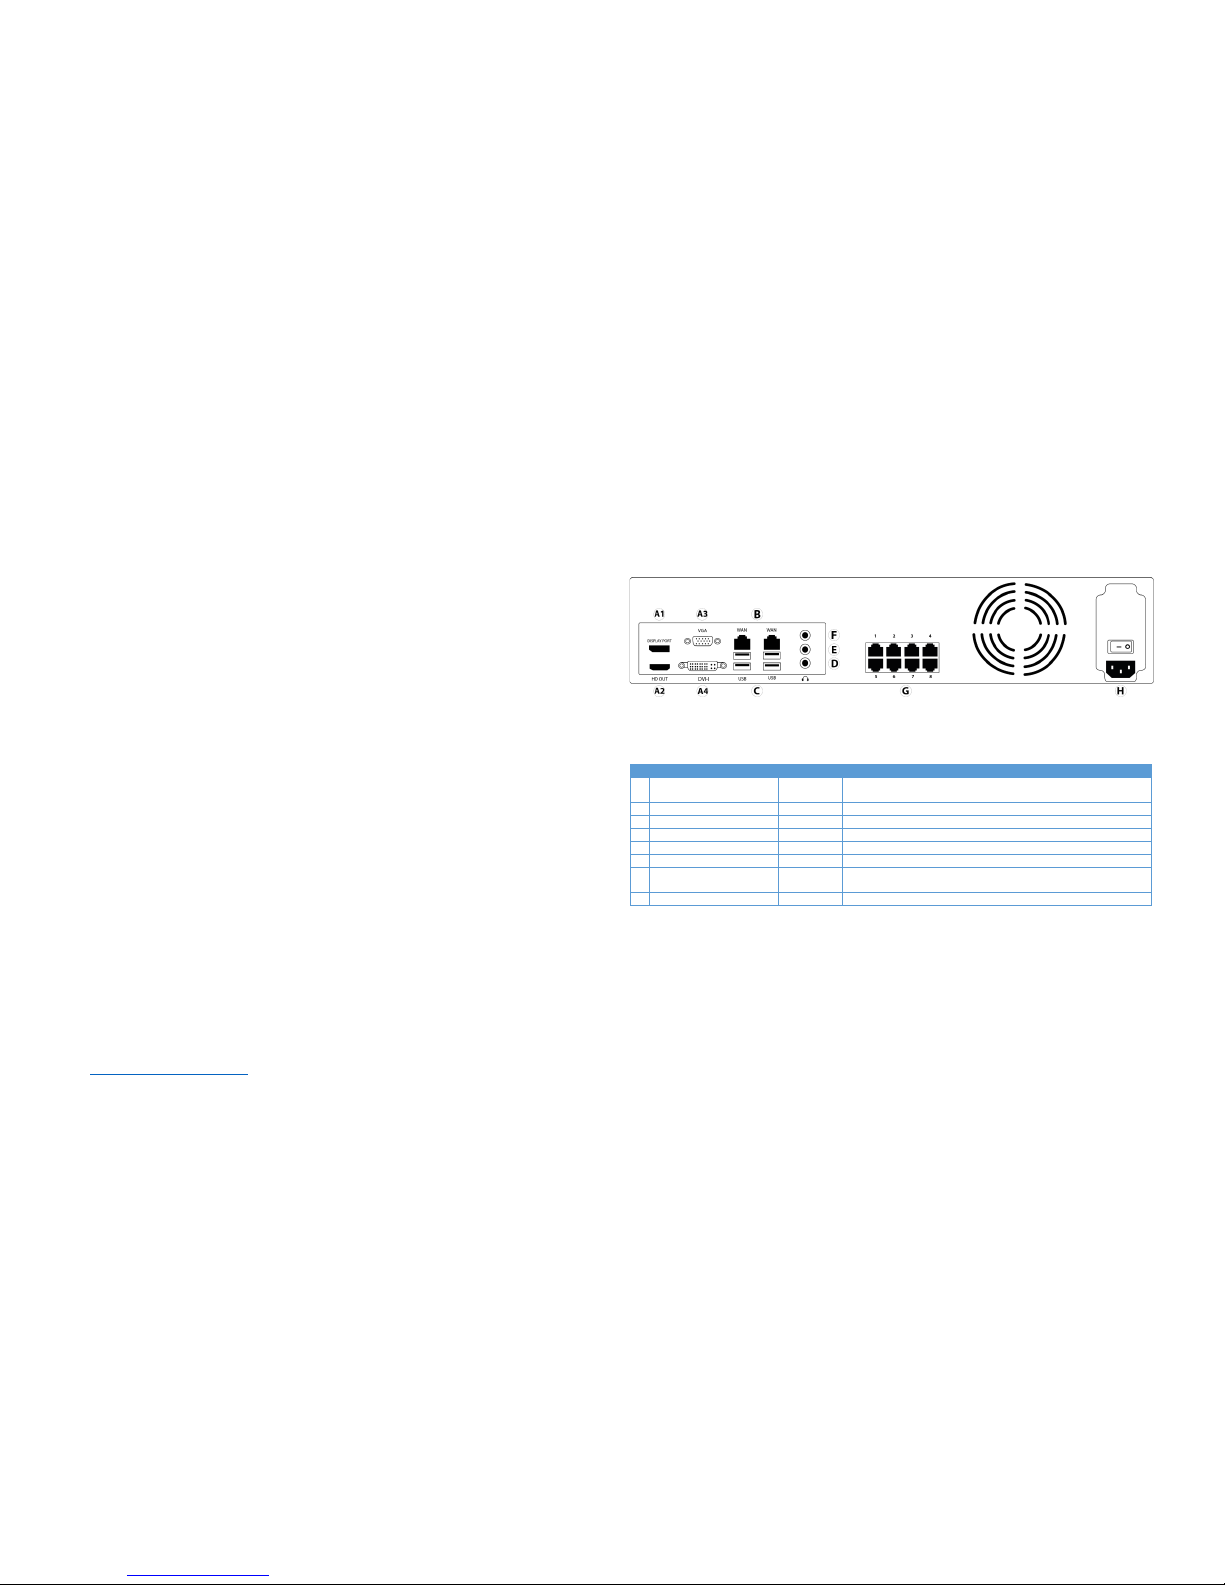
For information on the LC-Series Una serv er’s back panel, see
Figure 2
and
Table 2
.
Figure 2. LC-Series Una back panel
Warning:
Do not connect any switches, routers, computers, printers, encoders, or any non-c amera device to the PoE camera ports.
Name
No. of Ports
Description
A
Video out
4
Display Port (A1), HDMI (A2), VGA (A3), DVI-I (A4)
You may use a maximum of two video outputs simultaneousl y.
B
10/100/1000 Ethernet
2
Dual on-board NICs
C
USB 3.0 4 USB keyboard, mouse, memory device, or DVD burner.
D
Microphone input
1
Microphone (pink)
E
Audio output
1
Line out (green)
F
Line input
1
Line in (blue)
G
10/100 PoE camera
ports
8
DHCP enables posts for IP based cameras only.
H
Power 1 Use this port to connect the power plug to the server.
Table 2. LC-Series Una server back panel
 Loading...