

exacqVision E-Series Quick Start
www.exacq.com
Page 1 of 11
9/9/2014
1 Installation
Precautions
The E-Series audio/video encoder is highly advanced surveillance equipment that should be installed with care. Please
consider the following precautionary steps before installing the encoder.
Keep all liquids away from the encoder.
Install the encoder in a well-ventilated and dust-free area.
Ensure environmental conditions meet factory specifications.
Installation Notes
During the installation of the encoder:
Use brackets for rack mounting.
Ensure there is ample room for audio and video cables.
When installing cables, ensure that the bend radius of each cable is no less than five times its
diameter.
Connect both the alarm and RS-485 cable.
Allow at least 2cm (0.75in) of space between rack-mounted devices.
Ensure the encoder is grounded.
Environmental temperature should be within the range of -10 ºC to 55 ºC (14ºF to 131ºF).
Environmental humidity should be within the range of 10% to 90%.
Check the power supply to avoid the damage caused by voltage mismatch.
Keep the device horizontal and avoid installing in an environment of severe vibration.
The dust board will cause a short circuit after damping. Use a brush to regularly remove dust
from the board, connector, and chassis fan.
Improper use or replacement of the battery may result in hazard of explosion. Replace with
the same or equivalent type only. Dispose of used batteries according to the instructions
provided by the battery manufacturer.
exacqVision E-Series Quick Start
www.exacq.com
Page 2 of 11
9/9/2014
Regulatory information
FCC information
FCC compliance: This equipment has been tested and found to comply with the limits for a digital device, pursuant
to part 15 of the FCC Rules. These limits are designed to provide reasonable protection against harmful
interference when the equipment is operated in a commercial environment. This equipment generates, uses, and
can radiate radio frequency energy and, if not installed and used in accordance with the instruction manual, may
cause harmful interference to radio communications. Operation of this equipment in a residential area is likely to
cause harmful interference in which case the user will be required to correct the interference at his own expense.
FCC conditions
This device complies with part 15 of the FCC Rules. Operation is subject to the following two conditions: 1.) This
device may not cause harmful interference. 2.) This device must accept any interference received, including
interference that may cause undesired operation.
EU Conformity Statement
This product and -- if applicable -- the supplied accessories too are marked with "CE" and comply therefore with
the applicable harmonized European standards listed under the Low Voltage Directive 2006/95/EC, the EMC
Directive 2004/108/EC, the RoHS Directive 2011/65/EU.
This symbol is required in accordance with the Waste Electrical and Electronic Equipment (WEEE) Directive of the
European Union. The presence of this marking on the product indicates: 1.) the device was put on the European
market after August 13, 2005 and 2.) the device is not to be disposed via the municipal waste collection system of
any member state of the European Union.
It is very important that customers understand and follow all laws regarding the proper decontamination and safe
disposal of electrical equipment. Please contact +44.1438.310163 for details on the take back program that will
facilitate the proper collection, treatment, recovery, recycling, and safe disposal of the device.
2006/66/EC (battery directive): This product contains a battery that cannot be disposed of as unsorted municipal
waste in the European Union. See the product documentation for specific battery information. The battery is
marked with this symbol, which may include lettering to indicate cadmium (Cd), lead (Pb), or mercury (Hg). For
proper recycling, return the battery to your supplier or to a designated collection point. For more information see:
www.recyclethis.info.
exacqVision E-Series Quick Start
www.exacq.com
Page 3 of 11
9/9/2014
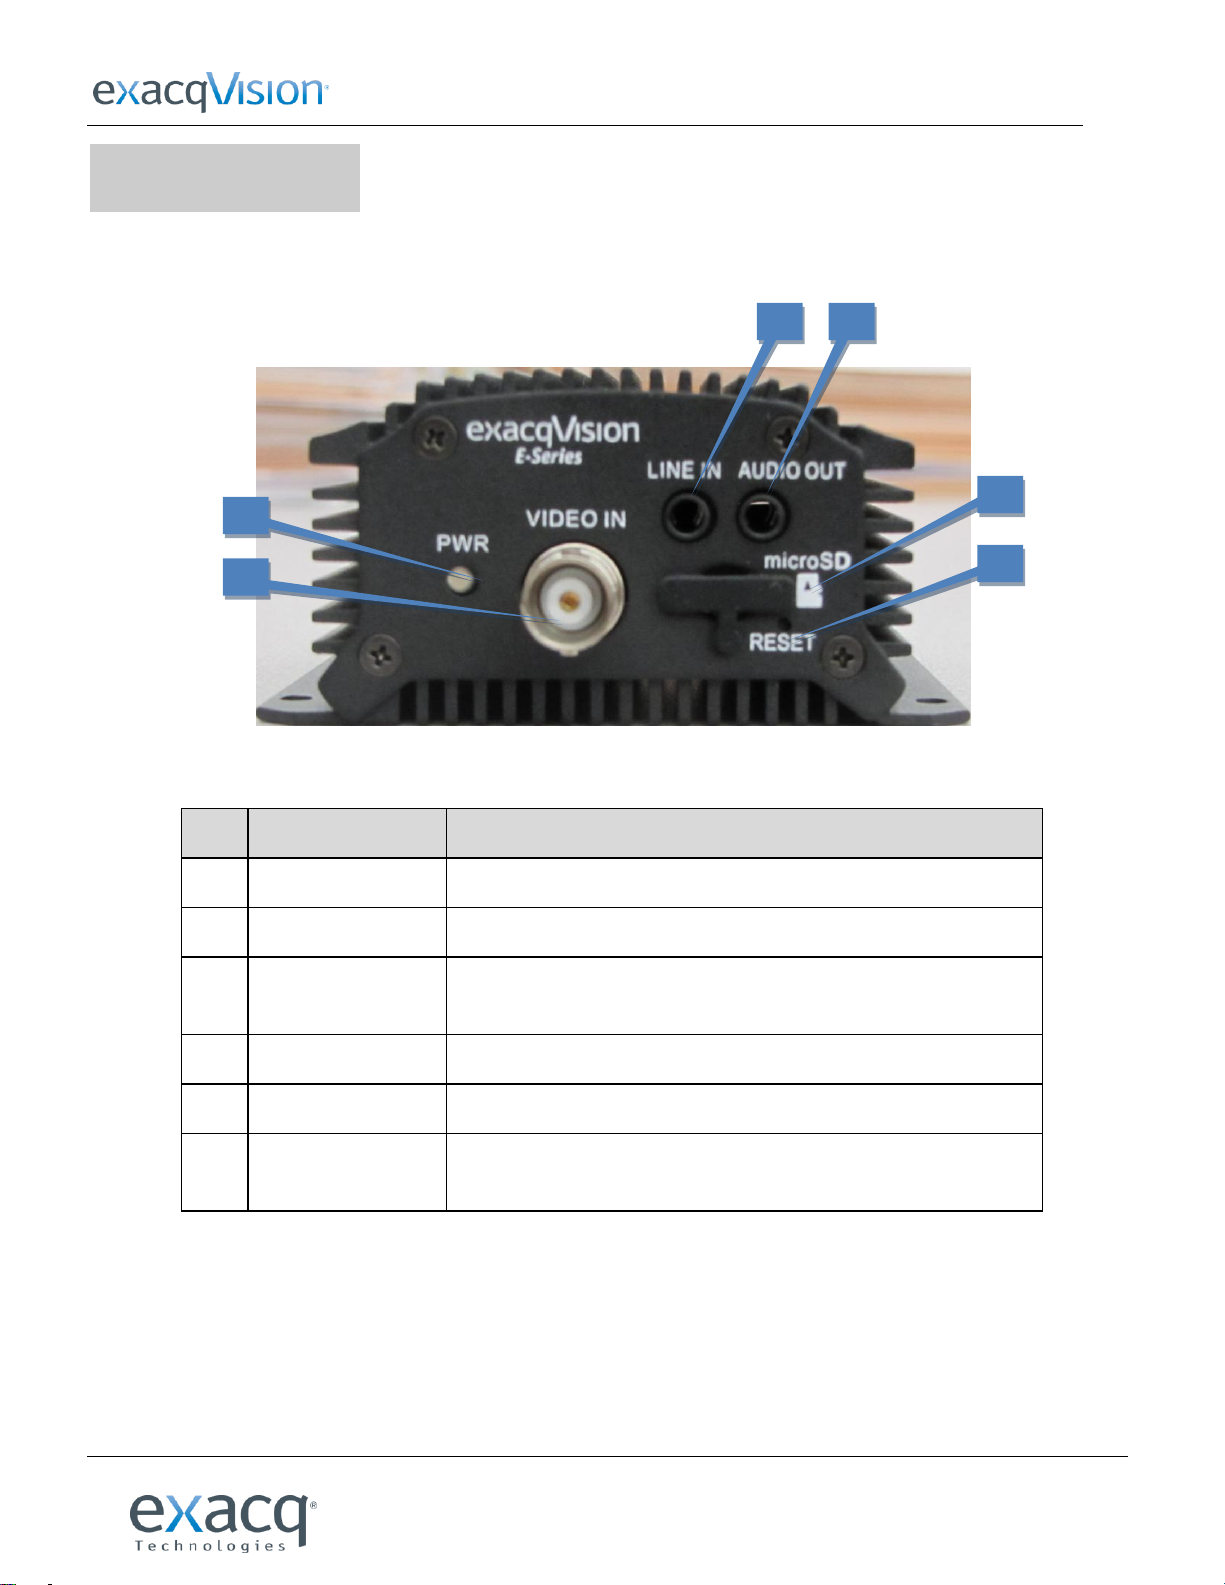
Item
Description
1
POWER LED Indicator
Red when the device is powered on.
2
VIDEO IN
BNC connector for video input.
3
LINE IN
3.5mm interface for two-way audio input or audio input; connect to
audio input device or active pick-up, microphone, etc.
4
AUDIO OUT
3.5mm interface; connect to audio output device such as loudspeaker.
5
microSD
Unused (included for future expansion).
6
RESET
Hold button for more than 15 seconds after power is turned on to
restore factory-default settings.
1 2 3 4 5
6
2 Front Panel
E-ADE1C FRONT PANEL

exacqVision E-Series Quick Start
www.exacq.com
Page 4 of 11
9/9/2014
Item
Description
1
POWER LED Indicator
Red when the device is powered on.
2
LINE IN
3.5mm two-way audio input interface; connect to active pick-up,
microphone, etc.
3
AUDIO OUT
3.5mm interface; connect to audio output device, such as loudspeaker.
4
VIDEO IN
BNC interface for video input.
5
AUDIO IN
Line input interface for audio input.
1 2 3 4 5
E-ADE4C FRONT PANEL

www.exacq.com
Page 5 of 11
9/9/2014
3 Rear Panel
Item
Description
1
ALARM IN /OUT
Relay alarm input/output. (JP2 pin not available on output.)
2
RS-485
RS-485 serial interface; connect to pan/tilt unit, speed dome, etc.
3
LAN
10M/100Mbps adaptive Ethernet interface (PoE). Right LED indicator
lights in green when the network cable is connected; left LED
indicator blinks in orange when data is transmitting/receiving.
4
DC12V
12V DC power supply.
5
GND
Grounding.
1 2 3 4 5
exacqVision E-Series Quick Start
E-ADE1C REAR PANEL

exacqVision E-Series Quick Start
www.exacq.com
Page 6 of 11
9/9/2014
Item
Description
1
ALARM IN
Relay alarm input.
2
ALARM OUT
Relay alarm output.
3
RS-232
Serial interface for configuration of device’s parameters; or used as
transparent channel.
4
RS-485
RS-485 serial interface; connect to pan/tilt unit, speed dome, etc.
5
RESET
Hold button for more than 15 seconds after the device is turned on to
restore factory-default settings.
6
microSD
Unused (included for future expansion).
7
LAN
10M/100Mbps adaptive Ethernet interface (PoE). Right LED indicator
lights in green when the network cable is connected; left LED indicator
blinks in orange when data is transmitting/receiving.
8
DC12V
12V DC power supply.
9
GND
Grounding.
1 3 5 6 7 8 9 2 4
E-ADE4C REAR PANEL

exacqVision E-Series Quick Start
www.exacq.com
Page 7 of 11
9/9/2014
Model
E-ADE1C
E-ADE4C
Video/
Audio
input
Video
H.264/MJPEG
Video input
1 channel
4 channels
BNC (1.0 Vp-p, 75 Ω)
Audio
G.711u
Audio Input
1 channel
4 channels
1-channel, 3.5mm interface (2.0 Vp-p,
1 kΩ) (LINE IN)
Line input interface (2.0 Vp-p, 1 kΩ)
Two-way
audio input
1 channel, 3.5mm interface (2.0 Vp-p,
1 kΩ) (LINE IN)
1 channel, 3.5mm interface (2.0 Vp-p, 1 kΩ)
Video/
Audio
output
Audio output
1-ch, 3.5mm interface (Linear, 600 Ω)
Recording
resolution
4CIF / 2CIF / CIF / QCIF
Frame rate
H.264 encoding: 25 fps (P) / 30 fps (N); MJPEG encoding: 15 fps
Video bit rate
32 Kbps ~ 3072 Kbps, or user defined (Max. 8192 Mbps)
Audio bit rate
64 Kbps
Dual Stream
Support
Stream Type
Video / Video & Audio
External
interface
Network
interface
1 RJ-45 10 M / 100 Mbps adaptive Ethernet interface (PoE)
Protocols and
Service
IPv4/v6, HTTP, HTTPS, QoS layer3 DiffServ, FTP, SMTP, Bonjour, UPnPTM, Multicast,
SNMPv1/v2c/v3(MIB-II), DNS, DynDNS, HiDDNS, NTP, RTSP, RTP/RTCP,TCP, UDP, IGMP,
ICMP, DHCP, ARP, SOCKSv4/v5, PSIA, ONVIF, HIKCGI, netFilter
Serial interface
1 half-duplex RS-485 interface
1 half-duplex RS-485 interface; 1 RS-232 interface
Alarm in
1
4
Alarm out
1
2
General
Power
12 VDC
Power
≤ 6W
≤ 8W
Working temp.
-10°C ~ +55°C
Working
humidity
10% ~ 90%
Dimensions
80 × 39 × 90 mm
114 × 48 × 128 mm
Weight
≤ 0.5 Kg
≤ 1 Kg
4 Specifications

exacqVision E-Series Quick Start
www.exacq.com
Page 8 of 11
9/9/2014
5 Configuring Network Parameters
There are two ways an IP address can be assigned to the encoder:
If a DHCP server is available, an IP address will be assigned to the encoder automatically. You can then locate the
encoder in exacqVision using the Find IP Cameras feature (see section 6 of this document for more information).
If a DHCP server is not available, the encoder will default to a link-local address.
In either case, you can use the E-Series IP utility to find and configure the IP address and other network parameters.
Searching Online Devices
Click to run the IP utility. It automatically searches online devices every 15 seconds on the computer’s subnet. It
displays the total number of located devices in the Online Devices interface. Device information such as device type, IP
address, port number, and gateway are displayed.
Click to refresh the online device list manually. Any newly searched devices are added to the list. Devices can
be searched and displayed in the list within 15 seconds of connection, and they are removed from the list within 45
seconds after going offline.

exacqVision E-Series Quick Start
www.exacq.com
Page 9 of 11
9/9/2014
1 2 3
Modifying Network Parameters
1. Select the device to be modified in the device list.
2. Network parameters of the selected device are displayed in the Modify Network Parameters panel. Edit the
modifiable network parameters as needed.
3. Enter the password of the admin account of the device in the Password field and click to save the
changes.
NOTE: To modify the network parameters of multiple devices simultaneously, select all the devices to be modified before
editing the parameters. The IP address entered is incremented by one for the additional selected devices; that is, if you
enter 10.13.6.43 for the first selected device, the next device will be assigned 10.13.6.44, and so on until each selected
device is assigned an address.
Restoring Default Password
It is recommended that you change the admin password. Default credentials for the encoder are as follows:
Username: admin
Password: admin256
If you need to restore the default password, contact technical support to obtain a security code. Enter the security code
and click OK.

exacqVision E-Series Quick Start
www.exacq.com
Page 10 of 11
9/9/2014
1 2 4a
5d 6 7
4b
5e
5a
5b
5c
3
6 Connecting to an exacqVision System
NOTE: The latest version of exacqVision Client can be downloaded from https://exacq.com/support/downloads.php.
Initiating the Connection
To add the encoder to the exacqVision system using exacqVision Client, complete the following steps:
1. Open exacqVision Client and select the Config (Setup) page.
2. In the site tree, find the exacqVision server that the encoder will be associated with. Expand the server until you
can select Add IP Cameras.
3. Click Rescan Network to ensure all cameras and encoders are displayed in the Find IP Cameras list.
4. Locate the encoder in the Find IP Cameras list (4a). To narrow the list, type information about the encoder, such
as “E-Series” or the IP address, in the search box (4b).
5. Select the encoder entry in the list to display the encoder in the IP Camera Information section (5a). Enter the
username and password (5b), and then click Apply (5c).
NOTE: Alternatively, you can select Add (5d) next to the encoder’s entry, click Add Selected (5e), enter the
username and password of the encoder in the pop-up box, and click OK.
6. Verify that the encoder has been added to the IP Camera List.
7. Look at the Status column to ensure the encoder is detected and connected.

exacqVision E-Series Quick Start
www.exacq.com
Page 11 of 11
9/9/2014
1 2 3
4
Verifying the Connection
To verify that the encoder is transmitting video and audio from its cameras to the exacqVision server, complete the
following steps:
1. Open the exacqVision Client live page.
2. Expand the server in the site tree.
3. Select an encoder/channel combination to display video from the camera in the playback window.
4. If audio is connected, drag an audio channel into the playback window to verify the audio connection and
transmission.
For complete information about exacqVision Client, click the Help button or download the user manual from
https://exacq.com/support/specsheets.php?perma=exacqVision+User+Manuals.
 Loading...