


®
Understanding OneBlox and OneSystem
OneBlox 4312 User Guide
Version 2.15.5
®
RESET

Copyright
© 2016 Exablox, Inc.
Legal
THIS DOCUMENT IS THE PROPERY OF EXABLOX, INC., AND THE INFORMATION HEREIN
IS PROVIDED “AS IS.” EXABLOX, INC. MAKES NO WARRANTIES OR GUARANTEES WITH
RESPECT TO THE INFORMATION IN THIS DOCUMENT.
Revision Control
Document Number OB_UG-01-4312, Version 2.15.5, January 2017
How to Reach Us
Exablox, Inc.
1156 Sonora Court
Sunnyvale, CA 94086 USA
408-773-8477
855.EXABLOX (855.392.2569)
support@exablox.com

Contents
Chapter 1 Quick Start ............................................................................ 7
1.1 - 4312 Quick Start....................................................................................................8
Chapter 2 About This Document .......................................................... 9
2.1 - Audience.............................................................................................................10
2.2 - Document Contents .............................................................................................10
2.3 - Attention Boxes ................................................................................................... 10
2.4 - Important Terms .................................................................................................11
Chapter 3 Specifications ..................................................................... 13
3.1 - 4312 OneBlox Appliance Specifications ..................................................................14
3.2 - 4312 OneBlox Appliance Dimensions .....................................................................15
Chapter 4 Concepts ............................................................................. 17
4.1 - Network Information............................................................................................18
4.2 - Storage Management...........................................................................................18
4.2.1 - How to Access Information on OneBlox ........................................................18
4.2.2 - Protecting the Information on OneBlox .........................................................18
4.2.3 - How to Increase the Storage Capacity ..........................................................19
4.2.4 - Space Savings ............................................................................................19
4.3 - Storage Capacity Reporting through OneSystem ....................................................19
4.3.1 - Used Capacity.............................................................................................19
4.3.2 - Free Capacity .............................................................................................19
4.3.3 - Raw Capacity..............................................................................................19
4.3.4 - Unformatted Drive Capacity......................................................................... 19
4.3.5 - Available Capacity.......................................................................................20
4.4 - Storage Capacity Reported to Applications .............................................................20
4.4.1 - Filesystem Capacity Reporting......................................................................20
4.5 - Continuous Data Protection .................................................................................. 21
4.6 - Data Deletion ...................................................................................................... 21
4.7 - Shares and Permissions........................................................................................22
4.8 - Drive Management...............................................................................................22
Understanding OneBlox and OneSystem | Version 2.15.5 | page 3

C
ONTENTS
OneBlox 4312 User Guide
Chapter 5 OneBlox 4312...................................................................... 23
5.1 - How Do I Install OneBlox 4312 .............................................................................24
5.1.1 - Preparing for Setup.....................................................................................24
5.1.2 - Warnings and Precautions ...........................................................................24
5.1.3 - Installing OneBlox into a Rack......................................................................25
5.2 - How do I Install the Disk Drives in OneBlox 4312? .................................................28
5.2.1 - SAS/SATA Drive Installation.........................................................................28
5.3 - How do I pair OneBlox 4312 using the web console? ..............................................29
5.4 - How do I change the Static IP address with the Web Console?................................30
5.5 - What if My Network Does Not Have a DHCP Server? ..............................................32
5.6 - What if I don’t know the IP address of my OneBlox on the Network?.......................33
5.7 - What if I have multiple OneBlox on my Network. Is there an easy way to view each
OneBlox web console?33
5.8 - How do I Enable Variable-length Deduplication for a Share? ...................................34
5.9 - How do I Enable Compression for a given Share?...................................................34
5.10 - OneBlox 4312 Hardware Display Information .......................................................35
5.10.1 - Control Panel Buttons................................................................................35
5.10.2 - Control Panel LEDs....................................................................................36
5.10.3 - Drive Carrier LEDs.....................................................................................37
5.11 - How do I Replace a Power Supply? .....................................................................37
5.11.1 - Power Supply Failure.................................................................................37
5.11.2 - Removing/Replacing the Power Supply .......................................................37
5.12 - OneBlox 4312 Network Configuration Recommendations.......................................38
5.12.1 - What if I have a 1GbE network?.................................................................38
5.12.2 - What if I have a 10GbE network?...............................................................39
5.12.3 - What if I have a 10GbE and 1GbE network? ................................................40
Chapter 6 Common Tasks................................................................... 43
6.1 - How do I Manage OneBlox—Creating a OneSystem Account and Login....................45
6.2 - How do I assign a Single IP Address for the OneBlox Ring?.....................................47
6.3 - How do I Configure OneBlox with different Network Settings?.................................48
6.4 - How do I Configure OneBlox with Multiple Network Profiles and Port Groups? ..........50
6.5 - VLAN Tagging......................................................................................................55
6.6 - How do I Reset the Network Port Group Configuration?..........................................56
6.7 - Setting Up Active Directory and Authenticating OneBlox .........................................57
6.7.1 - Overview....................................................................................................57
6.7.2 - Having a OneBlox Ring join AD ....................................................................59
Understanding OneBlox and OneSystem | Version 2.15.5 | page 4

6.7.3 - Configuring Shares in the AD environment....................................................62
6.7.4 - Mapping a Network Drive in Windows...........................................................63
6.8 - Enabled IPMI network access for Lights Out Management.......................................68
6.9 - How do I enable two-factor Verification for additional security?...............................68
6.10 - How do I disable two-factor Verification in OneSystem? ........................................73
6.11 - How do I enable the Backup/Recovery specific Deduplication?...............................73
6.12 - Does OneBlox Deduplication work on a per share basis? .......................................74
6.13 - Who has Access to the Information on OneBlox—Adding, Removing, or Editing Users'
Access to Storage74
6.14 - How to give Groups of Users access to OneBlox—Adding/Editing Groups (Users)....78
6.15 - How do I create a Hidden Share..........................................................................79
6.16 - How do I create an NFS Export ...........................................................................80
6.17 - How do I Mount an NFS Export ...........................................................................81
6.18 - How do I set NFS Quotas?..................................................................................82
6.19 - How Do I Create a VMware NFS Datastore with OneBlox? .....................................84
6.19.1 - NFS and VMware Tips................................................................................86
6.20 - How do I create a Microsoft Hyper-V VHDX file? ...................................................87
6.21 - How do I set SMB Share Level Quotas?................................................................89
6.22 - Share Level Capacity Reporting...........................................................................90
6.23 - Which 10GbE cards are used and what SFP+ transceivers are supported?..............90
6.24 - How do I Limit which Storage Shares Users have Access to—Adding Shares...........91
6.25 - How do Users access Restricted Shares when Active Directory is not used? ............93
6.26 - How are the Settings for the OneBlox Ring Changed? ...........................................93
6.27 - What if I want to setup additional OneBlox in different Rings?...............................93
6.28 - Viewing Snapshots .............................................................................................94
6.29 - How do I turn Snapshots On and Off? .................................................................96
6.30 - How do I Hide the Snapshot Directory? ...............................................................96
6.31 - What is the Retention Policy for the Continuous Data Protection feature?...............98
6.32 - Can I Change the Snapshot Retention Policy?.....................................................100
6.33 - How can Exablox support access OneBlox? ........................................................ 102
6.34 - Are there Specific Firewall Settings that must be enabled for OneSystem and OneBlox
communication?102
6.35 - How do I set up OneBlox for Disaster Recovery? ................................................103
6.36 - How Should I Configure my Firewall for Remote Replication? .............................. 106
6.36.1 - Allowing Inbound Access .........................................................................106
6.36.2 - Optionally Allowing Outbound Access........................................................ 107
6.37 - In the Event of a Failure, How do I Enable Applications to Access the Secondary Ring in
a Mesh Configuration?107
6.38 - How Can I stop or resume Remote Replication for a Given Share? .......................108
6.39 - How do I Know What the Recovery Point of a Given Share is?.............................109
6.40 - How do I Change or Reset my OneSystem Password?......................................... 110
Understanding OneBlox and OneSystem | Version 2.15.5 | page 5

C
ONTENTS
OneBlox 4312 User Guide
6.40.1 - Password Policy...................................................................................... 110
6.41 - What if I want to Erase all of the Information on my OneBlox? ........................... 111
6.42 - How do I see what the deduplication ratio is for the OneBlox Ring?..................... 112
6.43 - How Can I Audit OneSystem Administrator Actions? ........................................... 114
6.44 - How do I remotely Shutdown OneBlox?............................................................. 114
6.45 - How do I see the Status of Disk Drives used with my OneBlox? .......................... 115
6.46 - If I have a OneBlox hardware failure how do I replace the OneBlox?................... 115
6.47 - How do I Deploy Private OneSystem? ............................................................... 115
6.48 - How do I disable Encryption in Flight?............................................................... 116
Chapter 7 Open Source Software......................................................117
7.1 - Open Source Compliance ................................................................................... 118
Task Index .................................................................................................................119
Index ..........................................................................................................................121
Understanding OneBlox and OneSystem | Version 2.15.5 | page 6

C
HAPTER
1
Quick Start
4312 Quick Start........................................................................................................ 8
Understanding OneBlox and OneSystem | Version 2.15.5 | page 7

C
www.exablox.com @exablox
@
@
www.exablox.com
@
@
HAPTER
1 : Quick Start
1.1 - 4312 Quick Start
This Quick Start information was also shipped with your device. It is repeated here for your
convenience.
Insert Disk Drives
1
To view the quick start guide online visit https://exablox.io/4312-QSG.
•
Remove the drive carriers and the drive filler with a screwdriver. Insert a disk drive
•
with the circuit board facing down and SATA/SAS connections facing the open end of
the carrier. The additional necessary screws are in the Exablox accessory box.
Ensure all drive carriers are inserted completely into OneBlox for proper airflow. If
•
less than 12 drives are initially installed, additional drives may be added at any time.
The disk drives do not need to have identical capacities.
2 Rack, Connect the Power and Network Cables
To rack mount OneBlox, follow the directions provided with the rack rail hardware in
•
the original OneBlox packaging. Connect both power cords to the OneBlox and into
standard 120/220 VAC grounded outlet. Take note of the OneBlox host name
(OneBlox4xxxx) located on the rear for use in step 4 and later.
For 1GbE networks, connect 10GbE and 1GbE Ethernet cables to the rear of the
•
OneBlox. For 10GbE networks, connect only 10GbE BASE-T or 10GbE SFP+ ports.
NOTE: By default, all ports are bonded using `Active/Backup’ and present a single IP
address. Advanced network configuration is an option, including LACP and port
groups. Refer to the user guide for more details https://exablox.io/useinfo.
Please ensure OneBlox has internet access to OneSystem. If configuring static IP
•
addresses see step 3.
NOTE: The IPMI port located on the left and may be used for lights out remote
•
management. You may access it by browsing to http://<IPMIIPAddress>
OneBlox 4312 User Guide
Starting Up
3
The OneBlox Web Console is viewed through a web browser and used to configure the
•
Static IP address, DNS, NTP Server, bond mode, and other configuration details to meet
your network infrastructure requirements.
While on the same network as the OneBlox, you may view the Web Console by opening
•
a web browser and entering the OneBlox IP Address http://<OneBloxIPaddress> or by
the host name from a Mac http://<OneBlox4xxxx.local>
When logging into the Web Console and changing the network settings, the default user
•
name is ‘admin’ and default password is ‘config’. You will be prompted to change the
password when logging in.
NOTE: If OneBlox is deployed on a network with no DHCP server, please connect a
•
monitor to the display port and keyboard to view the OneBlox and IPMI IP addresses.
Refer to the user guide located at https://exablox.io/useinfo for additional information.
When the startup process is complete, the Web Console will display, “OneBlox is ready
•
to use”.
The OneBlox cluster may be accessed by using the cluster name displayed on the web
•
console. If desired, the cluster name may be changed in OneSystem.
Ready to Use
4
When you’re ready to manage your OneBlox, please create an account at:
•
https://onesystem.exablox.com. If a Private OneSystem deployment is selected,
please refer to the Private OneSystem deployment guide for details at
https://exablox.io/useinfo
•
For useful and tutorial information visit www.exablox.com/how-to-videos. Release
notes and user guide documentation can be found after logging into OneSystem and
selecting ‘help and info’ in the upper right portion of the web browser next to the
OneSystem user’s email address.
•
If you have any questions or problems, visit support.exablox.com or contact us at
support@exablox.com.
www.exablox.com @exablox
www.exablox.com @exablox
Understanding OneBlox and OneSystem | Version 2.15.5 | page 8

C
HAPTER
2
About This Document
Audience................................................................................................................. 10
Document Contents ................................................................................................. 10
Attention Boxes ....................................................................................................... 10
Important Terms ..................................................................................................... 11
Understanding OneBlox and OneSystem | Version 2.15.5 | page 9

C
HAPTER
2 : About This Document
2.1 - Audience
This document is written for administrators of OneBlox and the OneSystem Cloud-based
management service. It describes concepts, workflows, and tasks for administering OneBlox on a
network via OneSystem.
2.2 - Document Contents
This document contains the following information:
• Chapter 1, “Quick Start” on page 7
• Chapter 2, “About This Document” on page 9 (this chapter)
• Chapter 3, “Specifications” on page 13
• Chapter 4, “Concepts” on page 17
• Chapter 5, “OneBlox 4312” on page 23
• Chapter 6, “Common Tasks” on page 43
• Chapter 7, “Open Source Software” on page 117
•“Task Index” on page 119
•“Index” on page 121
OneBlox 4312 User Guide
2.3 - Attention Boxes
Warning: Bodily injury may result if instructions are not followed properly.
Caution: Equipment damage may result if instructions are not followed properly.
Important: Information that should be followed exactly as written.
Tip: Helpful information for understanding concepts or performing tasks more easily.
Task: Set of steps.
Understanding OneBlox and OneSystem | Version 2.15.5 | page 10

C
HAPTER
2 : About This Document
2.4 - Important Terms
OneBlox 4312 User Guide
Microsoft Active Directory Active Directory (AD) provides a central location for network administration and secu-
rity. Servers that run Active Directory are called domain controllers. An AD domain
controller authenticates and authorizes all users and computers in a Windows domain
type network-assigning and enforcing security policies for all computers and installing
or updating software. For example, when a user logs into a computer that is part of a
Windows domain, AD checks the submitted password and determines whether the
user is a system administrator or normal user. OneSystem enables administrators to
authenticate against an AD domain.
Active Connections Number of active users connected to the OneBlox ring at a given time
CIFS/SMB The Common Internet File System (CIFS) is the standard communication protocol
servers and clients use to access files on OneBlox. One section of the Server Messaging Block (SMB) protocol specifically deals with access to file systems, such that clients may make requests to a file server over the network.
Component Health Reflects health of a ring (comprised of one or more OneBlox) with regards to compo-
Continuous Data Protection
(CDP)
nents such as disks, ethernet cable, power, and so on.
An advanced technique to protect every file that is written to OneBlox. See “Continu-
ous Data Protection” on page 21.
Data Health Reflects the health of the data with regards to the number of copies of data available
in the ring(s). If the number of copies is less than the desired protection level (e.g., 3
copies) or the data is being rebuilt or rebalanced, the data health will indicate the
appropriate status.
Deduplication This is a method by which identical user data (or portions of identical data) is
detected and stored only once. See “Space Savings” on page 19.
Group A collection of user(s) can be assigned and organized into a collection of individuals to
make policy actions easier (e.g., group A has access to storage share A on the network).
Hard Link In computing, a hard link is a directory entry that associates a name with a file on a
file system. (A directory is itself a special kind of file that contains a list of such
entries.) The term is used in file systems which allow multiple hard links to be created
for the same file. This has the effect of creating multiple names for the same file,
causing an aliasing effect: e.g., if the file is opened by one of its names, and changes
are made to its content, then these changes will also be visible when the file is
opened by an alternative name.
NFS Network File System is a distributed file system protocol originally developed by Sun
Microsystems in 1984, allowing a user on a client computer to access files over a network much like local storage is accessed. NFS, like many other protocols, builds on
the Open Network Computing Remote Procedure Call (ONC RPC) system. The Network File System is an open standard defined in RFCs.
OneSystem
OneBlox
®
®
Protected Capacity The total amount of storage that is configured and available to applications and users
100% Cloud-based data management service used to manage OneBlox.
A physical storage hardware appliance to store and retrieve information.
within a ring. The raw storage capacity will be greater than the amount of protected
capacity. Protected capacity is analogous to usable capacity.
Protection Level The number of replicated copies of information within a ring or mesh providing a way
to recover information in the event of disk drive or OneBlox failure.
Ring Multiple interconnected OneBlox (up to 7 OneBlox) in a local area network that pres-
ent a single file system to applications and users.
Share The CIFS/SMB method of providing access to the file system. A file system can con-
tain any number of shares. A share can be thought of as a partition of the file storage
area with three levels of access: 'Anyone,' 'All Registered', and 'Restricted'. See “How
do I Limit which Storage Shares Users have Access to—Adding Shares” on page 91.
Snapshots Snapshots of data are taken continuously and can be viewed by date or by most
recent. See “Viewing Snapshots” on page 94.
Understanding OneBlox and OneSystem | Version 2.15.5 | page 11

C
HAPTER
2 : About This Document
OneBlox 4312 User Guide
Symbolic Link In computing, a symbolic link (also symlink or soft link) is a special type of file that
contains a reference to another file or directory in the form of an absolute or relative
path and that affects pathname resolution.
User Individual(s) with access to the network and consequently access to the public share
on OneBlox. The individual(s) can also be given different permissions and privileges to
access additional shares on OneBlox.
Understanding OneBlox and OneSystem | Version 2.15.5 | page 12

C
HAPTER
3
Specifications
4312 OneBlox Appliance Specifications...................................................................... 14
4312 OneBlox Appliance Dimensions ......................................................................... 15
Understanding OneBlox and OneSystem | Version 2.15.5 | page 13

C
HAPTER
3 : Specifications
3.1 - 4312 OneBlox Appliance Specifications
Table 3-1: 4312 OneBlox Appliance Specifications
System Input Requirements 100-240 V AC, 10.7 – 4.2A max
Power Supply Dual output Power 920W; Output Voltages +12V (75A), +5Vsb (4A)
Thermal Rating 900 BTU/hr, 270W (typical)
Weight (empty, no disks) 52 lb. (23.6 kg)
OneBlox 4312 User Guide
Space Requirements (W x H x D) 19 x 3.5 x 27.625 in. (482.6 x 88.9 x 701.7 mm)
Hard Drive Bays 12 x 3.5” drive slots, hot swappable
Hard Drive Type 3.5" SATA II & III (3 Gb/s and 6 Gb/s) / 3.5" SAS (6Gb/s and 12 Gb/s)
Max. Raw Capacity 96 TB (12 disks rated at 8 TB each)
Operating Temperature and
Humidity
Non-operating Temperature
and Humidity
Operating Acoustic Noise 56.5 dBA sound pressure (LpA) at normal operating conditions (at 22°C and at
Cooling Three variable-speed fans
File Service and Other Protocol
Support
Gigabit Ethernet Ports 2 x 10GbE BASE-T, 2 x 1 GbE BASE-T, 2 x 10GbE SFP+ (optional)
USB Ports 2 x USB 2.0, 2 x USB 3.0
Virtual LCD Screen Accessible through web browser
LED Lights Blue and red activity and status LEDs on each drive bay door
Electromagnetic Emission and
Compatibility
2 Rack Units
10° C to 35° C (50° F to 95° F); 8% to 90% relative humidity, noncondensing
-40° C to 60° C (-40° F to 140° F); 5% to 95% relative humidity, noncondensing
sea level)
SMB (1.0, 2.0, 2.1, 3.0), NFS v3
FCC Class A, EN 55022 Class A, EN 61000-3-2/-3- 3, CISPR 22 Class A
Safety and Quality CSA/EN/IEC/UL 60950-1 Compliant, UL or CSA Listed (USA and Canada),
CE Marking (Europe)
Understanding OneBlox and OneSystem | Version 2.15.5 | page 14

C
HAPTER
3 : Specifications
3.2 - 4312 OneBlox Appliance Dimensions
OneBlox 4312 User Guide
Understanding OneBlox and OneSystem | Version 2.15.5 | page 15

C
HAPTER
3 : Specifications
OneBlox 4312 User Guide
Understanding OneBlox and OneSystem | Version 2.15.5 | page 16

C
HAPTER
4
Concepts
Network Information................................................................................................ 18
Storage Management............................................................................................... 18
Storage Capacity Reporting through OneSystem ........................................................ 19
Storage Capacity Reported to Applications ................................................................. 20
Continuous Data Protection ...................................................................................... 21
Data Deletion .......................................................................................................... 21
Shares and Permissions............................................................................................ 22
Drive Management .................................................................................................. 22
Understanding OneBlox and OneSystem | Version 2.15.5 | page 17

C
HAPTER
4 : Concepts
4.1 - Network Information
OneBlox 4312 has 2 x 10GbE BASE-T and 2 x 1 GbE ports available to the network. An additional
2 x 10GbE SFP+ ports are optional.
OneBlox uses a balance-alb networking protocol to present a single IP address from the Ring,
even if multiple OneBlox are in the same Ring. Each OneBlox can be assigned either reserved
DHCP or Static IP addresses. Admins may assign a Virtual IP address for the Ring that will resolve
application and client connections to any OneBlox in the Ring if applications have difficulty with
mDNS or NETBIOS.
4.2 - Storage Management
4.2.1 - How to Access Information on OneBlox
When connecting OneBlox to the network, a Public share is accessible to anyone on the network.
Any information stored in the public share can be accessed and modified by individuals on the
network.
Administrators, through OneSystem, can define permissions for different users to have different
levels of access (read only vs. read/write) to different shares on the network. Administrators can
add/remove shares, groups and/or users through their OneSystem account. If companies are
using Microsoft Active Directory, OneSystem can be integrated with Active Directory and utilize the
existing access control permission a company is using.
To access OneBlox, it can be done over the local area network (LAN) and seen through Windows
Explorer, Mac Finder, or Linux. It appears as a drive or share to the users and applications.
OneBlox 4312 User Guide
4.2.2 - Protecting the Information on OneBlox
OneBlox's file system protects all information stored in a number of ways. OneBlox protects
against data deletion/corruption, drive removal, drive failures, OneBlox failures, and ring failures.
OneBlox takes continuous snapshots of information being stored in OneBlox. In doing so, each
user has access to previous versions of the files stored in OneBlox, even up to the last few
seconds. Users can access the snapshot directory through Windows Explorer or Mac Finder and
recover exactly the needed file themselves without requiring the assistance of an administrator.
The continuous protection provides the ability to go back to the last file written to OneBlox (which
could be the last few seconds), as well as further back in time: the last minute, hour, day, week,
month, or year(s).
OneBlox protects against drive failures by creating three replicated copies of every file written to
OneBlox. By creating three copies, any two drives can fail and users will still have access to the
information. OneBlox doesn't use a legacy RAID protection scheme, so administrators don't need
to be concerned with volumes, storage LUNs, drive types, or drive capacities. OneBlox manages
this complexity for the administrator.
When a single OneBlox is used, OneBlox creates three replicated copies of the information on the
single OneBlox. When multiple OneBlox are used, OneBlox, intelligently, load balances and
distributes the copies of information across multiple OneBlox. When three or more OneBlox are
used in a ring, two OneBlox can fail and users will still have access to the information. A OneBlox
failure may be a result of a hardware failure (e.g., network, memory, power supply). In each case
the information is protected.
If your company is concerned about a site failure, a ring (up to 7 interconnected OneBlox) may be
replicated to another ring over local or wide-area distances in a mesh. In the event of one site
Understanding OneBlox and OneSystem | Version 2.15.5 | page 18

C
HAPTER
4 : Concepts
going offline, the other site has additional copies of the information and users can access the
information from the alternate ring.
OneBlox 4312 User Guide
4.2.3 - How to Increase the Storage Capacity
OneBlox provides the ability to dynamically grow the size of the ring in a number of ways.
Individual drives can be added to a single OneBlox if there are available drive bays. Alternatively,
an existing drive in OneBlox can be removed and replaced with a larger capacity drive.
In addition to drive growth, additional OneBlox can be added. This is a similar process to the first
OneBlox addition, but simpler. Refer to Chapter 1, “Quick Start” on page 7 for OneBlox installation.
If the OneBlox is added to the same LAN as an existing OneBlox, it will dynamically join the
existing OneBlox(s) and the single file system accessible by applications and users now have
access to the capacity of the new OneBlox without any configuration changes.
4.2.4 - Space Savings
OneBlox efficiently stores information in OneBlox. Every file written to OneBlox is deduplicated.
Every file, and every portion of a file that is written is compared to files already stored on OneBlox.
If the same file (or portion) is already stored a duplicate is not written to OneBlox. This
dramatically improves the amount of usable capacity available to applications and users.
In addition to the information being deduplicated, the snapshots are also deduplicated resulting in
further increases in usable capacity.
4.3 - Storage Capacity Reporting through OneSystem
4.3.1 - Used Capacity
Used storage capacity is the amount of storage (or capacity) that has been consumed by
applications and/or users when data protection is taken into account. As OneBlox creates three
replicas of the information, the used capacity increases accordingly. With data deduplication, the
available storage capacity is typically increased with object-based global deduplication.
4.3.2 - Free Capacity
Free capacity is the amount of storage (or capacity) that is available to applications and/or users.
This value does not take into account data protection or deduplication. For example, if there is
6TBs of free capacity and an application writes 1TB of 100% unique data (resulting in zero
deduplication), the free capacity will be reduced to approximately 3TB. (There are three copies of
the 1TB of data to protect against two drive or two OneBlox failures.)
4.3.3 - Raw Capacity
Raw storage capacity is the total capacity installed in the OneBlox Ring. The raw capacity accounts
for the OneBlox filesystem and will be slightly less than the 'unformatted drive capacity' seen in
each OneBlox view of OneSystem. Raw capacity will be greater than the available storage capacity
that is presented to applications and users.
4.3.4 - Unformatted Drive Capacity
Unformatted drive capacity is the sum of the capacity of each drive in OneBlox and does not
account for any OneBlox filesystem formatting or overhead.
Understanding OneBlox and OneSystem | Version 2.15.5 | page 19

C
HAPTER
4 : Concepts
4.3.5 - Available Capacity
Available storage capacity is the free capacity presented to applications. Available capacity will be
the capacity a given application may write to the OneBlox Ring. The available capacity does not
take into account any data protection or deduplication. Consequently, an application that sees 1TB
of available capacity and writes 1TB of data that is 100% deduplicated, it will see 1TB of available
capacity at the conclusion of the new writes.
4.4 - Storage Capacity Reported to Applications
OneBlox’s object-based storage architecture enables OneSystem to report storage capacity
utilization information in two meaningful ways:
• OneSystem admins will see the pertinent physical disk storage information (the drive capacity
that does not take into account the OneBlox filesystem, deduplication, or data protection).
• OneSystem admins will also see the information from the application’s perspective. This is an
updated view into capacity planning and with OneBlox 2.6, applications will be able to more
accurately understand total, free, and used storage capacity.
4.4.1 - Filesystem Capacity Reporting
For filesystem capacity reporting, there are also three terms to understand.
OneBlox 4312 User Guide
1.
Total Storage Capacity is the maximum amount of information that can be written to the
OneBlox file system after accounting for the filesystem overhead and data protection. Since all
information is protected by storing three copies within a Ring, the total storage capacity will be
reported as 1/3 the Total Disk Capacity. This value can also be seen from the application.
Understanding OneBlox and OneSystem | Version 2.15.5 | page 20

C
HAPTER
4 : Concepts
2.
Free Storage Capacity is the amount of capacity that is presented to applications for a given
OneBlox Ring to accept new application writes. This value takes into account the data protection
provided by the OneBlox filesystem. Similar to total storage capacity, the free capacity is
approximately 1/3 the free disk capacity. For example, if an application sees 1TB of free storage
capacity and writes 1TB of unique data, it will consume 3TB of used disk capacity (as reported in
“Used Capacity” on page 19). Alternatively, if an application sees 1TB of free storage capacity
and writes 1TB of deduplicated data, it will not consume storage and the used disk capacity and
the free storage capacity will remain unchanged.
3.
Used Storage Capacity is the amount of capacity that an application has consumed after
writing information to the OneBlox filesystem. This value takes into account data protection,
deduplication, and snapshot capacity consumption. For example, if a OneBlox Ring is reporting
5TB of used storage capacity and an application writes 1TB of 100% duplicate information to the
OneBlox Ring, the used storage capacity will remain at 5TB since no additional file system storage
capacity has been consumed.
4.5 - Continuous Data Protection
• Continuous Data Protection (CDP) is enabled by default. For new shares created through
OneSystem, the snapshot policy can be customized and CDP disabled.
• Continuous Data Protection is an advanced technique to protect files that are written to OneBlox.
As files are written, a space optimized snapshot is taken, which is immediately available for
recovery if necessary.
• Snapshots may be viewed and recovered through Windows previous version as well through
Windows Explorer and Mac Finder.
• The snapshots leverage deduplication to decrease the amount of storage capacity used when
saving copies of files. You can access Snapshots by clicking the Snapshots folder on the network
share, and selecting to view the recoverable files by date or by the most recent. The date view
is presented in a tree-like hierarchy.
• Once the file is found that is needed to be recovered, it can be selected from Windows previous
version or users can copy/paste the desired file from Explorer/Finder to a directory on the local
client or in a share on OneBlox.
• To view a snapshot, see “Viewing Snapshots” on page 94.
OneBlox 4312 User Guide
4.6 - Data Deletion
Deleting data (e.g., a folder or file) does not actually delete all versions of the information if the
share is protected with CDP. When Snapshots and Continuous Data Protection are enabled, a copy
is stored based on the retention policy. For example, a user might delete a file or folder thinking
the information is deleted. The Snapshot feature means that copies of all files are saved, therefore
deleting the file does not actually delete it.
Through OneSystem, if an admin deletes an entire share, the primary information and all related
snapshots within a share will be permanently deleted. This operation can not be undone and will
require a password confirmation step before completion.
Understanding OneBlox and OneSystem | Version 2.15.5 | page 21

C
HAPTER
4 : Concepts
4.7 - Shares and Permissions
Shares are a way to access information stored on OneBlox over the network. When OneBlox is
initially installed, a Public share is automatically available on the network (the default share name
is name of the OneBlox appliance-which can be found on the LCD) and provides read/write access
to OneBlox for all users on the network. Additional shares can be created through OneSystem and
shares can have different access permissions associated with each share.
Shares can be added and assigned the following permissions:
• Public — Anyone on the local area network will have read/write access (no username or
password required).
• All Registered — Every registered user with OneSystem has access to the share (username and
password required). If OneSystem is integrated with Active Directory, every user in Active
Directory will have access to the share (username and password required). In the user and
group permission settings read only or read/write access can be assigned to the share.
• Restricted — Only selected users and/or groups have access to the share (username and
password required). In the user and group permission settings read only or read/write access
can be assigned to the share.
For information on how to add shares, see “How do I Limit which Storage Shares Users have
Access to—Adding Shares” on page 91.
For information on how to add users or groups, see “How to give Groups of Users access to
OneBlox—Adding/Editing Groups (Users)” on page 78.
OneBlox 4312 User Guide
4.8 - Drive Management
Important:
reusing an existing drive for use in OneBlox, back it up first before installation in OneBlox. You will
not be able to retrieve the data on the drive once it is inserted into OneBlox.
OneBlox supports many different 3.5" SATA/SAS drive options. Over 50 different makes and
models of drive are currently being used and certified with OneBlox. Drives need to be at least 1TB
or larger to be used in OneBlox. OneBlox 4312 supports up to 8TB drives with this release. If you
find a drive that seems not to work, please contact technical support. Although OneBlox supports
heterogeneous drive configurations, the optimal configuration is for all drives to be the same
capacity in a Ring. However, OneBlox with different drives are fully supported in a Ring. Please
review the FAQs at exablox.com.
For more information, see “How do I Add and Replace Storage—Installing and Removing Drives”
on page 50.
All drives placed into the OneBlox appliance will be reformatted, therefore if you are
Understanding OneBlox and OneSystem | Version 2.15.5 | page 22

C
HAPTER
5
OneBlox 4312
How Do I Install OneBlox 4312 ................................................................................. 24
How do I Install the Disk Drives in OneBlox 4312? ..................................................... 28
How do I pair OneBlox 4312 using the web console?.................................................. 29
How do I change the Static IP address with the Web Console? ................................... 30
What if My Network Does Not Have a DHCP Server? .................................................. 32
What if I don’t know the IP address of my OneBlox on the Network? .......................... 33
What if I have multiple OneBlox on my Network. Is there an easy way to view each OneBlox
web console? .......................................................................................................... 33
How do I Enable Variable-length Deduplication for a Share? ....................................... 34
How do I Enable Compression for a given Share? ...................................................... 34
OneBlox 4312 Hardware Display Information ............................................................. 35
How do I Replace a Power Supply? ........................................................................... 37
OneBlox 4312 Network Configuration Recommendations ............................................ 38
Understanding OneBlox and OneSystem | Version 2.15.5 | page 23

C
HAPTER
5 : OneBlox 4312
5.1 - How Do I Install OneBlox 4312
This section provides a quick setup checklist to install the OneBlox 4312 into a rack.
5.1.1 - Preparing for Setup
The box the OneBlox 4312 was shipped in should include two sets of rail assemblies, two rail
mounting brackets and the mounting screws you will need to install OneBlox into the rack. Follow
the steps in the order given to complete the installation process in a minimum amount of time.
OneBlox 4312 User Guide
Important:
Please read this section in its entirety before you begin the installation procedure
outlined in the sections that follow.
5.1.1.1 - Choosing a Setup Location
• Leave enough clearance in front of the rack to enable you to open the front door completely (~25
inches) and approximately 30 inches of clearance in the back of the rack to allow for sufficient
airflow and ease in servicing.
• This product is for installation only in a Restricted Access Location (dedicated equipment rooms,
service closets and the like).
5.1.2 - Warnings and Precautions
5.1.2.1 - Rack Precautions
• Ensure that the leveling jacks on the bottom of the rack are fully extended to the floor with the
full weight of the rack resting on them.
• In single rack installation, stabilizers should be attached to the rack. In multiple rack installations,
the racks should be coupled together.
• Always make sure the rack is stable before extending a component from the rack.
• You should extend only one component at a time—extending two or more simultaneously may
cause the rack to become unstable.
5.1.2.2 - Server Precautions
• Determine the placement of each component in the rack before you install the rails.
• Install the heaviest server components on the bottom of the rack first, and then work up.
• Use a regulating uninterruptible power supply (UPS) to protect the server from power surges,
voltage spikes and to keep your system operating in case of a power failure.
• Allow any hot plug drives and power supply modules to cool before touching them.
• Always keep the rack's front door and all panels and components on the servers closed when
not servicing to maintain proper cooling.
5.1.2.3 - Rack Mounting Considerations
Ambient Operating Temperature
If installed in a closed or multi-unit rack assembly, the ambient operating temperature of the rack
environment may be greater than the ambient temperature of the room. Therefore, consideration
should be given to installing the equipment in an environment compatible with the manufacturer’s
maximum rated ambient temperature (TMRA).
Reduced Airflow
Understanding OneBlox and OneSystem | Version 2.15.5 | page 24

C
HAPTER
5 : OneBlox 4312
OneBlox 4312 User Guide
Equipment should be mounted into a rack so that the amount of airflow required for safe operation
is not compromised.
Mechanical Loading
Equipment should be mounted into a rack so that a hazardous condition does not arise due to
uneven mechanical loading.
Circuit Overloading
Consideration should be given to the connection of the equipment to the power supply circuitry
and the effect that any possible overloading of circuits might have on overcurrent protection and
power supply wiring. Appropriate consideration of equipment nameplate ratings should be used
when addressing this concern.
Reliable Ground
A reliable ground must be maintained at all times. To ensure this, the rack itself should be
grounded. Particular attention should be given to power supply connections other than the direct
connections to the branch circuit (i.e., the use of power strips, etc.).
Warning: To prevent bodily injury when mounting or servicing this unit in a rack, you
must take special precautions to ensure that OneBlox remains stable. The following
guidelines are provided to ensure your safety.
• This unit should be mounted at the bottom of the rack if it is the only unit in the rack.
• When mounting this unit in a partially filled rack, load the rack from the bottom to the top with
the heaviest component at the bottom of the rack.
• If the rack is provided with stabilizing devices, install the stabilizers before mounting or servicing
the unit in the rack.
5.1.3 - Installing OneBlox into a Rack
5.1.3.1 - Separating the Sections of the Rack Rails
The OneBlox package includes two rail assemblies in the rack mounting kit. Each assembly
consists of two sections: an inner fixed OneBlox rail that secures directly to the server OneBlox and
an outer fixed rack rail that secures directly to the rack itself. You should also refer to the
installation instructions that came with the rack unit you are using.
5.1.3.2 - Installing the Inner Rail Extension
OneBlox includes a set of inner rails in two sections: inner rails and inner rail extensions. The inner
rail extension is attached to the inner rail to mount the OneBlox in the rack.
Understanding OneBlox and OneSystem | Version 2.15.5 | page 25

C
HAPTER
5 : OneBlox 4312
OneBlox 4312 User Guide
5.1.3.3 - Installing the Inner Rails
To install the Inner Rails
1.
Place the inner rail extensions on the side of the OneBlox aligning the hooks of the OneBlox with
the rail extension holes. Make sure the extension faces "outward" just like the pre-attached inner
rail.
2.
Slide the extension toward the front of the OneBlox.
3.
Secure the OneBlox with 2 screws as illustrated. Repeat steps for the other inner rail extension.
Warning: Do not pick up the server with the front handles. They are designed to pull OneBlox
from a rack only.
Figure 5-1: Separating the Rack Rails
Slide rail mounted equipment is not to be used as a shelf or a work space.
Stability hazard. The rack stabilizing mechanism must be in place, or the rack must be
bolted to the floor before you slide the unit out for servicing. Failure to stabilize the rack can cause
the rack to tip over.
Understanding OneBlox and OneSystem | Version 2.15.5 | page 26

C
HAPTER
5 : OneBlox 4312
OneBlox 4312 User Guide
Figure 5-2: Assembling the Outer Rails
5.1.3.4 - Outer Rack Rails
Outer rails attach to the rack and hold the OneBlox in place. The outer rails for OneBlox extend
between 30 inches and 33 inches.
To install the Outer Rails to the Rack
1.
Secure the back end of the outer rail to the rack, using the screws provided.
2.
Press the button where the two outer rails are joined to retract the smaller outer rail.
3.
Hang the hooks of the rails onto the rack holes and if desired, use screws to secure the front of
the outer rail onto the rack.
4.
Repeat steps 1-3 for the remaining outer rail.
To install the OneBlox into a Rack
1.
Extend the outer rails as illustrated above.
2.
Align the inner rails of the OneBlox with the outer rails on the rack.
3.
Slide the inner rails into the outer rails, keeping the pressure even on both sides. When the
OneBlox has been pushed completely into the rack, it should click into the locked position.
4.
Optional screws may be used to secure the front of the OneBlox to the rack.
NOTE:
The figure above is for illustration purposes only. Always install servers to the bottom of
the rack first.
Understanding OneBlox and OneSystem | Version 2.15.5 | page 27

C
HAPTER
5 : OneBlox 4312
Figure 5-3: Installing the Rack Rails
5.2 - How do I Install the Disk Drives in OneBlox 4312?
5.2.1 - SAS/SATA Drive Installation
These drives are mounted in carriers to simplify their installation and removal from OneBlox. The
carriers also help promote proper airflow for the drives. For this reason, even empty carriers
without hard drives installed must remain in OneBlox.
OneBlox 4312 User Guide
To remove a Drive Carrier
1.
Push the release button located beside the drive's LEDs.
2.
Swing the handle fully out and use it to pull the drive carrier straight out (see Figure 5-4).
To mount a drive in a Drive Carrier
1.
To add a new hard drive, install the drive into the carrier with the printed circuit board side facing
down so that the mounting holes align with those in the carrier.
2.
Secure the drive to the carrier with screws, as shown in Figure 5-5.
Understanding OneBlox and OneSystem | Version 2.15.5 | page 28

C
1
HAPTER
5 : OneBlox 4312
OneBlox 4312 User Guide
Figure 5-4: Removing a Hard Drive Carrier
2
Caution: Regardless of how many hard drives are installed, all drive carriers must remain
in the drive bays to maintain proper airflow.
Figure 5-5: Mounting a Drive in a Carrier
5.3 - How do I pair OneBlox 4312 using the web console?
To pair OneBlox using the web console
1.
Access the virtual OneBlox web console:
From a Mac laptop, when you are on the same network as the OneBlox, simply enter
http://oneblox4xxxx.local into your browser, where
oneblox4xxxx
is the host name found on the
rear of your OneBlox (or through OneSystem). The process to access the web console from a PC
also applies when using a Mac.
Understanding OneBlox and OneSystem | Version 2.15.5 | page 29

C
HAPTER
5 : OneBlox 4312
OneBlox 4312 User Guide
From a PC, when you are on the same network, you will need to enter the IP address of the
OneBlox into your web browser. For example, http://192.168.x.x, to access the web console. You
can open the web console by clicking on the word ‘OneBlox web console’ in OneSystem during the
“register new Rings” workflow.
2.
After clicking “OneBlox web console” this will open a new web page with the web console and
immediately display the pairing code. The web console is also used to configure static IP
addresses, DNS servers, proxy server, and NTP.
3.
For additional help in locating the web console information, you may click on “Where is my web
console” in the top portion of the window.
5.4 - How do I change the Static IP address with the Web Console?
To change the Static IP address with the web console
1.
With your web browser:
- From a PC or Mac, enter the IP address of the OneBlox.
- From a Mac, you may also enter the OneBlox host name, http://oneblox40xxx.local.
Understanding OneBlox and OneSystem | Version 2.15.5 | page 30

C
HAPTER
5 : OneBlox 4312
OneBlox 4312 User Guide
2.
Click “here” in the top portion of the page where you see “You can do basic configuration network
here”.
3.
Enter the default user name ‘admin’ and default password ‘config’.
4.
You will be prompted to change the default password. Select a secure password.
Understanding OneBlox and OneSystem | Version 2.15.5 | page 31

C
HAPTER
5 : OneBlox 4312
5.
Enter the appropriate network configuration information and click ‘Save’.
OneBlox 4312 User Guide
NOTE:
If you change from a DHCP to Static IP configuration and have logged into the web console
with the IP address, you will have to enter the new Static IP address to view the web
console again.
5.5 - What if My Network Does Not Have a DHCP Server?
When a OneBlox 4312 is installed on a LAN without a DHCP server, it will be assigned an IPv6 link
local IP address. With OneBlox 2.12 and later, the IP address, IMPI IP address, MAC address, and
other information may be seen by simply connecting a USB keyboard and monitor to the rear of
OneBlox. There’s no need to enter a username or password, the information will be printed on the
monitor. If OneBlox is installed on a network without DHCP, there will be a self assigned 169.x.x.x
IP address that will be shown. Enter this address into the web browser to access the OneBlox Web
Console. Following is what the print out will look like.
Understanding OneBlox and OneSystem | Version 2.15.5 | page 32

C
HAPTER
5 : OneBlox 4312
Hostname: oneblox400001.local
Version: OneBlox 2.14.1 build 18 Chardonnay
169.x.x.x
IPv6 Address: fe80::ec4:7aff:xxxx:xxxx
IPMI:
IP Address Source : DHCP Address
IP Address : 0.0.0.0
Subnet Mask : 0.0.0.0
MAC Address : 0c:c4:7a:xx:xx:xx
PING oneblox400001.local (169.254.8.96) 56(84) bytes of data.
OneBlox 4312 User Guide
Enter the IP address from the display in the browser URL bar. The OneBlox Web Console will
appear. To complete the static IP and network configuration, on the Web Console, click on the
word “here” to login. The default user name/password is admin/config. Refer to “How do I change
the Static IP address with the Web Console?” on page 30.
5.6 - What if I don’t know the IP address of my OneBlox on the Network?
If you have a DHCP network and you are trying to discover the OneBlox through the web console
for the first time there are a few options.
1.
You may connect a display and keyboard to OneBlox and the networking information will be
printed on the screen, and then enter the IP address in the URL bar of the browser. Refer to
section 5.5 for example output.
2.
While on the same network subnet, from a Mac laptop you can enter the hostname of the OneBlox
into your browser: http://oneblox4xxxx.local
3.
While on the same network subnet, from a PC (Windows 7 or later), you may open My Computer,
click on Network, and the scroll to the Storage Devices section and click on the appropriate
OneBlox.
Because the network is providing DHCP services, while on the same network, within OneSystem
go through the steps to ‘Register New Rings’ by selecting the’ Action’s button in the upper right
portion of OneSystem.
5.7 - What if I have multiple OneBlox on my Network. Is there an easy way to view each OneBlox web console?
You may easily navigate to any OneBlox on the network from the web console of a single OneBlox.
To view each OneBlox Web Console
1.
Open a web page and enter either the hostname:
From a Mac, http://oneblox4xxxx.local
Understanding OneBlox and OneSystem | Version 2.15.5 | page 33

C
HAPTER
5 : OneBlox 4312
OneBlox 4312 User Guide
From a PC, http://192.168.168.x
2.
Click on ‘Discover OneBlox’ which can be seen in the text above the web console display. This
will open a new web page with the OneBlox on your network and enable you to select the
appropriate OneBlox.
5.8 - How do I Enable Variable-length Deduplication for a Share?
Within a OneBlox cluster, individual shares and exports may now be configured to utilize variablelength deduplication. This is an option at the time new shares and/or exports are created.
Variable-length deduplication is well suited for backup/recovery applications. Traditional file
serving and unstructured data, including virtual servers, should not enable this deduplication
algortithm.
Variable and fixed-length deduplication are the two main types of data deduplication. Fixed-length
deduplication uses the same segment-length and offers good data reduction ratios for information
that is consistent in size. Variable-length uses a sliding window to determine the optimal
boundaries for deduplication; this feature, combined with compression, enables Exablox
customers to realize data reduction ratios up to 20:1 and to store as much as 4.4 PB of effective
storage in a single global file system.
Within a given OneBlox Ring, for each share the type of deduplication can be selected.
Additionally, compression can be turned on or off at the time the share or export are created.
5.9 - How do I Enable Compression for a given Share?
Within a OneBlox cluster, compression can be enabled on newly created SMB and NFS shares/
exports. The default storage policy has compression enabled, and compression can be disabled at
the time the share/export is created.
Understanding OneBlox and OneSystem | Version 2.15.5 | page 34

C
HAPTER
5 : OneBlox 4312
OneBlox 4312 User Guide
In OneSystem, admins can see the compression, deduplication, and total data reduction ratios for
both today (midnight to midnight UTC time) and lifetime.
The
compression ratio
is calculated by comparing the amount of application data written to the
Ring and application data after compression. This is calculated on a per share basis as well as
summarized for the entire OneBlox Ring.
As inline deduplication is a global feature, the
deduplication ratio
and includes both variable and fixed-length deduplication.
Total data reduction ratio
takes into account the total capacity written to the cluster and the
amount of storage capacity written to disk after the deduplication and compression reduction. This
is calculated for the entire cluster.
5.10 - OneBlox 4312 Hardware Display Information
There are several LEDs on the control panel as well as others on the drive carriers to keep you
constantly informed of the overall status of OneBlox as well as the activity and health of specific
components. There are also two buttons on the OneBlox control panel.
5.10.1 - Control Panel Buttons
There are two buttons located on the front of the OneBlox: a reset button and a power on/off
button.
5.10.1.1 - Reset
Use the reset button to reboot OneBlox.
is calculated for the entire Ring
5.10.1.2 - Power
This is the main power button, which is used to apply or turn off the main system power. Turning
off system power with this button removes the main power but keeps standby power supplied to
OneBlox.
Understanding OneBlox and OneSystem | Version 2.15.5 | page 35

C
HAPTER
5 : OneBlox 4312
OneBlox 4312 User Guide
5.10.2 - Control Panel LEDs
The control panel located on the front of the OneBlox has several LEDs. These LEDs provide you
with critical information related to different parts of OneBlox. This section explains what each LED
indicates when illuminated and any corrective action you may need to take.
5.10.2.1 - Power Fail
Indicates a power supply module has failed. The second power supply module will take the load
and keep OneBlox running but the failed module will need to be replaced. Refer to Chapter 6 for
details on replacing the power supply. This LED should be off when OneBlox is operating normally.
5.10.2.2 - Information LED
This LED will be blue when the UID function has been activated. When this LED flashes red, it
indicates a fan failure. When red continuously it indicates an overheat condition, which may be
caused by cables obstructing the airflow in OneBlox or the ambient room temperature being too
warm. Check the routing of the cables and make sure all fans are present and operating normally.
You should also check to make sure that the OneBlox covers are installed. Finally, verify that the
heatsinks are installed properly. This LED will remain flashing or on as long as the indicated
condition exists.
5.10.2.3 - NIC1
1
Indicates network activity on the LAN1 port when flashing.
5.10.2.4 - NIC2
2
Indicates network activity on the LAN2 port when flashing.
5.10.2.5 - HDD
This LED indicates hard drive activity when flashing.
Understanding OneBlox and OneSystem | Version 2.15.5 | page 36

C
HAPTER
5 : OneBlox 4312
OneBlox 4312 User Guide
5.10.2.6 - Power
Indicates power is being supplied to OneBlox's power supply units. This LED should normally be
illuminated when OneBlox is operating.
5.10.3 - Drive Carrier LEDs
Each drive carrier displays two status LEDs on the front of the carrier. Please refer to OneSystem
for more detailed information about each drive installed in each disk slot. OneSystem also
indicates the overall health of the disk drive.
LED Color State Status
Blue Solid On SAS Drive Installed
Blue Off No Drive or SATA drive installed
Blue Blinking I/O Activity
Red Solid On Failed drive
5.11 - How do I Replace a Power Supply?
The OneBlox 4312 has a 920 watt redundant, hot-plug power supply consisting of two power
modules. Each power supply module has an auto-switching capability, which enables it to
automatically sense and operate at a 100V - 240V input voltage.
5.11.1 - Power Supply Failure
An amber light will be illuminated on the power supply when the power is off. An illuminated green
light indicates that the power supply is operating. If either of the two power supply modules fail,
the other module will take the full load and allow OneBlox to continue operation without
interruption. The Power Fail LED on the front control panel will illuminate and remain on until the
failed unit has been replaced.
Replacement units can be ordered directly from Exablox. The power supply units have a hot-swap
capability, meaning you can replace the failed unit without powering down OneBlox.
5.11.2 - Removing/Replacing the Power Supply
You do not need to shut down OneBlox to replace a power supply unit. The backup power supply
module will keep OneBlox up and running while you replace the failed hot-swap unit.
To remove the Power Supply
See Figure 5-6.
1.
First unplug the AC power cord from the failed power supply module.
2.
Depress the locking tab on the power supply module.
Understanding OneBlox and OneSystem | Version 2.15.5 | page 37

C
HAPTER
5 : OneBlox 4312
3.
Use the handle to pull it straight out with the rounded handle.
To install a new Power Supply
1.
Replace the failed hot-swap unit with another identical power supply unit.
2.
Push the new power supply unit into the power bay until you hear a click.
3.
Secure the locking tab on the unit.
4.
Finish by plugging the AC power cord back into the unit.
Figure 5-6: Removing the Power Supply
Release Tab
OneBlox 4312 User Guide
5.12 - OneBlox 4312 Network Configuration Recommendations
There are two OneBlox 4312 options available at the time of initial purchase. One with an optional
10GbE SFP+ card and one without. In both configurations, the default network configuration
profile is to have one port group for all network ports in a bond0 configuration, bond mode
balance alb, and standard MTU packet size. With the default network configuration, only one
switch should be used for connectivity and the switch must support balance alb. For advanced
network configuration options, please refer to “How do I Configure OneBlox with Multiple Network
Profiles and Port Groups?” on page 50.
5.12.1 - What if I have a 1GbE network?
If you have a 1GbE network, then you can use the 2 x 10GbE BASE-T and 2 x 1GbE ports at the
same time. The 10GbE ports will auto-negotiate to 1GbE and all 4 ports may be used for data,
intra-Ring, and OneSystem network traffic. Alternatively, you may use the bond mode LACP or HA
(active/backup) to a 1GbE switch that supports LACP or HA for redundancy. If the desired network
configuration is to have one bond0 across all physical ports, any changes to the network profile
(e.g., static IP address, bond mode, MTU) should be made to via the management network
profile. It is recommended admins configure a virtual IP address, through OneSystem, that will
Understanding OneBlox and OneSystem | Version 2.15.5 | page 38

C
HAPTER
5 : OneBlox 4312
OneBlox 4312 User Guide
continue to provide a single IP address to the OneBlox Ring, as multiple OneBlox are added to the
Ring over time.
5.12.2 - What if I have a 10GbE network?
If you have a 10GbE network, simply connect 2 network cables to the appropriate 10GbE ports-either 2 x 10GbE BASE-T or 2 x 10GbE SFP+. There is no need to connect network cables to the
1GbE ports with the default single port group profile. The balance-alb algorithm will utilize the 2
10GbE ports for data, intra-Ring, and OneSystem network traffic. Alternatively, you may use the
bond mode LACP or HA (active/backup) to a 10GbE switch that supports LACP or HA for
redundancy. As discussed in 5.12.1, any changes to the default network profile should be made to
the management port group. It is recommended admins configure a virtual IP address, through
Understanding OneBlox and OneSystem | Version 2.15.5 | page 39

C
HAPTER
5 : OneBlox 4312
OneBlox 4312 User Guide
OneSystem, that will continue to provide a single IP address to the OneBlox Ring, as multiple
OneBlox are added to the Ring over time.
5.12.3 - What if I have a 10GbE and 1GbE network?
With OneBlox 2.13 and later, two port groups may be enabled for two different network profiles.
For example, the management network (bond0) will utilize the two 1GbE ports and may be
connected to two switches with bond mode HA or a single 1GbE switch with bond mode balance
Understanding OneBlox and OneSystem | Version 2.15.5 | page 40

C
HAPTER
5 : OneBlox 4312
OneBlox 4312 User Guide
alb or LACP. Similarly, the data network (bond0) will utilize the 10GbE ports and may be connected
to two switches with bond mode HA or a single 10GbE switch with bond mode balance alb or LACP.
Please refer to section 6.4 for details to configure the ‘management’ and ‘data’ port group profiles.
The figure below illustrates the two port groups and bond mode HA.
Understanding OneBlox and OneSystem | Version 2.15.5 | page 41

C
HAPTER
5 : OneBlox 4312
OneBlox 4312 User Guide
Understanding OneBlox and OneSystem | Version 2.15.5 | page 42

C
HAPTER
6
Common Tasks
How do I Manage OneBlox—Creating a OneSystem Account and Login........................ 45
How do I assign a Single IP Address for the OneBlox Ring? ........................................ 47
How do I Configure OneBlox with different Network Settings? .................................... 48
How do I Configure OneBlox with Multiple Network Profiles and Port Groups?.............. 50
VLAN Tagging ......................................................................................................... 55
How do I Reset the Network Port Group Configuration?.............................................. 56
Setting Up Active Directory and Authenticating OneBlox ............................................. 57
Enabled IPMI network access for Lights Out Management .......................................... 68
How do I enable two-factor Verification for additional security?................................... 68
How do I disable two-factor Verification in OneSystem? ............................................. 73
How do I enable the Backup/Recovery specific Deduplication? .................................... 73
Does OneBlox Deduplication work on a per share basis?............................................. 74
Who has Access to the Information on OneBlox—Adding, Removing, or Editing Users'
Access to Storage .................................................................................................... 74
How to give Groups of Users access to OneBlox—Adding/Editing Groups (Users) ......... 78
How do I create a Hidden Share ............................................................................... 79
How do I create an NFS Export................................................................................. 80
How do I Mount an NFS Export ................................................................................ 81
How do I set NFS Quotas? ....................................................................................... 82
How Do I Create a VMware NFS Datastore with OneBlox? .......................................... 84
How do I create a Microsoft Hyper-V VHDX file? ........................................................ 87
How do I set SMB Share Level Quotas? ..................................................................... 89
Share Level Capacity Reporting ................................................................................ 90
Which 10GbE cards are used and what SFP+ transceivers are supported? ................... 90
How do I Limit which Storage Shares Users have Access to—Adding Shares ................ 91
How do Users access Restricted Shares when Active Directory is not used? ................. 93
How are the Settings for the OneBlox Ring Changed?................................................. 93
What if I want to setup additional OneBlox in different Rings? .................................... 93
Viewing Snapshots................................................................................................... 94
How do I turn Snapshots On and Off? ....................................................................... 96
How do I Hide the Snapshot Directory? ..................................................................... 96
What is the Retention Policy for the Continuous Data Protection feature? .................... 98
Can I Change the Snapshot Retention Policy? .......................................................... 100
Understanding OneBlox and OneSystem | Version 2.15.5 | page 43

C
HAPTER
6 : Common Tasks
OneBlox 4312 User Guide
How can Exablox support access OneBlox?...............................................................102
Are there Specific Firewall Settings that must be enabled for OneSystem and OneBlox
communication? .....................................................................................................102
How do I set up OneBlox for Disaster Recovery?.......................................................103
How Should I Configure my Firewall for Remote Replication?.....................................106
In the Event of a Failure, How do I Enable Applications to Access the Secondary Ring in a
Mesh Configuration? ...............................................................................................107
How Can I stop or resume Remote Replication for a Given Share? .............................108
How do I Know What the Recovery Point of a Given Share is? ...................................109
How do I Change or Reset my OneSystem Password?...............................................110
What if I want to Erase all of the Information on my OneBlox? ..................................111
How do I see what the deduplication ratio is for the OneBlox Ring? ...........................112
How Can I Audit OneSystem Administrator Actions? ..................................................114
How do I see the Status of Disk Drives used with my OneBlox? .................................115
How do I remotely Shutdown OneBlox? ...................................................................114
If I have a OneBlox hardware failure how do I replace the OneBlox?..........................115
How do I Deploy Private OneSystem? ......................................................................115
How do I disable Encryption in Flight?......................................................................116
Understanding OneBlox and OneSystem | Version 2.15.5 | page 44

C
HAPTER
6 : Common Tasks
OneBlox 4312 User Guide
6.1 - How do I Manage OneBlox—Creating a OneSystem Account and Login
Once you create (register) a OneSystem account, you will then be able to login to OneSystem and
manage the OneBlox rings in your environment.
•“To create a OneSystem account” on page 45
•“To login to OneSystem” on page 46
To create a OneSystem account
1.
Go to https://onesystem.exablox.com
Understanding OneBlox and OneSystem | Version 2.15.5 | page 45

C
HAPTER
6 : Common Tasks
2.
Click Register and fill in the required information, then click the Register button.
OneBlox 4312 User Guide
3.
Check your email to see the confirmation email sent from OneSystem to you. The email will come
from onesystem@exablox.com. If you do not see the email in your inbox after five minutes, check
your spam folder/filter. Adding onesystem@exablox.com to your address book will help ensure
future emails are delivered.
4.
Click the provided link in the email to activate your account. Your account is now activated.
5.
You can now login (see the next section).
To l o g in t o On e Sy s te m
1.
Go to https://onesystem.exablox.com
Understanding OneBlox and OneSystem | Version 2.15.5 | page 46
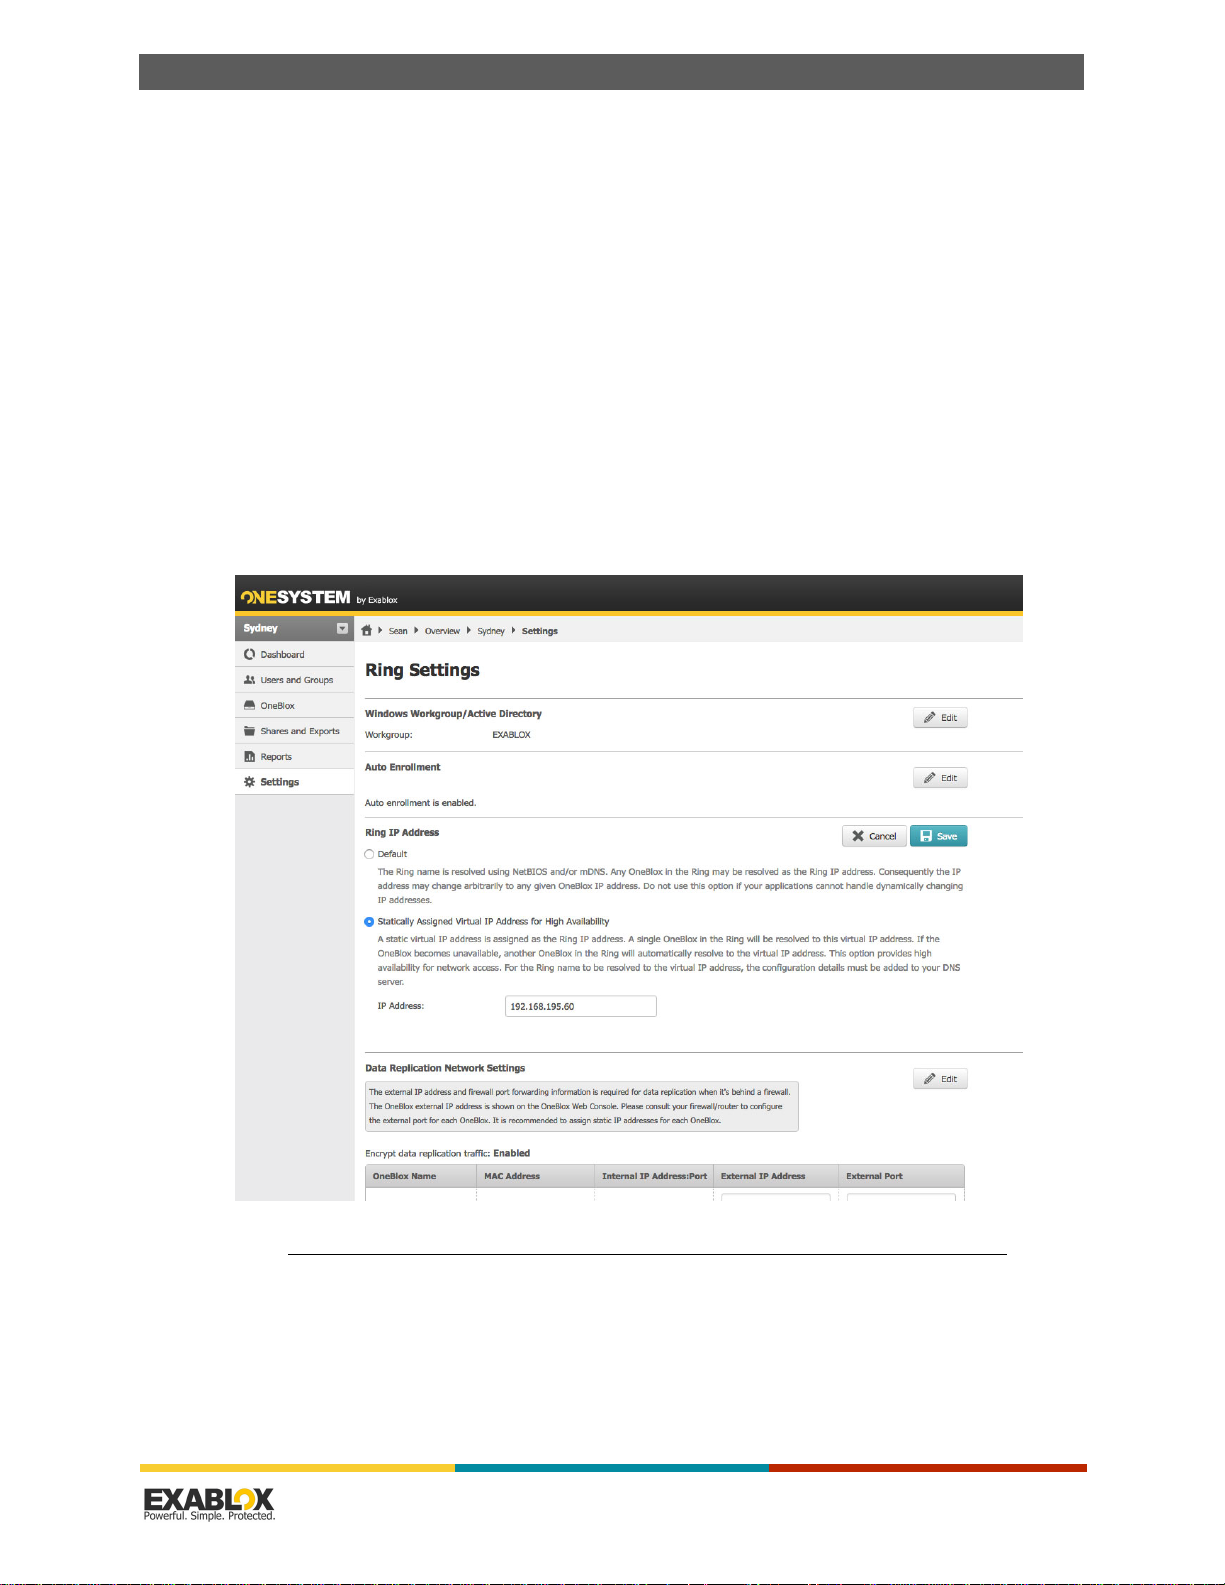
C
HAPTER
6 : Common Tasks
2.
Enter your email and password.
3.
Click Login.
OneBlox 4312 User Guide
6.2 - How do I assign a Single IP Address for the OneBlox Ring?
With the support of Virtual IP addresses, OneBlox now supports the presentation of a single IP
address for the OneBlox Ring. Before configuring the virtual IP address, ensure that each OneBlox
in the Ring has either a static IP address (see “How do I change the Network Configuration of the
OneBlox” on page 55) or a reserved DHCP address.
1.
In OneSystem, navigate to the desired Ring.
2.
Navigate to the left-hand pane and select 'Settings'.
3.
For the Ring (or Rings in a Mesh configuration) select the "Edit" radio button for the Ring IP
address.
4.
Enter the desired virtual IP address for the Ring.
NOTE:
5.
The Netmask will be 255.255.255.255 as this is a virtual IP address and is not configurable.
Click "Save".
Understanding OneBlox and OneSystem | Version 2.15.5 | page 47

C
HAPTER
6 : Common Tasks
6.
Now applications and users may access the Ring via the Virtual IP address or the Ring name. The
OneBlox 4312 User Guide
Virtual IP address should also be entered in the organization's DNS server for application and
client resolution to the OneBlox Ring.
6.3 - How do I Configure OneBlox with different Network Settings?
The default OneBlox configuration is a single network profile:
• All network ports are seen as bond0
• The bond mode is active-backup
• Standard MTU 1500
With OneBlox 2.13 and later, admins may now configure different bond modes to support different
network configurations including jumbo frames, multiple switches, and LACP. In doing so, all
network ports are still seen as bond0, but the network bond mode may be changed.
Important:
Although the two port group configuration options are ‘management’ and ‘data’, this
does not restrict the actual network traffic to management or data. It is dependent on the physical
network configuration of each company that determines what network traffic physically uses each
port. For example, OneSystem management, data, and remote replication traffic can utilize the
‘data’ (10GbE) port group.
Admins may open the Web Console in a web browser by entering the IP address of the OneBlox,
or in OneSystem navigating to the OneBlox view and clicking on the IP address (highlighted in
teal) in the upper right.
Through the web console, enter the appropriate information.
Understanding OneBlox and OneSystem | Version 2.15.5 | page 48

C
HAPTER
6 : Common Tasks
OneBlox 4312 User Guide
The management and data IP address information may now be seen in OneSystem when viewing
the OneBlox details page.
NOTE:
Although the data network configuration information is set correctly, the gateway IP
address is NOT displayed correctly in OneSystem, the Web Console, or if using the # show
data command after applying network changes. Before the configuration is applied, use #
show data to view the current and pending configuration. This will be remedied in an
upcoming release.
With OneBlox 2.13 and later, network configuration may be done by accessing the OneBlox web
console or by connecting a monitor and keyboard to the rear of the OneBlox. The default is:
username = ‘admin’ and password = ‘config’. After the initial login, there will be a prompt to
change the password. The passwords for the web console and command line are syncrhonized.
After logging in, to configure OneBlox with static IP address, switch redundancy across two
physical switches, and standard MTU, follow the steps below.
Understanding OneBlox and OneSystem | Version 2.15.5 | page 49

C
HAPTER
6 : Common Tasks
OneBlox 4312 User Guide
oneblox40001(config) network
oneblox40001(config-network) management static inet 192.168.195.58 255.255.0.0
192.168.168.168
oneblox40001(config-network) management bond ha
oneblox40001(config-network) management mtu 1500
oneblox40001(config-network) management dns 8.8.8.8 8.8.4.4
oneblox40001(config-network) management ntp 1.pool.ntp.org 2.pool.ntp.org
0.pool.ntp.org 3.pool.ntp.org
oneblox40001(config-network) show management
Management and Data Network
Current IP Settings:
Method: STATIC
Address: 192.168.195.58
Netmask: 255.255.0.0
Gateway: 192.168.168.168
Bond: alb
DNS Servers: 8.8.8.8 8.8.4.4
NTP Servers: 0.pool.ntp.org 1.pool.ntp.org 2.pool.ntp.org 3.pool.ntp.org
Pending Changes:
Netmask: 255.255.0.0
Mtu: 1500
Bondmode: ha
Gateway: 192.168.168.168
Address: 192.168.195.59
DNS Servers: 8.8.8.8 8.8.4.4
NTP Servers: 0.pool.ntp.org 1.pool.ntp.org 2.pool.ntp.org 3.pool.ntp.org
oneblox40001(config-network) apply
oneblox40001(config-network) logout
oneblox40001(config)
Similarly, to configure the network ports with LACP follow the same commands as above, but use
the LACP bond mode
oneblox40001(config-network) management bond LACP
6.4 - How do I Configure OneBlox with Multiple Network Profiles and Port Groups?
With the release of OneBlox 2.14, customers now have the ability to configure two OneBlox
network profiles and provide access for multiple networks. This may be done via command line or
through the Web Console. Customers can create two separate port groups: management (bond0)
and data (bond1). It’s important to note that the management port group may be used for any
application traffic (e.g., as a corporate file server with Active Directory integration) and and is not
limited to solely OneSystem or Private OneSystem management traffic.
Similarly, the data port group profile may be used for any type of traffic (e.g., data, remote
replication), it simply relies on the network topology. For example, many organizations have nonroutable backup or server virtualization networks that are well suited for a the multi-port group
network configuration, with backup data on a 10GbE network and then OneSystem and file
serving network access is provided through the 1GbE port group. If port groups are NOT enabled,
the default OneBlox network configuration profile is:
Default Network Profile Management Port Group
Port Group Bond0
Physical Network Ports 10GbE and 1GbE
IP Address Static or Dynamic
Understanding OneBlox and OneSystem | Version 2.15.5 | page 50

C
HAPTER
6 : Common Tasks
OneBlox 4312 User Guide
IP version IPv4
Netmask Configurable
Gateway Configurable
VLAN Tagging Configurable
DNS Configurable
NTP Configurable
Webproxy Configurable
Bond Mode Balance alb
MTU 1500
There are a few things to note when considering a multi-network configuration:
• The management port group profile will be bond0, includes the 2 x 1 GbE ports, provides
network access (e.g., OneSystem), and OneBlox remote replication traffic to another OneBlox
Ring.
• The data port group profile will be bond1, includes the 2 x 10GbE and 2 x 10GbE SFP+ (if the
SFP+ option is ordered).
• For both the management and data port groups there are a number options now available for
advanced configuration.
Configurable
Network Profiles
Port Group Bond0 Bond1
Physical Network Ports 1GbE 10GbE BASE-T & SFP+
IP Address Static or Dynamic Static or Dynamic
IP version IPv4 or IPv6 IPv4 or IPv6
Netmask Configurable Configurable
Gateway Configurable Configurable
VLAN Tagging Configurable Configurable
DNS Configurable Configurable
NTP Configurable n/a
Webproxy Configurable n/a
Bond Mode Balance alb
MTU 1500 or 9000 1500 or 9000
Management
Port Group
HA
LACP
Data
Port Group
Balance alb
HA
LACP
Understanding OneBlox and OneSystem | Version 2.15.5 | page 51

C
HAPTER
6 : Common Tasks
OneBlox 4312 User Guide
A single virtual IP address for the OneBlox Ring may also be configured, and in a multi-OneBlox
Ring, provides transparent access to any OneBlox in the Ring. The virtual IP address presents a
single static IP address that may be on either the data or the management network and may be
configured through OneSystem (see section 6.2 of the user guide). The virtual IP address is
advantageous on the data port group in virtual server environments as NFS datastores may be
mounted with the same /exports/<virtual IP address>/<NFS Datastore> in a multi-OneBlox Ring.
With OneBlox 2.13, the port groups can be configured by connecting a monitor and keyboard to
the rear of the OneBlox. With OneBlox 2.14, admins also have the alternative option of utilizing
the OneBlox Web Console.
Through the web console, enter the appropriate information.
Understanding OneBlox and OneSystem | Version 2.15.5 | page 52

C
HAPTER
6 : Common Tasks
OneBlox 4312 User Guide
To configure Port Groups
The following steps may be taken to configure port groups.
1.
Connect a monitor and keyboard directly to the rear of the OneBlox. The default login is:
username = ‘admin’ and password = ‘config’. After the initial login, there will be a prompt to
change the password.
NOTE:
The default login is the same for the Web Console and with keyboard/monitor access. When
the password is changed through either access method, it is reflected in both access
methods. For OneBlox releases prior to 2.13, the default username = ‘admin’ and password
=’admin’.
2.
Enter # network
oneblox40001(config) network
NOTE:
At any time, an admin may type # help for documented commands.
oneblox40001(config-network) help
Documented commands (type help <topic>):
========================================
apply cluster data help management portgroup reset show virtual
Undocumented commands:
======================
end logout
oneblox40001(config-network) help management
Configure the 1GbE management network profile for the system.
The management network profile is always used accessing the system
web interface, management servers, and any other control access over
the network.
The default address family is assumed to be IPv4 (inet), so if this
is going to configure an IPv6 (inet6) network then the family must
be specified as part of the configuration.
These setting will not be applied until the configuration is saved.
Usage:
management
management dhcp [inet|inet6]
management auto [inet|inet6]
management static [inet|inet6] <addr> <netmask> [<gateway>]
management bond (alb|ha|lacp)
management mtu <num>
management dns [<server>]...
management ntp [<server>]...
management webproxy [<proxy_server> <port>]
management vlan [<tag>]
Understanding OneBlox and OneSystem | Version 2.15.5 | page 53

C
HAPTER
6 : Common Tasks
OneBlox 4312 User Guide
Examples:
- configure a static ip network and no gateway
management static inet 10.0.0.0 255.0.0.0
- configure an ipv6 stateless link auto configuration
management auto inet6
See Also:
apply, portgroup, data
oneblox40001(config-network)
3.
The management and data port groups may now be configured with arguments for the
parameters seen in the step 2 screenshot.
NOTE:
If two switches will be configured for the management or data networks, bond mode ‘HA’
(active/backup) should be used (unless the stackable switches support LACP). For link
aggregation in a single switch configuration, LACP should be used.
4.
VLAN tagging is now supported with OneBlox 2.15 and later. VLAN tags can be set at the Cluster
level as well as for each portgroup. To enable a VLAN tag for the management port group enter:
# management vlan [<tag>] and similarly, data vlan [<tag>]
Important:
The pending network changes must be applied in order for the network configurations
to become effective.
oneblox40001(config-network) portgroup enable
portgroups: enabled (pending)
oneblox40001(config-network) management static inet 192.168.195.58 255.255.0.0
192.168.168.168
oneblox40001(config-network) data static inet 10.20.80.101 255.255.0.0 10.20.80.1
oneblox40001(config-network) management dns 192.168.168.100 191.168.168.101
oneblox40001(config-network) management ntp 192.168.168.100 192.168.168.101
oneblox40001(config-network) management mtu 1500
oneblox40001(config-network) data mtu 9000
oneblox40001(config-network) management bond lacp
oneblox40001(config-network) data bond lacp
5.
Before applying the configuration changes, you may preview the pending network changes by
entering # show management and # show data.
6.
Apply the pending network changes by entering # apply. The changes will be made in a minute
or so. #Logout
oneblox40001(config-network) apply
oneblox40001(config-network) logout
oneblox40001(config)
Understanding OneBlox and OneSystem | Version 2.15.5 | page 54

C
HAPTER
6 : Common Tasks
OneBlox 4312 User Guide
The management and data IP address information may now be seen in OneSystem when viewing
the OneBlox details page.
Tip:
For troubleshooting information the additional commands may also be used
with # help show.
oneblox40001(config-network) help show
Show the current network configuration settings
Display a summary of the network profiles and the settings
that have been changed in the console.
Usage:
show management
show data
show interfaces [<iface>]
show arp [<addr>]
show route
6.5 - VLAN Tagging
With OneBlox 2.15.2, admins may configure VLAN tagging via command line. Configuring VLAN
tagging through the OneBlox Web Console will be available in a future release.
To configure VLAN tagging, connect a monitor and keyboard to the OneBlox. The default user
name and password is ‘admin’ and ‘config’ (all lower case). In some cases the default password
may be ‘admin’, depending on the original OneBlox software version that was installed. After
logging in, admins may select # help to see different configuration options. Below is an example of
viewing the # help management information and the steps to configure the management port
group with a VLAN tag of 55.
If port groups are enabled different VLAN tags/IDs may be used for the management and data
port group.
oneblox40001(config) network
oneblox40001(config-network) help management
Configure the 1GbE management network profile for the system.
The management network profile is always used accessing the system
web interface, management servers, and any other control access over
the network.
The default address family is assumed to be IPv4 (inet), so if this
Understanding OneBlox and OneSystem | Version 2.15.5 | page 55

C
HAPTER
6 : Common Tasks
OneBlox 4312 User Guide
is going to configure an IPv6 (inet6) network then the family must
be specified as part of the configuration.
These setting will not be applied until the configuration is saved.
Usage:
management
management dhcp [inet|inet6]
management auto [inet|inet6]
management static [inet|inet6] <addr> <netmask> [<gateway>]
management bond (alb|ha|lacp)
management vlan [<tag>]
management mtu <num>
management dns [<server>]...
management ntp [<server>]...
management webproxy [<proxy_server> <port>]
Examples:
- configure a static ip network and no gateway
management static inet 10.0.0.0 255.0.0.0
- configure an ipv6 stateless link auto configuration
management auto inet6
See Also:
apply, portgroup, data, cluster, virtual
oneblox40001(config-network) management vlan 55
oneblox40001(config-network) show management
Management and Data Network
Current IP Settings:
Method: STATIC
Address: 192.168.195.58
Netmask: 255.255.0.0
Gateway: 192.168.168.168
MTU: 1500
Bond: ha
DNS Servers: 192.168.168.202
NTP Servers: 192.168.168.202
Pending Changes:
Vlan: 55
oneblox40001(config-network) apply
oneblox40001(config-network) logout
6.6 - How do I Reset the Network Port Group Configuration?
By default the network configuration for each OneBlox is:
• All network ports are seen as bond0
• The bond mode is balance alb
• Standard MTU 1500 is used
If changes are made to the network configuration (i.e., port groups, bond mode), the network
configurations may be easily reset to the default settings through the web console or by
connecting a monitor and keyboard to each OneBlox.
Understanding OneBlox and OneSystem | Version 2.15.5 | page 56

C
HAPTER
6 : Common Tasks
OneBlox 4312 User Guide
To reset the network configurations, log into the web console, select the Management tab, and
click “Reset Network Configuration”.
Alternatively, the network settings may be reset through command line:
1.
Login and enter # network
2.
To reset the network configuration enter # reset
3.
Logout from the network configuration by entering # logout
oneblox40001(config) network
oneblox40001(config-network) reset
oneblox40001(config-network) logout
6.7 - Setting Up Active Directory and Authenticating OneBlox
6.7.1 - Overview
Active Directory provides a central location for network administration and security. OneSystem
allows you to integrate your OneBlox to a previously configured Active Directory. This section
describes authenticating OneBlox with Active Directory.
NOTE:
Important:
synchronized with a public or private NTP server.
OneBlox supports up to 20 trusted forests, trees, and domains.
The time must be the same on OneBlox and the Domain controller. They both must be
Understanding OneBlox and OneSystem | Version 2.15.5 | page 57

C
HAPTER
6 : Common Tasks
OneBlox 4312 User Guide
6.7.1.1 - Requirements
The following information is required before proceeding:
• Domain Name — The Domain name is the Fully Qualified Domain Name (FQDN) of your
domain.
• NetBIOS Domain Name — The NetBIOS Domain Name is the short name of your Domain. It
is limited to 15 characters and is usually the first name of the FQDN, but sometimes it can be
completely different. This can be found on your domain controller by:
• Opening "Active Directory Users and Computers".
• Right-clicking on the domain and choosing "properties".
• Look for the “Domain Name” (Pre Windows 2000).
• Domain Controller — Domain controllers. The default, and strongly recommend option, is to
use an “*”. If there is a complex environment, this can be problematic and specifying the name
or IP address of your domain controllers can sometimes resolve problems. If there is more than
one domain controller, a comma can be used to delineate additional domain controllers. If there
are name resolution issues, an IP should be used.
• Organizational Unit — Optional configuration enabling admins to enter an organizational unit
within the Active Directory Domain.
• Domain/Delegated Admin Credentials — The Domain or Delegated Admin user name and
password are needed to authenticate OneBlox with the AD domain controller.
Important:
It is a best practice to ensure all of the domain controllers are accurately syncronized so
that all kerberos tickets are available to the OneBlox Ring. This will ensure seamless user access
through AD authorization.
Understanding OneBlox and OneSystem | Version 2.15.5 | page 58

C
HAPTER
6 : Common Tasks
OneBlox 4312 User Guide
6.7.2 - Having a OneBlox Ring join AD
To have a OneBlox Ring join AD
1.
Navigate to the desired Ring and then select ‘Settings’ on the left-hand navigation.
2.
Select the Edit button on the right-hand side to enter the appropriate AD credentials.
Understanding OneBlox and OneSystem | Version 2.15.5 | page 59

C
HAPTER
6 : Common Tasks
3.
Enter the required information and save settings. For example:
OneBlox 4312 User Guide
You will receive a message indicating that OneBlox successfully joined AD or that OneBlox failed to
join AD. If there was an error, one of the following messages will be displayed:
• kinit: Generic pre authentication failure while getting initial credentials
• kinit: Cannot contact any KDC for realm ‘$FQDN’ while getting initial
credentials
• kinit: Client not found in Kerberos database while getting initial credentials
Some possible causes for the error are:
• Cannot find a domain controller
• Mistyped Domain Administrator password
• Misspelled NetBIOS Domain Name
Possible solutions to resolve error(s):
• Specify domain controller(s) by IP address or FQDN
• $ip_dc1, $ip_dc2, $ip_dc3
• Example:
10.10.1.2, 10.10.1.3, 10.10.1.4
• Re-enter Domain Administrator password
• Confirm credentials or password is correct
• Confirm NetBIOS Domain Name
• This can be found on the Domain Controller: Active Directory Users and Computers >
Domain > Properties > Pre Windows 2000
Understanding OneBlox and OneSystem | Version 2.15.5 | page 60

C
HAPTER
6 : Common Tasks
Active Directory Users and Computers
1.
Select ‘Domain’ > ‘Properties’.
OneBlox 4312 User Guide
2.
Pre-Windows 2000 > NetBIOS Domain Name
Understanding OneBlox and OneSystem | Version 2.15.5 | page 61

C
HAPTER
6 : Common Tasks
OneBlox 4312 User Guide
6.7.3 - Configuring Shares in the AD environment
To add a Share
1.
Login to OneSystem.
2.
Click on the desired ring to bring up the Ring Overview.
3.
Click the Shares tab on the left navigation of the web page.
4.
Click Add Share.
Since OneBlox has been authenticated with Active Directory, the options for Adding a Share will
look like:
5.
Enter a Share Name and description (if desired).
6.
Restricted to Active Directory Users
will be the access policy applied to all SMB shares within the
OneBlox cluster.
This will create a share that is read/write accessible to all registered Active Directory Users in
your organization. Now any Domain Admin or Delegated AD Admin may change the permissions
or ACLs within the share as desired (see “Active Directory Users and Computers” on page 61).
7.
Delegate admins, users, and/or groups may be added to the share if desired. This will give explicit
AD ACL control to the members listed.
8.
Click Save.
Understanding OneBlox and OneSystem | Version 2.15.5 | page 62

C
HAPTER
6 : Common Tasks
6.7.4 - Mapping a Network Drive in Windows
To map a Network Drive in Windows
1.
Select Drive:
2.
Enter Folder | UNC Path.
3.
Connect using different credentials.
4.
Click Finish.
OneBlox 4312 User Guide
5.
Enter Domain Admin Password.
Understanding OneBlox and OneSystem | Version 2.15.5 | page 63
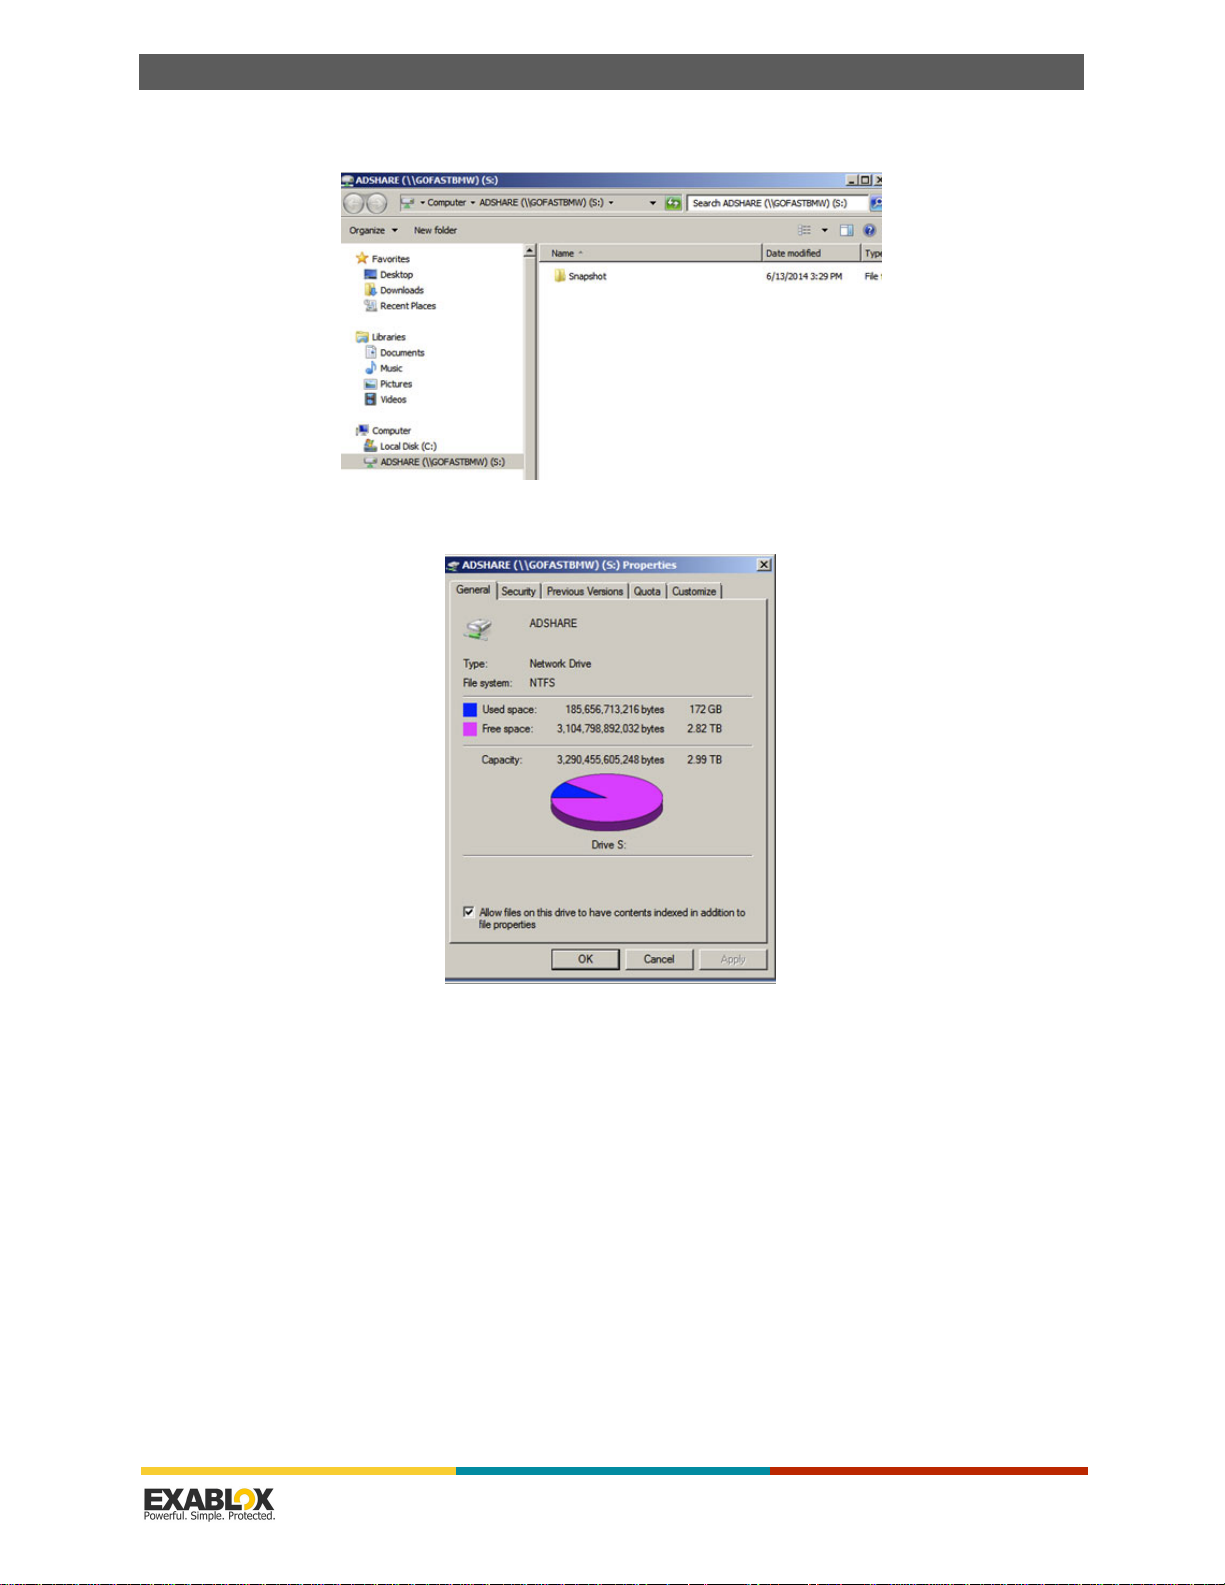
C
HAPTER
6 : Common Tasks
6.
After successfully connecting to the new Share (ADSHARE).
7.
Right-click and choose Properties.
OneBlox 4312 User Guide
Understanding OneBlox and OneSystem | Version 2.15.5 | page 64

C
HAPTER
6 : Common Tasks
8.
Choose the Security tab.
9.
Choose Edit.
OneBlox 4312 User Guide
10.
Choose Add.
Understanding OneBlox and OneSystem | Version 2.15.5 | page 65

C
HAPTER
6 : Common Tasks
11.
If requested, enter the Domain Admin credentials.
12.
Enter Domain Administrator or Domain Users.
OneBlox 4312 User Guide
13.
Click Check Names to confirm, followed by OK.
14.
Domain (Administrator | Users) is added.
15.
Click Full Control, followed by OK.
Understanding OneBlox and OneSystem | Version 2.15.5 | page 66

C
HAPTER
6 : Common Tasks
16.
Click Yes.
17.
Domain (Admin | Users) have full control.
OneBlox 4312 User Guide
18.
Create a test file or folder to confirm write functionality.
Understanding OneBlox and OneSystem | Version 2.15.5 | page 67

C
HAPTER
6 : Common Tasks
OneBlox 4312 User Guide
6.8 - Enabled IPMI network access for Lights Out Management
Admins may now connect a 1GbE cable to the IPMI port running any OneBlox software version
2.9.4 and later. Having IPMI will enable lights out management and enables network access to
OneBlox, similar to connecting a keyboard and monitor to the rear of the OneBlox. Admins may
configure network setting with the exconsole as well as power up OneBlox from a complete
shutdown. When logging into the exconsole, either through IPMI web page or monitor/keyboard,
the default user name is ‘admin’ and password is ‘config’. OneBlox running between 2.12 or 2.14
the user name is ‘admin’ and the password is ‘admin’. If this is the first time logging in, admins will
be prompted to change the password.
The IPMI IP address is displayed when connecting monitor/keyboard to OneBlox and may be
changed through IPMI web page. Simply enter the IPMI IP address in a web browser and log in
with the following credentials. Note: the credentials are cASe sensitive.
IPMI account = Admin
password = EXAB70x!2134%
6.9 - How do I enable two-factor Verification for additional security?
1.
As an additional layer of security to a strong password, OneSystem admins have the option to
enable two-factor authentication and verification. When enabled, all OneSystem admins and
delegated admins will be required to enter the OneSystem password and a one-time password
when logging into OneSystem or performing any administrative task that may result in data loss
(e.g., deleting shares, resetting OneBlox to factory default).
After successfully enabling two-factor verification, the next time admins log into OneSystem,
'Trust this device' can be selected. In doing so, while the one-time password will be required for
certain administrative tasks in OneSystem, it will not be required for login.
2.
For the latest how to videos, please visit https://www.exablox.com/what-is-it/how-to-video.php.
3.
After logging in, click on the admin email address in the upper right and select ‘Admin Settings’.
This will provide the option to enable two-step verification for the OneSystem account. Note:
Understanding OneBlox and OneSystem | Version 2.15.5 | page 68

C
HAPTER
6 : Common Tasks
OneBlox 4312 User Guide
when this additional security measure is enabled, it is required for all OneSystem admin and
delegated admins.
4.
Click ‘Edit’ and then select ‘Enable Service’ from the pull-down, and select the appropriate
service(s).
5.
Click on the admin email address in the upper right and select ‘Account Settings’.
Understanding OneBlox and OneSystem | Version 2.15.5 | page 69

C
HAPTER
6 : Common Tasks
6.
Click on 'configure'.
7.
Enter OneSystem admin's password.
OneBlox 4312 User Guide
8.
Select the method to receive one-time passwords either 'use a mobile app' or 'text messages'
Understanding OneBlox and OneSystem | Version 2.15.5 | page 70

C
HAPTER
6 : Common Tasks
OneBlox 4312 User Guide
9.
Google Authenticator is the free application, if using the mobile app. It can be downloaded for
free through Google Play. After the application is installed on the iOS, Android, or Windows mobile
device, scan QR code.
10.
Enter the one-time verification code displayed in Google authenticator.
Understanding OneBlox and OneSystem | Version 2.15.5 | page 71

C
HAPTER
6 : Common Tasks
OneBlox 4312 User Guide
11.
Alternatively, OneSystem admins may receive sms for the one-time password. Note: Standard
text/sms rates apply. Consider your mobile plan accordingly. To receive sms, select 'use text
messages'.
12.
Enter the appropriate mobile phone number.
13.
Enter the one-time password delivered via SMS to confirm.
Understanding OneBlox and OneSystem | Version 2.15.5 | page 72
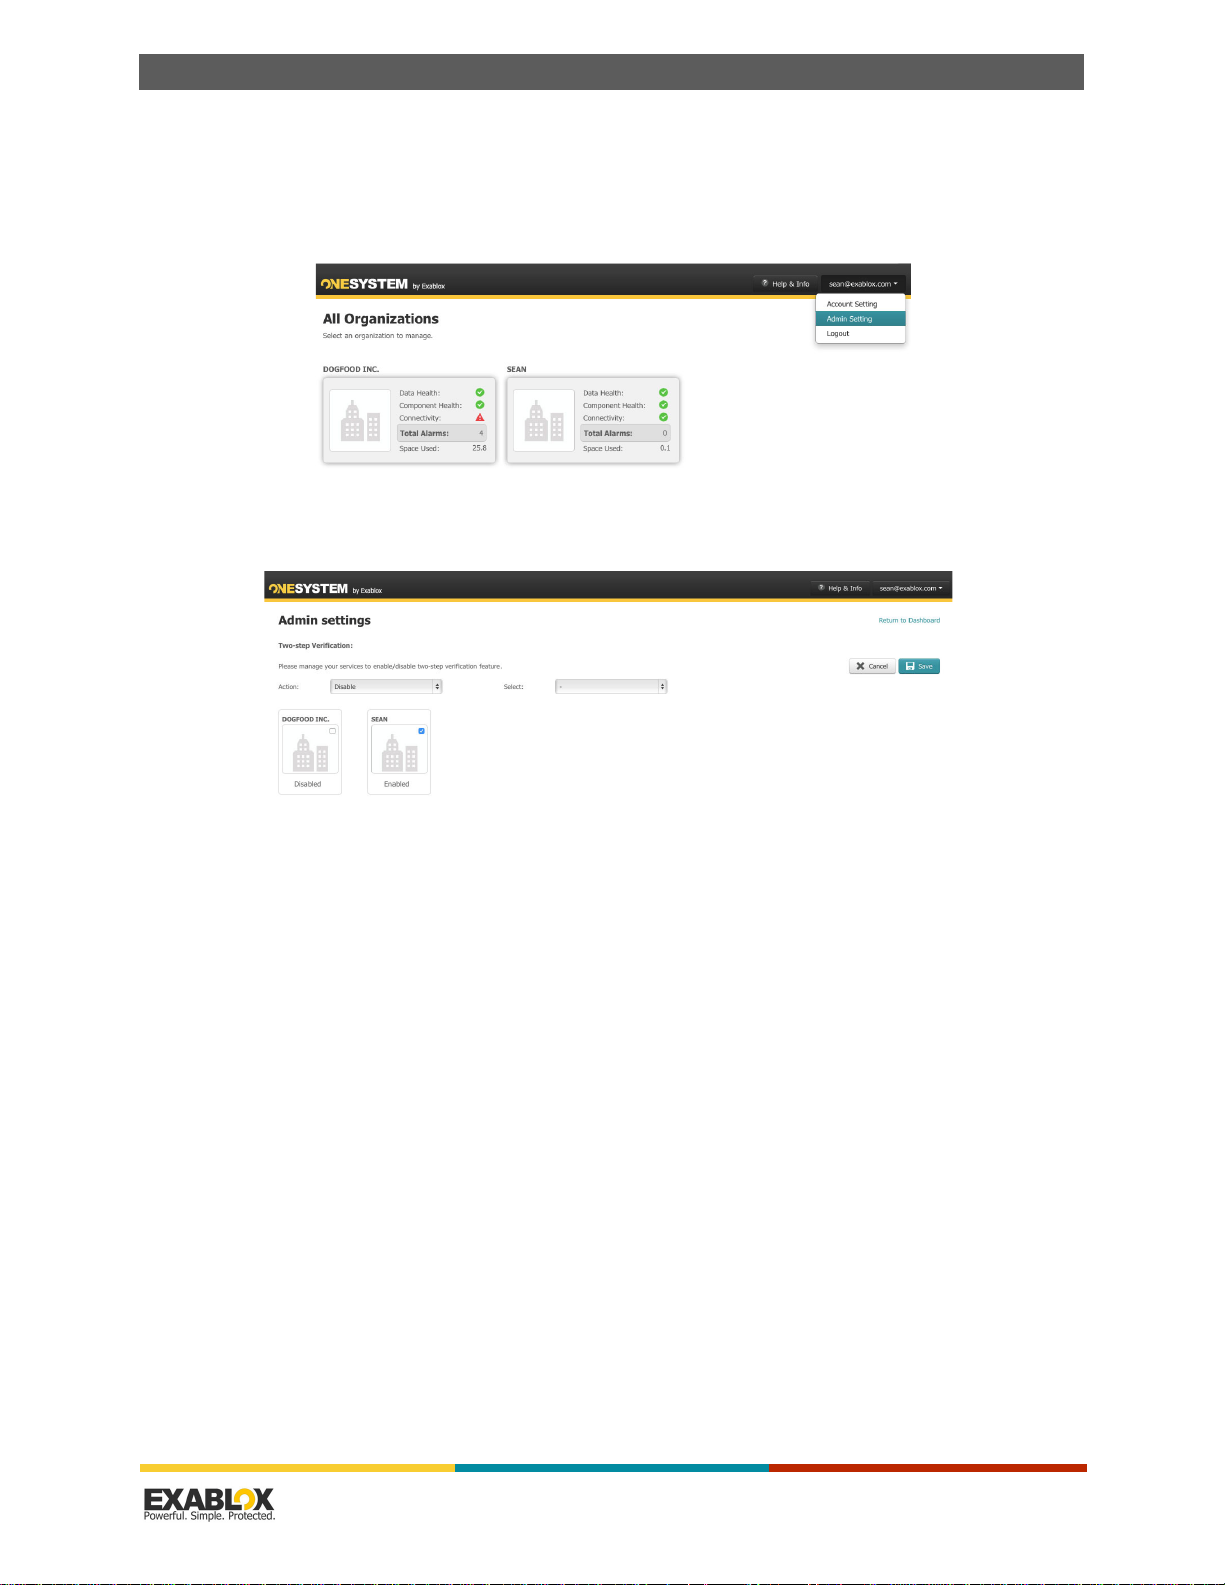
C
HAPTER
6 : Common Tasks
6.10 - How do I disable two-factor Verification in OneSystem?
1.
For the latest how to videos, please visit www.exablox.com.
2.
After logging in, click on the admin email address in the upper right and select 'Admin Settings'.
3.
Select 'Edit' and then select 'Disable' from the pull-down.
4.
Select the appropriate service(s) and click 'Save'.
OneBlox 4312 User Guide
6.11 - How do I enable the Backup/Recovery specific Deduplication?
Variable and fixed-length deduplication are the two main types of data deduplication. Fixed-length
deduplication uses the same segment-length and offers good data reduction ratios for information
that is consistent in size. Variable-length uses a sliding window to determine the optimal
boundaries for deduplication; this feature, combined with compression, enables Exablox customers
to realize data reduction ratios up to 20:1 and to store as much as 4.4 PB of effective storage in a
single global file system.
Within a given OneBlox Ring for each share the type of deduplication can be selected. The
'Backup/Recovery' storage policy is:
• Variable-length deduplication enabled
• Compression enabled
Understanding OneBlox and OneSystem | Version 2.15.5 | page 73
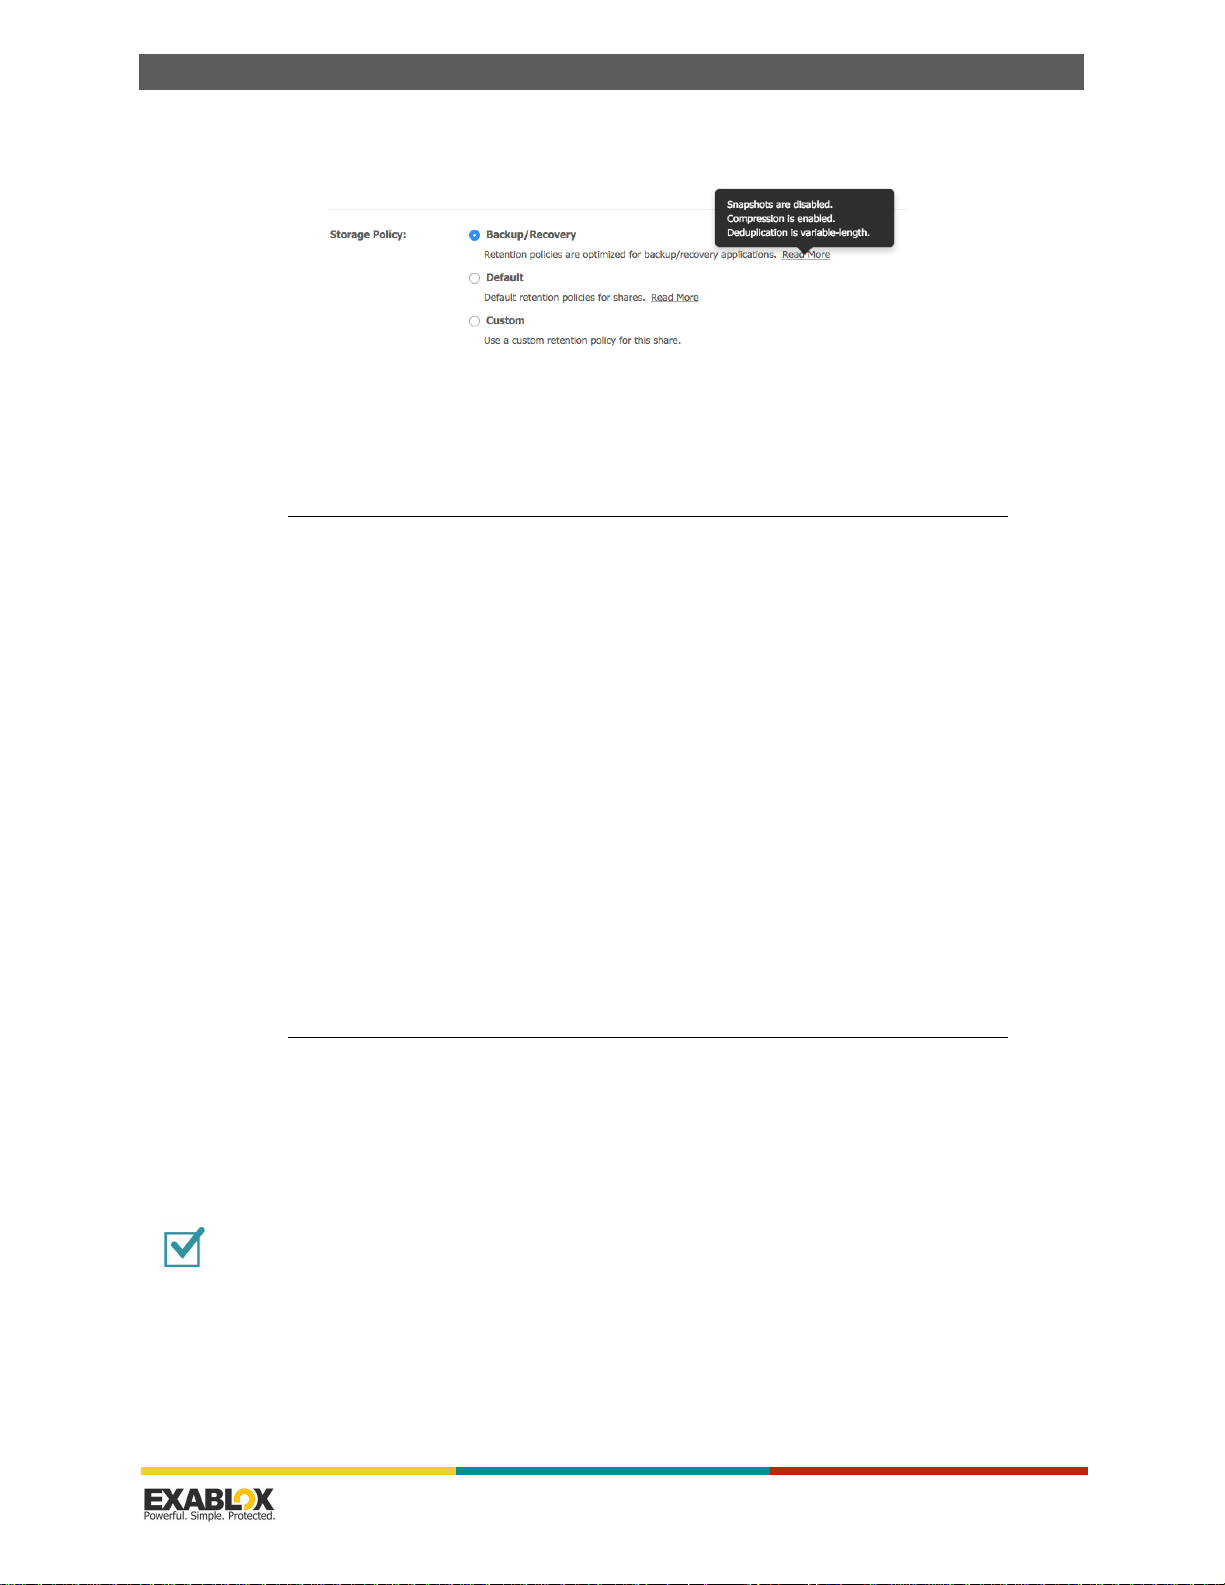
C
HAPTER
6 : Common Tasks
OneBlox 4312 User Guide
• Snapshots disabled
Additionally, admins can select 'custom' storage policy and select a different combination of
settings if desired.
NOTE:
For backup/recovery applications, all compression and deduplication should be disabled
within the backup software. OneBlox's inline deduplication and inline compression will yield
better data reduction ratios.
6.12 - Does OneBlox Deduplication work on a per share basis?
OneBlox deduplication works across all shares within a Ring. With the introduction of variablelength deduplication, all information written to all shares that have variable-length dedupe
enabled will be treated as a single dedupe pool.
Similarly, all information written to shares and exports that have fixed-length deduplication
enabled will be deduplicated and be treated as another dedupe pool.
6.13 - Who has Access to the Information on OneBlox—Adding, Removing, or Editing Users' Access to Storage
Users must have an account created in OneSystem by a user with Admin permissions before they
can access shares on the network with 'restricted' or 'registered user' access permissions.
NOTE:
•“To add a User” on page 74
•“To edit a User” on page 77
•“To change the password for a user” on page 77
This does not apply to OneBlox Rings that are authenticated with Active Directory.
To add a User
1.
Login to OneSystem at https://onesystem.exablox.com and click the ‘Users & Groups’ tab on the
left-hand navigation bar.
Understanding OneBlox and OneSystem | Version 2.15.5 | page 74

C
HAPTER
6 : Common Tasks
2.
Click the teal Add Users radio tab on the left half of the window.
OneBlox 4312 User Guide
3.
Enter the name (first, last).
4.
Enter an email address (confirmation is required upon acceptance of email before the account is
active).
5.
Select a role:
a.
The user role will only have access to the shares that are configured for them. A user has no
administrative rights on OneSystem.
b.
The admin role allows the user to administrate OneBlox (create more users, groups, shares,
and so on).
6.
In the "Group Member of" area, type or select any group(s) from the field as necessary.
NOTE:
7.
Users can be added to groups at any time. Users can be added to more than one group.
Assign the user Share Access.
a.
In the "Share Access" area, type or select the shares the user will have access to.
Understanding OneBlox and OneSystem | Version 2.15.5 | page 75

C
HAPTER
6 : Common Tasks
OneBlox 4312 User Guide
b.
Assign read/write permissions to each of the shares for the user. Different permissions can be
assigned to different shares.
NOTE:
Some shares have permissions that cannot be changed (e.g., for a Public share, everyone
has read/write access).
8.
Click Save.
The user will get a confirmation email from OneSystem. The user will need to click on the
confirmation link in the email to activate the account. In so doing, the user will be directed to
https://onesystem.exablox.com and prompted to create a password.
9.
Once the password is created, the user will see a confirmation and can begin using OneSystem.
NOTE:
The user permissions for access to shares will go into effect only after the account is
confirmed, and the user clicks on the confirmation link and creates a password to use
OneSystem.
Understanding OneBlox and OneSystem | Version 2.15.5 | page 76

C
HAPTER
6 : Common Tasks
OneBlox 4312 User Guide
To edit a User
1.
Select the user to edit from the list of users on the left-hand panel, then cick on the pencil next
to the user's name.
2.
Make the necessary changes to the name, group membership, and/or the share access.
3.
Click Save to save the changes.
To change the password for a user
1.
Click on the user email address in the top right corner of the browser.
2.
Select change password, then enter the old and new desired password.
Understanding OneBlox and OneSystem | Version 2.15.5 | page 77

C
HAPTER
6 : Common Tasks
3.
Click Change Password to confirm the changes.
OneBlox 4312 User Guide
6.14 - How to give Groups of Users access to OneBlox—Adding/Editing Groups (Users)
Groups are collections of users. For example, the "engineering" group might contain all registered
users who are engineers while the "Executive" group might contain registered users who are
executives in the organization.
Groups may be configured to have share access, thus giving all members of the group the same
access to the share. From the previous example, the "Executive" group has read/write access to
the share "Executives". This means that doug@mycompany.com and tad@mycompany.com who
are both members of the "Executives" group will have read/write access to the "Executives" share.
•“To add a Group” on page 78
•“To edit a Group” on page 79
To add a Group
1.
Login to OneSystem, then click on the Users and Groups tab on the left-hand panel.
Understanding OneBlox and OneSystem | Version 2.15.5 | page 78

C
HAPTER
6 : Common Tasks
2.
Click on Groups, then click Add Group.
OneBlox 4312 User Guide
3.
Enter the name of the group.
4.
Add a Group Member(s) to the group.
5.
Add what Share Access the group has access to, and the appropriate read or read/write
permission.
6.
You may create a new share as part of the adding group workflow.
7.
Click Save.
To e d it a G rou p
1.
Select the group to edit from the list of groups on the left-hand panel.
2.
Click on the pencil next to the group's name.
3.
Make the necessary changes to the group name, group members, and/or share access.
4.
Click Save.
6.15 - How do I create a Hidden Share
A share can be created in OneSystem and not be publicly browseable on the network. To do so,
navigate to Shares and Exports on the left-hand navigation of OneSystem.
Understanding OneBlox and OneSystem | Version 2.15.5 | page 79
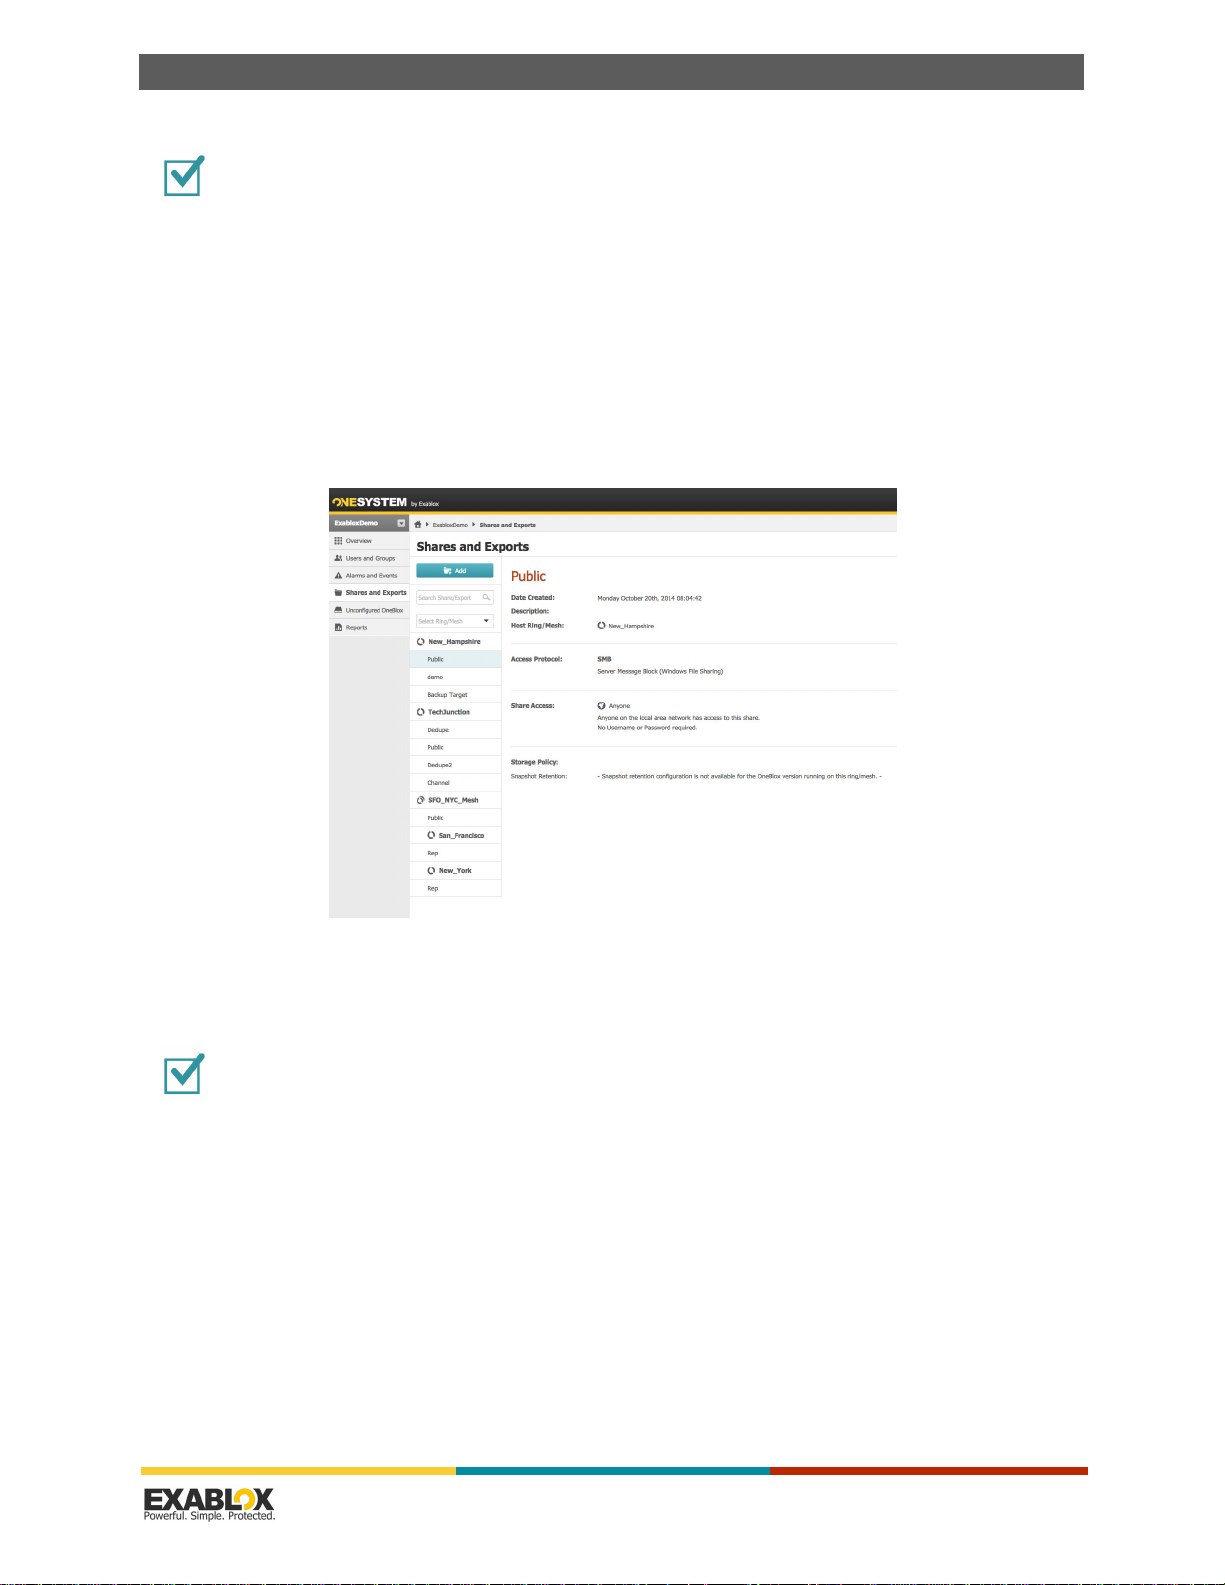
C
HAPTER
6 : Common Tasks
OneBlox 4312 User Guide
To create a hidden share
1.
Select the desired Ring or Mesh the new share should be part of.
2.
Create a share in the familiar Microsoft Windows context by adding a ‘$’ to the end of the share
name.
3.
Select the SMB access protocol.
4.
Select the desired share access.
5.
Select the desired storage policy.
6.
Click Save.
6.16 - How do I create an NFS Export
To create an NFS Export
To create an NFS export, navigate to Shares and Exports on the left-hand navigation of
OneSystem.
1.
Select the desired Ring or Mesh the new share should be part of.
2.
Select NFS as the access protocol.
3.
Select the desired Root Squashing permission.
4.
Select the desired storage policy.
Understanding OneBlox and OneSystem | Version 2.15.5 | page 80

C
HAPTER
6 : Common Tasks
5.
Click Save.
OneBlox 4312 User Guide
6.17 - How do I Mount an NFS Export
After creating an NFS export in OneSystem (see “How do I create an NFS Export” on page 80),
you can mount the export to clients or applications. Here are some examples of how to mount an
NFS export. OneBlox supports the use of hard links for mounting NFS exports.
To mount an NFS Export
This section describes command for listing and mounting exports on NFS Linux Clients.
• List exports available for mounting:
showmount -e # show mount information for oneblox system
• Show the OneBlox system's export list:
# showmount -e $oneblox
Example: OneBlox system. Two exports created through OneSystem - nfs1 & nf2.
# showmount -e oneblox
• Export list for OneBlox:
/exports/nfs1 *
/exports/nfs2 *
Understanding OneBlox and OneSystem | Version 2.15.5 | page 81

C
HAPTER
6 : Common Tasks
OneBlox 4312 User Guide
• Mounting export:
# mount -t nfs -overs=3,hard,intr $oneblox:/exports/$export /$local_mount_point
NOTE:
OneBlox currently supports NFS v3. Customers should use the overs, hard, and intr
options when mounting exports.
Example: Create local mount point. Create subdirectory called nfs1:
# mkdir /mnt/nfs1
• Mount export nfs1 to l ocal mount point /mnt/nfs1. Use OneBlox system ri ng name or i p addres s :
# mount -t nfs -overs=3,hard,intr oneblox:/exports/nfs1 /mnt/nfs1
or
# mount -t nfs -overs=3,hard,intr 192.168.201.8:/exports/nfs1 /mnt/nfs1
• Display mounted export. The following commands can be used to display mounted exports:
# mount
# df
# nfsstat -m
• Mount options. Options can be added with "-o".
rsize # data size that will be transferred from server to client per I/O operation
wsize # data size that will be transferred from client to server per I/O operation
6.18 - How do I set NFS Quotas?
With OneBlox 2.15 and later, IT admins have the ability to set hard NFS quotas (at the export
level) as well as client access restrictions by IP address or host name. When creating an NFS
export, quotas can be set to a usable storage capacity limit. The usable storage is from the client/
application perspective and does not take into account any deduplication or compression data
reduction within the OneBlox cluster. For example if the quota is set to 1TB, the application writes
Understanding OneBlox and OneSystem | Version 2.15.5 | page 82

C
HAPTER
6 : Common Tasks
OneBlox 4312 User Guide
1TB of information that is deduplicated and compressed to 500GB, the application has reached
100% of its quota.
Additionally, access to an NFS export can have one or client access policies. Client access policy
can be by IP address, subnet, or host name.
Understanding OneBlox and OneSystem | Version 2.15.5 | page 83

C
HAPTER
6 : Common Tasks
OneBlox 4312 User Guide
6.19 - How Do I Create a VMware NFS Datastore with OneBlox?
To create a VMware NFS Datastore
1.
After creating the desired number of NFS export(s) as described in “How do I create an NFS
Export” on page 80), you may mount those exports in VMware. OneBlox 2.11 and later currently
supports VMware vSphere 5.5 and 6.0.
2.
A single NFS datastore can support multiple vmdk files. Since there's no limit on the size of each
datastore and you can migrate datastores at any time, there's a significant amount of flexibility
with OneBlox and VMware.
3.
With OneBlox 2.14 and later, jumbo frames can be configured on a per port group basis. Care
should be taken if using jumbo frames to ensure the entire network is correctly configured.
Important:
Care should be taken if using jumbo frames to ensure the entire network is correctly
configured..
Tip:
Because OneBlox is a scale-out storage solution, all exports have equal access to the OneBlox
Ring capacity. There is no limitation on the size of an NFS export. A single export can be the entire
OneBlox Ring capacity-upwards of 300TB usable capacity. Moreover, as capacity is added to the
OneBlox Ring, simply rescan the datastores, and VMware seamlessly sees more storage-with zero
configuration. NFS quotas can be assigned to an export if desired.
4.
Open the vSphere Client and log into the appropriate vSphere ESXi server that you would like to
mount the NFS datastore. In the following screen shots, we used the traditional client, but the
principle is the same for the vSphere web client (see following figure). For details on installing
VMware vSphere and other VMware software, refer to VMware's technical documentation.
vSphere ESXi Server
Understanding OneBlox and OneSystem | Version 2.15.5 | page 84

C
HAPTER
6 : Common Tasks
OneBlox 4312 User Guide
5.
Click on the Configuration tab, then Storage, in the Hardware section on the left hand navigation.
6.
Click on Add Storage.. in the upper right and click Next.
7.
Select Network File System and click Next (see following figure).
VMware Datastore Storage Type
8.
Enter the virtual IP address of the OneBlox Ring in the server properties field (see following
figure).
Understanding OneBlox and OneSystem | Version 2.15.5 | page 85

C
HAPTER
6 : Common Tasks
OneBlox 4312 User Guide
VMware Datastore Naming
Tip:
It is a best practice to assign a virtual IP address for the OneBlox Ring. This future proofs the
scale-out capabilities of adding drives and/or OneBlox over time.
9.
In the folder field, enter the NFS export created in step 1. The format will always be /exports/
<OneBlox NFS name>.
10.
Provide a desired name for the datastore and click Next.
11.
Review the summary and click Finish. The OneBlox NFS datastore(s) may now be added to your
virtual machines.
Tip:
Within ESXi shell, to see the status of NFS mounts use esxcfg –nas –l.
NOTE:
VMs are provisioned as “Thick provision eager zeroed”. Datastore changes with vMotion
will always result in a thick provisioned VM on the new datastore. This is not a product
limitation. Since Exablox has a single name space for all of the NFS datastores, it eliminates
the need for thin provisioning as capacity can be added dynamically with zero
configuration.
6.19.1 - NFS and VMware Tips
• OneBlox 2.14 and later supports the configuration of multiple network port groups and VLAN
tagging. The OneBlox Web Console can be used to configure port groups, network bond modes,
and other networking configuration options.
Understanding OneBlox and OneSystem | Version 2.15.5 | page 86

C
HAPTER
6 : Common Tasks
• This should be done to the VIP for the Ring. In a future release, multiple VIPs will be available
to support multiple networks and multiple VMkernels for NFS data traffic.
• Only support vSphere 5.5. and 6.x.
• Through vSphere management configure VMkernels separate management, data, vmotion,
traffic.
• Command to check for VLAN config.
• Reference Book for deployment best practices.
6.20 - How do I create a Microsoft Hyper-V VHDX file?
With OneBlox 2.12 and later, Microsoft Windows 2012 R2 and Hyper-V is supported. IT Admins
may create SMB shares though OneSystem and utilize them as VHDX files.
OneBlox 4312 User Guide
Important:
SMB shares for Hyper-V should be created with 1) variable-length reduplication enabled,
2) compression enabled, and 3) snapshots disabled. This is the same storage policy as ‘backup/
recovery’. In an upcoming OneSystem release there will be a "virtual server" storage policy.
The ability for OneBlox to seamlessly scale-out storage capacity with zero configuration applies to
Hyper-V. When the OneBlox Ring capacity is increased, the Hyper-V VMs simply ‘see’ more storage
capacity. If IT admins want to limit the storage capacity for a given VM, they may do so by setting
the share level quotas.
To set up Microsoft Hyper-V
1.
Create a new blank VHDX.
Understanding OneBlox and OneSystem | Version 2.15.5 | page 87

C
HAPTER
6 : Common Tasks
OneBlox 4312 User Guide
2.
Select Dynamically expanding.
3.
Specify the name and location for the file. It’s a best practice to use the virtual IP address of
OneBlox Ring. This will dynamically route any Hyper-V connections to the appropriate OneBlox
and ensure zero scale-out expansion over time.
Understanding OneBlox and OneSystem | Version 2.15.5 | page 88

C
HAPTER
6 : Common Tasks
4.
Set the original VHDX file size.
5.
Verify the summary and click ‘Finish’.
OneBlox 4312 User Guide
6.21 - How do I set SMB Share Level Quotas?
OneBlox now supports share level quotas configured through Windows permissions. After
authenticating the OneBlox Ring with Active directory, creating the SMB share through OneSystem,
and logging into Windows with the appropriate permissions, an admin may now set the quota.
To set SMB share level quotas
Simply right mouse —> ’properties’ —> ’quota’.
1.
Check quota management.
Understanding OneBlox and OneSystem | Version 2.15.5 | page 89

C
HAPTER
6 : Common Tasks
2.
Check ‘Deny disk space...’ (OneBlox currently supports hard quotas.)
3.
Set the appropriate capacity limit on the share.
4.
Click Apply. The following figure shows setting hard quotas in Windows 2012 R2l
OneBlox 4312 User Guide
After this is complete, administrators and end users will only see the share level quota capacity.
They will no longer see the entire OneBlox Ring capacity. OneSystem administrators may view the
OneBlox Ring capacity at any time in OneSystem. SMB share level quotas may apply to Hyper-V
VHDX files if desired.
6.22 - Share Level Capacity Reporting
Share level storage management has been improved, initially with SMB and NFS share-level
quotas, and has now been extended to include share level storage capacity reporting. Shares that
are newly created with OneBlox 2.15.2 or later will display the application level capacity consumed
for a given share. The capacity reported through OneSystem is the application capacity and does
not take into account the additional capacity needed for drive failure protection or any
deduplication or compression data reduction.
For shares created prior to OneBlox 2.15.2, and currently do not have quotas set, n/a will be
displayed in OneSystem. An upcoming release of OneSystem will have a ‘calculate now’ button
that will enumerate the share and report the application capacity. If admins would like the
information before the next OneSystem release, you can set the quota (from MBs to PBs) of the
SMB or NFS share to any given value and OneBlox will enumerate the share and display the value.
Note that depending on the size of the share and the number of files/folders, the enumeration will
take some time.
6.23 - Which 10GbE cards are used and what SFP+ transceivers are supported?
OneBlox uses a dual ported Intel 82599EB 10-Gigabit SFP+ and Intel X540 10GBase-T. For the
10GbE BASE-T, please ensure that high quality Cat6e cables are used to minimize dropped
packets.
Understanding OneBlox and OneSystem | Version 2.15.5 | page 90

C
HAPTER
6 : Common Tasks
OneBlox 4312 User Guide
For the SFP+ card, Intel uses the MAUI interface with additional usage of low speed interface pins
(SDP, I2C and MDIO I/Os). The SPF+ card supports a connection to transceiver modules compliant
with the following Multi Source Agreements (MSAs): SFP+ — SFF-8431 Specifications for
Enhanced 8.5 and 10 Gigabit Small Form Factor Pluggable Module SFP+ rev 1.0.
Organizations may select fiber optic cabling or DAC (direct attach cable). Please consult with your
specific switch manufacturer to ensure the transceiver and cables type is supported befor use with
OneBlox.
6.24 - How do I Limit which Storage Shares Users have Access to—Adding Shares
A share is a method of providing users and applications access to the OneBlox. OneBlox may
contain any number of shares. A share can be thought of as a partition of the OneBlox storage,
with three levels of access:
• Anyone
• All Registered users
• Restricted users
See the following tasks:
•“To add a Share” on page 91
•“To edit a Share” on page 92
To add a Share
1.
Login to OneSystem.
2.
Click on the ring to bring up the Ring Overview.
3.
Click the Shares tab on the left navigation of the web page.
Understanding OneBlox and OneSystem | Version 2.15.5 | page 91

C
HAPTER
6 : Common Tasks
4.
Click Add Share.
OneBlox 4312 User Guide
5.
Enter a Share Name and description (if desired).
6.
Select the Share Access type radio button (assuming the OneBlox cluster is not authenticated
with Active Directory):
a.
If it is
b.
c.
If it is
If it is
Anyone
All Registered
Restricted
, no further actions are needed. Click Save, and you are done.
, no further actions are needed. Click Save, and you are done.
, follow these steps:
- Select or type a user(s) from the dropdown list, and/or
Select or type a group(s) from the dropdown list
- Provide read/write permission for the selected user/group.
d.
Click Save.
To edit a Share
1.
Click the ring of the share that you want to edit.
2.
Click on the shares tab on the left navigation of the web page.
3.
Select the share you want to edit on the left panel. Click on the pencil next to the name of the
share.
4.
Click Save.
Understanding OneBlox and OneSystem | Version 2.15.5 | page 92

C
HAPTER
6 : Common Tasks
OneBlox 4312 User Guide
6.25 - How do Users access Restricted Shares when Active Directory is not used?
For customers that select to manage restricted share access may do so by managing users and/or
groups directly in OneSystem (see “How do I Limit which Storage Shares Users have Access to—
Adding Shares” on page 91).
After a share is created and read/write permissions are assigned, users will need to login to the
share to access the information. To do so, users simply enter the first part of the email address
and the password they created with their OneSystem user account. For example, a user with the
email address of john@mycompany.com, will simply use ‘john’ as the user name in conjunction
with the OneSystem password
6.26 - How are the Settings for the OneBlox Ring Changed?
1.
Navigate to the desired Ring within OneSystem.
2.
To rename a OneBlox Ring from the default "OneBlox-R-####", click on the pencil icon next to
the Ring name, or click on the Ring name itself. Ring names cannot contain spaces and may have
up to 15 characters.
NOTE:
If the OneBlox Ring has already been authenticated with Active Directory and the Ring
name is changed, the administrator will need to repeat the authentication. Active Directory
will be looking for the old Ring name that no longer exists.
3.
To add additional OneBlox to an existing Ring, simply install an additional OneBlox (refer to “Quick
Start” on page 7). If the OneBlox are on the same network subnet, the new OneBlox will auto
enroll with the existing Ring. When this happens, the global filesystem simply increases in
capacity and all shares within the Ring can utilize the additional storage capacity.
4.
When OneBlox is initially installed, a Ring is created by default and auto enrollment is enabled by
default. To change this setting, see the following section.
6.27 - What if I want to setup additional OneBlox in different Rings?
The default settings of a OneBlox Ring is to have additional OneBlox auto enroll and join the
existing Ring that is discovered on the same network subnet. This is a configuration setting that
organizations may change.
To change the Auto Enrollment setting in OneSystem
1.
Navigate to the Ring view and select ‘Settings’ on the left-hand navigation.
Understanding OneBlox and OneSystem | Version 2.15.5 | page 93

C
HAPTER
6 : Common Tasks
2.
Once in the Settings view, auto enrollment may be enabled or disabled.
OneBlox 4312 User Guide
6.28 - Viewing Snapshots
1.
Snapshots may be viewed in a few ways, including through Windows previous version.
2.
In Windows Explorer or Mac Finder, locate OneBlox on the network.
Understanding OneBlox and OneSystem | Version 2.15.5 | page 94

C
HAPTER
6 : Common Tasks
OneBlox 4312 User Guide
3.
Click on OneBlox and navigate to the top level directory. You will see the Public share and any
other shares that have been created through OneSystem.
4.
Open the desired share folder, then open the Snapshots folder.
5.
Navigate the Snapshot folder that is sorted by date and time (hours, minutes, seconds), and
select the desired file(s).
6.
Copy/paste the file you'd like to recover from the snapshot directory to the directory you'd like to
recover the file to.
Understanding OneBlox and OneSystem | Version 2.15.5 | page 95

C
HAPTER
6 : Common Tasks
6.29 - How do I turn Snapshots On and Off?
Through OneSystem, for OneBlox running version 2.8 or later snapshots may be enabled or
disabled on existing and new shares and exports. After navigating to the correct share/export in
OneSystem, select ‘actions’ and then ‘edit’.
OneBlox 4312 User Guide
Caution: For any existing shares or exports when snapshots are turned off, any existing
snapshots for that share will be deleted. This operation cannot be undone. Snapshots may be
turned on again, but the recovery point will begin at the point snapshots are turned on.
6.30 - How do I Hide the Snapshot Directory?
With OneBlox 2.9 and later, admins now have the ability to hide the snapshot directory from users.
In OneSystem, after joining the Ring with Active Directory, admins can select access based
enumeration (ABE) for a given SMB share. From here, admins can manage the visibility through
Windows Shared Folder Settings.
Understanding OneBlox and OneSystem | Version 2.15.5 | page 96

C
HAPTER
6 : Common Tasks
OneBlox 4312 User Guide
OneSystem screenshot
The following can be used hide shares from certain users and groups when a OneBlox cluster is
authenticated with Active Directory. This is an alternative to using $ in the share name to hide
shares from users. When a $ sign is used, users may still navigate to the share if they know the
exact path.
To hide the Snapshot Directory
1.
Map a OneBlox share to windows server or Windows client that has Admin User credentials.
2.
Go to the Snapshot folder within the share and right click.
3.
Click on Properties>Security>Advanced.
Understanding OneBlox and OneSystem | Version 2.15.5 | page 97

C
HAPTER
6 : Common Tasks
OneBlox 4312 User Guide
4.
Add a desire user or group to hide Snapshot folder for (user=qatest5 in this example).
5.
Select “Deny” for Type and “This folders, subfolders and files” for Applies to.
6.
Click on “Show advanced permissions”.
7.
Select (1) Read attributes (2) Write attributes (3) Write Extended attributes.
8.
Click OK then click Apply.
9.
To verify, map a share on a different client with selected user, the Snapshot folder will be hidden
for that share.
6.31 - What is the Retention Policy for the Continuous Data Protection
Understanding OneBlox and OneSystem | Version 2.15.5 | page 98

C
HAPTER
6 : Common Tasks
feature?
The Continuous Data Protection (CDP) feature is enabled by default, and is 'triggered' when the
file system is updated, resulting in a snapshot. If no changes are made to the file system, then a
recovery point (snapshot) will not be shown.
If organizations have applications (e.g., backup/recovery) that are managing how long information
is kept, the Continuous Data Protection feature can be turned on or off at the share level through
OneSystem.
Snapshots are taken every 10 seconds for the first hour and then retained for a period of time.
Over time, different recovery points will be available, and the default retention period is for 1 year.
Below is a table of the default snapshot frequency and retention period.
OneBlox 4312 User Guide
NOTE:
Snapshots are deduplicated with the original information, resulting in efficient capacity
utilization. The 'clock' begins based on two factors: when the share/export was created and
if the file system is inactive for a period of time. Consequently, the timing of the snapshots
will not occur at midnight every 24 hours and December 31st for the annual snapshot.
Snapshot Frequency Snapshot Retention Period
every 10 seconds 1 hour
every hour 24 hours (1 day)
every 24 hours 7 days (1 week)
every 24 hours 14 days (2 weeks)
every 24 hours 21 days (3 weeks)
every 24 hours 30 days (1 month)
every month 3 months
every month 6 months
every month 9 months
every 7 days (weekly) 1 year
every month 1 year
Understanding OneBlox and OneSystem | Version 2.15.5 | page 99

C
HAPTER
6 : Common Tasks
6.32 - Can I Change the Snapshot Retention Policy?
With the OneBlox 2.10 release, for new and existing shares, the default snapshot retention policy
can be modified. When creating a share, select 'custom' and then adjust the slider to the desired
retention period. The default retention period is 1 year.
For existing shares, if the retention period is adjusted, and is a shorter retention period than the
previous settings, all snapshots older than the new retention period will be immediately and
permanently deleted. OneSystem admins will be prompted for their password, or, if enabled, their
two-step verification code. Additionally, the retention period for existing shares may be increased
from their current period (e.g., increasing from 6 months to 9 months).
OneBlox 4312 User Guide
For shares that are not being updated with new or modified files, customers will not see a
snapshot directory for that time interval. For example, if a share is only updated once in an hour,
there will be one snapshot displayed, there will not be 359 (every 10 seconds for one hour)
identical snapshot directories displayed.
The timing of snapshots begins when the share is created. For example, if the share was created
at 3pm, then the 'clock' begins at 3pm and the daily snapshots are retained every day at 3pm.
Snapshot are taken and retained as follows.
Snapshot Frequency Snapshot Retention Period
every 10 seconds 1 hour
every hour 24 hours (1 day)
every 24 hours 7 days (1 week)
every 24 hours 14 days (2 weeks)
every 24 hours 21 days (3 weeks)
every 24 hours 30 days (1 month)
every month 3 months
every month 6 months
Understanding OneBlox and OneSystem | Version 2.15.5 | page 100
 Loading...