

Page 1
EN - FR - DE
TM
TM
eFizz™ User Manual
Manuel d’utilisation eFizz
™
eFizz™ Bedienungsanleitung
003
041
079
EN
FR
DE
Page 2

Product: eFizz™
Company : Ewoo SA
Address:
Le Tresi 6B
1028 Préverenges
Switzerland
Tel : +41 21 821 55 00
These products conform to Section 15 of the F.C.C. regulations. Their operation is
subject to the following conditions:
1. These products do not cause any risk of harmful interference.
2. These products must accept all interference received including those that may
cause undesirable operation.
This equipment has been tested and stated to be in conformity with the limitations
regarding computer equipment Class B, in accordance with Section 15 of the
F.C.C. regulations. These limitations aim at ensuring reasonable protection against
interferences within the framework of a residential installation. This equipment
generates, uses, and can emit radio frequency energy. If it is not installed and used
in accordance with the manufacturer’s instructions, it may cause interference that
will affect radio and television reception. There is no guarantee that is will not cause
interference in any particular installation.
This equipment has been tested and declared to be in accordance with the following
standards:
EN300440-2 / EN301489-3
FCC Part 15C / FCC Part 15B
Statement of Conformity
Page 3

Introduction
Quick Start
Use of the remote
Updates for your product
Menu diagram
Installation repairs
Technical characteristics
Limited Guarantee
4
Table of Contents
5
11
21
27
29
31
35
37
Page 4
5
1
Introduction
Page 5

6
Introduction
Ewoo™ wishes to thank you for purchasing eFizz™, the HiFi stereo system for
iPod™. We hope that this product brings you satisfaction and enables you
to fully enjoy your new multimedia experiences.
If you are comfortable installing iPod™ accessories, use the
Quick Start
section
found below. For full details on the connections and functionality of
this equipment, please refer to instruction of use. Electronic versions of the
user guide can be found on our Internet site at
http://www.ewoo.com
.
We invite you to carefully read this user’s manual in order to experience the
full benefits and available features using your eFizz™ and HandMusic™.
Contents of Package
•iPod™ eFizz™ HiFi stereo system.
•HandMusic™ remote control
•Power section for outlets in EU/US/UK
•Mini-USB cable
•6 iPod™ adaptors
•User manual
Page 6

7
Introduction
How to maximise eFizz™
Positioning of the product
eFizz™ is designed to operate in a vertical position to respect the polar
curbature of speakers.
The supports of the decouple ensure better surrounding stability, by limiting
the resonance that can be generated, for example, by certain types of
floors. The surrounding walls are delivered with a protective fabric in the
front. It is possible to use them without fabric, but we recommend you keep
this protection in order to better protect the speakers.
The magnetic field of the speaker’s will resonate beyond the casing of
the speakers. It is necessary to place sensitive objects and appliances
approximately 50 cm (20 inches) away from this type of resonance
(televisions, computer screens, software discs, audio magnetic bands, or
videos, smart cards….). The central speakers are not affected by this type of
problem because they are magnetically sealed.
Location of speakers in a room.
Apart from the positioning of eFizz™, it is necessary to take into
consideration its location in the room, given that the acoustic properties of
a room is an important factor in the retransmission of sound.
The optimal location for stereo listening in 2.1
The location of the eFizz™ against a wall reinforces the low bass and limits
the reflections of 80 to 200 Hz. However, to obtain the best result, it is always
necessary to conduct tests of the room’s acoustics.
Page 7
8
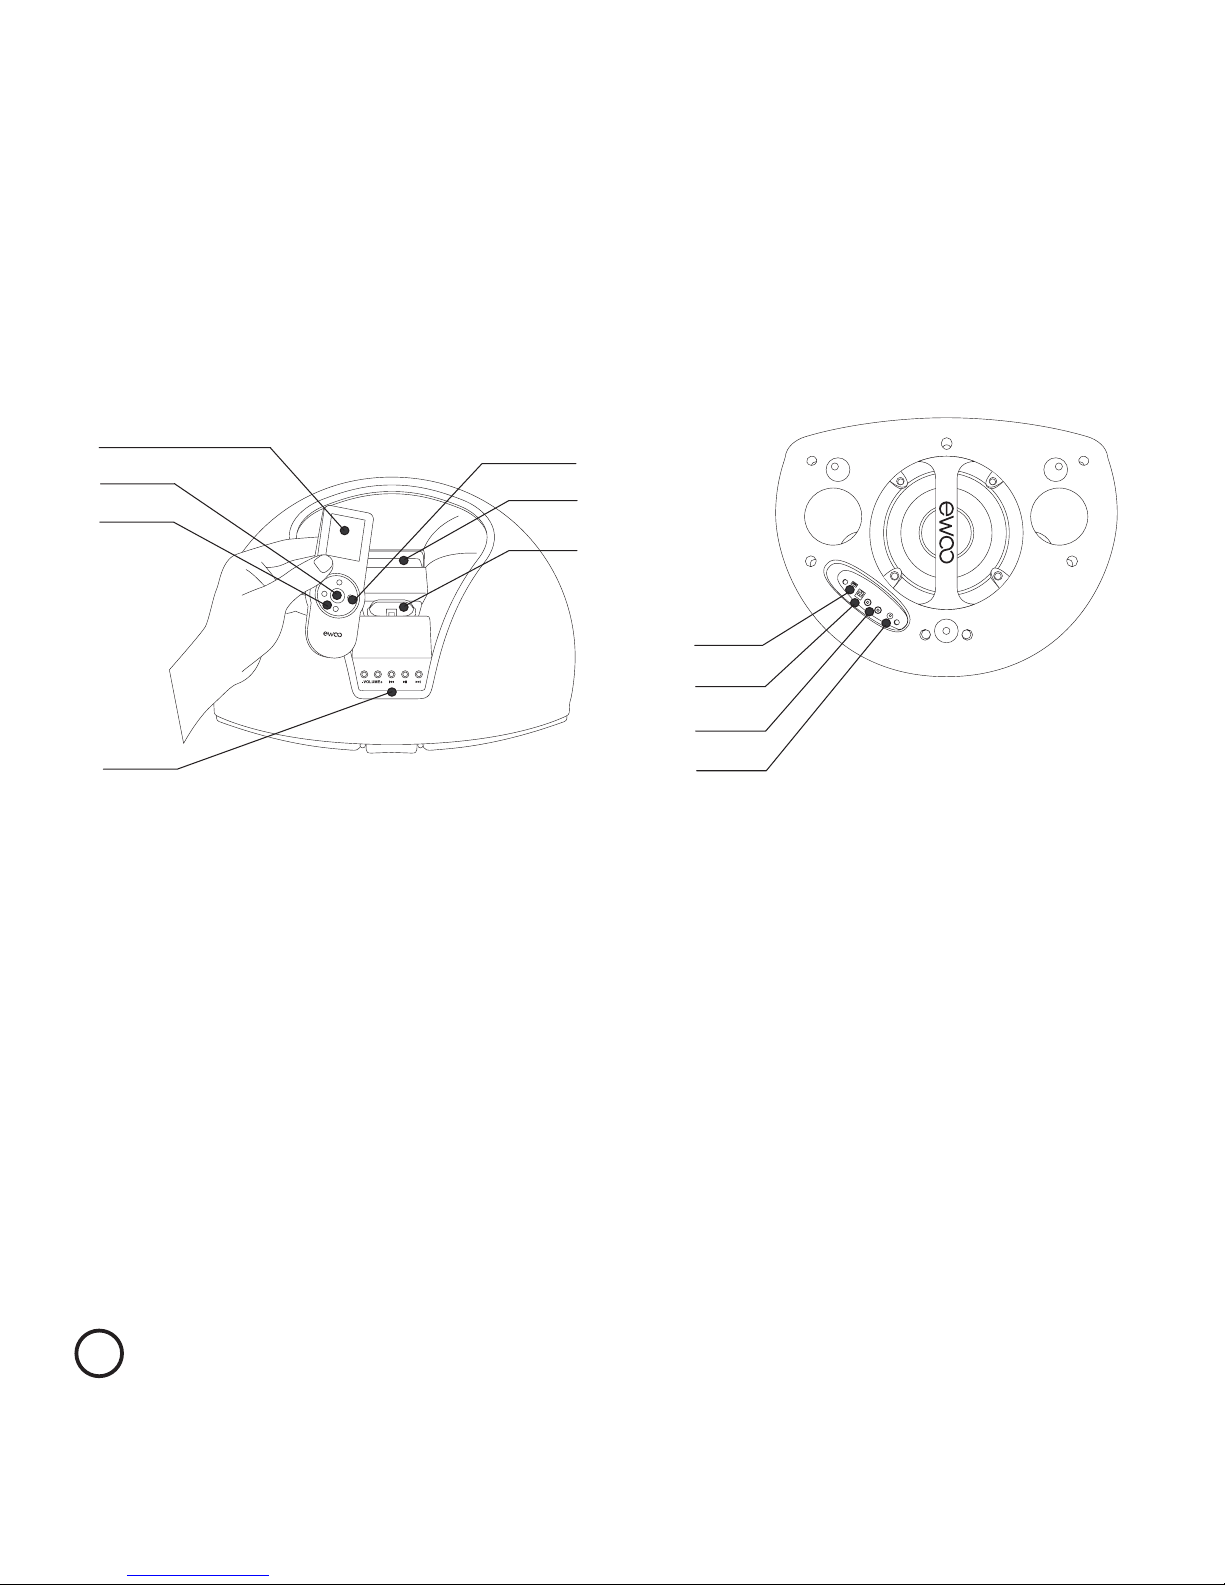
General view of the product
1. 1.8’’ Screen
2. Validation button
3. Touch zone
4. Direct access buttons
5. Navigation buttons
6. Location of iPod™ and adapter
7. Remote control recharging zone
8. Mini-USB Connector
9. Audio digital S/PDIF Connector
10. Audio analog Connector
11. Power Supply Connector
Introduction
7
6
1
8
9
10
11
3
4
2
5
Page 8
9
Introduction
Actions that are possible with the HandMusic™ remote control
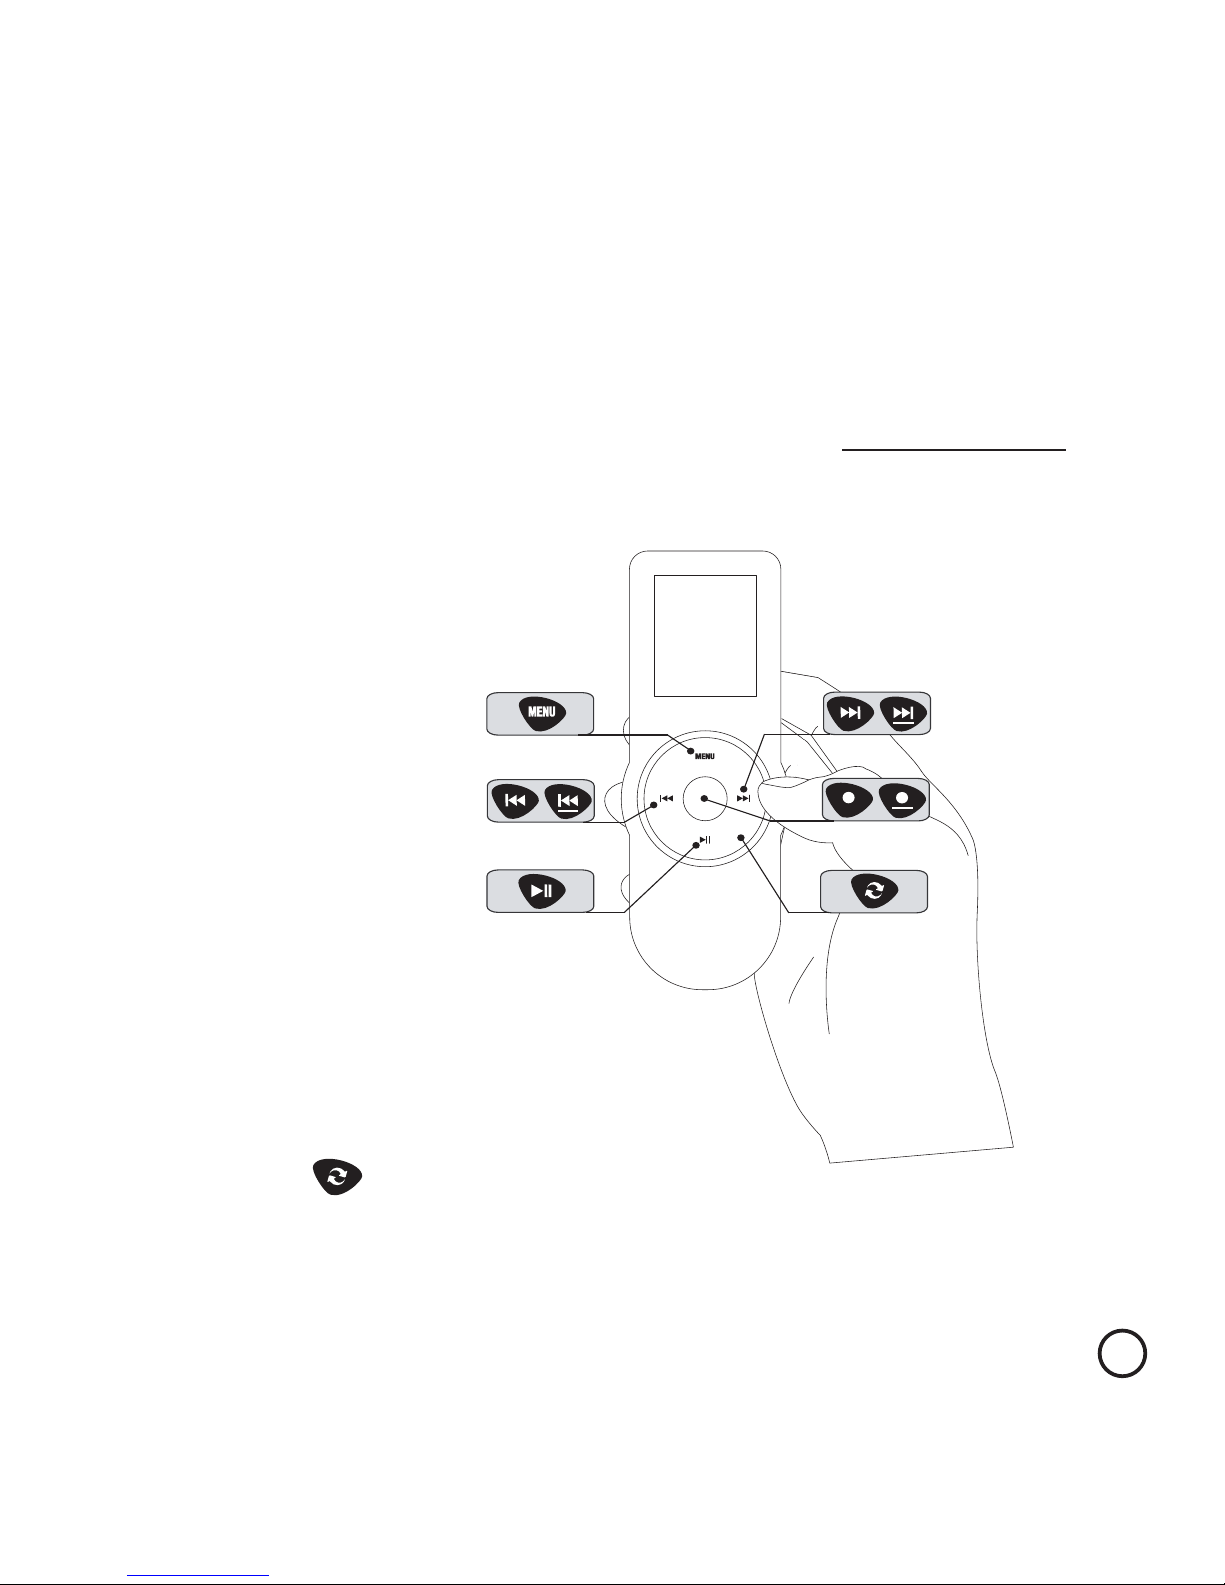
HandMusic™ is equipped with a navigation interface allowing the user to
press on any of the five buttons, while at the same time rotating the touch
zone. Advanced functions are obtained by holding one of the buttons
pressed for at least 2 seconds (indicated below by the underlined mark).
You will find picture graphs
like this one throughout
the manual: .
Page 9
10
Introduction
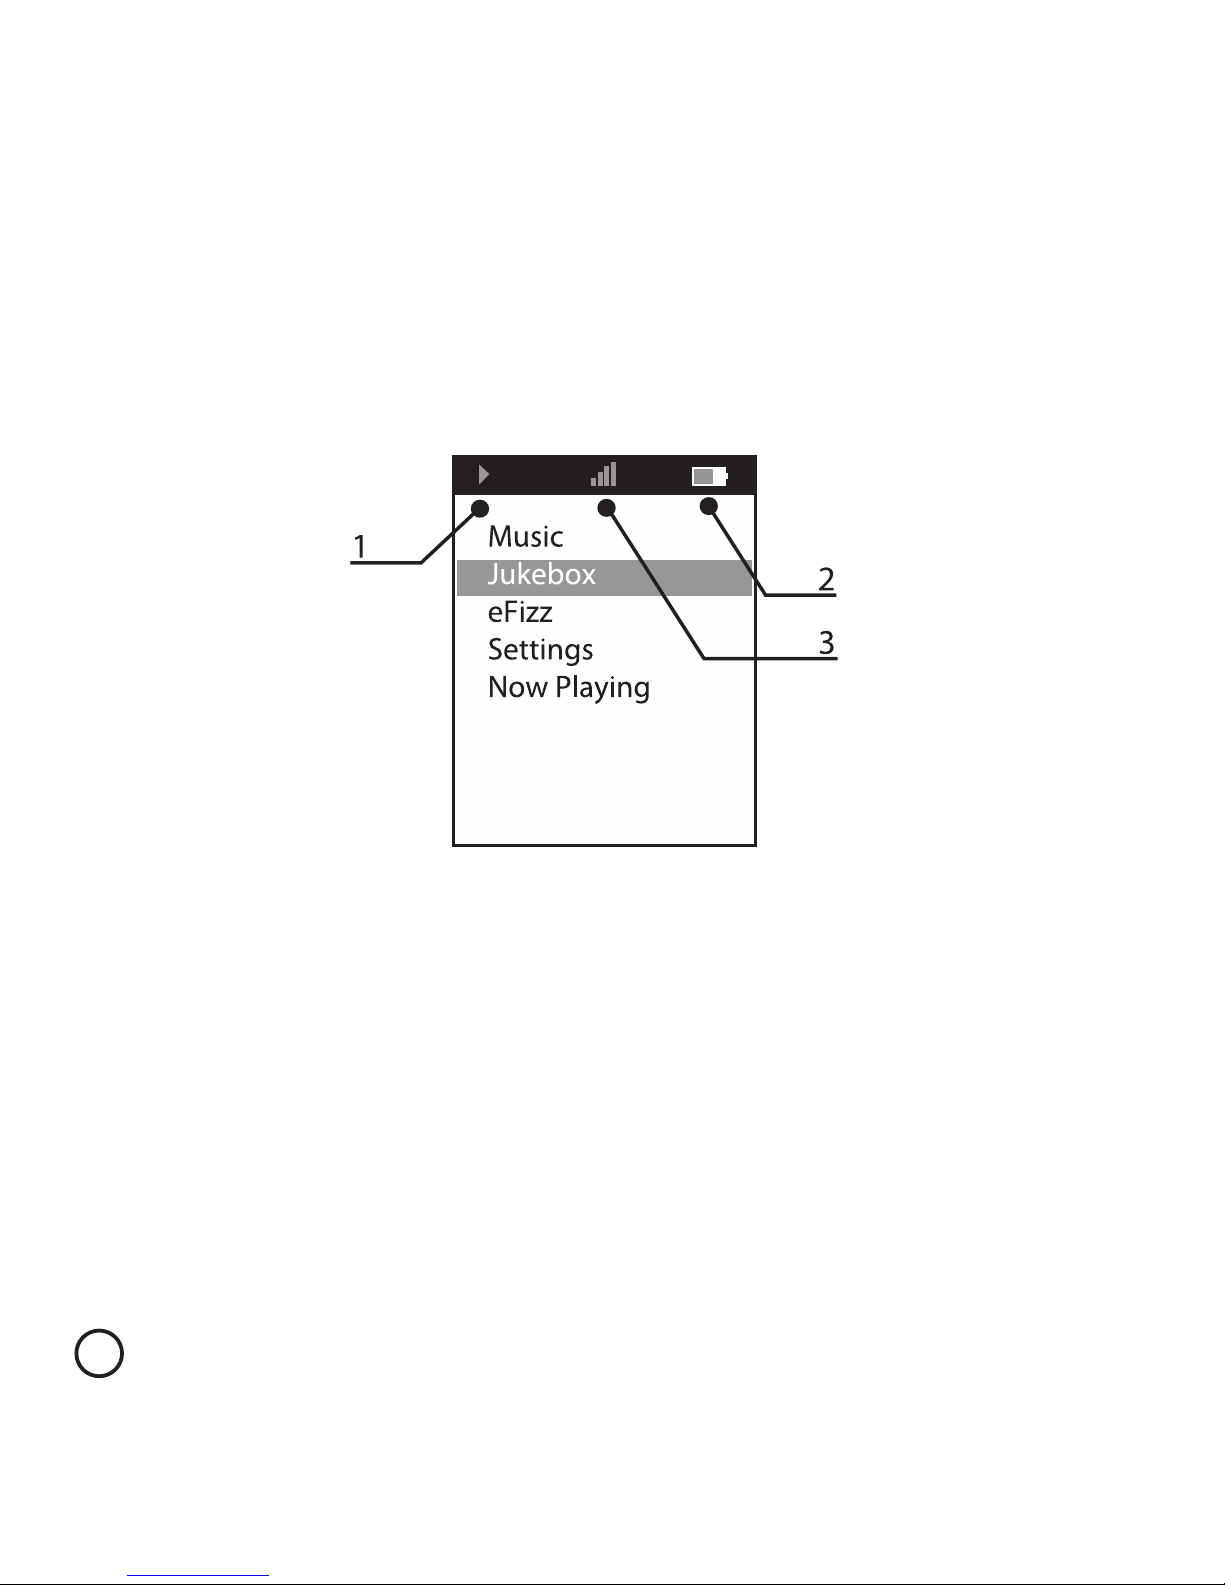
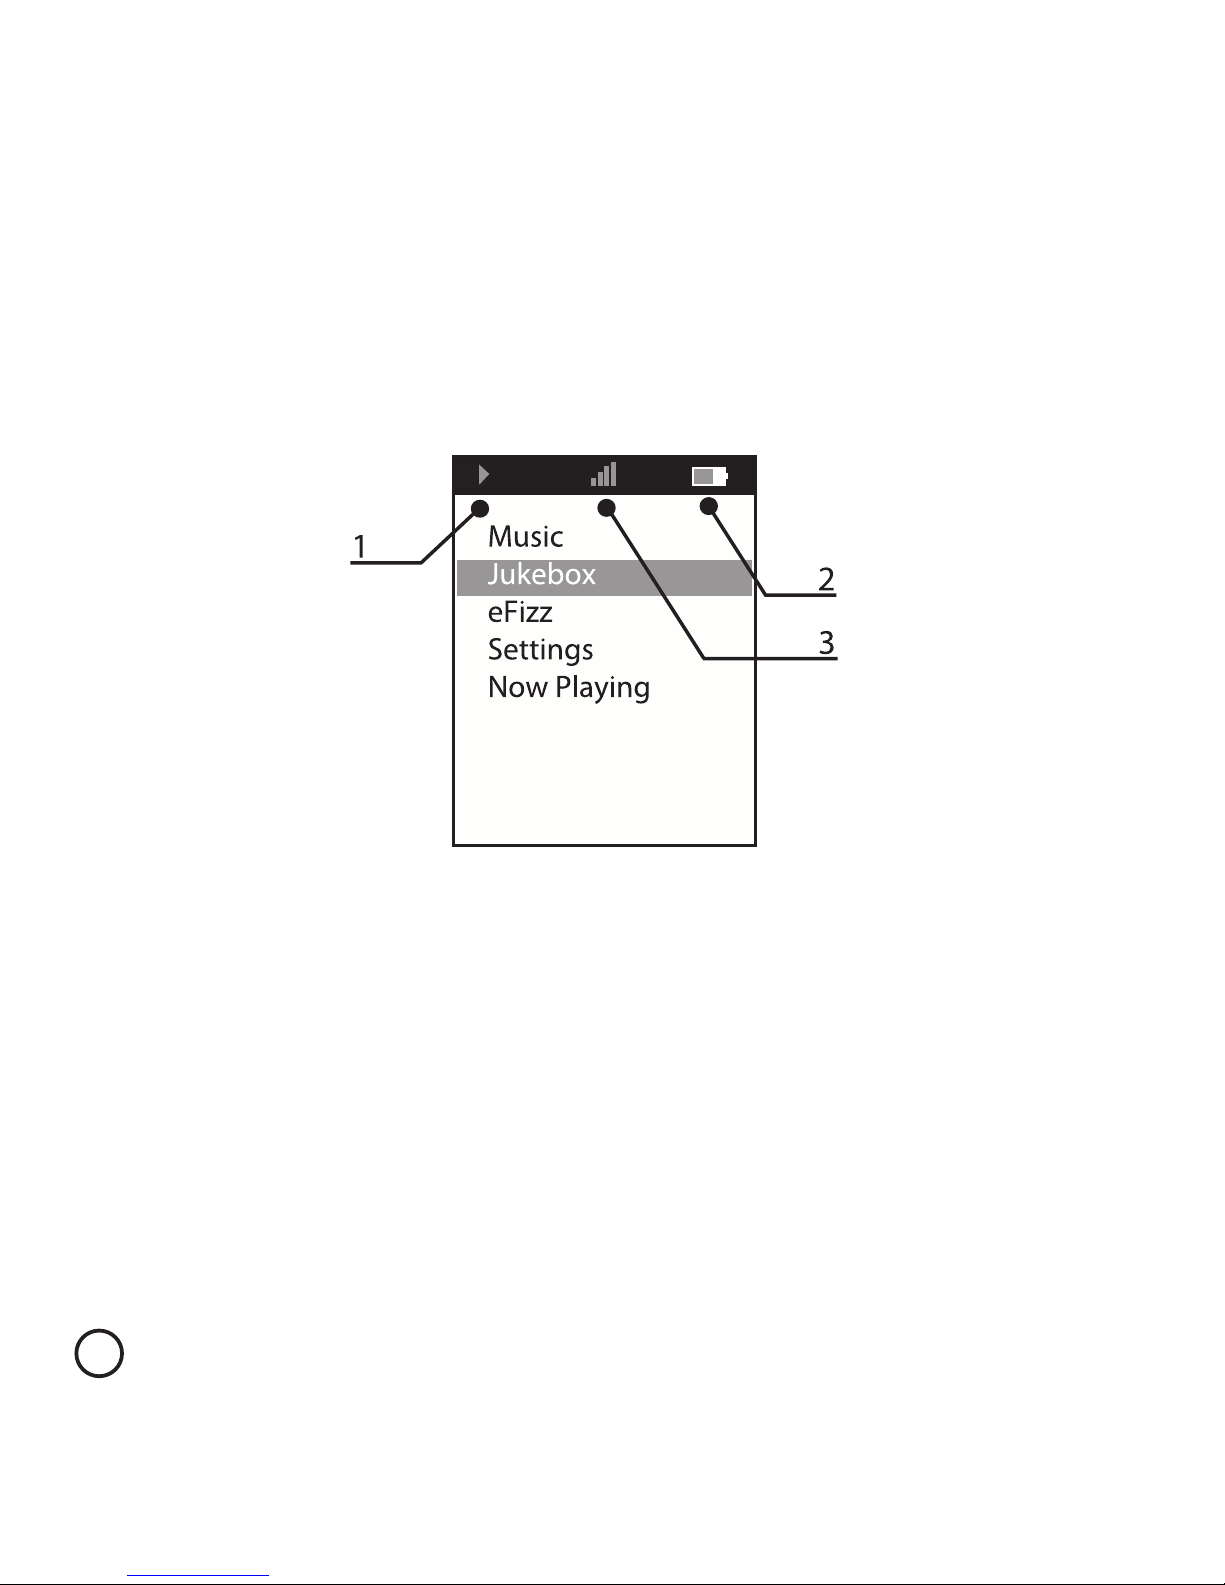
HandMusic™ Remote Screen
1. Reading instructions
2. Battery level
3. Quality of Cordless communication
NB: The contents of the main menu depend on the attachment of the ’iPod™ to the
eFizz™.
If it is absent, only the “Settings” menu is visible.
Page 10
Titre chapitre
11
2
Quick Start
Page 11
12
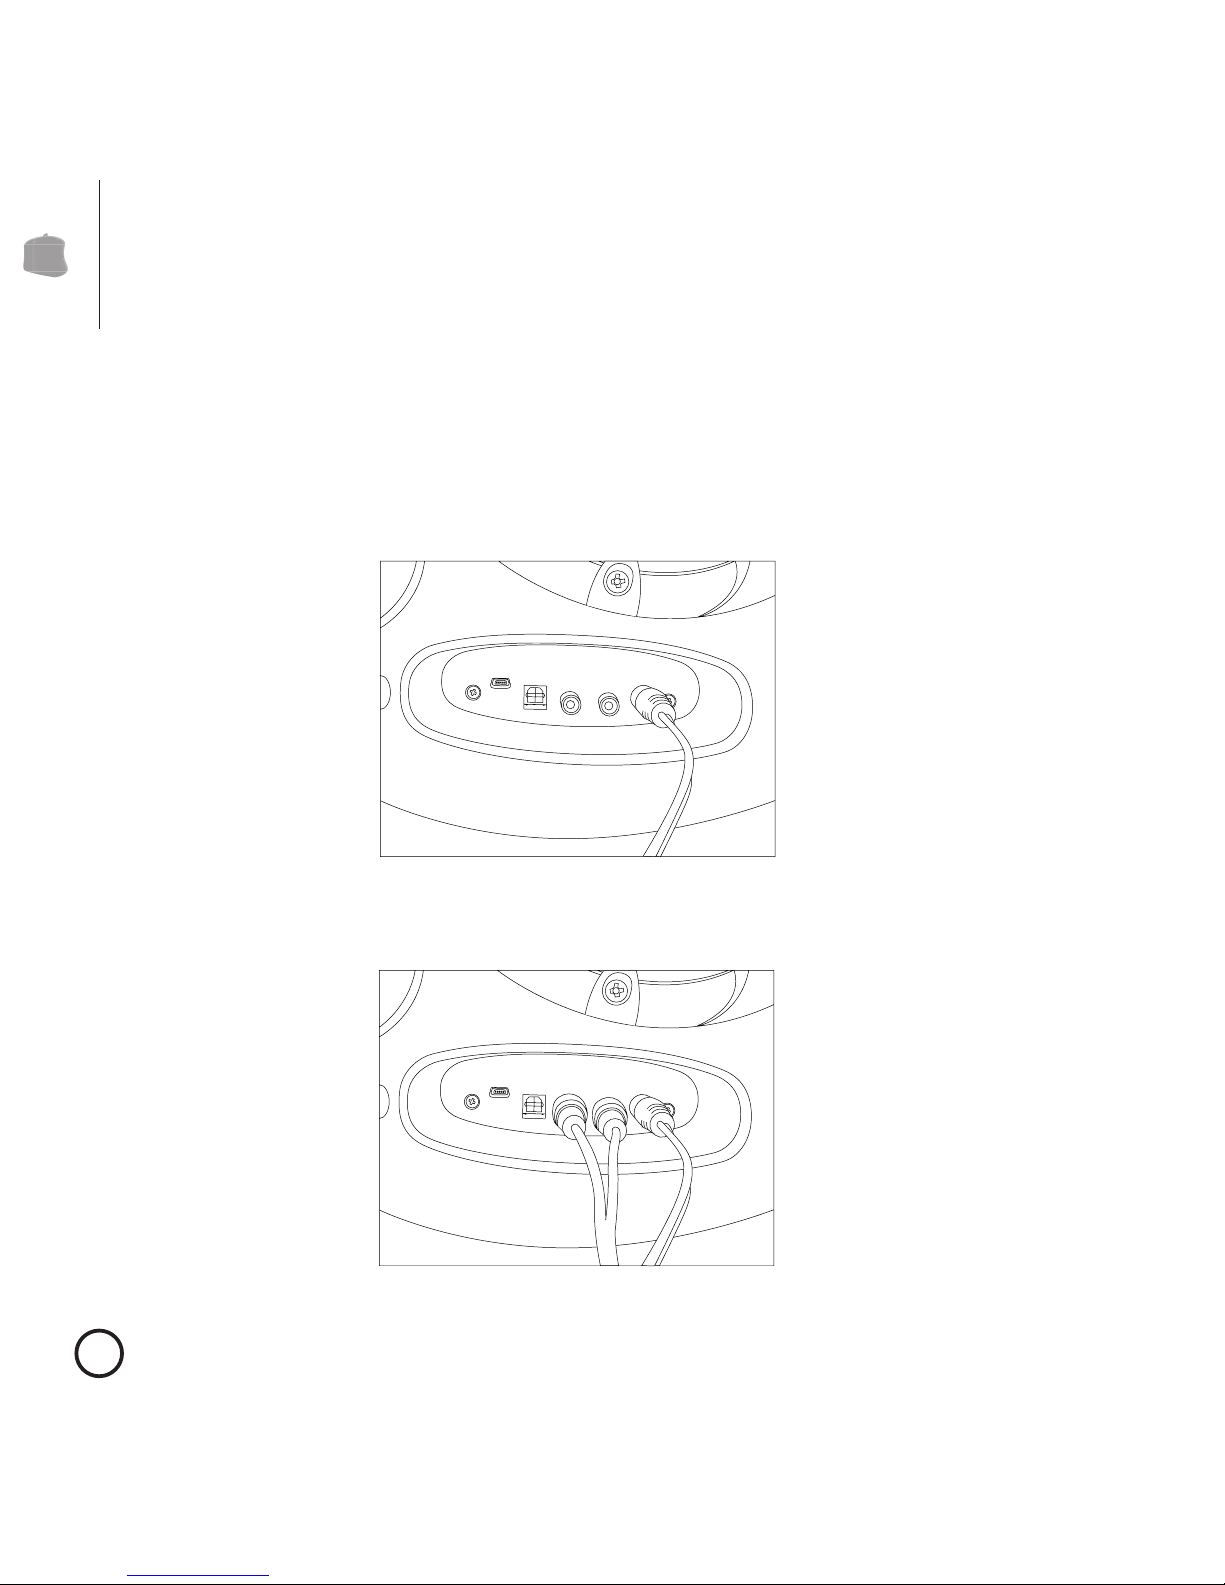
Connections
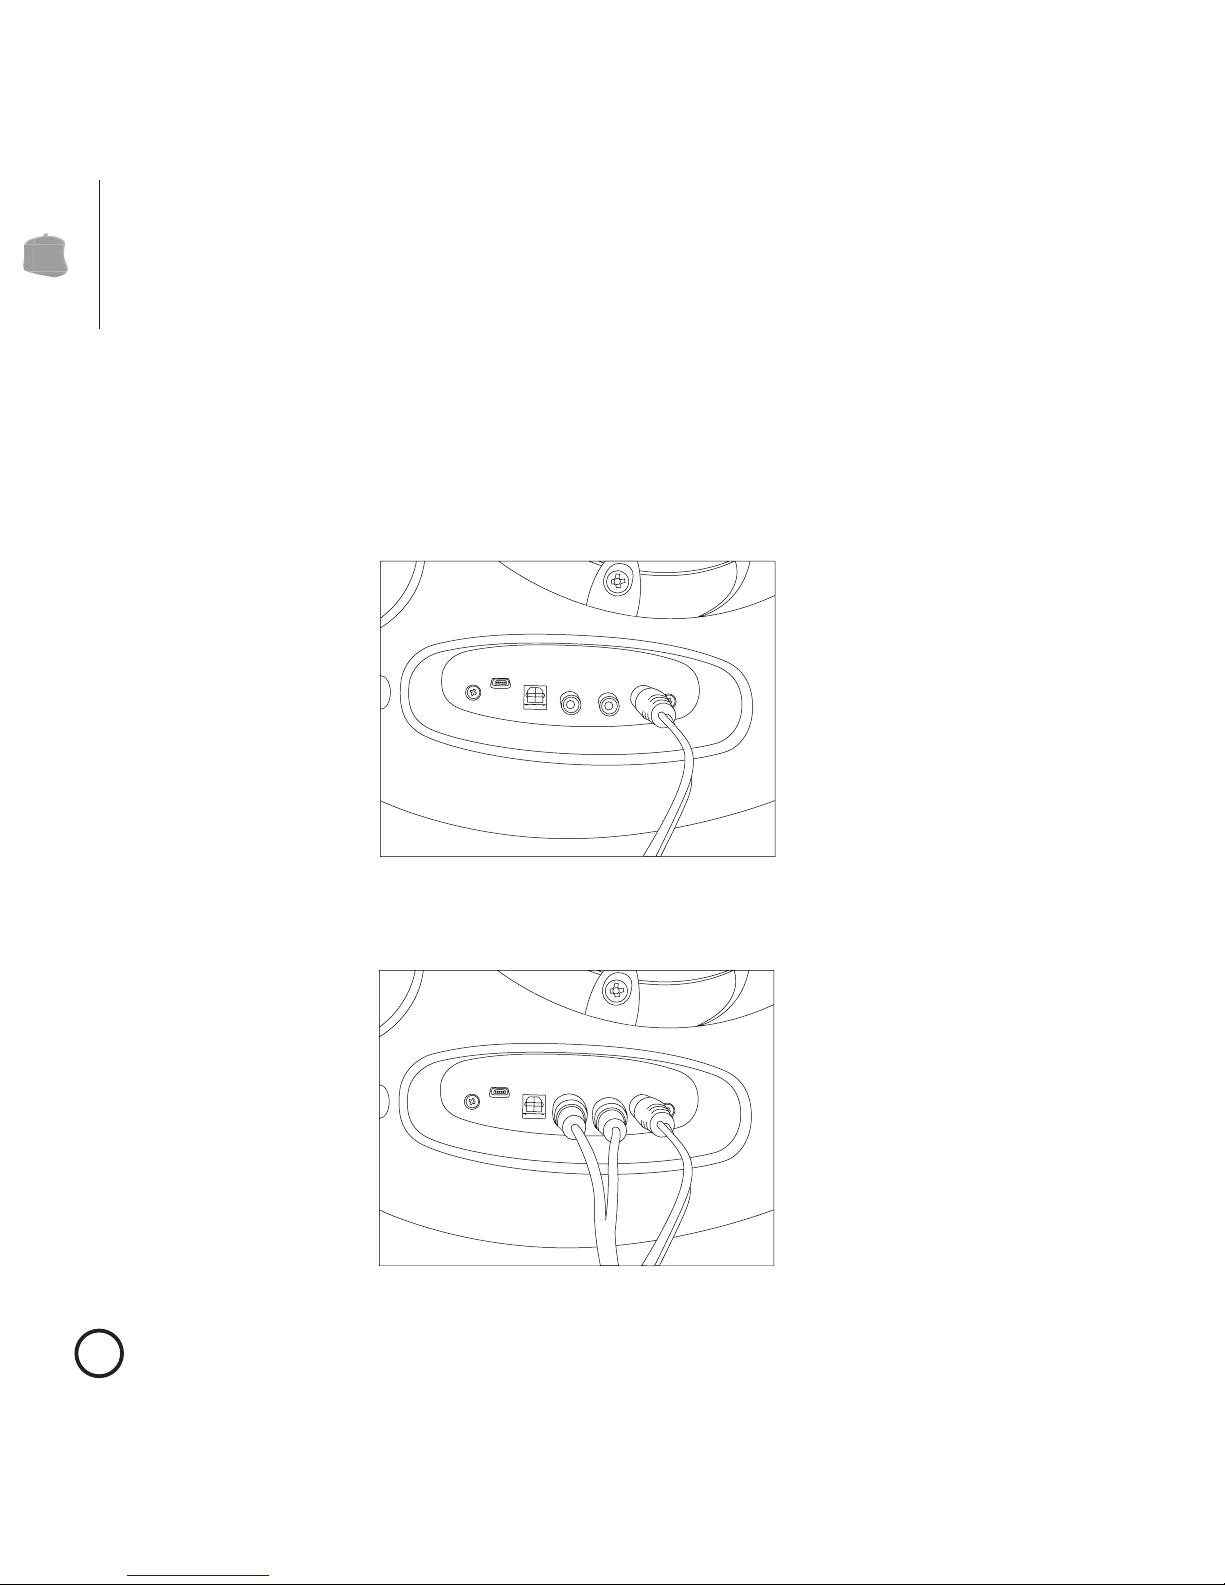
This section describes the different connections that are necessary for
proper functioning of your eFizz™ system.
1) Connect the power supply adapter to the eFizz™.
2) Optional: Connect an audio system to the analog input of the
eFizz™
Quick Start
Page 12
13
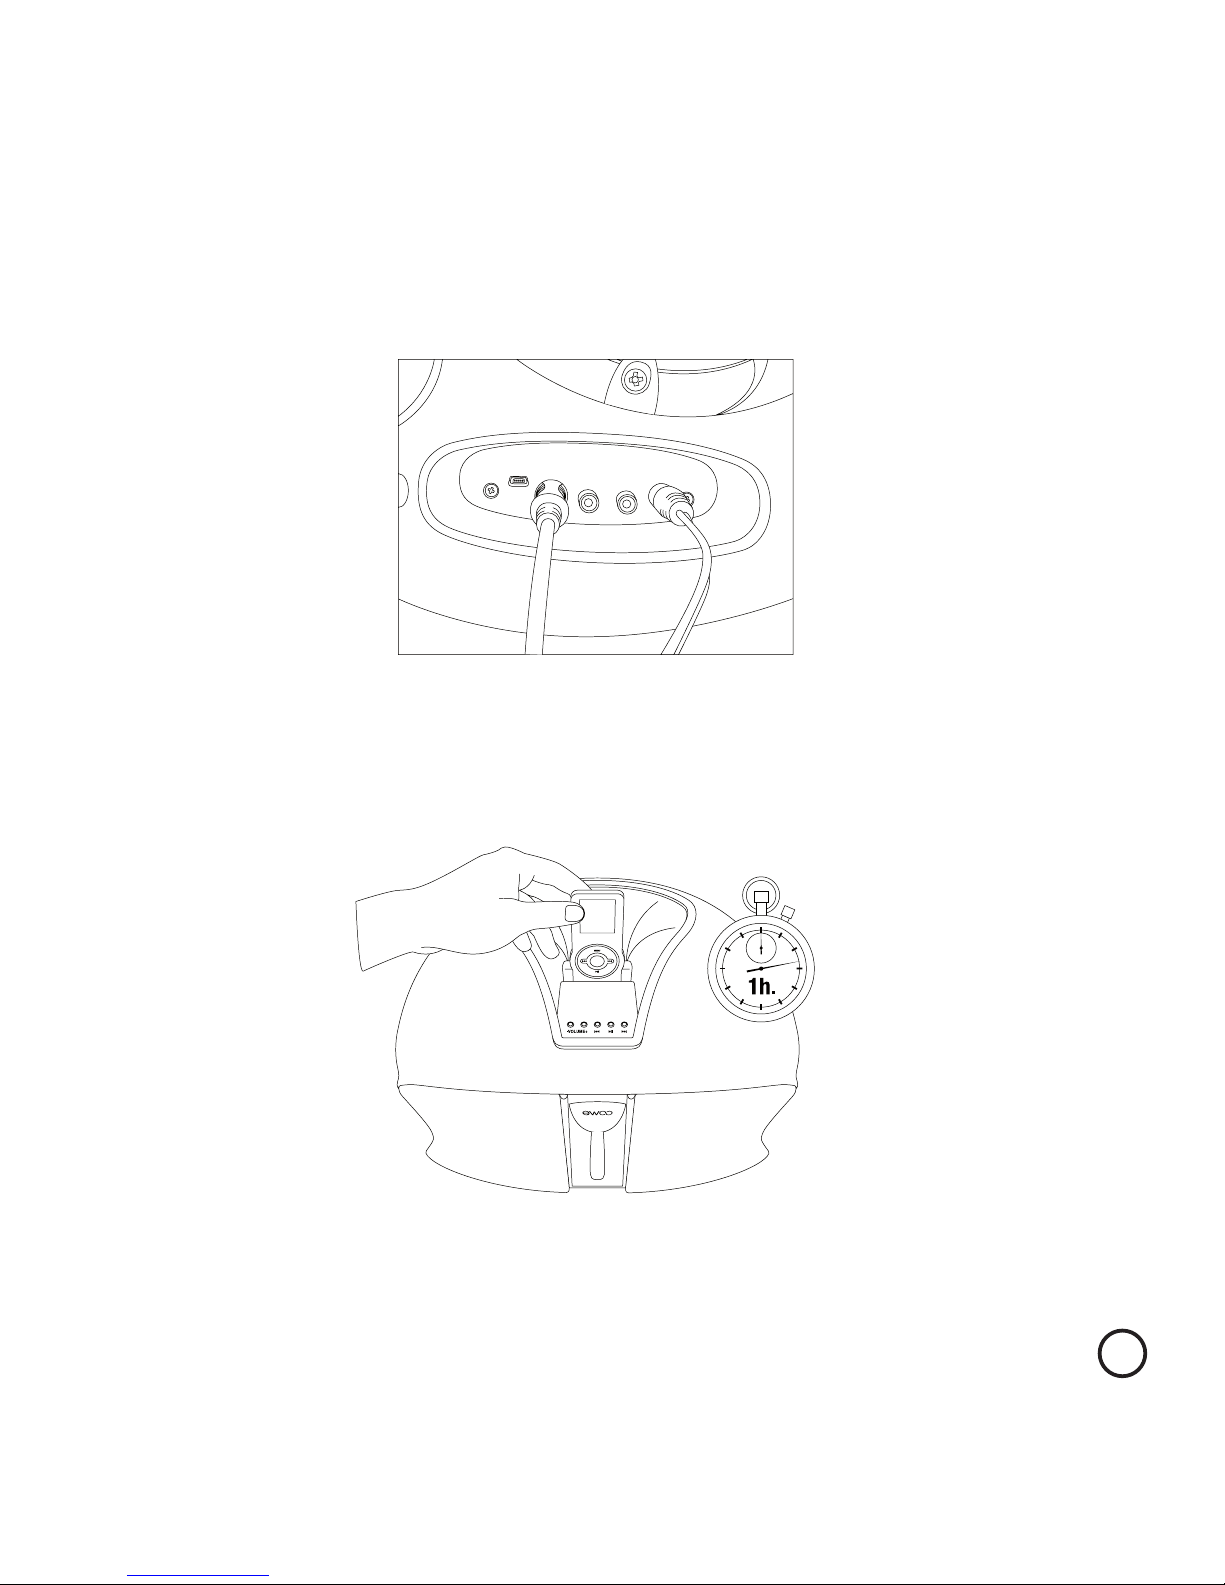
Quick Start
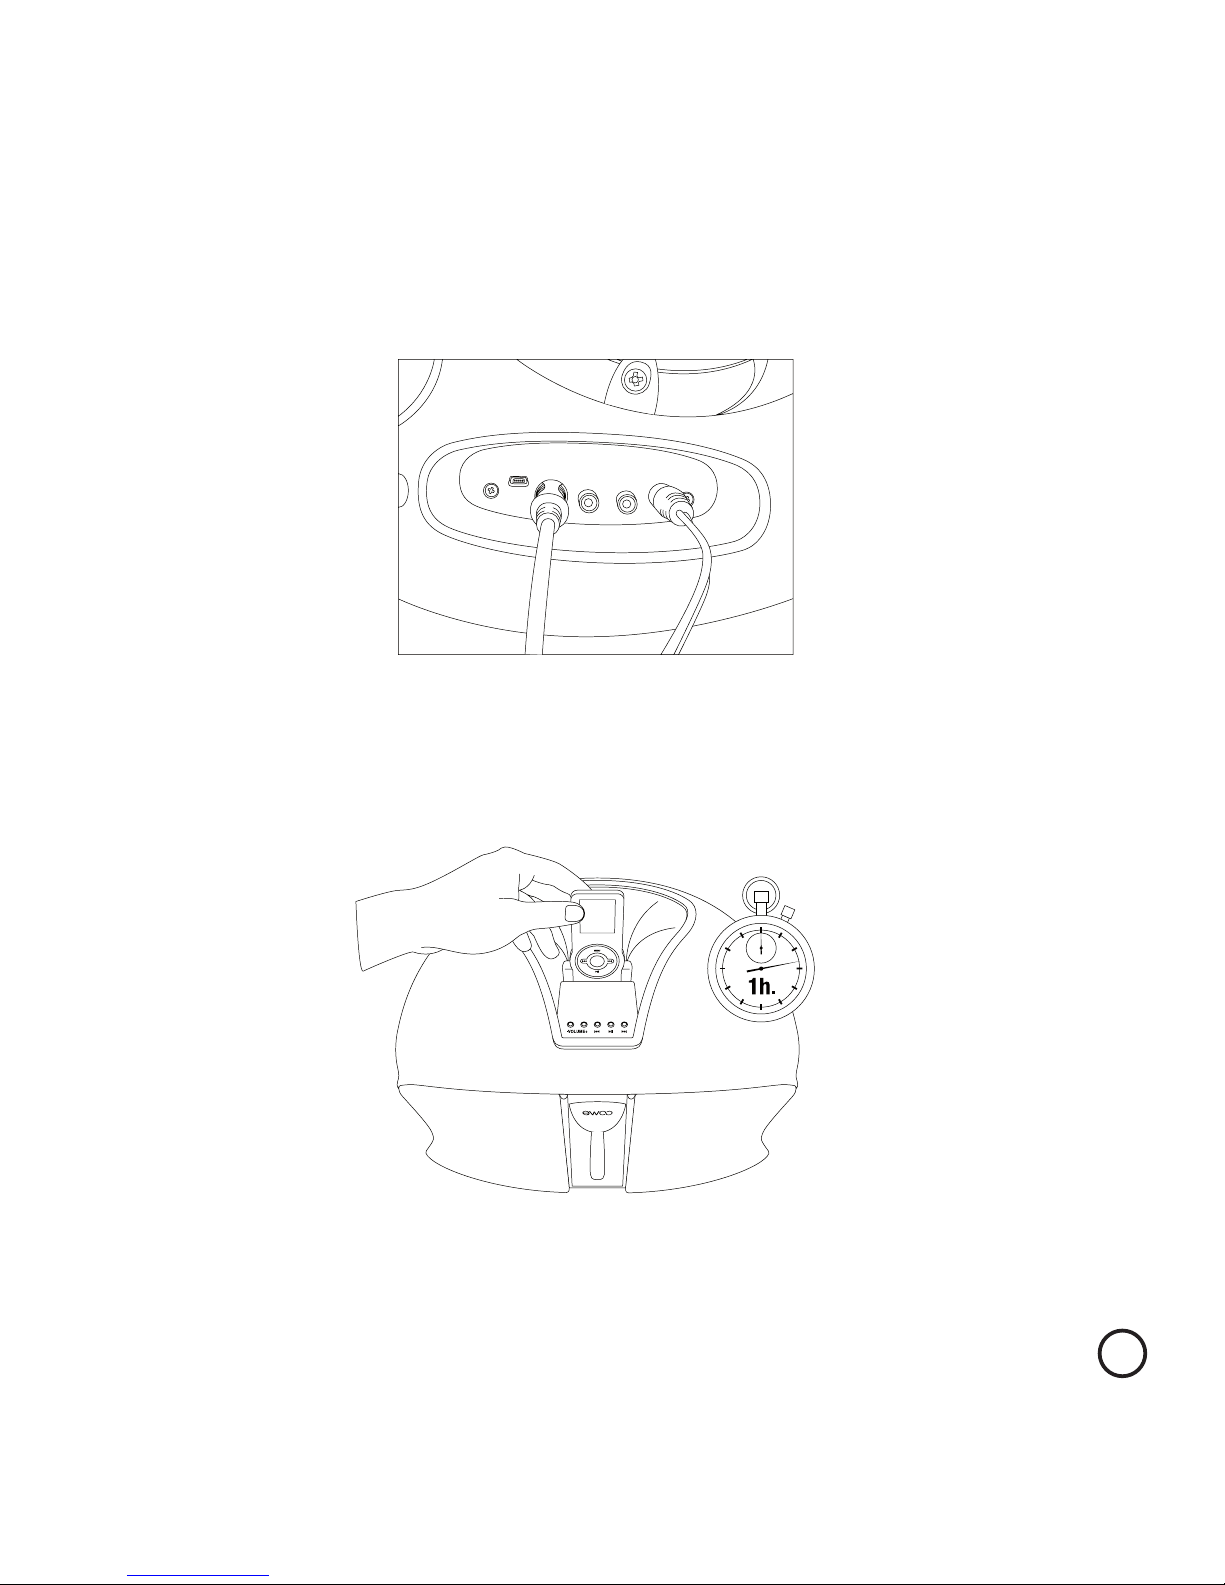
3) Optional: Connect an audio system to the digital input of the S/PDIF of
eFizz™
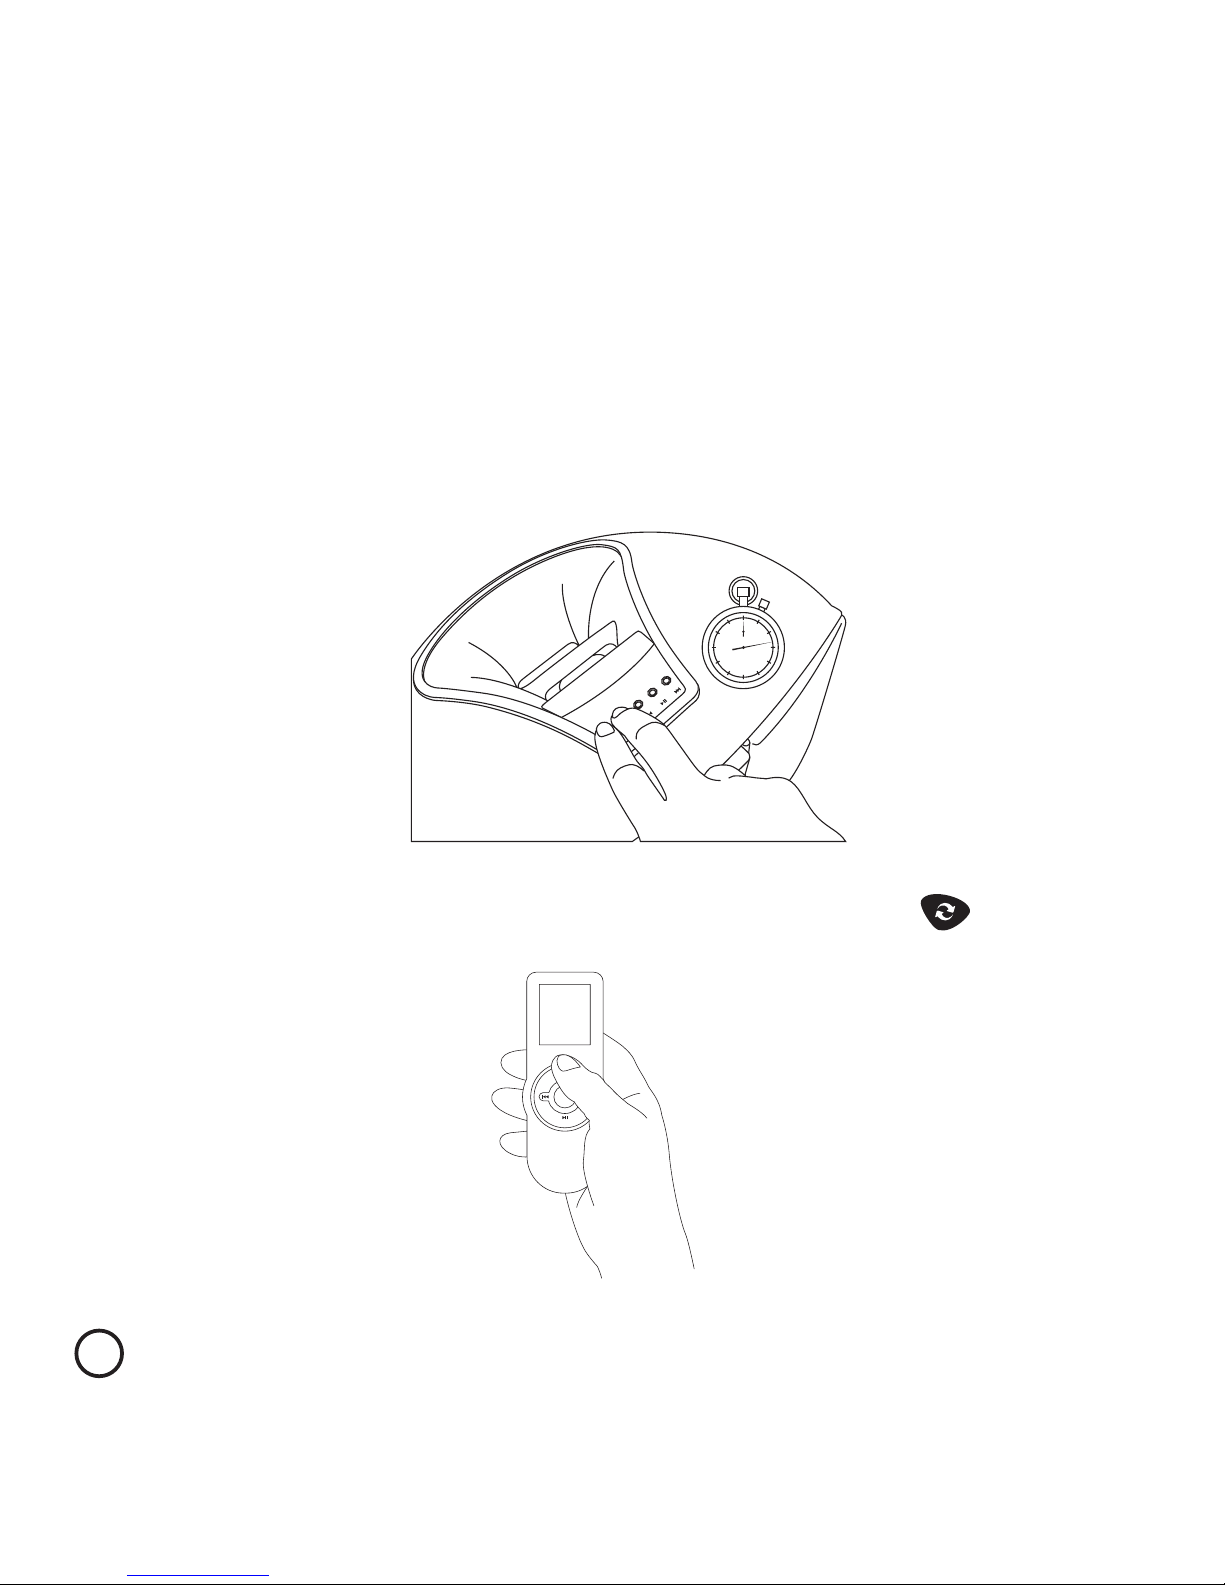
4) Place the remote on eFizz™ and charge for 1 hour.
Page 13
14
Quick Start
Pairing and first start up of the product
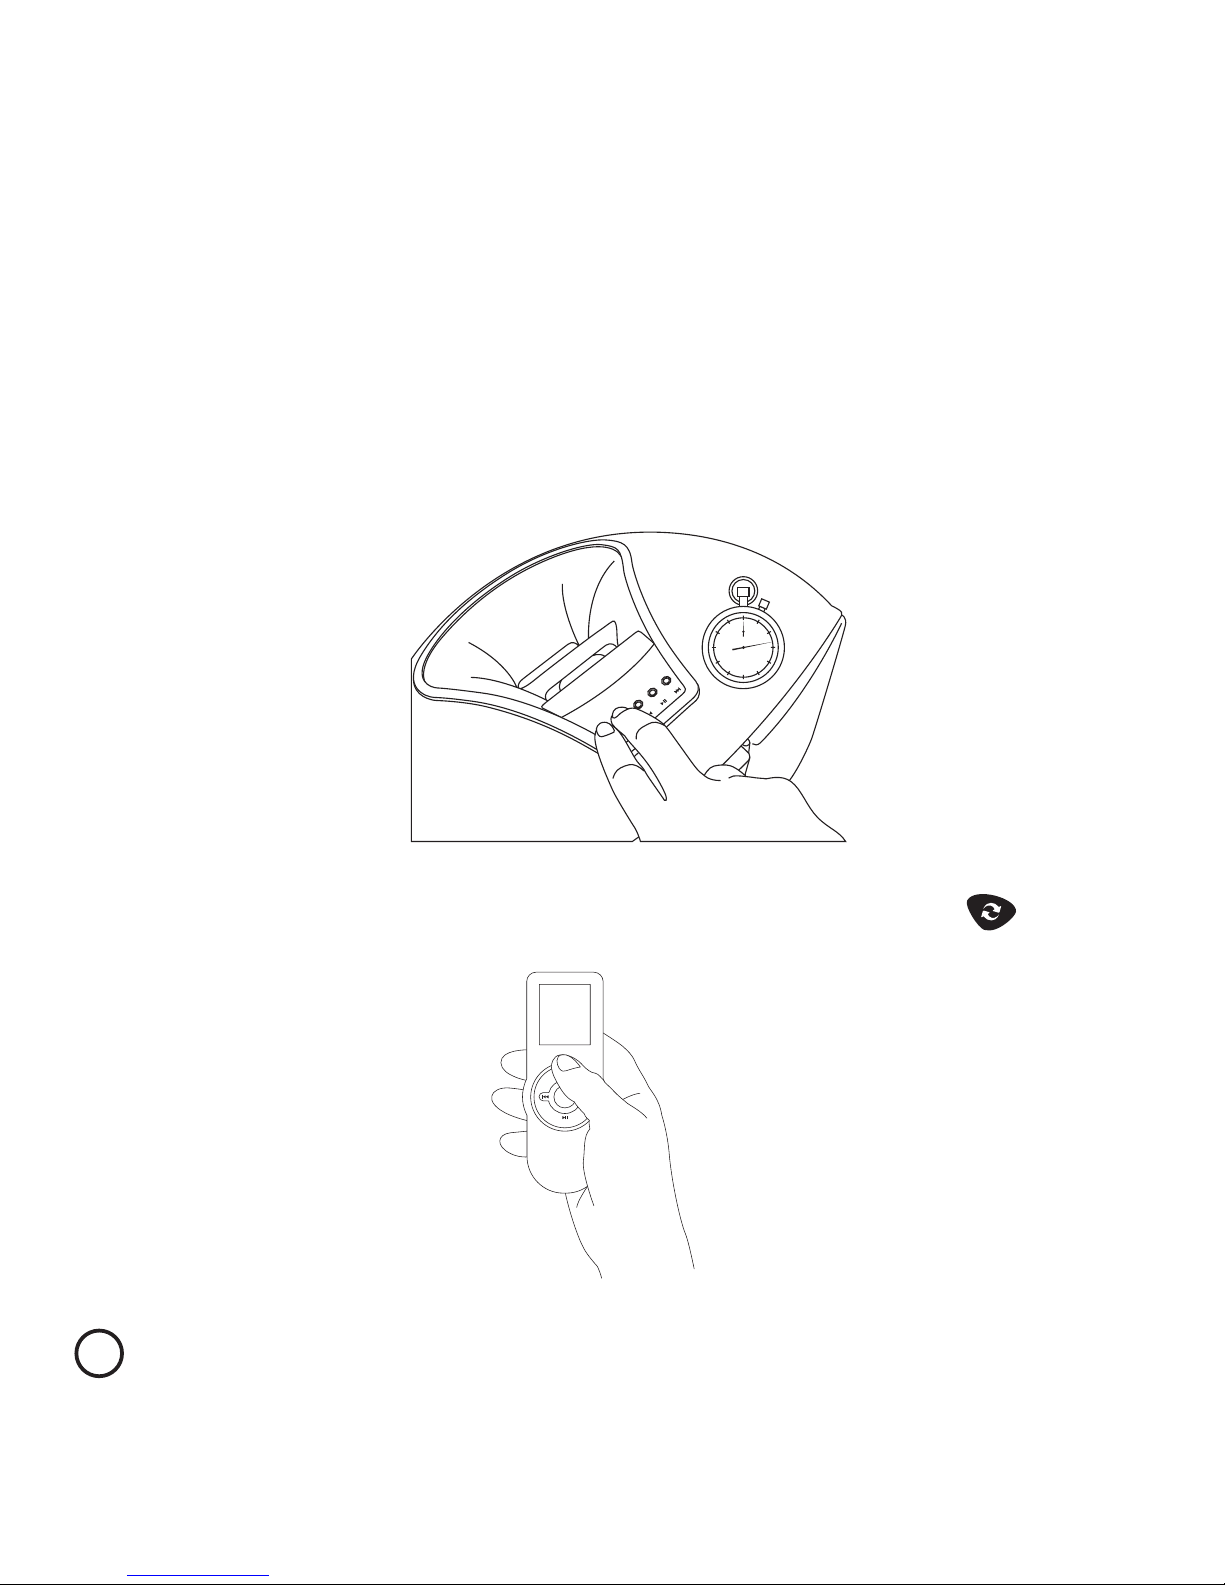
1) Simultaneously press the eFizz™ plus and minus volume buttons for
5 seconds to initiate the pairing mode.
2) Hold the remote in your hand and lightly touch the ( ) button
to illuminate.
5 s.
Page 14
15
Quick Start
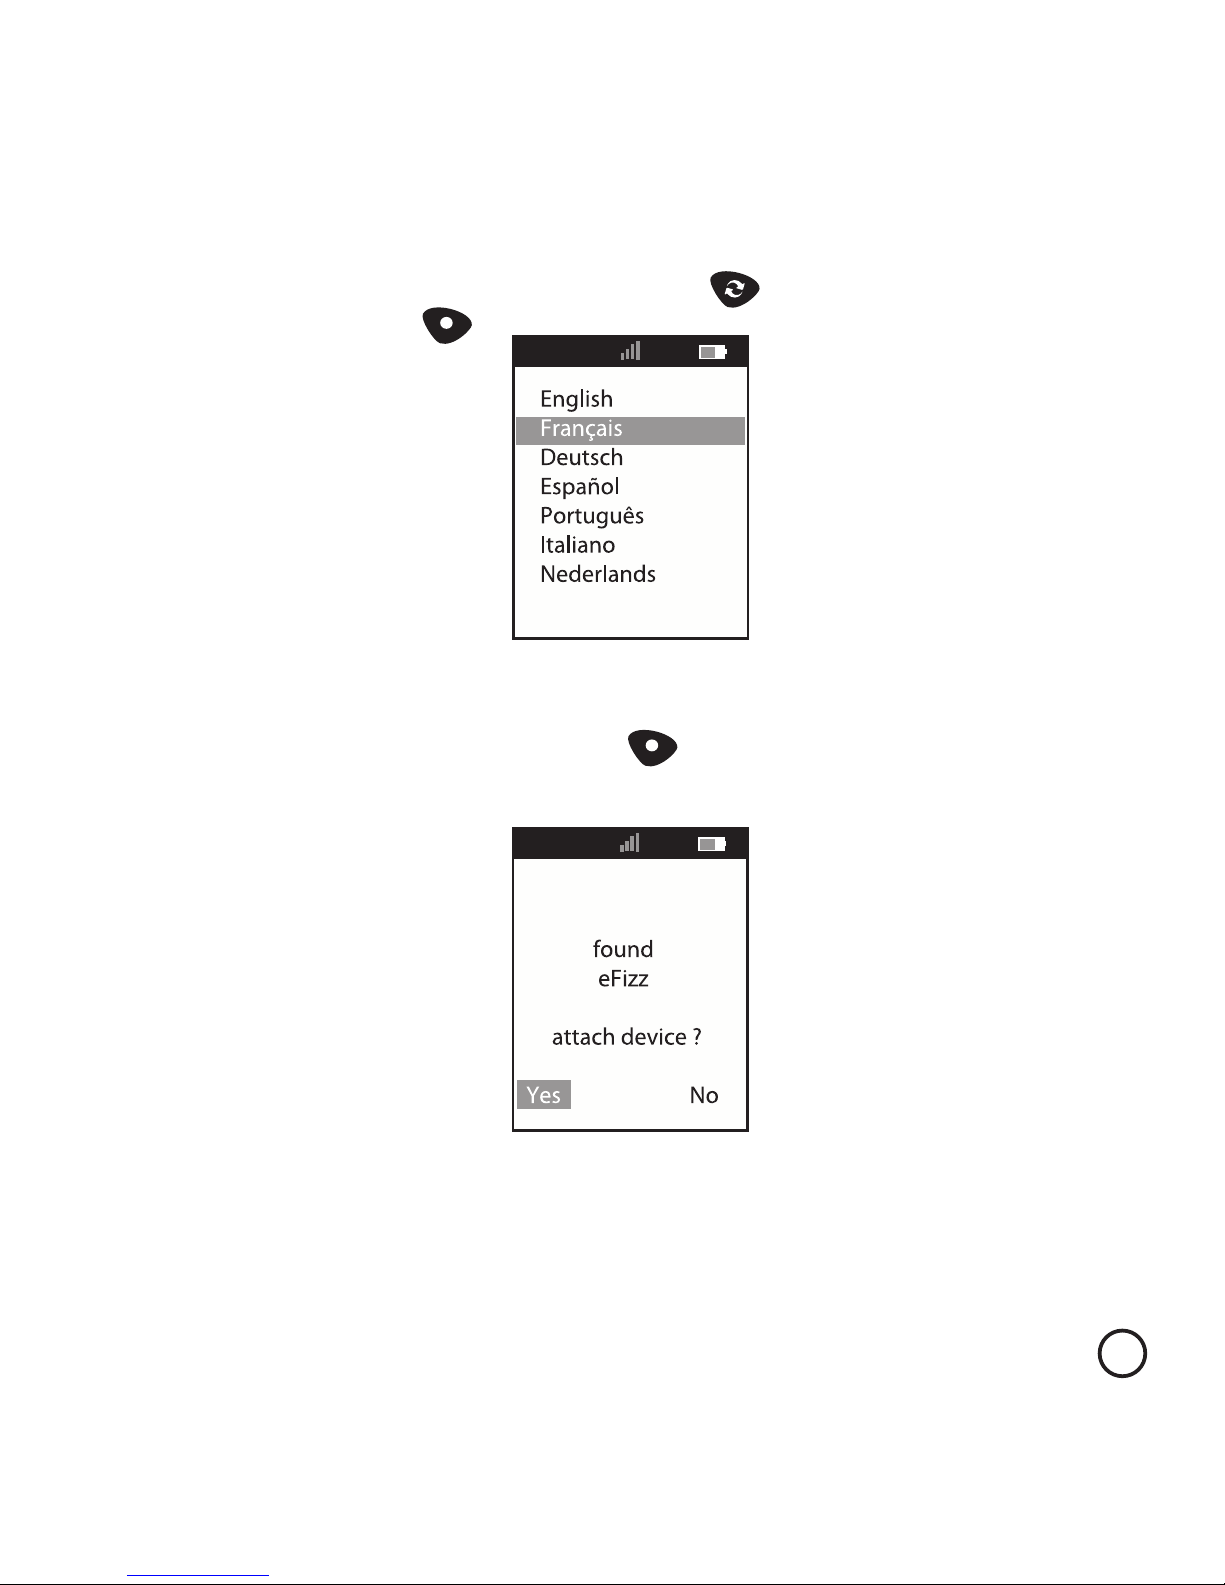
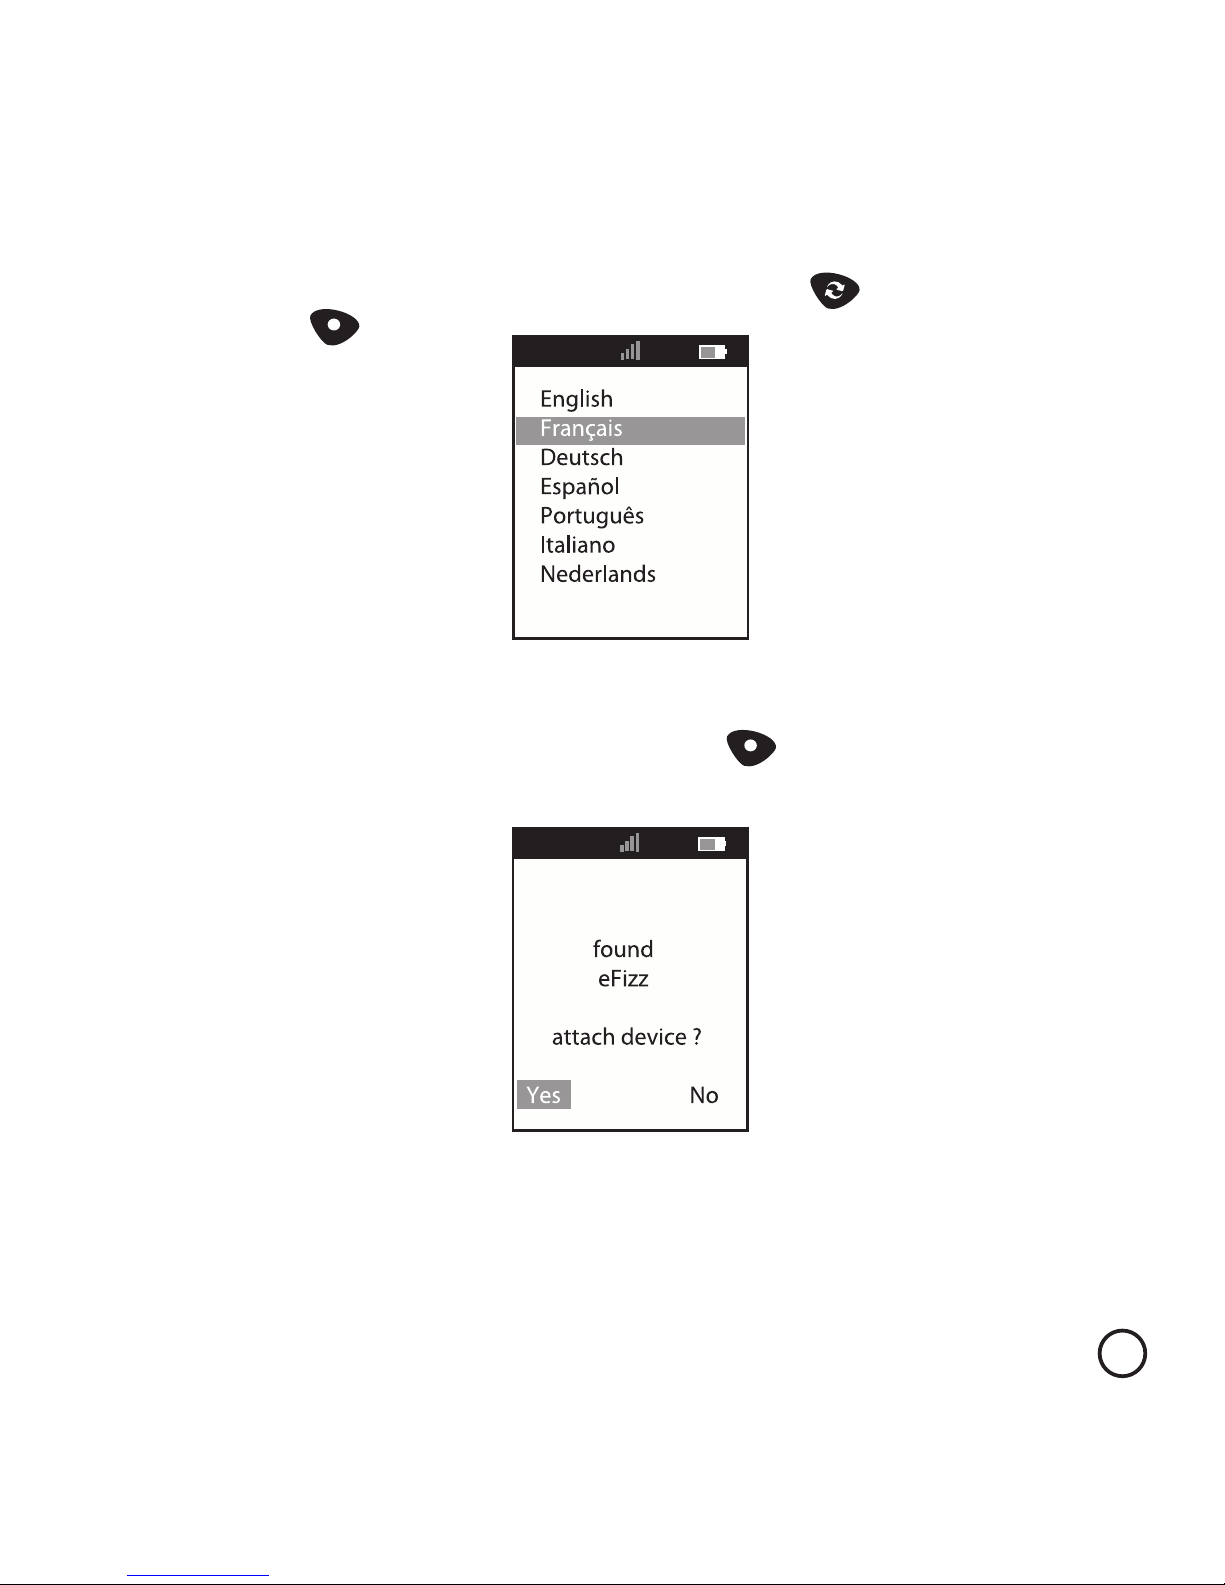
3) Select the language on the remote ( ) then validate
your selection ( )
4) The remote will search for the available devices; once your eFizz is
detected validate the pairing ( )
NB: The language selection and the search for devices can be done at any
time using the “Settings” menu.
Page 15
16
Quick Start
Connecting the iPod™
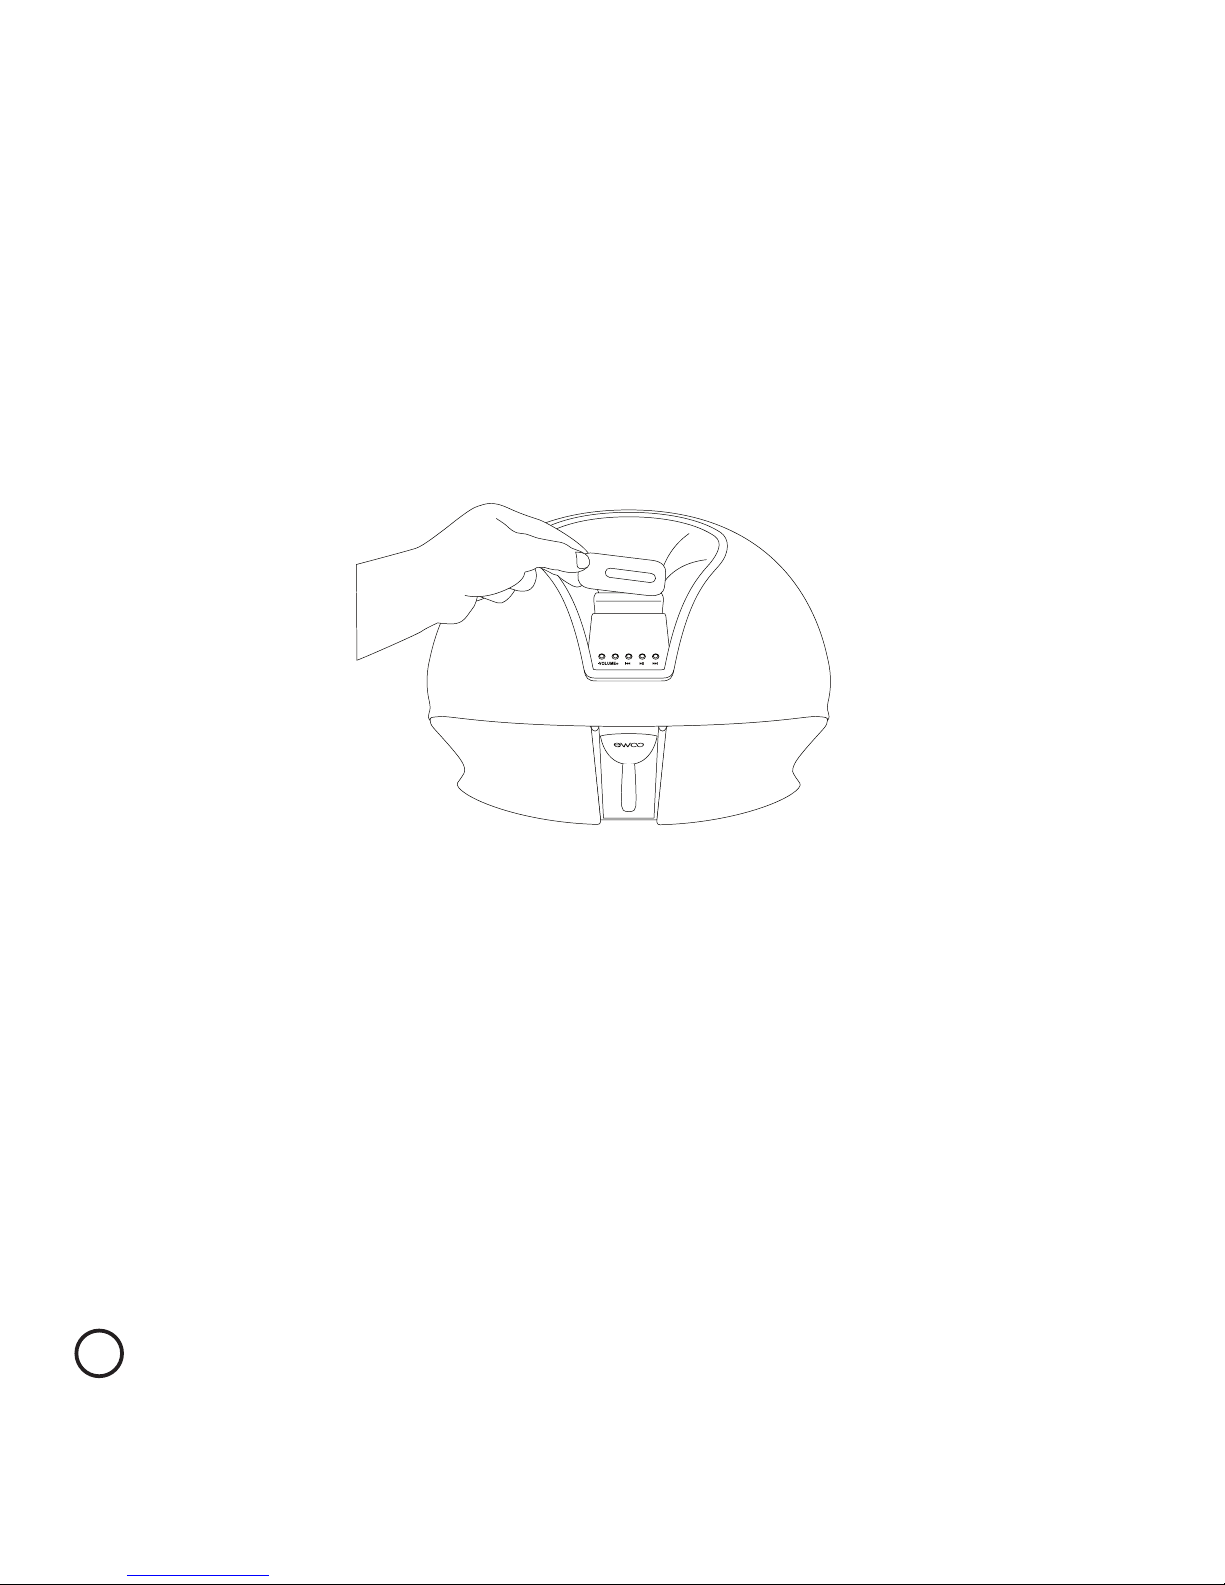
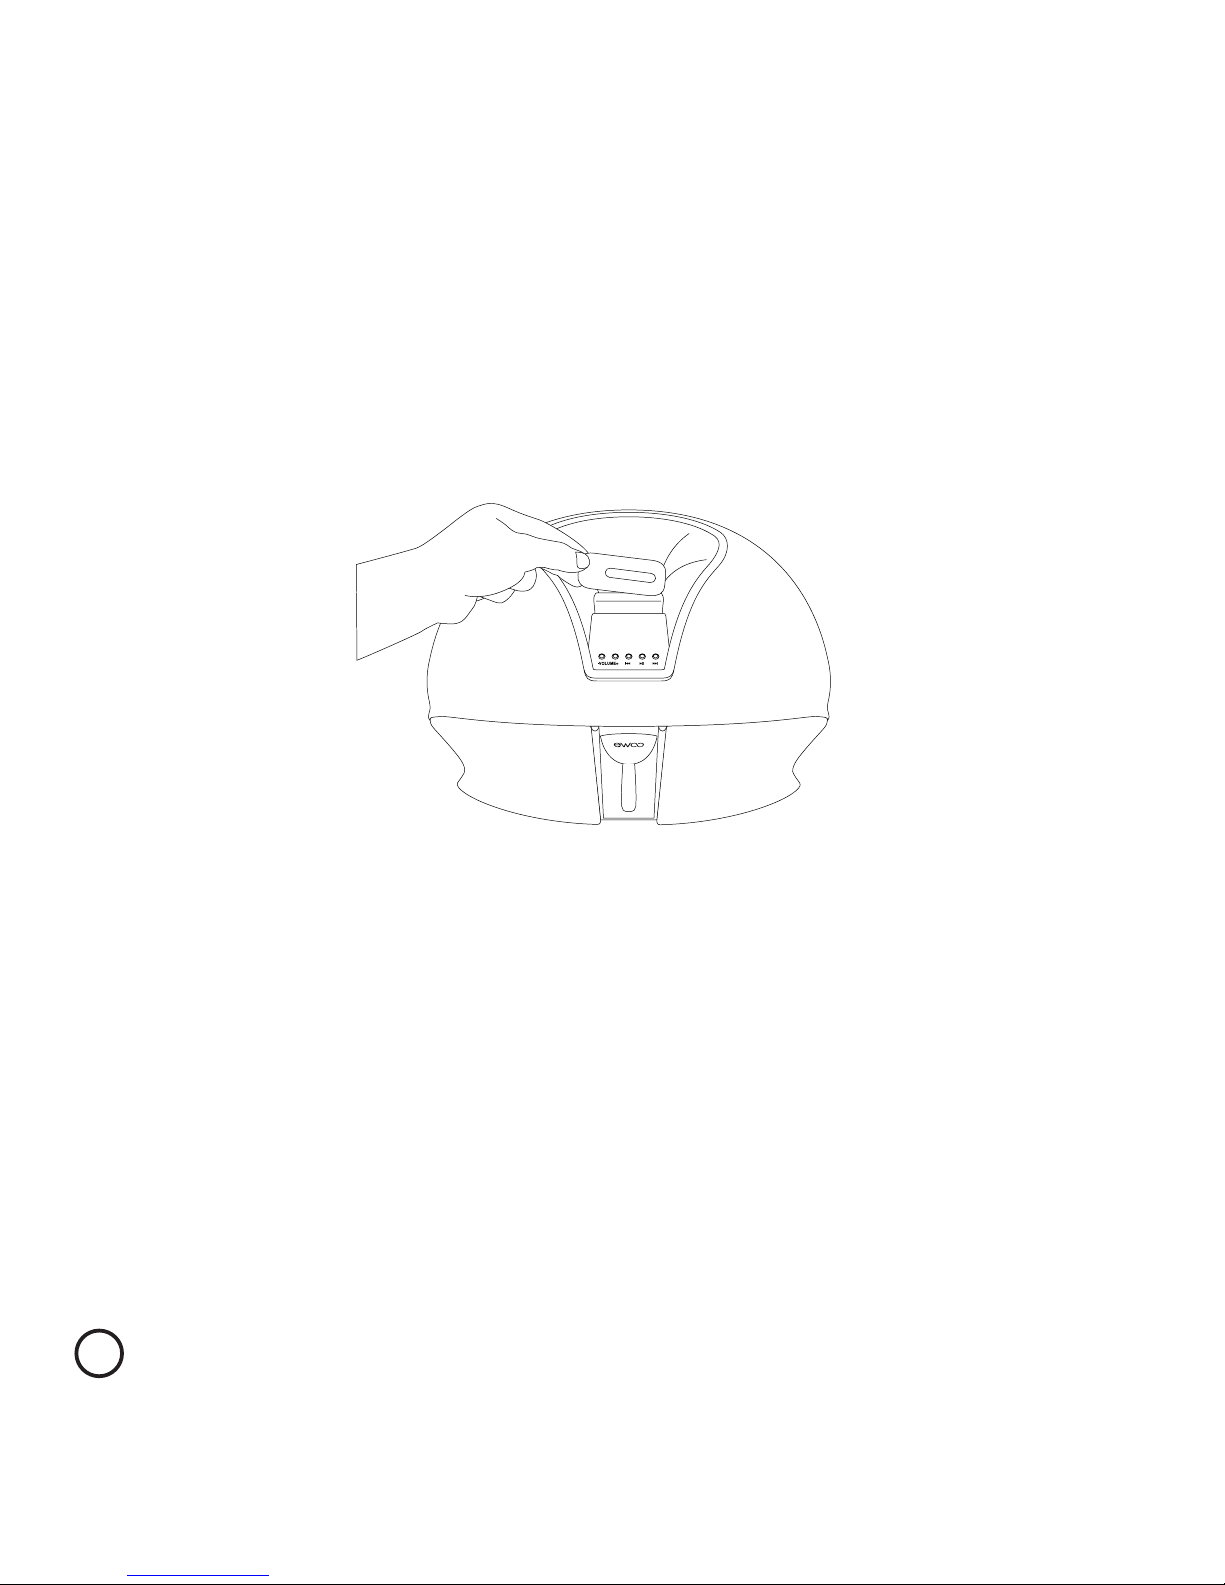
1) Insert the appropriate adaptor provided for your iPod™ on eFizz™.
Each iPod™ has its own adaptor:
•N°8: iPod™ Nano 1G
•N°9: iPod™ 5G (Video ) 30GB
•N°10 : iPod™ 5G (Video ) 60GB/80GB, iPod™ Classic
•N°11: iPod™ Nano 2G
•N°13: iPod™ Nano 3G
•N°14: iPod™ Touch
Page 16
17
Quick Start
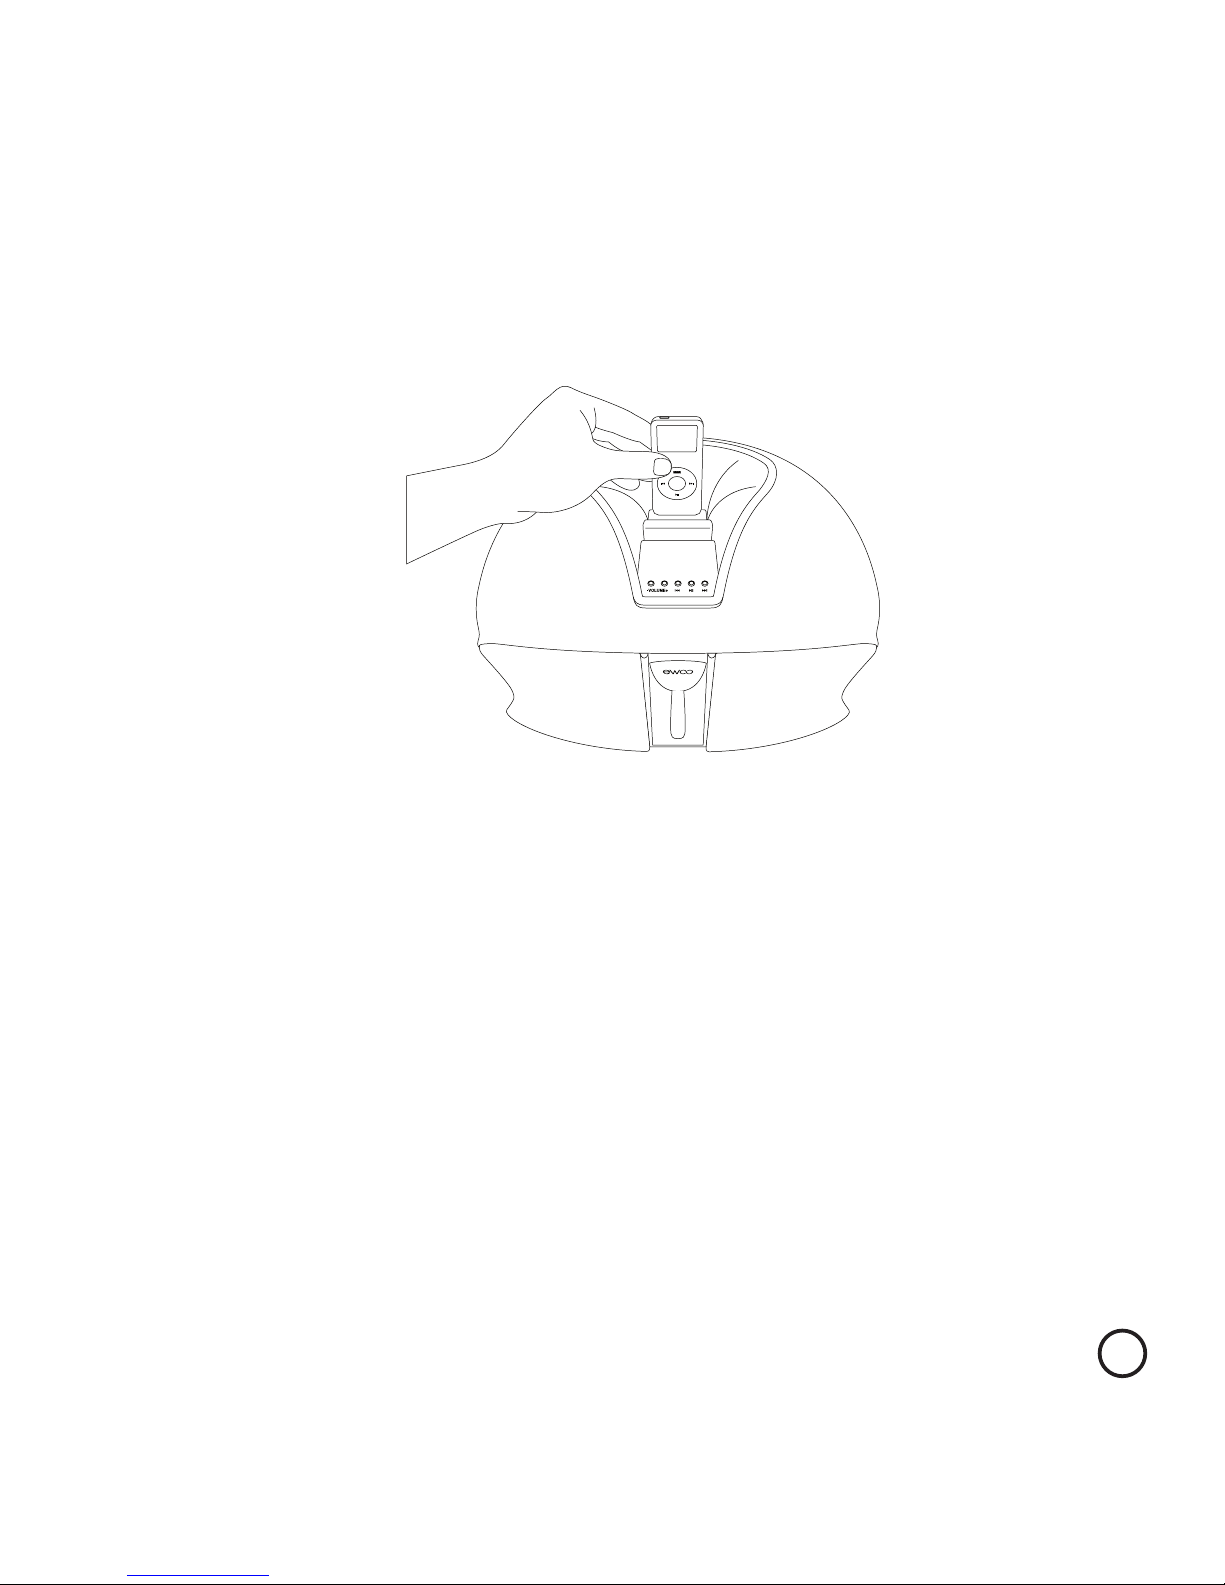
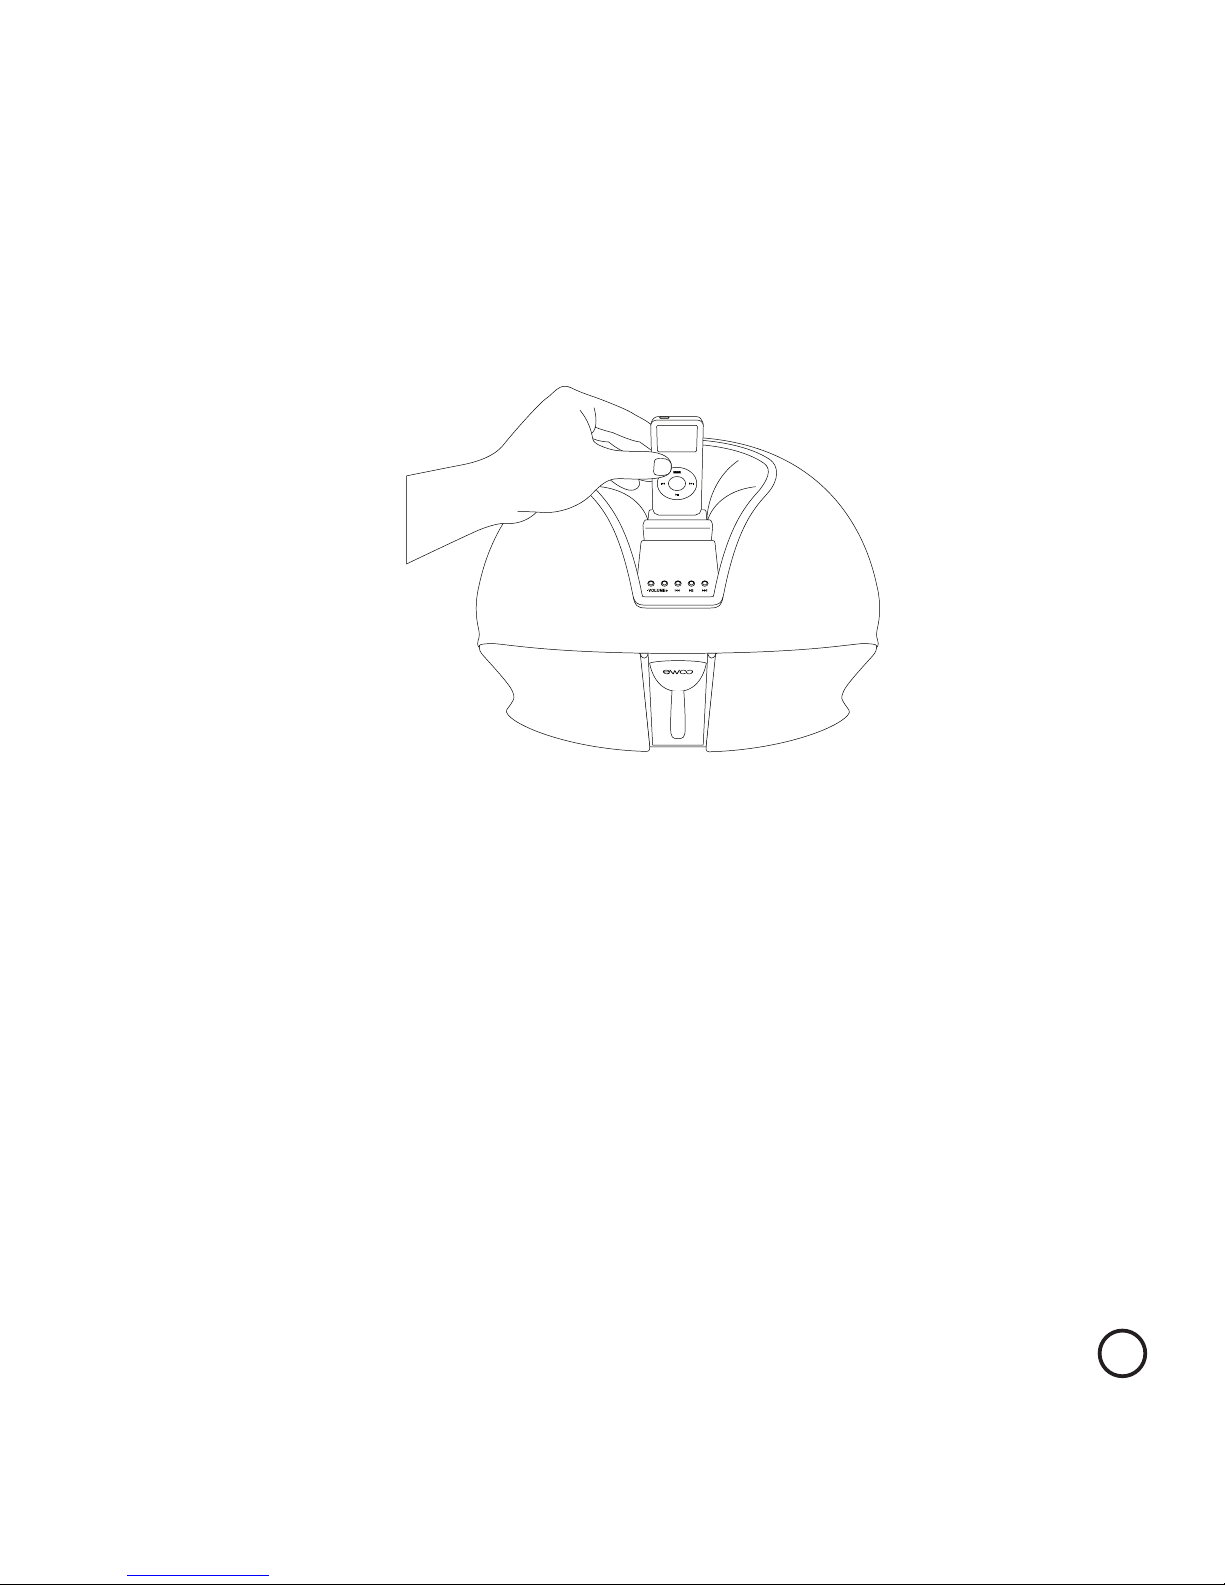
2) When you insert the iPod™ into eFizz™, the Ewoo™ logo appears on
the iPod™ screen.
3) Your installation is now ready to function.
Page 17
18
Quick Start
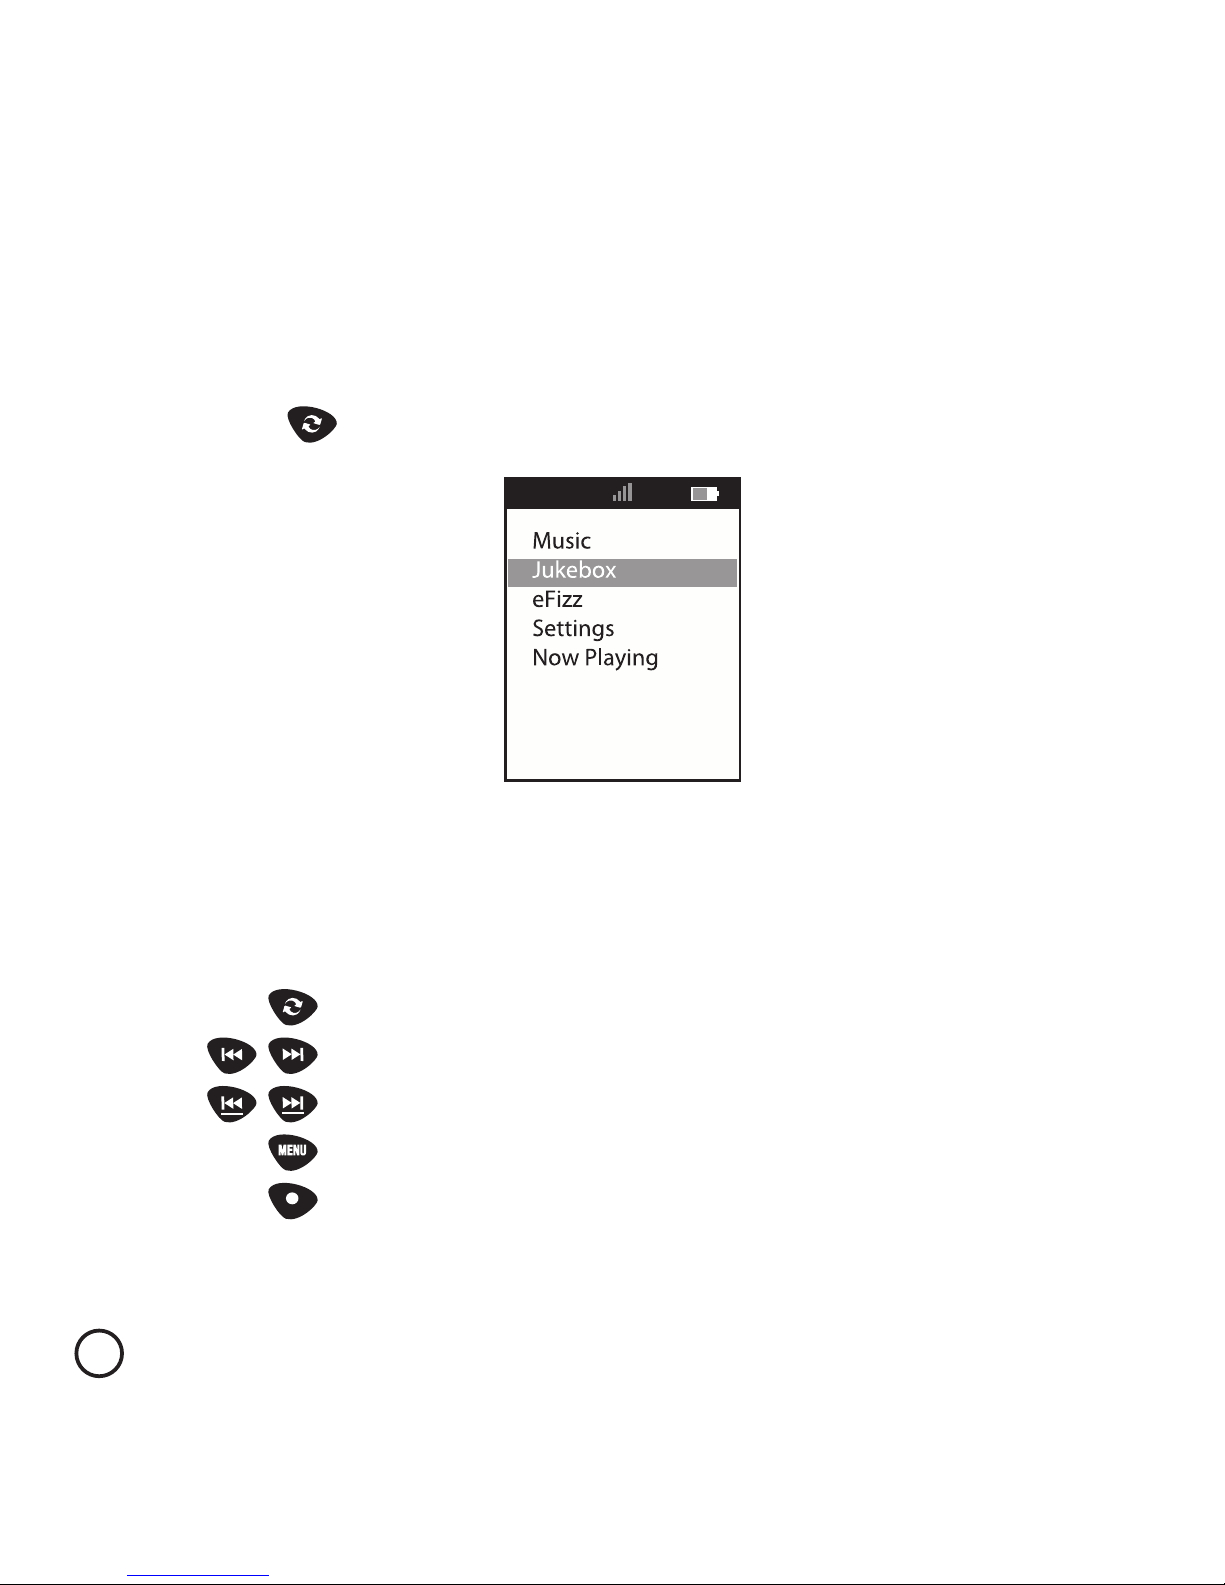
In the « navigation » mode , the volume, fast advance , reading and pause
are obtained with the same actions as with an iPod™:
adjustment of volume
next/previous
fast forward/return
return to previous menu
go from cover instructions to text instruction
1) HandMusic™ is equipped with a touch interface similar to that of
your iPod™, you can also navigate the contents using the touch
zone ( ) and the associated buttons.
Navigation in the iPod™ content
Page 18

Changing the audio source
In addition to the iPod™ audio source your eFizz™ has an analog and an
SPDI/F optical input.
The current source can be selected trough the « Input Selection » menu.
19
Quick Start
Page 19
Operation without HandMusic
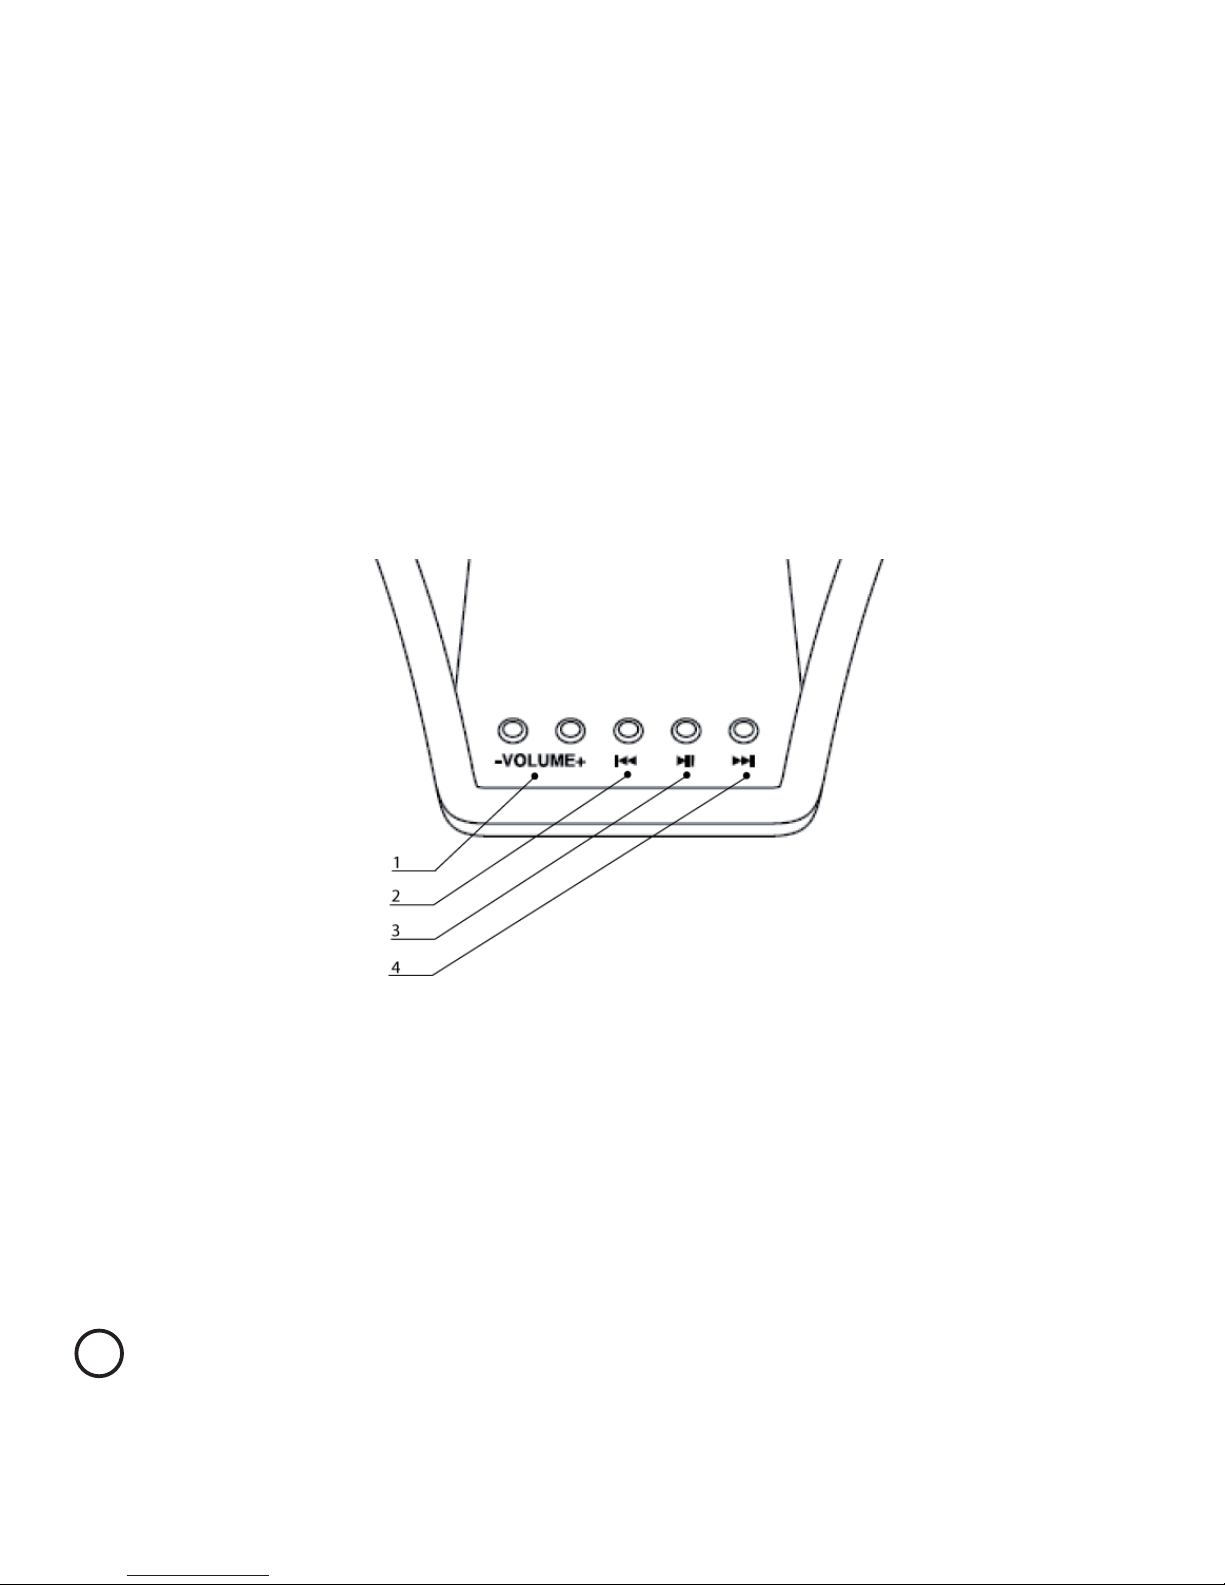
Your eFizz™ can also be controlled directly from its user interface.
1. Increase / decrease volume button.
2. Previous / fast return (extended press) button.
3. Switching from read to pause mode button.
4. Next / fast advance (extended press) button.
20
Quick Start
Page 20
21
3
Using the Remote
Page 21
Music Menu
From the main menu you can access the audio contents of your iPod™ via
the “Music” menu. It is then easy to navigate by using the touch zone.
HandMusic™ uses advanced functions allowing you to facilitate navigation
in your digital content:
•Fast forward in the lists: in order to navigate the lists faster, you can use
the Advance and Return buttons ( and ) that allow fast scrolling
at a touch.
22
Using the Remote
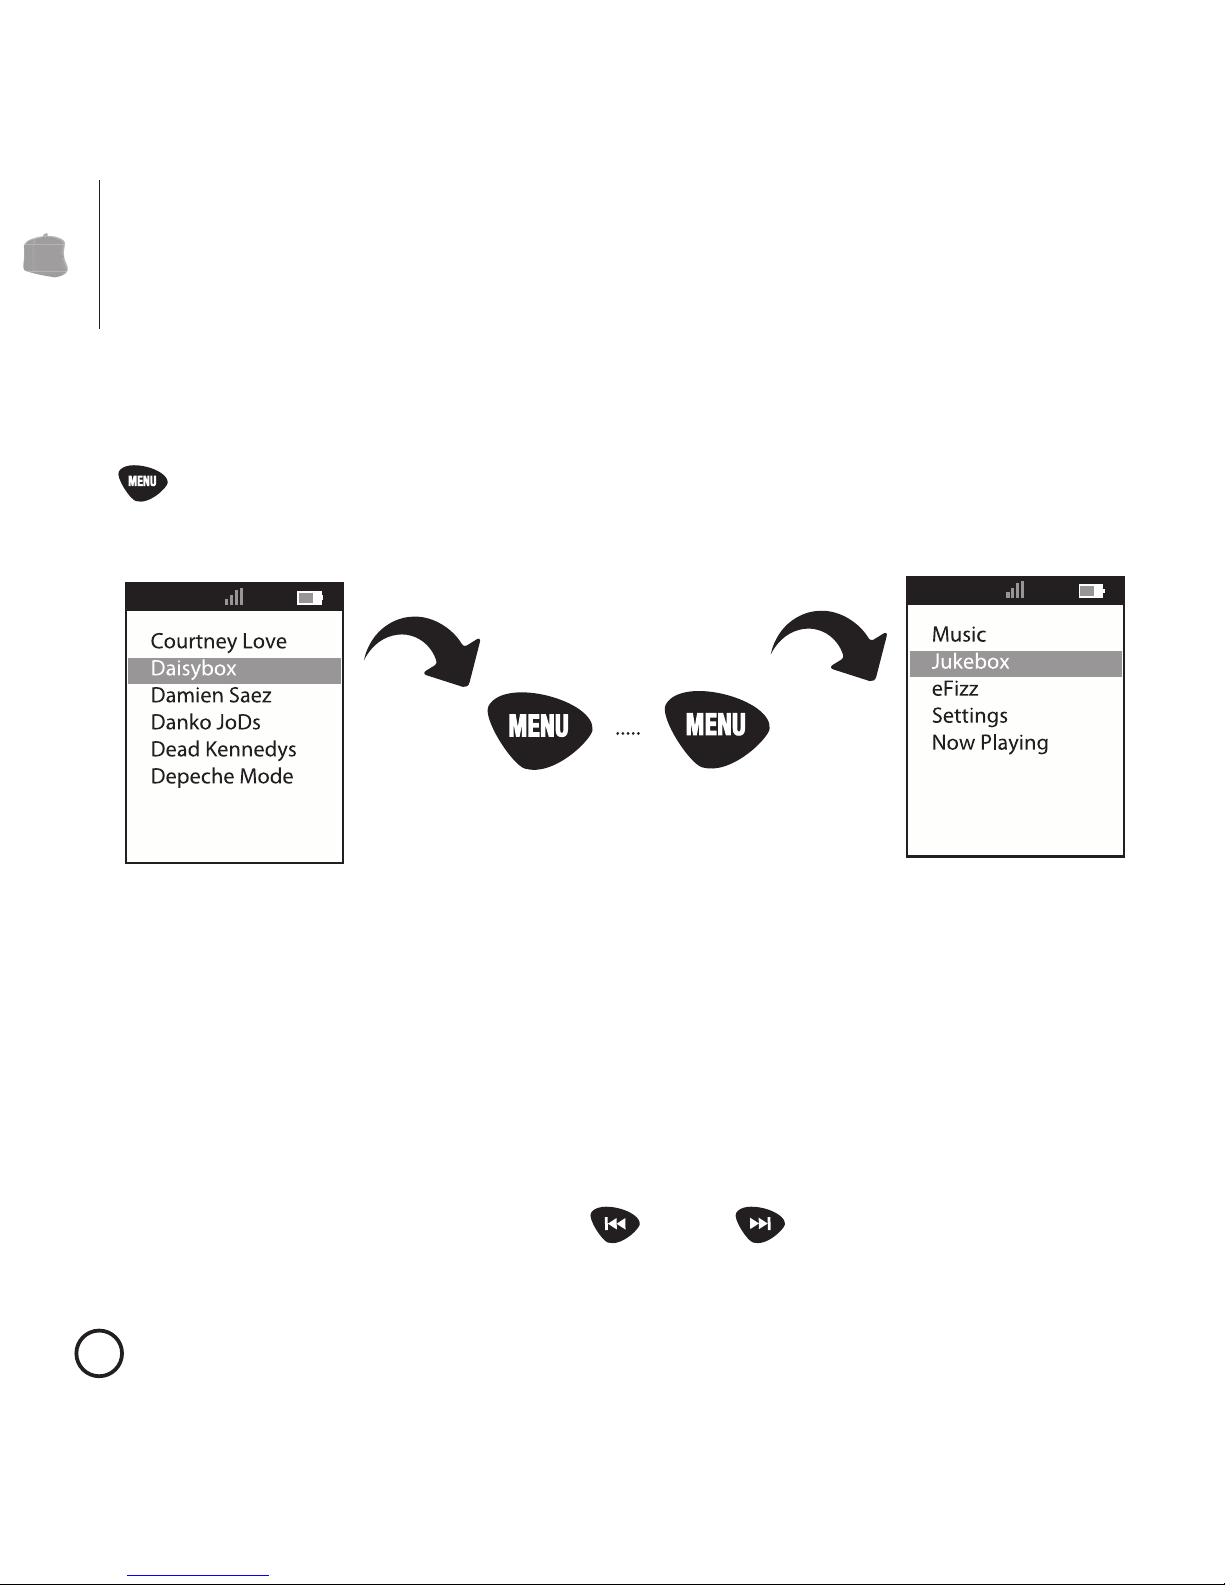
Main Menu
The main menu is the base menu for the remote. At any time it is possible
to return to the main menu by pressing the Menu button several times
( ), allowing access to all the functions offered by the remote.
Page 22
Jukebox
The exclusive HandMusic™ function, “Jukebox”, allows the creation of play
lists directly navigating the music contents on your iPod™ with the
assistance of the remote. To add a song, an album, or any other Jukebox
item, all it takes is to push the validation button ( ). The item selected will
light up and will be automatically added to the list.
In order to visualise the musical elements added to the Jukebox, go to
the
Jukebox
menu and then to
Tracks
. To delete the list, press
Clear
on the
Jukebox
menu.
NB: The selection made by the Jukebox menu is erased when the iPod™ is removed
from eFizz™ or when eFizz™ is disconnected.
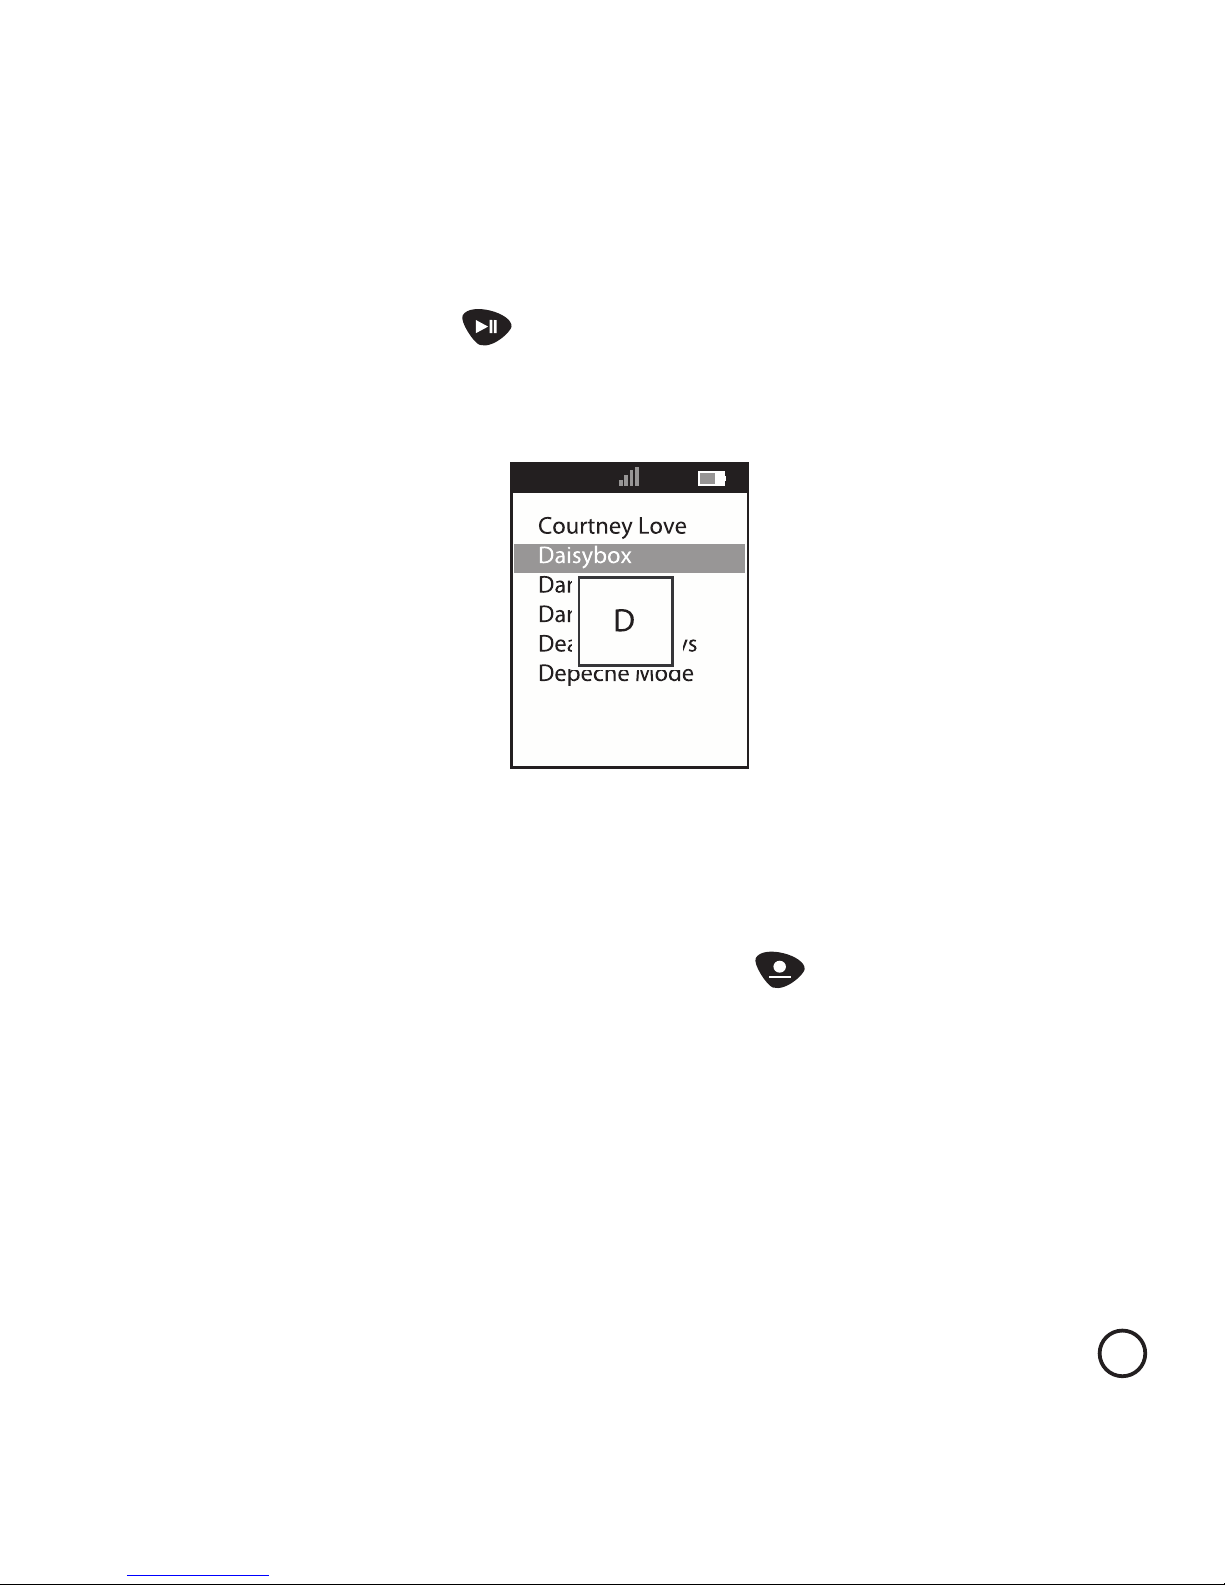
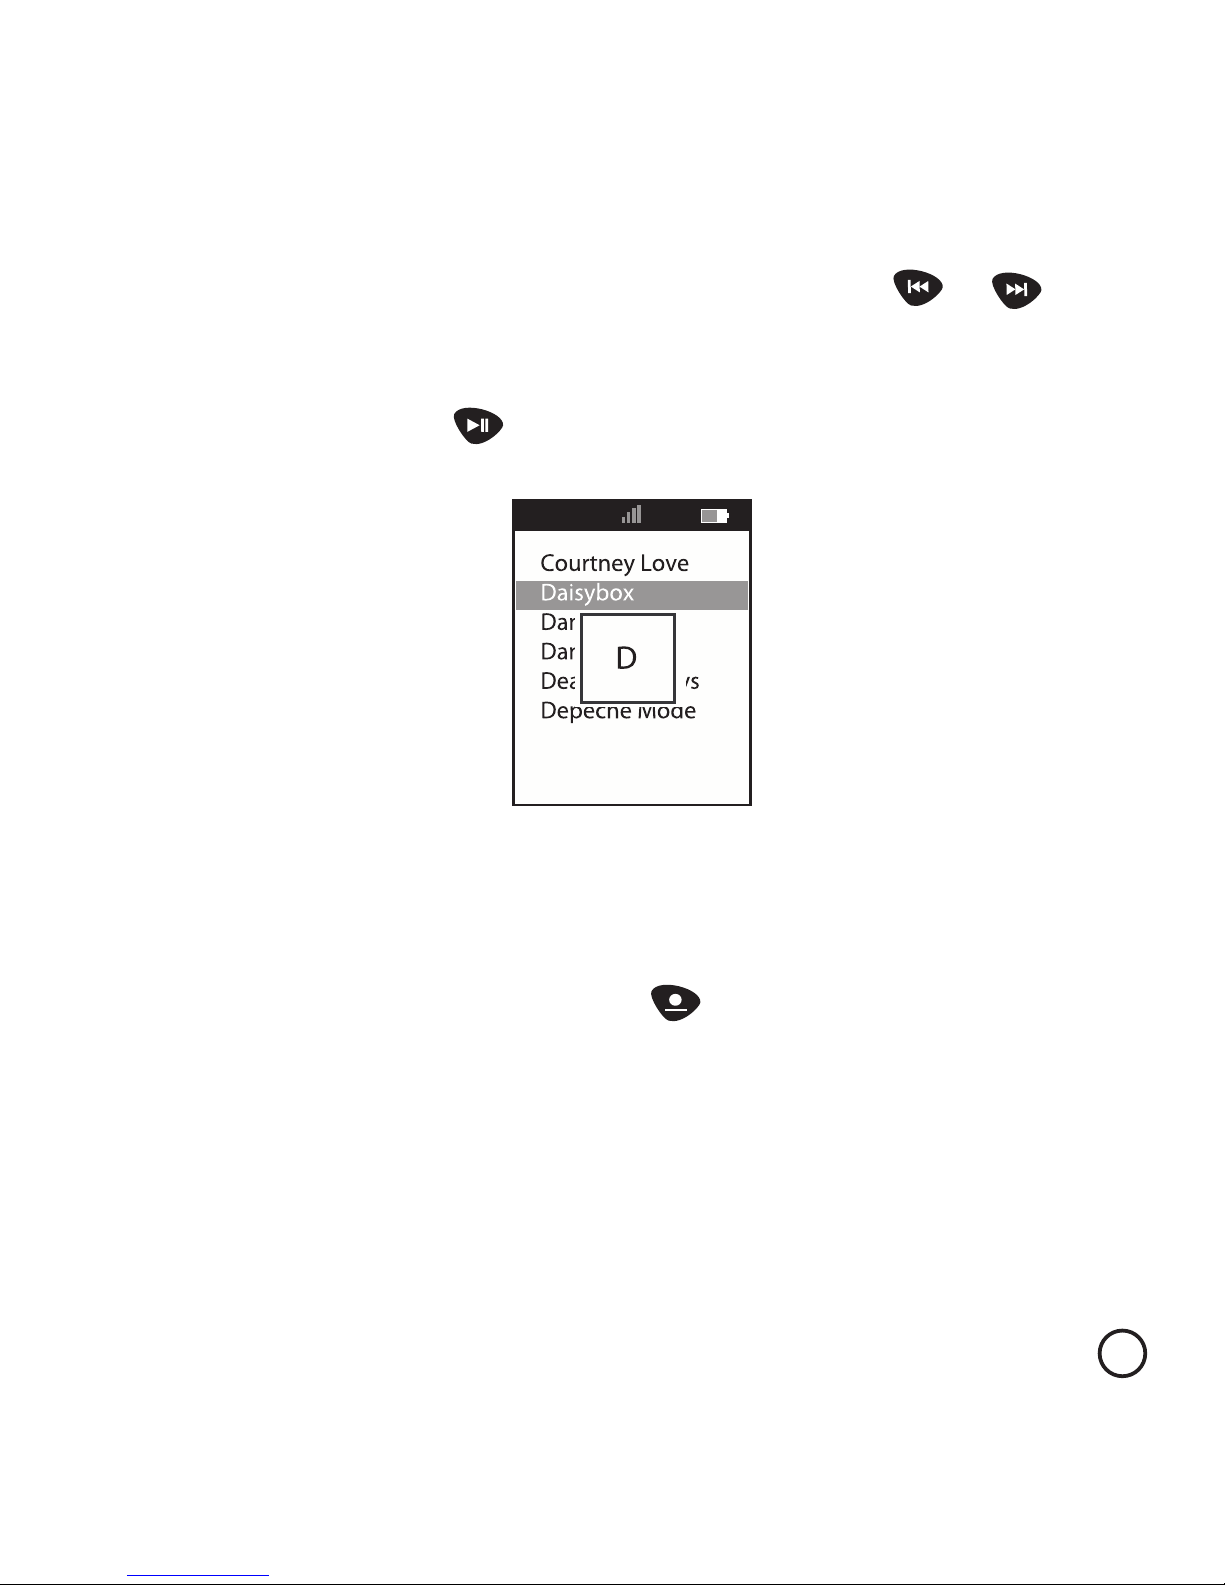
• Alphabetically search in lists: Sort lists in alphabetical order by pressing
the play/pause button ( ) to activate the alphabetical search.
23
Using the Remote
Page 23
24
Using the Remote
eFizz
The « eFizz™ » menus allows you to access all functions of your eFizz™ HiFi
stereo system for iPod™.
In this menu you find:
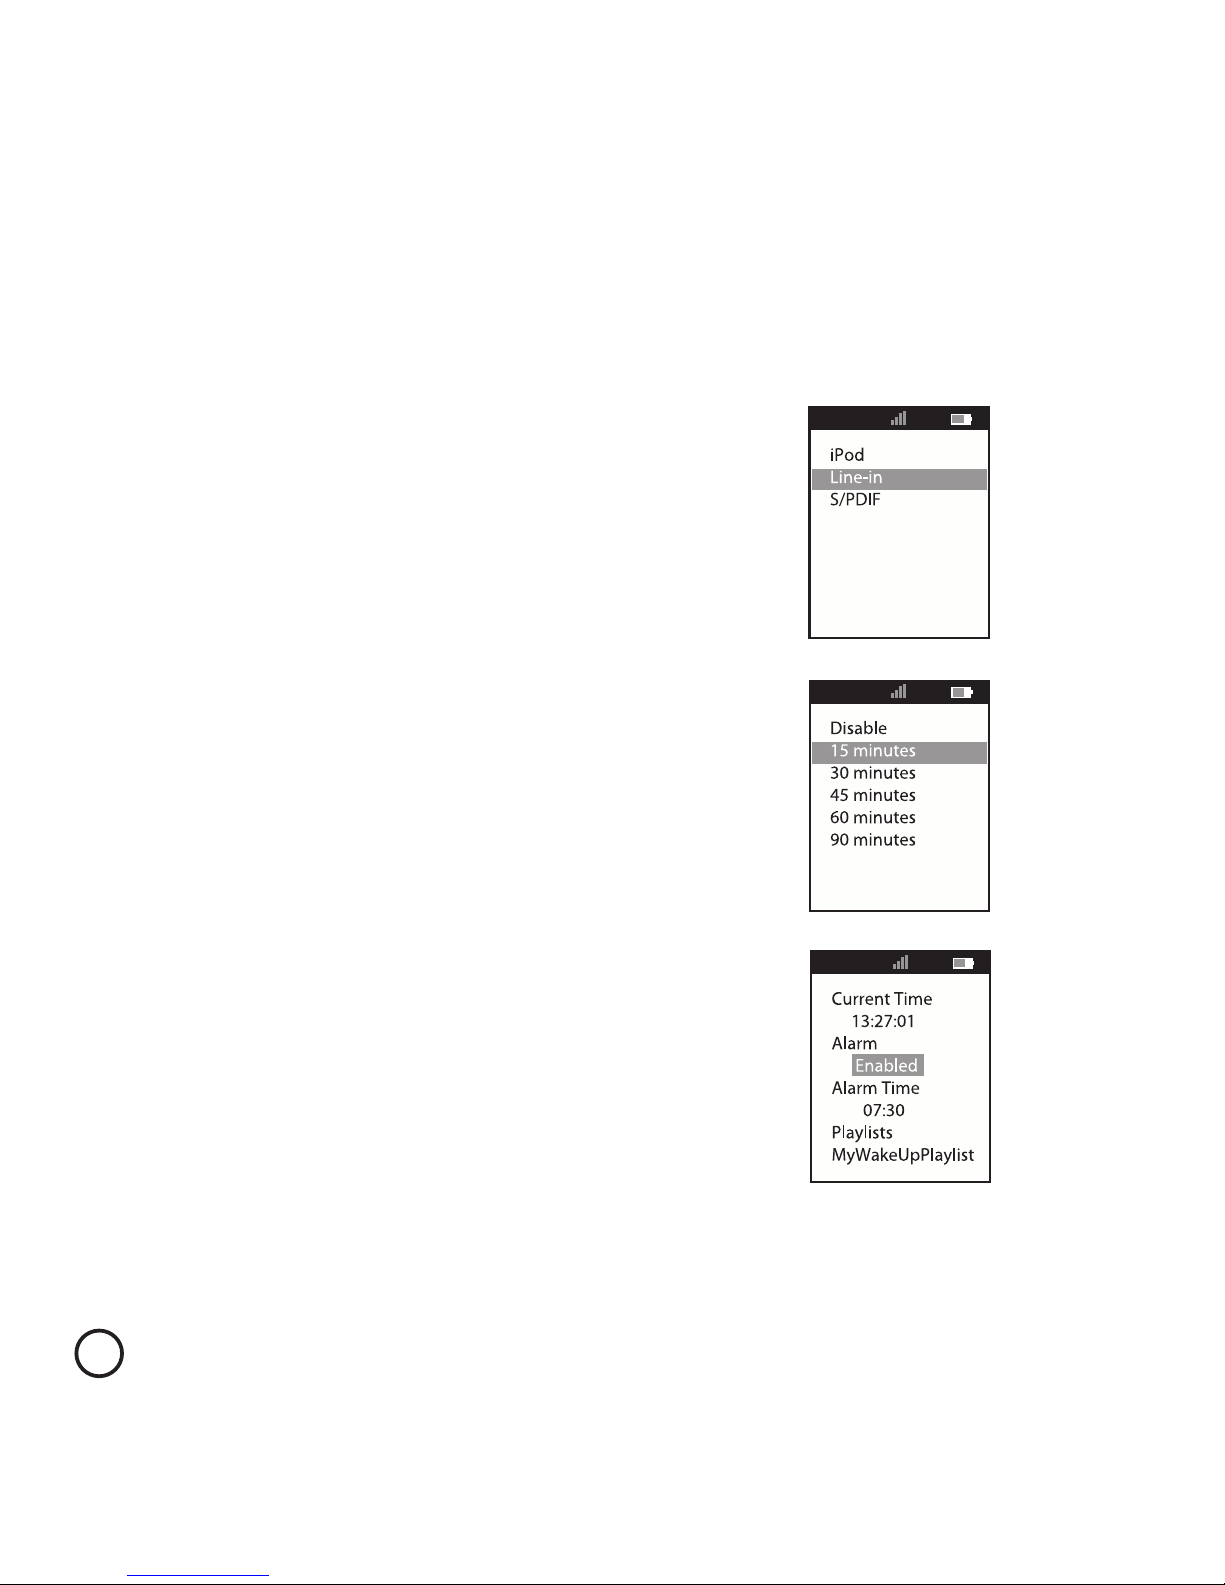
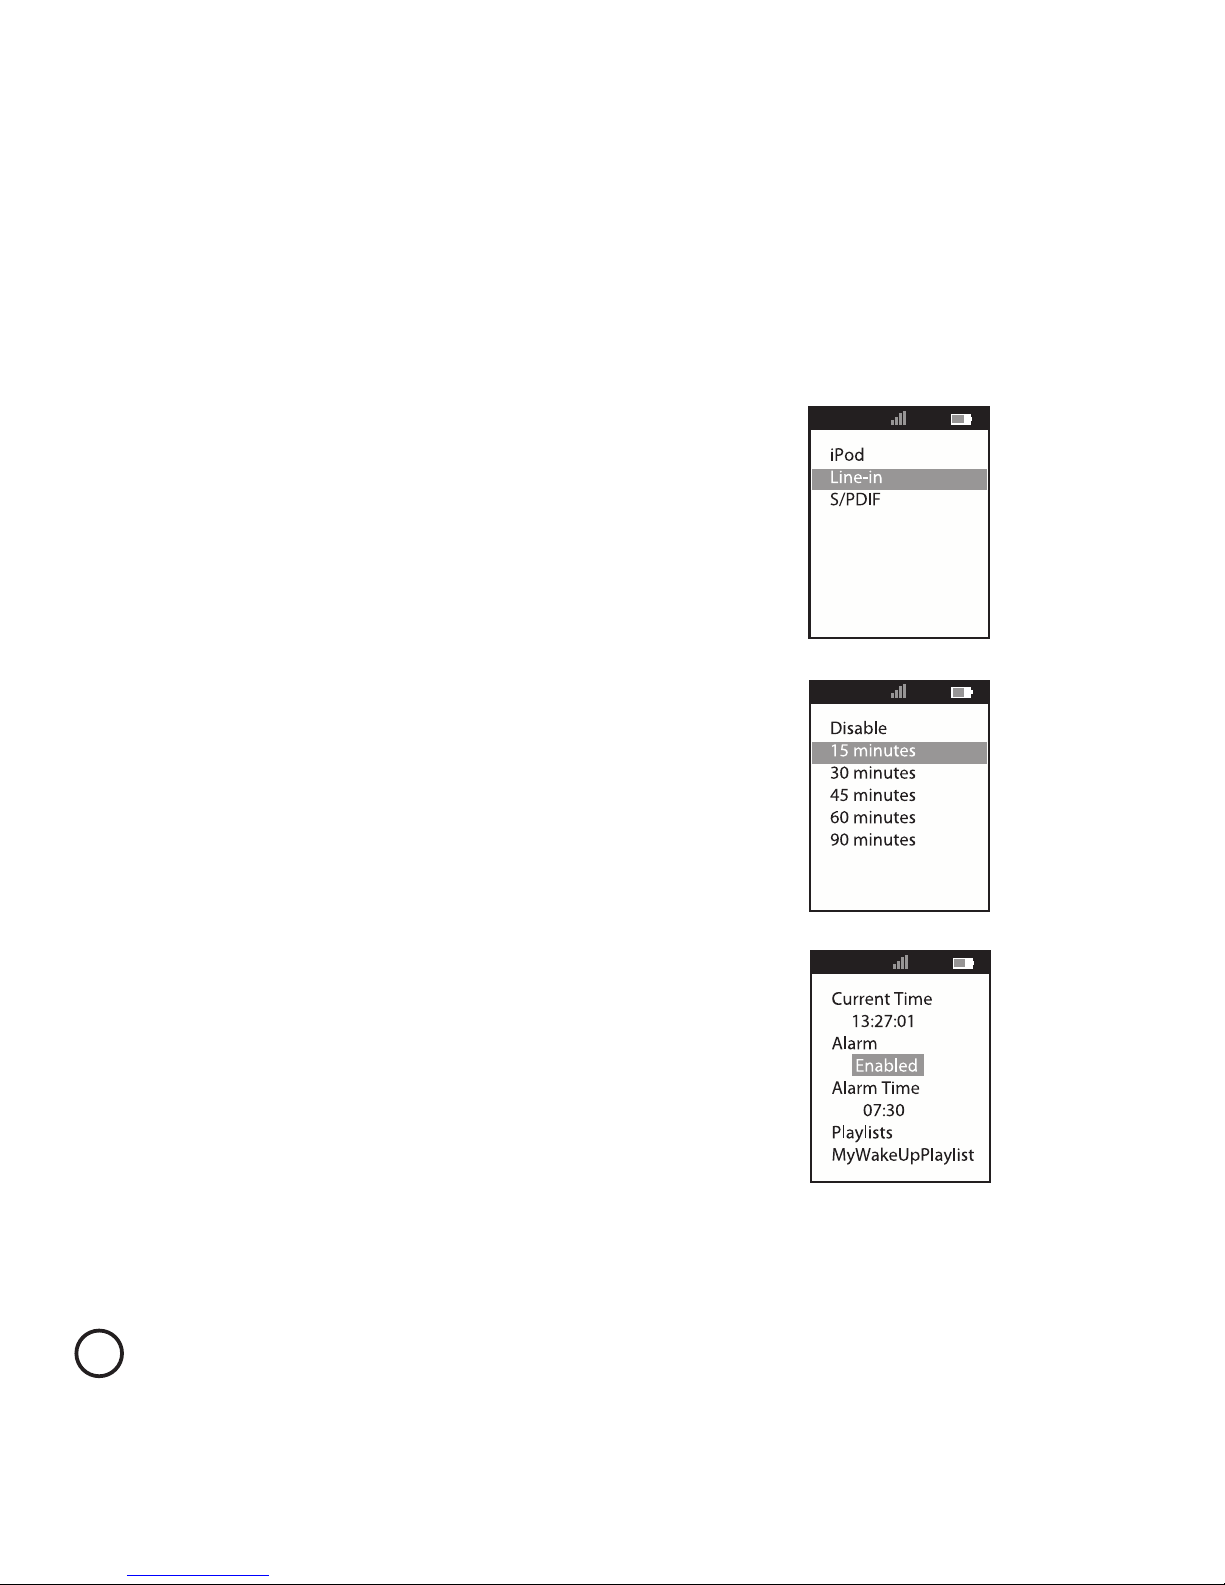
•Input selection: Select current
input source on eFizz™
(iPod™, analog or digital S/PDIF entry).
•Sleep: Program the sleep time on eFizz™.
•Alarm: Set the eFizz™ alarm parameters
(time, reading list)
•Synchronise time with the iPod™: Synchronize the time on eFizz™
according to the iPod™ time.
Page 24
1 After returning to adjustments to the system, it is necessary to establish a new twinning.
2 HandMusic™ operates with only one radio at a time, therefore each time you wish to go to
another radio station with your remote, use the menu.
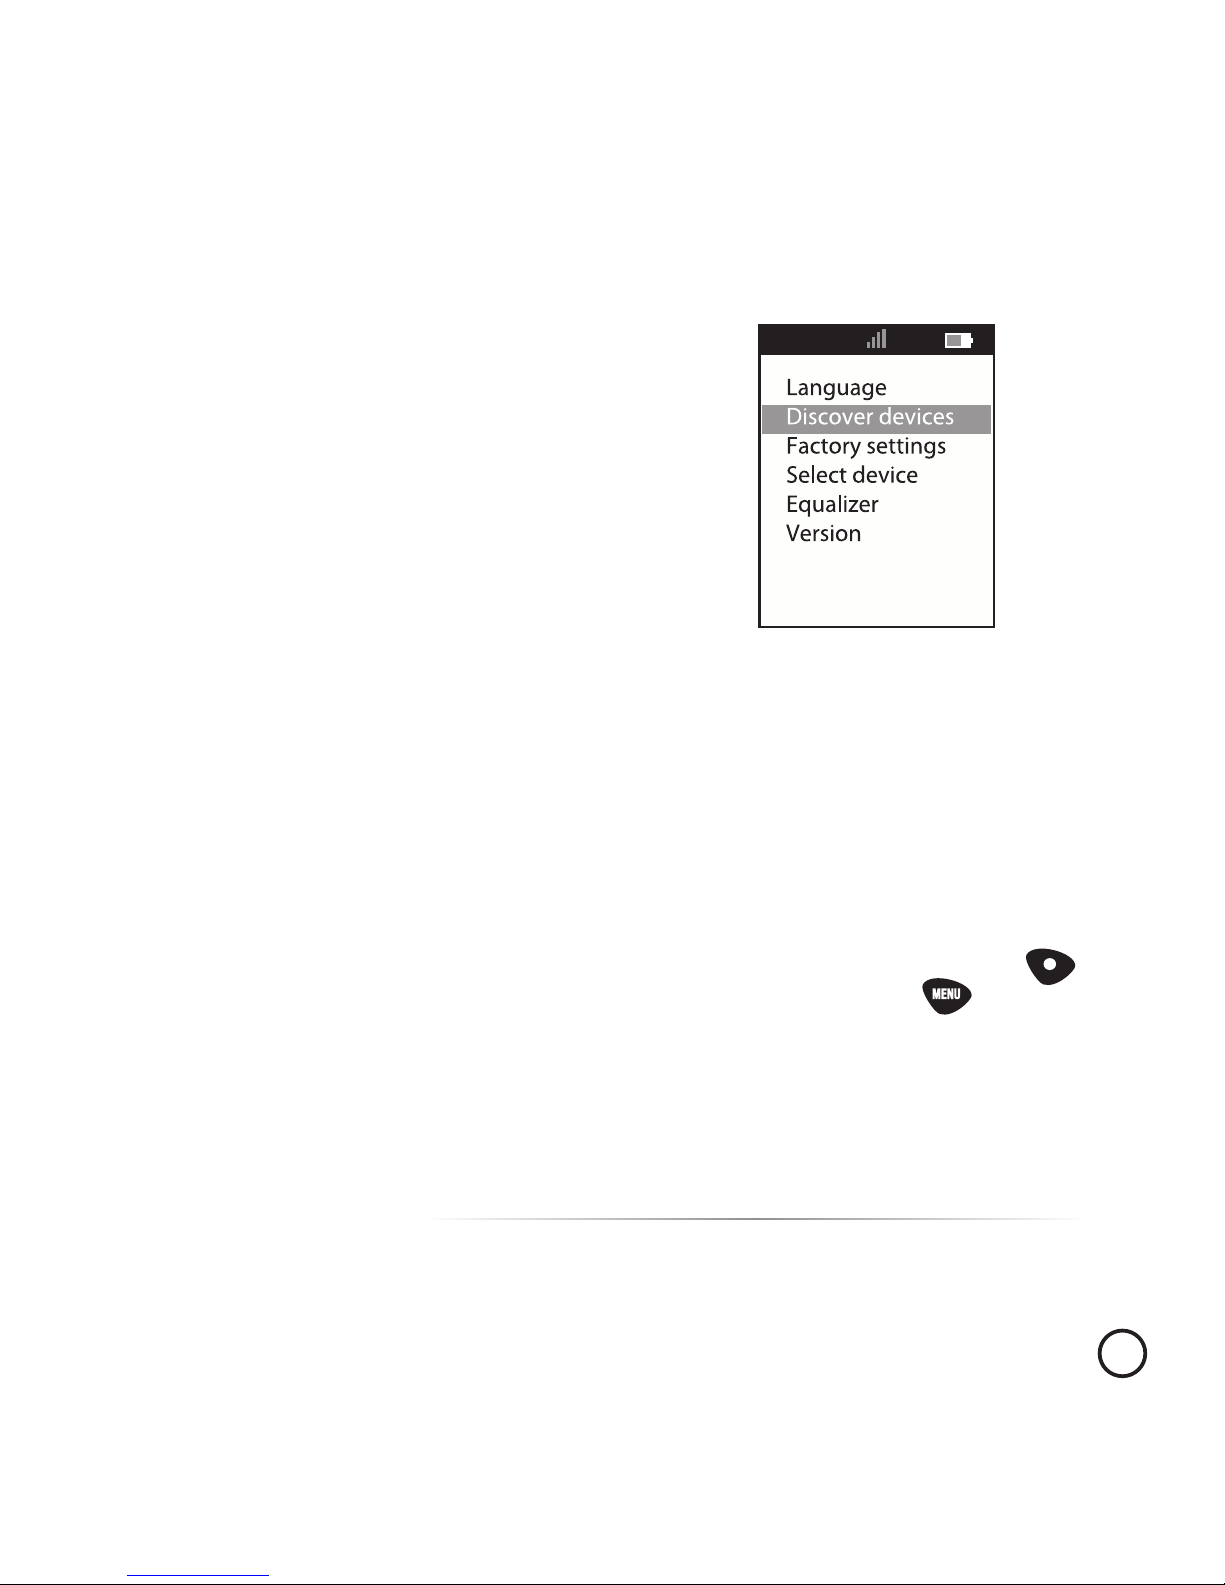
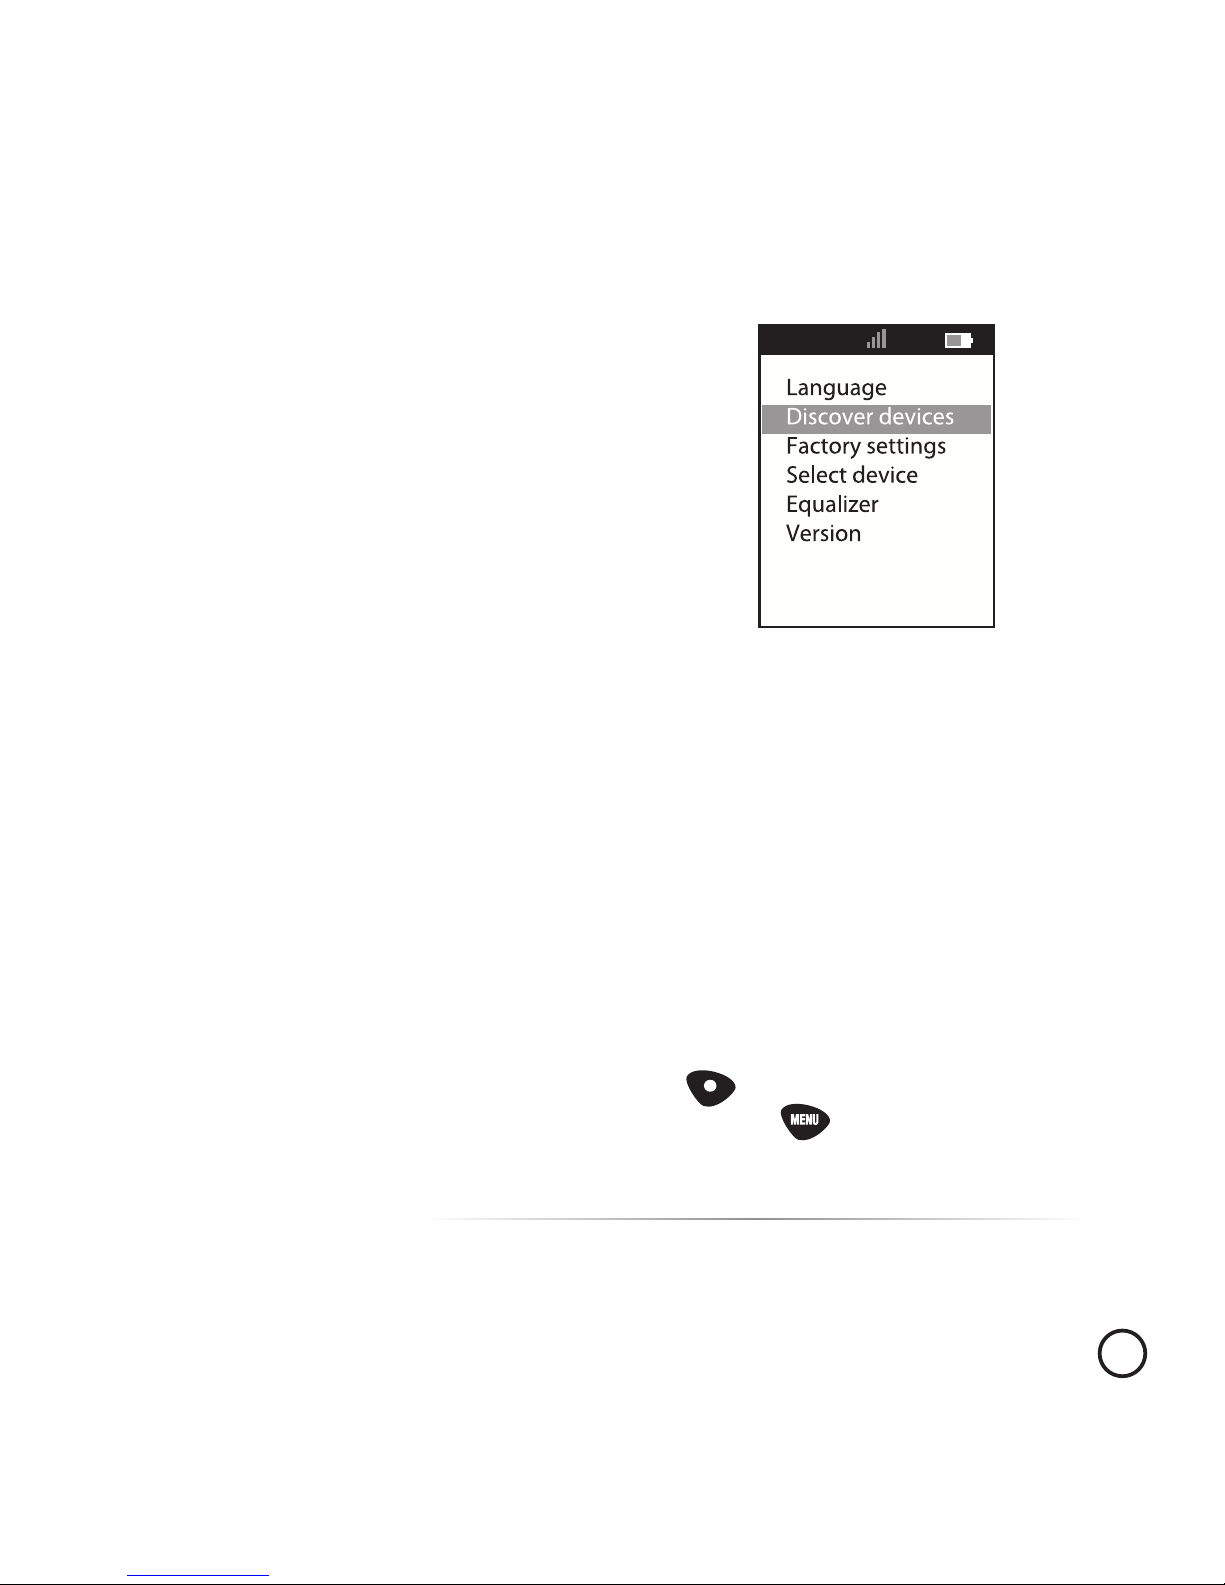
It offers you:
•Language: Select the current language.
•Discover devices: Allows pairing with new peripherals that
are compatible with HandMusic™.
•Factory settings: Reinstall all parameters of the remote1.
•Select device: Select a device previously paired2 .
•Equalizer: Modify the equalizer setting (available only if an iPod™
is connected to eFizz™). The highlighted preset is automatically
selected for preview. To maintain it, press the validation button ( ).
To abandon the modifications, press the Menu button ( ).
•Version: Read the version number of the software currently running on
the eFizz™ and the remote.
25
Using the Remote
Settings
The “Settings” menu is useful to modify all
the set up parameters of your remote.
Page 25
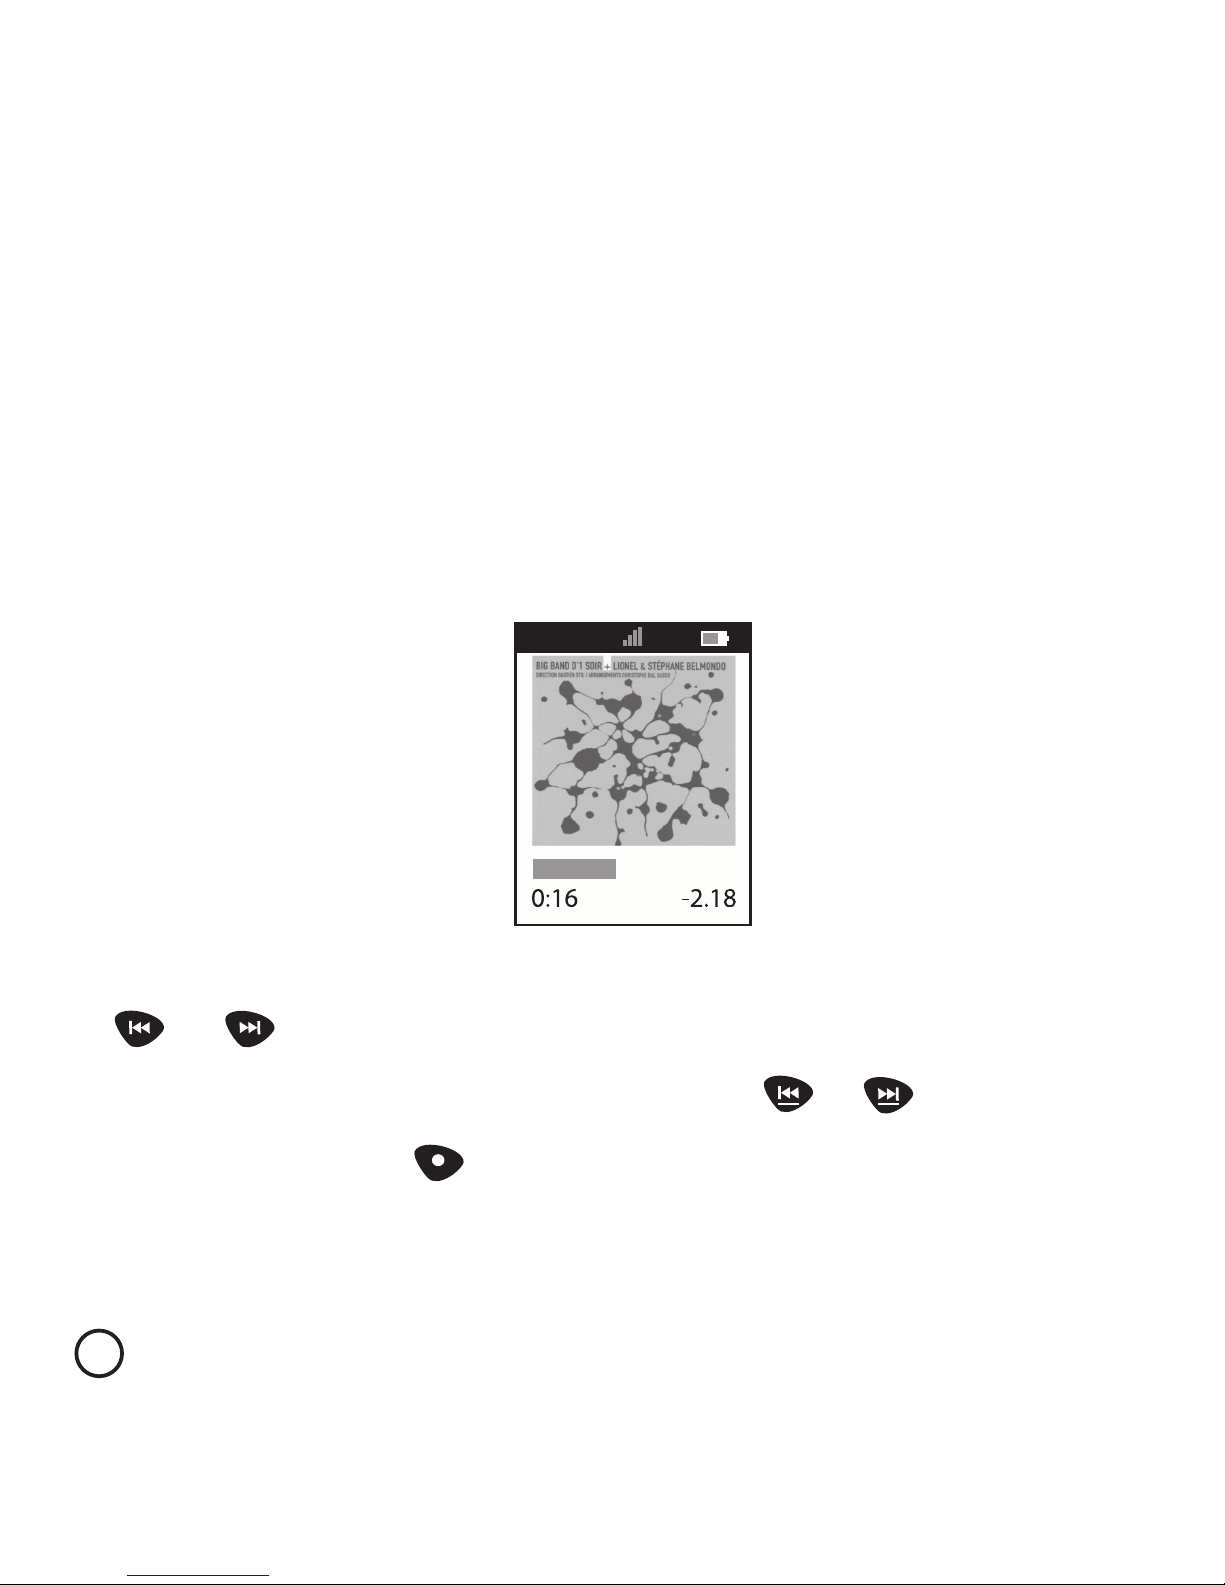
Now playing
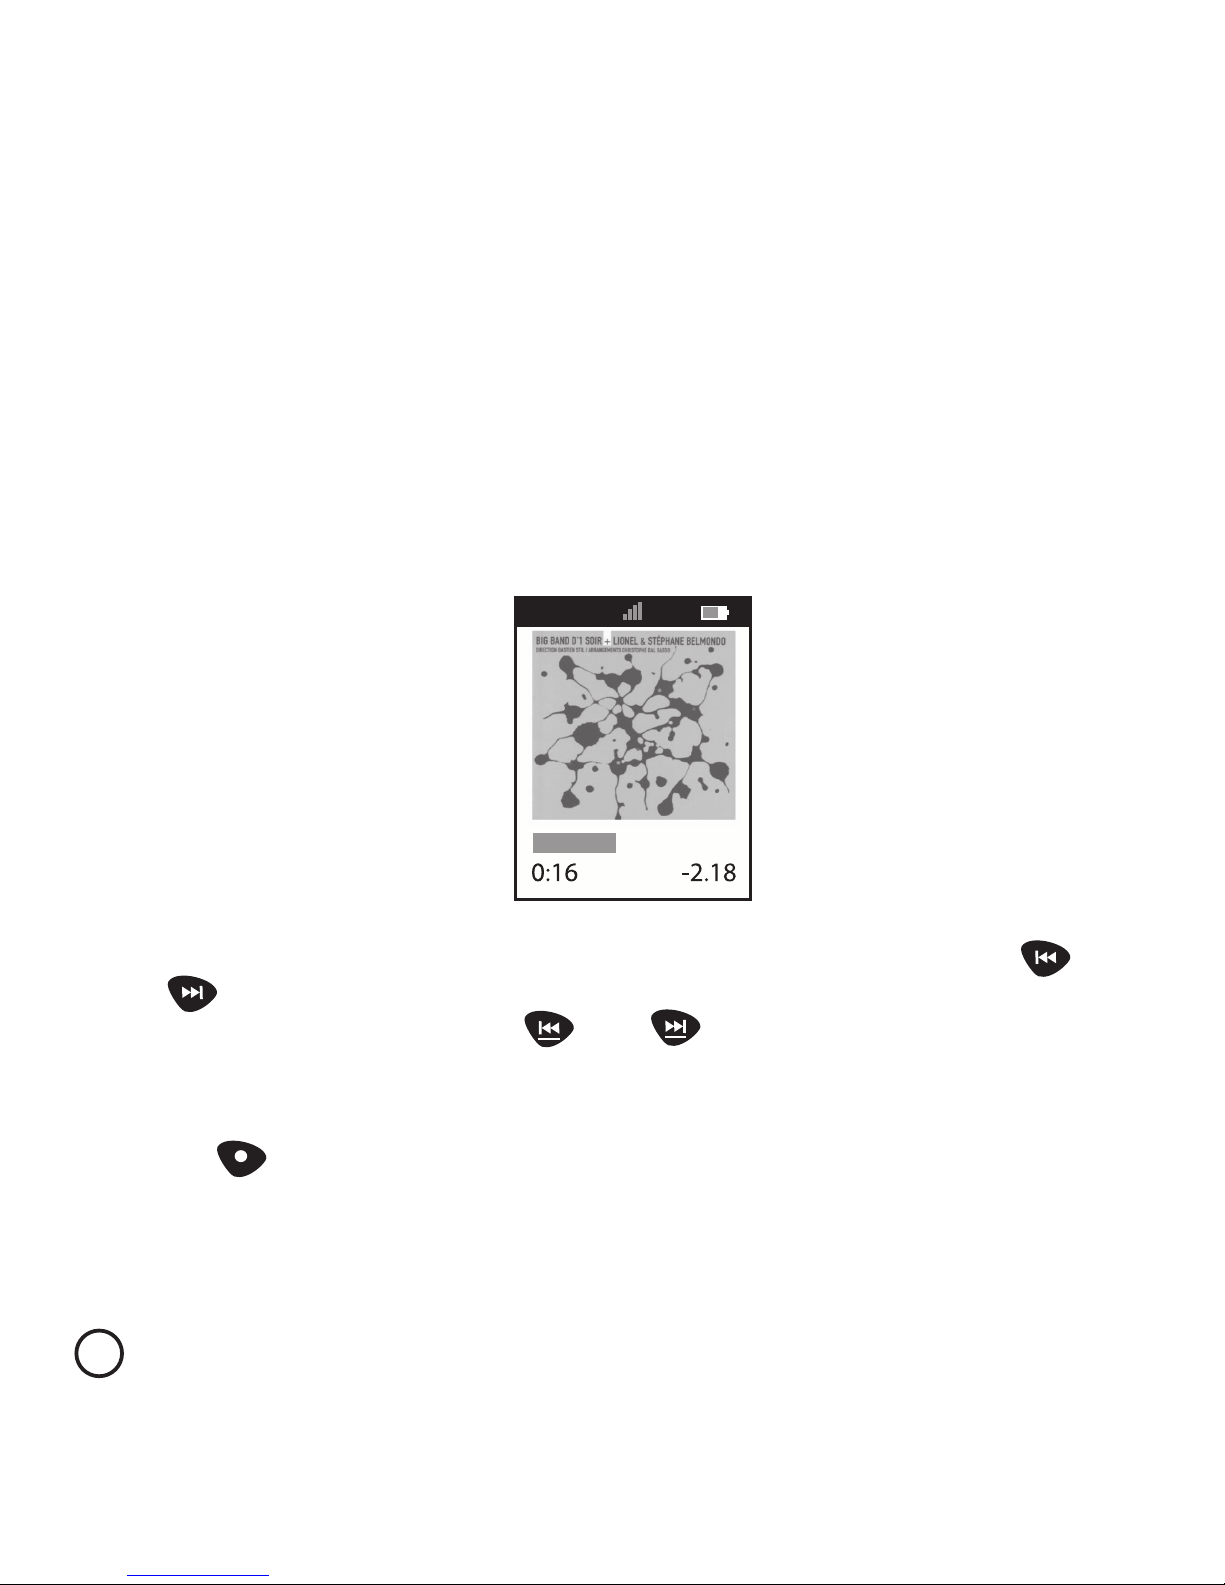
When a song or video is played, the “Now playing” menu appears and
displays the title, artist and album name, and the elapsed and remaining
time.
After a few seconds, if the title being played has a cover, it is automatically
displayed.
At any time, in the ‘Now playing”menu the previous / next features (
and ) allow the selection of the previous or next song or video. The
rewind / fast forward features ( and ) can be used to navigate in
the current song.
When the cover is shown for the title being played pressing the central
button ( ) switches views between the main and cover screens.
26
Using the Remote
Page 26
27
4
Updating your product
Page 27

Updating eFizz™
In order to update your eFizz™, please proceed as follows:
•Download the latest update from
http://www.ewoo.com
.
•Connect the power source of the eFizz™.
•Connect eFizz™ to your computer by means of the mini-USB cable
provided.
•Verify that the iPod™ is withdrawn from the eFizz™.
•Start the update program and follow the on screen instructions.
Updating the Remote
In order to update your remote, proceed as follows:
•Download the most recent update from
http://www.ewoo.com
.
•Connect your HandMusic™ to your computer using the mini USB
cable provided.
•Start the update program and follow the on screen instructions.
28
Updating your product
Page 28
29
5
Menu Diagrams
Page 29

• Main Menu
• Music
• Playlists
• Artists
• Albums
• Podcasts
• Genres
• Composers
• Audio books
• Jukebox
• Tracks
• Clear
• eFizz
• Input selection
• Sleep
• Alarm
• Synchronise the time with the iPod
• Settings
• Language
• Discover devices
• Factory settings
• Select device
• Equalizer
• Version
• Now playing
30
Menu Diagrams
Page 30
31
6
Repairs to Installation
Page 31

When I press the touch zone of my HandMusic™ remote, it does not wake
up, what can I do ?
1. Recharge your remote for an hour.
2. If the problem persists, restart the remote using a thin object inserted in the reset
cavity on the back of the remote.
3. If the problem persists, contact our online support at
http://www.ewoo.com/
support
.
My remote appears to be blocked, its screen is lit up, but pushing the
buttons does not produce any effect, what can I do?
1. Restart the remote with a thin object inserted in the reset cavity on the back
of the remote.
2. If the problem persists, contact our online support at
http://www.ewoo.com/
support
.
The logo Ewoo™ does not appear on my iPod™, and I cannot navigate
the contents, what can I do?
1. Restart your iPod™ following the instructions provided by the manufacturer.
2. If the problem continues, disconnect the power from your eFizz™ then reconnect
it
after waiting twenty seconds.
32
Troubleshooting
Page 32

3. If the problem persists contact our online support at
http://www.ewoo.com/
support
.
The wireless communications quality indicator is always red, the Ewoo™
log appears on my iPod™ when I connect, but I cannot navigate the
digital contents of my iPod™, what can I do?
1. It is possible that you are outside the communication range or that a source
has created a strong interference. To ensure this is the case, point the eFizz
in that direction.
2. If the problem persists, restart the remote using a thin object inserted in the reset
cavity on the back of the remote.
3. Restart your iPod™ following the instructions provided by the manufacturer.
4. If the problem persists, disconnect the power from the eFizz™ then reconnect after
waiting for several seconds.
5. If the problem persists, restore the system parameters of your remote.
6. Repeat the pairing process.
7. If the problem still persists, contact our online support at
http://www.ewoo.com/
support
.
33
Repairs to Installation
Page 33

34
Page 34
35
7
Technical Specifications
Page 35

Remote Control
- TTFT 1,8» color screen resolution 160x128 pixels.
- Possibility to recharge and update via USB
- Autonomy in use for 3 weeks.
- Ability to update the product via USB cable
- Touch and button navigator
eFizz™
- HiFi System 2.1 for iPod™
- Output of 70W RMS, HiFi quality
- Audio analog entry
- Optical S/PDIF entry
- USB connector
- iPod™ recharger
System
- Cordless communication in 2.4GHz, reach 150m (in a straight line of sight with no
obstacles).
- Compatible with iPods™ Nano (first, second, and third generations), fifth
generation
in (Video), Classic and Touch.
- Navigation of audio contents of iPod.™
36
Technical Specifications
Page 36
37
8
Limited Guarantee
Page 37

SCOPE OF GUARANTEE
Subject to legislation, Ewoo obligations regarding this product is limited to the following
terms and conditions:
Ewoo SA (“Ewoo”) guarantees this material product against defects in manufacture and
material for a period of one (1) year following the date of initial purchase (“Guarantee
Period”).
If a defect appears and a valid claim is received by Ewoo during the period of the
guarantee, Ewoo may choose to (1) repair the product free of charge using new or
remanufactured parts, or (2) exchange the product for a new one or manufactured
from new or remanufactured parts, that are functionally equivalent to the original
product, or (3) will reimburse the product purchase price.
Ewoo guarantees the products or replacement parts provided for under the terms
of this guarantee against defects in manufacture or materials following the date of
replacement or repair for the longer of the following periods: a period of ninety (90)
days or the remaining period covering the original product guarantee. When a product
or part is exchanged, all parts exchanged become your property and the parts
returned in exchange become the property of Ewoo. When a reimbursement is made,
your product becomes the property of Ewoo.
EXCLUSIONS AND LIMITATIONS
This Limited Guarantee is applicable only to the material product manufactured by or
on behalf of Ewoo that can be identified by the Ewoo trade mark, the commercial name
or logo affixed to it. This guarantee does not apply to any material product that is not
Ewoo nor any computer, even if packed and sold with the Ewoo material product.
Ewoo is not liable for any damage to, or any loss, of any program, data or any other
information stored on any support system contained in the Ewoo material product or
38
Limited Guarantee
Page 38

any product or part that is not Ewoo that is not covered by this guarantee. The recovery
or reinstallation of programs, data or other information is not included under this Limited
Guarantee.
This guarantee does not apply to: (a) Any accidental damage, abuse, faulty use, improper
use, or products that are not Ewoo; (b) Any damage caused by any intervention made
by any person other than Ewoo; (c) A product or part that has been modified without
the written authorisation of Ewoo; or (d) If any Ewoo serial number has been removed
or rendered illegible.
INSOFAR AS AUTHORISED BY THE LAW THIS GUARANTEE AND THE RECOURSE
OUTLINED HEREIN ARE EXCLUSIVE AND ARE A SUBSTITUTE OR REPLACEMENT OF
ANY OTHER CONTRACTUAL GUARANTEES, RECOURSE, AND CONDITIONS, WHETHER
WRITTEN OR VERBAL, LEGAL , EXPRESS OR IMPLIED. TO THE EXTENT ALLOWABLE BY THE
APPLICABLE LAW, EWOO EXPRESSLY EXCLUDES ALL IMPLIED GUARANTEES, INCLUDING
SPECIFICALLY MARKETING GUARANTEES AND ADAPTATION FOR A PARTICULAR USE.
IF EWOO IS NOT LEGALLY AUTHORISED TO REJECT ANY LEGAL OR IMPLIED GUARANTEE AS
A RESULT OF THIS LIMITED GUARANTEE, SAID GUARANTEE, INCLUDING ANY MARKETING
GUARANTEE OR ADAPTATION TO A PARTICULAR USE, AND ANY GUARANTEE AGAINST HIDDEN
OR LATENT DEFECTS WILL BE, INSOFAR AS AUTHORISED BY LAW, LIMITED TO THE DURATION
OF THIS GUARANTEE AND THE PROVISION OF REPAIR OR REPLACEMENT SERVICES. No
reseller, agent or salaried employee of Ewoo is authorised to modify, extend or complete
this guarantee.
INSOFAR AS AUTHORISED BY THE LAW EWOO IS NOT RESPONSIBLE FOR ANY DIRECT,
SPECIFIC, ACCESSORY OR INDIRECT DAMAGE RESULTING FROM ANY VIOLATION OF ANY
GUARANTEE OR CONDITION OR THE TERMS OF ANY OTHER LEGAL CONCEPT, INCLUDING
BUT NOT LIMITED TO ANY LOSS OF REVENUE, ANY ACTUAL OR ANTICIPATED LOSS OF PROFITS
(INCLUDING ANY LOSS OF PROFITS RELATED TO CONTRACTS), ANY FINANCIAL CASH LOSS,
SAVINGS, BUSINESS, LOSS OF OPPORTUNITIES, CLIENTS, REPUTATION, ANY LOSS OR DIRECT
OR INDIRECT DAMAGE WHATSOEVER, INCLUDING REPLACEMENT OF EQUIPMENT OR
GOODS, ANY RECOVERY FEES, PROGRAMMING OR REPRODUCTION OF ANY PROGRAM
39
Limited Guarantee
Page 39

OR DATA STORED OR USED WITH EWOO PRODUCTS AND ANY FAILURE IN THE PRESERVATION
OF DATA STORED IN THE PRODUCT. THIS LIMITATION DOES NOT APPLY TO CLAIMS IN THE
EVENT OF DEATH OR INJURY. MORE SPECIFICALLY, EWOO DOES NOT MAKE ANY STATEMENT
REGARDING ITS CAPACITY TO REPAIR ANY PRODUCT UNDER THE TERMS OF THIS GUARANTEE
NOR TO EXCHANGE ANY PRODUCT WITHOUT ANY RISK OR LOSS OF PROGRAMS OR DATA.
If you are a consumer PROTECTED BY A LEGAL CONSUMER PROTECTION LAW IN
THE COUNTRY OF PURCHASE, OR IF THIS DIFFERS IN THE COUNTRY OF RESIDENCE, this
guarantee complements YOUR RIGHTS AND RECOURSE UNDER THE LAWS OF CONSUMER
PROTECTION. INSOFAR AS THE CONSUMER PROTECTION LAW AUTHORISES SUCH A
LIMITATION, THE LIABILITY OF EWOO IS LIMITED AT THEIR SOLE OPTION TO THE REPLACEMENT,
REPAIR OR SUPPLY OF A NEW REPAIR SERVICE.
OBTAINING GUARANTEE SERVICE
We kindly request that you carefully read the help resources online regarding the
attached documentation before requesting a guarantee service. If after having used
the services the product is still not functioning correctly, log in to the internet site:
www.
ewoo.com/support
for further instructions regarding obtaining guarantee services.
40
Limited Guarantee
Page 40

Produit : eFizz™
Société : Ewoo SA
Adresse :
Le Trési 6B
1028 Préverenges
Switzerland
Tél : +41 21 821 55 00
Ces produits sont conformes à la Section 15 des règles de la FCC. Leur
fonctionnement est soumis aux deux conditions suivantes :
1. Ces produits ne risquent pas de causer d’interférences nuisibles.
2. Ces produits doivent accepter toutes les interférences reçues, y compris celles
qui risquent d’entraîner un fonctionnement indésirable.
Cet équipement a été testé et déclaré conforme aux limitations relatives à un appareil
numérique de classe B, conformément à la Section 15 des règles de la FCC. Ces
limitations visent à assurer une protection raisonnable contre les interférences dans le
cadre d’une installation résidentielle. Cet équipement génère, utilise et peut émettre
de l’énergie de fréquence radio. S’il n’est pas installé et utilisé conformément aux
instructions du fabricant, il risque de provoquer des interférences qui affecteront la
réception radiophonique et télévisuelle. Il n’y a toutefois aucune garantie qu’il ne se
produira pas d’interférences dans une installation particulière.
Cet équipement a été testé et déclaré correspondre aux normes suivantes :
EN300440-2 / EN301489-3
FCC Part 15C / FCC Part 15B
Déclaration de conformité
Page 41

Introduction
Quick Start
Utilisation de la télécommande
Mise à jour de votre produit
Arborescence des menus
Dépannage de l’installation
Caractéristiques techniques
Garantie limitée
42
Table des matières
43
49
59
65
67
69
73
75
Page 42
43
1
Introduction
Page 43

44
Introduction
Ewoo™ vous remercie d’avoir fait l’acquisition du système HiFi stéréo
pour iPod™ eFizz™. Nous espérons que ce produit vous apportera entière
satisfaction et vous permettra d’apprécier pleinement vos nouvelles
expériences multimédia.
Si vous connaissez bien l’installation d’accessoires pour iPod™, utilisez la
section
Quick Start Guide
(démarrage rapide) qui se trouve ci-après. Pour
des détails complets sur le branchement et le fonctionnement de cet
équipement, reportez-vous à ce mode d’emploi. Les versions électroniques
de ce mode d’emploi se trouvent sur notre site Internet
http://www.ewoo.
com
.
Avant toute chose, nous vous invitons à lire attentivement le manuel de
l’utilisateur afin de bénéficier d’une expérience optimale à la mise en
œuvre de eFizz™
et HandMusic™.
Contenu du pack
•Système HiFi stéréo pour iPod™ eFizz™.
•Télécommande HandMusic™
•Alimentation secteur avec prise EU/US/UK
•Câble mini-USB
•6 adaptateurs iPod™
•Manuel d’utilisation
Page 44

45
Introduction
Comment tirer le meilleur parti d’eFizz™
Positionnement du produit
eFizz™ est prévu pour fonctionner en position verticale, afin de respecter
la courbe polaire des haut-parleurs.
Les pieds de découplage permettent d’assurer une meilleure stabilité
de l’enceinte tout en limitant les résonances pouvant être générées par
certains types de sols comme les planchers par exemple. Les enceintes
sont livrées
avec un tissu de protection en face avant. II est possible de les utiliser sans
ce tissu. Nous vous recommandons de garder cette protection pour mieux
protéger les haut-parleurs de votre enceinte.
Le champ magnétique des moteurs des haut-parleurs va rayonner au delà
de l’enveloppe de l’enceinte acoustique. Il faut donc éloigner d’environ 50
cm les appareils et objets sensibles à ce type de rayonnement (téléviseurs,
écrans d’ordinateur, disquettes informatiques, bandes magnétiques audio
ou vidéo,
cartes à puces...). Les enceintes centrales ne sont pas concernées par ce
type de problème car elles sont blindées magnétiquement.
Placement des enceintes dans une pièce
Outre la position de eFizz™, il faut tenir compte de son emplacement
dans la pièce, les propriétés acoustiques d’un local étant un facteur
capital
dans la retransmission du son.
Le placement optimal pour une écoute stéréo en 2.1
Le placement d’eFizz™ contre un mur renforce l’extrême grave et limite
les réflexions de 80 à 200 Hz. Cependant, pour obtenir le meilleur résultat,
il est toujours nécessaire de faire des essais d’emplacement en fonction
de l’acoustique de la pièce.
Page 45
46
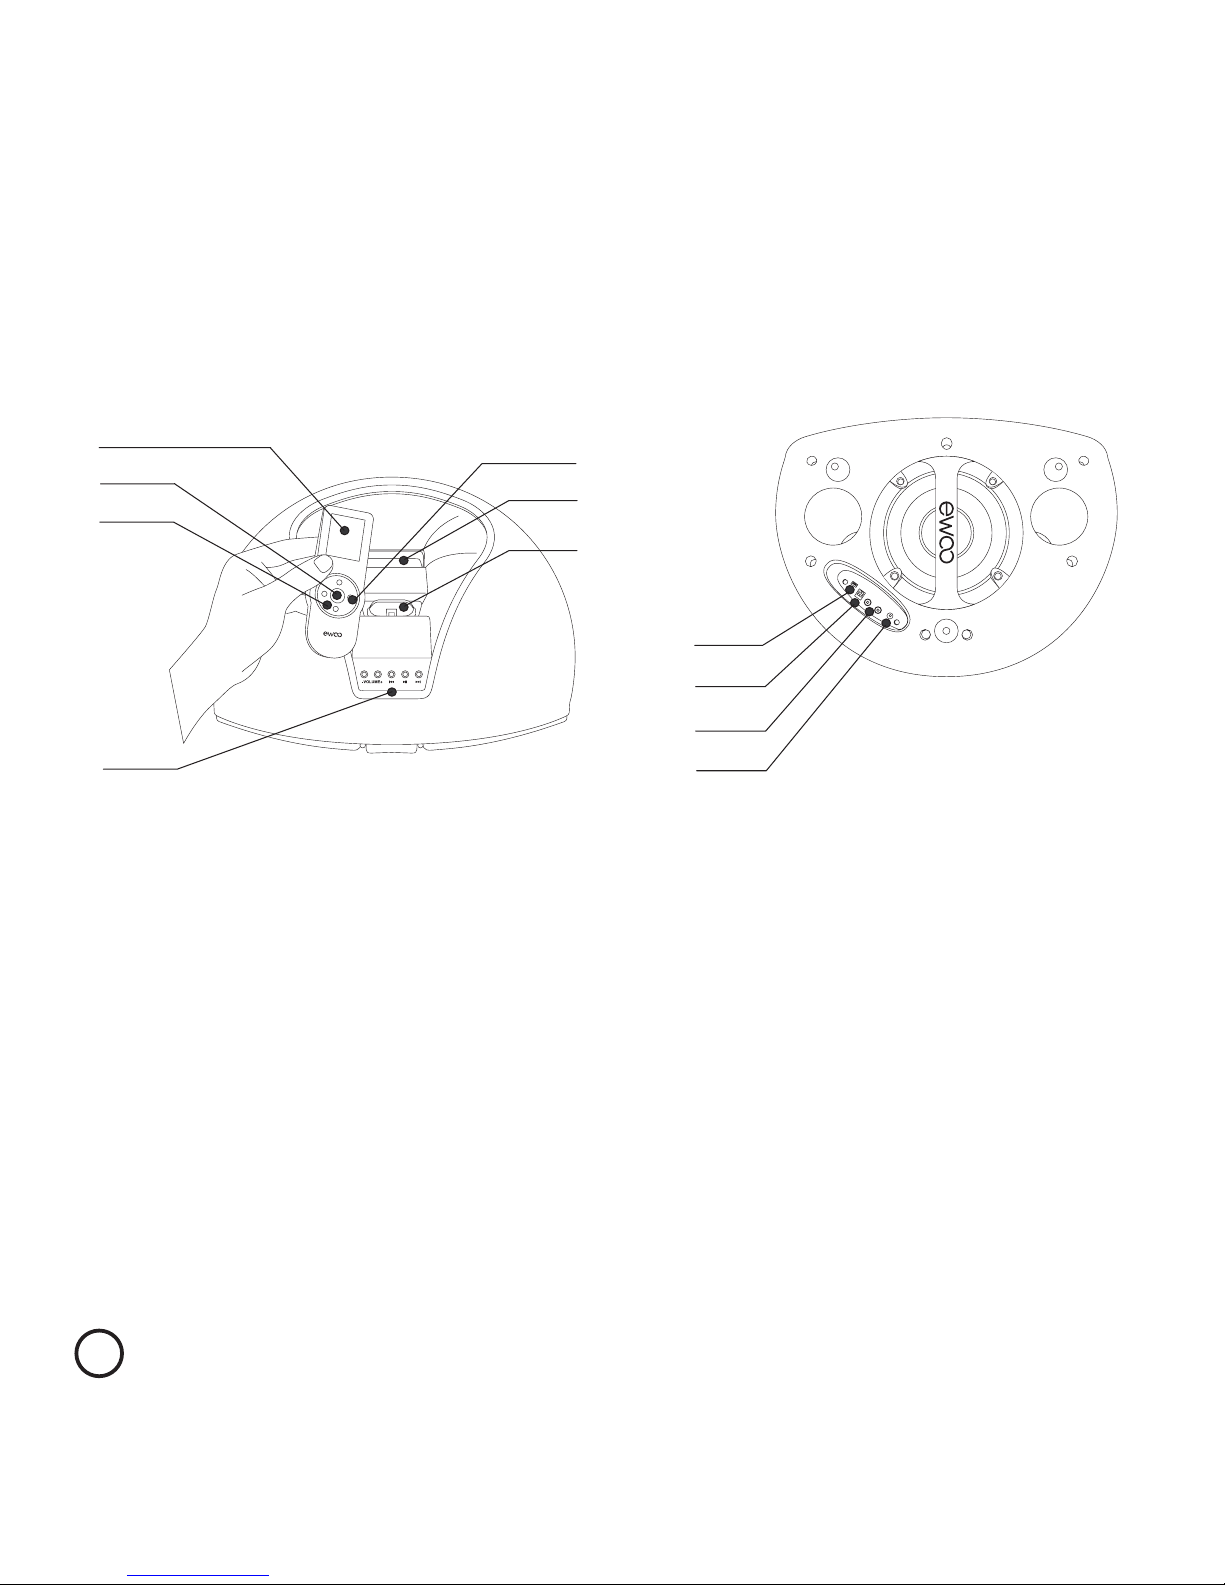
Aperçu général du produit
1. Ecran 1.8’’
2. Bouton de validation
3. Zone tactile
4. Boutons d’accès direct
5. Boutons de navigation
6. Emplacement iPod™ et adaptateur
7. Zone de recharge de la télécommande
8. Connecteur Mini-USB
9. Connecteur audio digital S/PDIF
10. Connecteur audio analogique
11. Connecteur d’alimentation
Introduction
7
6
1
8
9
10
11
3
4
2
5
Page 46
47
Introduction
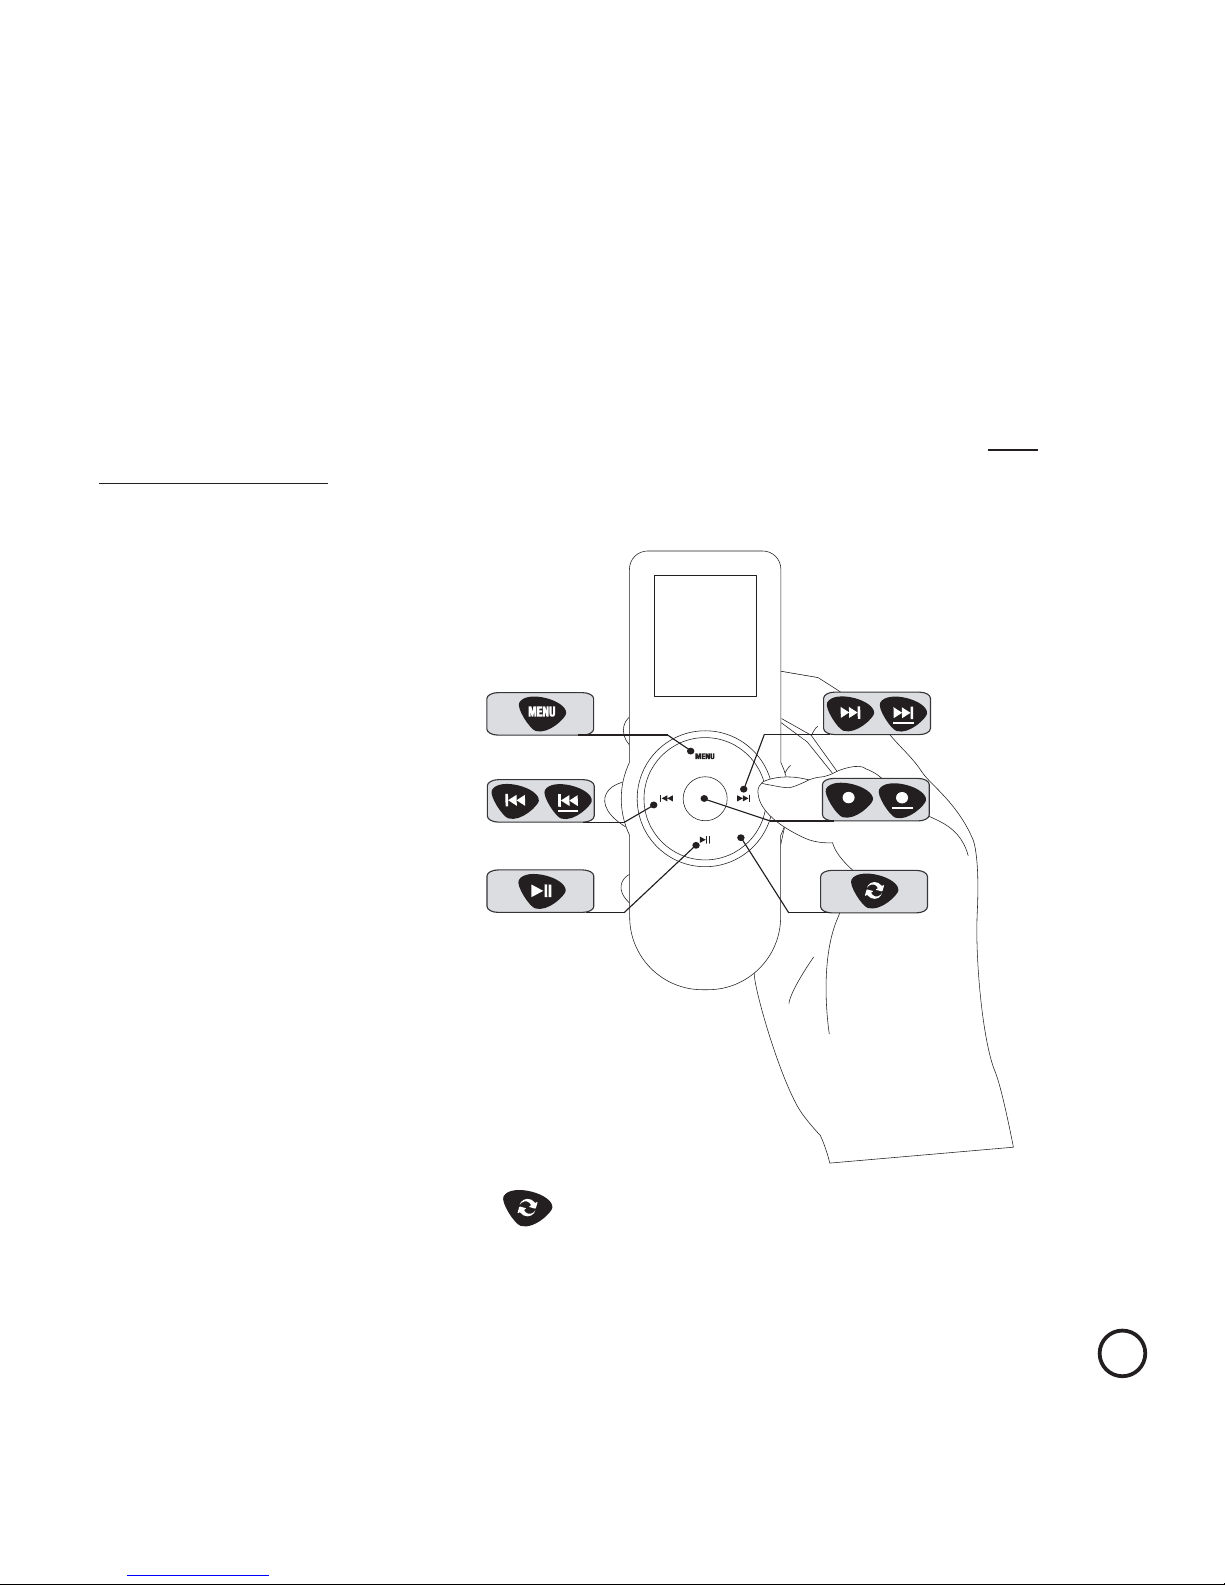
Actions possibles sur la télécommande HandMusic™
HandMusic™ dispose d’une interface de navigation permettant à la fois
la pression sur l’un de ses 5 boutons, mais aussi la rotation sur la zone tactile.
En outre, certaines fonctions avancées sont obtenues par pression longue
(> 2 secondes) sur l’un des boutons (ci-après représentée par un trait
de soulignement).
Vous retrouverez les pictogrammes
ci-dessus tout au long du manuel,
la rotation sur la zone tactile étant
représentée comme ceci : .
Page 47
48
Introduction
Ecran de la télécommande HandMusic™
1. Mode de lecture
2. Niveau de la batterie
3. Qualité de la communication sans fil
NB : Le contenu du menu principal dépend de la présence de l’iPod™ sur l’eFizz™.
S’il est absent, seul le menu « Réglages » est visible.
Page 48
Titre chapitre
49
2
Quick Start
Page 49
50
Raccordements
Cette section décrit les différents branchements nécessaires au
fonctionnement de votre système eFizz™
1) Brancher l’alimentation du système HiFi stéréo pour iPod™ eFizz™.
2) Optionnel : Brancher un appareil audio sur l’entrée analogique
d’eFizz™
Quick Start
Page 50
51
Quick Start
3) Optionnel : Brancher un appareil audio sur l’entrée digitale S/PDIF
d’eFizz™
4) Placer la télécommande sur eFizz™ durant 1 heure afin de la
charger.
Page 51
52
Quick Start
Jumelage et premier démarrage de la télécommande
1) Appuyez simultanément sur les boutons Volume + et Volume –
d’eFizz™ durant 5 secondes pour initier le mode de jumelage.
2) Prenez la télécommande en main et effleurez le tactile ( )
pour l’allumer
5 s.
Page 52
53
Quick Start
3) Choisissez la langue sur la télécommande ( ) puis validez votre
choix ( )
4) La télécommande va rechercher les périphériques disponibles,
après affichage, validez le jumelage ( )
NB : Le choix de la langue et la recherche de périphériques peuvent en tout
temps être effectués au travers du menu « Réglages ».
Page 53
54
Quick Start
Connexion de l’iPod™
1) Insérez l’adaptateur prévu pour votre iPod™ sur eFizz™.
Chaque iPod™ possède son adaptateur propre :
•N°8 : iPod™ Nano 1G
•N°9 : iPod™ 5G (Video ) 30GB
•N°10 : iPod™ 5G (Video ) 60GB/80GB, iPod™ Classic
•N°11 : iPod™ Nano 2G
•N°13 : iPod™ Nano 3G
•N°14 : iPod™ Touch
Page 54
55
Quick Start
2) Insérez l’iPod™ sur eFizz™, le logo Ewoo™ apparaît sur l’écran de ce
dernier.
3) Votre installation est désormais prête à fonctionner.
Page 55
56
Quick Start
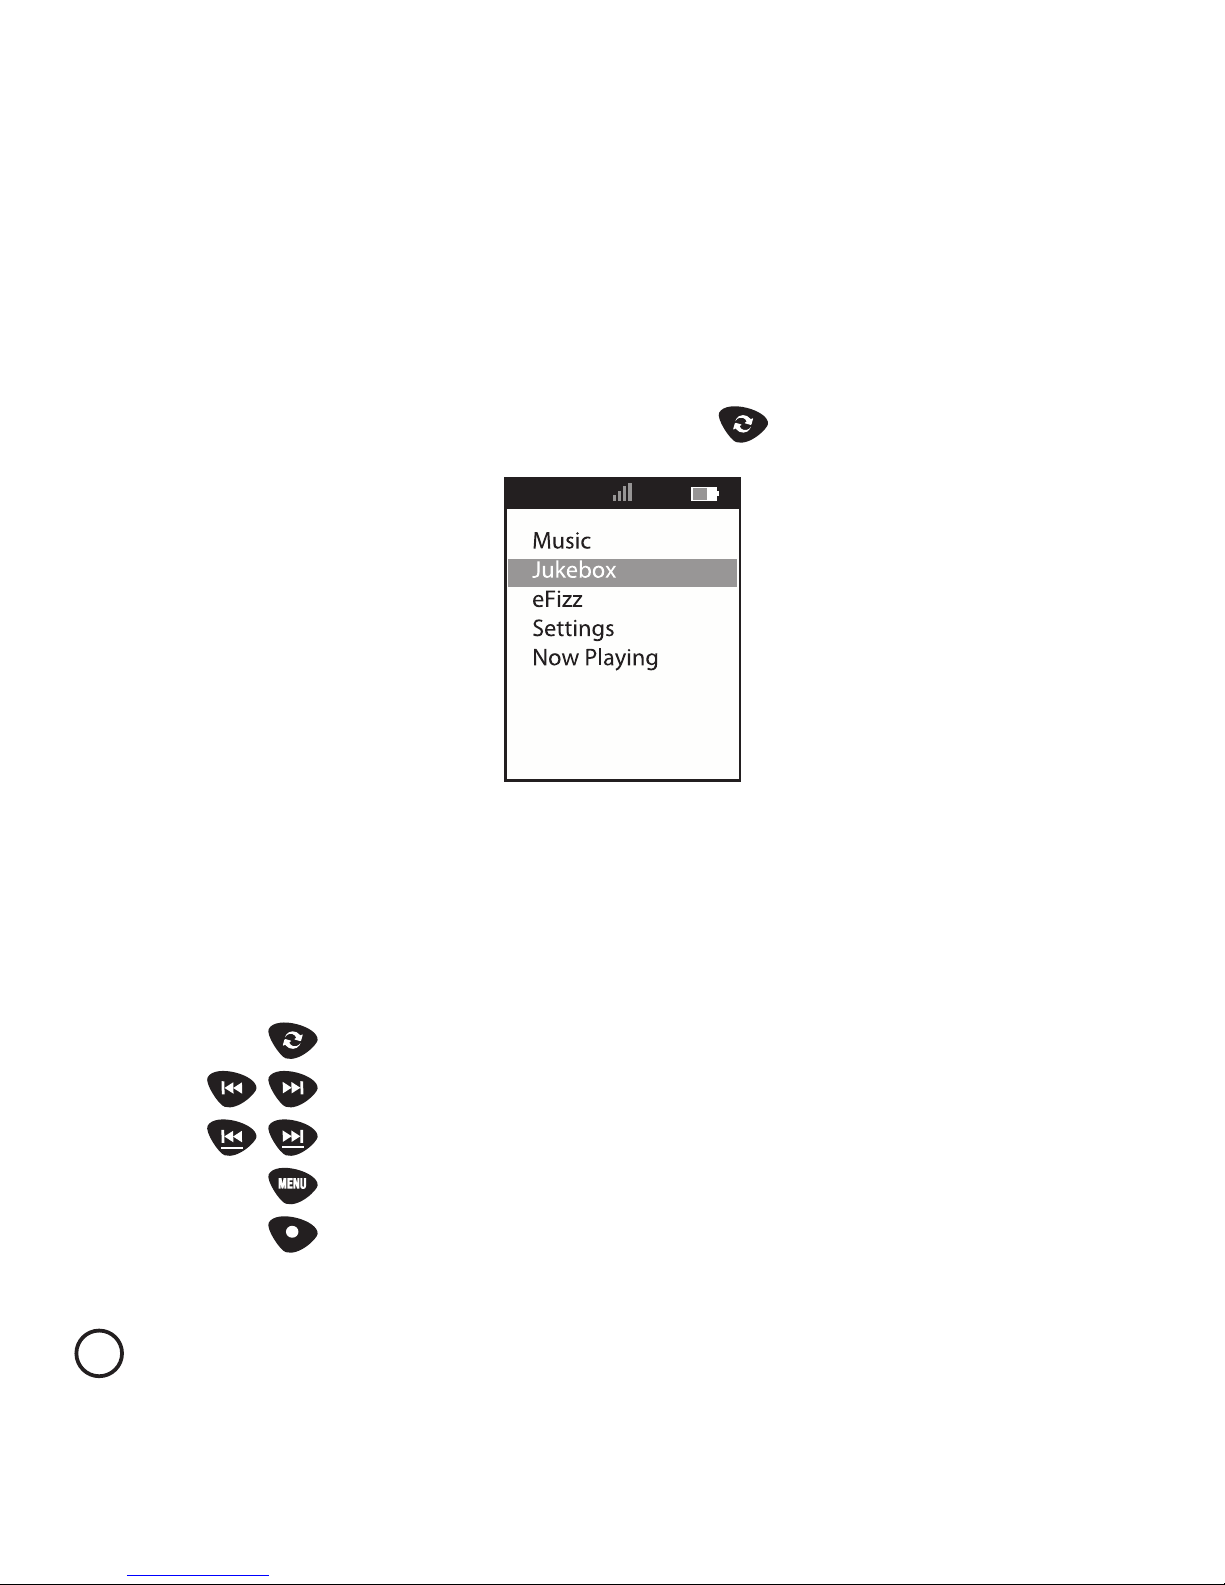
Dans le mode « En Lecture », le réglage du volume, l’avance rapide,
le changement de titre, les modes lecture et pause s’obtiennent
avec les mêmes actions que sur un iPod™ :
réglage du volume
suivant/précédent
avance/retour rapide
retour au menu précédent
passage du mode jaquette au mode texte
1) HandMusic™ dispose d’une interface tactile semblable à celle de votre
iPod™, il vous est ainsi possible de naviguer dans le contenu de ce
dernier par le biais de la zone tactile ( ) et des boutons associés.
Navigation dans le contenu de l’iPod™
Page 56

Changement de source audio
Votre eFizz™ permet la restitution d’une autre source musicale que votre
iPod™. Une fois cette source audio connectée à votre eFizz™, il vous est
possible de la sélectionner à l’aide du menu « Sélectionner source », situé
dans le menu « eFizz » de votre télécommande. Il vous est alors possible
d’y sélectionner l’entrée analogique ou l’entrée S/PDIF optique digitale
de votre eFizz™, afin de l’écouter. De la même manière, vous pouvez y
sélectionner votre iPod™ comme source musicale, lorsque vous le désirez, à
l’aide du même menu.
57
Quick Start
Page 57
Fonctionnement sans HandMusic
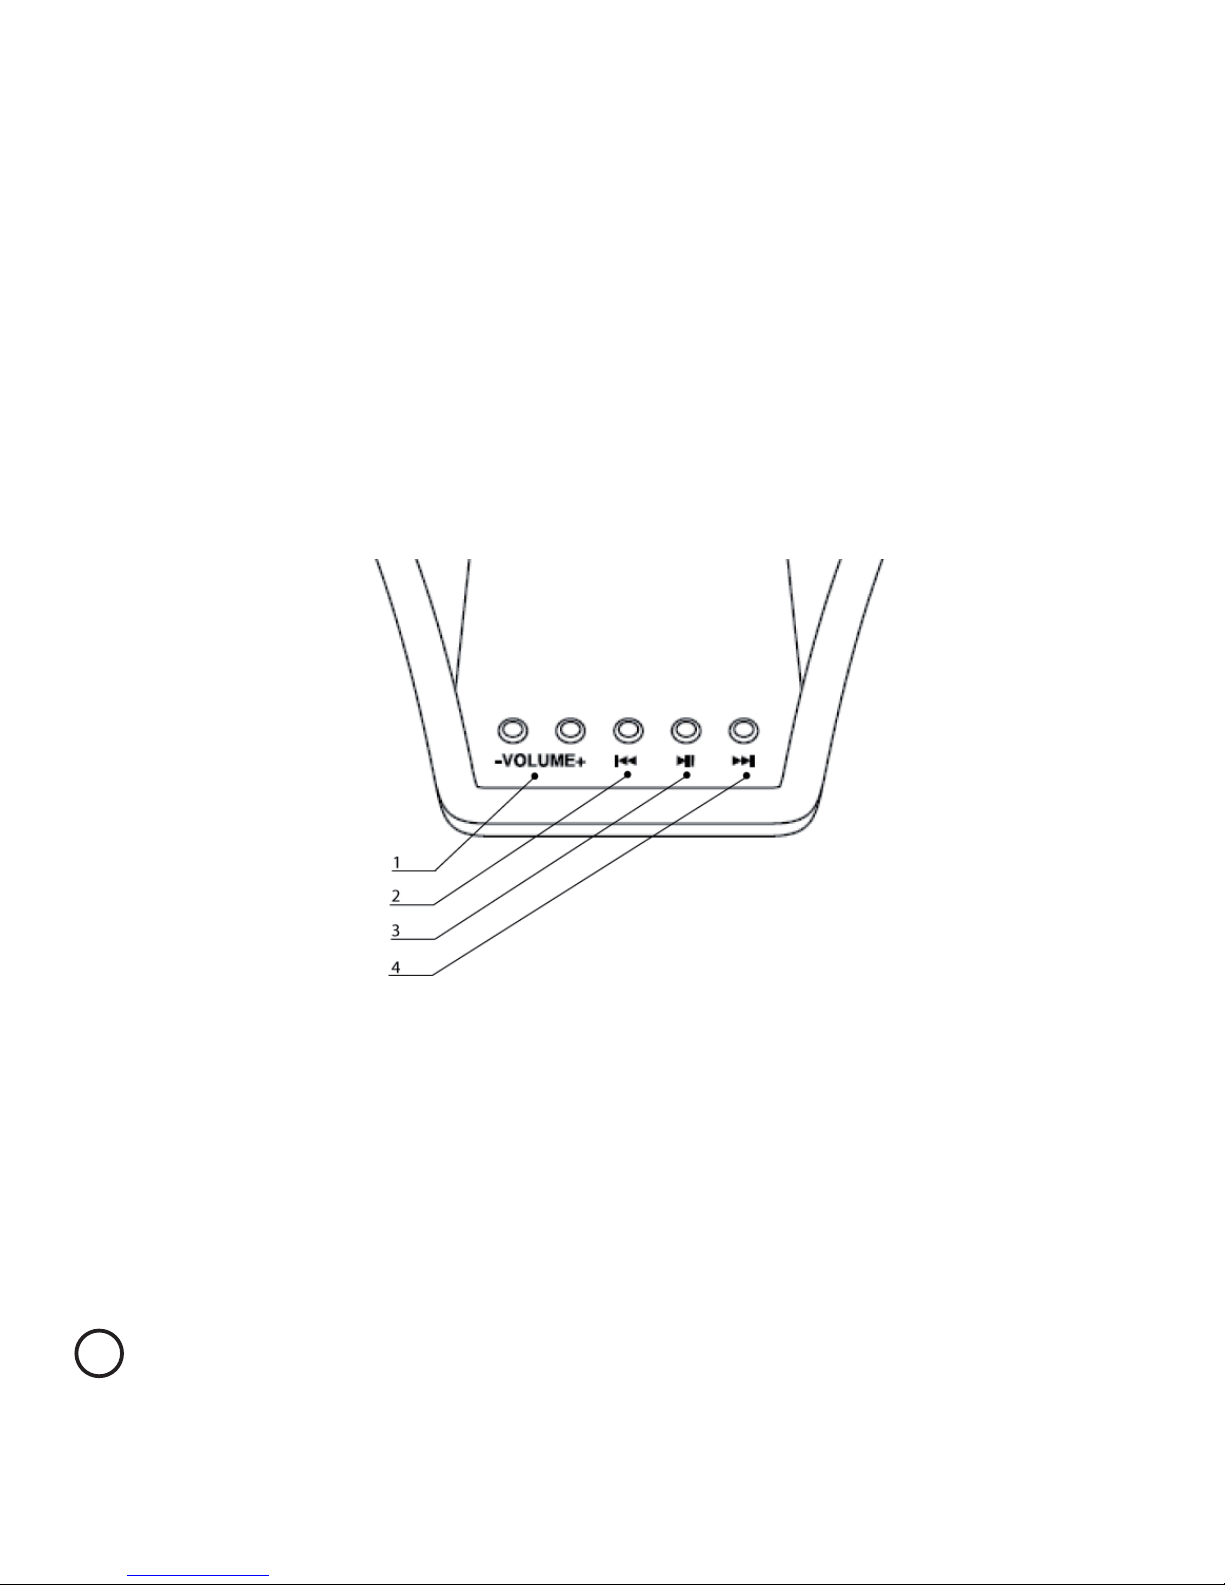
Votre eFizz™ peut aussi être piloté directement à l’aide de son
interface utilisateur.
1. Touches d’augmentation / diminution du volume.
2. Touche précédent/retour rapide (sur pression longue).
3. Touche de passage du mode lecture au mode pause.
4. Touche suivant/avance rapide (sur pression longue).
58
Quick Start
Page 58
59
3
Utilisation de la télécommande
Page 59
Menu Musique
A partir du menu principal, vous accédez au contenu audio de votre
iPod™ via le menu « Musique ». Il vous est alors aisé d’y naviguer en utilisant
la surface tactile.
HandMusic™ dispose de fonctionnalités avancées vous permettant de
faciliter
la navigation dans votre contenu digital :
• Avance rapide dans les listes : afin de naviguer plus rapidement dans les
60
Utilisation de la télécommande
Menu Principal
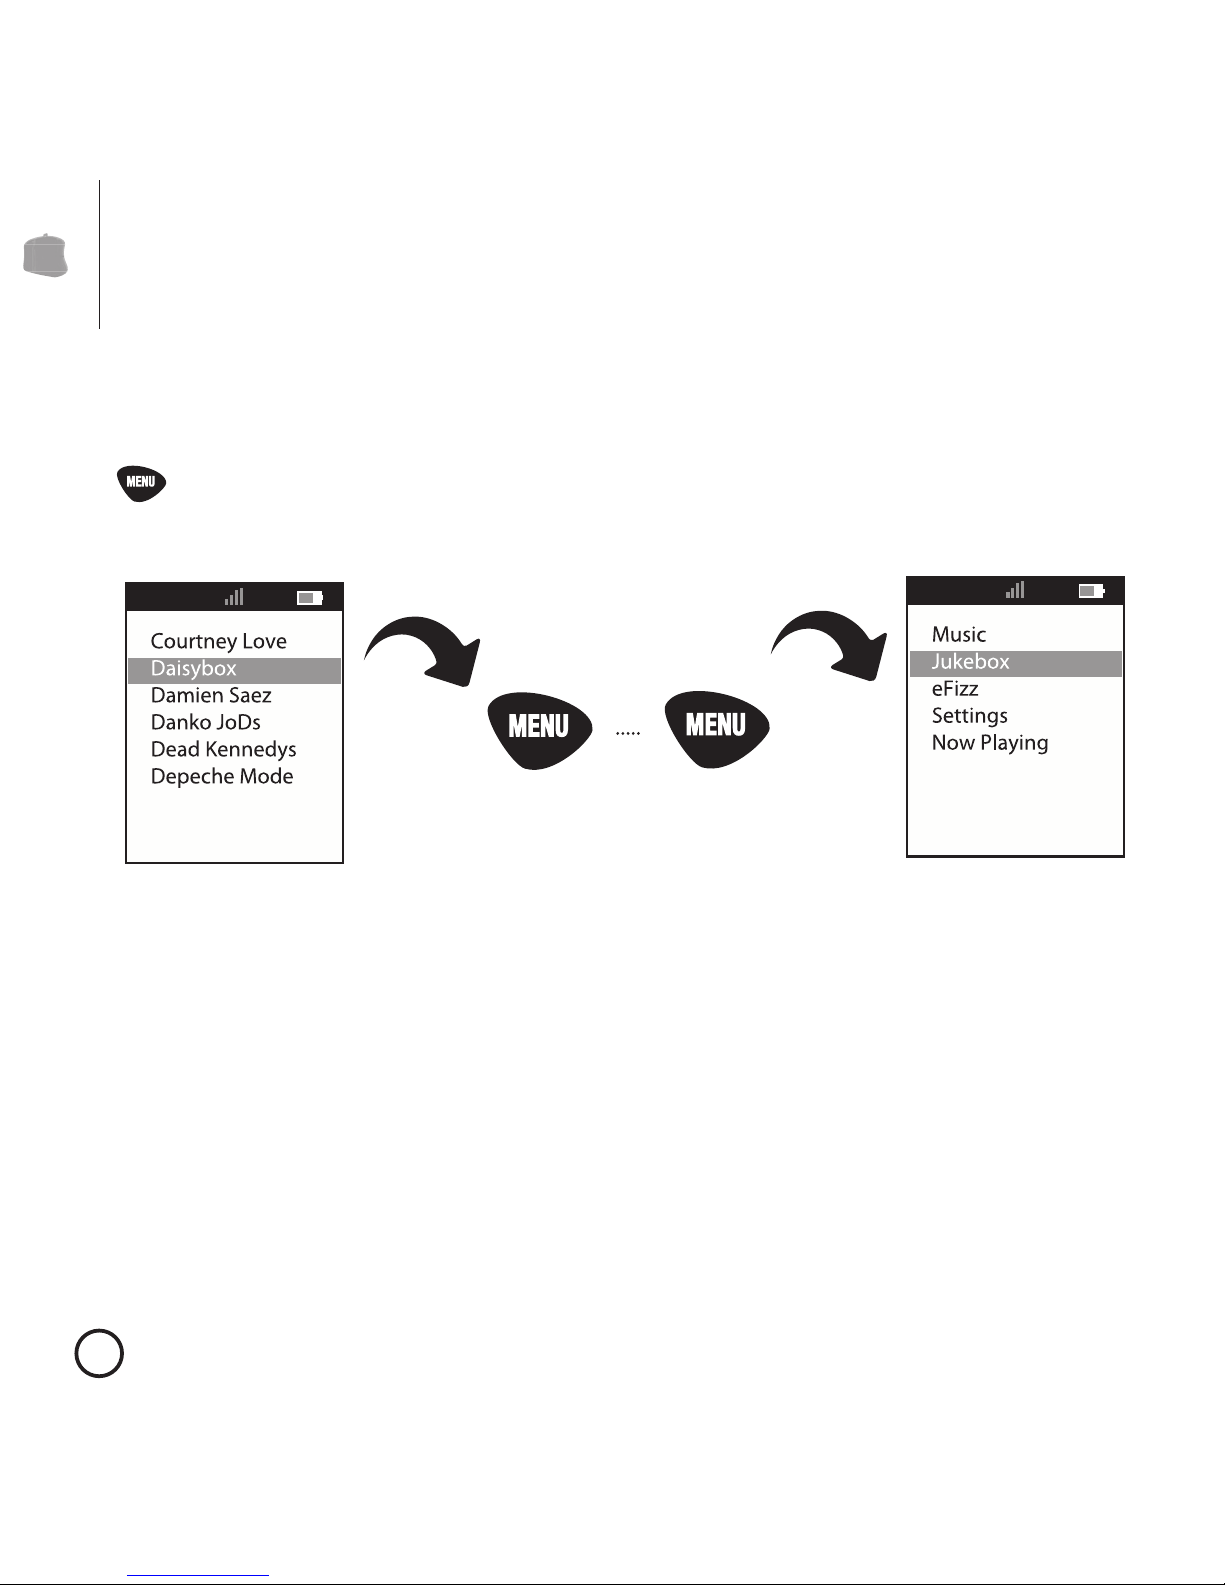
Le menu principal est le menu de base de la télécommande. Il est
en tout temps possible d’y revenir en pressant le bouton Menu plusieurs fois
( ). Il permet d’accéder à toutes les fonctionnalités offertes par la
télécommande.
Page 60
Jukebox
La fonction exclusive HandMusic™, « Jukebox », permet de créer une liste
de lecture directement en naviguant dans le contenu musical de votre
iPod™ à l’aide de la télécommande. Pour ajouter une chanson, un album
ou tout autre élément au Jukebox, il suffit de le sélectionner grâce à un
appui long sur le bouton de validation ( ). L’élément sélectionné
clignotera alors, et sera automatiquement ajouté à la liste.
Pour visualiser les éléments musicaux ajoutés au Jukebox, il suffit de se
rendre dans le menu Jukebox puis Morceaux. Pour effacer la liste, appuyez
sur Effacer dans le menu Jukebox.
NB : La sélection effectuée par le menu Jukebox est effacée lorsque l’iPod™ est retiré
d’eFizz™ ou lorsque eFizz™ est débranché du secteur.
listes, vous pouvez utiliser les boutons Avance et Retour ( et )
qui permettent un défilement rapide à chaque pression.
• Recherche alphabétique dans les listes : de la même manière,
dans une liste classée par ordre alphabétique, une pression sur
le bouton play/pause ( ) active la recherche alphabétique,
ce qui vous permet d’atteindre immédiatement le contenu désiré.
61
Utilisation de la télécommande
Page 61
62
Utilisation de la télécommande
eFizz
Le menu « eFizz™ » vous permet d’accéder à toutes les fonctions spécifique
de votre système HiFi stéréo pour iPod™ eFizz™.
Dans ce menu, vous retrouverez :
• Sélection de l’entrée : Choisir la source
qui sera restituée sur eFizz™ (iPod™, entrée ligne
analogique ou entrée digitale S/PDIF).
•Veille : Programmer la mise en veille automatique
d’eFizz™.
•Alarme : Régler les paramètres d’alarme d’eFizz™
(heure, liste de lecture)
•Synchroniser l’heure avec l’iPod™ : Mettre votre eFizz™ à la même heure
que votre iPod™.
Page 62
1 Après un retour aux réglages d’usine, il est nécessaire d’effectuer à nouveau un jumelage.
2 HandMusic™ fonctionne avec un seul périphérique à la fois, donc chaque fois que vous souhaitez
piloter un autre périphérique avec votre télécommande, vous devrez passer par ce menu.
Il vous est proposé :
• Langue : Modifier la langue d’affichage.
• Recherche de périphériques : permet le jumelage avec de
nouveaux périphériques compatibles HandMusic™.
• Réglages d’usine : réinitialiser tous les paramètres de la
télécommande
1
.
• Sélection de périphérique : Sélectionner un périphérique
préalablement jumelé2.
• Egaliseur : Modifier le réglage acoustique (disponible uniquement
si un iPod™ est connecté sur eFizz™). Lorsque vous vous trouvez
dans le menu Egaliseur, le réglage acoustique surligné est
automatiquement appliqué pour pré-écoute. Pour le conserver,
appuyer sur le bouton de validation ( ). Pour abandonner les
modifications, appuyer sur le bouton Menu ( ).
• Version : Lire le numéro de version du logiciel installé sur la
télécommande et eFizz™.
63
Utilisation de la télécommande
Réglages
Le menu « Réglages » vous est utile pour
modifier l’ensemble des paramètres de
votre télécommande.
Page 63
En lecture
Lorsqu’une chanson ou une vidéo est jouée, le menu « En lecture » apparaît
dans le menu principal. Il permet l’affichage d’informations sur le contenu
joué, tel que son titre, son artiste et son album. Le temps écoulé depuis le
début est affiché, ainsi que le temps restant.
Après quelques secondes, si le titre en cours possède une jaquette, celle-ci
est automatiquement affichée.
A tout moment, dans le menu « En lecture », les boutons retour et avance
( et ) permettent de sélectionner la chanson/vidéo précédente
ou suivante. La fonctionnalité avance/retour rapide est accessible via
un appui long sur les boutons retour et avance ( et ). Lorsque
la jaquette est présente pour le titre en cours, une pression courte sur le
bouton de validation ( ) permet de basculer entre l’affichage de base
et l’affichage de la jaquette.
64
Utilisation de la télécommande
Page 64
65
4
Mise à jour de votre produit
Page 65

Mise à jour d’eFizz™
Pour mettre à jour votre eFizz™, veuillez procéder comme suit :
•Téléchargez la dernière mise à jour sur le site
http://www.ewoo.com
.
•Branchez l’alimentation secteur d’eFizz™.
•Reliez eFizz™ à votre ordinateur au moyen du câble mini-USB fourni.
•Vérifiez que l’iPod™ est retiré d’eFizz™.
•Démarrez le programme de mise à jour, et suivez les indications
données à l’écran.
Mise à jour de la télécommande
Pour mettre à jour votre télécommande, veuillez procéder comme suit :
•Téléchargez la dernière mise à jour sur le site
http://www.ewoo.com
.
•Connectez votre télécommande HandMusic™ à votre ordinateur à
l’aide du câble mini-USB fourni.
•Démarrez le programme de mise à jour, et suivez les indications
données à l’écran.
66
Mise à jour de votre produit
Page 66
67
5
Arborescence des menus
Page 67

• Menu Principal
• Musique
• Listes de lecture
• Artistes
• Morceaux
• Podcasts
• Genres
• Compositeurs
• Livres audio
• Jukebox
• Morceaux
• Effacer
• eFizz
• Sélection de l’entrée
• Veille
• Alarme
• Synchroniser l’heure avec l’iPod
• Réglages
• Langue
• Recherche de périphériques
• Réglages d’usine
• Sélection du périphérique
• Egaliseur
• Version
• En lecture
68
Arborescence des menus
Page 68
69
6
Dépannage de l’installation
Page 69

Lorsque j’efeure la zone tactile de ma télécommande HandMusic™,
cette dernière ne s’allume pas, que faire ?
1. Mettez votre télécommande en charge durant une heure.
2. Si le problème persiste, effectuez un redémarrage de la télécommande à l’aide
d’une pointe fine insérée dans le logement de reset au dos de la télécommande.
3. Si le problème persiste, veuillez contacter notre support en ligne
http://www.ewoo.com/support.
Ma télécommande semble bloquée, son écran est allumé, mais l’appui
sur les boutons ne déclenche aucune action, que faire ?
1. Effectuez un redémarrage de la télécommande à l’aide d’une pointe fine insérée
dans le logement de reset au dos de la télécommande.
2. Si le problème persiste, veuillez contacter notre support en ligne
http://www.ewoo.com/support.
Le logo Ewoo™ ne s’afche pas sur mon iPod™, et je n’arrive pas à
naviguer dans son contenu, que faire ?
1. Effectuez un redémarrage de votre iPod™, selon les instructions fournies
par le fabricant.
2. Si le problème persiste, débranchez l’alimentation secteur de votre eFizz™
puis rebranchez-le après avoir attendu vingt secondes.
3. Si le problème persiste, veuillez contacter notre support en ligne
http://www.ewoo.com/support.
70
Dépannage de l’installation
Page 70

L’indicateur de qualité de la communication sans ls est toujours rouge,
le logo Ewoo™ apparaît sur mon iPod™ quand je le connecte, mais
je n’arrive pas à naviguer dans le contenu digital de mon iPod™, que
faire ?
1. Il est possible que vous soyez en dehors des limites de portée de communication
ou qu’une source crée une forte perturbation. Pour vous en assurer, rapprochezvous d’eFizz.
2. Si le problème persiste, effectuez un redémarrage de la télécommande à l’aide
d’une pointe fine insérée dans le logement de reset au dos de la télécommande.
3. Effectuez un redémarrage de votre iPod™, selon les instructions fournies par le
fabricant.
4. Si le problème persiste, débranchez l’alimentation secteur d’eFizz™ puis
rebranchez-le après avoir attendu quelques secondes.
5. Si le problème persiste, effectuez une restauration des paramètres d’usine de
votre télécommande.
6. Effectuez à nouveau la procédure de jumelage.
7. Si le problème persiste, veuillez contacter notre support en ligne
http://www.ewoo.com/support.
71
Dépannage de l’installation
Page 71

72
Page 72
73
7
Caractéristiques techniques
Page 73

Télécommande
- Ecran couleur TFT 1,8» de résolution 160x128 pixels.
- Possibilité de recharge et mise à jour par USB
- Autonomie en veille de 3 semaines
- Possibilité de mise à jour du produit via USB
- Navigation tactile et par boutons
eFizz™
- Système 2.1 HiFi pour iPod™
- Puissance de 70W RMS, qualité HiFi
- Entrée audio analogique
- Entrée S/PDIF optique
- Connectique USB
- Recharge de l’iPod™
Système
- Communication sans fil en 2.4GHz, d’une portée de 150m (en ligne droite et sans
obstacles)
- Compatible avec les iPods™ Nano (de première, deuxième et troisième
génération), cinquième génération (Video), Classic et Touch.
- Navigation du contenu audio de l’iPod™
74
Caractéristiques techniques
Page 74
75
8
Garantie limitée
Page 75

ETENDUE DE LA GARANTIE
Sous réserve des dispositions légales, les obligations d’Ewoo au titre de la garantie du
présent produit matériel se limitent aux dispositions figurant ci-après:
Ewoo SA (“Ewoo”) garantit le présent produit matériel contre les vices de fabrication
et de matière pour une durée de un (1) an à compter de la date de l’achat initial
(“Période de Garantie”).
Si un vice apparaît et qu’une réclamation valable est reçue par Ewoo au cours de la
Période de Garantie, Ewoo, à son choix, (1) réparera le produit gratuitement en utilisant
des pièces de rechange neuves ou remanufacturées, ou (2) échangera le produit
contre un produit neuf ou fabriqué à partir de pièces neuves ou remanufacturées et
qui est fonctionnellement équivalent au produit d’origine, ou (3) remboursera le prix
d’achat du produit.
Ewoo garantit les produits ou pièces de remplacement prévus aux termes de la
présente garantie contre les vices de fabrication et de matière à compter de la date
du remplacement ou de la réparation pour la plus longue des durées suivantes : une
durée de quatre vingt dix (90) jours ou la durée restant à courir de la garantie du
produit d’origine. Lorsqu’un produit ou une pièce est échangé, toute pièce de rechange
devient votre propriété et la pièce échangée devient la propriété d’Ewoo. Lorsqu’un
remboursement est effectué, votre produit devient la propriété d’Ewoo.
EXCLUSIONS ET LIMITATIONS
La présente Garantie Limitée s’applique uniquement au produit matériel fabriqué
par ou pour le compte d’Ewoo qui peut être identifié par la marque Ewoo, le nom
commercial ou le logo qui y est apposé. La présente Garantie Limitée ne s’applique pas
à tout produit matériel non Ewoo ni à tout logiciel, même s’ils sont emballés ou vendus
avec le produit matériel Ewoo.
76
Garantie limitée
Page 76

Ewoo n’est pas responsable de tout dommage survenant à, ni de toute perte de tout
programme, toute donnée ou toute autre information stockés sur tout support contenu
dans le produit matériel Ewoo ou tout produit ou pièce non Ewoo qui n’est pas couvert
par la présente garantie. La récupération ou la réinstallation de programmes, données
ou autres informations n’est pas incluse dans la présente Garantie Limitée.
La présente garantie ne s’applique pas : (a) à tout dommage causé par accident,
abus, mauvaise utilisation, usage impropre, ou des produits non Ewoo ; (b) à tout
dommage causé par toute intervention effectuée par toute personne autre qu’Ewoo
; (c) à un produit ou une pièce qui a été modifié sans l’autorisation écrite d’Ewoo ; ou
(d) si tout numéro de série Ewoo a été enlevé ou rendu illisible.
DANS TOUTE LA MESURE AUTORISEE PAR LA LOI, LA PRESENTE GARANTIE ET LES RECOURS
ENONCES CI-DESSUS SONT EXCLUSIFS ET SONT AU LIEU ET PLACE DE TOUS AUTRES
GARANTIES CONTRACTUELLES, RECOURS ET CONDITIONS, QU’ILS SOIENT ECRITS OU
VERBAUX, LEGAUX, EXPRES OU TACITES. DANS LA MESURE DE CE QUI EST PERMIS PAR LA
LOI APPLICABLE, EWOO EXCLUT EXPRESSEMENT TOUTES GARANTIES TACITES, Y COMPRIS
NOTAMMENT LES GARANTIES DE COMMERCIALISATION ET D’ADEQUATION A UN USAGE
PARTICULIER. SI EWOO N’EST PAS JURIDIQUEMENT AUTORISEE A REJETER TOUTE GARANTIE
LEGALE OU TACITE EN VERTU DE LA PRESENTE GARANTIE LIMITEE, LADITE GARANTIE, Y
COMPRIS TOUTE GARANTIE DE COMMERCIALISATION, D’ADEQUATION A UN USAGE
PARTICULIER ET TOUTE GARANTIE CONTRE LES VICES CACHES OU LATENTS, SERA, DANS
TOUTE LA MESURE AUTORISEE PAR LA LOI, LIMITEE A LA DUREE DE LA PRESENTE GARANTIE
ET A LA FOURNITURE D’UNE PRESTATION DE REPARATION OU DE REMPLACEMENT. Aucun
revendeur, agent ou salarié Ewoo n’est habilité à modifier, proroger ou compléter la
présente garantie.
DANS TOUTE LA MESURE AUTORISEE PAR LA LOI, EWOO N’EST PAS RESPONSABLE DE
TOUT DOMMAGE DIRECT, SPECIFIQUE, ACCESSOIRE OU INDIRECT RESULTANT DE TOUTE
VIOLATION DE TOUTE GARANTIE OU CONDITION OU AUX TERMES DE TOUT AUTRE CONCEPT
JURIDIQUE, Y COMPRIS DE FACON NON LIMITATIVE TOUTE PERTE DE REVENU, TOUTE PERTE
ACTUELLE OU PREVISIBLE DE PROFITS (Y COMPRIS TOUTE PERTE DE PROFITS LIES A DES
CONTRATS), TOUTE PERTE DE DISPONIBILITE FINANCIERE, TOUTE PERTE D’EPARGNE PREVUE,
TOUTE PERTE D’AFFAIRES, TOUTE PERTE D’OPPORTUNITES, TOUTE PERTE DE CLIENTELE, TOUTE
PERTE DE REPUTATION, TOUTE PERTE, TOUT DOMMAGE OU TOUT ENDOMMAGEMENT
77
Garantie limitée
Page 77

DE DONNEES, OU TOUTE PERTE OU TOUT DOMMAGE INDIRECT OU CONSECUTIF, QUEL
QU’IL SOIT, Y COMPRIS LE REMPLACEMENT D’EQUIPEMENT OU DE BIENS, TOUS FRAIS DE
RECUPERATION, DE PROGRAMMATION OU DE REPRODUCTION DE TOUT PROGRAMME OU
DE TOUTE DONNEE STOCKE OU UTILISE AVEC LES PRODUITS EWOO ET TOUT ECHEC DANS
LA PRESERVATION DE LA CONFIDENTIALITE DES DONNEES STOCKEES DANS LE PRODUIT.
LA PRESENTE LIMITATION NE S’APPLIQUE PAS AUX RECLAMATIONS EN CAS DE DECES
OU DE BLESSURE. PLUS SPECIFIQUEMENT, EWOO NE FAIT AUCUNE DECLARATION QUANT
A SA CAPACITE A REPARER TOUT PRODUIT AUX TERMES DE LA PRESENTE GARANTIE NI A
ECHANGER TOUT PRODUIT SANS AUCUN RISQUE NI AUCUNE PERTE DE PROGRAMMES OU
DE DONNEES.
Si vous êtes un consommateur BENEFICIANT DE DISPOSITIONS LEGALES DE PROTECTION
DES CONSOMMATEURS DANS LE PAYS D’ACHAT, OU S’IL DIFFERE DANS LE PAYS DE RESIDENCE,
cette garantie vient en supplément DE VOS DROITS ET RECOURS OCTROYES PAR LES LOIS
DE PROTECTION DES CONSOMMATEURS. DANS LA MESURE OU LES LOIS PROTECTRICES
DES CONSOMMATEURS AUTORISE UNE TELLE LIMITATION, LA RESPONSABILITE D’EWOO EST
LIMITEE, A SA SEULE OPTION AU REMPLACEMENT, A LA REPARATION DU PRODUIT , OU A LA
FOURNITURE D’UNE NOUVELLE PRESTATION DE REPARATION.
OBTENTION D’UN SERVICE DE GARANTIE
Nous vous prions de bien vouloir examiner les ressources d’assistance en ligne visées
dans la documentation jointe avant de solliciter une prestation de garantie. Si après
avoir utilisé ces ressources, le produit ne fonctionne toujours pas correctement,
connectez-vous au site Internet :
www.ewoo.com/support
pour les instructions relatives
à l’obtention d’une prestation de garantie.
78
Garantie limitée
Page 78

Produkt : eFizz™
Hersteller : Ewoo SA
Adresse :
Le Tresi 6B
1028 Préverenges
Switzerland
Tel : +41 21 821 55 00
Diese Produkte entsprechen den Regelungen des Paragrafen 15 der F.C.C. Der Betrieb
erfüllt folgende Anforderungen :
1. Diese Produkte bewirken keine gesundheitlichen Beeinträchtigungen.
2. Auch bei Bedienungsfehlern kann es nicht zu derartigen Beeinträchtigungen
kommen.
Das Gerät wurde geprüft und für konform erklärt mit den Einschränkungen, die
Computer der Klasse B. in Übereinstimmung mit Paragraf 15 der F.C.C. Regelungen
betreffen. Diese Einschränkungen bezwecken den Schutz vor Beeinträchtigungen
bei Montage im Wohnbereich. Dieses Gerät erzeugt, benutzt und strahlt
Hochfrequenzenergie ab. Wenn es nicht entsprechend der Bedienungsanleitung
installiert und benutzt wird, können Beeinträchtigungen beim Radio- und
Fernsehempfang auftreten. Es kann nicht ausgeschlossen werden, dass es bei
unsachgemäßer Montage zu Beeinträchtigungen kommt.
Das Gerät wurde geprüft und es wurde befunden, dass es den folgenden Standards
entspricht :
EN300440-2 / EN301489-3
FCC Part 15C / FCC Part 15B
Konformitätsbescheinigung
Page 79

Einleitung
Kurzeinführung
Benutzen der Fernsteuerung
Aktualisierung der Geräte
Menu Diagramm
Störungsbeseitigung
Technische Daten
Garantiebedingungen
80
Inhaltsverzeichnis
81
87
97
103
105
107
111
113
Page 80
81
1
Einleitung
Page 81

82
Einleitung
Ewoo™ dankt Ihnen für den Kauf dieses HiFi Stereosystems eFizz™ für Ihren
iPod™ Wir hoffen, dass dieses Produkt Sie völlig zufrieden stellt und Sie Ihre
Freude mit Ihren neuen Multimedia- Erfahrungen haben werden.
Wenn Sie sofort mit der Installation des iPod Zubehörs beginnen wollen,
benutzen Sie nachfolgende Kurzeinführung. Die ausführliche Beschreibung
der Anschlüsse und des Gebrauchs finden Sie in der Bedienungsanleitung.
Elektronische Darstellungen der Gebrauchsanleitungen finden Sie auf
unserer Internet Seite
http://www.ewoo.com.
Aber vor allem bitten wir Sie, sorgfältig die Bedienungsanleitung zu lesen,
um
in den vollen Genuss der Fähigkeiten Ihres HandMusic™ und eFizz™ zu
kommen.
Packungsinhalt
•eFizz™ HiFi Stereo System für iPod™
•HandMusic™ Fernbedienung
•Stromversorgung für EU/US/GB- Anschlüsse
•Mini-USB Kabel
•6 Adapter für den iPod™
•Bedienungsanleitung
Page 82

83
Einleitung
Der Weg zum besten Einsatz des eFizz™
Aufstellen des Produktes
eFizz™ sollte senkrecht aufgestellt werden, um die polare Abstrahlkarkteristik
der Lautsprecher zu unterstützen.
Dies bewirkt eine bessere Surround- Abstrahlung durch Begrenzung der
Resonanzen, die z.B. durch verschiedene Arten der Fußbodenmaterialien
erzeugt werden können.
Die Lautsprecher werden mit einer Schutzvorrichtung an der Vorderseite
ausgeliefert. Diese kann entfernt werden. Es wird aber empfohlen, diese
dort zum besseren Schutz zu belassen. Das magnetische Feld der
Lautsprecher erzeugt außerhalb der Lautsprecher Abstrahlungen. Daher
sollten empfindliche Gegenstände und Geräte sich nicht näher als 50 cm
vom Gerät entfernt befinden (z.B. Fernseher, Computerbildschirme, Software
Discs, Tonbänder, Videobänder, Chipkarten…)
Bei den Hauptlautsprechern entstehen solche Probleme nicht, da sie
magnetisch
abgeschirmt sind.
Aufstellen der Lautsprecher
Darüber hinaus sollte beim Aufstellen des eFizz™ darauf geachtet werden,
dass die spezielle Raumakustik berücksichtigt wird, da diese bei
der Tonübertragung eine wichtige Rolle spielt.
Die bestmögliche Aufstellung für optimalen Stereogenuss mit dem 2.1
System
Die Positionierung vor einer Wand verstärkt den tiefen Bass und begrenzt
die Abstrahlungen auf 80 bis 200 Hz.
Auf jeden Fall sollten immer Tests durchgeführt werden, um den besten
Aufstellungsplatz in Bezug auf die Raumakustik zu ermitteln.
Page 83
84
Produktansicht
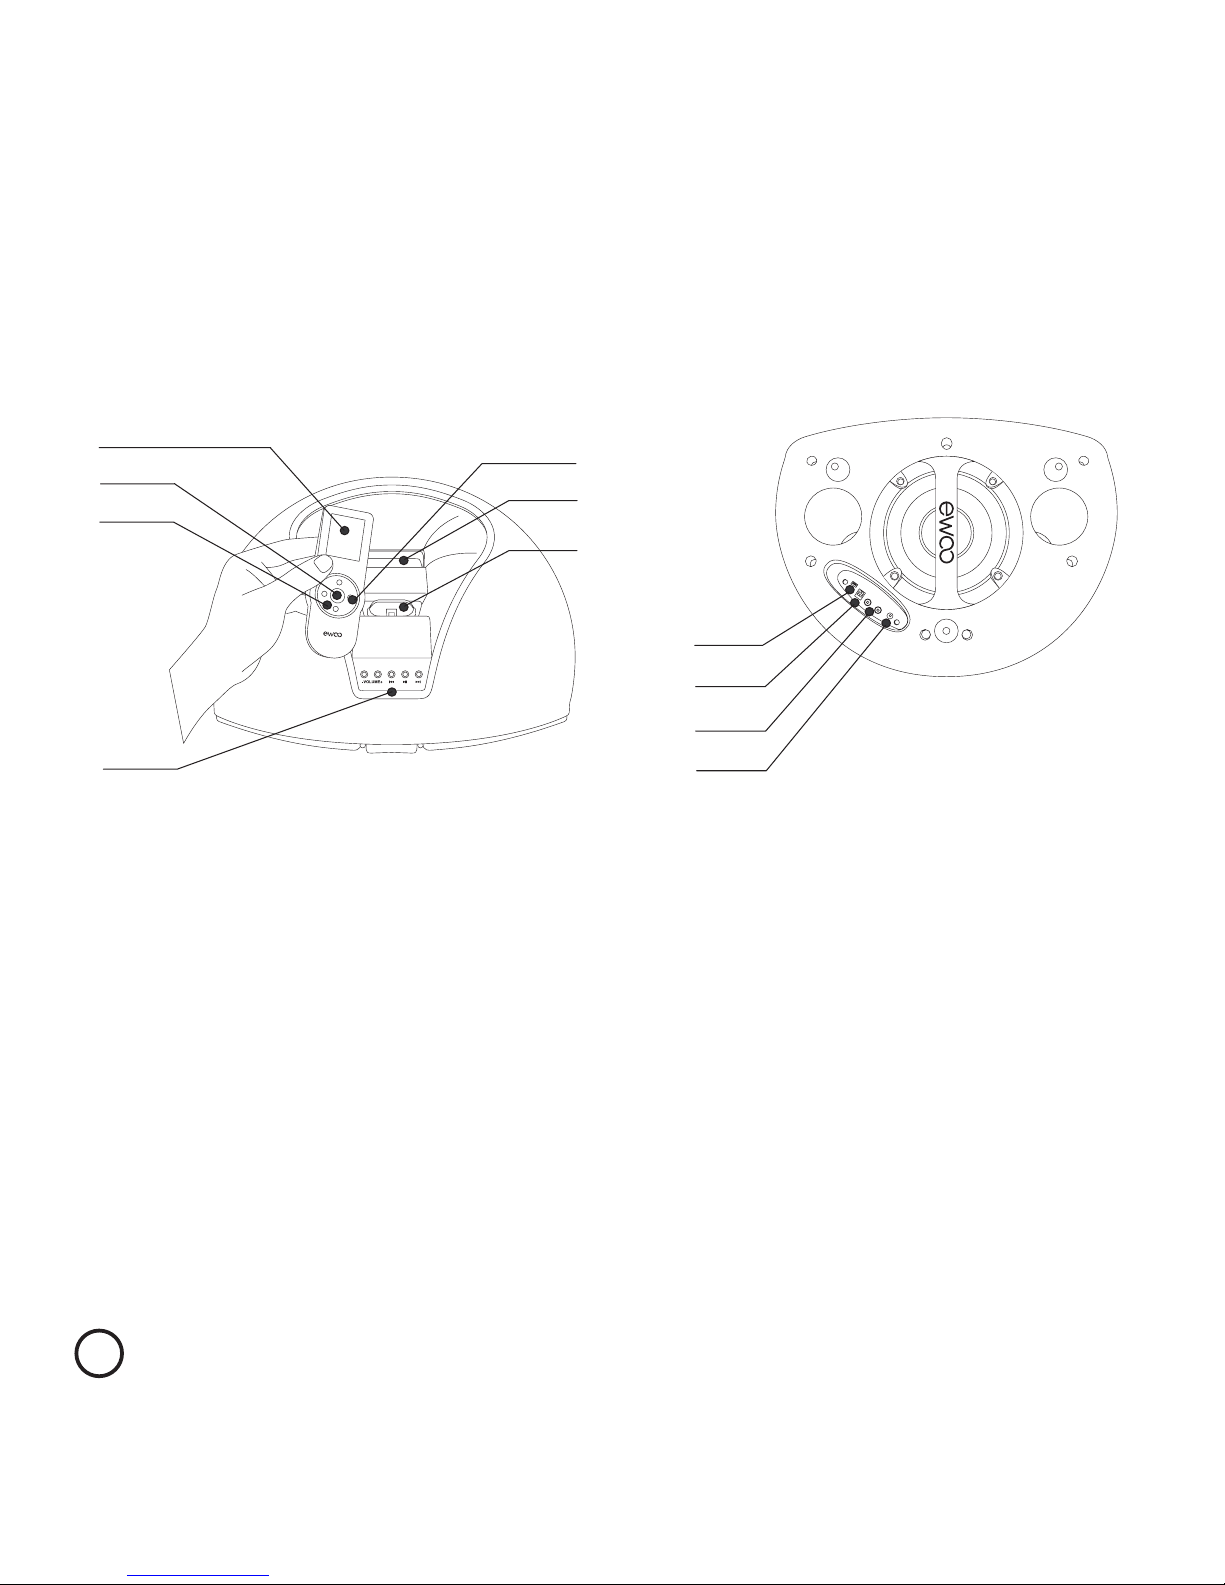
1. 1.8’’ Bildschirm
2. Bestätigungsknopf
3. Berühnungsfeld
4. Knöpfe für Direktzugang
5. Navigationsknöpfe
6. Aufstellort für iPod™ mit Anschluss
7. Platz für die Fernbedienung, wenn sie aufgeladen werden
soll.
8. Mini-USB Anschluss
9. Digitaler Audio S/PDIF Anschluss
10. Analoger Audio Anschluss
11. Übertragungsanschluss
Einleitung
7
6
1
8
9
10
11
3
4
2
5
Page 84
85
Einleitung
Einsatzmöglichkeiten der HandMusic™ Fernbedienung
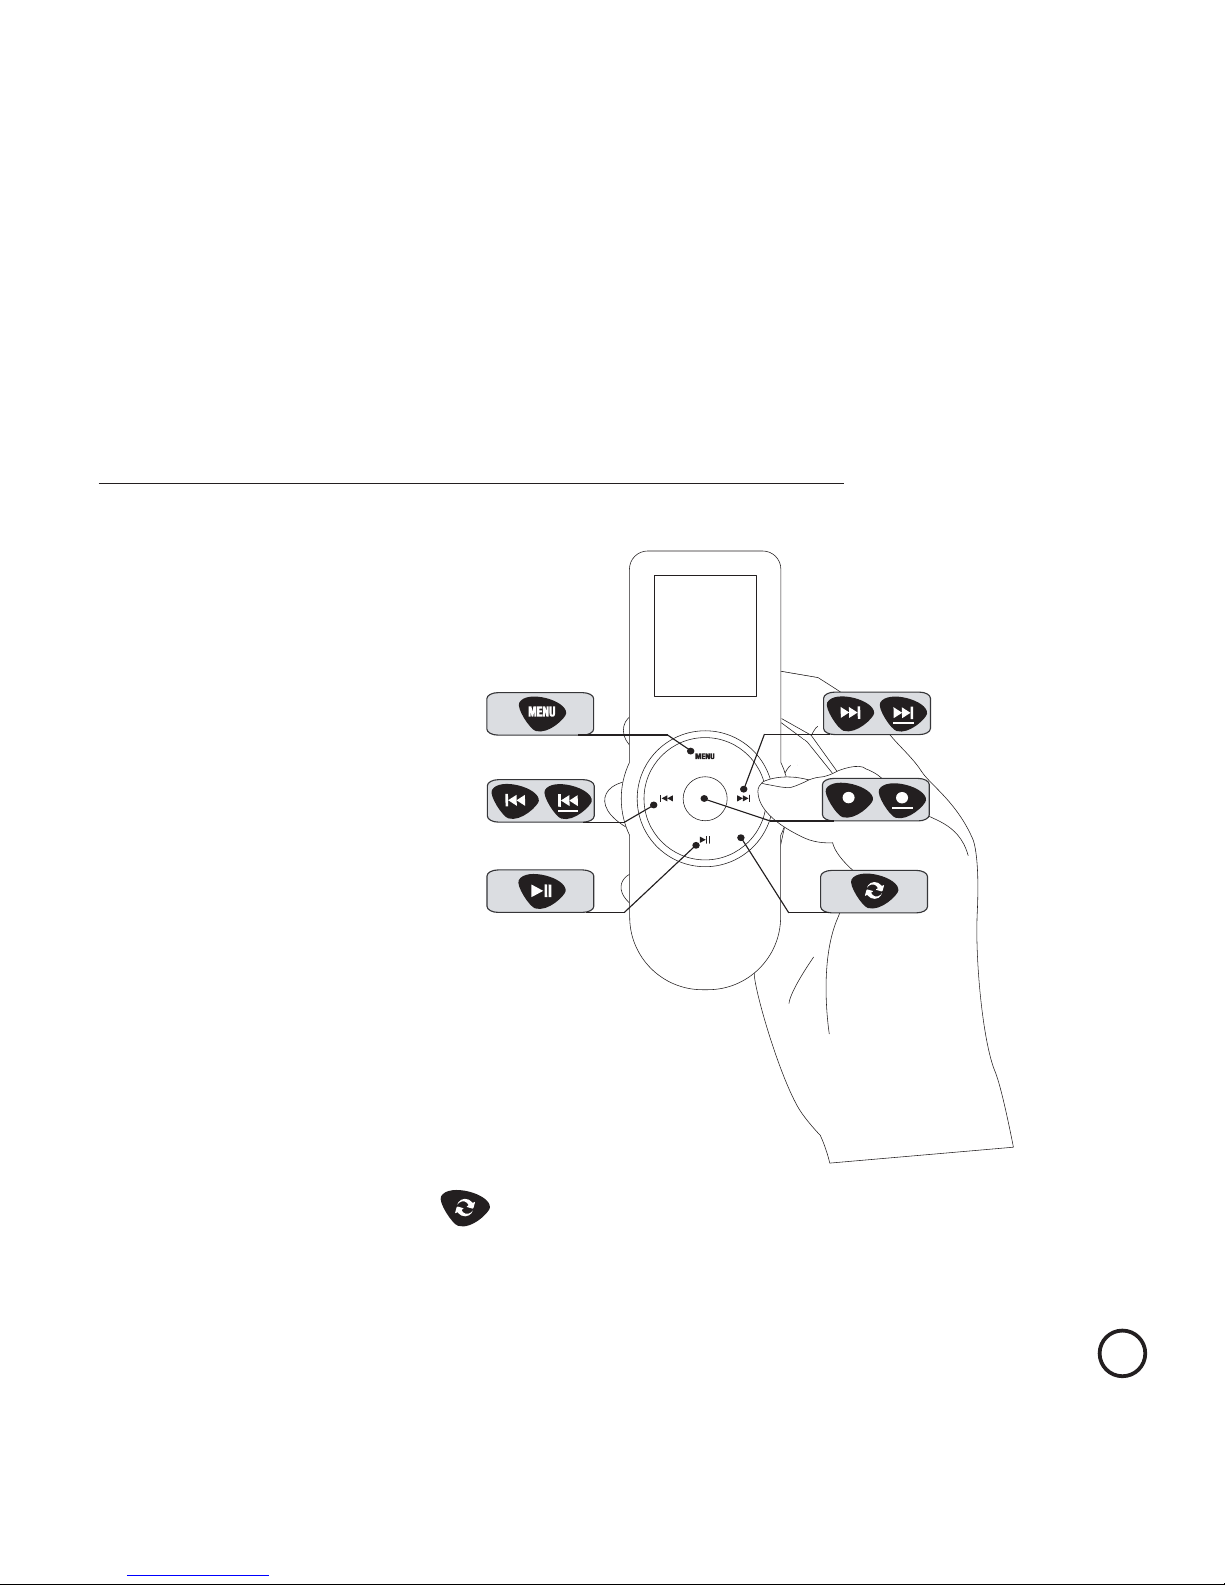
HandMusic™ ist mit einem Navigations-Interface ausgestattet, das
es ermöglicht, auf einen Knopf zu drücken und gleichzeitig die
Berührungszone zu rotieren. Unter Anderem sind gewisse Funktionen
möglich durch Dauerdruck (> 2 sec.) auf einen der Knöpfe (unter der
Oberfläche erkennbar durch tieferliegende Markierung).
Grafische Zeichen
wie diese finden
Sie in der gesamten
Bedienungsanleitung: .
Page 85
86
Einleitung
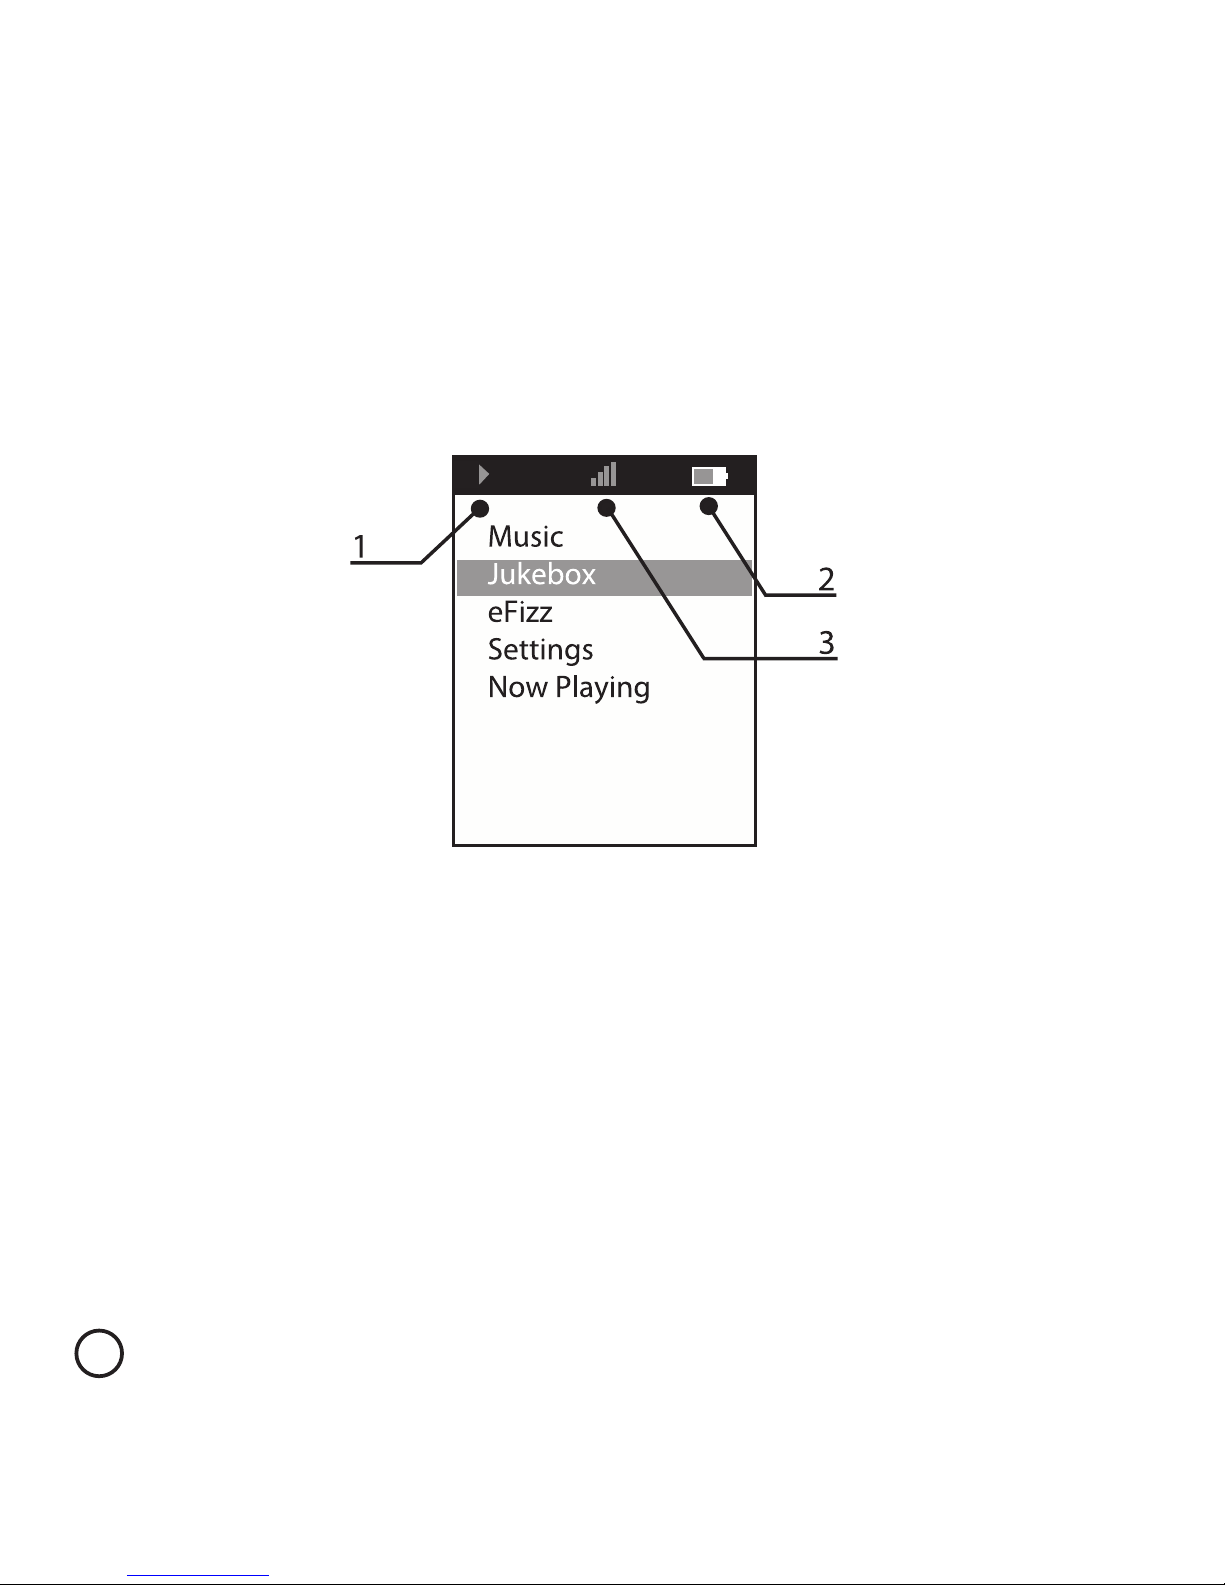
HandMusic™ Fernbedienungs-Bildschirm
1. Abspielanweisungen
2. Batteriezustand
3. Übermittlungssignalstärke
Anmerkung: Der Inhalt des Hauptmenus hängt von der Datenübertragung des iPod™
zum eFizz™ ab. Ohne diese ist nur das Einstellungsmenu zu sehen.
Page 86
Titre chapitre
87
2
Kurzeinführung
Page 87
88
Anschlussmöglichkeiten
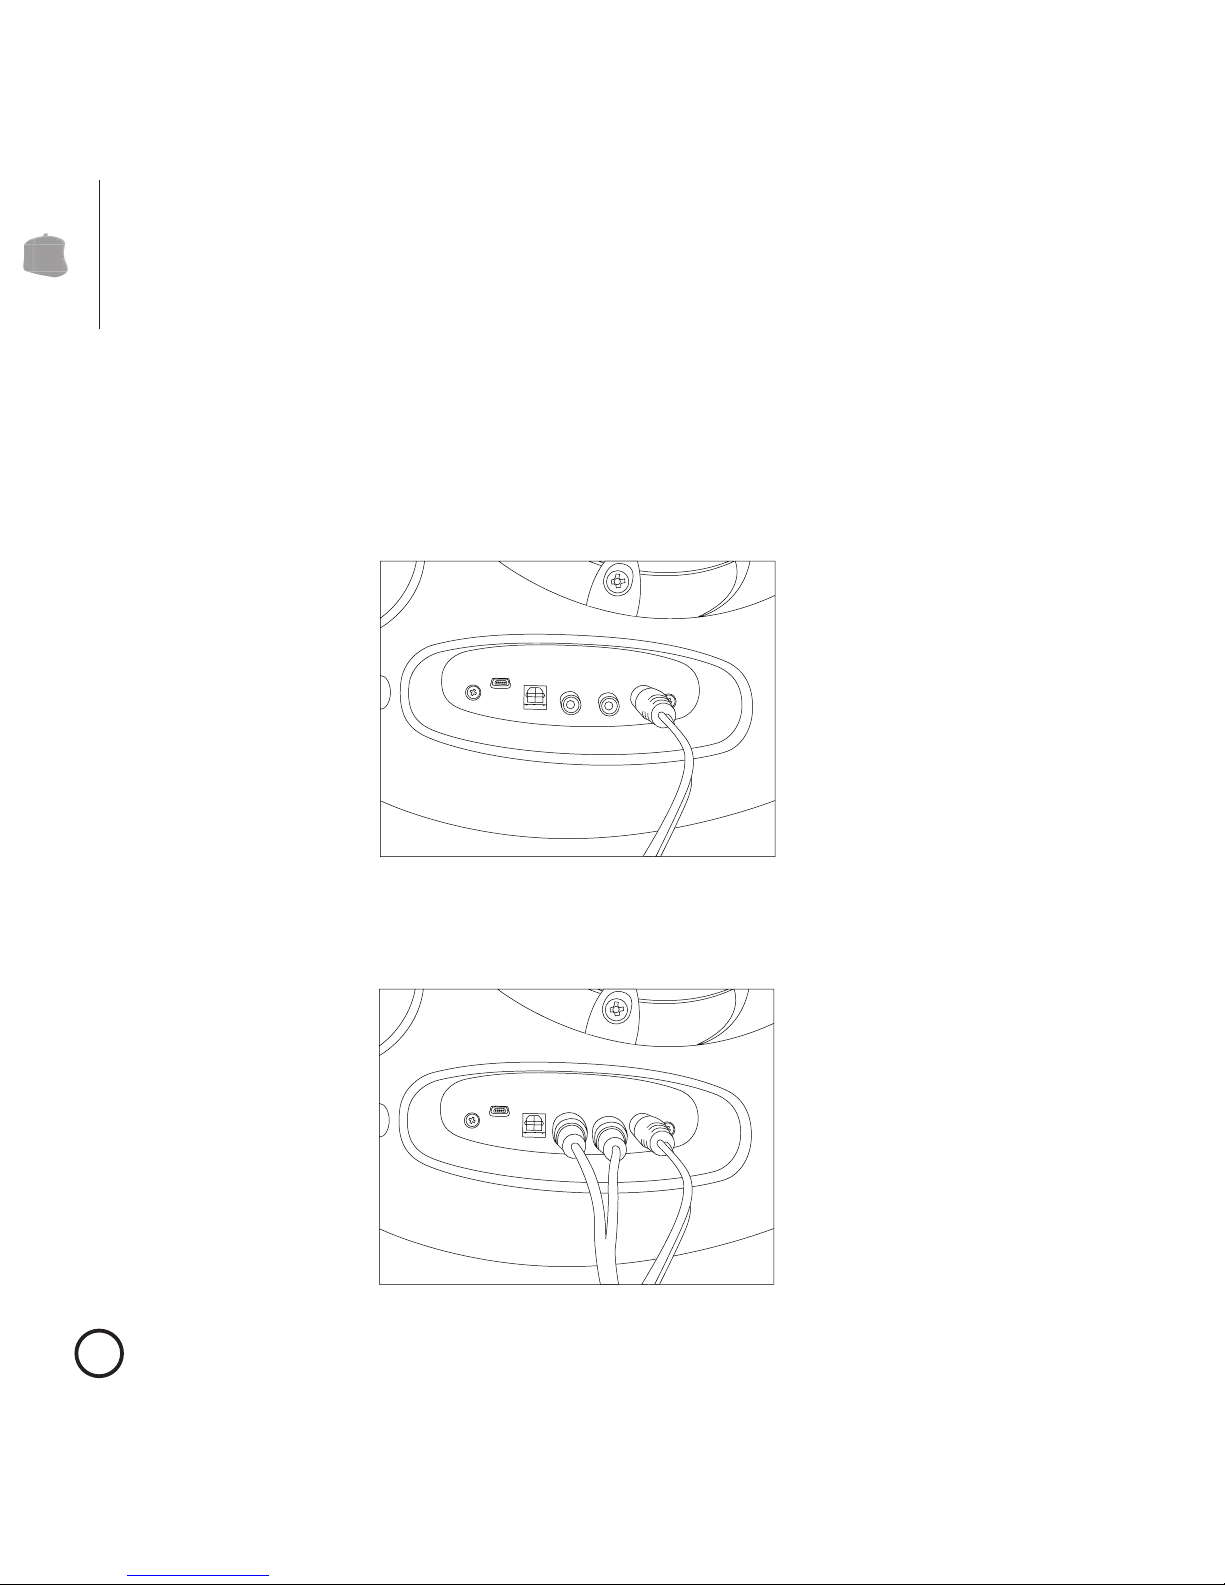
Dieser Abschnitt zeigt die verschiedenen Anschlussmöglichkeiten, die
notwendig sind für ein ordnungsgemäßes Funktionieren Ihres eFizz™
Systems.
1) Anschluss des HiFi Stereosoundkabels für iPod™ und eFizz™
2) Walhweise: Verbindung eines Audio Systems mit dem analogen
Eingang des eFizz™
Kurzeinführung
Page 88
89
Kurzeinführung
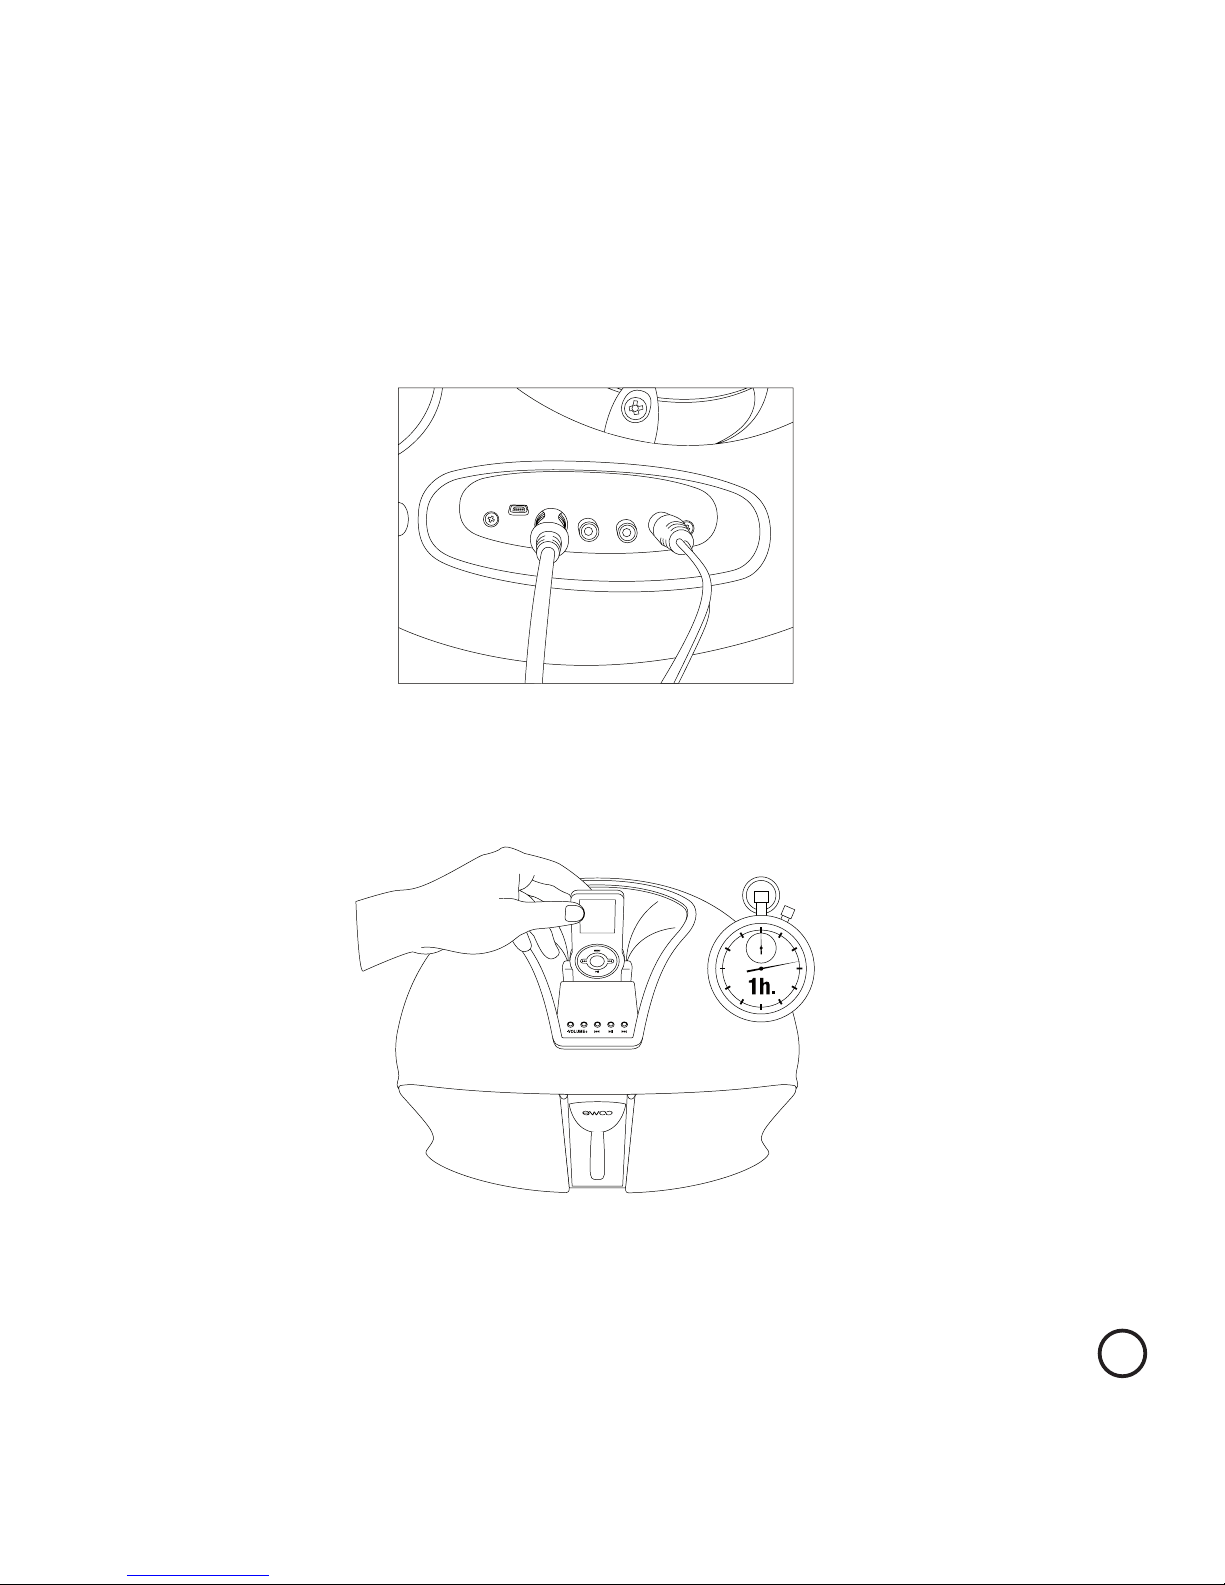
3) Walhweise: Verbindung eines Audio Systems mit dem digitalen Eingang
des S/PDIF – Anschlusses des eFizz™
4) Aufstellen der eFizz™ Fernbedienung zum Aufladen innerhalb einer
Stunde
Page 89
90
Kurzeinführung
Ankuppeln und erster Start des Recorders
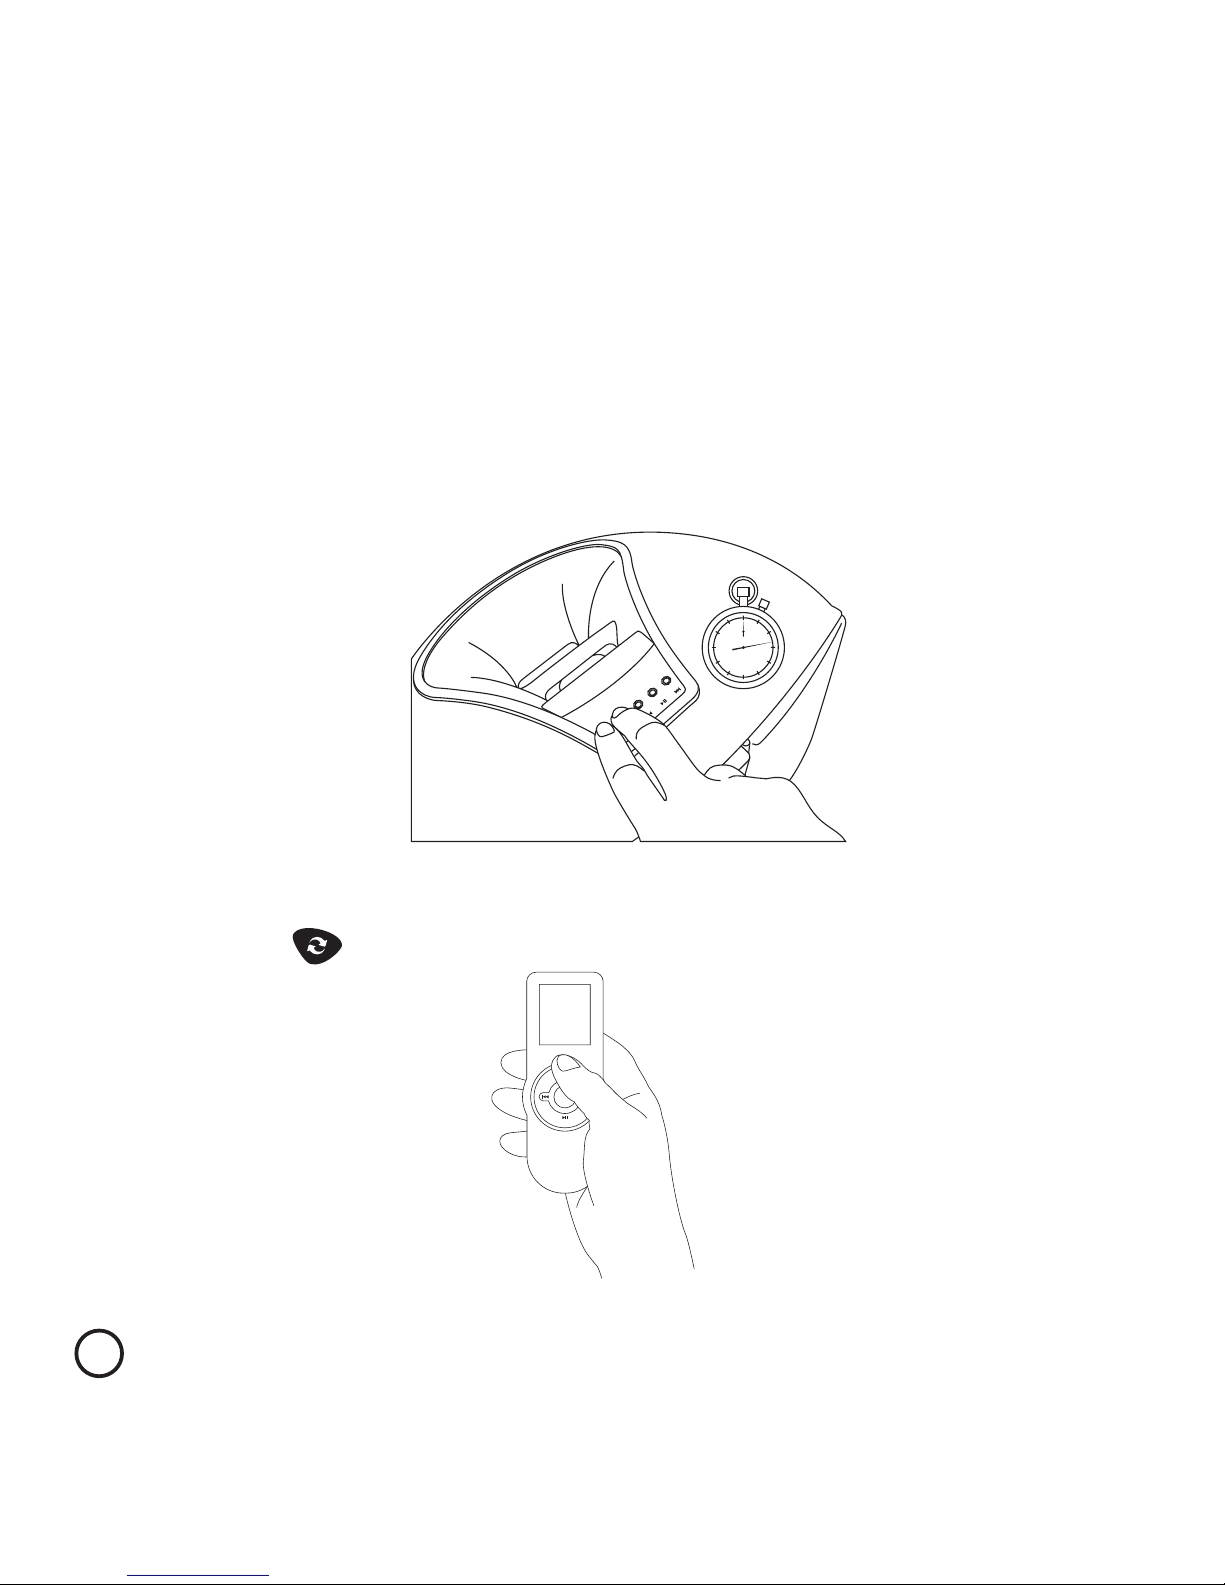
1) Gleichzeitiges Drücken der Volume + und Volume – Knöpfe
des eFizz™ über einen Zeitraum von 5 sec. bewirkt den
Kopplungsmodus
2) Nehmen Sie die Fernbedienung in die Hand und berühren sie leicht
den ( ) Knopf, um die Beleuchtung anzustellen.
5 s.
Page 90
91
Kurzeinführung
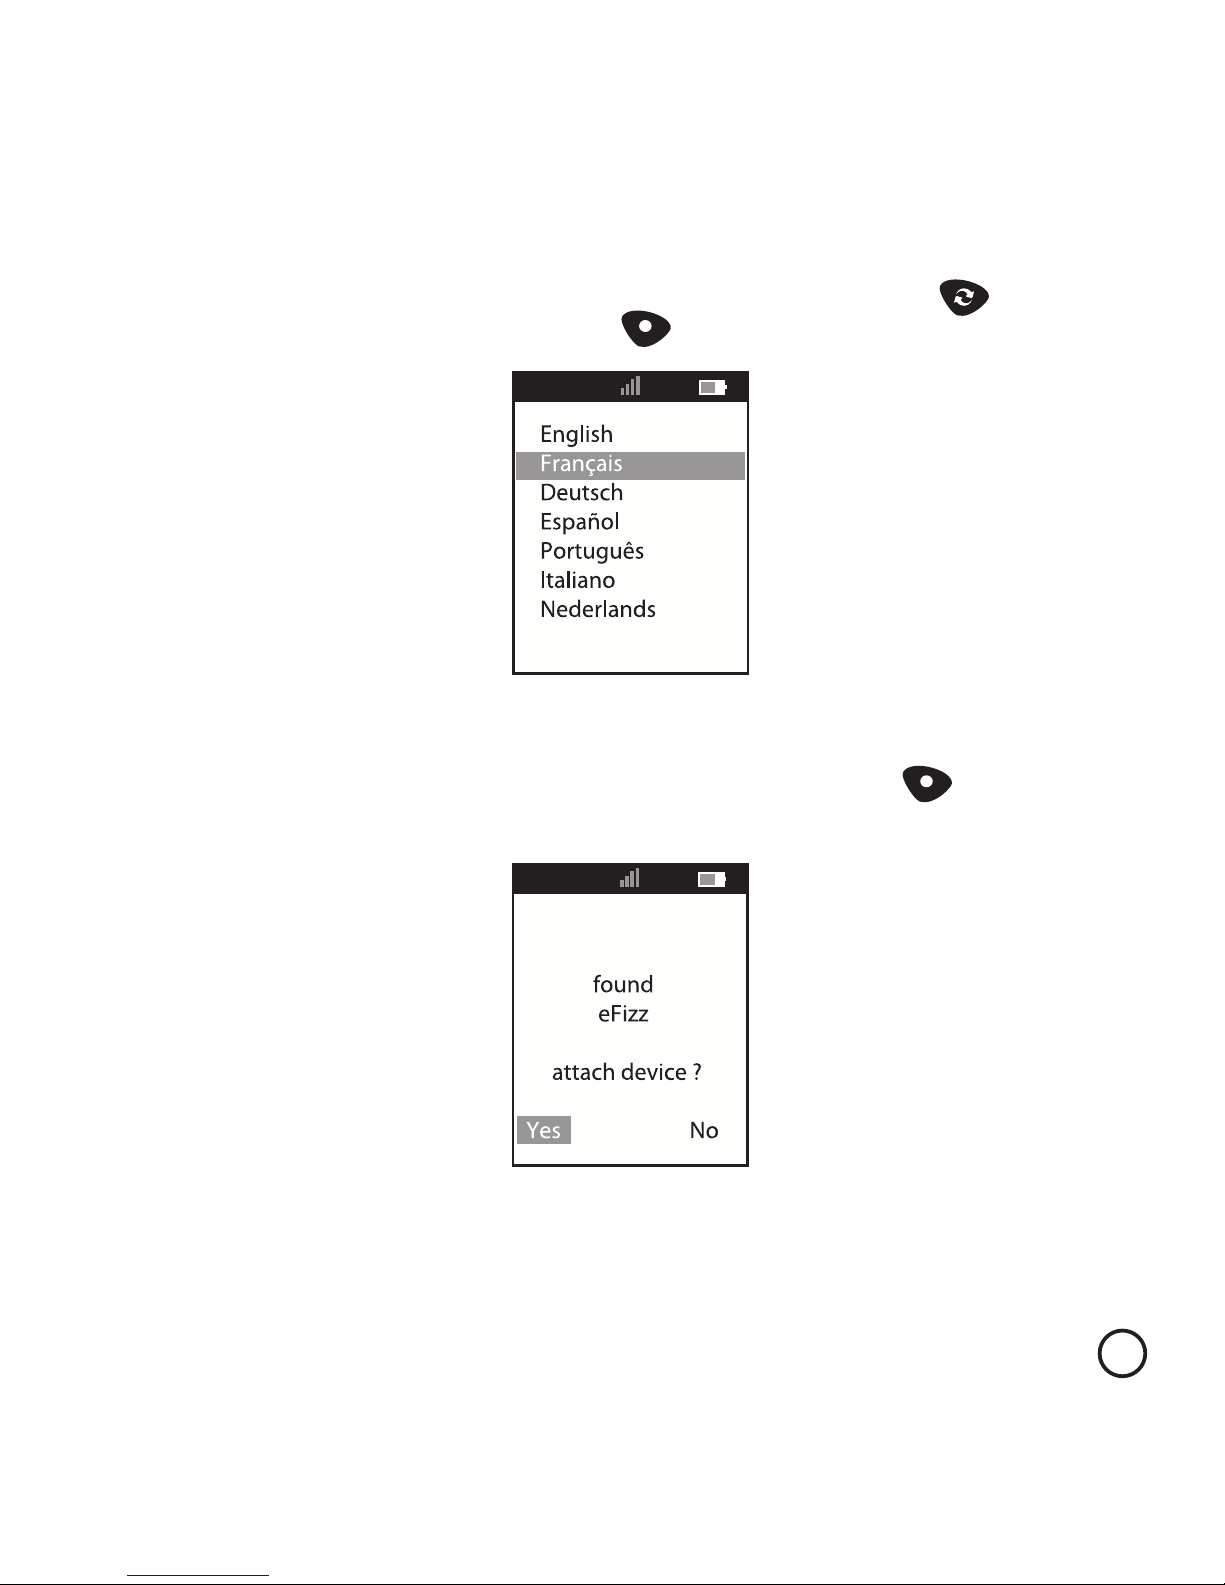
3) Wählen Sie die Sprache auf der Fernbedienung aus ( )
und bestätigen Sie Ihre Wahl ( )
4) Die Fernbedienung sucht nun die verfügbaren Sender; nachdem
Sie sie sehen können, bestätigen Sie Ihre Auswahl. ( )
Anmerkung: Die Sprachauswahl und die Suche nach Sendern kann jederzeit
durch Nutzung des „Tuning“ Menus erfolgen.
Page 91
92
Kurzeinführung
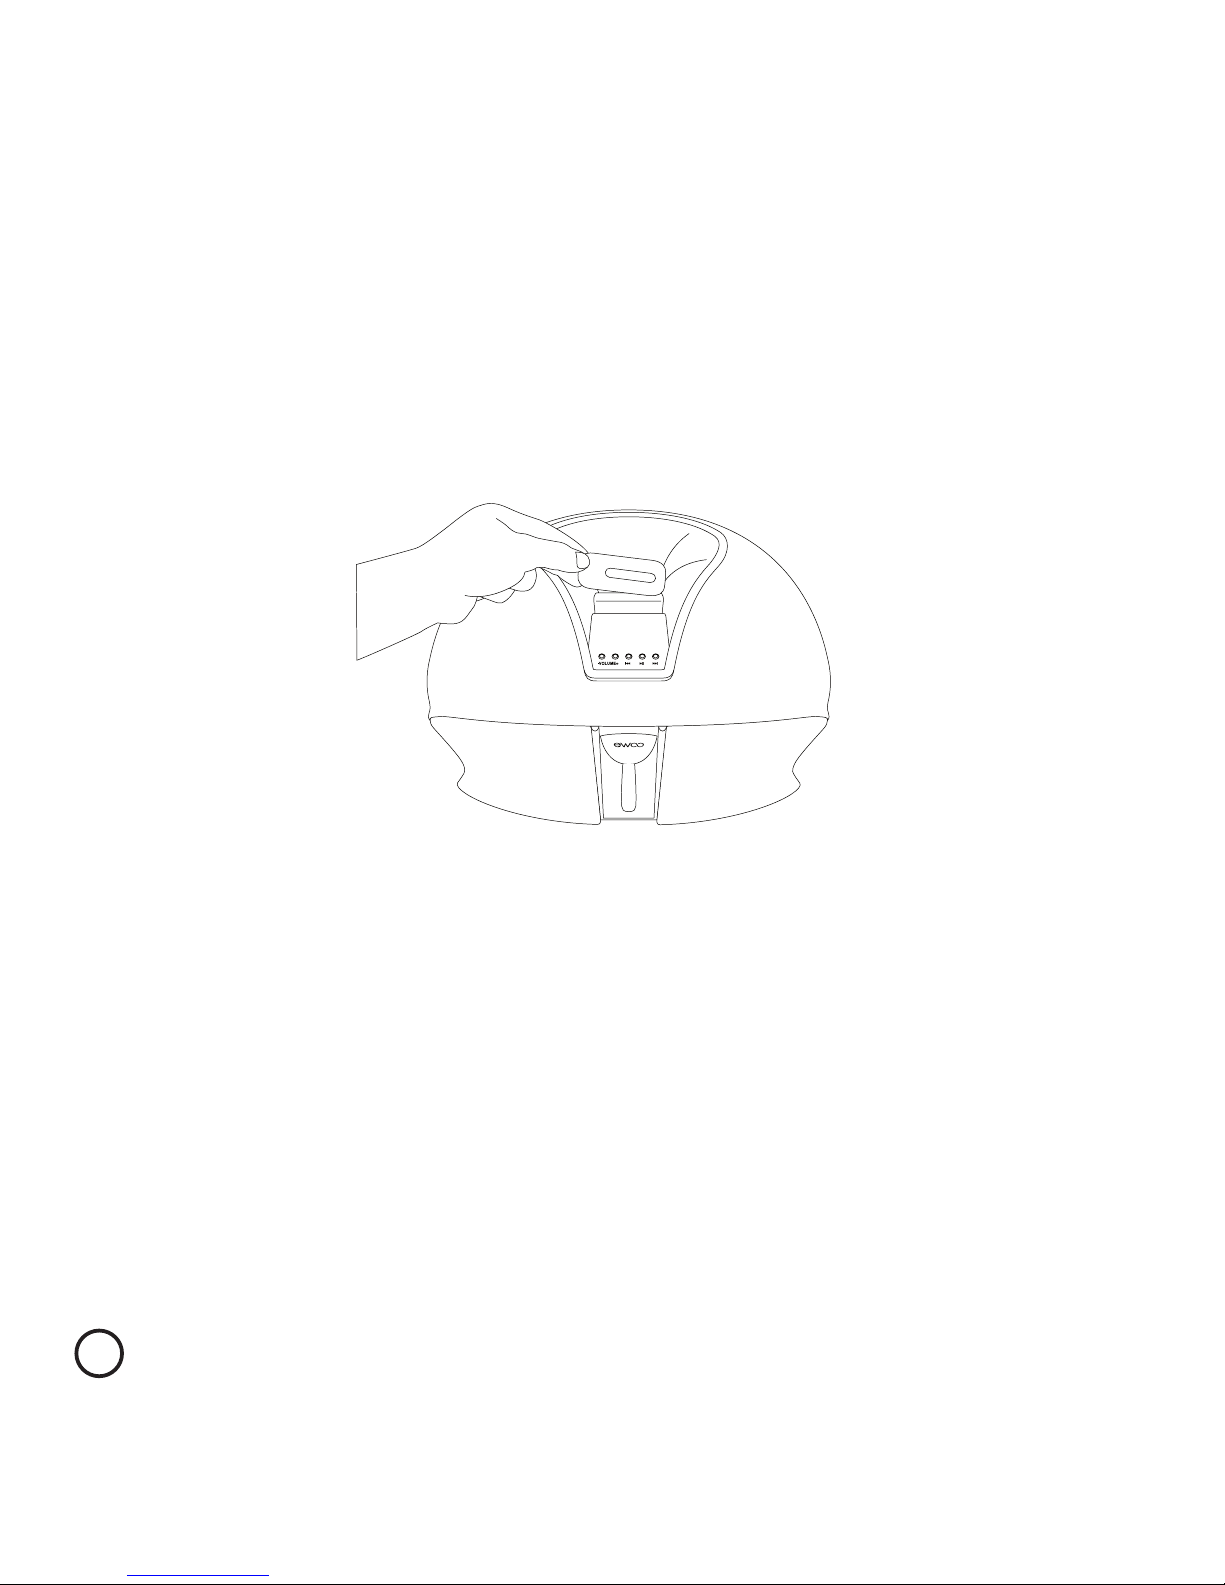
Anschließen des iPod™
1) Einsetzen des passenden iPod™-Adapters an den eFizz™.
Jeder iPod™ hat seinen eigenen Adapter:
•N°8 : iPod™ Nano 1G
•N°9 : iPod™ 5G (Video ) 30GB
•N°10 : iPod™ 5G (Video ) 60GB/80GB, iPod™ Classic
•N°11 : iPod™ Nano 2G
•N°13 : iPod™ Nano 3G
•N°14 : iPod™ Touch
Page 92
93
Kurzeinführung
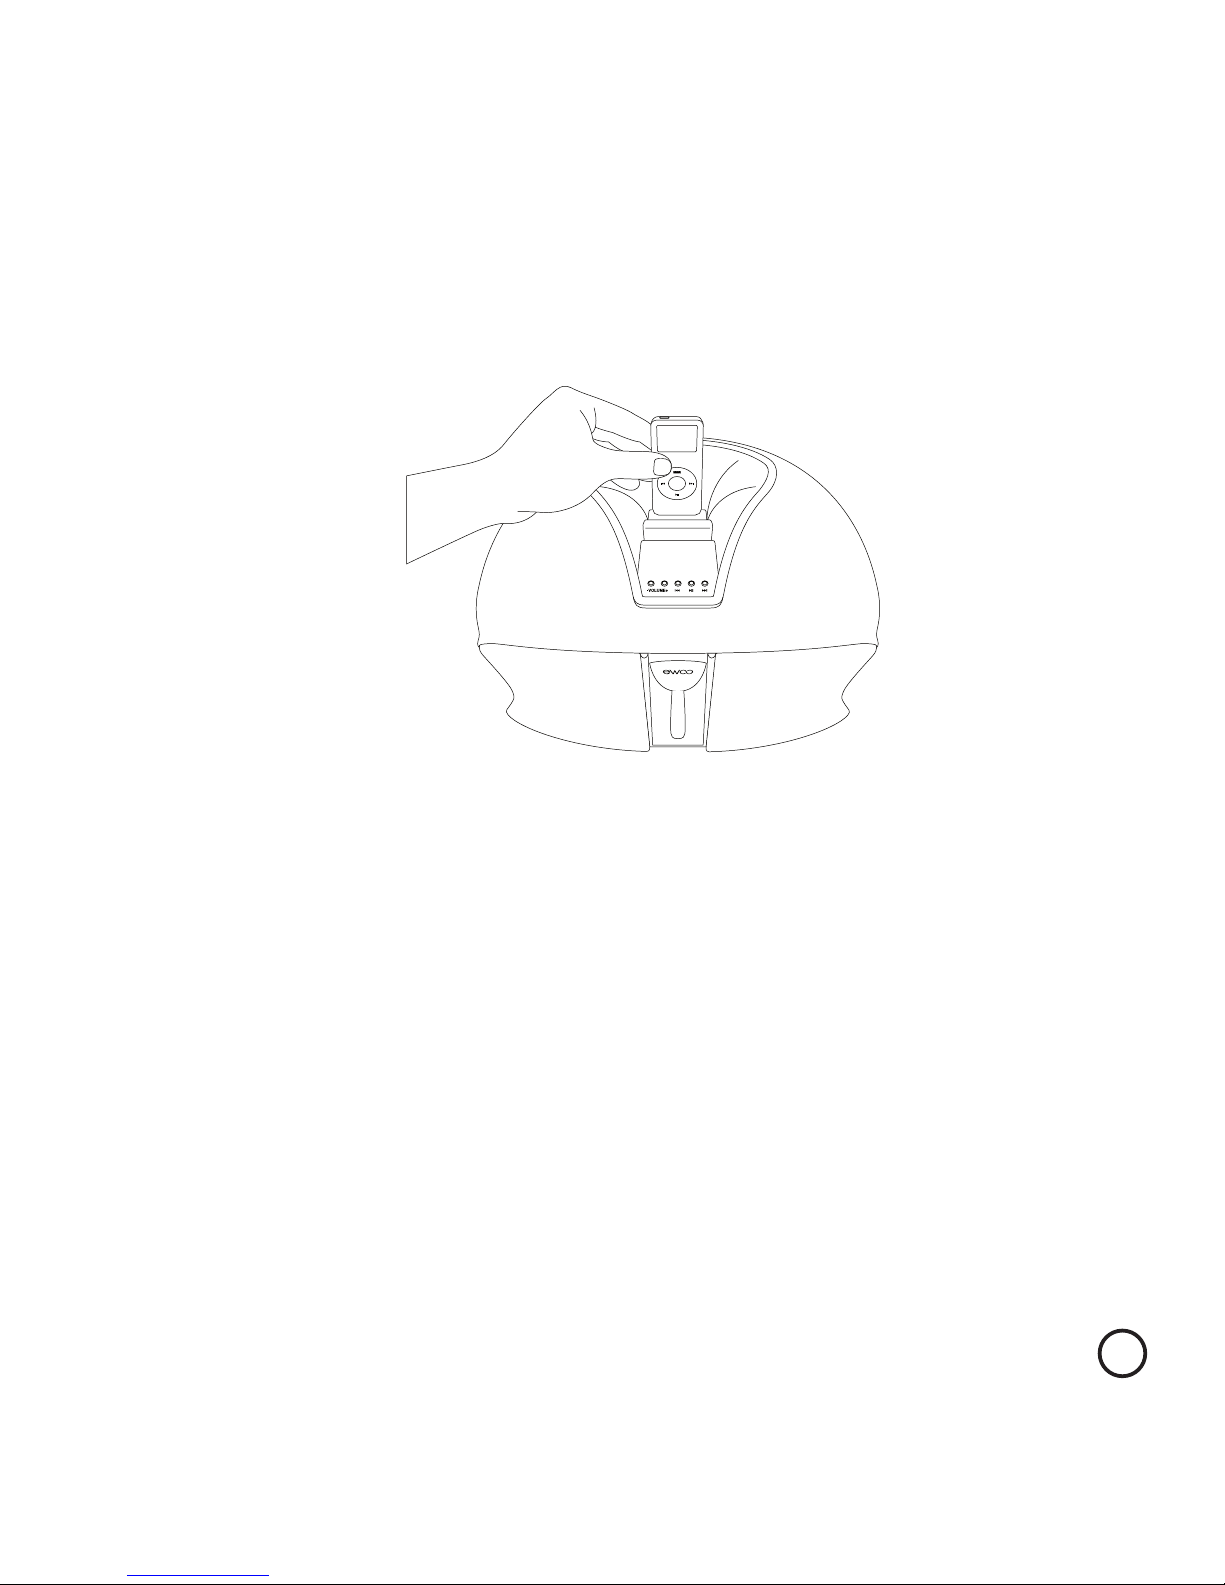
2) Setzen Sie den iPod™ auf den eFizz™ und das Logo Ewoo™
erscheint auf dem Bildschirm.
3) Ihre Apparatur ist nun betriebsbereit.
Page 93
94
Kurzeinführung
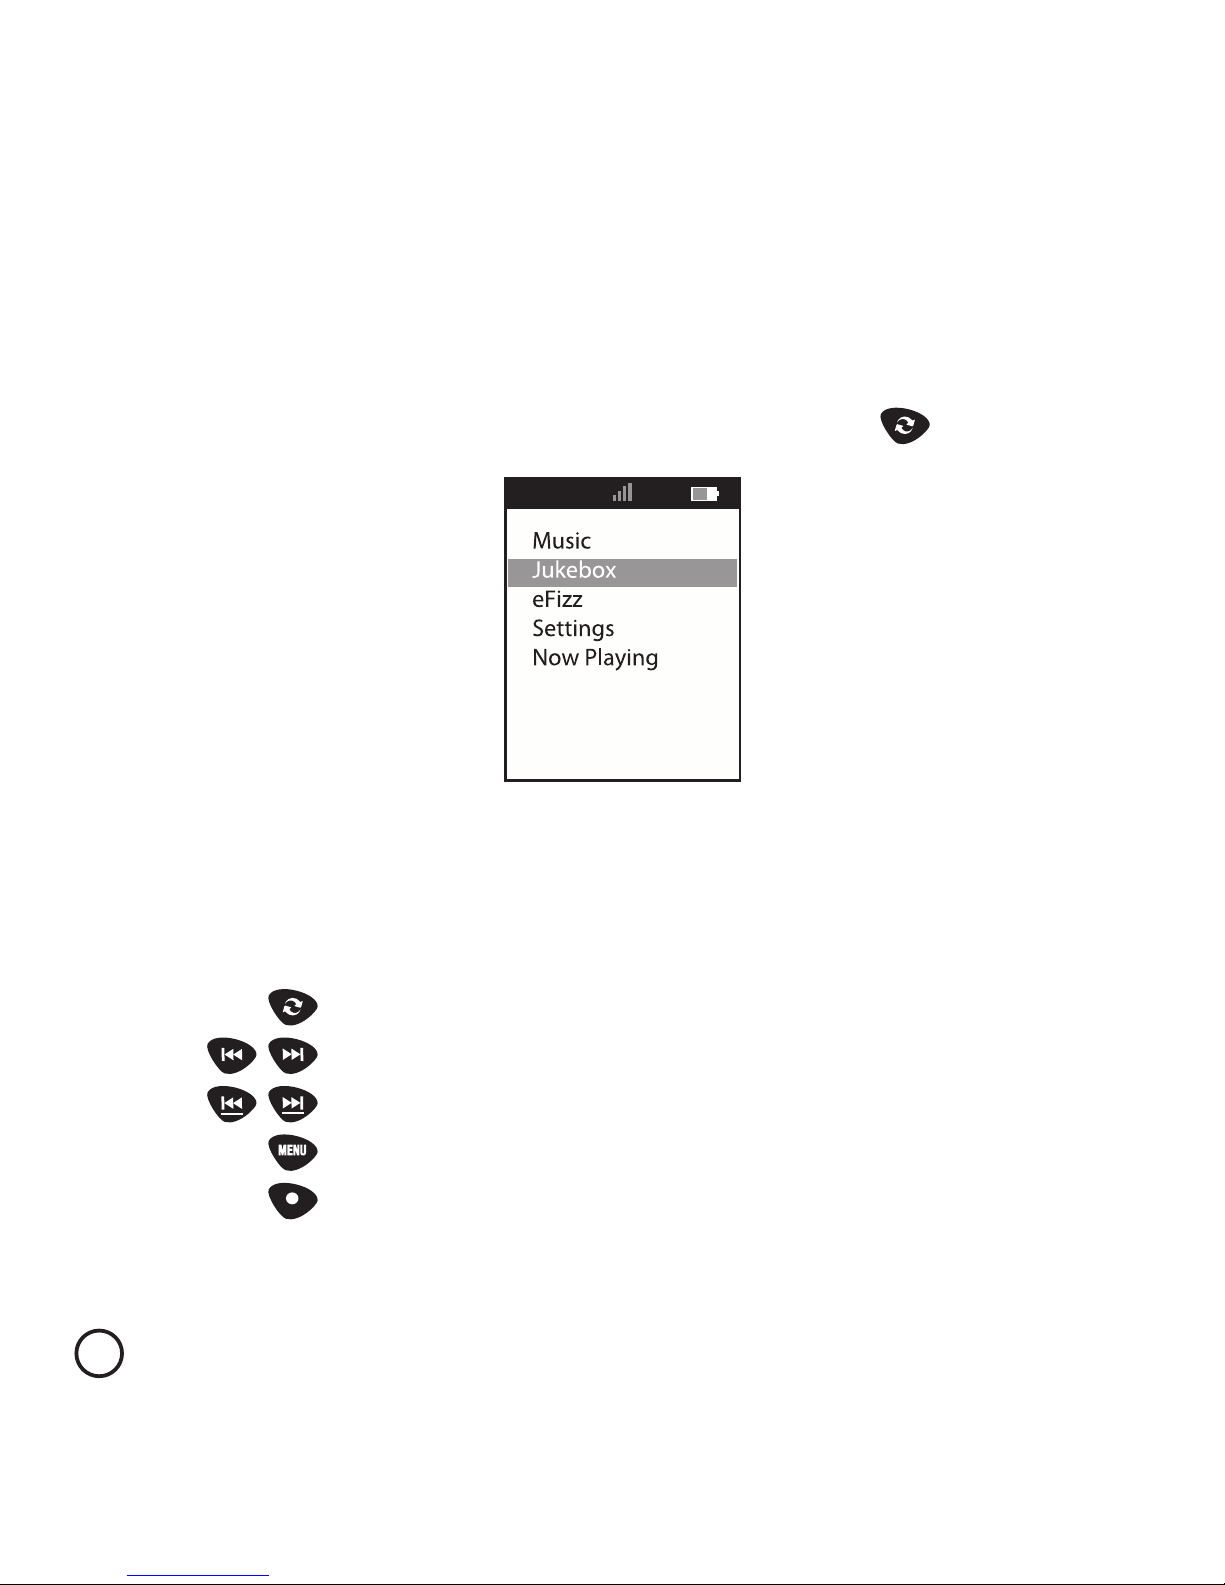
Im « Reading » Modus ändern Sie Lautstärke, schneller Vor-/Rückwärtslauf,
Menu-Einstellungen und Pause genauso wie bei einem iPod™ :
Lautstärkeeinstellung
nächster/ vorheriger
schneller Vorwärts-/Rückwärtslauf
zurück zum vorherigen Menu
gehe von der angezeigten zur nächsten
Handlungsanweisung
1) HandMusic™ ist mit einem Berührungs- Interface ausgestattet,
das dem Ihres iPod™ ähnelt. Sie können zusätzlich die eigenen
Inhalte benutzen, indem Sie die Berührungszone ( ) und die
zugehörigen Knöpfe betätigen.
Navigation im iPod™ Inhalt
Page 94

Verändern der Sender-Einstellungen
Mit Ihrem eFizz™ können Sie anders als mit Ihrem iPod™ Musikeinstellungen
verändern. Sobald die Audio-Quelle mit Ihrem eFizz™ verbunden ist, und Sie
den Menu Punkt « Select source » benutzen, können Sie diese Quelle auf
der Fernbedienung Ihres « eFizz » auswählen. Nun können Sie den analogen
Eingang oder den digitalen optischen S/PDIF Eingang Ihres eFizz™
benutzen, um Musik
zu hören. Genauso können Sie Ihren iPod™ als Musikquelle benutzen, wenn
Sie wollen, sogar mit dem gleichen Menu.
95
Kurzeinführung
Page 95
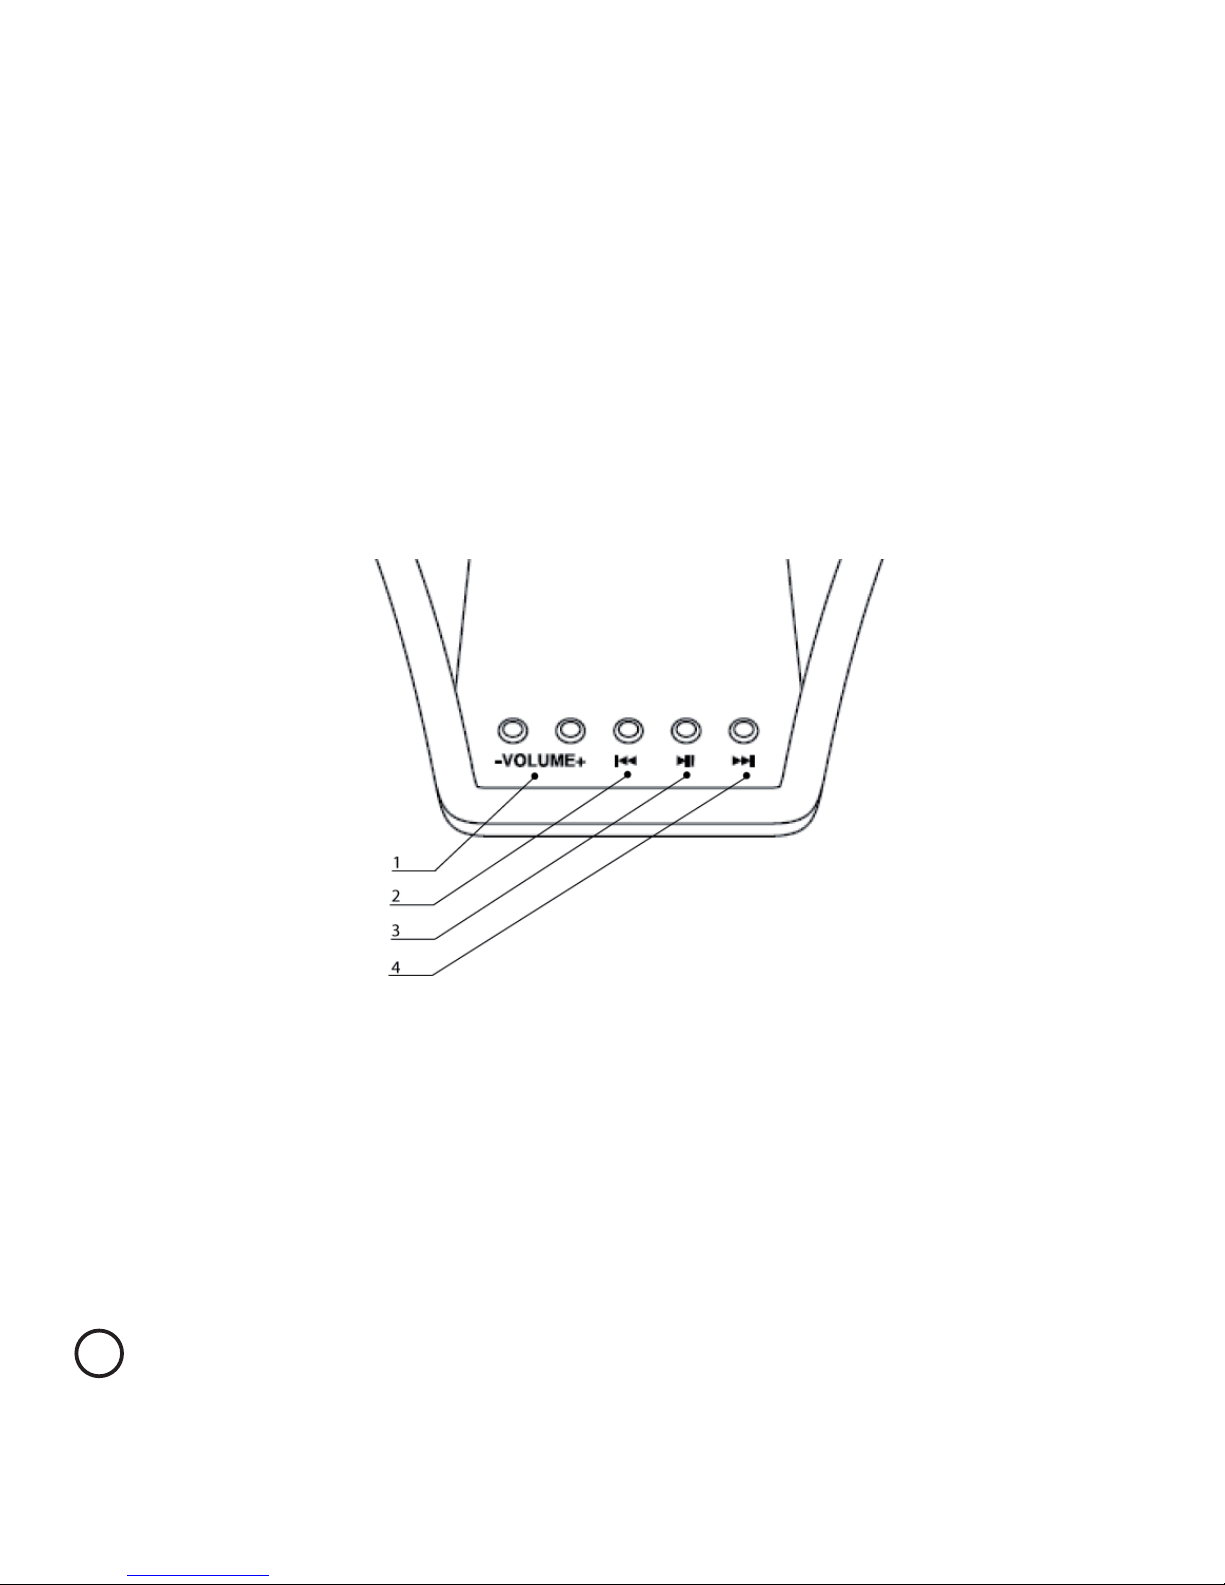
Betrieb ohne HandMusic
Ihr eFizz™ kann auch direkt aus der Benutzerschnittstelle bedient
werden.
1. Volume + und Volume – Knöpfe für Lautstärkeregelung
2. Rücklauf/ schneller Rücklaufknopf (längeres Drücken)
3. Pausenknopf
4. Vorlauf/ schneller Vorlaufknopf(längeres Drücken)
96
Kurzeinführung
Page 96
97
3
Benutzen der Fernsteuerung
Page 97
Music Menu
Vom Hauptmenu gelangt man zum Audio- Inhalt des iPod™ über das
„Music Menu“. Nun ist es leicht durch Einsatz der Berührungszone zu
navigieren.
HandMusic™ verfügt über erweiterte Funktionen, die es ermöglichen, im
digitalen Inhalt zu navigieren:
• Schneller Vorlauf innerhalb der Listen: Um das Navigieren dort zu
beschleunigen, kann man die Vorwärts- und Rückwärtsknöpfe ( und
98
Benutzen der Fernsteuerung
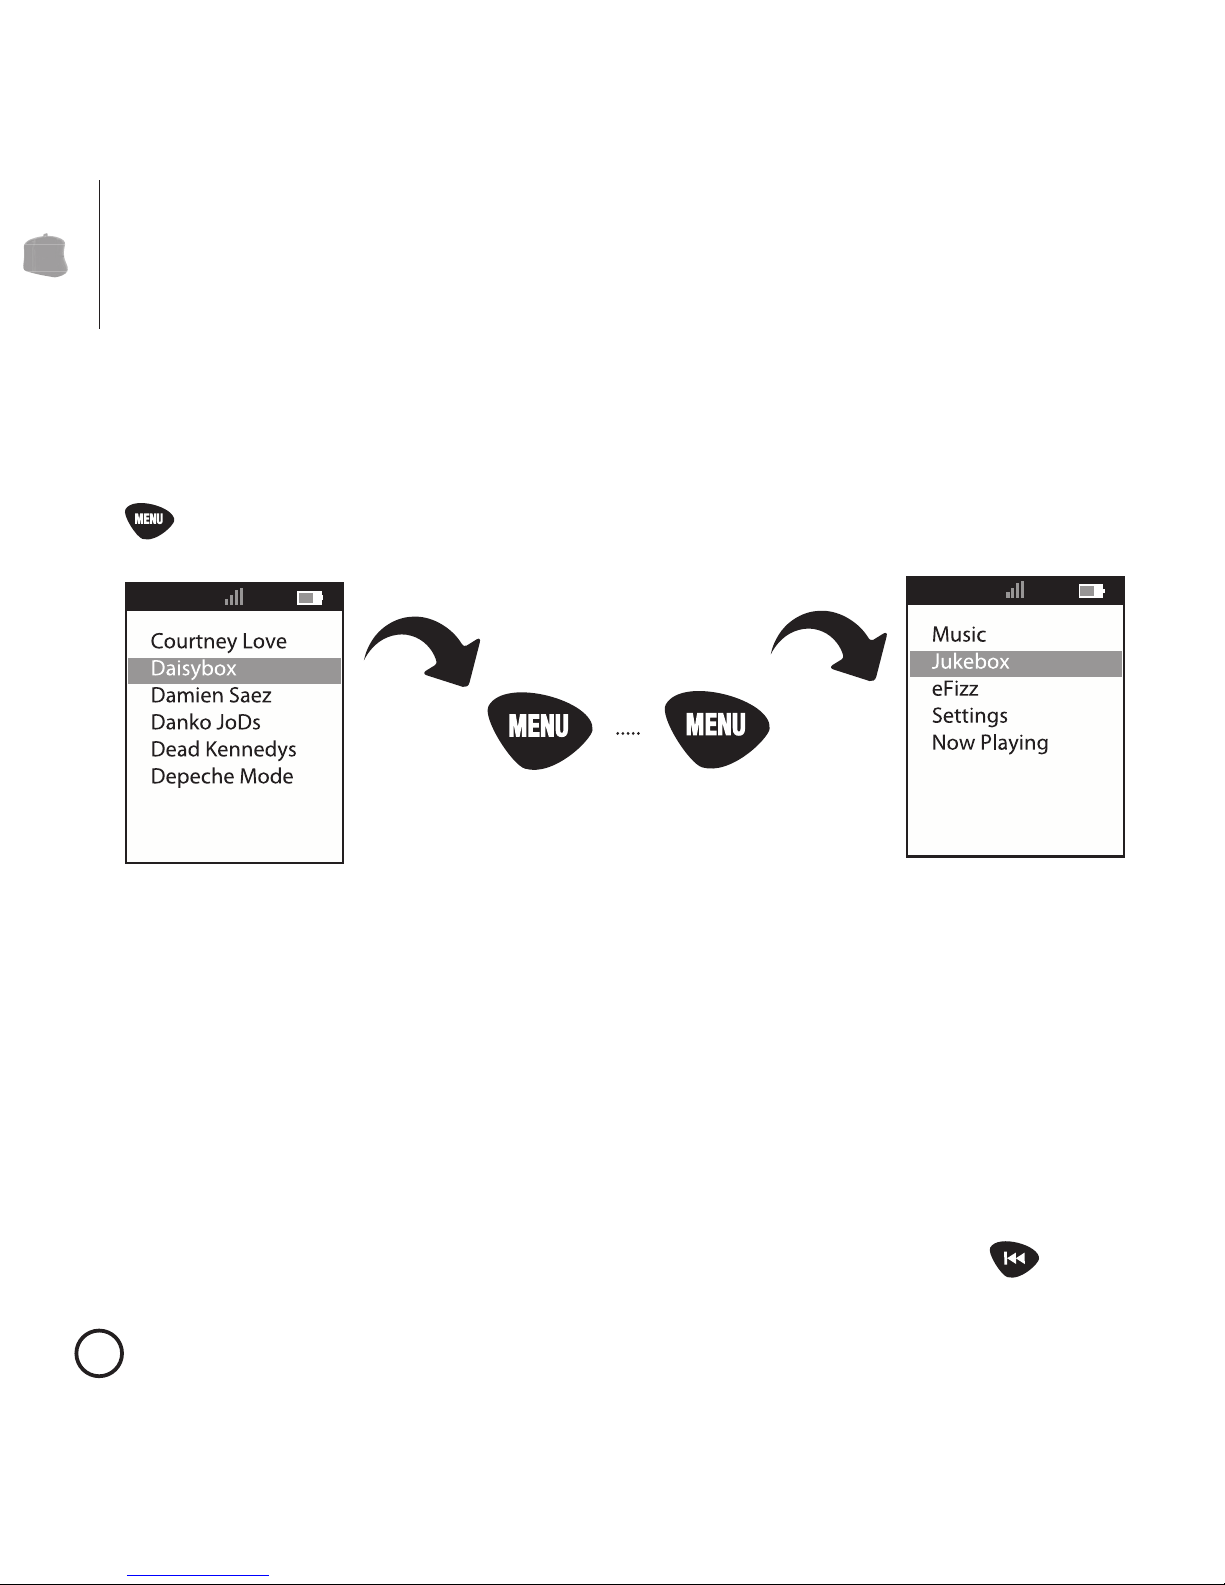
Hauptmenu
Das Hauptmenu ist das Grundmenu für die Fernbedienung. Jederzeit ist
eine Rückkehr dorthin möglich durch mehrmaliges Drücken des MenuKnopfes
( ). Es erlaubt jederzeit Zugang zu allen Funktionen der Fernbedienung.
Page 98
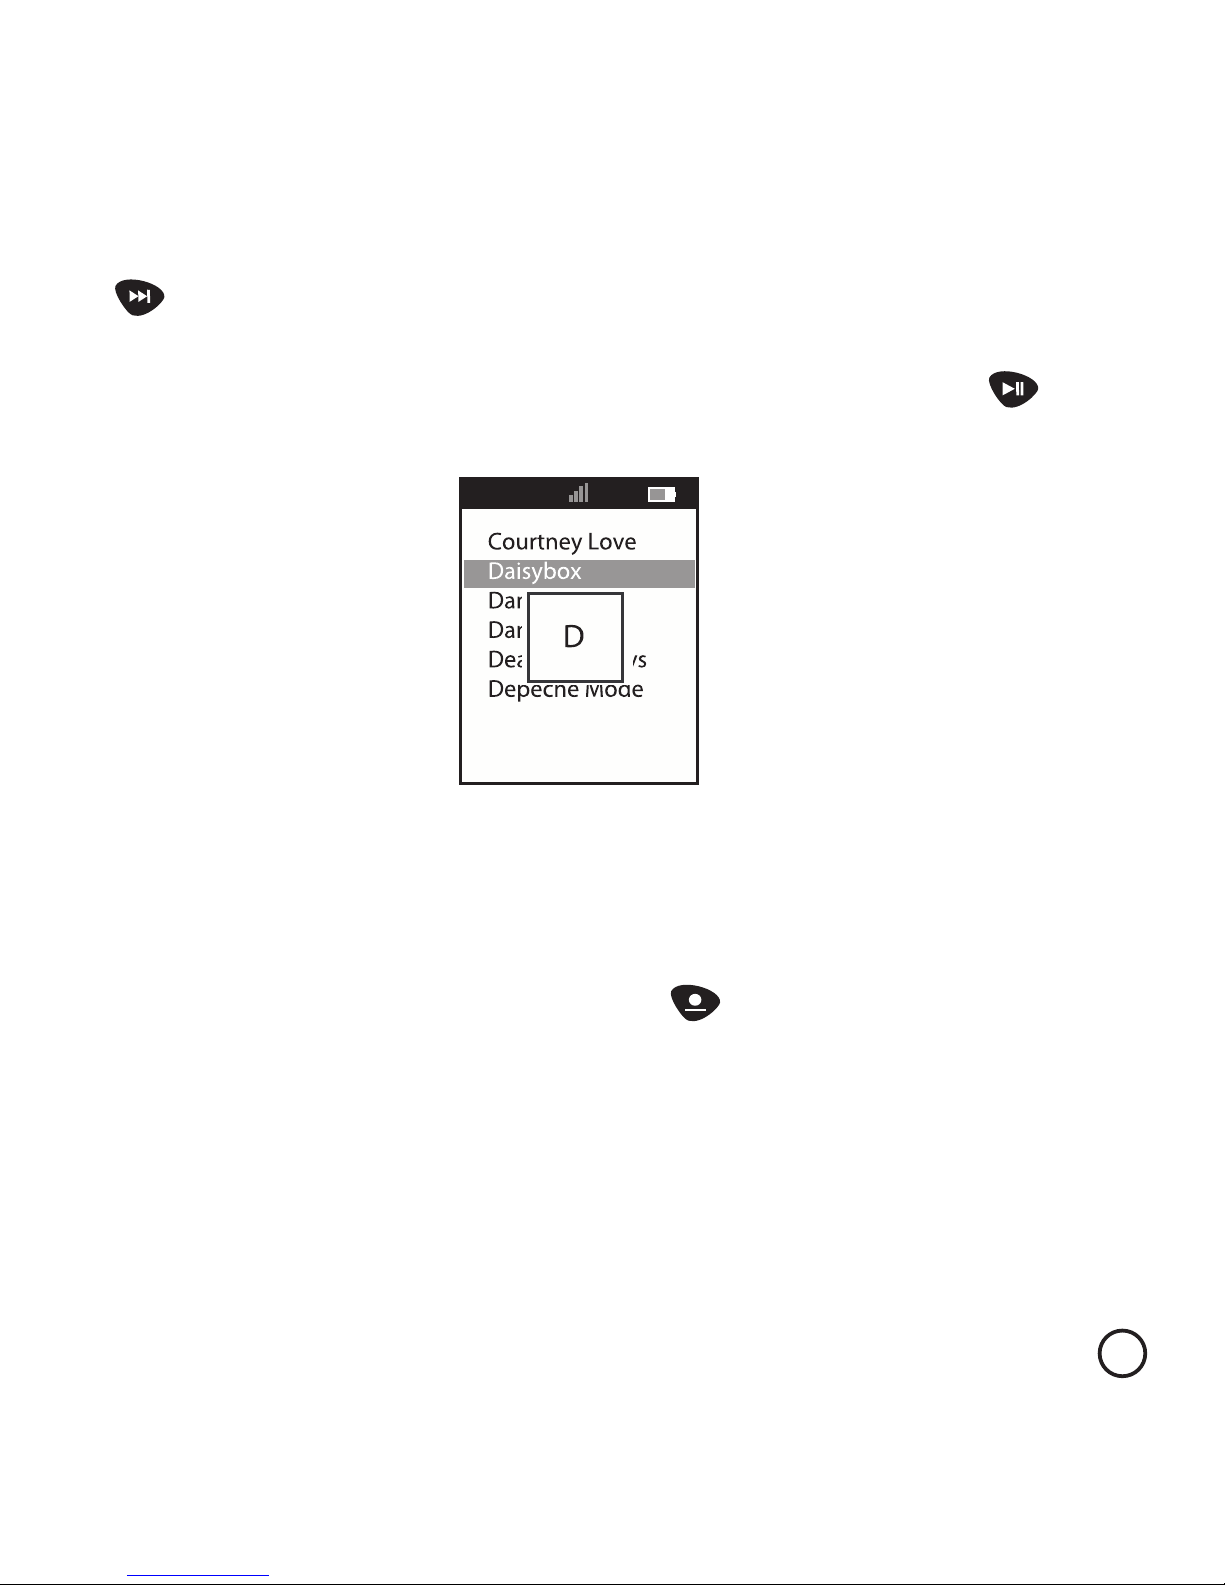
Jukebox
Die exclusive HandMusic™ Funktion “Jukebox” erlaubt es, eine Abspielliste
zu erstellen, die das sofortige Navigieren in den Musikinhalten des iPod™
mit Hilfe der Fernbedienung ermöglicht. Um einen Song, ein Album oder
irgendeinen anderen Jukebox-Inhalt hinzuzufügen, genügt es eine Auswahl
durch Drücken des Bestätigungsknopfes ( ) zu treffen. Der ausgewählte
Inhalt leuchtet auf und wird automatisch der Liste zugefügt.
Um die Musikstücke in der Jukebox zu sehen, genügt es in das JukeboxMenu zu gehen und dann zu Titel. Um die Liste zu löschen, klickt man Delete
im Jukebox Menu.
Anmerkung: Die Auswahl des Jukebox- Menus verschwindet, wenn der iPod™
vom eFizz™ getrennt wird oder wenn der eFizz™ abgeschaltet ist.
) betätigen,
die ein schnelles Scrollen bei jeder Berührung ermöglichen.
• Alphabetische Suche in Ihren Abspiellisten: Genau wie in einer
alphabetisch geordneten Liste aktiviert der play/pause Knopf ( ) Ihre
alphabetische Suche, die es Ihnen ermöglicht, sofort den gewünschten
Inhalt zu finden.
99
Benutzen der Fernsteuerung
Page 99
100
Benutzen der Fernsteuerung
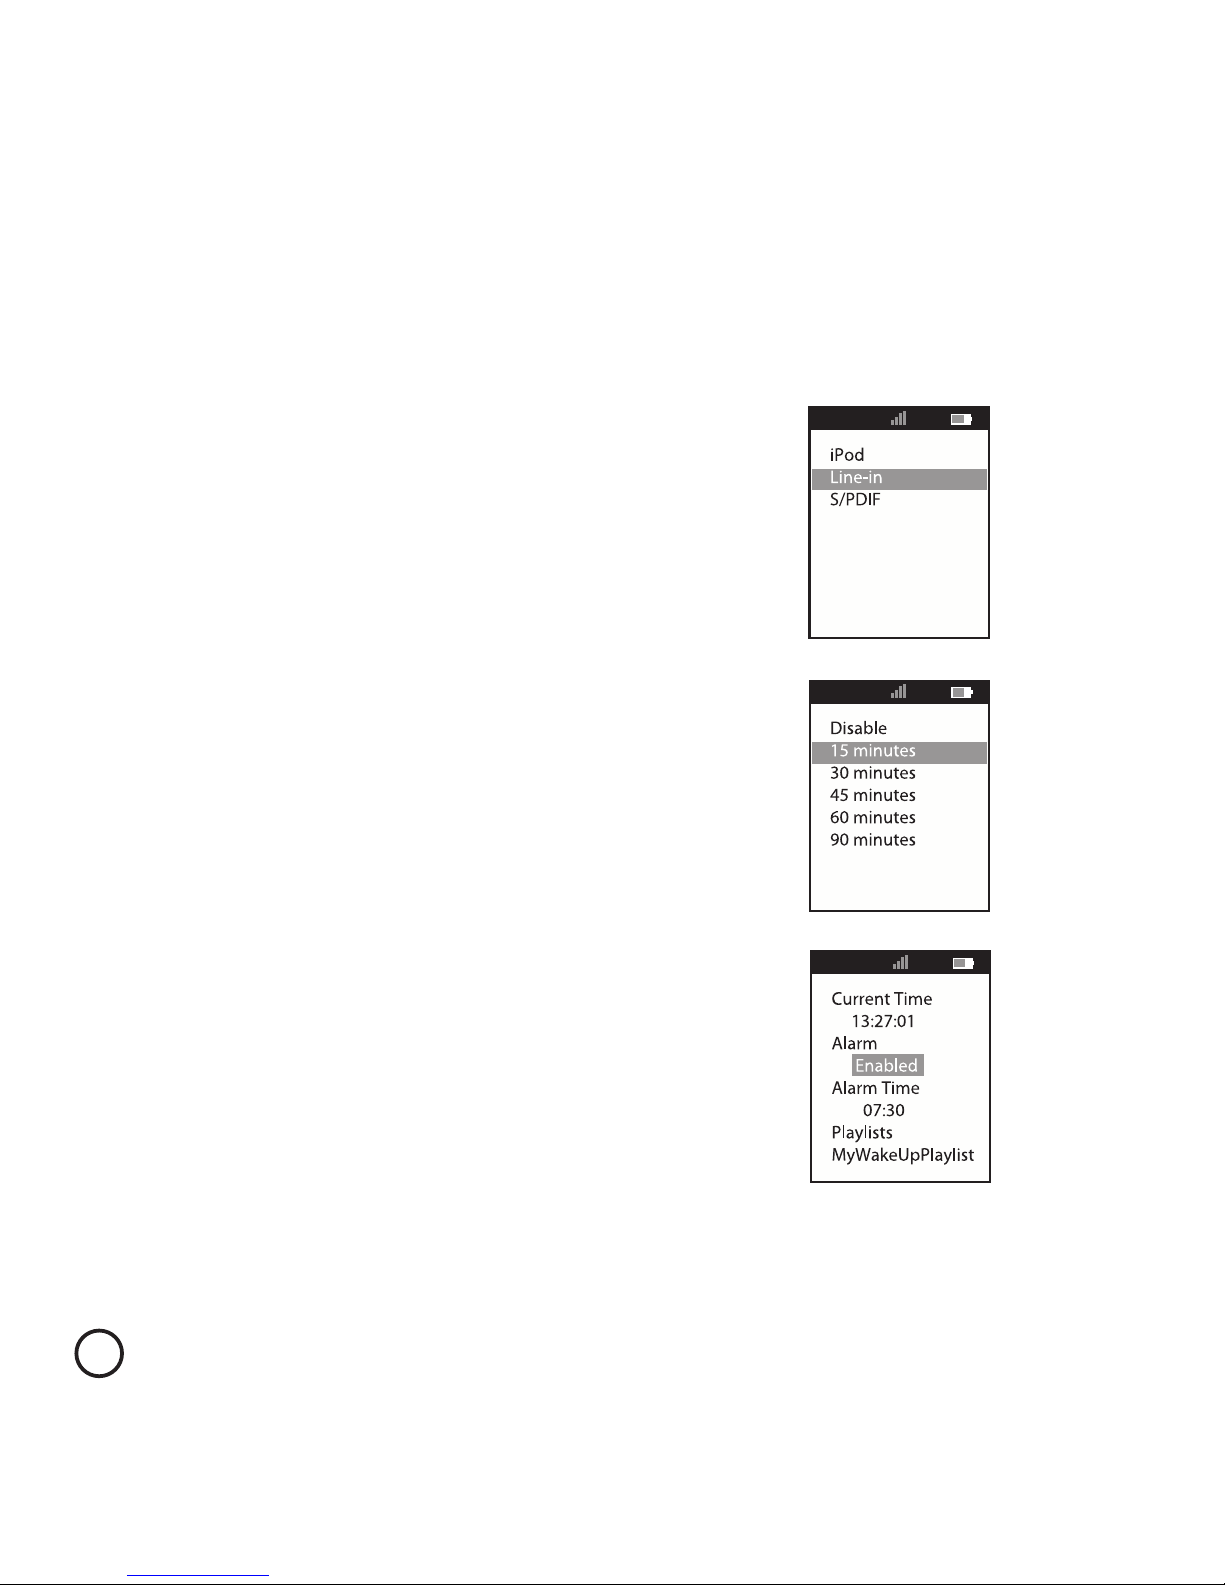
eFizz
Das « eFizz™ » Menu für iPod™ und eFizz™ erlaubt Ihnen jederzeit den
Zugriff
auf alle besonderen Funktionen Ihres HiFi Stereo Systems.
In diesem Menu finden Sie:
•Auswahl des Eingangs: Wählen Sie die Quelle,
die auf Ihrem eFizz™ aktiviert wird (iPod™,
analoger oder digitaler S/PDIF Eingang).
•Aktualisierung: Programmierung der
automatischen Aktualisierung des eFizz™.
•Alarm: Aktiviert die Einstellungen des eFizz™
Alarms (Zeit, Abspielliste).
•Zeit-Synchronisation mit dem iPod™: Synchronisiert die eFizz™- Zeit mit
den Zeiteinstellungen Ihres iPod™.
Page 100
1 Nachdem die Einstellungen in das System zurückgenommen sind, muß eine neue Verbindung
erstellt werden.
2 HandMusic™ arbeitet mit nur einem Radio gleichzeitig; daher benutzt man das Menu jedes Mal,
wenn man zu einer anderen Radiostation mit der Fernbedienung wechseln will.
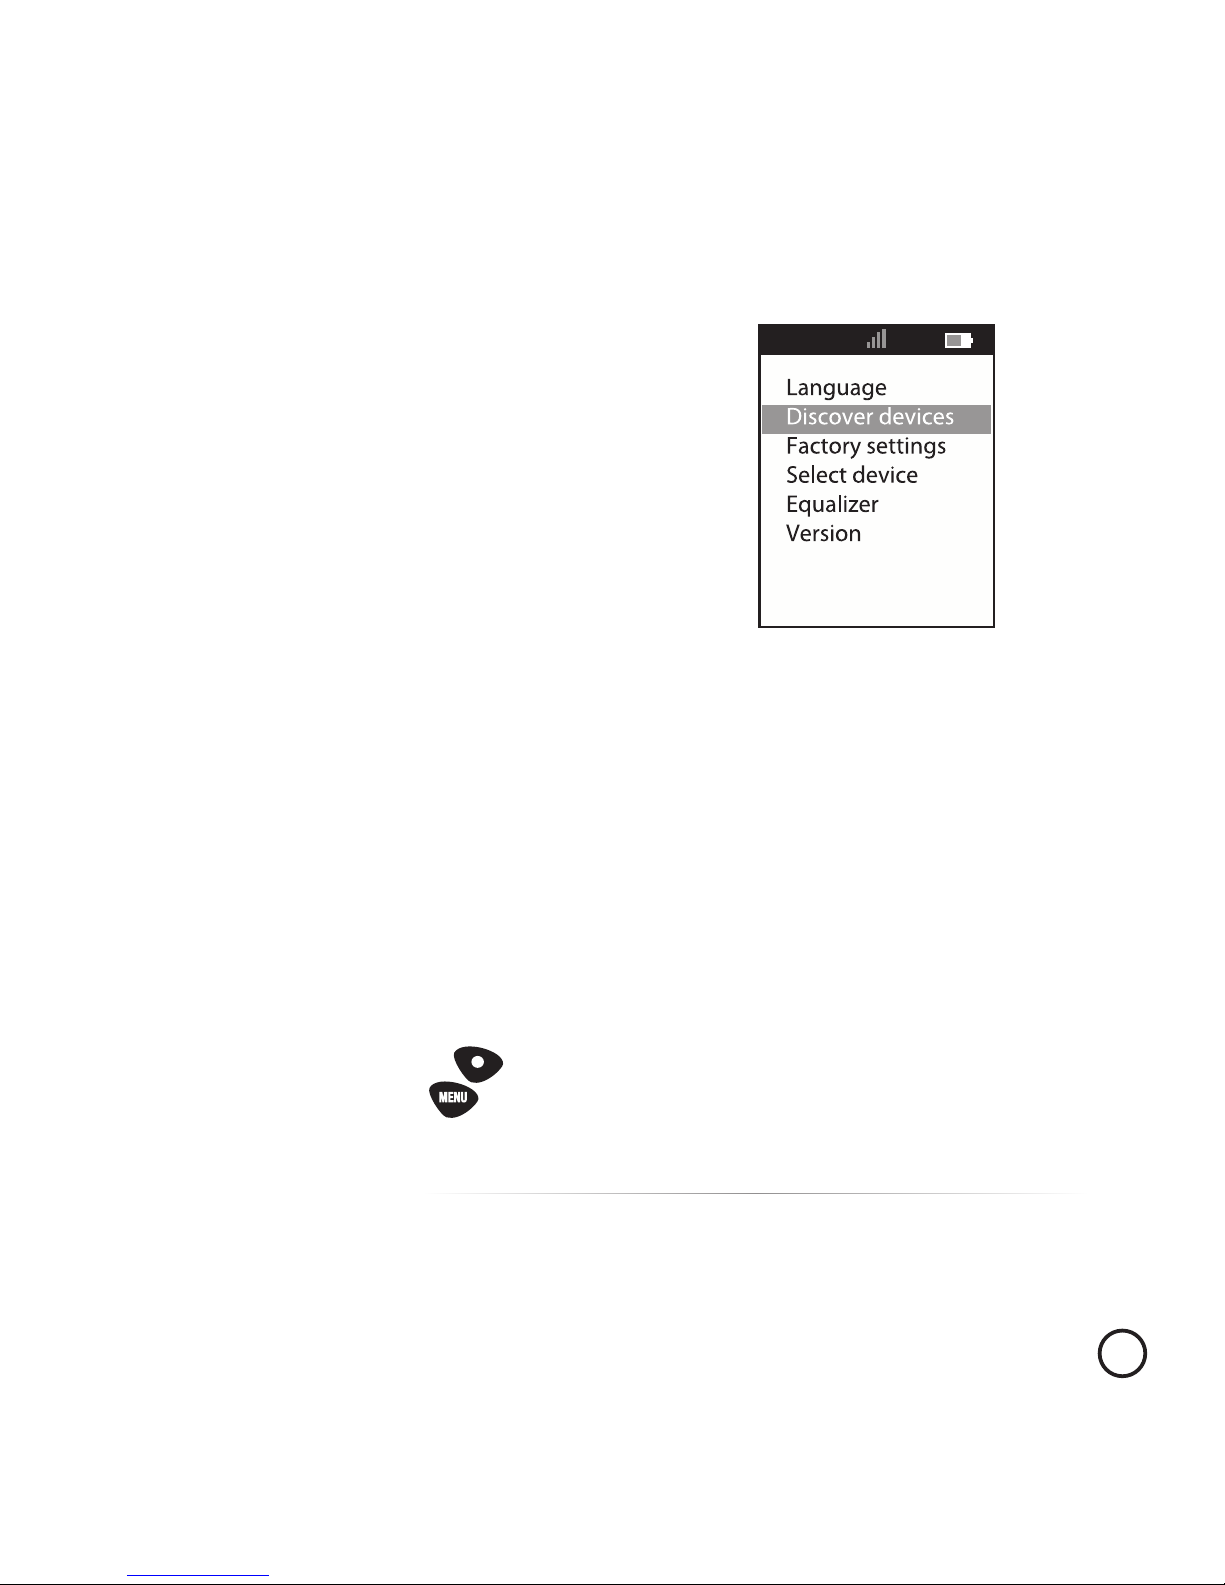
Es ermöglicht:
•Language: Änderung der Sprache.
•Search radio stations: Ermöglicht das Verbinden des Senderumfelds,
das kompatibel mit HandMusic™ ist.
•Factory settings: Ermöglicht das Zurücksetzen auf die
Werkseinstellungen1.
•Selection of radio stations: Wählt einen vorher verbundenen Sender2 .
•Equalizer: Modifiziert die akustischen Einstellungen (nur möglich,
wenn iPod™ und eFizz™ verbunden sind). Wenn “Equalizer” im
Menu erscheint, ist die unterstrichene akustische Einstellung
automatisch abspielbereit. Um diese zu auszuwëhlen, drücken Sie den
Bestätigungsknopf. ( ). Um diesen Modus zu verlassen, drücken Sie
den Menu Knopf ( ).
•Version: Zeigt die Versionsnummer der Software an, die auf der
Fernbedienung des eFizz™ installiert ist.
101
Benutzen der Fernsteuerung
Angleichung
Das “Adjustments” Menu benutzt man
um all die Konfigurations-Parameter der
Fernbedienung zu modifizieren.
 Loading...