

Weather station with 433MHz thermo-hygro sensor and
radio controlled clock
Model: WSU601+THX201
INSTRUCTION MANUAL
Congratulations on your purchase of this new Weather Station. This unique product is
designed for everyday use for the home or office and is a definite asset of great use. To
fully benefit from all the features and understand the correct operation of this product,
please read this instruction manual thoroughly.
FUNCTIONS OF THE WEATHER STATION
This weather station measures the environment of its surrounding area and receives
weather data transmitting from up to five outdoor thermo-hygrometers for temperature
and humidity.
The data is continuously updated to bring you the latest weather information displayed
on the LCD of the receiving unit. Its wireless 433MHz can transmit data over a distance of
50 meters (165 feet) in open space.
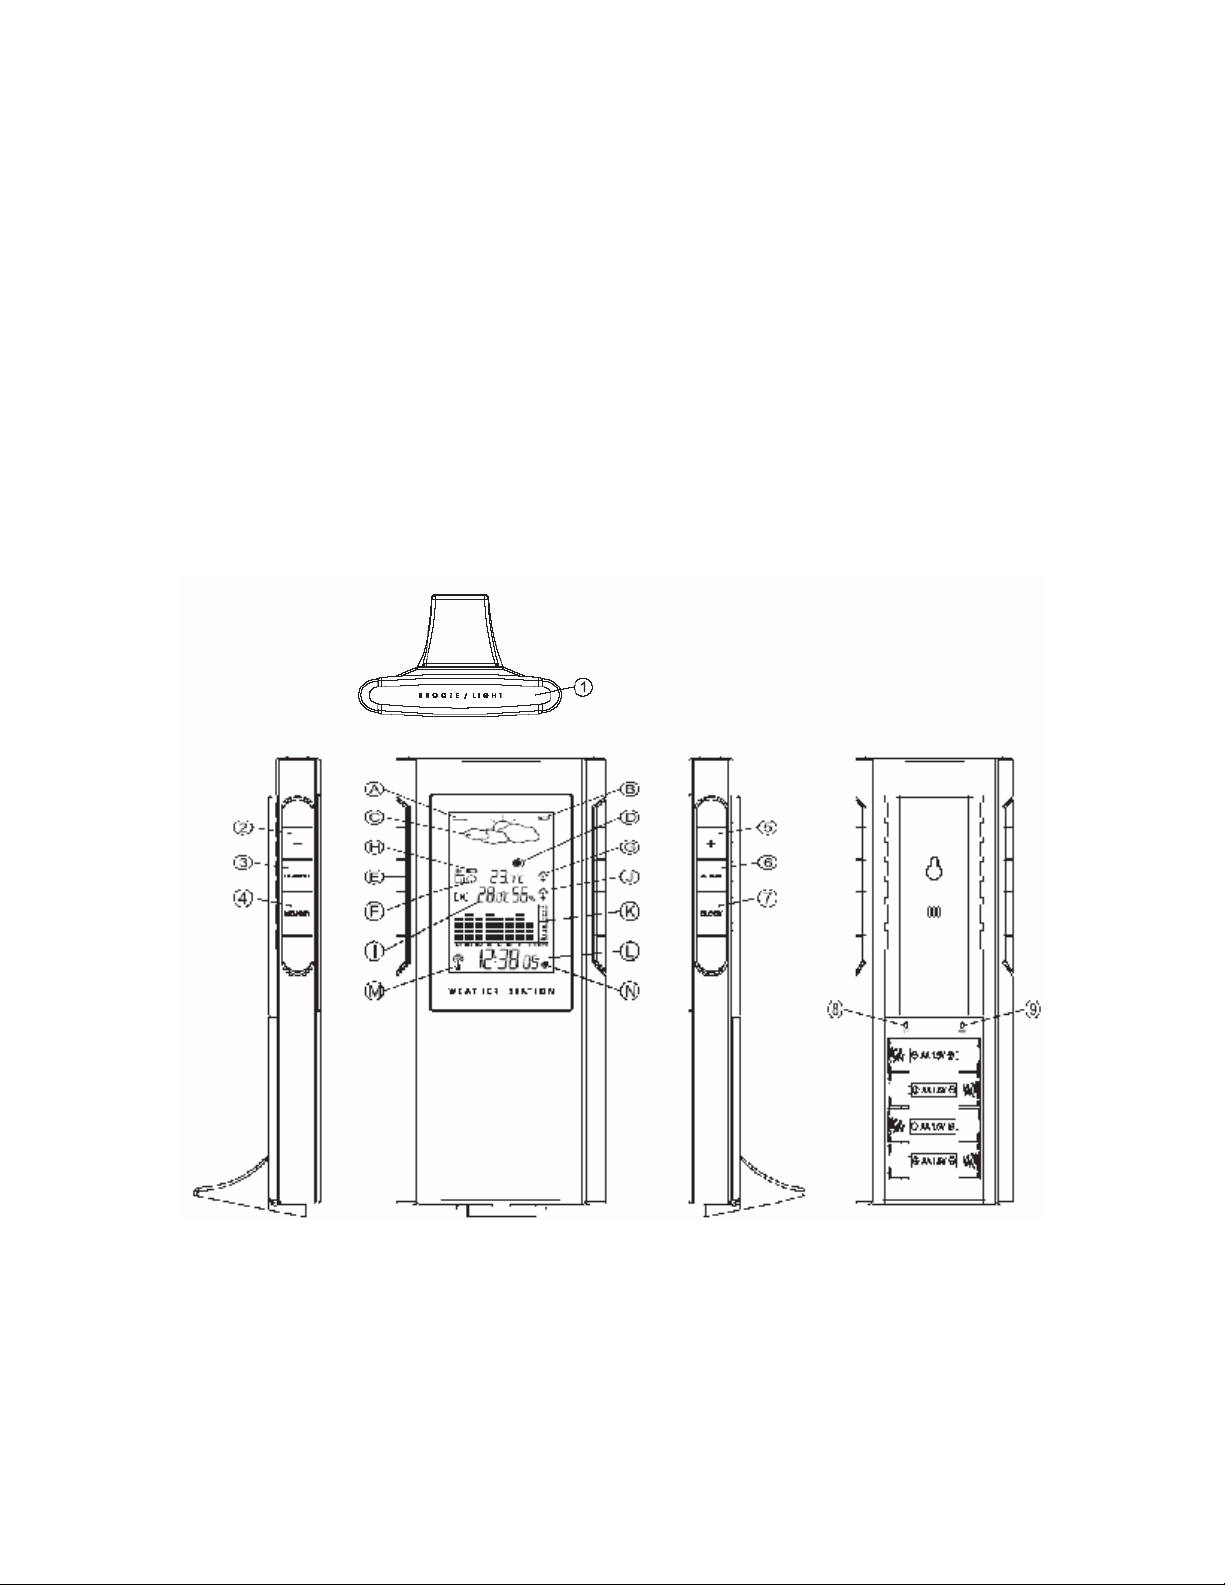
FEATURES: MAIN UNIT
A. Air pressure trend arrows
Indicate the trend of air pressure changes
B. Low battery indicator
Shown to indicate the battery in the main unit is low and all displayed information in LCD is
no longer reliable. The user needs to change the batteries at once

C. Weather forecast window
Show weather forecast in animation with snowfall indicator and storm warning indicator
D. Moon phase
The animated running moon phase will pause for 5 seconds in place of current moon
phase.
E. Outdoor remote sensor indicator
Indicates the current outdoor remote sensor signal received. It can display up to 5
different remote sensors, which are placed in 5 different places and within 50-meter
distance from the main unit.
F. Auto scroll indicator
The animated rolling arrow icon is shown to indicate the auto scroll of 5 different remote
channels.
G. Outdoor maximum/minimum indicator
Indicates the maximum/minimum outdoor temperature or humidity is displayed
H. Remote sensor battery low indicator
Appear when the batteries of the remote sensor are running dry and the temperature or
humidity measured by this sensor is no longer reliable. The user must change the batteries
at once.
I. Indoor indicator
Indicates the indoor temperature and humidity are displayed.
J. Indoor maximum/minimum indicator
Indicates the maximum/minimum indoor temperature is displayed.
K. Barometric pressure chart
Shows the barometric pressure trend chart for the past 24 hours.
L. Clock window
Display Clock-Second (HR-MIN-Sec), Clock-Weekday (HR-MIN-Weekday), calendar or
alarm time.
M. Radio reception signal
Indicates the condition of WWVB radio controlled time reception.
N. Alarm on icon
Appears when alarm is activated.
DESCRIPTION OF BUTTONS
WSU601 has 7 major function buttons on top and both edges.
1. [SNOOZE/LIGHT]
Press once to activate the LCD backlight or snooze function.
2. [-]
Press to decrease the calendar date to view the MOON PHASE status of a specific day in
Day-Month-Year (or Month-Day-Year depends on the date format setting).
Press once to decrease the setting in CLOCK, CALENDAR or ALARM setting mode.
3. [CHANNEL]
Select among channel 1, 2, 3, 4, 5 or to enter auto scroll mode.
Press and hold 2 seconds to activate or deactivate the sensor searching mode.
4. [MEMORY]
Toggle to view the Max/Min reading of the Indoor & Remote Temperature/humidity.
Press & hold 2 seconds to clear Indoor & all Remote temperature/humidity memories.
5. [+]
Press once to increase the date to view the MOON PHASE status of a specific day in
Day-Month-Year (or Month-Day-Year depends on the date format setting).
Press once to increase the setting in CLOCK, CALENDAR or ALARM setting mode.
Press & hold 2 seconds to manually activate or deactivate the radio controlled function.
6. [Alarm]
Press once to switch from clock mode to alarm time display mode.
While in alarm display mode, press once to toggle between arm or disarm the daily alarm.
7. [Clock]
Toggle amongst display for Clock-Sec (HR-MIN-Sec), Clock-day (HR-MIN-Weekday),
Calendar (Date-Month-Year) and repeat…
And 2 buttons inside battery compartment
8. [°C/°F]
Toggle the temperature unit °C <- -> °F
9. [Reset]
To activate system reset to the main unit during abnormal condition which will reset all
settings back to factory values.
GETTING STARTED
This Weather Station was designed for easy set up. For best operation, the following steps
are required to be done in the proper sequence.
1. INSERT BATTERIES FOR MAIN UNIT BEFORE DOING SO FOR THE SENSOR UNITS.
2. RECEIVING UNIT CANNOT BE PROGRAMMED MANUALLY UNTIL THE WIRELESS REMOTE
SENSOR UNIT REGISTRATION PROCEDURE HAS BEEN COMPLETED.
3. POSITION THE REMOTE UNIT AND MAIN UNIT WITHIN EFFECTIVE TRANSMISSION RANGE,
WHICH, IN USUAL CIRCUMSTANCES, IS 165 FEET. Although the remote unit is weather
resistant, it should be placed away from direct sunlight, rain or snow.
BATTERY INSTALLATION FOR MAIN UNIT
1. Remove the battery door;
2. Insert 4 pieces AA size 1.5V alkaline battery as indicate by the polarity;
3. Close the battery door.
Note: Replace the batteries when the low battery indicator appears on the top-right
corner of the LCD.
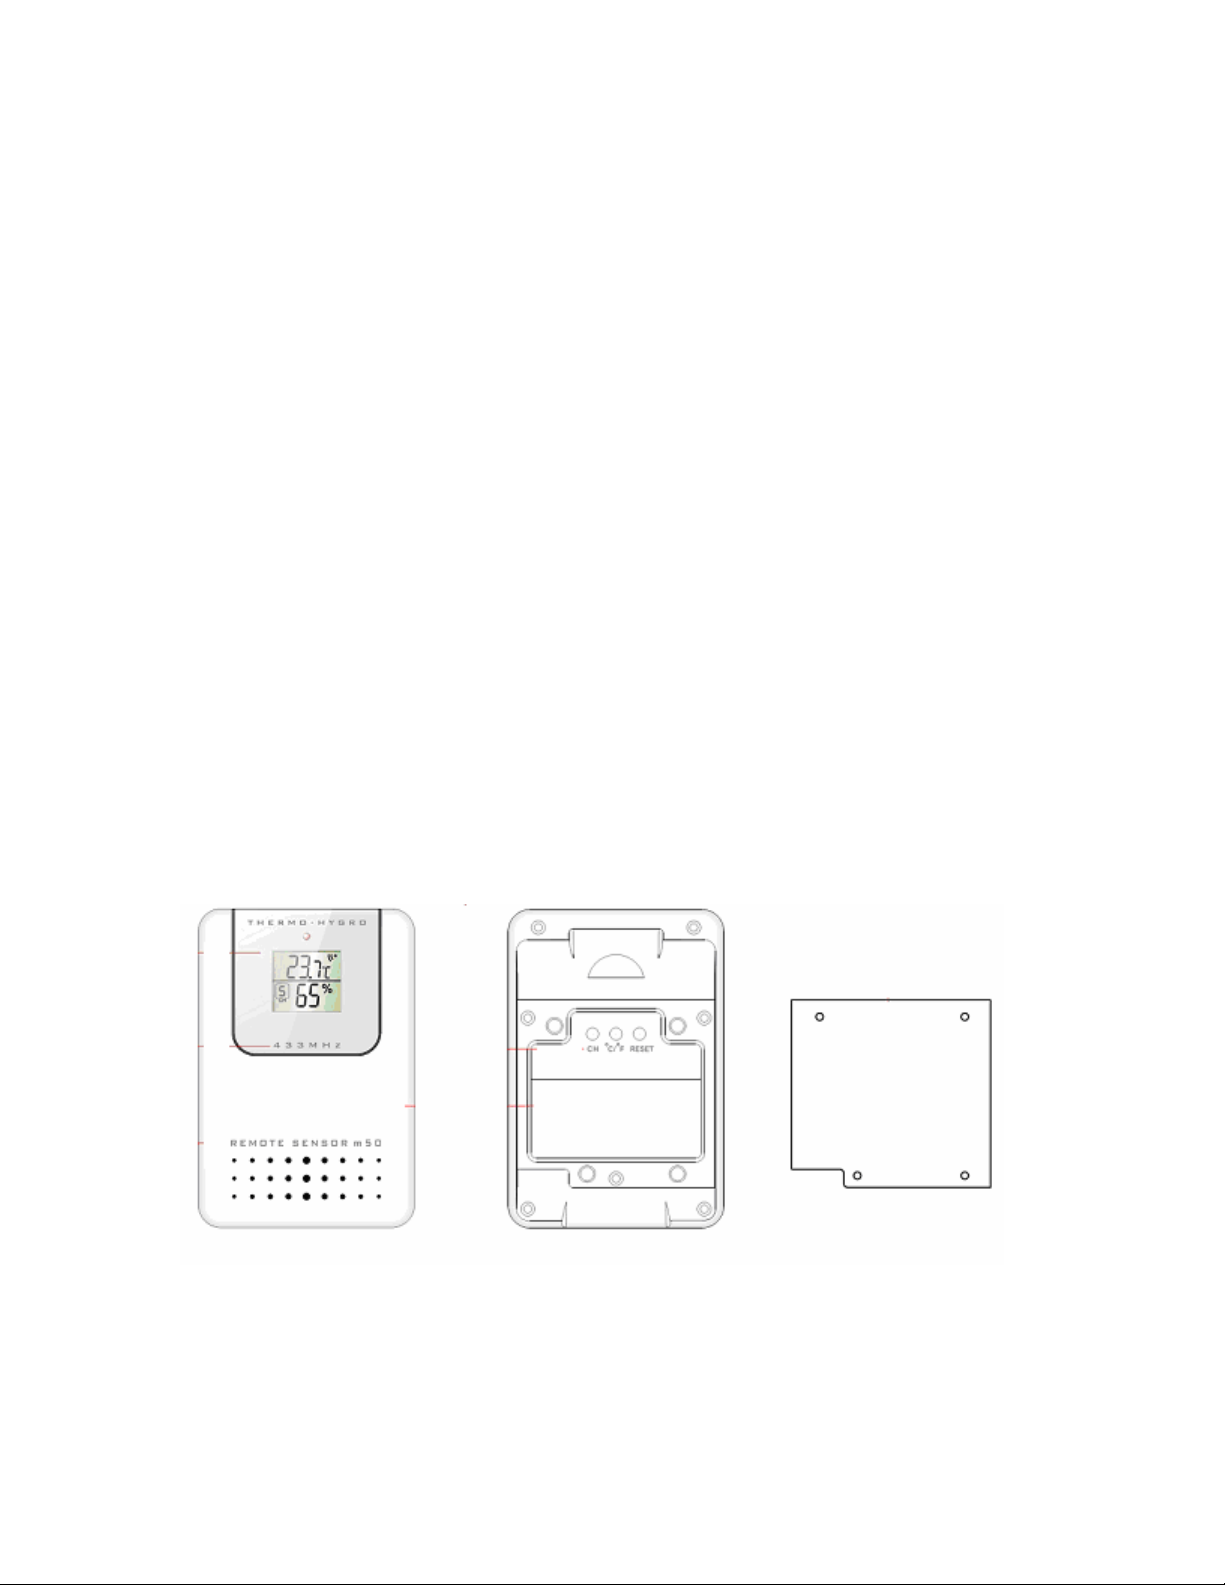
BATTERY INSTALLATION FOR REMOTE SENSOR UNIT
1. Lift off the bracket stand of the remote sensor unit by releasing the 2 fixing snaps at the
bottom;
2. Use a small Philips type screwdriver to remove the battery cover screws;
3. Insert 2 pieces of AAA size batteries according to the ‘ + ’ and ‘ – ’ polarity marks
shown in the battery compartment and then close the battery door.
 Loading...