

Ewig Macao Commercial Offshore MAV220A User Manual
MODEL # MAV219/MAV220 INSTRUCTION MANUAL
Congratulations on your purchase of the new Williams-Sonoma
wireless voice alert grill thermometer. This unit will allow you to see
the temperature of your food cooking in the oven or on the grill from
anywhere in your home. The unit allows you to be alerted by a voice
alert telling you when your food is almost ready or ready and by
beeps that tell the same. The following instructions will show you how
to easily use the thermometer.
THE UNIT HAS A LOCKING CASE. THE TABS WILL HOLD IT CLOSED WHILE
STORED. TO OPEN SIMPLY GRASP THE BATTERY COMPARTMENT OF THE
RECEIVER AND PULL OUT. YOU WILL HEAR A CLICK AND THE UNIT WILL
SEPARATE.
WHEN USED AS A THERMOMETER: First you must register the base unit
with the remote unit (the remote unit has the display showing the
food selections). To register the unit do the following:
● Turn the unit on by holding the MODE button on the receiver unit
until you hear the BEEP sound.
● Plug in the stainless steel probe into the transmitter unit. This
must be done within 120 seconds of turning the unit on.
● The unit should beep three times when turned on and the
probe temperature should appear within 5-10 seconds of
plugging in the probe. When the temperature appears the unit
will beep once.
● If this does not happen repeat the process.
HOW TO KNOW IF THE SIGNAL IS LOST: The receiver unit will normally
work within 150 feet of the transmitter. If the receiver is taken out of
range or there is abnormal external interference the receiver may
not be able to receive the transmission from the transmitter. If this
happens the unit will alert you by beeping once for every 3 seconds
to tell you to re-sync the signal. If this happens you need to move the
unit close to the transmitter and follow the instructions above.
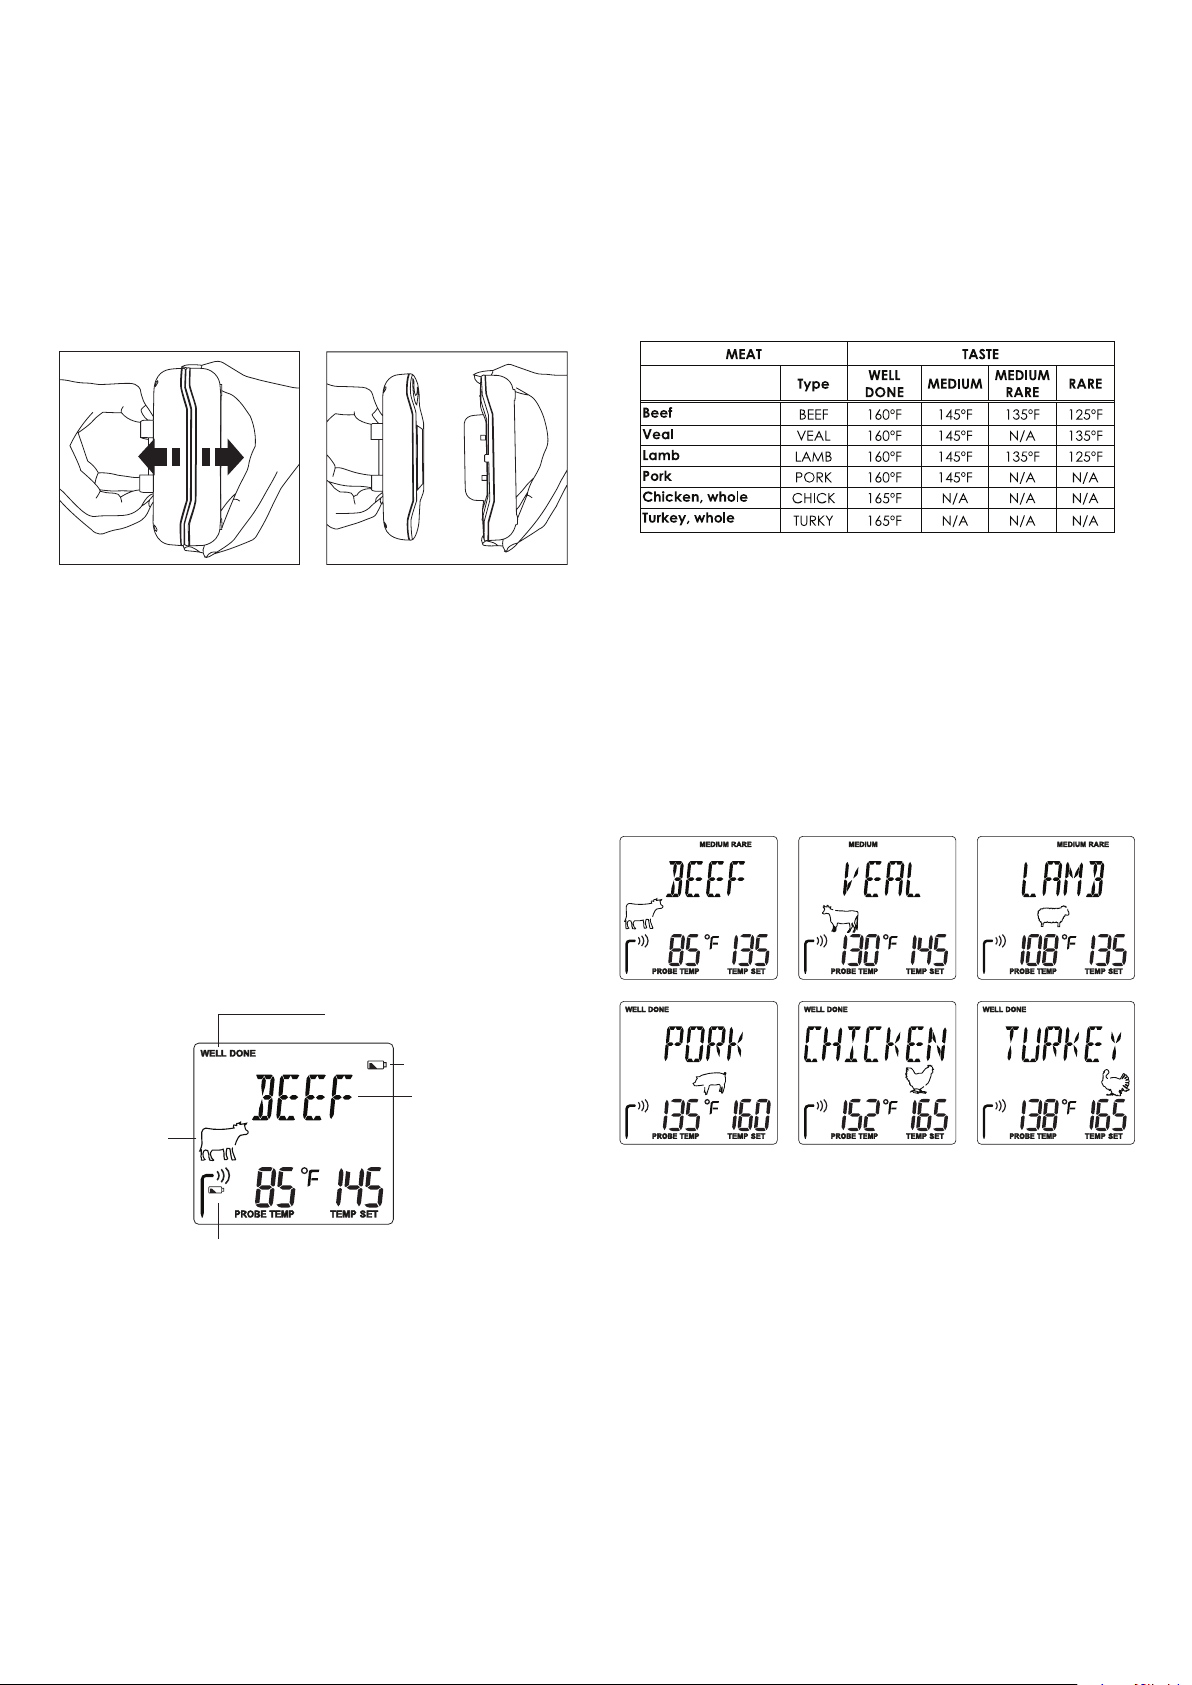
SETTING THE SELECTED FOOD TEMPERATURE: The unit is programmed
with selected pre-set temperatures for all types of meats. These
temperatures are recommended by both major cookbooks and the
USDA for food safety.
The chart of the selected temperatures is as follows below:
TO SELECT A SPECIFIC TYPE OF MEAT: Press the button marked “MEAT”
and scroll through the selection until the type of meat (BEEF, VEAL,
CHICKEN, ETC) shows on the LCD (display). There will also be the
meat icon shown on the display.
TO SELECT YOUR OWN PREFERRED TEMPERATURE: Once you have
selected a temperature and food selection – for instance BEEF –RARE
– you can customize the temperature setting by using the HR/▲ sign
to increase the temperature setting or the MIN/▼ to reduce the
temperature setting.
See below examples of what the LCD will look like:
THE PROBE MUST BE PLUGGED INTO THE TRANSMITTER FOR THE UNIT TO
WORK.
ONCE THE UNIT IS ON: Press the MODE button again to change the
unit from the thermometer function to the timer function. This button
will change the feature of timer/thermometer back and forth.
Taste level
Low battery indicator
for receiver unit
Meat type
Icon for Meat
Low battery indicator
for transmitter unit
IF THE SIGNAL IS LOST: If the receiver unit is turned off and then on
and the signal is lost do the following:
● Turn the receiver on by pressing the MODE button for two
seconds.
● Once the unit is on hold the CLEAR button for several seconds
until the probe temperature starts to blink with the --- showing.
● Press and hold the (TX) button inside the battery compartment
of the transmitter or re-plug the temperature probe. This has to
be done within 120 seconds of turning the unit on.
● If the unit registers the transmitter the unit will beep and show
the probe temperature. If it does not register press and hold the
(TX) button again.
Pre-Alert: When the probe temperature reaches ten degrees to the
set temperature of your food the unit will let you know with the voice
alert “Your food is almost ready” and the unit will beep twice. The
pre-alert will be repeated after four seconds.
Alert: When the probe temperature reaches the set temperature
(selected with the meat and taste selection) the unit will beep three
times and the voice will say “Your food is ready”. At the same time
the alert icon will flash on the face of the unit. To cancel the alert
press the STOP button on the unit.
TO USE THE UNIT AS A TIMER:
● Press the MODE button to switch the unit from Thermometer
setting to Timer setting.
● Press the clear button if the timer is running so that the timer
shows 0:00.
● COUNT UP – To use as a count up timer simply press START. The
timer will count up to a maximum of 23:59:59.
● COUNT DOWN – To use as a count down timer set the hour time
by pressing the HOUR▲ to the proper hour. To set the MINUTE
press the MIN▼ to the desired number of minutes. Once the
hours and minutes are set press start. The unit will count down to
0 and then beep for 20 seconds and the icons will beep.

Timer mode (Count up timer /Count down timer)
Count up timer Count down timer
THE TIMER CAN BE USED WHILE THE THERMOMETER IS ALSO IN USE. IT
WILL RUN IN THE BACKGROUND AND CAN BE VIEWED BY PRESSING
THE MODE TO SWITCH BACK FROM TIMER TO THERMOMETER.
Put the receiver on the transmitter base
The receiver can stand on the transmitter. (Figure 1)
Cautions:
(1) Not Intended for Use by Persons ages 12 and Under.
(2) Always wear a heat resistant glove to touch the stainless steel
probe sensor or wire during or just after cooking. Do not touch
with bare hands.
(3) Keep the stainless steel probe sensor and wire away from
children.
(4) Clean the stainless steel probe and dry thoroughly after each
and every use.
(5) Do not use the receiver in the rain, it is not waterproof.
(6) Do not expose the plug of the stainless steel probe or the plug
in hole of the transmitter to water or any liquid. This will result in a
bad connection and faulty readings.
(7) Do not expose the receiver or transmitter to direct heat or
surface.
(8) Do not use stainless steel probe in microwave oven.
(9) The Remote Thermometer registers temperatures as low as 14°F
(-10°C) and as high as 482°F (250°C). LLL will be displayed below
14°F and HHH will be displayed above 482°F.
(10) Do not use the stainless steel probe sensor above 410°F. Doing so
will deteriorate the wire.
Cleaning
(1) Always wear a heat resistant glove to touch the stainless steel
probe sensor or wire during or just after cooking. Do not touch
with bare hands.
(2) Keep the stainless steel probe sensor and wire away from
children.
(3) Wash the metal probe tip with hot soapy water and dry
thoroughly. Do not immerse the probe in water while cleaning.
(4) Wipe the transmitter and receiver with damp cloth. Do not
immerse either in water.
Figure 1
If you want not to use the grill thermometer, put the receiver and
transmitter face to face to combine them as a box for easy storage
(Figure 2).
Figure 2
HELPFUL HINTS
If the receiver and/or the transmitter display LLL or HHH instead of the
probe temperature, wait for probe to reach room temperature. If LLL
or HHH is still displayed it is likely the internal probe wire has shorted
out either through moisture or heat damage.
Information to user
“Modicationsnotauthorizedbythemanufacturermayvoidusers’
authority to operate this device”
Note: This equipment has been tested and found to comply with the
limits for a Class B digital device, pursuant to part 15 of the FCC Rules.
These limits are designed to provide reasonable protection against
harmful interference in a residential installation. This equipment
generates, uses and can radiate radio frequency energy and, if not
installed and used in accordance with the instructions, may cause
harmful interference to radio communications.
However, there is no guarantee that interference will not occur
in a particular installation. If this equipment does cause harmful
interference to radio or television reception, which can be
determined by turning the equipment off and on, the user is
encouraged to try to correct the interference by one or more of the
following measures:
- Reorient or relocate the receiving antenna.
- Increase the separation between the equipment and receiver.
- Connect the equipment into an outlet on a circuit different
from that to which the receiver is connected.
- Consult the dealer or an experienced radio/TV technician for
help.
This device complies with part 15 of the FCC Rules. Operation is
subject to the following two conditions: (1) this device may not
cause harmful interference, and (2) this device must accept
any interference received, including interference that may
cause undesired operation.
Do not immerse the probe in water while cleaning.
Do not allow the probe or probe wire to come into contact with
ames. If cooking with grill cover closed, only use medium or low
heat.
Make sure the probe tip is inserted into the meat at least 1 inch.
If the temperature displayed seems to read too high or the
temperature seems to increase too quickly check to make sure the
probe tip is not poking through the food to outside. Reposition the
probe tip in the center of the thickest part of food. Avoid touching
bone or heavy fat areas.
 Loading...