

Page 1
CDN103
User
Guide
Page 2
Features .............................................4
Functions ............................................6
Settings ..............................................9
Important Safety Instructions
This ala rm clock is d esigned to provide an acous tic alarm or alert signal a t a set time. Any
permi tted. Do not open the device an d attempt any r epair work your self.
Installation location
Prevent excessive e xposure to s moke, dust, vibration, chemicals, mois ture, heat an d direct
sunlight.
Heart Pacemaker
Always maint ain a distanc e of at least 6 inche s from implant ed heart pa cemakers t o prevent
any poss ible interference.
2
Page 3
FCC Compliance
The FCC re quires that you will be a dvised of cert ain requirement s involving the use of this e quipment.
This devic e complies with Par t 15 of the FCC Rules. Opera tion is subject to th e following two condit ions: (1) This d evice may not cause
harmful int erference, and (2) this d evice must accep t any interferen ce received, inclu ding interfere nce that may cause undesi red
NOTE: This e quipment has been te sted and found to compl y with the limits for a Cl ass B digital devic e, pursuant to Part 15 o f the FCC
rules. Th ese limits are des igned to provide re asonable prote ction against har mful interfer ence in a resident ial installation . This equipment
generate s, uses and can radiate r adio frequenc y energy and, if not inst alled and used in accor dance with the instruc tions, may cause
harmful int erference to ra dio communicatio ns. Howev
and on, the use r is enc ouraged to try to cor rect the interf erence by one or mor e of the following meas ures:
* Reorient o r relocate the re ceiving antenna.
* Increas e the separation be tween the equipment a nd receiver.
* Consult th e dealer or an exper ienced radio/T V technician for he lp.
er, there is no guar antee that inter ference will not oc cur in a particular ins tallation.
equipment .
3
Page 4

Features
• Clock and calendar display
• Dual alarm clock and snooze
• Indoor temperature
• Low battery indicator
• Selectable alarm (audio, vibration or both)
• Wireless transmission to wrist aler t
• Amber backlight
• Runs on 3 AAA batteries
4
Page 5

Clock Face Layout
5
Page 6

Button Functions
When alarm is beeping or vibrating o n wrist, pre ss any butto n except for
“SNOOZE” , and a larm will stop be eping and/or vib rating.
LIGHT/SNOOZE
• Activate light for 8 sec onds
• Stop alarm temporarily for 5 minutes when alarm sounds or
temporarily stop vib ration on wrist
MODE/ENTER
• Single pre ss to selec t the clock (Hour:Minute:Second), the clock
(Hour:Minut e:weekday), calendar, buzze r volume viewing, key to ne
after viewing c alendar or Buz zer volume viewing f or 10 seconds)
• Press and hold for 2s to act ivate cloc k setting mode
10s to pre ss up or down to select or the c lock rever ts back to t he display.
6
Page 7

UP ARROW
• In cloc k setting mode, increase the settin g value or selec t 12/24hr format
or temper ature unit or buzzer volume/ frequen c y high/low;
• In alarm set ting mode, in crease the se tting value or select alar m
mode(audio alar m/vibrati on alarm/bo th/both no t)
DOWN ARROW
• In cloc k setting mode, decreas e the setti ng value or selec t 12/24hr format
or temper ature unit or buzzer volume/ frequen c y high/low;;
• In alarm set ting mode, de crease the setting value or s elect alar m
mode(audio alar m/vibrati on alarm/bo th/both no t)
ALARM
• Single pr ess to cyc les through ‘n o rmal mode’, ‘alar m 1 view mode’, and
‘alarm 2 view mo de’;
• In alarm 1/alar m 2 view mode, press and hold key f or 2s to enter alarm 1/2
setting mode
7
Page 8

RESET
Reset s ystem, It is inside the battery compartment.
Alarm and Snooze Function
When the a larm 1/2 viewing display, press and hold A LARM 2s t o enter the set mode of
alarm ti me. The sequence is Hour--- Minute ---alarm mode ---exit.
When pr ess UP or DOWN AR ROW to modify the alarm time. Press and ho ld UP/DOWN
ARROW 2s to enter fast s et the parame ter.
When press UP or DOWN AR ROW to selec t alarm mode, c ycles through audio alarm →
vibrat ion alarm → bot h → disable;
Pres s ALARM to enter next s
When the alarm display, pre ss UP or DOWN ARROW to select alarm mode, cycles
through au dio alarm → vibration alarm → both → disable;
When the c urrent tim e equal with the alarm time and the alarm func tion enable, the
unit will beep f or 90 seconds, a ny key except for SNOOZE key will end the beep.
While the unit is beeping, if SNOOZE Motio n is triggere d, the unit will enter snooze,
the snooze time is 5 minutes. After 5 minutes, the unit will beep again.
8
et parameter or exit.
Page 9

While the u nit is beepin g, icon or the
If alarm mo de is in audio alarm mode, the alarm beep for mat is:
0 → 9s [B] / s
10 → 29s [BB] / s
30 → 90s [BBBB] / s
If alarm mo de is in vibration alarm mode, it will send RF packet every 0.5 second, The
wrist b elt will vibrate when it has received the RF packet.
Settings
Pres s and hold MODE/E NTER 2s to set the c lock at clo ck viewing scr een.
The set ting sequence as follow:
24Hr/12Hr → Hour → Min → Year → MD/DM → M onth → Day → Language →
Temperature unit → E xit.(DCF versi on)
24Hr/12Hr → Hour → Min → Year → MD/DM → M onth → Day → Language →
Temperature unit → PMCE →
Language set follow: English → German → Fre nch → Spanish → Italian
→ Exit.(WW VB version)
9
Page 10

conditions of operat ion. Press and hold UP/DOWN ARROW 2s to fast set th ese conditio ns.
Press and hold MODE /ENTER 2s to set t he buzzer volume and frequency at buzze r
volume viewing s creen.
Press UP or DOWN ARROW to select volume hi gh or low, then pre ss MODE to
Press UP or DOWN to selec t buzzer high /low frequency, then press MODE to
Temperature Setting
The indoor temperature will sample ever y 30 sec.
The tempe rature range:
Indoor:
-10.0˚C (14.0˚F) → 60.0˚C (110.0˚F),
➢ > 60.0˚C, disp lay “HH.H”;
➢ < –10.0˚C, display “LL .L”.
10
Page 11

Connect-check with Wrist unit
Transmitter: If alarm 1 or alarm 2 h ave been set wit h vibration, t hen press and hold
DOWN ARROW 2S to send RF co nnect-check command, (include alarm 1 and alarm 2)
Transmitter: R F command will keep tr ansmitt ing for 90s, pr ess any key excep t for
SNOOZE to e nd connec t-c heck with wr ist unit
Transmitter:
Wrist unit : During conn ect-check with wrist unit, wrist unit also must enter connectchec k mode, this mode can be enter f or 10s after p ower on
Wrist unit : If wrist unit has r eceived conne ct-check c ommand, it will check channel
conne cted with th is transmitt er;
11
Page 12

Default Settings
The display mode is Hour—Minute--Second.
Language: English.
The clock time is Jan 1,2012 0:00.
The alarm time is 0:00 and the alarm is disable.
The time format is 24 Hr (DCF) or 12Hr(WWVB).
The temperature unit is ˚C (DCF) or ˚F (WWVB).
Maintenance and Warranty
Maintenance
• Please clean your equipment’s surfaces with a soft, lint-free
cloth.
• Never use cleaning agents or solvents.
12
Page 13

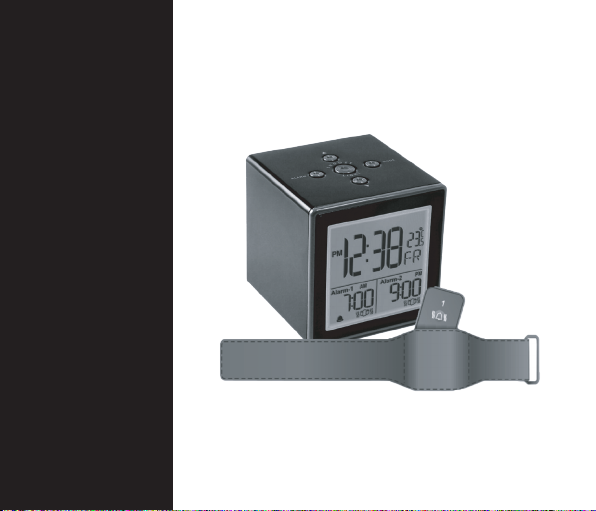
Radio-controlled alarm clock
with vibrating wristband
Fig. 1
A 2
A 1
A 4
A 5
A 7
A 8
Buttons (Fig. 1 )
B 1: ALARM button
B 2:
B 3: MODE button
B 4:
B 5: SNOOZE/LIGHT button
:
button
button
A 3
A 6
B 2
B 1
B 5
Radio-controlled alarm clock
Display (Fig. 1)
A 1: Battery symbo l
A 2: Snooze symbol
A 3: DCF signal
A 4: AM or PM (12-hours sy stem)
A 5: Time with seconds or d ay-of-the-week / Date
A 6: Indoor temperature
A 7: Alarm 1 / Alarm 2
A 8: Alarm symbol
:
B 3
B 4
Important information on product safety !
Do not pl ace your product near extreme temperatures, vibrat ions or
•
shocks.
13
Page 14

Radio-controlled alarm clock
with vibrating wristband
Fig. 2
D 1 D 5
C 1
Housing (Fig. 2)
C 1: Battery compartment
Radio-controlled vibrating wristband (Fig. 2)
D 1: Switch CH1/OFF/CH2
:
14
D 3
D 4
D 2
 Loading...