

Page 1
Page 2

Table of Contents
1 Introduction, overview ..................................................................................... 7
1.1 General legal notes .................................................................................... 7
1.2 EVVA support ............................................................................................ 8
1.3 Legal notice .............................................................................................. 9
1.4 Signs and symbols ...................................................................................10
2 System architecture ........................................................................................11
2.1 Locking components .................................................................................12
2.1.1 AirKey cylinder...................................................................................12
2.1.2 AirKey wall reader ..............................................................................14
2.2 AirKey app ..............................................................................................15
2.3 Smartphones ...........................................................................................15
2.4 AirKey media ...........................................................................................16
2.5 AirKey online administration ......................................................................16
2.5.1 System requirements..........................................................................16
2.6 EVVA KeyCredits ......................................................................................16
2.7 Coding station..........................................................................................17
2.7.1 System requirements..........................................................................17
2.8 Emergency power device ...........................................................................17
3 System overview — Procedure .........................................................................19
3.1 Installing software and components ............................................................19
3.2 Setting up the locking system ....................................................................19
3.3 Creating authorisations .............................................................................20
3.4 System administration, reading out information ...........................................20
4 Commissioning ...............................................................................................21
4.1 Glossary ..................................................................................................21
4.2 Installing the AirKey app ...........................................................................22
4.3 Registering the AirKey online administration ................................................22
4.4 Login ......................................................................................................26
4.5 Installing coding stations ...........................................................................27
4.6 Topping up credit .....................................................................................29
4.7 Creating persons ......................................................................................30
4.8 Creating smartphones ...............................................................................32
4.9 Registering smartphones ...........................................................................34
2
Page 3

4.10 Assembling locking components ..............................................................36
4.10.1 AirKey cylinder...................................................................................36
4.10.2 AirKey wall reader ..............................................................................37
4.11 Adding locking components ....................................................................37
4.12 Adding cards, key tags and combi keys to the locking system .....................40
4.13 Assigning media to persons ....................................................................42
4.14 Assigning authorisations .........................................................................44
4.14.1 Permanent access ..............................................................................45
4.14.2 Periodic access...................................................................................46
4.14.3 Single access .....................................................................................47
4.14.4 Individual access ................................................................................48
4.15 Creating authorisations ..........................................................................50
5 AirKey online administration ............................................................................51
5.1 AirKey login .............................................................................................51
5.2 AirKey logout ...........................................................................................53
5.3 Administrators .........................................................................................54
5.3.1 Creating administrators .......................................................................54
5.3.2 Editing administrators .........................................................................56
5.3.3 Deleting administrators .......................................................................57
5.4 KeyCredits for access authorisations ...........................................................58
5.4.1 Topping up credit ...............................................................................58
5.5 System settings .......................................................................................60
5.5.1 Time zones ........................................................................................60
5.5.2 Further settings .................................................................................63
5.6 Locking system ........................................................................................64
5.6.1 Overview of locking components ..........................................................64
5.6.2 Adding locking components .................................................................65
5.6.3 Editing locking components .................................................................70
5.6.4 Removing locking components .............................................................73
5.6.5 Areas ................................................................................................74
5.6.6 Creating areas ...................................................................................74
5.6.7 Assigning locking components to areas .................................................75
5.6.8 Cancelling locking component assignments to an area ............................76
5.6.9 Deleting areas ...................................................................................77
5.6.10 Authorisation overview .......................................................................78
3
Page 4

5.6.11 Maintenance tasks ..............................................................................80
5.7 Media & persons .......................................................................................83
5.7.1 Overview of persons ...........................................................................83
5.7.2 Creating persons ................................................................................84
5.7.3 Editing persons ..................................................................................85
5.7.4 Deleting persons ................................................................................86
5.7.5 Assigning persons to media .................................................................87
5.7.6 Overview of media .............................................................................89
5.7.7 Creating media ..................................................................................89
5.7.8 Creating smartphones .........................................................................91
5.7.9 Creating cards ...................................................................................94
5.7.10 Editing media ....................................................................................95
5.7.11 Assigning media to persons .................................................................96
5.8 Authorisations ..........................................................................................97
5.8.1 Assigning authorisations .....................................................................98
5.8.2 Granting permanent access authorisations ............................................99
5.8.3 Granting periodic access authorisations ............................................... 101
5.8.4 Granting single access authorisations ................................................. 103
5.8.5 Granting individual access authorisations ............................................ 104
5.8.6 Creating authorisations ..................................................................... 107
5.8.7 Changing authorisations .................................................................... 108
5.8.8 Deleting authorisations ..................................................................... 109
5.8.9 Deactivating media ........................................................................... 111
5.8.10 Removing deactivated media ............................................................. 112
5.8.11 Reactivating media ........................................................................... 113
5.8.12 Duplicating media ............................................................................ 115
5.8.13 Emptying media ............................................................................... 117
5.8.14 Cancelling assignments ..................................................................... 117
5.8.15 Removing media .............................................................................. 121
5.9 Protocols ............................................................................................... 122
5.9.1 Locking component protocol .............................................................. 122
5.9.2 Media protocol ................................................................................. 125
5.9.3 System protocol ............................................................................... 127
5.10 Support logins .................................................................................... 127
5.10.1 Creating support logins ..................................................................... 128
4
Page 5

5.10.2 Blocking support logins ..................................................................... 129
5.11 Help .................................................................................................. 130
6 AirKey app ................................................................................................... 131
6.1 Registering smartphones ......................................................................... 131
6.2 Authorisation overview ............................................................................ 134
6.3 Security function .................................................................................... 136
6.3.1 Activating PIN codes ......................................................................... 138
6.3.2 Changing PIN codes .......................................................................... 139
6.3.3 Deactivating PIN codes ..................................................................... 139
6.4 Entering PIN codes ................................................................................. 141
6.5 Updating smartphones ............................................................................ 142
6.6 Connecting to components ...................................................................... 142
6.7 Maintenance mode ................................................................................. 143
6.8 Adding AirKey components ...................................................................... 146
6.8.1 Adding media .................................................................................. 147
6.8.2 Adding locking components ............................................................... 149
6.9 Removing AirKey components .................................................................. 152
6.10 Protocol data in the AirKey app ............................................................. 154
6.11 Information on the installed AirKey app ................................................. 156
7 Operating AirKey locking components ............................................................. 157
7.1 Access with smartphones ........................................................................ 157
7.2 Access with media, such as cards, key tags or combi keys ........................... 158
8 AirKey system operation and maintenance ...................................................... 159
8.1 Updating locking components .................................................................. 159
8.2 Updating smartphones ............................................................................ 162
8.3 Updating media ...................................................................................... 163
8.4 Updating locking component firmware ...................................................... 166
8.5 Updating the keyring version of media ...................................................... 173
8.6 Updating smartphones' app versions ......................................................... 179
8.7 Replacing batteries and using the emergency power device ......................... 179
8.7.1 AirKey cylinder: ............................................................................... 180
8.8 Repair options ........................................................................................ 181
8.8.1 Installing replacement components .................................................... 181
8.8.2 Removing locking components without replacements ............................ 185
8.8.3 Revoking maintenance tasks for repair options .................................... 189
5
Page 6

9 Emergency media ......................................................................................... 191
9.1 Issuing emergency media ........................................................................ 191
10 Working with several AirKey systems ........................................................... 192
10.1 Sharing locking components with other locking systems ........................... 192
10.2 Adding locking components from other locking systems ........................... 193
10.3 Assigning authorisations for shared locking components ........................... 195
10.4 Viewing authorisations for shared locking components ............................. 196
10.5 Revoking shared locking components ..................................................... 197
10.6 Using smartphones in several systems ................................................... 198
11 Locking component signals ......................................................................... 199
12 Values and limits of AirKey ......................................................................... 201
12.1 AirKey online administration ................................................................. 201
12.2 AirKey locking components ................................................................... 201
12.3 Cards, key tags or combi keys .............................................................. 201
12.4 AirKey app ......................................................................................... 201
13 When are KeyCredits deducted? .................................................................. 202
14 Troubleshooting ........................................................................................ 203
14.1 No communication within the system ..................................................... 203
14.2 Locking component has trouble identifying or is unable to detect media ..... 203
14.3 Media no longer detected ..................................................................... 204
14.4 Unable to unscrew the thumb turn of an AirKey cylinder .......................... 204
14.5 The locking component signals "Hardware error" ..................................... 205
14.6 The electronic thumb turn is hard to operate .......................................... 205
15 Important information ................................................................................ 206
15.1 System .............................................................................................. 206
15.2 Using locking components .................................................................... 206
16 List of illustrations ..................................................................................... 212
6
Page 7

1 Introduction, overview
This AirKey system manual contains information on installation, operation and the controls of the electronic AirKey locking system, consisting of the AirKey online administration, app, cylinders and wall readers for the AirKey master key system.
The products and/or user software described in the AirKey system manual must exclusively be operated by personnel that is adequately qualified for the corresponding task.
Qualified personnel is able to identify risks when handling products/systems and prevent
potential hazards on the basis of their expertise.
1.1 General legal notes
> EVVA concludes the contract on the use of AirKey exclusively on the basis of its Gen-
eral Terms of Business (EVVA-GTB) as well as its General Licensing Conditions (EVVAALB) with regard for the software for the product. Please refer to:
http://www.evva.at/terms-and-conditions/en/.
> We explicitly notify clients that the use of the locking system subject to this contract
may trigger legal approval, reporting or registration obligations, in particular with regard to data protection (e.g. if you are establishing a comprehensive information system), as well as grant the right of co-determination to staff in the event of use on
corporate premises. Customers, clients and end users shall be responsible for product
use in compliance with legal stipulations.
> The aforementioned information must be observed and passed on to operators and
users as per the defined manufacturer product liability according to product liability
legislation. Non-compliance releases EVVA from any liability.
> Any use deemed as non-compliant with the contract or as unintended use, any repair
work or modifications that have not been explicitly approved by EVVA as well as all
types of incorrect servicing may cause malfunctions and are prohibited. Any modifications that have not been explicitly approved by EVVA render claims to liability, warranty as well as any separate guarantee claims void.
> Architects and advisory institutions are obliged to request all necessary product in-
formation from EVVA and take into account all such information to comply with obligations regarding information and instructions under the Product Liability Act. Specialist retailers and installers must comply with the information in EVVA
documentation and they must pass on such information to customers, if applicable.
7
Page 8

1.2 EVVA support
AirKey is a sophisticated and tested locking system. However, should you still require
support, please do not hesitate to contact your EVVA-Partner.
A list of certified EVVA-Partners is available on our homepage at
http://www.evva.at/partners/search-for-retailers/en/
Set the filter to "Electronic system partners" to explicitly filter by EVVA-Partners with expertise on electronic EVVA products.
Use the EVVA online form for certain types of support requests. We currently provide the
online form for the following situations:
You have exceeded the maximum attempts to enter credit codes.
Unable to add credit
AirKey login unavailable
Unable to log in Forgot user ID and/or email address?
Click the following link to access the online form:
http://support.evva.at/airkey/en/
For general information on AirKey visit our homepage at
http://www.evva.com/airkey/en/
8
Page 9

1.3 Legal notice
1. English edition, July 2015
This edition shall not longer be valid upon publication of a new system manual. Please
download the most recent version of the system manual from our homepage.
All right reserved. This system manual must not be reproduced, copied or adapted neither in full or in part using electronic, mechanical or chemical methods or any other procedures without written consent by the publisher.
This manual may contain defects or misprints resulting from printing. However, the data
in this system manual is revised regularly and corrections are incorporated. We shall not
assume any liability for technical or printing errors and their potential consequences.
All trademarks and industrial property rights reserved.
We reserve the rights to make adaptations and update the document without prior notification.
Legal Notice
Publisher
EVVA Sicherheitstechnologie GmbH
Content Management
EVVA Sicherheitstechnologie GmbH
Technical content
Florian Diener, Michael Eberhardt,
Hanspeter Seiss, Johannes Ullmann
9
Page 10
Warning, risk of material damage in the event of non-compliance
with the corresponding safety measures.
Notices and additional information
Hints and recommendations
Error messages
Options
1.4 Signs and symbols
Throughout the system manual, sequences of commands are illustrated as follows.
For example: Media & persons > Create persons menu or for commands and buttons,
such as Save.
10
Page 11
All transferred data is secured as end-to-end data according to the most
recent encryption standards, from EVVA servers to locking components.
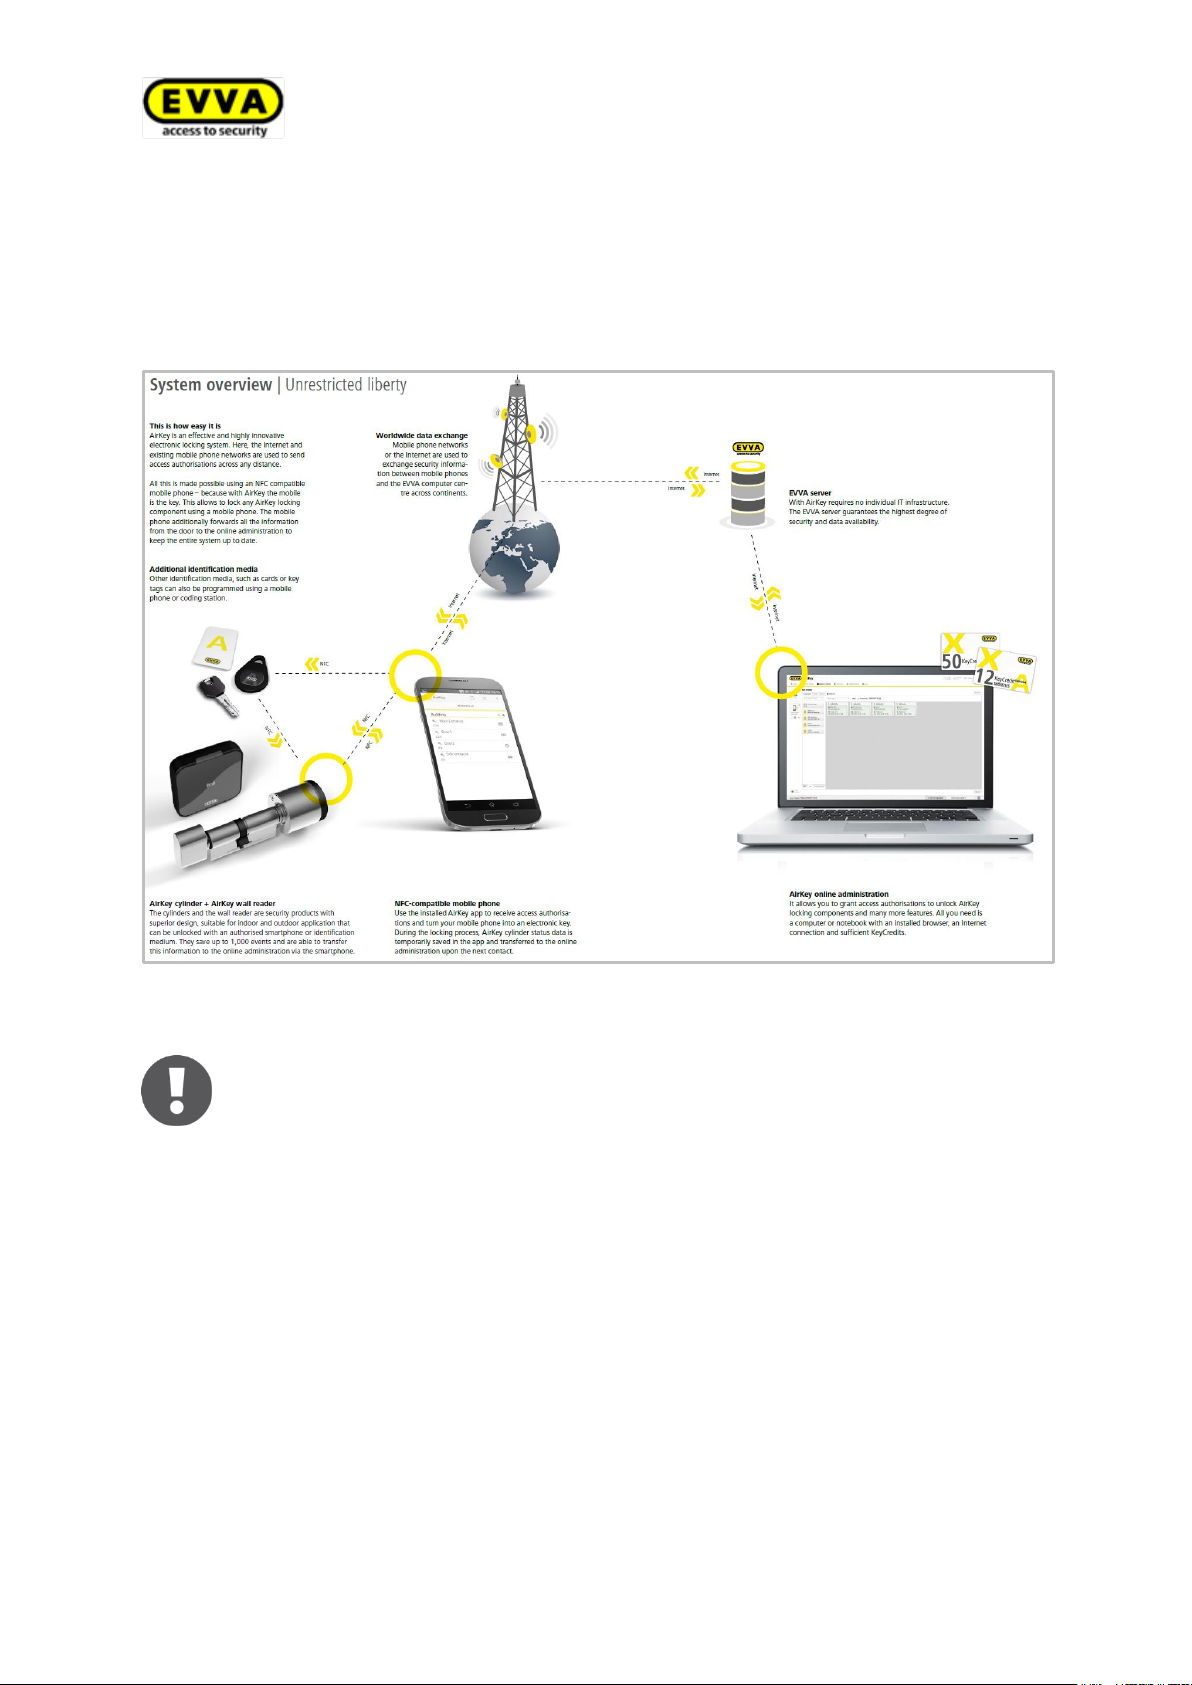
2 System architecture
The following figure provides an overview AirKey components and their communication
methods. This is followed by descriptions of the individual components.
Figure 1: System architecture
11
Page 12
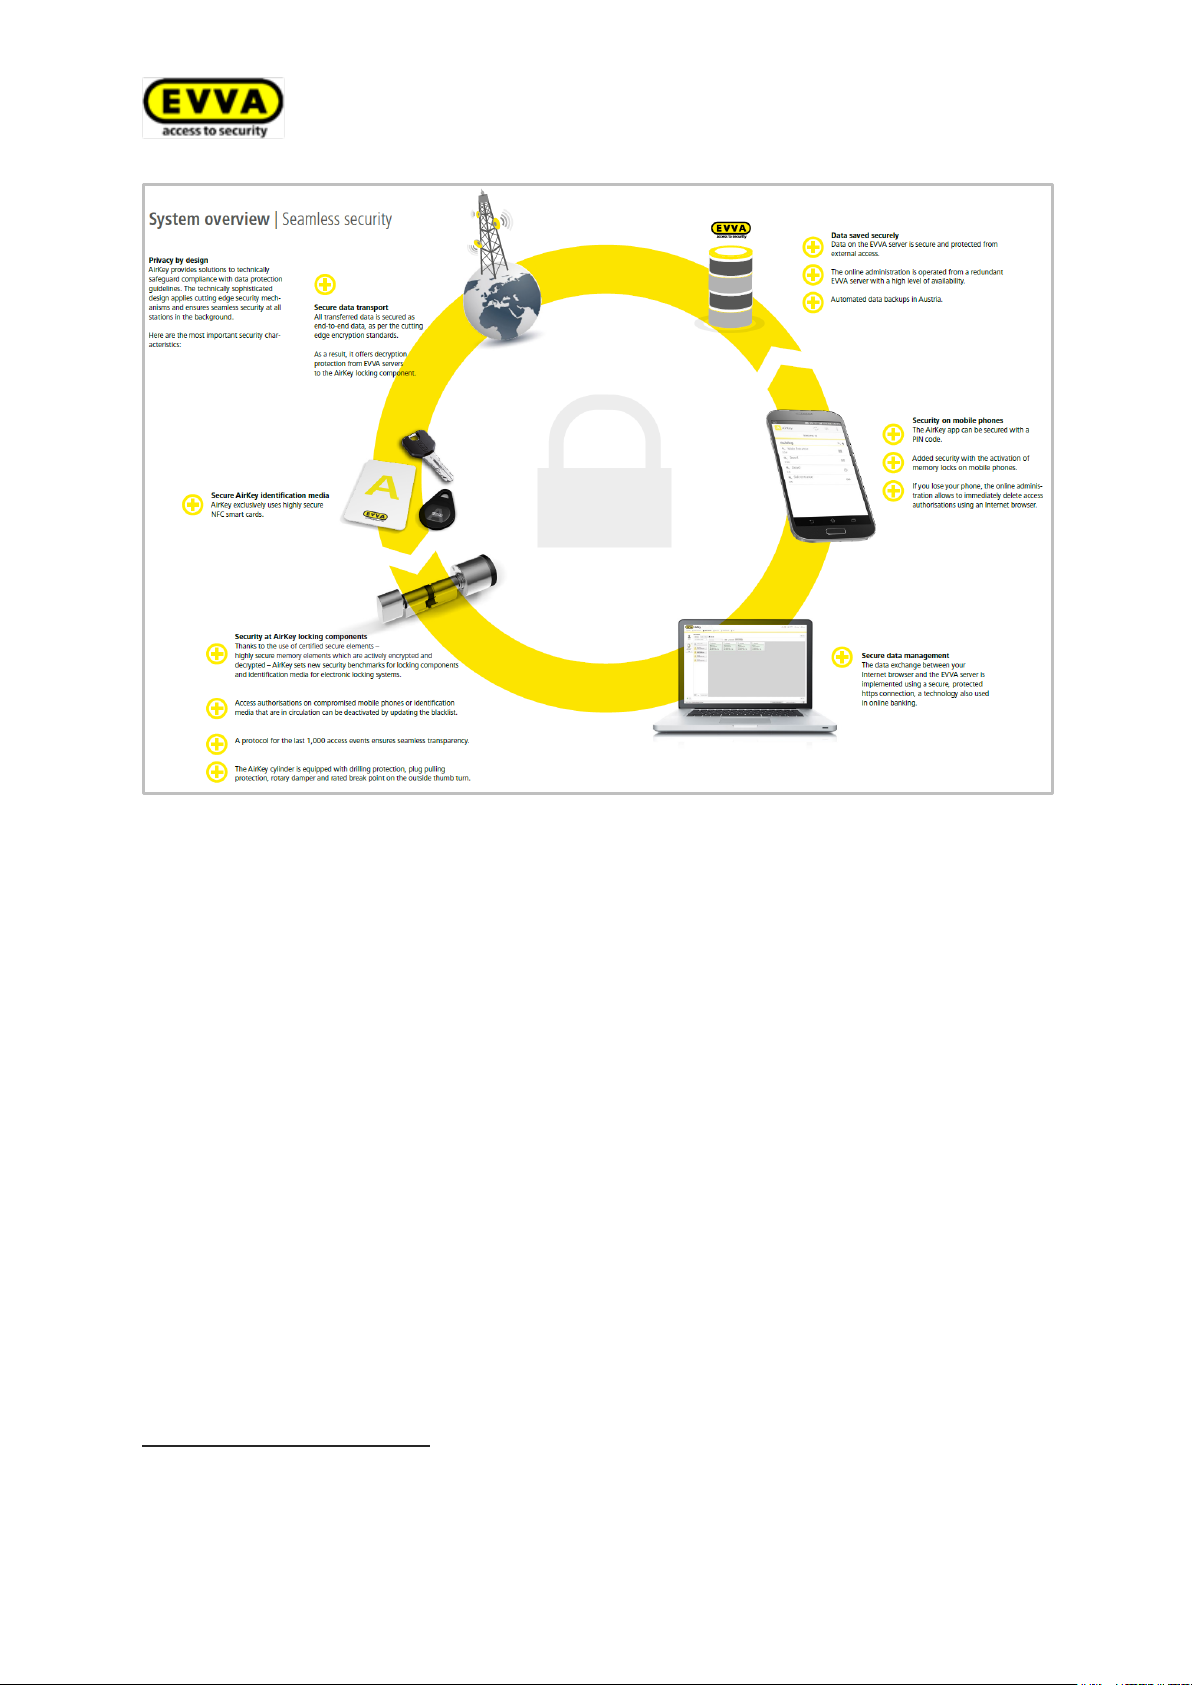
Figure 2: System overview — seamless security
2.1 Locking components
Locking components control access at the doors. Depending on the authorisation, the
locking component enables or denies access.
2.1.1 AirKey cylinder
AirKey cylinders are battery-operated locking components. They are certified for indoor
and outdoor use. Depending on the specific requirements, AirKey cylinders may also be
suitable for use in areas that are critical to security. AirKey cylinders boast mechanical
protection from vandalism and manipulation.
AirKey cylinders are suitable for installation in fire doors and emergency exit doors*.
AirKey cylinders are available as half cylinders or double cylinders. Double cylinders are
available as one-sided or double-sided access models. One-sided access models merely
feature electric authorisation components on the outside, whereas users must provide
authorisation on both sides with the double-sided access model. The electronic thumb
turn on the identification side rotates freely unless authorisation is provided. The black
plastic cap of the AirKey cylinder is the reader unit.
*
The FAP anti-panic function may be required for use in emergency exit and panic doors,
depending on the mortise lock. Please observe the corresponding information and certificates from lock manufacturers as well as the product code in the order.
12
Page 13

Please note that a door is not automatically locked after having closed it.
Doors must be locked manually or alternatively using corresponding,
additional equipment.
If users hold an authorised medium against the thumb turn, the cylinder engages briefly
to allow to turn the electronic thumb turn and operate the lock. In this context, also ob-
serve the information on Operating AirKey locking components.
Please check the AirKey cylinder you selected is suitable for your application.
We have made the required data sheet available in the download section of our homepage: http://www.evva.at/products/electronic-locking-systems-access-
control/airkey/assembly-instructions-datasheets/en/
AirKey cylinders feature visual and acoustic signals. Please refer to the Locking compo-
nent signals section for descriptions of the individual signals.
Follow the assembly manual enclosed with the packaging during assembly of the AirKey
cylinder or the online assembly clip at http://video.evva.com/tutorials/airkey/eapzkz-
s/eapzkz-s-1/en/
Please also note the important information on Using locking components.
Assembly tool for the AirKey cylinder
AirKey cylinders protect against manipulation with a special mechanism. The electronic
thumb turn can be removed with special tools only. The required assembly tools for assembly, disassembly and those to change the batteries are not enclosed with the AirKey
cylinder as standard and for this reason, they must be ordered separately.
Product code: E.ZU.PZ.ZW.V1
13
Page 14

Please note that one AirKey control unit each is required to operate one
AirKey wall reader.
2.1.2 AirKey wall reader
AirKey wall readers are suitable for indoors and outdoors, surface-mounted or flush installation and for areas critical to security.
Please use the dedicated seal enclosed with the product for use outdoors or in areas that
are exposed to water as well as in the event of surface-mounted installation and observe
the information in the assembly manual.
AirKey wall readers are connected to the AirKey control unit using CAT5 cables (max. 100
m, Rloop max. = 2 Ohm) to supply them with power. The AirKey control unit is supplied
with power by the mains adapter and in the event of a power cut it features a data buffer
for a maximum of 72h, providing the AirKey control unit had previously been in operation
for a minimum of six hours.
AirKey wall reader and control unit combinations can be used to operate electronic locking elements, such as motorised cylinders, sliding and swinging doors, etc.
Please check carefully to make sure the AirKey product you selected is suitable for your
intended application/assembly situation. We have made the required data sheet or assembly manual available in the download section of our homepage:
http://www.evva.at/products/electronic-locking-systems-accesscontrol/airkey/assembly-instructions-datasheets/en/
2.2 Maintenance
Two CR2 batteries are required to operate each AirKey cylinder. We recommend you exclusively use spare parts supplied by EVVA and replace the seals enclosed in the battery
replacement set each time you replace the batteries to continue to guarantee the IP protection class.
This safeguards compliance with the assured AirKey cylinder performance characteristics
(battery life, IP protection class and permissible temperature range).
Cylinder seals must be replaced by trained personnel after two years at the latest. The
durability of the seals depends on component use and the installation environment, i.e.
the service life will be shorter in environments affected by direct sunlight or in hot, cold
and dusty environments, etc. Immediately replace seals upon identifying any damage,
such as cracks, deformation or atypical appearance to continue to guarantee the corresponding IP protection. EVVA recommends to always have the seals replaced by trained
personnel as part of battery replacements. Any regular, statutory inspections of the locking components must be carried out as per the local regulations applicable in the country
of installation (e.g. escape doors).
14
Page 15
Battery replacement set
incl. 8 sealing gaskets, 2x CR2 batteries)
Productcode: E.TE.PZ.PZ14
(Batteries and seals are each also available separately.)
http://video.evva.com/tutorials/airkey/etepzpz14/
EVVA provides the AirKey app in the Google Play store free of
charge.
https://play.google.com/store/apps/details?id=com.evva.airkey
Internet connections may incur extra charges. For this purpose, please note
your provider agreement.
Please note that the smartphones' compatibility depends on many factors
and not every smartphone that meets the minimum requirements guaran-
tees compatibility. For this reason, EVVA comprehensively tests
smartphones. For a permanently up-to-date list of tested smartphones suit-
able for use with AirKey go to http://www.evva.at/products/electronic-
locking-systems-access-control/airkey/compatible-smartphones/en/
2.3 AirKey app
The AirKey app is required to operate AirKey locking components with your smartphone.
You can also use your smartphone to add or update locking components and media to
your AirKey system. Most AirKey app features require an active Internet connection.
However, locking components can also be operated offline.
2.4 Smartphones
Smartphones must meet the following minimum requirements for use in AirKey systems:
> Smartphones with NFC functionality
> Android
> AirKey app from the Google Play store
TM
operating system, from 4.0.0
15
Page 16
Media, such as cards, key tags or combi keys are supplied in factory
state. You must add media to your AirKey locking system before being
able to use them.
You require a valid email address to register an AirKey system.
2.5 AirKey media
Tested smartphones, cards, key tags and combi keys are currently available as media.
2.6 AirKey online administration
The AirKey online administration is EVVA's online software solution to manage AirKey
locking systems. The electronic AirKey locking system is compatible with all common Internet browsers and operating systems and does not require local software installations
or dedicated IT infrastructure. EVVA is responsible for live operation and maintenance of
AirKey servers.
2.6.1 System requirements
> Operating systems:
Windows XP (or higher), MacOS 10.6 (or higher), Linux
> Currently compatible with the following browsers:
Internet Explorer 9+, Chrome 14+, Safari 6+, Firefox 6+
> Internet connection (768 kBit/s or faster)
> Optionally: USB port 2.0 for coding station
> Internet ports 7070 and 8072 must be available
Use the "Port connection check" to check your network:
http://www.evva.at/services/port-test-page/en/
2.7 EVVA KeyCredits
> KeyCredits are required to operate AirKey locking systems, for instance to assign or
change access authorisations. KeyCredits are available in different packages, either
on the basis of quantity as quantity credit (defined number of enabled changes to authorisations within an unrestricted period of time) or on the basis of time (unrestricted number of enabled changes to authorisations within a defined period of time). The
matching KeyCredit package for every application is available from specialist EVVA retailers, tailored to the size and dynamic characteristics of your AirKey system. Please
refer to the AirKey product catalogue for more detailed information on the available
packages.
16
Page 17
Do not place more than one medium on the coding station. Otherwise media may be incorrectly configured. Exclusively use media that have been
approved by EVVA.
The coding station is optionally available.
Product code: E.ZU.CS.V1
The emergency power device is optionally available.
Product code: E.ZU.NG.V1
2.8 Coding station
Add or update AirKey locking components and media to your AirKey system using the
optionally available coding station.
2.8.1 System requirements
> 1 USB port
> Java 7 or higher
> HID Omnikey 5421 driver for coding station required
The LED indicates the coding station is ready for operation once it has been connected.
Disconnect and reconnect if the coding station does not indicate it is ready for operation.
If necessary, re-install the coding station drivers.
2.9 Emergency power device
All locking components feature an interface at the front of the locking component, below
the EVVA logo. Slightly press towards the inside on the left-hand side of the logo (near
the "E") and fold out on the right-hand side (near the "A") to access it. The installed interface is intended for emergency power supply only and it is not required as part of
normal operation.
The emergency power device supplies locking components with power to enable operation in the event that the batteries have gone flat. For this purpose, connect the emergency power device connecting cable to the corresponding interface and then switch it
on. No other interactions with the emergency power device are required. A medium with
valid authorisation is still required to operate the AirKey locking component. In this process, please note that this must be a permanent authorisation without a restricted validi-
ty period. Please refer to the Emergency media section for more detailed information.
Immediately replace batteries after having used the emergency power device to operate
locking components and subsequently update locking components to also enable access
with additional media. Please refer to the Replacing batteries and using the emergency
power device section for more detailed information.
17
Page 18

Please note that the AirKey wall reader cannot be supplied with power using
the emergency power device, it is supplied with power using an external
power supply in combination with the control unit.
18
Page 19
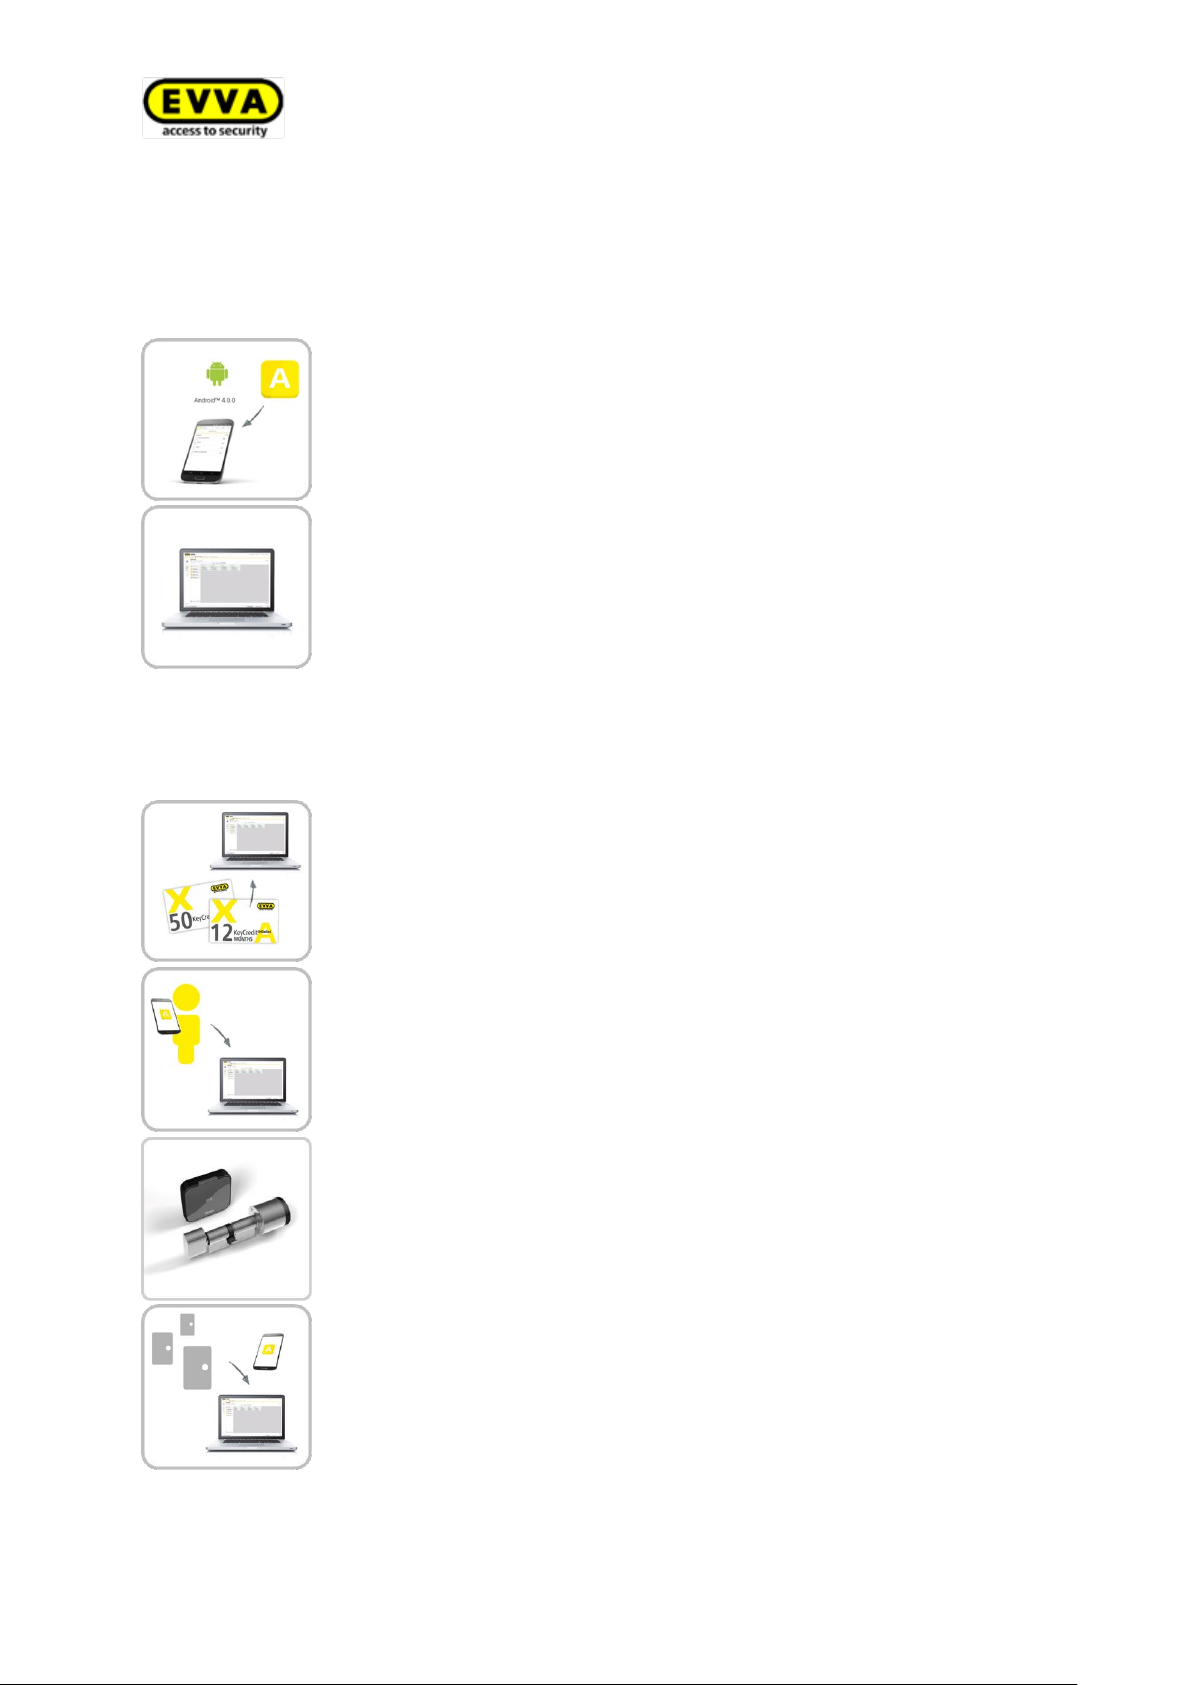
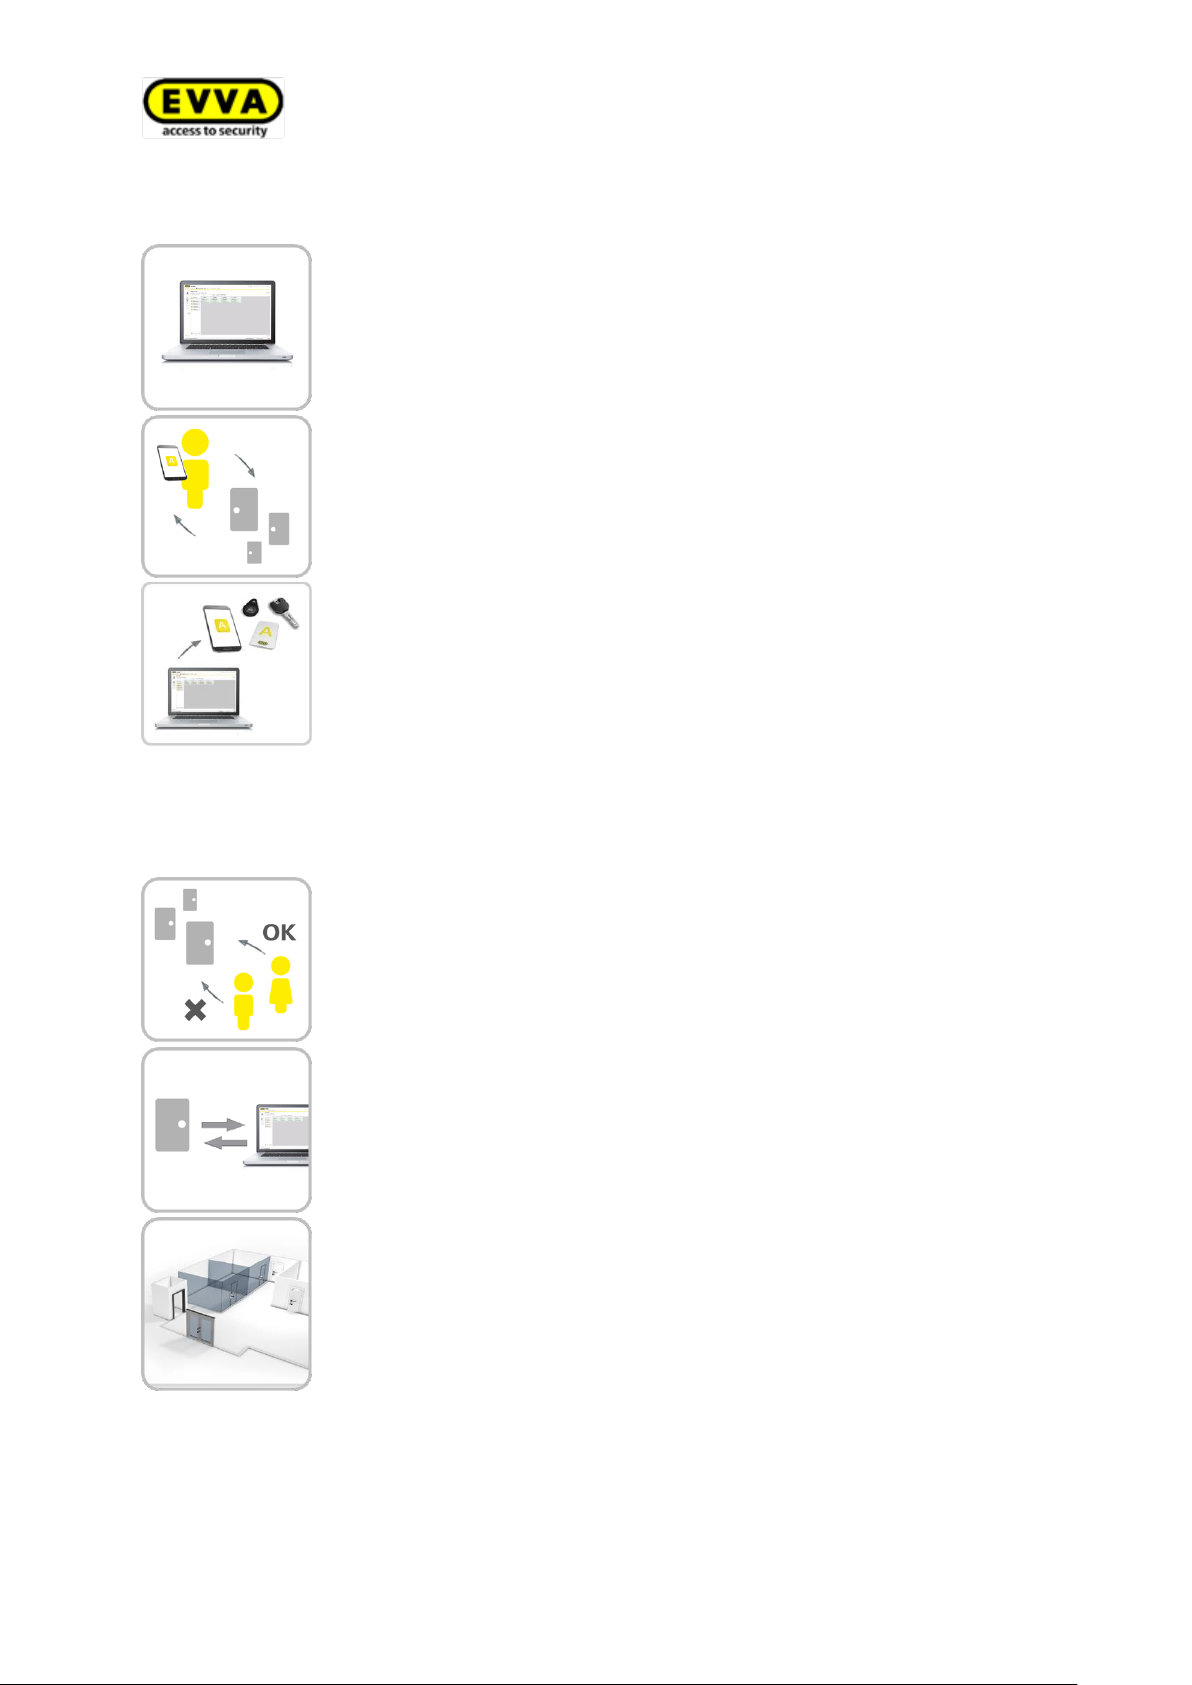
Download the AirKey app
Simply install the free AirKey app.
Registration
Register to the AirKey online administration with your browser to create a new locking system.
Use KeyCredits
Simply enter one or several KeyCredit codes in the AirKey online administration.
Register smartphones
Register any smartphones with NFC functionality to grant access to
the locking system.
Installing locking components
Install the AirKey locking component (e.g. in doors, key switches or
tubular safes).
Adding locking components
Use an NFC-compatible smartphone in maintenance mode to add locking components to the locking system.
3 System overview — Procedure
3.1 Installing software and components
3.2 Setting up the locking system
19
Page 20
Enter changes
Use the AirKey online administration to change authorisations and
settings.
Create access authorisations
Simply drag-and-drop access components to smartphones or media to
create access authorisations.
Creating media
Simply transfer access authorisations to smartphones and create media.
Blocks
Access events and the battery status of media are temporarily saved
in the locking component and transferred to the AirKey online administration upon the next contact.
Updates
In this process, each AirKey app user can update system information
between locking components/media and the AirKey online administration.
Who accessed what and where?
Access events and door information is available online at any time,
such as the number of times the lock has been operated, user access
events, times or the battery status.
3.3 Creating authorisations
3.4 System administration, reading out information
20
Page 21
Visit our homepage at http://video.evva.com/tutorials/airkey/software/en/
for a screencast describing the first steps and commissioning of the AirKey
systems.
Designation
Function
Client
Owner of the locking system with a unique customer number.
Administrator
Administrators are responsible for administrative tasks within
clients' AirKey online administration. Administrators centrally
manage the system and they always have comprehensive authorisation.
It is possible to create several (equally authorised) administrators for one client. A minimum of one administrator must be defined for each AirKey locking system.
Person
Persons using authorisation media.
Persons are assigned to locking components and authorised to
access areas with media.
Service technician
Service technicians are responsible for on-site locking component updates and maintenance. They are equipped with a
smartphone with a maintenance authorisation for the locking
system. They are exclusively authorised to add or remove components from a system. The smartphone with enabled maintenance mode grants service technicians so-called "construction
site authorisations" which also enable to block locking components in factory state.
4 Commissioning
This section describes the first steps to commission the AirKey system. The following sections describe individual AirKey system functions in detail.
EVVA offers the following materials to support locking component assembly:
> Assembly instructions:
EVVA provides non-verbal assembly instructions to support locking component assembly. They are enclosed with the packaging of the corresponding product or available to download from our homepage at http://www.evva.at/products/electronic-
locking-systems-access-control/airkey/assembly-instructions-datasheets/en/.
> Videos:
We have provided assembly video clips on our homepage at
http://video.evva.com/en/.
4.1 Glossary
The following terms are used within the context of AirKey:
21
Page 22
The AirKey app for your smartphone is available to download free
of charge from the Google Play store.
https://play.google.com/store/apps/details?id=com.evva.airkey
4.2 Installing the AirKey app
> Download the AirKey app from the Google Play store.
> Follow the AirKey app installation instructions on your smartphone.
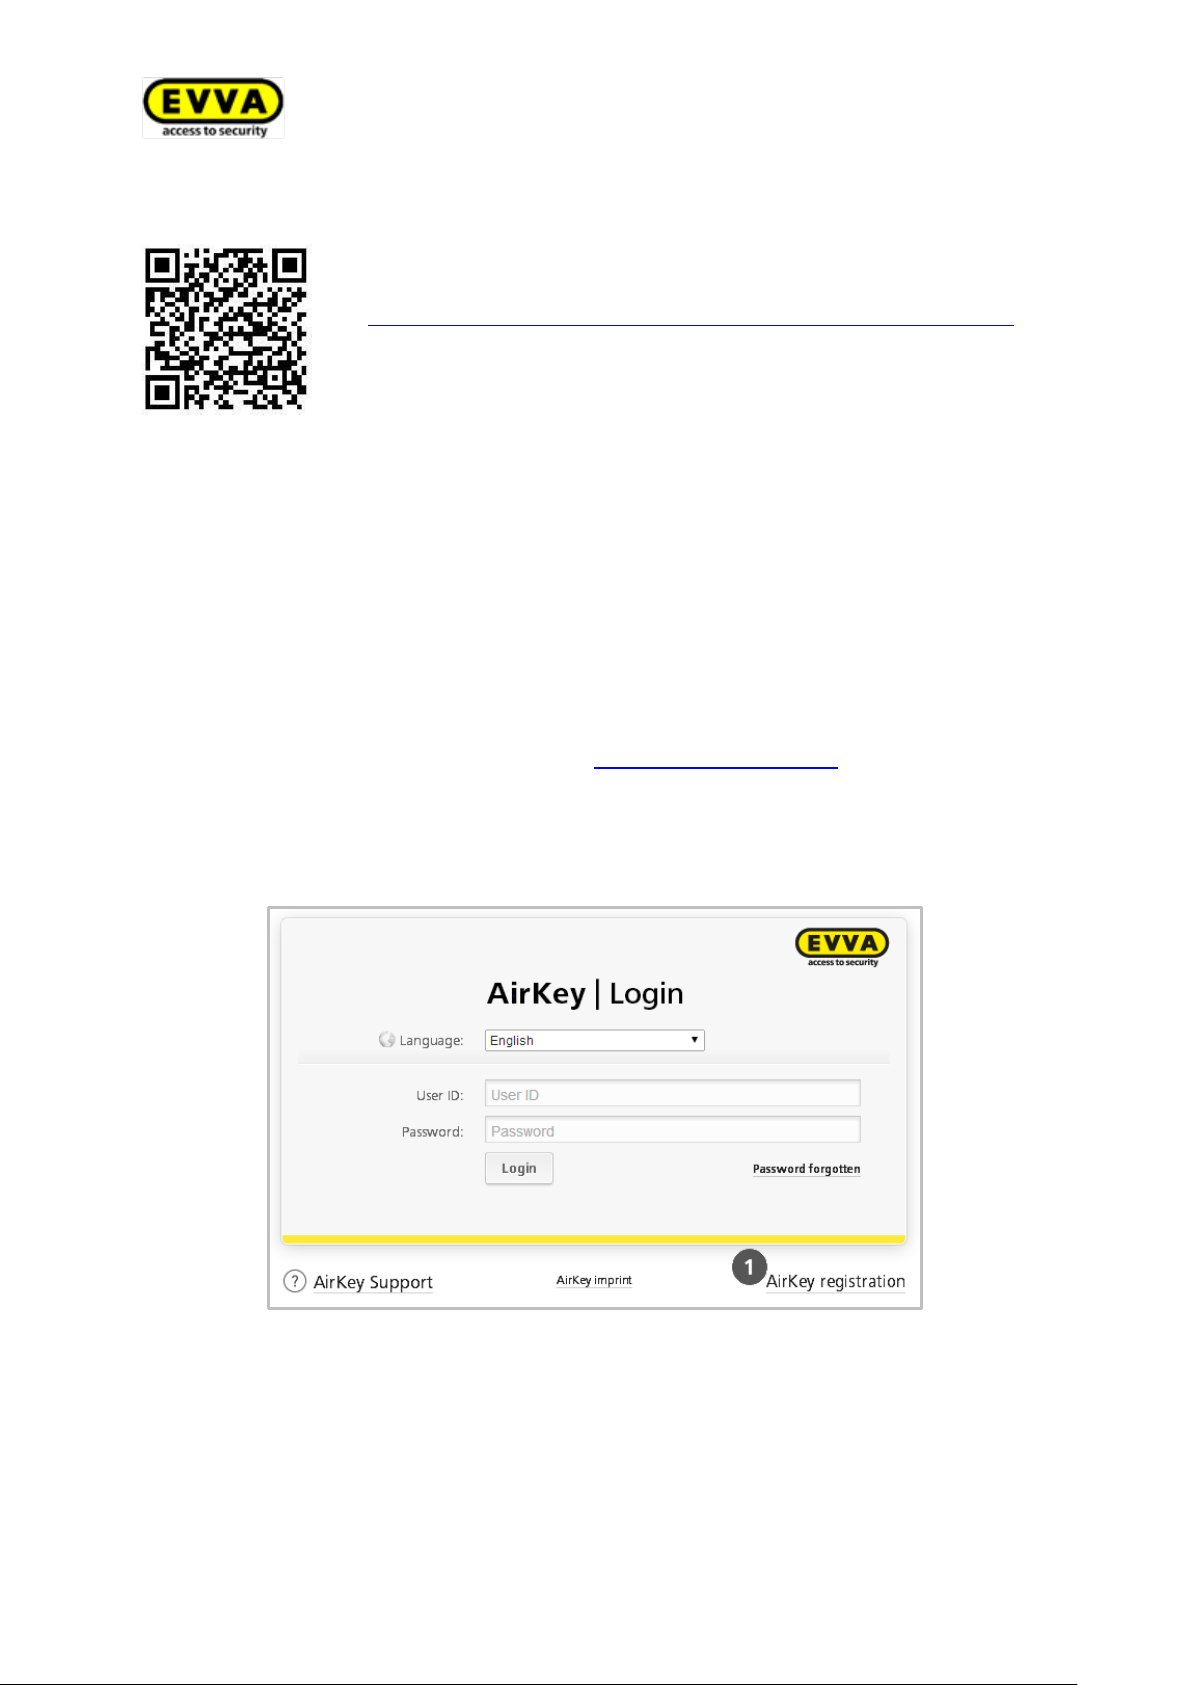
4.3 Registering the AirKey online administration
Register with EVVA using a valid email address to be able to use the AirKey online administration.
> Open the following page in your browser https://airkey.evva.com.
The AirKey login screen appears.
> Select your preferred language.
> Click AirKey registration.
Figure 3: AirKey | Login
22
Page 23
If necessary, you can retrospectively change your customer data at any
time. For this purpose, click Access control system > Customer data in
the main menu of the AirKey online administration.
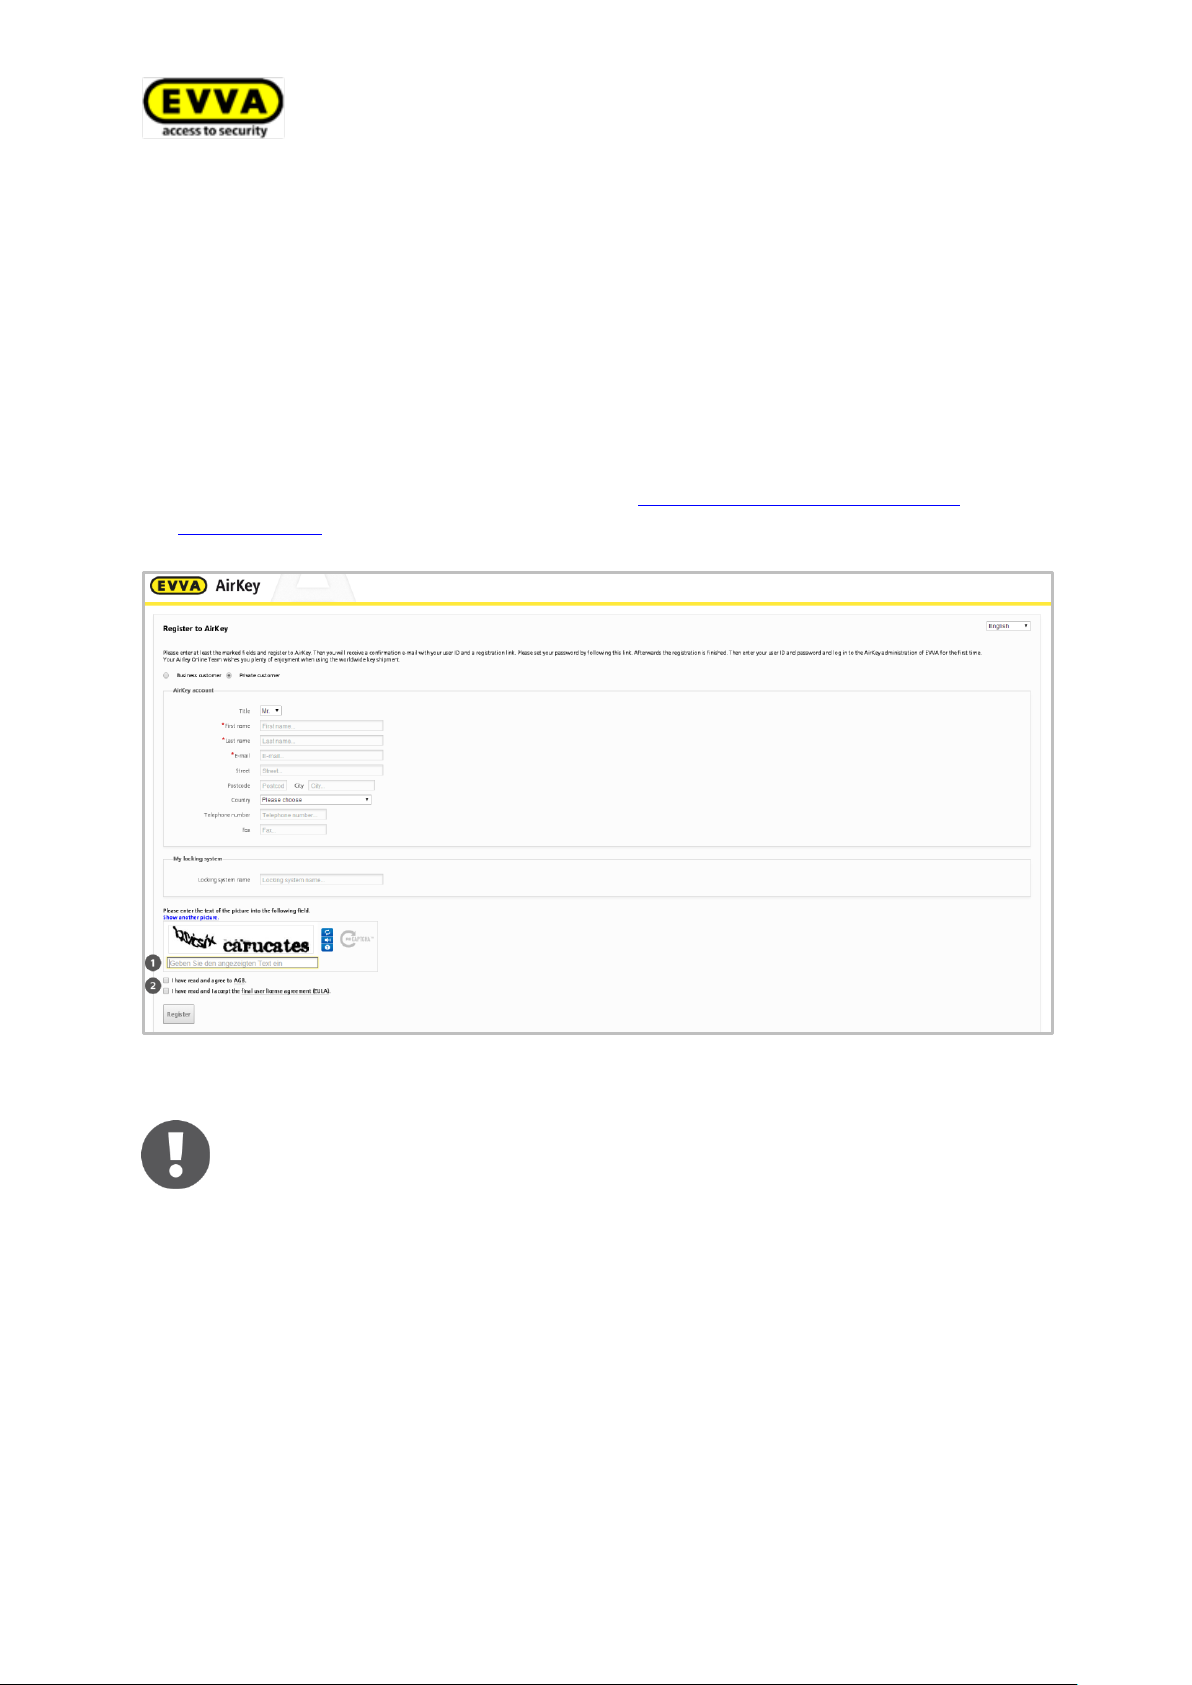
Complete the fields in the registration screen and register to AirKey.
> Select Business customer or private customer.
> Complete mandatory fields.
Fields highlighted with * are mandatory fields.
> Enter the text in the Captcha field .
> Click the link regarding the General Terms and Conditions or the link regarding EULA
to read or print the respective document.
> Tick the check boxes to confirm the General Terms and Conditions and the End-User
Licence Agreement (EULA) . Please refer to http://www.evva.at/terms-and-
conditions/en/ to view these documents.
Figure 4: Registration to AirKey
23
Page 24
Keep this email safe. If you need support, you require the unique user ID
and your customer number in the email.
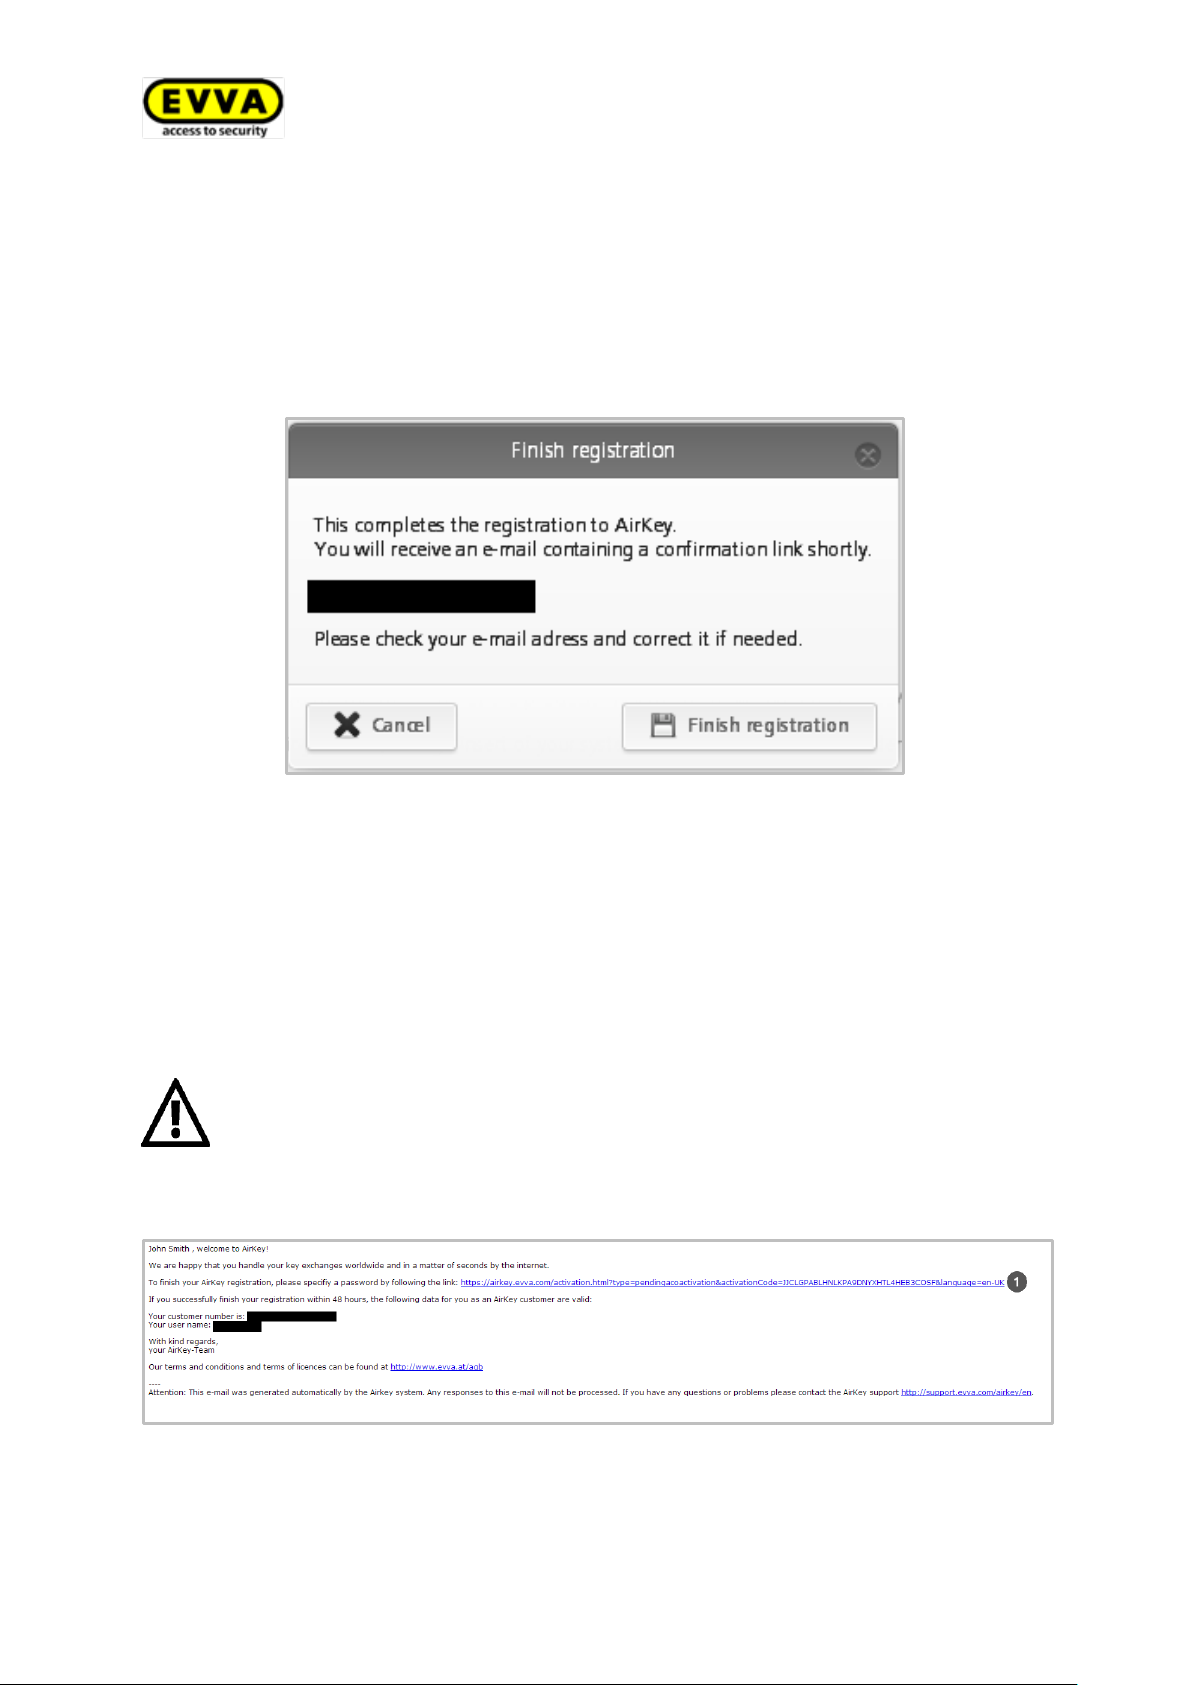
> Click Register. The "Finish registration" application window opens.
> Once again check the email address you entered as we will send a confirmation con-
taining a registration link to this address.
> Click Cancel to cancel the process and correct your input if the email address shown
was incorrect.
> Click Finish registration if the email address is correct and complete the process.
Figure 5: Finishing registration
The AirKey system automatically generates a user ID and registration link and sends it to
the email address you stated as part of a registration email.
> Open your email client. It will contain an email from EVVA AirKey with the subject line
"EVVA AirKey registration".
> Open the email and click the registration link .
Figure 6: EVVA AirKey registration email
24
Page 25
The registration link in the email is valid for 48 hours only.
An error message indicating an "Invalid registration link" will appear if
the registration link has expired or if it is invalid. In this case, you must reregister.
We recommend to make your AirKey password as long as possible and to
not disclose it.
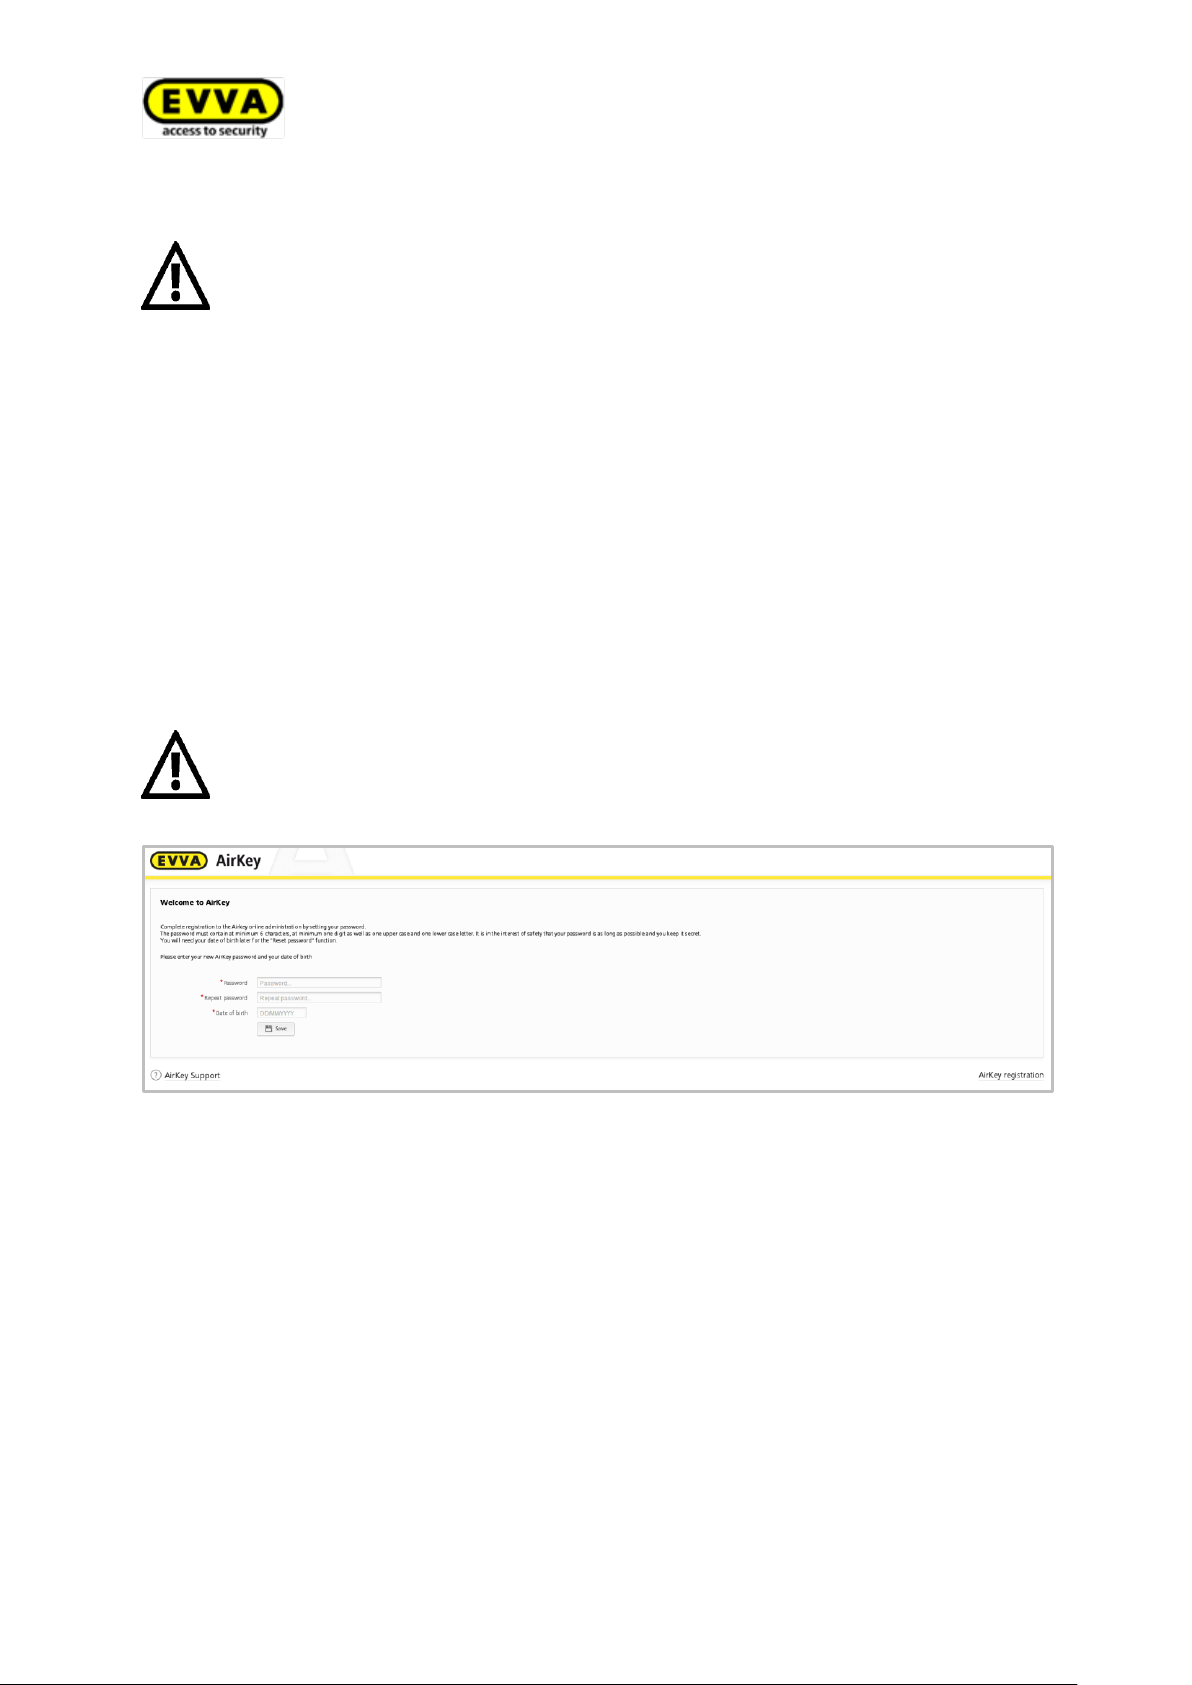
The Welcome window opens after having clicked the registration link. This is where you
must complete registration.
> Enter your AirKey password.
The AirKey password must consist of a minimum of six characters, one digit, one upper case letter and one lower case letter. An error message appears if this is not the
case.
> Re-enter your password.
> Enter your date of birth. It is used as a security question to confirm your identity if
you have forgotten your password.
Figure 7: Finishing registration
> Click Save to finish registration once you have completed the mandatory fields and
both AirKey passwords match.
You have now completed the registration process and your AirKey locking system has
been activated successfully.
You can now log on at any time on the AirKey online administration login screen. All you
need is the user ID from the registration email and the previously defined password.
25
Page 26
4.4 Login
You must log in to configure and manage the AirKey system.
> Open the following page in your browser https://airkey.evva.com.
The AirKey login screen appears.
> Select your preferred language. Log out as a first step to retrospectively change the
language settings. You can subsequently select a different language on the login
screen.
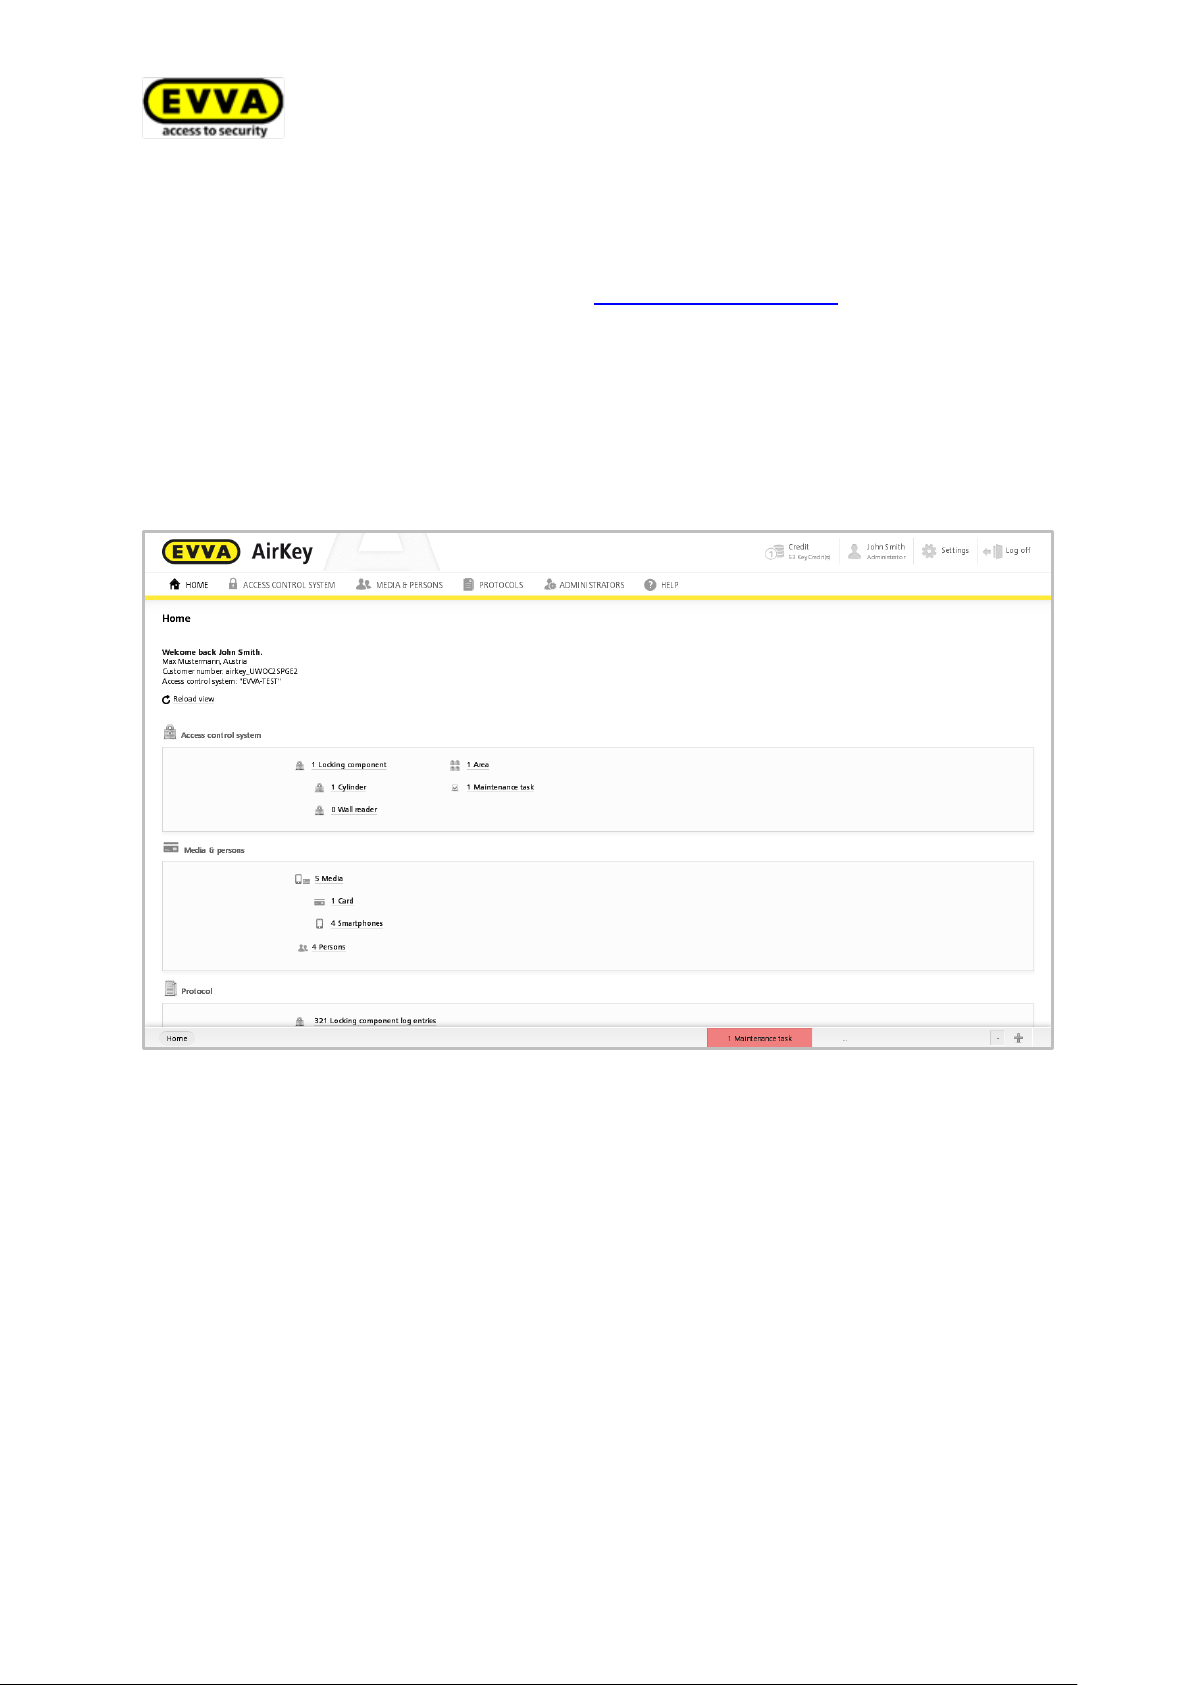
> Enter your user ID from the registration email and the defined password and confirm
with Login. The AirKey system home screen appears.
Figure 8: AirKey system home screen
The home screen provides an overview of all data relevant to the system. Browse to any
functions and settings from this screen.
26
Page 27
4.5 Installing coding stations
Please observe the following if you intend to use the optional coding station
to update and add locking components and media:
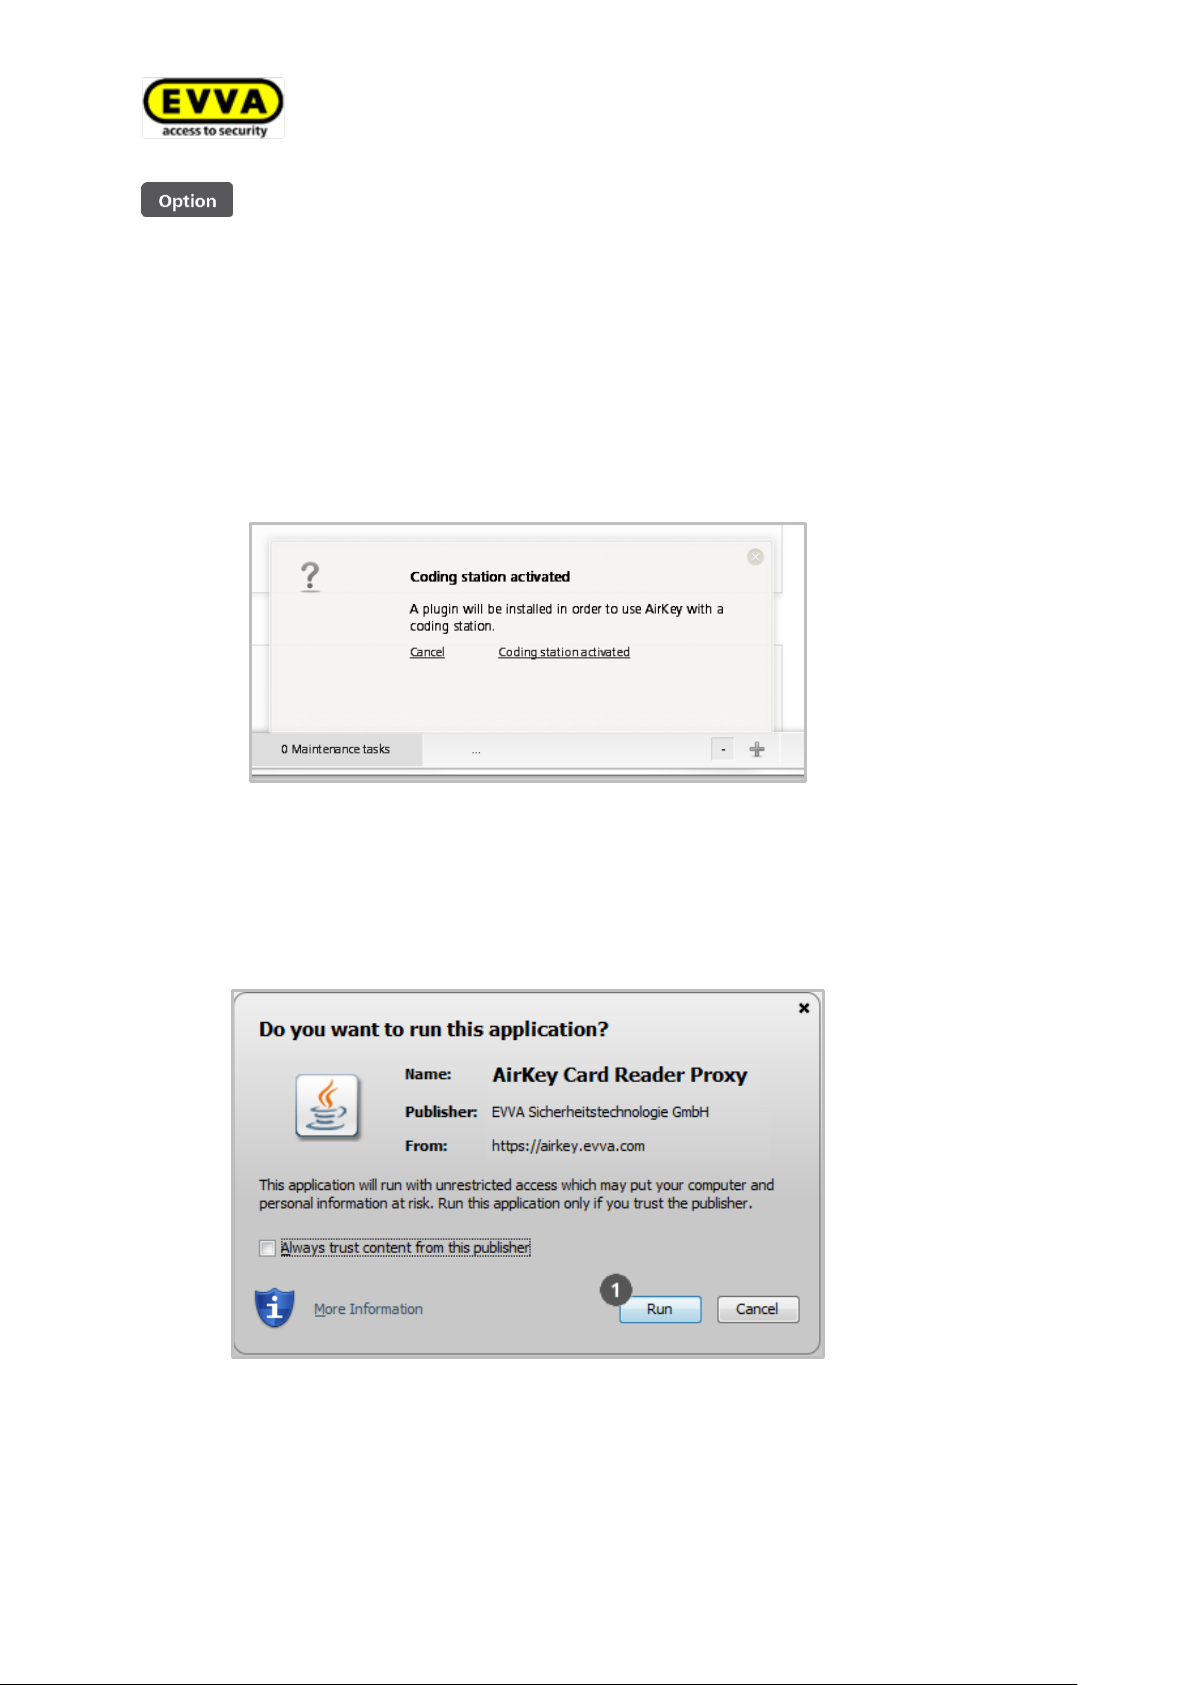
> Connect the coding station to a USB port on your computer.
> Click the + icon in the bottom right of your AirKey online administration
to activate the coding station.
Figure 9: Activating the coding station
The Java plugin is required and will be installed.
> Confirm the message "Do you want to run this application [?]".
> Run the application .
Figure 10: Installing the Java plugin
> As a result, you can now use the coding station. The coding station is
listed in the bottom right. The coding station features two reader units
(contactless and contact-based) and for this reason, you must also correctly specify the contactless reader units.
27
Page 28
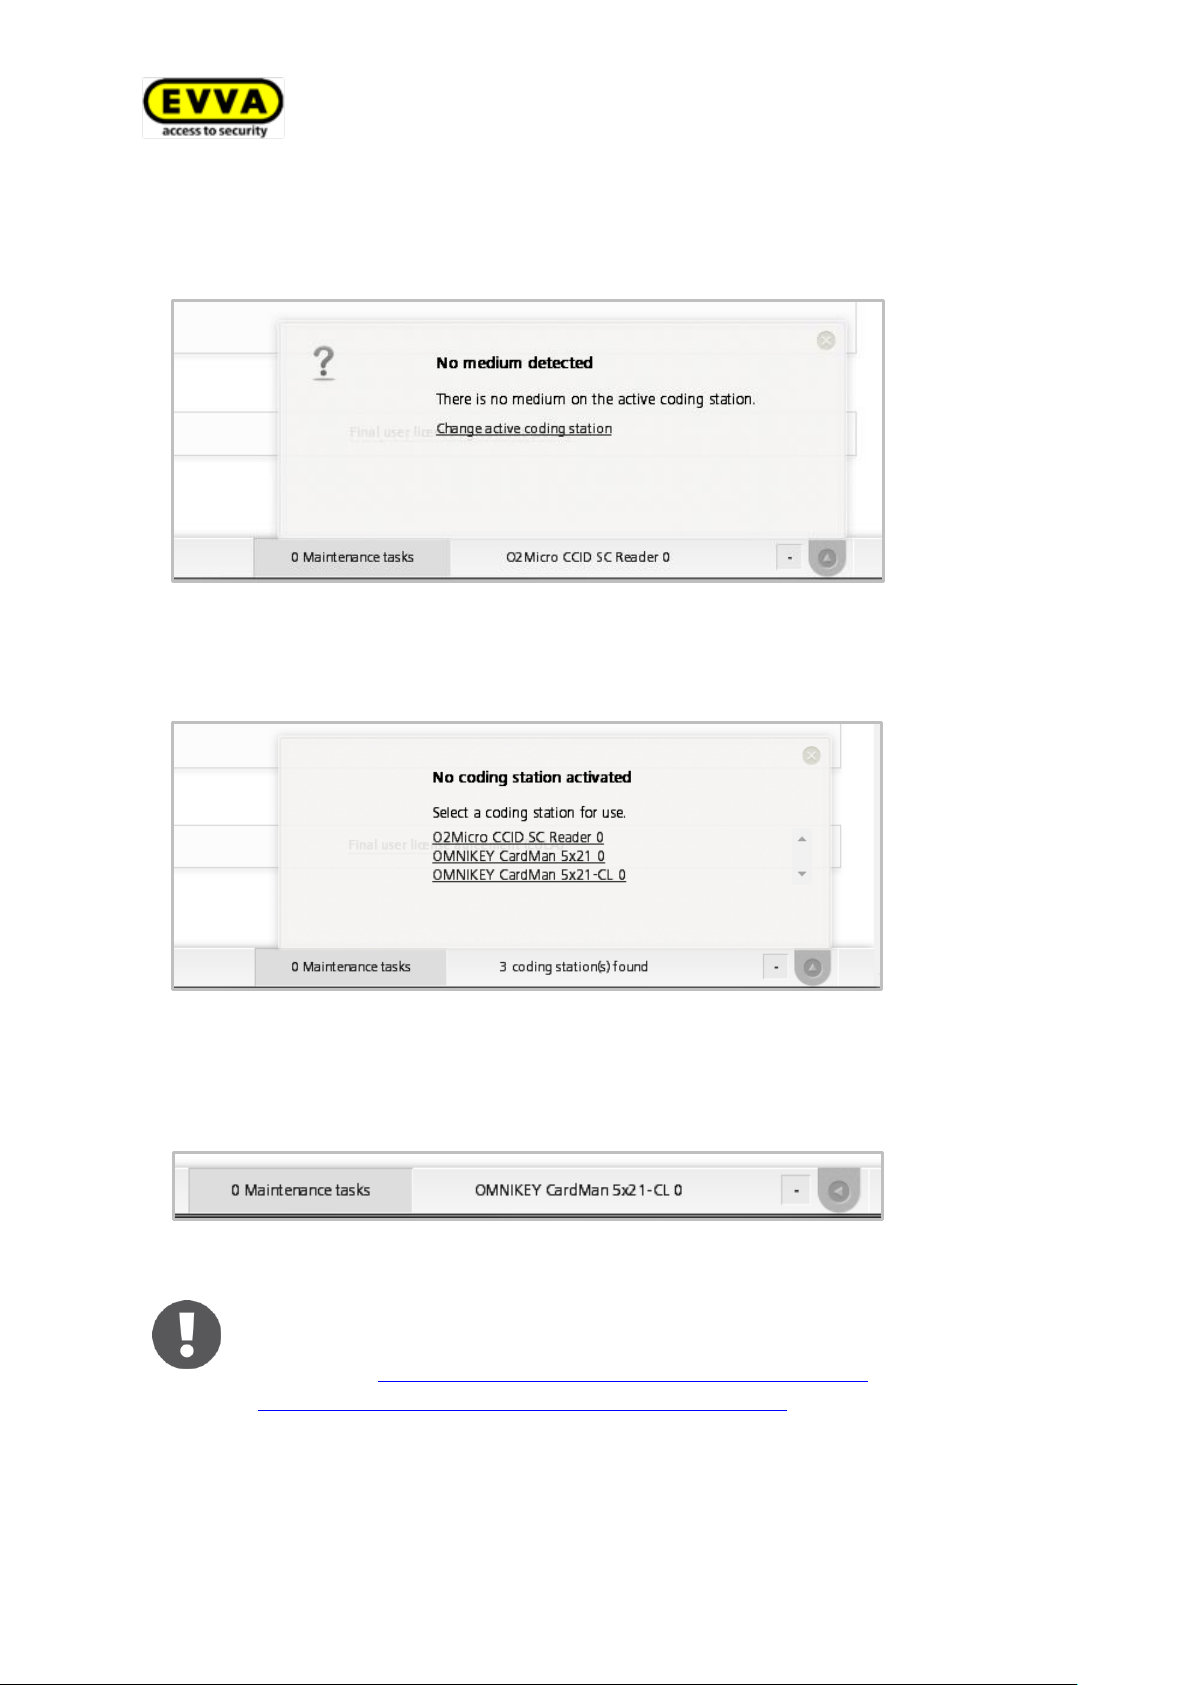
> Click the triangle icon in the bottom right and select Change active
coding station.
>
Figure 11: Changing the active coding station
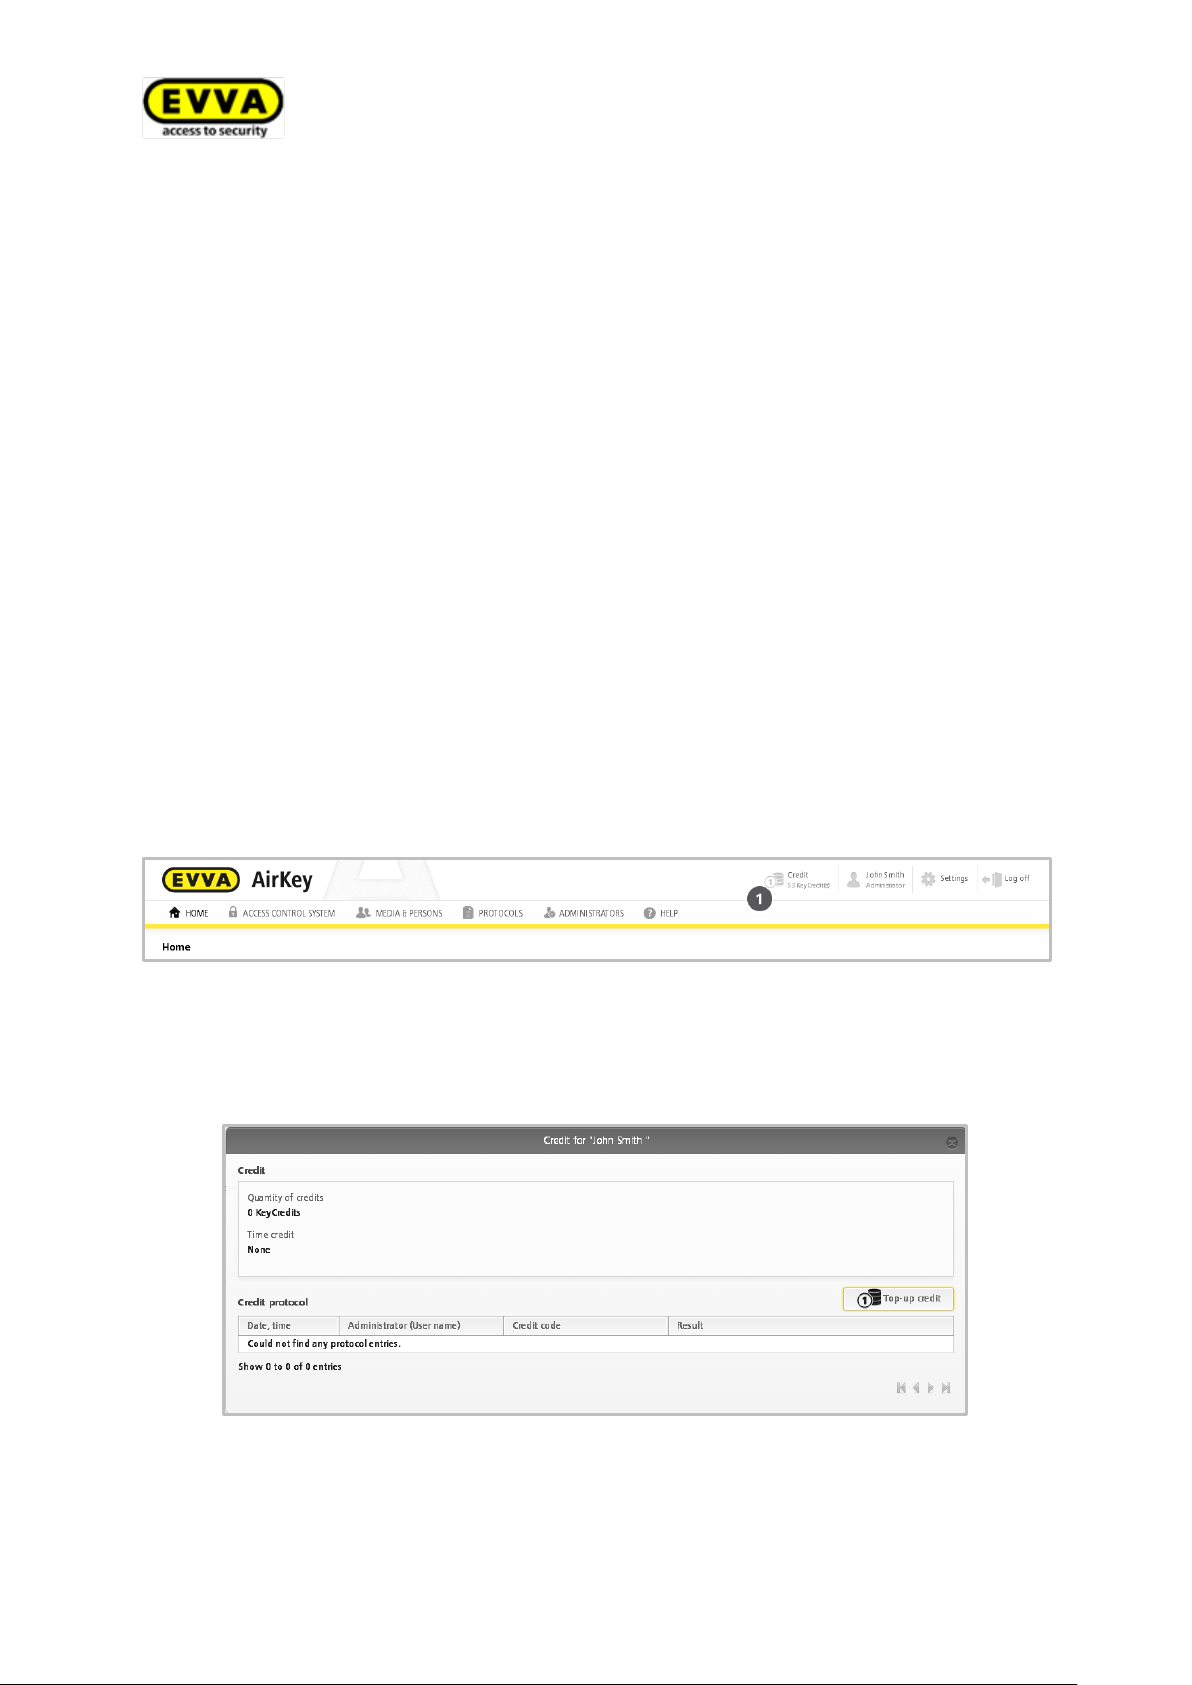
> Select "OMNIKEY CardMan 5x21-CL 0" from the list
>
Figure 12: Selecting coding stations
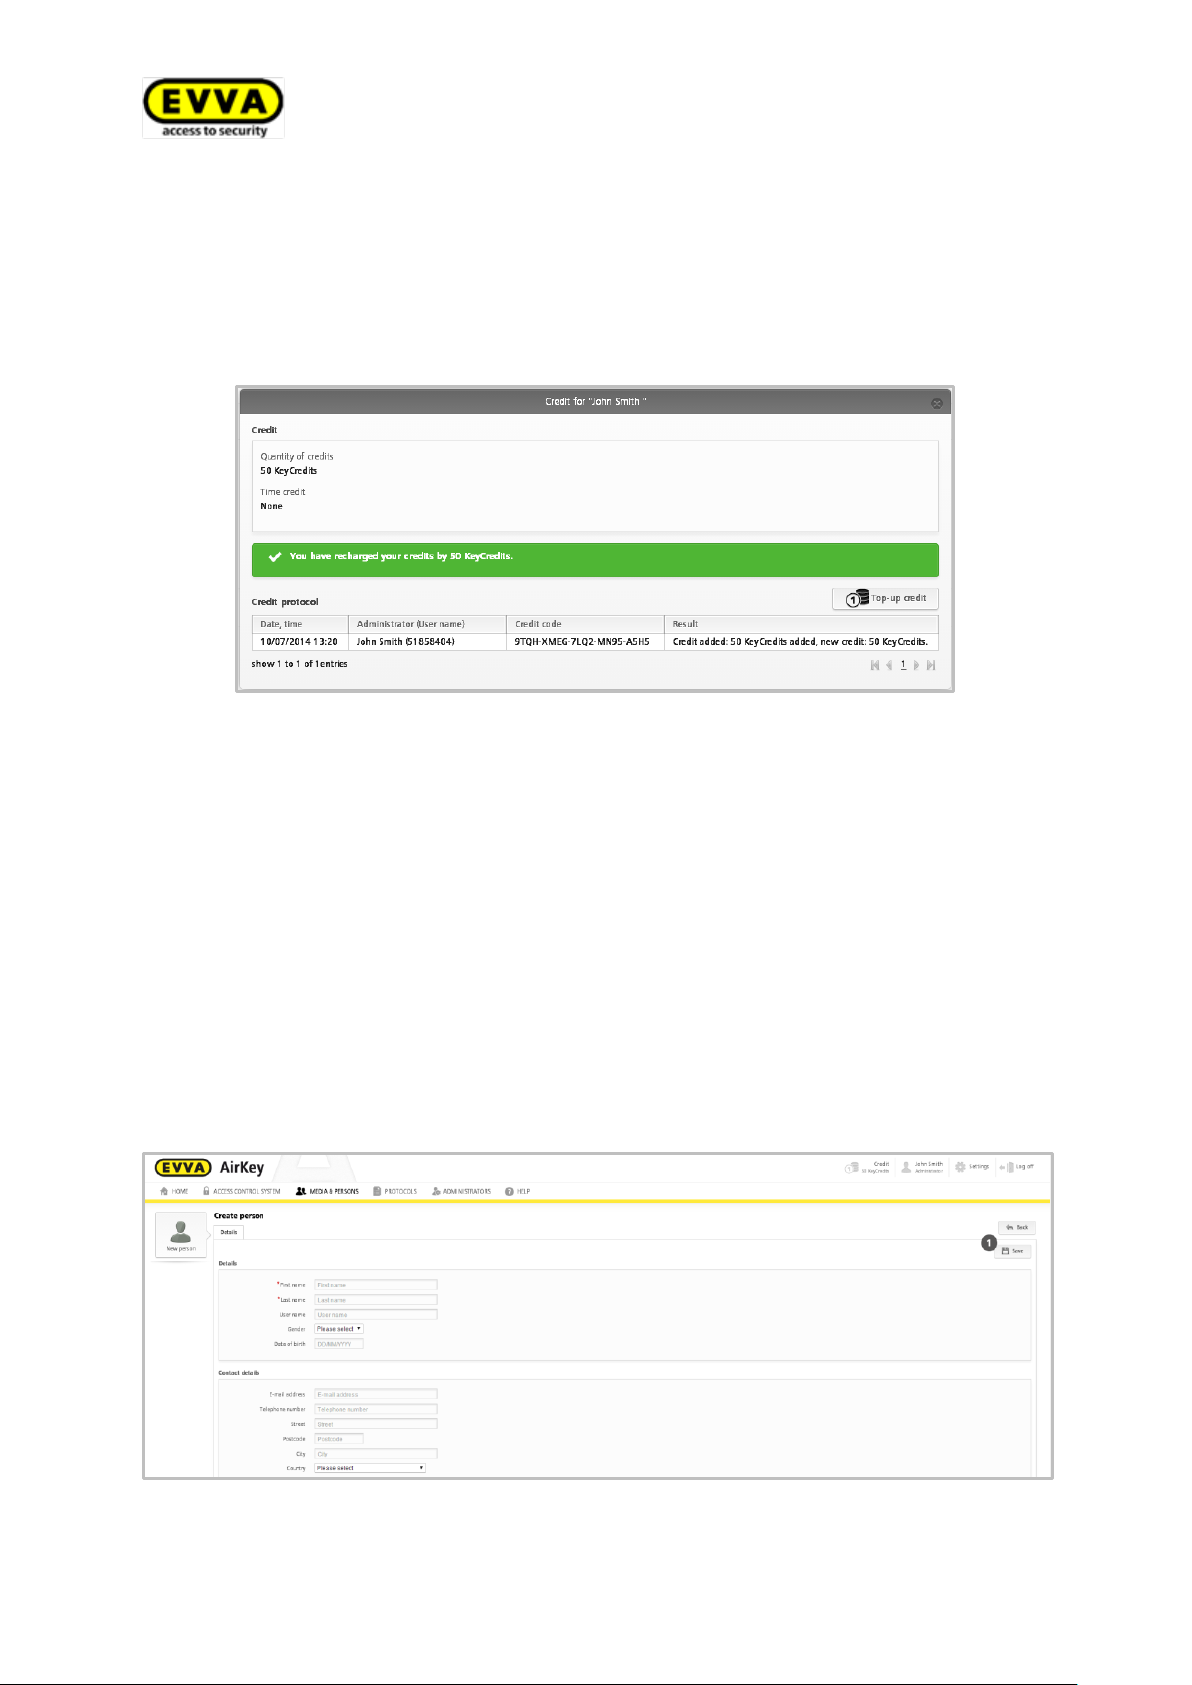
> The selected coding station is shown in the bottom right, in the footer.
>
Figure 13: Coding station indicator
Download the most recent driver for the AirKey coding station
if your system does not detect the coding station. For this purpose, go to http://www.evva.at/products/electronic-locking-
systems-access-control/airkey/system-overview/en/ on the
right-hand side of the page, in the "Drivers" section.
28
Page 29
Proceed as follows:
> Close the AirKey online administration
> Install driver
Download the most recent driver from the aforementioned website.
Double-click to open the file and follow the on-screen instructions of the
program.
> Connect coding station
> Restart your computer
> Open your browser
> Open the AirKey online administration
4.6 Topping up credit
For this purpose, you require a KeyCredit-Card featuring a scratch field on the rear that
conceals a credit code.
> Click the Credit function in the header of the screen.
The screen shows an overview of your current credit and any previous top ups.
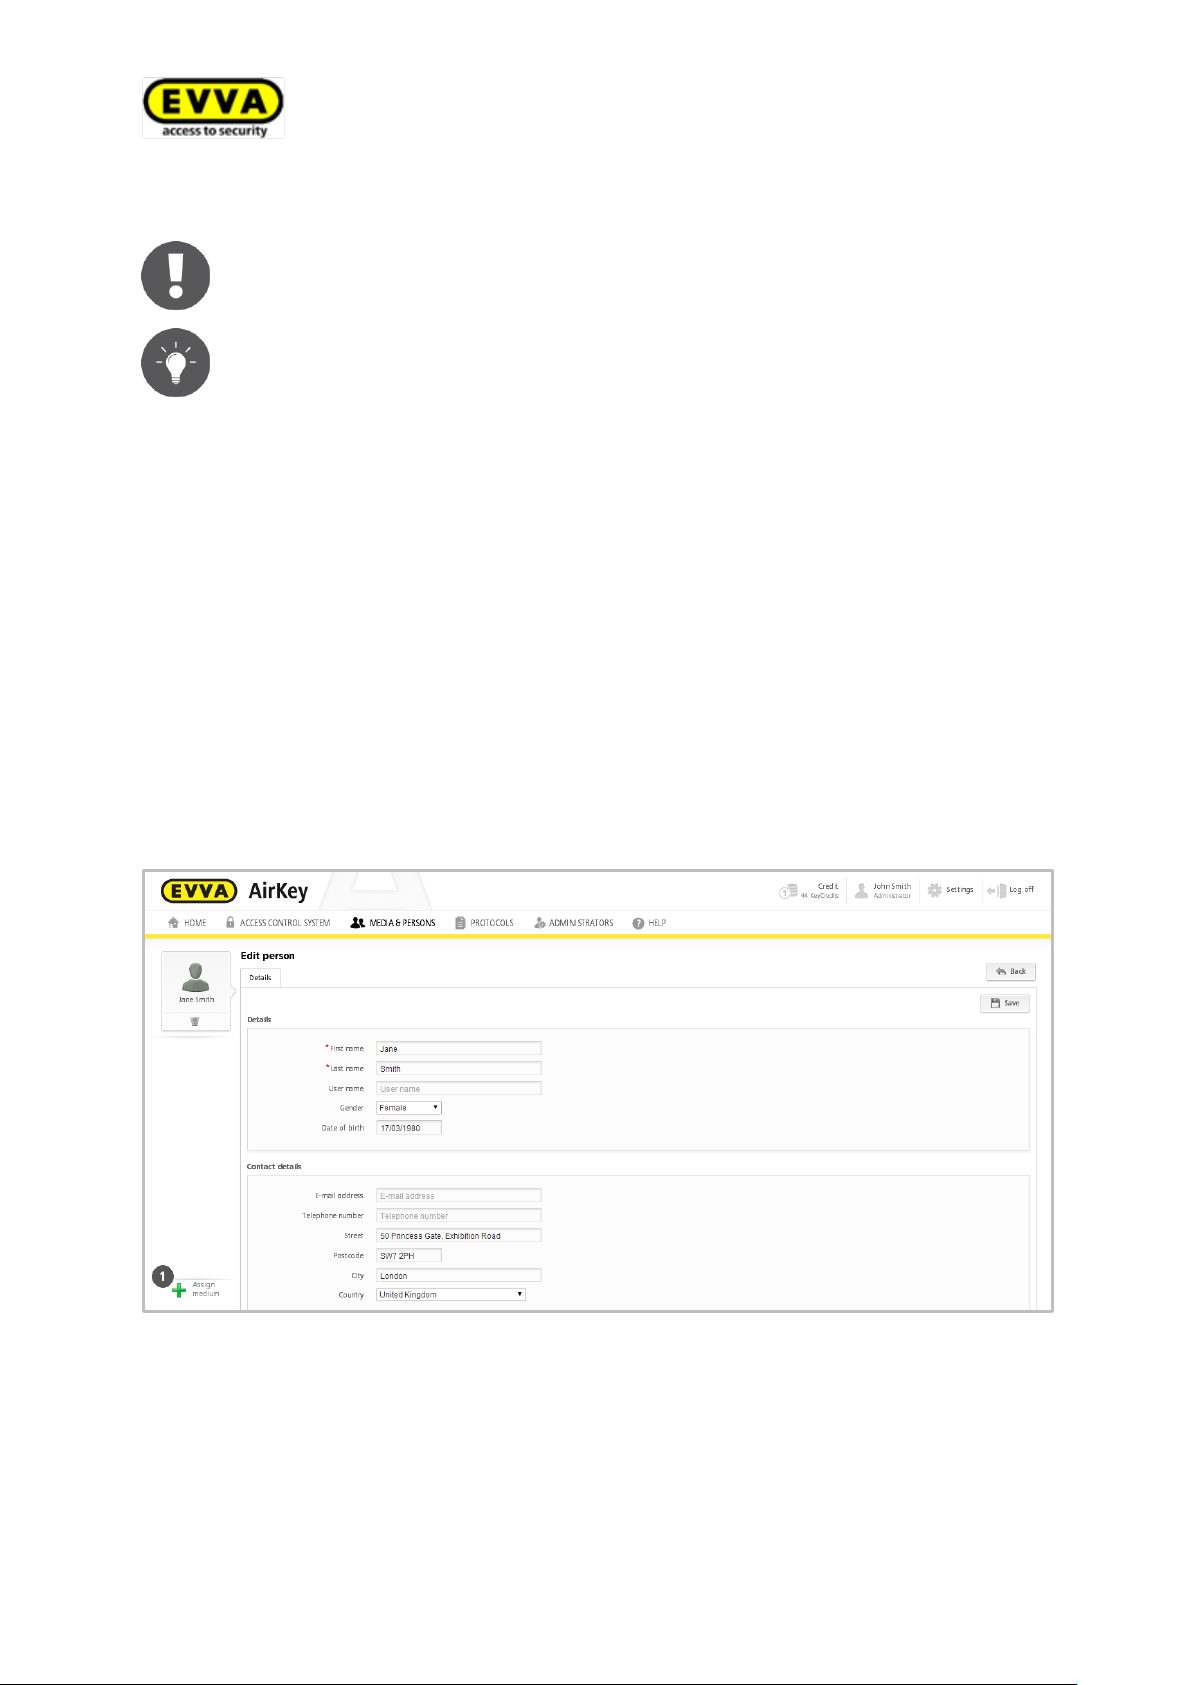
Figure 14: Credit
Figure 15: Topping up credit
> Click the Top-up credit button.
29
Page 30
> Enter the code you uncovered by scratching the KeyCredit-Card in the "Top-up credit"
application window.
> Click Top-up credit.
If you entered the code correctly, the system confirms your input and adds the credit.
Figure 16: Topping up credit
4.7 Creating persons
Each person designated to be granted authorisation to the AirKey locking system must be
created beforehand.
> In the main menu, select Media & Persons > Create person.
> Complete mandatory fields.
Fields highlighted with * are mandatory fields.
> Click Save .
30
Figure 17: Creating persons
Page 31
The first name/last name/ID fields result in a unique combination within the
AirKey locking system.
If you additionally use the "ID" field, enter a value that ensures the combination of first name and last name is unique (e.g. the staff number). This
makes sense (most of all) in situations where there are persons with the
same first and last names.
The characters in the Email address, Telephone number, Address, Post code and City
fields are restricted to a maximum of 50. The character limit in the comment field is 500
characters.
If the combination you entered already exists, the system will report "Person already
exists".
> Check or correct your input.
> Click Save.
Once you have successfully created a person, the system shows a confirmation and a
new button appears below the name, Assign medium .
Figure 18: Assigning media
You have now created the person in the AirKey system and the user appears on the person list.
31
Page 32
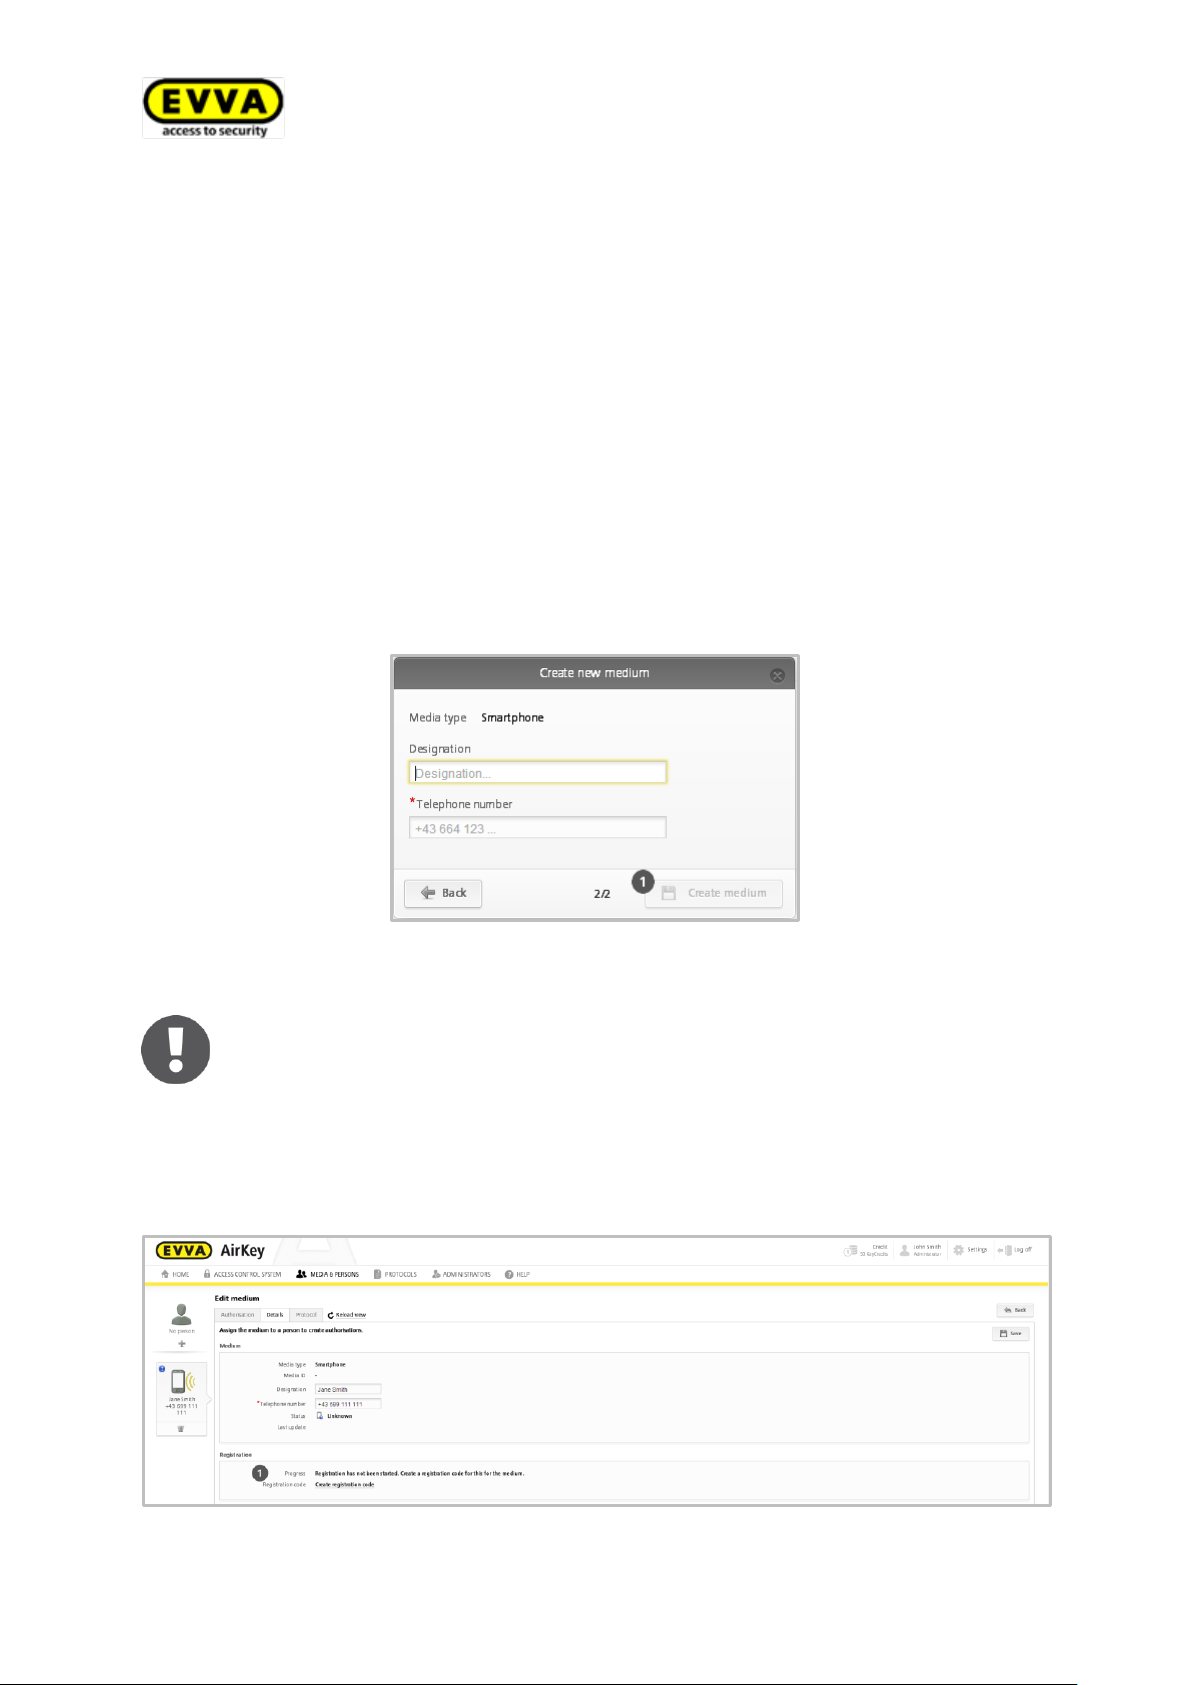
An error message will appear if the telephone number is invalid or the telephone number has already been created.
4.8 Creating smartphones
You must create or add smartphones to your locking system before you can manage
them as part of your locking system.
> In the main menu, select Media & Persons > Create medium.
Alternatively, go to Media & Persons > Media and click the Create medium button.
> Select Smartphone as the new medium and click Continue.
> Enter unique information (e.g. smartphone type) in the Designation field.
> Enter the smartphone's telephone number (starting with "+" and the two digits of the
country calling code).
> Click Create medium .
Figure 19: Creating new media
Now you are in the details section of this smartphones.
> Click Create registration code , if you have not yet created a registration code.
Figure 20: Creating registration codes
32
Page 33
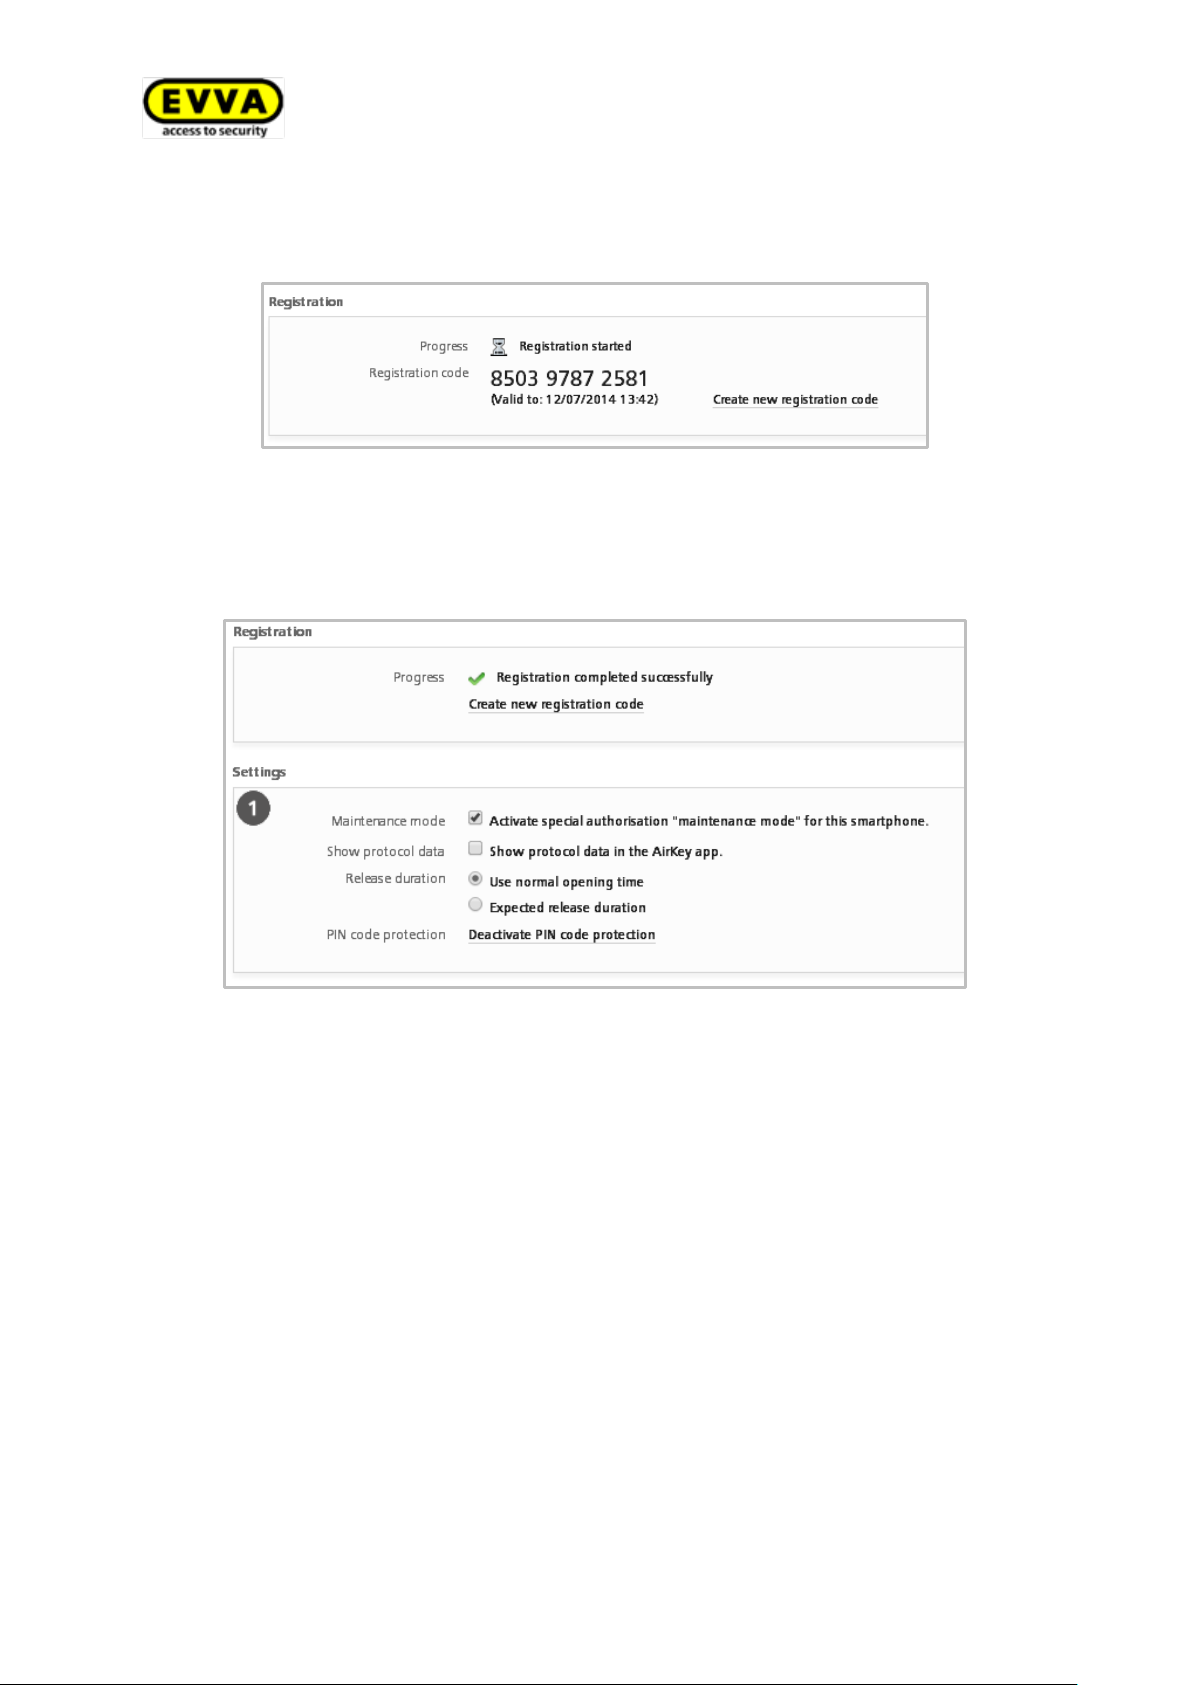
The Registration section shows a valid registration code and its expiry date.
Figure 21: Registration code
Specify the following parameters in the Settings section in the smartphone's details
section:
Figure 22: Edit medium – Settings
> Activate special authorisation "maintenance mode" for this smartphone.
Maintenance mode can only be activated on smartphones that have already been assigned to a person. As a result of activation, the smartphone is authorised to block
locking components in factory state as well as add or remove locking components and
media within the AirKey system. Additionally, the firmware on locking components
and media keyrings can be updated.
> Show protocol data in the AirKey app: this option shows persons their own access
events and any other protocol data relevant to the media in the AirKey app.
> Release duration: specifies how long the locking component is unlocked when using
this particular smartphone. The normal release duration is 5 seconds and the extended release duration amounts to 20 seconds.
> PIN code protection: shows the status of whether PIN code protection is on or off in
the AirKey app of this particular smartphone. If it is active and the person has forgotten their PIN code, you can reset it here.
33
Page 34
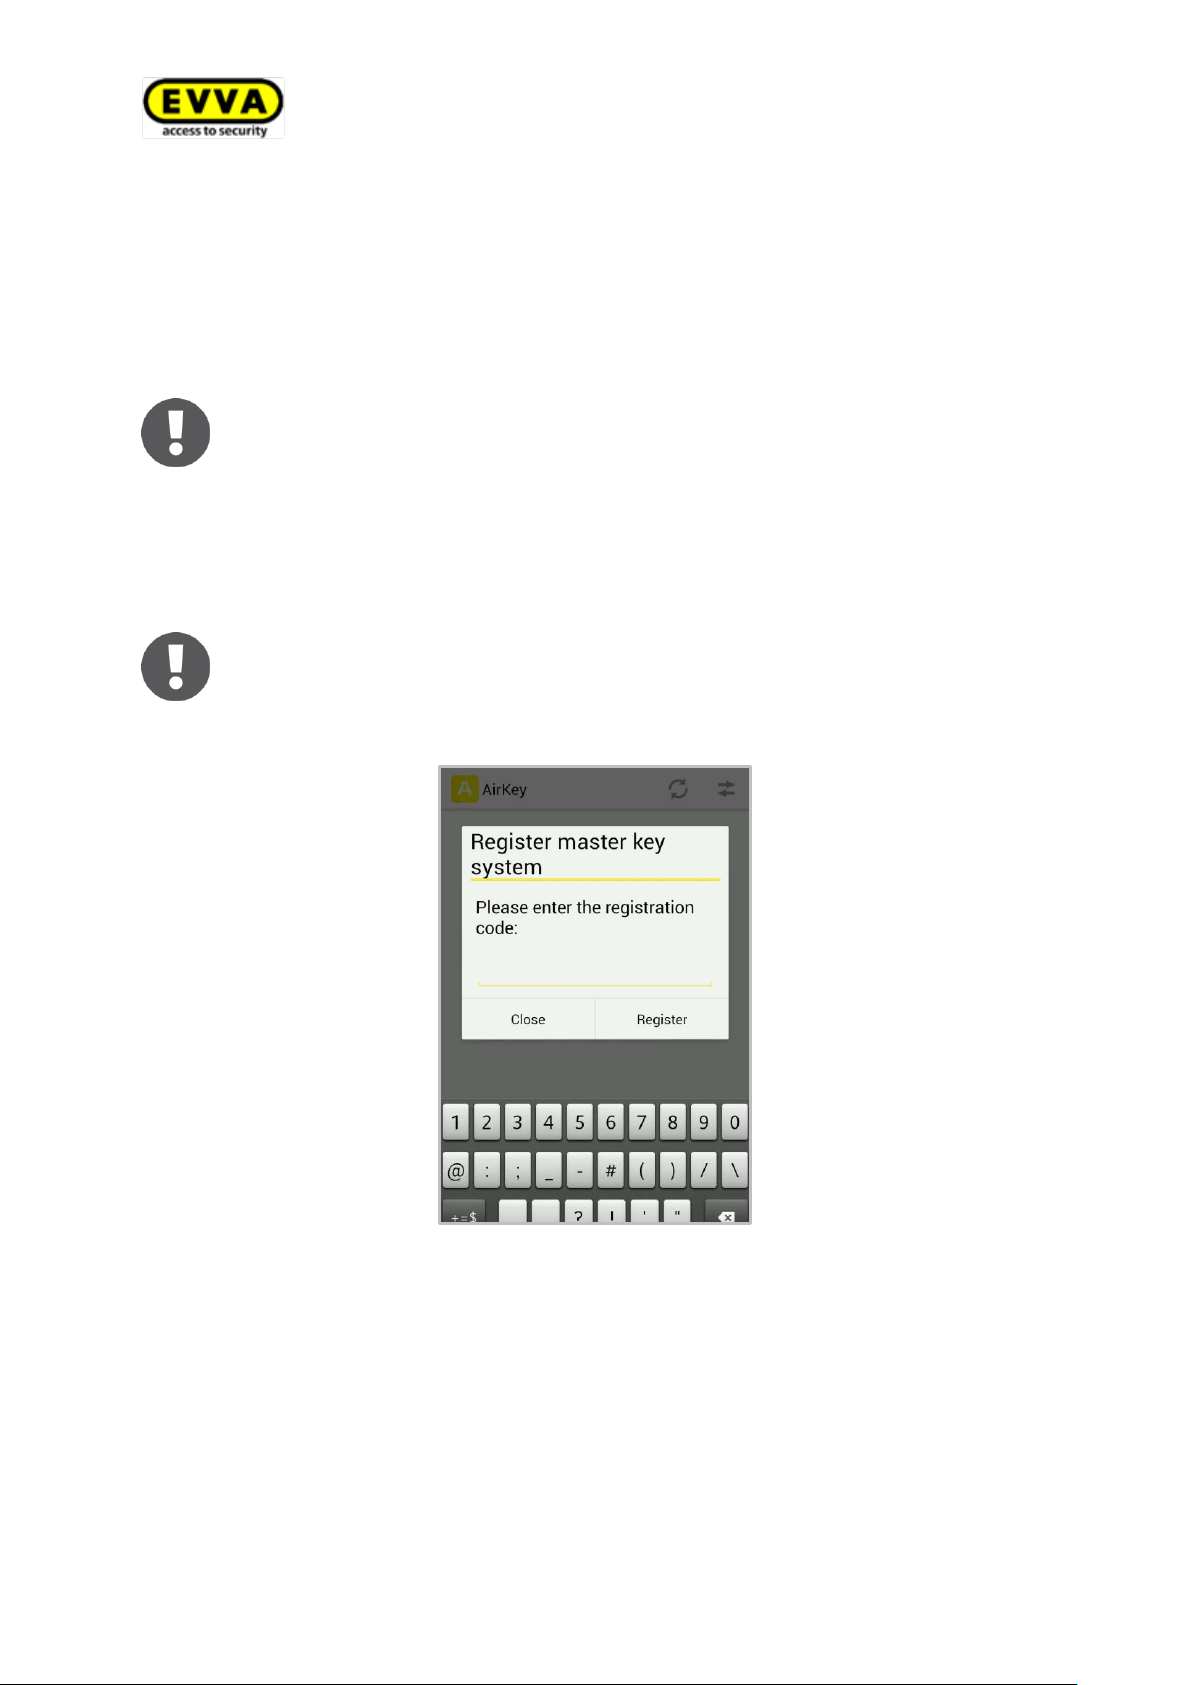
If the smartphone has not been connected to a locking system, the menu to
enter the registration code appears automatically.
You can also register a single smartphone in several AirKey systems. Select
the Add locking system app menu to re-open the registration dialogue.
4.9 Registering smartphones
You can register smartphones once you have created them in the locking system and you
know the registration code.
> Start the AirKey app on your smartphone.
> Enter the registration code you received from the AirKey locking system administra-
tor.
> Click Register to confirm.
Figure 23: AirKey app - registering locking systems
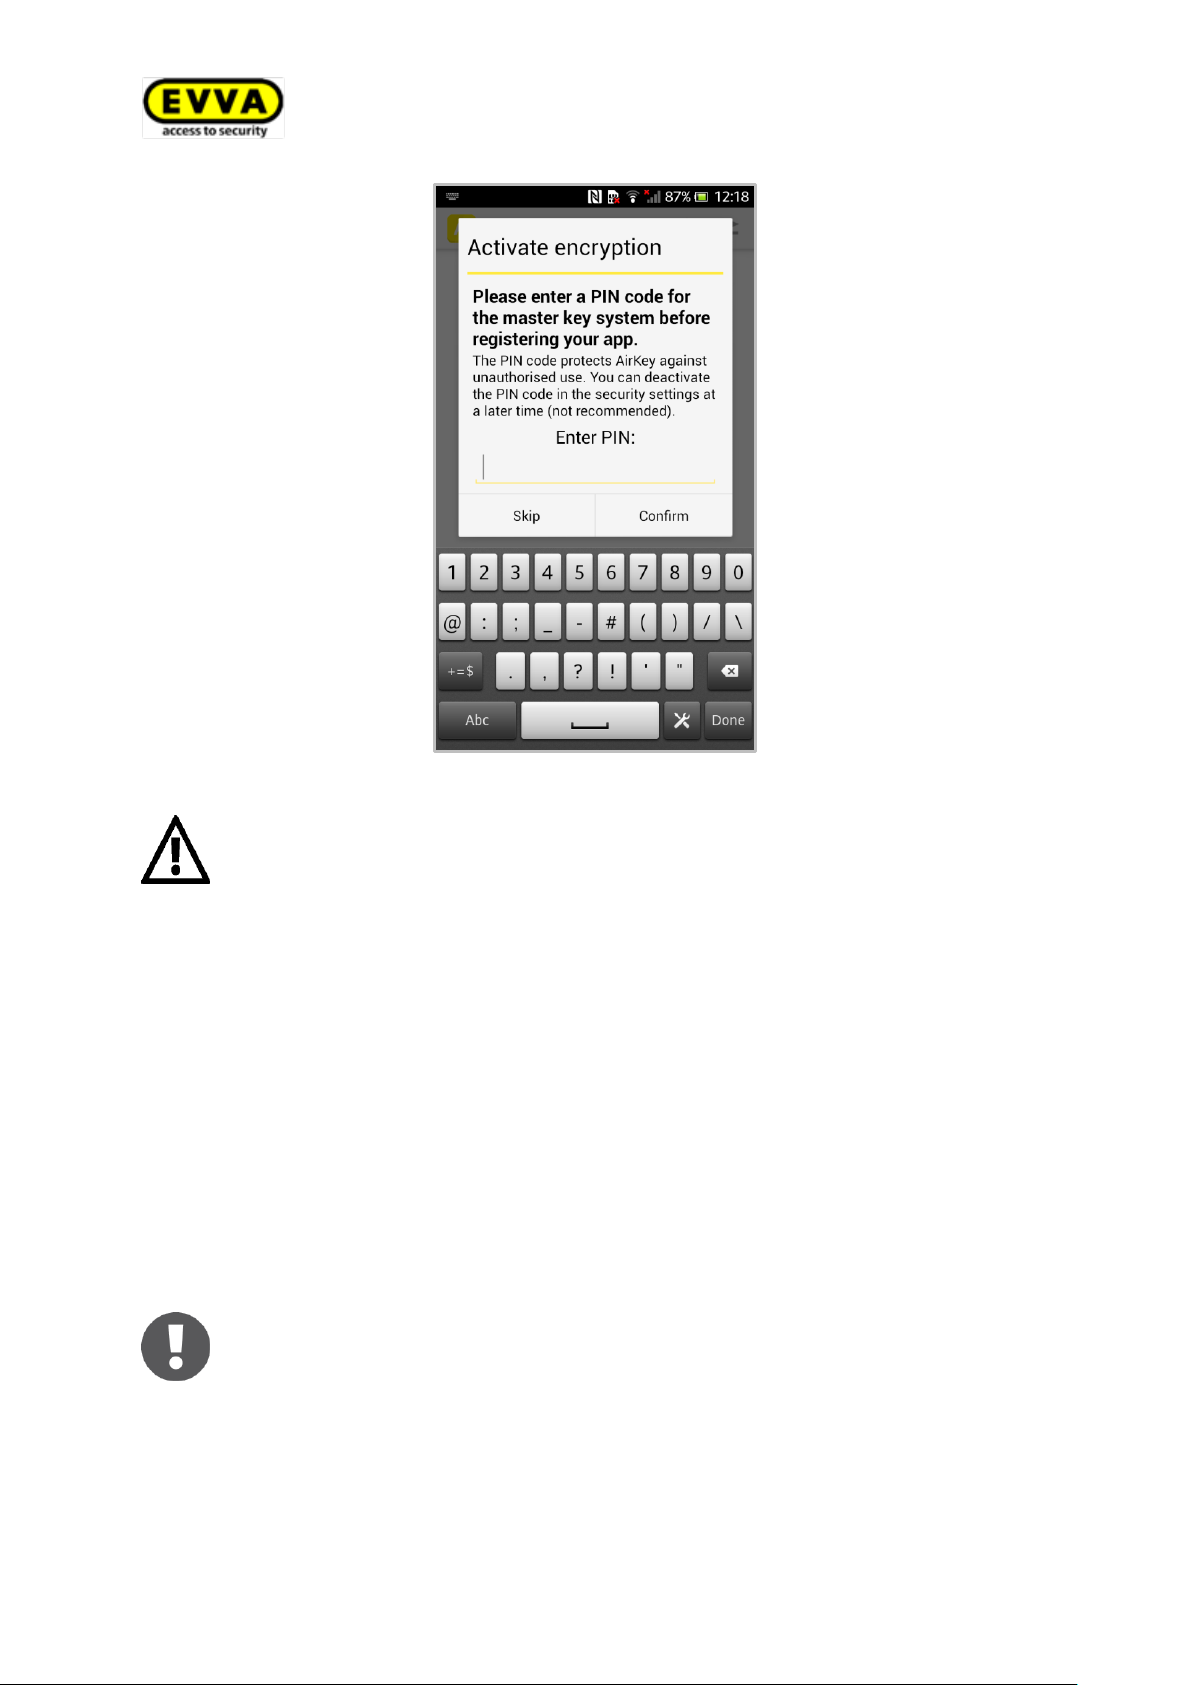
> After having successfully entered the registration code, you have the option to define
a PIN code.
> Define a PIN code, re-enter it and select Confirm to complete registration or select
Skip to continue without having defined a PIN code.
34
Page 35
An error message appears if the registration code is invalid or has expired.
In this event, please contact the locking system administrator from whom
you received the registration code.
If users delete the AirKey app or app data, there is the option to once again
assign authorisations that had already been granted to the smartphone
without using additional credits. However, this exclusively applies to the
same device and your locking system. This option does not apply to a different device (in the event of replacements).
> In the main menu, select Media & Persons > Media.
> Select the affected smartphone from the overview list.
> Click Create new registration code and send the registration code to
the person wanting to link a smartphone to the locking system.
> Enter the registration code in the AirKey app and the smartphone is
once again linked to the locking system.
If your smartphone has previously been registered to an AirKey locking system and it has not been correctly removed from this AirKey locking system,
you delete app data or the AirKey app and you then register your
smartphone to a different AirKey locking system, a message appears indicating the smartphone has already been registered to an AirKey locking
system. You can register the smartphone as usual if you ignore the message. The smartphone is created as a new medium and any previous data is
rendered unusable.
Figure 24: AirKey app – defining a PIN code upon registration
35
Page 36
EVVA recommends assigning a PIN code. It serves as an additional level of
security. You can also retrospectively activate or deactivate PIN protection.
Please refer to the Activating PIN codes section for more detailed information.
> Important notice:
> Media in factory state block locking components in factory state.
> Smartphones with installed AirKey app and enabled maintenance mode
can block locking components in factory state
> Unlocking attempts are not recorded in factory state.
> The lock is securely locked after having added the AirKey cylinder to a
locking system.
Observe the notes in the assembly manual during assembly. Take particular
care to position the cylinder correctly and block the door during assembly/disassembly to prevent accidentally locking yourself in or out.
Make sure both sides of a double-sided cylinder are configured within the
AirKey system to prevent locking users in or out.
4.10 Assembling locking components
4.10.1 AirKey cylinder
Follow the assembly manual enclosed with the packaging during assembly of the AirKey
cylinder or the online assembly video clip at
http://video.evva.com/tutorials/airkey/eapzkz-s/eapzkz-s-1/en/
AirKey cylinders are always supplied in factory state.
36
Page 37
> Media in factory state can unlock locking components in factory state.
> Smartphones with installed AirKey app and enabled maintenance mode
can unlock locking components in factory state
> Unlocking attempts are not recorded in factory state.
> The lock is not securely operated until you have added the AirKey wall
reader to a locking system.
> One control unit is required per reader unit.
> The control unit must be installed indoors, in a secure area.
> Check the cabling on the wall reader and control unit.
Observe the notes in the assembly manual during assembly.
Block the door during (dis)assembly to prevent inadvertently locking yourself in/out.
You must comply with the following requirements to add locking components using your smartphone:
> The AirKey app has been installed.
> An active Internet connection is available.
> The smartphone has been registered within the locking system.
> The smartphone has been assigned to a person.
> Maintenance mode has been activated on the smartphone.
4.10.2 AirKey wall reader
Please note the assembly manual enclosed in the packaging to assemble the AirKey wall
reader. Our homepage additionally provides a drilling template or the assembly video at
http://video.evva.com/tutorials/airkey/eawlru/eawlru-1/en/
AirKey wall readers are always delivered ex works in factory state.
4.11 Adding locking components
Locking components are added to the locking system using smartphones with construction site authorisation or a coding station. For this purpose, they must be set to factory
state.
Adding locking components with the smartphone
> Start the AirKey app.
> Select the Connect to component icon .
37
Page 38
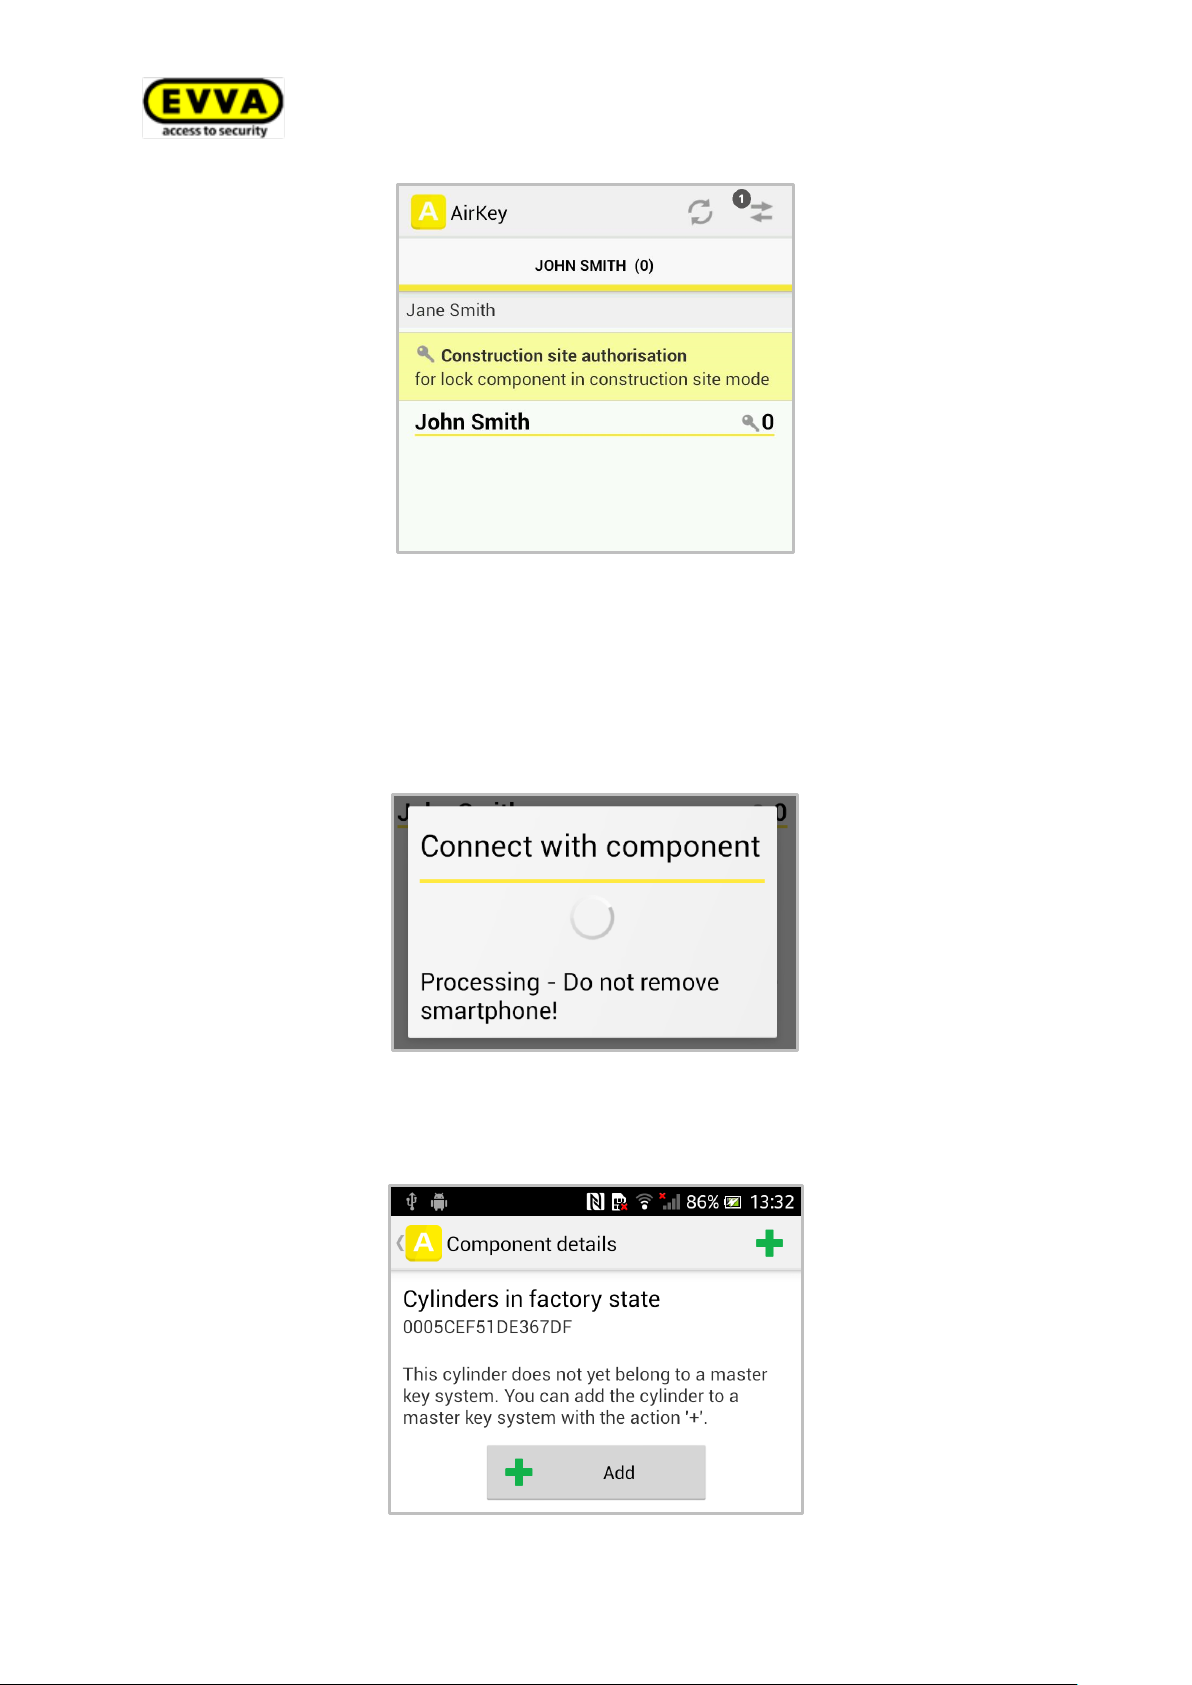
Figure 25: AirKey app – connecting to components
> Hold the smartphone to the locking component in factory state.
The smartphone establishes a connection to the locking component.
Do not remove the smartphone from the locking component while it is establishing
the connection.
Figure 26: AirKey app - connecting
> Now you see information about the locking component.
Figure 27: AirKey app – locking component in factory state
38
Page 39
Make sure both sides of a double-sided cylinder are configured within the
AirKey system. Assign a clear designation to each of the sides on cylinders
with double-sided access. Create an area that features both sides of the
cylinder and assign an area authorisation to obtain the same authorisation
for both sides.
The system checks the data and updates the locking component.
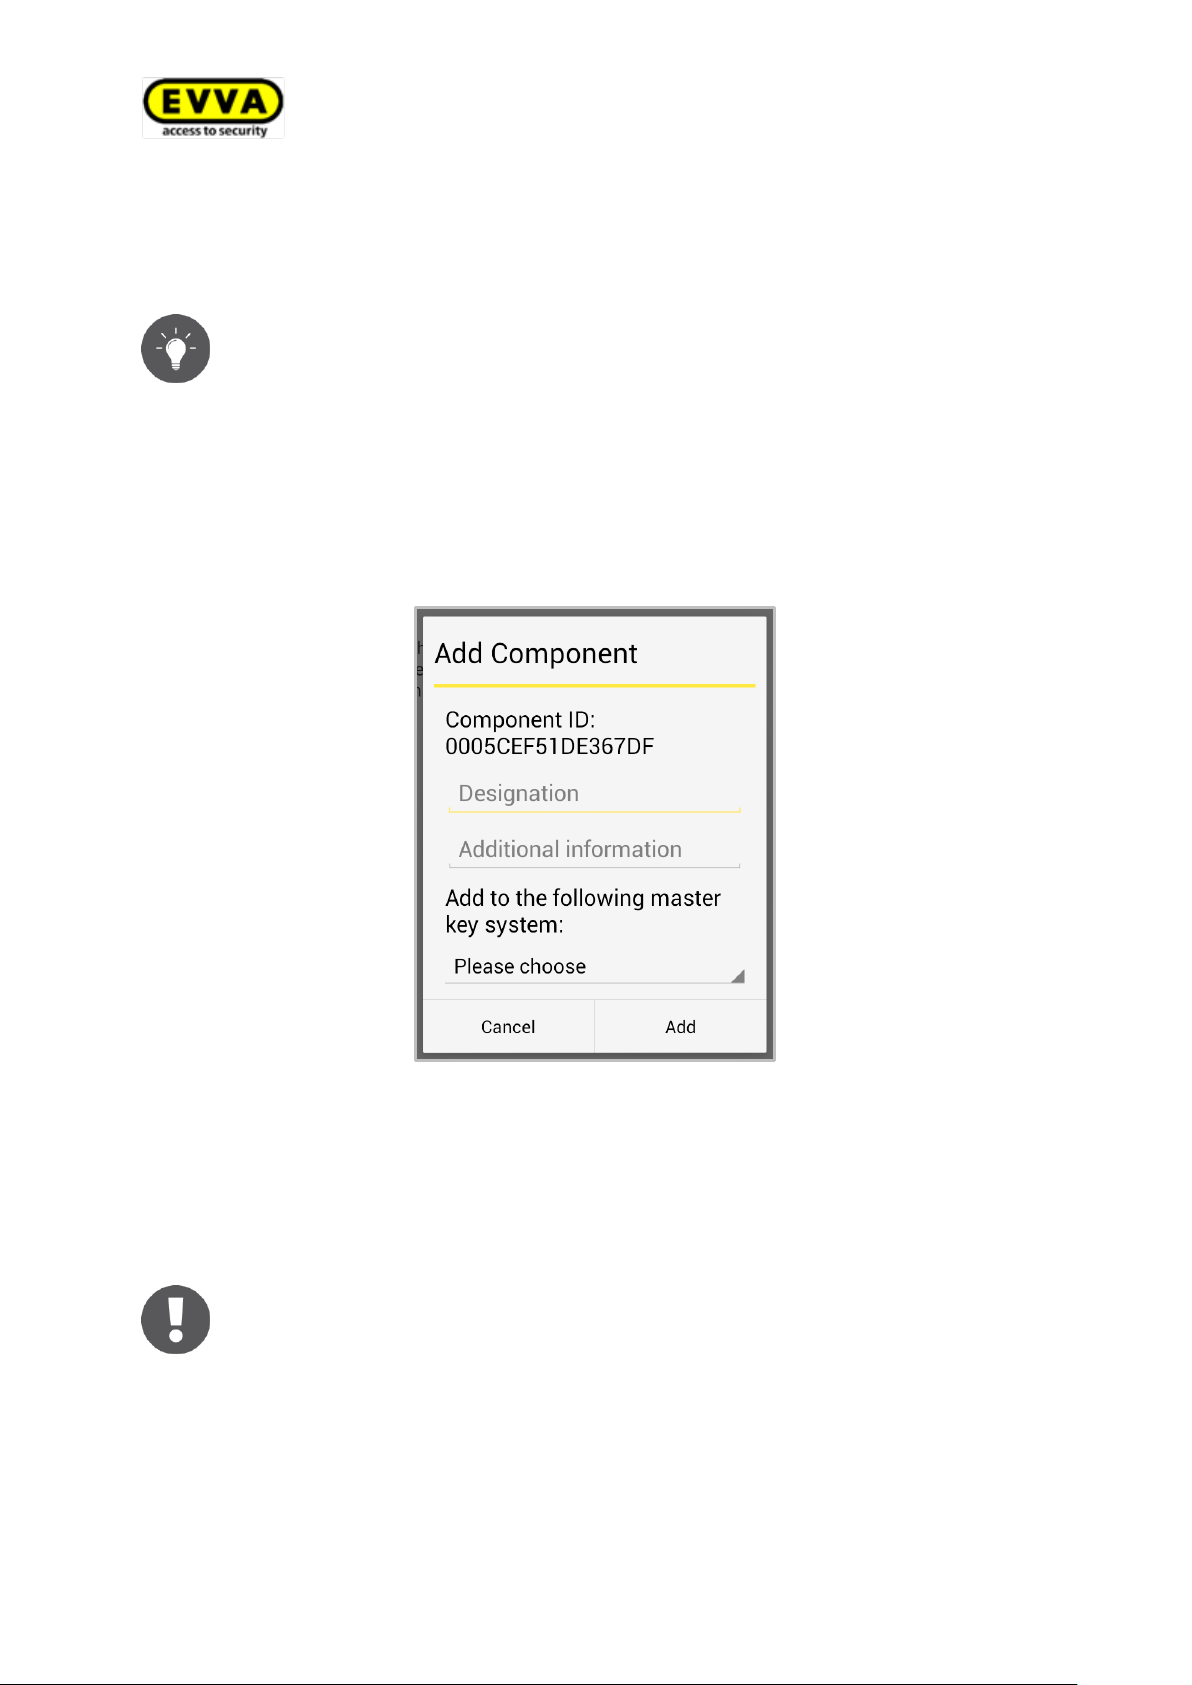
In this process, do not remove the smartphone from the locking component.
> Select Add.
> Enter a unique designation for the locking component.
> Select the locking system to which you would like to add the locking component if the
smartphone with active maintenance mode is registered in several locking systems.
Figure 28: AirKey app – adding locking components
> Select Add.
> Now once again hold the smartphone to the locking component to complete the pro-
cess.
> A confirmation prompt completes the process. The locking component is now availa-
ble for management in the AirKey online administration.
39
Page 40
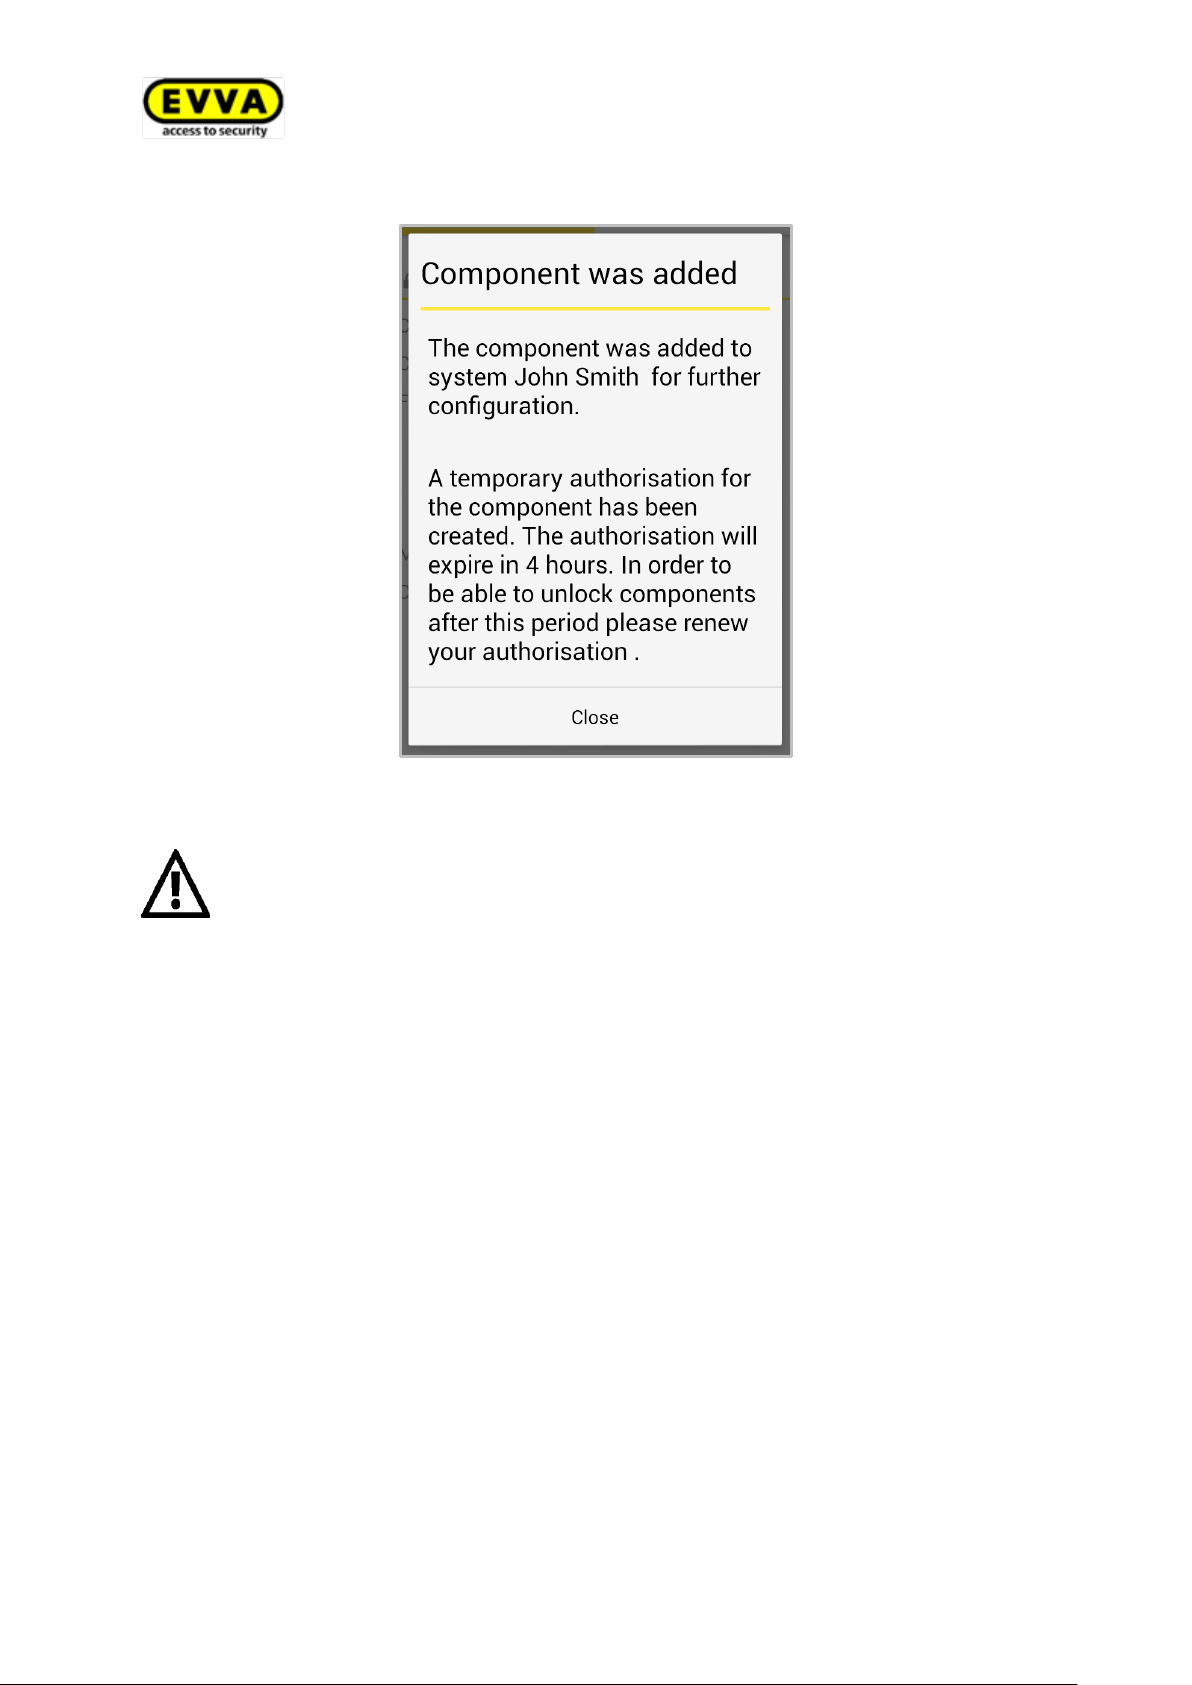
The locking component is now no longer in factory state. Media in factory
state or smartphones in maintenance mode are consequently no longer authorised. The smartphone that added the locking component is automatically authorised for a period of four hours. Please change the corresponding
authorisation or assign additional media with a valid authorisation to continue to have access to this locking component.
Figure 29: AirKey app – locking component added
4.12 Adding cards, key tags and combi keys to the locking
system
Media are added to locking systems using smartphones with maintenance authorisation
or a coding station. For this purpose, they must be set to factory mode.
> Start the AirKey app.
> Select the Connect to component icon .
40
Page 41
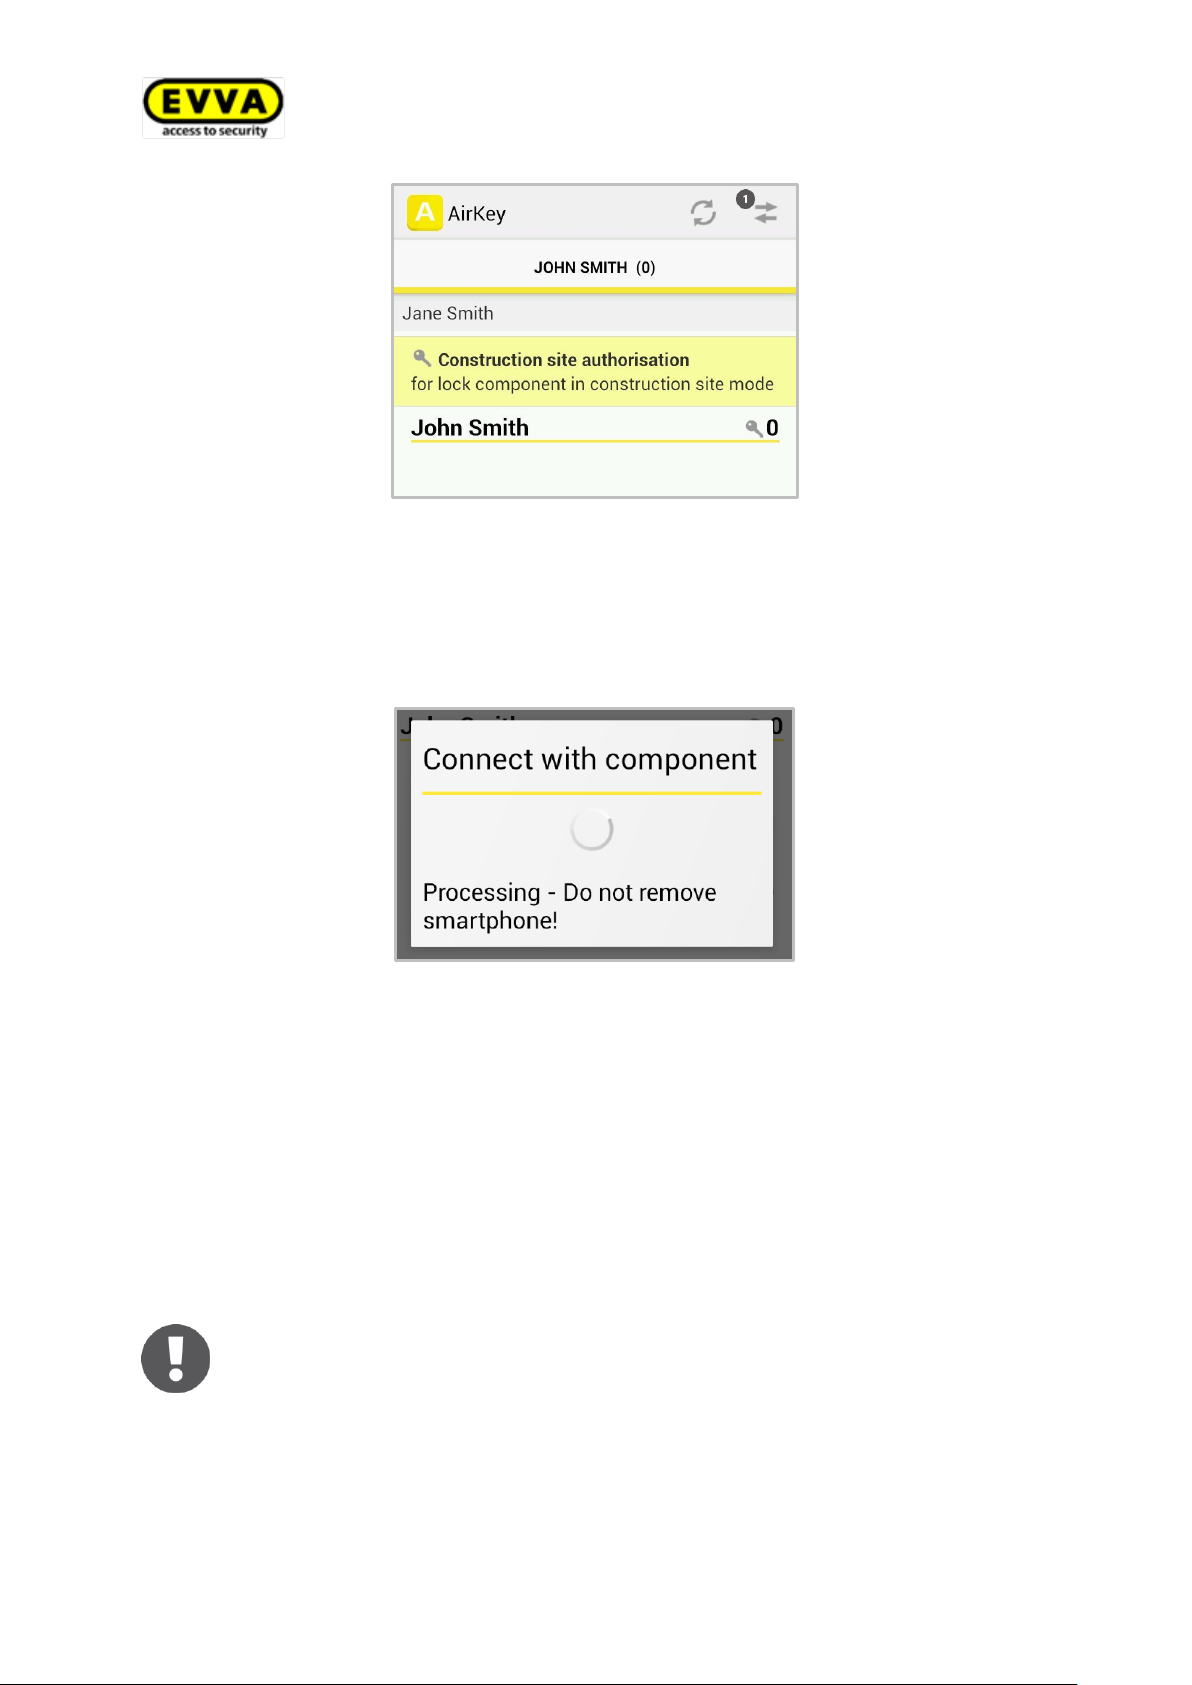
This process is identical for cards, key tags and combi keys. Key tags and
combi keys are also included in the term "card".
When using smartphones to add combi keys to the locking system you must
hold the combi key side featuring the RFID icon to the smartphone. Present
the combi key to the area of the smartphone where the smartphone's NFC
antenna is. Most models require the combi key to be held directly on the
smartphone.
Figure 30: AirKey app – connecting to components
> Hold the smartphone to the medium in factory state.
The smartphone establishes a connection to the medium.
Do not remove the medium from the smartphone while it is establishing the connection. Now you see information about the medium.
Figure 31: AirKey app - connecting
> Select Add.
> Enter a designation for the medium.
> Select the locking system to which you would like to add the medium if the
smartphone is registered in several locking systems.
> Select Add.
> Now once again hold the smartphone to the medium to complete the process.
> A confirmation prompt completes the process. The medium is now available for man-
agement in the AirKey online administration.
41
Page 42
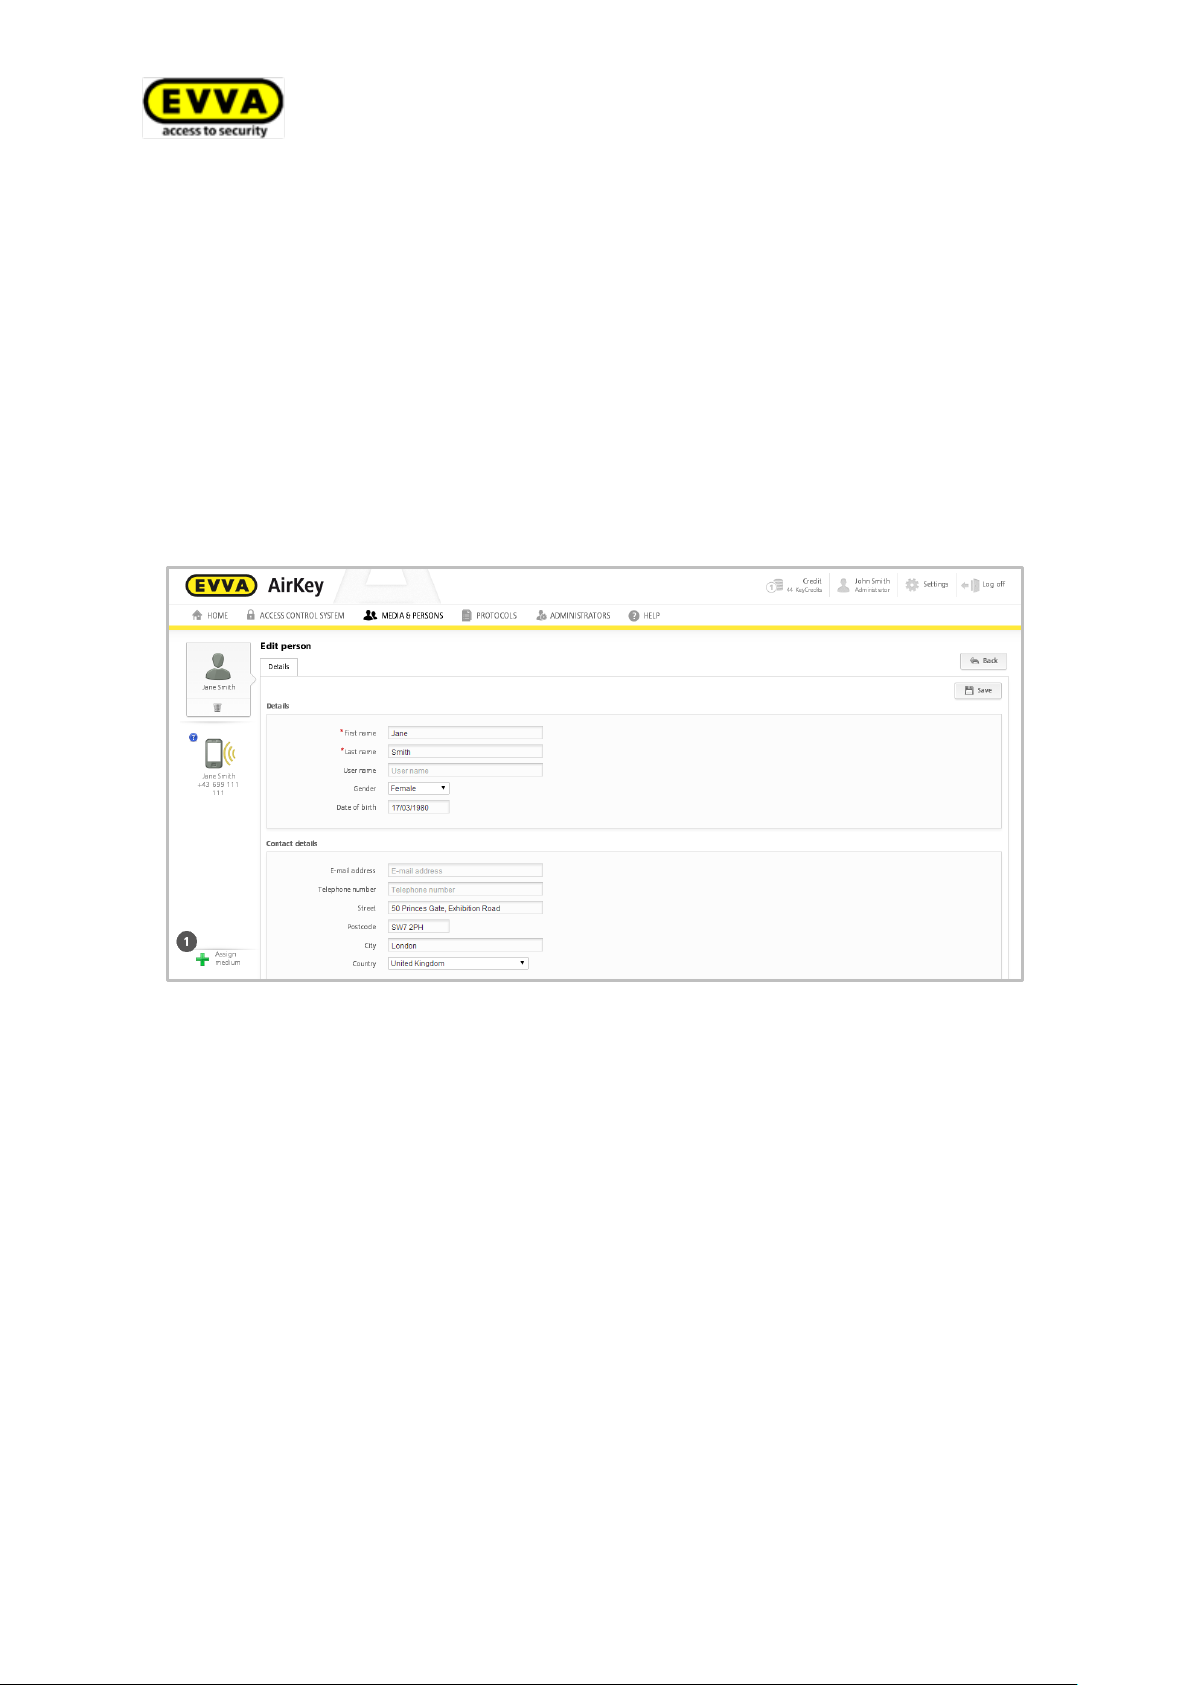
4.13 Assigning media to persons
As part of the next step, you must assign the medium to a person within the AirKey
online administration to be able to assign authorisations. This is the only way to link persons to access events.
> In the online administration main menu, select Media & Persons > Persons.
> In the list of persons, click the person you would like to assign a medium to.
> Click the Assign medium button .
Figure 32: Assigning media
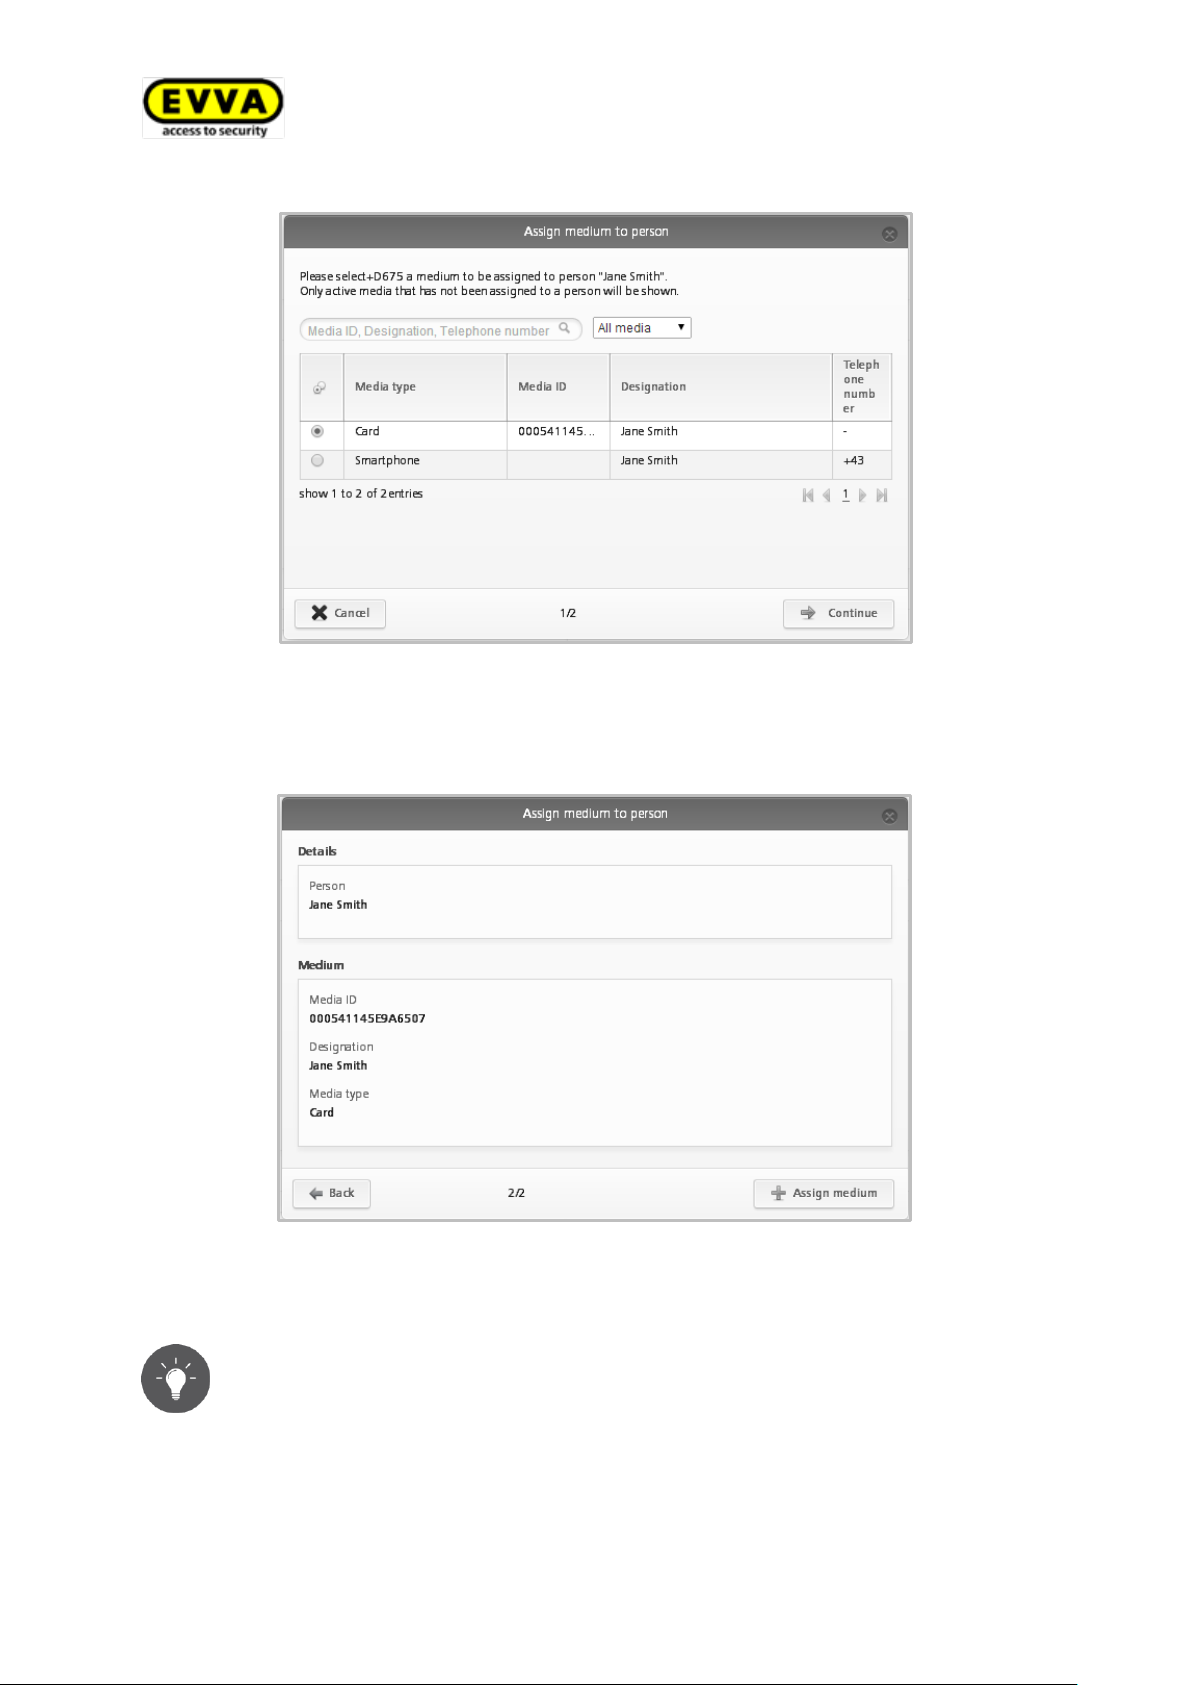
> Select the desired medium and click Continue.
42
Page 43
Alternatively, you can also assign media to persons using the medium.
Please refer to the Assigning media to persons section for more detailed
information.
Figure 33: Assigning media to persons
> Click Assign medium to complete the process.
Figure 34: Assigning media to persons
> A confirmation prompt appears. The medium has now been assigned to a person.
43
Page 44
Please note that you can only assign authorisations once a medium has
been assigned to a person.
There are four access types available:
> Permanent access
> Periodic access
> Single access
> Individual access
4.14 Assigning authorisations
> In the main menu, select Media & Persons > Media.
> Select the desired medium from the overview list.
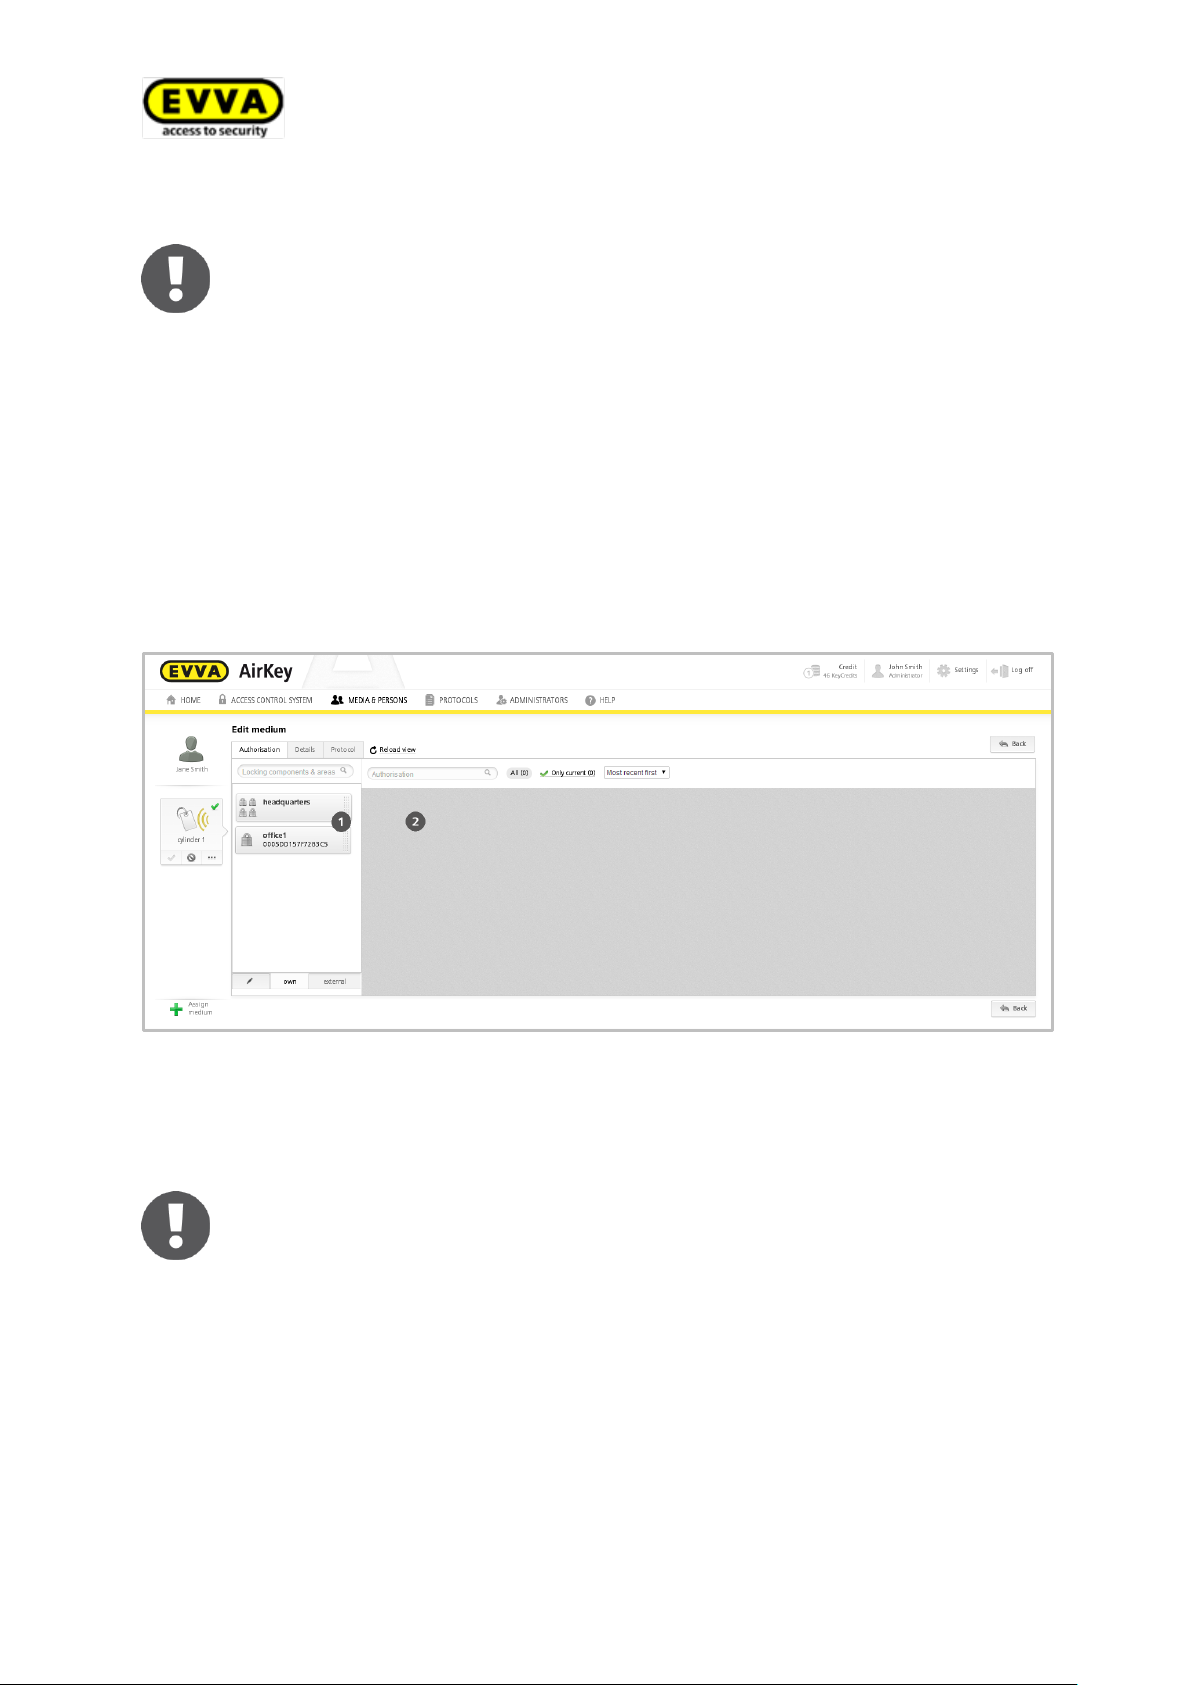
> If the medium has been assigned to a person, an overview of authorisations for this
medium appears.
> Drag and drop the button with the selected door/area into the centre. The poten-
tial access types are only displayed after having dragged and dropped the selected
door/area into the centre.
Figure 35: Assigning authorisations
> Select the desired access type by dragging and dropping the selected door/area into
the corresponding field.
44
Page 45
We explicitly recommend to create a sufficient number of preconfigured
media (cards, key tags) featuring permanent authorisations without an expiry date (emergency media) and keep these safe to be able to operate the
locking system regardless of the online administration.
4.14.1 Permanent access
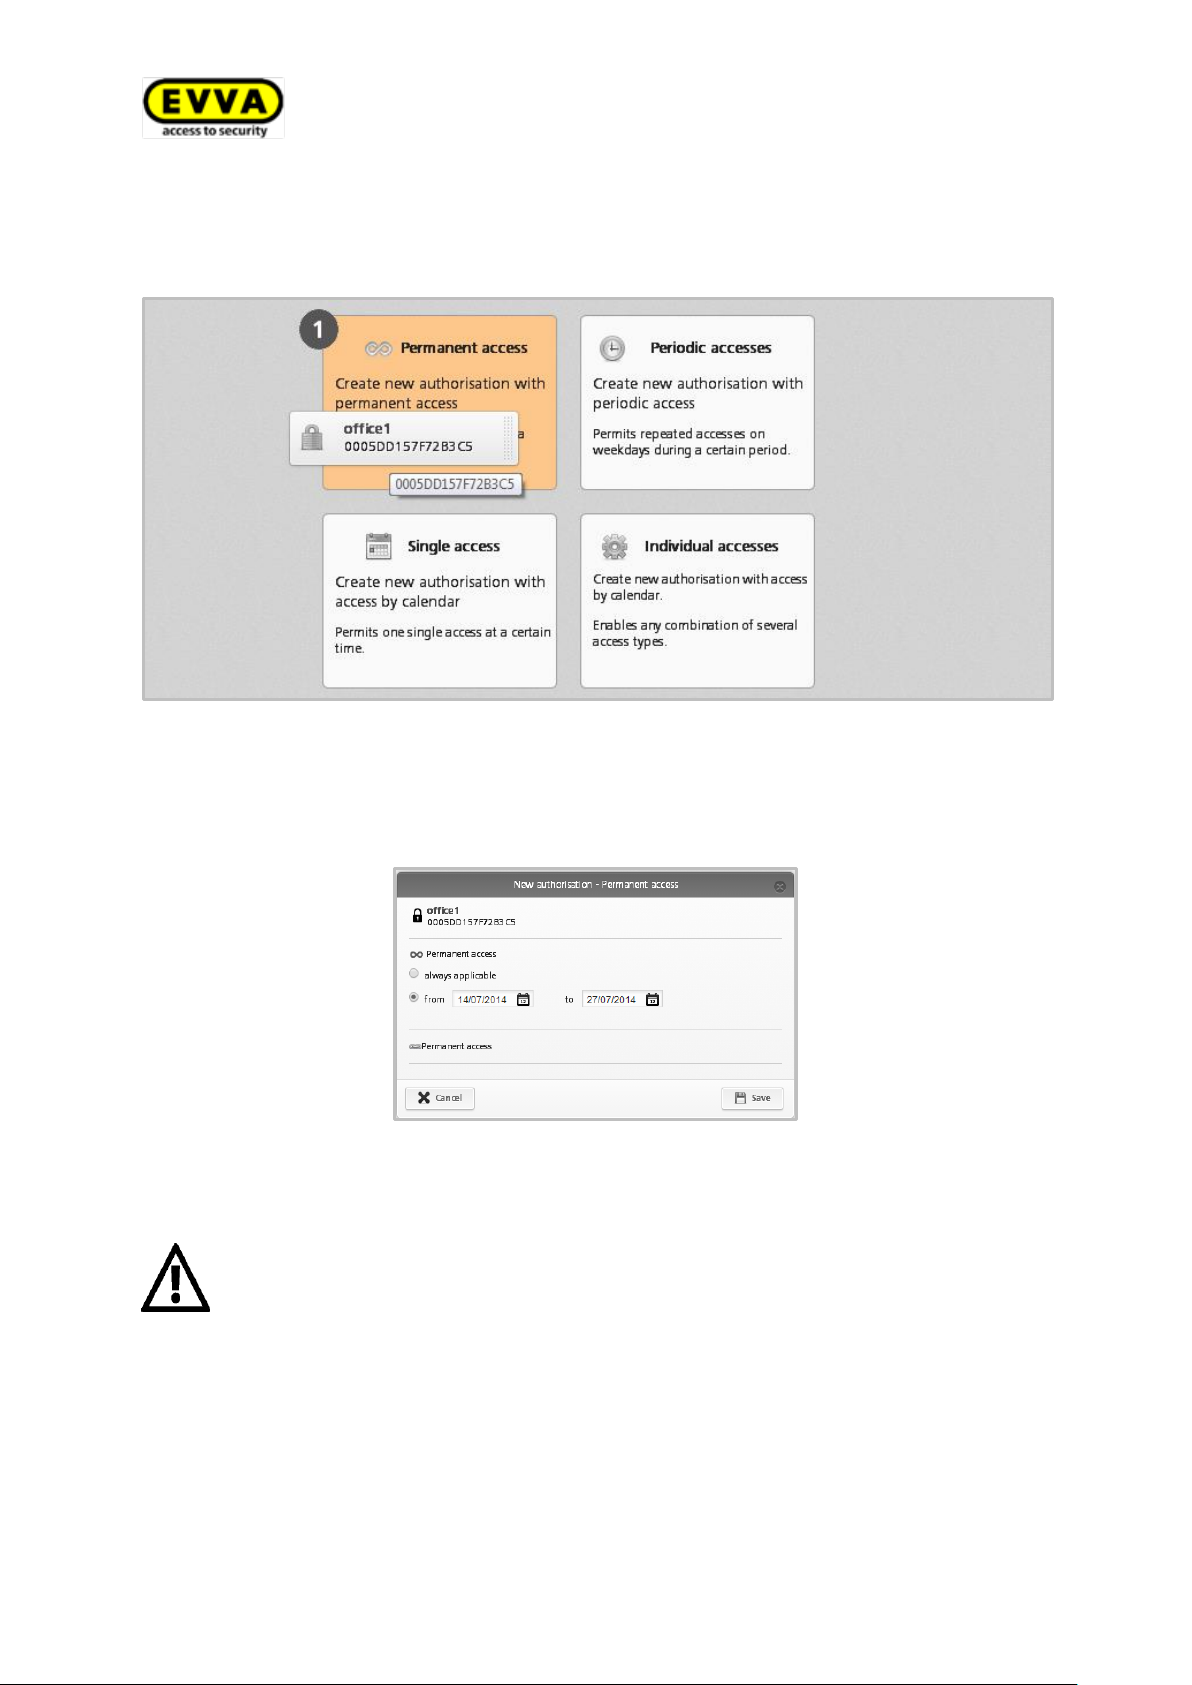
Permanent access indicates access is granted at any time. Specify a start and end date
to restrict the authorisation.
Figure 36: Assigning permanent access authorisations
> Specify the period of permanent access.
> You can choose between unrestricted, permanent access or permanent access with a
specified start and end date.
Figure 37: Assigning permanent access authorisations
> Click Save.
45
Page 46
4.14.2 Periodic access
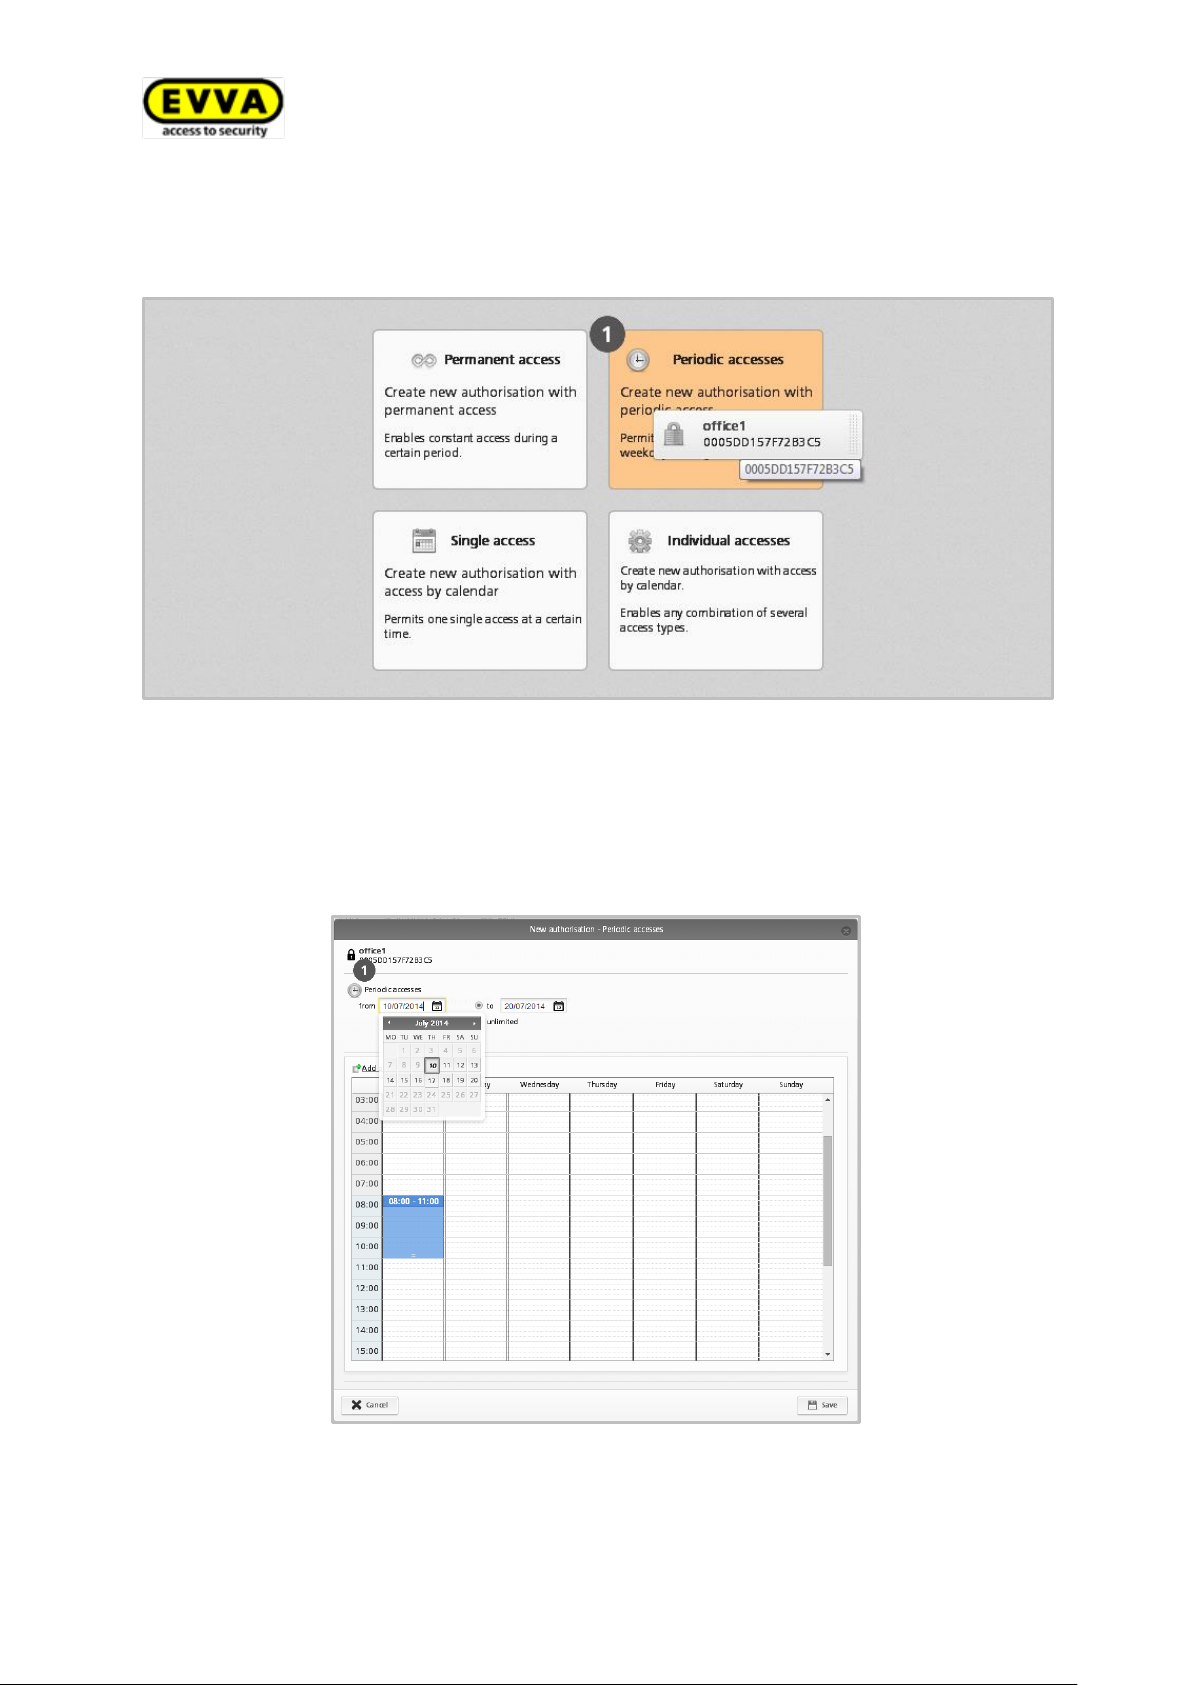
Assign periodic access for recurring access at certain times. For instance, recurring
access events could be a series of weekly appointments.
Figure 38: Assigning periodic access
The system shows a weekly calendar allowing you to define up to four periods for each
day of the week.
> Specify the period of periodic access .
Figure 39: Assigning periodic access
> Directly highlight the period in the calendar or click Add periodic access.
> Enter the desired period and click Save.
46
Page 47
4.14.3 Single access
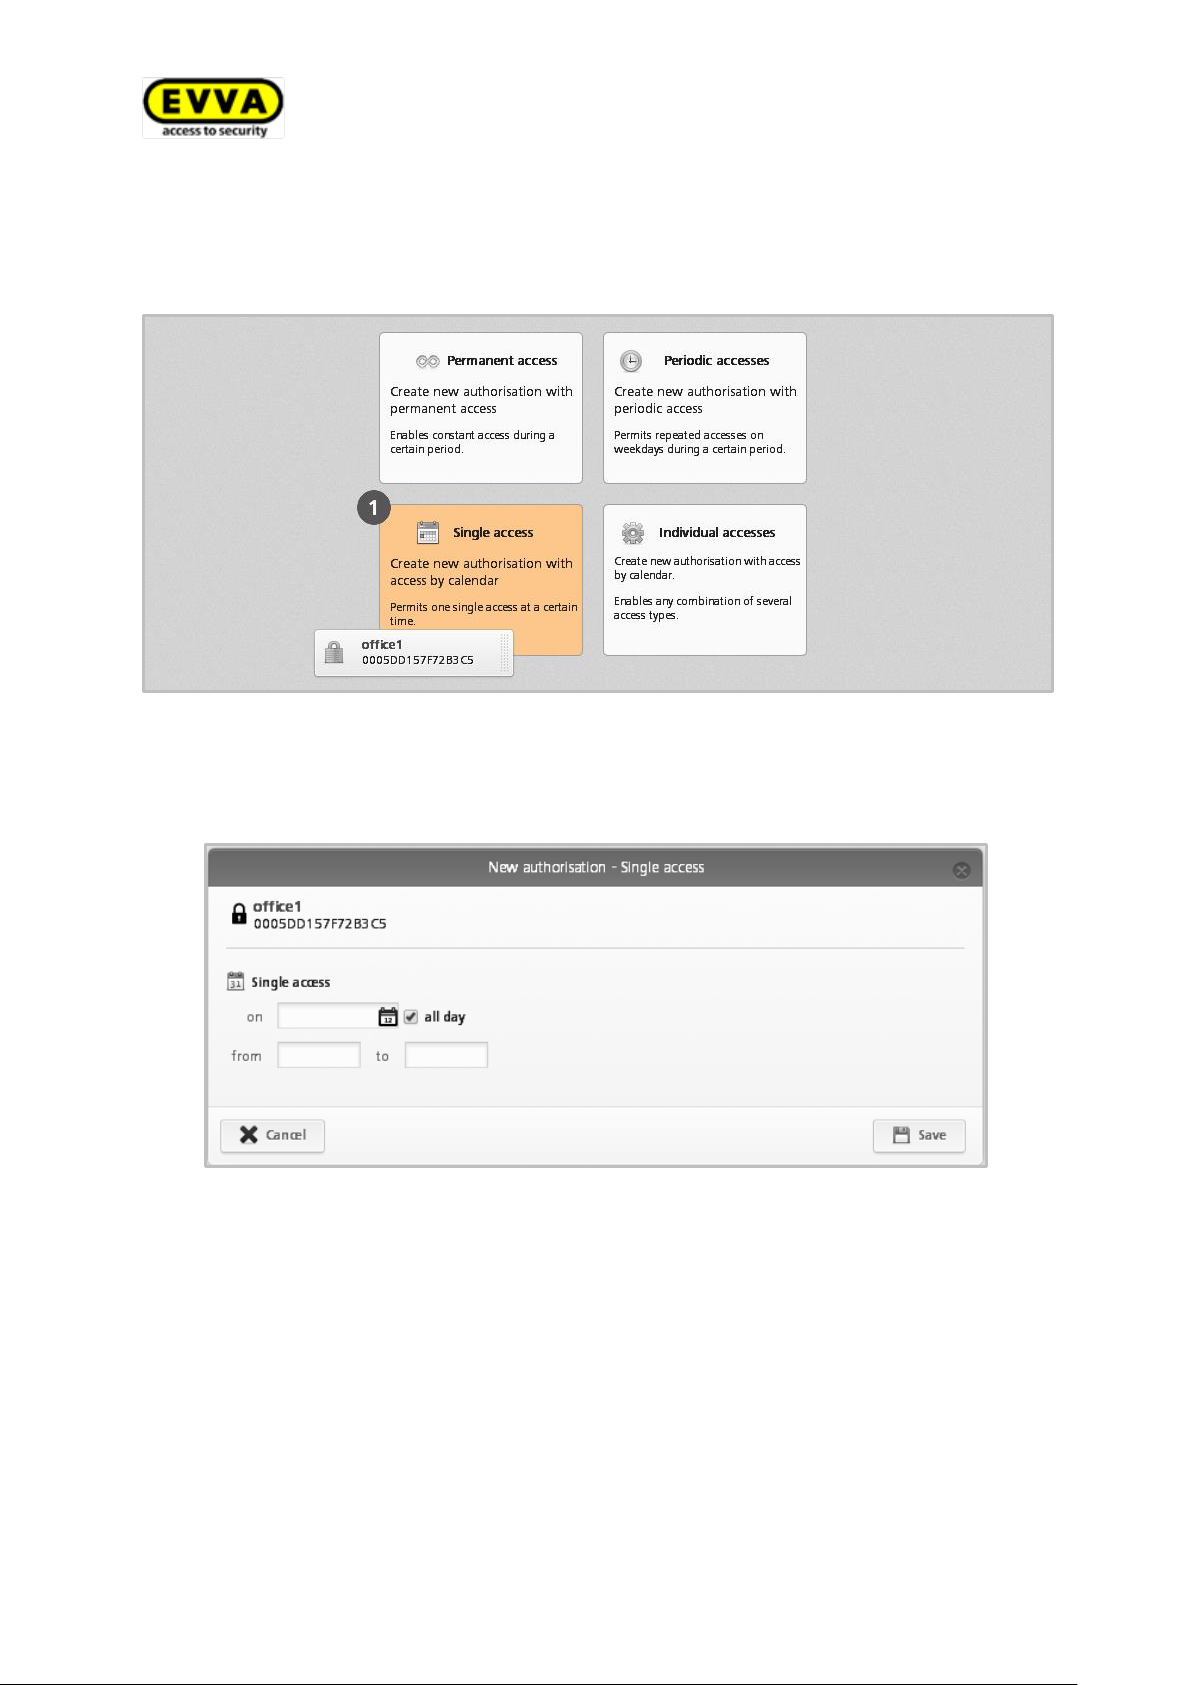
Assign single access authorisations , if access must be restricted to a certain day and a
certain period.
Figure 40: Assigning single access authorisations
> Enter the desired period and click Save.
Figure 41: Assigning single access authorisations
47
Page 48
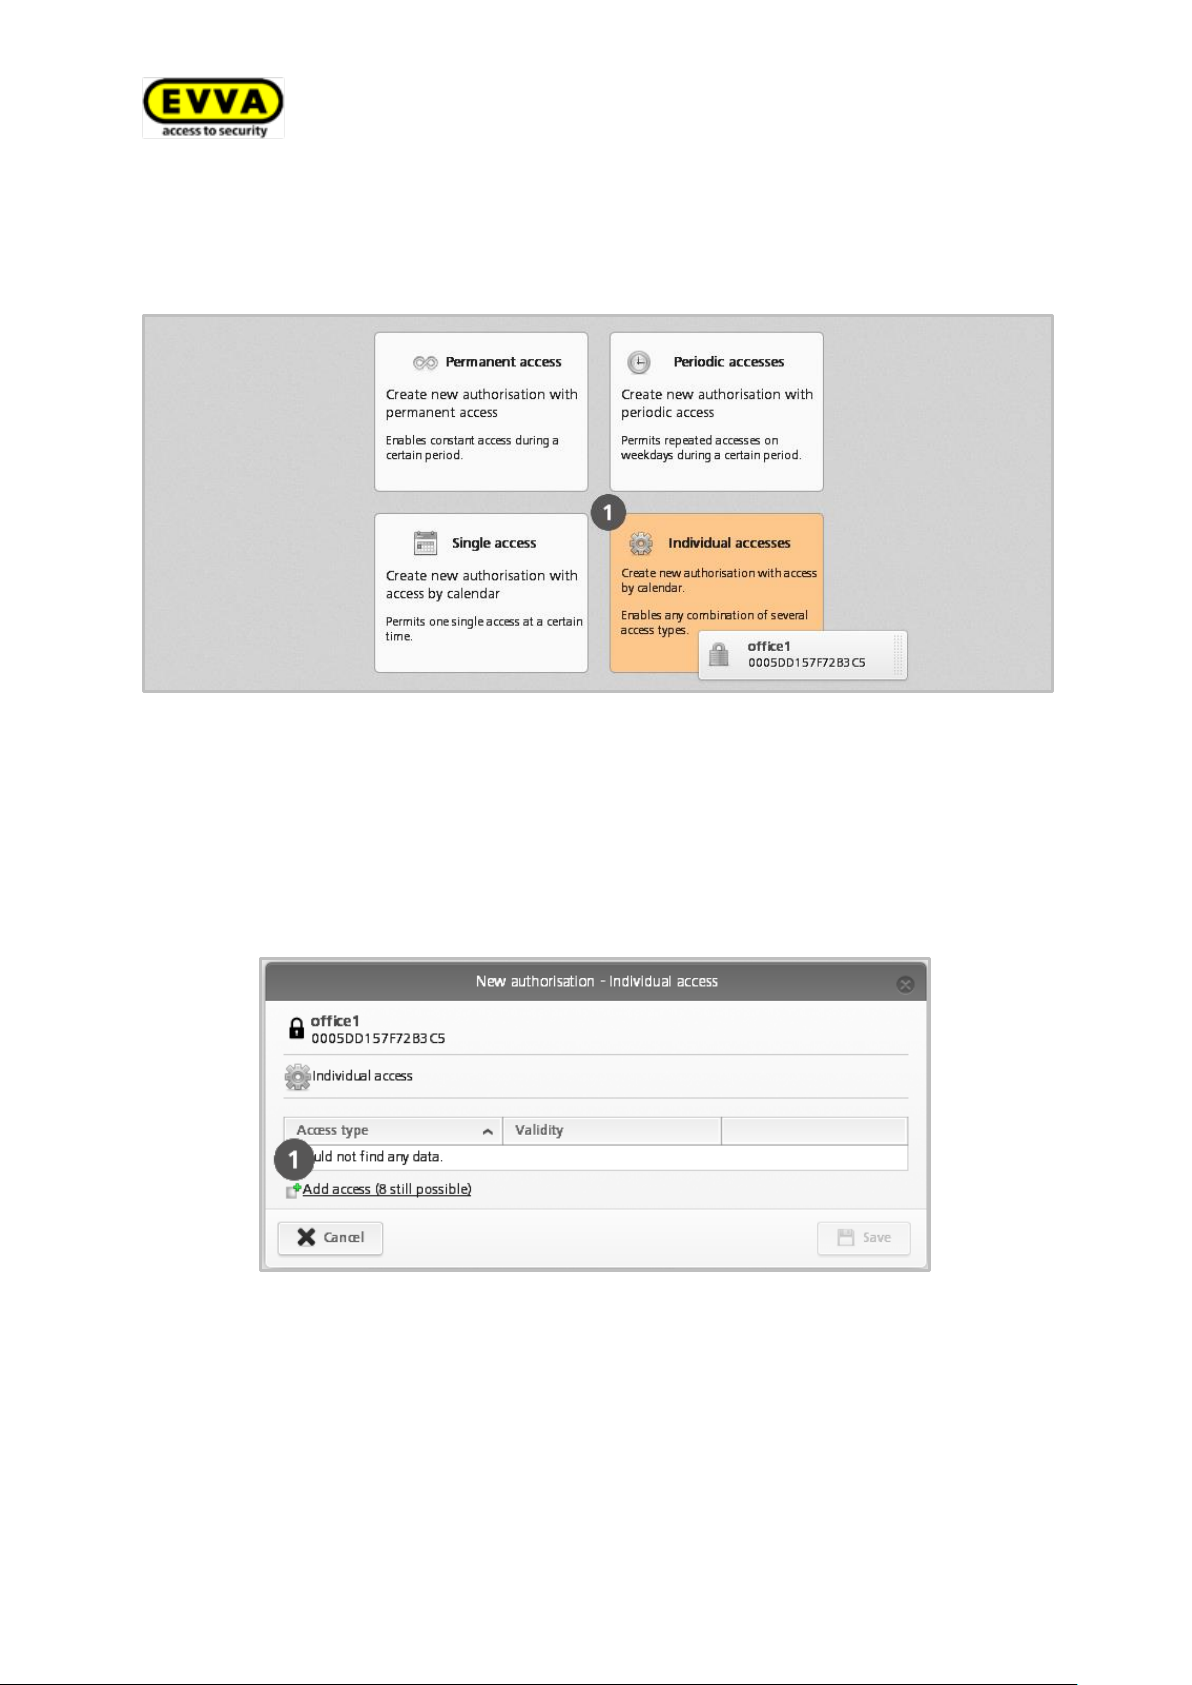
4.14.4 Individual access
Assign individual access authorisations if you require a combination of permanent access, single access and periodic access.
Figure 42: Assigning individual access
> The "New authorisation – Individual access" dialogue window shows any individual
access authorisations you have already assigned.
> Click an entry in a row to change the authorisation.
> Alternatively click Add access for a new entry.
Figure 43: New authorisation — individual access
> Select permanent access, periodic access or single access and define the correspond-
ing specifications. The parameters correspond to the access authorisations that have
been described above.
48
Page 49
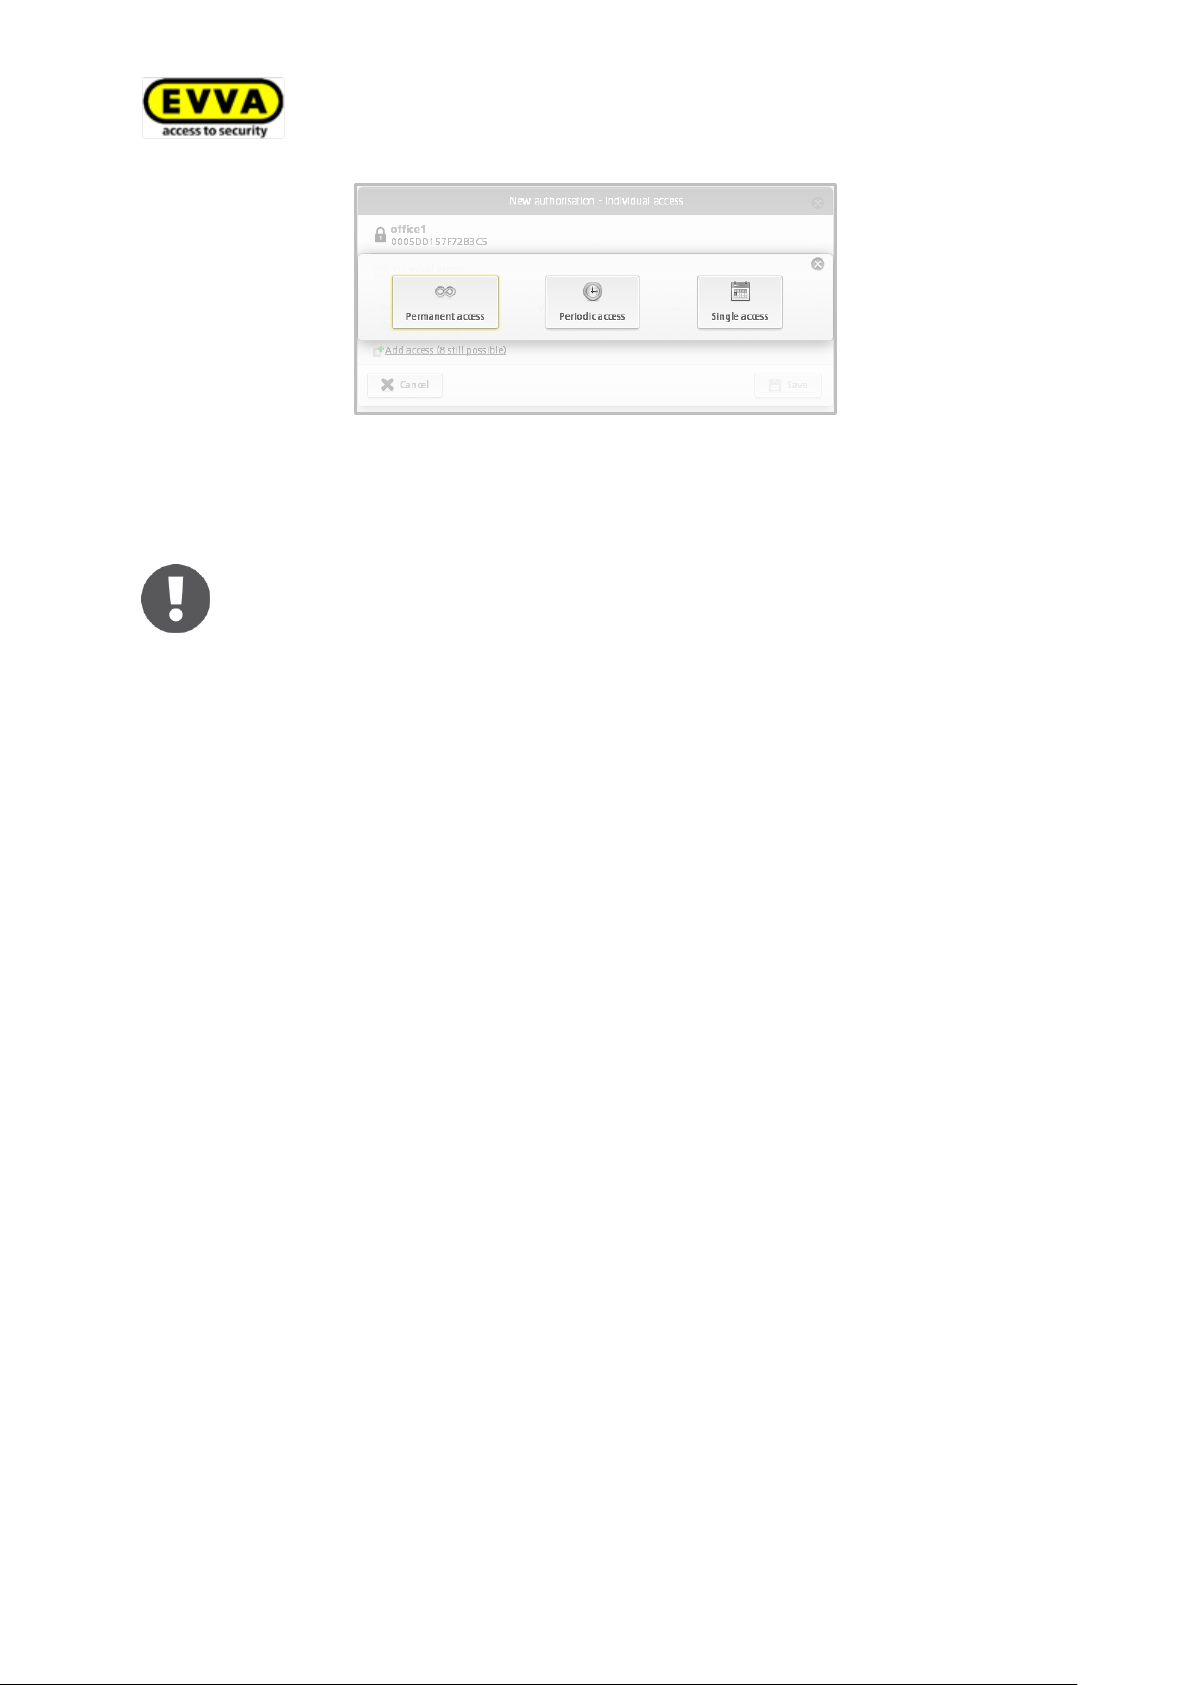
> Permanent access and periodic access periods must not overlap.
> It is possible to define a maximum of one single access per day.
> If single access and periodic access overlap, both access types are valid.
> You can configure a maximum of eight individual authorisations.
Figure 44: New authorisation — individual access
> Click Save once you have configured all authorisations for individual access.
49
Page 50
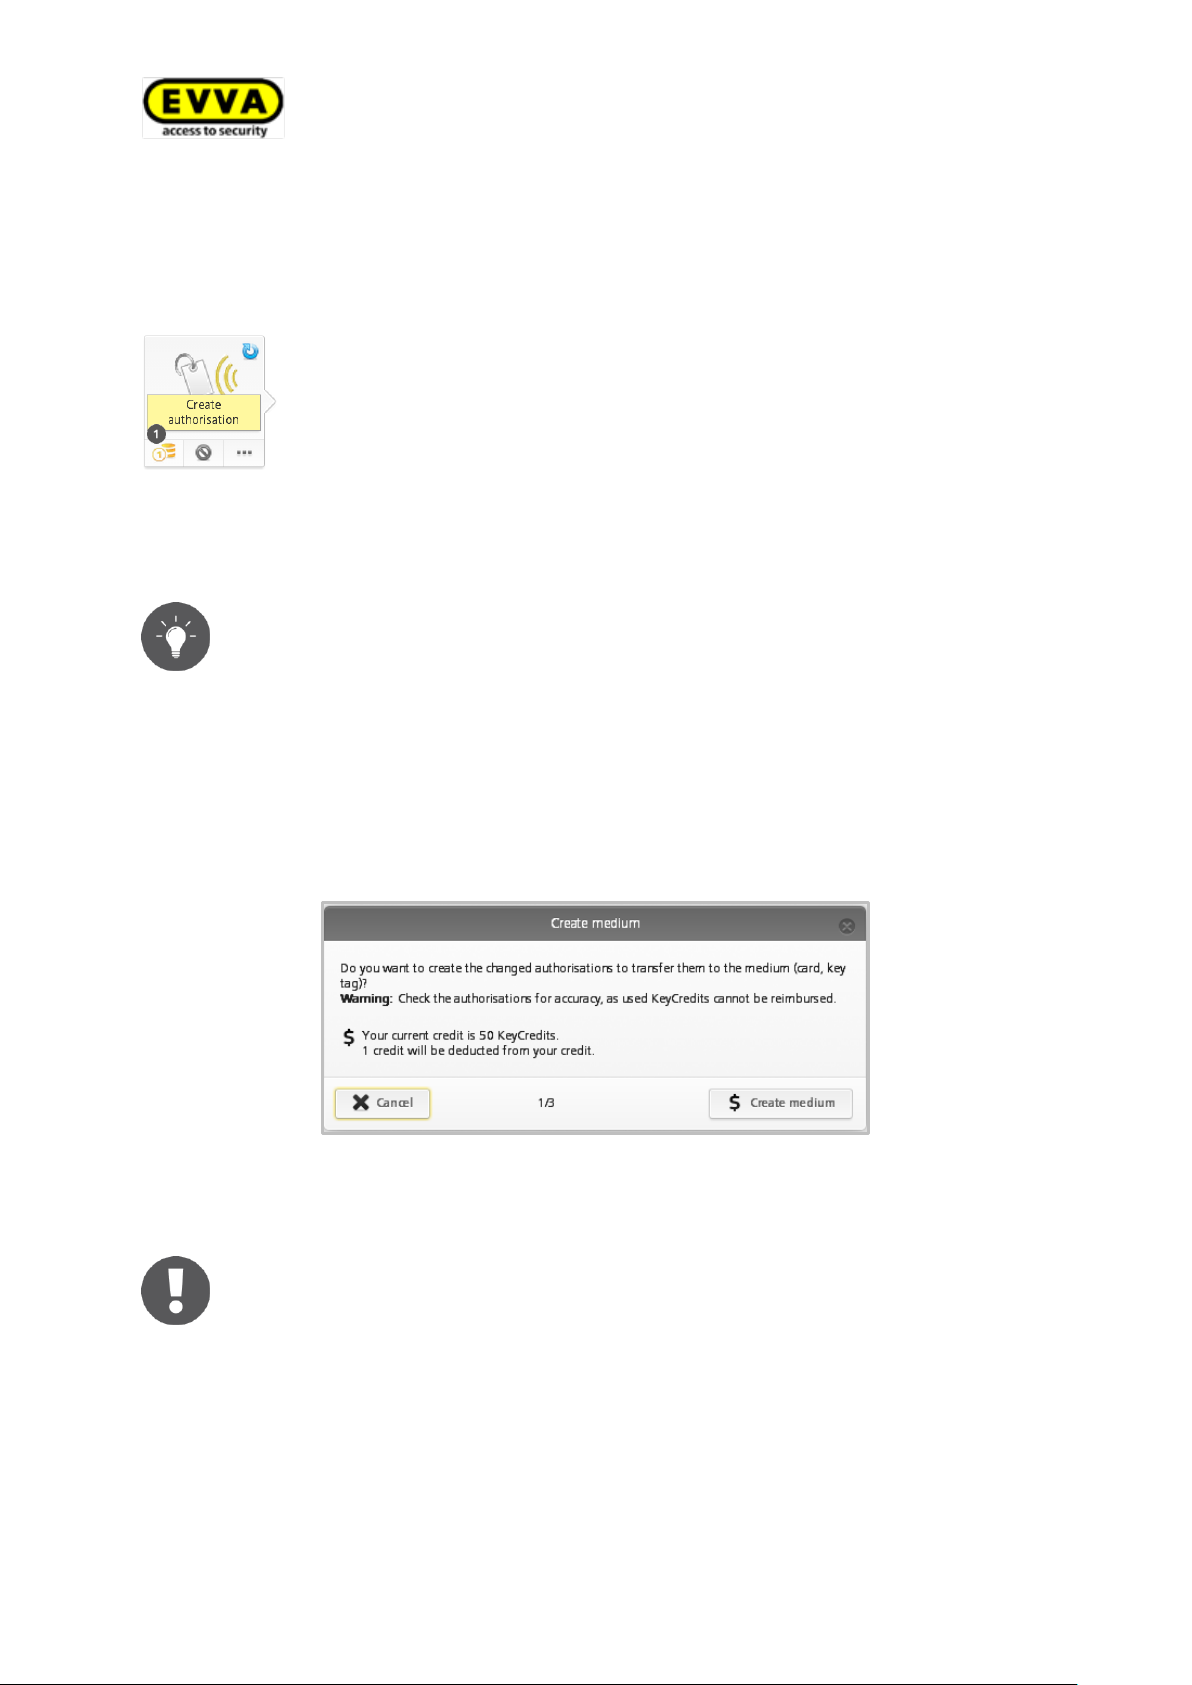
Changing an existing authorisation or creating new authorisations changes the icon of the corresponding medium. You can now create the medium, providing you have sufficient credit.
A corresponding message appears if you do not have sufficient credit at
this point in the process. You can immediately top-up your credit using a
link in this message. Topping up your credit using this message will automatically create the authorisation and deduct a KeyCredit from your
account.
You must now manually update media, such as cards, key tags or combi
keys using a smartphone or coding station for the authorisations to be activated on the medium. Smartphones receive authorisations by push message.
4.15 Creating authorisations
After having created access authorisations for media, click Create authorisation to
complete the process and then update the corresponding medium.
> Click the icon for the medium to Create an authorisation.
> You will receive a corresponding message indicating deduction from your quantity-
based credit as a result of creating the medium.
Figure 45: Creating media
> Click Create medium to confirm the process.
This section described how to commission the AirKey system and set it up correctly.
The processes described herein illustrate the first steps and enable you to manage your
AirKey system. Please refer to the following sections for a more detailed description of
individual AirKey online administration functions and the AirKey app.
50
Page 51
5 AirKey online administration
5.1 AirKey login
> Open the following URL in your browser https://airkey.evva.com.
The "AirKey | Login" dialogue window appears.
> Enter the user ID you received in the "EVVA AirKey registration" email.
> Enter your defined password and click Login.
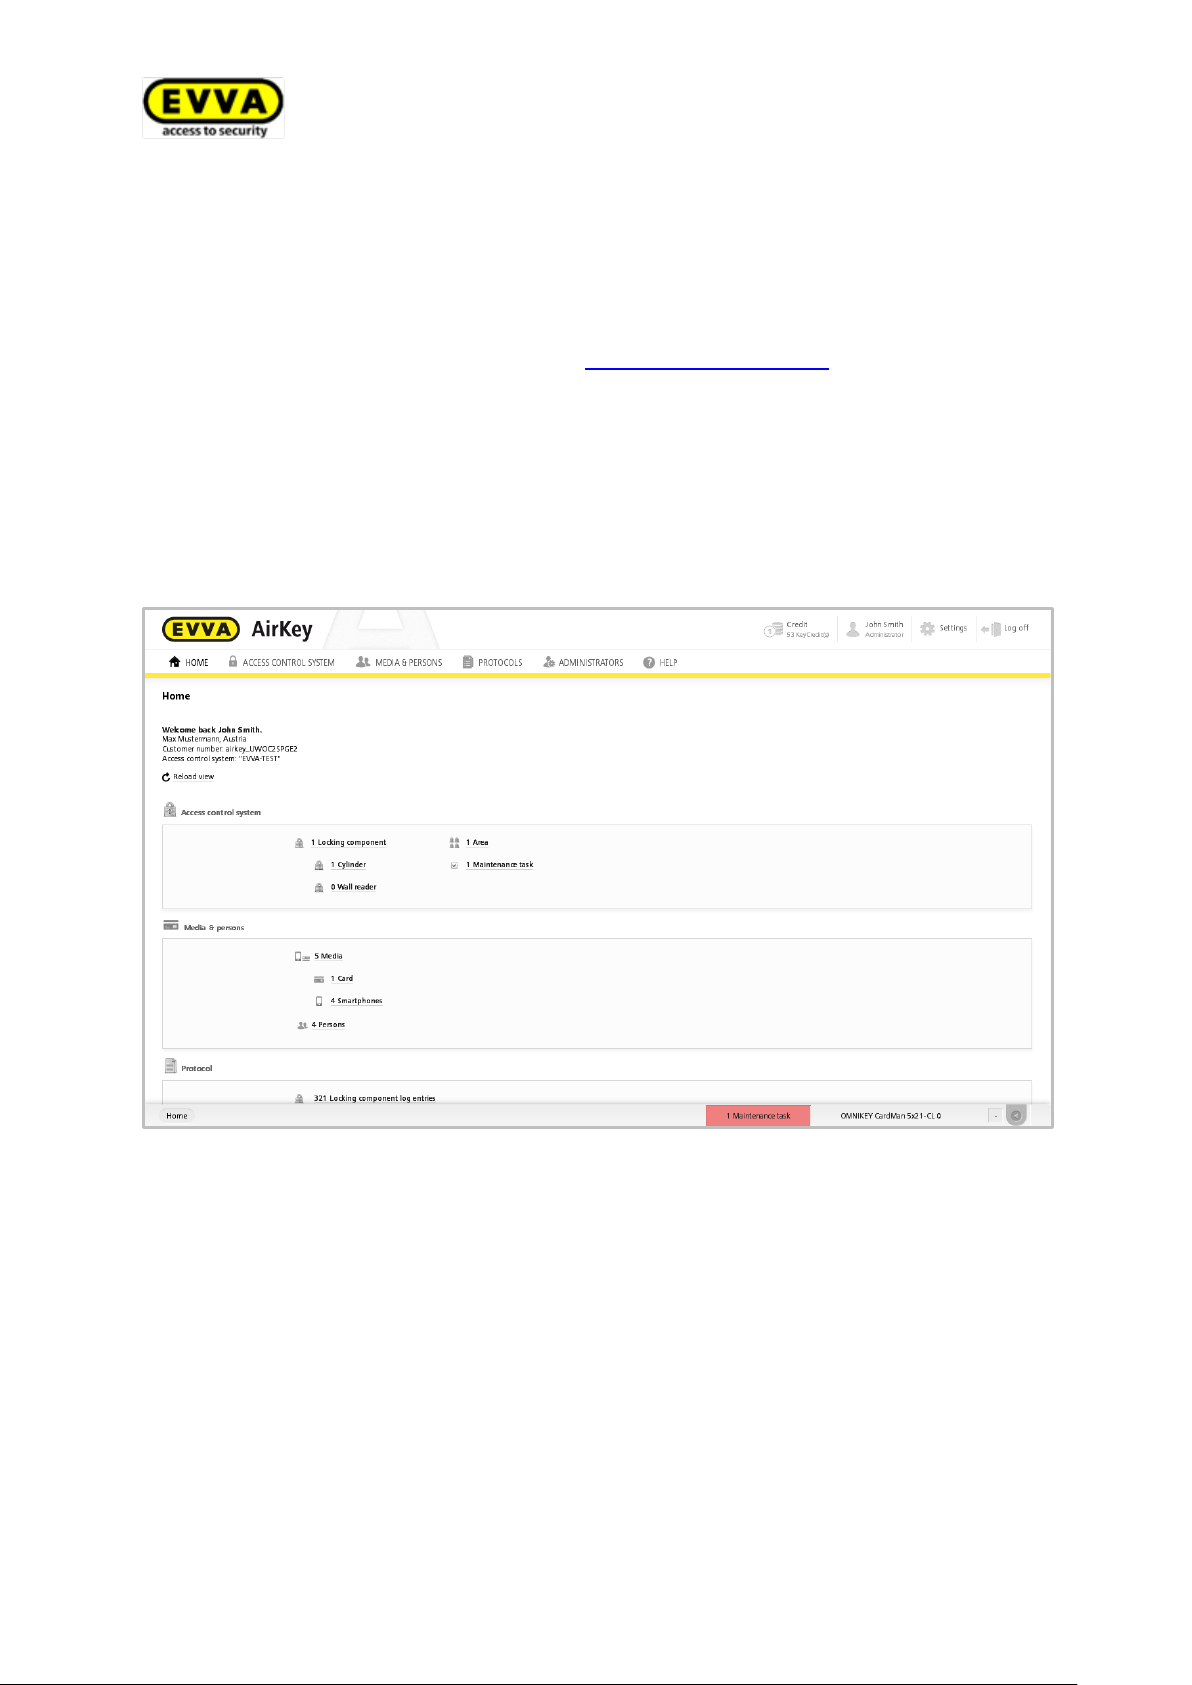
Once you have logged on, the system opens the "Home" screen. It provides an overview
of your AirKey locking system.
Figure 46: AirKey "Home" screen
If you have forgotten your password, you can reset your password yourself.
> Click Password forgotten.
51
Page 52
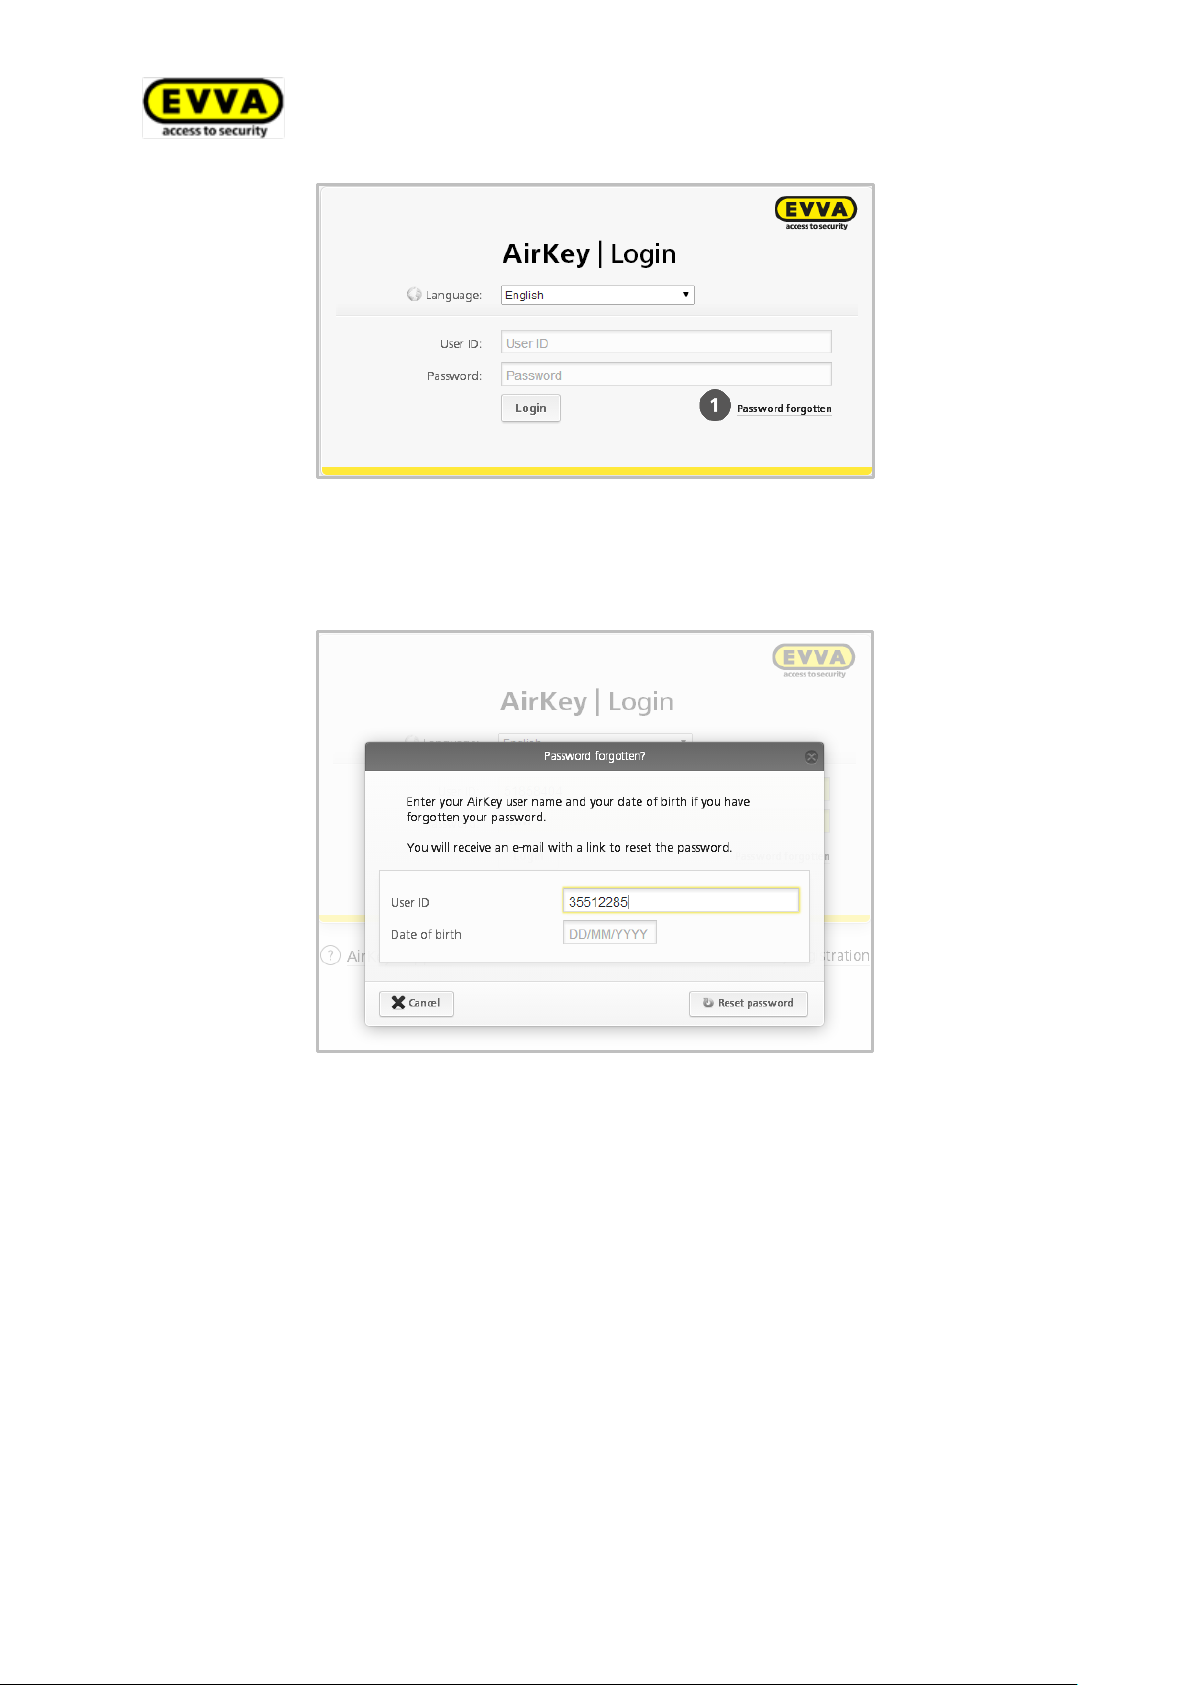
Figure 47: AirKey | Login
> Enter your user name and the date of birth you entered upon registration in the
"Password forgotten?" dialogue window and click Reset password.
Figure 48: Password forgotten?
You will receive an automated email from EVVA AirKey with the following subject line:
"EVVA AirKey – password reset".
> Open the email from EVVA AirKey.
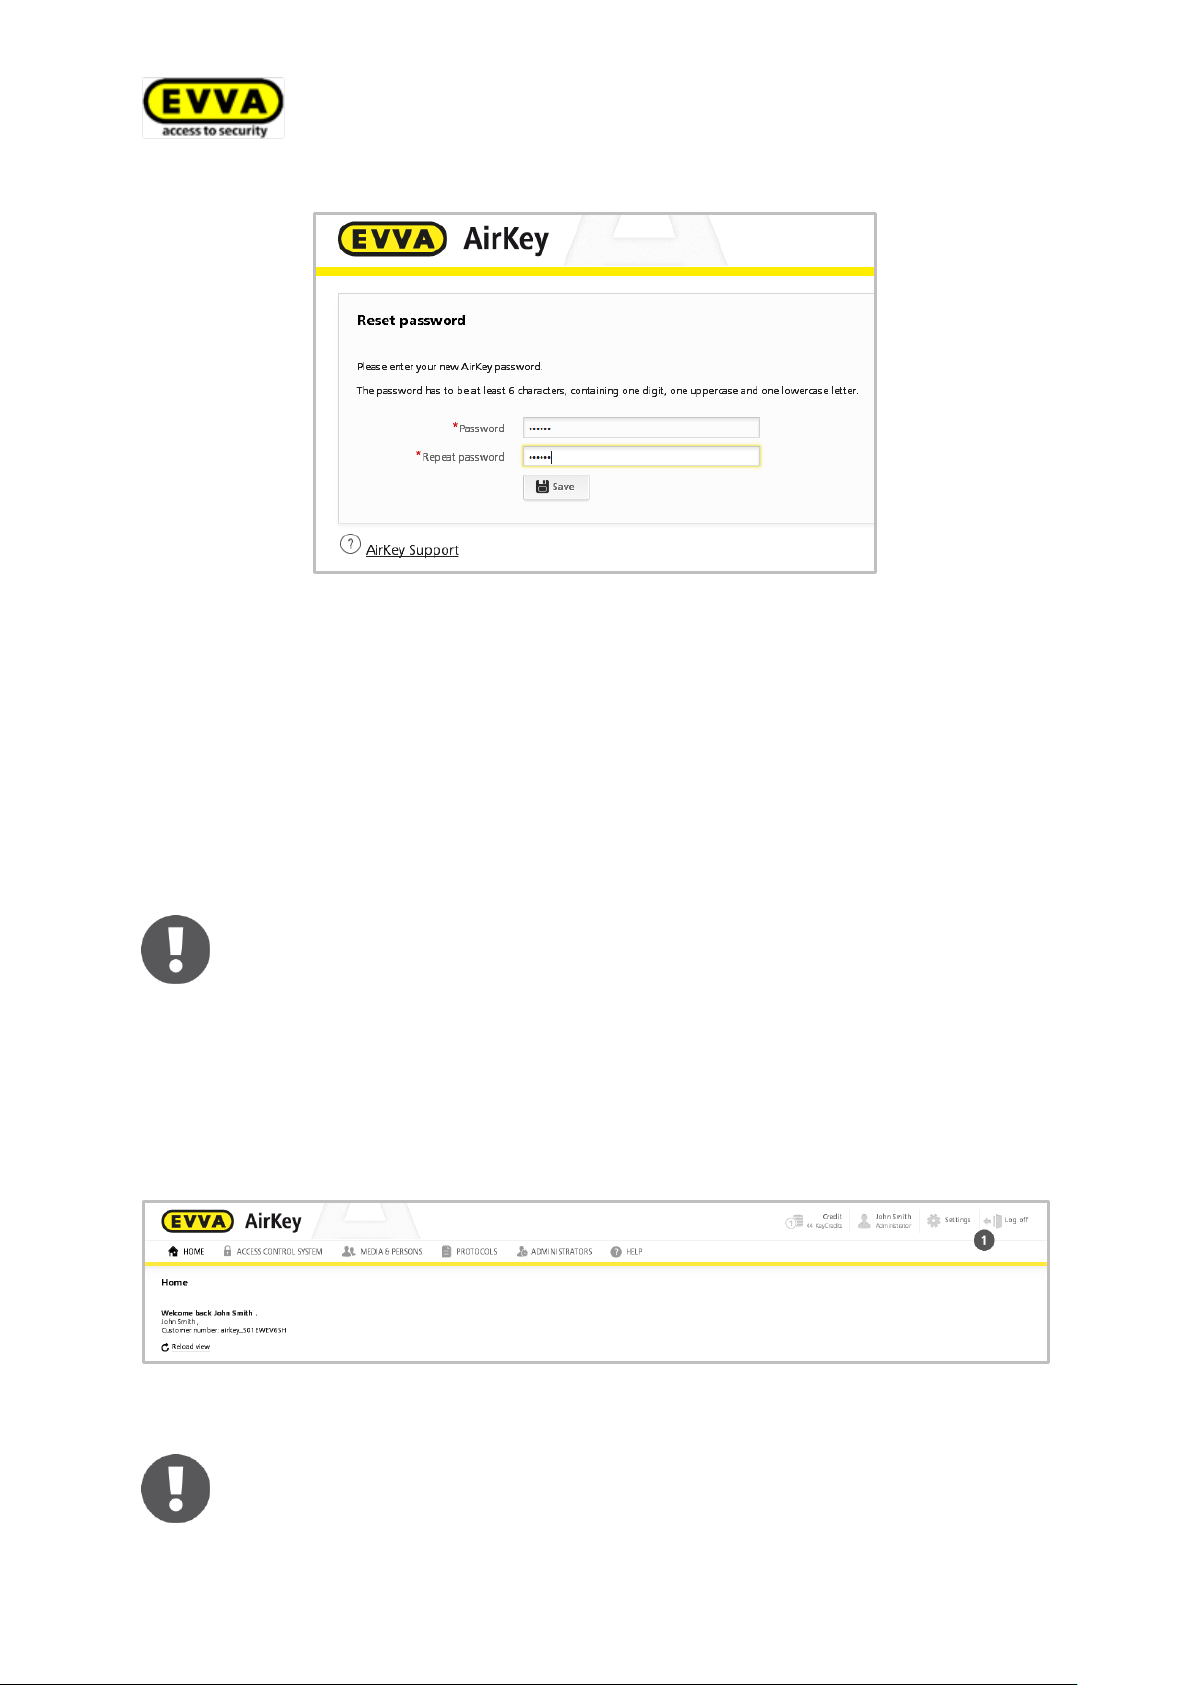
> In the email, click the link to reset your password. The "Reset password" dialogue
window opens.
> Enter your new password and re-enter your new password to confirm the process.
> Click Save.
52
Page 53
If required, you can also change your password in the AirKey online administration. For this purpose click your name in the header of the AirKey
online administration and use the Change password function to change
the password.
Despite having integrated an automatic logout feature after 30 minutes we
highly recommend administrators always log out after having completed
any due tasks in the AirKey online administration using the Log off button.
Figure 49: Reset password
The "AirKey | Login" dialogue window opens.
> Enter your user name.
> Enter your current password.
> Click Login.
If your input is correct, the AirKey online administration Home screen opens. The top
right shows the name of the user that is logged in.
5.2 AirKey logout
Click Log off to quit the AirKey online administration.
Figure 50: AirKey online administration Home screen
53
Page 54
There must be a minimum of one administrator per client and locking system.
Check the email address to which the activation link is sent before you
save.
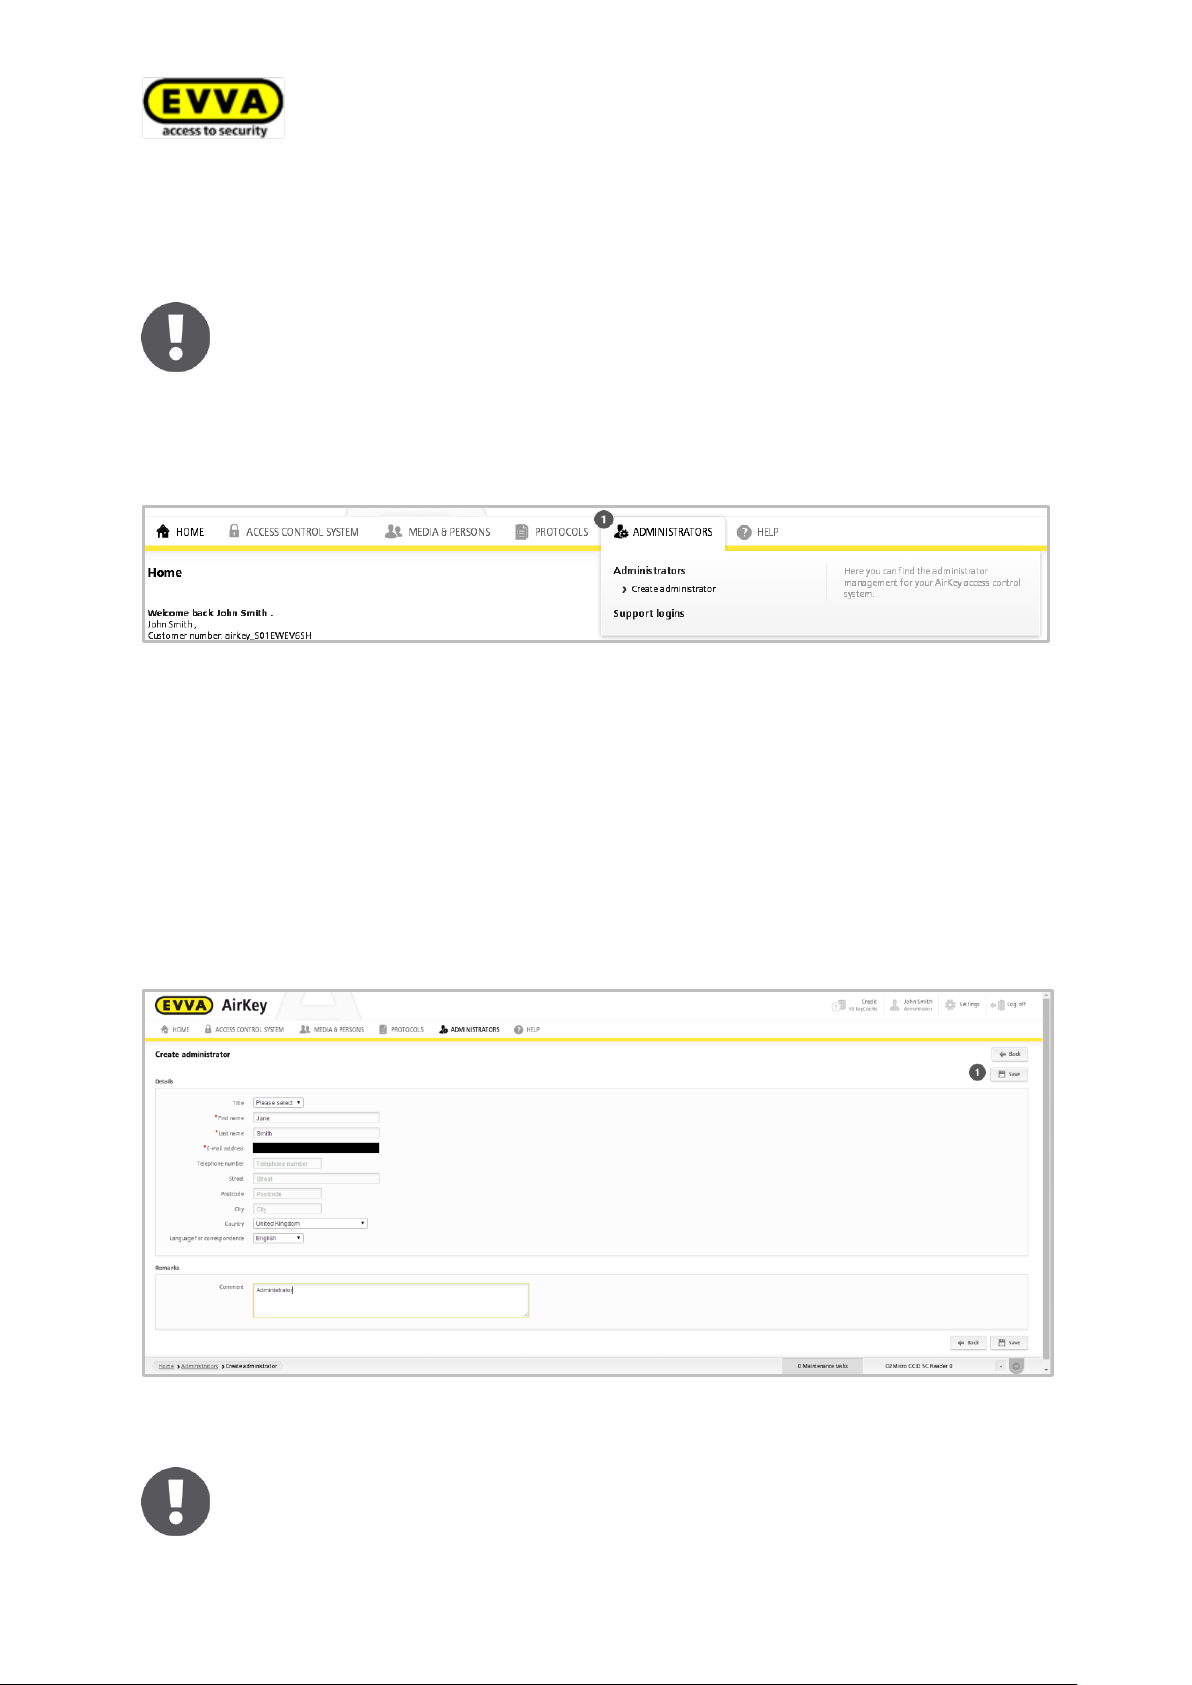
5.3 Administrators
Administrators have comprehensive rights to manage the entire AirKey locking system.
Please refer to the Administrators main menu for the administrator management
functions.
Figure 51: Administrators main menu
5.3.1 Creating administrators
Administrators can exclusively be created by other administrators.
> In this menu, select Administrators > Create administrator.
> Complete mandatory fields.
Fields highlighted with * are mandatory fields.
> Click Save .
Figure 52: Creating administrators
54
Page 55
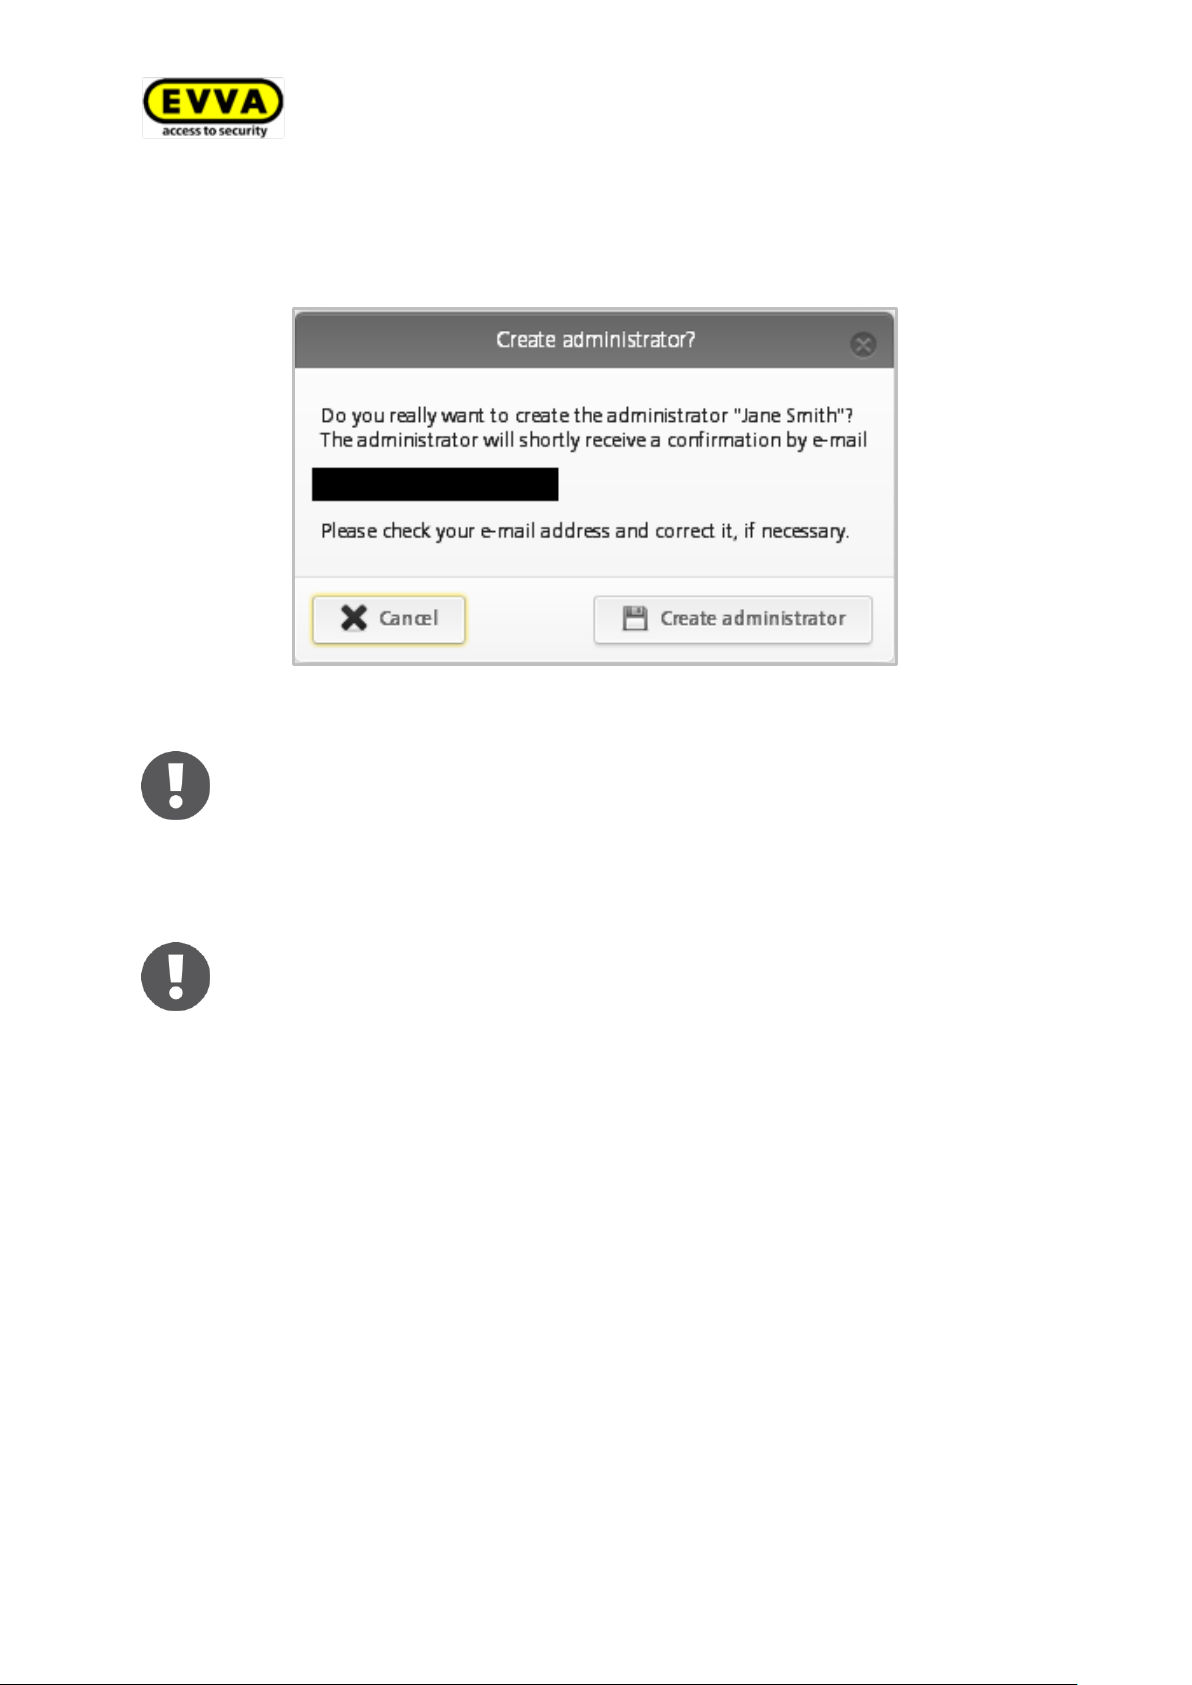
A message indicating "Administrator saved successfully" appears upon successfully creating administrators.
The data is deleted and the activation link is rendered invalid if it is not activated within 48 hours.
> Click Create administrator to confirm the security prompt and complete the pro-
cess.
Figure 53: Creating administrators
Now the administrator you created receives an email from EVVA AirKey with an activation
link.
The administrator you created must complete registration as described below:
> Open the EVVA AirKey email
> Click the activation link.
The "Welcome to AirKey" dialogue window opens.
> Enter the password, re-enter the password and specify your date of birth
> Click Save password.
> This completes the process to create administrators. Users are then forwarded to the
"AirKey | Login" page. On this page, new administrators can log in with their user
credentials.
55
Page 56
You are unable to change the user name.
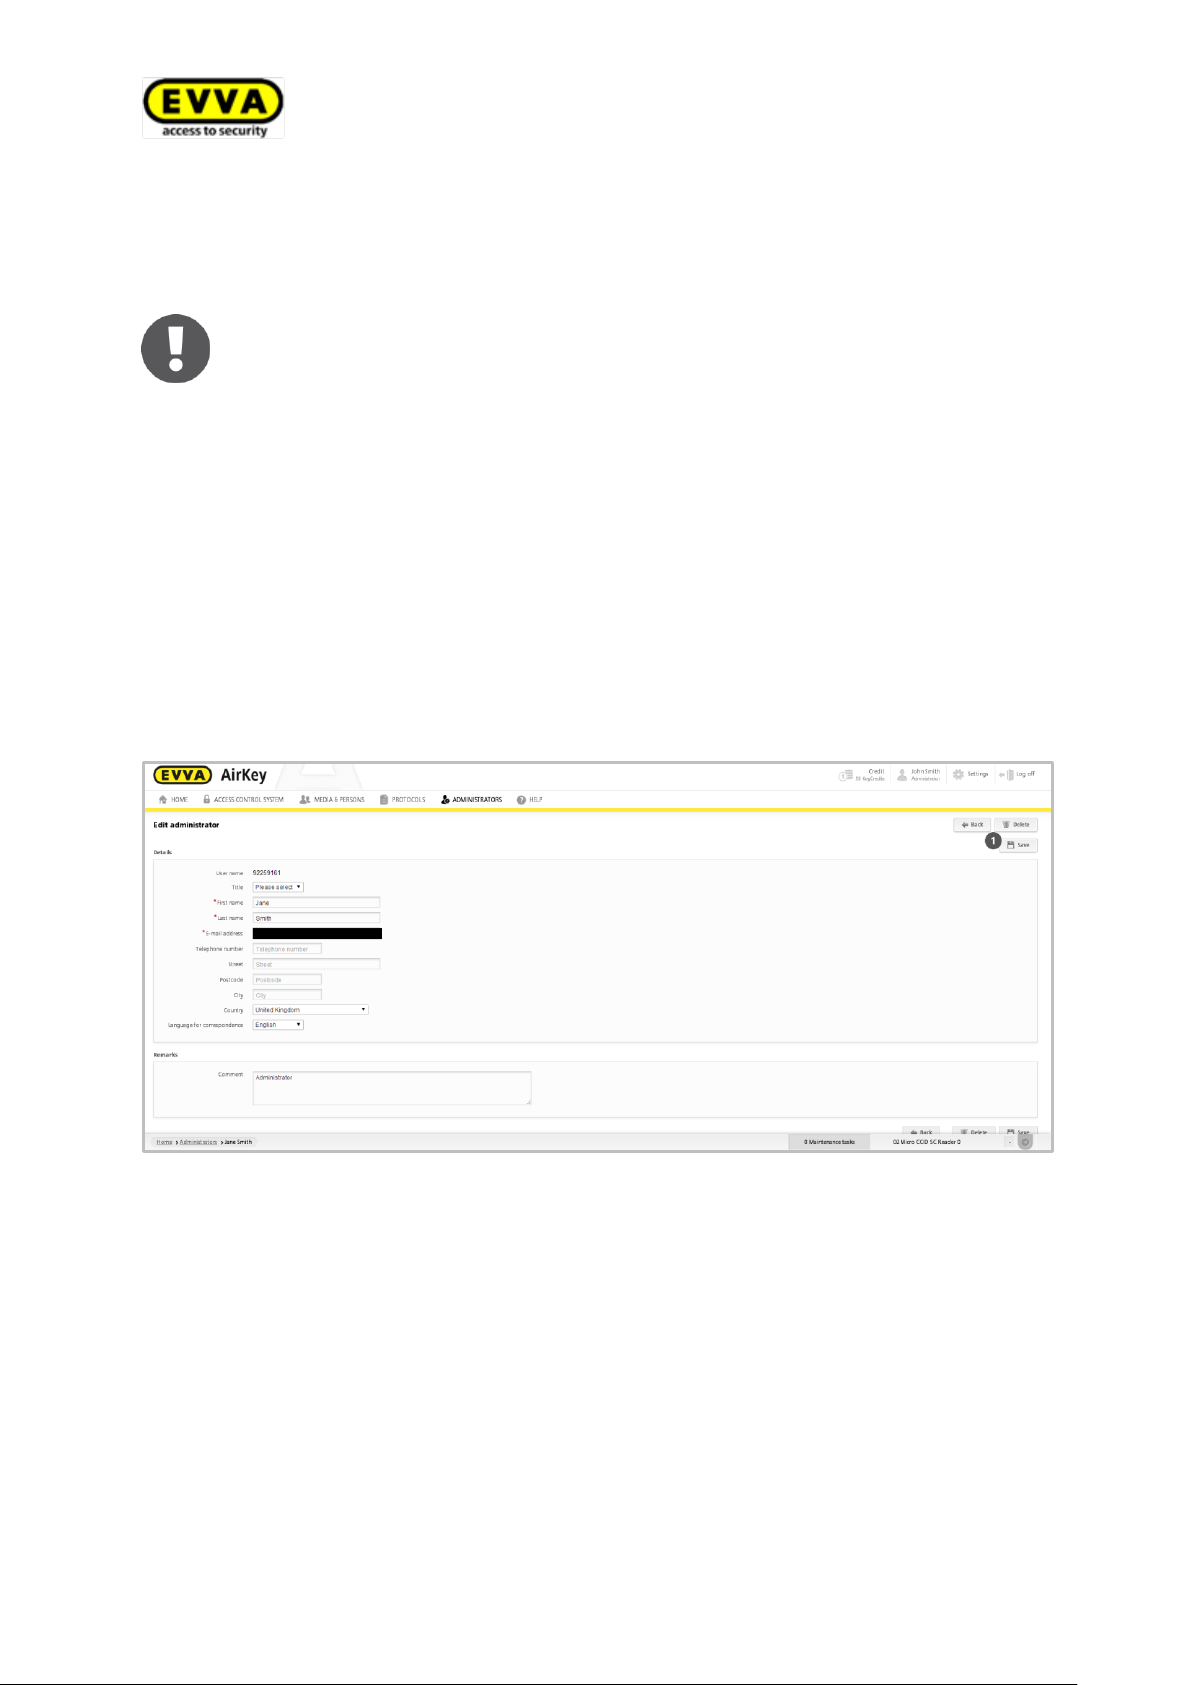
5.3.2 Editing administrators
You can retrospectively change administrators' details, such as last name(s), email address or telephone number.
> In the main menu, select Administrators > Administrators.
The system shows a list of all valid administrators.
Search for administrators, sort columns and restrict the number of entries shown per
page in the list on screen.
> Click the administrator whose details you would like to change.
> Change the desired data.
> Click Save .
56
Figure 54: Editing administrators
Page 57
A message indicating "Administrator deleted successfully" appears upon
successfully deleting administrators. The deleted administrator no longer
appears on the administrator list and is consequently no longer able to log
on to the AirKey system.
5.3.3 Deleting administrators
Exclusively administrators can delete other administrators.
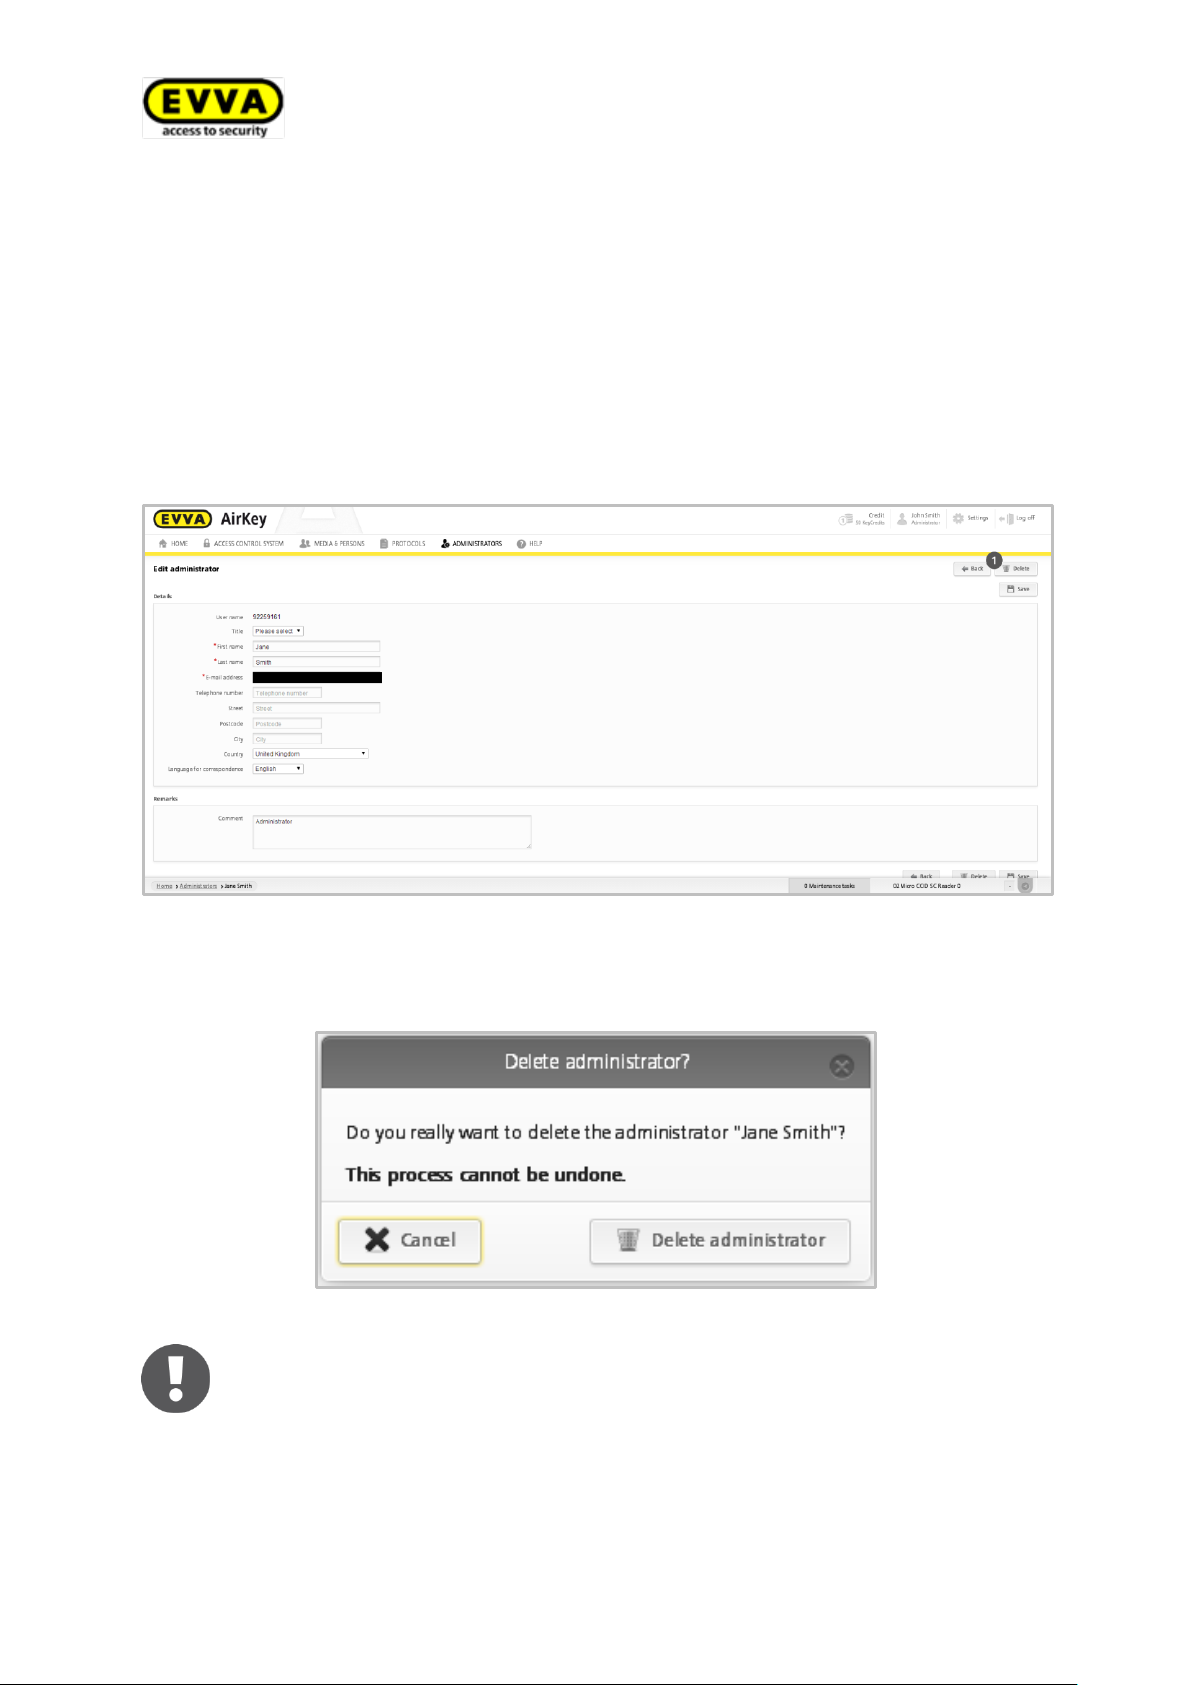
> In the main menu, click Administrators > Administrators.
> Select the administrator you would like to delete.
Now you are forwarded to the "Edit administrator" dialogue window.
> Click Delete .
Figure 55: Deleting administrators
> Click Delete administrator to confirm the security prompt.
Figure 56: Deleting administrators
57
Page 58
With time-based credit, you receive a notification of the upcoming expiry
thirty days before the end of the validity period. With quantity-based credit,
you receive a notification once the total available KeyCredits drop below
four.
5.4 KeyCredits for access authorisations
KeyCredits enable you to create and change access authorisations.
You can merge quantity-based and time-based credit. The system will preferably deduct
from valid, time-based credit packages. KeyCredits from quantity-based credits are only
deducted from the account once the time-based credit has expired. .
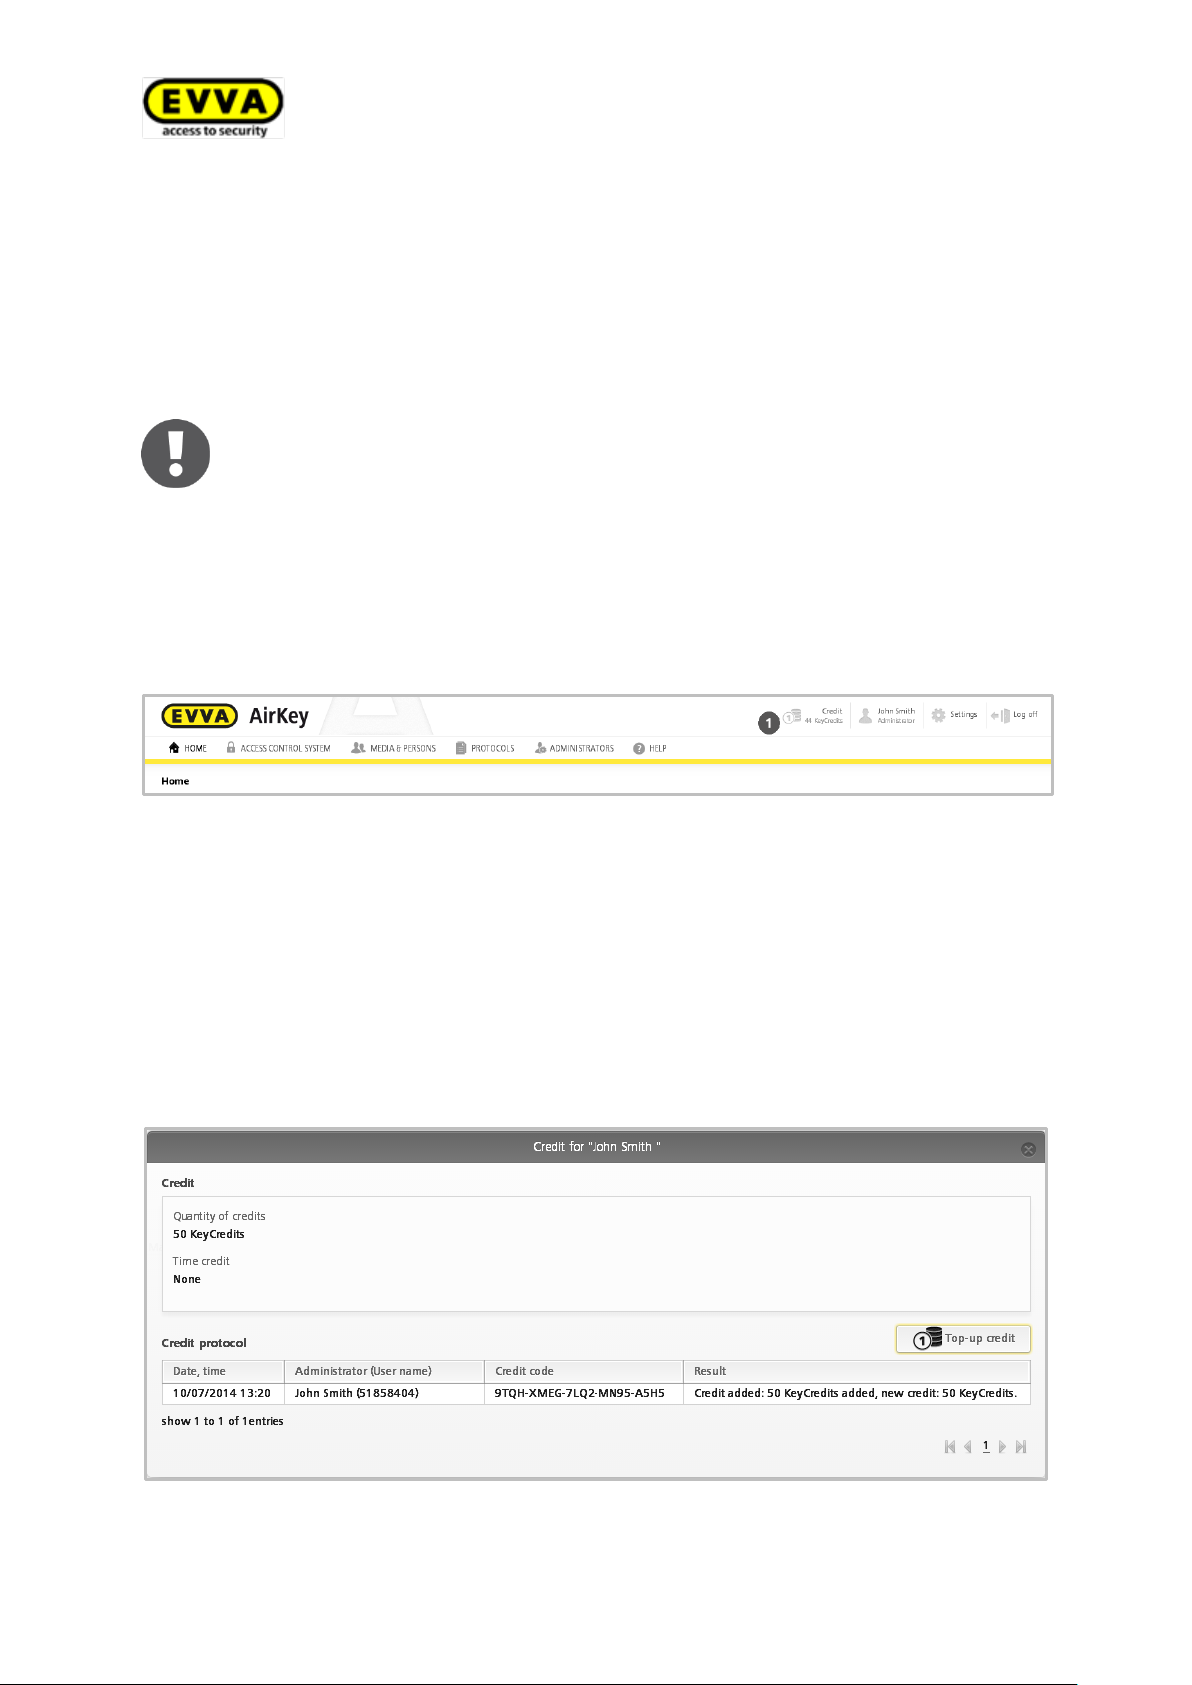
The Credit function in the header of the page shows the amount of available KeyCredits below. The information in the header is always available so you have a permanent
overview of the current amount of KeyCredits.
Figure 57: Credit
5.4.1 Topping up credit
You require a KeyCredit-Card with a valid credit code to top up your KeyCredits. This
credit code is concealed on the rear of the KeyCredit-Card in a scratch field.
> Click the Credit function in the header of the screen.
The screen shows an overview of your current credit and any previous top ups.
Figure 58: Topping up credit
58
Page 59
The function to top up the credit is blocked after five unsuccessful attempts.
In such a case, please contact EVVA Support using the online form.
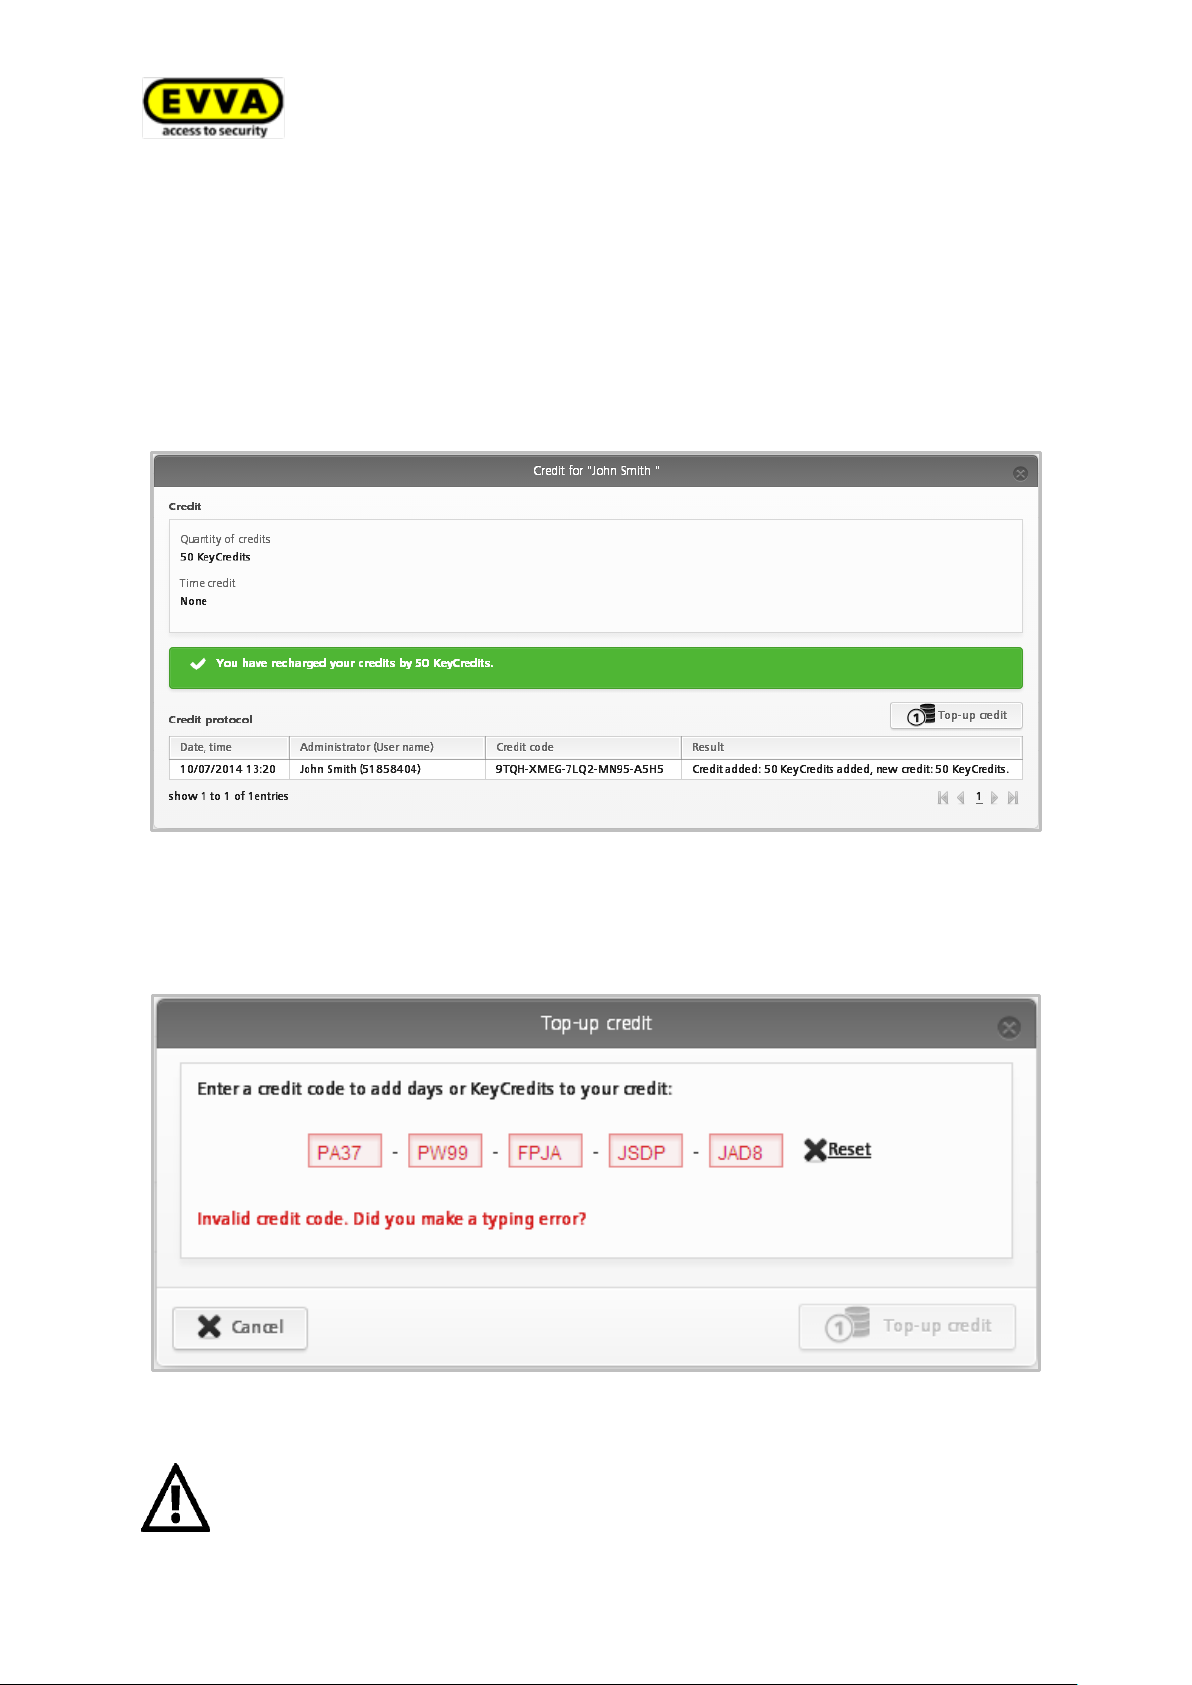
> Click the Top-up credit button.
> Enter the credit code for KeyCredits in the "Top-up credit" application window.
> Click Top-up credit.
If you entered the code correctly, the system confirms your input with a message and
adds the credit.
Figure 59: Topping up credit
An error message appears upon entering an incorrect code.
Figure 60: Topping up credit
59
Page 60
5.5 System settings
In the AirKey online administration settings you can configure general settings, such as
the parameters for time zones as well as basic settings for protocols of added locking
components.
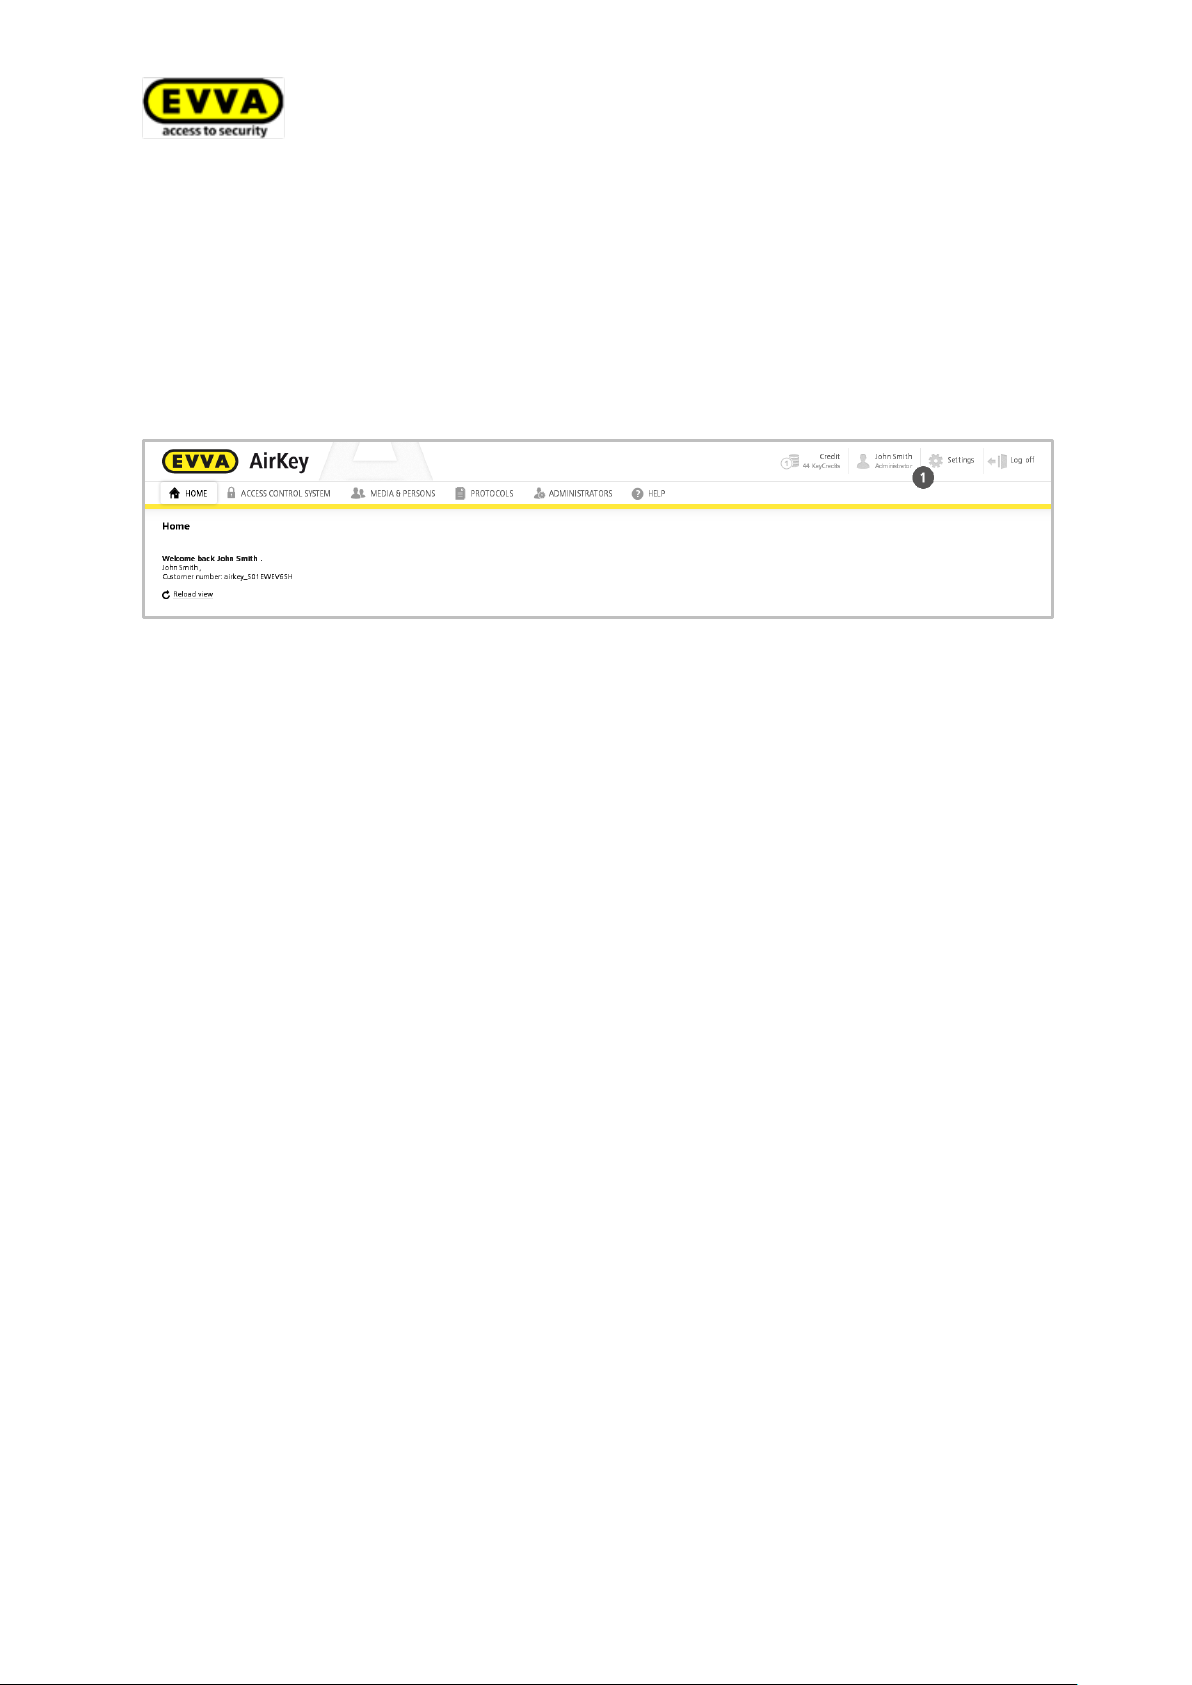
> Click Settings in the header.
Figure 61: Settings
The "Time zones" tab opens automatically. Click the "Further settings" tab to browse to
the protocol settings.
5.5.1 Time zones
AirKey locking systems enable to manage locking components located in different time
zones.
By default, the standard time zone specification is CET (UTC+1) and during daylight saving time CEST (UTC+2), applicable to central Europe.
60
Page 61
Check the current UTC online, e.g. using this website:
http://en.wikipedia.org/wiki/Time_zone
Proceed as follows to create an additional time zone:
> In this menu, select Settings > Time zones.
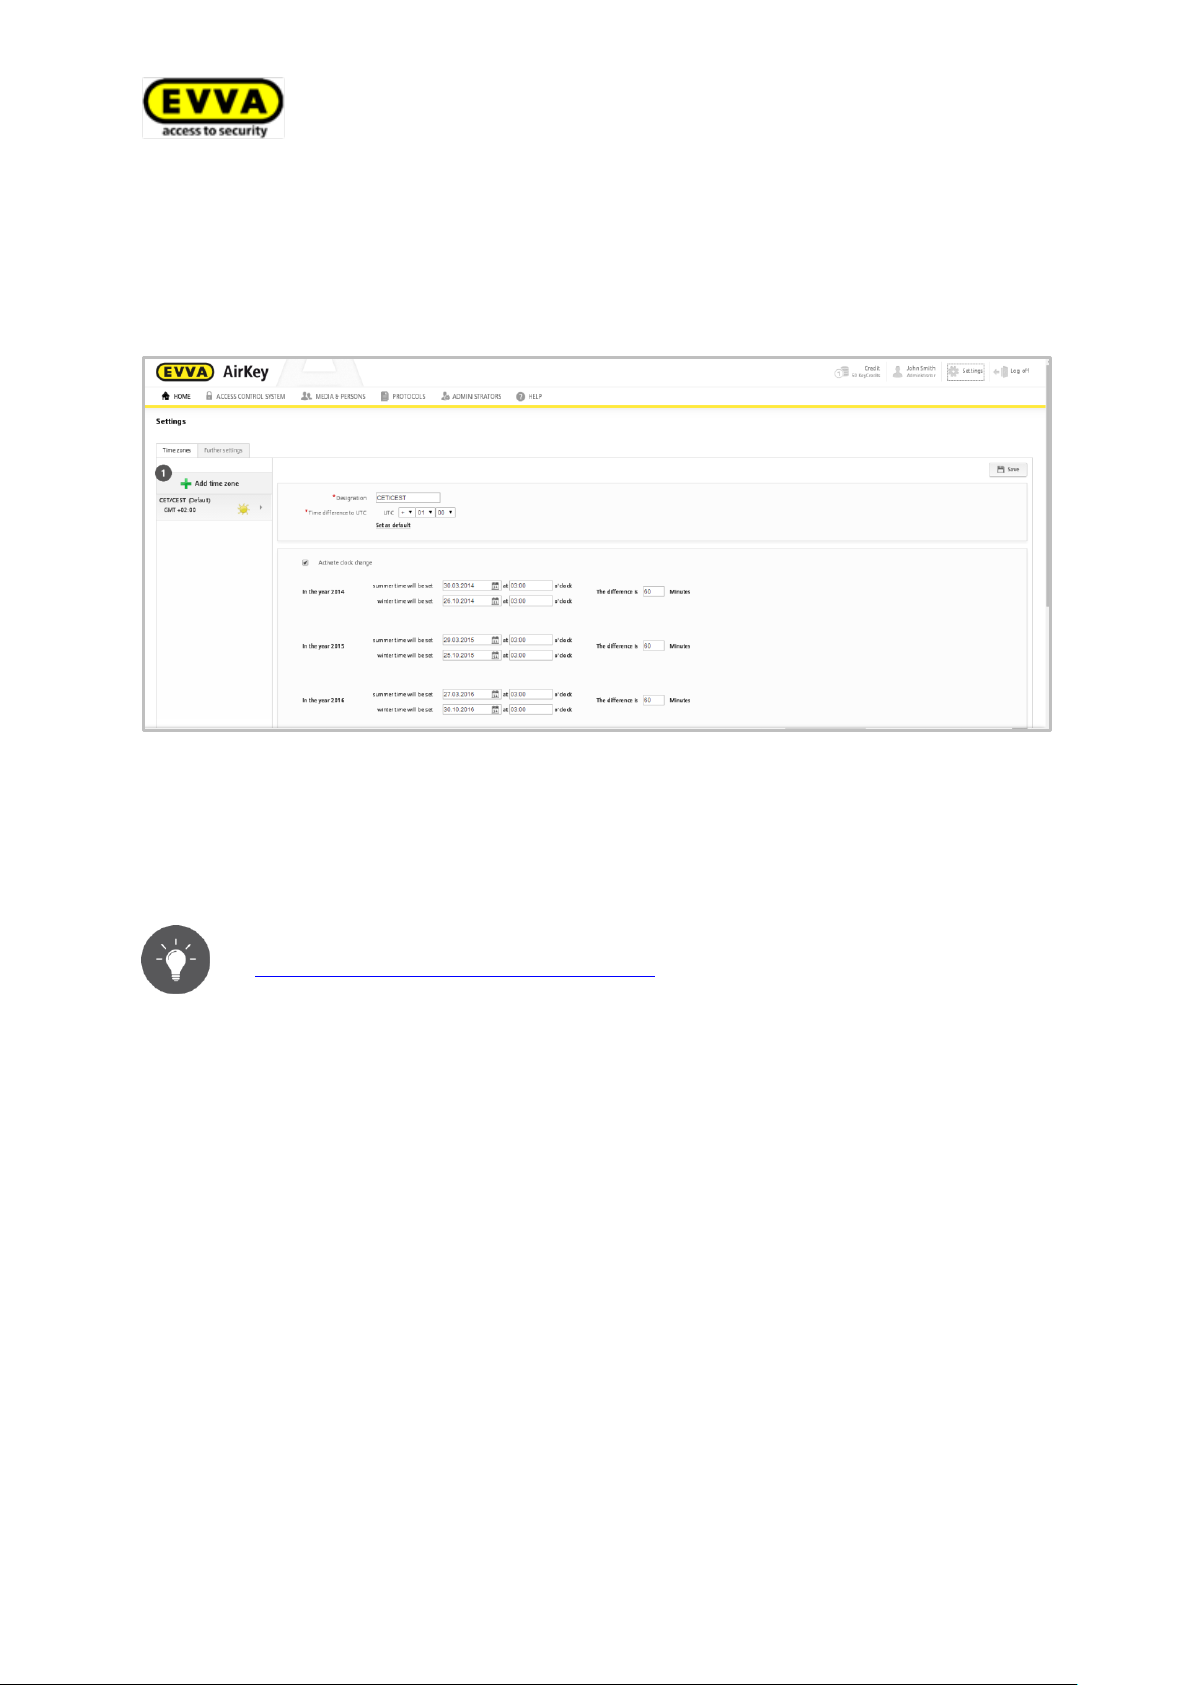
> Click Add time zone .
Figure 62: Adding time zones
> Define a Designation for the time zone.
> Define the time difference to UTC (Coordinated Universal Time, UTC) .
> Activate the Activate clock change option to automatically switch between sum-
mer and winter time.
> Enter the dates for clock changes (date and time) for the current year and the fol-
lowing years. You can specify dates for clock changes for the next five years.
61
Page 62
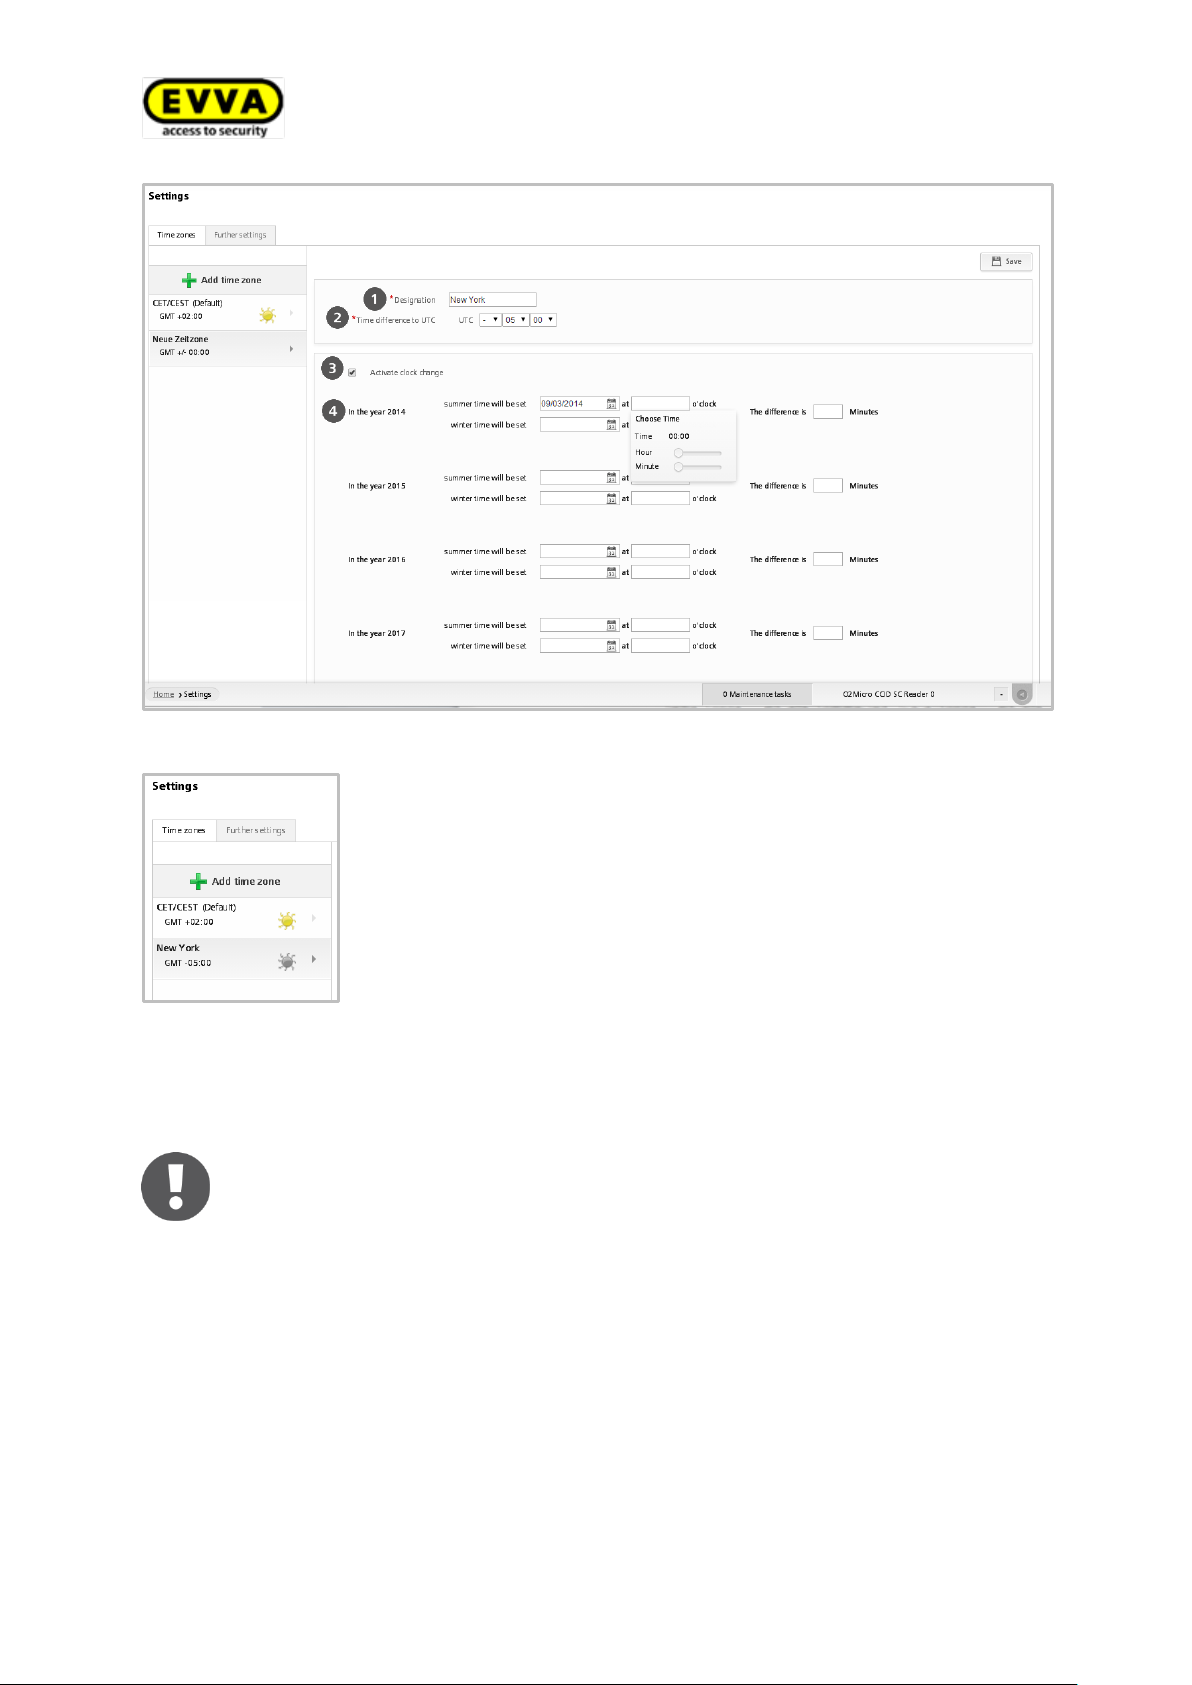
The sun icon in the corresponding time zone section indicates
whether summer or winter time is currently active.
Yellow sun = Summer time
Grey sun = Winter time
If there is no sun icon, no clock changes have been activated for
this time zone. A warning triangle next to the sun icon indicates the
option is active, but no dates have been entered for clock changes.
You can also change the time zones of locking components retrospectively
by opening the locking component and changing the time zone. Please refer
to the Editing locking components section for more detailed information.
Figure 63: Adding time zones
Select Set as default to set the new time zone for the new locking component. The additional information (default) shows the set default time zone.
62
Page 63
Specified default values can be changed for individual locking components,
regardless of the settings specified here.
5.5.2 Further settings
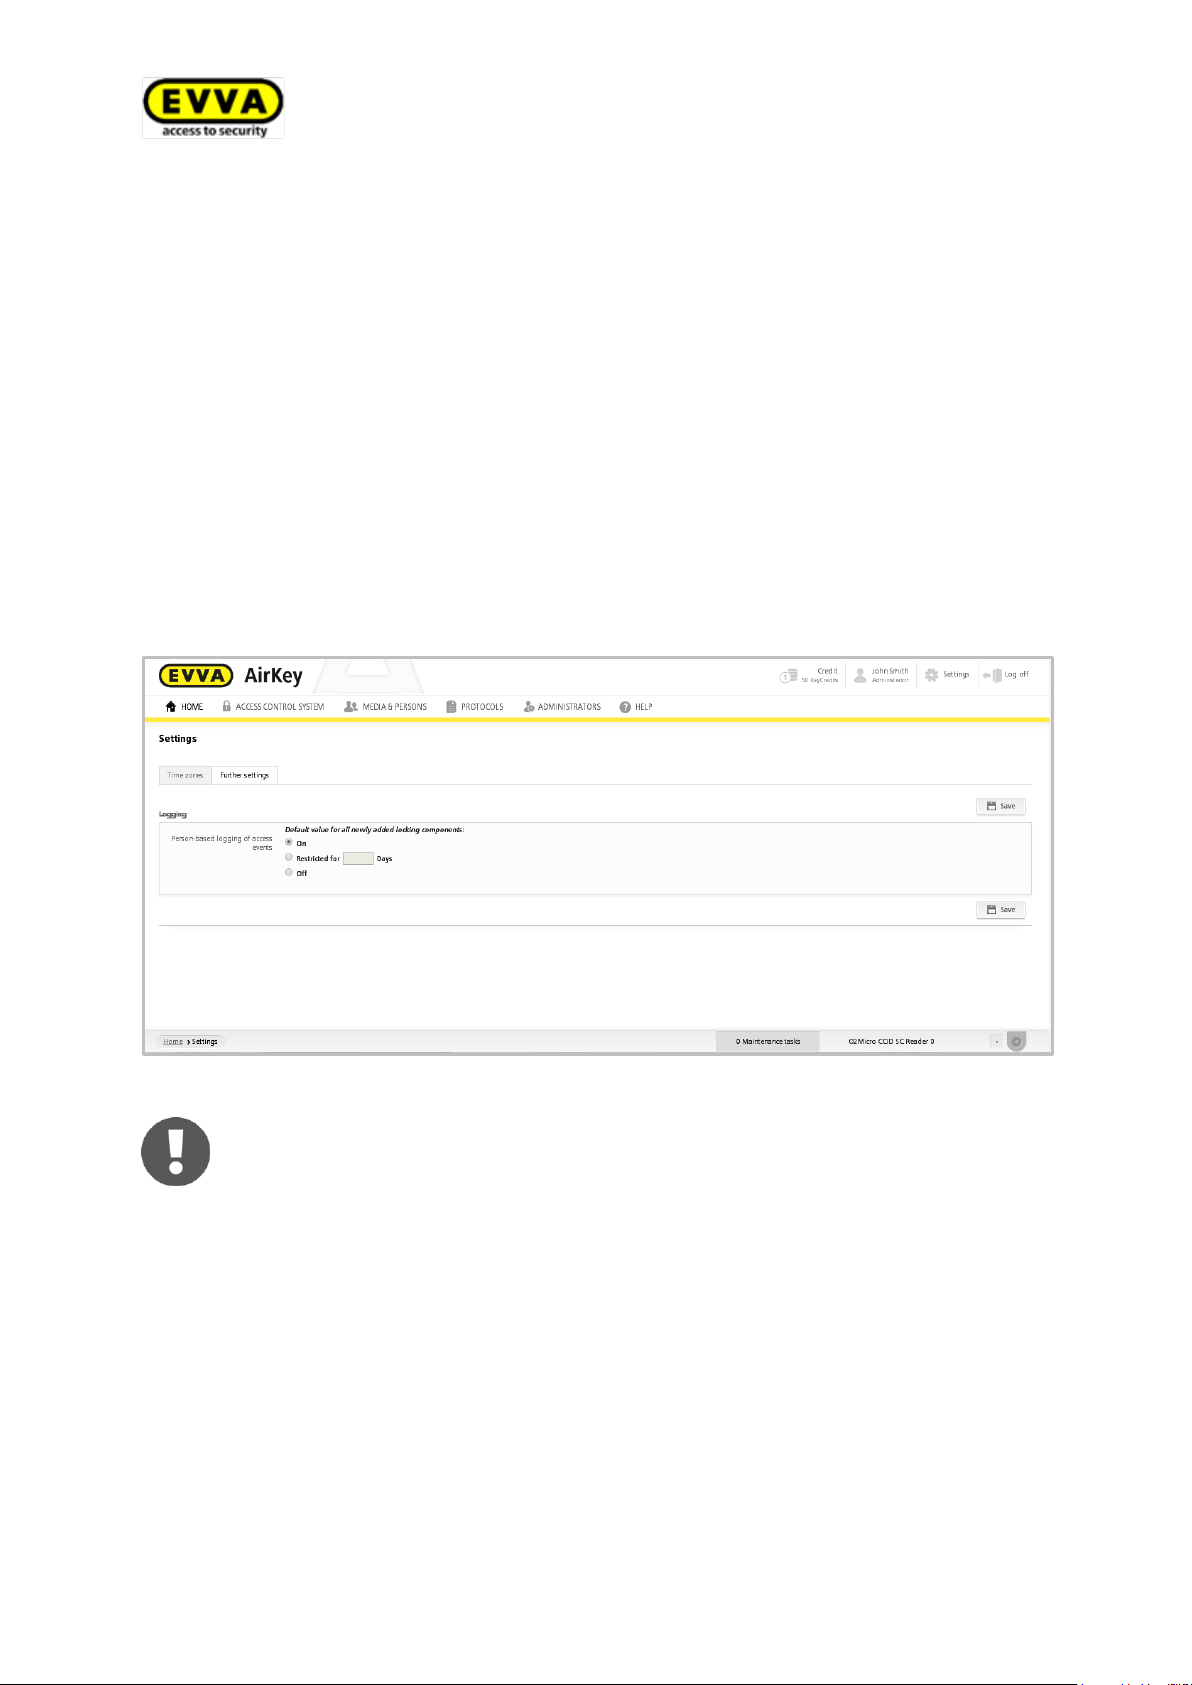
The Further settings tab enables you to define the type of personal protocol for access
events. This setting is globally applicable throughout the AirKey locking system for locking components that are newly added to the AirKey locking system.
> In the Settings menu, select the Further settings tab.
> Select the specified value for personal protocols in the event of access events. For
this purpose, you have various options available:
> On permanently switches on the display of personal data for access events.
> Restricted to …days renders personal data for access events anonymous after the
defined number of days.
> Off immediately renders all personal data for access events anonymous.
Figure 64: Further settings
63
Page 64
AirKey allows you to authorise locking components for an external AirKey
locking system. The list differentiates between your own and external lock-
ing components. Please refer to the Sharing locking components with other
locking systems section for more detailed information on how to authorise
locking components.
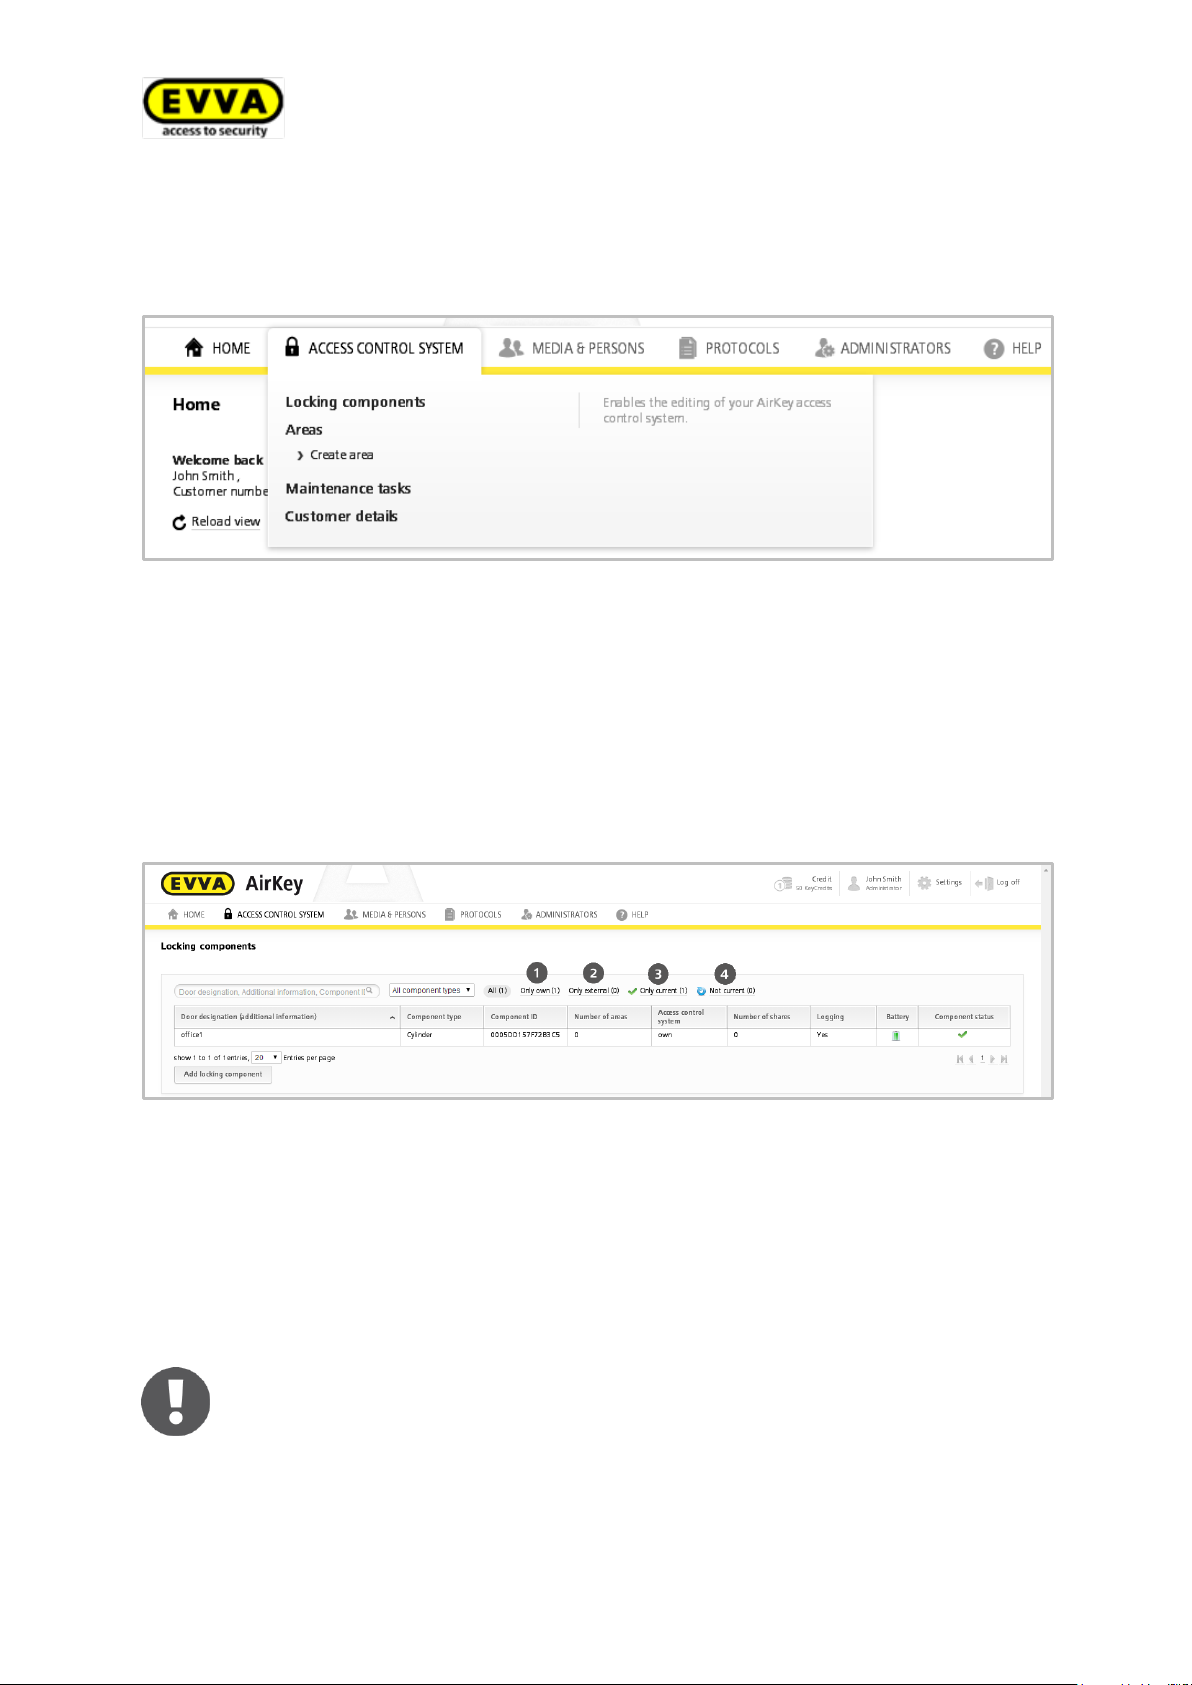
5.6 Locking system
The functions in the Locking system main menu enable you to manage your AirKey
locking system.
Figure 65: AirKey locking system
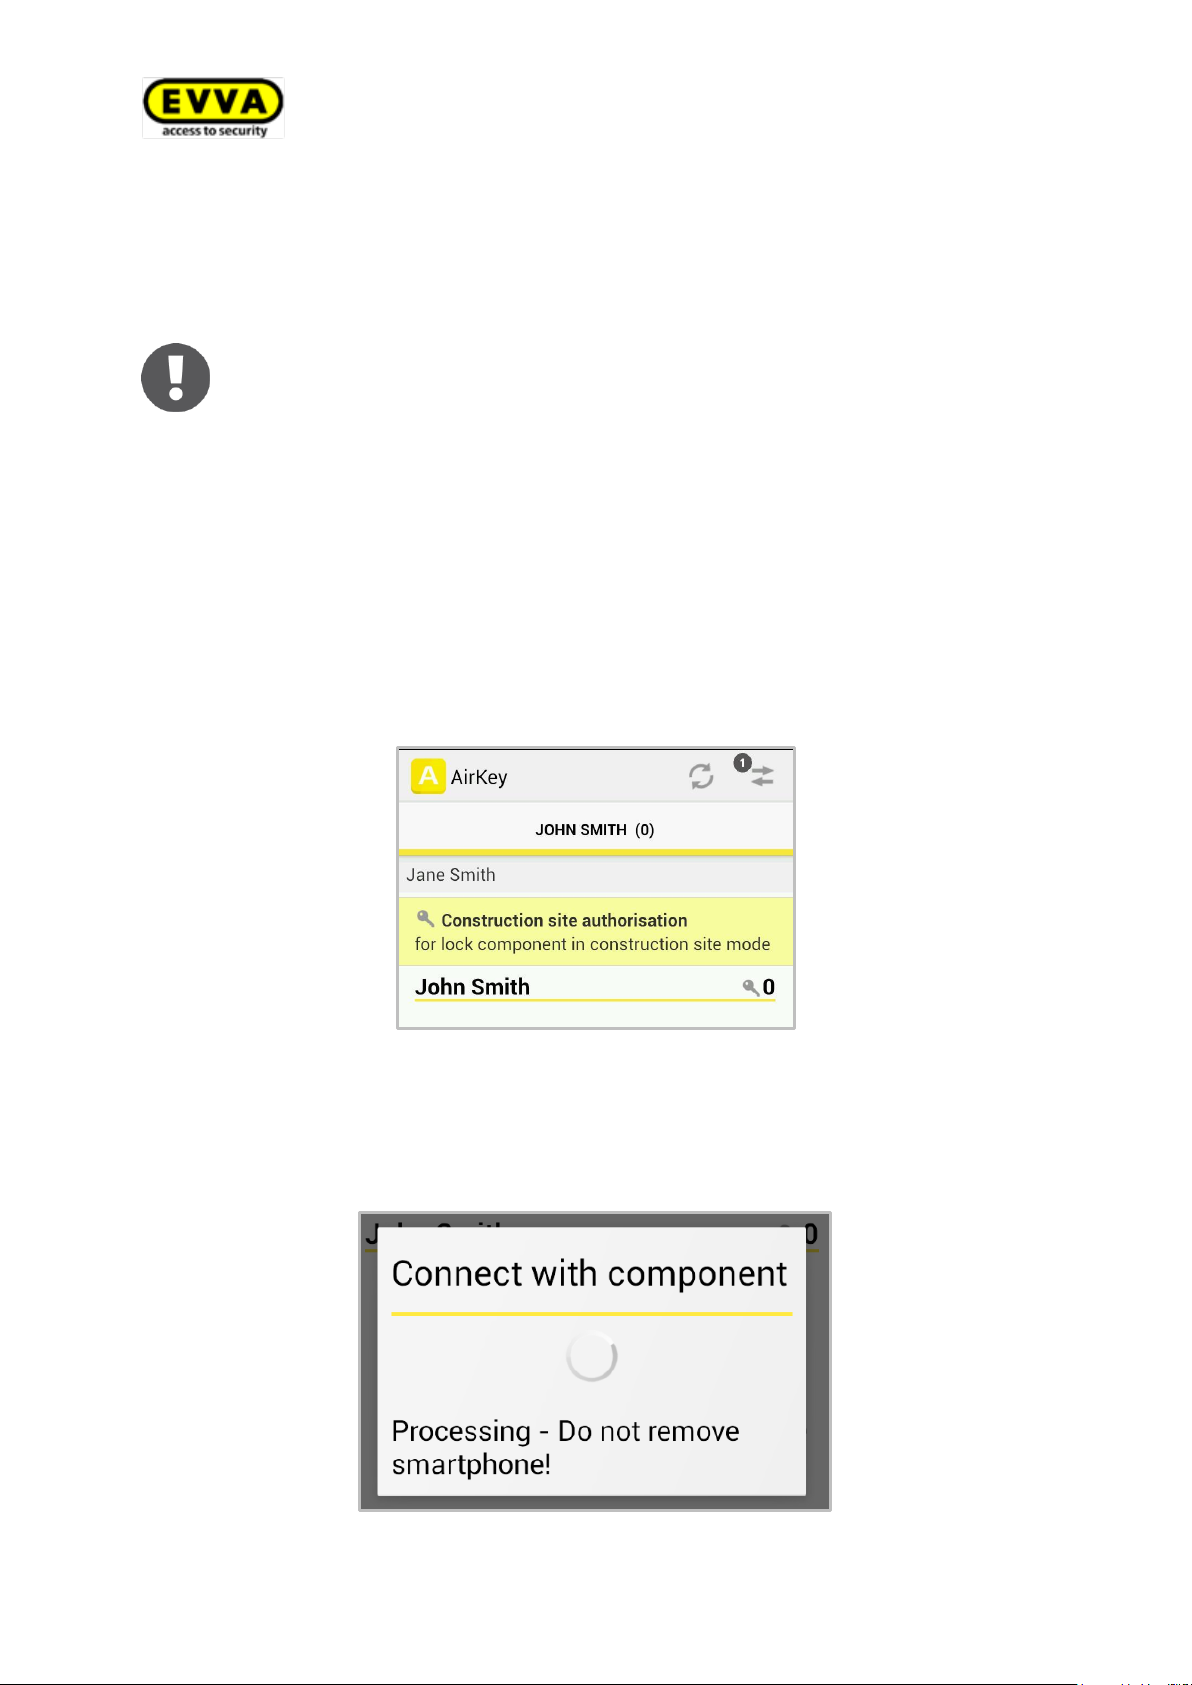
5.6.1 Overview of locking components
> In the main menu, click Access control system > Locking components for an
overview of all locking components in your AirKey system.
All locking components with additional information as well as their status are listed. The
first row of the list features the search field as well as filter functions for locking components.
Figure 66: Locking components
> "Only own" exclusively lists your own locking components
> "Only external" exclusively lists locking components that have been authorised by
an administrator.
> "Only current" exclusively lists locking components where the status is up to date.
> "Not current" exclusively lists locking components due for an update.
64
Page 65
You must comply with the following requirements to add locking components using your smartphone:
> The AirKey app has been installed.
> An active Internet connection is available.
> The smartphone has been registered within the locking system.
> The smartphone has been assigned to a person.
> Maintenance mode has been activated on the smartphone.
5.6.2 Adding locking components
Locking components are added to locking systems using smartphones with construction
site authorisation or the coding station of the locking system. For this purpose, the locking components must be in factory state.
Adding locking components with the smartphone
> Start the AirKey app.
> Select the Connect to component icon .
Figure 67: AirKey app – connecting to components
> Hold the smartphone to the locking component in factory state.
The smartphone establishes a connection to the locking component. Do not remove
the smartphone from the locking component while it is establishing the connection.
Figure 68: AirKey app - connecting
65
Page 66
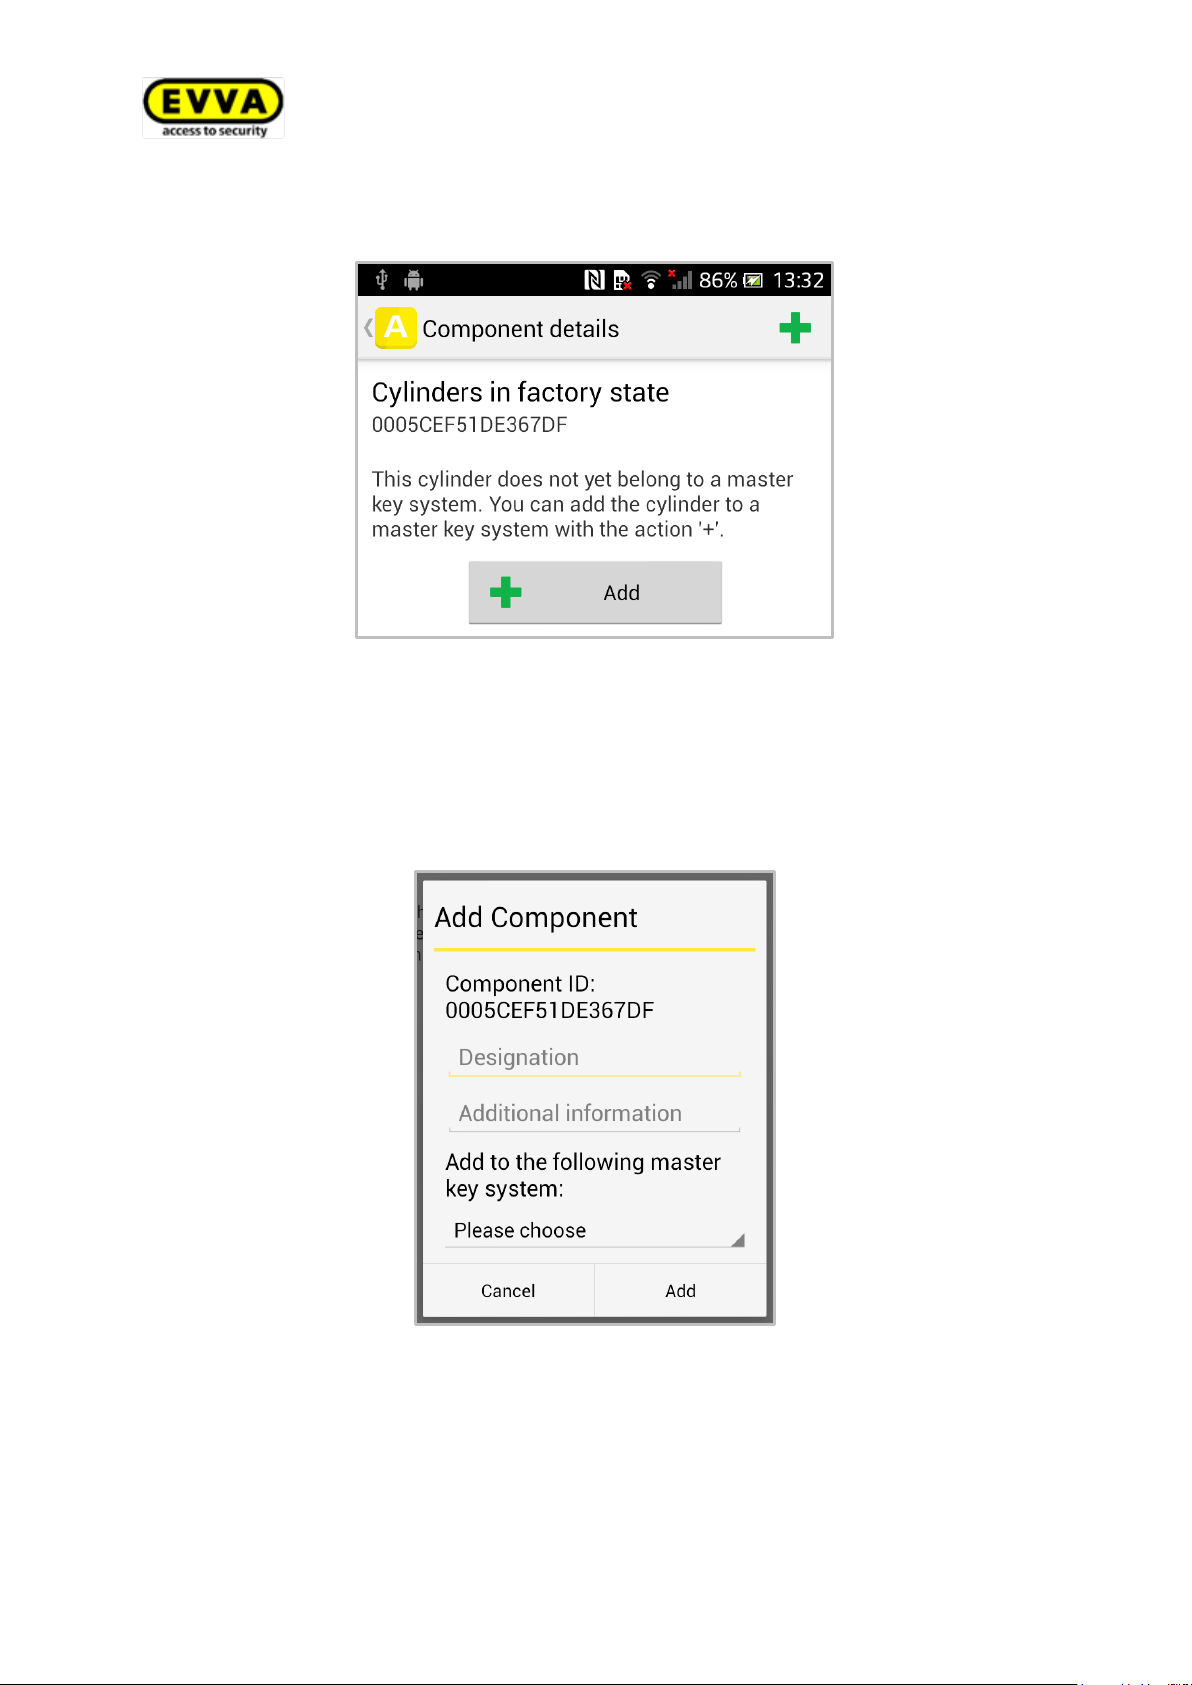
> Now you see information about the locking component.
Figure 69: AirKey app – locking component in factory state
> Select Add.
> Enter a designation for the locking component.
> Select the locking system to which you would like to add the locking component if the
smartphone is registered in several locking systems.
Figure 70: AirKey app – adding locking components
> Select Add.
> Now once again hold the smartphone to the locking component to complete the pro-
cess.
66
Page 67
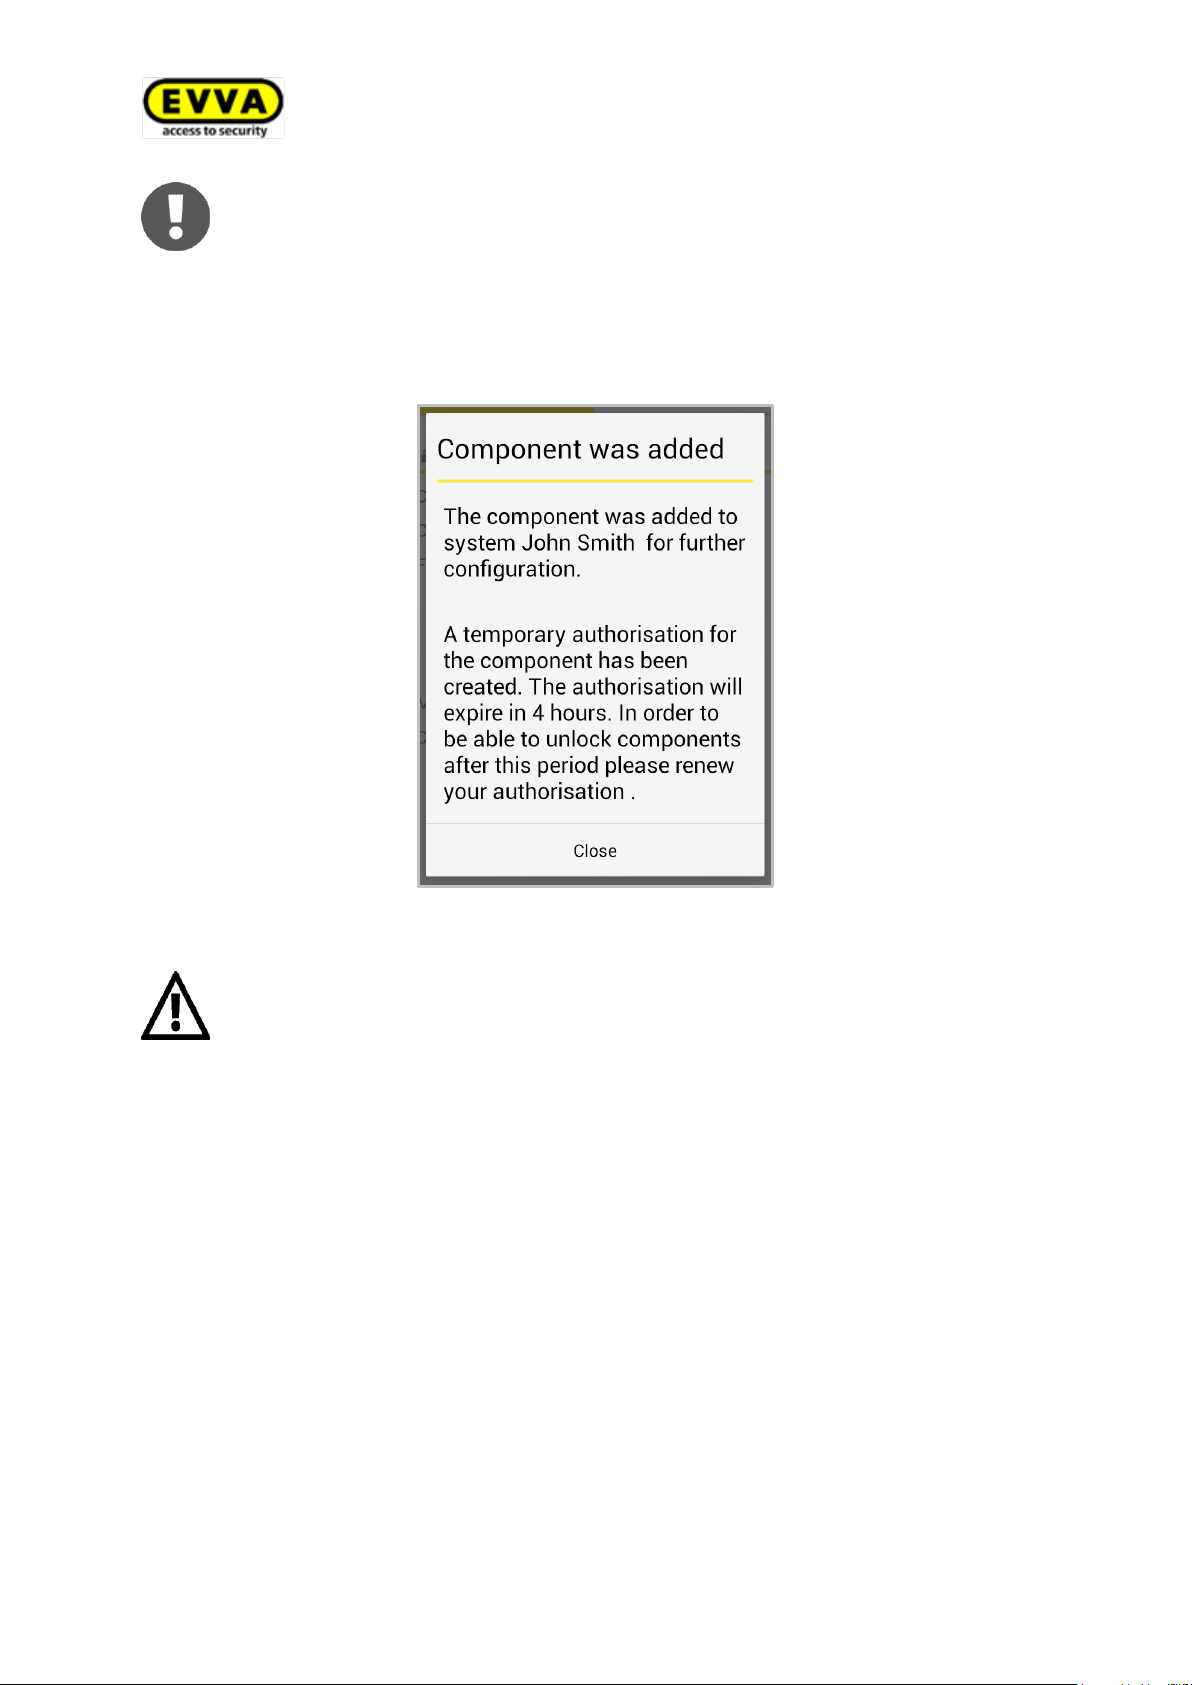
The system checks the data and updates the locking component.
In this process, do not remove the smartphone from the locking component.
The locking component is now no longer in factory state. Media in factory
state or smartphones in maintenance mode are consequently no longer authorised. The smartphone that added the locking component is automatically authorised for a period of four hours. Please change the corresponding
authorisation or assign additional media with an authorisation to continue to
have access to this locking component.
> A confirmation prompt completes the process. The locking component is now availa-
ble for management in the AirKey online administration.
>
Figure 71: AirKey app – locking component added
67
Page 68
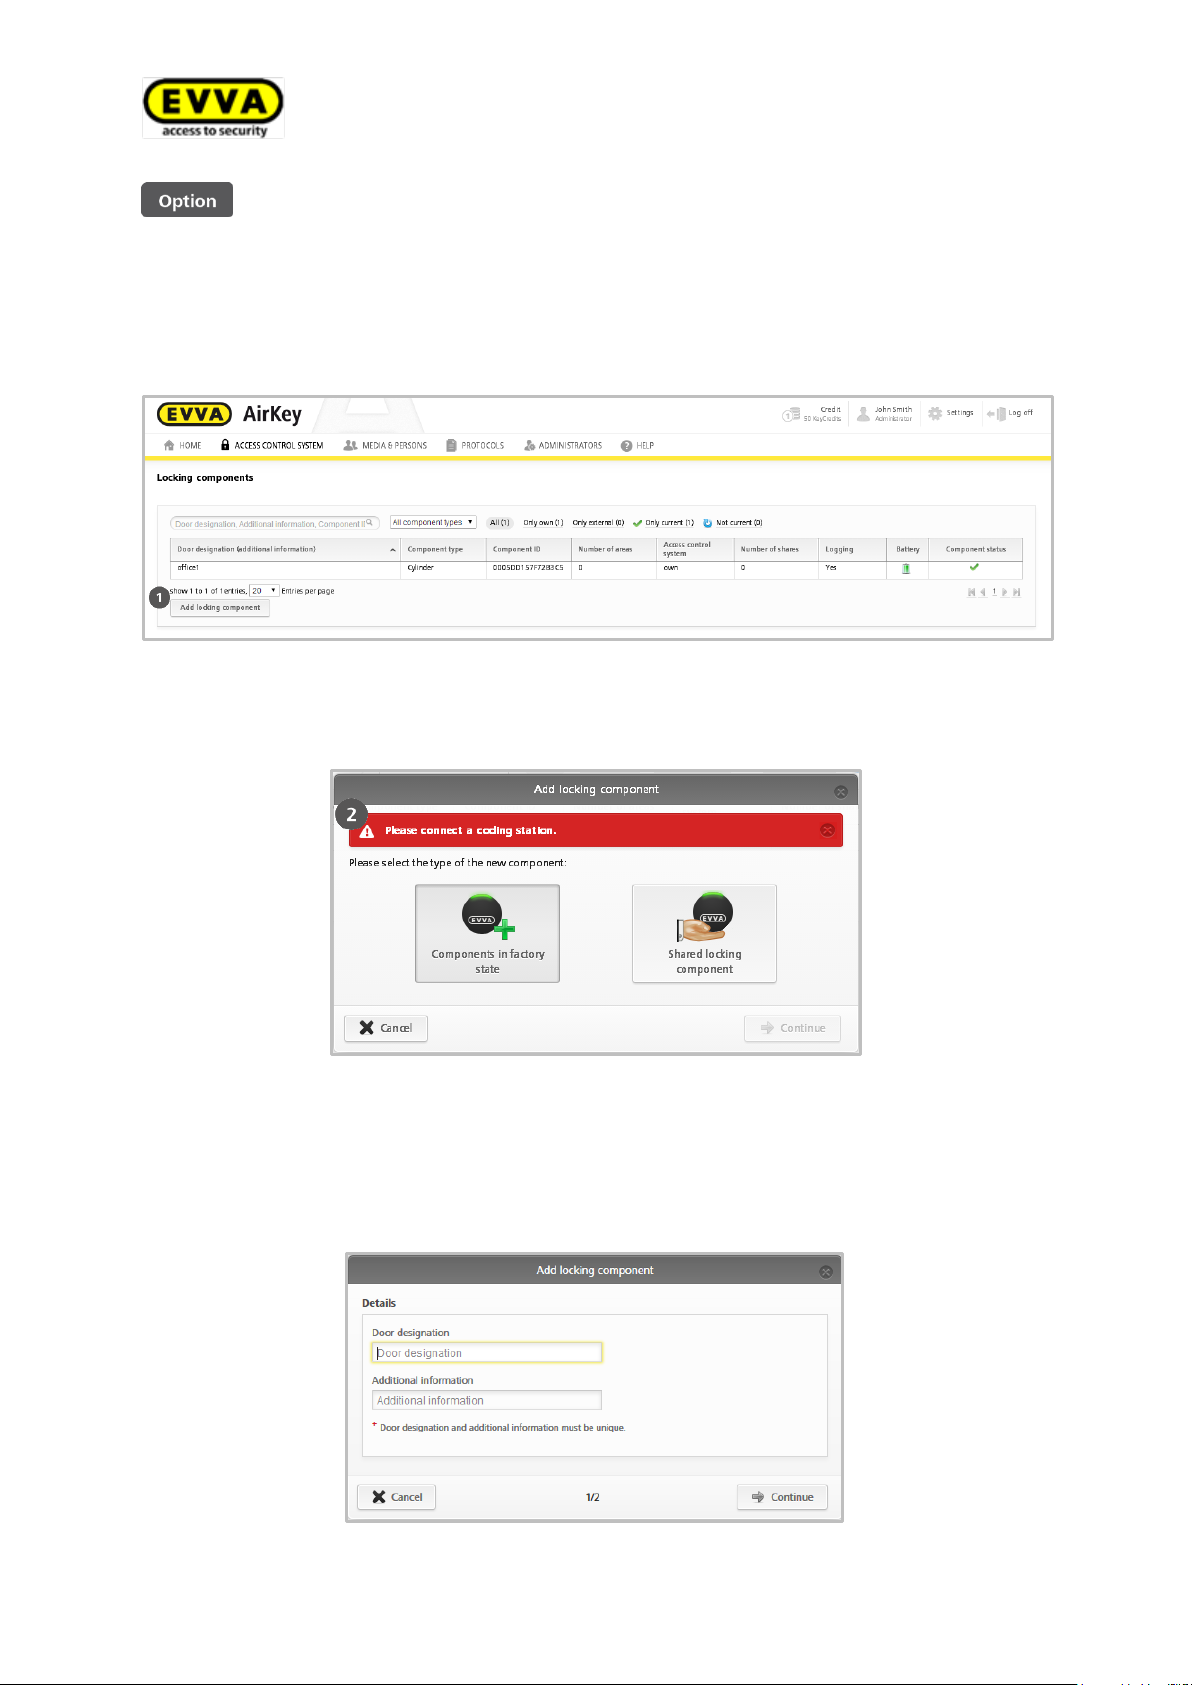
Adding locking components using coding stations
Proceed as follows to add locking components using coding stations:
> In the main menu, select Access control system > Locking components.
> Click the Add locking component button.
Figure 72: Adding locking components
> Connect the coding station to the computer otherwise the system notice appears.
Figure 73: Adding locking components/no coding station
> Select Component in factory state.
> Click Continue.
> Enter the door designation in the following dialogue window and click Continue.
Figure 74: Adding locking components
68
Page 69
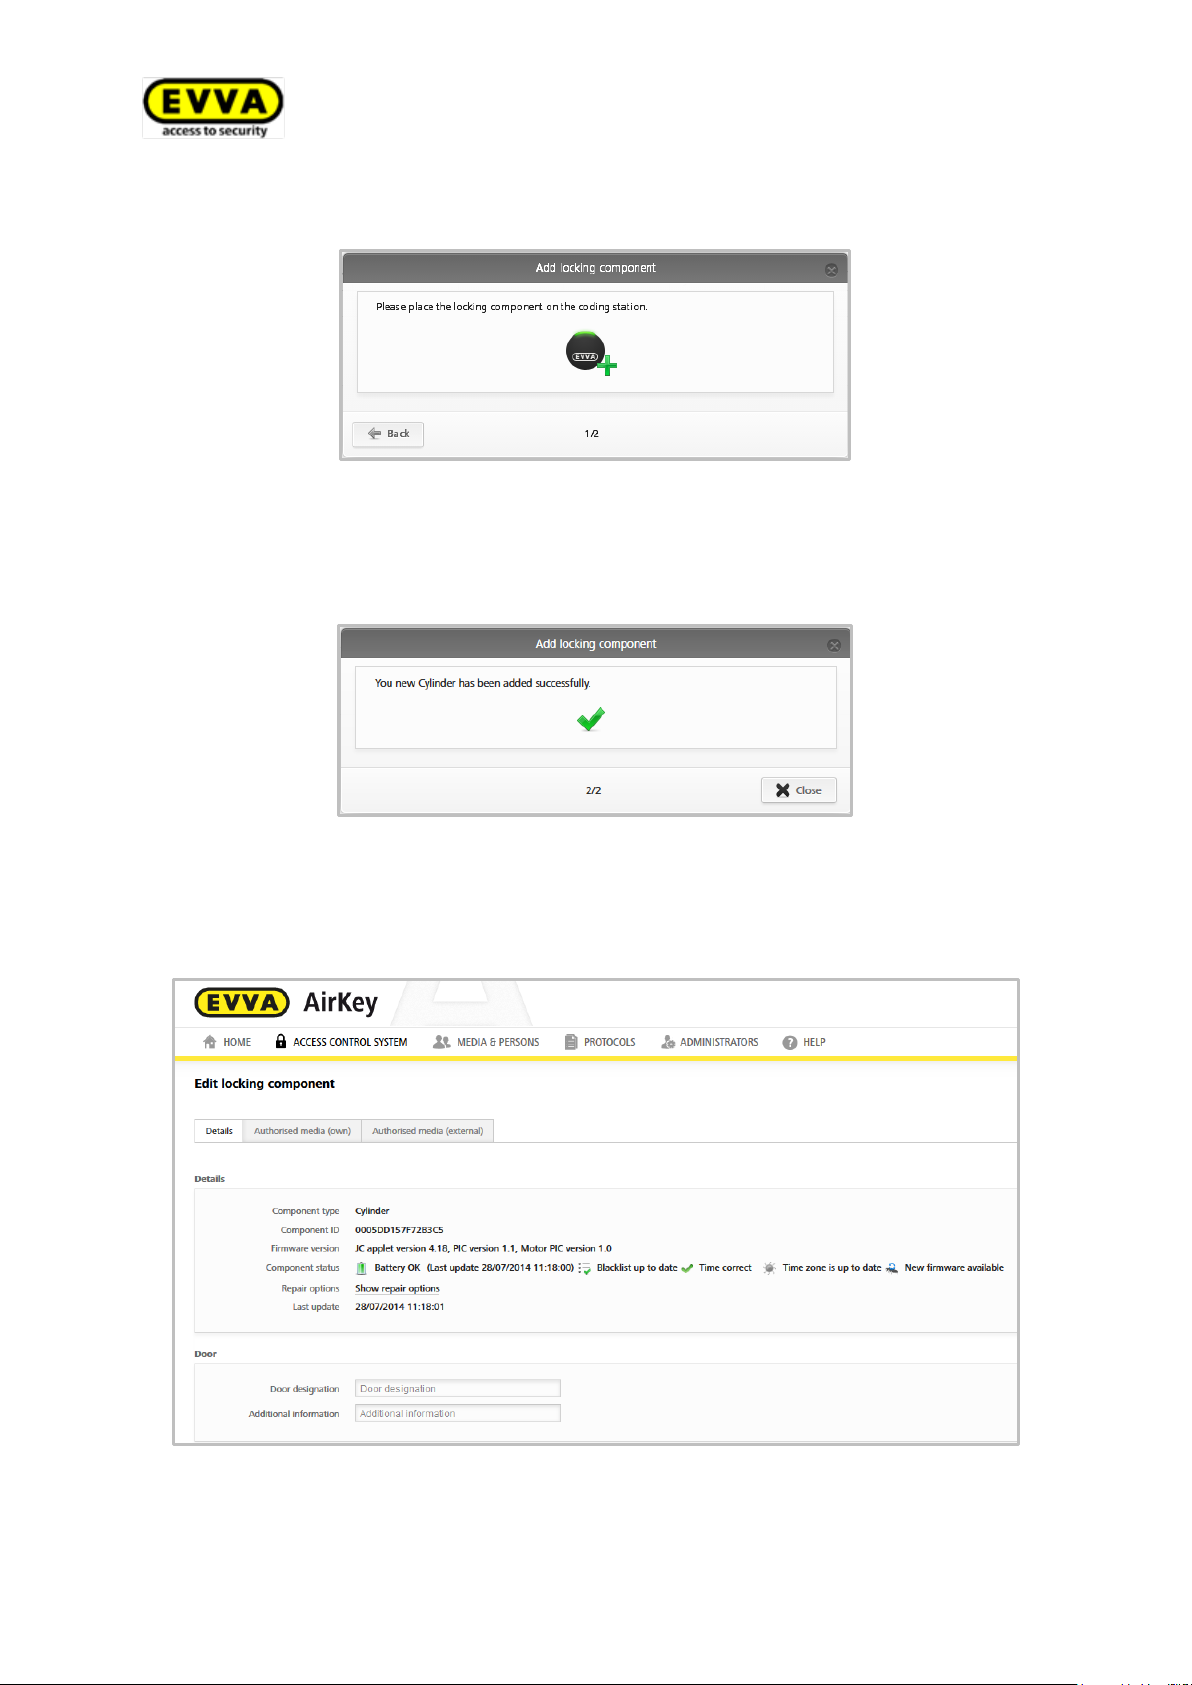
> Follow the on-screen instructions and place the locking component on the coding sta-
tion.
Figure 75: Adding locking components
> A confirmation prompt appears and the locking component is added to the AirKey
system.
Figure 76: Adding locking components
After having confirmed the prompt you are forwarded to the detailed locking component
view.
69
Figure 77: Locking component details
Page 70
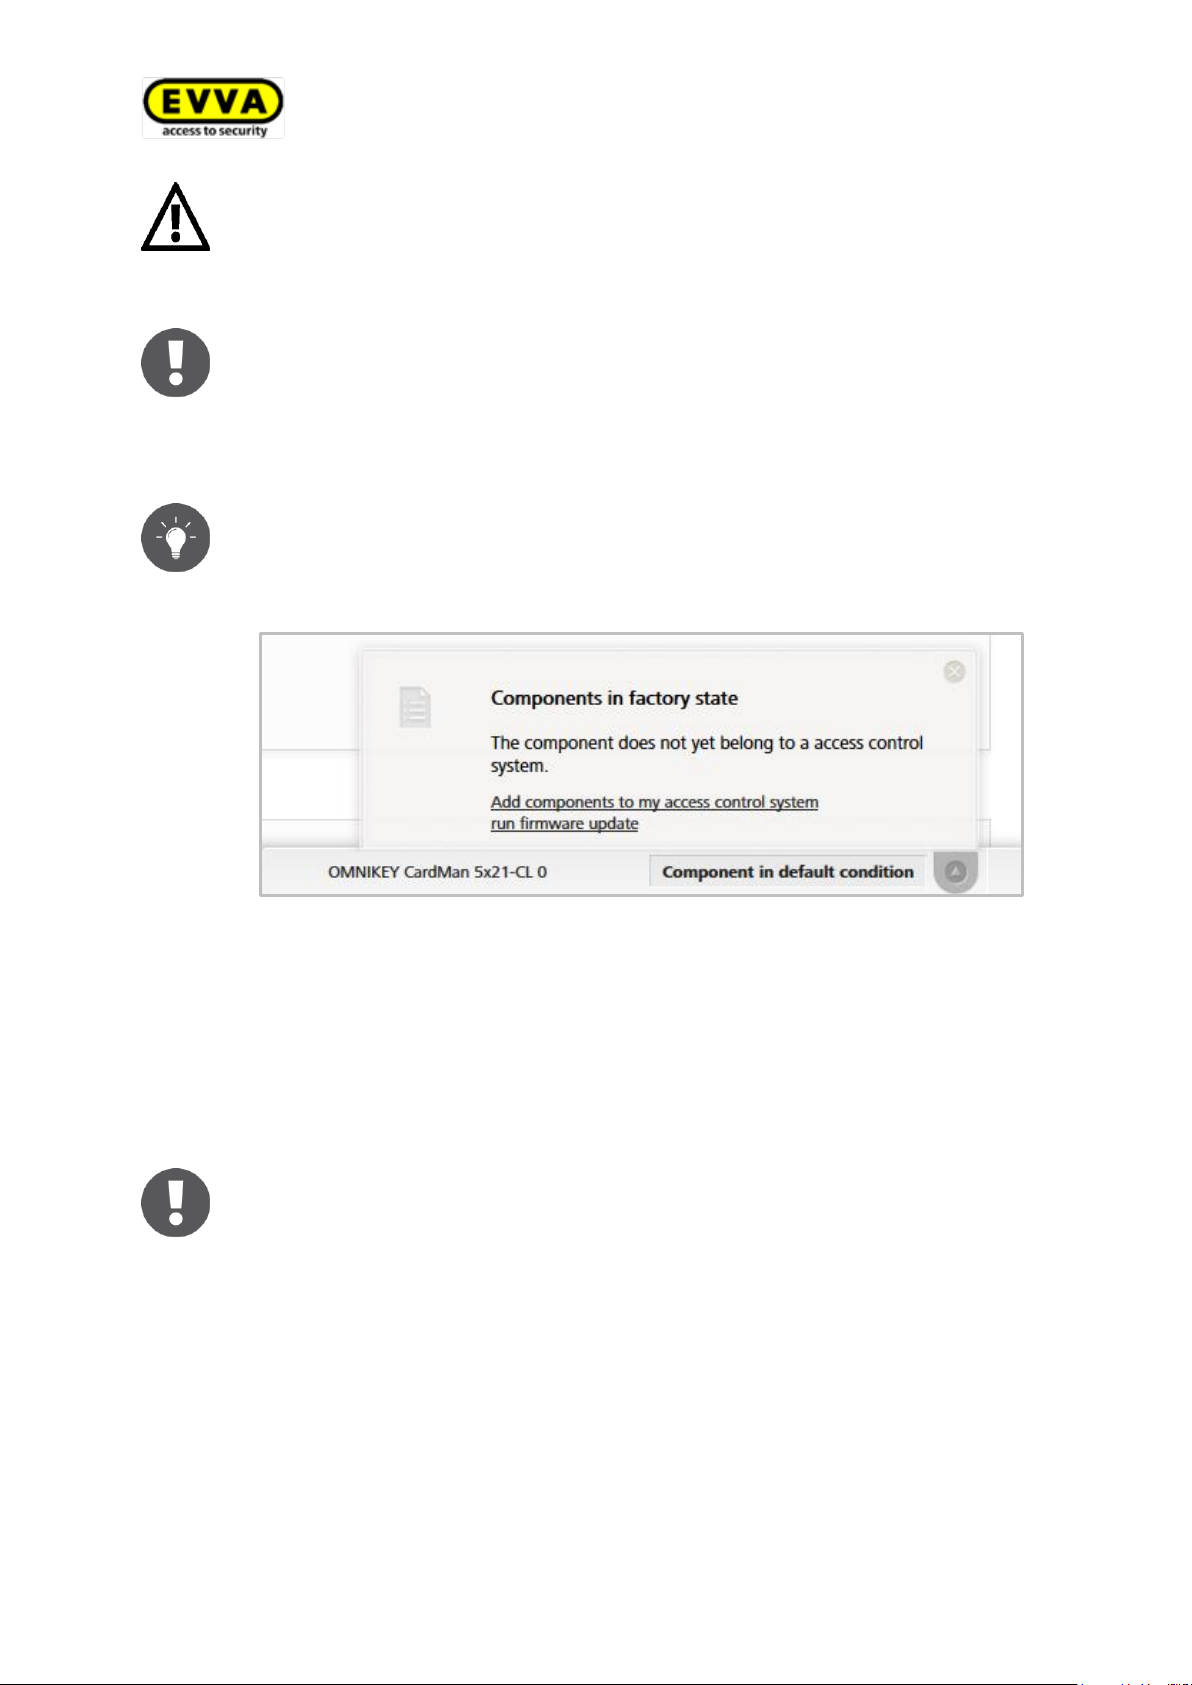
The locking component is now no longer in factory state. Media in factory
state or smartphones in maintenance mode are consequently no longer authorised. Now assign valid authorisations to said locking components to
continue to be able to unlock them.
The default time zone and data protection settings are automatically configured for the added locking component according to the specified settings.
Please refer to the Time zones and
Further settings sections for more detailed information.
Alternatively, you can also just place a locking component in factory state
on the coding station. An information window appears in the bottom right,
enabling you to also add the locking component to the AirKey system using
the Add component to my locking system link.
Figure 78: Adding components to my locking system
The battery status shown corresponds to the status at the last update or
the last transferred protocol entry. For this reason, the actual battery status
of the locking component may deviate from the battery status shown in the
online administration.
(Applies to battery-operated locking components only)
5.6.3 Editing locking components
The "Edit locking components" application window provides detailed information, such as
the firmware version or component status as well as repair options, door information,
assigned time zone and protocol settings.
> In the main menu, select Access control system > Locking components.
> Click on the locking component you would like to edit in the list.
> For example, assign a new door designation and add optional, additional information
. The unique characteristics of this data is verified within the locking system.
70
Page 71
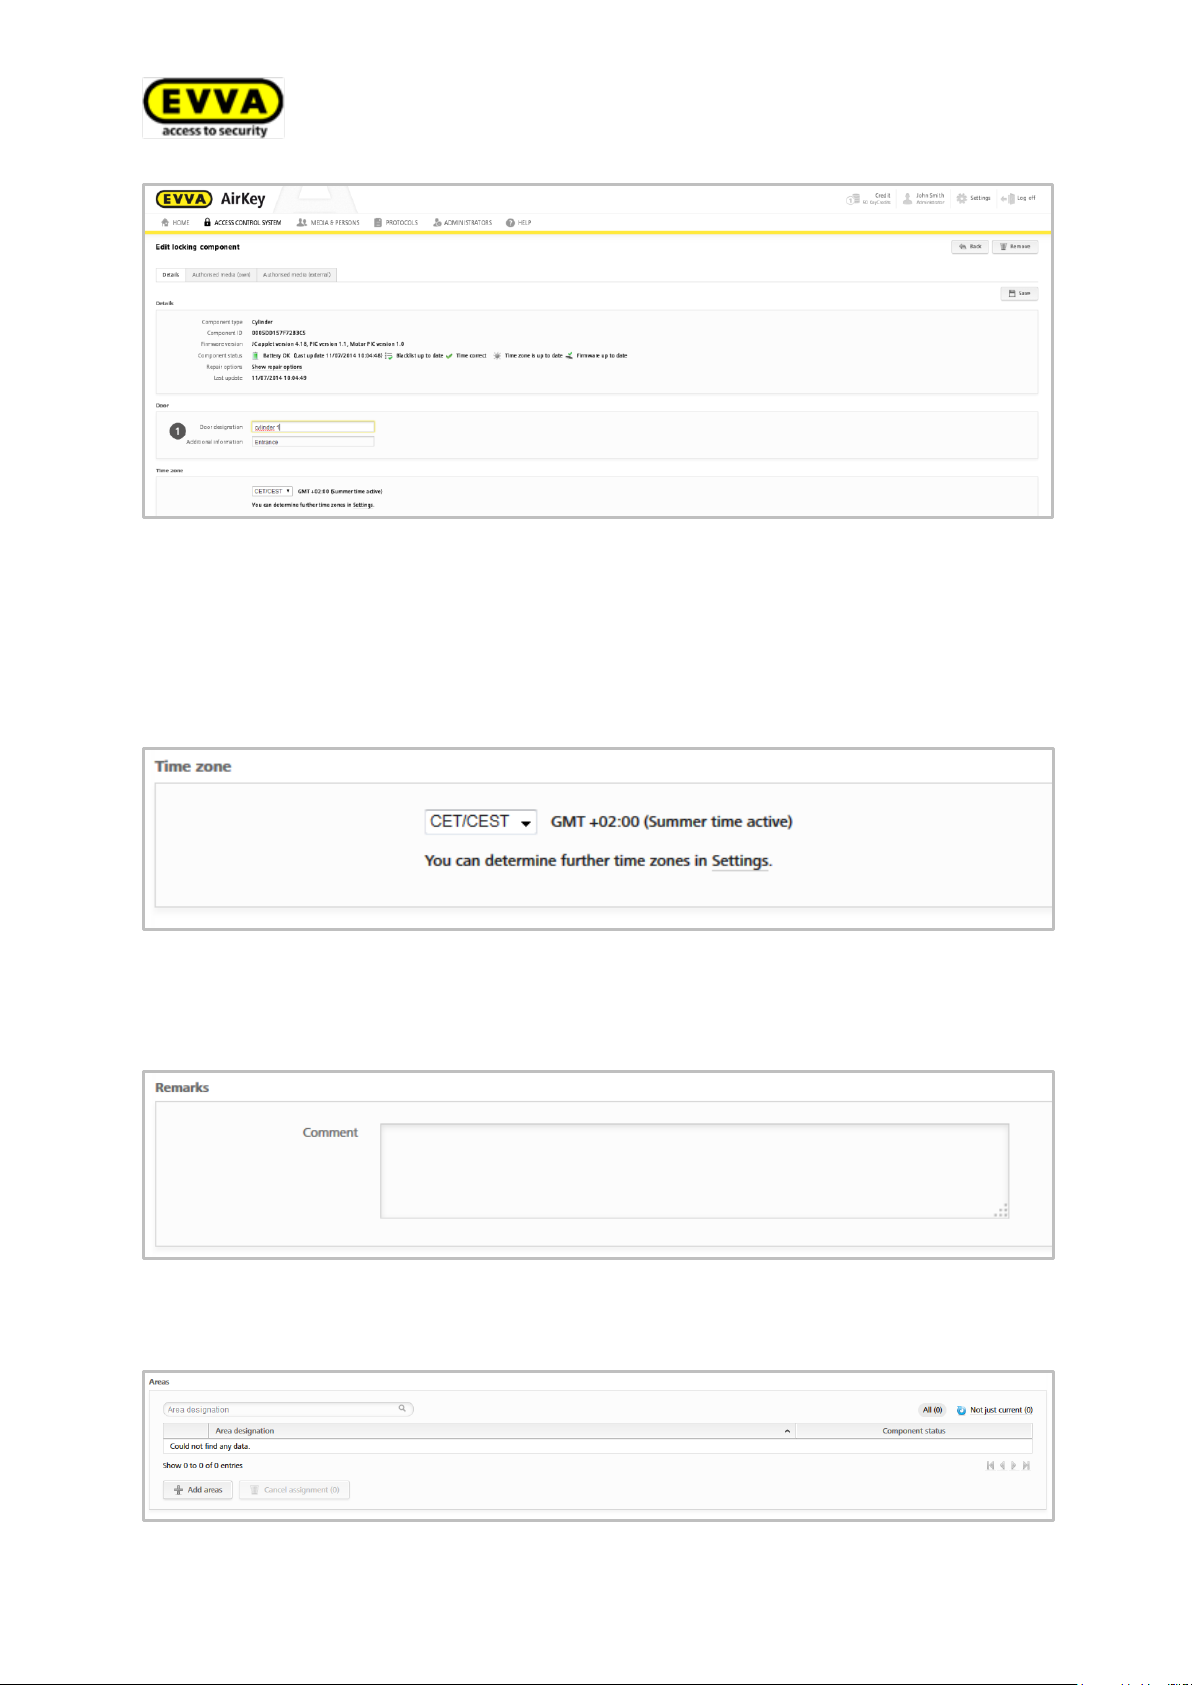
Figure 79: Editing locking components
> If you operate several time zones within a single locking system, you can assign an
individual time zone (which has already been created and configured in the online
administration) to each locking component. The default time zone is used as standard.
Figure 80: Editing locking components
> You can optionally enter a comment on a locking component in the Remarks section.
Figure 81: Editing locking components
> Go to the Areas section to edit assigned areas for selected locking components.
71
Figure 82: Editing locking components
Page 72
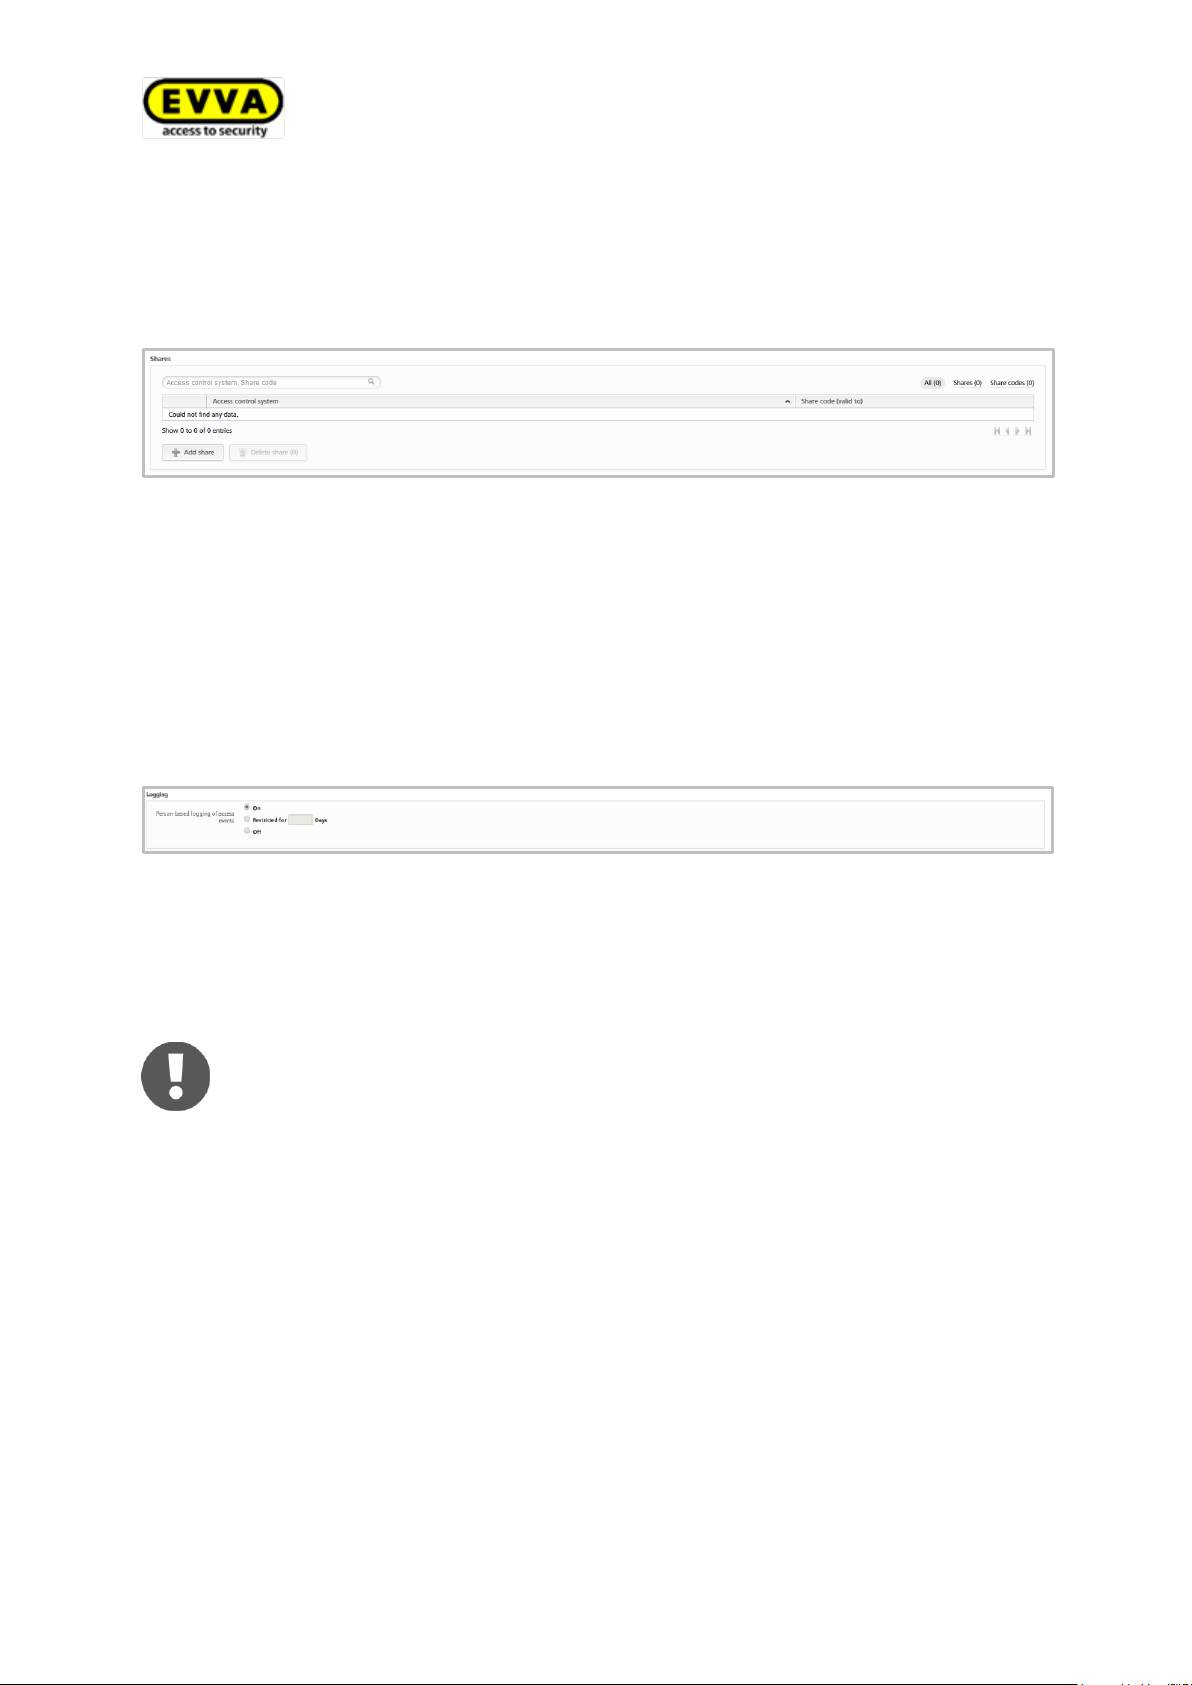
A maintenance task for this locking component may appear depending on
the locking component data you edited. The changes are accepted and the
maintenance task disappears after having updated the locking component
using a smartphone with construction site authorisation or a coding station.
> You can optionally also authorise the locking components for other locking systems.
You can manage the corresponding authorisations in the "Authorisations" section.
Please refer to the Working with several AirKey systems section for more detailed in-
formation on authorisations.
Figure 83: Editing locking components
> You can adapt personal protocols for each locking component. The default settings
are used as standard.
> On permanently switches on the display of personal data for access events.
> Restricted to …days renders personal data for access events anonymous after the
defined number of days.
> Off immediately renders all personal data for access events anonymous.
Figure 84: Protocols
> Click Save to confirm the changes to the locking component. A confirmation prompt
subsequently appears.
72
Page 73
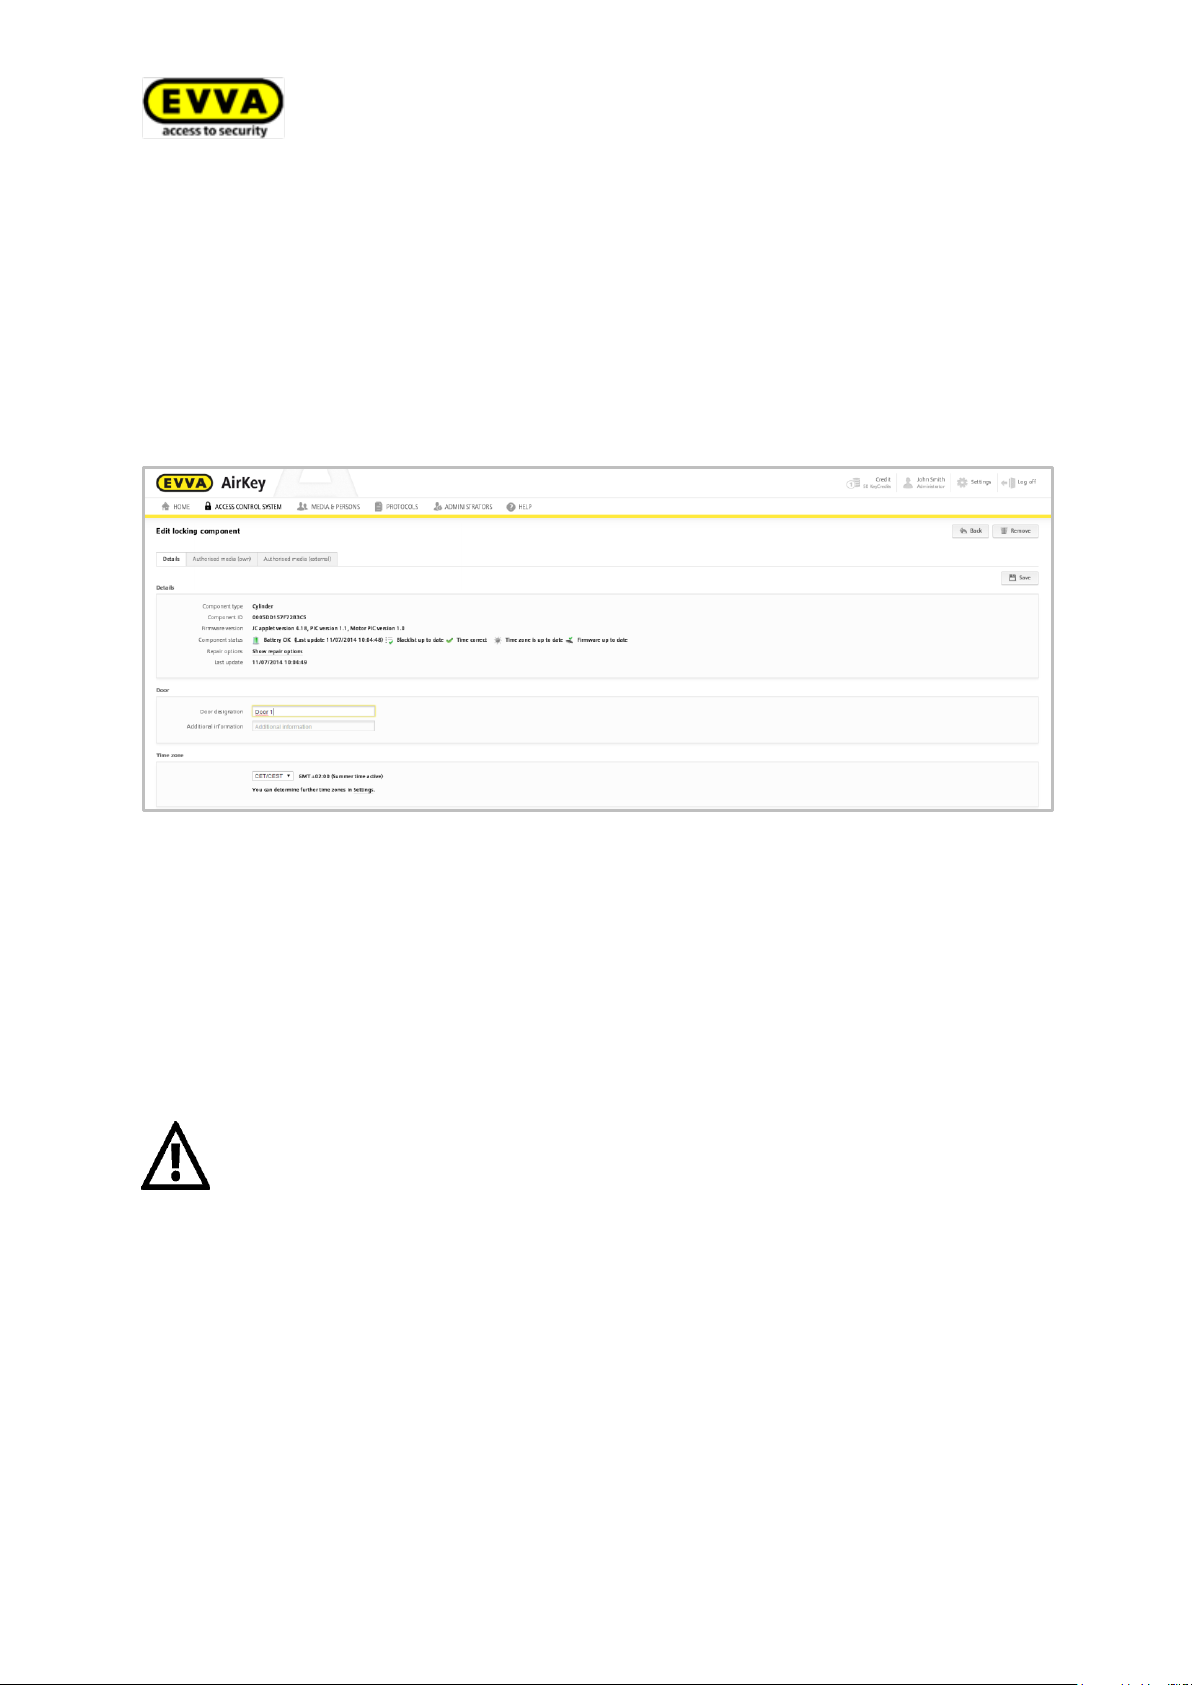
This process is irrevocable.
The locking component is reset to factory state after having removed it.
Any available authorisations no longer apply to unlock the locking component. They are automatically highlighted for deletion and no longer shown.
5.6.4 Removing locking components
You can remove locking components from your locking system if you no longer require
them in your AirKey system.
> In the main menu, select Access control system > Locking components.
> Click on the listed locking component you would like to delete from your locking sys-
tem.
> Click Remove.
Figure 85: Deleting locking components
> Click Delete locking component to confirm the security prompt.
> A confirmation prompt and a maintenance task appear, indicating the locking compo-
nent must be removed from the system.
The process has only been completed once the locking component has been updated using a smartphone with construction site authorisation or a coding station. As soon as the
locking component has been updated it is successfully removed from the system.
73
Page 74
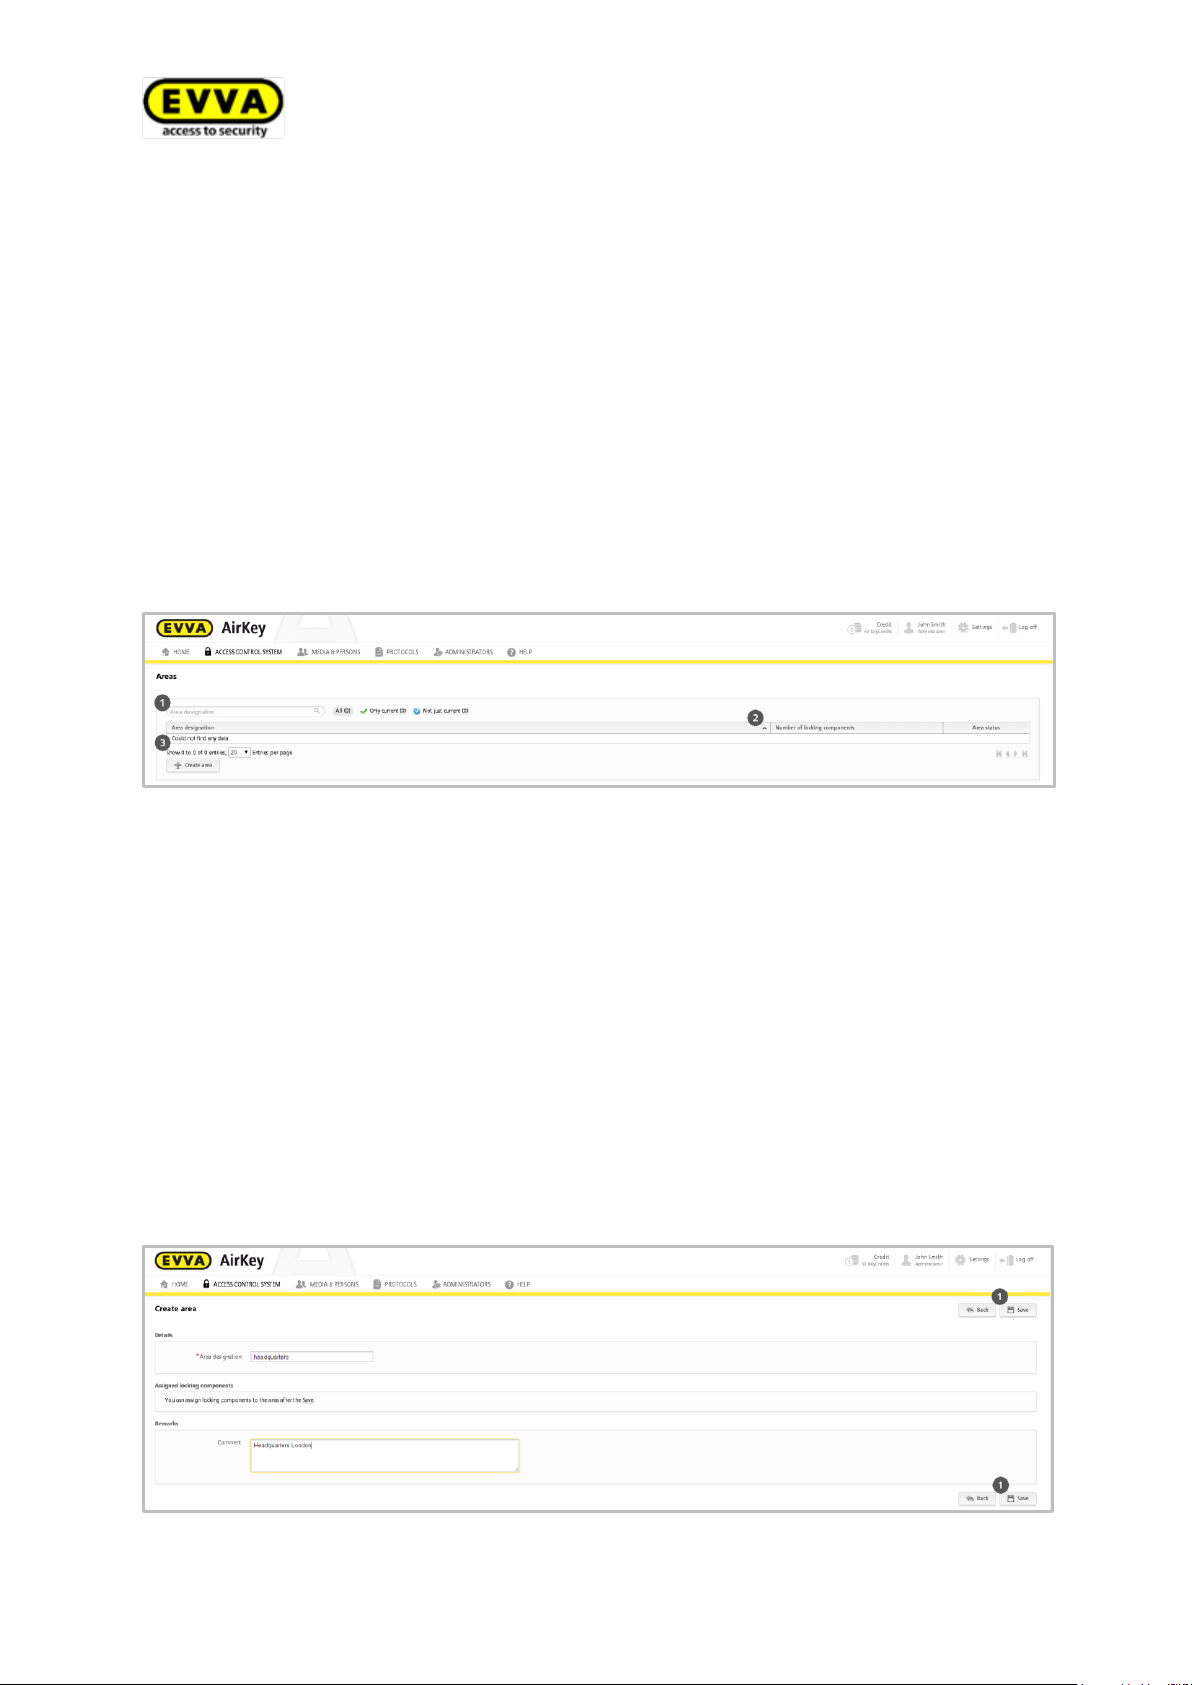
5.6.5 Areas
You can merge several locking components to areas to make it easier to manage authorisations in your locking system.
The main menu in Access control system > Areas shows a list of all areas including
their states.
The list of areas enables the following adaptations:
> Enter a search term in the search field .
> Click the corresponding column heading to determine it as the sorting criterion .
> Specify how many entries are shown per page .
Figure 86: Access control systems > Areas
> Select the desired area from the list to view the details of the selected area.
5.6.6 Creating areas
No areas have been defined as standard. You must create new areas to be able to merge
locking components in areas.
> In the main menu, select Access control system > Create area.
> Specify a unique designation for the area.
> Document any additional information on the area in the "Comment" field.
> Click Save .
74
Figure 87: Creating area
Page 75
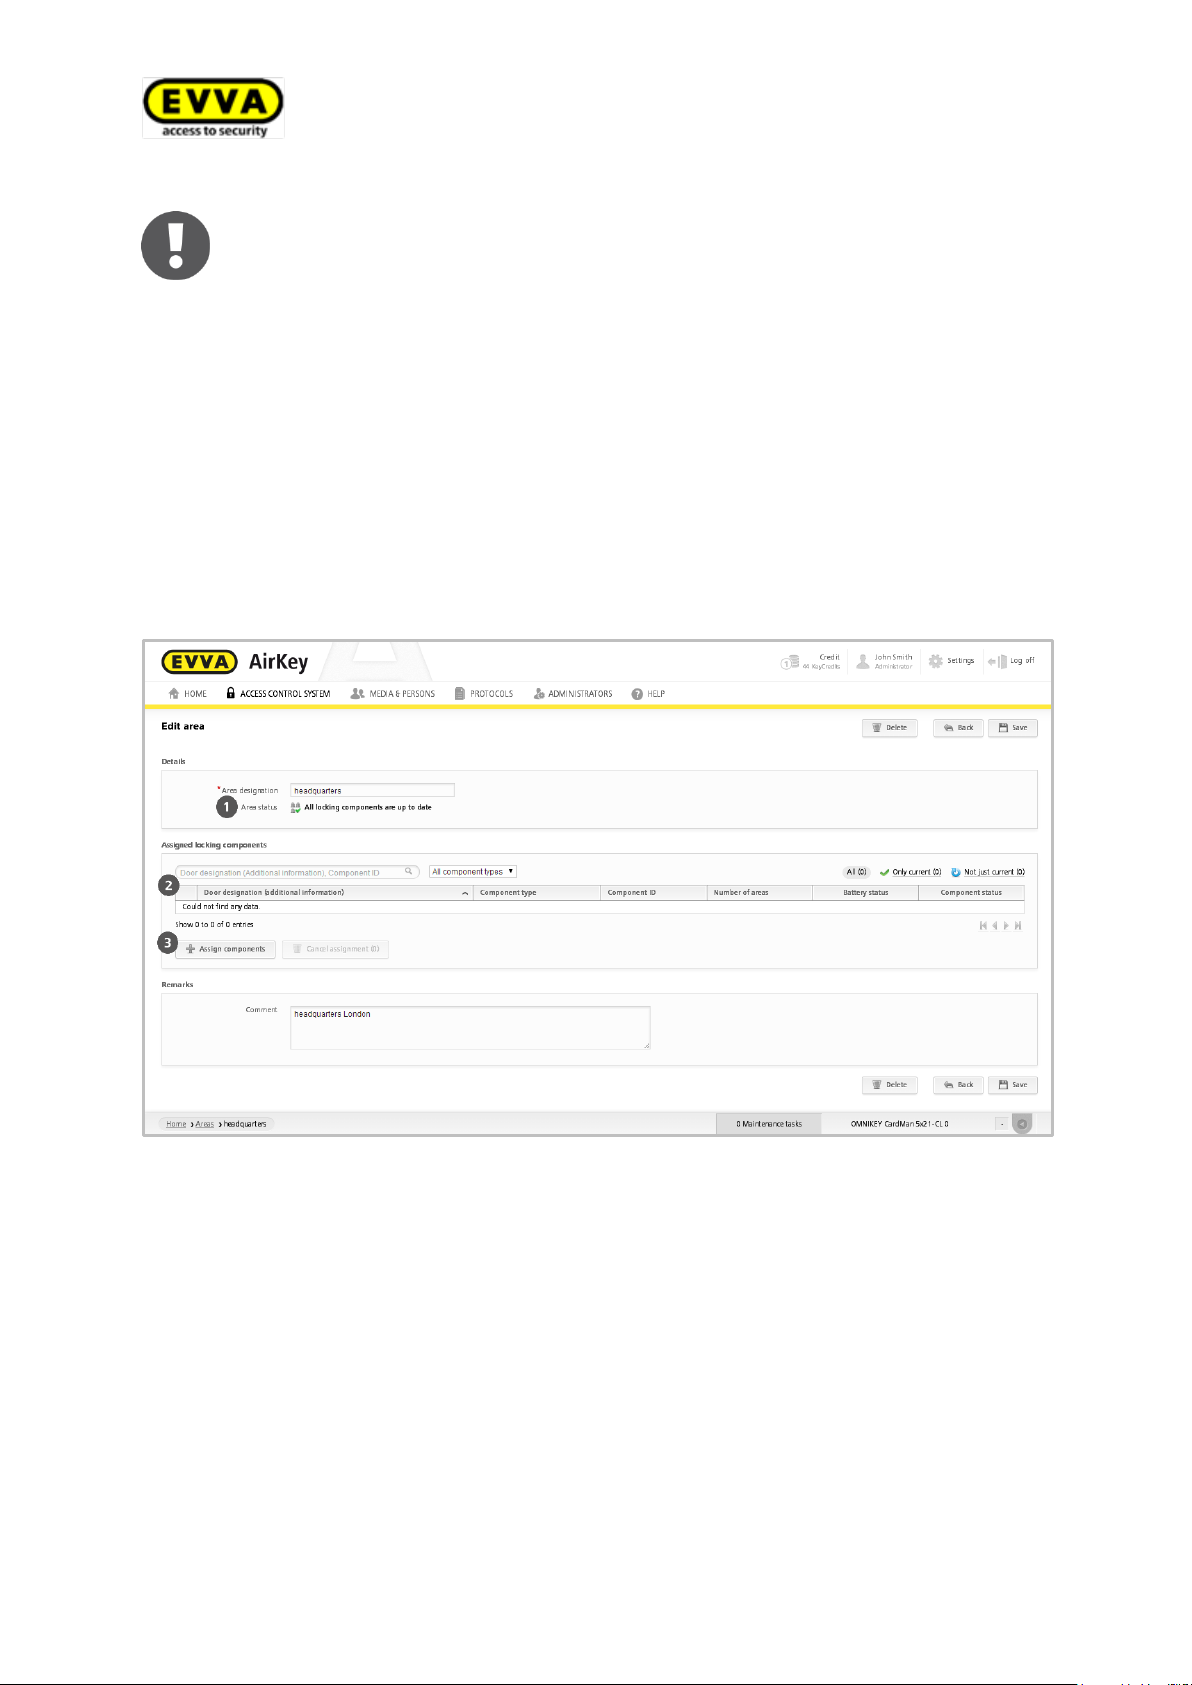
A message indicating "Area saved successfully" appears upon successfully
creating areas. You can only add locking components to areas once you
have successfully saved them.
5.6.7 Assigning locking components to areas
> In the main menu, select Access control system > Areas.
> Select the area from the list to which you would like to add locking components.
> The details of the selected area appear. "Area status" indicates whether or not all
locking components within the area are up to date. The "Assigned locking component"
list lists all locking components assigned to the area.
> Click Assign component to add a locking component to the area.
Figure 88: Editing areas
A list of all locking components that have not yet been assigned to the area appears.
> Select the desired locking components (multiple locking component selections, also
different types, are possible).
> Click Assign components to add locking components to the area.
> Click Save to confirm the changes.
The system creates maintenance tasks for the affected locking components, indicating
that they must be updated.
75
Page 76
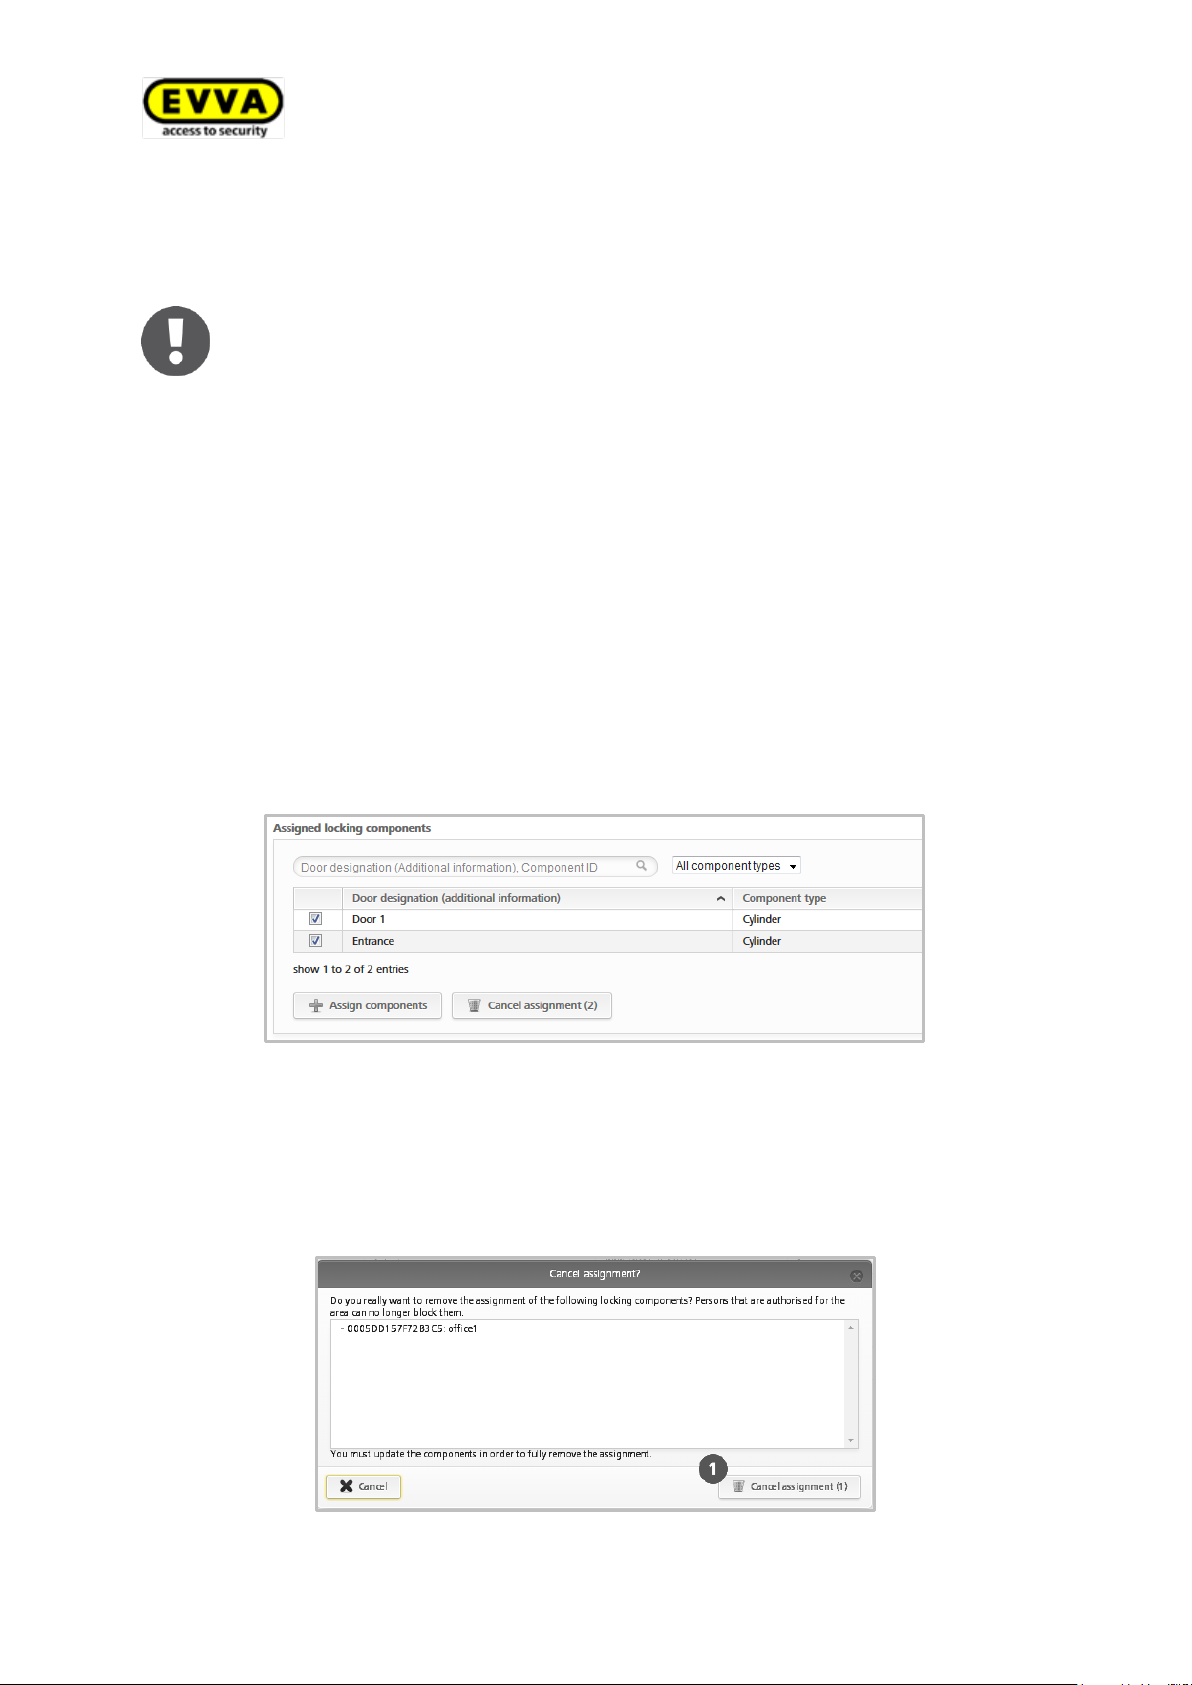
A locking component can be assigned to a maximum of 96 areas.
Alternatively, you can also directly edit the area assignments of locking
components in the locking component details. Please refer to the Editing
locking components section for more detailed information.
> Update the corresponding locking components.
The maintenance task will consequently disappear from the list and you have completely assigned the locking component to the area.
5.6.8 Cancelling locking component assignments to an area
Proceed as follows to cancel assignments of one or more locking components to an area:
> In the main menu, select Access control system > Areas.
> Select the area from the list in which you would like to cancel the locking component
assignment.
> Tick the check boxes of the components for which you would like to cancel the as-
signments to areas. You can select multiple entries.
Figure 89: Highlighting locking components
> Click Cancel assignments.
> A dialogue appears that once again lists the locking components for which the as-
signments to an area are to be cancelled.
> Also confirm this dialogue with Cancel assignment
76
Figure 90: Cancelling assignments
Page 77
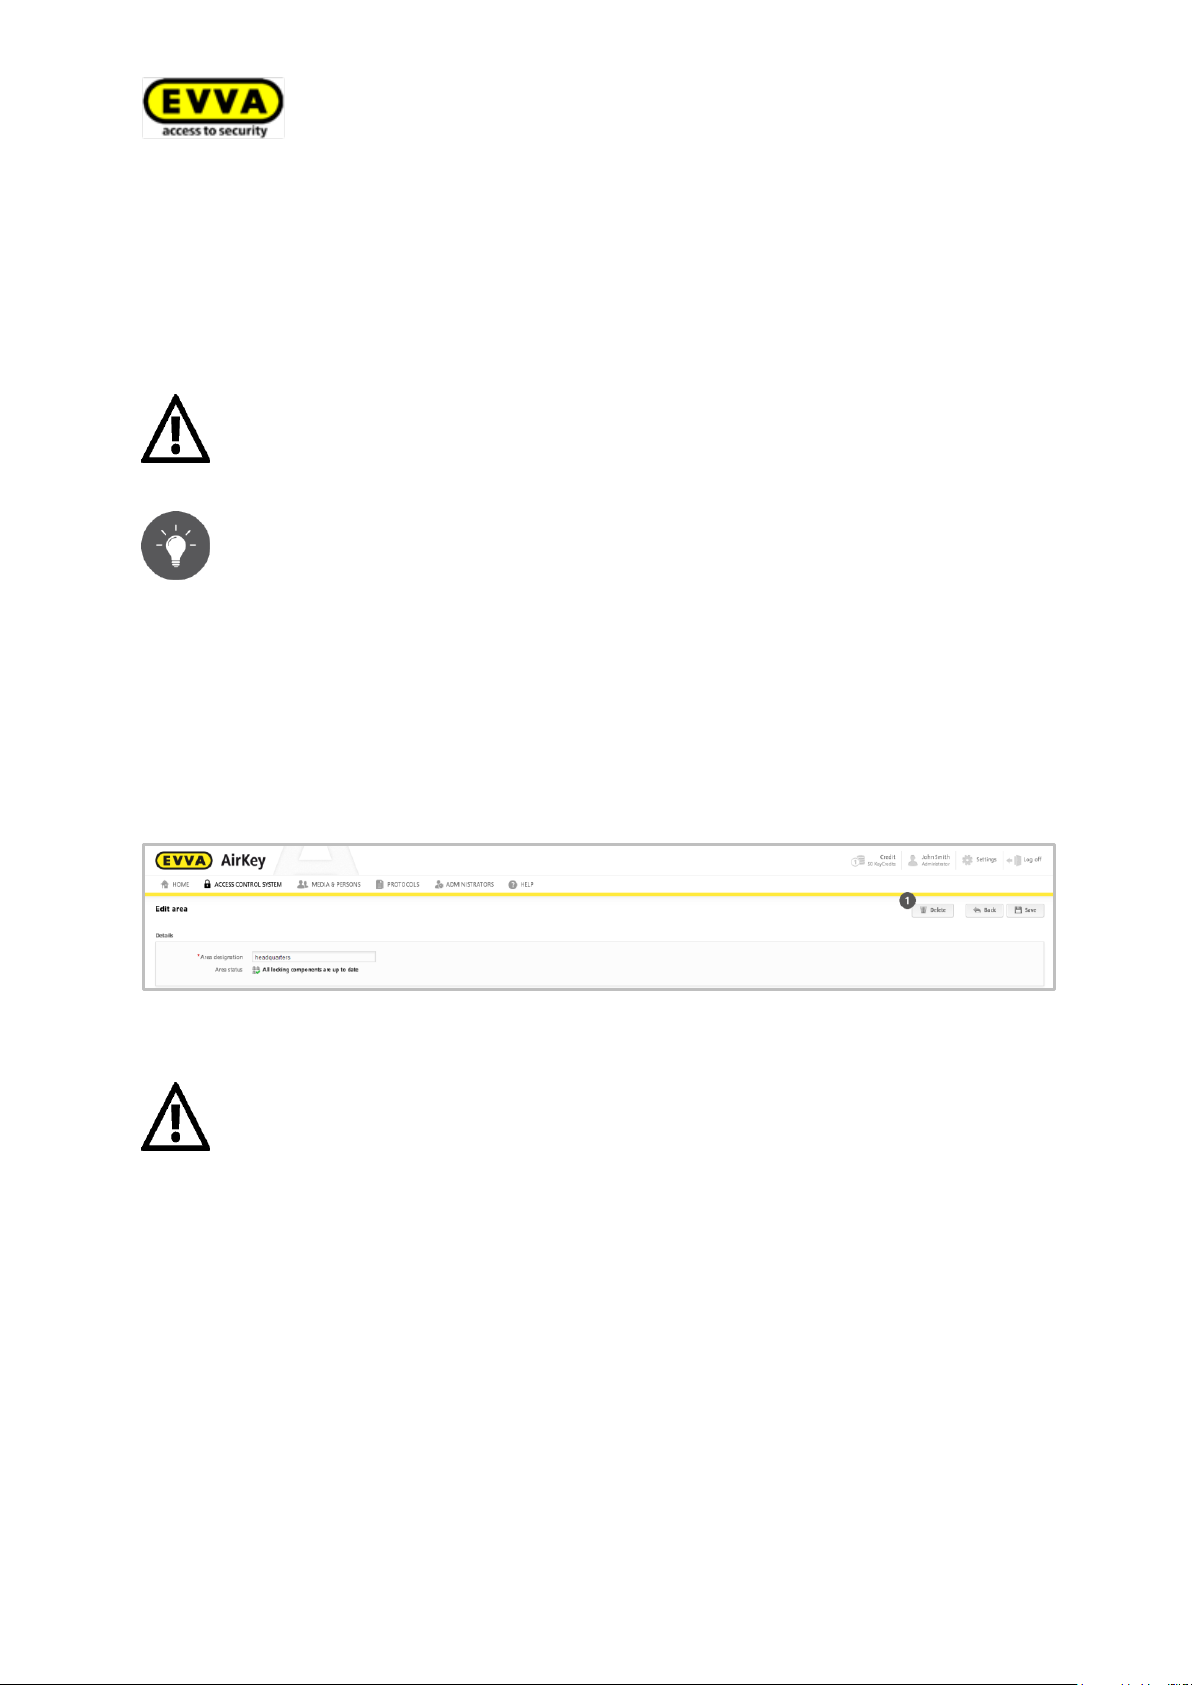
After having updated, persons with media featuring authorisations for this
area will be unable to unlock the locking component for which you cancelled
the assignment.
Alternatively, you can also directly edit the area assignments of locking
components in the locking component details. Please refer to the Editing
locking components section for more detailed information.
Any existing authorisations for a deleted area are automatically deleted and
no longer shown. Deletion is irrevocable.
The system creates maintenance tasks for the affected locking components, indicating
that they must be updated.
> Update the corresponding locking components.
The maintenance task will consequently disappear from the list and you have completed cancelling the locking component from the area.
5.6.9 Deleting areas
> In the main menu, select Access control system > Areas.
> Select the area you would like to delete from the list.
> Click Delete .
Figure 91: Deleting areas
77
Page 78
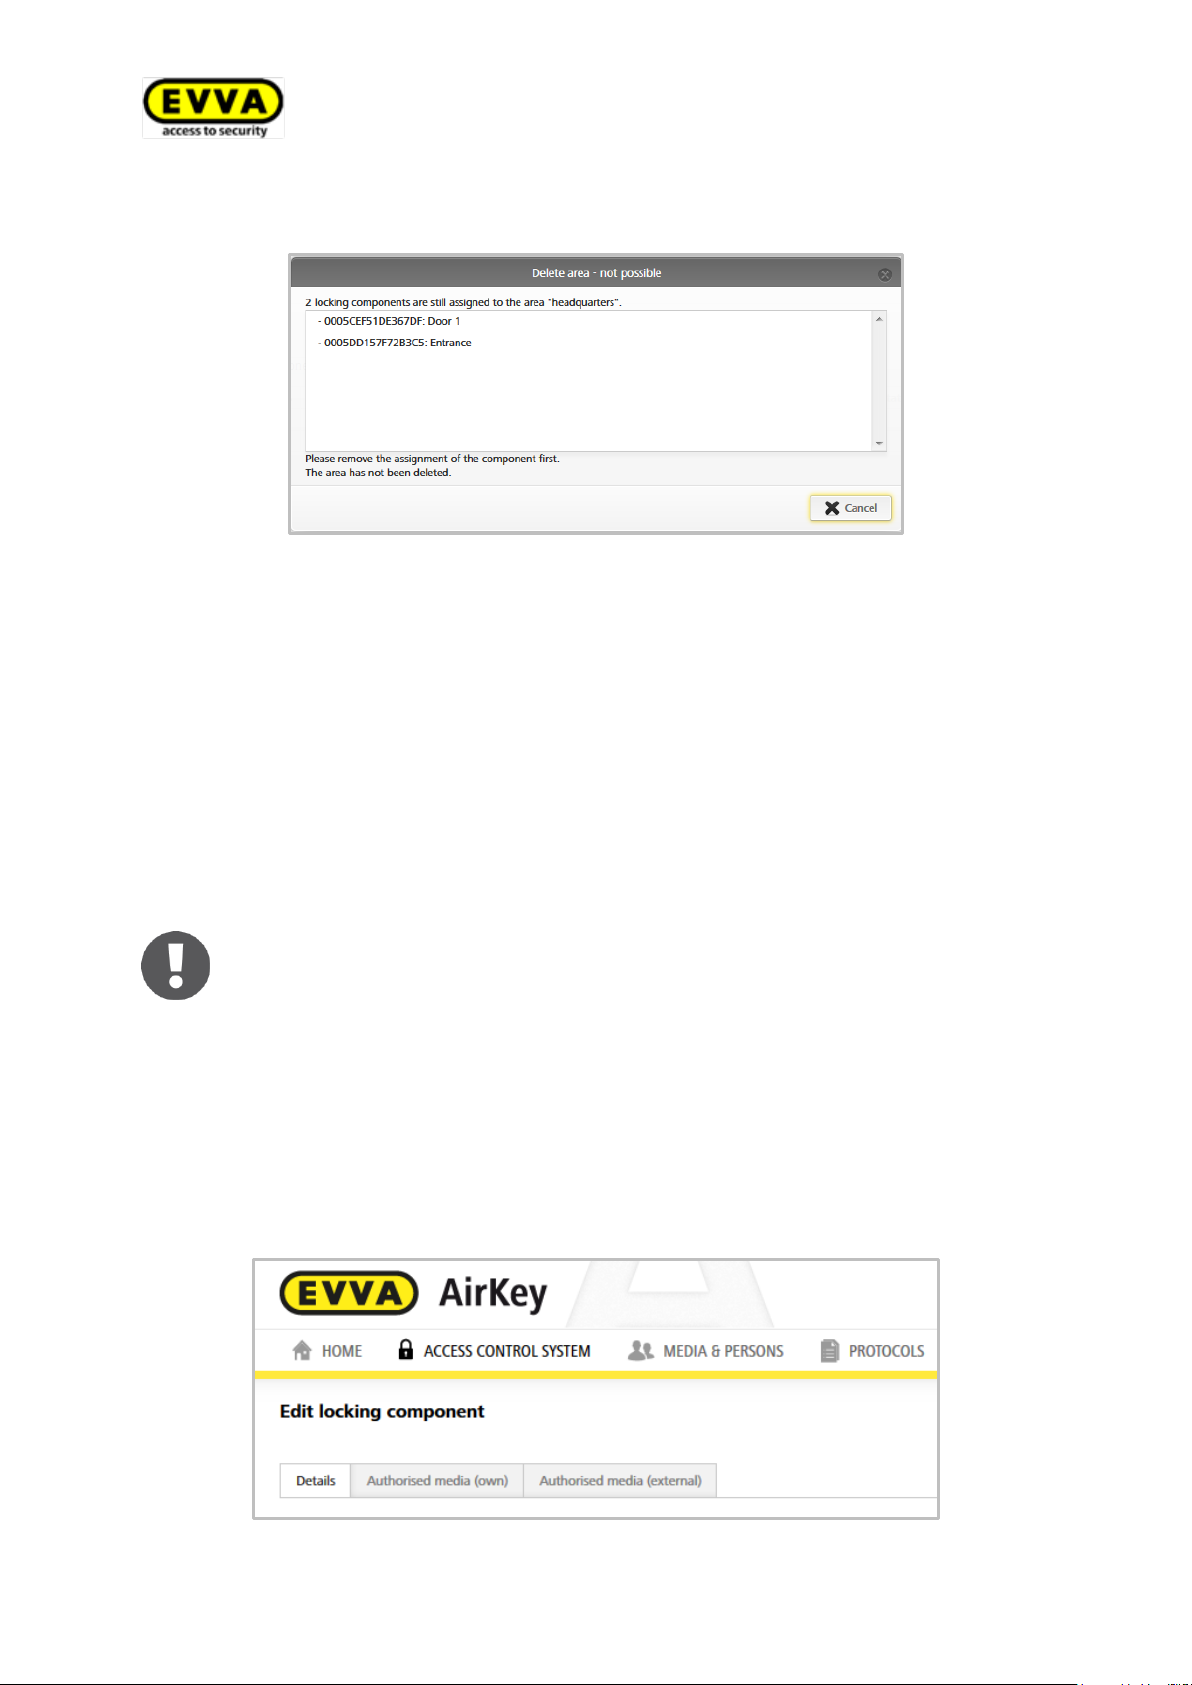
All media with authorisations for this locking component are listed. However, the listed authorisation must not necessarily be currently active (i.e. the
current medium is currently not authorised) to be listed.
An error message appears if locking components are still assigned to the area.
Figure 92: Unable to delete area
> For this reason, initially cancel all locking component assignments of the area and
subsequently repeat the illustrated process. Please refer to the Cancelling locking
component assignments to an area section for more detailed information on as-
signing locking components to areas
5.6.10 Authorisation overview
The authorisation overview shows all authorisations of media for each individual locking
component. The authorisation overview relates to the selected locking component.
> In the main menu, select Access control system > Locking components.
> Select the locking component for which you would like to view the authorisation over-
view.
> Browse from the Details tab to Authorised media (own) to view the authorisations
of your own system or select Authorised media (external) to view authorisations
from other systems for which the locking component is to be authorised.
Figure 93: Authorised media tabs
78
Page 79
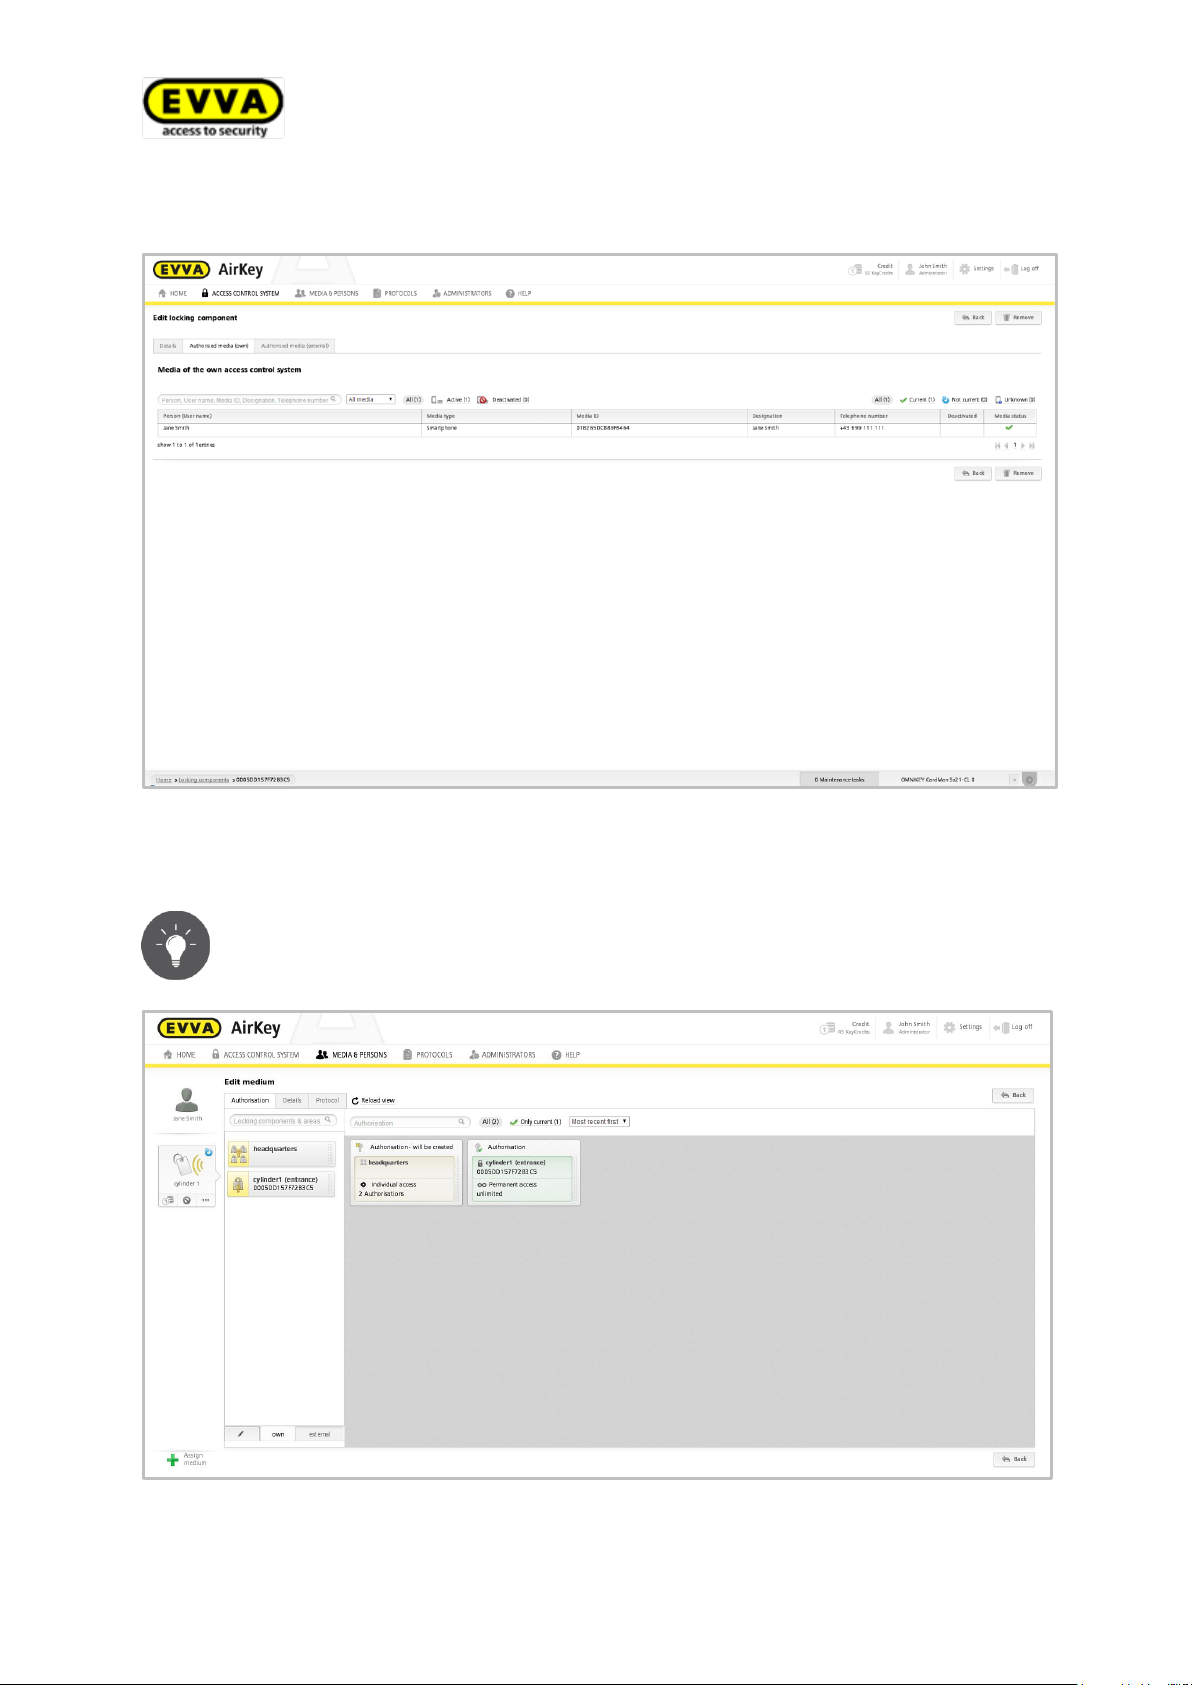
Click a person's name to directly view this persons authorisations of the medium.
Shows a list of all persons and their media. You can also view the media type.
Figure 94: Access overview
You can search, filter or sort this list to find certain authorisations.
Figure 95: Editing media
79
Page 80
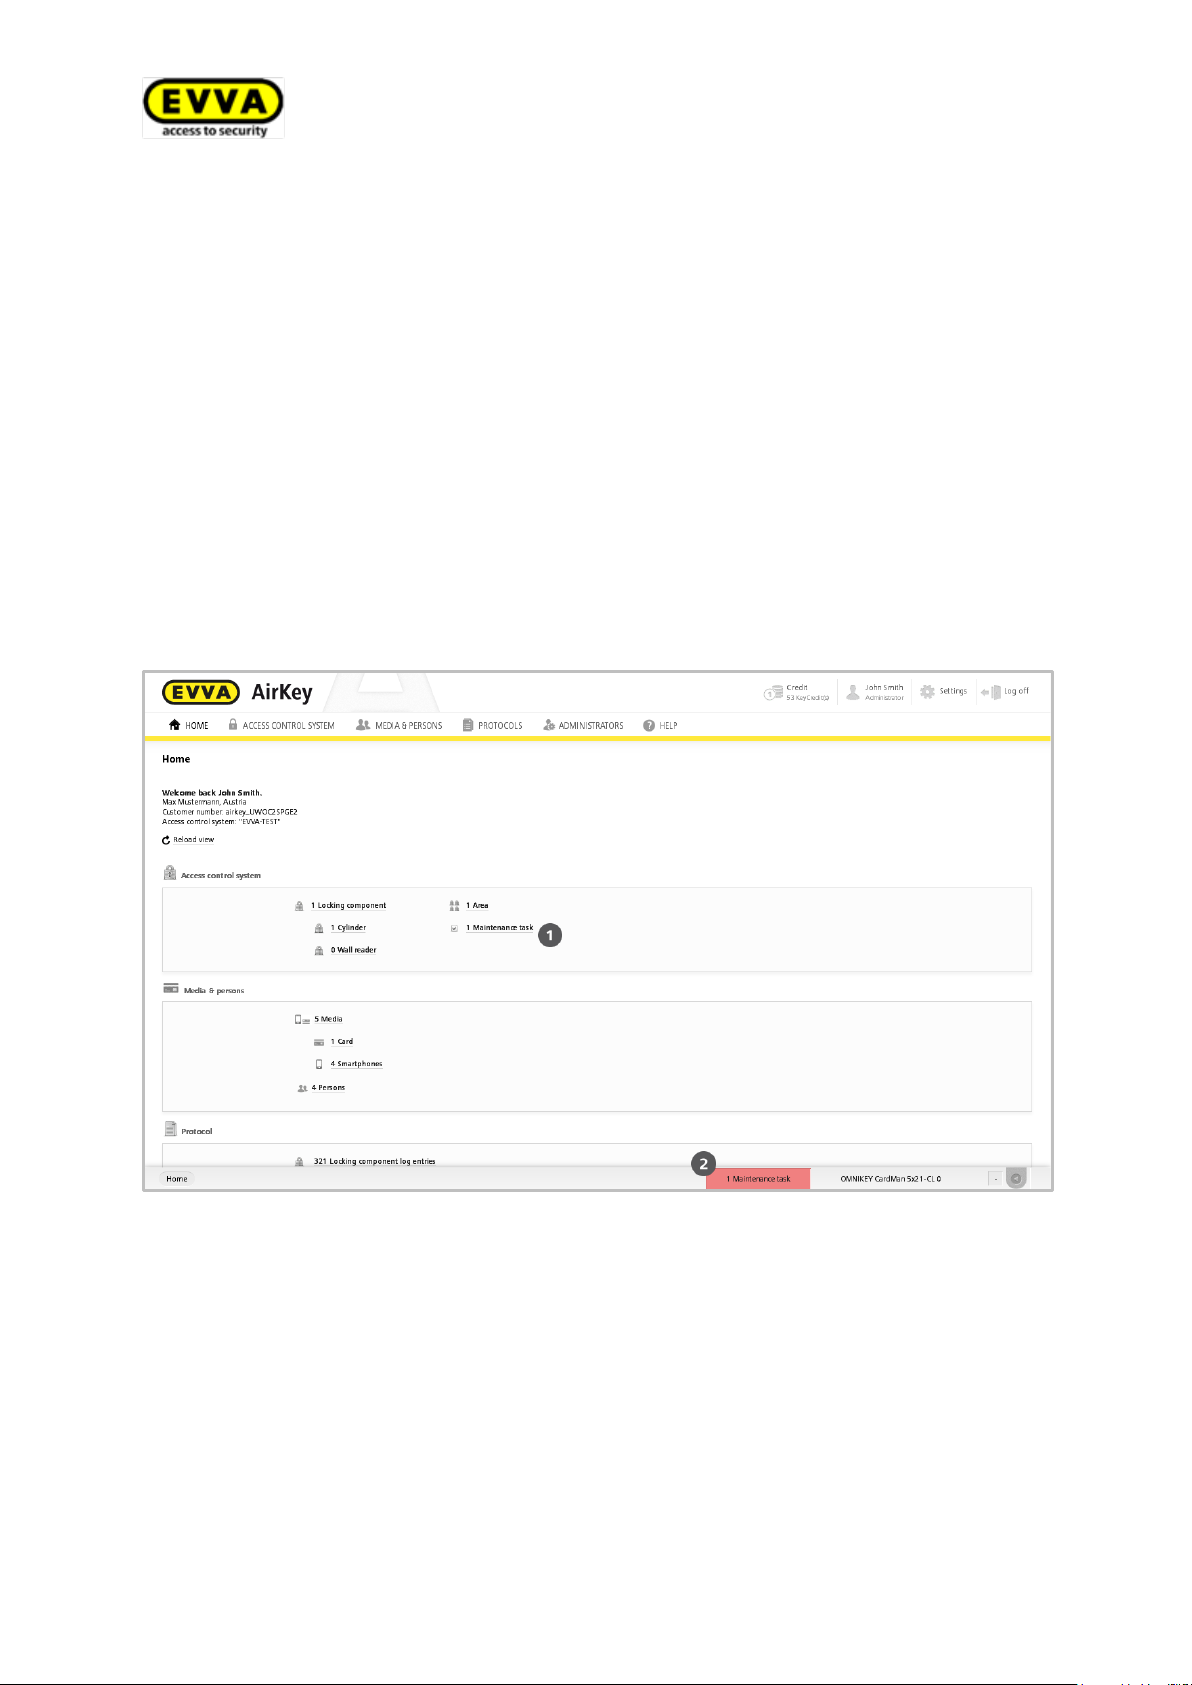
5.6.11 Maintenance tasks
Certain functions influence the locking component configuration. Such changes to the
configuration are listed as maintenance tasks. As a result, maintenance tasks relate to
locking components that have not been recently updated.
Proceed as follows to view a list of up-to-date maintenance tasks within the AirKey locking system:
> Click the Maintenance tasks link in the Access control system section of the
Home screen
or
> Click Maintenance tasks in the status bar
or
> In the main menu, select Access control system > Maintenance tasks.
Figure 96: Home
This section provides a transparent list of maintenance tasks for locking components
within the AirKey locking component .
You can search for door designations or component IDs in the list of maintenance tasks.
You can sort the door designation, component ID and maintenance tasks columns.
You can also prioritise maintenance tasks and create a PDF file to print.
80
Page 81
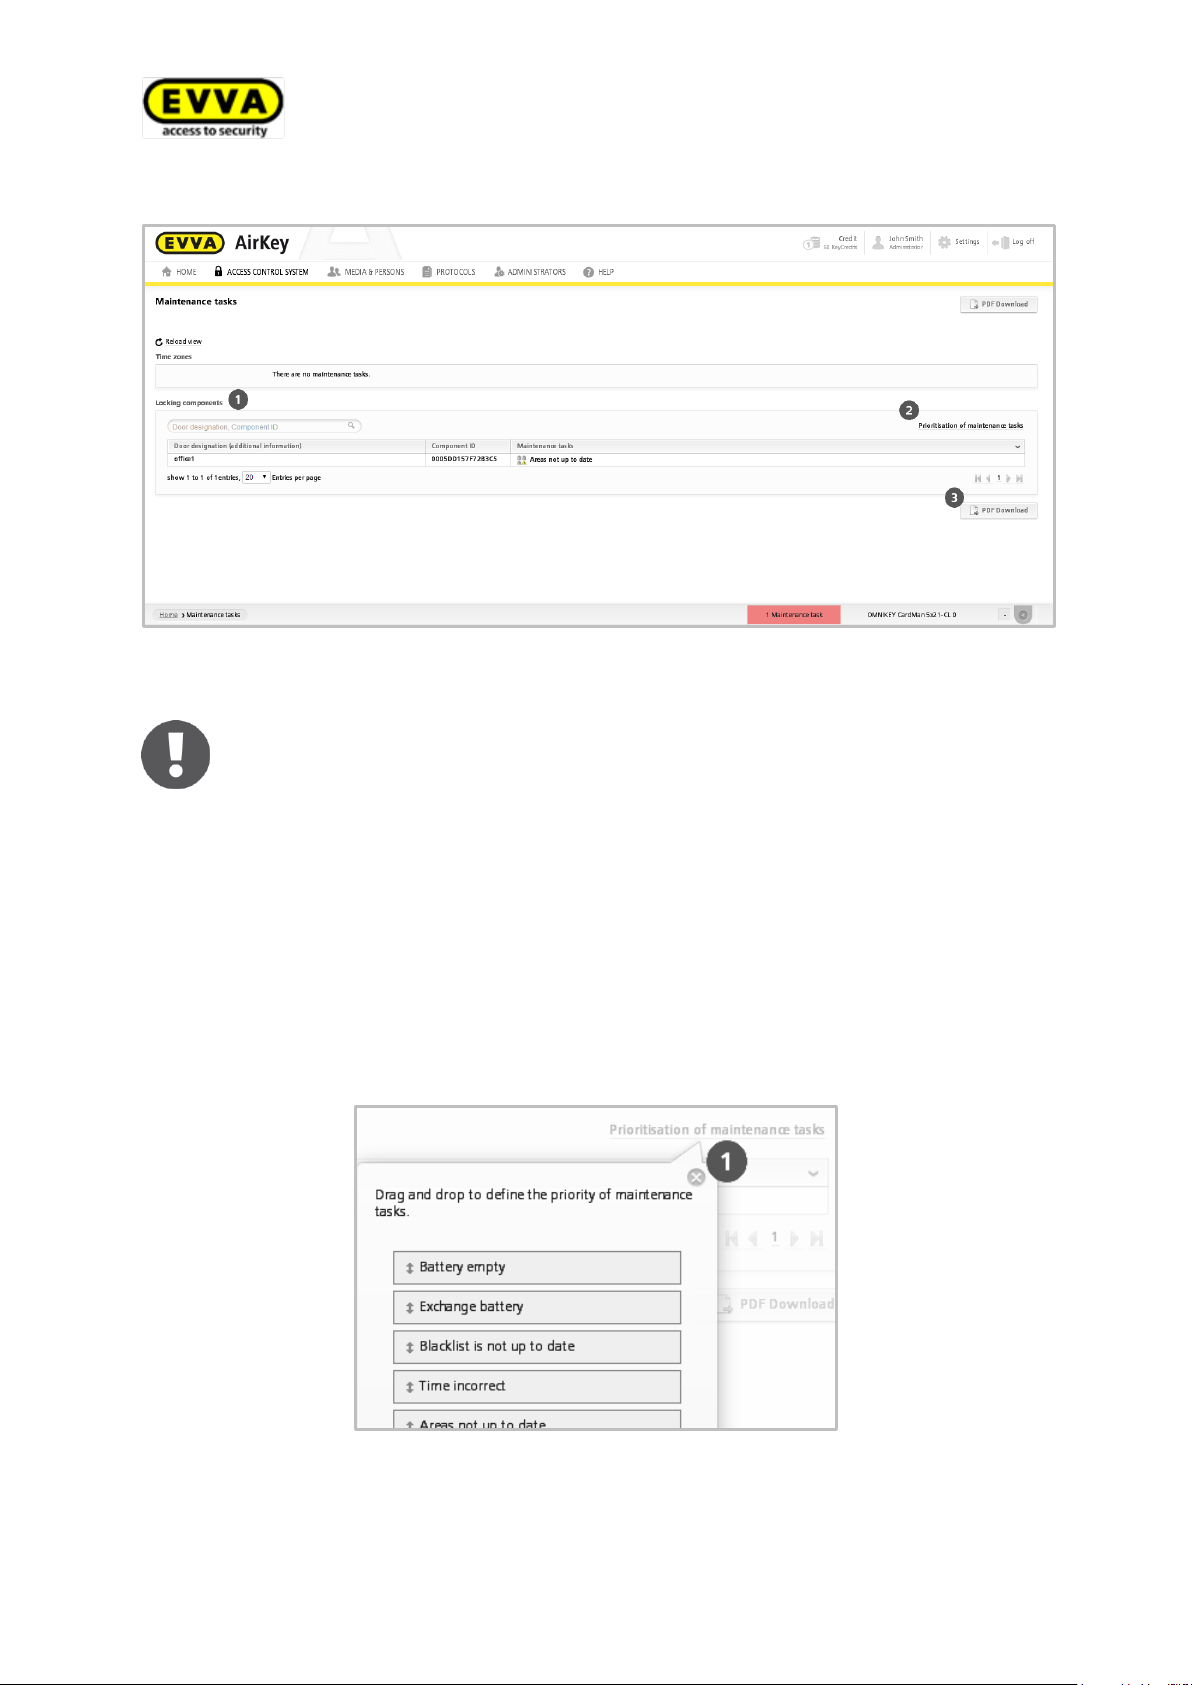
The list of maintenance tasks also indicates if time zone data for the locking
components must be changed. These maintenance tasks are shown in the
"Time zones" section.
Figure 97: Maintenance tasks
Prioritisation of the maintenance tasks is saved per locking system/client and also applies
to the smartphone app with activated maintenance mode.
> Click Prioritisation of maintenance tasks .
> Customers have different demands, depending on the applications - drag and drop
the items into the desired order.
> Click Confirm to save the changed prioritisation.
Figure 98: Prioritisation of maintenance tasks
The list of maintenance tasks is now shown with changed priorities.
81
Page 82

You can create the list of all due maintenance tasks as a PDF file and print
it. For this purpose, click the PDF download button.
Individual items on the list with maintenance tasks have been linked to the detailed pages of the corresponding locking components.
Once a maintenance task has been completed, the item is automatically removed from
the list of maintenance tasks.
82
Page 83
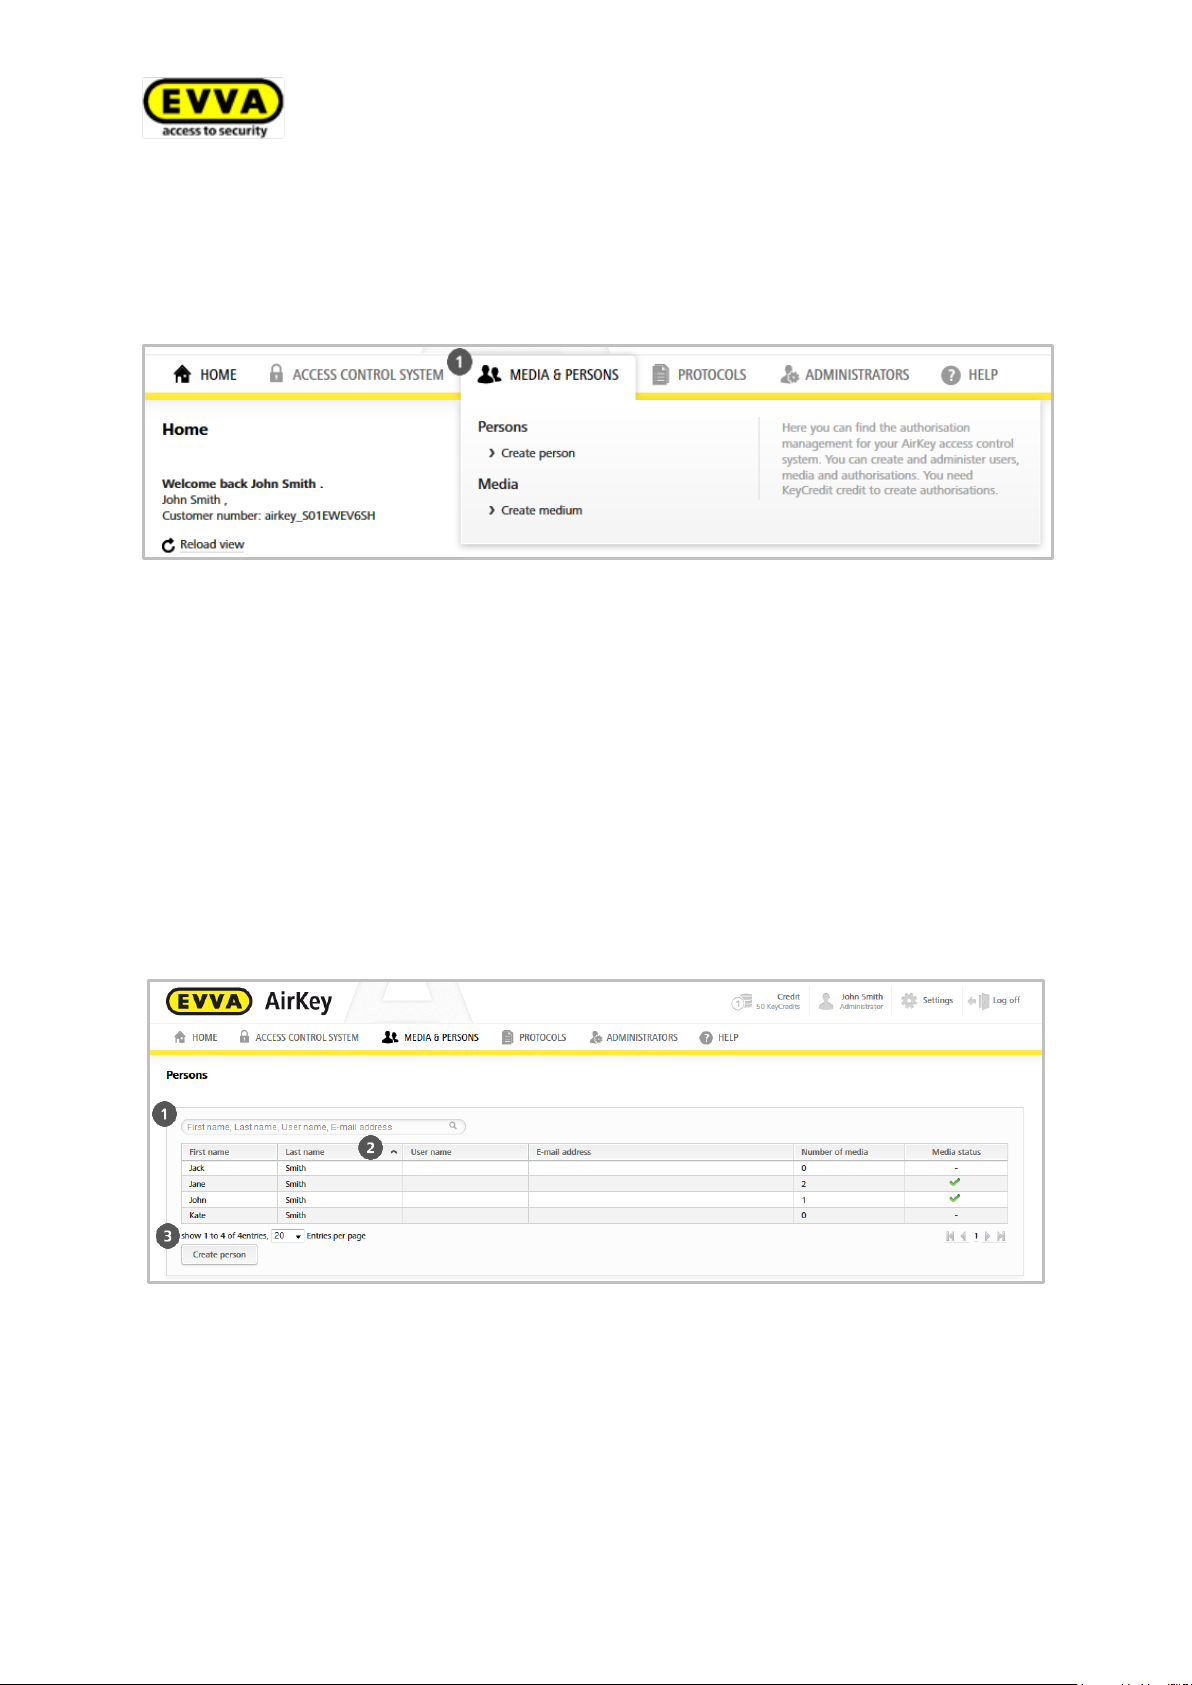
5.7 Media & persons
The Media & persons main menu is intended to manage all persons, media and authorisations within the AirKey locking system.
Figure 99: Media & persons
5.7.1 Overview of persons
The main menu in Media & persons > Persons shows a list of all created persons including their states.
The list shown enables the following functions:
> Enter a search term in the search field .
Choose either first name/last name/user name or email address.
> Click the corresponding column heading to determine it as the sorting criterion .
> Specify how many entries are shown per page .
Figure 100: Persons
83
Page 84
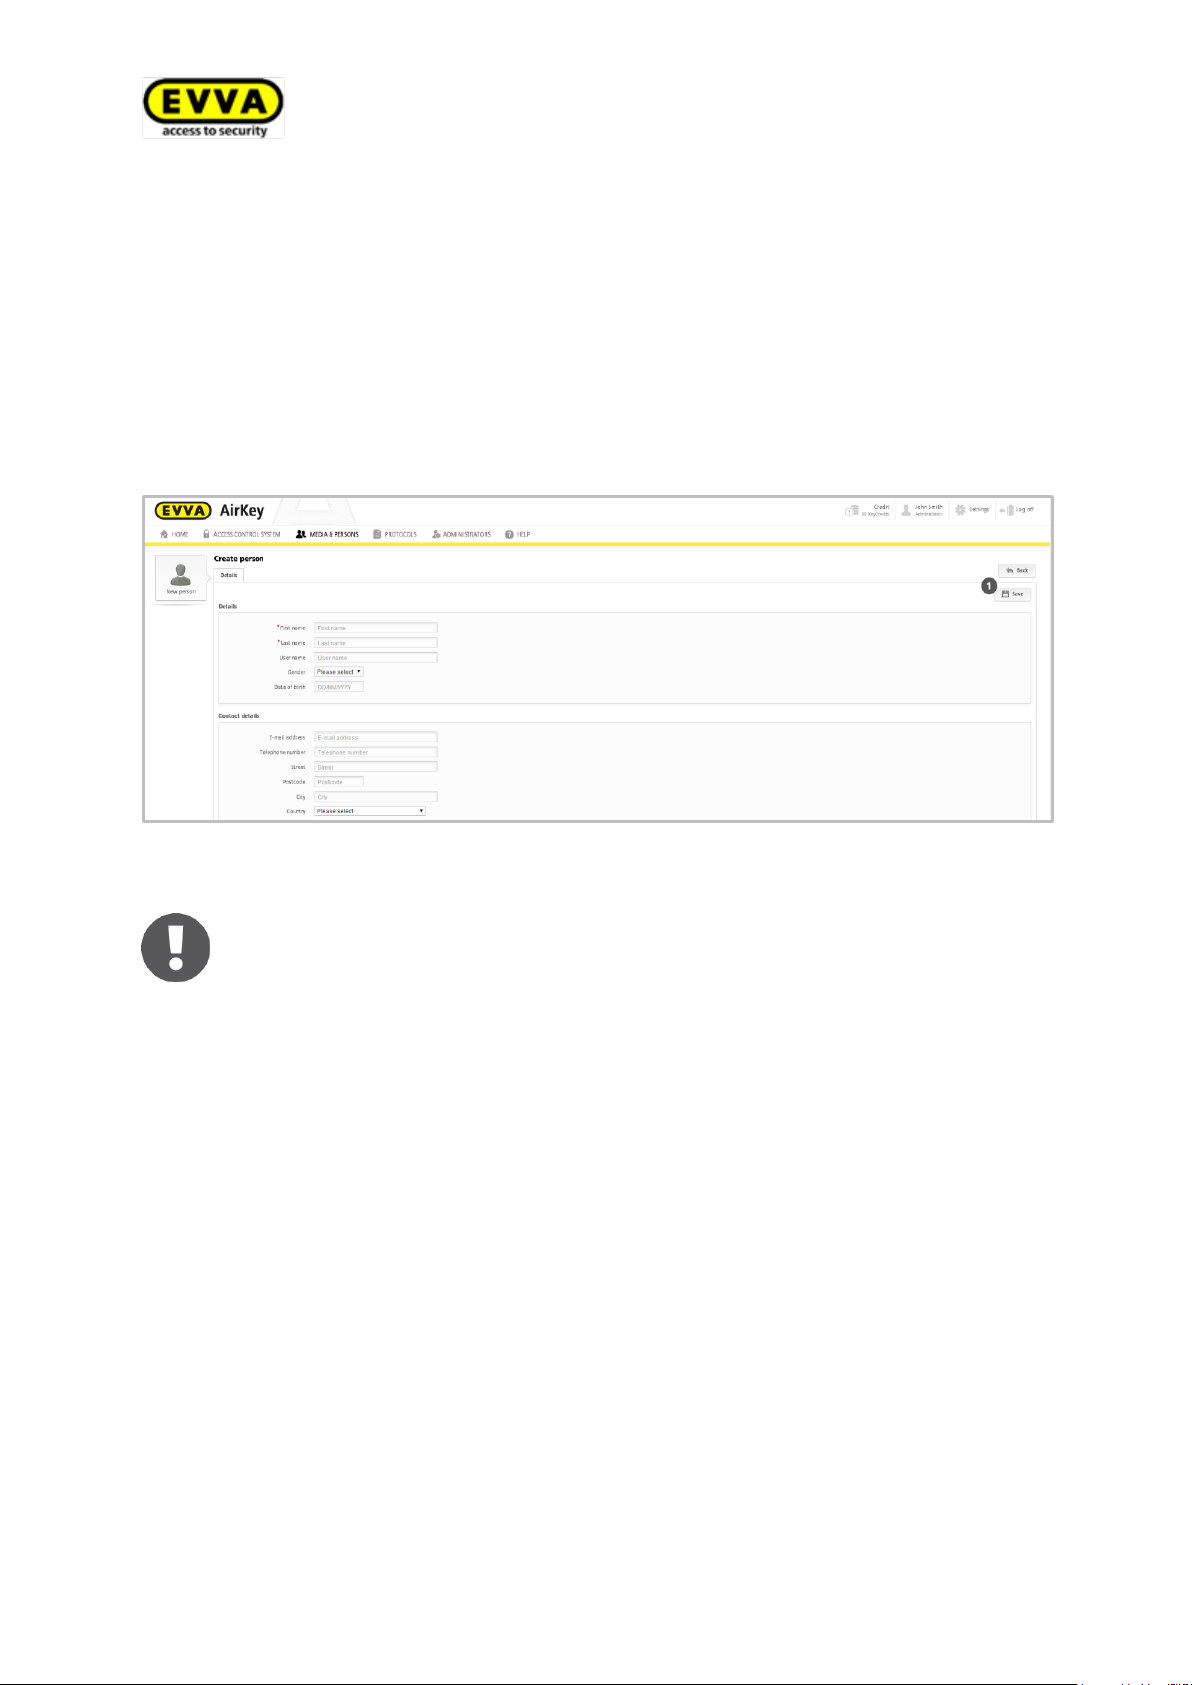
The first name/last name/ID fields result in a unique combination within the
AirKey locking system.
If you additionally use the "ID" field, enter a value that ensures the combination of first name and last name is unique (e.g. the staff number).
5.7.2 Creating persons
You must create persons to be able to assign them to media. You can exclusively grant
authorisations to media that have been assigned to persons.
> In the main menu, select Media & Persons > Create person.
> Complete mandatory fields.
Fields highlighted with * are mandatory fields.
> Click Save .
Figure 101: Creating persons
If the combination you entered already exists, the system will report "Person already
exists".
The characters in the Email address, Telephone number, Address, Post code and City
fields are restricted to a maximum of 50. The character limit in the comment field is 500
characters.
> Check and correct your input (if required).
> Click Save.
After having created the person, the Assign medium button appears below the name.
84
Page 85
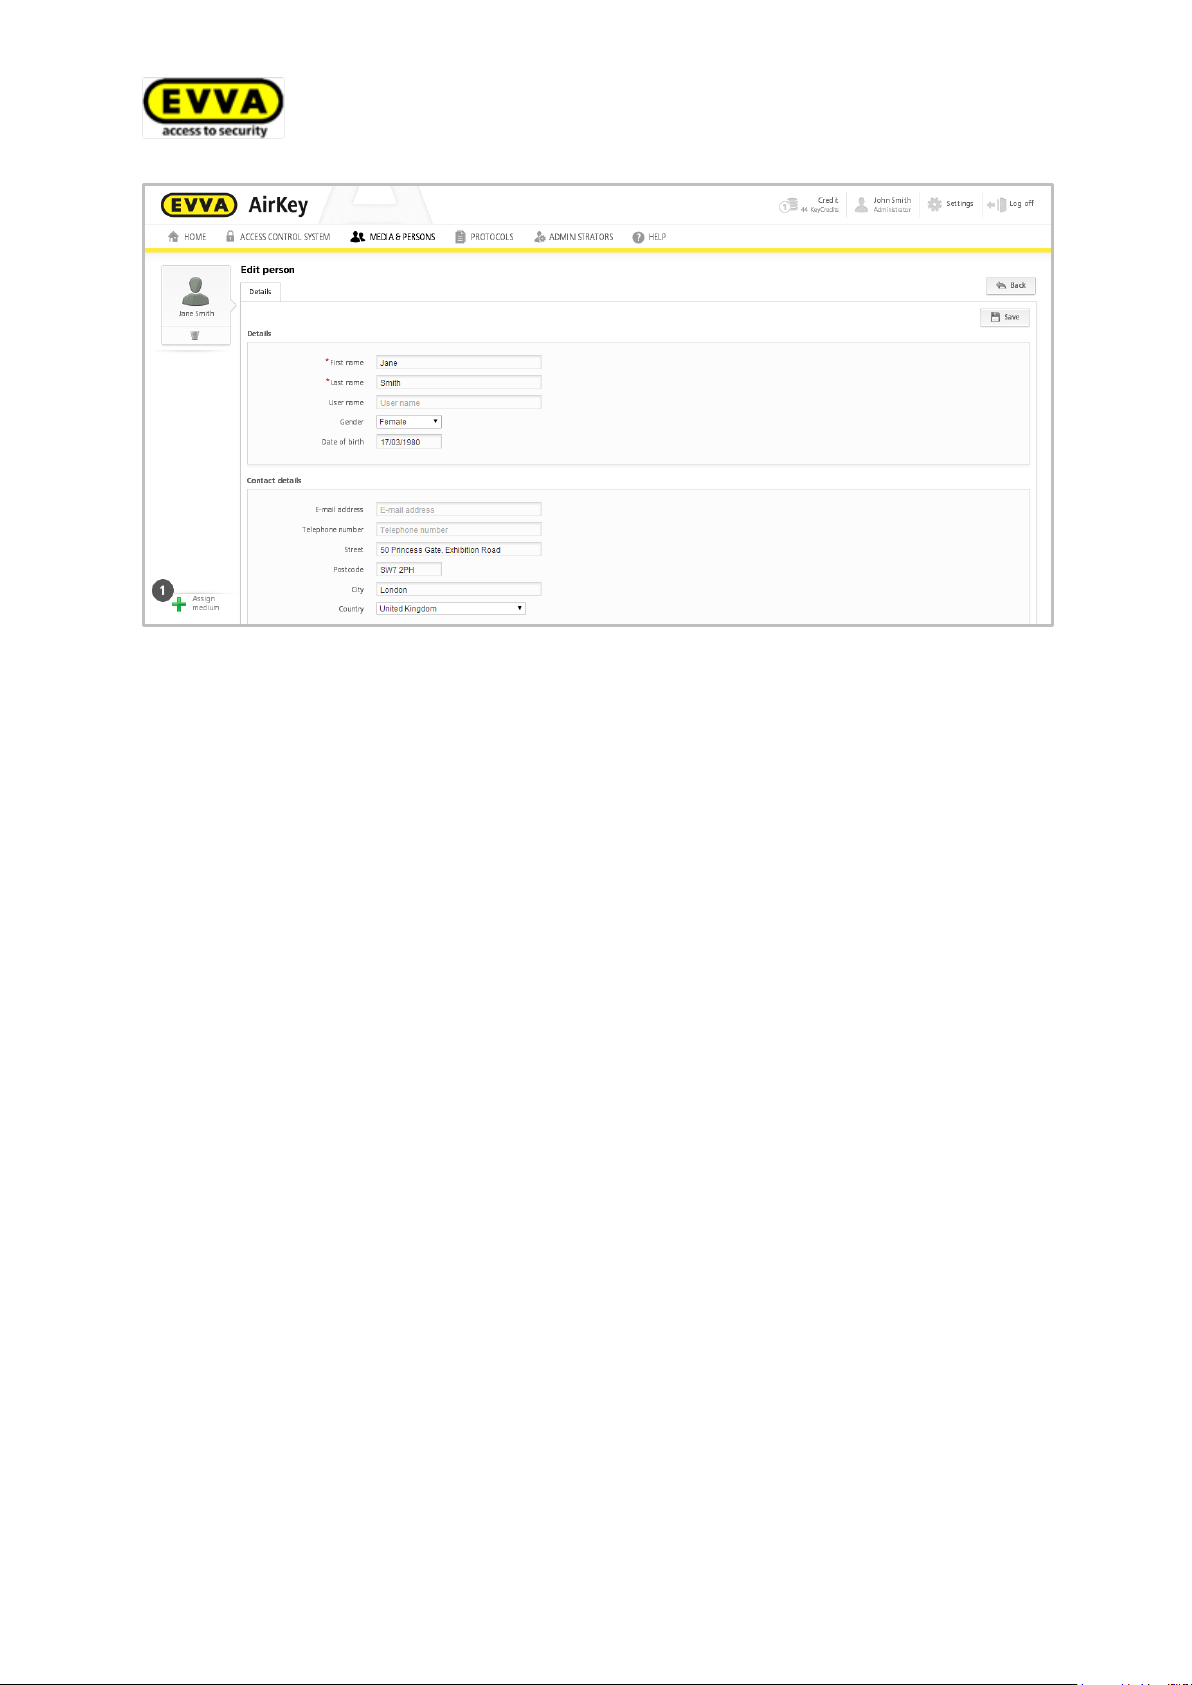
Figure 102: Assigning media
You have now created the person in the AirKey system and the user appears on the person list.
5.7.3 Editing persons
The "Edit person" application window allows to change personal details and contact data
or assign a new medium.
> In the main menu, select Media & Persons > Persons.
> Click the name of the person on the person list for which you would like to change
details.
> Change the corresponding data.
> Click Save.
85
Page 86
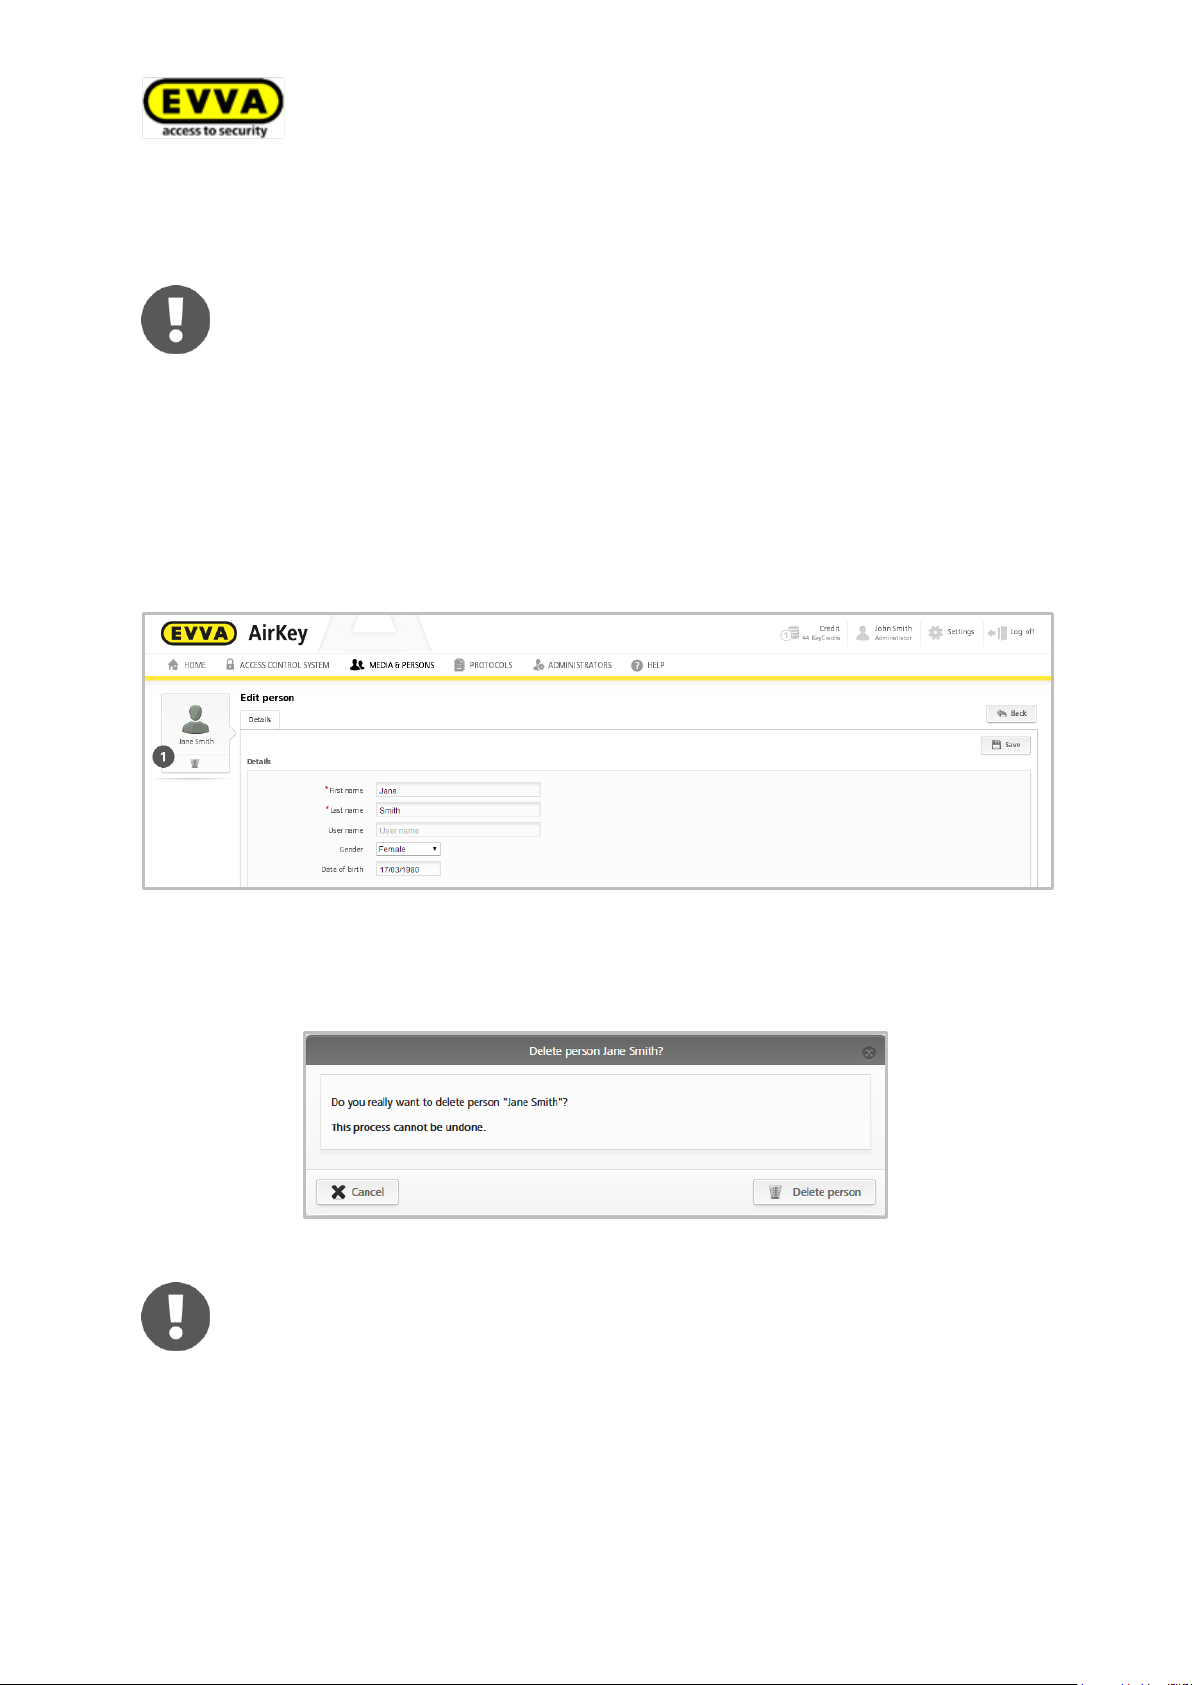
You are unable to delete a person who is still assigned to media. For this
purpose, ensure that all media have been unassigned from this person before deletion.
The data and protocol data of the deleted person is no longer shown in the
detailed view. However, you can continue to view any available, personal
data in the locking component and media protocol.
5.7.4 Deleting persons
You can delete persons if you would like to remove them from your AirKey system.
Proceed as follows once no more media is assigned to the person to be deleted:
> In the main menu, select Media & Persons > Persons.
> Click the name of the person on the person list you would like to delete.
> Click the recycling bin icon.
Figure 103: Deleting persons
> Click Delete person to confirm the security prompt.
Figure 104: Delete person security prompt
86
Page 87
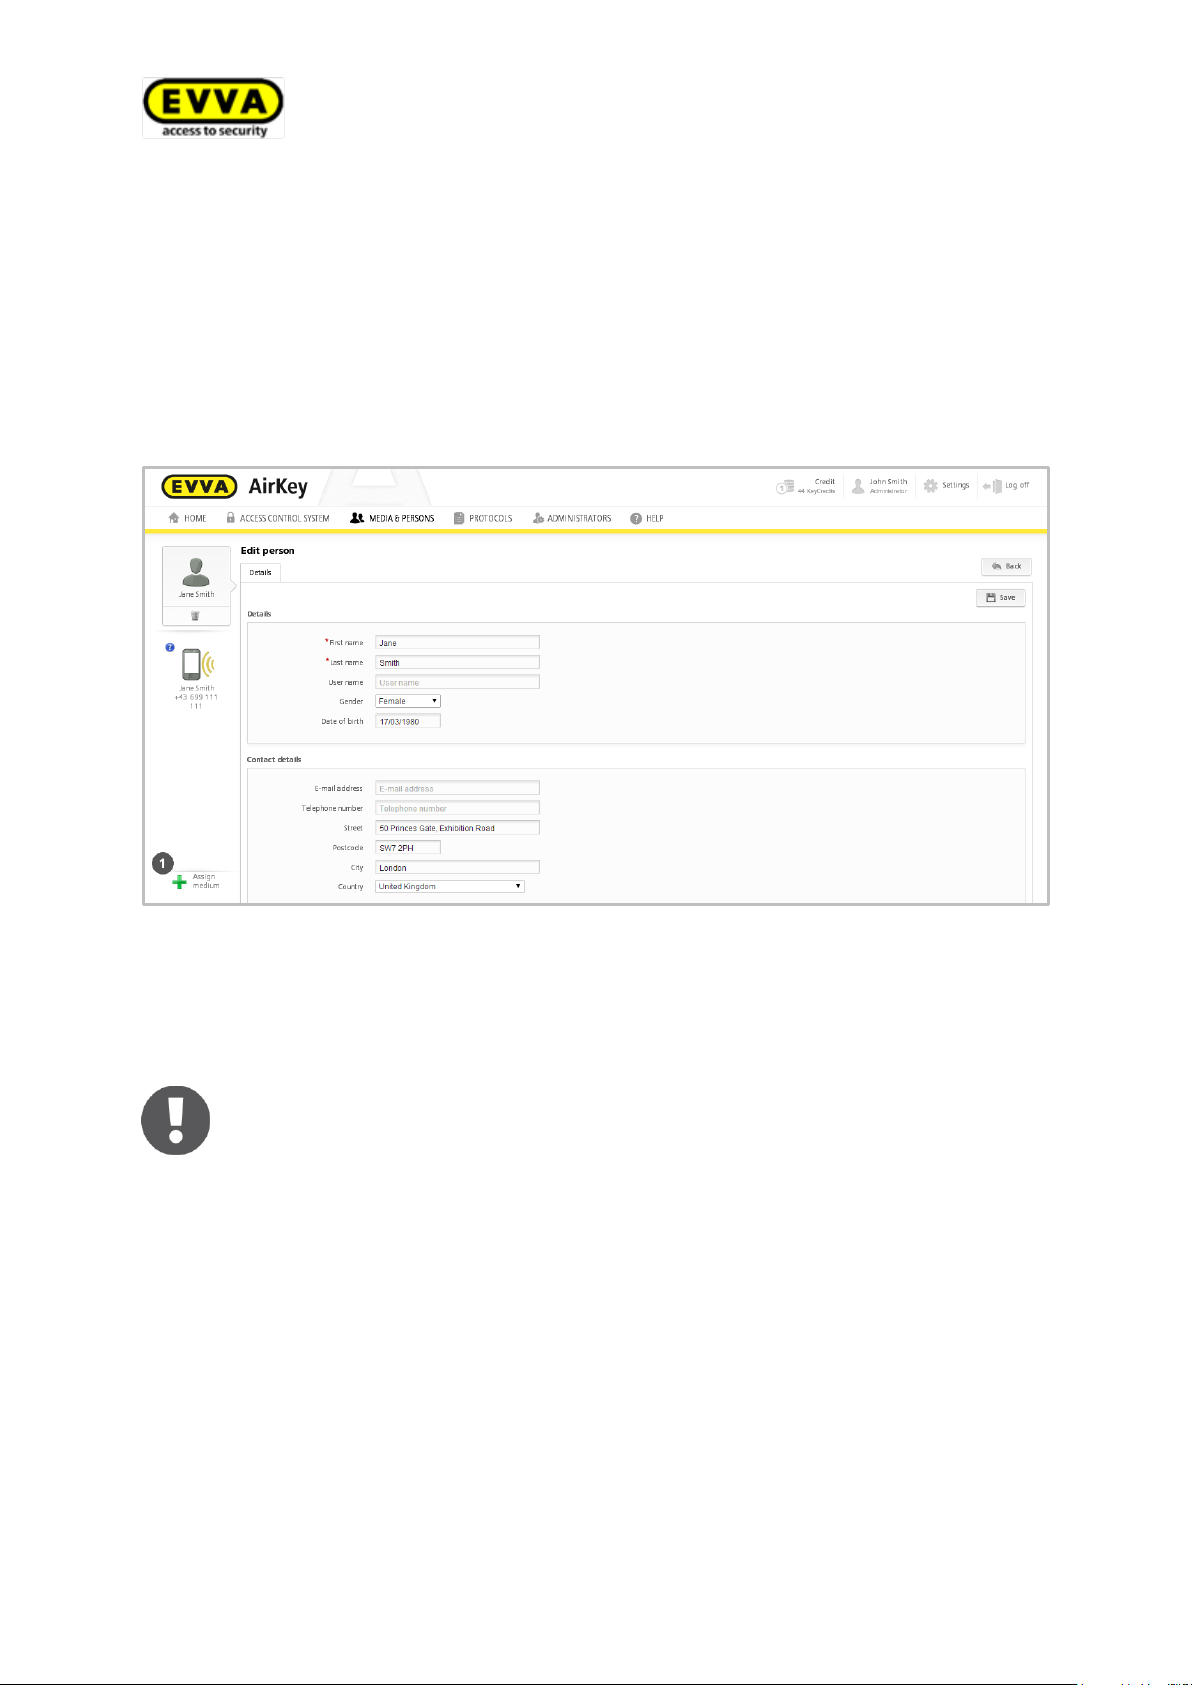
Exclusively active media that have not yet been assigned are shown in your
locking system.
5.7.5 Assigning persons to media
Assign the medium to a person to be able to assign authorisations. This is the only way
to link persons to access events.
> In the main menu, select Media & Persons > Persons.
> In the list of persons, click the person you would like to assign a medium to.
> Click the Assign medium button .
Figure 105: Assigning media
A list with all media that you can assign to the person appears.
You can sort the list, filter by media type or search for certain entries.
> Select the desired medium and click Continue.
87
Page 88
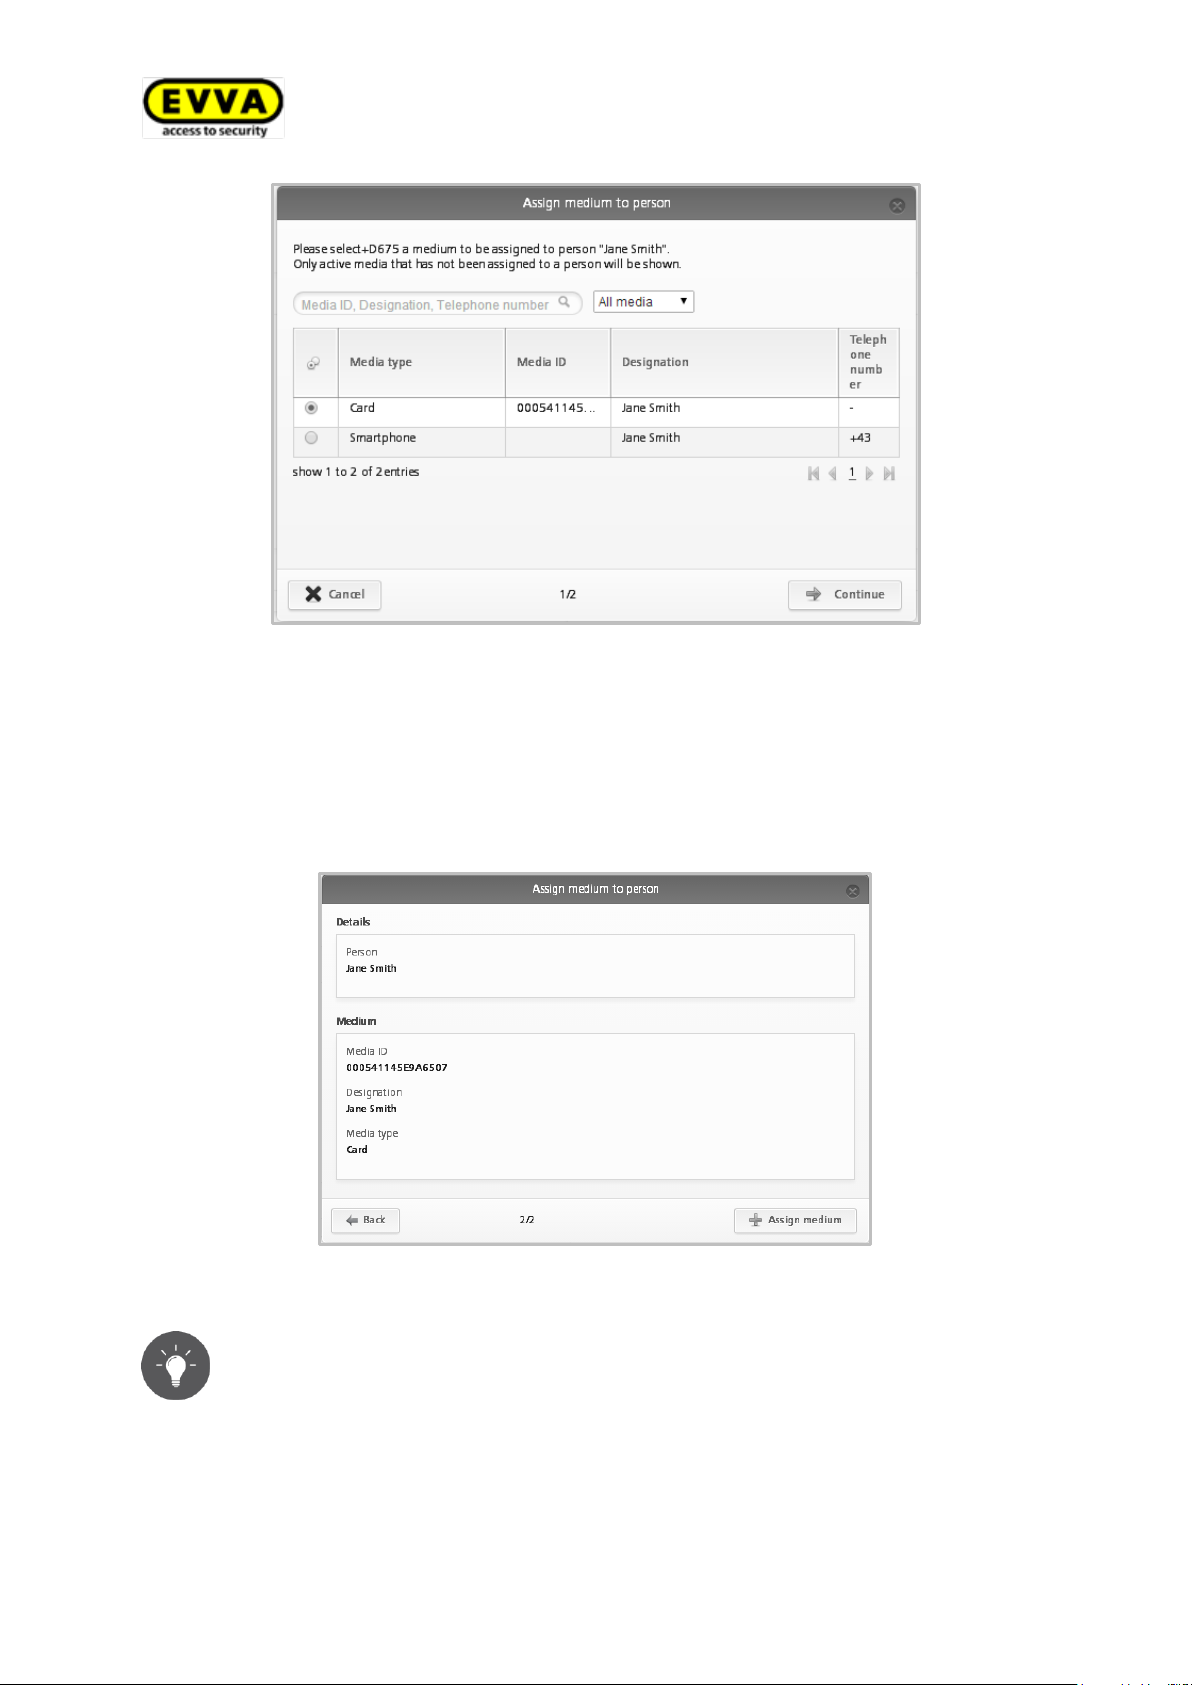
Alternatively, you can also assign media to persons using the medium.
Please refer to the Assigning media to persons section for more detailed in-
formation.
You can also assign several media (smartphones, cards, key tags or combi
keys) to a single person.
Figure 106: Assigning media to persons
The details are shown after having selected the medium. If required, click Back and select a different medium.
> Click Assign medium to complete the process.
Figure 107: Assigning media to persons
88
Page 89
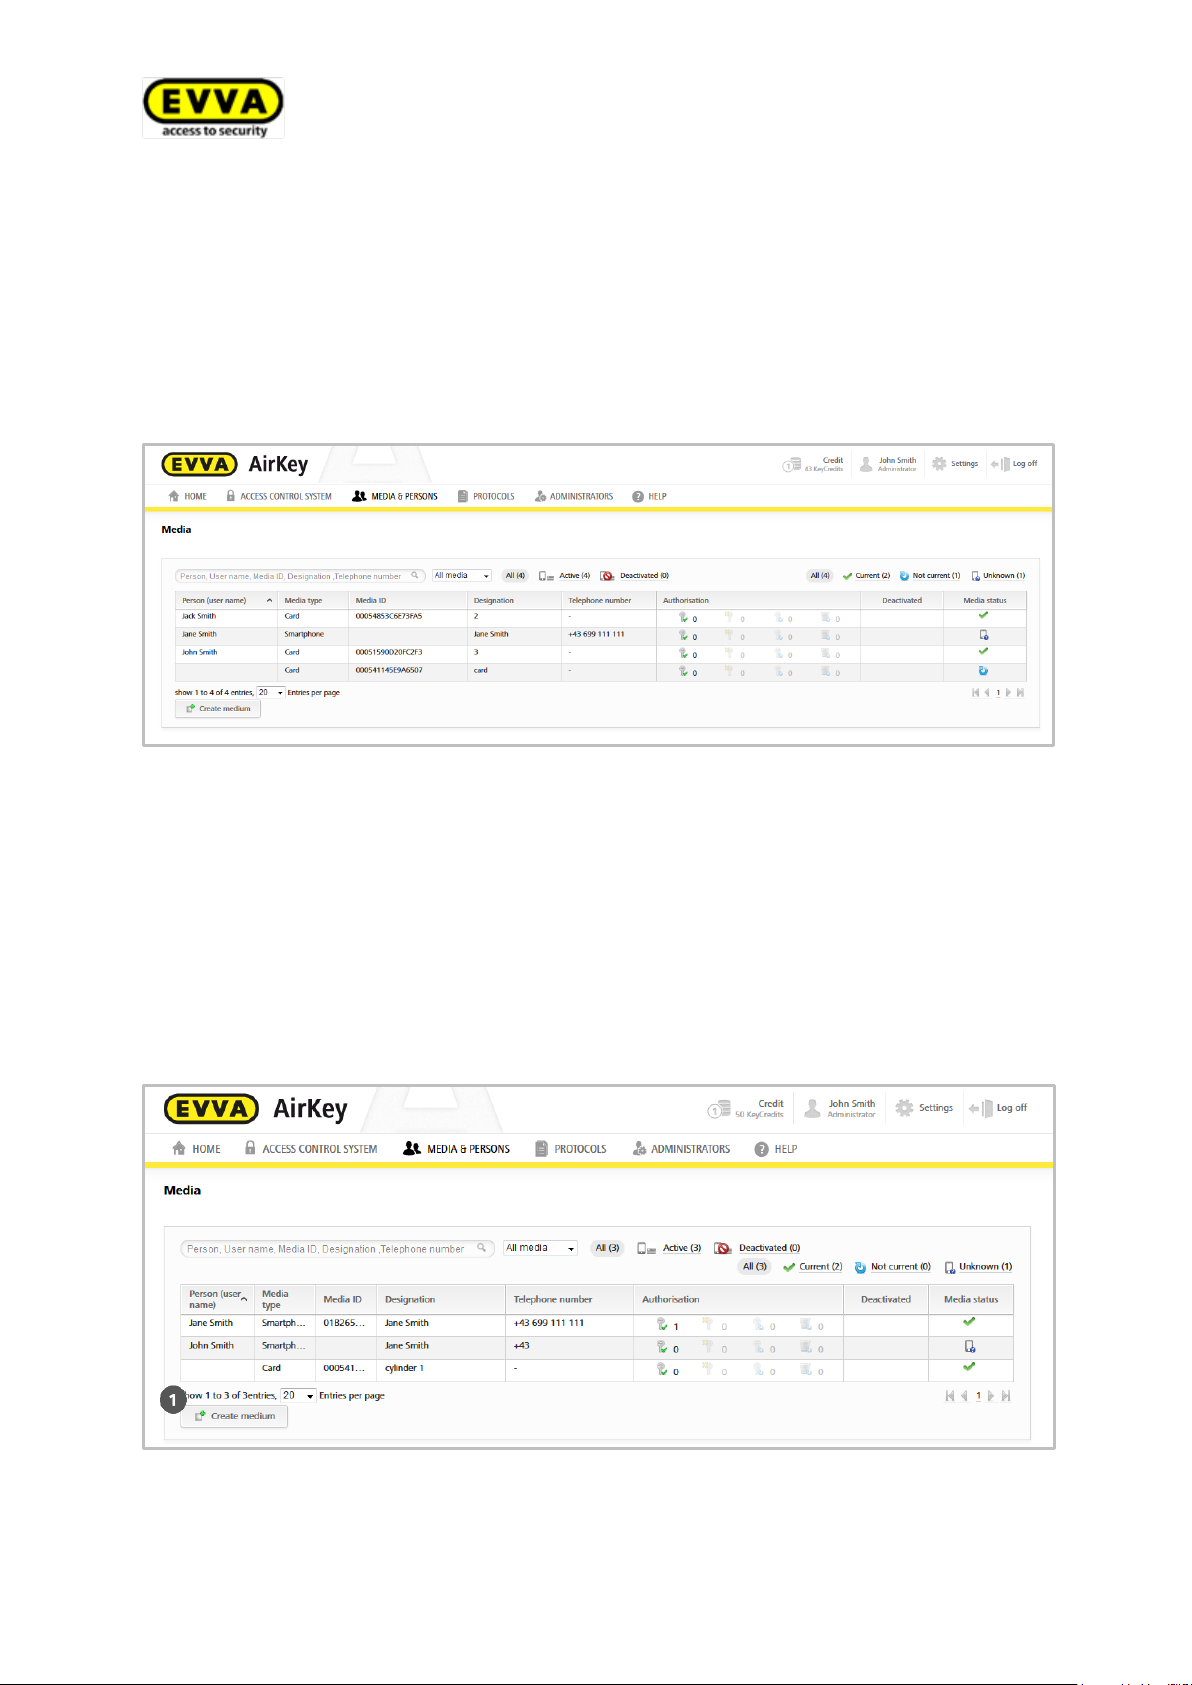
5.7.6 Overview of media
The main menu in Media & persons > Media shows a list of all created media
(smartphones, cards, key tags and combi keys) and gives you an overview of the corresponding media status. You can also manage authorisations in this list.
You can search for media in this media list, filter for certain states, change the sort order
or restrict the number of entries per page.
Figure 108: Media list
5.7.7 Creating media
You must create a medium in your locking system before you can manage it as part of
your locking system.
> In the main menu, select Media & Persons > Create medium.
Alternatively, click Media & Persons > Media > Create medium.
Figure 109: Creating media
> Select the media type of the new medium:
89
Page 90
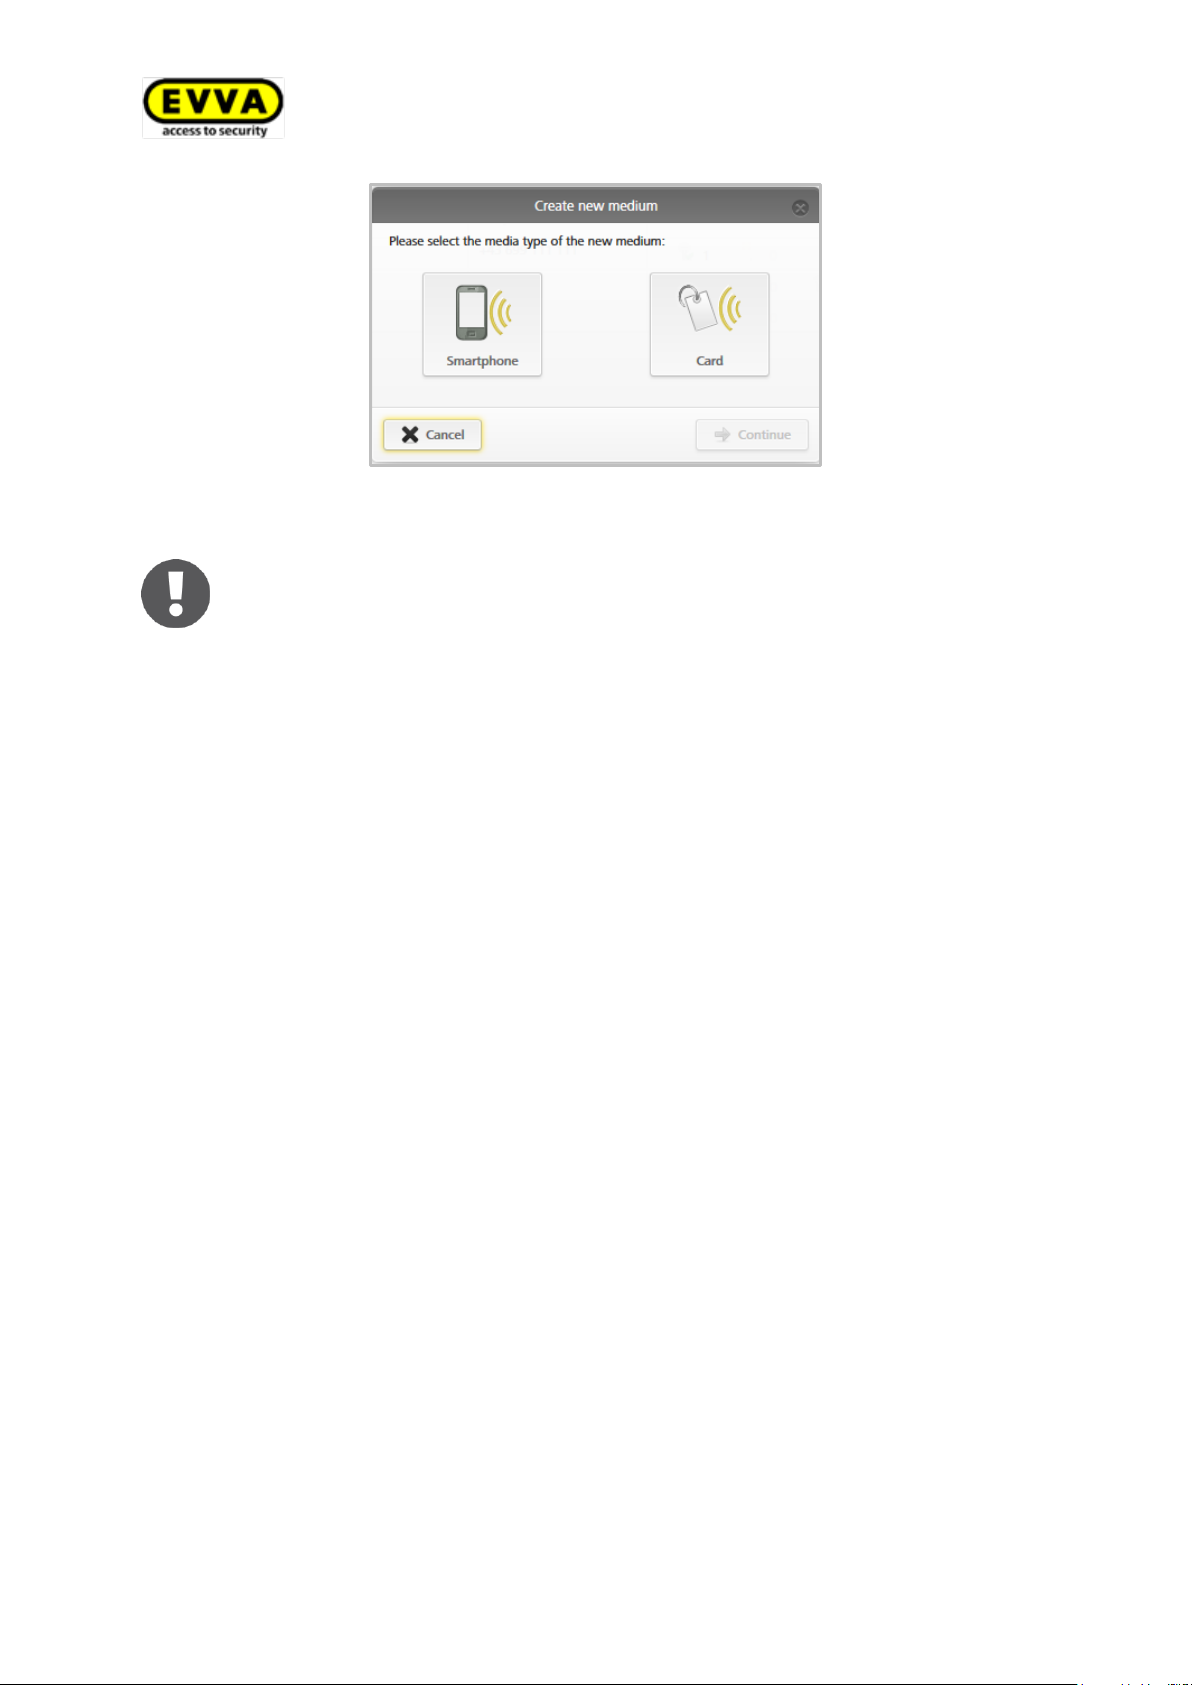
There is no difference between key tags, cards and combi keys and consequently key tags and combi keys must also be created as Cards.
Figure 110: Creating new media
> If you select Smartphone, follow the instructions in Creating smartphones and if you
select Card follow the instructions in
90
Page 91
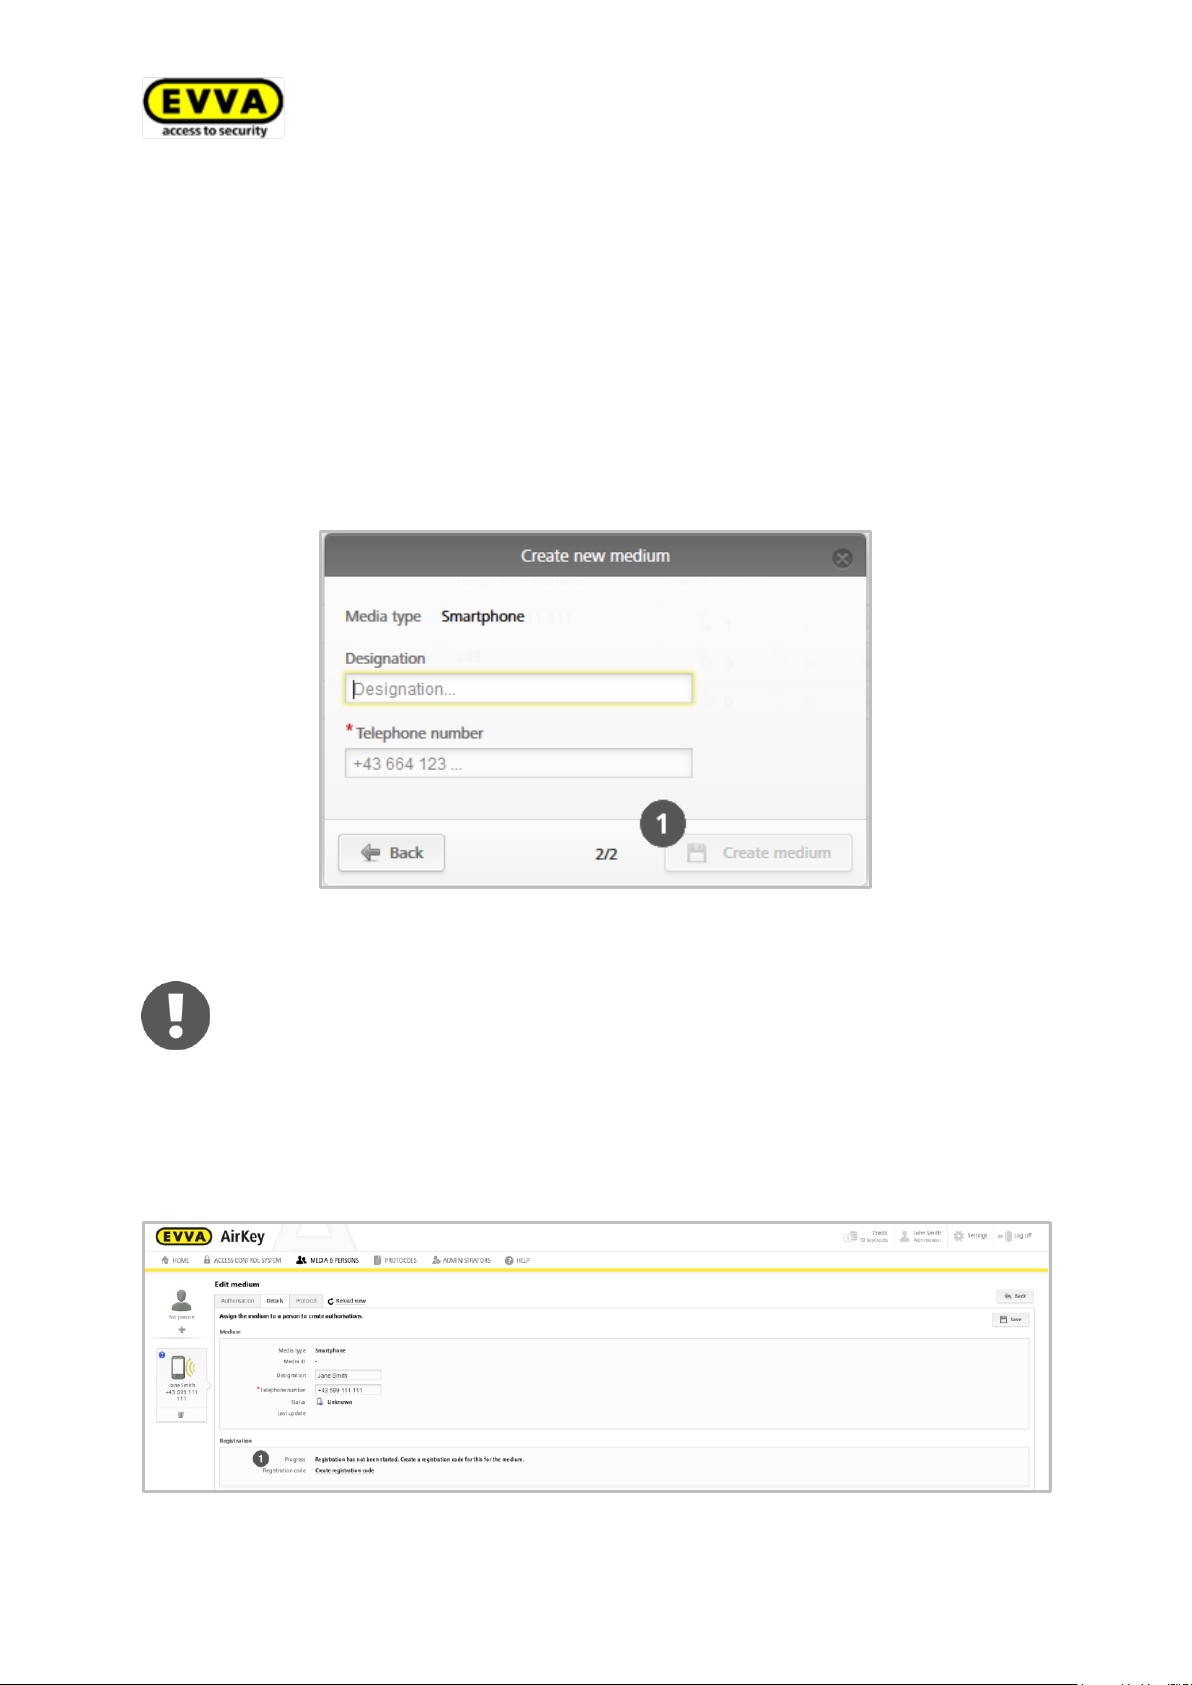
An error message will appear if the telephone number is invalid or the telephone number has already been created.
> Creating cards.
5.7.8 Creating smartphones
> Select Smartphone as the new medium and click Continue.
> Enter unique information (e.g. smartphone type) in the Designation field.
> Enter the telephone number (starting with "+" and the two digits of the country call-
ing code).
> Click Create medium .
Figure 111: Creating new media
Now you are in the details section of this smartphones.
> Click Create registration code , if you have not yet created a registration code.
Figure 112: Creating registration codes
91
Page 92
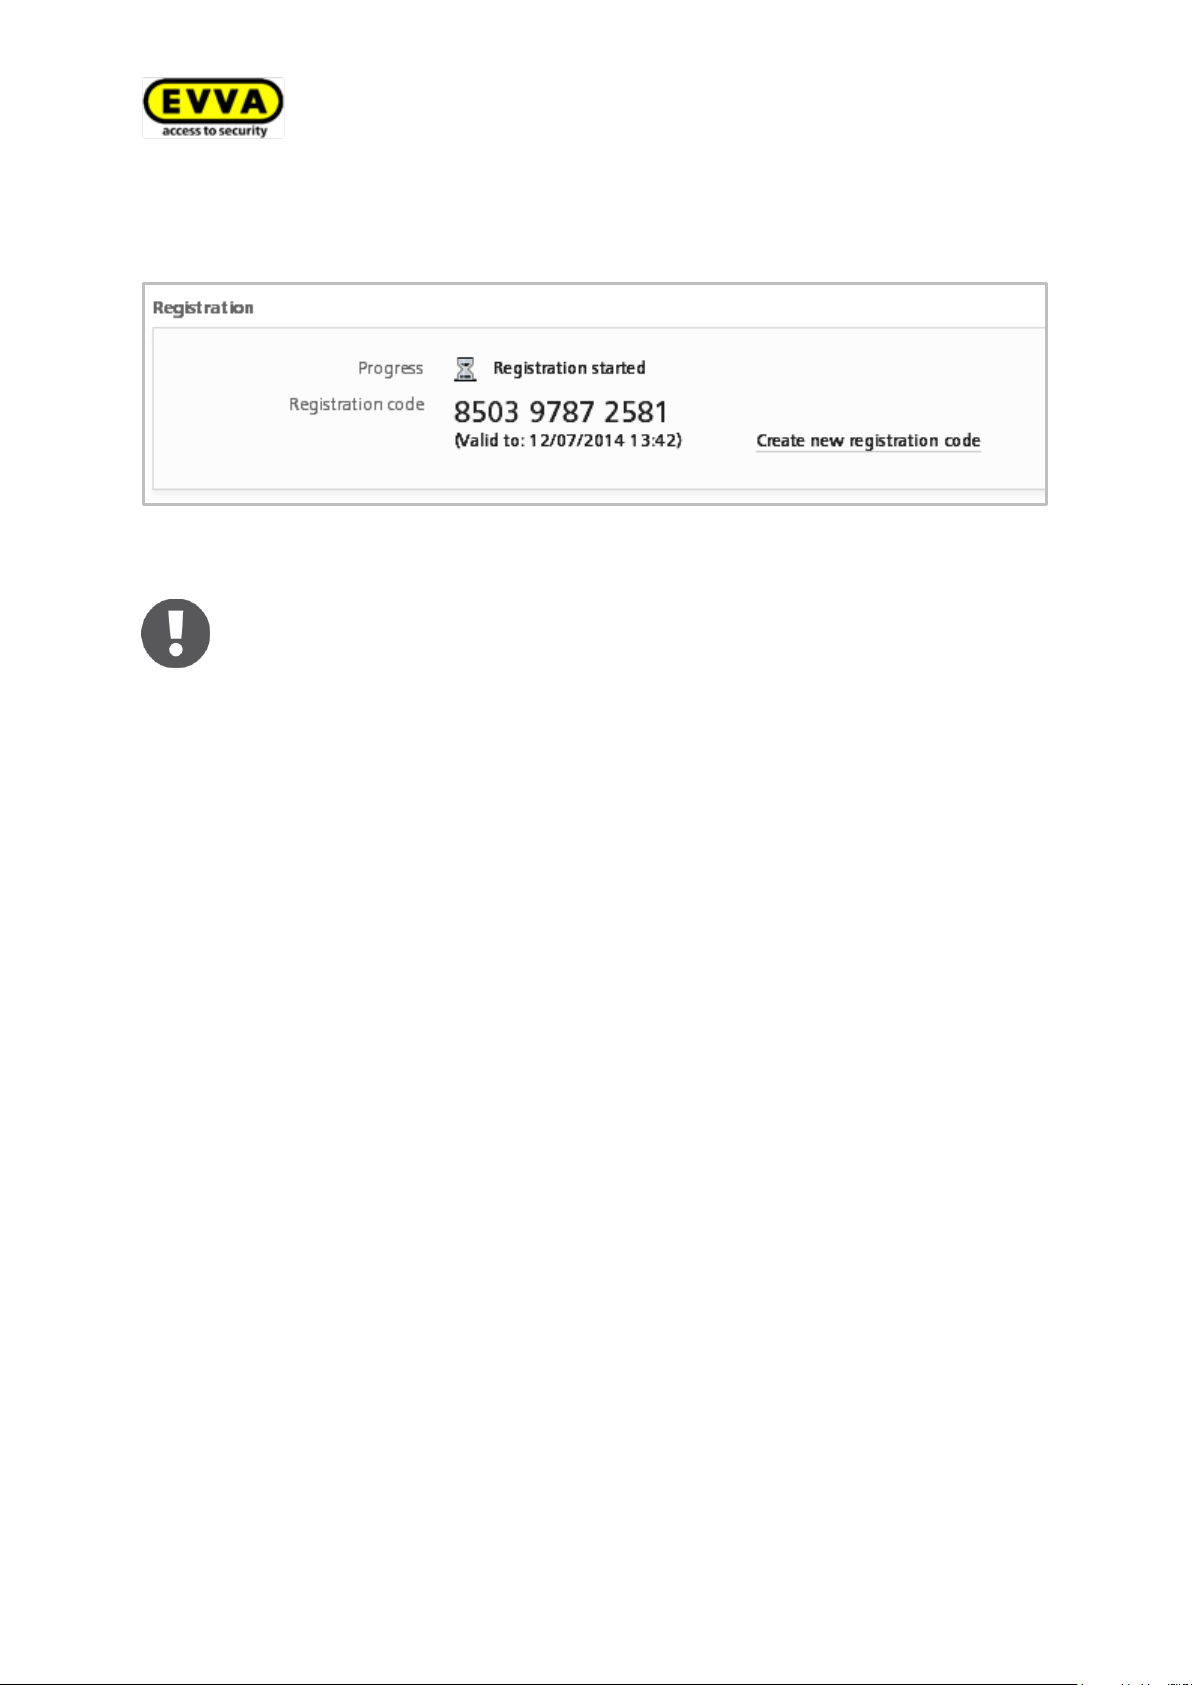
The generated registration code is valid for 48 hours. The old code is rendered void if you create a new registration code before the this specific code
expires.
The progress shows "Registration started" and only after having successfully entered the code on the smartphone it switches to "Registration completed successfully".
The Registration section shows a valid registration code and its expiry date.
Figure 113: Registration code
Specify the following parameters in the Settings section in the smartphone's details
section:
> Activate special authorisation "maintenance mode" for this smartphone:
maintenance mode can only be activated on smartphones that have already been as-
signed to a person (please refer to Assigning media to persons for more detailed in-
formation). As a result of activation, the smartphone is authorised to block locking
components in factory state as well as add or remove locking components and media
within the AirKey system. Additionally, the firmware on locking components and media keyrings can be updated.
> Showing protocol data in the AirKey app: activating this option shows persons
their own access events and any other protocol data relevant to the media in the
AirKey app.
> Release duration: specifies how long the locking component is unlocked when using
this particular smartphone. The normal release duration is 5 seconds and the extended release duration amounts to 20 seconds.
> PIN code protection: Specifies whether or not the smartphone has activated PIN
code protection in the AirKey app.
If it is active and the person has forgotten their PIN code, you can reset it here.
92
Page 93
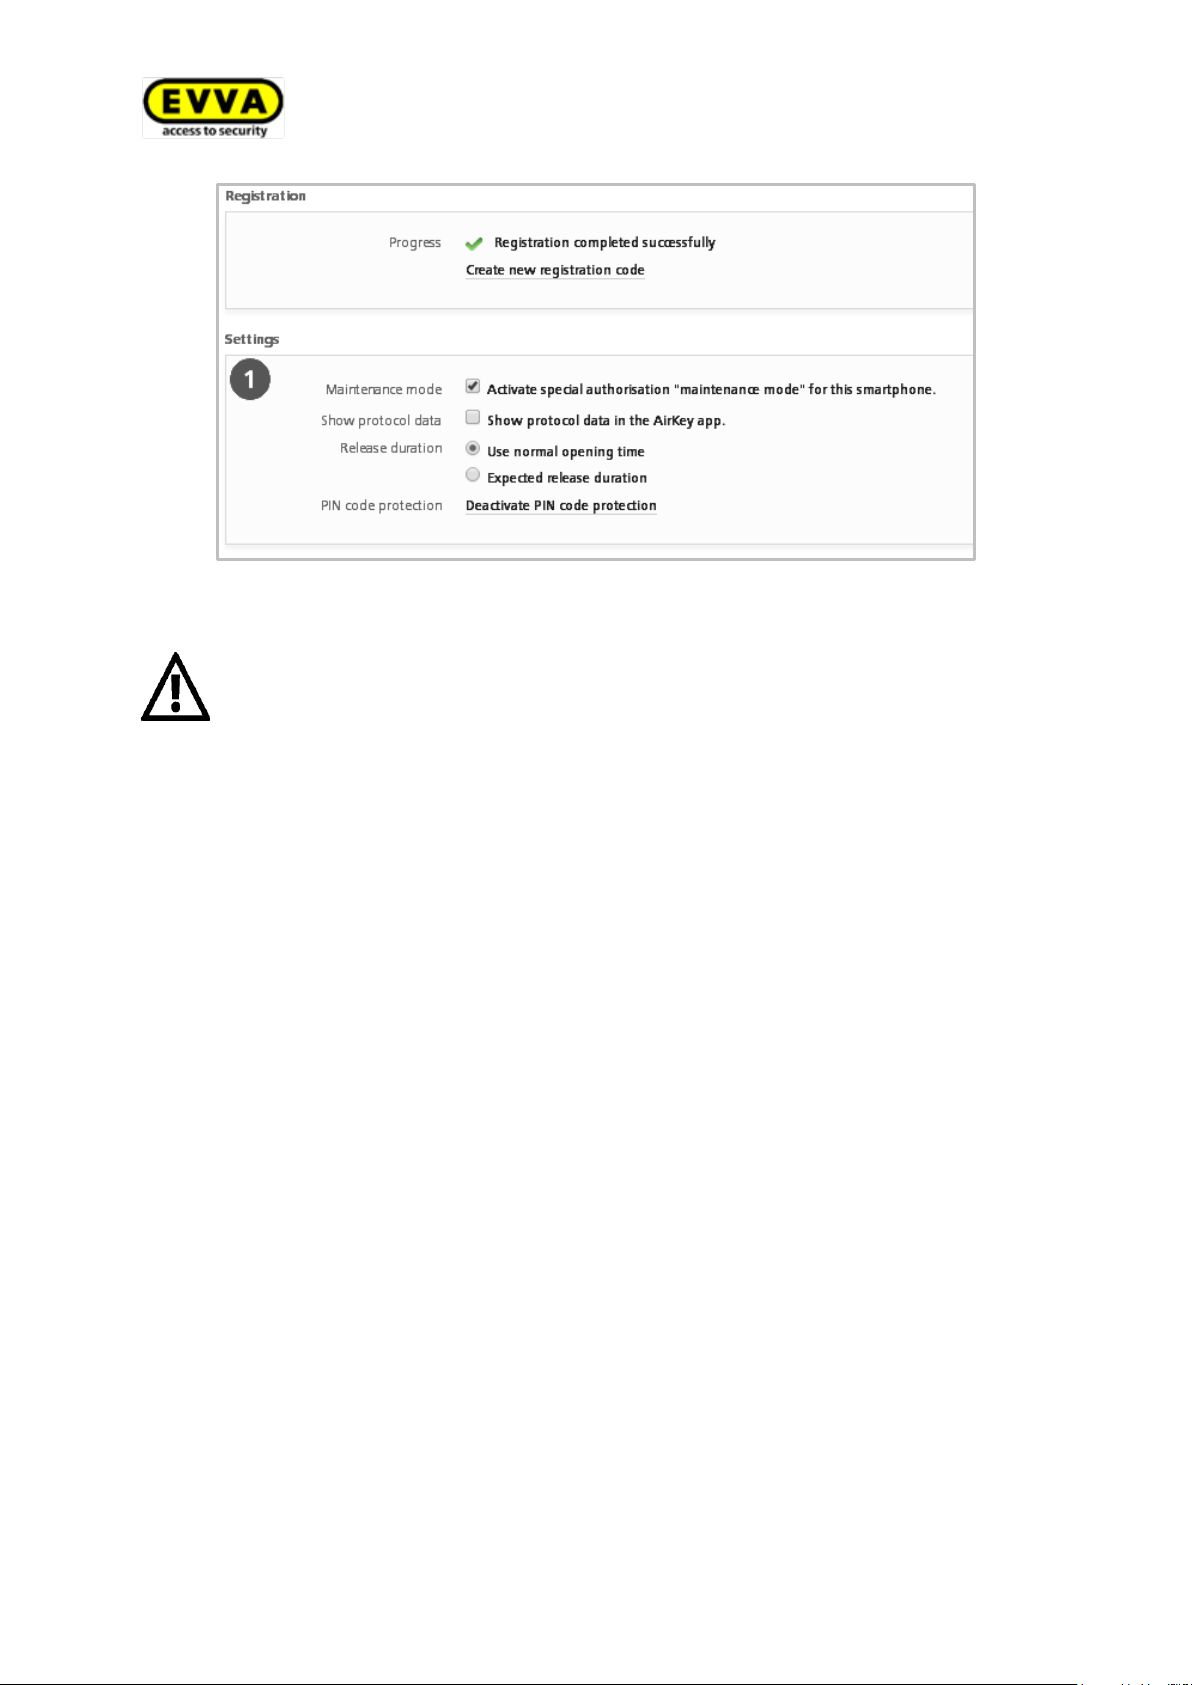
Enter a registration code on the smartphone to register it to the system and
connect the smartphone to the locking system. Only then will the
smartphone be ready for operation. Please refer to Registering smartphones
for more information.
Figure 114: Editing media – settings
93
Page 94
> Connect the coding station to your computer.
> In Media & persons, click on Create medium.
> Select Card as the new medium and click Continue.
> Enter a designation and click Create medium
> Hold the card to the coding station.
We explicitly recommend to create a sufficient number of preconfigured
media (cards, key tags) featuring permanent authorisations without an expiry date (emergency media) and keep these safe to be able to operate the
locking system regardless of the AirKey online administration. Please refer
to Assigning authorisations for more detailed information.
5.7.9 Creating cards
If you run the function to create a card in the AirKey online administration, you require a
coding station. As the coding station is an optional accessory, the description is listed as
"Optional". Please refer to Fehler! Verweisquelle konnte nicht gefunden werden. for more
detailed information on installing coding stations. If you do not have a coding station
available, you can add cards, key tags or combi keys to the system using a smartphone
in maintenance mode. Proceed as described in Adding AirKey components.
The detailed view of this medium automatically opens once you have successfully completed the process.
94
Page 95
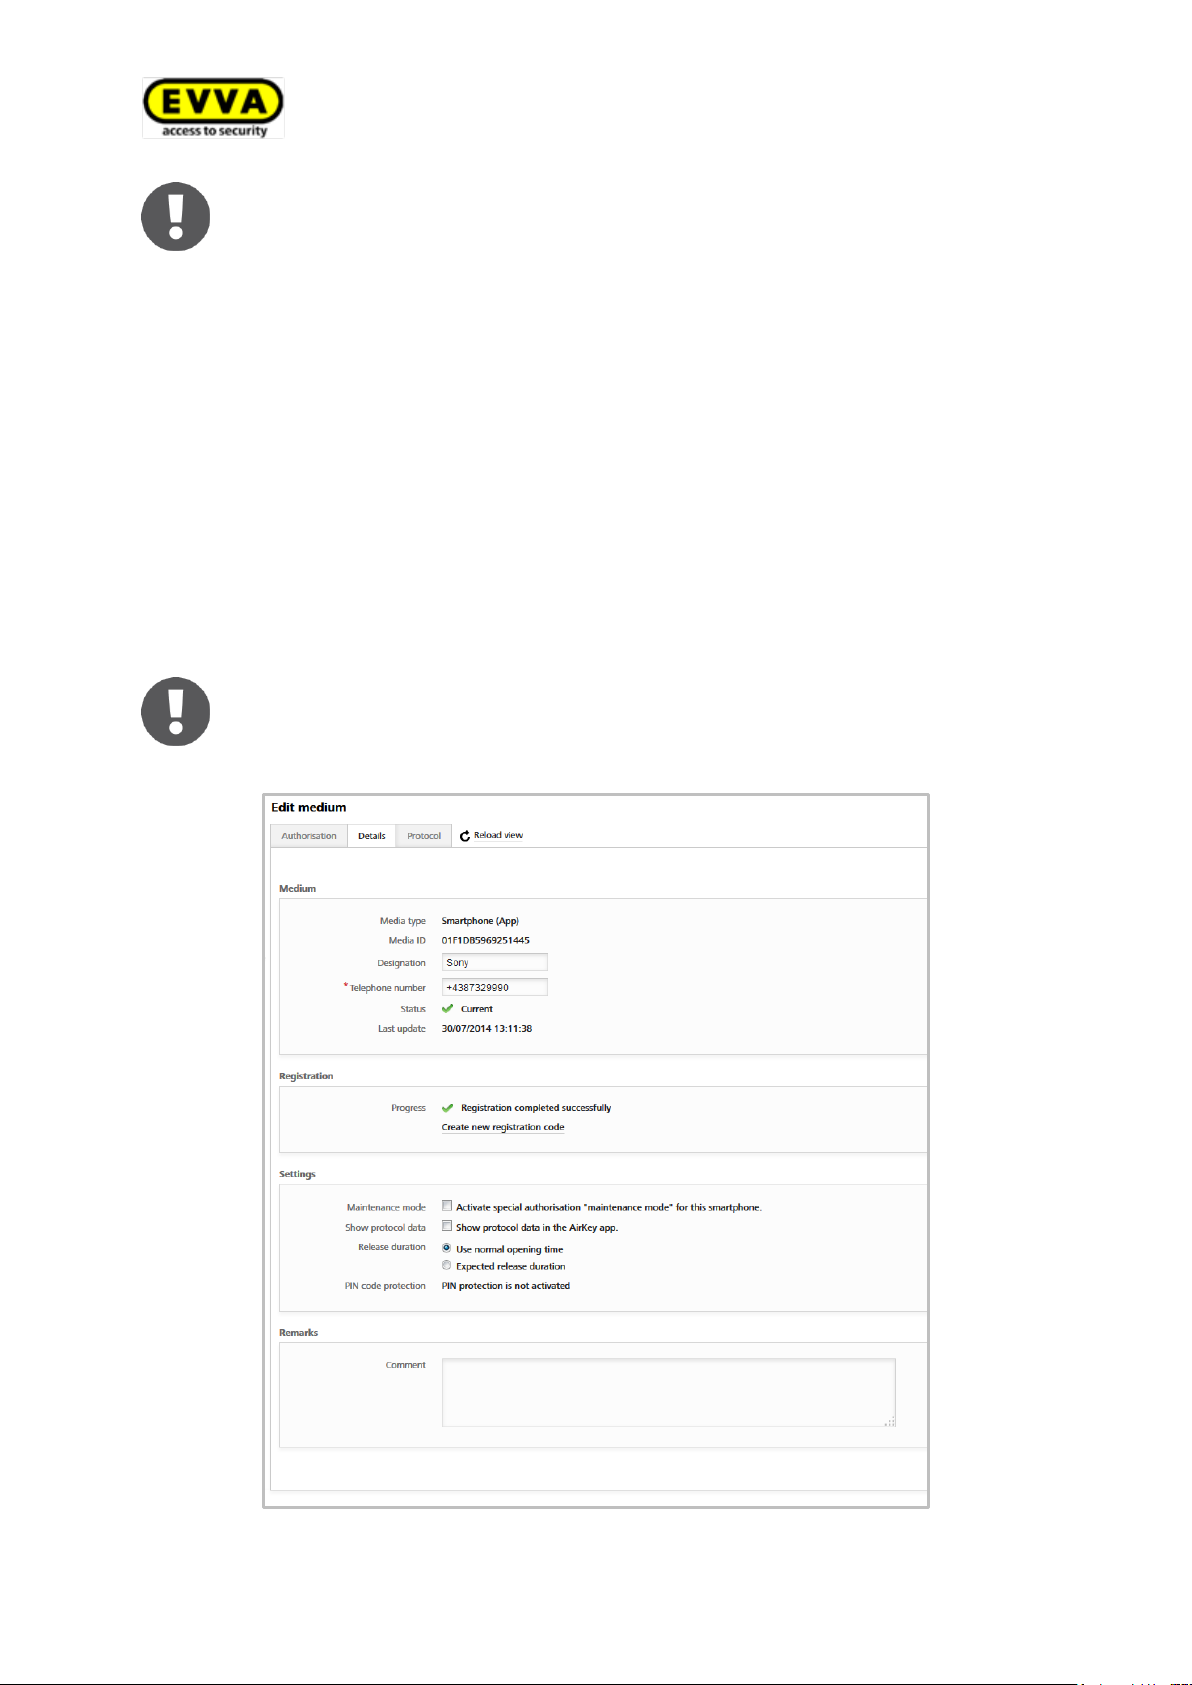
When using coding stations to add combi keys to the locking system you
must hold the combi key side featuring the RFID icon to the coding station.
Hold the combi key directly onto the coding station. Adding is not possible
across the entire coding station reader area – with the current type (HID
Omnikey 5421) combi keys are exclusively detected in the top and the bottom third of the coding station.
Please refer to Adding media for more detailed information on adding media to your AirKey locking system using smartphones.
The details of smartphones differ from those on a card, key tag or combi
key.
5.7.10 Editing media
> In the main menu, select Media & Persons > Media.
> Select the desired medium from the overview list.
> Select the Details tab to edit the details.
95
Figure 115: Editing media — smartphones
Page 96
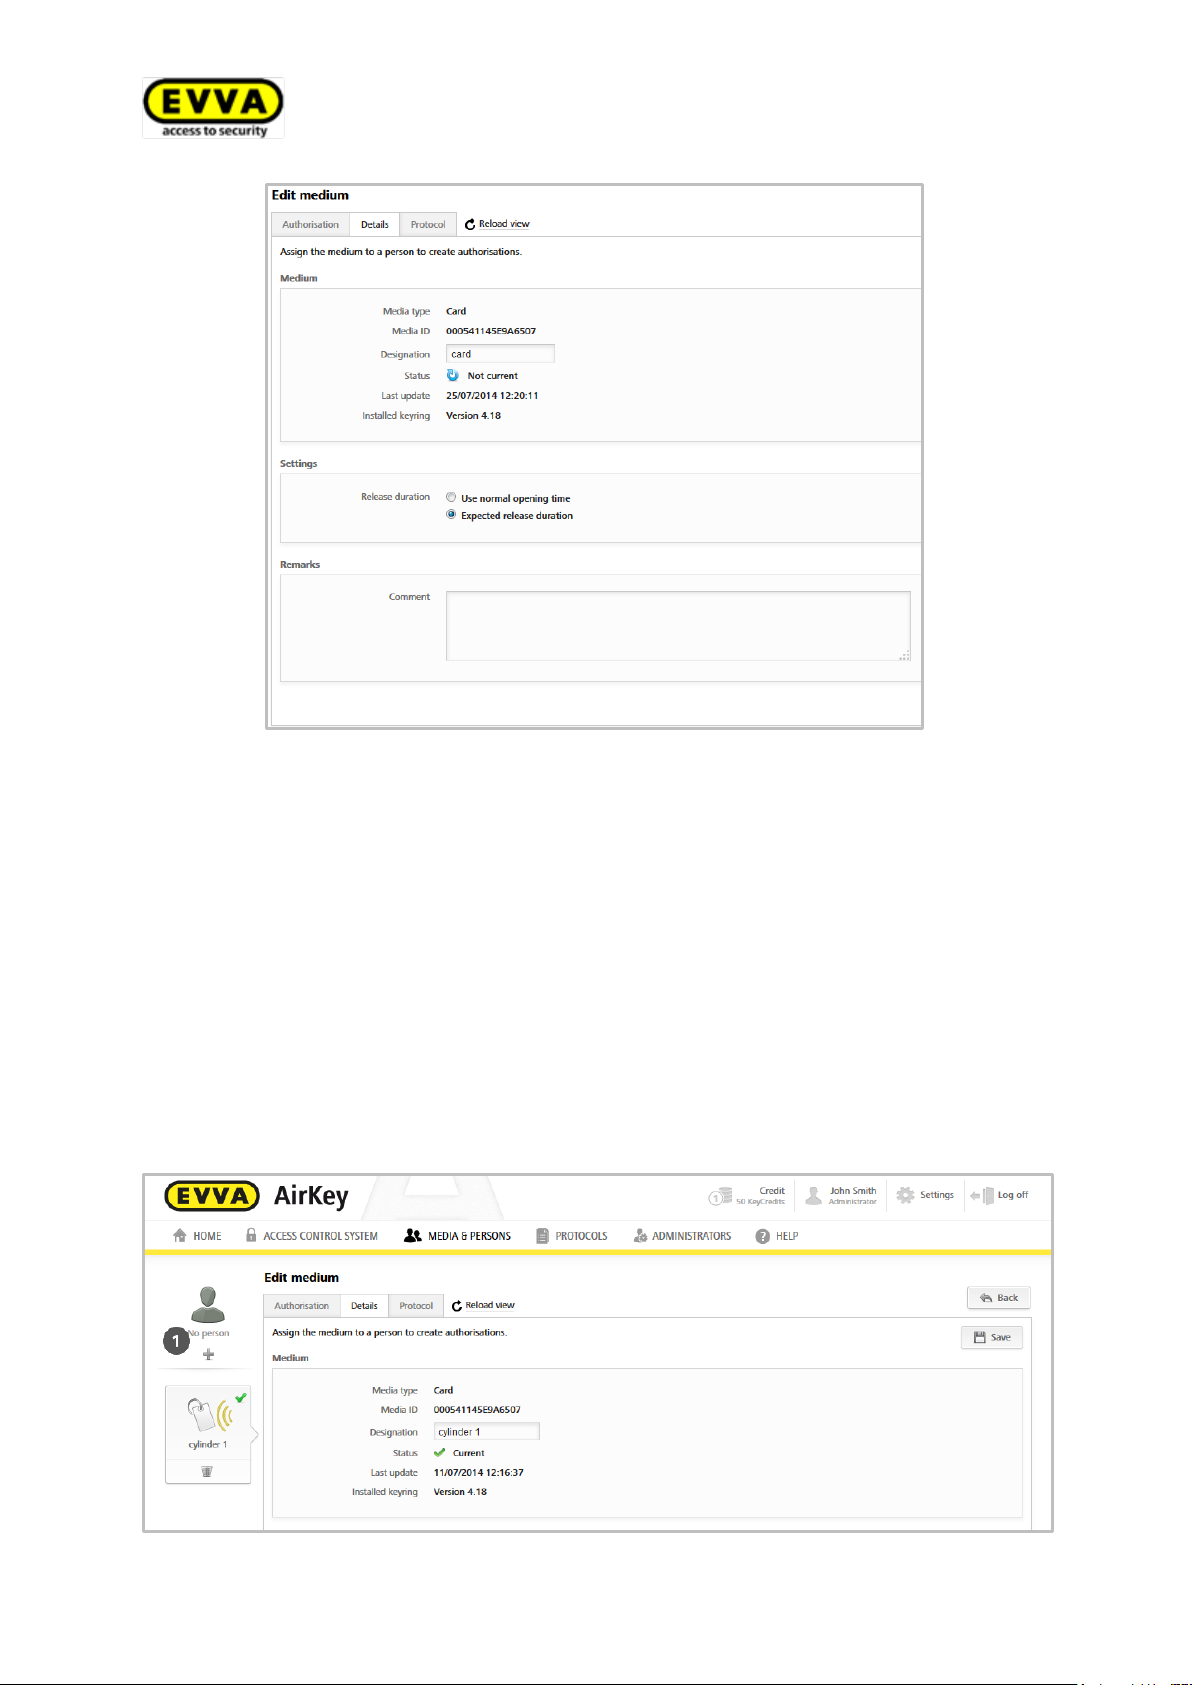
Figure 116: Editing media — cards
> Click Save to confirm the changes.
5.7.11 Assigning media to persons
Assign the medium to a person to be able to assign authorisations. This is the only way
to link persons to access events.
> In the main menu, select Media & Persons > Media.
> Select the desired medium from the overview list.
> Click the + icon if the system shows "No person".
96
Figure 117: Assigning media to persons
Page 97
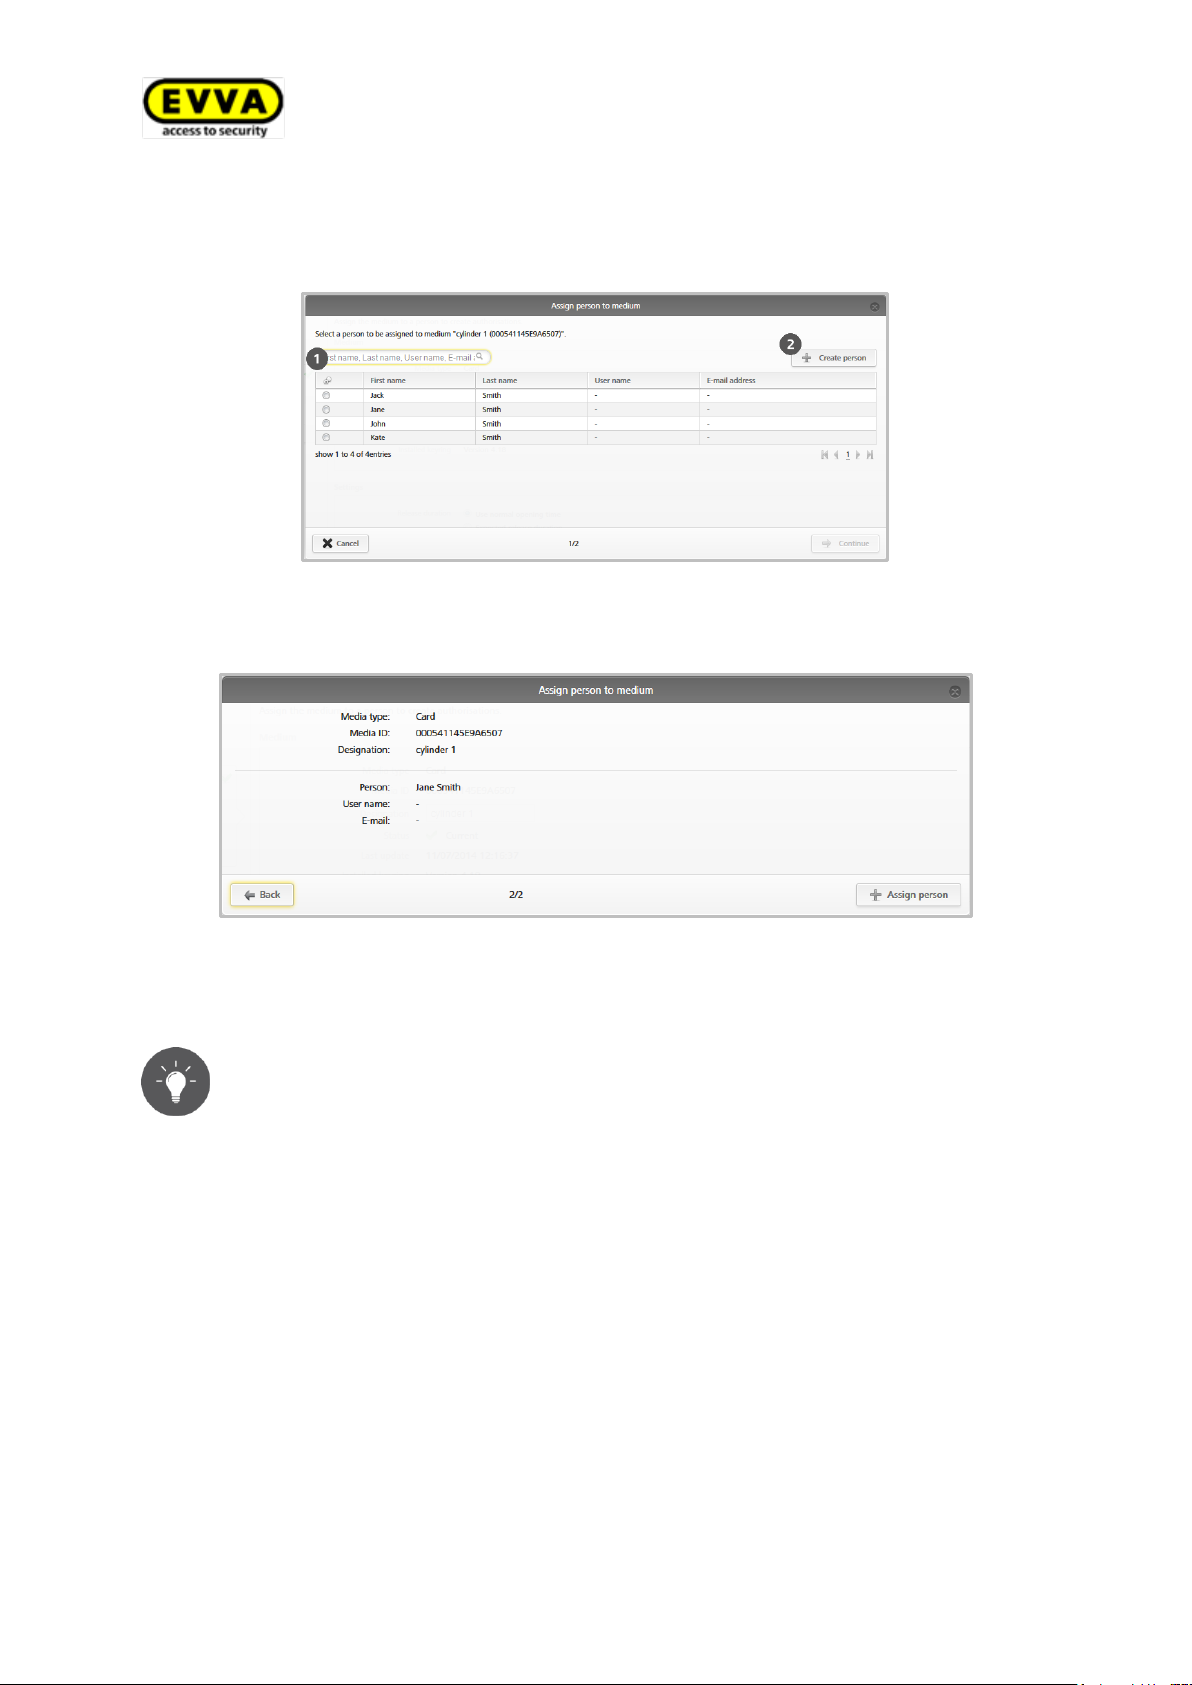
Alternatively, you can also assign media to persons using the Person sec-
tion. Please refer to the Assigning media to persons section for more detailed
information.
You can also assign several media (smartphones, cards, key tags or combi
keys) to a single person.
The system shows you a list of all persons and you can now select a person that is already available or create a new person .
Figure 118: Assigning persons to media
> Select the desired person and click Continue.
Figure 119: Assigning persons to media
> Click Assign person to complete the process.
5.8 Authorisations
Authorisations control access of persons to locking components. Media must have already
been assigned to persons to be able to create authorisations for media. Please refer to
Assigning media to persons for more information on how to assign media to persons.
Proceed as follows to view the authorisation overview of a medium:
> In the main menu, select Media & Persons > Media.
> Select the desired medium from the overview list.
97
Page 98
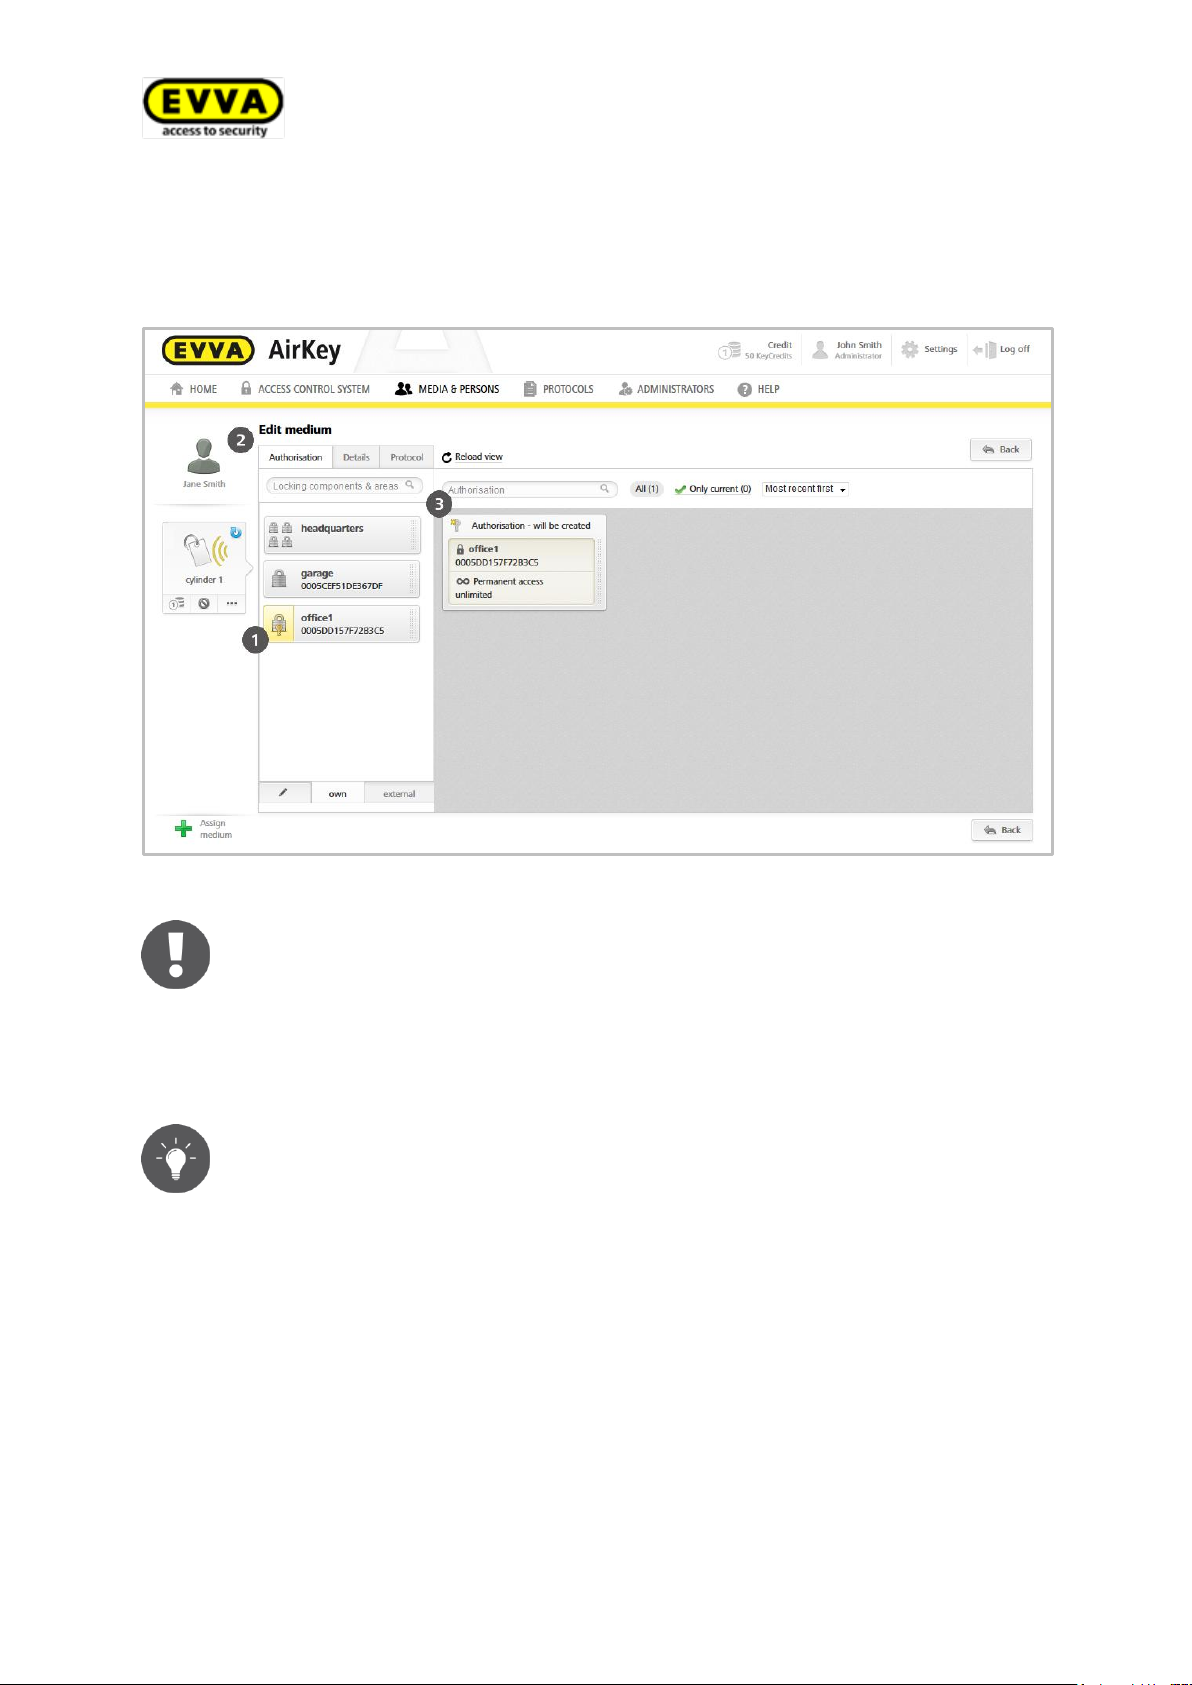
Authorisations have been colour-coded.
Green = Status OK, authorisation saved, valid and updated on the media.
Blue = Authorisation created, but not updated on the medium.
Yellow = Authorisation has been changed or deleted, but not saved (creat-
ed).
Grey = Authorisation expired.
Alternatively, you can also open the authorisation list via Media & persons
> Persons and select a person from the person list that has been assigned
a medium. Now click on the media icon on the left-hand side.
> The medium has already been selected (several media can be assigned to one per-
son).
> Click the Authorisation tab .
You now see all authorisations that have already been assigned .
Figure 120: Authorisation overview
5.8.1 Assigning authorisations
> In the main menu, select Media & Persons > Media.
> Select the desired medium from the overview list.
> If the medium has been assigned to a person, an overview of authorisations for this
medium appears.
> Drag and drop the button with the selected door/area into the centre. The poten-
tial access types are only displayed after having dragged and dropped the selected
door/area into the centre.
98
Page 99
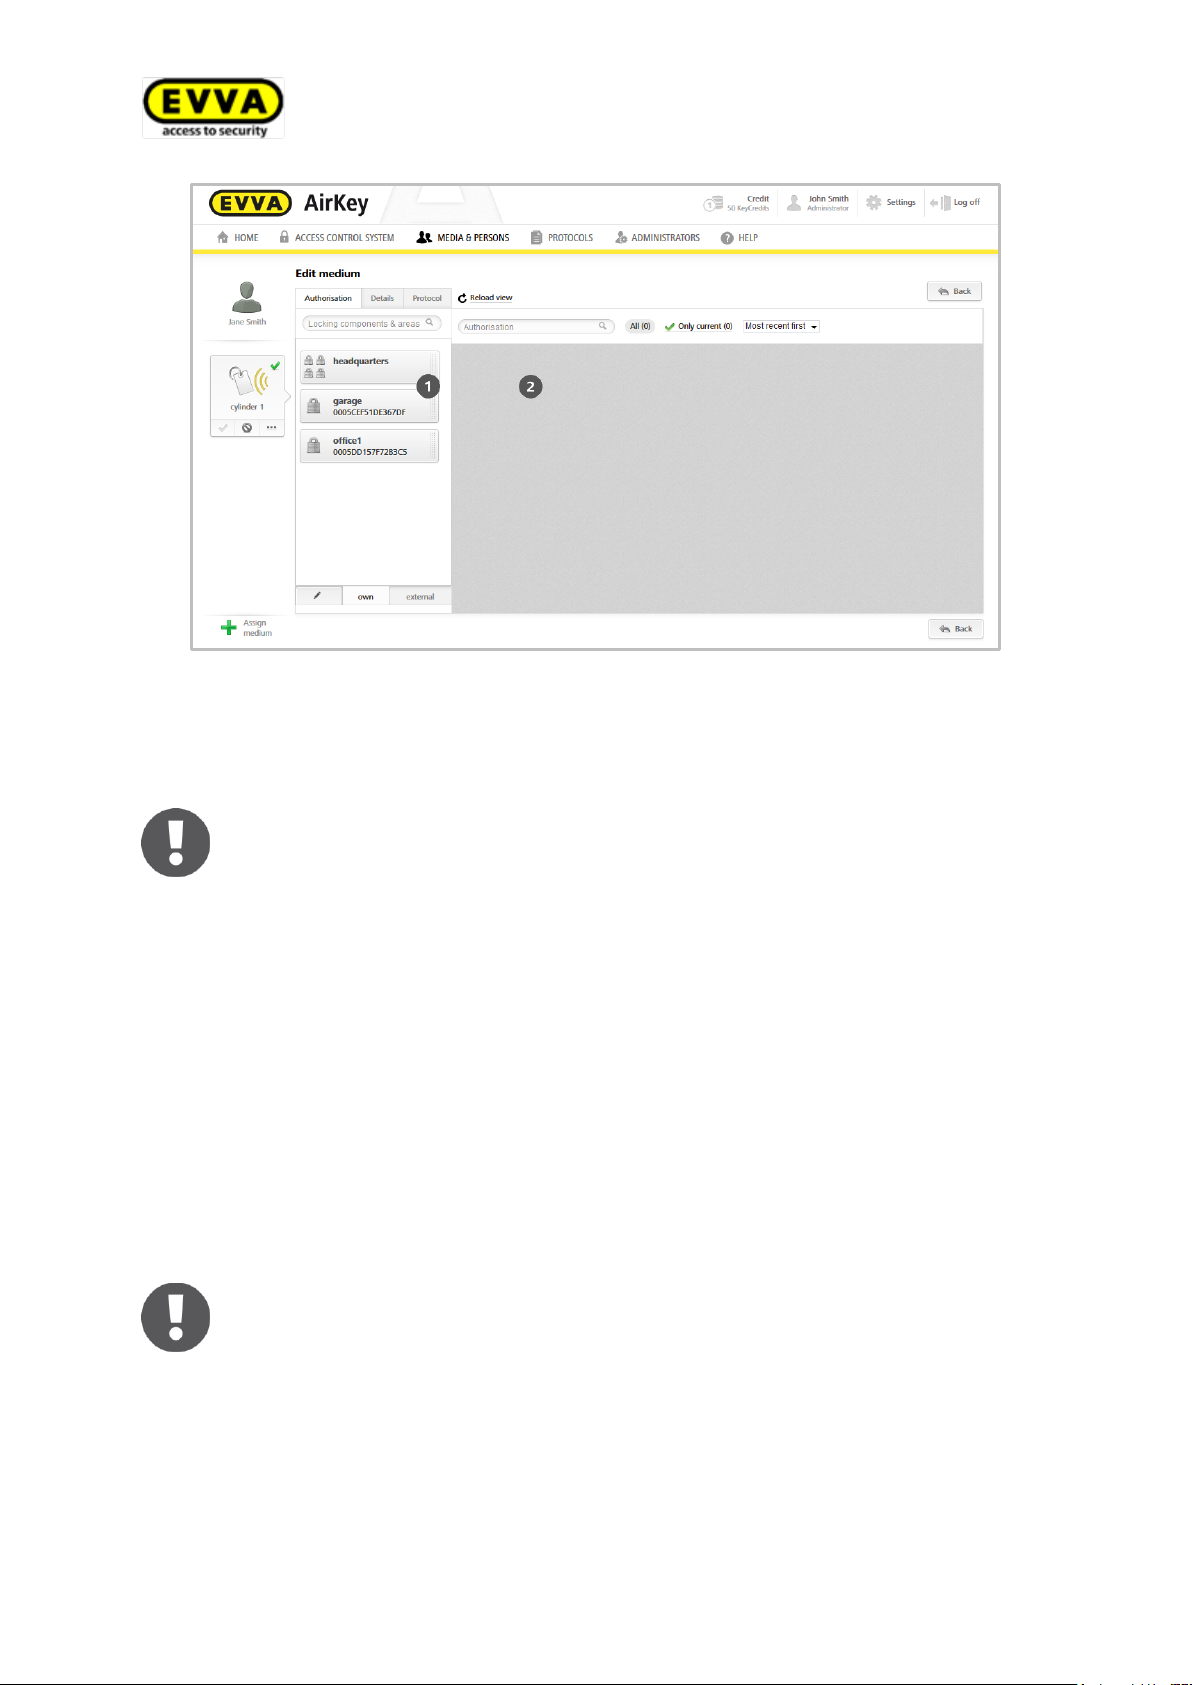
There are four access types available:
> Permanent access
> Periodic access
> Single access
> Individual access
Permanent access indicates access is granted at any time. Specify a
start and end date to restrict the authorisation.
Figure 121: Assigning authorisations
> Select the desired access type by dragging and dropping the selected door/area into
the corresponding field.
5.8.2 Granting permanent access authorisations
Assign permanent access authorisations to grant permanently valid access.
> In the main menu, select Media & Persons > Media.
> Select the desired medium from the overview list.
> Drag and drop the button with the selected door/area into the centre.
> Select Permanent access as the access option.
99
Page 100
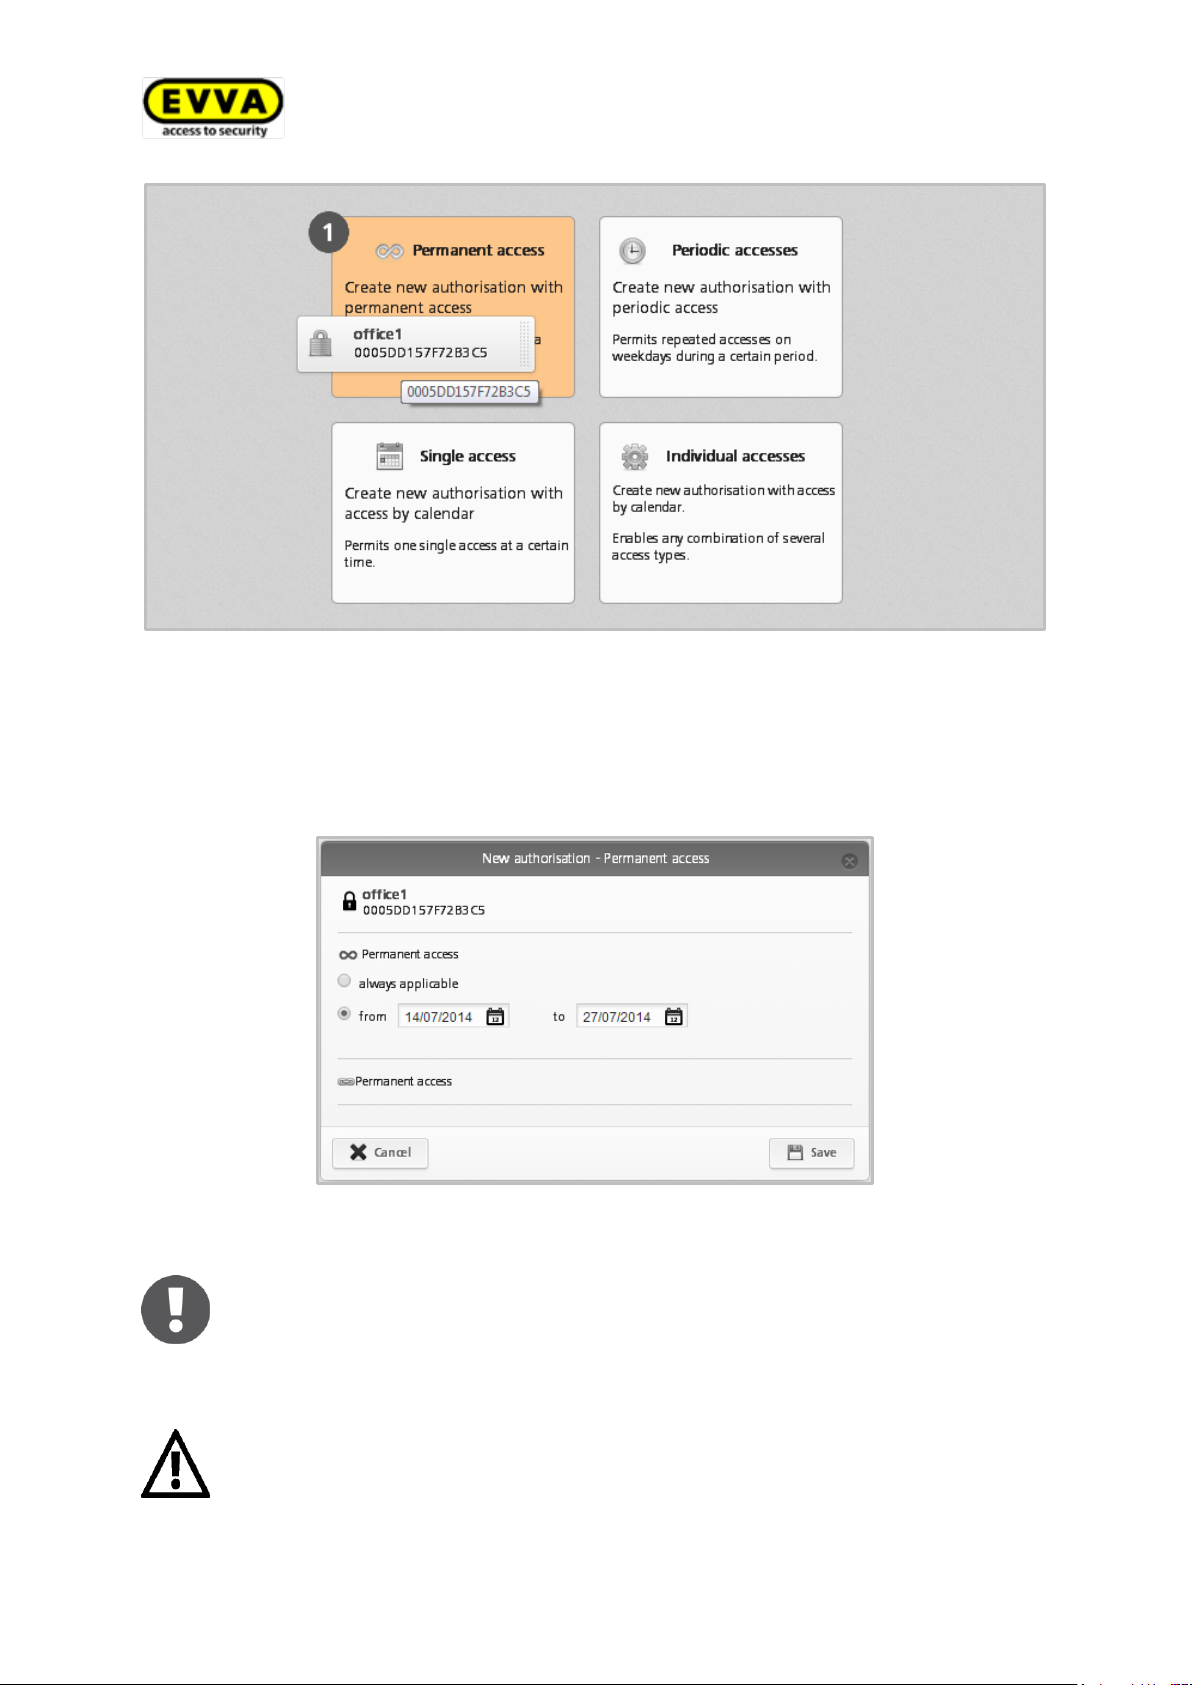
Ensure the date is not in the past otherwise no valid authorisations will be
granted.
We explicitly recommend to create a sufficient number of preconfigured
media (cards, key tags) featuring permanent authorisations without an ex-
piry date (Emergency media) and keep these safe to be able to operate the
locking system regardless of the online administration.
Figure 122: Assigning permanent access authorisations
> Specify the period of permanent access.
> You can choose between unrestricted, permanent access or permanent access with a
specified start and end date.
Figure 123: Assigning permanent access authorisations
> Click Save.
100
 Loading...