

Page 1

USER MANUAL
S19AF
Electrically powered scooter Class A (EN 12184)
Intended Use:
Maximum safe slope: 3° (Not intended for use outdoors)
The product is not intended for visually impaired people.
Riders need to be mentally and physically apt to ride this scooter.
Finger dexterity is required to operate this scooter..
Users under 12 years of age can’t use this scooter without parental or professional consent.
The driving distance will be reduced if the power scooter is used frequently on slopes, rough ground or to climb curbs.
This vehicle is suitable for land or air transportation. (Please check with your airline for approval before flying)
Don’t operate your power scooter without completely reading and understanding this user manual!
Do not operate the scooter with low charge batteries, since the occupant could be stranded.
Battery should be disconnected from the scooter during transportation/shipping.
EV Rider, LLC
6410 Arc Way - Suite A
Ft. Myers - FL 33966 USA
1
Page 2
CONT
Safety Instructions
Ele
ctro
magnetic Interference
Tran
sport
ing
the Scooter
Spec
ifications
Comfort Adjustment
Control
Panel
Riding on the Road
Emergency Charging
Charging Instructions
Battery Instruction and Maintenance
Scooter
Maintenance and Repair
Troubleshoot
Warranty
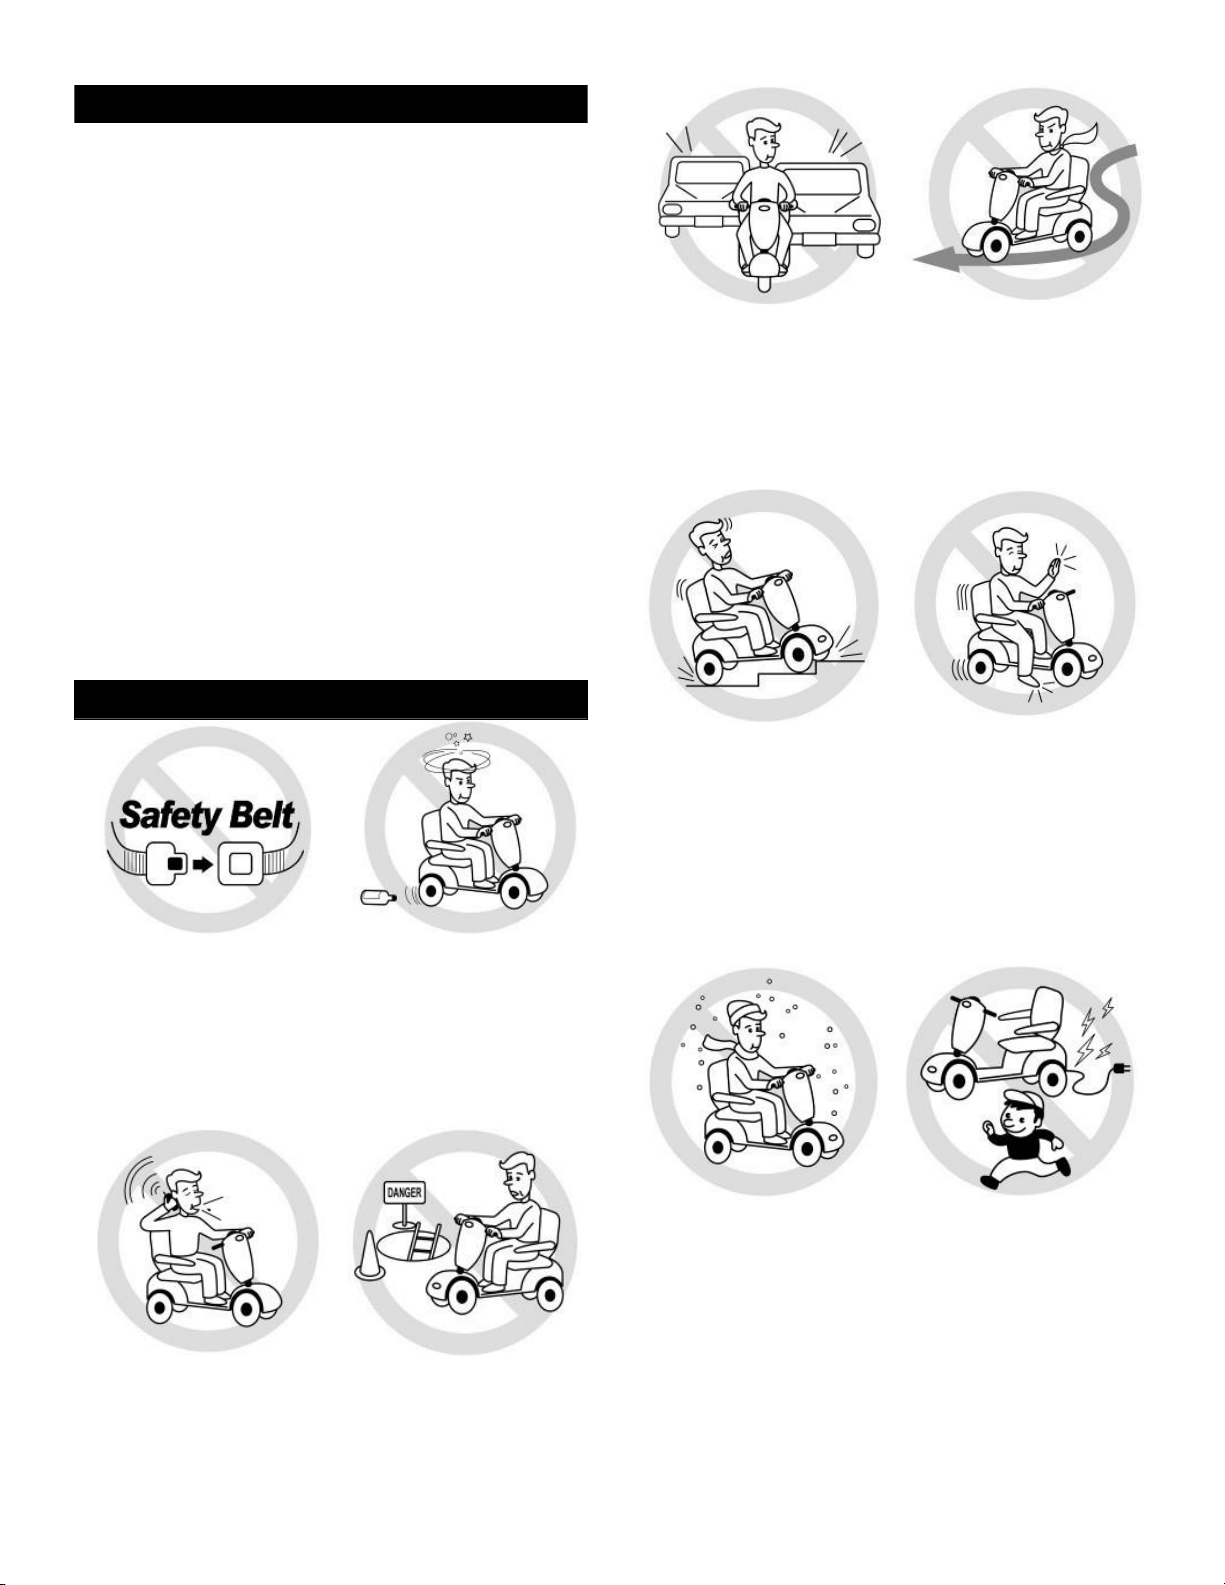
SAFETY INSTRUCTIONS
Always use a seat belt,
and keep your
the
scooter
Never use mobile
phones
transmitters
walkie-t
feet on
at
all times.
or radi
such as
alkies.
o
ENTS
(EMI)
Operation
Procedure
ing and Fault Repair
Never operate the
scooter while you are
under
the
influence of
alcohol.
Make sure
are
no
obst
that there
behind you while
reversing your scooter.
acle
s
Do
not ride
scooter
Do
not attempt to
in tr
you
r
affic.
climb curbs greater
than
the
m a xi m um
r e c o m m e n de d in
the specs.
Do
not ride
scooter during snow in
order to
accidents.
you
avo
r
id
Do
turns or
while riding you
Do
hands and legs from
the
riding the scooter.
unsupervised ch
to
not
make s
sudden stops
scooter.
not
remove you
scooter when
Do
not
allow
play near th
harp
ildre
r
r
n
is
equipment while the
batteries are char
ging.
Page 3

Warning
first time without
–
Do not operate your scooter for the
com
pletely reading
and
understanding this owner’s manual.
1.
Do not
local pedestrian traffic rules.
may
are
is
caution.
2.
To prevent injury to
operate
the scoote
be difficult for traffic to
seated
clear
on the
of traffic,
scooter.
and then proceed
yourself
r on the
road.
Be aware
see
you
when
Wait until your path
with
or ot
hers,
ensure that the power is switched off when
getting
on or off of the scooter.
3. Always check that the drive wheels are
engaged
(drive mode) before
iding.
Do not
switch off the power when the scooter is st
moving
an extremely
4. Do not use this product or any
forward. This will bring the scooter to
abrupt stop.
available
optional equipment without first completely
reading and
you are
understanding
unable
to
these instru
understand
the
warnings,
cautions or instructions, contact your dealer
before attempting to use this equipmen
otherwise injury
5.
There are certain situations, including some
medical conditions, where
need to practice operating
or
damage may
occur.
the
scooter
user will
the scooter in the
presence of a trained attendant. A trained
attendant can be defined
as
a family member or
care professional especially trained in
assisting
activities.
6. Do not attempt to lift or
a scooter user in
move
various
daily living
the scooter by
any of its removable parts including the
arm
rests, seats
damage
7.
Never try to use your scooter beyond its
limitations as described
8.
Please
moving vehicle such as a
to the
do not sit on your
9. Keep your
or shrouds.
scooter may result.
in
hands away
from the
Personal
this
manual.
scooter while
car,
bus
or
wheels
injury and
it is in a
train.
while riding the scooter. Be aware that
fitting
clothing
can
become caught
in the drive
wheels.
Obey all
that it
you
extreme
always
ill
cti
ons.
t,
(tires)
loose
If
10.
Consult w i t h your physician if you are
taking prescribed medication or if you have
any certain
me
dications
ability to
Consu
physical
limitations.
Some
and limitations may impair your
operate scooters in a safe manner.
lt
with your physician if you are taking
any medication that may affect your ability to
operate your scooter s
afe
ly.
11. Do not drive or sit on the scooter when in
freewheel mode.
12. Do
not
remove
the
anti-tipper.
13. Always switch off the scooter and charger
before doing any work or
the scooter.
14.
Do not climb a gradient at an angle.
drive straight up a gradient,
using
any tools on
as
Always
this greatly
reduces the risk of tipping or a fall. Do not
climb a
15.
Do not drive
other
or fall.
16.
Always reduce your speed and maintain a
gradient
obstacle.
steeper than 6º.
backwards
down any step, curb or
This may cause
the scoo
ter to tip
stable center of gravity when cornering
sharply. Do not corner sharply when driving
scooters
17. Operating
slippery
on the
18.
Beware the motor may be hot after use. Do
not touch or
has cooled
19.
Never sit on your
at
higher spe
eds.
in rain, snow, salt, mist and
surfaces
may have an
electrical system.
access
down.
the motor directly until i
scooter when
on icy or
adverse
it is
being used
affect
t
connection with any type of lift or hoist. Your
scooter is not
and any
use is
21.
not the
Always ensure
before sitting
scooter until you have fully exited the
and the
down.
designed
damage
responsibility
or injury incurred from
with
of
such use
EV Rider.
the scooter is fully unfolded
on the scooter. Do not fold the
backrest
on the scooter se
at
in mind
such
scooter,
is
folded
in
Page 4

Modifi
Your scooter
p
ossible.
cations
has
been
designed
However, under no
to be
as
practical
circumstances shou
you modify, add, remove, or disable any part or
function of your
to the
scooter may result.
1.
Do not modify your power
authorized by
if they
Rider products.
2.
Get to know the feel of your power scooter and
its capab
you perform a safety check before
make
sure your scooter operates safely.
scooter. Personal
EV Rider. Do not use
have
not been tested or
ilities.
EV Rider recommends that
injury and damag
scooter
in
any way
accessories
approved
each use
for EV
Inspections
1. Please
sure
they
2.
Please
sure
they
3.
Please check
Weight limitation.
1.
Do not exceed the weight
Specification se
capacity voids your
be held
damage
prior to
check all electrical
are
check all
are secured prope
using your power scooter:
connections
tight
and
not
corroded.
harness connections
rly.
and make
and make
the brakes.
capacity
stated in the
ction. Exceeding the weight
warranty. EV Rider will not
responsible
for injuries or property
resulting from failure to observe weight
limitations.
2.
Do not carry
passengers
of
gravity,
passengers
on your
resulting
on scooters. Carrying
scooter may
affect the center
in a tip or a fall.
Tempe
1. Some
-25ºC ~ 50ºC (-13
2.
rature
of the parts of the scooter are susceptible
to
change
in temperature.
The
controller
can
only
operate in temperature that ranges between
ºF to
122ºF).
At extreme low temperatures,
freeze,
and your scooter may not be able to
operate. In extreme high temperatures,
operate at
slower speeds
the batteries may
due to a
safety
it may
feature
of the controller that prevents damage to the
motors and
other
electrical
components.
as
ld
e
not
to
ELECTROMAGNETIC
The
rapid
development
the area of
environ
communications, has
ment with
electromagnetic (EM)
that are emitted by te
communication si
and their strength
source.
the
All
EM signals
wheelchairs
gnals. These EM wave
increases as one approaches
electrical conductors
and, to
and
scooters
levision, radio and
varying degrees, all power
INTERFERENCE
of
ele
ctronics, especially in
saturated our
act
are
susceptible to
electromagnetic interference (EMI).
could result
and/or erratic control of the
may
be
(EMI), which is
emitted from
stations,
radios, cellular phones
interference (from
power scooter
move
permanently damage
system.
measured
scooter can resist EMI up
called “immunity level”.
the greater the protection.
technology is capable
i
mmunity
against common sources
Following
the
chance
scooter movement that
1. Do not turn
in
abnormal, unintentional
susceptible
to
electromagnetic
interfering
electromagnetic
sources such as
amateur
radio
(HAM) transmitters,
and
radio
wave sources) can cause
to
release
in
unintended directions. It
its
the powered scooter’s control
The intensity
in
volts
of the
per meter (V/m).Each powered
to a certain intens
The higher the
At
of
providing
level,
which would provide useful
of radiated EMI.
the
warnings
of
unintended brake release
listed
could result
on hand-held
vehicle.
radio stations,
alarm systems. The
brakes, move
can
EM energy can
this time, current
below should
personal
communication devices such as citizens
(CB) radios
powered scooter is
2. Be aware of
or TV
them.
3. If
unintended movement or
occurs, turn the
it
is safe.
stations
and
cellular phones while
turned on.
nearby
transmitters
and try to
avoid coming close to
powered scooter
brake releas
radio wave
are
invisib
as antennas to
The
interference
movement
Power scooters
interference
energy
TV
two-way
by itself or
also
be
ity.
This i
immuni
at least
ty level
20 V/m of
protection
reduce
or powered
in
serious injury:
band
the
such
as radio
e
off
as soon
s
le
the
the
s
as
Page 5

Model
S19AF
Weight Limit
250 lb. /115kg
(18 stone)
Overall Di
mensions
(L
x W x H)
86 x 42
x 84cm
34” x 16½” x 33”
Folded Dimensions
(L
x W x H)
73
x 44 x 42cm
28¾” x 17½” x 16½”
Seat Dimensions
(L
x W x H)
32
x 40 x 38cm
12½” x
16” x 15”
Footplate Length
37cm
14½”
Wheelbase
Length
63cm
25”
Turning Radius
7
8cm
31”
Ground
Clearance
3.5cm
1.4”
Drive
Wheel
200mm
x 50mm
(8” x 2”
) PU
Tire
Front Wheel
180mm
x 40mm
(7” x 1.6”
) PU
Tire
Rear
Anti-Tip
Castor
Standard
Maximum Speed
3.5
mph
6 kph
Maximum Range
6 miles
10
km
Stability
3º (Dynamic)
6º (Static)
Weight
42 lb. / 19
kg
(with
battery)
38.5 lb. / 17.5kg
(without
battery)
Charger Type
2A
110/2
40V
Li-Ion
Charger
Controller
50A
Dynamic
Motor
180W
24V
Battery
Lithium-Ion
Battery
24V
8.7 Ah
4.
Be aware
components,
may make
from radio
evaluate
the
5.
Report
brake
manufacturer,
wave source nearby.
that adding
or
modifying
it
more susceptible
wave sources (N
the effect
on
powered scooter).
all
incidents
release
of
to the
and note
accessories
the
powered scooter,
to interference
ote: It
the
overall i
unintended movement or
powered
scooter
whether
there
TURN OFF YOUR POWER SCOOTER AS
POSSIBLE IF
YOU
EXPERIENCE
THE
FOLLOWING:
The higher
p
rotection.
level
of 20 V/m
Unintentional scooter
Unintended
Unexpected
the
Your
common sources
can disturb
the
fields such as
or
uncontrollable dire
brake release
immunity level
powered scooter has
which should
of
EMI. Warning: The scooter
performance
emitted by an alarm system.
movements
the greater the
protect
agains
of the electromagnetic
TRANSPORTING THE
The scooter is suitable
hold of
The scooter should
and
scooter
The lithium
safe
an
aircraft.
be folded, the
the battery disconne
from ope
for airline
ration.
battery
transpo
used
for
transportation
cted.
in the
rtation.
SCOOTER
key
removed
This
will inhibit the
scooter is
or
is
difficult to
mmunity of
is
a radio
SOON
ction.
an immunity
t
itself
in the cargo
certified as
AS
SP
Note:
ECIFICA
TION
Maximum Range and Speed are based on
conditions. User weight, battery condition, temp
terrain, gradient, weather conditions and driving style may
all reduce the maximum range and speed.
Manufacturers reserve the right
specifications without prior notice. Specifications
product purchased may differ from those
to change
optimal
erature,
of the
stated.
Page 6
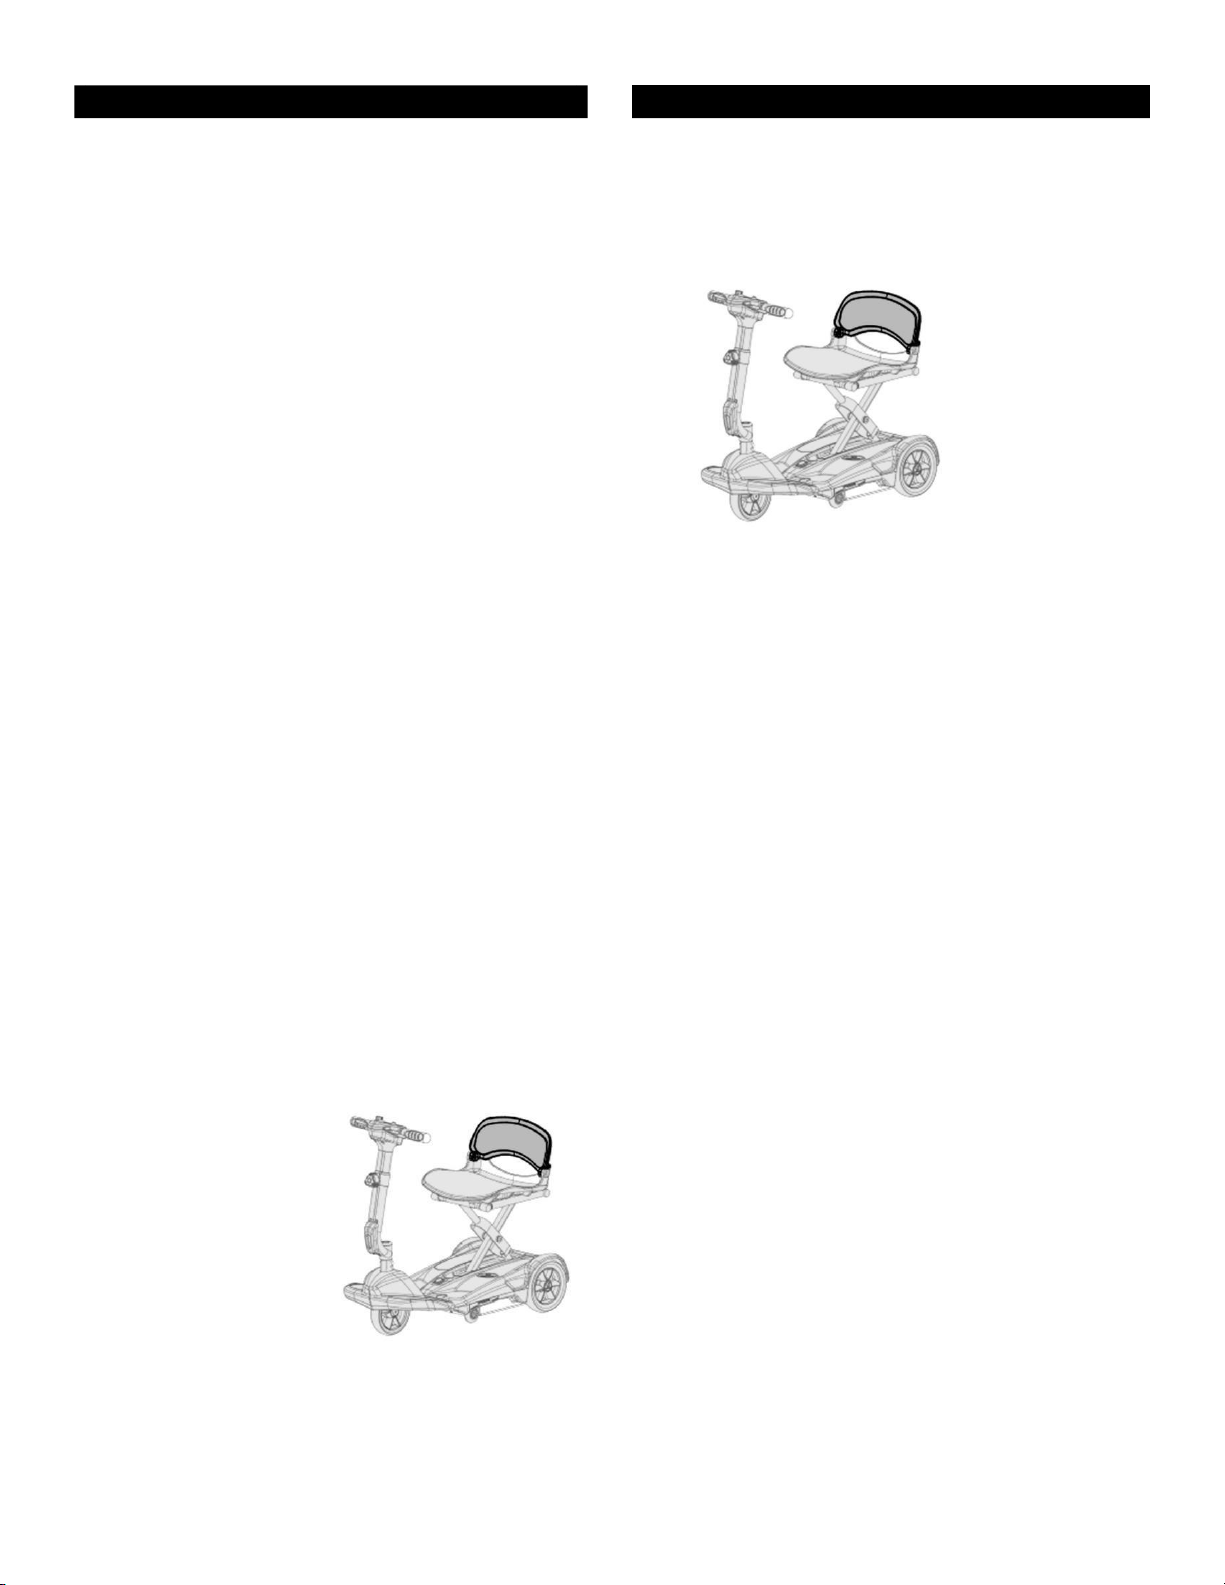
UNFOLDING THE
1.
Position
tip
the
wheels on
scooter
the
SCOOTER
with rear
ground (as shown below):
wheels and
anti-
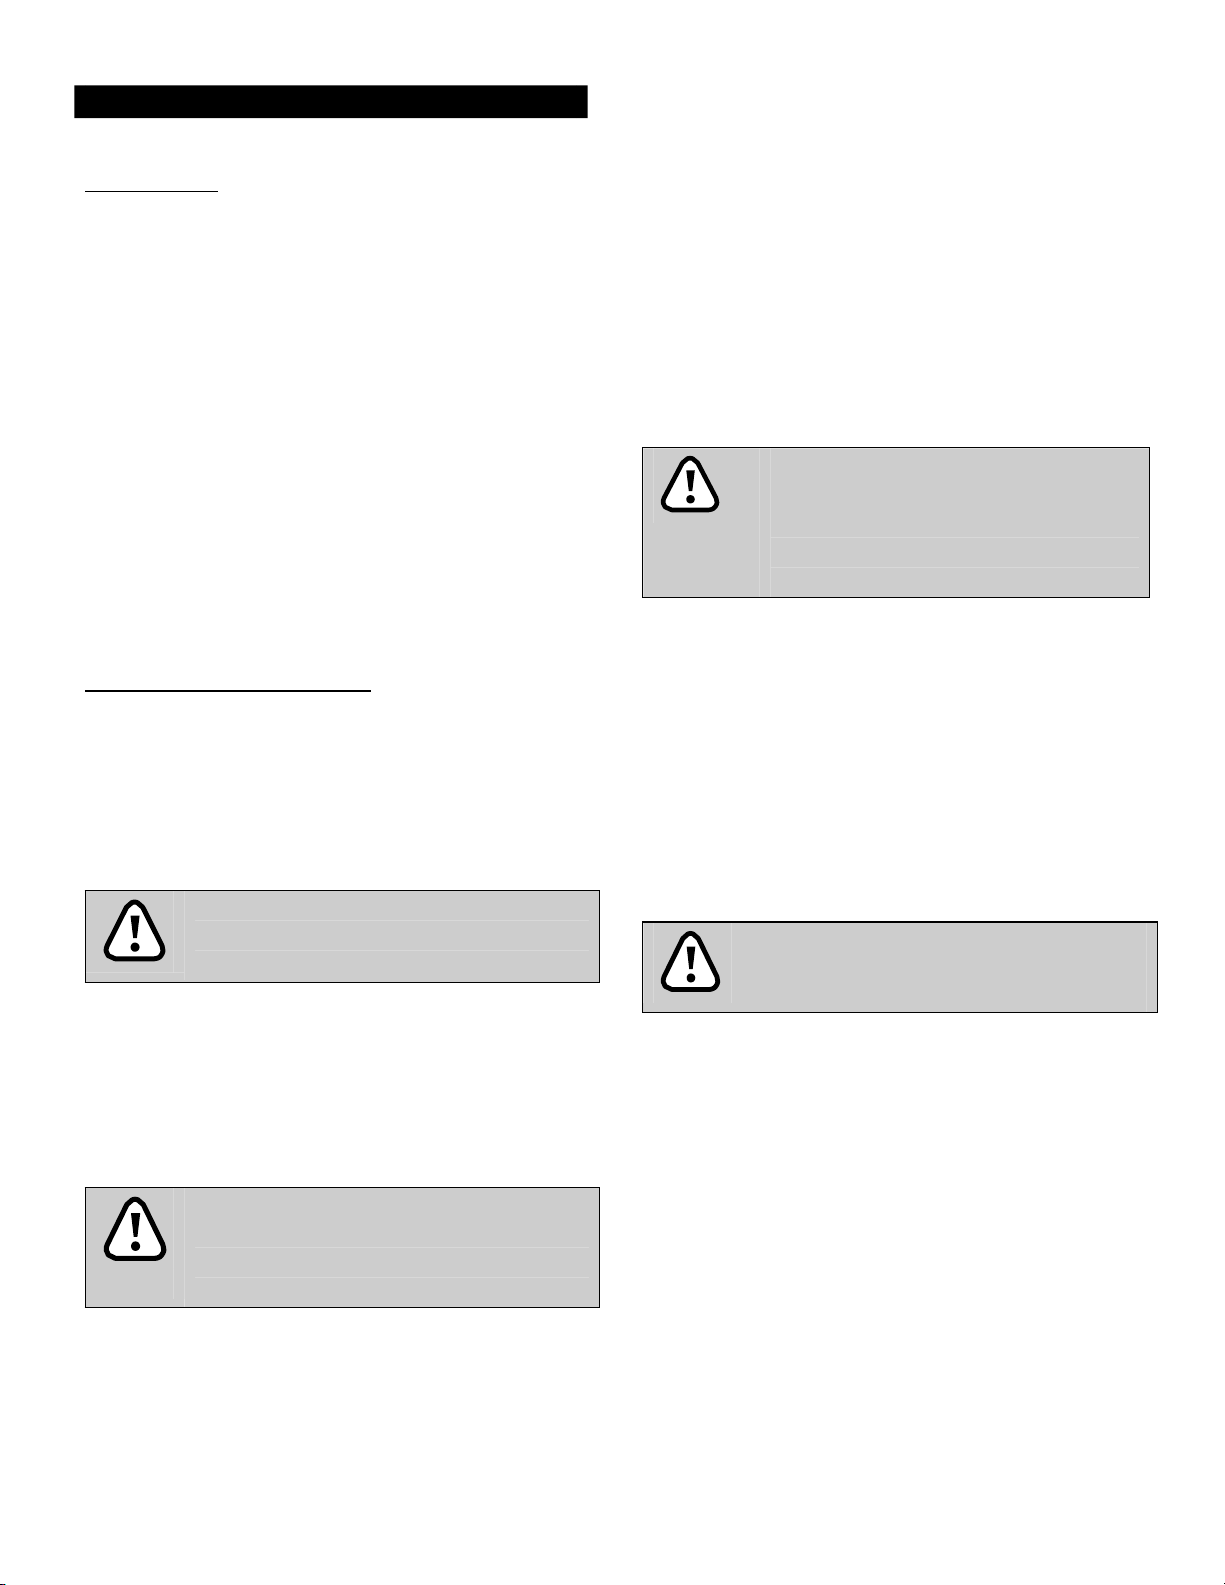
FOLDING THE
SCOOTER
1. Turn the key off and dismount the scooter.
2.
Fold down
on the
the backrest
picture below).
of the seat (highlighte
d
2.
Insert
and
(In
rear
procedure.
keep
scooter is
4.
the
key
in to the
switch
case
of the
of
your
the
emergency,
scooter
If
this happens,
finger on
fully unfolded).
Switch
off the
scooter using
the
key and
lif
up the
backrest
(highlighted
in the picture
right)
ignition
scooter on.
3.
The green
arrow
s
cooter should now
illuminated. Press
release
and
automatically
A
the
the rem
press
to
stop
the
green
t
of the
button (green
below) on
the button
the
scooter
lternatively,
green
button
ote.
the red button
the un
folding
remove
the
button until the
scooter
the
be
it
then
will
unfold.
press
on
on
hazard and
the
4.
Switch
remove
the
the
scooter
key.
3.
The
red button (red
arrow
below) on
s
cooter should now
i
lluminated.
then release
the button
scooter
will au
Press
and
the
tomaticall
the
it,
fold.
A
lternatively,
red button
(In
case
the
green
of the
scooter
of
button
press
on
the rem
emergency,
on
the rear
to
stop
folding procedure. If this
happens,
remove
the hazard
and keep your finger on
red button until the
scooter i
fully folded).
off
using
the
ignition
and
be
the
pre
the
the
y
ote.
ss
s
Page 7
SCOOTER
Control Panel
How To
•
Operate Your Scooter
Key
Ignition.
switch
turn the
i
counter-
for the
key clockwise
lluminate. To switch
clockwise, after
should switch
Do not turn the ignition off whi
this will lead to an
possible risk
•
Speed Dial. Turn
maximum speed
clockwise
the dial
counter-clockwise
setting.
Do not
as this could result
not set the
indoors.
•
Moving and
the right
with
your hand towards you
OPERATION
The key
scooter. To switch
off and the
to
increase
Braking.
hand side (RED)
ignition acts
and battery
the
power
which
of
damage
the
speed
of the
scooter. Turn
the
adjust
the
highest speed while riding
To
as
the power
the
power on,
gauge
should
off, turn the key
the battery gauge
key can
be removed.
le
riding
emergency stop
and
or injury.
dial to
determine
the
the dial
speed setting
to
decrease
speed
in
loss
dial
while riding
of
control.
and turn
the speed
Do
move forward, sq
ueeze
of the wigwag paddle
while holding
the
as
handle bars.
Squeeze
the left hand
wigwag paddle (BLACK) towards you
scooter
reverse alarm.
paddle which
the
bring the
paddle allows you
scooter
the
defle
3.5mph)
will
move back
wards,
emitting an audible
To brake, release
will return to neutral and activate
electromagnetic brake automatically
scooter
to a prompt stop. The
to control the
up to a
Speed Dial. The
cted, the
.
maximum speed determined
further the
faster
the
scooter
Warning
Do not operate both left and right hand
sides
•
Horn Button.
h
orn.
Release
horn is
the
of the
You
will not be able to control the
s
coote
Press
the button to
green
wigwag simultaneously.
r.
the
horn
button to
stop
button located
panel.
•
Braking – Electr
wigwag paddle
electromagnetic brake
automatically
When
to
applied.
•
Light. Press
headlight. Press
omagnetic
comple
Brake. Release
tely,
and the
will be activated
and the
on a
scooter
gradient, never set the vehicle
freewheel mode.
the light
switch
the light
switch
The brakes
to turn
light off.
N
ote: the light will
switched on
•
Handlebar
Height Adjustment. Turn
adjustment knob on
anticlockwise
handlebar
to the
knob clockwise
only
at the
ignition.
the front of the ti
to
release
required position,
to
secure
operate if the
the
handlebar. Slide
the
handlebar
side
of the
and the
the wigwag
and
wigwag
speed
of the
by
wigwag paddle
will go
(up to
sound
the
the horn. The
on
the control
the
will stop.
will not be
on
the
again to turn the
power i
the large
lle
r
then turn the
in place.
is
s
the
Page 8
•
Battery
console lights LEDs
Green (3
Yellow (2 LEDs
Red (1
The remaining power indicated
will
vary
ride. Repeated starting, stopping
consume power more quickly.
above
Gauge. The
LED
by the
.
battery
to
or 4
LEDS
lit) -
lit) -
draining charge
lit) -
immediate recharge is necessary.
gauge on
show remaining power:
40% - 100%
by the battery gauge
driving
time
incurred
and
and
climbing
The gauge is shown
the ti
lle
capacity
(10%
- 30%)
how
you
will
Please keep hands/fingers out of machine during the
folding/unfolding process.
r
RIDING
•
1.
2.
3.
4.
5. Set the
ON
THE
Starting and Riding
Make sure
Make sure
Switch
Check
power
about the
pack
the
the tiller
the
key
the battery
for
your journey. If
remaining power, recharge
before use.
speed
ROAD
scooter is
fully unfolded.
has been secured prope
ignition to the
gauge
on position.
to
check
you have any
dial to a
position you
there
the batte
feel
rly.
is
enough
doubt
safe
ry
and
comfortable with.
6.
Check
work correctly.
7.
Before riding, check
is safe
the
wigwag paddle
for
you
to ride your scooter.
and automatic brake
the
environ
ment
around
you
Warning
Be
careful
reversing
while in
the
vehicle, be
crowded areas.
aware
of
While
people
or
objects behind you.
•
Stopping
1.
Release
vehicle
s
top.
2.
Switch
out the
the
wigwag
will
automatically decelerate
the
scooter
paddle
off at the
key.
Stopping distance
begin
braking
Always
remove
park
the
as
on
flat
key
before dismounting.
comple
tely.
and
key
ignition and pull
will vary with
early
as possible.
ground,
The
speed so
switch
off and
The scooter is not for use as a seat in a motor
vehicle.
Page 9
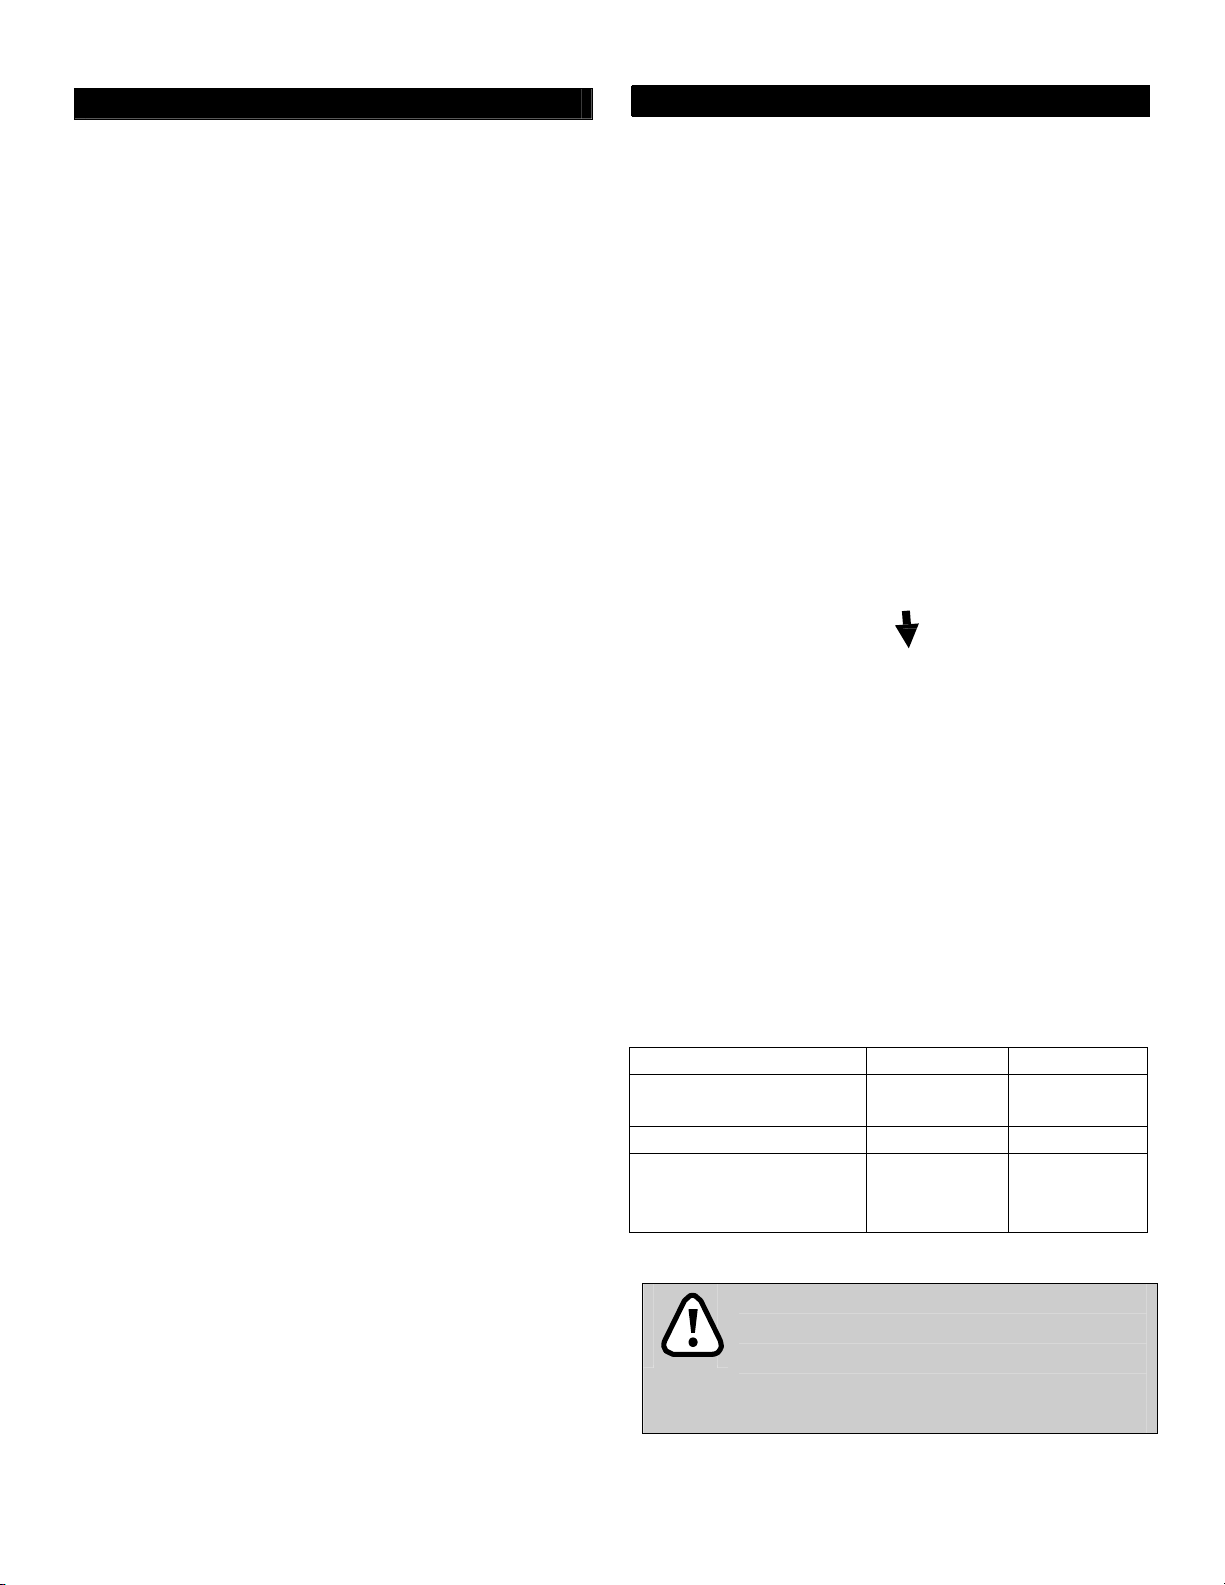
EMERGENCY CHARGING
Status
Power
LED
Status
LED
Standby
or Charging
Complete
RED
GREEN
Charging
in progress
RED
RED
Over current/vol
tage/
Tempe
rature,
or other
fault status
RED
Flashing
RED
and
GREEN
PROCEDURE
The scooter comes
If the
scooter is
completely
flat, then the
can be difficult to
emergency charging cable can
the battery to be
The emergency charging cable is shown
To
install
the
cable at the front of the
(as shown below).
with an
emergency charging cable.
folded up and the battery is
standard charging socke
access.
charged
In this insta
be
installed
while
the
scooter is folded.
charging cable, plug this
underside
of the scooter
t
nce, the
to allow
below:
in to connector
BATTERY CHARGING
Step
1.
Insert
the
s
witch
the
power on. Ensure
connected to
LEDs is
Step 2. Insert the
charging
should change
change back
comple
ted.
the
lit green.
port
of the
from
from red to
The scooter should
is
fully recharged.
hours.
lights
The status
on the
charger, and is described be
AND CARE
charger
in to the power outlet
the
scooter, and one
round plug on
charger is
of the
the
charger
scooter (arrow below). The
green
to
red. The LED
green when charging
be left
A full
of the
on charge
until the battery
recharge takes around
charge is shown
by the LED
low:
and
not
charger
in to the
LED
will
is
5
Install
the
as described
cable, then
in the next se
proceed
ction.
to
charge
the battery
Ensure
the power
charging.
the battery.
pack while
that the
outlet
Failure
Do not
the
charger is removed
and the
scooter
to do this may
remove
the battery
from
after
flatten
scooter is switched on.
Page 10
Warning
1.
Only
2.
3.
4.
Suggestions
1.
Do not
2.
3.
4.
5.
Battery Disconne
It
is recommended
the
scooter is
time,
or for
For air
disconnected
certain methods
transportation
use
the
charger supplied
scooter. Using
charger
disassemble
Always charge
the
wrong
may cause damage.
or
modify
the
scooter
ventilated space. Avoid
the scooter.
direct sun
with the
type of
Never
in a well
light
or contact with water and moisture.
Do not
charge
or operate the
scooter
temperatures below -10ºC or above
5
0ºC (14oF and 122oF). Do not
expose
temperatures.
The charger is
the battery to
for
indoor use only.
these
disconnect
the
charger
cord until
charging is completed.
When
fully
charged
will still trickle
optimum
Even when
be
ensure
range.
charged
battery
not in
at least every week to
Ambient temperature
charging time.
longer
The
in cold
battery
carries a 1
which covers manufacturing
only. It
result
herein.
of not
ction
does
not
following
that the battery
not
going
to be
the battery
before transp
the battery charger
charge
the battery for
use,
the
scooter should
longevity.
will effect
Charging
environ
time will be
ments.
year warranty
cover
battery faults as
the guidelines
is disconnected
used
for
a long
of
transpo
rtation.
should
orting
.
defects
period of
be
if
in
To
disconnect
the ba
ttery:
1.
Remove
lifting cover
the battery
up
using
compa
the
ignition key
rtment cover
or a
small flathead screwdriver.
2.
Once
the
cover is removed, unplug
connector shown
3.
Reinstall
the battery
prevent dust
compartment.
4. To replace the battery for a new one, follow
steps (1) and (2) above, undo the hook
and loop strap and remove the battery.
o Install only new batteries of the same
type in your product.
o Batteries should be recycled or
disposed of as per state and local
guidelines.
4.
below.
compa
and
moisture getting
rtment cover
by
the black
to
in to the
Page 11
CARE
AND MAINTENANCE
Weekly
Check
you
further
•
•
•
•
•
• F
• Tires. Check
Service Re
To ensure your scooter is correctly serviced
EV Rider to direct you to an
regular
serviced
charge
A
handbook.
Checking
the following
find
anything abnormal
inspection
Tiller.
Speed
Wigwag
lever is de
released.
Motor.
the
corre
Ensure
control dial.
paddle. Ensure scooter moves
pressed,
Check
electromagnetic brake works
ctly.
items weekly
contact EV Rider for
or advice.
it
is
not
loose
and
Ensure
and
for
any abnormal noise
it
adjusts freely.
stops when
or before
can
turn sm
lever is
and
Seat. Make sure is not loose and the backrest folds
down with ease.
reewheel Lever. Ensure
tire tread depth and for
damage such as
cord
cracking.
it
works corre
any signs
authorized dealer
servicing.
a fee for this.
copy
of the
at
Even
should
We
least annu
service
if the
still be
recommend
ally, and
record
is
scooter has
serviced annu
that
scooters
your dealer may
at the
back
not
been used, it
ally.
Battery and Tires
•
For
• Tires condition
• The scooter comes
information on
the
section on
the
scooter
puncture p
pressure.
the battery pack,
Battery
Charging
will be affected by
and what terrain it
with
solid tires which
roof,
so
there
is no need
please
and C
how you
is ridden on.
to
riding. If
oothly
when
ctly.
contact
for
are
of thi
s
read
are.
drive
are
check
tire
of
Cleaning
• Use a soft,
clean
detergent to
wrung
and dust
dry cloth to
free. Use a damp
clean
the sco
ote
keep your scoote
cloth and mild
r.
r
Storage
•
It
is advised
scooter is
battery
dis
conne
to
store
going to be
should
be fully charged and
cted
.
the
stored
scooter
folded. If the
for a long time, the
Store the scooter in environments which are free from direct
sunlight and water or moisture
Don’t use a hose pipe or splash water directly onto the scooter
Don’t user gasoline, solvents or vaporizing solutions as these
may damage body panels. Do not use wax.
Ensure the charger is unplugged and the scooter switched off
before cleaning the scooter
Moving
1. Switch
2.
3.
About
off the
dismount from the scooter.
Lift the
scooter
scooter using
by the
chassis only.
the ignition
key
For your safety ask for help if required. You will
need
two or
the
scooter as a wh
more people when moving
ole.
or
and
liftin
g
Never lift the scooter by the bumpers or body panels
as this can cause injury or damage.
Visually inspect the tires tread. If
(1/32”),
contact EV Rider for the location of your
less
than 1mm
nearest authorized dealer.
Page 12
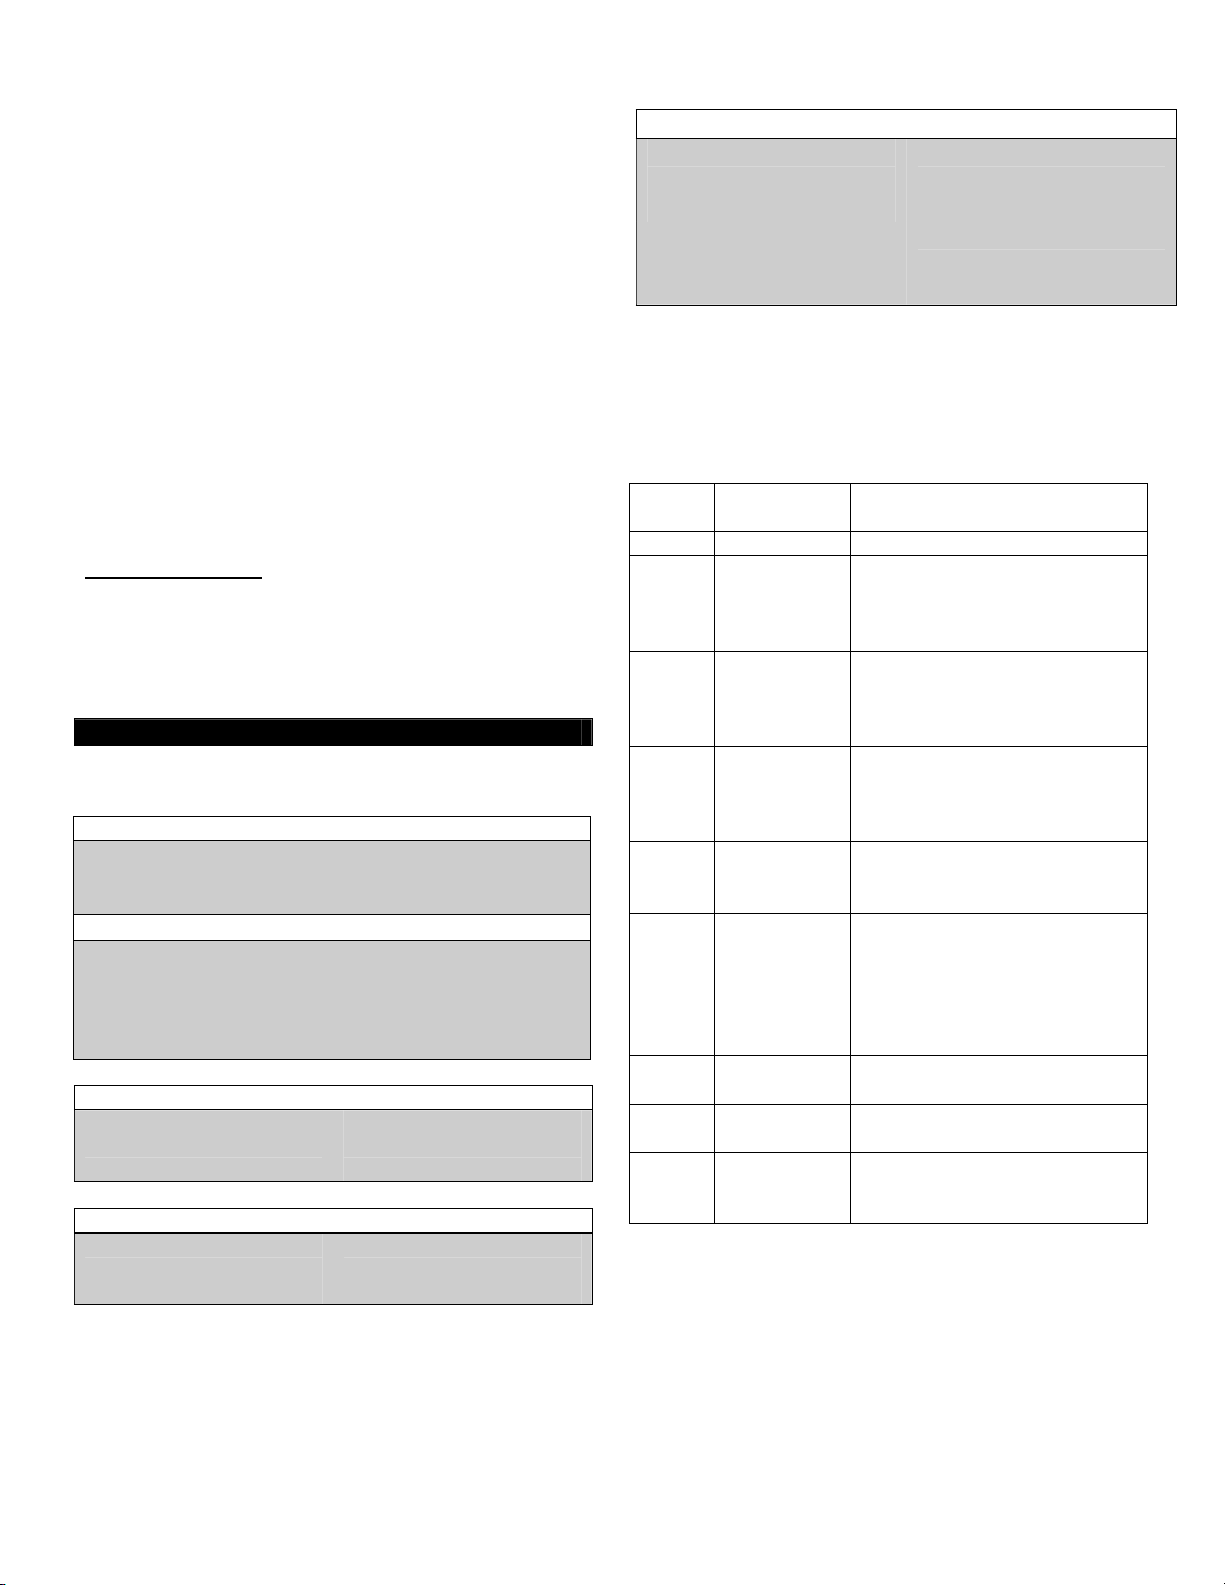
No. of
Flashes
Description
Meaning
1
Battery
low
Recharge
the batteries
2
Low
battery
f
ault
The batteries have run
out.
Recharge
the batterie
s.
Check
the battery and
associated
wiring
3
High
battery
f
ault
Battery voltage is
too high.
Due
to
overcharging
or steep
descent. Reduce speed if
travelling down
a slope.
4
Time
out or
controller
too
hot
The scooter may have
stalled.
The scooter
off
and leave
for a
few
minutes.
Check motor is
not faulty.
5
Park
brake
f
ault
Check
the
scooter is
not in
freewheel mode.
Check
park
brake and wiring.
6
Drive
inhibit
Out of
neutral
at
power
up and
battery
charge
connec
ted
.
Release wigwag paddle
and
remove charger.
Wigwag may
require
recalibration.
7 Speed
Pot
Fault
Check speed
pot
and thro
ttle
pot are not faulty.
8
Motor
voltage fault
Check
the
motor,
connectors
and
wiring
are not faulty
9
Other error
Check
all
connections
and wiring.
Possible controller
fault.
All
Symptom:
Scooter
will not
switch
on
Prob
lem:
Remedy:
Battery
not connected
Check batteries
connected
Circuit
breaker has
tripped
Push circuit breaker
to reset
Symptom:
Scooter
will
switch on
but will not run
Prob
lem: Flat
Remedy: Rechar
ge
battery Charger battery Unplug
plugged
in
charger
from scooter
Motor in
freewheel
mode
Push down freewheel
lever
upholstery
and mild soap.
back for sagging, cuts and tears. Replace i
necessary. Do not store your
humid
conditions
rapid deterioration of the
All moving
mechanisms
lubrication and inspe
petroleum jelly or light oil. Do not
oil, otherwise small drips could stain and
damage carpets and furnishings etc.
perform a general
all
nuts
and
ANNUAL SE
We
recommend
bolts.
RVICE
the scooter is
by an authorized te
referred to one near you.
TROUBLESHOOTING
can be washed with warm water
Occasionally
as this will lead to
check the seat
scooter
in damp or
mildew
upholstery parts.
and
and
will benefit from simp
ction.
Lubricate usin
use
g
too much
Always
inspection
of the
tightness
servicing
chnici
an. Contact EV Rider to be
by annually
le
of
Symptom:
Prob
lem:
f
The scooter has
a fault
The scooter comes
the operation of the
most LED
of a fault state,
below
:
Horn sounds involuntarily / automatically
diagno
sed
with a
Dynamic
scooter.
on the battery gauge
count
the
number
If a fault state
Remedy:
Ensure
is released and switch
scooter
Recharge batteries
persists.
50A controller
will
flash
of
the
off
occurs, then the left
in sequence. In the event
flashes
and refer to the table
wigwag
and
on.
which monitors
paddle
the
if error
Symptom:
Prob
Flat battery
Speed setting
Scooter appears
lem
:
slow
slow
Remedy: Rechar
battery
speed
Symptom:
Prob
Tiller adjustment knob
Tiller appears loose
lem:
loose
or will not
Remedy:
Tighten
knob
Turn
up
dial
swivel
tiller
adj
ge
freely
ustmen
t
Page 13

PRODUCT WARRANTY
THREE-YEAR LIMITED WARRANTY
Three (3) years from the date of purchase on all structural frame components; including platform, seat post, and frame.
ONE-YEAR LIMITED WARRANTY
One (1) year from the date of purchase, if any part or electronic component of the Scooter is found upon examination to be
defective in material and/or workmanship, it will be repaired or replaced, at EV Rider, LLC’s option, without charge. Labor
charges are NOT included. The purchaser is responsible for the delivery to the authorized repair facility. Satisfactory proof of
purchase, serial number and the date of purchase are always required. For warranty service, contact EV Rider for the location of
your nearest authorized dealer.
SHIPPING -DOMESTIC: All warranty items will be shipped via Fedex Ground. Requested expedited shipping will be at the
expense of the purchaser.
SHIPPING -INTERNATIONAL: Parts will be provided under warranty at no charge, but shipping to any offshore and/or
international location will be the responsibility of the purchaser. International and offshore end-users must contact the
dealer/distributor directly to initiate the warranty process.
ONE-YEAR WARRANTY EXCEPTIONS Motor: In cases where there is an increase in the operational noise level, the
warranty does not apply. (An increase in operational noise level usually occurs due to abusive and excessive strain on the
scooter).
The batteries are warranted by EV Rider for one year after the purchase of the Unit with the exception of the Stand-N-Ride
scooter.
Service: Warranty service can be performed by EV Rider, LLC or by an authorized EV Rider, LLC service facility. Do not return
faulty parts to EV Rider, LLC without prior consent. A request for a Return Authorization is required prior to returning
items. All transportation costs and shipping damage incurred while submitting units and/or parts for repair or replacement are
the responsibility of the original purchaser.
WARRANTY EXCLUSIONS: This warranty is only given to the original purchaser of the Scooter. This
Warranty excludes:
seating, motor brushes, fuses, plastic shrouds and footrest covers, etc.)
caused by: battery fluid spillage or leakage, abuse, misuse, accident, or negligence, improper operation,
excessive loading, maintenance, or storage, commercial use or use other than normal.
f the product not approved by EV Rider, LLC.
Batteries: Batteries carry a limited warranty which is subject to a stringent wear and tear clause. Any battery faults due to a
defect in the original manufacture will normally become obvious within the first two months of use. Any gradual deterioration in
performance after this period is normally associated with fair wear and tear, misuse or accidental damage and as such is not
covered by the manufacturer’s warranty. There is no other express warranty.
Implied warranties, including those of merchantability and fitness for a particular purpose, are limited to one (1) year from the
date of the original purchase and to the extent permitted by law. Any and all implied warranties are excluded. This is the
exclusive remedy. Liabilities for consequential damages under any and all warranties are excluded.
Some states do not allow limitations on how long an implied warranty lasts or do not allow the exclusion of limitation of
incidental or consequential damages. So, the above limitation or exclusion may not apply to you.
EV Rider, LLC // www.evrider.com
800-944-1997
 Loading...