

Page 1
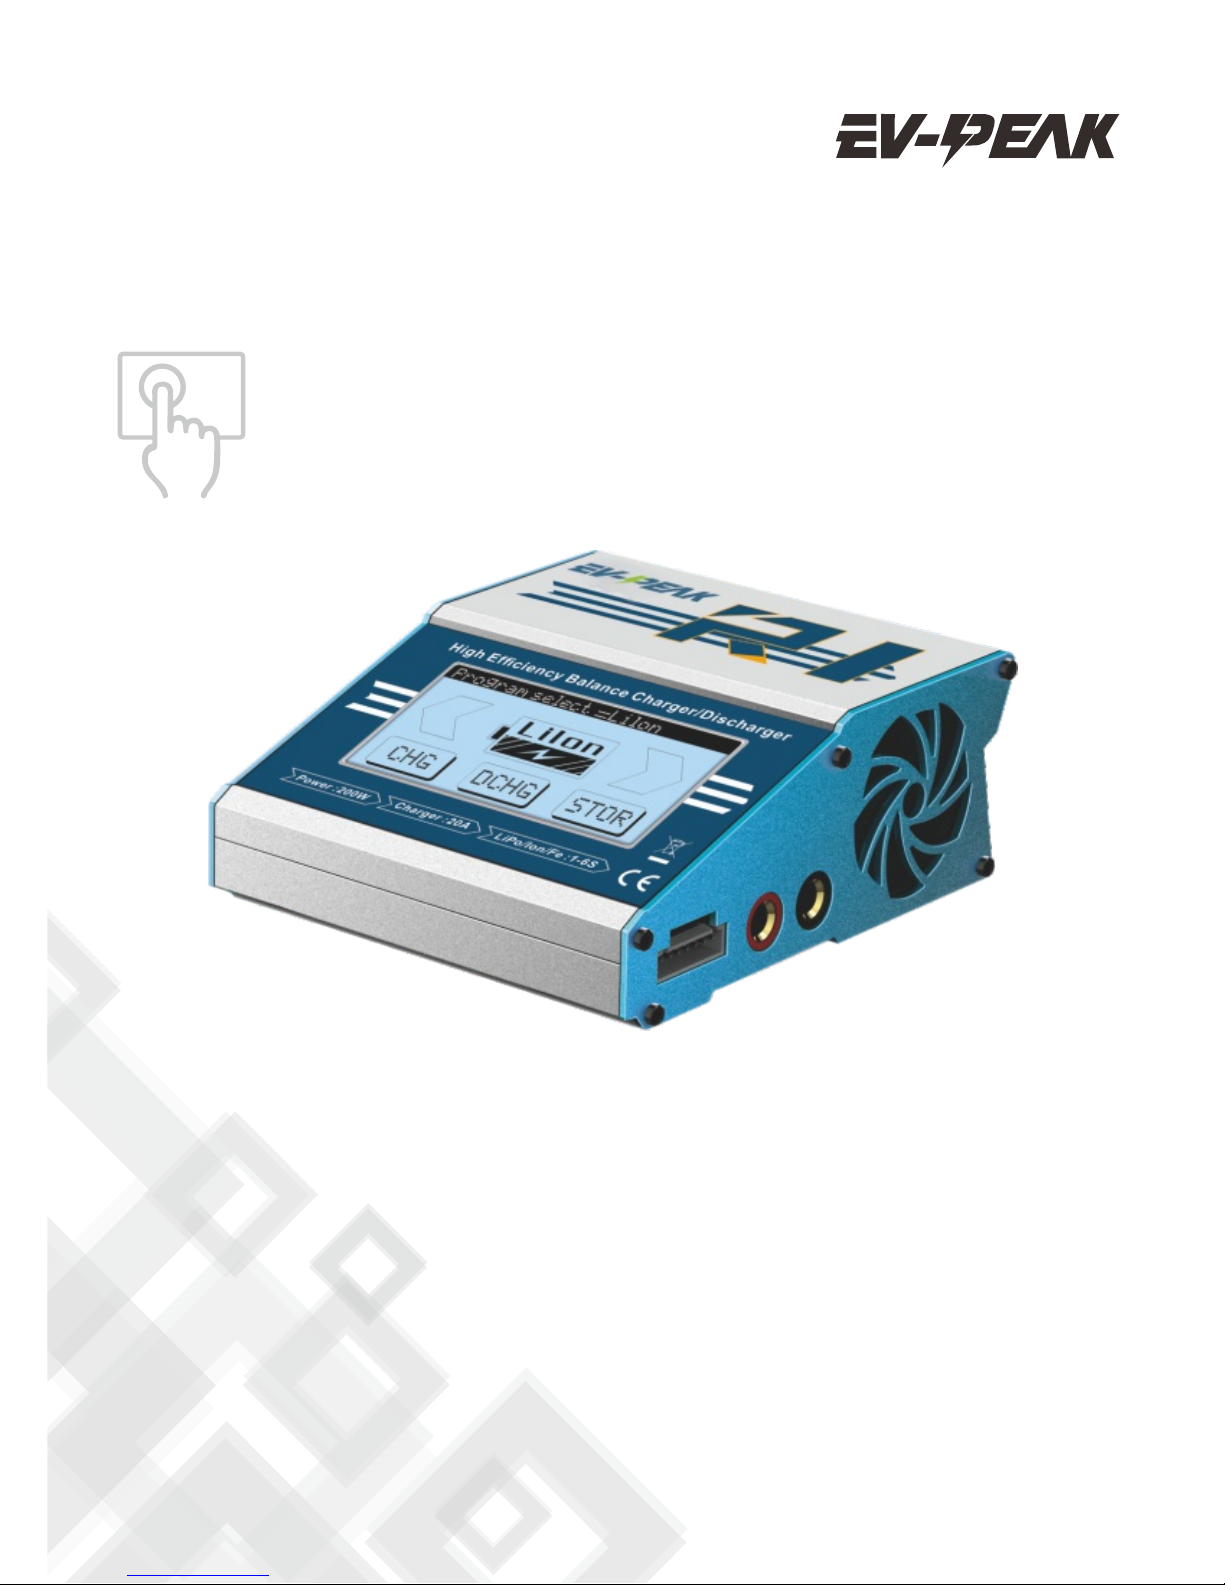
Touch screen fast charger / discharger
Instruction manual
R1
Page 2

TABLE OF CONTENTS
INTRODUCTION............................................................................................. 01
SPECIFICATION.............................................................................................. 03
MAIN FEATURES............................................................................................ 04
WARNING AND SAFETY NOTES..................................................................... 06
PROGRAM FLOW CHART............................................................................... 09
PROGRAM DESCRIPTION.............................................................................. 10
OPERATING PROGRAM.................................................................................. 11
Touch Screen Operation........................................................................... 11
Connection............................................................................................... 12
CHARGING PROGRAM.............................................................................. 13
DISCHARGE PROGRAM............................................................................. 15
Storage Program for Lithium Battery...................................................... 17
BATTERY MEMORY.................................................................................... 18
Data view................................................................................................... 19
LITHIUM BATTERY BALANCER.................................................................. 20
Digital Power............................................................................................. 21
Forming Charge........................................................................................ 22
SYSTEM SETTING........................................................................................... 23
ERROR MESSAGE........................................................................................... 26
AUTHENTICATION INFORMATION................................................................ 28
WARRANTY..................................................................................................... 29
Page 3

INTRODUTION
01
These operating instructions are designed to ensure that you quickly
become familiar with its functions. It is therefore important that you read
right through the Operating instructions, Warning and Safety Notes before
you attempt to use your new charger for the first time.
R1 integrates battery technology together with touch-operated system.
It is equipped with a 128*64 pixel resistive touch screen, which plays very
important role in the entire system. Every operating procedure and status
change can be shown on this screen, making the operating procedures very
intuitive. When the battery is working, you can directly check the battery
capacity, battery voltage, charging time and internal resistance on the
screen. Additionally, the entire charging procedures can be recorded and
generated into a charging curve for you to check on the screen.
R1 comes with a memory module. Users can edit and save parameters
of different batteries. Once the battery parameters are edited, the shortcut
for parameters will be generated on the screen, which provides a simple
on-click interface for users.
R1 can be powered up with DC 11-24V output power supply, suitable
for use with LiPo / LiFe / LiHV / Li-lon / NiMH / NiCd / Pb battery, maximum
20A charge current and maximum 200W charge power. Integrated
high-performance micro processor and high-efficient cooling system,
control the charger always under a safety temperature situation.
Please BE SURE to read these INSTRUCTIONS, WARNING and SAFETY
NOTES before you use the charger for the first time
It can be dangerous to mishandle batteries and battery chargers, as
there is always a risk of batteries catching fire and exploding.
Please read this entire operating manual completely and attentively
before using this product, as it covers a wide range of information on
operating and safety. Or please do use this product in company with a
specialist.
Page 4

INTRODUTION
02
1. DC Input
2. Temperature Sensor Port
3. Micro-USB port for firmware upgrade
4. Touch screen
5. 1- 6S cells balance socket
6. Main Output
7. Cooling fan
1
3
4
5
6 7
2
Page 5

SPECIFICATIONS
03
● DC input Voltage: 11-24V
● Control: Touch system
● Backlight: Blue
● Dimension: 120 x102 x46 mm
● Charge current: 0.1A-20.0A
● Balance tolerance:±0.01V
● Regenerative discharge power: max.300W
● Regenerative discharge current: 0.1-20.0A
● Charge power: max. 200W
● Memory: 20 different charge/discharge profiles
● External port: 1-6S Balance Socket-XH
Temperature probe socket
Battery Socket XT60
Micro USB for PC
● Battery Types/cells: LiPo/Lilon/LiFe/LiHV: 1-6S
NiMH/NiCd: 1-15cells
Pb: 2-24V
● Charge Voltage: LiPo: 4.18-4.22V/cell
Lilon: 4.18-4.20V/cell
LiFe: 3.68-3.80V/cell
LiHV: 4.30-4.40V/cell
● Discharge cut-off voltage: NiMH/NiCd: 0.1-1.1V/cell
LiPo: 3.0-3.3V/cell
Lilon: 2.9-3.2V/cell
LiFe: 2.6-2.9V/cell
LiHV: 3.1-3.4V/cell
Pb: 1.8V
● Display Type: LCD resistive touch screen
● Cooling system: cooling fan
● Weight: 450g
● Safety timer: 1-720min or turn off
● Discharge current: 0.1A-20.0A
● Discharge power: max. 30W
Page 6

MAIN FEATURES
04
Touch System
With the graphic touch controlled interface, the resistive touch LCD
screen intuitively displays every charging status & information, which makes
the operating procedures very easy. Users can enjoy a more convenient and
comfortable “touch” experience.
Optimized Operating Software
R1 simplifies and optimizes the operating procedures for users, it can
maximumly protect your battery safety, and prolong the lifetime of the
battery effectively; what's more, the charger allows users to self-define the
charging parameters, so that you can configure other charging parameters
according to your own requirements.
Charging Status Monitor
When the charger is working, you can check the charging capacity,
battery voltage, charging time and internal resistance on the screen. More
important, the voltage curve can be displayed on the screen, so you can
monitor the charging status.
Internal Independent Lithium Battery Balancer
R1 Changer employs an individual-cell-voltage balancer. It isn’t neces.
sary to connect an external balancer for balance charging.
Balancing Individual Cells Battery Discharging
During the process of discharging, R1 can monitor and balance each cell
of the battery individually. Error message will be indicated and process will
be ended automatically if the voltage of any single one cell is abnormal.
Fast and Storage Mode of Lithium battery
Purposes to charge lithium battery varies, “fast ” charge reduce the
duration of charging, whereas “store” state can control the final voltage of
your battery, so as to store for a long time and protect useful time of
thebattery
Lndependent Balance function
When the battery performance declines and vlitage difference
increas-es, the balance function of charger will to work. The equalizer
circuit will work independently and reduce the voltage difference to below
0.01V, which can prolong the lifetime of battery and reduce risks due to
over discharge.
Page 7

MAIN FEATURES
05
Memory Preset
The charger can store up to 0 different charge/discharge profiles for
your convenience. You can keep the data pertaining to program setting of
the battery of continuous charging or discharging. Users can call out these
data at any time without any special program setting.
Terminal Voltage Control (TVC)
The charger allows user to set the charge/dischareg and voltage.
Capacity Limit
The charging capacity is always calculated as the charging current
multiplied ba time. if the charging capacity exceeds the limit, the process
will be terminated automatically when you set the maximumvalue.
Processing Time Limit
You can also limit the maximum process time to avoid any possible
defect.
PC Control Software ”Charge Master ”
Please download the ''PC Monitor” software on our website:
www.ev-peak.com. There is mini USB port in the charge which can be used
to connect it to the PC. You need optional USB cable (USB A Male to Mini B
Male) which is not included in the package. The free “Charge Master”
software gives you unparalleled ability to operate the charger through your
computer. You can update firmware from “Charge Master”.
Inner Resistance of Battery Pack
Measure Inner resistance of battery pack inclusively all connections and
leads.
Regenerative Discharging
The user can transfer the battery energy to the car battery or other
energy storage equipment.
Page 8

WARNING AND SAFETY NOTES
06
These warnings and safety notes are particularly
important. Please follow the instructions for
maximum safety; otherwise the charger and the
battery can be damaged or at worst it can cause
a fire.
Never leave the charger unattended when it is connected to its power
supply. If any malfunction is found, TERMINATE THE PROCESS AT ONCE
and refer to the operation manual. If any malfunction is found,
TERMINATE THE PROCESS AT ONCE and refer to the operation manual.
Keep the charger well away from dust, damp, rain, heat, direct
sunshine and vibration. Never drop it.
The allowable DC input voltage is 11~24V DC.
This charger and the battery should be put on a heat-resistant,
noninflammable and nonconductive surface. Never place them on a car
seat, carpet or similar. Keep all the inflammable volatile materials away
from operating area.
Make sure you know the specifications of the battery to be charged or
discharged to ensure it meets the requirements of this charger. If the
program is set up incorrectly, the battery and charger may be damaged.
It can cause fire or explosion due to overcharging.
To avoid short-circuiting between the charge lead, always connect the
charge cable to the charger first, then connect the battery. Reverse the
sequence when disconnecting.
Page 9

WARNING AND SAFETY NOTES
07
Standard Battery Parameters
3.7V/cell
3.7V/cell
4.2V/cell
3.8V/cell
≦1C
3.6V/cell
4.1V/cell
≦1C
3.3V/cell
3.6V/cell
3.3V/cell
≦4C
3.0-3.3V/cell 2.9-3.2V/cell
2.6-2.9V/cell
1.2V/cell
1.5V/cell
n/a
1C-2C
1.2V/cell
1.5V/cell
n/a
1C-2C
2.0V/cell
2.46V/cell
n/a
≦0.4C
0.1-1.1V/cell 0.1-1.1V/cell
1.8V/cell
3.7V/cell
4.35V/cell
3.85V/cell
≦1C
3.1-3.4V/cell
Nominal
Voltage
Max Charge
Voltage
Storage
Voltage
Allowable
Fast Charge
Min.Discharge
Voltage
LiPo
LiIon LiFe
NiCd MiMH
PbLiHV
※
Be very careful to choose the correct voltage for different types of
battery otherwise you may cause damage to the batteries. Incorrect
settings could cause the cells to fire or Explode.
Never attempt to charge or discharge the following types of
batteries
● A battery pack, which consists of different types of cells (including
different manufacturers)
● A battery that is already fully charged or just slightly dis charged.
● Non-rechargeable batteries (Explosion hazard).
● A faulty or damaged battery.
● A battery fitted with an integral charge circuit or a protection circuit.
● Batteries installed in a device or which are electrically linked to other
components.
● Batteries that are not expressly stated by the manufacturer to be
suitable for the currents the charger delivers during the charge
process.
Please bear in mind the following points before commencing
charging
● Did you select the appropriate program suitable for the type of
battery you are charging?
● Did you set up adequate current for charging or discharging?
● Have you checked the battery voltage? Lithium battery packs can be
wired in parallel and in series, i.e. a 2 cell pack can be 3.7V (in parallel)
or 7.4V (in series).
● Have you checked that all connections are firm and secure? Make
sure there are no intermittent contacts at any point in the circuit.
Page 10

WARNING AND SAFETY NOTES
08
Charging
During charge process, a specific quantity of electrical energy is fed into
the battery. The charge quantity is calculated by multiplying charge current
by charge time. The maximum permissible charge current varies depending
on the battery type or its performance, and can be found in the information
by the battery manufacturer. Only batteries that are expressly stated to be
capable of quickcharge are allowed to be charged at rates higher than the
standard charge current.
Connect the battery to the terminal of the charger: red is positive and
black is negative. Due to the difference between resistance of cable and
connector, the charger can not detect resistance of the battery pack, the
essential requirement for the charger to work properly is that the charge
lead should be of adequate conductor cross-section, and high quality
connectors which are normally goldplated should be fitted to both ends.
Always refer to the manual by battery manufacturer about charging
methods, recommended charging current and charging time. Especially,
the lithium battery should be charged according the charging instruction
provided by the manufacturer Strictly.
Attention should be paid to the connection of lithium battery espe cially.
Do not attempt to disassemble the battery pack arbitrarily. Please get
highlighted that lithium battery packs can be wired in parallel and in series.
The main purpose of discharging is to clean residual capacity of the
battery, or to reduce the battery voltage to a defined level. The same
attention should be paid to the discharging process as charging. The final
discharge voltage should be set up correctly to avoid deep-dis-charging.
Lithium battery can not be discharged to lower than the minimum voltage,
or it will cause a rapid loss of capacity or a total failure.
Generally, lithium battery doesn't need to be discharged. Please pay
attention to the minimum voltage of lithium battery to protect them.
Lithium batteries are recommended to be discharged partially rather than
fully. Frequent full discharging should be avoided if possible.
Discharging
Page 11
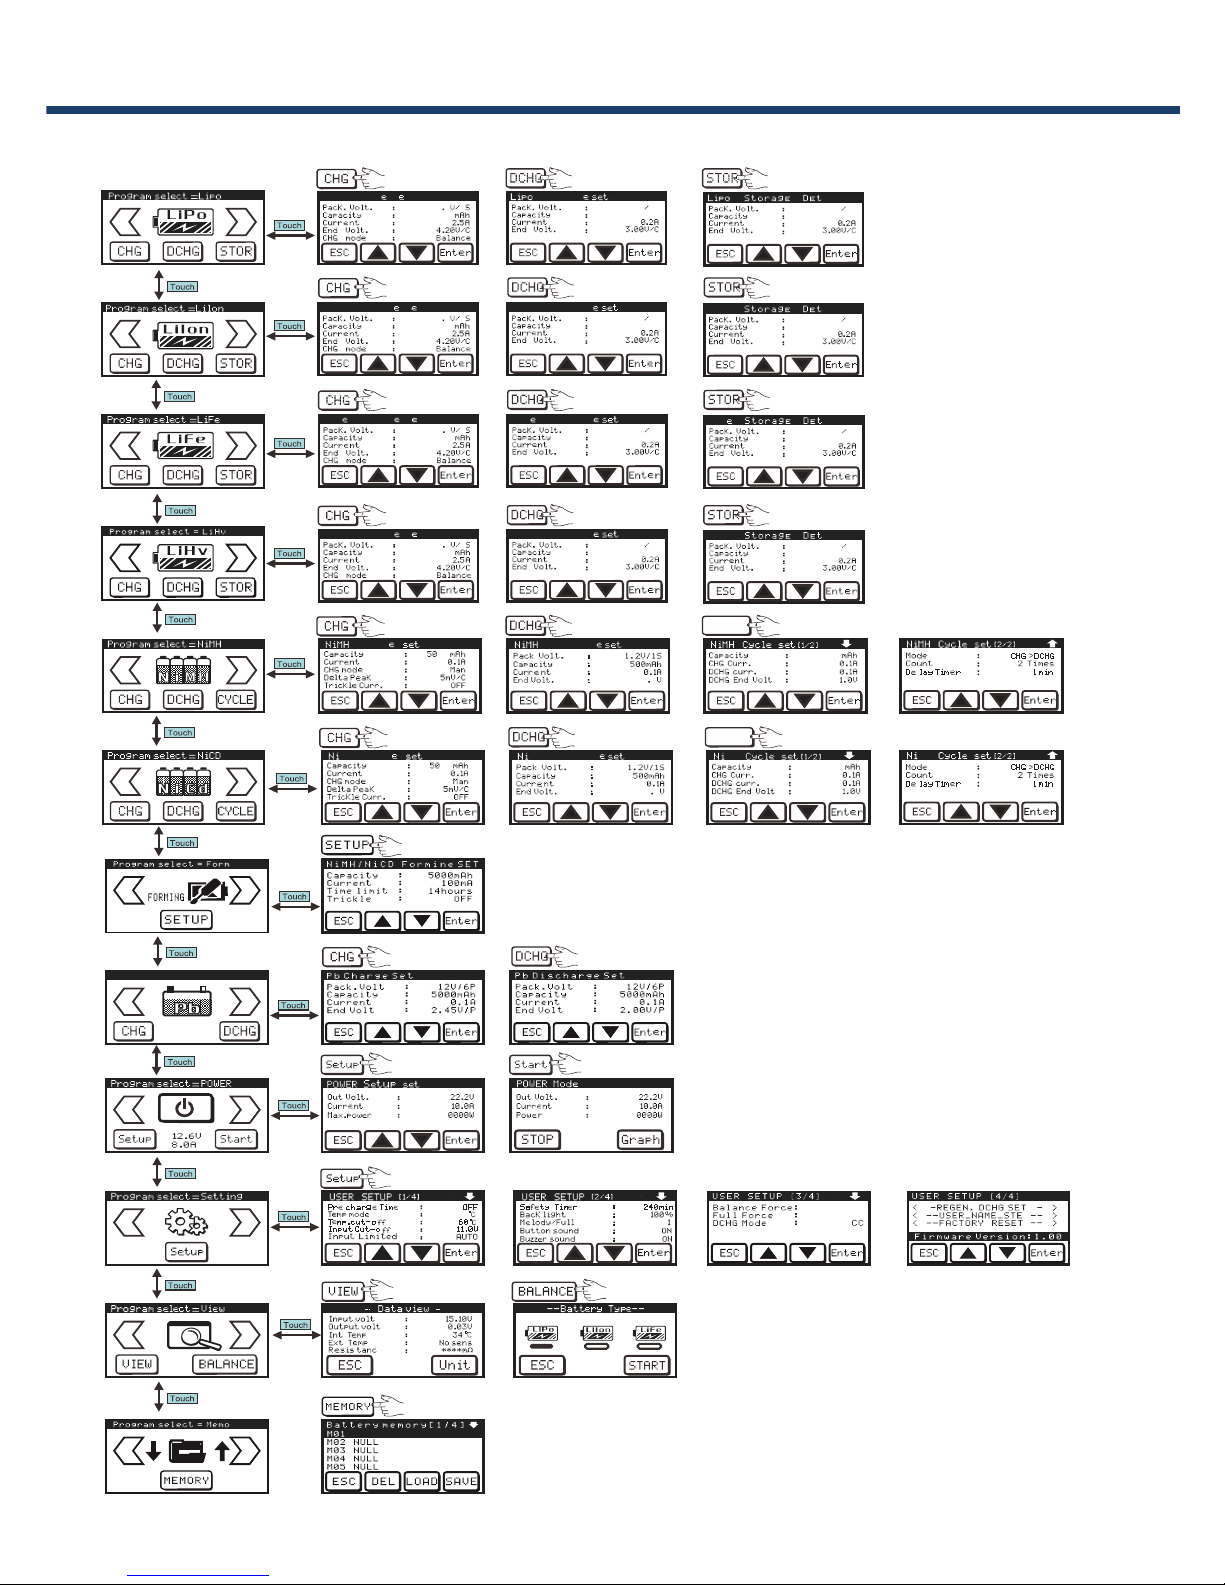
PROGRAM FLOW CHAT
09
14.8 V 4S
5000 mAh
Discharg
5000
1
LiPo C h a r g S t
4
8
4
14.8 V 4S
5000 mAh
14.8 V 4S
5000 mAh
Discharg
5000
1
LiIon C h a r g S t
4
8
4
14.8 V 4S
5000 mAh
LiIon
LiIon
14.8 V 4S
5000 mAh
Discharg
5000
1
LiF
LiF
Charg S t
4
8
4
14.8 V 4S
5000 mAh
LiF
14.8 V 4S
5000 mAh
Discharg
5000
1
LiHv
LiHv
Charg S t
4
8
4
14.8 V 4S
5000 mAh
LiHv
5000
00
Charg
1
0
Discharg
CYCLE
5000
00
Charg
1
0
Discharg
CYCLE
Cd
Cd
Cd
Cd
-1. 00V
0.1A
LiPo 6 S C= 10. 0A
Page 12

PROGRAM DESCRIPTION
10
NiMH
NiCd
Pb
Description
Charger automatically detects the connected NiMH/NiCd
battery and control the charging current in the affordable
range, and limit the maximum current does not exceed
the setting value.
Attention: Ensure to set the maximum charging current,
or it may overcharge and damage the battery.
Charger will charge the battery with setting current.
To increase the remaining usable battery life, cycling is
strongly recommended. charger supports 1-5 times of
charge﹥discharge or discharge﹥charge cycle.
LiPo
Lilon
LiFe
LiHV
Charger will discharge the battery with setting current,
operation same as lithium battery.
This mode is for charging Pb battery
This mode is for discharging Pb battery.
Fast charge
Discharge
Storage
Balance Charge
Auto mode
Man mode
Discharge
Cycle
Charge
Discharge
This charging mode is for charging LiPo /LiFe /Lilon /LiHV
battery in normal mode without balancing.
This mode is for discharging LiPo /LiFe /Lilon /LiHV battery.
This charging mode is for charging LiPo/ LiFe/ Lilon/ LiHV
battery in normal mode.
This program is for discharging LiPo/ LiFe/ Lilon/LiHV
battery which will not be used for long time.
Depends on different battery types, the operating programs are
different
Battery
type
Operation
Program
Page 13

OPERATION PROGRAM
11
LiPo 4S CHG
10
2500
Ext
32.8
5000
1
LiPo Charg S t
4
8
4
Previous menu/Next menu
Charge
Discharge
Storage
Back to the previous menu
Up
Down
Enter
Next screen
Stop
View cell voltage and internal
resistance
View voltage curve during
charging or discharging
1.Touch Screen Operation
1). Press the Left and Right Arrows on the LCD Touch Screen to scroll
through the main menu screens.
2). Press the action at the button of the LCD Touch Screen to enter that
menu.
3). Press a parameter to highlight that parameter.
4). Press the Up and Down Arrows to edit the parameter.
5). Press “Enter” for more than 2 seconds to save the parameter and start
working.
6). If there is more than one screen of parameters, press the top right
corner of the LCD Touch Screen to scroll through the parameter screens.
7). Press “ESC” to return to the previous menu.
8). Press “Stop” to stop working.
Page 14

OPERATION PROGRAM
12
Ensure to connect the battery to balance port when charging LiPo, Lilon,
LiFe and LiHV battery under balance mode.
The following describes the action process of the charger, in order to
lithium polymer battery charging program as an example.
1) Connecting power
You can attach R1 directly to a 11-32V output power supply via the XT60
input cable.
2) Connecting The Battery
Important!!! Before connecting a battery it is absolutely essential to
check one last time that you have set the parameters correctly. If the
settings are incorrect, the battery may be damaged, and could even burst
into flames or explode. To avoid short circuits between the banana plugs,
always connect the charge leads to the charger first, and only then to the
battery. Reverse the sequence when disconnecting the pack.。
3)Balance Socket
The balance wire attached to the battery must be connected to the
charger with the negative marking. Take care to maintain correct polarity!
(See the wiring diagram below.)
2.Connection
WARNING:
Failure to connect as shown in this diagram will damage this charger.
Toavoid short circuit between the charge lead always connect the
chargecable to the charger first, then connect the battery. Reverse the
sequence when disconnecting.
1. Connect the charger DC input cable
to a power source.
2. Connect the charge lead and balance
adapter board to charger, making
sure that the positive and negative
connectors are not reversed.
3. Insert the battery balance lead to balance adapter board.
4. Connect the battery connector to the charge lead.
5. Select the program and charging settings.
6. Start battery charging
Connection Steps
Page 15

13
OPERATION PROGRAM
5000
1
LiPo
LiPo C4S CHG
harg S t
10
4
8
4
2500
Ext
32.8
3.Charge program
Set cell count and pack voltage
Set battery capacity
Set charge current
Set end voltage
Set charge mode
Press Enter>2S=Start
Elapsed time
Go to next screen
Real time charged capacity
Real time current
Real time pack voltage
Internal resistance
External temperature
1).Charging status
In this program, user can set the cell count, battery pack voltage,
battery capacity, charge current, end voltage and charge mode, press
Enter for more than 2 seconds to start charging.
Notice: According to the battery capacity setting, charger will
automatically set the charge current at a rate of 1C.
Page 16
14
OPERATION PROGRAM
117 33
Data LiPo Graph
1 20m
2 15m
3 15m
4 20m
5
6
---
-
m
m
LiPo 4S CHG
10
Go to previous screen
Input voltage
End voltage
Internal temperature
Safety timer
Cut-off capacity
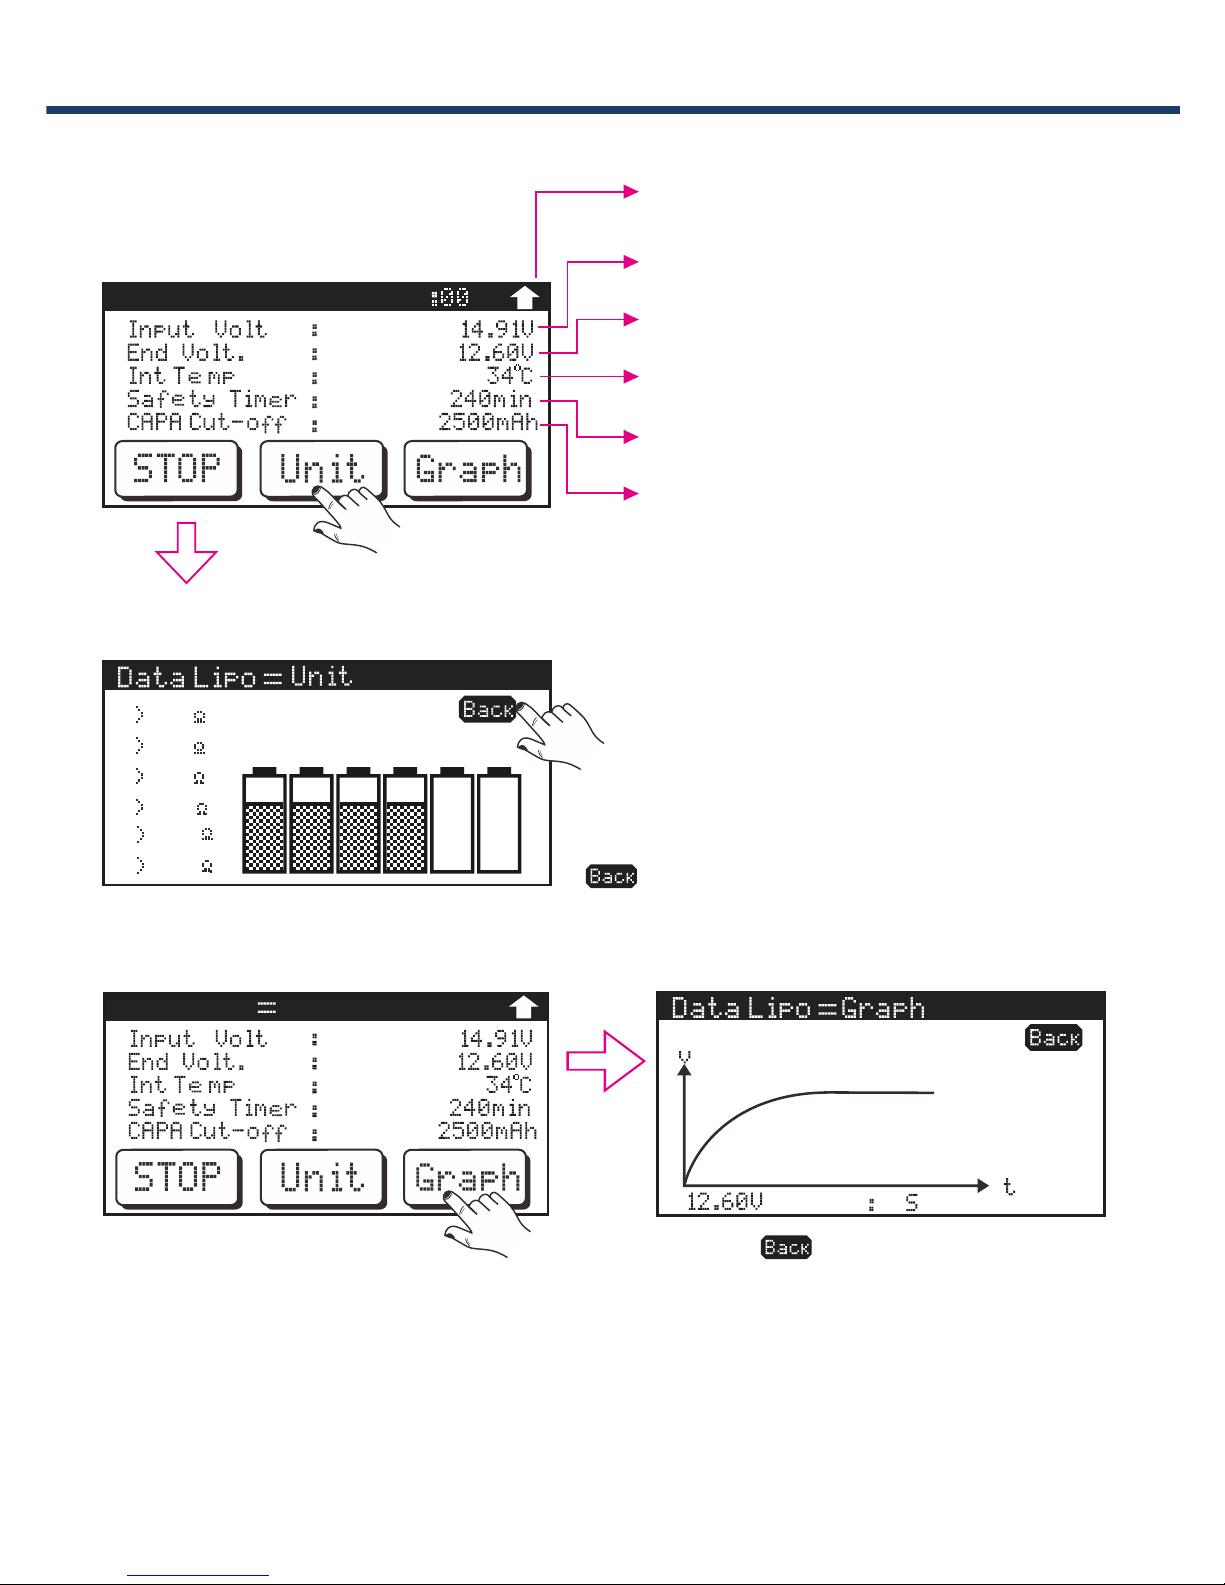
2). View cell voltage and cell resistance
3). View voltage curve graph during charging
Back to previous screen
Back to previous screen
4). Stop process finished
Press the “STOP” button to stop charging
5). Process finished
Charger will alarm once program finished
Page 17
15
OPERATION PROGRAM
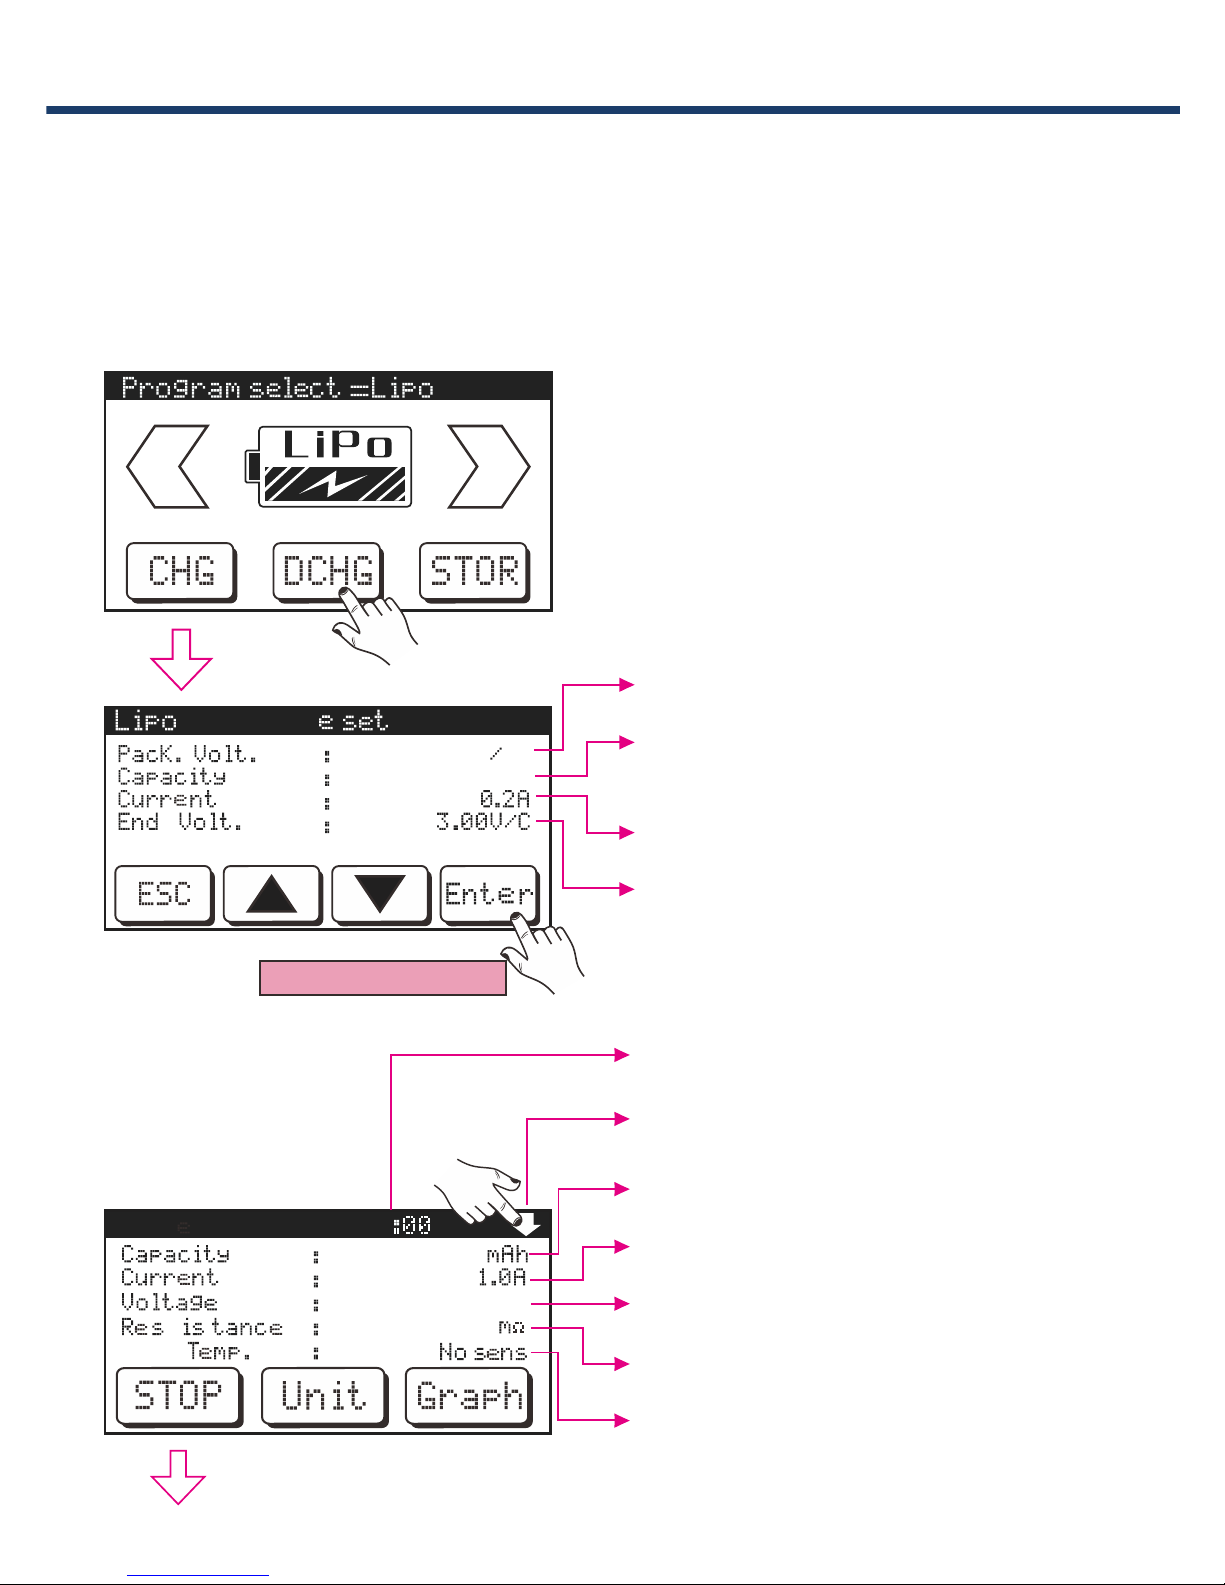
4.Discharge program
14.8V 4S
14.8V
5000mAh
Discharg
LiPo 4S DCHG
10
2500
Ext
32.8
Set cell count and pack voltage
Set battery capacity
Set discharge current
Set end voltage
1). Discharging status
Elapsed time
Go to next screen
Real time discharged capacity
Real time pack voltage
Internal resistance
External temperature
Press Enter>2S=Start
Real time current
In this program, user can set the cell count, battery capacity, discharge
current and end voltage.
Attention: Set the correct discharge end voltage, or it will cause over
discharge and damage the battery.
Page 18

16
OPERATION PROGRAM
117 33
Data LiPo Graph
LiPo 4S DCHG
10
1 20m
2 15m
3 15m
4 20m
5
6
---
-
m
m
Go to previous screen
Input voltage
End voltage
Internal temperature
Safety timer
Cut-off capacity
2).View cell voltage and cell resistance
3).View voltage curve graph during discharging
Back to previous screen
Back to previous screen
4).Stop process finished
Press the “STOP” button to stop charging
5).Process finished
Charger will alarm once program finished
Page 19
17
OPERATION PROGRAM
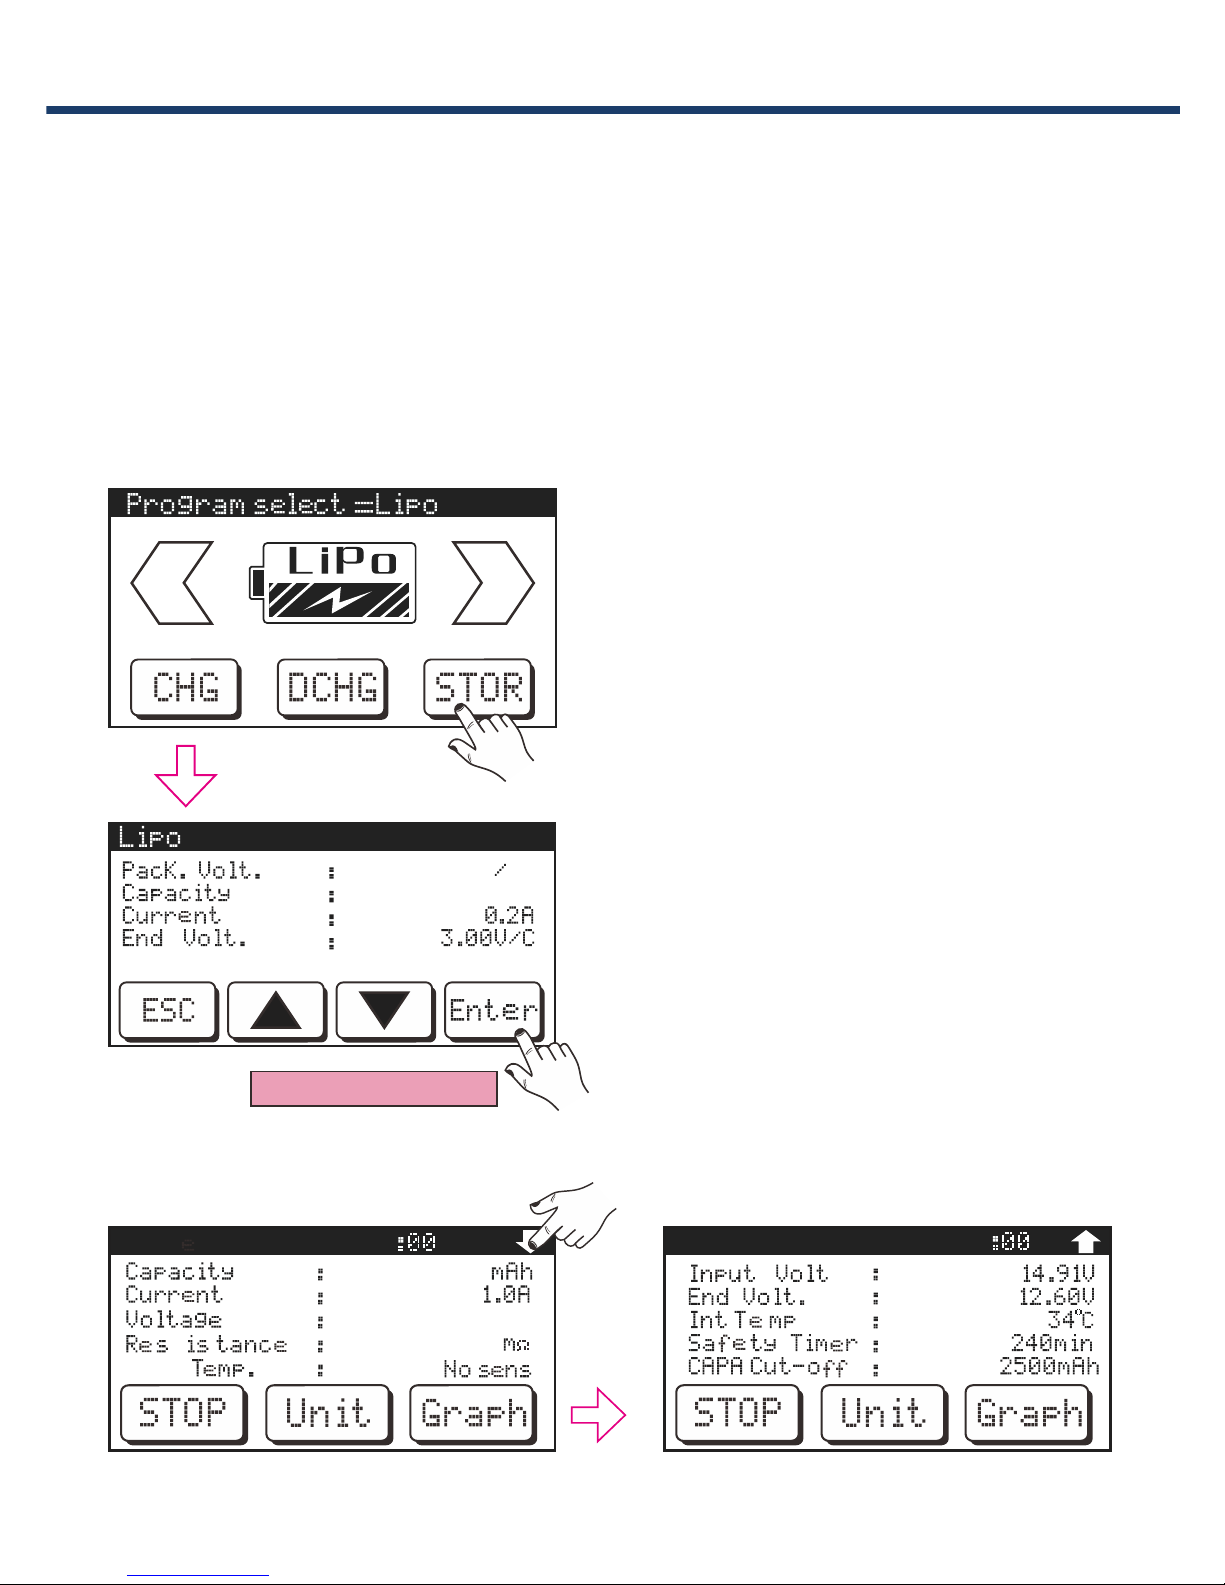
5.Storage Program for Lithium Battery
14.8V 4S
14.8V
5000mAh
Real time status during storage
LiPo 4S DCHG
10
LiPo 4S DCHG
10
2500
Ext
32.8
STORAGE
Press Enter>2S=Start
“STORAGE” is a function which is specialized for Lithium battery
storage, its operation is same as the discharge program. To store for a
long time and protect useful time of the battery, it automatically charge/
discharge the battery to a safe voltage.
For different battery type, the end
voltage are different, LiPo:3.85V,
LiHV:3.85V, LiFe:3.3V, Lilon:3.75V. This
is a intelligent program, it detects the
battery voltage and automatically
charge or discharge the battery. make
sure to connect the battery to balance
port when use this program.
Page 20

18
OPERATION PROGRAM
6. Battery Memory
LiPo 6S C= 10. 0A
LiPo 6S C= 10. 0A
LiPo 6S C= 10. 0A
The charger can store up to 20 different charge/discharge profiles for
your convenience, and the stored profiles can be recalled quickly without
having to go through the setup process.
1). Save
When you finish setting the charging/
discharging/storage parameters, please
press ESC to return to the main menu
screen, and go to MEMORY screen.
Press SAVE, the parameters you just
entered will be saved.
2). Recall
To use a memory file, press it, then
press LOAD
3). Delete
To delete a memory file, press it, then
hold DEL for more than 2 seconds.
Page 21
OPERATION PROGRAM
19
1 20m
2 15m
3 15m
4 20m
5
6
---
-
m
m
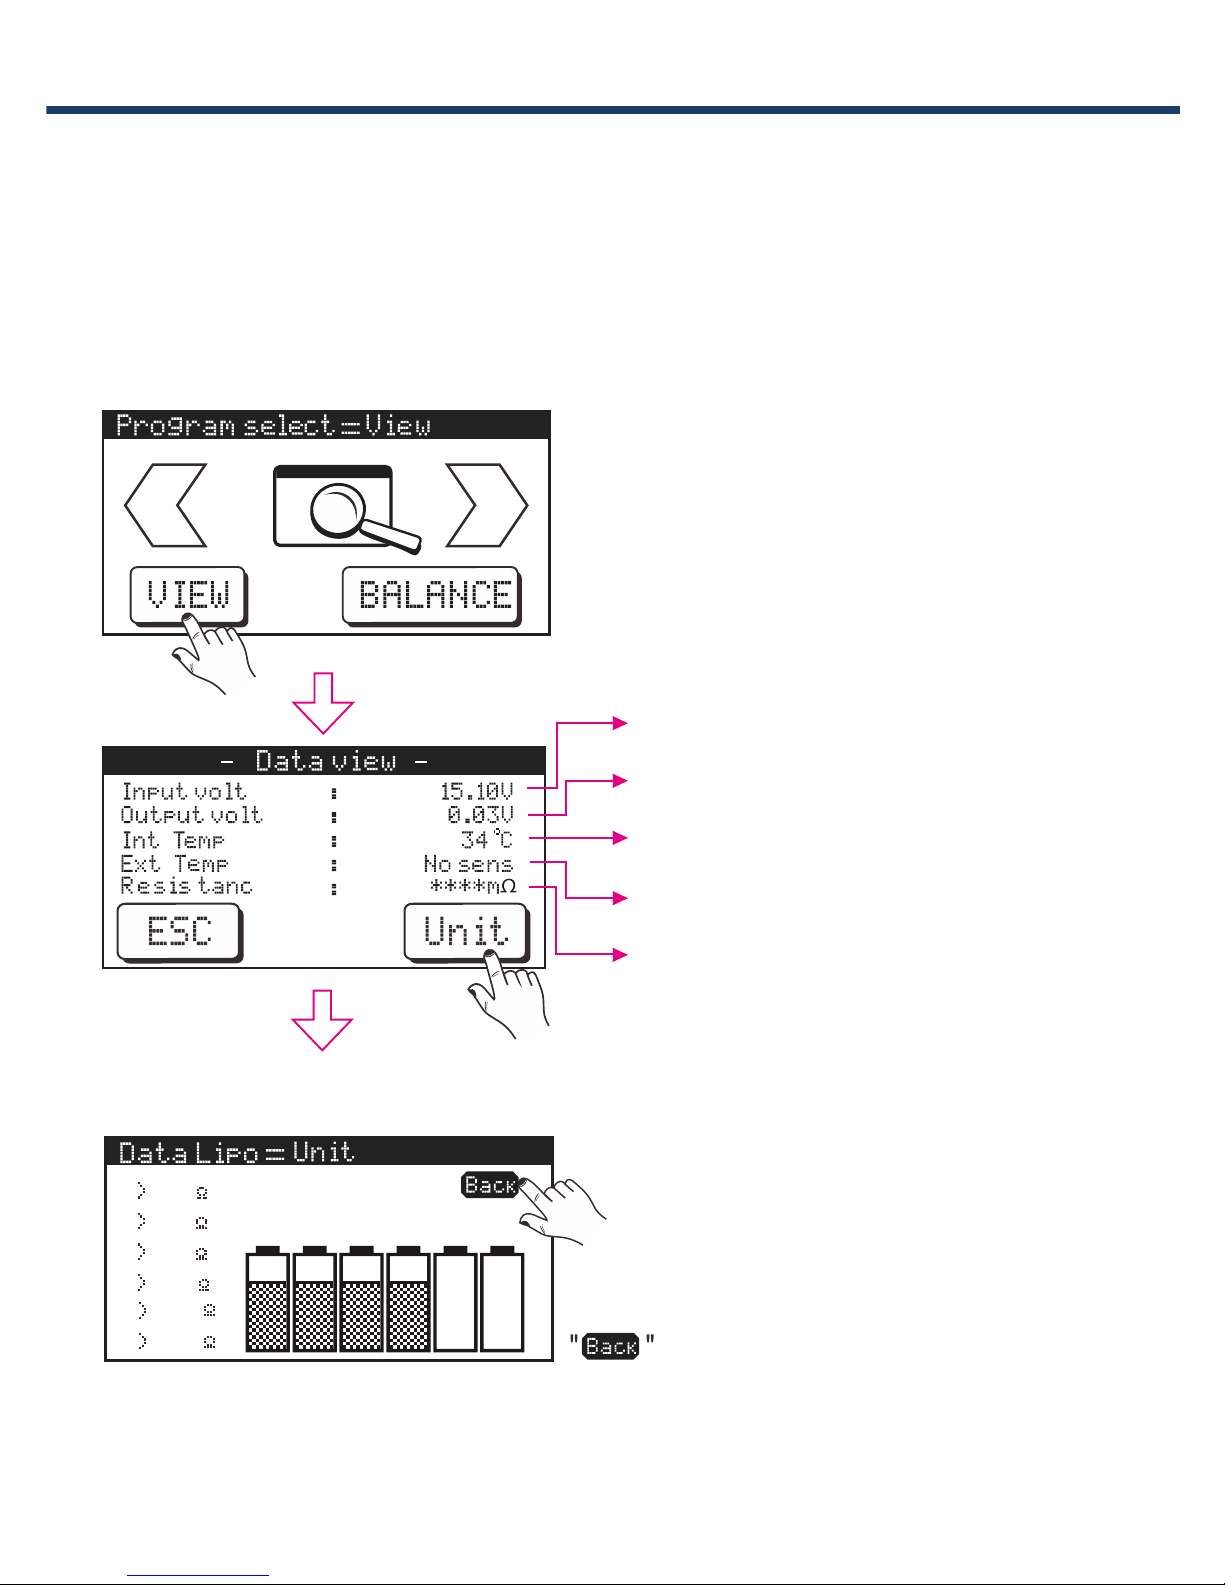
7.Data view
With this program, user can check the battery cell voltage, internal
resistance, input voltage, output voltage, inner temperature and external
temperature. Please connect the battery to charger output port. (both main
output and balance port).
Input voltage
Output voltage
Internal temperature
External temperature
Internal resistance
Cell voltage and cell resistance
Back to the previous screen
Page 22
20
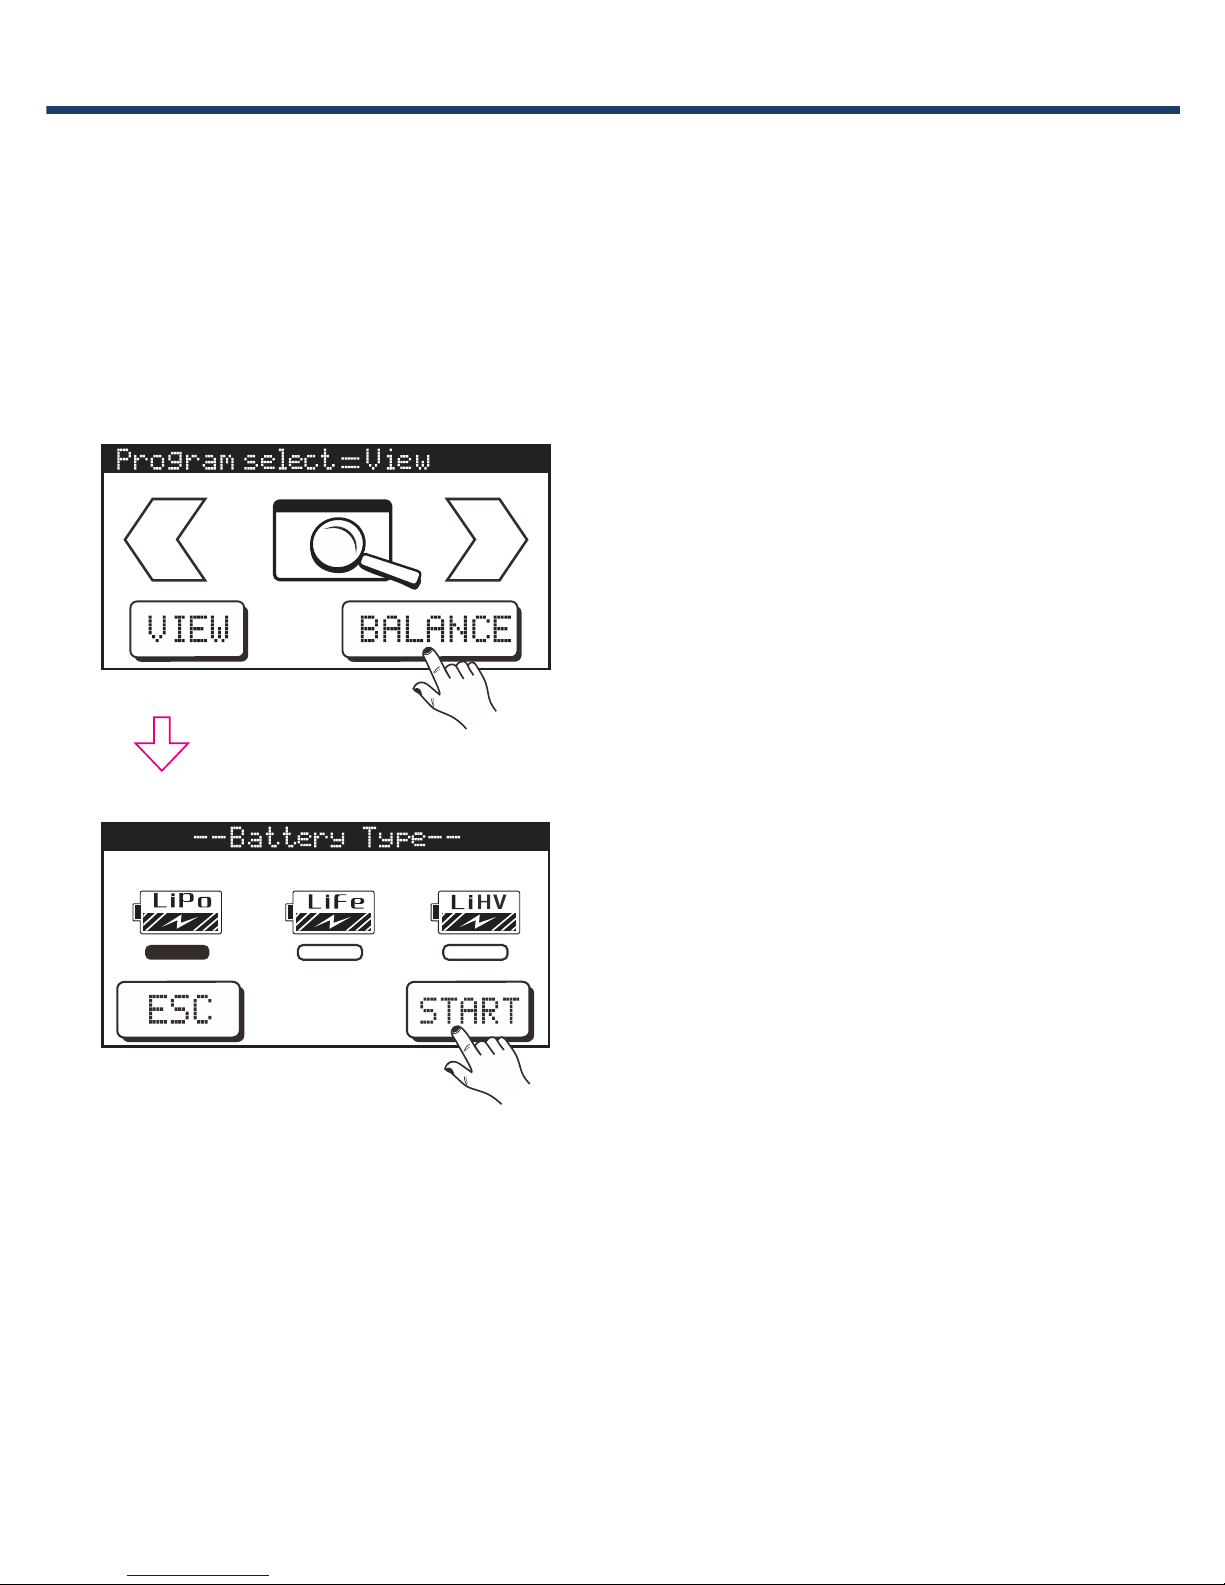
OPERATION PROGRAM
This function is for unbalanced lithium battery pack, set the correct
battery type when using this program, or it will damage the battery.
The equalizer circuit will work independently and reduce the voltage
difference to below 0.02V,which can prolong the lifetime of battery and
reduce risks due to over discharge.
CAUTION:
Please check the battery type and settings carefully, or it may damage
the battery
8.Lithium battery balancer
Page 23
OPERATION PROGRAM
21
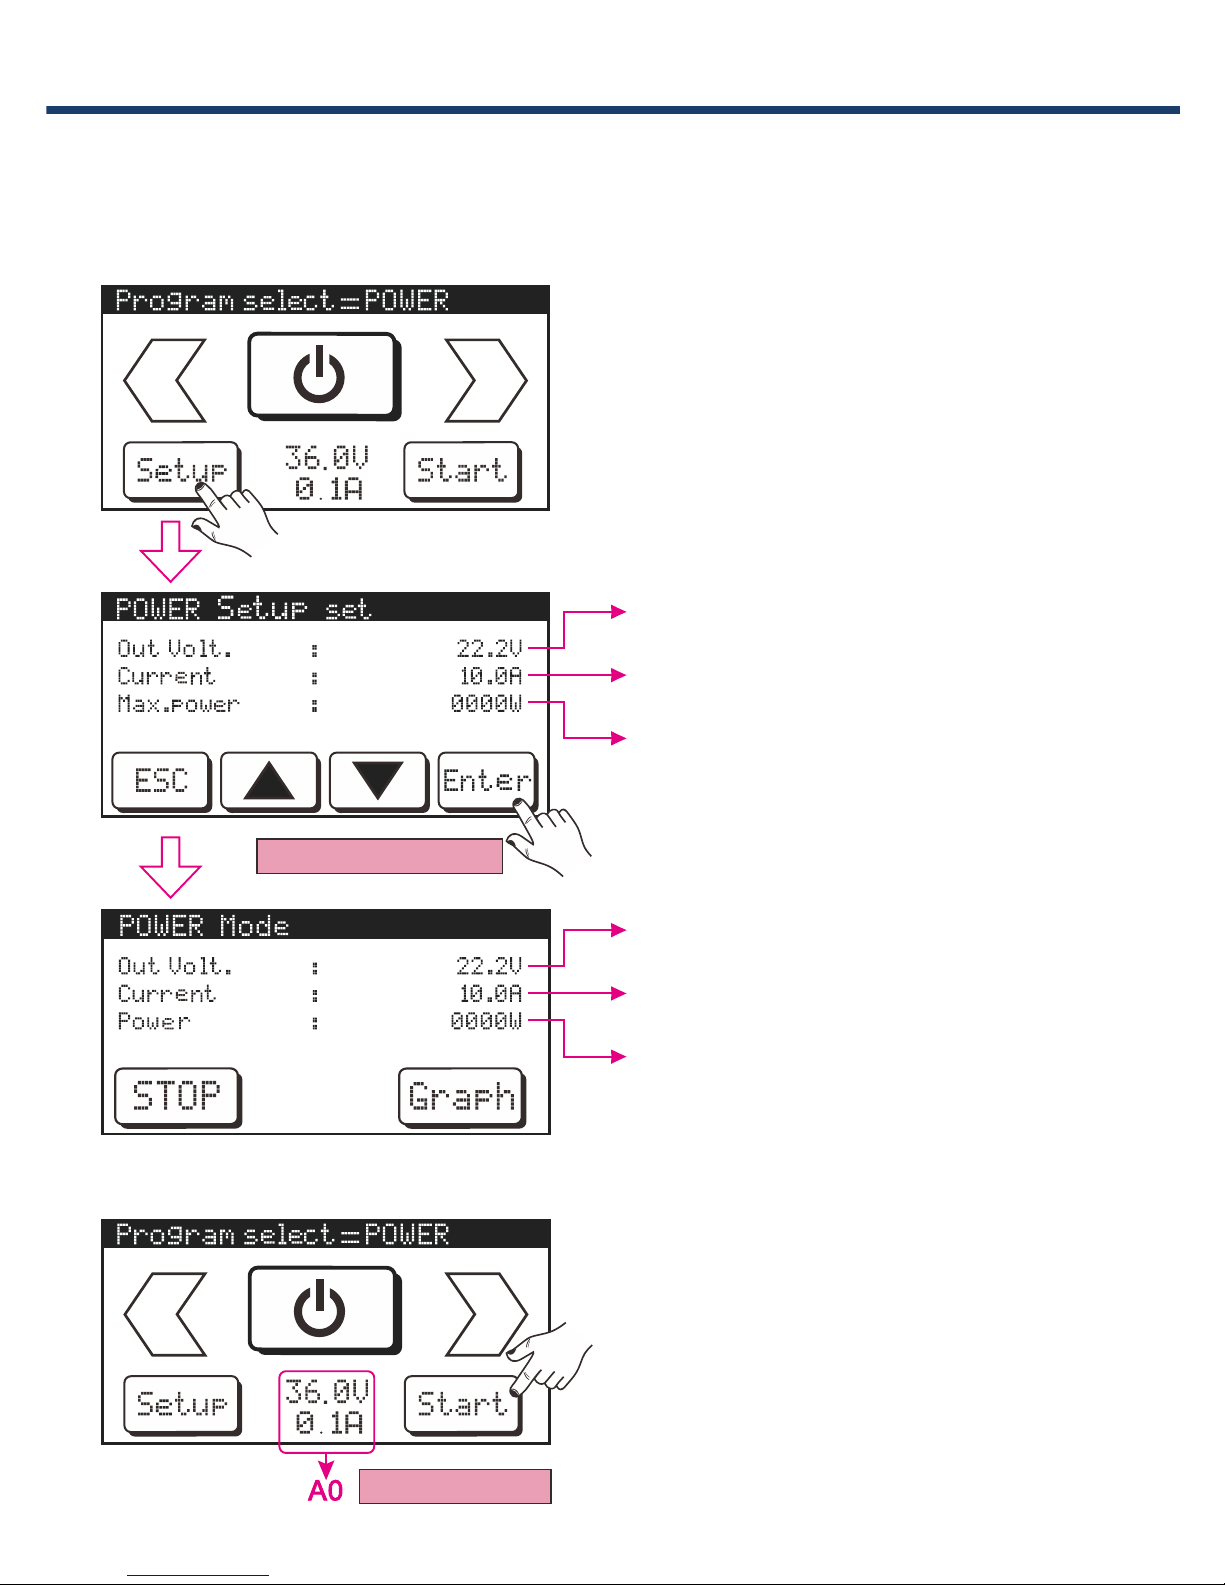
9.Digital Power
In this mode, charger can provide a output power of DC 3.0V-24V for
other device.
Press Enter>2S=Start
Press Start >2S
Set output voltage
Set output current
Set output power
Real time output voltage
Real time output current
Real time output power
A0: It shows the last setting here,
press Start for more than 2 seconds
to start if do not need any changes.
Page 24
OPERATION PROGRAM
22
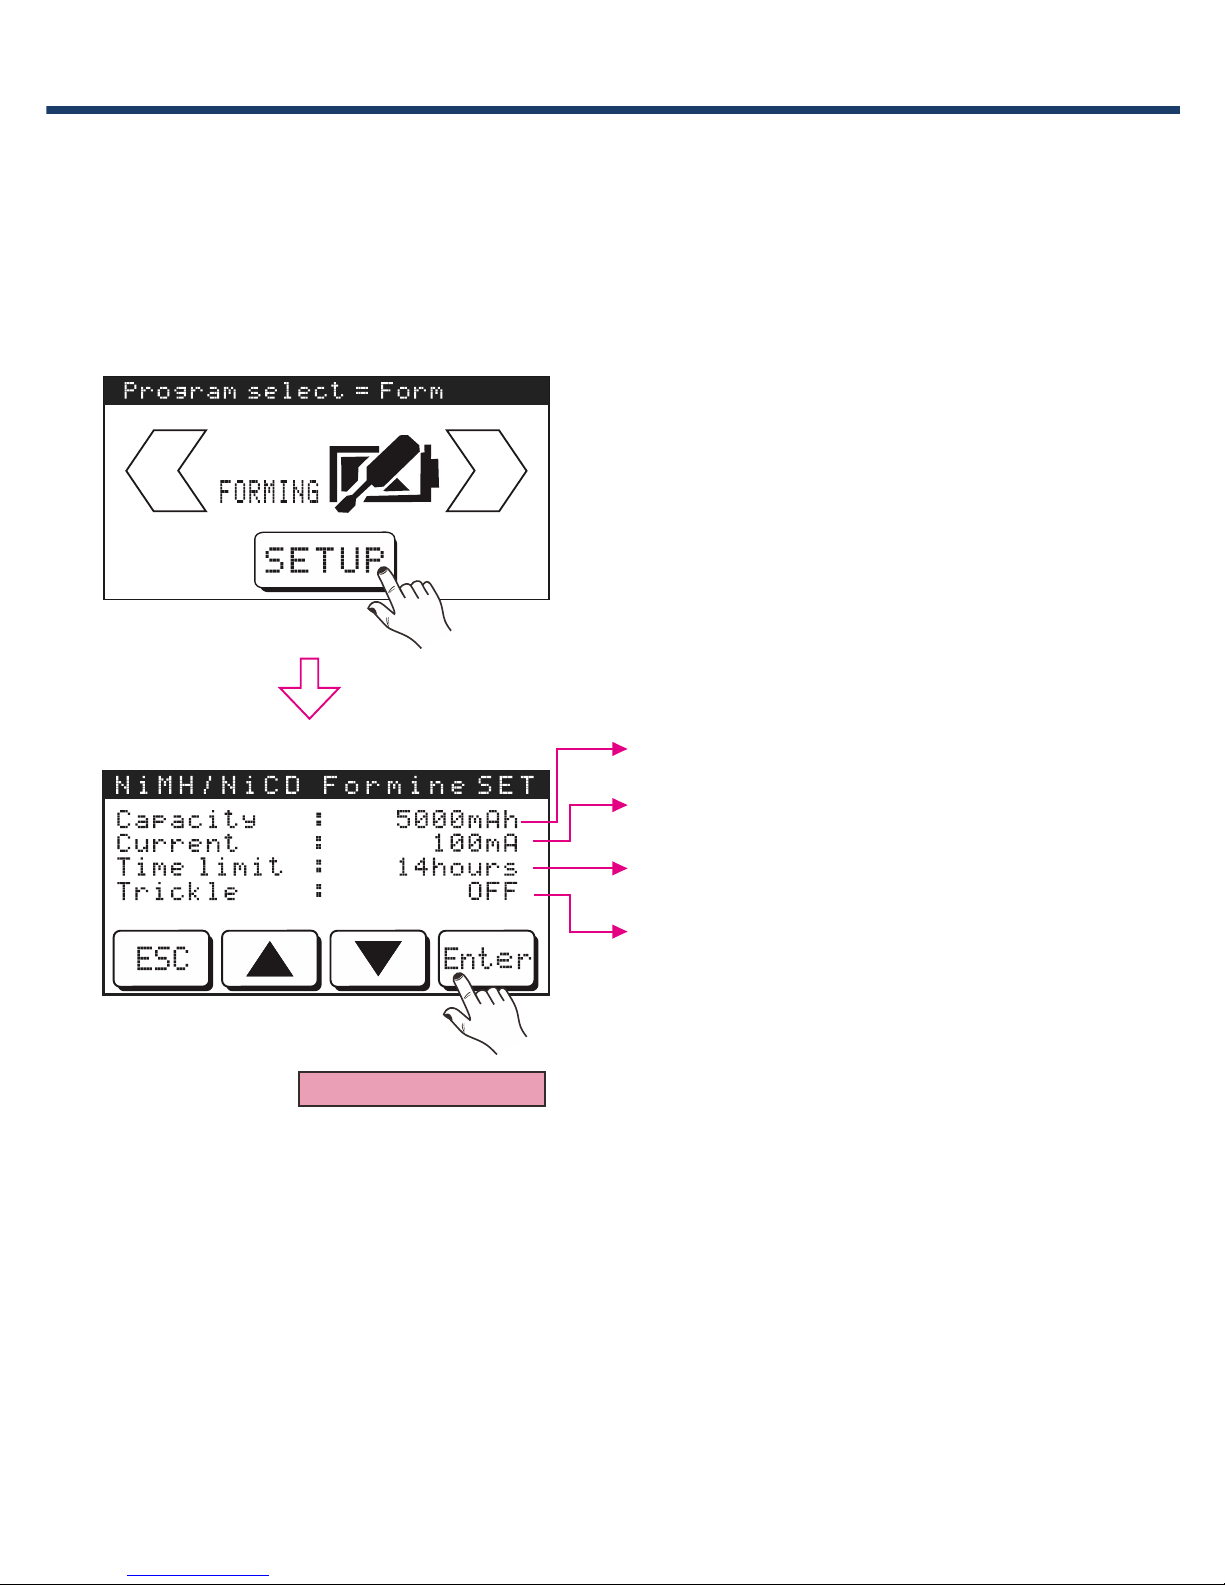
10. Forming Charge
For long time not used NiMH/NiCd battery, charger will charge the
battery pack by a low current for a long time, which can depolarize and
reactive battery.
Capacity
Current, ranges from 10mA to 1000mA
Time limit,ranges from 1-24 hours
Trickle,OFF/AUTO/50mA-200mA
Press Enter>2S=Start
Page 25
23
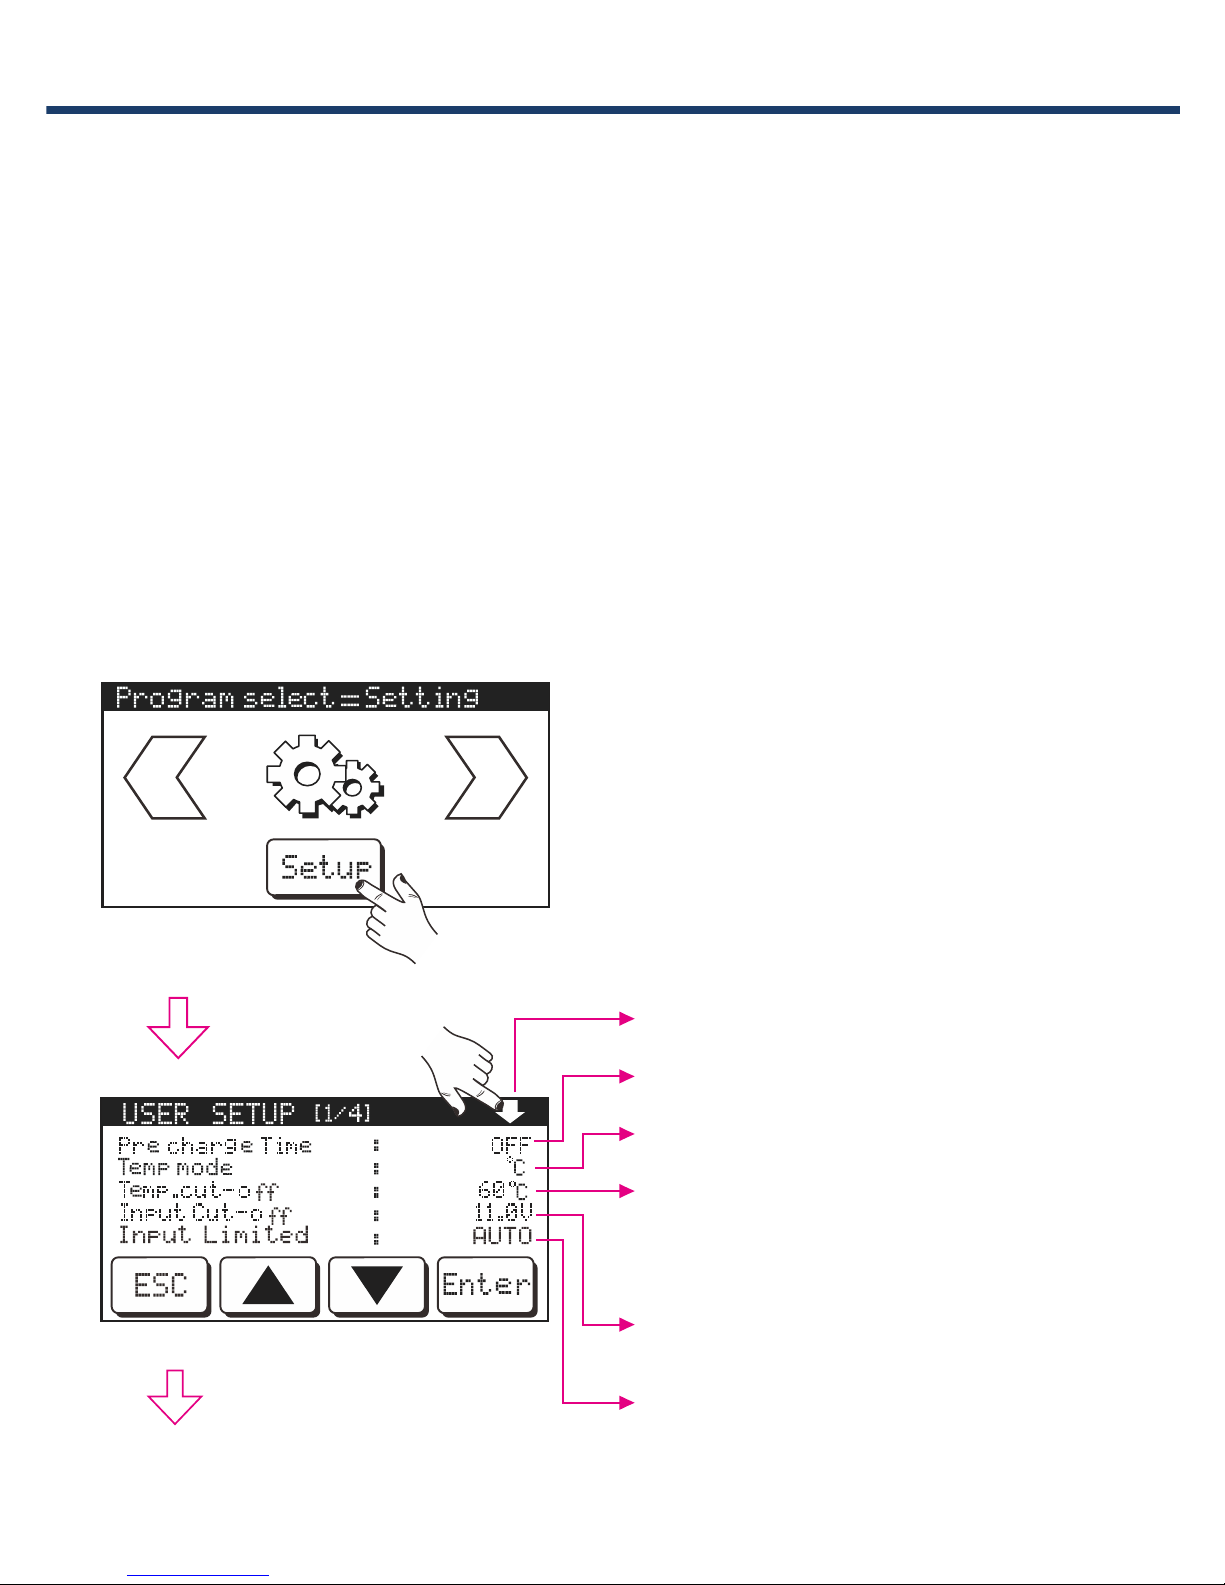
SYSTEM SETTING
Go to next screen
Set precharge time: OFF/1-10min.
Set temperature unit ℃/℉
Set cut-off temperature, ranges
from 20 ℃ to 80℃(68-176℉)
Set input voltage, ranges from
11.0V to 32.0V
Set Input current limited value,
1.0A-55.0A/AUTO
Notice: Please set the parameters in Setup menu when charger is powered
on for the first time.
This charger can recognize battery cell count automatically. It has a
precharge function which can reactive the slightly over discharged battery.
user can set the precharge time(normally 2 minutes) in the menu. the more
battery capacity, the more time needed.
Attention: In the normal charge mode, always turn off the precharge
program. DO NOT use this function unless you know the battery status very
well. Stop the process immediately when battery voltage increase quite few,
or it may cause danger!!!
Page 26

SYSTEM SETTING
24
-1.00V
0.1A
Go to next screen
Set safety timer:OFF/1-720min
Set screen brightness:
OFF/10%-100%
Set melody
Button sound:ON/OFF
Set buzzer volume:ON/OFF
Go to next screen
Set regenerative discharge parameter: Function ON/OFF,discharge
current, End voltage
Set balance force trigger voltage,
for LiPo/LiFe/LiIon/LiHV battery
ONLY.
Set full force
Set discharge mode CC or CV, for
LiPo/LiFe/LiIon/LiHV/Pb battery
ONLY.
Page 27

SYSTEM SETTING
25
SER NAME SETUP
A x B C D E F G H I J K L M .
N O P Q R S T U V W X Y Z ,
0 1 2
USER_NAME
3 4 5 6 7 8 9 + -
-
-
---
Notice: When in this program, Pb battery is recommended to connect to
the charger input port, DO NOT use NiMH/NiCd as a “battery power”.
Factory reset: This operation will delete all your personal data, and reset all
settings to the manufacturer default settings.
DO NOT use it unless you are sure it is necessary.
User can set the user name and it will be displayed once charger
powered on.
Page 28

26
ERROR MESSAGE
Incorrect polarity connected
Process interrupted
Output short circuit
Input voltage error
Charger fault
Battery total voltage is lower than setting value,
please check the cell count.
Battery total voltage is higher than setting
value, please check the cell count.
Voltage of one cell in the battery pack is too low.
Page 29

ERROR MESSAGE
27
Voltage of one cell in the battery pack is too high.
The battery balance connection is wrong. Please
check the connector and cable.
Temperature too high, please check the
temperature sensor and take cooling measures.
Output power is higher than setting in digital
power mode
Output current is higher than setting in digital
power mode
Limited time is reached
Limited capacity is reached
External temperature too high
Page 30

28
AUTHENTICATION INFORMATION
R1
Page 31

29
www.ev-peak.cn
SHENZHEN EV-PEAK NEW ENERGY TECHNOLOGY CO.,LTD
Product specifications and information mentioned in this manual are for reference only, subject to updates without notice.
Warranty
Thank you for purchasing this charger, we will do our best to provide you
with a comprehensive after-service and protect your rights. If you have
problems with this charger, please contact local distributor immediately.
We warranty this charger for a period of one year from the date of
purchase. If it has a quality problem itself, all guarantee will be free. In case
customers can not provide an effective certificate of purchase, we will
refer the date of series number of charger. If it is over one year since the
purchase date, an appropriate cost will be charged, users need bear the
transportation cost back and forth.
The warranty does not cover incorrect installation, components worn by
use, or any other problem resulting from incorrect use or handling of the
product. No liability will be accepted for any damage resulting from the
use of this product. By the act of connecting and operating this product,
the user accepts all resulting liability.
Is considered incorrect use:
1. Failure to follow instructions.
2. Improper use of the product (abusive use, out of spec, etc.).
3. Failure to adapt settings for proper function (improper connections,
wrong gearing, installation, setup, etc.).
4. Overload, overheating (disordering, melting, etc.).
5. Running in inadequate conditions (damage or rust from rain, humidity,
etc.).
6. Improper maintenance (presence of dirt, etc.).
7.Disassembly, modification by the user (modifying original connectors,
wires, components, etc.).
8. Mechanical damage due to external causes
 Loading...