

AC/DC SMART BALANCE CHARGER
INSTRUCTION MANUAL
C1-XR

TABLE OF CONTENTS
INTRODUCTION............................................................................................... 01
SPECIFICATION.................................................................................................03
MAIN FEATURES............................................................................................... 04
WARNING AND SAFETY NOTES........................................................................06
PROGRAM FLOW CHART..................................................................................09
PROGRAM DESCRIPTION.................................................................................10
OPERATING PROGRAM....................................................................................11
EXPLANATION OF BUTTONS....................................................................12
CHARGING PROGRAM.............................................................................13
DISCHARGE PROGRAM............................................................................15
LITHIUM BATTERY STORAGE PROGRAM.................................................16
BATTERY MEMORY SET AND CALL OUT...................................................17
BATTERY CHECKING.................................................................................18
SYSTEM SETUP..................................................................................................20
FAULTY OPERATION.........................................................................................22
CERTIFICATION INFORMATION........................................................................23
AFTER SALE SERVICE........................................................................................24

INTRODUTION
01
These operating instructions are designed to ensure that you quickly
become familiar with its functions. It is therefore important that you read
right through the Operating instructions, Warning and Safety Notes before
you attempt to use your new charger for the first time
EV-PEAK C1-XR integrates battery technology together with LCD screen. It is
equipped with 4 function buttons. Every operating procedure and status
change can be shown on LCD screen, making the operating procedures very
intuitive. When the battery is working, you can directly check the battery
capacity, battery voltage, charging time and internal resistance on the
screen.
C1-XR comes with a memory module. Users can edit and save parameters of
different batteries. Once the battery parameters are edited, the shortcut
for parameters will be generated on the screen, which provides a simple onclick interface for users.
C1-XR is built-in switching power supply. It can be powered up with 12V car
battery or 100-240V AC input, suitable for use with LiPo / LiFe / LiHV / Li-lon /
NiMH / NiCd / Pb battery.
Please BE SURE to read these INSTRUCTIONS, WARNING and
SAFETY NOTES before you use the charger for the first time
It can be dangerous to mishandle batteries and battery chargers, as there is
always a risk of batteries catching fire and exploding.
Please read this entire operating manual completely and attentively before
using this product, as it covers a wide range of information on operating and
safety. Or please do use this product in company with a specialist.
INTRODUTION
02
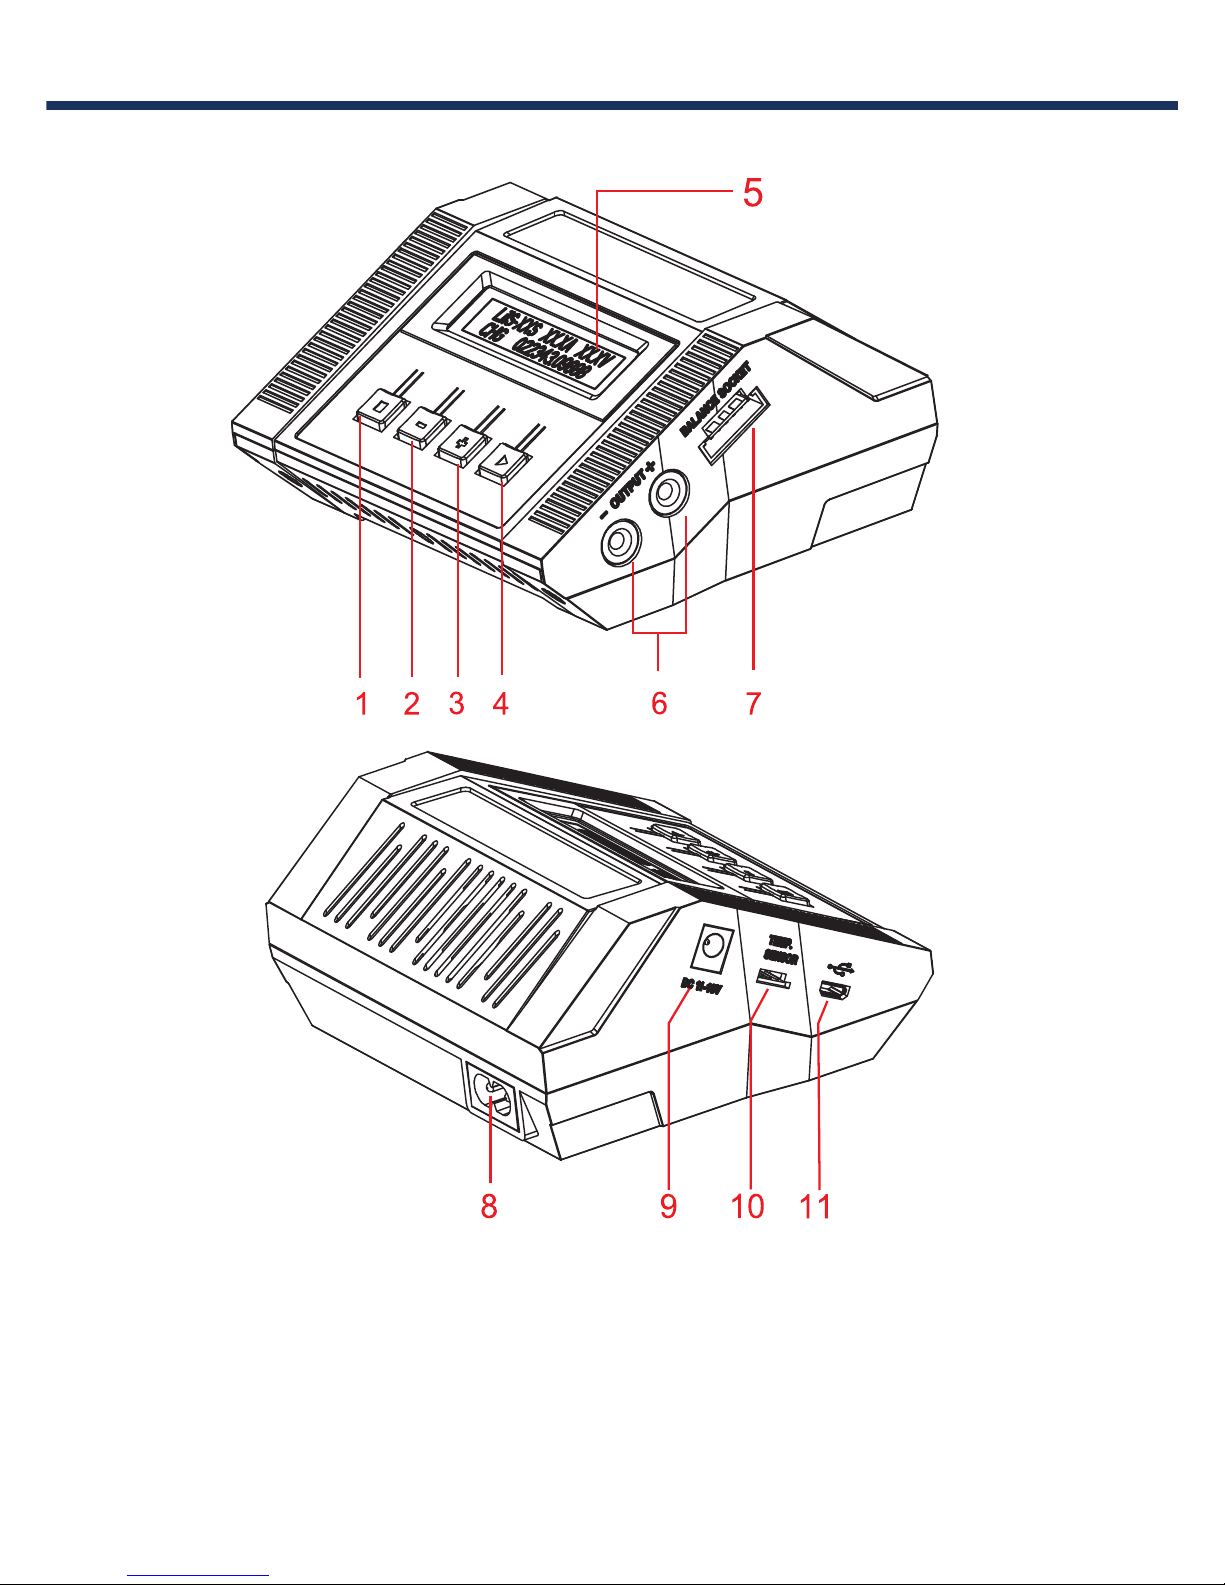
1.Mode / ESC
2.- Dec.
3.+ Inc.
4.Start / Enter
5.LCD screen
6.Main Output
7.Balance port
8.AC Input
9.DC Input
10.Temperature Sensor Port
11.Micro-USB port

SPECIFICATIONS
●Memory: 10 different charge/discharge profiles
●External port: 1-6s Balance Socket-XH, Temperature probe socket,
Battery Socket, DC input, AC Input, Micro USB for PC.
●Battery Types/cells: LiPo/Lilon/LiFe/LiHV:1-6S
NiMH/NiCd:1-15cells
Pb:2-24V
●Charge Voltage: LiPo:4.18-4.22V/cell Lilon:4.18-4.20V/cell
LiFe:3.68-3.80V/cell LiHV:4.30-4.40V/cell
●Discharge cut-off voltage: NiMH/NiCd:0.1-1.1V/cell
LiPo:3.0-3.3V/cell Lilon:2.9-3.2V/cell
LiFe:2.6-2.9V/cell LiHV:3.1-3.4V/cell
Pb:1.8V
●Control: Button
●Backlight: Blue
●Dimension: 130*115*61mm
●Charge current: 0.1A-10A
●Charge power:max.100W
●Balance current: 400mA/cell
●AC input Voltage: 100V -240V ●DC input Voltage: 11- 18V
●Display Type: LCD
●Cooling system: 1 cooling fan
●Weight: 380g
●Safety timer: 1-720min or turn off
●Discharge current: 0.1A-2.0A
●Discharge power: max.5W
03

MAIN FEATURES
04
Dual Power Input
Th e power source c an be 11 -18V DC in put, it can b e p owered u p a t a ny
pl an ce wi th a 12V ca r b at tery or 100-240 V AC in put. The pow er su pply
is bu il t i n a nd us ers c ould conne ct the AC Powe r c ord to the m ain AC
so cket directly. Wh at ’s mo re the AC in put volt ag e i s 100 -240V so that
th e use rs could use charger al l over the w orld and don’t need to worry
ab ou t a ny damage cause d by improp er input volt ag e.
Chargi ng S tatus Mon itor
Wh en th e c harg er is wo rking, you ca n che ck th e c harg ing capa ci ty,
ba tt ery v oltage, ch arging time and inte rn al resist ance on th e s creen.
Mo re i mportan t, th e v ol tage curve ca n be displ ayed on th e s cree n, so
yo u can mo nitor the chargin g sta tus.
Internal Indepen dent Lith ium Battery Balan cer
A2 0 Cha ng er em ploy s a n ind iv idual -c ell-vol ta ge balance r. It isn’ t
ne ce s. sa ry to connect an extern al balance r for ba lance chargi ng .
Balancing I ndiv idual Cel ls Ba ttery Dis charging
Du ri ng th e p roce ss of discharging , C 1- XR Ch arger c an monitor an d
ba la nce e ach c ell of the batte ry in dividua lly. E rror me ss age w ill be
in di cated and process will be en ded auto ma tically if th e v oltage of any
si ng le on e c el l i s a bn ormal.
Fast an d Sto rage Mode of Lithium batt ery
Pu rp oses to charge li thium ba tt ery vari es , “ fa st” ch arge redu ce th e
du ration of ch arging, whereas “sto re” st ate c an co ntro l t he fi nal
vo lt age o f y our b attery, so as to st ore for a long tim e and protec t
us ef ul ti me of thebatt er y
Memory Preset
Th e cha rg er ca n s tore up to 10 di fferent c harge/dis ch arge profil es fo r
yo ur co nvenien ce. You can keep t he da ta pe rtain in g t o progra m
se tt ing o f the batt ery o f c on tinuous ch arging or di scharging . Use rs
ca n cal l out the se d ata at an y tim e without any spec ial pro gra m
setting.

MAIN FEATURES
05
Terminal Voltage Control (TVC)
The charger allows user to set the charge/dischareg and voltage.
Capacity Limit
The charging capacity is always calculated as the charging current
multiplied ba time. if the charging capacity exceeds the limit, the
process will be terminated automatically when you set the
maximumvalue.
Processing Time Limit
You can also limit the maximum process time to avoid any possible
defect.
PC Control Software ”Charge Master ”
Please download the ''PC Monitor ” software on our website:
www.ev-peak.com.
There is mini USB port in the charge which can be used to connect
it to the PC. You need optional USB cable (USB A Male to Mini B
Male) which is not included in the package. The free “Charge
Master”software gives you unparalleled ability to operate the
charger through your computer. You can update firmware from
“Charge Master”.
Inner Resistance of Battery Pack
Measure Inner resistance of battery pack inclusively all
connections and leads.

WARNING AND SAFETY NOTES
06
These warnings and safety notes are
particularly important. Please follow the
instructions for maximum safety;
otherwise the charger and the battery
can bedamaged or at worst it can cause a
fire.
Never leave the charger unattended when it is connected to its
power supply. If any malfunction is found, TERMINATE THE PROCESS
AT ONCE and refer to the operation manual. If any malfunction is
found, TERMINATE THE PROCESS AT ONCE and refer to the operation
manual.
Keep the charger well away from dust, damp, rain, heat, direct sunshine
and vibration. Never drop it.
The allowable DC input voltage is 11~18V DC. The allowable AC input
voltage is 100~240V AC.
This charger and the battery should be put on a heat-resistant,
noninflammable and nonconductive surface. Never place them on a
car seat, carpet or similar. Keep all the inflammable volatile
materials away from operating area.
Make sure you know the specifications of the battery to be charged
or discharged to ensure it meets the requirements of this charger. If
the program is set up incorrectly, the battery and charger may be
damaged. It can cause fire or explosion due to overcharging.
To avoid short-circuiting between the charge lead, always connect the
charge cable to the charger first, then connect the battery. Reverse the
sequence when disconnecting.

Standard Battery Parameters
3.7V/cell
3.7V/cell
4.2V/cell
3.8V/cell
≦1C
3.6V/cell
4.1V/cell
≦1C
3.3V/cell
3.6V/cell
3.3V/cell
≦4C
3.0-3.3V/cell 2.9-3.2V/cell
2.6-2.9V/cell
1.2V/cell
1.5V/cell
n/a
1C-2C
1.2V/cell
1.5V/cell
n/a
1C-2C
2.0V/cell
2.46V/cell
n/a
≦0.4C
0.1-1.1V/cell 0.1-1.1V/cell
1.8V/cell
3.7V/cell
4.35V/cell
3.85V/cell
≦1C
3.1-3.4V/cell
WARNING AND SAFETY NOTES
Never attempt to charge or discharge the following types of
batteries.
●A battery pack, which consists of different types of cells (including different
manufacturers)
●A battery that is already fully charged or just slightly dis charged.
●Non-rechargeable batteries (Explosion hazard).
●A faulty or damaged battery.
●A battery fitted with an integral charge circuit or a protection circuit.
●Batteries installed in a device or which are electrically linked to other
components.
●Batteries that are not expressly stated by the manufacturer to be suitable
for the currents the charger delivers during the charge process.
Please bear in mind the following points before commencing
charging:
● Did you select the appropriate program suitable for the type of battery you
are charging?
●Did you set up adequate current for charging or discharging?
● Have you checked the battery voltage? Lithium battery packs can
be wired in parallel and in series, i.e. a 2 cell pack can be 3.7V (in parallel) or 7.4V
(in series).
●Have you checked that all connections are firm and secure? Make sure there
are no intermittent contacts at any point in the circuit.
Nominal
Voltage
Max Charge
Voltage
Storage
Voltage
Allowable
Fast Charge
Min.Discharge
Voltage
LiPo
LiIon LiFe
NiCd MiMH
PbLiHV
※
Be very careful to choose the correct voltage for different types of battery
otherwise you may cause damage to the batteries. Incorrect settings
could cause the cells to fire or Explode.
07

WARNING AND SAFETY NOTES
Charging
During charge process, a specific quantity of electrical energy is fed into the
battery. The charge quantity is calculated by multiplying charge current by
charge time. The maximum permissible charge current varies depending on
the battery type or its performance, and can be found in the information by
the battery manufacturer. Only batteries that are expressly stated to be
capable of quickcharge are allowed to be charged at rates higher than the
standard charge current.
Connect the battery to the terminal of the charger: red is positive and black
is negative. Due to the difference between resistance of cable and
connector, the charger can not detect resistance of the battery pack, the
essential requirement for the charger to work properly is
that the charge lead should be of adequate conductor cross-section, and
high quality connectors which are normally goldplated should be fitted to
both ends.
Always refer to the manual by battery manufacturer about charging
methods, recommended charging current and charging time. Especially, the
lithium battery should be charged according the charging instruction
provided by the manufacturer Strictly.
Attention should be paid to the connection of lithium battery espe cially.
Do not attempt to disassemble the battery pack arbitrarily.
Please get highlighted that lithium battery packs can be wired in parallel
and in series.
In the parallel connection, the battery s capacity is calculated by multiplying
single battery capacity by the number of cells with total voltage stay the
same. The voltages imbalance may cause fire or explosion .Lithium battery
is recommended to charge in Series.
08

Discharging
The main purpose of discharging is to clean residual capacity of the
battery, or to reduce the battery voltage to a defined level. The same
attention should be paid to the discharging process as charging. The
final discharge voltage should be set up correctly to avoid deep-dis-
charging. Lithium battery can not be discharged to lower than the
minimum voltage, or it will cause a rapid loss of capacity or a total
failure.
Generally, lithium battery doesn't need to be discharged. Please pay
attention to the minimum voltage of lithium battery to protec t them.
Lithium batteries are recommended to be discharged partially rather
than fully. Frequent full discharging should be avoided if possible.
WARNING AND SAFETY NOTES
09

Program Flow Chart
STOP
STOP
STOP
STOP
STOP
STOP
STOP
STOP
STOP
STOP
STOP
LiHv
IR
MAIN OUT *.*
Back-light
Batt ry nd volt
LiPo 4 2V C
100
NiMH NiCd
Trickl oFF
1
1
LiHv
LiHv
LiHv
LiHv
m
STOP
FACTORY RESET
PRESS ENTER > 2S
0.00 0.00 0.00
1.
.
.
0.00 0.00 0.00
2
4.
10

NiMH
NiCd
Pb
Description
Charger automatically detects the connected NiMH/NiCd
battery and control the charging current in the affordable
range, and limit the maximum current does not exceed
the setting value.
Attention: Ensure to set the maximum charging current, or
it may overcharge and damage the battery.
Charger will charge the battery with setting current.
To increase the remaining usable battery life, cycling is
strongly recommended. charger supports 1-5 times of
charge﹥discharge or discharge﹥charge cycle.
LiPo
Lilon
LiFe
LiHV
Charger will discharge the battery with setting current,
operation same as lithium battery.
This mode is for charging Pb battery
This mode is for discharging Pb battery.
Fast charge
Discharge
Storage
Balance Charge
Auto mode
Man mode
Discharge
Cycle
Charge
Discharge
This charging mode is for charging LiPo /LiFe /Lilon /LiHV
battery in normal mode without balancing.
This mode is for discharging LiPo /LiFe /Lilon /LiHV battery.
This charging mode is for charging LiPo/ LiFe/ Lilon/ LiHV
battery in normal mode.
This program is for discharging LiPo/ LiFe/ Lilon/LiHV
battery which will not be used for long time.
OPERATION PROGRAM
Depends on different battery types,the operating programs
are different
Battery
type
Operation
Program
11

Dec.
Inc.
Explanation of Buttons
OPERATION PROGRAM
“STOP” button
It is used to stop the process or go back to the previous step.
“Dec./-“button
It is used to go through the menus and decrease the parameter value.
“Inc./+”button
It is used to go through the menus and increase the parameter value.
“START”button
It is used to enter parameter or start program.
When you want to alter the parameter value in the program, press the
START/ENTER button to make it blink and then change the value by pressing
DEC and INC button. The value will be stored by re-pressing the
START/ENTER button. If there is another parameter which can be altered in
the same screen, on confirming the first parameter value, the next
parameter value will start to blink and you can set it.
When you are ready to start to program, press and hold the START/ENTER
button for 3 seconds.
When you want to stop the program or go back to the previous step/screen,
press the BATT PROG/STOP button once.
12
Here are the detailed procedures to make the charger work. All the screens
and operations will take LiPo-CHARGE program for example
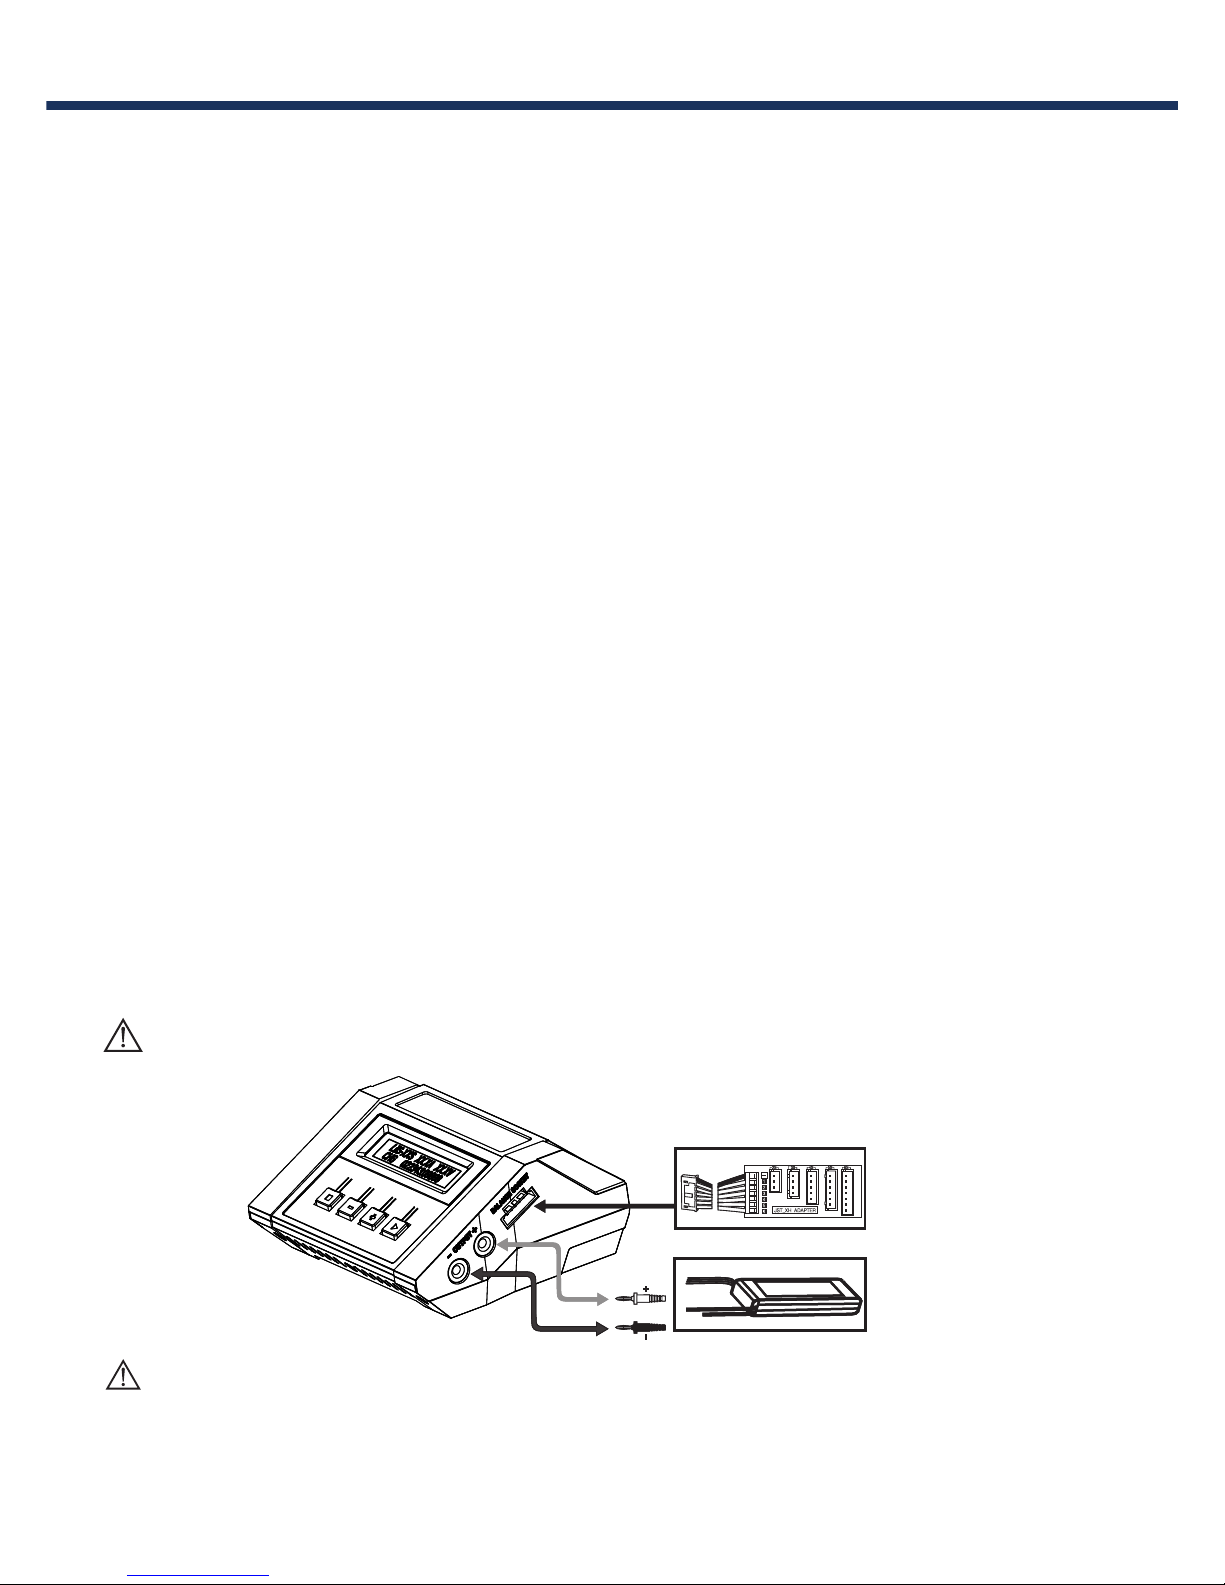
Connection
Ensure to connect the battery to balance port when charging LiPo,Lilon,
LiFe and LiHV battery under balance mode.
OPERATION PROGRAM
1).ConnectingtoPowerSource
2)ConnectingTheBattery
3).BalanceSocket
C1-XR comes with the built in switching power supply.You can connect the
AC power cord directly to the main AC socket (100-240V AC) or attaching
directly to 12V car batteries. It is critically important that you use a fully
charged 13.8V car battery.
Important!!! Before connecting a battery it is absolutely essential to check
one last time that you have set the parameters correctly.If the settings are
incorrect, the battery may be damaged, and could even burst into flames or
explode. To avoid short circuits between the banana plugs, always connect
the charge leads to the charger first, and only then to the battery. Reverse
the sequence when disconnecting the pack.
The balance wire attached to the battery must be connected to the charger
with the negative marking. Take care to maintain correct polarity!(See the
wiring diagram below.)
This diagram shows the correct way to connect your battery to the AC while
charging in the balance charge program mode only.
bat terie
Bal ance - Bo ard
WARNING:
Failure to connect as shown in this diagram will damage this charger. To
avoid short circuit between the charge lead always connect the charge
cable to the charger first, then connect the battery. Reverse the sequence
when disconnecting.
13
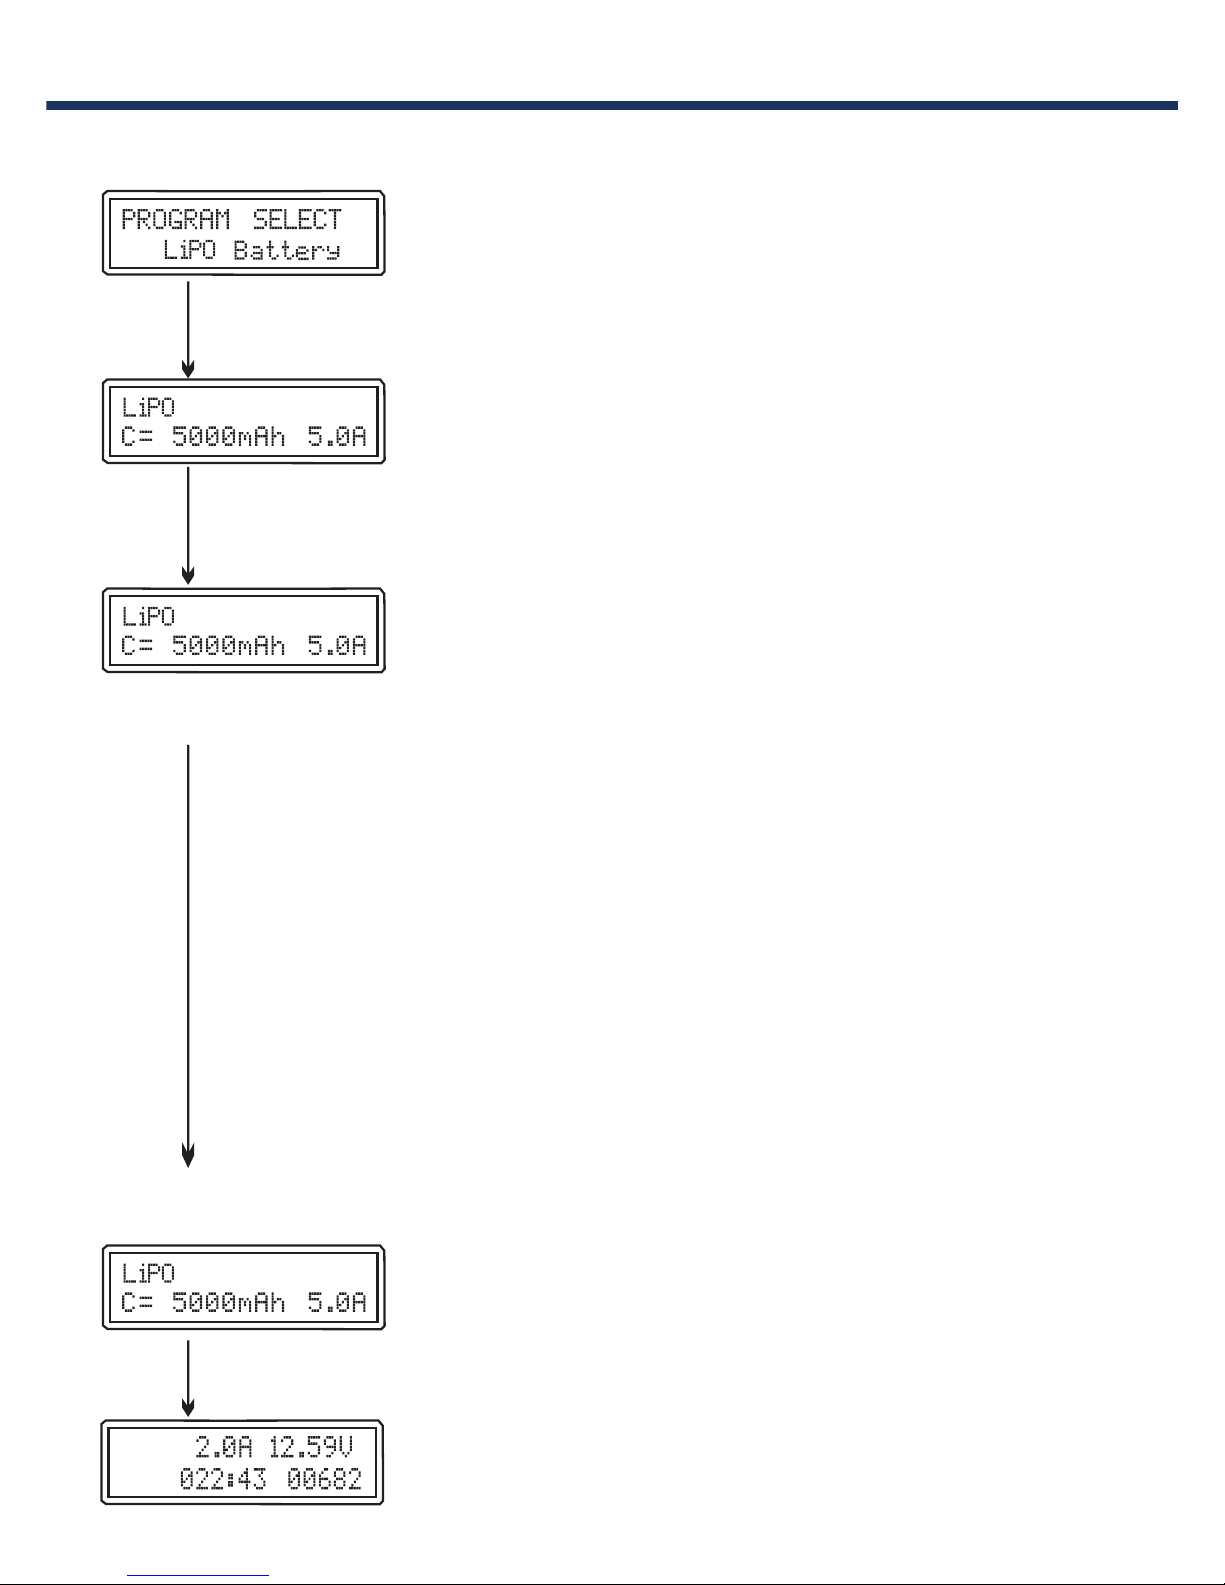
Charge program
BATT/PROGRAM Select
Press “STOP” and “-“to go through all the programs
and press “START/ENTER to enter LiPo BATT program.
Mode Select
Press “+” and “-” to go through all the modes (balance
charge mode,storage mode, discharge mode and fast
charge mode).
Battery Setting
Press START, the present value will start to blink. Press
”+” and ”-” to set the battery cells. And press START to
confirm your setting. At the same time, Press START,
the present value will start to blink. Press “+”and “-“to
change the value and press START to confirm your
setting. Charger automatically recommend charging
current according the capacity and cell count setting
value, Press START to confirm if no objection, or
manually set the current by pressing “+”or”-“button,
then press START to confirm.
Program Start
Press and hold START for 2 seconds to start the
program.
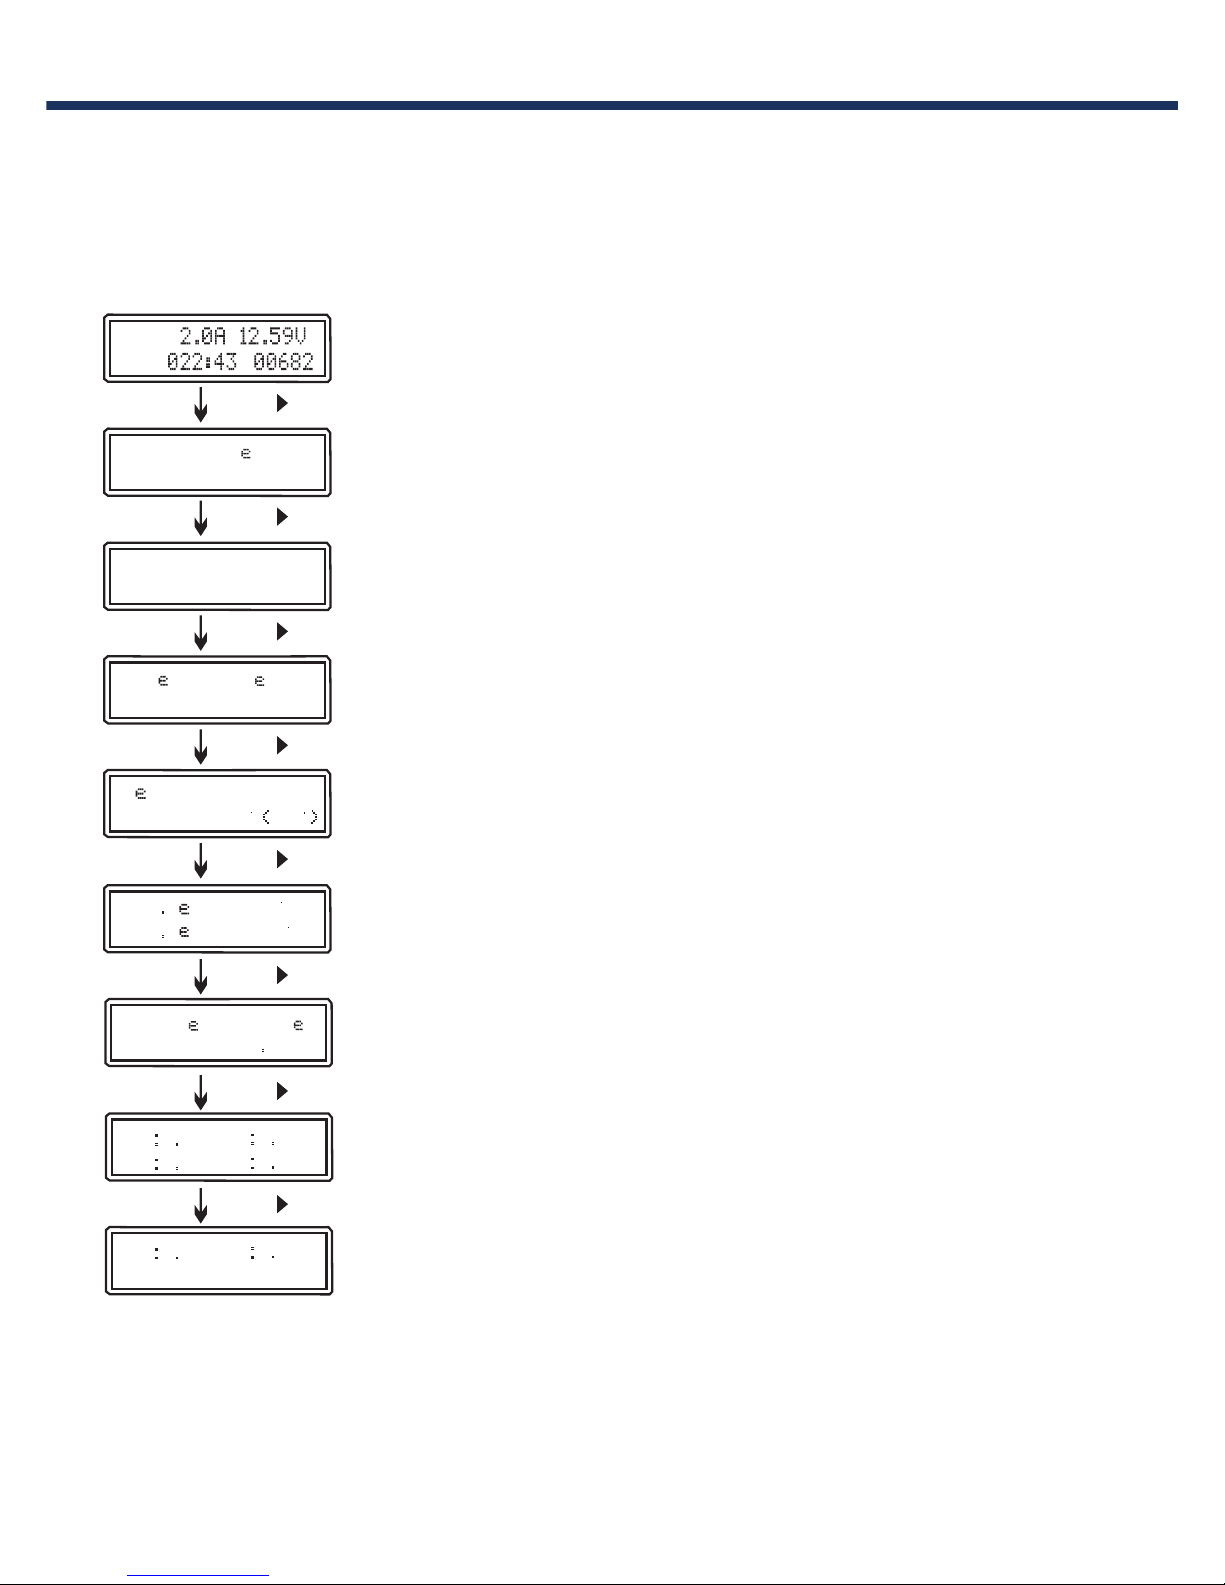
Charging Status
It show the real-time data during charging.
START
Dec./Inc.
Dec./Inc.
START
>2Seconds
BAL-CHG
4S
BAL
Li4S
BAL-CHG
4S
BAL-CHG
4S
OPERATION PROGRAM
14
Li4S
End Voltag
16.80V
Capacity Cut-OFF
5000mAh
SaftyTim
ON240min
VARIOUS INFORMATION DURING THE PROCESS
Press INC or DEC during the charging or discharging process to view further
pertinent information on the LCD screen.
TMPCut-off
ON60 140
C
F
EXTT MP0
IntT MP43
C
F
INPow
C1415
C3416
C2416
C4415
rVoltag
1474V
C5000
C6000
Dec.
Dec.
Dec.
Dec.
Dec.
Dec.
Inc.
Inc.
BAL
OPERATION PROGRAM
Real-time status: battery type, battery cell count, charge
current, battery pack total voltage, elapsed time and
charge capacity.
Final voltage when the program ends.
Capacity cut-off ON and value of the set capacity limit.
Safety timer ON and duration of time in minutes.
Cut off temperature.
Internal temperature.
Temperature probe needs to be connected to show
external temperature.
Input voltage
Voltage of each cell in the battery packs when the
battery is connected with balance lead.
Program Stop
During the charging process, press STOP to stop the charging process.
Program Finished
Charger will alarm once program finished.
15

START
Dec./Inc.
Dec./Inc.
START
>2Seconds
DCHG
DCHG
4.0V
3.8V
0.1A 15.6V(4S)
0.3A 15.2V(4S)
DCHG
3.8V
0.3A 15.2V(4S)
0.3A
.
.
15.6V
DSC 000 44 00058
Li4S
Discharge program
Warning: Ensure to set the right end voltage, or it may
over-discharge the battery.
OPERATION PROGRAM
BATT/PROGRAM Select
Press “STOP” and “-“to go through all the programs
and press “START/ENTER to enter LiPo BATT
program.
Mode Select
Press “+” and “-” to go through all the modes
(balance charge mode, memory mode, discharge
mode and fast charge mode) .
Battery Setting
Press START, the present value will start to blink.
Press ”+” and ”-” to set the battery cells. And press
START to confirm your setting. At the same time,
Press START, the present value will start to blink.
Press “+” and “-“to change the value and press
START to confirm your setting.
Program Start
Press and hold START for 2 seconds to start the
program.
Discharging Status
It show the real-time data during discharging.
16

START
Dec./Inc.
START
>2Seconds
0.3A
.
.
15.6V
STO 000 44 00058
Li4S
4
4
OPERATION PROGRAM
Storage Program
“STORAGE” is a function which is specialized for Lithium battery storage, its
operation is same as the discharge program. To store for a long time and
protect useful time of the battery, it automatically charge/discharge the
battery to a safe voltage.
17
>2Seconds
Battery Memory Set
BAL-CHG
4S
BAL-CHG
4S
BAL-CHG
4S
BATTMEMORYSAVE
LiPoBattry
MEMORY01
NULL
Battery Memory Recall
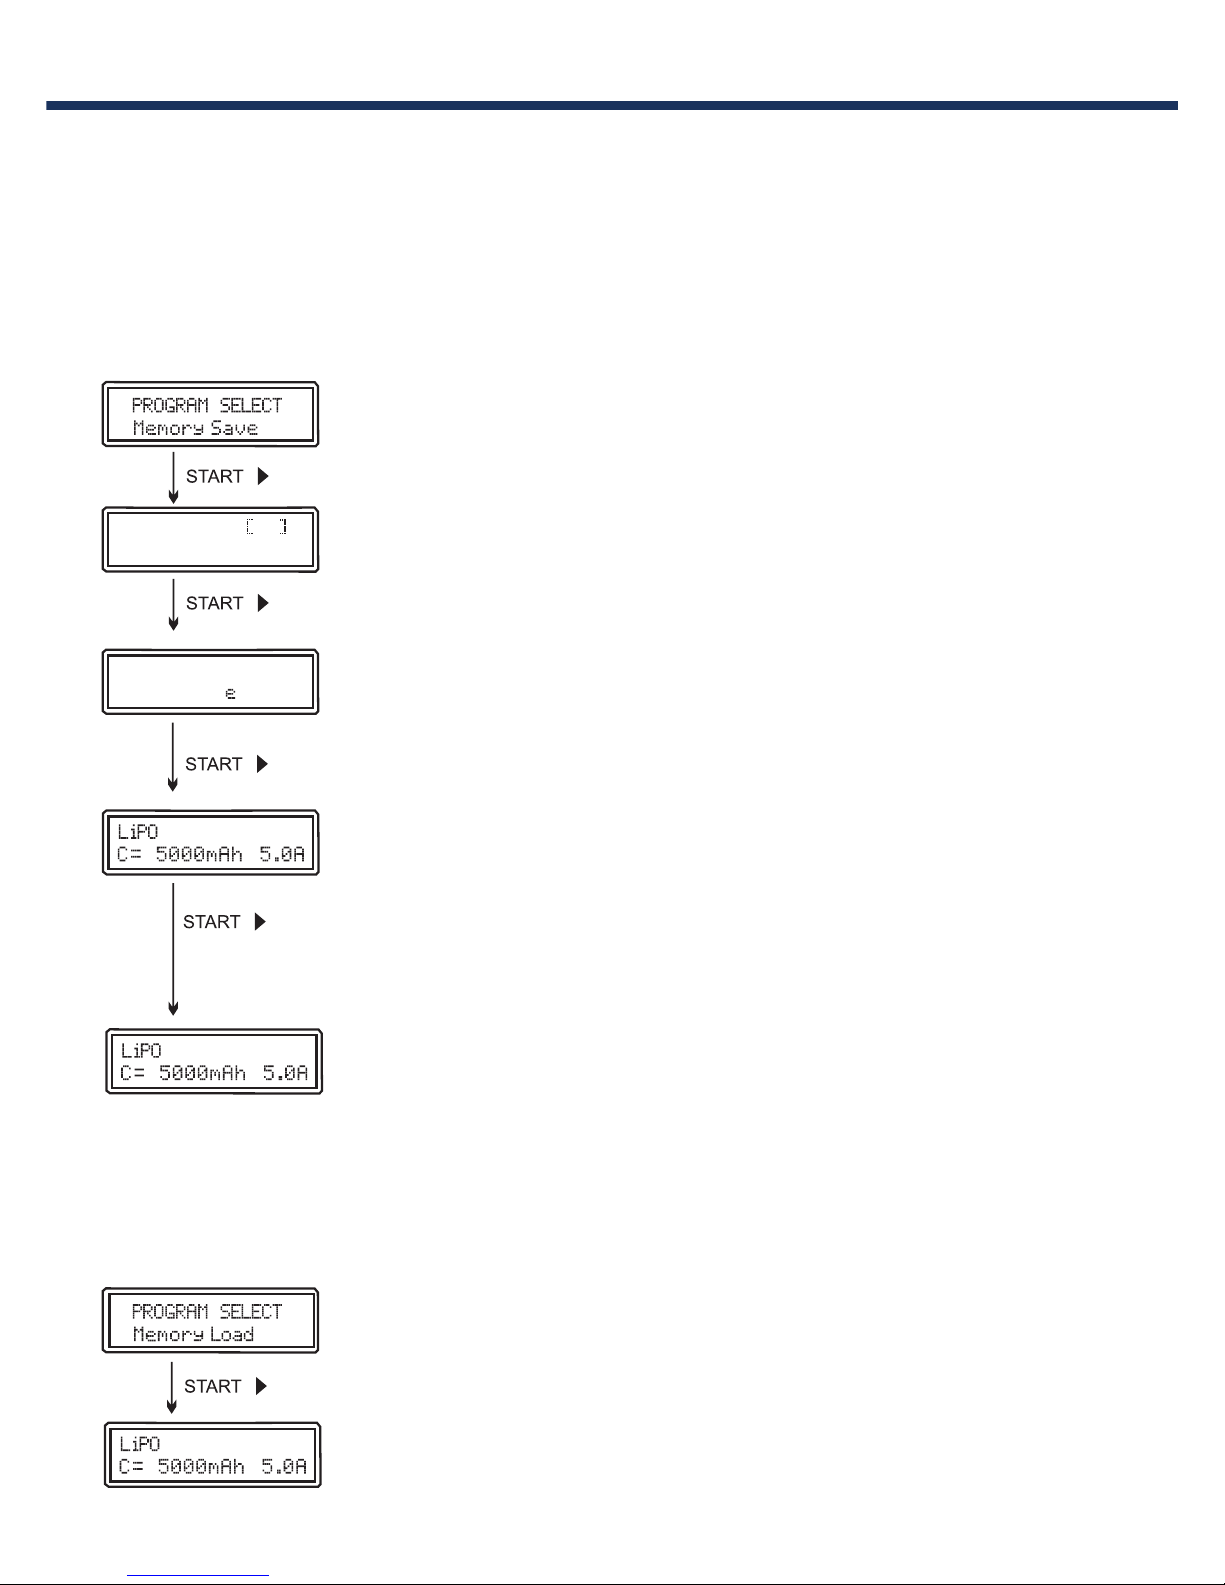
OPERATION PROGRAM
Battery Memory
The charger can store up to 10 different charge/discharge profiles for your
convenience, and the stored profiles can be recalled quickly without having
to go through the setup process.
Enter into this program
Press “+“or”-” to set the file number
Press “+“or”-” to set the battery type
Press “+“or”-” to set the Balance Charge Mode, Memory
Mode, Discharge Mode and Automatic Charge Mode, Press
”START” to confirm. Then press “+“or ”-” to set battery cell
count, capacity, charge current. Press ”START” for more
than 2s to save data.
It shows battery type, program mode, battery cell count,
capacity, current you have saved.
Enter into this program.
Press” START” for more than 2s to start program.
18
Dec./Inc.
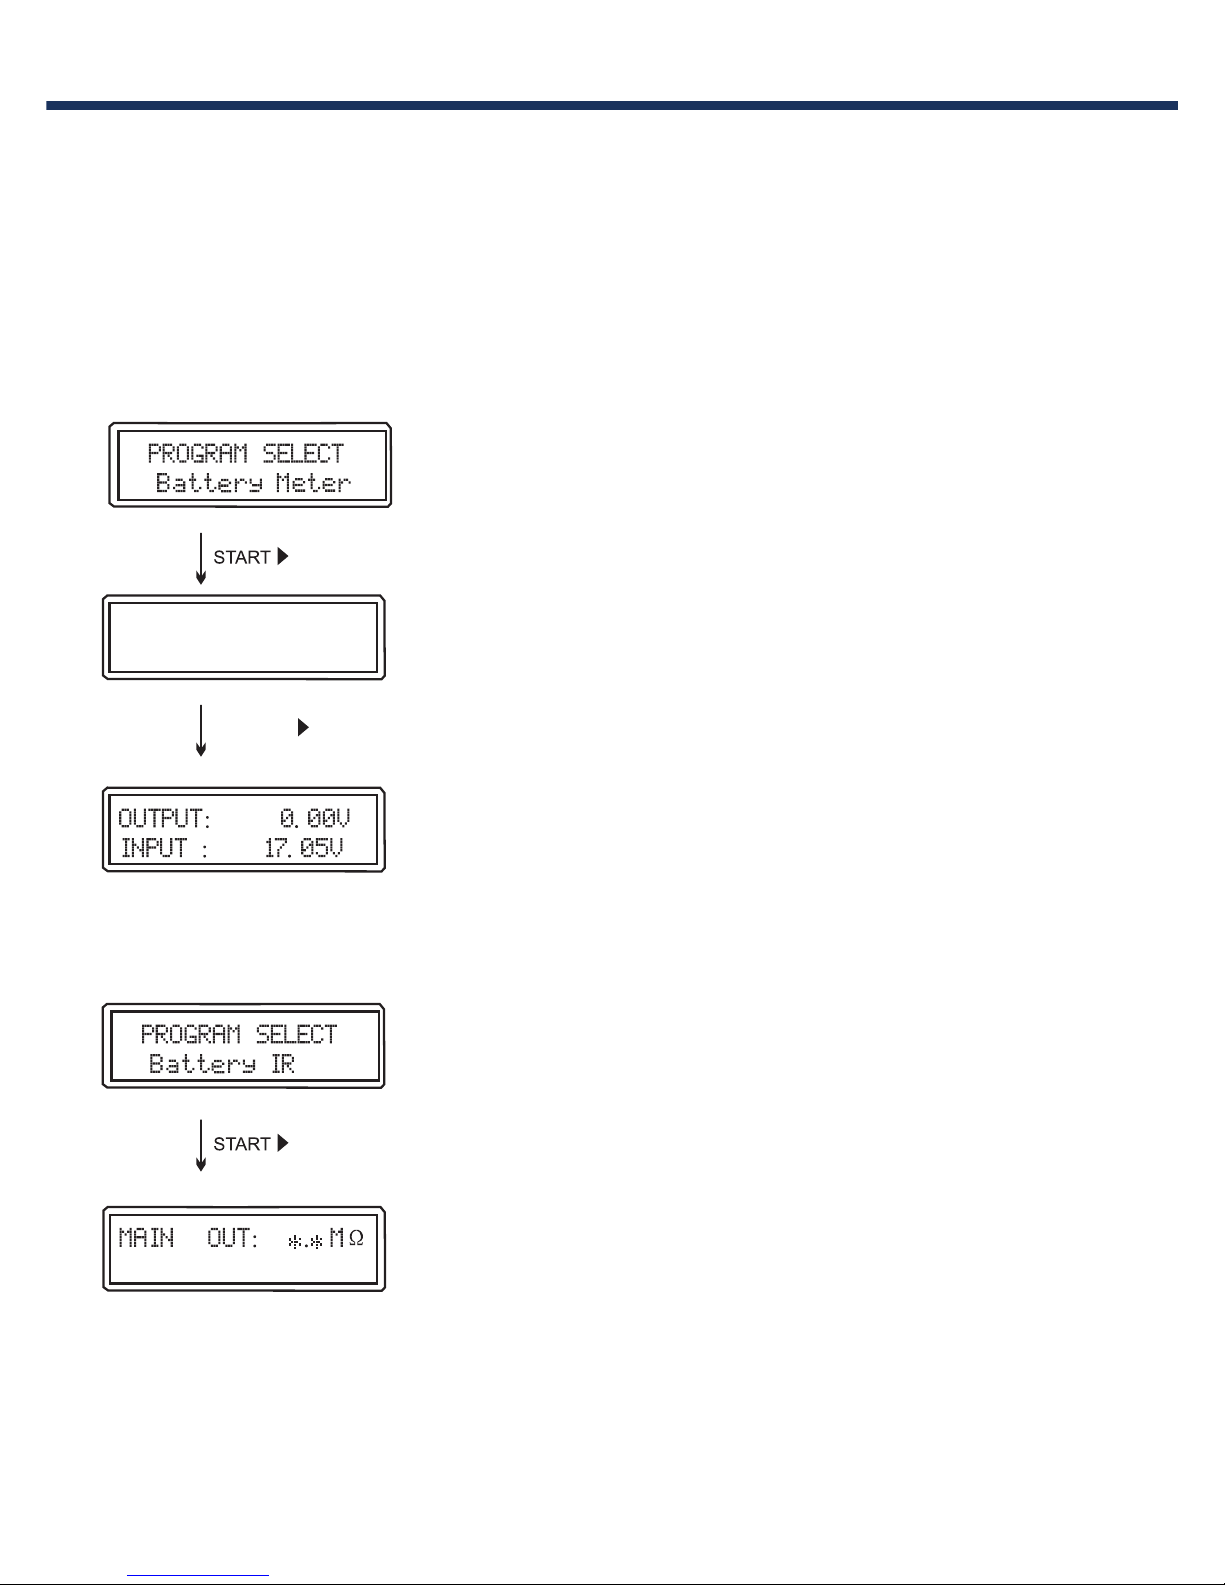
I.R. Meter
Check the inner resistance, for user's reference to check
the battery quality.
4.17 4.18 4.17
1.
.
.
4.18 4.18 4.17
2
4.
OPERATION PROGRAM
Battery Meter
With this program, user can check the battery cell voltage, input voltage,
output voltage, inner temperature and external temperature. Please
connect the battery to charger output port. (both main output and balance
port).
Voltage Meter
It can check the cell voltage of battery pack.
It can check the output voltage and input voltage.
19

AUTO/OFF
(50-200 mAh)
Item
Select
Description
OFF/
ON
(1-60 Min)
(1-10 Min)
OFF/
ON
(30 C/86 F -
80 C/176 F)
Default:
6-20mV/Cell
5-20mV/Cell
System Setting
The charger will operate with default values for the essential user settings
when it is powered on for the first time. The screen displays the following
system settings in sequence and the user can change the parameter value
on each screen.
When you want to change the parameter value, press START/ENTER to
make it blink, then change the value with INC or DEC. Then value will be
stored by pressing START/ENTER once.
Precharge Program
Attention: Please OFF this program
when under the normally charge
mode.
This is for cycle mode, set the wait
time between each charge or
discharge process.
This setting is for NiMH/NiCd battery
only. When the charger detects that
the delta peak value you set has been
reached, the charger will say the
battery is fully charged.
Trickle function is for full power
maintenance on battery packs after
fully charged.
The battery's internal chemical
reaction will cause the temperature
of the battery to rise. If the
temperature limit is reached, the
process will be terminated.
20

OFF/
OFF
ON
10%-100%
3.80V/C-4.10V/C
(100-99900 mAh)
OFF/
ON
(10-720 Min)
System Setting
Item
Select
Description
When you start a charge process, the
internal safety timer automatically starts
running at the same time. It is
programmed to prevent overcharging.
If the battery proves to be faulty or if the
termination circuit cannot detect the full
battery. The value of the safety timer
should be generous enough to allow full
charging of the battery.
This sets the maximum charge
capacity that will be supplied to the
battery during charge. If the delta
peak voltage is not detected for any
reason or the safety timer has not
expired, this feature will
automatically stop the process at the
selected capacity value.
Key Beep sounds every time you
press a button. Buzzer beep or
melody sounds at various instances
during operation to alert certain
process events.
Adjust the LCD backlight
Set the cut-off voltage of LiPo, Lilon,
LiFe, LiHV, Pb batteries.
Press START for more than 2s for
factory reset.
21

Error Message
Incorrect polarity connected.
Charger and battery connection is wrong.
Input short circuit
Input voltage less than required value
Battery total voltage is lower than setting value,
please check the cell count.
Battery total voltage is higher than setting value,
please check the cell count.
Voltage of one cell in the battery pack is too low.
Voltage of one cell in the battery pack is too high.
The battery balance connection is wrong.
Please check the connector and cable.
Temperature too high, please check the temperature
sensor and take cooling measures.
22
Warranty and Service
23
COMPLIANCE INFORMATION FOR THE EUROPEAN UNION
European Compliance Information
Declaration of Conformity
The object of declaration described above is in conformity with
the requirements of the specifications listed below, following
the provisions of the European EMC Directive 2004/108/EC.

24
www.ev-peak.cn
SHENZHEN EV-PEAK NEW ENERGY TECHNOLOGY CO.,LTD
Product specifications and information mentioned in this manual are for reference only, subject to updates without notice.
Warranty
Thank you for purchasing this charger, we will do our best to provide you
with a comprehensive after-service and protect your rights. If you have
problems with this charger, please contact local distributor immediately.
We warranty this charger for a period of one year from the date of
purchase. If it has a quality problem itself, all guarantee will be free. In case
customers can not provide an effective certificate of purchase, we will
refer the date of series number of charger. If it is over one year since the
purchase date, an appropriate cost will be charged, users need bear the
transportation cost back and forth.
The warranty does not cover incorrect installation, components worn by
use, or any other problem resulting from incorrect use or handling of the
product. No liability will be accepted for any damage resulting from the use
of this product. By the act of connecting and operating this product, the
user accepts all resulting liability.
Is considered incorrect use:
1. Failure to follow instructions.
2. Improper use of the product (abusive use, out of spec, etc.).
3. Failure to adapt settings for proper function (improper connections,
wrong gearing, installation, setup, etc.).
4. Overload, overheating (disordering, melting, etc.).
5. Running in inadequate conditions (damage or rust from rain, humidity,
etc.).
6. Improper maintenance (presence of dirt, etc.).
7.Disassembly, modification by the user (modifying original connectors,
wires, components, etc.).
8. Mechanical damage due to external causes
 Loading...