


RoboTrex H9
www.evolveo.com
Dear customer,
thank you for choosing the EVOLVEO RoboTrex H9. We believe you will enjoy a lot of fun and happiness.
Please, read the safety rules carefully and follow all common safety rules before using a robotic vacuum cleaner.
WARNING SYMBOLS USED
This is the safety alert symbol. This symbol alerts you to
potential hazards that could result in property damage and/or
serious bodily harm or death.
• This device can be used by children aged from 8 years and above and persons
with reduced physical, sensory or mental capabilities or lack of experience and
knowledge if they have been given supervision or instruction concerning use of this
device in a safe way and understand the hazards involved.
• Children should be supervised to ensure they do not play with this device.
• Cleaning and maintenance shall not be performed by children without adult
supervision.
• This device is only to be used with the power supply unit provided.
• For the purposes of recharging the battery, only use the detachable power supply
unit provided with this device.
• The battery must be removed from this device before this device is disposed of. To
remove the battery from this device, first remove the screws on the bottom, then
remove the battery by disconnecting the quick connector.
• The used battery should be placed in a sealed plastic bag and disposed of safely
according to local environmental regulations.
• The external flexible cable or cord of the power supply unit cannot be replaced; if the
cord is damaged, the power supply unit shall be disposed of.
• This device is for indoor use only.
• This device is not a toy. Do not sit or stand on this device. Small children and pets
should be supervised when this device is operating.
• Store and operate this device in room temperature environments only.
• Clean with a cloth dampened with water only.
• Do not use this device to pick up anything that is burning or smoking.
• Do not use this device to pick up spills of bleach, paint, chemicals, or anything wet.
1
• Before using this device, pick up objects like clothing and loose paper. Lift up cords
for blinds or curtains, and move power cords and fragile objects out of the way. If
this device passes over a power cord and drags it, an object could be pulled off a
table or shelf.
• If the room to be cleaned has a balcony, a physical barrier should be used to prevent
access to the balcony and to ensure safe operation.
• Do not place anything on top of this device.
• Be aware that this device moves around on its own. Take care when walking in the
area where this device is operating to avoid stepping on it.
• Do not operate this device in areas with exposed electrical outlets on the floor.
• Do not expose the electronics of this device, its battery, or the integrated Charging
Base. There are no user-serviceable parts inside.
• Do not use this device on an unfinished, unsealed, waxed or rough floor. It may
result in damage to the floor and this device. Use only on hard floor surfaces or low-
pile carpet.
• This device has been designed to be used on floors without scratching them. We
still recommend that you test this device on a small area of the room to be cleaned
to ensure no scratches are made before cleaning the whole room.

Contents
Product Compo si ti on / Package Contents
Product Compo si ti on / Part Name
Product Usage / Prepa ra tion
Product Use/ Charge Robot
Product Use / Turn On / Turn Off
Product Use / Start Pause, Wake up
Product Usage / Select a Cleaning Mode
Component Use the Boundary Strip
Component Time Scheduling Setting
Component Cleaning and Maintenance
Troubleshooting
Product Parameter
3
4
6
7
8
8
9
11
11
12
16
17

Product Composition / Package Contents
Power Adapter
3
Robot
HEPA Filter x2
Charging Base
Instruction Manual
Water Box MoppingCloth x2
Remote Control (with battery x2)
Cleaning Brush
Dust Box
Side Brush x4
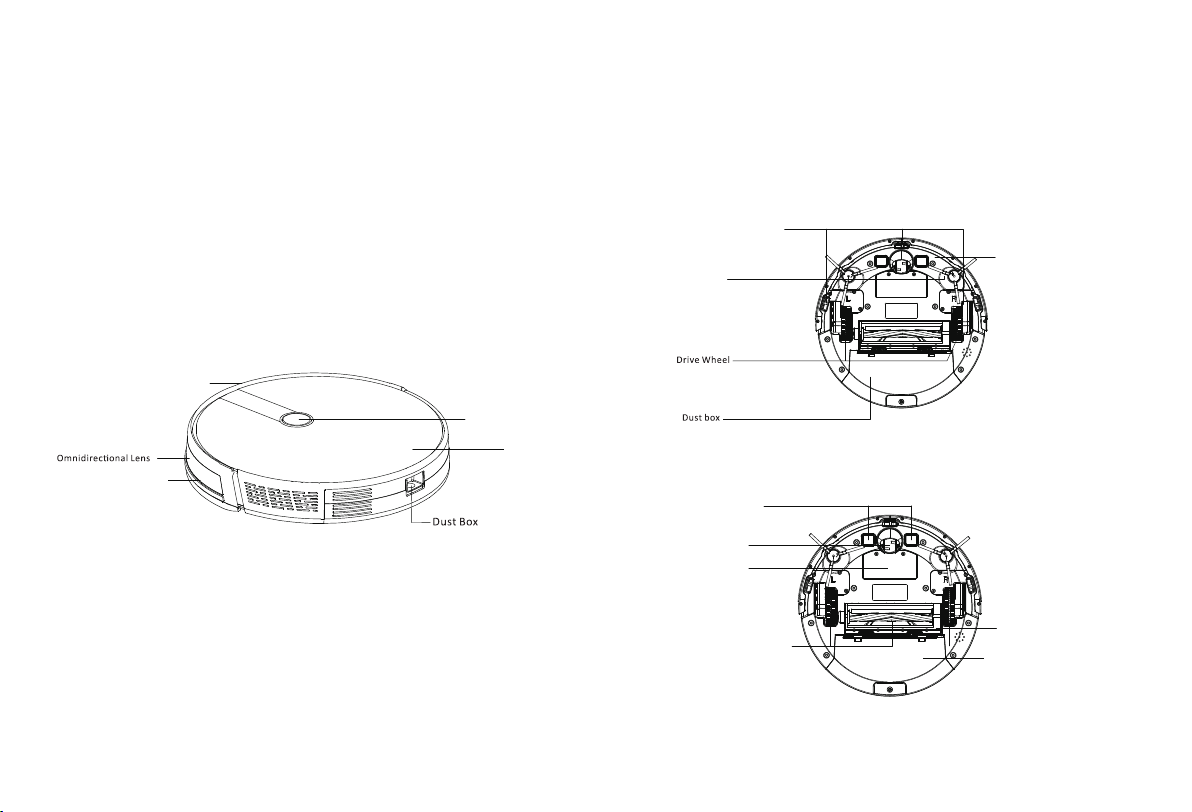
Product Composition / Part Name
Front Robot Back Robot
Drop Sensor
Side Brush
Bumper
Power ON/OFF Button
Auto Cleaning Start/Stop Button
Surface Cover
Infrared sensor
Charging Contact Pins
Swivel Wheel
Battery Compartment
Hall Sensor
Rolling Brush
Brush Guard
Dust Collector
4
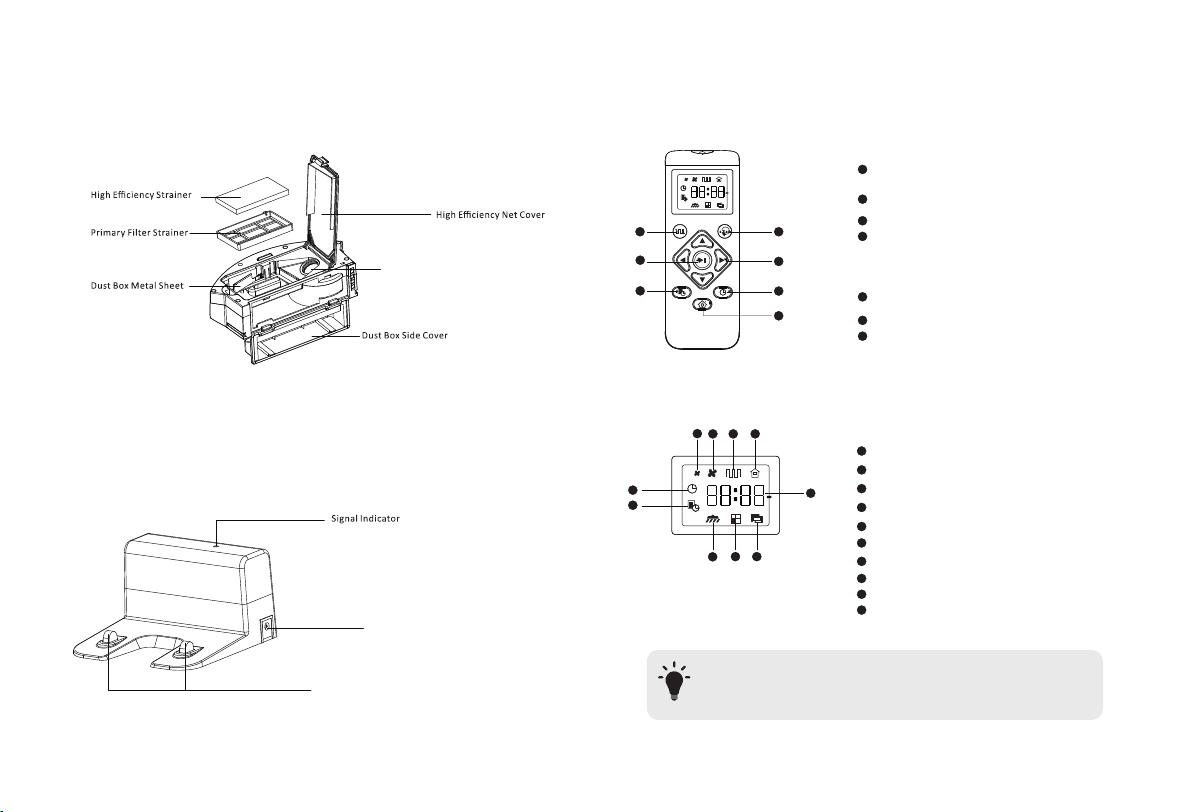
Dust Box
Charging Base
DC Socket
Charging Base Pins
Vent
Remote Control
1
2
3
4
5
6
7
Remote Control Display
4
3
65
1
2
10
9
Install 2 AAA batteries before using the remote control for the first time. Make sure
T
The positive and negative ends are facing the correct polarity direction as marked in
The battery compartment.
7
8
Start Auto Cleaning
1
Adjust suction power level in Auto Cleaning Mode
Start Auto Cleaning
2
Stop Cleaning
3
Schedule Auto Cleaning start time
Mode Switching:
4
Spot Cleaning Mode
Single Room Cleaning Mode
Edge Cleaning Mode
Control cleaning direction manually
5
Adjust the hour and minute
6
Adjust time
Return to Charging Base
7
Time Setting
1
Schedule cleaning time
2
3
Standard suction power
Strong suction power
4
Auto Cleaning Mode
5
Returning to Charging Base
6
7
Clock
Edge Cleaning Mode
8
9
Single Room cleaning Mode
Spot Cleaning Mode
10
5
 Loading...