

Evolve Communications GUIDE Remote RD5000 User Manual
User’s Manual RD5000
*
This changes everything!
SM

1
*Trademark
Table of Contents
Introduction
1. Evolve GUIDE Remote*
2. Computer Requirements
3. Key Descriptions
a. Key Layout
b. Key Function Descriptions
Getting Started
1. Activate Remote Control
a. Install Batteries
b. Install RemoteLinker* Software
c. Connect RemoteLinker Cable
2. Start RemoteLinker Software
3. Activate Remote Control at Website
4. Sync Remote Control
5. Setup Remote Control
a. Setup a TV
b. Setup Other Devices
c. Remove a Device
6. Setup DirecTune*
a. Determining DirecTune Device
b. Setup DirecTune Device
Using the Remote
1. Channel Screen
2. Changing Modes
3. Using the GUIDE Key
a. Accessing Program Listings, Suggestions and Reminders
b. Program Listings
Browsing and Tuning
Quick Browse
c. Program Descriptions
Accessing and Tuning
Quick Browse
d. Suggestions
e. Reminders
Reminders Notification
Accessing the Reminders List
Personal Reminders
4. Using Interactivity Keys
a. Interactivity Keys
b. Interactivity Offers
c. Browsing Interactivity Offers
Table of Contents
3
3
4
5
5
6
8
8
8
9
10
11
11
12
13
13
15
19
20
20
21
25
25
26
27
27
28
29
30
31
31
32
33
34
34
35
35
36
36
37
39

2
*Trademark
Table of Contents
5. Using the MENU Key
a. Menu Screen
b. Remote Support
c. Time and Date
6. Using the ADVANCED Key
a. Extended Function Screen
b. Accessing the Extended Function Screen
7. Using the LIGHT Key
8. Promo Screens
a. Informational
b. Request a Link
c. Request an Email
d. Channel Tuning
e. Channel Promo Screens
f. Browsing Promos
9. Alert Screens
Advanced Settings
1. View Device Settings
2. View DirecTune* Settings
3. Adjust DirecTune Method
4. Adjust DirecTune Speed
5. Channel Key Settings
6. Add or Clear Channel Lock
7. Add or Clear Volume Lock
Troubleshooting
1. General
2. Setting up
3. Syncing
FAQ
Specifications
License Agreement
Privacy Policy
Index
Table of Contents
40
40
41
42
43
43
44
45
45
45
46
46
46
47
47
49
50
50
50
51
53
55
57
59
61
61
62
62
63
65
66
69
70
3
*Trademark
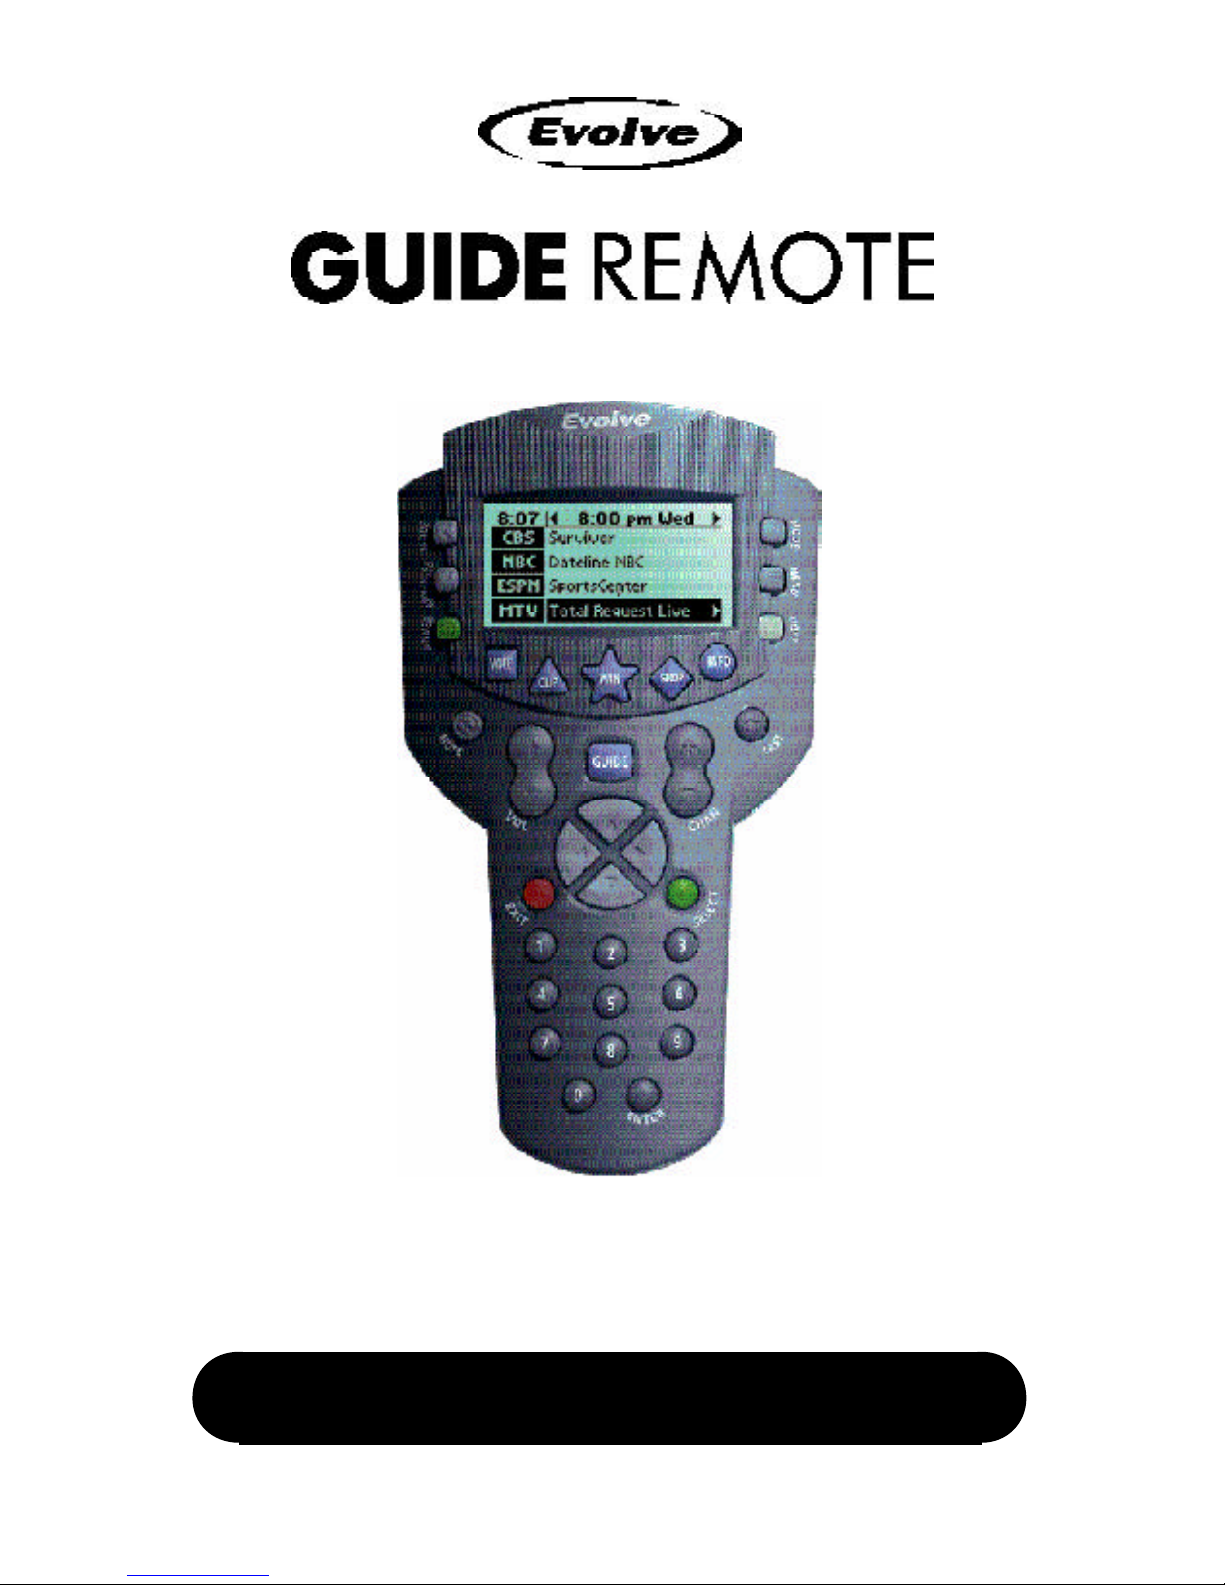
Introduction
1. Evolve GUIDE Remote*
The Evolve GUIDE Remote* (GUIDE Remote*) is more than a universal remote
control—it is the ultimate interactive device for TV and Internet users. The
GUIDE Remote has state-of-the-art features that provide you and your family
with hand-held, instantaneous access to weekly TV Listings, games, viewer
rewards and valuable discounts. It allows you to request information about your
favorite programs while you watch TV, and then interact with your requested
information on your computer (PC) using the Internet.
The screen on your GUIDE Remote is always on, providing instant access to the
TV program listings, Interactivity Offers and special Promo Offers.
Please use this manual to become familiar with your remote. The GUIDE Remote
can control up to 16 devices, including TVs, VCRs, Cable settop boxes, Satellite
receivers, CD players, stereo receivers, digital tape players, phonographs and
home automation systems. In fact, the GUIDE Remote has built-in control codes
for nearly every make and model of infrared (IR) controlled device.
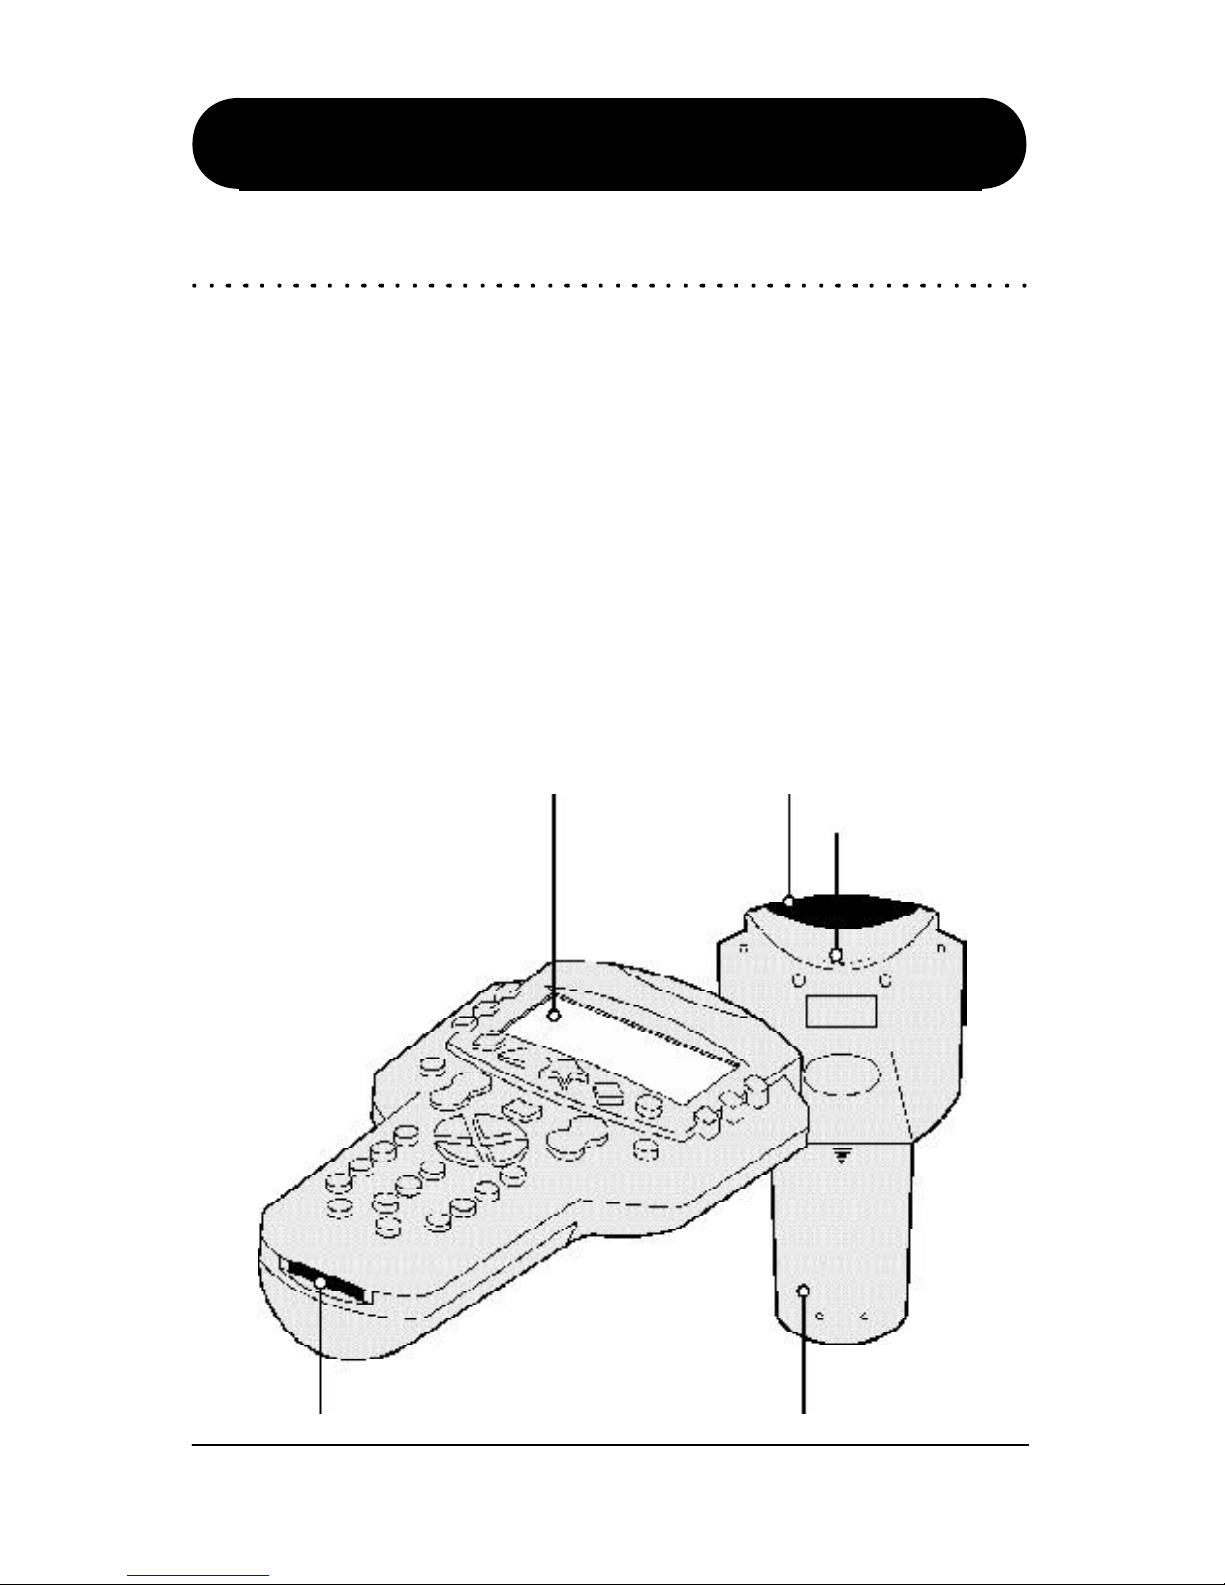
LCD screen
Battery coverConnector port
Speaker
IR lens
Evolve GUIDE Remote

4
*Trademark
The following system is recommended for software installation and use:
A PC running Windows 95/98, Windows ME, Windows NT Workstation
version 4.0+, Windows 2000 or Windows XP.
An Internet Explorer 5.0+, Netscape 4.0+ or AOL 5.0+ Web Browser.
(NOTE: Microsoft Internet Explorer 5.0 must be installed on your computer
even if it is not your default browser, because RemoteLinker uses resource
files provided only with Internet Explorer.)
One available RS-232 Serial Port.
A CD ROM Drive.
At least 5 MB free hard disk space.
At least 8 MB RAM.
An active connection to the Internet.
2. Computer Requirements
Introduction
Computer Requirements
5
*Trademark
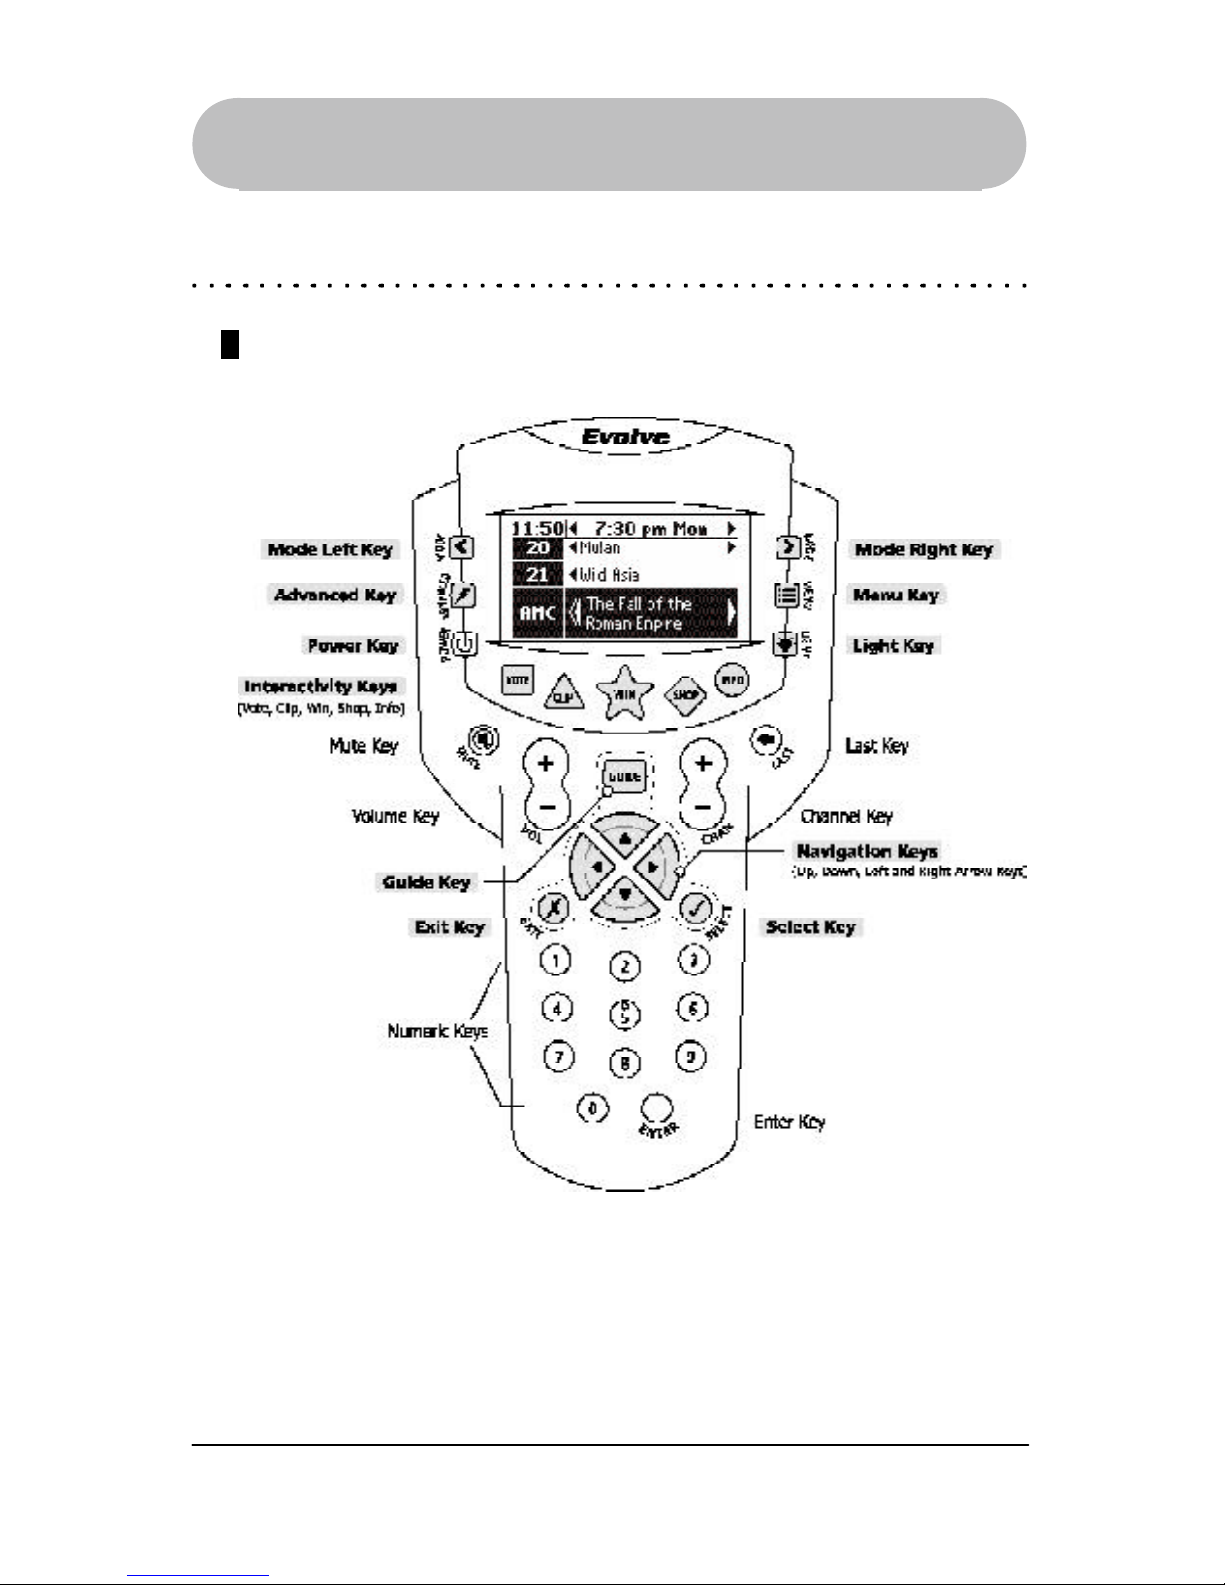
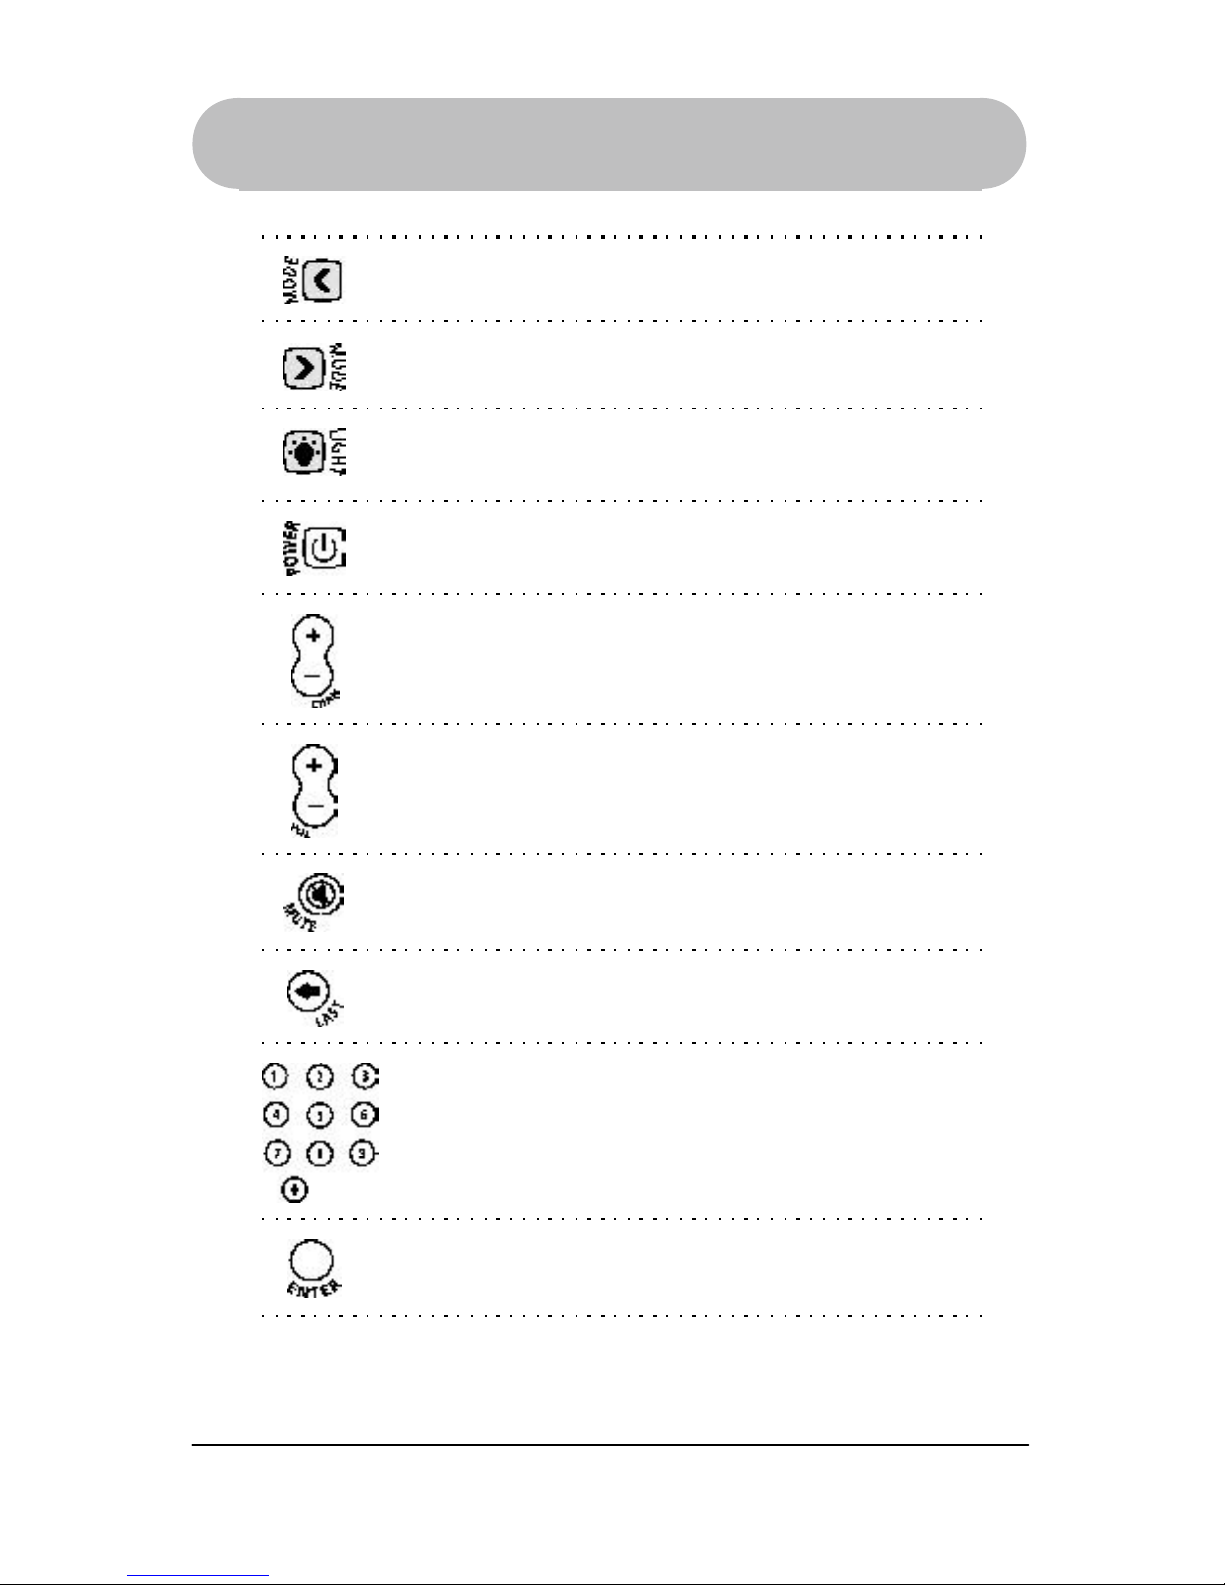
3. Key Descriptions
Introduction
Key Layout
Key Descriptions
Keys shown in gray are used to navigate and control what appears on the remote
screen.
All other keys operate like those found on regular remote controls.
6
*Trademark
Introduction
Key Function Descriptions
Press this key to voice your opinion. Rate what you’re watching
with the push of a button. See what others think.
Press this key to access the three types of TV Listings: Program
Listings, Suggestions, and Reminders.
Press this key to access the Main Menu. You can configure and
setup the remote the way you like it.
Press these keys to navigate in the screen.
Press this key to choose highlighted item(s) and/or request links to
Promo Offers on the screen.
Press this key to quit the current operation.
Press this key to access the remote functions that are not
represented on the GUIDE Remote* keypad ( i.e. sleep, play, PIP,
etc.).
Press this key to save money. Find coupons, deals, and savings
related to what you’re watching.
Press this key to win big. Enter sweepstakes and contests with
incredible ease; earn points for valuable bonuses.
Press this key to buy smart. Find great stuff related to advertisers
and your favorite TV shows.
Press this key to find out more. Get more information about the
show you’re watching.
Key Descriptions
7
*Trademark
Introduction
Press this key to select which device you want the remote to
control.
Press this key to select which device you want the remote to
control.
Turns on or off the backlight on the screen.
Turns on or off the device your remote is currently controlling.
Changes channels up or down.
Adjusts volume up or down.
Turns the volume on or off.
Tunes your TV back to the previous channel watched.
Press these keys to tune to a channel on your TV.
Press this key if needed by your device after you use the digit keys
to tune to a channel.
Key Descriptions
8
*Trademark
Note A Low Battery icon appears on the top of all display screens when
the battery power is low.
Getting Started
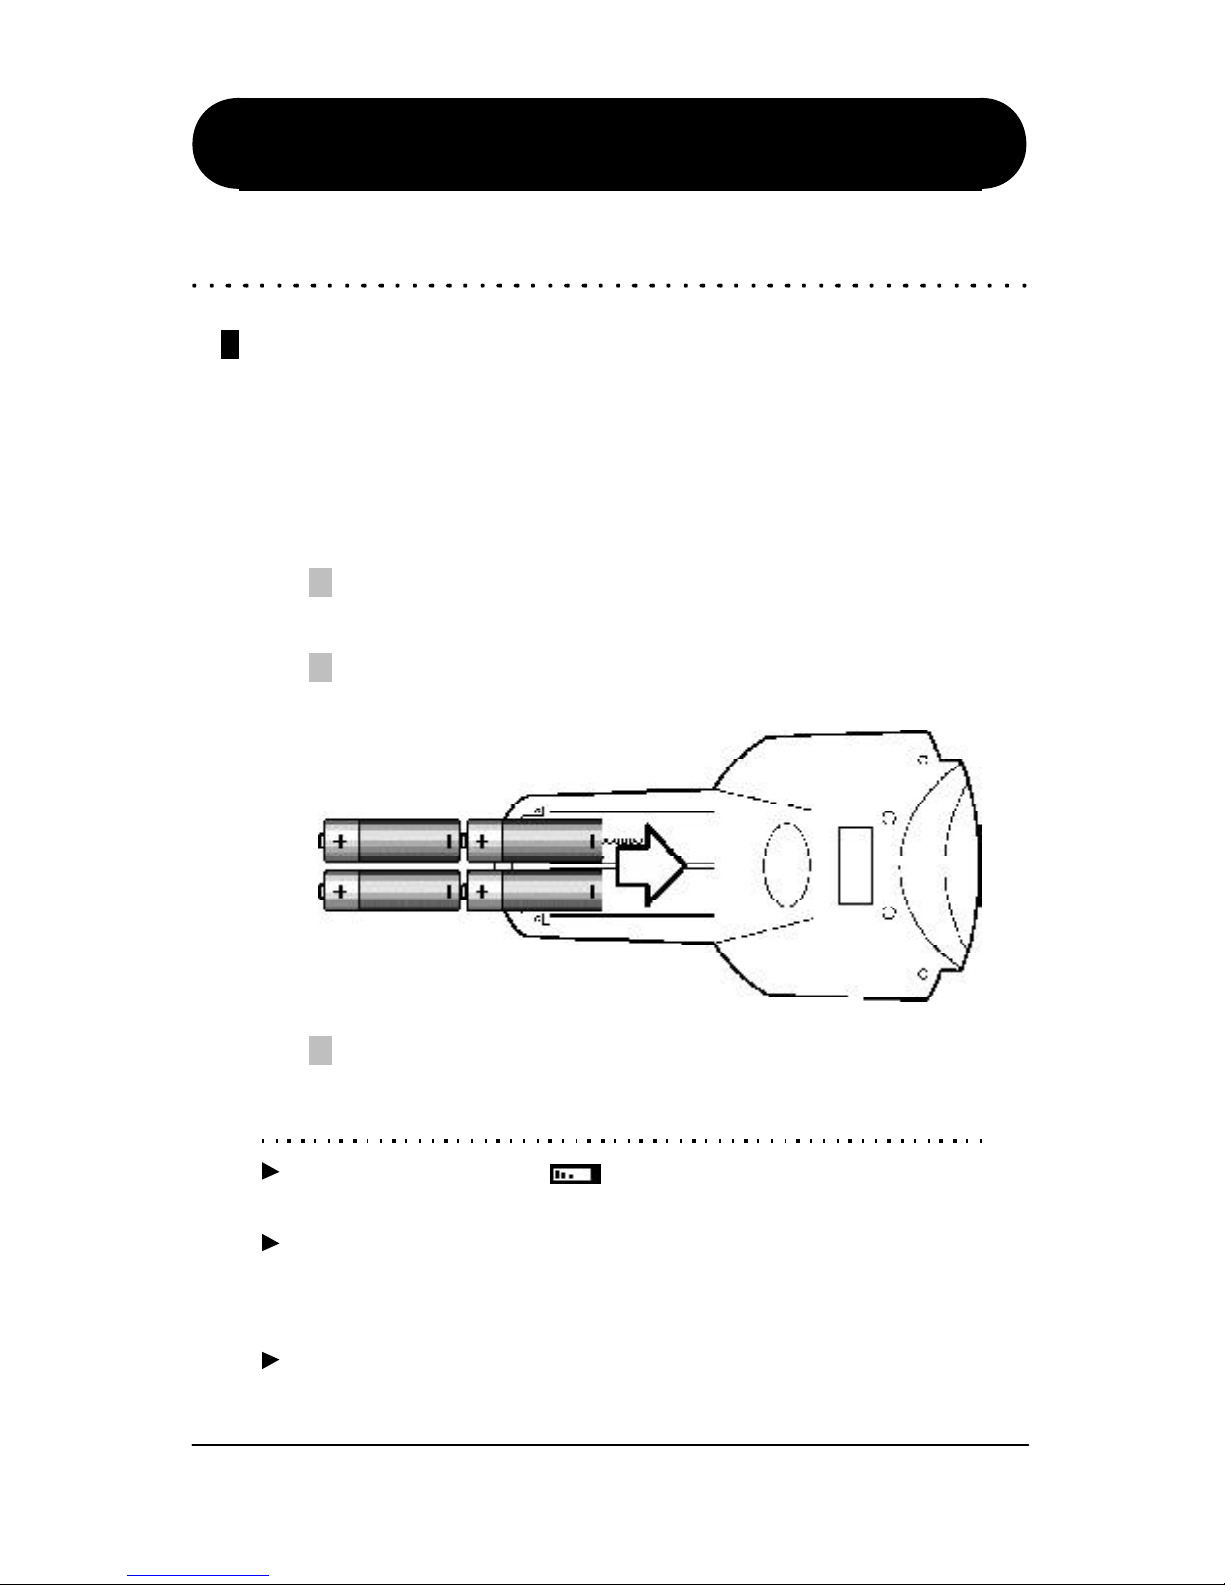
1. Activate Remote Control
Install Batteries
The battery cover is located on the back of the remote. Pay close attention to the
direction of the batteries, making sure the poles (+ and -) are aligned as indicated in
the battery compartment.
Remove battery case cover to install the batteries in the remote control:
Press firmly on the arrow on the back of the remote to remove the battery
cover.
Insert four new 1.5-volt AA alkaline batteries, taking care to align the
poles ( + and - ) as indicated in the battery compartment.
Close the battery cover.
Note The batteries in your GUIDE Remote* should last about three months,
depending on how much you use it. If the remote will not be in use for three
or more weeks, it is suggested that you remove the batteries to avoid
damage to the remote.
Note Your remote will not lose its device settings when you remove and reinstall
batteries. However, you will need to either sync your remote or set the time
and date manually (see page 42) for your remote to work properly.
1
2
Activate Remote Control
1.5-volt AA alkaline
3

9
*Trademark
Install RemoteLinker* Software
The RemoteLinker* software is an easy-to-use utility for downloading TV Listings
and uploading your saved Interactivity Offer requests to our Website.
Getting Started
Note In step 3, you can also start the RemoteLinkerInstall.exe by selecting
START and RUN from the Taskbar. Type D:\RemoteLinkerInstall.exe
(Replace D: with the letter of your CD-ROM drive if necessary). Click OK or
press the Enter key.
Help If you are having trouble installing the RemoteLinker software, try the
following:
- Check the Readme file in the RemoteLinker program folder.
- Check and verify that your computer meets the minimum system
requirements. (see page 4)
- Temporarily turn off any PDA syncing, anti-virus or screen-saver software
on your computer.
Activate Remote Control
Note Palm Users: You should disable your Palm software before you install the
RemoteLinker* software. Additionally, if the GUIDE Remote* and Palm
share the same serial port, you are required to disable the Palm software
before you sync your remote.
1
2
3
4
5
IMPORTANT: Temporarily disable any PDA syncing and anti-virus software,
and if necessary, restart your computer.
Insert the RemoteLinker Software CD into your CD-ROM drive.
Double click on RemoteLinkerInstall.exe file in the CD-ROM.
Follow the installation instructions on the screen until finished.
Once the software is installed, when prompted, select the “Yes, I want to
launch RemoteLinker now” option.
10
*Trademark
Note If you have more than one serial port, make sure that the RemoteLinker*
software is configured to the one that you’re using. To access COM port
settings, right-click on the RemoteLinker icon located in the lower right
hand corner of your computer screen. Choose Settings. Select the correct
COM port to which you will be connecting the cable and click Apply.
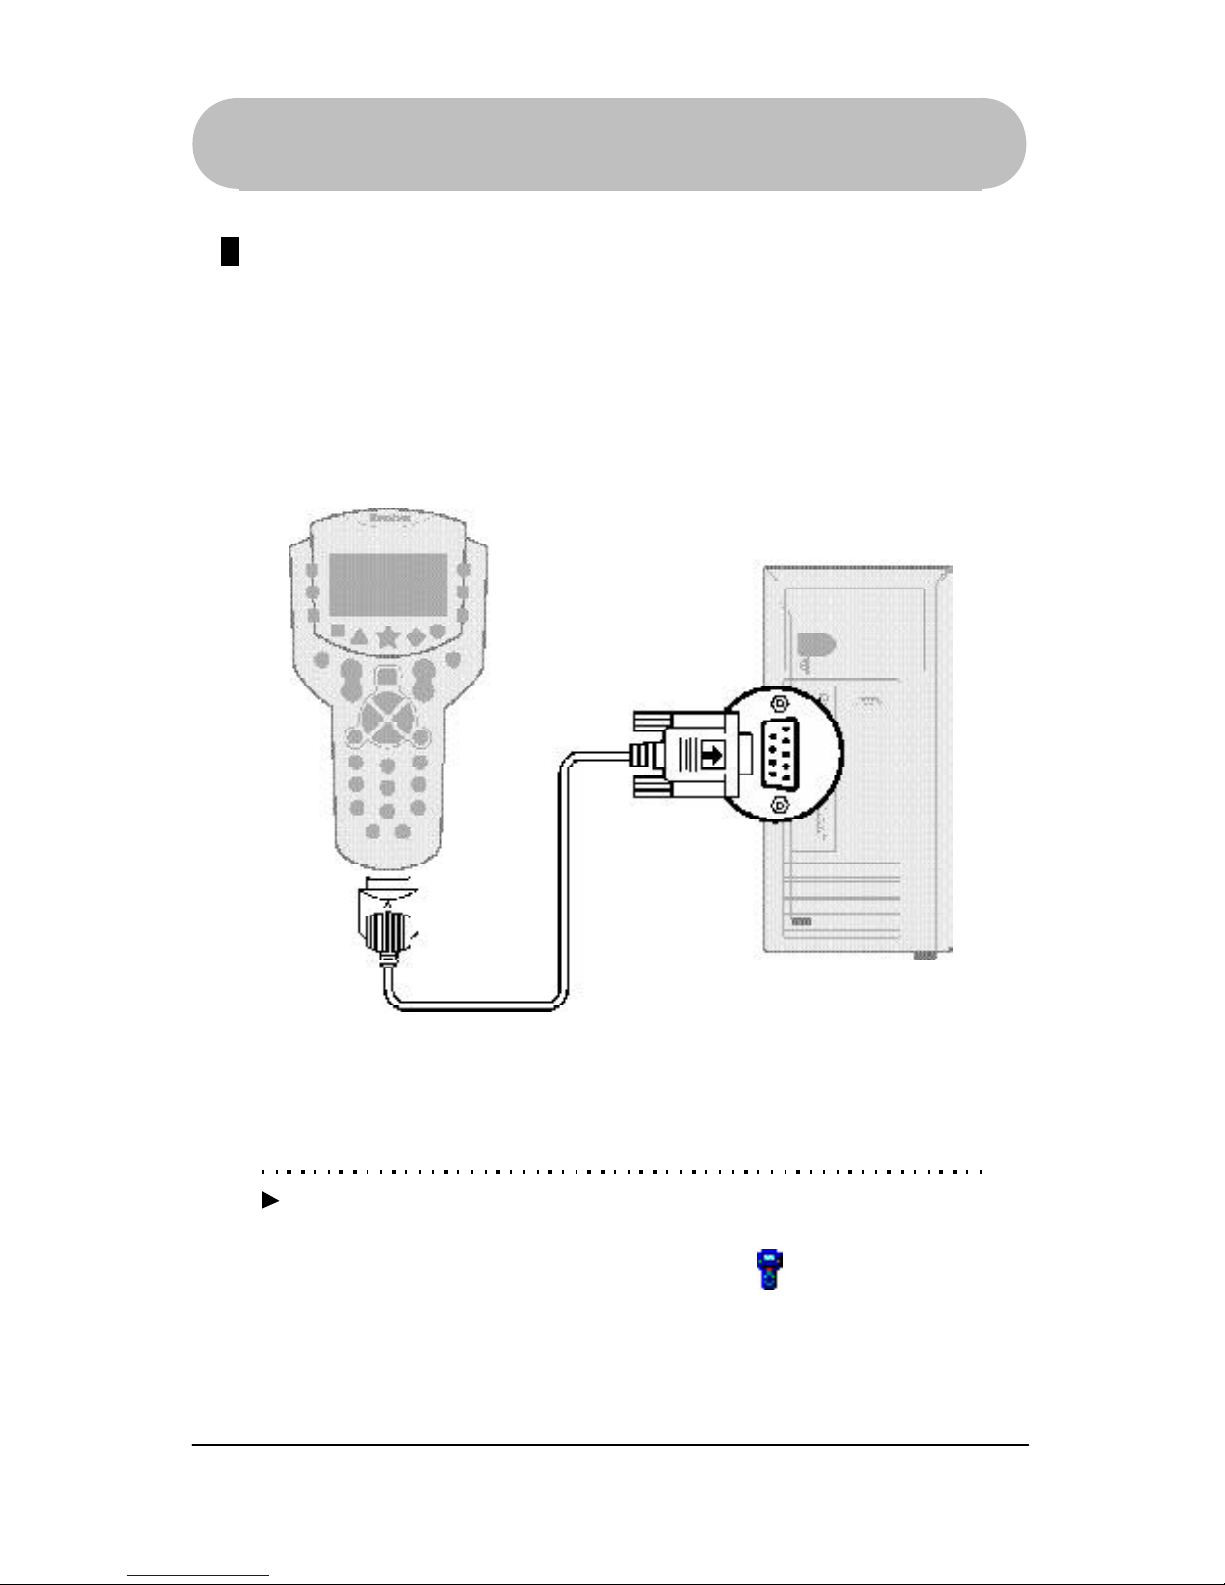
Connect RemoteLinker* Cable
Before you connect the RemoteLinker* cable, you should determine the COM
port to which you will be attaching the cable. If your computer is on, perform the
shutdown procedure recommended by the manufacturer and turn it off. Turn your
computer back on after connecting the cable as indicated below.
Getting Started
Connect the small end of the cable to
the bottom of your GUIDE Remote.
Connect the large end of the cable
to the PC serial port.
Activate Remote Control
11
*Trademark
Getting Started
2. Start RemoteLinker* Software
Initiating Web Activation
1
2
Make sure you are connected to the Internet. YOU MUST BE ONLINE
Double-click the RemoteLinker* icon located in the lower right hand
corner of your computer screen, in the system tray near the system clock, to
start activating your remote. You may need to wait a few seconds for the
activation page to show up on your browser.
Note Double-clicking on the RemoteLinker* icon will take you to the Remote
Activation page at our Website. Follow the step-by-step instructions on the
Website to finish the activation process successfully.
Activating and Signing Up
When you double-clicked on the RemoteLinker icon, you started the activation and
sign-up process at www.GuideRemote.com. The instructions on the Website will
ask you to do the following:
1
2
Identify how you obtained your GUIDE Remote*.
Enter your email address, which MUST BE A VALID EMAIL ADDRESS.
Note At the end of the activation and sign-up process we will send you a
confirmation email. Click on the link in the email to complete the activation
process.
3
Enter your ZIP CODE and SERVICE TYPE.
4
Select your SERVICE PROVIDER.
5
Enter your PROFILE.
Start RemoteLinker Software / Activate Remote Control at Website
3. Activate Remote Control at Website
Note If you have problems starting the RemoteLinker software please refer to
“Syncing” on page 62.

12
*Trademark
Getting Started
6
8
Enter your PASSWORD.
Select up to 2 Critics for Suggestions.
9
REVIEW your settings. Make sure everything is correct.
10
CHECK YOUR EMAIL AND CLICK ON THE LINK TO COMPLETE THE
ACTIVATION PROCESS.
7
Select your channels. THESE ARE THE CHANNELS FOR YOUR
PROGRAM LISTINGS.
4. Sync Remote Control
Download your TV Listings (Program Listings, Program
Descriptions, Suggestions, and Reminders)
1
Connect your GUIDE Remote* to your computer, if it is not already connected.
2
Double-click on the RemoteLinker* icon located in the lower right hand
corner of your computer screen, in the system tray, to download and get your
Program Listings, Program Descriptions, Suggestions, and Reminders.
Note Prior to double-clicking on the RemoteLinker* icon to download, you must be
connected to the Internet and also logged in at our Website. Otherwise, ifyou’re not
logged in, your browser will be directed to the Login page at the Website. You’ll then have
to enter a username (email address) and password to log in. Double-click on the
RemoteLinker icon again to start the downloading process.
Sync Remote Control
13
*Trademark
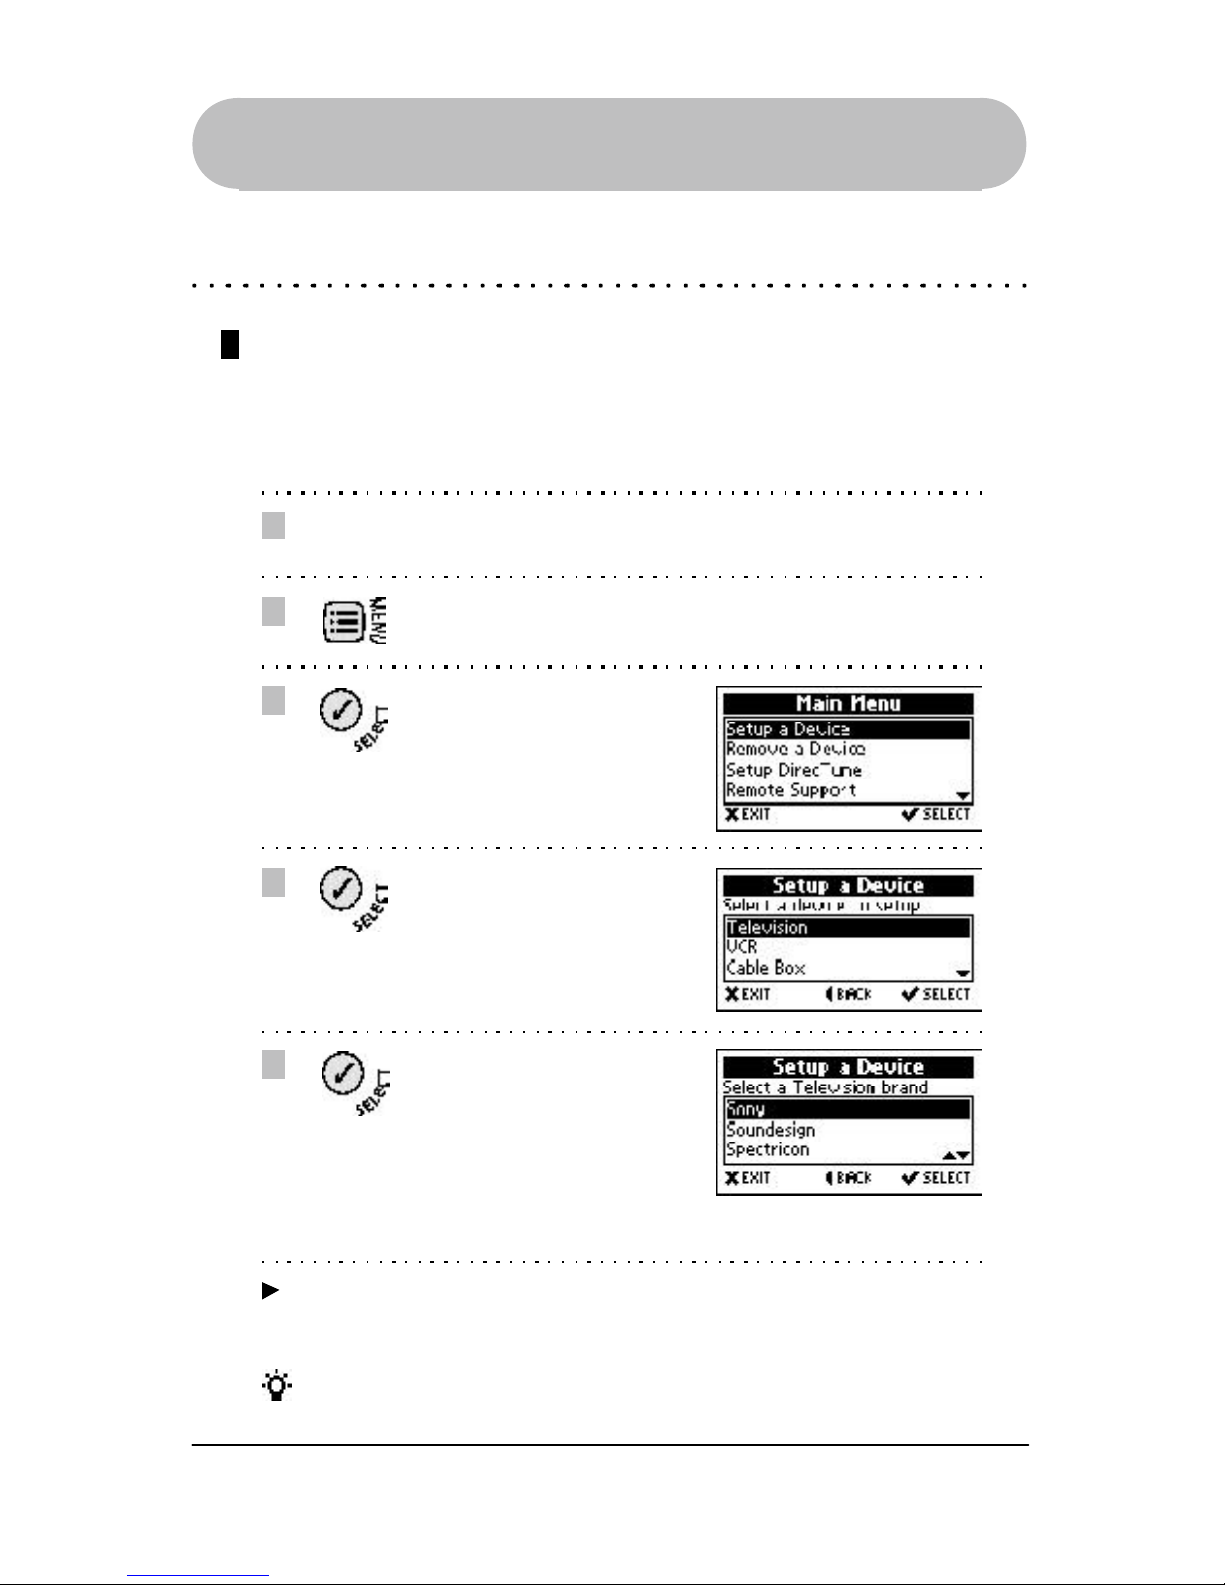
5. Setup Remote Control
Setup a TV
Setting up your GUIDE Remote* to operate your TV is an easy process. To set up a
new a TV (or to add new ones later on), perform the following steps:
Getting Started
1
2
3
4
5
Turn on the device that you
will be setting up.
Press the MENU key to enter
the Main Menu.
Highlight Setup a Device and
press the SELECT key.
Highlight Television and
press the SELECT key.
Highlight the brand of your TV
and press the SELECT key.
If you cannot find your brand
on the list, you can choose
the brand “~UNKNOWN~”
(the last choice on the list).
Note Choosing “~UNKNOWN~” brand requires you to test all the codes in the
library. Although one of these codes may work for your device, we cannot
guarantee it.
Setup Remote Control
Tip To scroll quickly through the list, press and hold the Up or Down Arrow key.
14
*Trademark
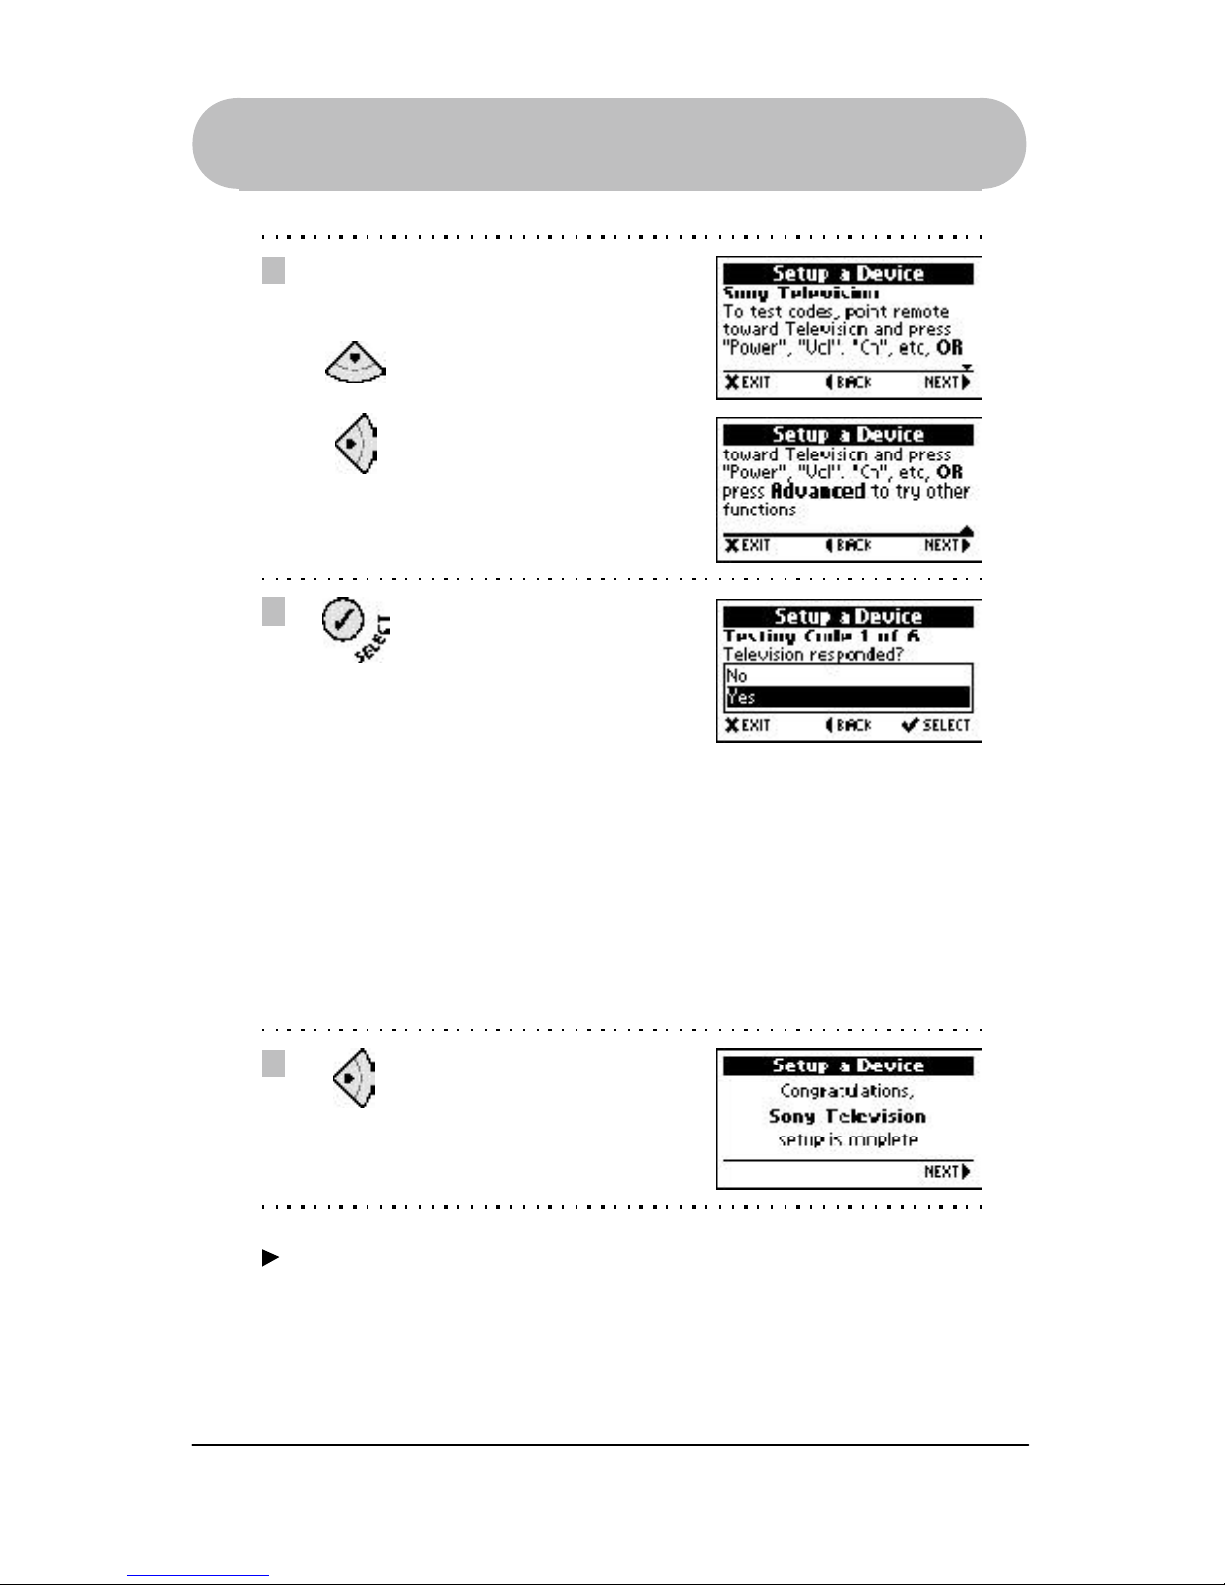
Getting Started
6
7
8
Read and follow the
instructions on the screen.
Press the Down Arrow key
to read all the text.
Press the Right Arrow key to
continue.
To test codes, point the
remote toward the TV and
press keys like “POWER”,
“VOL”, “CHAN”, etc.
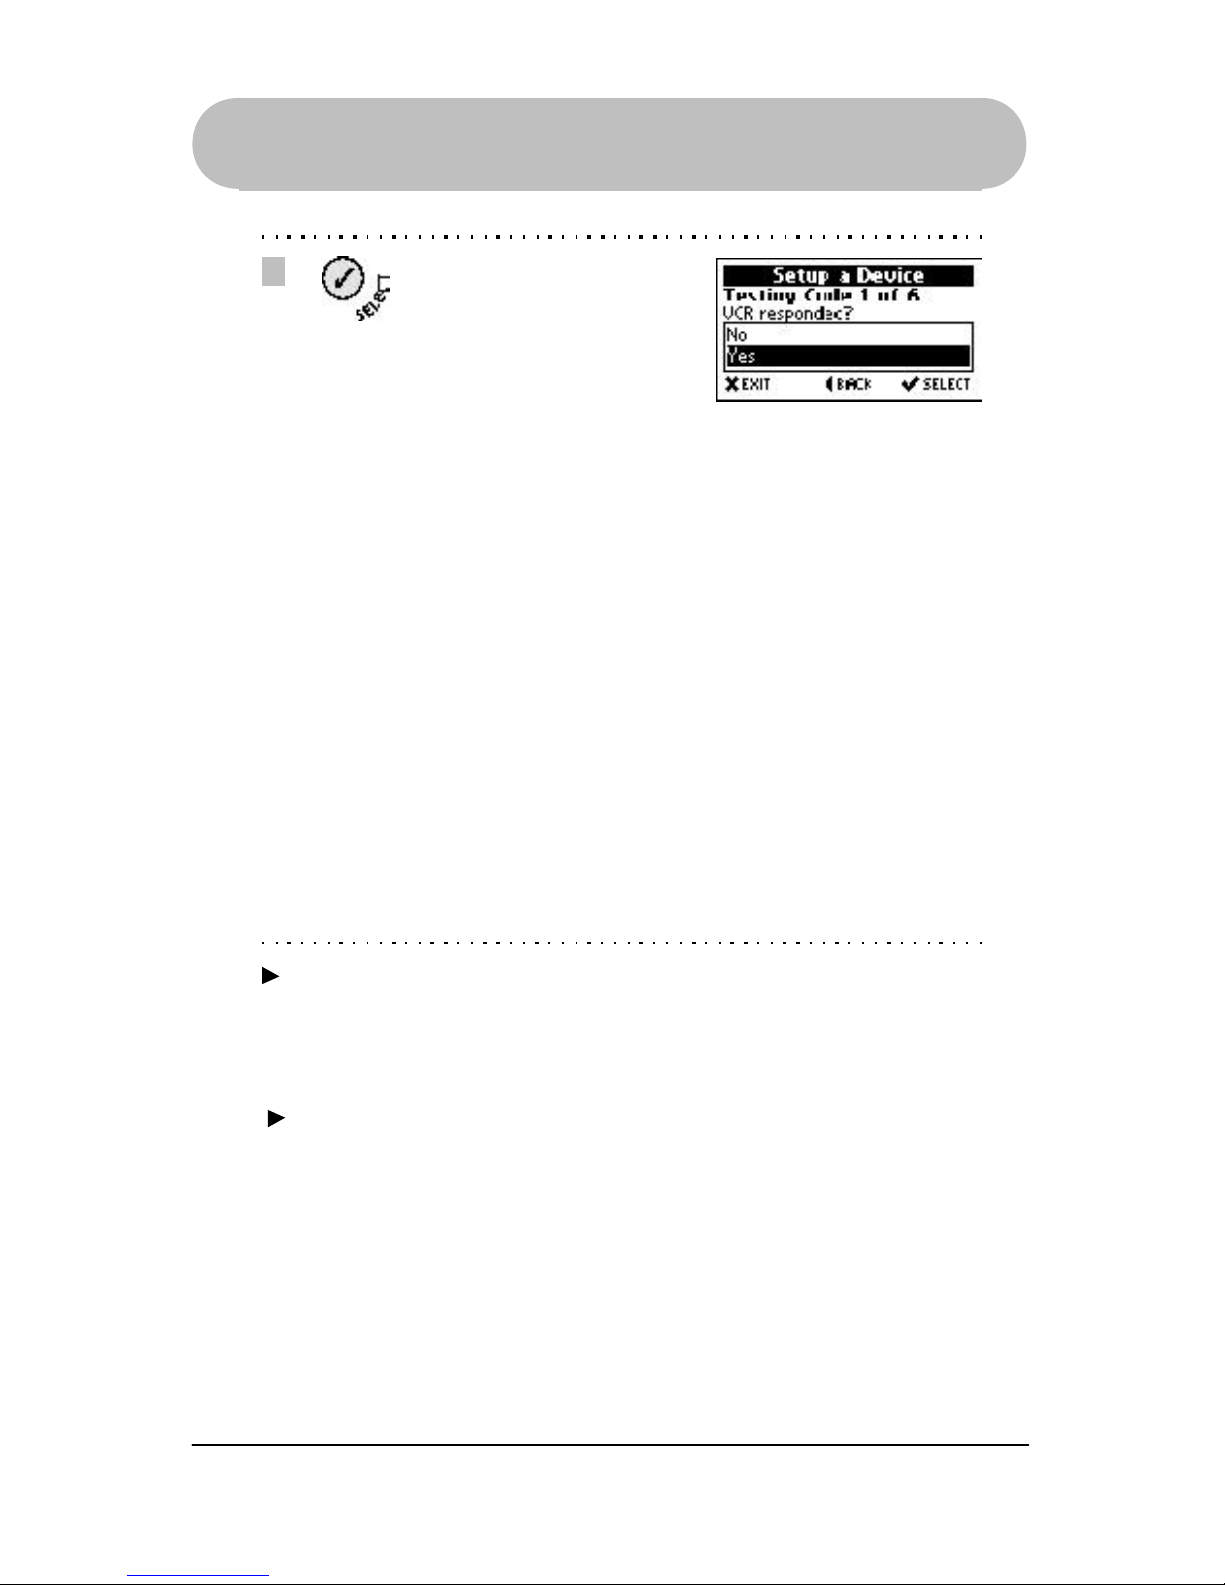
If the keys respond, highlight
Yes and press the SELECT
key, then go to step 8.
If the keys do not respond,
highlight No and press the
SELECT key. (repeat step 7
to test the next code)
Once a code is found that
operates your device, basic
setup is complete.
Press the Right Arrow key.
Setup Remote Control
Note If more than one of any type of device is setup in your remote (i.e. 2 or more
TVs or VCRs), they will be sequentially numbered (i.e. TV, TV#2, TV#3 or
VCR, VCR#2, VCR#3, etc.). The devices will appear in the order that you
set them up.
15
*Trademark
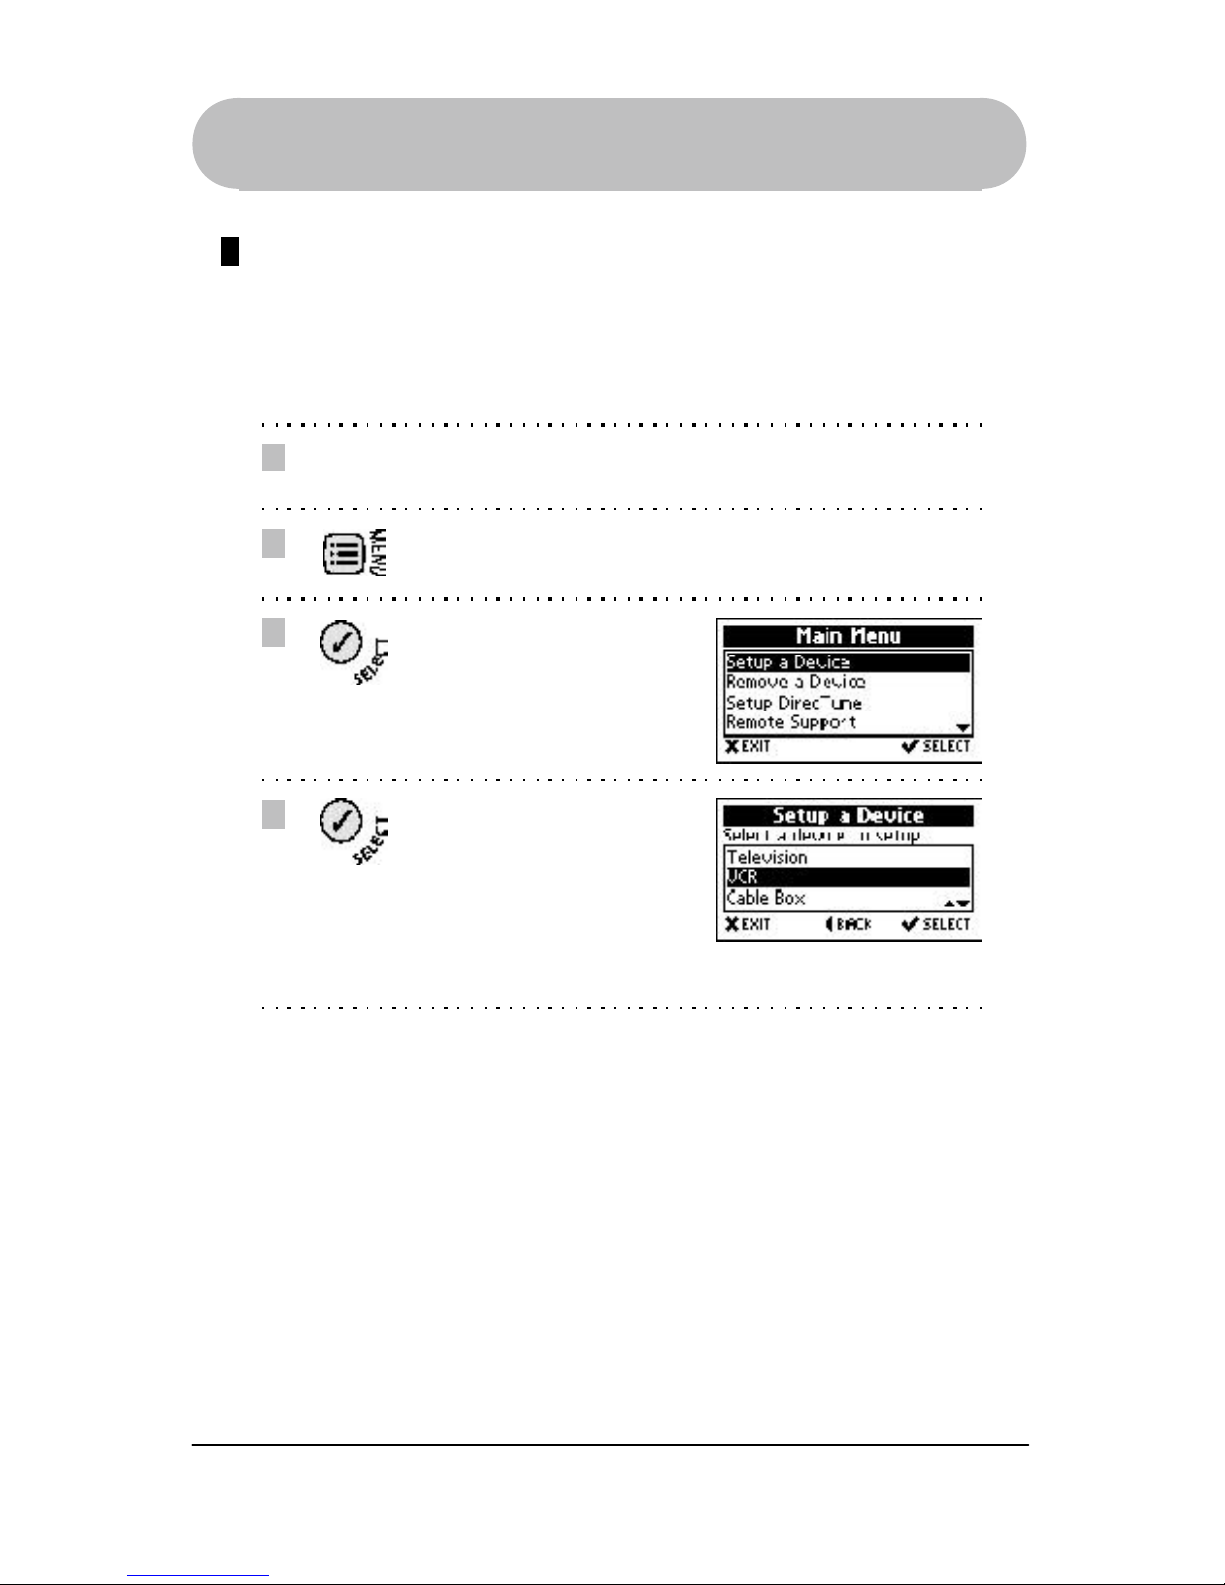
Setup Devices
Setting up your GUIDE Remote to operate additional devices such as VCR, Cable
Box, Satellite Receiver, CD Player, Audio Receiver, Amplifier and Tape, DAT,
Phonograph, DVD, Laser Disk and Home Control is an easy process.
To setup these types of devices, perform the following steps:
Getting Started
1
2
3
4
Turn on the device that you
will be setting up.
Press the MENU key to enter
the Main Menu.
Highlight Setup a Device and
press the SELECT key.
Highlight the device type you
wish to set up (i.e. TV, VCR,
Cable Box, etc.) and press
the SELECT key.
For this example, we will
setup a VCR.
Setup Remote Control
16
*Trademark
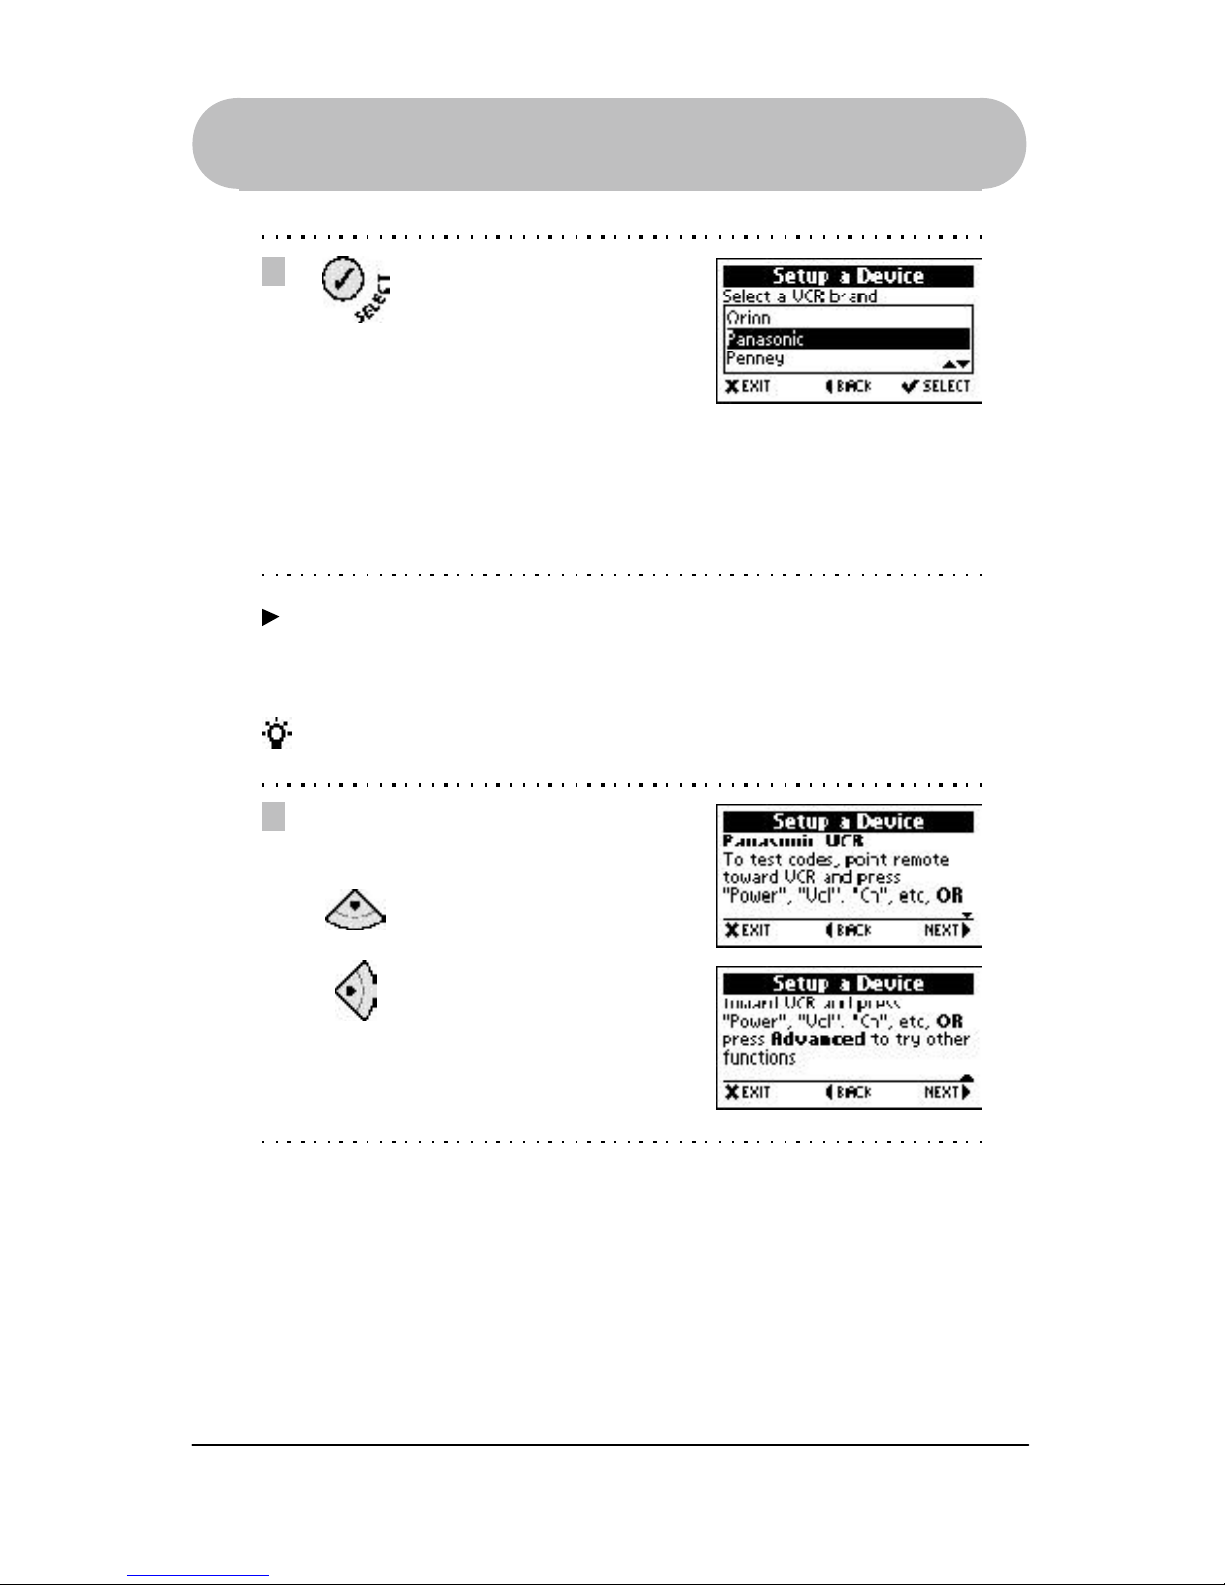
6
Read and follow the
instructions on the screen.
Press the Down Arrow key
to read all the text.
Press the Right Arrow key to
continue.
5
Highlight the brand of your
device and press the
SELECT key.
For this example, we will
setup a Panasonic VCR.
If you can not find the brand
on the list, you can choose
the brand “~UNKNOWN~”
(the last choice on the list).
Note Choosing “~UNKNOWN~” brand requires you to test all the codes in the
library. Although one of these codes may work for your device, we cannot
guarantee it.
Tip To scroll quickly through the list, press and hold the Up / Down Arrow key.
Setup Remote Control
Getting Started
17
*Trademark
Getting Started
7
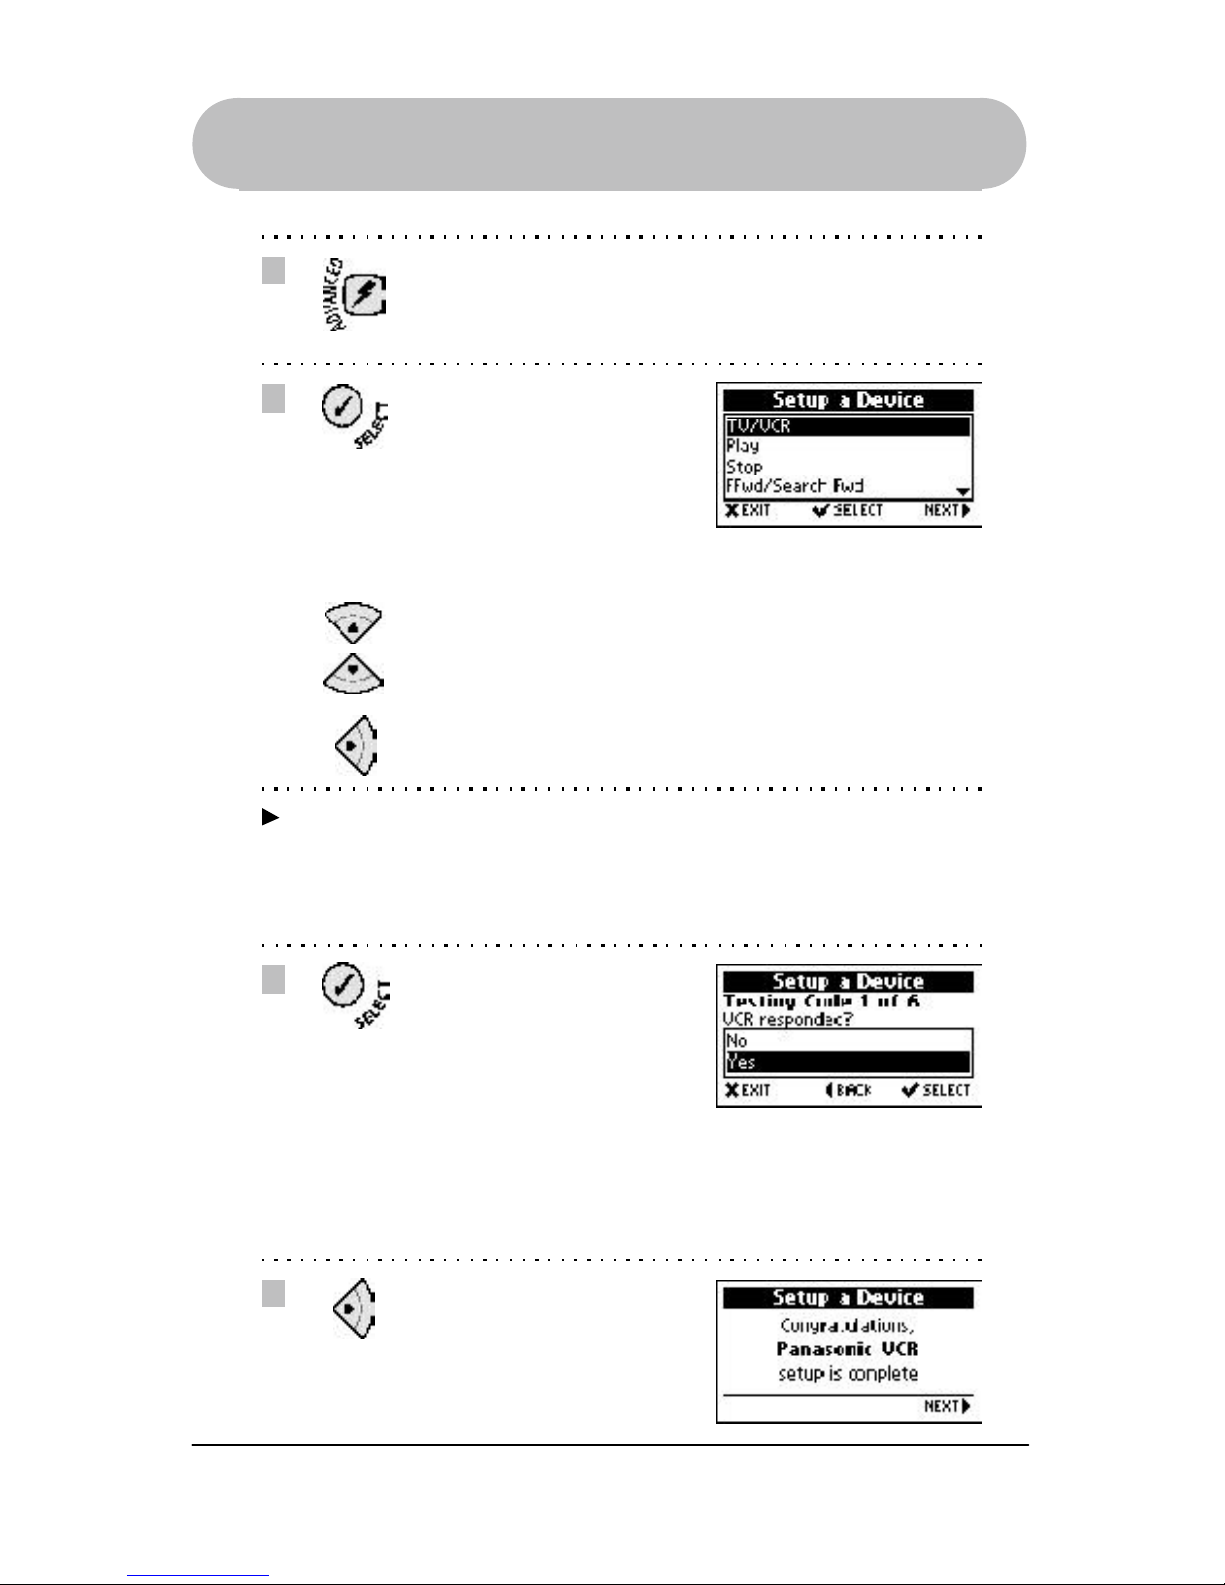
To test codes, point the
remote towards the device
and press keys like
“POWER”, “VOL”, “CHAN”,
etc. Or, to access keys such
as “PLAY”, “STOP”,
“SLEEP”, etc. see the first
note below.
If the keys respond, highlight
Yes and press the SELECT
key, then go to step 8.
If the keys do not respond,
highlight No and press the
SELECT key. (repeat step 7
to test the next code)
If the keys you want to test
are not on the remote,
access the Extended
Function Screen by pressing
the ADVANCED key and
follow step 7b.
Note Most devices can be tested using the “hard” keys on the remote like
“POWER”, “VOL”, “CHAN” etc. However, depending on the device, such as
stereo receivers, CD players, digital tape players, etc., you may be required
to access the Extended Function Screen because the hard keys are not on
the remote (i.e. Play, Stop, Menu, Contrast, etc.). (see step 7b)
Setup Remote Control
Note There is a possibility that more than one code will work when setting up your
device. After you have completed setup, if you cannot find a function in
the Extended Function Screens, remove the device and try setting up the
device again using a different code.
18
*Trademark
Getting Started
7b
7c
8
Press the ADVANCED key to
access the Extended
Function Screen.
To test codes, highlight a
function from the list and
press the SELECT key. Only
functions which are also
present on your original
remote will work on your
device.
Press the Up / Down
Arrow key to access
additional functions.
When you’re finished testing,
press the Right Arrow key.
Once a code is found that
operates your device, basic
setup is complete.
Press the Right Arrow key.
7d
If the keys respond, highlight
Yes and press the SELECT
key then, go to step 8.
If the keys do not respond,
highlight No and press the
SELECT key. (repeat step 7b
to test the next code)
Note When testing functions from the list, you must pick the correct function as on
your original remote. There may be many other additional functions
on the list that do not relate to your device. If the appropriate functions
respond, you have found the right code.
Setup Remote Control
19
*Trademark
Remove a Device
You may remove a device from setup at any time. To remove a device from setup in
your GUIDE Remote, perform the following steps:
1
2
4
Press the MENU key to enter
the Main Menu.
Highlight Remove a Device
and press the SELECT key.
If you really want to remove
this device, highlight Yes and
press the SELECT key.
Getting Started
Note If you remove a DirecTune* device you will see a caution screen.
In addition, you will not be able to tune from within the TV Listings, or
access Interactivity Offers.
5
The device has been
removed.
Press the Right Arrow key.
Note If you highlight No and press the SELECT key or press the EXIT key at this
time, you will retain your current settings.
3
Highlight the device you want
to remove and press the
SELECT key.
Setup Remote Control

20
*Trademark
The device you use to change channels (typically your TV, cable box, or satellite
box) is referred to as your DirecTune* device. DirecTune lets you jump directly to a
TV channel from within the TV Listings. Your remote needs to know what device is
responsible for changing channels, such as your TV, cable box, satellite box or
VCR. It also needs to know the procedure for changing channels (for instance,
whether or not you have to press an “enter” button after selecting a channel).
Please identify the DirecTune device in Setup DirecTune when the screen prompts
you. Only one device can be set up as the DirecTune device. Therefore, you
should set up all your devices prior to setting up a DirecTune device. You may
change the DirecTune device settings at anytime.
Getting Started
Setup DirecTune
6. Setup DirecTune*
Determining DirecTune* Device
Which device should you set up as your DirecTune device? To assist you in
determining which device should be set up as your DirecTune device, see below.
The TV is recommended as the DirecTune device in the following
configurations:
TV or TV + VCR or TV + Cable-without-a-box or
TV + VCR + Cable-without-a-box
Cable-without-a-box indicates that your cable line is connected to your TV or
VCR and you use your TV to tune channels.
The Cable box is recommended as the DirecTune device in the following
configurations:
Cable box + TV or Cable box + TV + VCR
The Satellite receiver is recommended as the DirecTune device in the
following configurations:
Satellite receiver + TV or Satellite receiver + TV + VCR
The VCR is recommended as the DirecTune device if you use your VCR to
tune channels.

21
*Trademark
Setup DirecTune
Getting Started
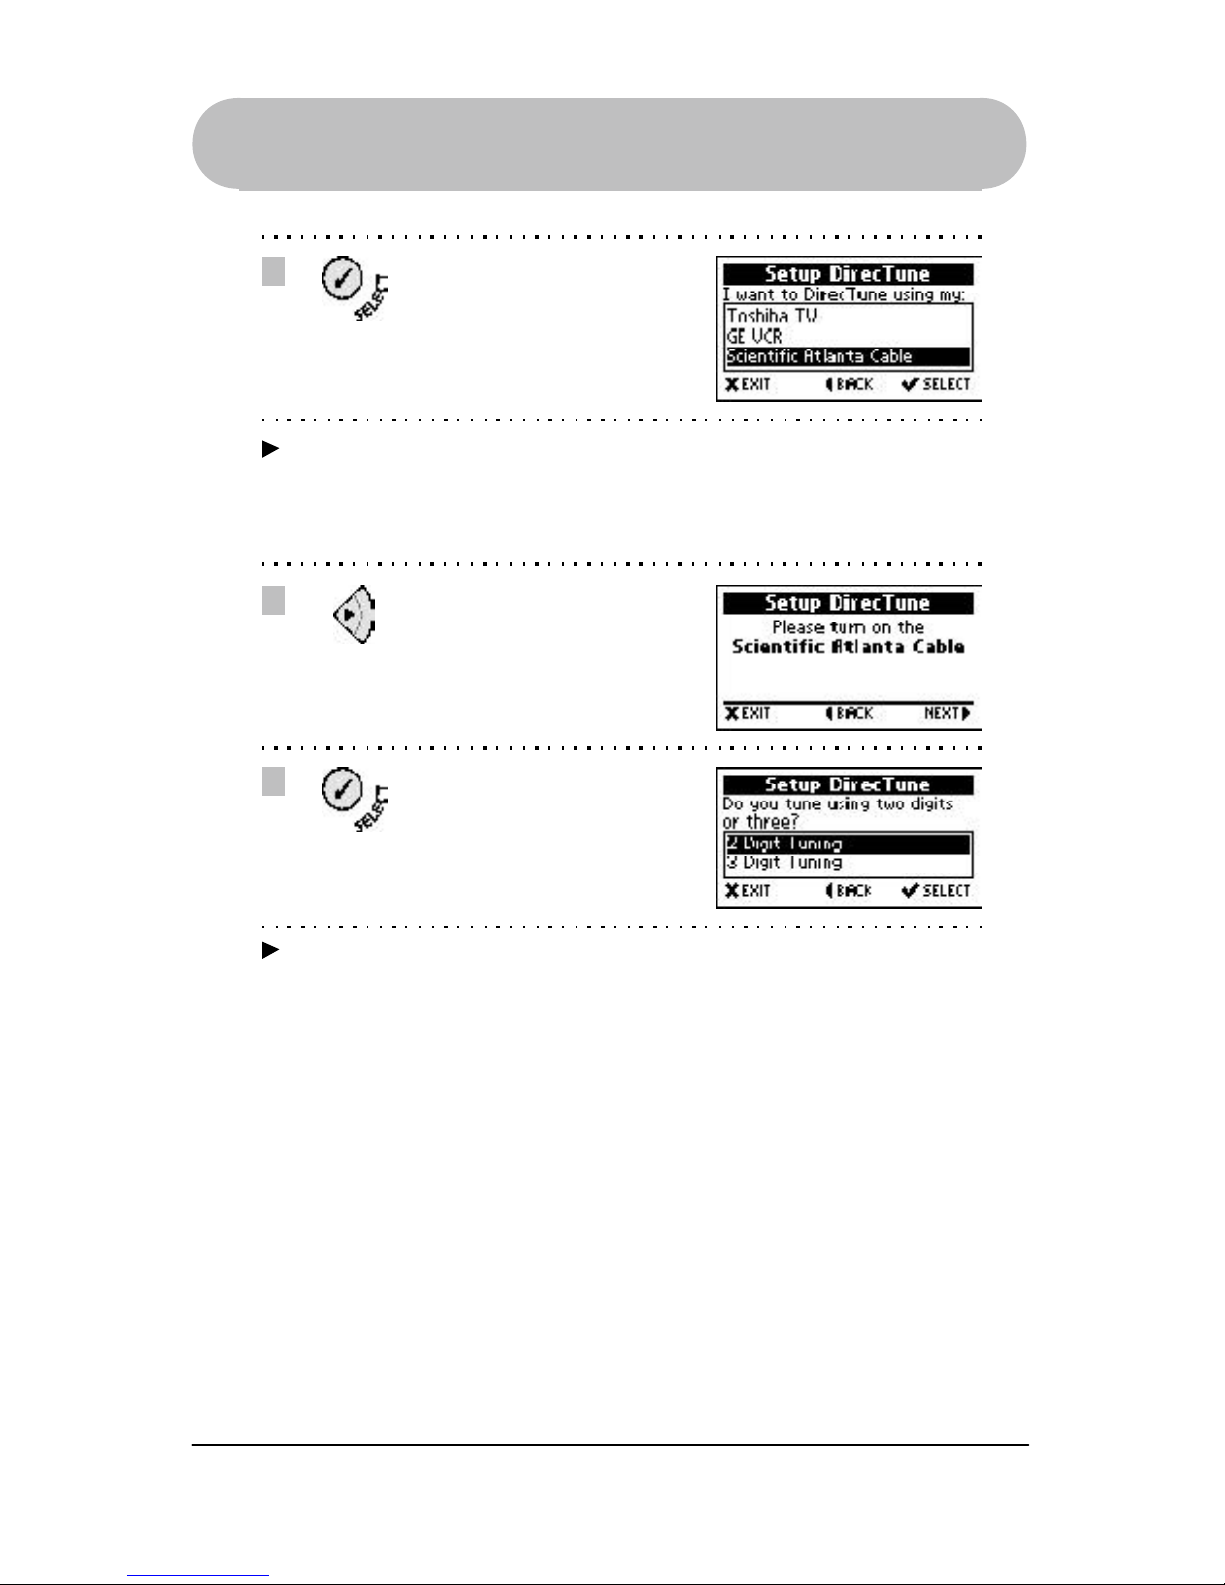
4
Read and follow the
instructions on the screen.
Press the Down Arrow key
to read all the text.
Press the Right Arrow key to
continue.
3
Highlight Setup DirecTune
and press the SELECT key.
1
2
Turn on the DirecTune
device that you will be setting
up.
Press the MENU key to enter
the Main Menu.
Setup DirecTune* Device
To setup a DirecTune device, perform the following steps:
22
*Trademark
Note If you were to tune to channel 23 using the number keypad, highlight
2 Digit Tuning if you press 2+3 or 3 Digit Tuning if you press 0+2+3.
7
Highlight the appropriate digit
tuning method for your TV
and press the SELECT key.
Getting Started
Setup DirecTune
6
Read and follow the
instructions on the screen
and press the Right Arrow
key to continue.
5
Highlight your DirecTune
device and press the
SELECT key.
Note In step 5, you will see all your devices listed. Please be advised that your
DirecTune* device can only be one of the following: TV, Cable, Satellite, or
VCR. (see page 20 to determine your DirecTune device)
 Loading...